

Page 1
USER MANUAL
8221913 - 38 - 02
Model EMS1740
English
Page 2

Page 3

EMS1740 t English
Contents
Before using you r mi crowave oven 4
Technical data 4
Safety instructions 5
– Utensil safety 5
– Safety Instructions when Co oking with Grill 5
– Testing suitability of cookware 6
– Food safety 6
– Oven utensils and accessories gui de 7
Getting Started 8
– Unpacking 8
Installation 8
– Connecting to the mains 8
How to operate your micro wave oven 9
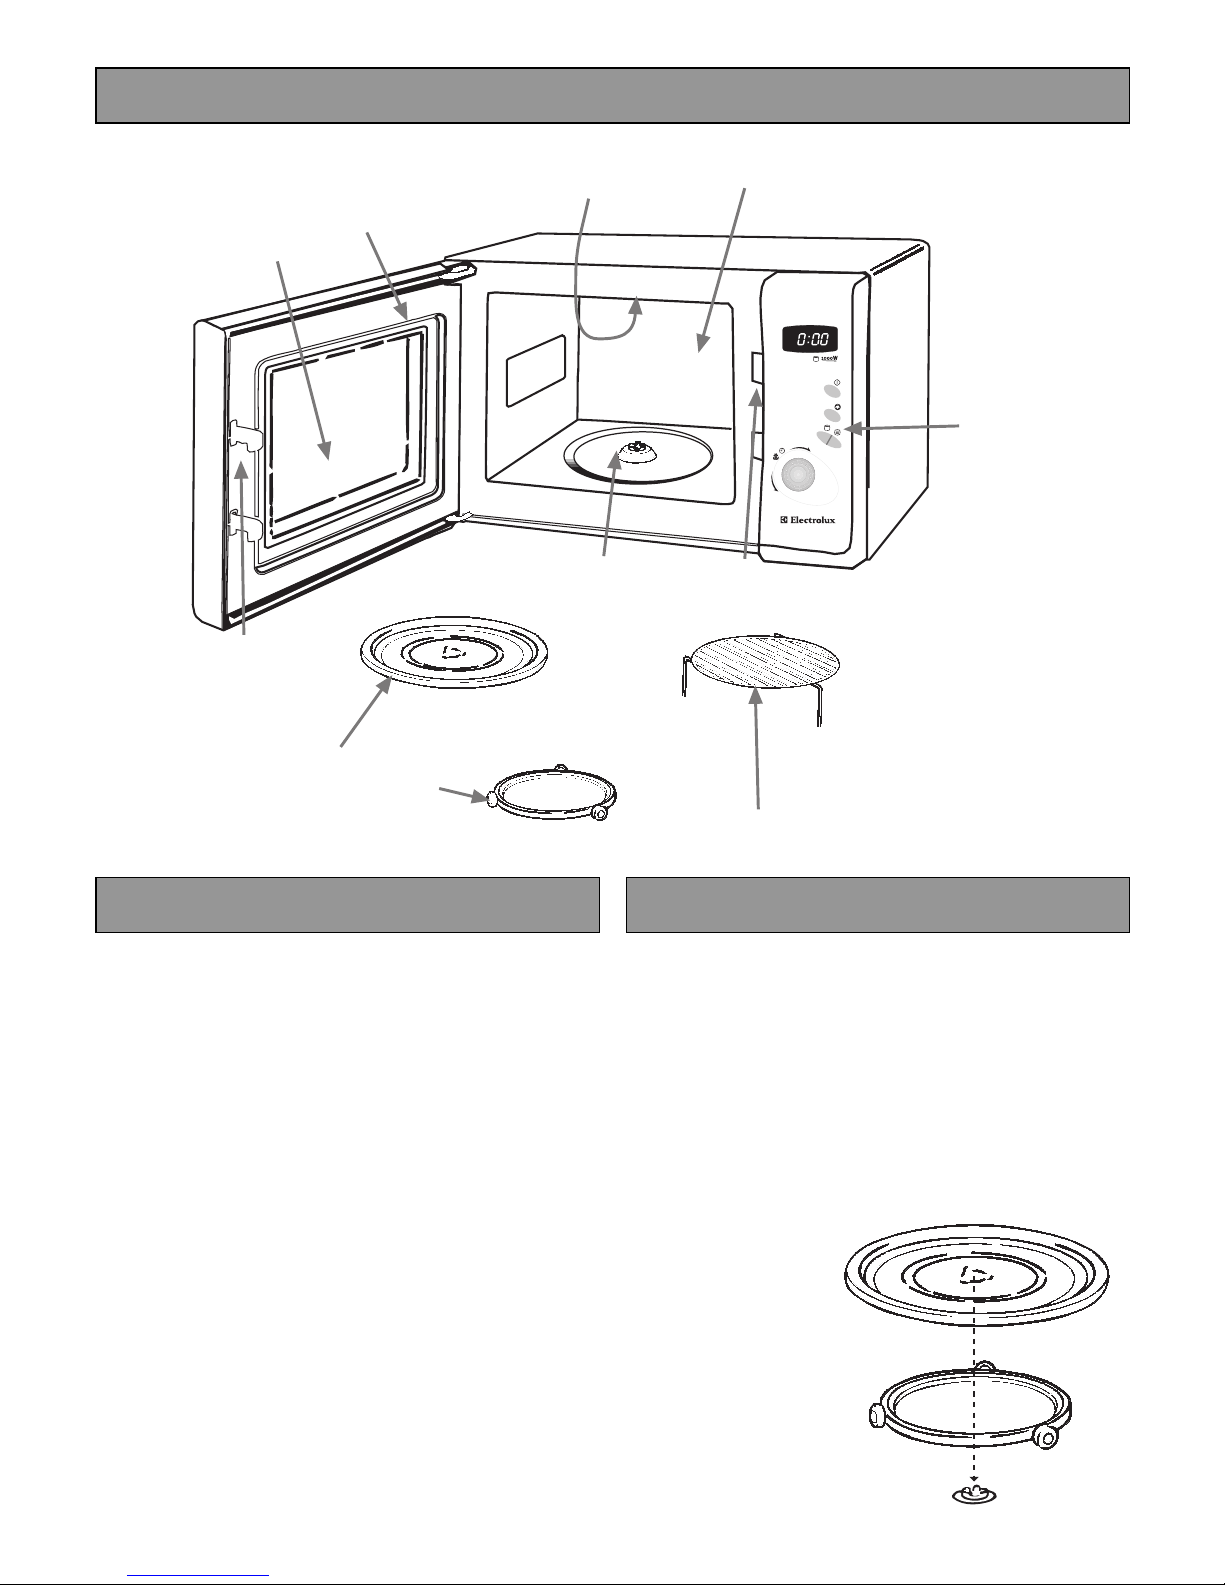
– Name and function of parts 9
– Turntable Installation 9
– Control panel 10
– Microwave cooking 11
– Defrosting Using 75W 11
– Microwave Power setting Guide 11
– Cooking with Grill 12
– Cooking with Microwave and Grill (Combination) 12
– Automatic Defrost 13
– Child Safety Lock 13
Charts 14
– Recommendations for Cooking with Grill 14
– Recommendations for Cooking wit h Microwave and Grill 14
– Defrosting instructions using 75W 15
– Microwave Hints 16
– Care and cleaning 17
– Cleaning the accessories (turntable and support) 17
– Cleaning the interior 17
– Cleaning the exterior 17
Guarantee Conditions 18
3
Page 4
EMS1740 t English
'SRKVEXYPEXMSRWSRXLITYVGLEWISJ]SYVRI[1MGVS[EZI3ZIR
Thank you for having chosen a Electrolux product. We are convinced that you will find your new microwave
oven very useful and that it will be of great help to you. As with all n ew kit c hen appliances, it will t ake some
time to learn all the new functions and features, but with time, t his oven will become indispensabl e t o you.
Before using your Microwave Oven
Read through the instruction manual carefully. In order that you can get the best from your new Electrolux
Microwave Oven, the following instructions have been prepared. Please make sure you read them carefully.
It is important that this instruction book is retained with the appliance for future reference. Should t he appliance
be sold or transferred to another ow ner, or if you move house and leave the appliance, always ensure that the
book is supplied with the app liance or that the new owner can be ac quainted with the functioning of the
appliance and the relevant warnings.
Please ensure you have read the whole instruction book before using t he appliance and that you follow the
recommendations given.
Technical data
Overall dimension Weight 15.5 kg
Width 458 mm
Depth 296 mm
Height 375 mm
Cavity dimension Power consumption 1160W
Width 320 mm
Depth 183 mm
Height 288 mm
Volume 17 Litre
Power source 230V, 50 Hz
Fuse 10A
Power output 700W
Grill 1000W
4
Page 5

EMS1740 t English
Safety Instructions
• The built-in safety interlock swit ches prevent the
microwave oven from operating when the door is
open.
• Do not tamper with them, or attempt to operate
the oven with the door open as open door
operation can result in exposur e t o microwave
energy.
• Do not allow food spills or cleaner residue to
accumulate on door sealing surfaces. See t he
Cleaning and Care section for cleaning
instructions.
• Do not operate the oven if it is damaged until it
has been repaired by qualified service personnel.
• It is particularly important t hat the oven door
closes properly and that there is no damage to
the: (1) door (warped), (2) hinges and latc hes
(broken or insecure), (3) door seals and seal ing
surface.
• Under no circumstances should you attempt to
repair the appliance yourself. Repairs carried out
by inexperienced persons may cause i njury or
serious malfunctioning. Co nt act your local Service
Force Centre.
• Do not remove the outer case, door or control
panel at any time. Doing so may cause exposure
to extremely high voltage.
• Install or locate this oven only in accordance with
“INSTALLATION INSTRUCTIONS” found in this
manual.
• Use the appliance for its intended use as
described in this manual. Do not use corrosive
chemicals in this appliance. This type of oven is
specifically designed to heat , cook, or defrost
food. It is not designed for industr ial or laboratory
use neither for commercial use as this will
invalidate the guarantee.
• Do not operate the oven empty. If food or water is
not present to absorb the microwave e nergy, the
magnetron tube can be damage d.
• Close supervision is necessary when the oven is
used by children.
• Do not store this appliance out doors. Do not use
this product near water.
• Do not attempt to dry clothing or newspapers in
the microwave oven. These items can ig nite.
• Do not use the cavity for storage purposes. Do
not leave paper products, cooking ut ensils, or
food in the cavity when not in use.
Utensil safety
Most glass, glass ceramic and heat-resistant
glassware utensils are excellent for use in the
microwave oven. Although micro wave energy will not
heat most glass and ceramic items, these ut ensils
can become hot as heat transfers from the food to
the container. The use of oven gloves t o remove
dishes is recommended.
Safety instructions when cooking by
Grill
1. The glass viewing window may break if water is
spilled on it during grilli ng.
2. Be sure to use an oven glove when loadin g and
unloading the oven. Containers get very hot in the
oven, so be careful not to burn yourself. The
turntable and metal rack also get very hot so be
sure to use an oven glove when handl ing t hem.
3. Do not touch the inner or outer view ing window
with metal components when loading or unloading
the oven. The inside of the door and oven get
very hot so take care when attending food in the
oven.
4. Do not put the turntable or conta iners in cold
water or try to cool them quickly after use.
5. Do not place items on top of the cabinet. The top
of the cabinet gets very hot, so anything placed
on it may be damaged by the heat. It is quite
normal for steam to be emitted around t he door,
or for misting to occur on the door, or even
around the door, or even for water droplet s to
appear below the door during t he cooking cycle.
This is merely condensation from t he heat of the
food and does not affect t he safety of your oven.
The door is not intended to seal the oven cavity
completely.
5
Page 6

EMS1740 t English
Testing suitability of cookware Food safety
• Place the cookware in the microwave a long with a
glass half full of water. Heat on 750 W (100%) for
one minute. If the cookware feels hot , you should
not use it. If it is just slightly warm, you can use it
for reheating but not for cooking. If the dish is
room temperature, it is suitable f or microwave
cooking.
• Paper napkins, wax paper, paper towels, plates,
cups, cartons, freezer wrap and cardbo ard are
great convenience utensils. Always be sure
containers are filled with food to absorb energy
and thus avoid the possibility of overheating.
• Many plastic dishes, cups, freezer containers and
plastic wraps may be used in the microwave
oven. Follow manufacturer’s instructions when
using plastics in the oven. Avoid using plastic
utensils with foods that have high f at or sugar
content since these foods reach high
temperatures and could melt some plastics.
Do not leave oven unatt ended, and look at it from
•
time to time when heating or cooking food in
plastic, paper or other combustible cont ainers. If
smoke is observed, keep door closed, switch the
oven off or disconnect oven until smoke stops.
Metal utensils and utensils with metallic trim
•
should not be used in the microwav e oven, unless
specifically recommended for microwave use.
Containers with restricted openings, such as
•
bottles, should not be used for microw ave
cooking.
Use caution when removing a lid or cover fr om a
•
dish to avoid steam burns.
Do not heat food in a can in the microw ave oven.
•
Always remove the food to a suitable co nt ainer.
Deep fat frying should not be done in the
•
microwave oven, because the fat t emperature
cannot be controlled, hazardous sit uations can
result.
Popcorn may be prepared in the microwave oven,
•
but only in special packages or uten sils designed
specifically for this purpose. This cooking
operation should never be un-at tended.
Pierce foods with non-porous skins or
•
membranes to prevent steam build-up and
bursting. Apples, potatoes, chicken livers, and
egg yolks are examples of items that should be
pierced.
WARNING: When heating liquids, e.g. soups, sauces
and beverages in your microwave oven, overheating
the liquid beyond boiling p oint can occur without
evidence of bubbling. This could result in a sudden
boil over of the hot liquid. T o prevent this possibility
the following steps should be taken:
1. Avoid using straight-sided cont ainers with narrow
necks.
2. Do not overheat.
3. Stir the liquid before placin g the container in the
oven and again halfway through the heating time.
4. After heating, allow to st and in the oven for a
short time, stirring again before carefully removing
the container.
Some products such as whole eggs and seal ed
•
containers – for example, closed glass jars – may
explode and should not be heat ed in t his oven.
Occasionally, poached eggs may ex plode during
cooking. Always pierce the yolk, then cover and
allow the standing time of one minut e before
removing cover.
NOTE:
Do not force the turntable to rot at e by hand. This
•
may cause malfunctioning.
Arcing in the oven during microwave operation
•
usually occurs from use of metallic utensils.
Continuous arcing, howev er, can damage the
unit. Stop the programme and check the ut ensil.
Care should be taken not to obstruct any air vents
•
located on the top, rear, side and bottom of the
oven.
Do not use this oven for co mmercial purposes.
This oven is made for d o mestic use only.
Keep these instructions
6
Page 7
EMS1740 t English
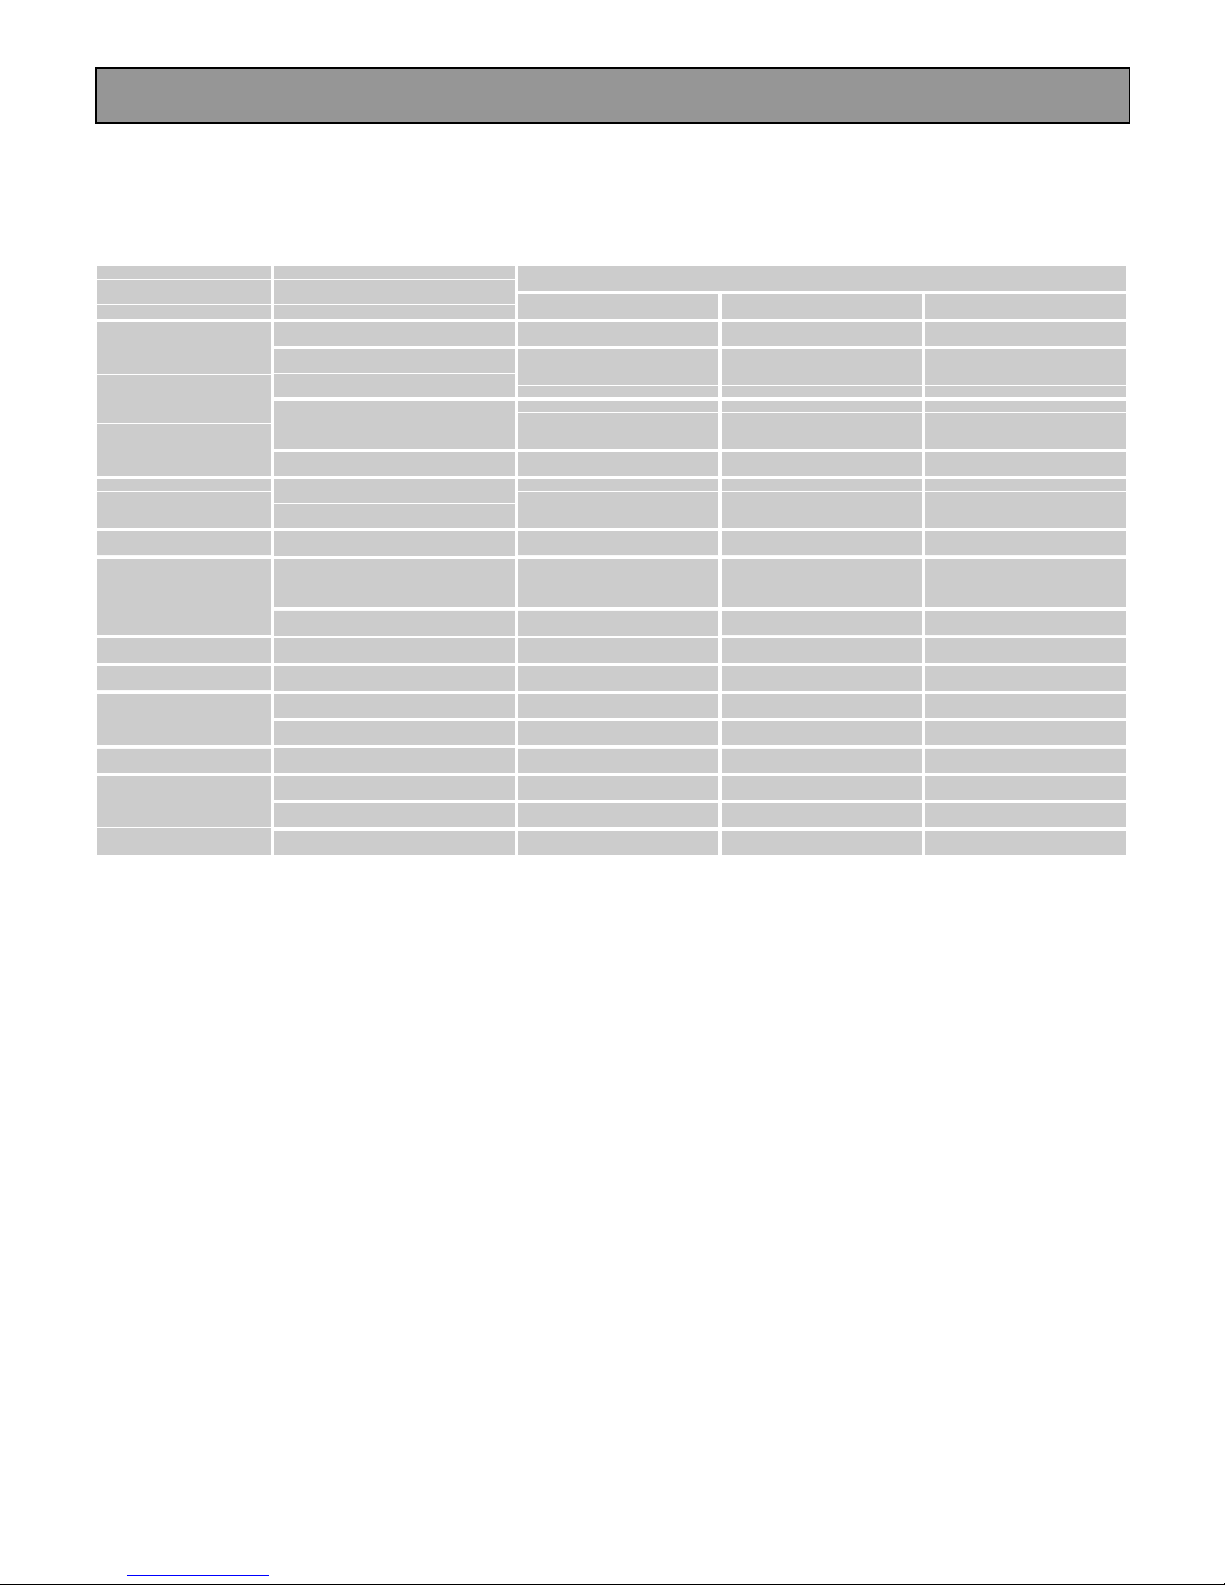
Oven utensils and accessories guide
A variety of Utensils and Materials may be us ed for cooking in your microwave oven. For your saf ety and to
prevent damaging utensils and your oven choose appropriate ut ensils and materials for each cooking method.
The list below is a general gu ide.
Material Utensils
Corning ware YES YES YES
Heat resistant glass
Ceramic &
Glass
China
Pottery*2 YES YES YES
Plastic
Metal Baking pan NO YES NO
Paper
Wood NO NO NO
Glass ware with metal
Lead crystal glass NO NO NO
Cups, plates, towels YES NO NO
ware
decoration
Without metal
decoration
Microwave oven
heat-proof wear
Plastic wrap YES
Aluminium foil*3 YES YES YES
Waxed paper YES NO NO
Grill rack NO YES YES
Turntable YES YES YESAccessories
Turntable support YES YES YES
Microwave Grill Combination
YES*1 YES YES*1
NO NO NO
YES YES NO
YES NO NO
Mode of operation
YES: Utensils and accessories to use NO: Utensils and accessories to avoid
*1 Only if there is no metal trim.
*2 Only if it does not have a glaze cont aining metal.
*3 NOTE: Use aluminium foil only for shielding purposes, over use may cause arcing.
7
Page 8

EMS1740 t English
GETTING STARTED
Unpacking
N.B. When you unpack the oven, check that t he
product is free from damage. Damage or a ny missing
parts must be reported immediate ly t o t he retailer.
The oven, parts of the oven or the accessori es may
be wrapped by a protection foil. If so, you must
remove this foil before using the oven. Do not leave
packing material so that small chil dren can play with
it. This can be hazardous.
Installation
1. Remove any promotion label f r om the door.
2. Install the oven on a flat, level surface. The
surface must be strong enough to safely be ar the
weight (15.5 kg) of the oven, and the contents. To
avoid the possibility of causing vibration or noise
the oven must be in a stable position.
3. Keep the oven away from heat and wat er.
Exposure to heat and water can lower oven
efficiency and lead to malfuncti oning, so be sure
to install the oven away from heat and water
sources.
4. Do not block air vents on the top and the sides of
the cabinet and also do not place any articles on
the top of the oven. If air vents are blocked during
operation, the oven may overheat , and this may
lead to malfunctioning. Hot air escapes from the
vents, so be sure not to obstruct it or let curtains
come between the oven and the rear wall.
5. Place the oven as far away from radios and T V ’s
as possible. This oven does conform to EEC
requirements* of radio interference suppression,
but some interference may occur if it is placed t oo
close to a radio or TV, so keep them as far apart
as possible.
6. If positioned in a corner, leave a gap of at least
5,0 cm from the walls to meet ventilat ion
demands.
Important! The oven can be plac ed almost anywhere
in the kitchen. Make sure the oven is placed on a flat,
level surface and that vents as well as the surf ace
underneath the oven are not blocked (for sufficient
ventilation).
Connecting to the mains
The oven is delivered with the power cord and a plug
for 230V, 50Hz, earthed socket outlet. Eart h
protection minimises the risks should a short-circuit
occur. Check to ensure the voltage of t he oven
matches the supply.
N.B. If the oven is connected to the socket via an
extension cord, make sure the cord is earth ed.
WARNING! This appliance must not be used on a
non-earth protected power supp ly.
Contact an electrician if you are uncertain regarding
electrical connection of t he oven or provision of earth
protection of the supply.
This appliance must be earthed. If this appliance is
fitted with a non-rewireable plug for which your socket
is unsuitable, the plug should be cut off and the
appropriate plug fitted. If it is necessary to change the
fuse in a non-rewireable plug, t he fuse cover must be
refitted. If the fuse cover is lost or damaged, the plug
must not be used until a replacement is obt ained.
Electrical connections
WARNING! THIS APPLIANCE MUST BE
EARTHED.
The manufacturer declines any liabili t y should
this safety measure not b e ob served .
If the plug that is fit t ed to your appliance is not
•
suitable for your socket outlet, it must be cut off
and the appropriate plug fitted.
Remove the fuse from the cut off plug. The cut off
•
plug should then be disposed of t o prevent the
hazard of shocks in case it should be plugged into
a 13 Amp socket in another part of your home.
* This appliance conforms to the requirements of
EEC Radio Interference Direct ive 87/ 308/EEC.
8
Page 9
EMS1740 t English
How to operate your microwave oven
4
2
3
7
6
1
5
4
8
9
10
Name and function of parts Turntable Installation
1. Cooking compartment. W ipe t he compartment
clean after using the oven.
2. Viewing window. Food can be checked while the
microwave oven is in operation.
3. Oven door. The door must always be firmly
closed while cooking.
4. Latch hook & Safety interlock system.
5. Control panel.
6. Drive shaft for turntable.
7. Grill Element.
8. Turntable. Made of special he at-resistant glass.
Food in a suitable container is placed on this tray
for cooking. Do not use the oven without the
turntable.
9. Turntable support. Place the support on the floor
of the cooking chamber to support the turntable.
10. Grill Rack.
1. Place the turntable support on t he cavit y Bottom.
2. Place the turntable on top of the turntable support
as shown in the diagram. Make sure that turntable
hub is securely locked in the turntable shaft. Never
place the turntable upside down.
• Both turntable and turntable sup port must always be
used during cooking.
• All food and containers of food are a lways placed on
this turntable for cooking.
• This turntable rotates clockwise and a nt iclockwise;
this is normal.
Turntable
Roller rest
Turntable Shaft
9
Page 10
EMS1740 t English
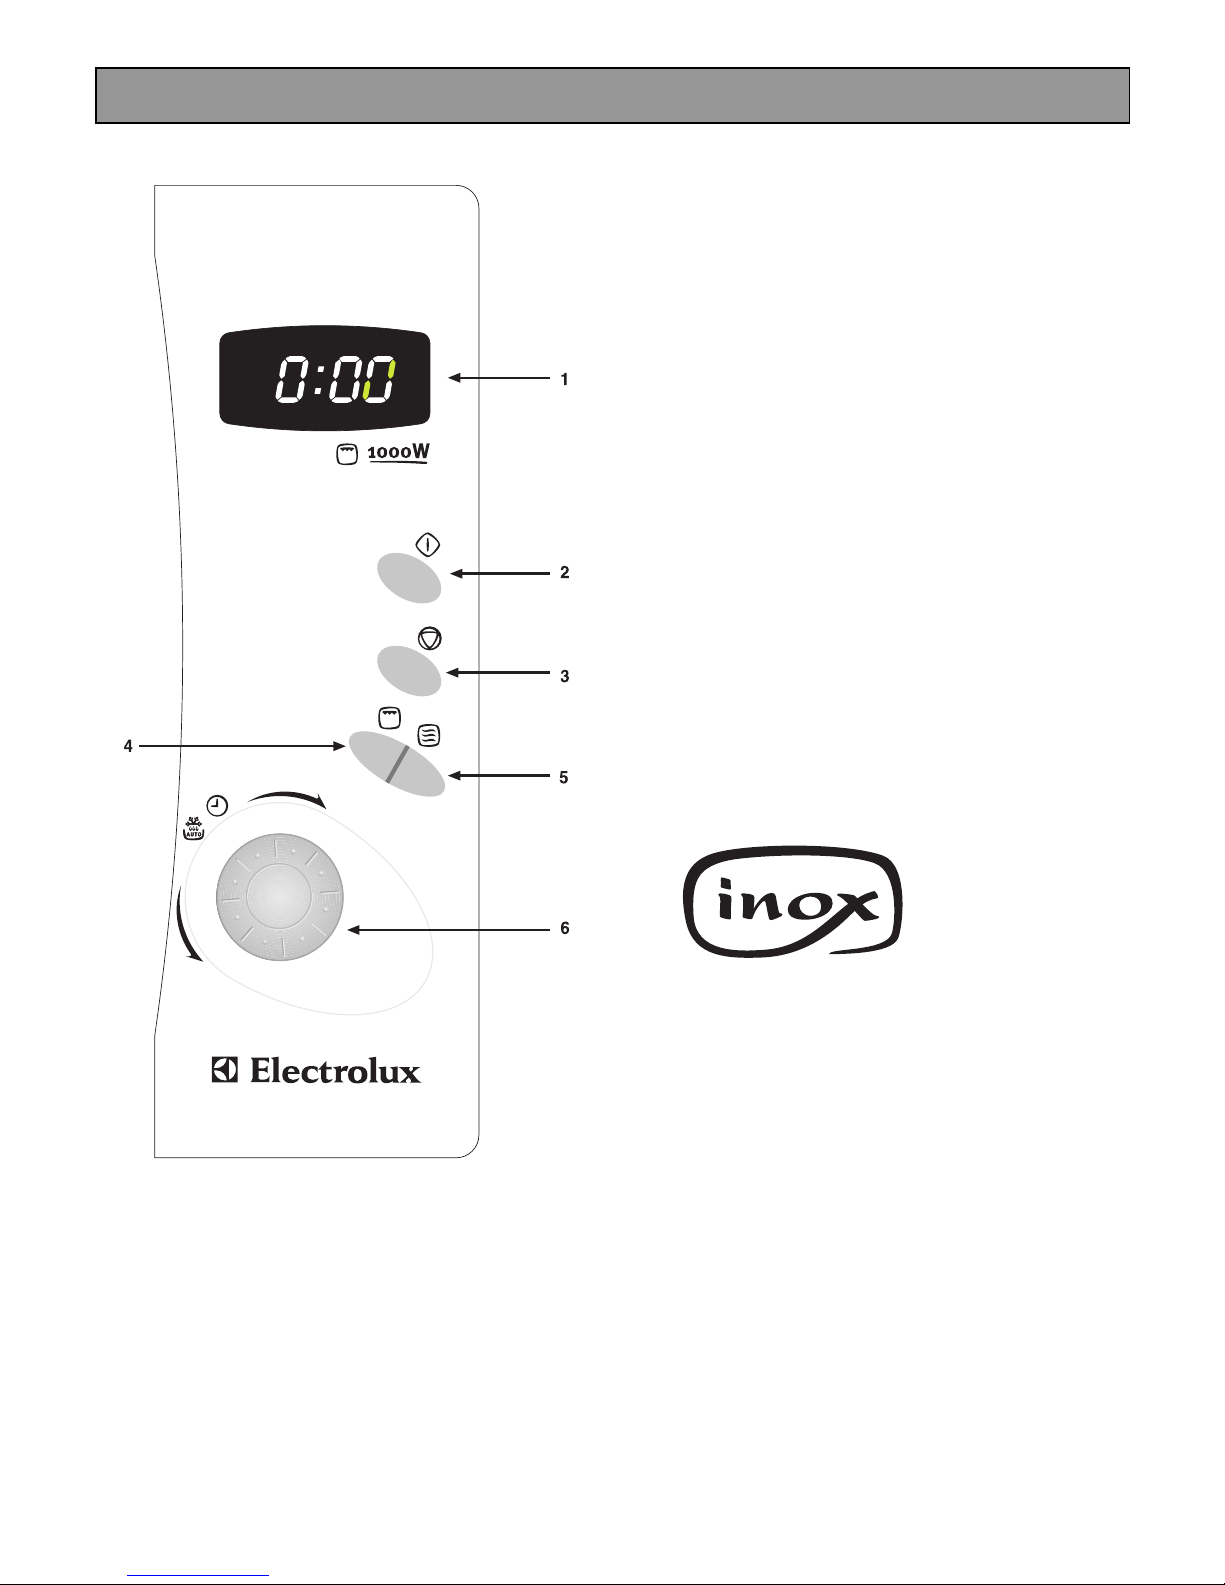
CONTROL PANEL
1. Display Window
To view either Cook time or Power level
2. Start Button
To start your microwave
3. Stop/Clear
To stop or pause your Microwave
4. Grill Button
To set the desired Grill po wer level
Press one time = 100% Grill
Press two times = 50% Grill
Press three times = C1 (50% Micr o + 45% Grill)
Press four times = C2 (30% Micro + 70% Grill)
5. Power setting button
To set the desired power level
Power increases from 10% - 100%
6. Setting control knob
To set the desired time or to set auto def rost
INOX :
If your microwave oven displays this symbo l
•
then it comes with a ’ Stainless Steel ’ cavity.
If your microwave oven does not show this
symbol then it has a ’ White Painted ’
standard cavity..
10
Page 11
EMS1740 t English
MICROWAVE COOKING
1. Open the door, place the food on t he turntable.
Close the door.
2. Press the Power setting button until the desired
power level is reached.(See table below.)
3. Set the desired time by turning the sett ing control
knob clockwise.
4. Press Start (The oven begins cooking.)
Example: To cook at 50% (375W) fo r 15 minutes
1. Touch the Power button three times (50% should now be showing in t he display window) .
2. Turn the setting control knob until 15:00 is shown in the display window.
3. Press start. The Oven will now start cooking.
To turn off the oven during cooking, simply touch the
Stop/Clear button.
Note: After use, be sure to press th e Sto p/Clear
button Twice as this will ensure that you have
reset the microwave.
Note: The Micro button will decrease microwave
power from 100% to 10%
Manual Defrosting
For manual defrosting (without operating the Auto Defrost Feature), Use 75W.
To speed up the defrosting of dense foods over 450g (1lb), the oven may be started on 750W (100%) power
for 1 - 3 minutes, then reduced to 75W until def r ost ing is complete.
Example: To defrost at 10% (75W) for 6 minutes
4. Touch the Power button 5 times (10% should now be showing in the display window) .
5. Turn the setting control knob until 6:00 is shown in the display window.
6. Press start. The Oven will now start defrosting.
Microwave Power setting Guide
Power Setting Suggested use
75W
225W 30% Simmer; Completing the cooking cycle of some pot roasts.
375W 50% Medium; Faster defrosting and reheating for casseroles and
525W 70% Reheat; Reheating pre-cooked foods.
750W 100% Max Power; Boiling or reheating liquids.
Defrost; Thawing frozen foods.
Casseroles and stews.
Baked custards or cheesecakes.
stews.
Baking cakes and sponge puddings
Roasting joints of meat and poultry.
Cooking vegetables.
Preheating a browning dish.
11
Page 12
EMS1740 t English
Cooking With Grill
1. Open the door, place the food on the turntable.
Close the door.
2. Press the Grill button until the desired power level
is reached.
3. Set the desired time by turning the set t ing control
knob clockwise.
4. Press Start (The oven begins cooking.)
Example: To cook at 100% Gri ll (1000W) for 15 minutes
1. Touch the Grill Butt on once (100% should now be showing in the display windo w) .
2. Turn the setting control knob unt il 15:00 is shown in the display window.
3. Press start. The Oven will now start.
To turn off the oven during cooking, simply touch the
Stop/Clear button.
Note: After use, be sure to press th e Sto p/Clear
button Twice as this will ensure that you have
reset the microwave.
Note:
Pressing the grill bu tton once will set the
grill to 100%
Pressing the grill bu tton twi ce will set the
grill to 50%
Cooking with Microwave and Grill (Combination)
1. Open the door, place the food on the turntable.
Close the door.
5. Press the Grill button until the desired power level
is reached.
6. Set the desired time by turning the set t ing control
knob clockwise.
7. Press Start (The oven begins cooking.)
Example: To cook at 55% Micro wave Power and 45% Grill ( ’ C 1 ’ ) for 8 minu tes
2. Touch the Grill Button 3 times ( ’ C 1 ’ should now be showing in the display window) .
3. Turn the setting control knob unt il 8:00 is shown in the display window.
To turn off the oven during cooking, simply touch the
Stop/Clear button.
Note: After use, be sure to press th e Sto p/Clear
button Twice as this will ensure that you have
reset the microwave.
Note:
Pressing the grill b u t ton 3 times w ill set
’ C1 ’ (55% microwave power and 45% Grill)
Pressing the grill b u t ton 4 Ti mes w il l set
’ C2 ’ (30% microwave power and 70% Grill)
4. Press start. The Oven will now start.
12
Page 13
EMS1740 t English
Automatic Defrost
1. Open the door, place the food on t he turntable.
Close the door.
2. Set the desired weight by turning the set t ing
control knob anti - clockwise.
The oven will now be in defrost mode.
3. Press Start (The oven begins defrosting.)
NOTE : During Auto Defro st th e oven will automatical l y select the required microwave power and
defrost time.
NOTE : The maximum w ei ght setting for Auto Defrost i s 2kg (2000g)
If you wish to defrost any item of food which is larger than this, then it is recommended
that the item be split into two or more pieces of equal size.
If the item cannot be split then you should not defrost it in this microwave.
Example: To automatical l y d efrost 700g of food.
1. Turn the setting control knob, ant i - clockwise until 0.7kg is shown in the display window.
2. Press start. The Oven will now start defrosting.
To turn off the oven during cooking, simply touch the
Stop/Clear button.
NOTE : After use, be sure to press the Stop/Clear
button Twice as this will ensure that you have
reset the microwave.
Defrosting Tips
1. It is better to underestimat e defrosting time if you are unsure. Food will continue to defrost during the
standing time.
2. Separate food as soon as possible.
3. Turn large items, e.g. joints , halfway through the defrosting time.
4. Remove any thawed food as soon as possible.
5. Remove or open any packaging before defrosting.
6. Place food in a larger container than that which it was f r ozen in, this will allow for easy stirring.
7. Begin thawing poultry, breast side down and turn over half way through defrosting time or at pause.
Delicate areas such as wing tips can be shielded with small pieces of smooth foil.
8. Standing time is very important, particularly f or large, dense foods which cannot be stirred to ensure that
the centre is completely defrosted before cooking.
Child safety lock
This oven has a safety feature which prevents t he accidental running of the oven by a child. After the lock has
been set, no part of the microwave oven will operate unt il t he child lock feature has been cancelled.
To set:
1. Press the ' Stop/Clear ' button three times. A key symbol should appear in the display window.
NOTE : To cancel the child safety lock simply repeat t he process.
13
Page 14
EMS1740 t English
Charts
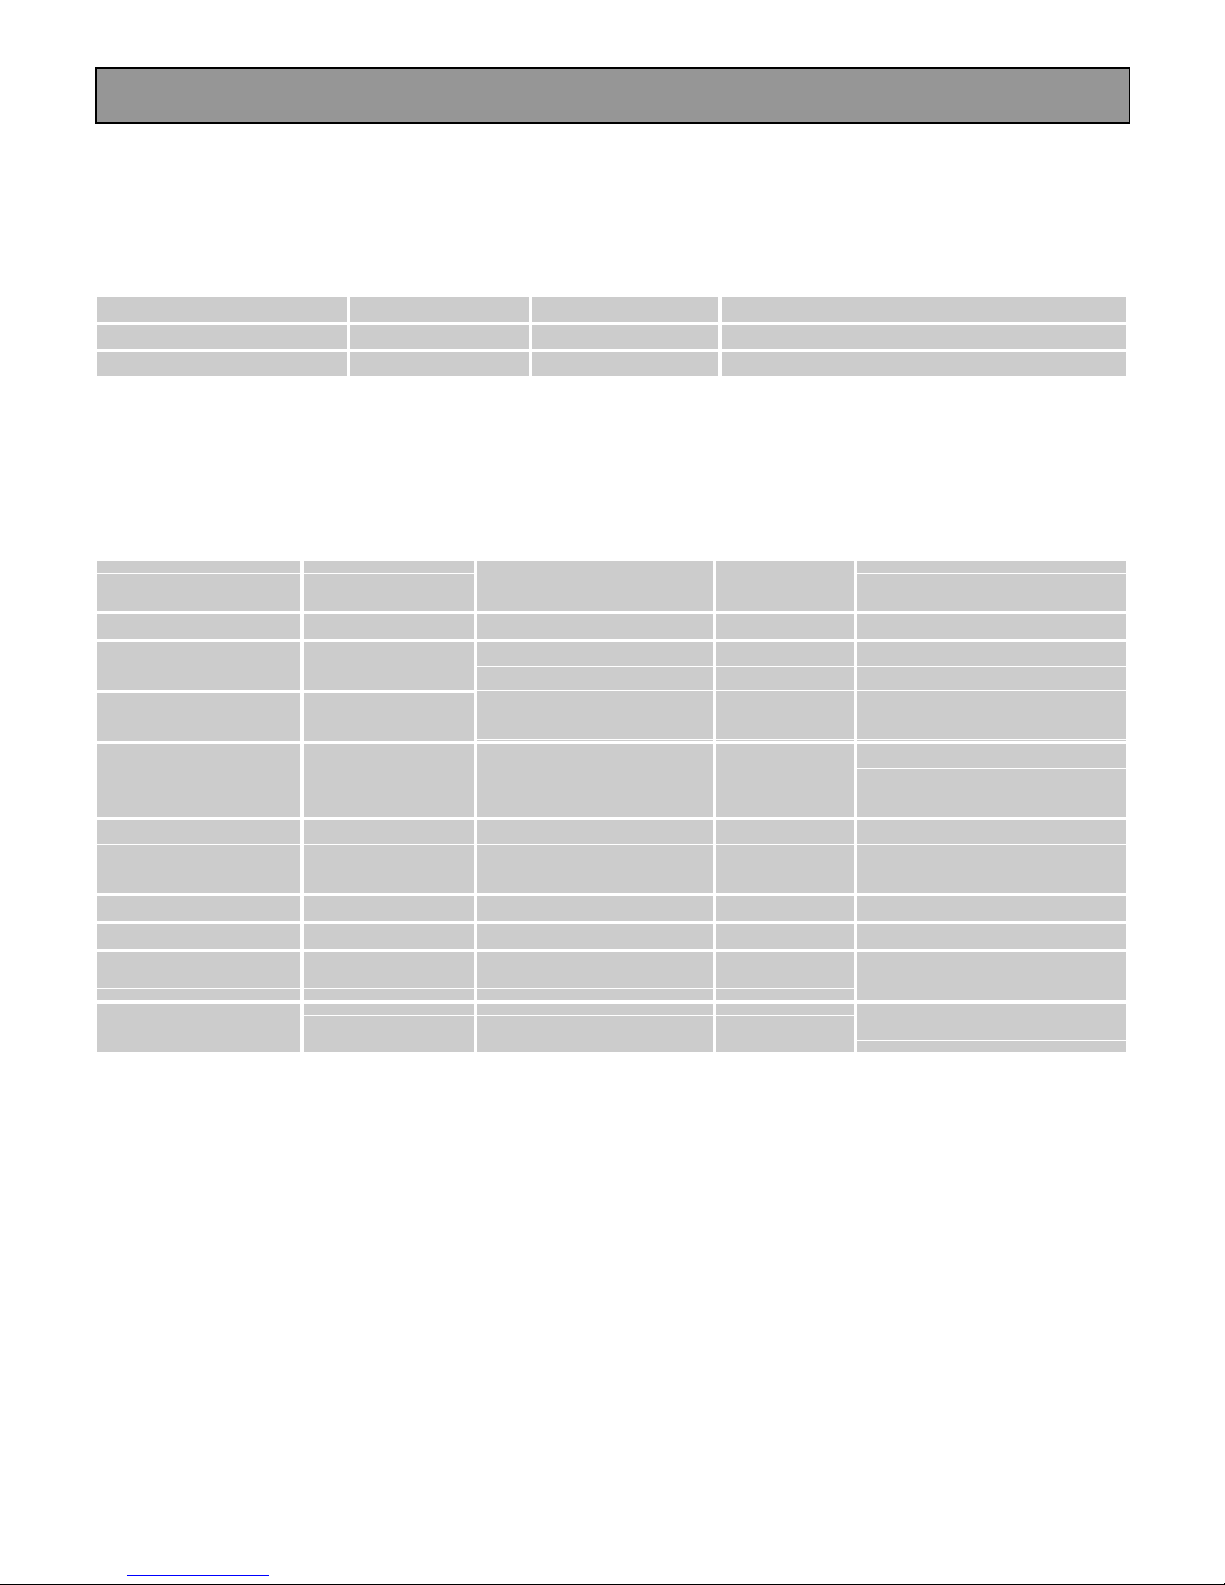
Recommendations for cooking with Grill
All foods should be placed on t he grilling rack with a dish placed underneath to catch any food spilla ge or
juices to minimise cleaning. T urn all food halfway through the cooking time.
Food QTY. (Weight) Cooking time Special notes
Toast 2 Slices 4 – 5 min
Cheese on Toast 4 Slices 6 – 7 min 4 – 5 min. to toast. 2 min. wit h topping
General recommendations for cooking with Microwave and Grill
Use roasting rack on turntable for roast beef and pork, shield thin parts and edges. Place a dish on the turntables under the grill rack to cat c h f ood spillage and juices. Turn f ood, as appropriate during the cooking time.
Food QTY (Weight)
Bacon 4 (100 g) C 1 7- 9 min
Roast Beef (Boned) 900 g
Roast Pork (Loin) 900 g
Pork Chops 2 - 3(450 g) C 1 20 - 25 min
Chicken, Halved
lengthways
Legs
Frozen Hamburger 4 (200 g) C 1 12 - 15 min
Sausages 450 g Only C 1 10 - 15 min
Fish Steak 2 (350 g) C 1 22 – 24 min
Frozen Potato,
Hash Brown
450 g
800 g
2 (150 g) C 1 16 – 18 min.
Power Selector
position
Microwave only 750W
C 1
C 2
C 1
Cooking
time
25 min
5 - 6 min
15 - 20 min
25 - 30 min
Special notes
Brush with oil. Season
with salt and pepper. Allow
15 – 20 minutes standing
time after cooking.
Brush with oil. Season
with salt, pepper and
paprika.
Brush with oil. Season
with salt, pepper and
paprika.
Brush with oil, Season
with salt and pepper.
14
Page 15
EMS1740 t English
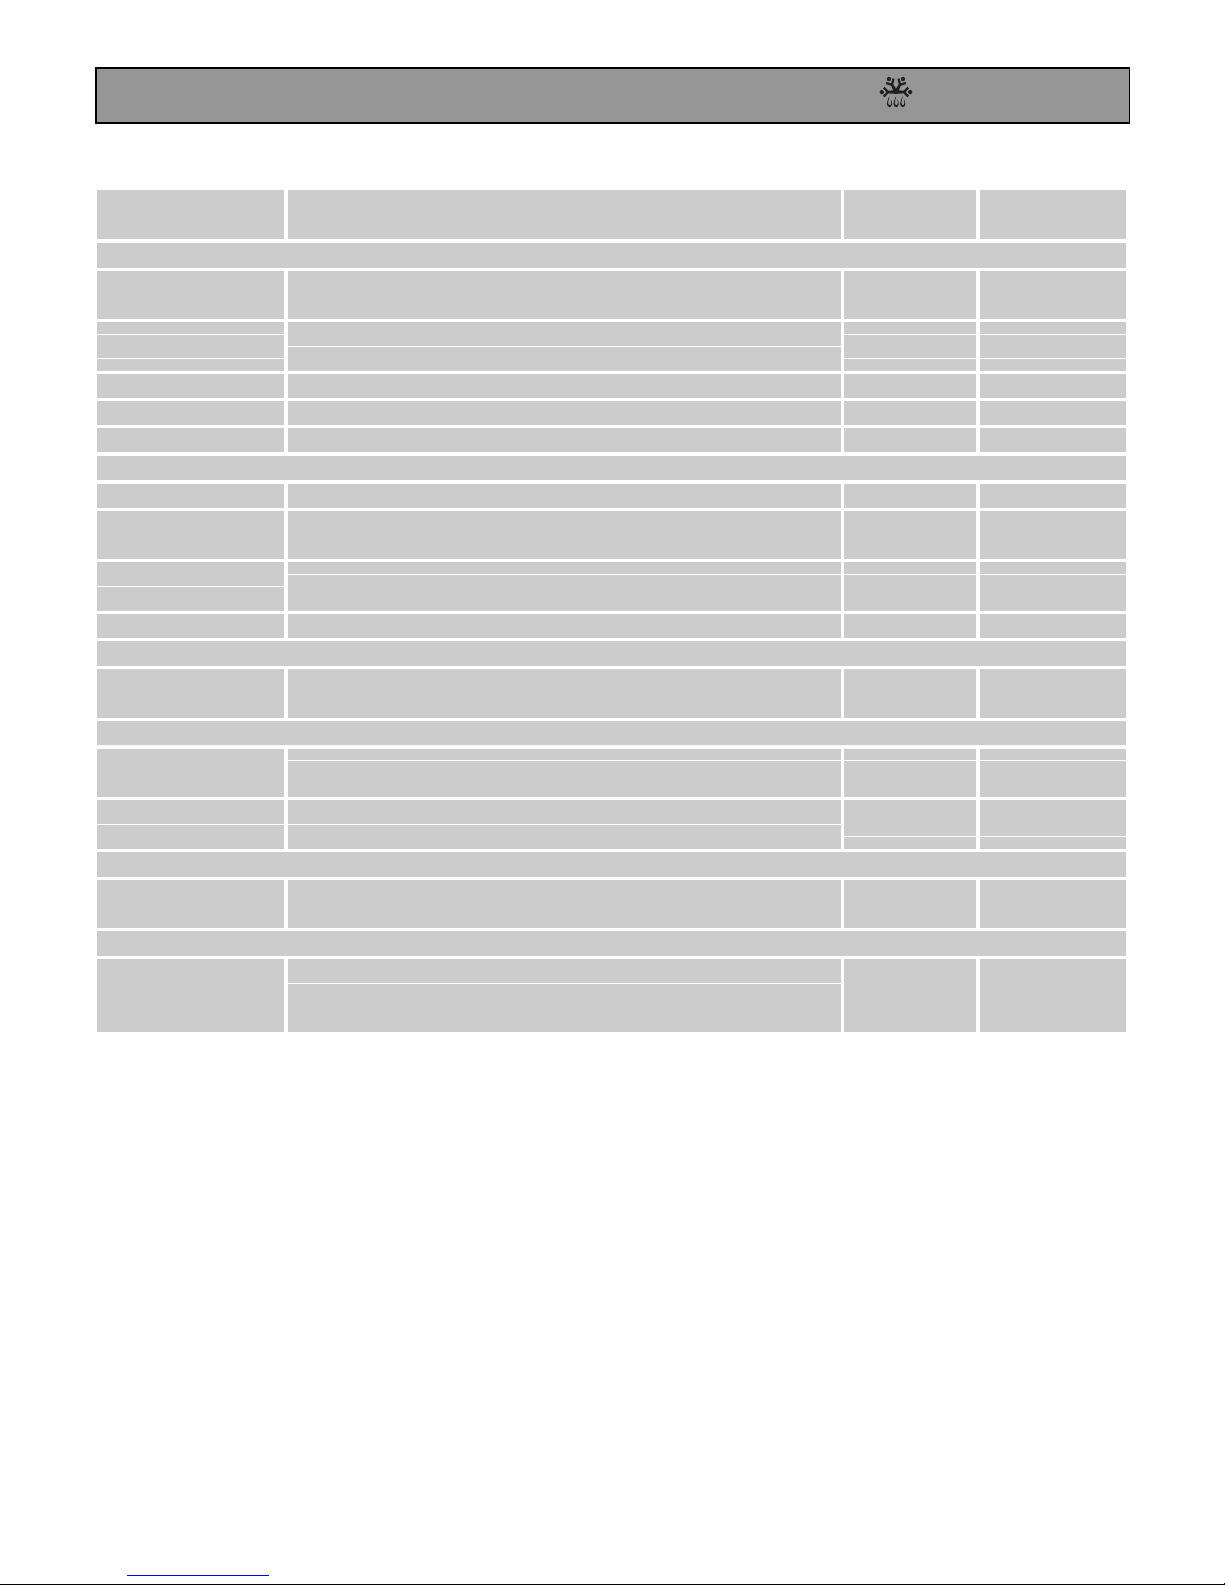
Defrosting instructions using 75W
Some foods such as bread and fruit, can successfully be thawed manually by using t his power setting.
FOOD PREPARATION (75W)
Bread
Small loaf
Sliced large loaf
2 slices Place on kitchen paper. 55–60 sec. 5 min.
1 bread roll Place on kitchen paper. 55–60 sec. 5 min.
2 bread rolls Place on kitchen paper. 2–21/2 min. 5 min.
Cakes and Pastry
Gateau 450g/1 lb Remove from packaging, place on plate. 19–21 min. 15–30 min.
Cheesecake
450g/1 lb
Pie (cooked)
450g/1 lb
Pastry 450g/1 lb Remove from packaging, place on plate. 17– 19 min. 15–30 min.
Butter
250g/8.8 oz
(1 packet)
Fruit
225g/8 oz
Soft berry fruits
450g/1 lb
Soft berry fruits
Plated meal
400g/14 oz
Vegetables
Place on microwave-proof rack or kitchen paper.
Turn over halfway through defrost ing t ime.
Place on microwave-proof rack or kitchen paper.
Turn over halfway through defrost ing t ime.
Remove from packaging, place on plate. 19–21 min. 15–30 min.
Remove from packaging, place on plate. 17– 19 min. 15–30 min.
If foil wrapped, remove from wrapper and place on a
plate
Place in a single layer in a sha llow dish. 15– 16 min. 5–10 min.
Place in a single layer in a sha llow dish.
Cover with a plate or non P.V.C. cling f ilm.
To reheat, microwave at 100% (750W)f or 3–4 minutes.
It is not necessary to defrost vegetables bef ore cooking.
All vegetables can be thawed and cooked at 100%
(750W)
18–20 min. 10–15 min.
20–23 min. 10 min
13– 14 min. 5–10 min.
17– 18 min. 5–10 min.
17– 18 min 5–10 min.
STANDING
TIME
15
Page 16

EMS1740 t English
Microwave Tips
Microwave Hints
Always keep the oven clean – avoid spill-overs
•
and do not forget to clean under the glass tray
and the inside of the door.
Preferably use round or oval casseroles with a lid
•
when cooking in your microwave oven.
Do not use metal or metal decorated casseroles.
•
Certain plastic materials can melt an d be warped
by hot food.
Cover the food when cooking. Use a glass lid, a
•
plate or grease proof paper.
Pastry, bread and the like can be defrosted
•
directly in a bread basket or on a paper towel.
If frozen food is heated in its packaging, the
•
packaging should be opened. Packaging
containing metal or metal decoration must not be
used unless specifically recommended for use in
the microwave. Remove metal clips and wire ties.
Smaller pieces of aluminium foil can be used to
•
cover parts that easily over cook such as chicken
legs.
Food with peel or skin should be pierced with a
•
fork – e.g. potatoes and sausages. Do not boil
eggs in the microwave oven as they can explode.
Put large, thick pieces close to the edge of the
•
casserole and try to cut the food in t o even sized
pieces. Always place the food in the cent re of the
oven.
The food will be evenly cooked if you stir or turn it
•
a few times.
Always set a shorter cooking time than indicat ed
•
in your recipe to avoid over cooking. The larger
the amount of food the longer it takes.
Use little or no water for vegetables.
•
Use less salt and spices than for ‘normal’ co oking.
•
Season afterwards.
•
Allow a few minutes ‘standing ’ time after the oven
•
has switched off to ensure complete and even
cooking results.
Always ensure food is piping hot throughout
•
before serving.
Use pot holders or gloves when taking dishes and
•
food from the oven.
Softening Honey
•
If you have a jar of honey which has
crystallised, remove lid and place the jar in the
oven, microwave on medium power for 2
minutes.
Melting Chocolate
•
Break 100g of chocolate into squares, place in
A bowl and heat on high power for 1-2
minutes and stir well.
Softening or Melting Butter
•
Melting takes a few seconds on high po wer.
Softening is best done more gent ly on low
power.
Freshen or Warm Bread
•
Use medium power for few seconds.
Peeling Garlic easily
•
Heat 3 or 4 cloves of garlic on high power f or
15 seconds. Squeeze at one end until t he
clove pops out.
Fruit Juice
•
Citrus fruits will yield more juice if they are
heated on high power for 15 seconds bef ore
squeezing.
Cooking Porridge
•
Porridge is easily cooked in the serving dish
with no sticky pan to wash. Follow f ood
manufacturers’ recommendatio ns.
16
Page 17

EMS1740 t English
g
Care and cleanin
The oven must always be clean. Residu e of food from spillovers or spatters wil l at tract microwave energy
causing it to burn on. This could reduce the efficiency of the oven and may cause bad odours. Do not attempt
to tamper with or make any adjustments or repa irs to any part of the oven. Repairs should only be done by a
qualified service technician.
Be sure the oven is disconnected from the electricity supply before cleaning.
Cleaning the accessories (turntable and support)
Clean them with mild deterge nt after removing them from the cavity. T he turntable support should be careful ly
handled.
CAUTION: The inside of the oven and turntable get very hot, so do not touch them immediately after use.
Cleaning the interior
Always keep the inside of the oven clea n. Wipe up spill-overs and food spatters immediately. Deposits that are
allowed to remain on the oven walls, door seal and door surface will absorb microwave energy, reduce the
efficiency of the oven, and possibly damage the oven interior. Use mild, liquid detergent, warm water and a
soft, clean cloth to remove deposits.
NEVER USE ABRASIVE CLEANERS, COMMERCIAL OVEN CLEANERS OR STEEL WOOL PADS ON
ANY PART OF THE MICROWAVE OVEN.
To loosen difficult depos its, boil a cup of water in the microwave ov en f or 2 or 3 minutes.
NEVER USE A KNIFE OR ANY UTENSIL TO REMOVE DEPOSITS FROM OVEN SURFACES.
To remove odours from the oven interior, boil a cup of water plus 2 tablespoons of lemon juice for 5 minutes.
Cleaning the exterior
Open the oven door when cleaning the control panel. This wil l prevent the oven from being turned on
accidentally. You should clean out side surfaces of the oven with mild li quid detergent and water followed by a
wiping with clear water to remove any excess detergent. Dry with a soft cloth.
Spray-on window cleaners or all purpose spray-on kitchen cleaners can also be us ed. Never use abrasive
cleaners, scouring pads or harsh chemicals on out side surfaces of your oven. To prevent damage to t he
working parts, do not allow water to seep into ventilation openings.
17
Page 18

EMS1740 t English
GUARANTEE CONDITIONS
Electrolux offer the following guarantee to the first purchaser of this appliance:
1. The guarantee is valid for 24 months commencing when the appliance is handed over to the first retail
purchaser, which must be verified by purchase invoice or similar documentation. The guarantee does not
cover commercial use.
2. The guarantee covers all parts or components which fail due to faulty workmanship or faulty materia l. The
guarantee does not cover appliance s where defects or poor performance are due to misuse, accidental
damage, neglect, faulty installation, unauthorised modification or attempt ed repair, commercial use or
failure to observe requirement s and recommendations set out in the instruct ion book. This guarantee does
not cover such parts as light bulbs, removable glassware, or plastic.
3. Should guarantee repairs be nec essary t he purchaser must inform the nearest customer service of fice
(ELECTROLUX’s service or authorised agent). ELECTROLUX reserves the right to stipulate the p lace of
repair (i.e. the customer’s home, place of installatio n or ELECT RO LUX workshop).
4. The guarantee or free replac ement includes both labour and materials.
5. Repairs carried out under guarantee do not extend the guarante e period for the appliance. Parts removed
during guarantee repairs becom e t he property of ELECTROLUX.
6. The Purchaser’s st atutory rights are not affected by this guarantee.
European Guarantee
If you should move to another country wit hin Europe then your guarantee mov es wit h you to your new home
subject to the following q ualifications:
• The guarantee starts from the date you first purchased your product
• The guarantee is for the same period and to the same extent for labour and part s as exists in the new
country of use for this brand or range of products
• This guarantee relates to you and cannot be transferred to another user
• Your new home is within the Europe an Community (EC) or European Free Trade Area
• The product is installed and used in accordance with our instructions and is only used domestically, i.e. a
normal household
• The product is installed taking int o account regulations in your new count ry
Before you move please contact your nearest Customer Care centre, listed below, to give them details of your
new home. They will then ensure t hat the local Service Organisatio n is aware of your move and able to look
after you and your appliances.
France Senlis +33 (0) 3 44 62 20 13
Germany
Italy Pordenone +39 (0) 800117511
Sweden Stockholm +46 (0) 20 78 77 50
UK Slough +44 (0) 1753 219898
Nürnberg +49 (0) 800 234 7378
18
Page 19

Page 20
 Loading...