

Electrolux DF80, DF80X, DFI80, DI80X Instruction Manual
2
User’s Manual
This refrigetaror is not intended for use by persons
(including children) with physical, sensory or mental
impairments, or people with lack of experience and
knowledge, unless they have received regarding
the use of the refrigerator or under the supervision
of person responsible for their safety.
Its recommended that children be supervisioned
to ensure they are not playing with the refrigerator.
For Children
Prevent accidents. After unpacking the refrigerator, keep the
packing material out of the reach
of children.
Do not allow your refrigerator
to be handled by children, even
when disconnected.
In case your refrigerator has any silica gel or Desi
Pak® pack inside, throw it away and do not let the
children play with it.
For the User / Installer
1. Safety
Safety ............................................................. 02
Installation .....................................................03
Description of the Refrigerator ...................04
How to Use .................................................... 13
Cleaning and Maintenance .......................... 16
Solving Problems ......................................... 20
Hints and Suggestions .................................22
Technical Information ..................................26
Table of contents
Disconnect the Refrigerator from the socket
whenever cleaning or doing maintenance.
Never disconnect the Refrigerator from the socket by pulling the power cable. Use the plug.
If the power cord is damaged, do not try to x
it. It must be replaced by the tecnical service
or qualied professional in order to avoid a
hazard.
Do not store drugs, toxic or chemical products
in your Refrigerator, as they may contaminate
food items.
Products in high-pressure aerosol, identied
as ammable or with a small ame symbol
cannot be stored in the refrigerator or freezer
under risk of explosion.
Do not lean on the doors. The hinges may become deregulated, affecting the refrigerator’s
sealing and compromising its performance.
Transport your refrigerator in vertical position
(standing). It is not recommended transportation in horizontal position.
IMPORTANT
Thank you for choosing Electrolux. In this manual
you will nd all the information for your safety and
proper use of your Fridge. Read all the instructions
before using the device and save it for further
references.
The identication label where all the information
about code, model, manufacturer and others, will
be used by the Technical Service in case your fridge needs repairs. Do not remove it from its place.
Environmental Hints
The symbol on the product or on its packaging
indicates that this product may not
be treated as household waste.
Instead it shall be handed over to
the applicable collection point for
the recycling of electrical and electronic equipment. By ensuring this
product is disposed of correctly,
you will help prevent potential negative consequences for the environment and human health,
which could otherwise be caused by inappropriate
waste handling of this product. For more detailed
information about recycling of this product, please
contact your local city ofce, your household waste
disposal service or the shop where you purchased
the product.
silica gel or
Desi Pak®
WARNING
Never place candles or incense
lighted over the Fridge, given the
risk of res or product damage.

3
2. Installation
Remove the base from the packing
With the help of other adults,
carefully recline the fridge to one
of the sides. With someone’s
help, break the base with your
hands. Tilt the refrigerator to the
other side and remove the rest
of the base.
In the back part remove the adhesive tapes and unlock both back
spacers. Leave it in horizontal
position.
Choose the Location
Install your refrigerator in a ventilated location
away from direct sunlight and heat sources (stove,
ovens, etc.) and ammable products.
Do not install your refrigerator unsheltered (open
to weather).
For the denite position of the refrigerator, respect
the minimum distances recommended:
- On top: 10 cm
- Side: 10 cm
- Behind: 10 cm
Check if the spaces left in
the front of the fridge and
in the right side (looking
at the front of the fridge)
are enough to allow complete opening of the door
and crisper drawer.
Leveling
Set the leveling feet to
ensure perfect refrigerator
stability, preventing rocking
movement. Leave frontal
casters rolling freely.
In order to perform the leveling feet must be com-
pletely on the oor.
To better close the door, the product must be
slightly reclined to the back.
The proper functioning of the refrigerator shall
depend on its perfect leveling.
WARNING
Leveling must be performed with closed
doors.
Your refrigerator was developed to use the
leveling feet, which come with it.
Therefore, do not use other feet other than
the original. There are wheels on the upper
back part of your refrigerator to facilitate
movement.
During packaging removal, the feeding cable
will be loose. To avoid damages, attach it
with adhesive tape in the back of the fridge.
After unpacking and leveling, wait at least
two hours before connecting your refrigerator to prevent malfunctioning.
On top
Side
Behind
Electrical Installation
Before turning your fridge on remove the transparent protective
wrapping plastic applied on the
control panel in the freezer door.
Before connecting your refrigerator, check if the voltage on the
socket where it will be plugged
is equal to the one indicated on
the label next to the plug (on the
power cable) or on the refrigerator ID label.
Be careful not to leave the refrigerator over the power cable.
Connect the refrigerator to an
exclusive socket. Do not use
extensions or T-connectors.
For your safety, request an electrician of your trust to check the
condition of the electrical power
system at the location it will be
plugged and for further information, contact the Technical
Service.
The socket wires where your
refrigerator will be connected
should be of copper and have
a minimum section of 2.5 mm².
4
3.Description of the Refriger ator
Parts
1. “Ice Twister” (DF80/DF80X) / Automatic Ice Maker
(DFI80/DI80X)
2. Ice storage recipient
3. “Drink Express” (DF80/DF80X)
4. Turbo freezing compartment (Turbo Freezer)
5. Retractile and small shelf of the freezer
6. Retractile and big shelf of the freezer
7. Freezer compartment light - 1 unit - (luminary)
8. Freezer door shelves (2 units)
9. Removable “Ice Stock”.
10. Cup support - “Frosty Cups” (2 units)
11. Space convenient compartment
12. Lights in the fridge compartment - 3 units - (luminary)
13. Temperature control selector in the fridge (DF80/
DF80X)
14. Removable glass shelve (2 per refrigerator)
15. Crisper drawer lid
16. Humidity Control
17. Crisper Drawer
18. Crisper Drawer sliding control
19. Leveling feet/ casters
20. Removable bin “Space+” (picnic)(DFI80/DI80X)
21. “Space Express”/“Gourmet Express”/“Drink Ex-
press” (DFI80/DI80X) Retractile Shelf (DF80/DF80X)
22. “Flex Box” shelf (2 per fridge)
23. Small multi-use shelf
24. Removable shelf for delicate fruits
25. Bottle holder shelve
26. Refrigerator door shelf (3 in models DF80/ DF80X)
and (2 in models DFI80/DI80X)
27. Bottles lock
28. “Space Light” removable shelf.
29. Water supply (DFI80/DI80X)
30. Removable can dispenser
31. Control Panel
32. Handles
33. Rotating water dispenser (DFI80/DI80X)
34. Water dispenser action button (DFI80/DI80X)
35. Deodorizer
36. Water lter element (DFI80/DI80X)
37. Retractile shelf of the fridge
38. Freezer door (not reversible)
39. Fridge door (not reversible)
40. Multi-Flow
41. Egg tray
42. Extra Crisper Drawer (DFI80/DI80X)
43. Extra Crisper Drawer cover (DFI80/DI80X)
44. Breakfast tray
WARNING
Do not use the refrigerator without connecting
the grounding wire.
Do not use the product without grounding it. If the
installation doesn’t have grounding, for your safety,
ask to a trusted electrician to provide it.
The grounding cable (green or yellow and green)
located at the back of your refrigerator must be
connected to an efcient grounding and should
not be connected directly to the electric power
network or to water and/or gas pipes, electricity,
telephone conduits, lightning rods, etc.
If your product is equipped with a 3-prong plug power cord, it will not have a grounding cable (green
or yellow and green). It must be plugged into a
properly grounded and polarized 3-prong outlet.
Do not use adaptor to bypass the grounding. Do
not replace it for a two prong plug. If necessary, for
your safety, ask to a trusted electrician to ground
your appliance.
Grounding is the best safety for the user against
electric discharges.
Ground Wire (Grounding)
Admissible voltage variation
Voltage (V) Minimum (V) Maximum (V)
127
220
116
201
133
231
Fio Terra (aterramento)
IMPORTANT
In case the voltage at installation site is out of
the indicated limits on Admissible Voltage Variation table, ask the dealer energy the adequacy
of voltage levels and adapt a voltage stabilizer
of not less than 2000 VA. If there is any, voltage
variation on site, outside the specied limits
(see table above) or a not constant energy supply, the appliance may change in its operation.
If so, remove the plug for 5 minutes and then
reconnect it to the energy supply (check item
6 - Solving Problems - Pages 20 and 21).
5
Control Panel DF80 / DF80X
Control Panel DFI80 / DI80X
This panel has approximation mode. To set it,
place your hand rapidly over the control panel.
All Buttons will light up with 50% luminous intensity.
6
Button “GOURMET EXPRESS” (fast cooling
after desserts - models DFI80/DI80X)
By setting this button, it is selected the kind of dessert
expected to cool faster, during a predetermined time
for each dessert:
trie, cheesecake, mousse and pudding. In case you
wish to deactivate this function, you must touch the
screen “GOURMET EXPRESS” again until the indicator shows room temperature.
Button “FRIDGE TEMPERATURE (models
DFI80/DI80X)
This button allows the adjustment of temperature in the
fridge compartment: Minimum, Medium and Maximum.
Intermediary adjustments to these positions can also
be performed.
Button “FREEZER TEMPERATURE”
This button allows the adjustment of temperature in
the freezer compartment: Minimum, Medium and
Maximum. Intermediary adjustments to these
positions can also be performed, in models (DFI80/
DI80X).
WARNING
The function “Drink Express” (Beverage Fast
Cooling) can experience changes to the beverage
nal temperature given the electric tension, room
temperature and beverage initial temperature.
Avoid opening the fridge door frequently when this
function is being used.
Button “DRINK EXPRESS” (Beverage fast
cooling)
By setting this button, it is selected the kind of drink
expected to cool faster, during a predetermined time for
each drink: In case you wish to deactivate this function,
you must press the button “DRINK EXPRESS” again
until the indicator shows two bars (- -) in models DF80/
DF80X and room temperature in models DFI80/DI80X.
For models DF80 and DF80X the beverages must be
in the Drink Express drawer at the freezer.
Indicator of Electronic Panel Locked
Indicates when the control panel is locked to avoid
changes to the settings.
To lock the control panel of models DFI80/DI80X
it must be pressed at the same time the buttons
FRIDGE TEMPERATURE and FREEZER TEMPERATURE for approximately 3 seconds.
To unlock, repeat the process.
To lock the control panel of models DF80/DF80X
it must be pressed at the same time the buttons
FREEZER TEMPERATURE and AUTO CONTROL
for approximately 3 seconds. To unlock, repeat the
process.
For these models, once the panel is locked “LOC” will
appear on the display.
Button “INTELLIGENT SENSOR” (DFI80/DI80X)
This button when set, will make the device stop operating in manual mode to operate in automatic mode.
Variations in room temperature will be considered
automatically, assuring the conservation properties in
food stored in the fridge.
With this function activated, it is not possible to set the
freezer temperature and the fridge temperature (the
buttons are blocked).
Indicator of FREEZING TURBO or BEVERAGES
FAST COOLING or DESSERT FAST COOLING time
(DFI80/DI80X)
In case one of the functions above has been chosen, the
indicator shows the operation remaining time.
For example: 30, 29, 28 minutes and so on until zero
(0:00). Should you wish to use the functions simultaneously (cool drinks and freeze food or party manner), the
counter will show the remaining time to conclude each
Dessert Indicator (DFI80/DI80X)
It shows which dessert was selected for fast cooling:
trie, cheesecake, mousse or pudding. The selection is
made by pressing the button “GOURMET EXPRESS”.
Indicators of Temperature Selection of Fridge
Compartment (DFI80/DI80X)
They indicate the temperature selected in the fridge
compartment.
The adjustment is made by pressing the button
FRIDGE TEMPERATURE.
When the fridge is turned on for the rst time, turned on
after cleaning or after blackout, the control will always
indicate medium position.
Temperature Selection Indicators of the
Freezer Compartment
They indicate the selected temperature in the freezer
compartment.
The adjustment is made by pressing the screen
FREEZER TEMPERATURE.
When the fridge is turned on for the rst time, turned
on after cleaning or after blackout, the control always
indicates medium position.
Beverage Indicator
Shows the drink selected for Rapid Cooling: champagne, beer or canned drinks (DF80/DF80X) or sodas,
champagne, beer and canned drinks (DFI80/DI80X).
The selection is made by pressing the screen “DRINK
EXPRESS”.
7
function with a respective display light for 30 seconds
and then remain alternating in-between functions until
one of them is concluded.
(DFI80/DI80X)
When no function is selected, the indicator in models
DFI80 and DI80X shows room temperature and in
models DF80 and DF80X the indicator will show two
bars (- -) moving up and down.
Button TURBO FREEZING:
Allows for faster food cooling or freezing. This function’s
operation time can be set to 30 minutes (minimum) and
up to 2 hours and 30 minutes (maximum).
Other periods that may be selected: 45 minutes, 1 hour,
1 hour and 30 minutes and 2 hours.
In case you wish to deactivate this function, you must
press the button TURBO FREEZING again until the
indicator shows (- -) in models DF80/DF80X or room
temperature in models DFI80/DI80X.
WARNING
The function TURBO FREEZING will not work in
case the function BEVERAGE FAST COOLING
is working or selected before (this information
is valid only for models DF80 and DF80X).
Indicator of High Temperature in the Freezer
and/or Fridge Compartment (DFI80/DI80X)
This indicator will turn on every time the Freezer and/or
Fridge compartment temperature is higher (hot) than
the proper temperature for storage.
We recommend not to perform freezer and/or fridge
load when the indicator of high temperature is on.
Keep temperature setting of freezer compartment at
maximum and wait a few minutes until the indicator is
off. In case this indicator remains on for a long period,
contact Technical Service.
Indicator of Water Filter Replacement (DFI80/
DI80X)
Indicates when the water lter expired and must be
replaced.
The lter must be purchased in the Technical Service.
After the lter replacement, by pressing at the same
time buttons PARTY and FRIDGE TEMPERATURE,
for approximately 3 seconds. This operation will turn
off the luminous indicator and will restart the 500 liters
count (lter useful life) of the new lter.
Indicator of Door Opened (DFI80/DI80X)
This indicator stays on as an alert while any of the doors
(refrigerator or freezer) remains open.
BUTTON/Function PARTY
The function, when selected, maintains the freezing
capacity at maximum, and cooling capacity for 6 hours,
even with several door openings. To activate this function by pressing the button “PARTY” once (DFI80/
DI80X) or press the button “AUTO CONTROL” twice
(DF80/DF80X). The function Party can be deactivated
at any time, by pressing the button “PARTY” (DFI80/
DI80X) or button “AUTO CONTROL” (DF80/DF80X).
Button/Function Shopping
The function, when selected, keeps the freezing capacity at maximum, allowing a fast freezing and cooling
of new food.
The function Shopping has a duration of 3 hours,
although it can be deactivated at any time, by pressing the button “SHOPPING” (DFI80/DI80X) or button
“AUTO CONTROL” (DF80/DF80X). This function
activates open door alarm to start tinging only after
10 minutes.
WARNING
The water outlet in the dispenser will be interrupted
at the moment the Ice Maker is being relled.
Fill up only with potable water.
Button “ICE MAKER” (Automatic Ice Maker
– only in models DFI80 and DI80X)
By pressing this button, the ice maker is turned on and
the ice starts to be made automatically.
Make sure there is water in the water supply at all
times, so the ice can be made. The lack of water in
the water supply is indicated on
the display according to the picture. To deactivate the automatic
ice maker at any time, press the
button “ICE MAKER”.
To remove the “ rA “ from the display you must rell
the water supply, wait a few minutes so the water can
go through the lter and press the Button Ice Maker
again. The fact “ rA “ does not appear on the display
does exempt the lack of water from the water supply,
because the water use by the Water Dispenser is not
monitored by this alert.

8
Button/Function Vacation
The function Vacation, when selected keeps the freezer temperature at minimum for models DF80/DF80X
and the freezer temperature and fridge at minimum for
models DFI80/DI80X. This function is indicated when
the product remains closed for long periods of time.
During the rst 30 minutes, after the function is selected, the product can be opened without deactivating
this function. To deactivated this function at any time,
press the button “VACATION” in models DFI80/DI80X
and the button “AUTO CONTROL” in models DF80/
DF80X or open one of the doors for 30min, after the
function is selected.
Button “AUTO CONTROL” (Automatic Control)
DF80/DF80X
By pressing the button “AUTO CONTROL” it is possible to select one of the automatic control functions:
Vacation, Party and Shopping (DF80/DF80X).
Attention: If the function “AUTO CONTROL” is
selected, the functions TURBO FREEZING, “DRINK
EXPRESS”, “ICE EXPRESS” and FREEZER TEM-
PERATURE will not be selected, until the function
“AUTO CONTROL” is interrupted.
“AUTO CONTROL” indicators (Automatic Control - DF80/DF80X)
Shows the automatic control function selected.
21.1. Vacation
The function Vacation, when selected (pressing the button “AUTO CONTROL”, keeps the freezer temperature
at minimum. This function is indicated when the product
remains closed for long periods of time. During the rst
30 minutes, after the function is selected, the product
can be opened without deactivating this function. The
function Vacation can be deactivated at any time, by
pressing the button “AUTO CONTROL” or open any one
of the doors 30 minutes after the function is selected.
21.2. Party
The function, when selected (pressing the button “AUTO
CONTROL” twice), keeps the freezing capacity at most
for 6 hours, even with several door openings. The function Party can be deactivated at any time, by pressing
the button “AUTO CONTROL”.
21.3. Shopping
The function, when selected (pressing the button “AUTO
CONTROL” three times), keeps the freezing capacity at
most, allowing a fast freezing of new food. The function
Shopping has a duration of 3 hours, although it can be
deactivated at any time, by pressing the button “AUTO
CONTROL”.
With this function activated, the alarm of the door opened
starts to work after 10 minutes.
Button “ICE EXPRESS” (DF80/DF80X)
This Button allows the ice to be formed faster in the
freezer compartment. Make sure the ice trays in the
“Ice Twister” are lled with water. To deactivate this
function, press the button “Ice Express” at any time.
Indicator of Room Temperature (DFI80/
DI80X)
Indicates the room temperature where the fridge is
installed when no other function is being used.
Time Indicator (DFI80/DI80X)
Indicates in minutes the remaining time of a preselected function.
Temperature Indicator (DFI80/DI80X)
Indicates the temperature in Celsius grade of a preselected function.
The fridge has ve types of alarm:
26.1 Open door Alarm
After, approximately 4 minutes (normal operation) and 10
minutes (operating on shopping mode) with the door(s)
opened, the alarm goes on.
The alarm is automatically turned off when closing the
door. Note: In case of the doors remains opened, after
silence time is passed, the alarm goes on again.
26.2 TURBO FREEZING LONG Alarm
(Periods of 1:00h, 1:30h, 2:00h and 2:30h)
At the end of the time chosen for the TURBO FREEZING, the respective Button and the panel numbers will
be ashing for about 10 seconds.
To turn off, open and close the freezer door or activate
the respective button.
26.3 TURBO FREEZING SHORT Alarm
(Periods of 30 and 45 minutes)
At the end of the selected TURBO-FREEZE period, the
alarm will be triggered, sounding for about 1 minute. In
this case, if the door is not opened, an alert “bip” will
sound every minute. After the end of the operation, in
addition to the sound signal the respective Button will
be ashing in the control panel. To turn off the sound
and visual alarms, open and close the freezer door or
activate the respective button.
26.4 Beverage Fast Cooling Alarm (DRINK EXPRESS)
At the end of the pre-set period for the chosen drink
express cooling, the alarm will sound for one minute.
Remove all the beverages and close the door. If this
procedure is not followed, after 1 minute, 1 alert “bip”
will sound every minute. After the end of the operation,
in addition to the sound signal the respective Button will
9
be ashing in the control panel. To turn off the sound and
visual alarms, activate the respective Button or remove
the beverage and close the door.
26.5 Dessert Fast Cooling Alarm (GOURMET EXPRESS - mod. (DFI80/DI80X)
At the end of the pre-set period for the chosen dessert
express cooling, the alarm will sound for one minute.
After the end of the operation, in addition to the sound
signal the respective Button will be ashing in the control
panel. To turn off the sound and visual alarms, activate
the respective button. Remove the dessert and close
the fridge door. If this procedure is not followed, after 1
minute, 1 alert “bip” will sound every minute.
26.6 ICE EXPRESS Alarm (DF80/DF80X)
At the end of the chosen time for the ICE EXPRESS, the
respective Button and the panel numbers will be ashing, for approximately 10 seconds. To turn off, open and
close the freezer door or activate the respective button.
Button “Water Dispenser Activator”
Pressing the Button and keeping it pressed, you can
serve water in a glass.
For this it is necessary to: a) The water dispenser
is opened; b) The electric panel is unlocked; c) The
reservoir is lled with potable water.
Turbo-freezing Compartment
This compartment allows a
faster foodstuff cooling. This
compartment is located in the
superior right area of your
freezer.
“Ice Twister” / Ice Trays (DF80/DF80X)
After removing it from its place, ll the “Ice Twister”
with water carefully so the ice
trays will not overow. Place
the “Ice Twister” correctly into
position. The water freezes
after a few hours. Gently, turn
the handle clockwise until the
cubes come loose and fall from
the ice recipient.
“Ice Maker” / Automatic Ice Maker (DFI80/
DI80X)
Fill the potable water supply on
the fridge door with and activate
the button “Ice Maker” located
in the control panel. The water
freezes after a few hours. the ice
will automatically fall into the ice recipient. This compartment is located in the superior left area of your freezer.
Beverage Fast Cooling Drawer (DF80/
DF80X)
Place the bottle or can in this
drawer to cool your drink faster in
the freezer compartment (A) and
activate the function drink express
in the control panel (refer to section “Tips and Advices” beverage
fast cooling table).
If you wish, you can use this drawer to keep food in the fridge (B),
in this position, even activating
the function DRINK EXPRESS beverage fast cooling
will not occur.
A
B
Frosty Cups
Developed to store cups and
glasses, so they can be cooled at
the moment of use.
Space Convenience Compartment
This compartment is used to store
some food that require lower
storing temperature (near 0°C)
without freezing. Example: food
to be consumed or cooked in a
short period of time such as meat, sh, dessert and
similar. This compartment is located in the superior
right area of your fridge.
WARNING
Fill up only with potable water.
10
Fruits and Vegetables Drawer (DFI80/DI80X)
Compartment that does not allow
the cooled air to be directly in
contact with fruits and vegetables.
It provides the right humidity level to
an improved preservation.
For better preservation, always
keep fruits and vegetables stored
inside this compartment.
Retractile Shelf (DF80/DF80X)
This shelf can be detracted, allowing storage of larger objects
in your fridge, such as
jars and bottles.
To unlock them, push
the locks down (A) in
the lower part of the
shelf and then, push
it back (B).
A
B
Crisper Drawer with Sliding Control
Keep the humidity and freshness
of fruits and vegetables due to the
circulation of cool air not in direct
contact with the food.
For best conservation, keep the vegetables and fruits in this location.
You are provided with a fruit and
vegetable sliding control, to facilitate the food organization place
it on the right or left. In it, can also
be stored small packages of food.
Humidity Control
To Best store the food, there is a
humidity control in the crisper dra-
wers which regulates the airow.
When storing Leafy vegetables
it is recommended to reduce the
incoming air, displacing the Button
to the left, avoiding food dehydra-
tion. For fruits, we recommend increasing the airow.
When storing fruits and vegetables together, set the
Humidity Control to intermediary.
Delicate Fruits
The compartment has an inclination system (A) and a handle
that facilitate its removal from the
product. Use this space to store
small fruits, such as grapes,
strawberry, etc.
This compartment is located in the central right area
of you fridge door.
Multi-Flow System
This system distributes cool
air for the cooling of food
items inside the refrigerator
compartment.
Attention: Always leave the
air outlets free to facilitate
cool air circulation and thus
improve food conservation.
Ice Stock
This compartment is able to store
ice made in the “Ice Twister”
(DF80/DF80X), automatic ice
maker (DFI80/DI80X), or store beverage bottles that do not freeze.
The compartment has a handle
that facilitate its removal from the product. This
compartment is located in the inferior right area of
your freezer door.
Removable Multi-use Shelves
These 3 shelves (2 in models,
DFI80 and DI80X) are used to
store several types of food,
adequate to the fridge temperature.
A
Light Space
The compartment has a cover and
a handle that facilitate its removal
from the product. Ideal to store
light products. This compartment
is located in the superior right area
of your fridge.

11
Deodorizer
The deodorizer reduces inconvenient food or liquid odors.
It is installed on the upper part of
the refrigerator compartment.
To solve any doubts concerning
the cleaning of the deodorizer,
consult the section “Cleaning and
Maintenance”.
Egg Tray
The egg tray is removable and
has a handle for better movement
between the fridge, sink and table.
Its maximum capacity is of 18 eggs.
The egg tray is sent into the Crisper drawer.
Removable Can Dispenser
The can support is sent into the
Crisper drawer.
Especially developed for storing
350ml containers of your favorite
drinks.
You can remove it from the door
and take to the table for your
greater convenience.
The container-holder can be
mounted in two different positions: In the door (1) or in the
fridge “Space Express” compartment (2) (DFI80/DI80X). It can
cool the cans faster at the same time, by only activating
the DRINK EXPRESS function in the Control Panel.
Position
Position
Retractile Glass Shelves
This shelves can be detracted and folded, allowing
the storage of bigger objects in your fridge, such
as jars and cakes. To unlock them, push the locks
down (A) in the lower part of the shelves and then,
push it back.
If you wish, you still can fold it up.
Position 1
Position 2
A
Bottle Shelves and Locks
1. Bottle-holder Shelves:
The bottle-holder shelf accommodates bottles of 3.3 liters.
2. Bottles lock:
The bottle lock has a function that
prevents bottles from shaking
loose on the shelf.
To use it, just t it onto the shelf and slide to the right or
left, as shown on the gure.
It can also be used to store small condiments or Milk
cartons in its interior.
Gourmet Express / Drink Express Compartment (models DFI80 and DI80X)
This compartment was developed for fast cooling of desserts
and beverages within the fridge
compartment. It can be used with
trays, cans, bottles and, if you wish
even with the whole can support.
To use this compartment, open its
door, store the dessert or beverage you wish to cool fast, close the
door and select the type of dessert
to be cooled off through the Button
“Gourmet Express” or select the
type of beverage through the
button “Drink Express”. It is not
recommended to put desserts
and beverages at the same time.
In case you do not wish to use
this compartment for the functions
mentioned above, it can be used
as a regular shelf in the fridge,
you only need to place the cover
according to the pictures shown.
It is not recommended to use the
buttons Gourmet Express and
Drink Express in this position.
This compartment is located in the superior left area of
your fridge.
In case you wish to use this place as an extra cold
compartment to store some food that require lower temperature (near 0ºC) close the lip, but do not activate the
buttons “Gourmet Express” and “Drink Express”.
WARNING
Do not put weight or recipients over the cover
“A” when it is opened.
A
A
12
Water Container (only for models, DFI80
e DI80X)
Developed to provide pure and healthy water,
given its exclusive ltering system.
Pure Filter
Fill it with potable water only
and wait the ltering to start.
Important: In the rst rell use
(lter element) the water can
present a ark aspect, due to the
activated coal black. It is requi-
red to conduct this rst ltering
with the container outside the
fridge, preferably in the sink, so the water with
dark aspect is disposed. Repeat this procedure
for 3 times (approximately 9 liters of water). This
procedure must be repeated at every rell
replacement (lter element). recommended to
replace the rell every 6 months or 500 liters. The
indicator of lter replacement will turn on after the
consumption of 500l of water.
How to Use the Water Container (only for
models, DFI80 and DI80X)
1. Detach the water tube of the container.
2. Remove the reservoir from the refrigerator’s
door, lifting and pulling it as
shown on the side drawing.
3. Fill the water container and
wait the ltration.
It is required the rst ltering
is made in a place the ltered
water can be described (for
instance, in the sink).
Repeat this procedure for 3
times (approximately 9 liters
of water).
This procedure must be repeated at every rell
replacement (lter element).
4. Place the water container in the position and
attach the water tube, pressing rmly down.
5. Open the cover of the superior area of the water
container, ll it up and wait the potable water
ltering process.
“Flex Box” Shelves
These two shelves are used to
store several types of food units
or small packages. To make the
access easy, they are removable. To facilitate the Access
use them in position 2 and after
using return them to position 1.
6. After this procedure, the ltering system can be
used normally.
7. To serve, open the dispenser rotating it, place a
glass in the water outlet located in the external
door of the fridge and activate the button (A)
located right above.
8. In order to avoid undesirable activations, turn
the dispenser and keep it closed (position 1).
A
WARNING
- Before using it for the rst time, wash the
reservoir with water and neutral soap to eliminate any residues. Refer to section “Water
Container Cleaning”, on page 16.
Use drinking water only. The use of any other
beverage can leave residues, taste or odor
in the container.
- The potable water reservoir should only be
lled when placed into its position on the
door. Water supply temperature shall not be
higher than 43ºC.
- Let the water cool for about 12 hours.
- It is possible to hear some noise from the
air entry when the water leaves the reservoir.
- For models DFI80 and DI80X it is possible
also to hear some noises made by the water
supply automatic system in the ice maker
and water dispenser.
- In case the water is not owing, press once
again the activating button. Keep the glass
under the water outow for a few moments
to ensure the water is completely collected
by the glass.
- Do not use gasied beverage such as soft
drinks. The drink may leak due to the gas
pressure.
13
Back Spacer
Avoid the fridge to touch the wall.
Keep the back spacers always in
position 1 (horizontal).
When transporting the fridge,
keep the spacer in position 2
(vertical). This will facilitate the
fridge passage through the door, for instance. Use an
adhesive tape to keep in position 2.
Bin “Space +” (Picnic) (DFI80/DI80X)
The “Space +” bin is removable
and has two handles to improve
the movement between fridge,
sink, table, etc.
Breakfast tray
In this space it is possible to store
items such as cheese, yogurts,
butter, etc. which are regularly
taken to the table.
4. How to Use
How to turn your refrigerator on and off
To turn your refrigerator on or off, just connect or
disconnect the plug from the socket after checking
the product’s correct voltage.
Before turning the fridge on by the rst time, read
the instruction brochure placed in the door and
this entire manual carefully.
When turning the fridge off, wait 10 minutes
before turning it on again.
IMPORTANT
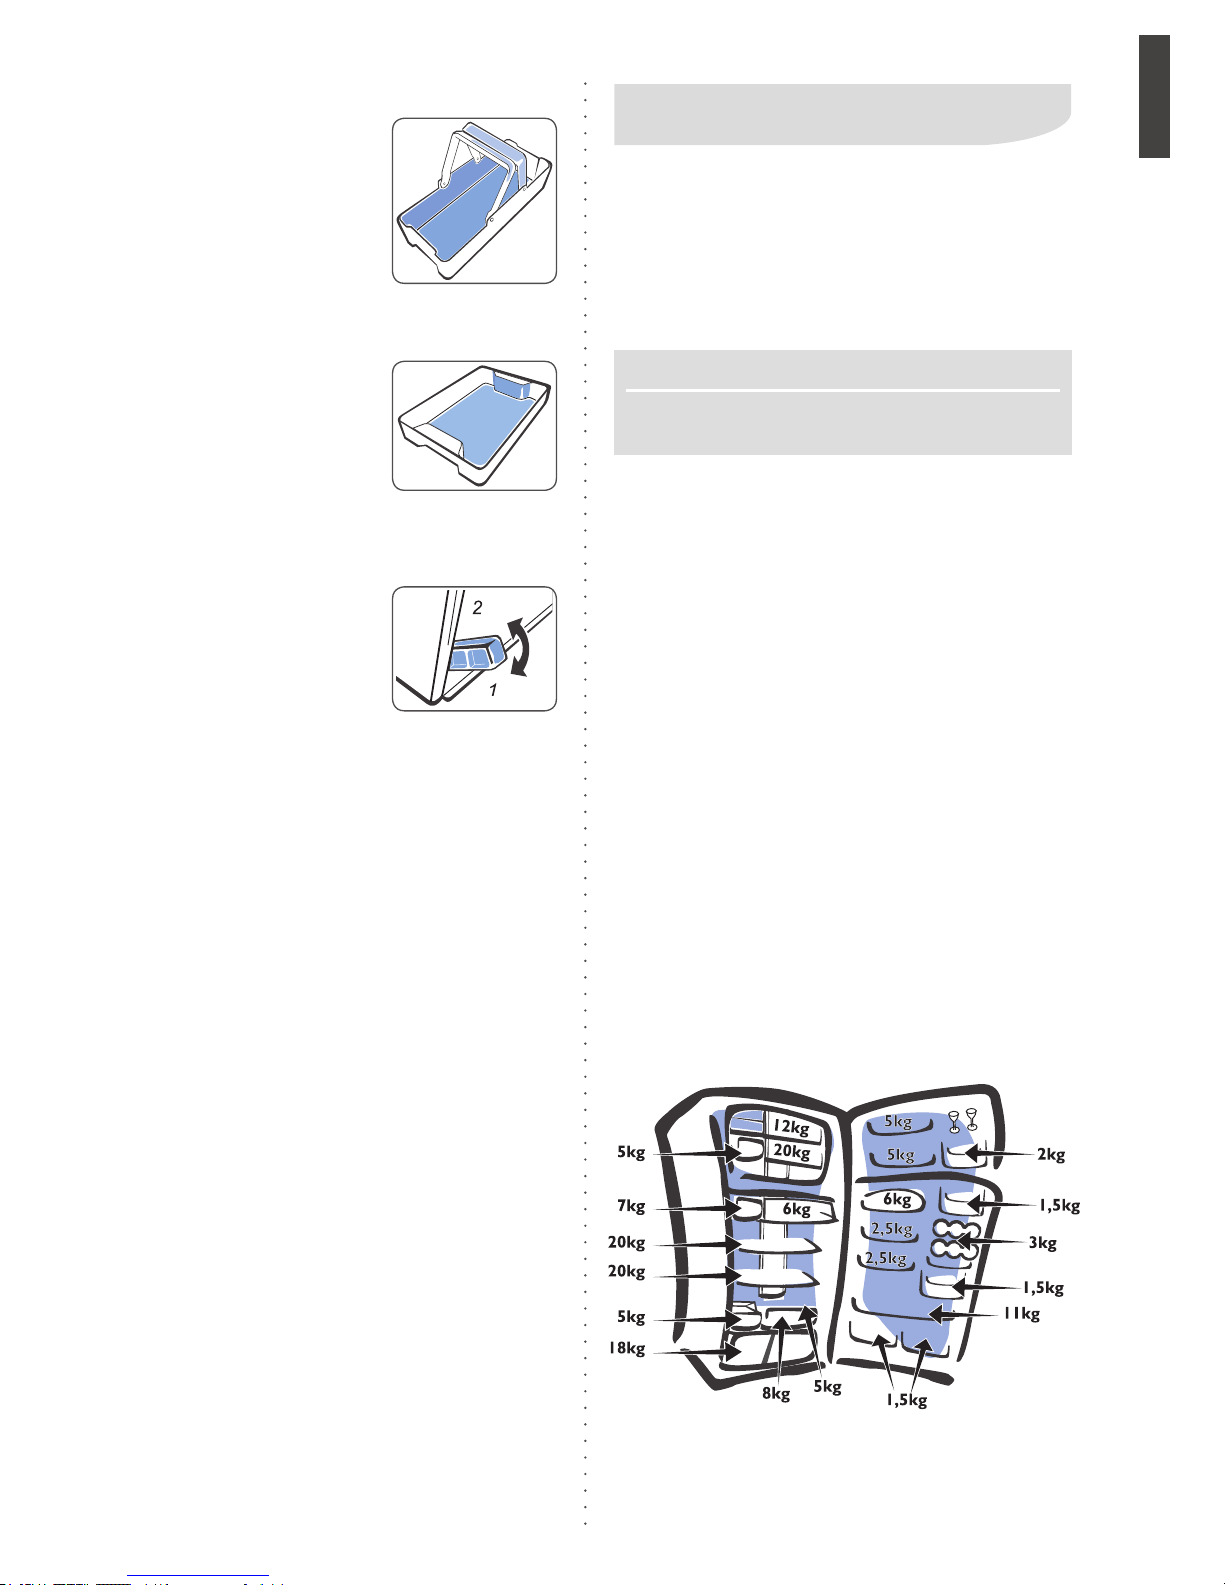
Loading/Replenishing
In the rst lling or after cleaning:
1. For better accommodation of recipients in the
freezer and refrigerator compartments, all shelves
can be removed and repositioned, and the freezer
and fresh food compartments removed.
2. Connect the refrigerator’s plug into the socket.
3. Leave it working for at least two hours before
storing any foodstuff inside.
4. Begin lling of the food items from the refrigerator
shelves, leaving the door shelves for last. It is important to respect the maximum load limit indicated
in the gure below.
5. After lling, set the temperature control to the most
suitable position, following the information of the
items “Freezer Electronic Temperature Control”
and Refrigerator Temperature Control”.
6. Do not put food on the air outlets, so the fridge
performance is not compromised.
Maximum Load Limits
14
The adjustment positions for freezer and fridge
temperature are pre-established at the manufacturer plant.
However, the temperature shall depend on the
conditions of the room temperature, foodstuff and
the rate at which the door is opened.
Therefore, be careful not to place foodstuff in such
manner that it blocks the air outlets and avoid
opening the door unnecessarily.
The fridge compartment of models DF80/DF80X
has independent temperature control located
inside and on top of the fridge. For adjustments,
refer to section “Manual Temperature Control of
the Fridge”.
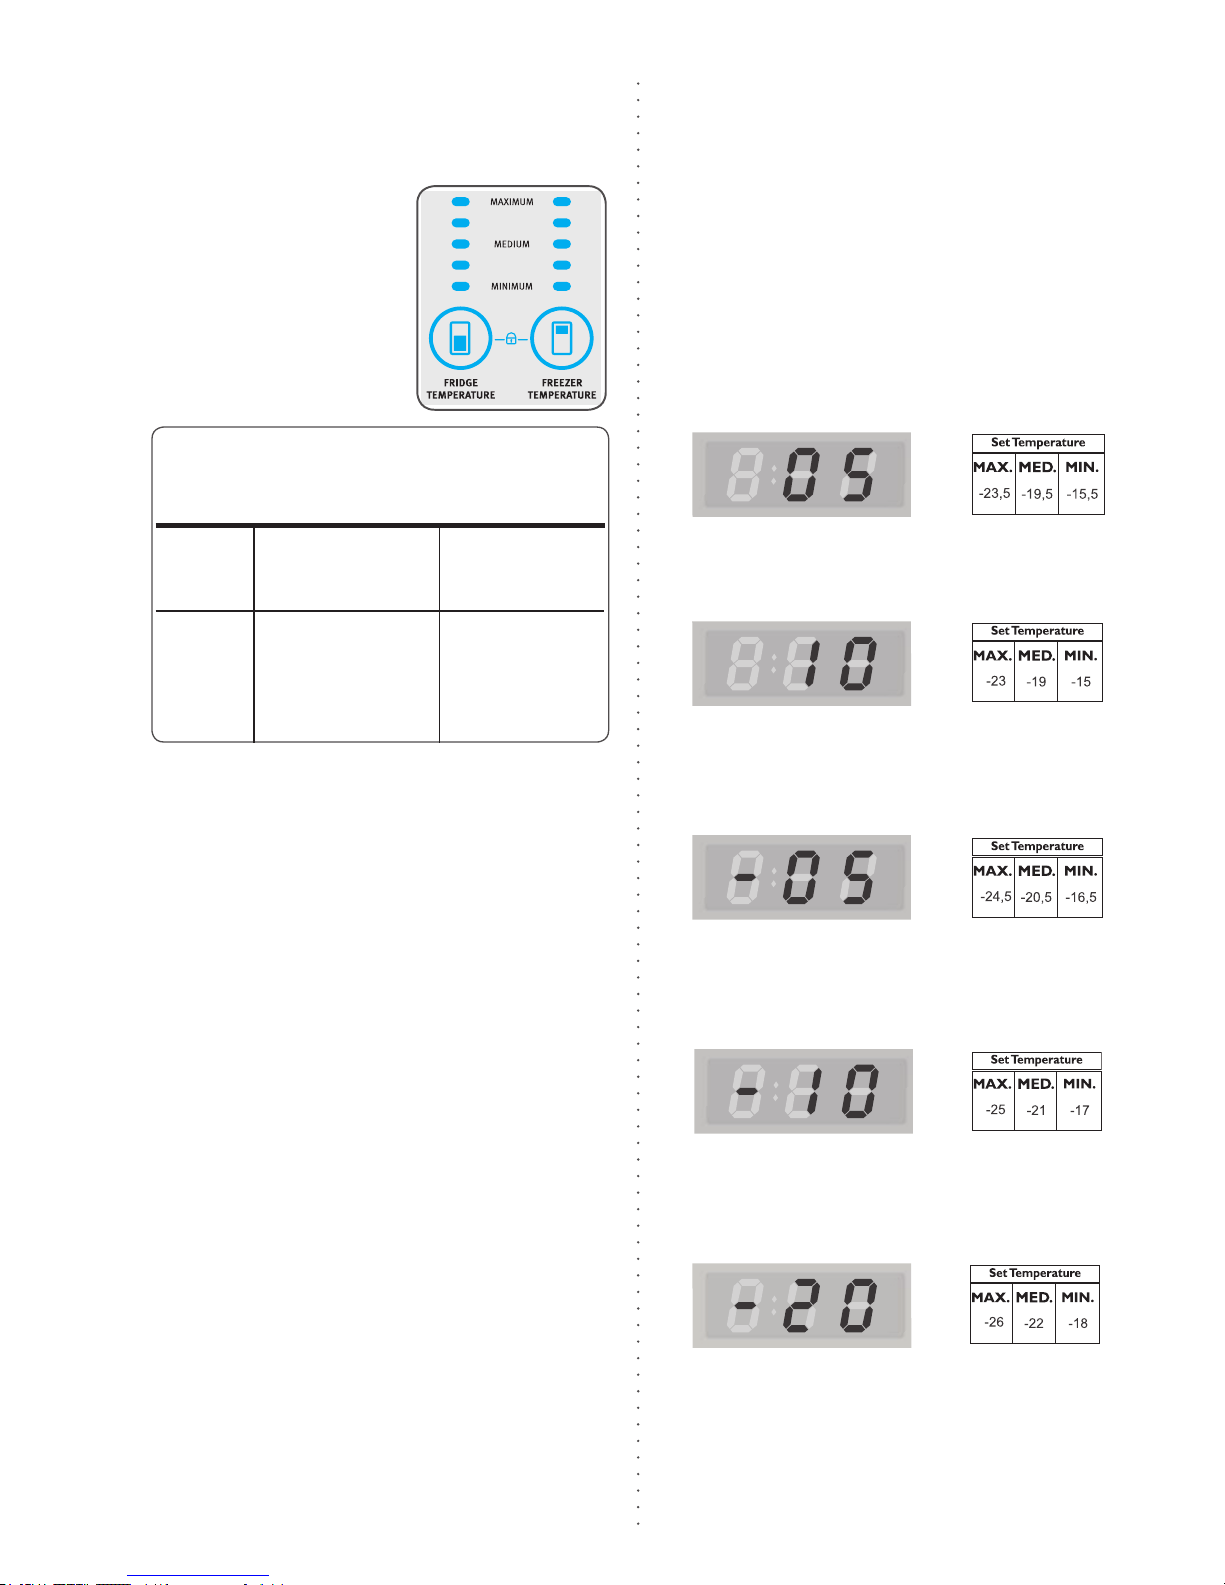
Fine Adjustment of Temperature
Your fridge has been manufactured within international Standards and has three levels of
temperature with pre-established values at the
manufacturer plant for models DF80/DF80X and
ve levels for models DFI80/DI80X, being able to
be adjustable (increase or decrease) according
to your need.
Should you wish to change them, you have the
Temperature Fine-Tuning option for the three/ve
levels as explained next.
Electronic Control of Freezer (DF80/
DF80X/DFI80/DI80X) and Fridge
(DFI80/DI80X) Temperature
By pressing it successively,
the freezer temperature
will be selected as shown
below:
Electronic Control of Freezer and
Fridge Temperature
(Default Temperatures)
Freezer
Temperature
Fridge
Temperature
(DFI80/DI80X)
Adjust
-24ºC (cold max)
---
-20ºC (cold med)
---
-16ºC (cold min)
-1ºC (cold max)
1ºC
3ºC (cold med)
5ºC
8ºC (cold min)
Maximum
Medium
Minimum
1. To program this function (DF80/DF80X)
1.1. Press the button “AUTO CONTROL” and
select function VACATION and then, press
5 times the button “TEMP. FREEZER”. The
function indicator will turn on showing the latest
adjustment made. Temperature ne adjustment
set is valid for the 3 temperature levels of the
freezer compartment.
1.2. Setting Options:
To increase 0.5 ºC to the pre-established tem-
perature, press the button TEMP. FREEZER
until the function indicator shows 05.
To increase 1 ºC to the pre-established tempe-
rature, press the button TEMP. FREEZER until
the function indicator shows 10.
To decrease 0.5 ºC to the pre-established tem-
perature, press the button TEMP. FREEZER
until the function indicator shows 05 with a
dash on its left side.
To decrease 1 ºC to the pre-established tempe-
rature, press the button TEMP. FREEZER until
the function indicator shows 10 with a dash on
its left side.
To decrease 2.0 ºC to the pre-established tem-
perature, press the button TEMP. FREEZER
until the function indicator shows 20 with a
dash on its left side.
After three seconds without pressing any buttons,
the ne adjustment is nished.
15
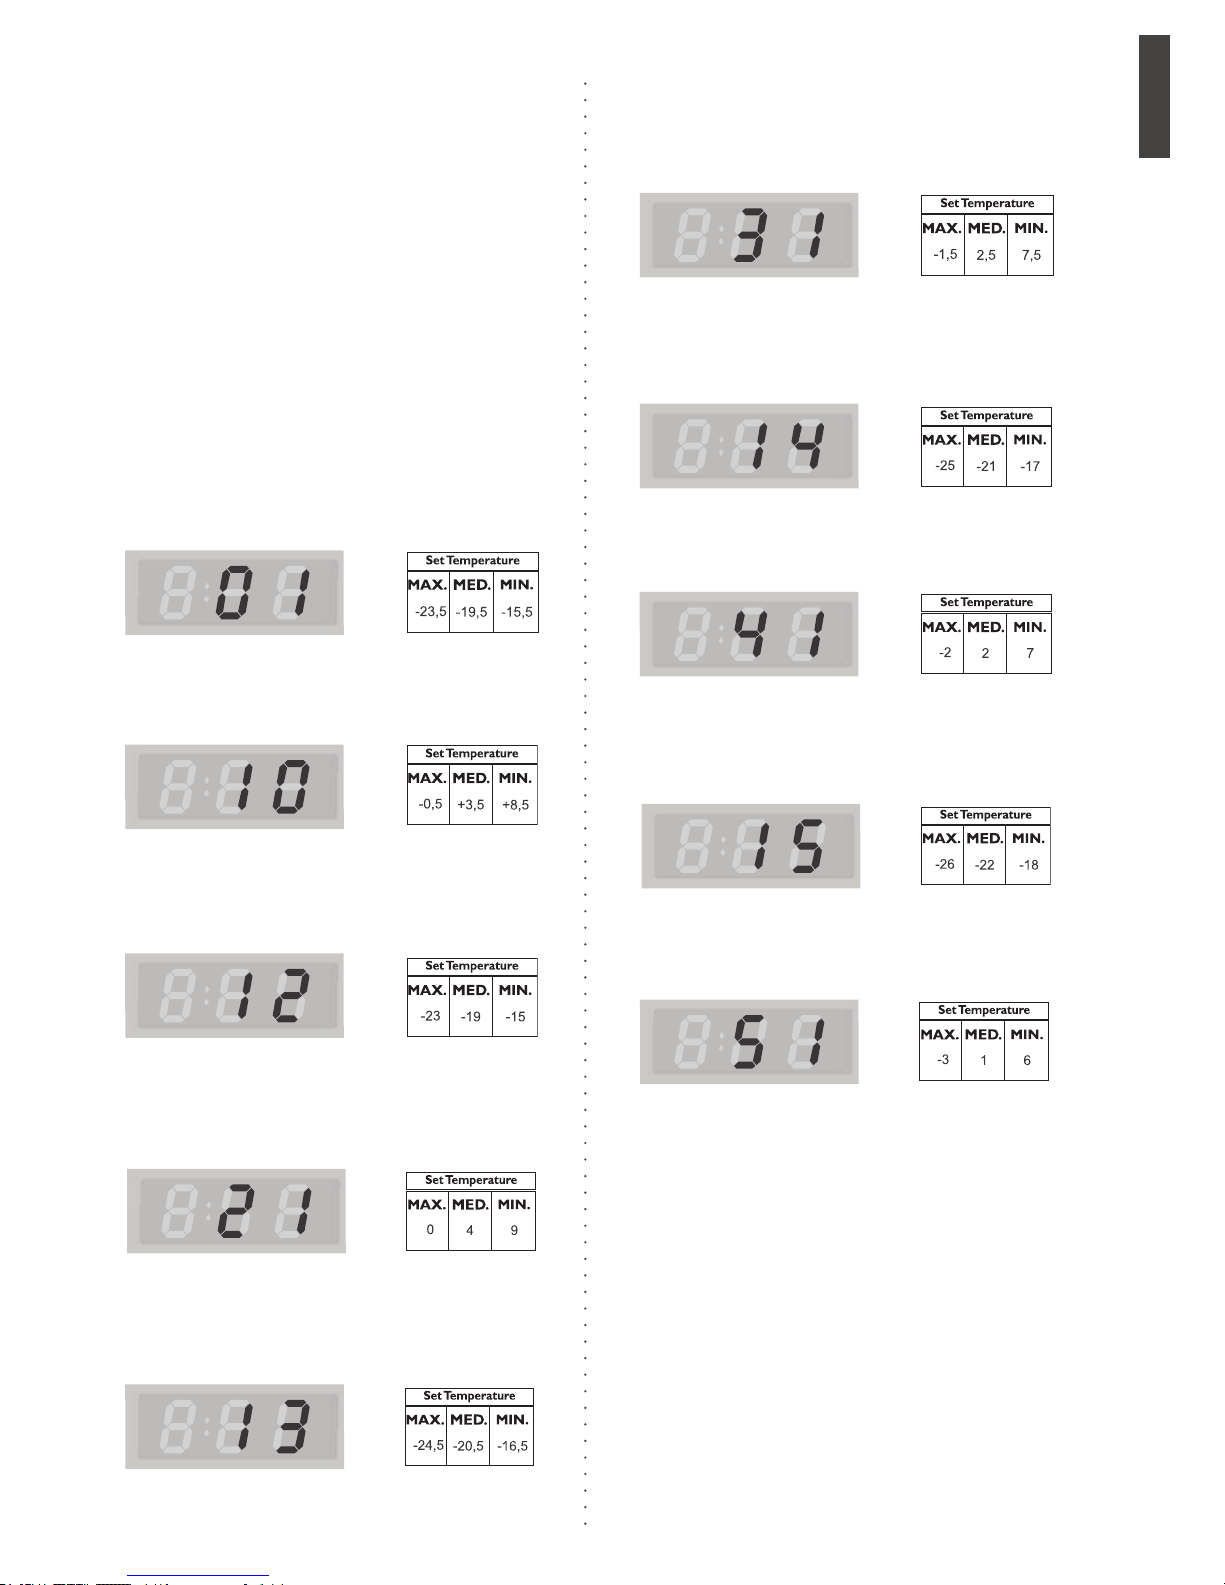
2. To program this function (DFI80/DI80X)
2.1. Press at the same time the buttons “DRINK
EXPRESS” and “TEMP. FREEZER” until you
hears a sound alarm. The function indicator will
turn on showing the latest adjustment made.
The ne adjustment is valid for all ve levels
of freezer and fridge temperature.
2.2. Setting Options:
The rst number appearing on the display
(tens) corresponds to fridge temperature and
the second number (units) corresponds to
freezer temperature.
To increase 0.5ºC to the pre-established fridge
temperature press TEMP. FRIDGE until the
number 1 appears on the left side of the display.
To increase 0.5ºC to the pre-established freezer
temperature, press TEMP. FREEZER until
the number 1 appears on the right side of the
display.
To increase 1ºC to the pre-established freezer
temperature press TEMP. FREEZER until
the number 2 appears on the right side of the
display.
To increase 1ºC to the pre-established fridge
temperature press TEMP. FRIDGE until the
number 2 appears on the left side of the display.
To decrease -0.5ºC to the pre-established
freezer temperature press TEMP. FREEZER
until the number 3 appears on the right side of
the display.
To decrease 1.0ºC to the pre-established free-
zer temperature press TEMP. FREEZER until
the number 4 appears on the right side of the
display.
To decrease -0.5ºC to the pre-established
fridge temperature press TEMP. FRIDGE until
the number 3 appears on the left side of the
display.
To decrease 1.0ºC to the pre-established fridge
temperature press TEMP. FRIDGE until the
number 4 appears on the left side of the display.
To decrease 2.0ºC to the pre-established free-
zer temperature press TEMP. FREEZER until
the number 5 appears on the right side of the
display.
To decrease 2.0ºC to the pre-established fridge
temperature press TEMP. FRIDGE until the
number 5 appears on the left side of the display.
After three seconds without pressing any buttons,
the ne adjustment is nished.
Several freezer and fridge combinations can be
freely used, ex: 55, 32, 52, 33, 43, etc.
16
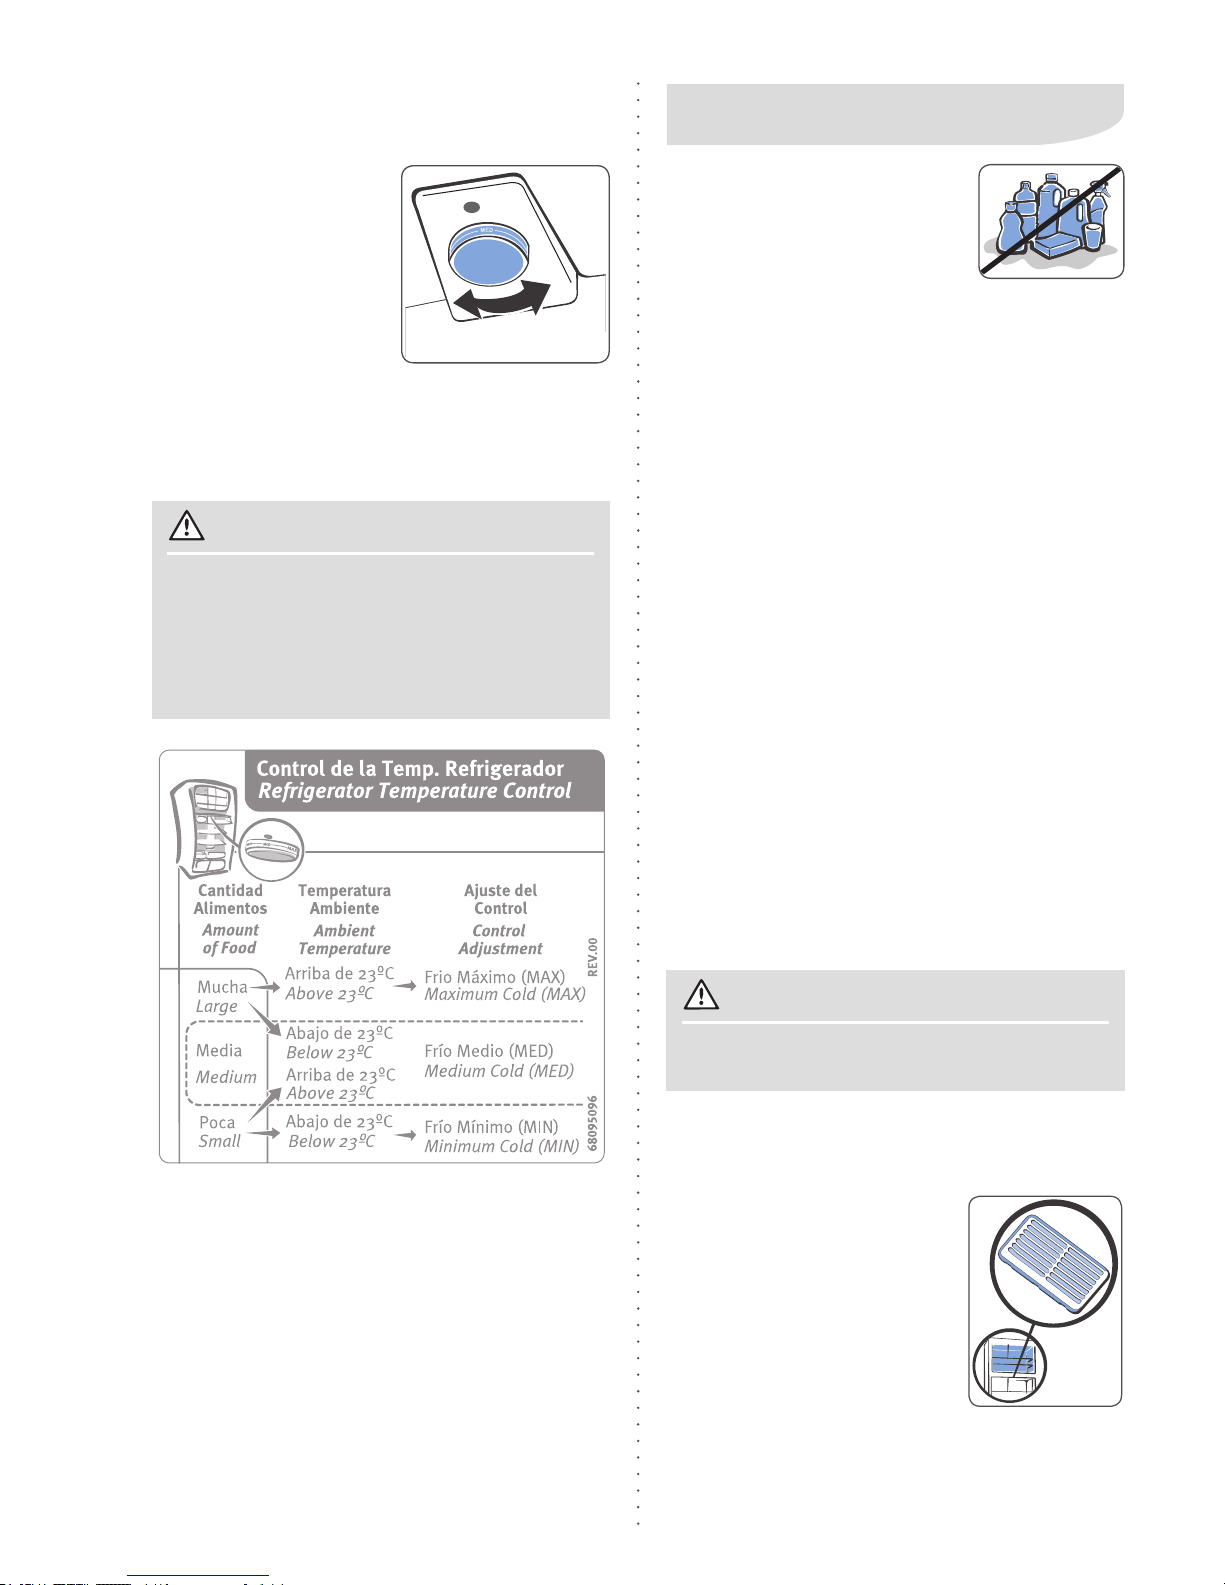
Fridge Manual Temperature Control
(DF80/DF80X)
To properly control your
refrigerator’s temperature, consider the following
factors:
1. The quantity of food
stored.
2. The environment tem-
perature where the refrigerator is installed.
3. To get maximum, medium and minimum cold,
turn the “B” Button to the right or left until the
respective grading is align with the Gray round
part “A”.
A
B
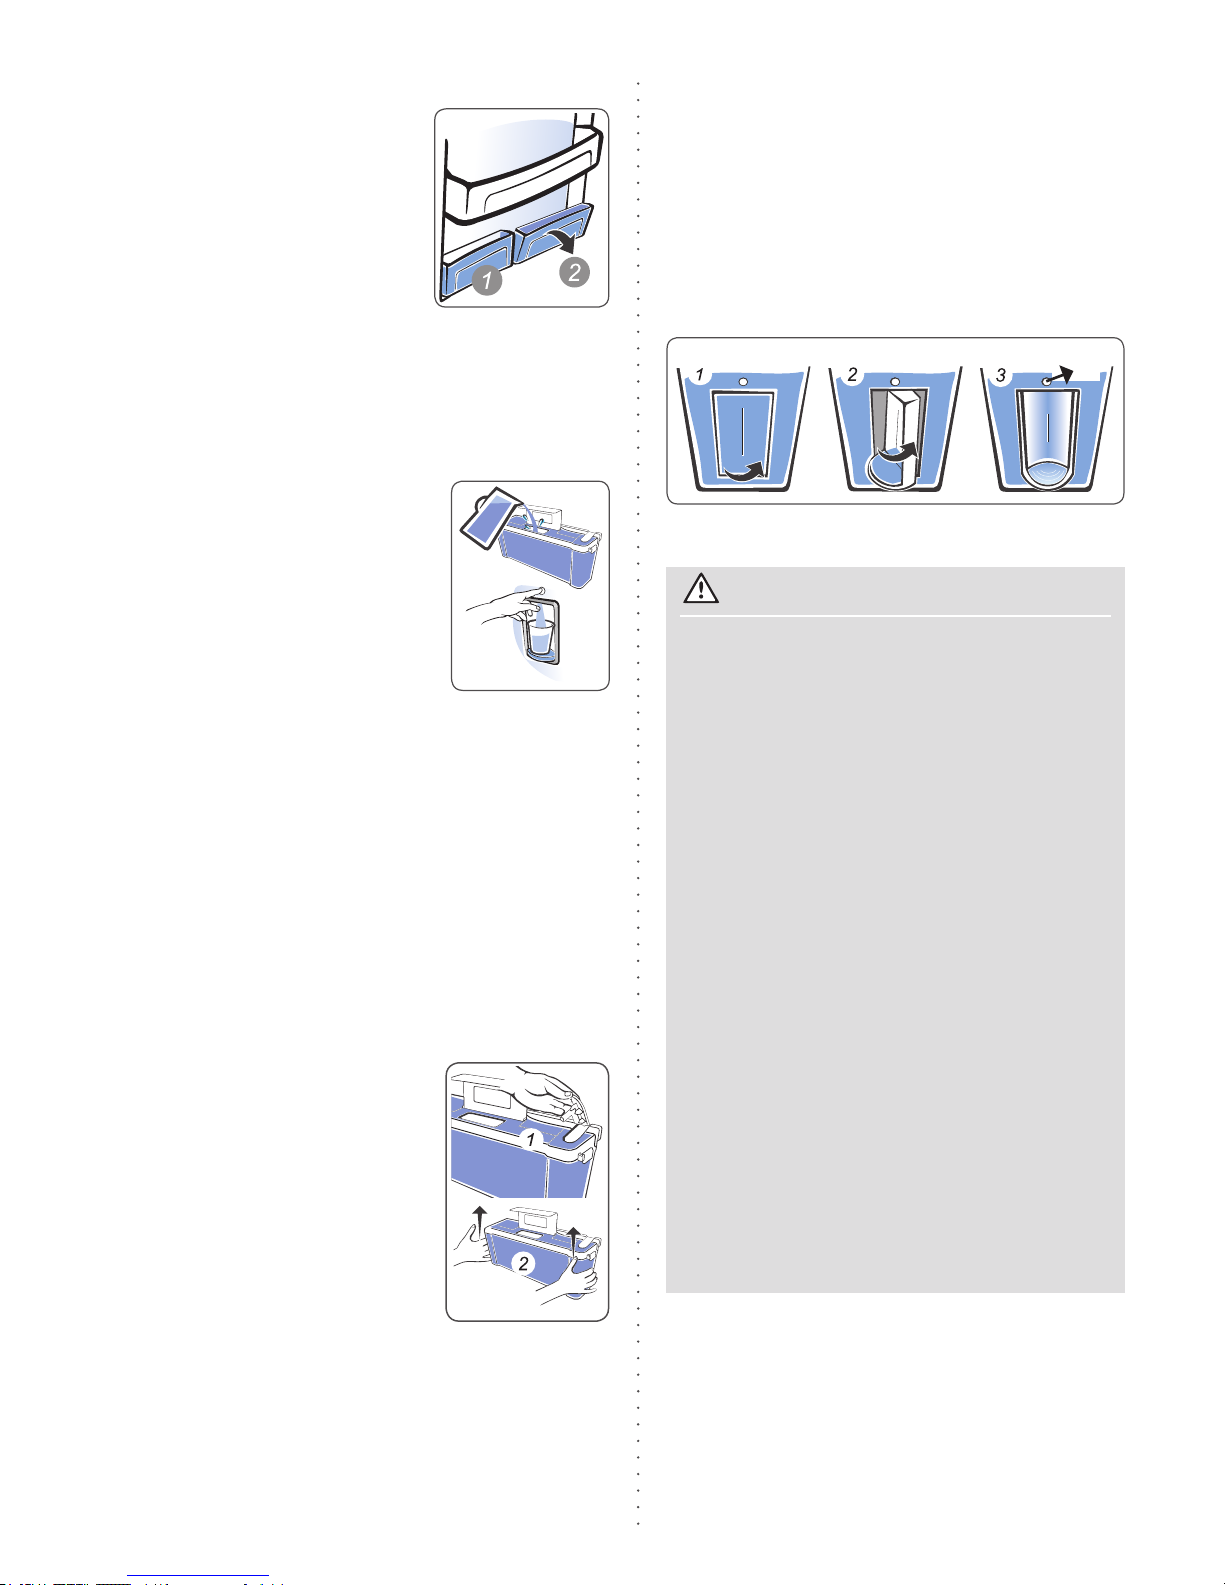
Cleaning the Deodorizer
In case of a bad odor in the
freezer compartment and in the
refrigerator, act as follows:
1. Set the temperature control of
the refrigerator to MAXIMUM
for about an hour and return
to the former setting.
2. Then, remove the deodorizer
fron the upper part of the compartment of the refrigerator and carefully loosen
the deodorizer from inside the cover.
5. Cleaning and Maintenance
Before any maintenance operation, including those described
in this manual, disconnect the
refrigerator from the main power by
removing the plug from the socket.
Never clean your fridge with in-
ammable uids, such as alcohol, kerosene, thinner,
varsol, solvents or any other abrasive chemical products such as detergents, acids or vinegars in order
to not damage the polished protection and other parts.
After cleaning, replace the accessories supplied with
the refrigerator (drawers, shelves, etc) in their proper
places inside the refrigerator. In case any food item
is spilled inside the refrigerator, clean it immediately.
Many of these food items can damage or leave an
inconvenient odor on the internal refrigerator surfaces
if they stay un-cleaned for long.
Never use metallic spatulas, brushes, abrasives or
alkaline products to clean the plastic surfaces inside
your refrigerator.
Before cleaning the refrigerator, remember that wet
objects can easily stick to extremely cold surfaces.
Therefore, do not touch cold surfaces with cloths,
sponges or even your wet hands.
WARNING
WARNING
The plastic parts cannot be washed with
hot water.
In case of not wanting to use the specic
functions of your refrigerator’s in the daily
basis, for example: Party, Shopping, Vacation, Auto Control, etc; you can regulate
your refrigerator according to the table
below.
Internal Part
Clean the inside of the refrigerator and the accessories with a warm water solution and sodium
bicarbonate (a soup spoon of bicarbonate for each
liter of water). Carefully dry it.
17
Automatic Ice Maker “Ice- Maker”
(DFI80/DI80X)
The ice maker has a
stick (A) that checks if
there is ice formed in
the ice storage container. When cleaning the
ice maker, this stick,
must not be forced at nay direction.
The ice maker is placed in the superior left area
of the freezer compartment.
3. Leave it in a clean water container for three hours.
4. Remove and leave the deodorizer at rest to dry for
2 hours and assemble it again.
5. The deodorizer should be changed after its third
cleaning.
6. It is recommended the use of a small screwdriver to
remove the part supporting the deodorizer.
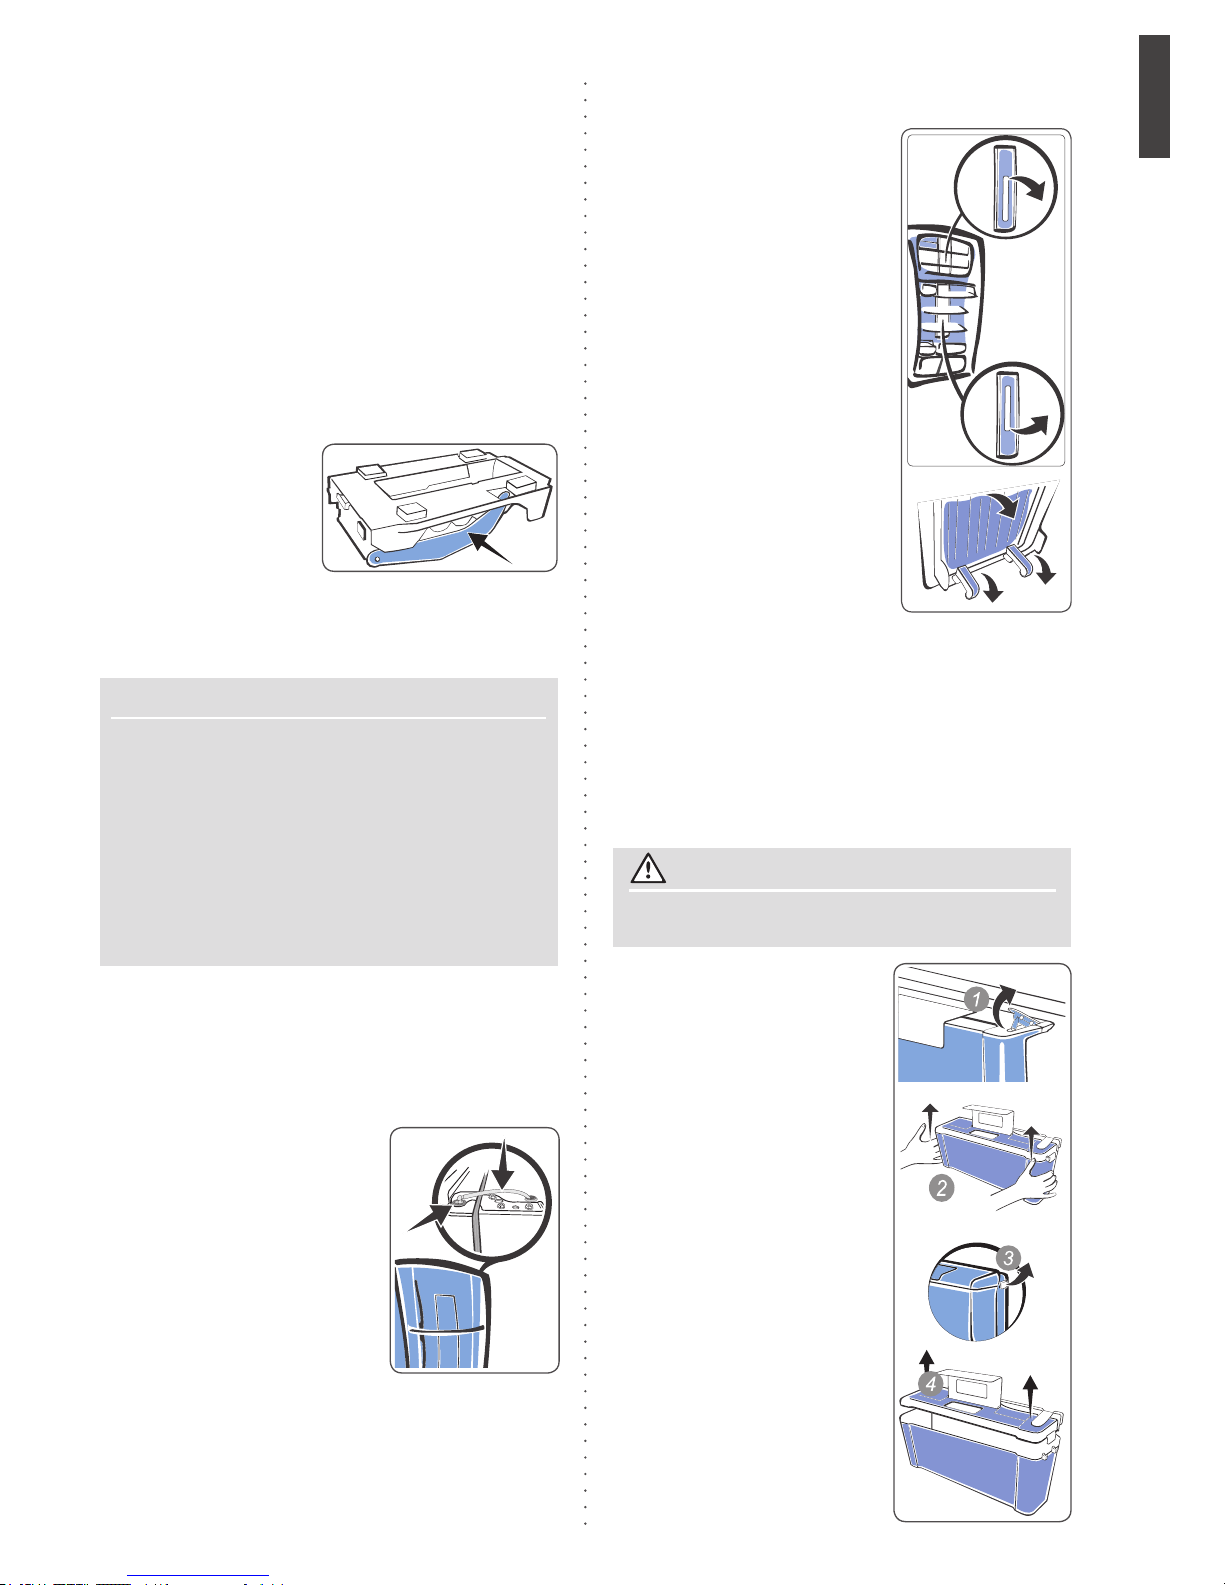
Water Tubes Replacement (DFI80/DI80X)
Your fridge allows the replacement of the water tubes from
time to time, in order to maintain
the water purity at all times. It is
recommended the annual replacement of the tubes.
Before using the automatic ice maker, it
is recommended to clean the water container, according to item “Water Container
Cleaning”.
It is also recommended the disposal of the
rst ice cubes. This will assure the ice trays
and other parts in contact with the water
before turning to ice, are clean. Dispose at
least 30 ice cubes before using it.
IMPORTANT
Lamp Replacement
To replace the lamp in your
fridge, proceed as follows:
1. Turn the fridge off, by unplug-
ging the electrical power cord
from the wall outlet.
2. Remove the shelves in front
of the light lid (luminary).
3. Pull the luminary simulta-
neously with both hands until
it is completely loose (A).
4. Replace the used lamp with
an equivalent one (same
dimensions, tension and
maximum Power of 25 W).
5. Reattach the luminary, rst
attaching the pins of one of
plastic cover ends (B) and
then, push the other end (C)
against the fridge wall, until it
is locked in the original position.
6. Attach the electrical power cord to the wall outlet.
A
A
A
B
B
1. Release the water tube
of the water container (1)
2. Remove the fridge door
container, lifting and
pulling according to the
picture (2).
3. Release the lateral locks
carefully (3).
4. Remove the main contai-
ner cover (4).
5. Remove the inside contai-
ner and remove the rell
carefully – lter element
(5).
6. Clean up all the parts (ex-
cept the rell) with warm
water and mild soap,
wash with running water.
7. Do not forget to reattach
the rubber seal cover from
the main container.
Water Container Cleaning (only for models
DFI80 and DI80X)
WARNING
Before removing the reservoir from the door,
completely empty it.
C
 Loading...