

Electrolux DFW51, DW51X Instruction Manual
2
User’s Manual
This refrigerator is not intended for use by persons
(including children) with physical, sensory or mental
impairments, or people with lack of experience and
knowledge, unless they have received regarding
the use of the refrigerator or under the supervision
of a person responsible for their safety.
Its recommended that children be supervisioned
to ensure they are not playing with the refrigerator.
For Children
Prevent accidents. After unpacking
the refrigerator, keep the packing
material out of the reach of children.
Do not allow your refrigerator to be
handled by children, even when
disconnected.
In case your refrigerator has any silica gel or Desi
Pak® pack inside, throw it away and do not let the
children play with it.
For the User / Installer
1. Safety
Safety .............................................................02
Installation .....................................................03
Description of the Refrigerator ...................04
How to Use .................................................... 10
Cleaning and Maintenance .......................... 12
Solving Problems ......................................... 16
Hints and Suggestions .................................18
Technical Information ..................................20
Table of contents
Disconnect the Refrigerator from the socket
whenever cleaning or doing maintenance.
Never disconnect the Refrigerator from the
socket by pulling the power cable. Use the plug.
If the power cord is damaged, do not try to x
it. It must be replaced by the tecnical service or
qualied professional in order to avoid a hazard.
Do not store drugs, toxic or chemical products
in your Refrigerator, as they may contaminate
food items.
Products in high-pressure aerosol, identied as
ammable or with a small ame symbol cannot
be stored in the refrigerator or freezer under risk
of explosion.
Do not lean on the doors. The hinges may become deregulated, affecting the refrigerator’s
sealing and compromising its performance.
Transport your refrigerator in vertical position
(standing). It is not recommended transportation
in horizontal position.
IMPORTANT
Thank you for choosing Electrolux. In this manual
you will nd all the information for your safety and
proper use of your Fridge. Read all the instructions
before using the device and save it for further
references.
The identication label where all the information
about code, model, manufacturer and others, will
be used by the Technical Service in case your fridge needs repairs. Do not remove it from its place.
Environmental Hints
The symbol on the product or on its packaging
indicates that this product may not
be treated as household waste.
Instead it shall be handed over to
the applicable collection point for
the recycling of electrical and electronic equipment. By ensuring this
product is disposed of correctly,
you will help prevent potential negative consequences for the environment and human health,
which could otherwise be caused by inappropriate
waste handling of this product. For more detailed
information about recycling of this product, please
contact your local city ofce, your household waste
disposal service or the shop where you purchased
the product.
silica gel or
Desi Pak®
ATTENTION
Never place candles or incense
lighted over the Fridge, given the
risk of res or product damage.
3
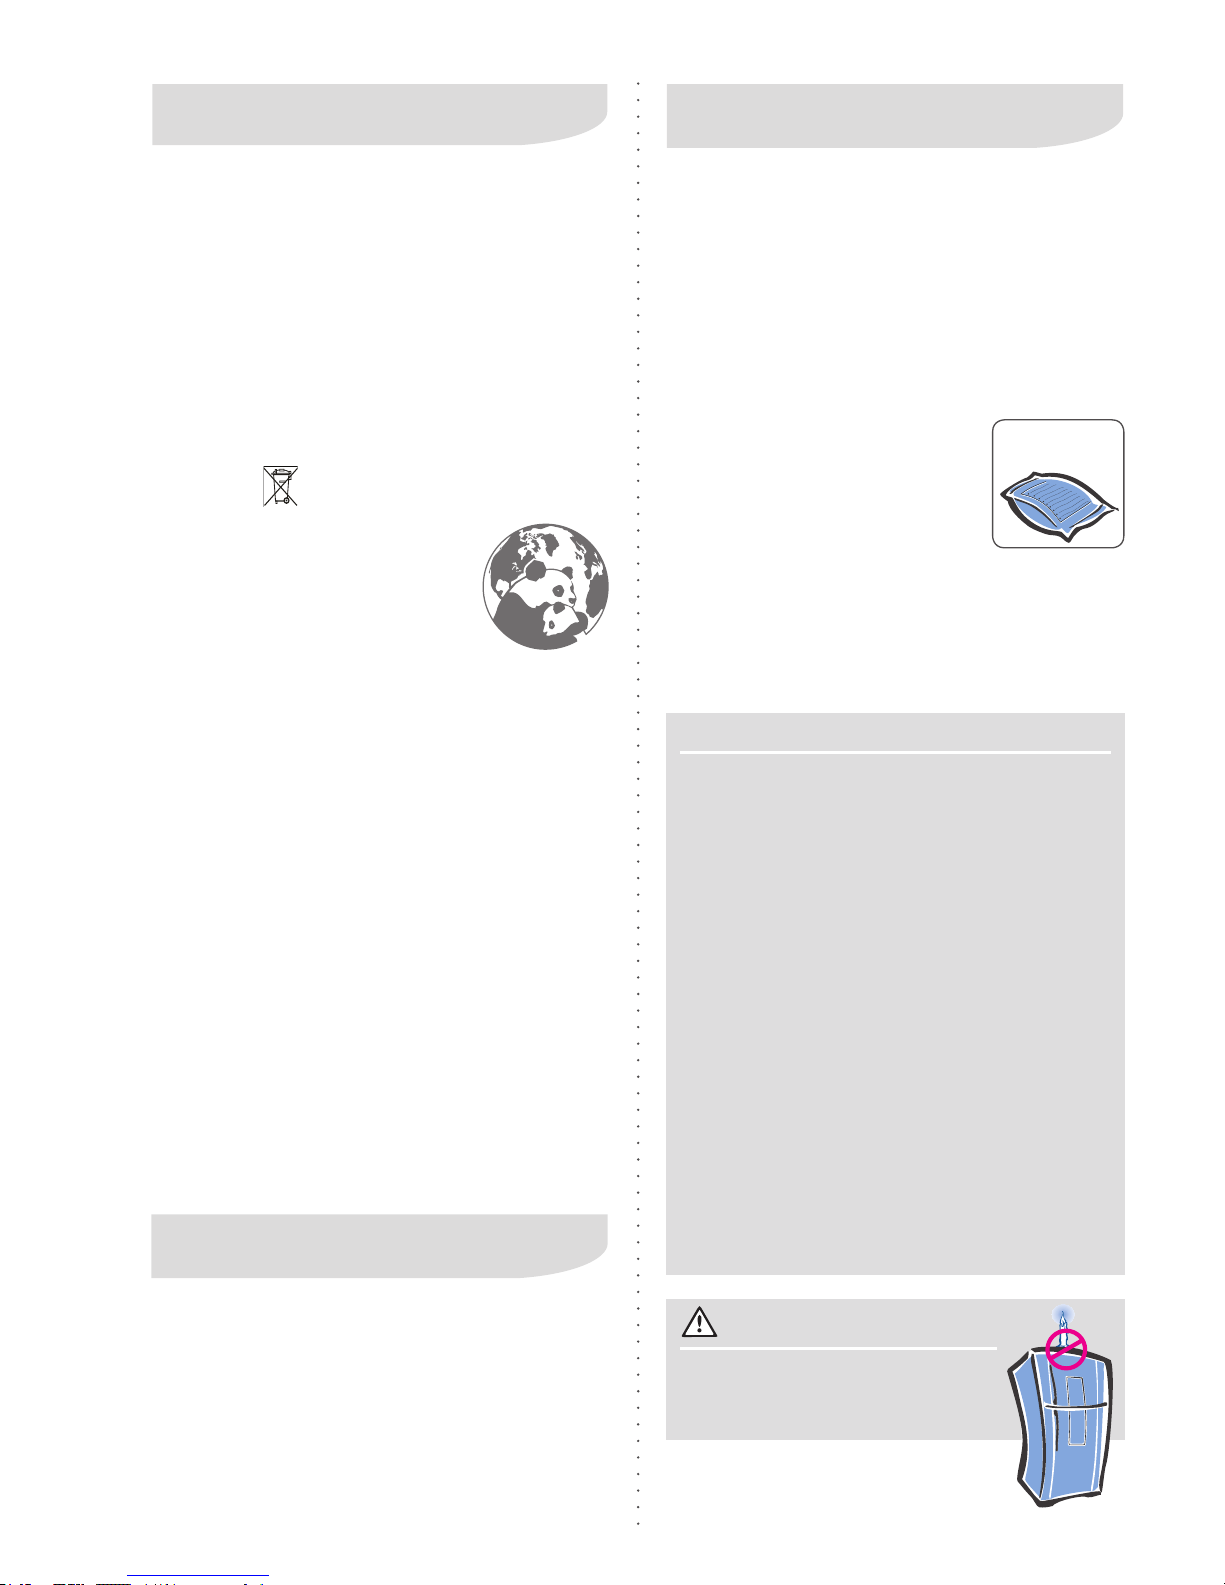
2. Installation
Unpacking
Remove the package of the product and, to remove the base of
the package, carefully incline the
refrigerator to one of the sides.
With the help of another person,
break the base with your hands.
Incline the refrigerator to the
other side and remove the rest
of the base.
In the back of the refrigerator,
remove the adhesive tapes and
unlock the two back spacers. Let
them in the horizontal position.
Before turning the refrigerator on, remove the
shim of the doors, the shim of the compressor
located in the back part and also remove the
base of the package.
Choose the Location
Install your refrigerator in a ventilated location
away from direct sunlight and heat sources (stove,
ovens, etc.) and ammable products.
Do not install your refrigerator unsheltered (open
to weather).
For the denite position of the refrigerator, respect
the minimum distances recommended:
- On top: 10 cm
- Side: 10 cm
- Behind: 10 cm
Check if the spaces
left in the front of the
fridge and in the right
si de (l oo ki ng at th e
front of the fridge) are
enough to allow complete opening of the door and
crisper drawer.
Leveling
Set the leveling feet to ensure
perfect refrigerator stability, preventing rocking movement. For
a better closing of the doors, we
recommend the product to be
inclined back.
The proper functioning of the refrigerator shall
depend on its perfect leveling.
ATTENTION
Your refrigerator was developed to use the
leveling feet, which come with it.
Therefore, do not use other feet other than the
original. There are wheels on the back part of
your refrigerator to facilitate movement.
After unpacking and leveling, wait at least two
hours before connecting your refrigerator to
prevent malfunctioning.
Electrical Installation
Before turning your fridge on remove the transparent protective
wrapping plastic applied on the
control panel in the freezer door.
Before connecting your refrigerator, check if the voltage on the
socket where it will be plugged
is equal to the one indicated on
the label next to the plug (on the
power cable) or on the refrigerator ID label.
Be careful not to leave the refrigerator over the power cable.
Connect the refrigerator to an
exclusive socket. Do not use
extensions or T-connectors.
For your safety, request an electrician of your trust to check the
condition of the electrical power
system at the location it will be
plugged and for further information, contact the Technical
Service.
The socket wires where your
refrigerator will be connected
should be of copper and have
a minimum section of 2.5 mm².
Check if the maximum admissible
voltage uctuation of the installation site is in conformity with the table below. In case the voltage at
the installation site is off the limits, adapt a voltage
stabilizer of not less than 2000 Watts.

4
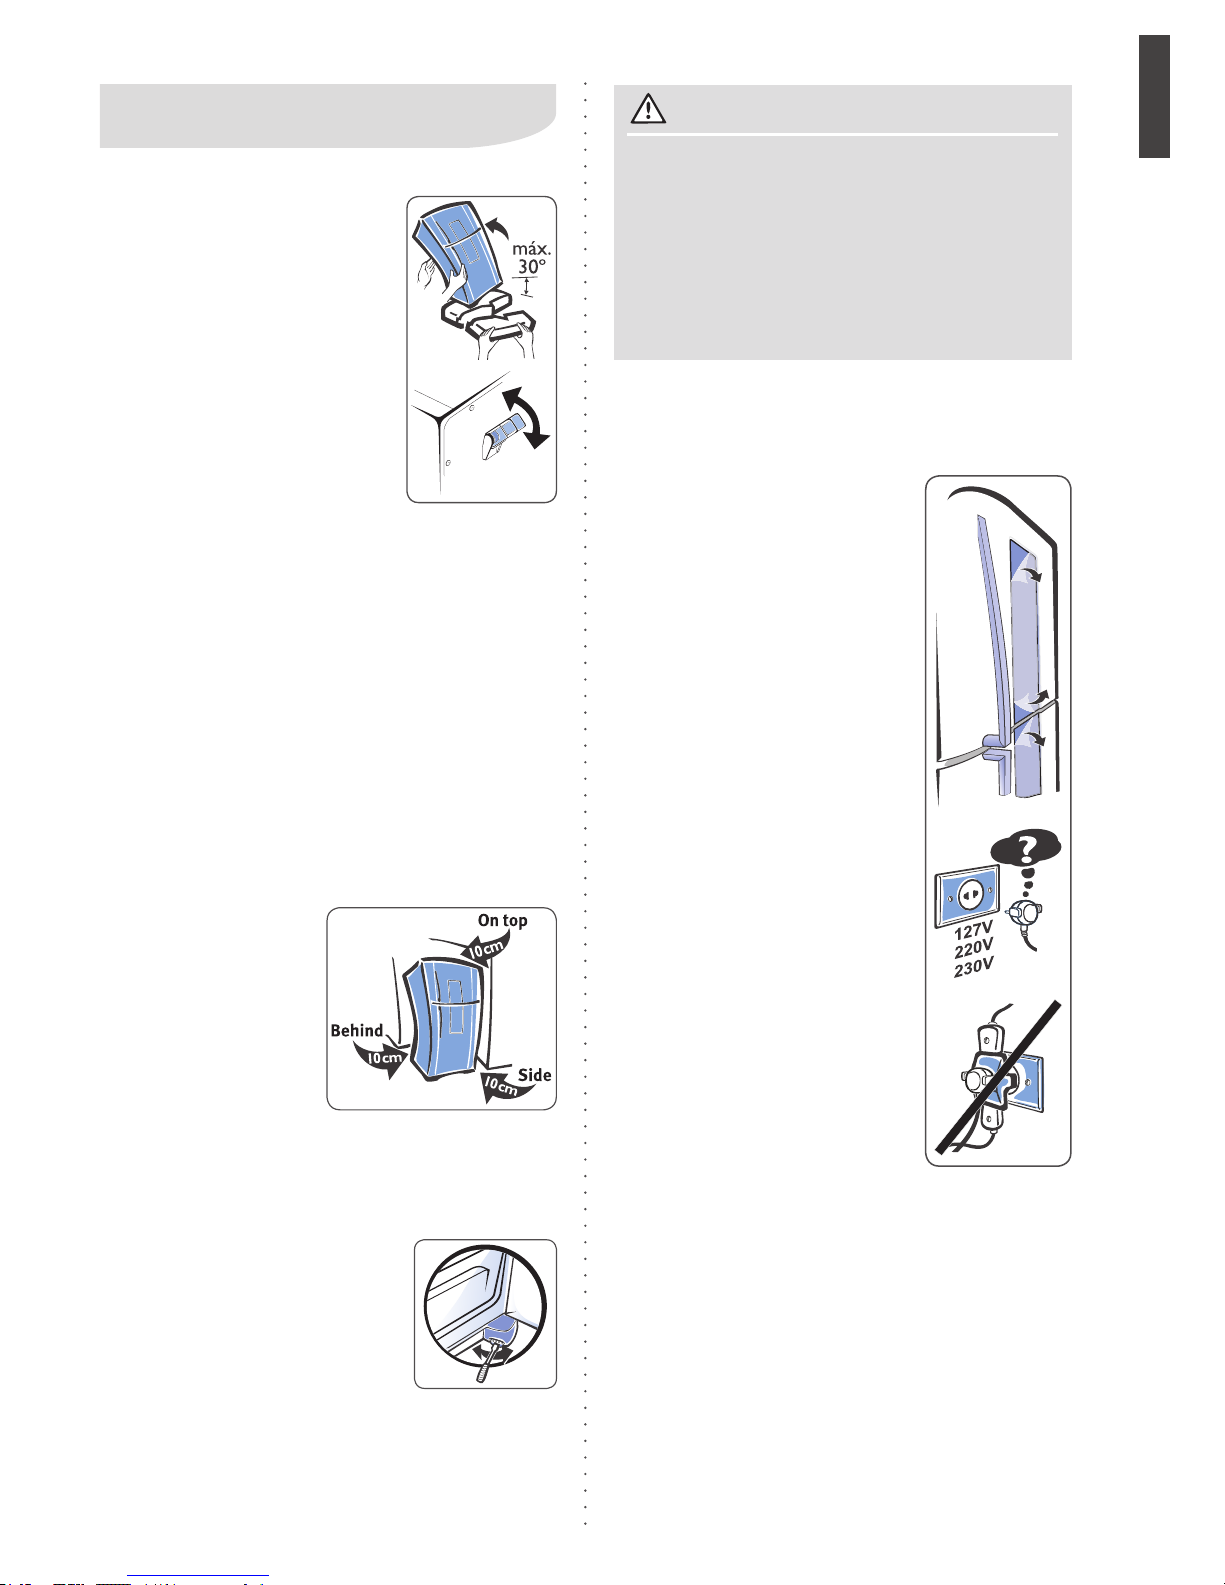
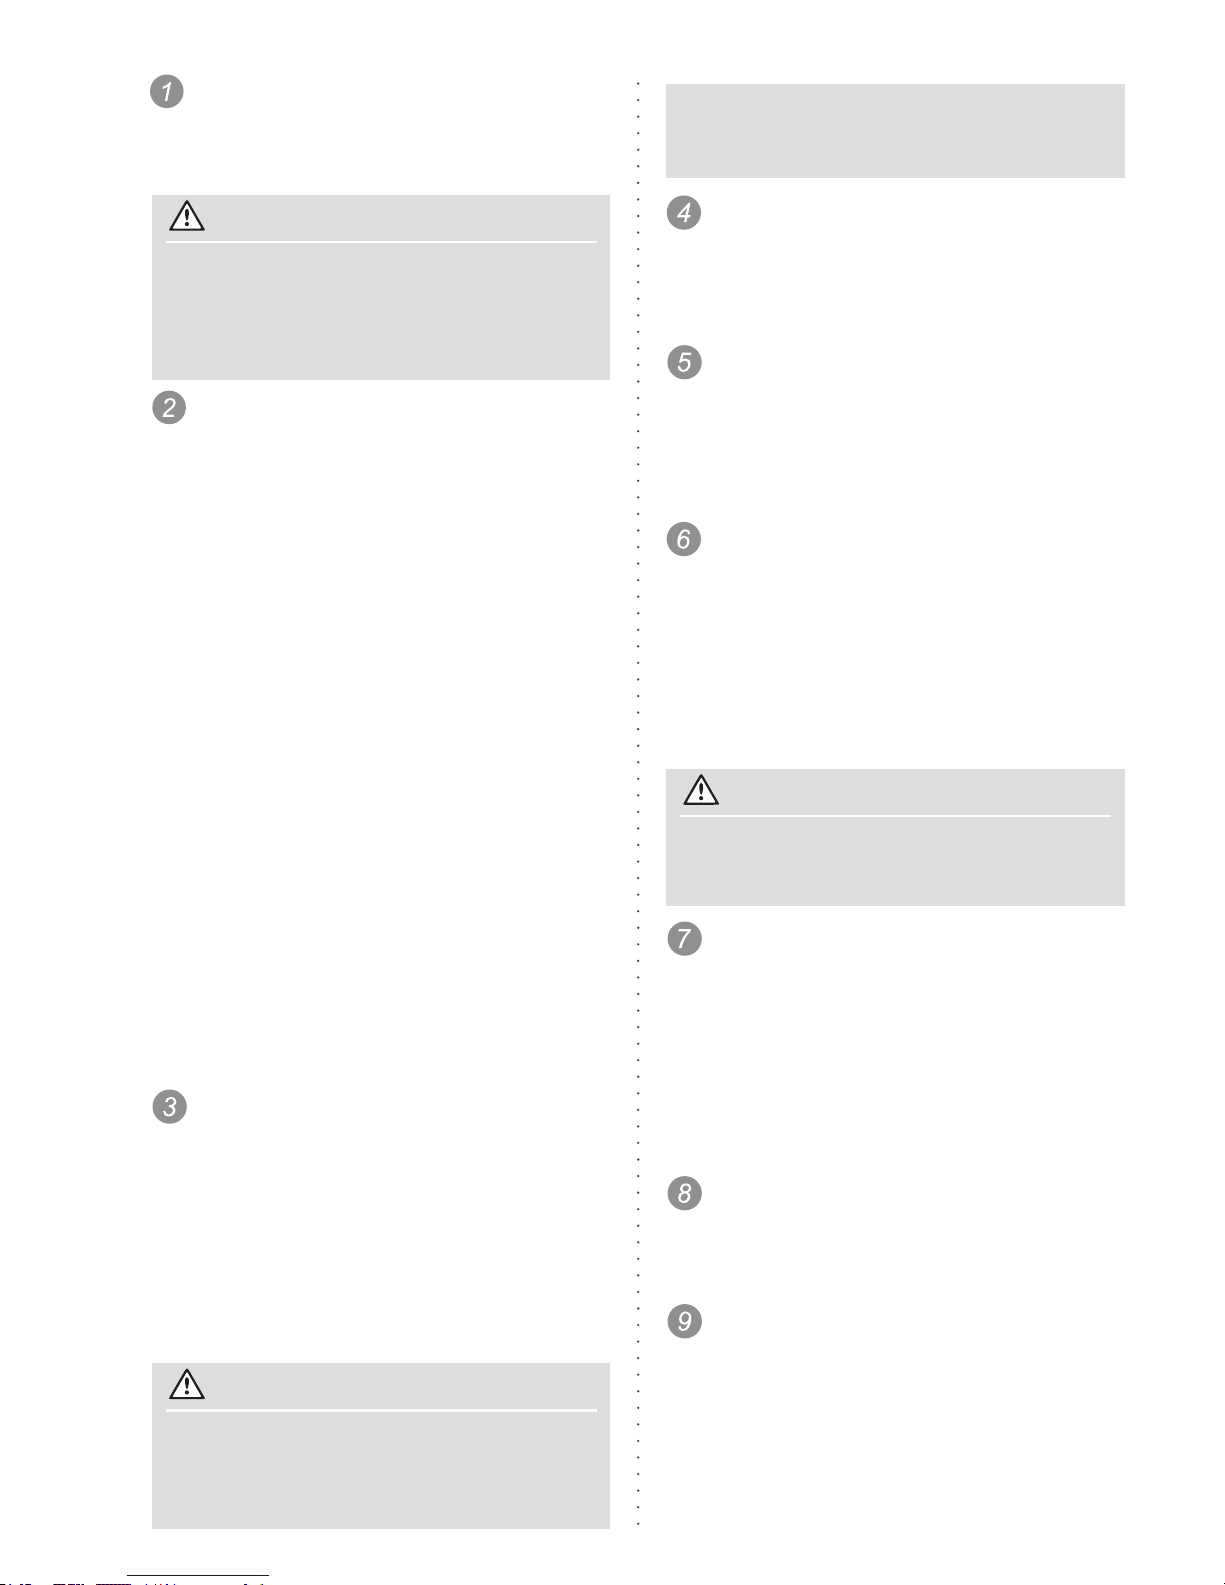
3.
Description of the Refrigerator
Parts
1. “Ice Twister”
2. Ice storage recipient
3. Freezer door shelf
4. Turbo freezing compartment (Fast Freezing)
5. Retractile and folding shelf of the freezer
6. Freezer shelf
7. Freezer compartment light – 1 unit
8. “Drink Express”
9. Removable “Ice Stock”
10. “Frosty Cups” (2 units)
11. Deodorizer
12. Fresh food compartment
13. Lights in the fridge compartment - 2 units
14. Temperature control selector in the fridge
15. Eggs tray (packs 18 eggs)
16. Vertical Division
17. Multi-use drawer (2 units)
18. Folding glass shelf
19. Removable glass shelf (2 units)
20. Extra fruit/vegetables drawer
21. Humidity control
22. Fruit/vegetables drawer
23. Fruit/vegetables drawer mobile divisor
24. Leveling feet / casters
25. Water supply
26. Water purier (Pure Filter)
27. Refrigerator door shelf
28. Removable can dispenser
29. Sliding multi-use shelf (2 units)
30. Removable aluminum bar (3 units)
31. Bottle holder shelf
32. Lock of the aluminum bar (6 units)
33. Bottles lock
34. Fruit/vegetables drawer cover
35. Multiow
36. Freezer door shelf support
37. Refrigerator door shelf support (2 units)
38. Control panel
39. Handles
40. Rotating water dispenser
41. Water dispenser action button
42. Freezer door (not reversible)
43. Refrigerator door (not reversible)
ATTENTION
ATTENTION
Do not use the refrigerator without connecting
the grounding wire.
If the refrigerator 127V is turned on to a 220V
switch, it will not be connected to any component, a sound alarm will be spread and the
panel will be locked (_ _). The lamps of the
refrigerator will burn out if the door of the
refrigerator is opened. The 220V refrigerator
turned on to a 127V switch will not present
error, but the product will not function (it will
not refrigerate).
Do not use the product without grounding it. If the
installation doesn’t have grounding, for your safety,
ask to a trusted electrician to provide it.
The grounding cable (green or yellow and green)
located at the back of your refrigerator must be
connected to an efcient grounding and should
not be connected directly to the electric power
network or to water and/or gas pipes, electricity,
telephone conduits, lightning rods, etc.
If your product is equipped with a 3-prong plug power cord, it will not have a grounding cable (green
or yellow and green). It must be plugged into a
properly grounded and polarized 3-prong outlet.
Do not use adaptor to bypass the grounding. Do
not replace it for a two prong plug. If necessary, for
your safety, ask to a trusted electrician to ground
your appliance.
Grounding is the best safety for the user against
electric discharges.
Ground Wire
Admissible voltage variation
Voltage (V) Minimum (V) Maximum (V)
127
220
230
116
201
201
133
231
253
5
Control Panel
6
Time Indicator of the TURBO FREEZING or
“DRINK EXPRESS”
In case one of the functions above has been chosen,
the indicator shows the operation remaning time.
For example: 30, 29, 28 minutes and so on until zero
(0:00).
Temperature Selection Indicators of the
Freezer Compartment
They indicate the selected temperature in the freezer
compartment.
The adjustment is made by pressing the FREEZER
TEMP. button.
When the fridge is turned on for the rst time, turned
on after cleaning or after blackout, the control always
indicate medium position.
FREEZER TEMP. button
This button allows the adjustment temperature in the
freezer compartment among Minimum, Medium and
Maximum.
LOCK KEYBORD function
It allows locking the keyboard, avoiding the accidental
activation of any function. To activate this function,
press the “AUTO CONTROL” and “FREEZER TEMP.”
buttons simultaneously for approximately 3 seconds,
the Functions Indicator will show the word “loc”. To
deactivate the function, press simultaneously the
“AUTO CONTROL” and “FREEZER TEMP.” buttons.
“AUTO CONTROL” Button (Automatic Control)
By pressing the “AUTO CONTROL” button, it is possible to select one of the automatic control functions:
Vacation, Party and Shopping.
“AUTO CONTROL” Indicators (Automatic
Control)
Shows the automatic control function selected.
2.1. Vacation (1 touch in the AUTO CONTROL button)
The Vacation function, when selected, keeps the freezer
temperature at minimum. This function is indicated when
the product remains closed for long periods of time. Dur-
ing the rst 30 minutes, after selecting the function, the
product can be opened without deactivating this function.
The Vacation function can be deactivated at any time,
by pressing the “AUTO CONTROL” button or open any
of the doors 30 minutes after the function is selected.
2.2. Party (2 touches in the AUTO CONTROL button)
The party function, when selected, keeps the freezing
capacity at most for 6 hours, even with several doors
openings. The Party function can be deactived at any
time, by pressing the “AUTO CONTROL” button.
2.3. Shopping (3 touches in the AUTO CONTROL
button)
The shopping function, when selected, keeps the freezing capacity at most, allowing a fast freezing of new food.
The Shopping function has a duration of 3 hours,
although it can be deactived at any time, by pressing
the “AUTO CONTROL” button. Whith this function
activated, the alarm of the door opened starts to work
after 30 minutes.
“DRINK EXPRESS” button (beverage fast
cooling)
By setting this button it is selected the kind of drink
expected to cool faster during a predetermined time
for each drink. In case you wish to deactivate this
function, you must press the “DRINK EXPRESS” button again, until the indicator shows two bars (- -). The
beverage shall be in the Drink Express shelf or in the
removable can dispenser and in the freezer, for the
adequate cooling.
Beverage Indicator
Shows the selected drink for the Rapid Cooling: champagne, beer or canned drinks.
The selection is made by pressing the “DRINK EXPRESS” button.
ATTENTION
If the function “AUTO CONTROL” is selected,
the TURBO FREEZING, “DRINK EXPRESS”,
“ICE EXPRESS” and FREEZER TEMPERATURE
functions will not be selected, until the “AUTO
CONTROL” function is interrupted.
TURBO FREEZING button
Allows for faster food cooling or freezing. This function
operation time can be set to 30 minutes (minimum) and
up to 2 hours and 30 minutes (maximum).
Other periods that may be selected: 45 minutes, 1 hour,
1 hour and 30 minutes and 2 hours.
In case you wish to deactivate this function, you must
press the TURBO FREEZING button again, until the
indicator shows (- -).
ATTENTION
The TURBO FREEZING function will not work
in case “DRINK EXPRESS” function is working
or selected before.
ATTENTION
The “Drink Express” function (Beverage Fast
Cooling) can expirience chenges to the beverage nal temperature given the electric tension,
room temperature and beverage initial tempe-
rature. Avoid opening the freezer or fridge door
frequently when this function is being used and
be careful with glass bottles put in the freezer.
7
“ICE EXPRESS” button
This buttons allows the ice to be formed faster in the
freezer compartment. Make sure the ice trays in the
“Ice Twister” are lled with water. To deactivate this
function, press the “Ice Express” button at any time.
Thefridgehasvetypesofalarm:
11.1 Open Door Alarm
After, approximately 4 minutes (normal operation) and 30
minutes (operating in shopping mode) with the door(s)
opened, the alarm goes on.
The alarm automatically turned off when closing the
door(s).
Note: In case of the doors remains opened, after silence
time is passed, the alarm goes on again.
11.2 TURBO FREEZING LONG Alarm
(Periods of 1:00h, 1:30h, 2:00h and 2:30h)
At the end of the time chosen for the TURBO FREEZING, the respective button and the panel numbers will
be ashing for about 10 seconds.
To turn off, open and close the freezer door or activate
the respective button.
11.3 TURBO FREEZING SHORT Alarm
(Periods of 30 and 45 minutes)
At the end of the time chosen for the TURBO FREEZING
period, the alarm will be triggered, sounding for about 1
minute. In this case, if the door is not closed, an alert “bip”
will sound every minute. After the end of the operation,
in addition to the sound signal, the respective button will
be ashing in the control panel. To turn off the sound and
visual alarms, open and close the freezer door or activate
the respective button.
11.4 Beverage Fast Cooling Alarm (DRINK EXPRESS)
At the end off pre set period for the chosen drink express
cooling, the alarm will sound for one minute. Remove all
the beverages and close the door. If this procedure is not
followed, after 1 minute, 1 alert “bip” will sound every
minute. After the end of the operation, in addition to the
sound signal the respective button will be ashing in the
control panel. To turn off the sound and visual alarms,
activate the respective button or remove the beverage
and close the door.
11.5 ICE EXPRESS Alarm
At the end of the chosen time for the ICE EXPRESS, the
respective button and the panel numbers will be ashing for approximately 10 seconds. To turn off, open and
close the freezer door or activate the respective button.
“Water Dispenser Activator” button
Pressing the button and keeping it pressed, you can
serve water in a glass. For this, it is necessary to: a) the
water dispenser is opened; b) The reservoir is lled with
potable water.
Turbo-freezing Compartment
This compartment allows a
faster foodstuff cooling. This
compartment is located in the
superior right area of your
freezer.
“Ice Twister”
After removing it from its place,
ll the “Ice Twister” with water
carefully, so the ice trays will
not overow.
Put it over the ice recipient. After
some hours, the water will freeze gently. Turn the
handle clockwise until the cubes come loose and fall
in the ice recipient.
Drink Express
Put bottles in this shelf to cool your
beverage faster in the freezer compartment and activate the Drink
Express function in the control
panel (refer to the section “Tips and
Advices”, the table to fast cooling
of beverage).
If you want to, you can use this
shelf to conserve beverages in
the fridge, in this position, even
when activating the DRINK EXPRESS function, the
fast cooling of beverages will not occur. The drawer
has a lock that allows to regulate the size of the bottle
and that can be unmounted, according to the previous illustration.
8
Frosty Cups
Developed to store cups and
glasses, so they can be cooled at
the moment of use.
Fresh Food Compartment
This compartment serves to conserve some foods that need less
conservation temperature (near
0°C) without freezing.
Example: food to be consumed or
cooked in short space of time, such
as meat, sh, desserts and similar.
Ice Stock
This compartment is able to store
ice made in the “Ice Twister”.
The compartment has a handle
that facilitate its removal from the
product. This compartment is located in the inferior right area of your
freezer door, but can be mounted where is aluminum
bar, in the freezer and the fridge.
Retractile Shelf
This shelf can be detracted and folded, allowing the
storage of bigger objects in its freezer compartment,
such as jars and cakes. To unlock it, press the locks
(A) down in the inferior part of the shelf and then
push it back.
If you prefer, you can still fold it up.
Position 1
Position 2
A
Eggs Tray
The eggs tray is removable and
has a handle to have a better
movement between the fridge,
the sink and the table. Its maximum capacity is 18 eggs.
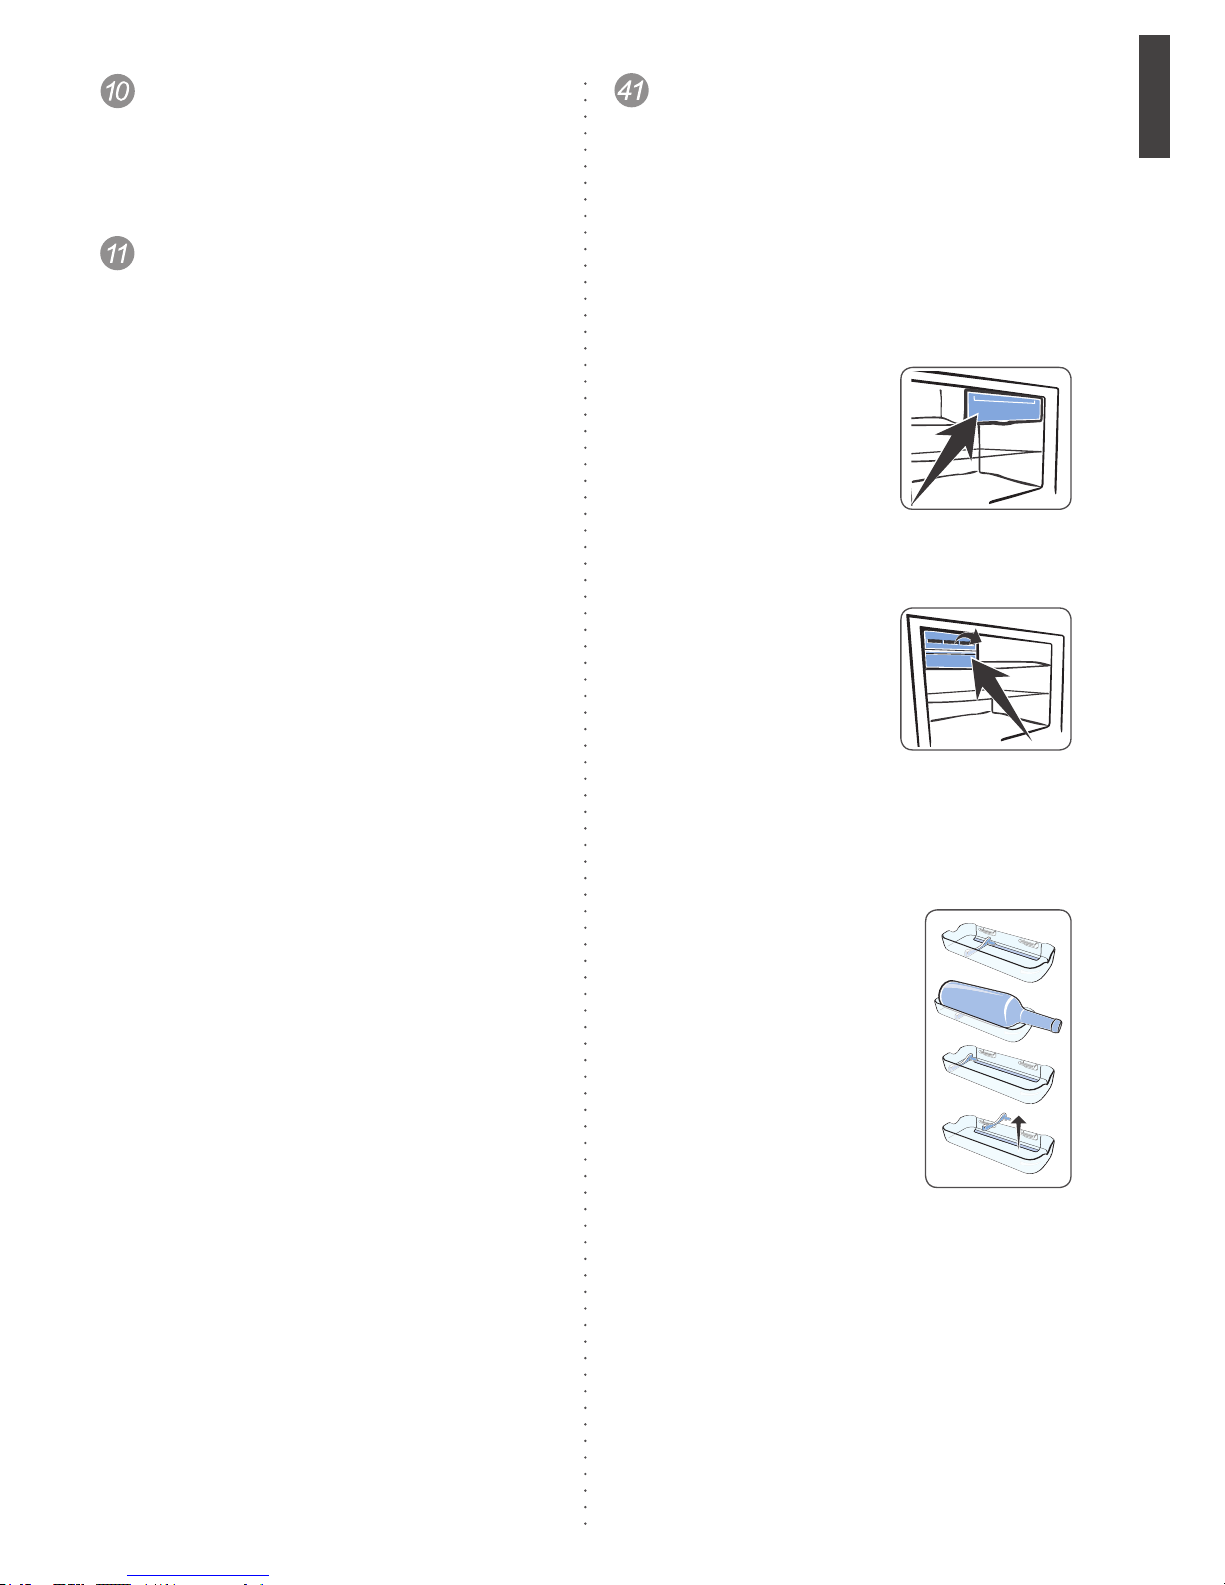
Multi-use Drawers
Those drawers serve to store
several types of food.
Fruit/Vegetables Drawers
Keep the humidity and the freshness
of the vegetables and fruit due to the
circulation of the cold air, which is not
in direct contact with the food. For a
better conservation, always keep the
vegetables and fruit in this place.
In the bigger drawer you have a fruit
and vegetables separator to facilitate
the organization of your food.
Aberto
Humidity Control
For a better conservation of the
food, there is a humidity control
in the fruit/vegetables drawers
that regulates the air passage. When storing vegetables, we recommend the reduction of the opening of the
air passage, avoiding the dehydration of the food. When
storing fruit, we recommend increasing the air passage.
When storing fruit and vegetables together, regulate the
Humidity Control in an intermediary position.
Fechado
Folding Glass Shelf
This shelf can be folded in two positions, allowing
the storage of bigger objects in your fridge, such
as jars and cakes. To facilitate the handling, use
the existing grasp.
Position 1 Position 2
Deodorizer
The deodorizer reduces inconvenient food or liquid odors. It is
installed on the upper part of the
refrigerator compartment. To solve
any doubts concerning the cleaning
of the deodorizer, consult the section
“Cleaning and Maintenance”.
Multi-Flow System
This system distributes cool air for
the cooling of food items inside the
refrigerator compartment.
9
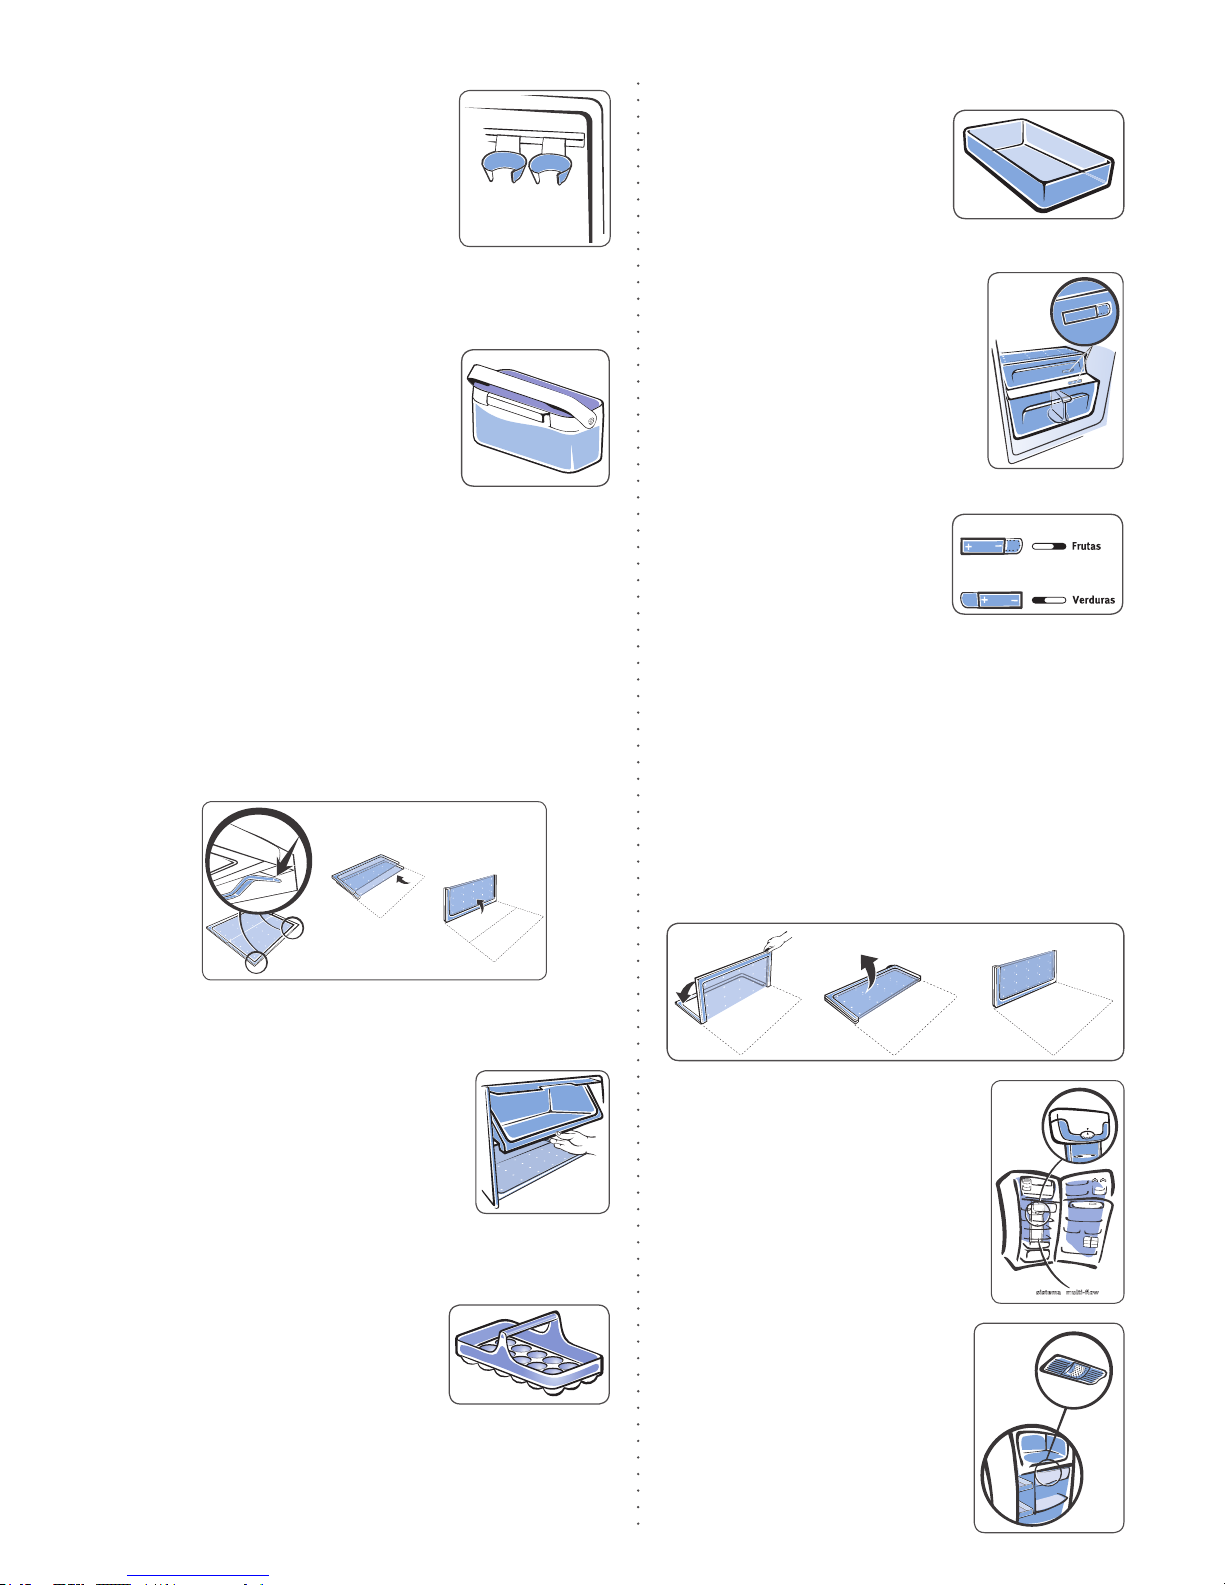
Bottle Shelves and Locks
1. Bottle-holder Shelves:
The bottle-holder shelf accommodates bottles of 3.3 liters.
2. Bottles lock:
The bottle lock has a function that
prevents bottles from shaking
loose on the shelf.
To use it, just t it onto the shelf and slide it to the sides,
as shown on the gure.
It can also be used to store small condiments or in
its interior.
Water Container
Developed to provide pure and
healthy water, given its exclusive
ltering system.
Pure Filter
Fill it with potable water only and
wait the ltering to start.
Removible Multi Use Drawers
Those 2 shelves serve to store
several types of food. Those shelves can be assembled in several
positions in the refrigerator, but
they shall not be used in the
freezer door, because they obstruct its closing, as
indicated in the examples below.
How to Use the Water Container
1. Remove the container wi-
thout water from the refrigerator door, lifting and pulling
it according to the illustration
beside (1).
2. Remove the tap of the con-
tainer, rotating it counter-clockwise (2).
3. Push the cover in the (3) direction and ll up the
container with treated water and wait for the ltering.
We recommend the rst ltering to be made in a
place where the ltered water can be discarded (for
example, in the sink).
Repeat this procedure 3 times (approximately 9 liters
of water).
This procedure shall be repeated every time you
change the rell (purier). We recommend you to
change the rell every 6 months or 500 liters.
4. Mount the sealing rubber and the tap in the container.
5. Fit the container without water in the refrigerator
door.
6. Push the cover of the superior part of the container,
ll it up and wait the water ltering process.
7. After this procedure, you can normally use the
ltering system.
8. To serve, open the dispenser, rotating it, put a glass
along with the water exit, located in the external part
of the refrigerator door and activate the button (A)
located right above it.
9. To avoid unwanted activation, turn the dispenser
and keep it closed (position 1).
ATTENTION
Be careful not to invert the
direction of the assembling of
the rubber part, according to
the illustration beside.
A
Removable Can Dispenser
This part was especially developed to
store cans with 350 ml of your favorite
drink. The cans may be assembled
in the support with the superior part
of the can directed to the center, rst
inserting the bottom of the can on the
side of the support (1) and then in the
central part of the support (2), as the
illustration beside shows, otherwise,
the cans will fall.
You can remove the can compartment and take it to the table for your
best convenience, to facilitate the
withdrawal pull the same direction
as shown in drawing (3). The can
compartment can be used in the
refrigerator and in the freezer. In it,
you can cool faster all the cans at
the same time, by only activating the
function “DRINK EXPRESS” in the Control Panel.
When it is assembled in the door of the refrigerator, and
without bearing cans, it can be used as a lock for the
bottles (4).
10
Back Spacer
Avoid the fridge to touch the wall.
Keep the back spacers always in
position 1 (horizontal).
When transporting the fridge, keep
the spacer in position 2 (vertical).
This will facilitate the fridge passage through the door, for instance. Use an adhesive tape
to keep in position 2.
4. How to Use
How to turn your refrigerator on and off
To turn your refrigerator on or off, Just connect
or disconnect the plug of the socket, verifying the
correct voltage of the product.
Before turning the refrigerator on for the rst time,
read attentively the instructions brochure on the
door and this entire guide.
When you turn the Refrigerator off, wait for
10 minutes before turning it on again.
IMPORTANT
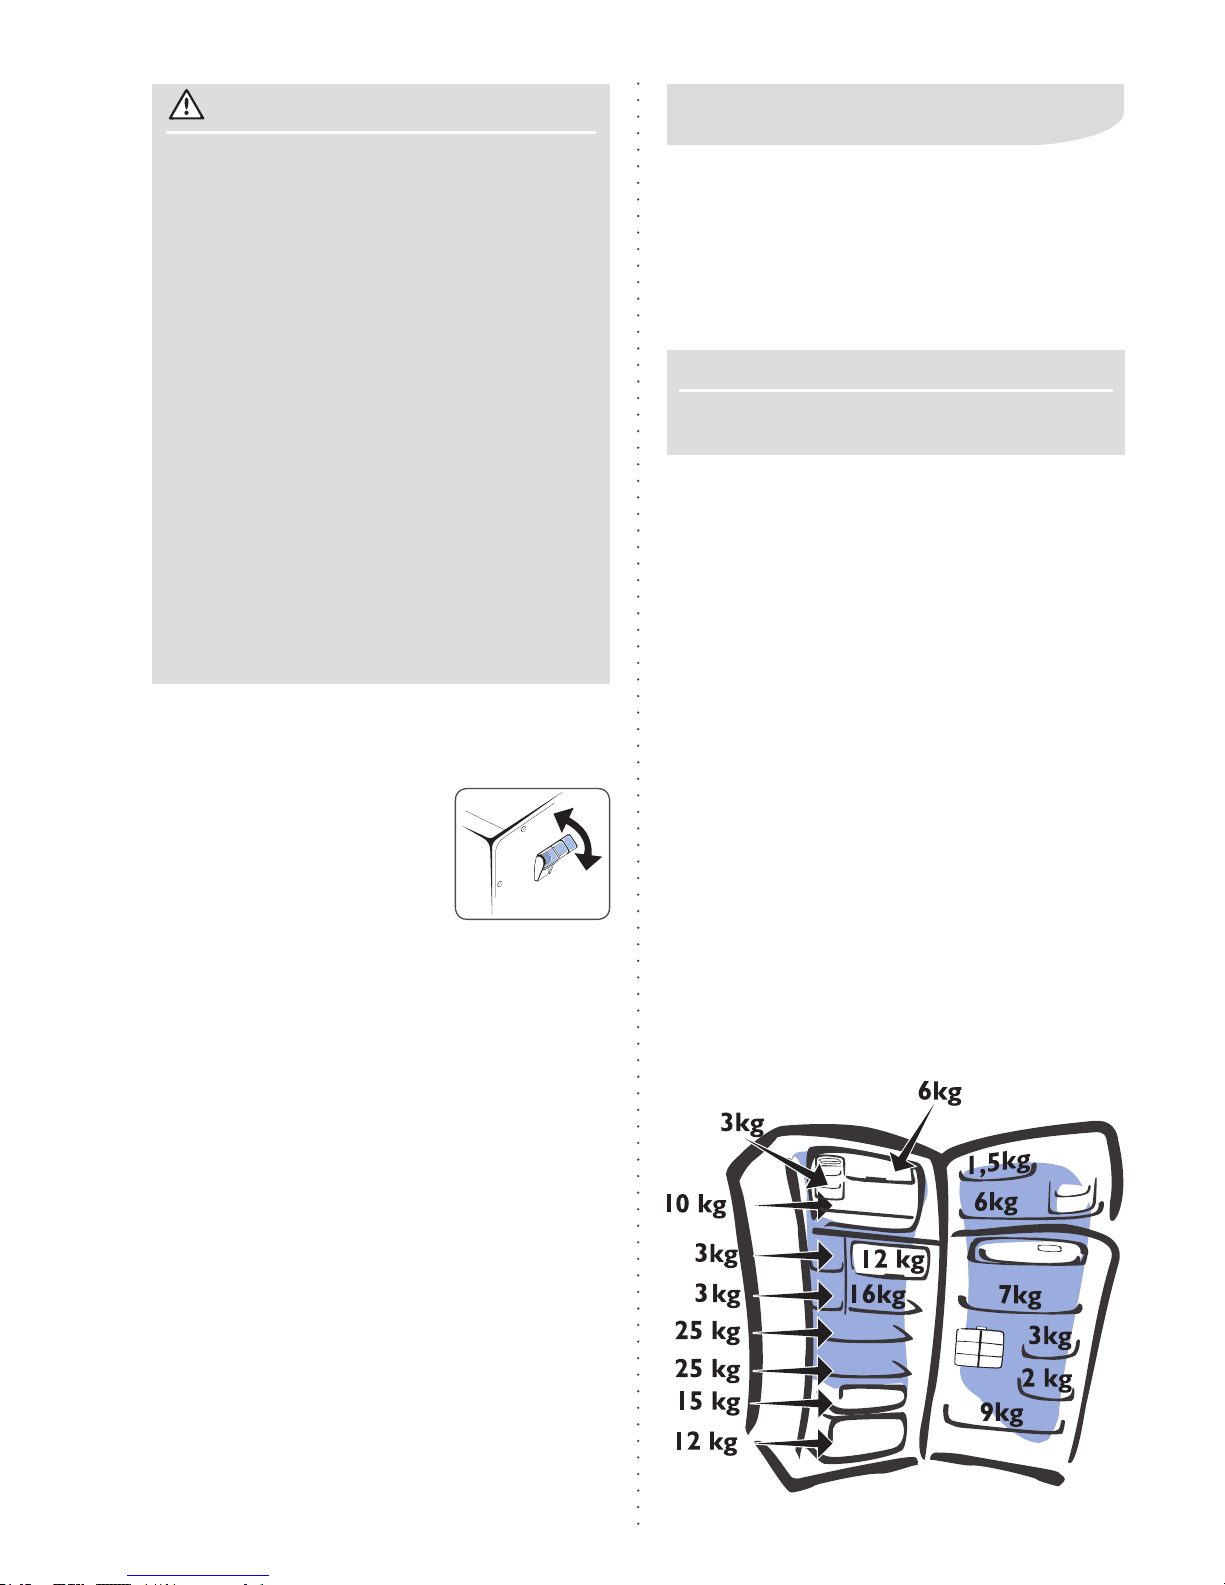
Loading / Replenishing
In the rst lling or after cleaning.
1. To best store the recipients in the freezer and
refrigerator compartments, all the shelves can
be removed or replaced and the covers of the
freezer compartments and of the fresh food can
be removed.
2. Connect the plug of your refrigerator in the socket.
3. Let it functioning at least for two hours before
storing any food inside it.
4. Start supplying the food by the shelves of the refri-
gerator, and nally the door shelves. It is important
to respect the maximum limits of charge indicated
in the gure below.
5.
After the lling, adjust the temperature control to the
most adequate position, following the information in
the items “Freezer Eletronic Temperature Control”
and “Refrigerator Temperature Control”.
6. Do not support food in the air exits, so you don’t
endanger the performance of the refrigerator.
Maximum Load Limits
ATTENTION
- Before initiating the usage, wash the reservoir with water and neutral soap, in order to
eliminate eventual residues. Refer to the topic
“Water Container Cleaning”.
- Use only water proper to consume (drinking
water). The use of any other type of drink can
leave residues, taste or odor in the reservoir.
- The water reservoir shall be lled up only
when it is t in its position on the door.
- Wait for the water to cool for approximately
12 hours.
- It is possible to hear some noise caused by
the entry of air when the water comes out of
the reservoir.
- If the water does not ow well, push the activating button again. Stay with the glass under
the water exit for some moments to assure that
all the water is collected by the glass.
- Do not use gasied drinks, such as soft
drinks. The drink can leak off due to the gas
pressure.

11
The internal temperatures may vary depending
on the room temperature, charging, number of
opening of the doors and ventilation of the place
where the product was installed.
The positions of temperature adjustment of the
freezer are pre-established at the factory. But this
temperature depends on the conditions of packaging of the food and the frequency of opening of
the door. So, take care to place the food in a way
they do not obstruct the air exits and avoid to open
the door unnecessarily.
The refrigerator compartment has an independent
temperature control located in its interior, close
to the lamps. To regulate it, refer to the section
“Manual Temperature Control of the Fridge”.
Fine Adjustment of Freezer Temperature
Your refrigerator was produced within the international standards and has three levels of temperature with pre-established values at the factory, which
can be adjusted (reduced or increased) according
to the necessity.
If you want to change it, there is the possibility of
the Fine Adjustment of Temperature with three
levels, as explained next.
To program this function:
1. Press the “AUTO CONTROL” button and select the VACATION function, and then press
the “TEMP FREEZER” button 5 times. The
functions indicator will be turned on, indicating
the last adjustment. The ne adjustment of temperature programmed is valid for the 3 levels
of temperature of the freezer compartment.
Electronic Control of Freezer Temperature
By touching the button successively, you can select the freezer
temperature.
Electronic Control of Freezer
Temperature
(default temperatures)
Adjust
Freezer Temperature
-20,5ºC (cold maximum)
---
-18ºC (cold medium)
---
-15,5ºC (cold minimal)
Maximum
Medium
Minimum
2. Setting Options:
To increase 0,5 ºC in the pre-established tempera-
ture, press the TEMP. FREEZER BUTTON until
it shows 05 in the Functions indicator.
To increase 1 ºC in the pre-established tempera-
ture, press the TEMP FREEZER button until it
shows 10 in the Functions indicator.
To reduce 0,5 ºC in the pre-established tempera-
ture, press the TEMP FREEZER button until
it shows 05 with a dash on the left side of the
Functions indicator.
To reduce 1 ºC in the pre-established tempera-
ture, press the TEMP FREEZER button until
it shows 10 with a dash on the left side of the
Functions indicator.
To reduce 2,0 ºC in the pre-established tempera-
ture, press the TEMP FREEZER button until
it shows 20 with a dash on the left side of the
Functions indicator.
After three seconds without pressing any button,
the ne adjustment is nalized.
To verify what is the last adjustment realized:
Press the “AUTO CONTROL” button and select
the VACATION function and then press the TEMP
FREEZER button 5 times. The Functions indicator
will turn on, indicating the last adjustment.
12
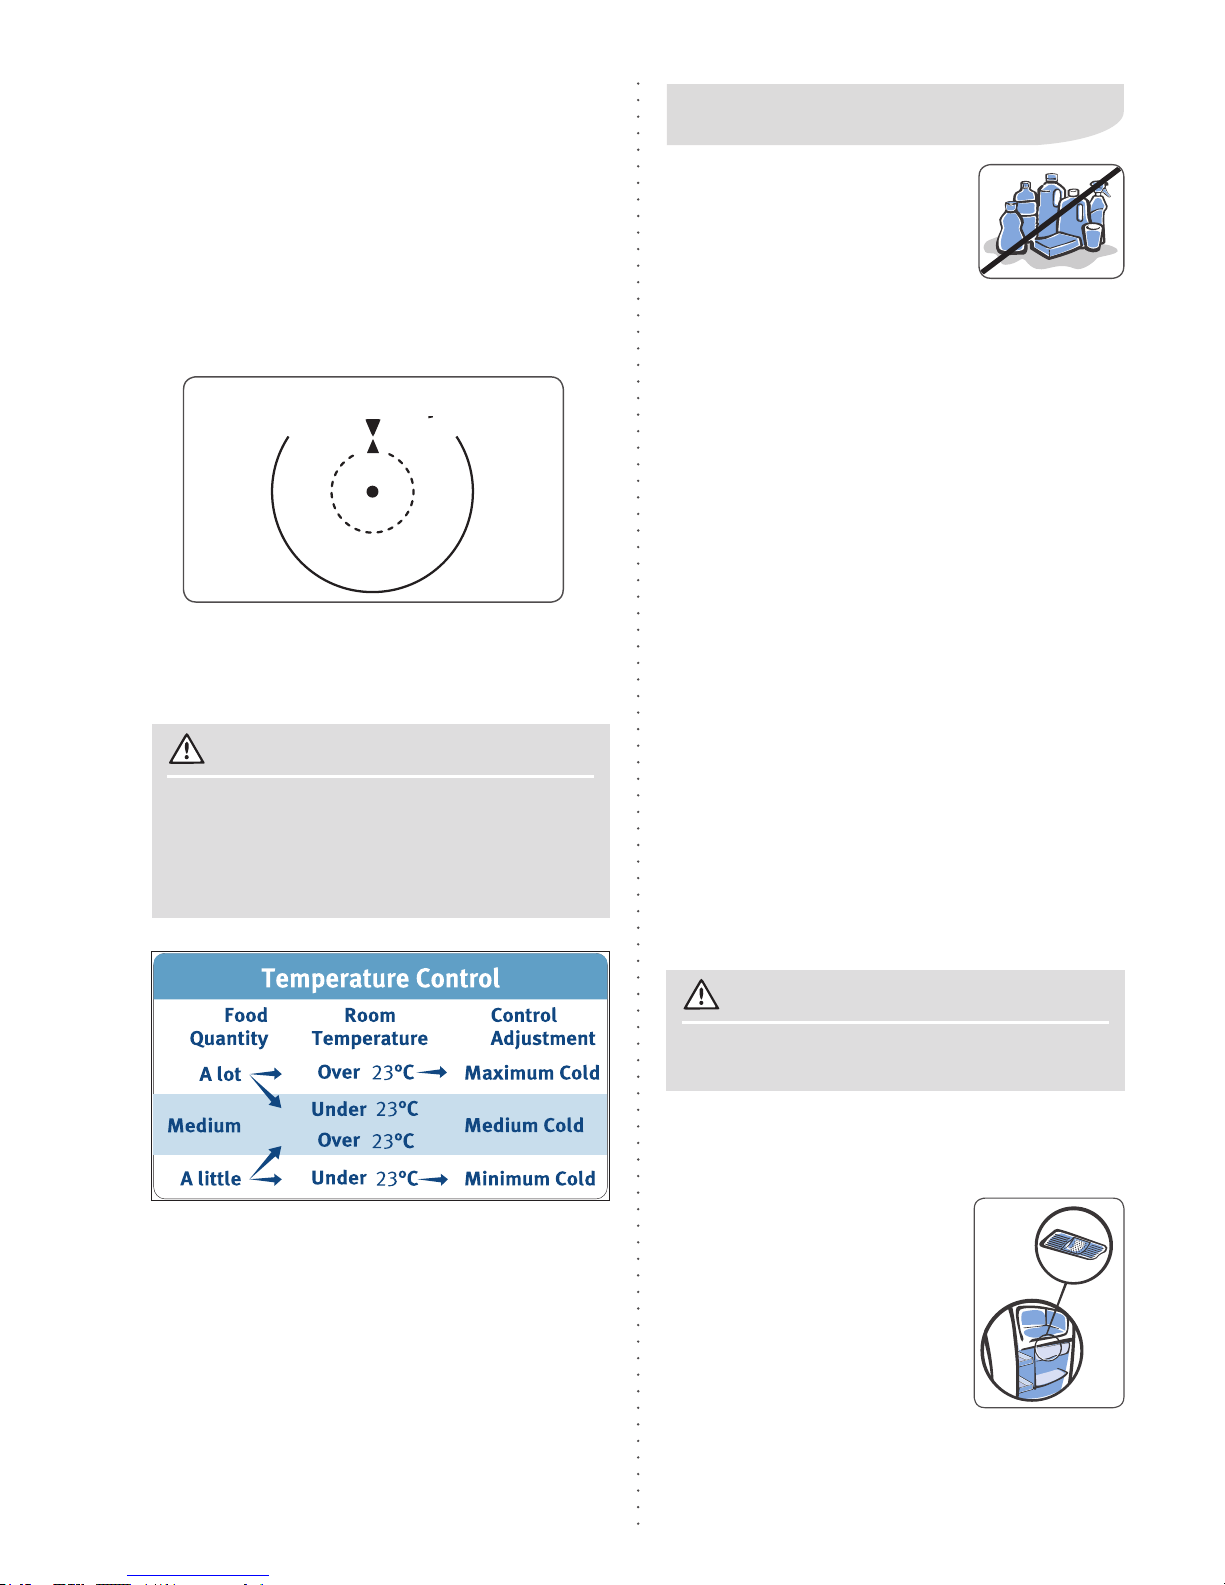
Fridge Temperature Control
To properly control your refrigerator’s temperature,
consider the following factors:
1. The quantity of food stored.
2. The room temperature where the refrigerator
is installed.
3. Do not surpass the adjustment limits of the
regulation button of the refrigerator temperature (Maximum and Minimum Cold), observing
the alignment of the marks according to the
example below.
4. When realizing the temperature adjustment
of the refrigerator, do not let the blue strip be
showed in the regulation button, because it may
endanger the performance of your refrigerator.
Cleaning the Deodorizer
In case of a bad odor in the freezer
compartment and in the refrigerator, act as follows:
1. Set the temperature control of
the refrigerator to MAXIMUM
for about an hour and return to
the former setting.
2. Then, remove the deodorizer
fron the upper part of the compartment of the refrigerator and carefully loosen
the deodorizer from inside the cover.
5. Cleaning and Maintenance
Before realizing any maintenance
operation, including the ones
described in this guide, turn the
refrigerator off of the electric power
removing the plug of the socket.
Never clean your refrigerator with
ammable uids, such as alcohol, kerosene, gasoline,
tinner, varsol, solvents or other abrasive chemical products such as chlorine, detergents, acids or vinegar,
so you do not damage the surface.
After cleaning it, replace the accessories supplied
with the refrigerator (drawers, shelves, etc.) in their
adequate places, inside the refrigerator.
If any food is poured inside the refrigerator, clean it
immediately. Most of the food can damage, spot or
leave the internal surfaces of the refrigerator with an
unpleasant smell, if they stay for a long time in contact.
Never use metallic spatulas, brushes, abrasive or
alkaline products to clean the plastic surfaces inside
your refrigerator.
Before you start cleaning the refrigerator, remember
that humid objects can easily adhere to extremely cold
surfaces. Thus, do not touch the cold surfaces with
cloths, sponges or even with humid hands.
ATTENTION
ATTENTION
The plastic parts cannot be washed with
hot water.
If you do not want to use the specic functions of your refrigerator daily, such as:
Party, Shopping, Vacation, Auto Control,
etc; you can regulate your refrigerator according to the table below.
Internal Part
Clean the inside of the refrigerator and the accessories with a warm water solution and sodium
bicarbonate (a soup spoon of bicarbonate for each
liter of water). Carefully dry it.
Temperature Control
13
Cleaning of the Water Collector
Your refrigerator has a water
collector located in the back
part, near the compressor (engine). The function of the collector
is to store the water from the
automatic defrost that evaporates through the
heat generated in that region.
The cleaning of the collector is not necessary
for the functioning of the refrigerator. If you want
to clean it, turn the refrigerator off of the electric
Power, removing the plug of the socket and use
a wet cloth.
3. Leave it in a clean water container for three hours.
4. Remove and leave the deodorizer at rest to dry for
3 hours and assemble it again.
5. The deodorizer should be changed after its third
cleaning.
6. It is recommended the use of a small screwdriver to
remove the part supporting the deodorizer.
ATTENTION
The doors rubbers are attached and
removable.
ATTENTION
As the special varnish is applied in your
product to ease the cleaning, do not use
abrasive sponges, steel, brushes, or even
products that are special to clean stainless steel, pastes, sapolio and products
with inammable uids, such as alcohol,
kerosene, gas, varsol, solvents, automotive
waxes, polishers or other abrasive chemical products such as chlorine, detergents,
External part
In order to easily clean the external part of your refrigerator, use
a humid cloth in a warm water
solution with neutral soap and
then dry it carefully.
(Only for the DW51X model)
The doors have a special protector varnish, which
avoid ngerprints and marks.
Use a dry annel or dip it in warm water with mild
soap and then dry it carefully.
acids or vinegars. The use of such products may damage the polish protection
and, consequently, result in irreversible
scratches and/or marks on the surface of
your refrigerator.
We recommend you to activate the LOCKED
ELECTRONIC PANEL function when executing the cleaning of the Control Panel to
avoid accidentally activating some function.
Light Replacement
To replace the light of your Refrigerator, proceed
in the following manner:
RefrigeratorCompartment:
1. Turn the refrigerator off of the
electric power.
2. Press the inferior part of the
cover upwards, displace it frontwards and remove it.
3. Change the burnt light for another with the same dimensions,
tension and maximum power of
15 W.
FreezerCompartment:
1. Turn the refrigerator off of the
electric power.
2. Remove the superior freezer
shelf.
3. Open the cover of the light pressing the lock with a screwdriver.
4. Change the burnt light for another with the same dimensions, tension and maximum power of 15 W.
Door Rubber Seal
The sealing rubbers of the doors may be cleaned
carefully with a wet cloth, avoiding damaging
them.
WARNING
Do not remove the collector when cleaning
it, and do not displace the tubes located
inside this colector. Do not throw water
directly inside or outside the refrigerator.
14
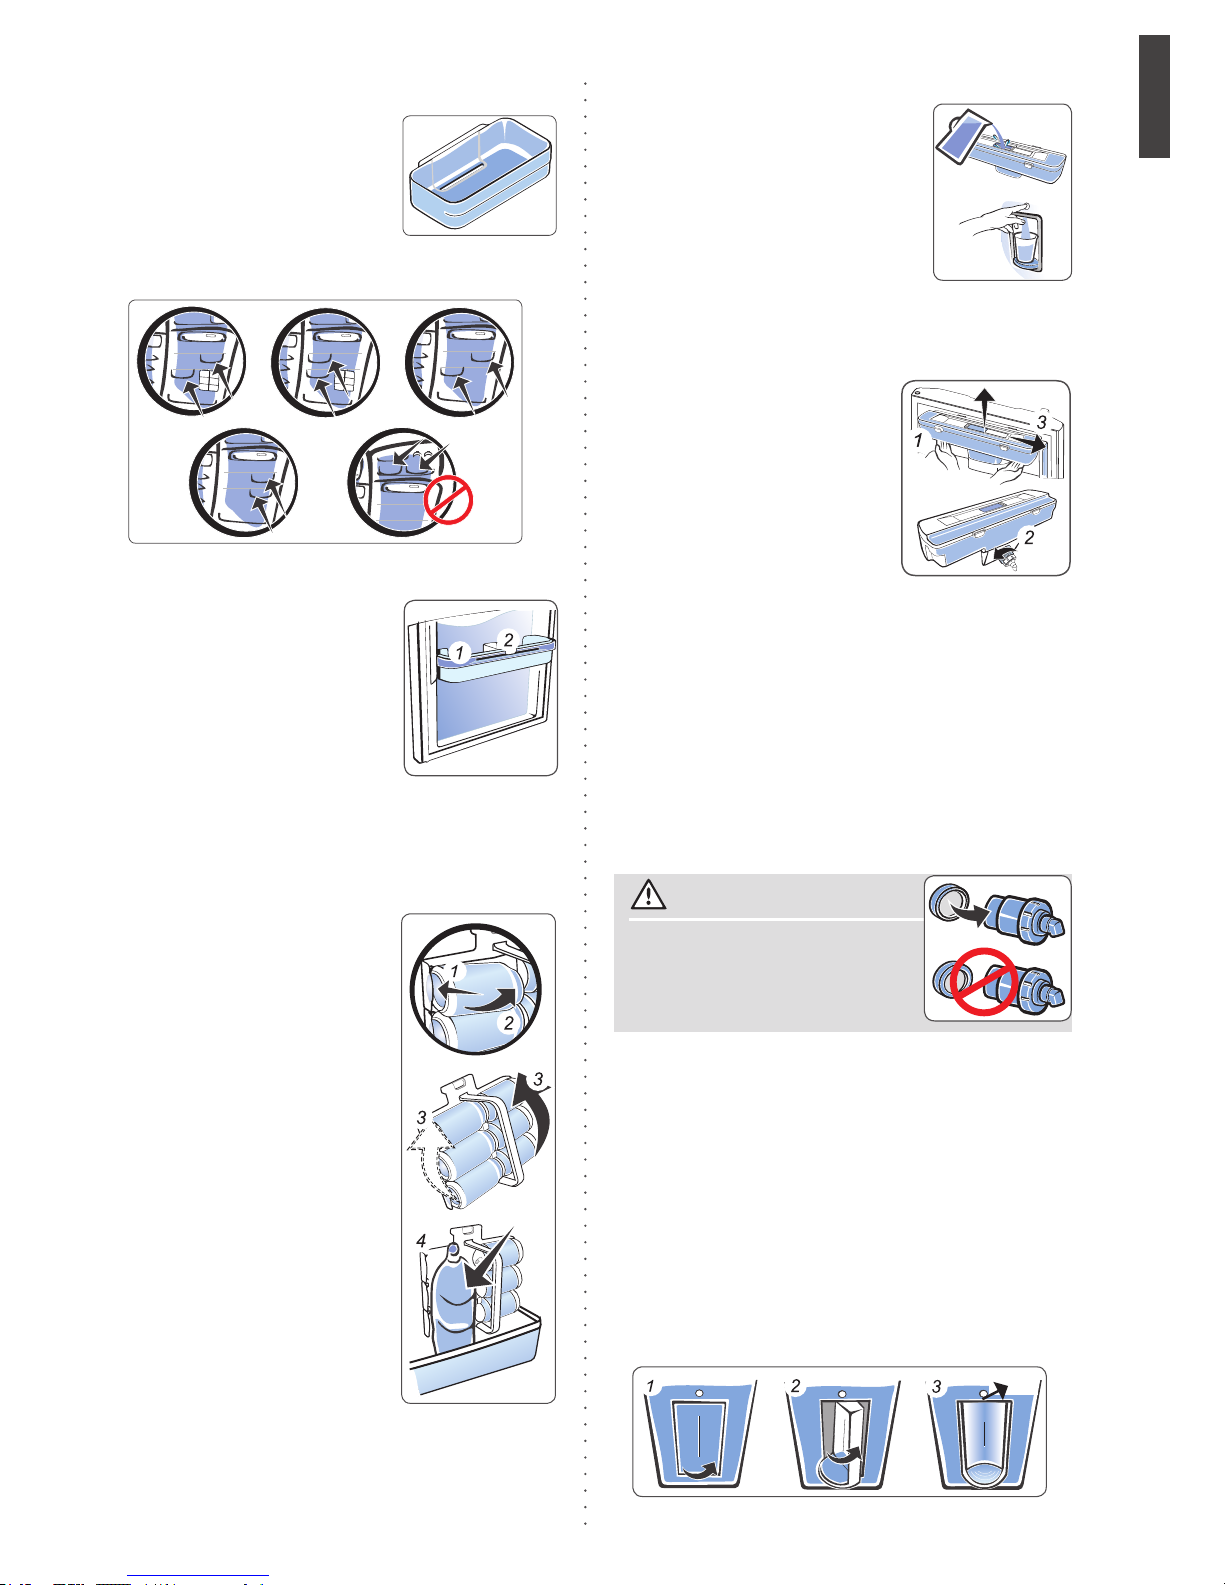
ATTENTION
Before removing the container from the door,
completely empty it.
ATTENTION
Be careful not to invert the
direction of the assembling
of the rubber part, according
to the illustration beside.
Water Container Cleaning
How to remove accessories
The Freezer shelves are removable, and can be used
according to your need.
FreezerShelves:
To remove it, pull the shelf until it is unlocked and
lift it up.
RetractileandFoldingfreezershelf:
The superior freezer shelf is removable, and can be
used according to your need. To remove it, press
the security locks down (A), and let them retracted
(B), lift the shelves up a little jointly and pull the joint
frontwards (C).
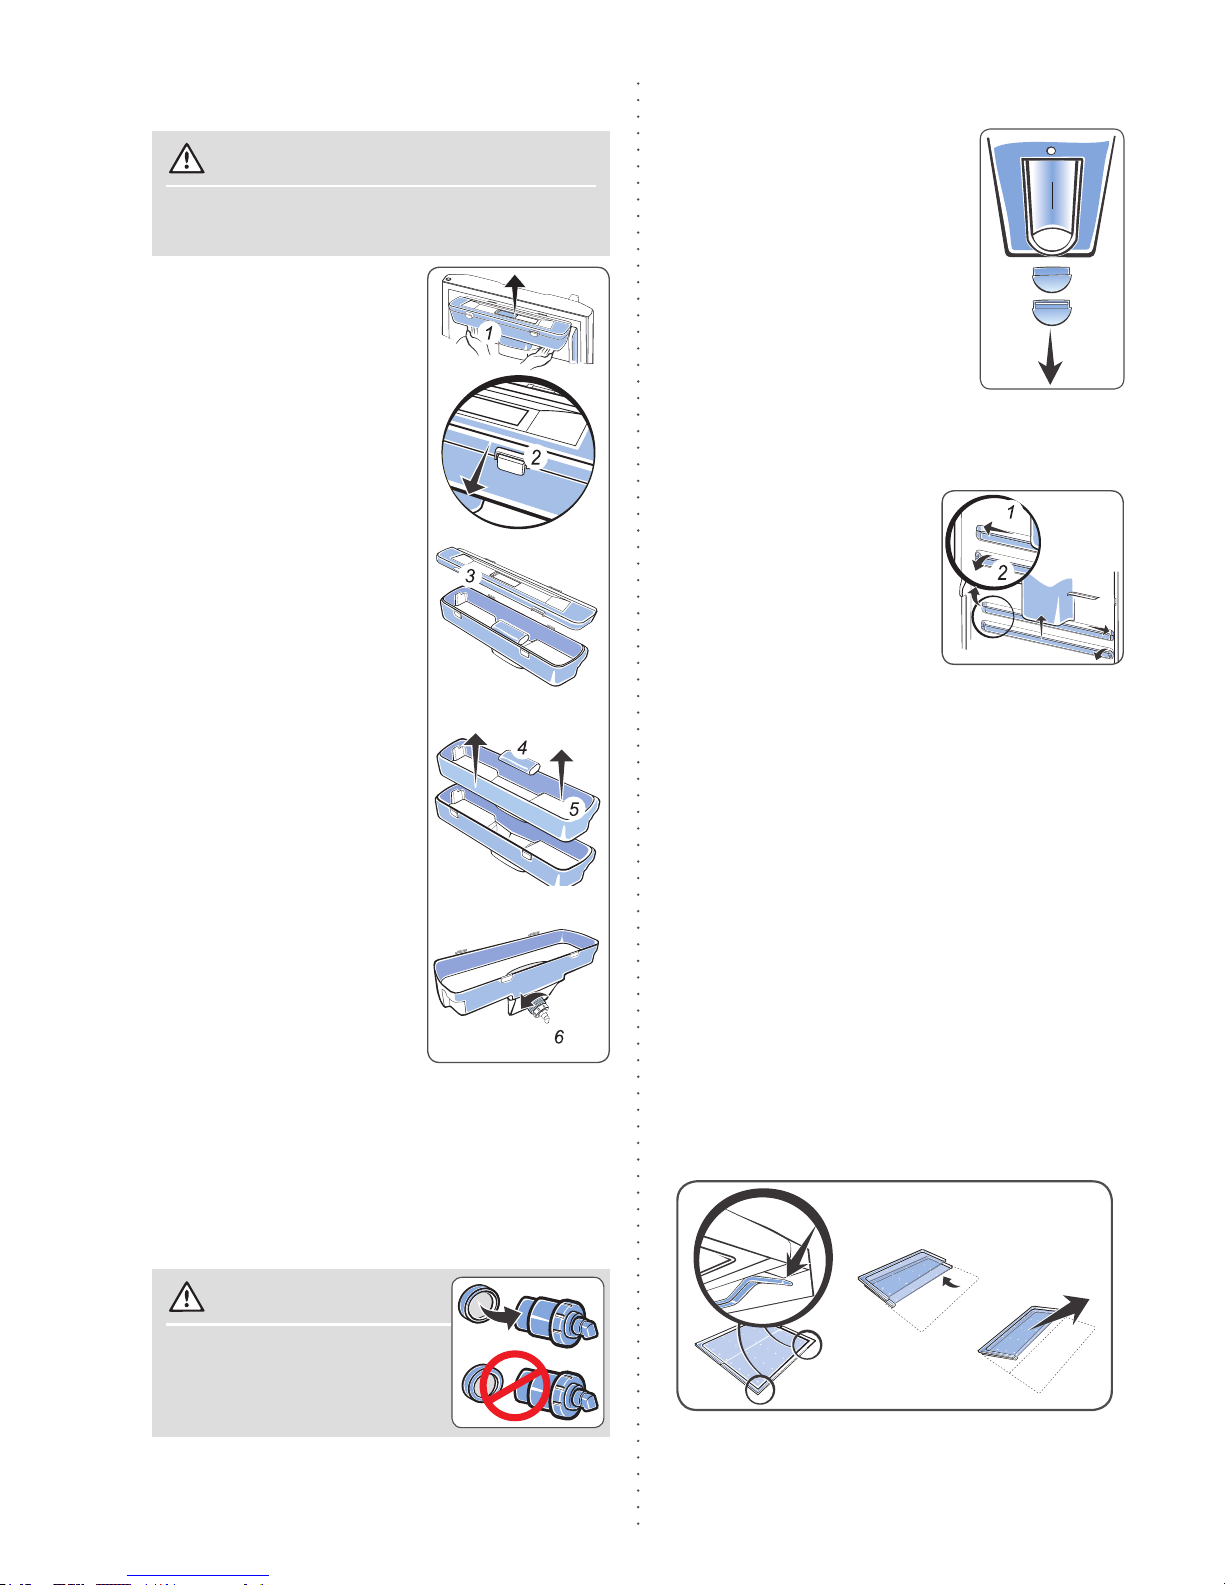
1. Remove the fridge door
container, lifting and pulling
according to the illustration (1).
2. Release the 6 locks carefully (2).
3. Remove the main container
cover (3).
4. Remove the rell carefully,
purifier (4) and remove the
inside container (5).
5. Remove the tap of the container, rotating it clockwise (6).
6. Use an object without tips to
take the rubber seal cover from
the main container (3) and of
the internal container (5).
7. Remove the rubber seal of
the tap and clean all the parts
(except the rell) with warm
water and mild soap. After
cleaning the parts, wash them
in running water.
8. Put the tap in the container,
observing the correct side to
mount the rubber part, according to the illustration beside.
9. Put the rubbers seal cover
from the main container and of
the internal container.
10. Asemble the inside container in the main container.
11. Install the rell (purier) in
the internal container, verifying if it ts in a manner to
keep the sealing between the parts.
12. Attach the main container cover using the 6 locks.
13. To avoid leakage, rmly tighten the tap clockwise
and t the container rmly, until there is no looseness.
Do not wash the rell, under the risk of contamina-
ting it.
Cleaning Aluminum Bar Area
If really exists the need to
remove the Aluminum Bar
to clean the door area where
the Bar is mounted, proceed
in the following manner:
Press the buttons of the
Locks of the Aluminum Bar
(1) and turn it on the contrary
direction to the door (2), the buttons may be pressed
one at a time.
After that, push the Aluminum Bar in the direction
showed in the illustration.
A
B
C
Water Drop Collector Cleaning
1. Remove the drip pan from the
refrigerator door.
2. Dry the water whenever ne-
cessary.
3. Clean the drip pan and the
cover with warm water and
neutral soap.
4. Fit the drip pan cover on the
refrigerator door.
 Loading...