


User Reference Manual
95000
performance loop laboratory

TABLE OF CONTENTS
MEET THE 95000… 3
What’s in the Box? | Main Features | Specifications
QUICK START GUIDE… 4
RECORDING AND WORKING WITH MULTITRACK LOOPS |
Make Connections and Set Input Level | Prior to Recording | Record a Multitrack Loop | Overdub onto a Track | Undo and Redo | Erase a Track | Erase a Loop | Record 2 Tracks Simultaneously (Stereo) | Record a Quantized Loop | MIXING | Prepare to Mix | Perform a Mix | RESTORE FACTORY SETTINGS
IN DEPTH: RECORDING TRACKS… 22
Prepare to Record a New Loop | Non-Quantize vs. Quantize Loop Recording | Stereo Mode | Record a New Loop | End a New Loop | Loop Length and Storage Capacity | Change Loop Numbers | Erase Loops and Tracks
IN DEPTH: OVERDUBBING TRACKS… 25
Choose a Track to Overdub | Overdubbing | DUB Settings (aka Feedback) | Manipulating Sounds While Overdubbing | Punching-In
BASIC TERMINOLOGY AND
KEY CONCEPTS… 7
MONITORING… 9
DRY OUTPUT L/R Faders and Pan Knobs | CLIX LVL Knob | HEADPHONE LVL Knob | MASTER LVL Knob
THE RECORD TRANSPORT… 10
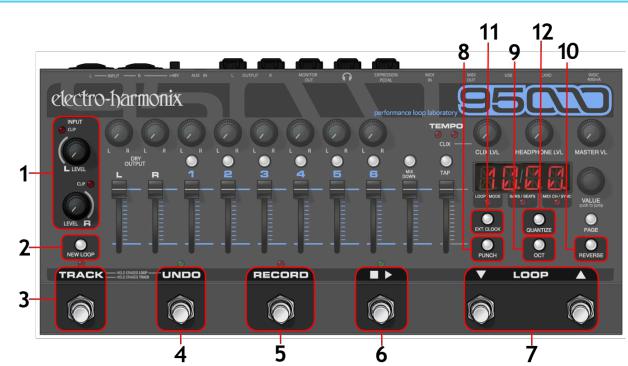
INPUT LEVEL L/ R Knobs and CLIP LEDs | NEW LOOP Button | TRACK Footswitch | UNDO Footswitch | RECORD Footswitch | PLAY ( ) Footswitch | LOOP Selection Footswitches | PUNCH Button | OCT Button | REVERSE Button | EXT. CLOCK Button | QUANTIZE Button
TRACKS, TRACK SELECTION, MIXDOWN,
TEMPO… 14
TRACKS OVERVIEW | TRACK Faders | TRACK SELECT Buttons | MIXDOWN Track | TRACK PAN Knobs | MIXDOWN Fader | MIXDOWN Button | TEMPO Slider | TAP Button | CLIX LEDs
LED DISPLAY AND CONTROL… 17
LED DISPLAY | VALUE Push to Jump Knob | PAGE Button | PRIMARY MODE PAGES | LOOP/DUB Mode | BARS/BEATS Mode | MIDI CH/SYNC Mode | SYNC Modes | SECONDARY MODE PAGES | CLIX Metronome | TEMPO Slider Resolution | Count-In | Loop Fade-Out
REAR CONNECTIONS AND CONTROLS… 20
9VDC 400mA Power Jack | microSDHC Card Slot | USB Connector | MIDI OUT Connector | MIDI IN Connector | EXPRESSION PEDAL Jack | HEADPHONE Jack | MONITOR OUT Jack | L and R OUTPUT Jacks | AUX IN Jack | +48V Phantom Power Button | L and R INPUT Combo Jacks
IN DEPTH: MIXDOWN… 27
Mixdown Basics | Performing a Mixdown | After the Mixdown | Constant Tempo Mixdown Mode | Using Constant Tempo Mixdown Mode
MEMORY CARD AND USB… 29
About the microSDHC Memory Card | Overview of microSDHC Memory Card Requirements, Size and Performance | Hot to Format microSDHC Memory Cards | How to Remove the microSDHC Card | USB Port: How to Interface the 95000 with a Computer |
95000’s microSDHC Card File System | Backing-Up Files | Restoring Files | Importing Audio Files
MIDI SYNC… 32
IN (Internal Clock Sync Mode) | XT (Normal External Clock Mode) | BX (Beat Sync External Clock Mode) | TUTORIAL: the 95000 as MIDI Clock Slave and MIDI Clock Master
MIDI CONTROLLER AND
PROGRAM MESSAGES… 35
Overview | Set the MIDI Channel | MIDI Control Change (CC) Messages | MIDI Program Change (PC) Messages | MIDI Thru | Change Loop Numbers with MIDI | MIDI CC Tables | MIDI Program Change (PC) Messages
SIGNAL PATH DIAGRAM… 38
FACTORY DRUM LOOPS… 39
WARRANTY… 40
FCC COMPLIANCE… 40
©2017 Electro-Harmonix. All rights reserved. 95000 and Electro-Harmonix and logo are trademarks of New Sensor/Electro-Harmonix. Product and company names used within the manual are trademarks of their respective companies.
95000 Manual Version 1.0
2

MEET THE 95000
Thank you for purchasing the Electro-Harmonix 95000 Performance Loop Laboratory. Please set aside some time to read this manual and familiarize yourself with this unique instrument’s layout and operation. Then keep the manual close by to use as a reference guide.
The manual is divided into the following basic sections:
What’s in the Box, Main Features, Specifications
Quick Start Guide
Basic Terminology and Key Concepts
Overview of the controls of the 95000
In-depth look at the operation of the 95000
MIDI functions and assignments
What’s in the Box
95000 Performance Loop Laboratory
User Reference Manual
16GB microSDHC Memory Card
9.6VDC 0.5A power supply
Main Features
Total recording time up to 375 minutes with 16GB card
Stores up to 100 multi-track loops per card
6 tracks plus one stereo Mixdown track
Records one or two tracks (stereo or 2 mono) at once
Stereo dry output level controls
Undo/Redo your last recording/overdub per track
Overdub (DUB) with adjustable feedback amount
Reverse button instantly changes loop direction
Octave button instantly halves the loop’s playback speed
Quantize function allows for playing along with CLIX metronome and locking loops to external devices
Specifications
Current Draw: 400mA at 9V. Maximum allowable power supply voltage: 10.5 VDC
Digital Audio Specifications: 16-bit/44.1 kHz
microSDHC Memory Card Size: 4GB-32GB
Maximum Loop Recording Time on Included 16GB microSDHC Memory Card: up to
375 minutes
Headphones Output Power: 0.1W into 16 ohms
9.6VDC 0.5A power supply
Combo Mic/Instrument/Line input with adjustable gain and phantom power
Headphone output
Data entry rotary knob
4-digit LED display
TAP Tempo
Octave/Reverse/Quantize functions
Removable microSDHC Memory Card (16GB card included)
USB port for easy transfer of files to and from computer
MIDI Clock sync and control
Expression pedal input jack to control loop audio volume
20 Factory-supplied drum loops
Convenient dedicated footswitch functions
Rugged, all-metal stage-worthy chassis
Input Impedances:
L and R 1/4" Inputs: 2MΩ L and R XLR Inputs: 2.5kΩ AUX Input: 9.5kΩ
Output Impedances:
L and R 1/4" Outputs: 400Ω Monitor 1/4" Output: 400Ω Headphones Output: 2Ω
3

QUICK START GUIDE
RECORDING AND WORKING WITH MULTITRACK LOOPS
Make Connections and Set Input Level
1.Plug your instrument or microphone into either the L or R INPUT jacks and adjust the corresponding INPUT knob so that the CLIP LED barely lights up on your loudest notes.
2.Connect the MONITOR OUT jack to an amplifier or mixer. Turn up the HEADPHONE LVL knob to approximately 50%.
3.Plug the supplied AC Adapter into an AC outlet and insert its output plug into the power jack on the rear panel of the 95000.
Prior to Recording
1.Raise the corresponding L or R DRY OUTPUT fader so that you can hear your instrument.
2.Raise the TRACK 1 fader so that you can hear your recording when you finish.
3.Make sure the QUANTIZE LED is off.
4.If you do not want to hear the metronome, turn the CLIX LVL knob down to zero; if you do want to hear the metronome, adjust to taste. Adjust the tempo of the metronome with the TEMPO slider or by pressing the TAP button—in time—at least twice.
5.Set the TEMPO slider to 50% (or your preferred tempo if listening to the metronome). You may also tap in the tempo using the TAP button.
6.Find an empty loop by pressing the LOOP UP () or DOWN () footswitches. The left two digits of the display show you the loop number. If there is a dot next to the loop number then the loop contains audio; no dot indicates that the loop is empty.
Record a Multitrack Loop
1.Press the RECORD footswitch to start recording immediately. The 95000 will begin recording onto TRACK 1. The red 4-digit LED displays the progression of the loop in bars and beats.
2.When you are ready to end the loop and set the loop length, press either the RECORD or PLAY ( ) footswitches. Press RECORD to stop recording and immediately begin playback of the loop you just recorded. Press PLAY to loop the 95000 back to the beginning, put the 95000 into OVERDUB mode, and automatically continue recording onto TRACK 2. To exit OVERDUB mode, press the RECORD button.
3.To record on another track, press the TRACK footswitch to cycle through the 6 tracks OR go directly to a track by pressing its illuminated button. The lit track button indicates the track is enabled for recording.
Overdub onto a Track
1.You can continuously overdub onto any one (or pair) of the tracks.
2.Record a New Loop onto TRACK 1. See Record a Multitrack Loop (above).
3.Press the TRACK footswitch until TRACK 1 is lit, or you may directly press the TRACK 1 button.
4.Press the RECORD button. Both the RECORD and PLAY LEDs will light up to show that you are in Overdub mode. The lit TRACK 1 LED indicates you are overdubbing onto TRACK 1.
5.Move TRACK 1’s fader to adjust its volume.
6.Repeat these steps to overdub onto any track number—just press the TRACK footswitch until the track on which you want to overdub is selected.
4
Undo and Redo
1.Select the track you want to undo.
2.Press and release the UNDO footswitch. The last layer of audio on the track is removed and the previous version of the track begins playing. The UNDO LED lights up.
3.If only one layer of audio was recorded on the track, then the track plays back silence.
4.Press and release the UNDO footswitch to return—or redo—the audio layer that undo had removed. The previous layer of audio begins playing back as you last heard it.
Erase a Track
1.Select the track you want to erase.
2.Press and hold the TRACK footswitch.
3.After about a second you will see both the TRACK LED and selected Track button blink. Continue to hold down TRACK (for about one more second) until the TRACK LED stops blinking.
4.You may now release the footswitch as the track has been erased. You can UNDO the Track Erase by pressing the UNDO footswitch.
Erase a Loop
1.Press and hold both the TRACK and UNDO footswitches.
2.After about one second, all the Track buttons blink. Continue to hold down the footswitches for about another second until the LEDs stop blinking. You may now release the footswitches. The loop has
been erased.
CAUTION: You cannot undo a loop erase. Once you erase a loop it is gone forever (unless you backed it up onto a computer).
Record 2 Tracks Simultaneously (Stereo):
1.Press and hold both buttons of the stereo pair that you want to record. Stereo mode is enabled immediately upon pressing the second button in the pair. You should see the two tracks in the stereo pair lit up.
2.After connecting to the L and R INPUT jacks, adjust the INPUT Level knobs so that the CLIP LEDs barely light. The L INPUT records to odd numbered tracks only; R INPUT records to even numbered tracks.
3.Press the RECORD footswitch to begin recording immediately.
4.To stop recording, press either the RECORD or PLAY footswitches.
Record a Quantized Loop
1.Press the QUANTIZE button to enable Quantize mode. The button will light up.
2.Turn the CLIX LEVEL knob up so you hear the metronome beat coming out of either the MONITOR or HEADPHONES output.
NOTE: The CLIX metronome is not output through the L and R OUTPUT jacks.
3.The metronome tempo may be adjusted by the TEMPO slider or by tapping in a tempo with the TAP button. When the tempo is changed, the display will briefly show the tempo in BPM.
4.Press the RECORD footswitch. The 95000 will not immediately begin recording but instead will give you a 1-bar count-in, where beat 1 of the bar occurs at the moment you press RECORD. After the Count-In is complete, the 95000 begins recording on beat 1 of the following bar.
NOTE: The Count-In bar length may be adjusted or disabled.
5.During Count-In, the bars count down and the beats count up with a minus sign in front of the bar number. The Track 1 button also blinks rapidly.
6.The 95000 begins recording at the end of the Count-In, as indicated by the flashing Track 1 button going solid and the minus sign being removed from the display.
7.Stop recording by pressing either the RECORD or PLAY footswitches. Press RECORD or PLAY within the first 2 beats of the current bar and the 95000 will truncate the loop length to the end of the previous bar. Press RECORD or PLAY during the 3rd or 4th beats of the current bar and the 95000 will finish recording the current bar and then stop recording. For example, if you want to record a 2 bar loop, you can press the PLAY button during the 3rd and 4th beat of the second bar or within the first 2 beats of the third bar. The QUANTIZE button will blink rapidly until the loop has finished recording.
5
MIXING
Prepare to Mix
1.You can mix your 6 tracks down to one stereo Mixdown track at any time. For now, let’s start with the 95000 in Idle (stopped) mode. If the 95000 is playing or overdubbing a loop, press the PLAY footswitch to stop.
2.Press the MIXDOWN button once and it will light solid to indicate that the Mixdown track has been enabled for overdubbing.
3.Press the PLAY footswitch. Your loop will play back. Move the Volume and Pan controls of the 6 tracks to establish a satisfactory balance.
NOTE: You can adjust the Volume and Pan controls as much as you like when recording the Mixdown track.
Perform a Mix
1.When you are ready to record the Mixdown track, press the RECORD footswitch. You will immediately begin recording your mix onto the Mixdown track.
2.The Mixdown track records the audio output from the 95000’s mixer, enabling you to record your volume fader and pan movements as you hear them.
3.To stop recording the Mixdown track, press either the PLAY or RECORD footswitch.
4.Move the Mixdown slider up, move all of the track sliders down. Press PLAY to hear the newly recorded mix.
NOTE: The original audio on the 6 mono tracks remains after you complete a mixdown. In other words, the mixdown operation does not erase the 6 tracks. The Dry Input signal is not recorded to the Mixdown track. Only audio that was previously recorded onto the 6 tracks will be recorded to the Mixdown track.
RESTORE FACTORY SETTINGS
To restore your 95000 to its original factory setting: press and hold the REVERSE button for 5 seconds or longer until you see some of the TRACK buttons blink and all three small LEDs below the Display are unlit.
Restoring the 95000 factory settings has NO effect on the audio loops you store on the microSDHC card.
6

BASIC TERMINOLOGY AND KEY CONCEPTS
ERASE: The act of deleting an entire loop, one track, or a stereo pair of tracks when a stereo pair is enabled.
You cannot undo a loop that has been erased. Once a loop is erased it is permanently deleted.
To erase an entire loop do one of the following:
Press and hold the TRACK and UNDO footswitches simultaneously for two seconds. After the Track LEDs stop blinking, the loop is erased.
Press the NEW LOOP button while the loop is idle or in playback. Then press the RECORD footswitch to begin recording. Once you press the RECORD footswitch, the old audio that was at the current loop location is erased.
While recording a New Loop, press the NEW LOOP button to abort the recording and immediately erase the tracks.
The 95000 does allow you to undo/redo a Track Erase.
IDLE: Equivalent to stop. When idle, the 95000 is not playing, recording or overdubbing.
LOOP: A loop is made up of 6 mono tracks and one stereo Mixdown track. All tracks are the exact same length.
Think of a loop in terms of multi-track tape: the 6 tracks and the Mixdown track in a 95000 loop always playback, overdub or record in parallel, at the same speed and in the same direction. The one exception to this rule occurs with the use of Constant Tempo Mixdown mode, as described later in this manual.
Loops are recorded and played back directly from the inserted microSDHC card.
Up to 100 loops can be stored on one card.
Upon creating a New Loop, the audio for all 6 mono tracks and the Mixdown track are established on the microSDHC card as silence; they take up space on the card even though you haven’t actually recorded those tracks yet.
Recording time: The total recorded audio time; varies with size of microSDHC Memory Card.
Loop time: The actual loop length time that you can record. The loop length time will always be less than the total recording time. This time difference occurs because each loop consists of 6 mono tracks and the stereo Mixdown track, and every loop you record has all seven of these tracks as .WAV files at equal length.
OVERDUB/OVERDUBBING: The recording of any track after the initial recording of a New Loop. The RECORD and PLAY LEDs are both lit but the PUNCH button is off. Overdubbing can mean:
Recording on a track—other than Track 1—that has not been previously recorded.
Layering notes or instruments on top of each other on one track or a stereo pair of tracks. The tracks’ DUB setting acts like a feedback control that may attenuate any previously recorded audio with each loop cycle.
QUANTIZE: A mode that allows the user to create loops that are exact bar lengths. Let’s imagine you need to create a loop that is exactly 3 bars long. Enable Quantize mode to help make this happen.
In Quantize mode, the 95000 starts and stops new-loop recording automatically.
When using Quantize mode, it is best to listen to the 95000’s built-in CLIX metronome or synchronize the 95000 to an external device that will produce a beat so you know exactly when recording will stop and start.
By factory default, when Quantize is enabled, a loop begins recording after a one bar Count-In. You can change the number of bars of the Count-In to up to 8 bars, or you can disable the Count-In altogether.
When Quantize is disabled, you are able to create loop lengths that are completely freeform. Loop recording starts immediately upon pressing either RECORD or PLAY footswitch and ends immediately upon pressing either RECORD or PLAY footswitch.
RECORD: The act of recording a New Loop. When stereo is disabled, the audio is recorded to Track 1. If stereo is enabled, the audio is recorded onto Tracks 1 and 2.
7
TRACK: A track is a discrete or separate channel of loop audio that may be recorded, overdubbed or mixed independently from other tracks.
All tracks in a loop are the same length.
All tracks contained in a loop playback, record or overdub at the same speed and direction as the other tracks.
Each loop contains 6 mono tracks and one stereo track.
UNDO/REDO:
Undo: The undo function allows you to remove the last overdub layer that was recorded on a track.
The 95000 has one level of undo for each track. You can independently undo each track without affecting the other tracks.
To perform an undo, first ensure the selected track is the one that you want to undo. Then press and release the UNDO footswitch. The LED above the UNDO footswitch lights to indicate that an undo has been performed for the selected track.
If you press the RECORD footswitch to overdub after performing an undo on a given track, the audio layer removed by the undo function will be permanently deleted and cannot be retrieved.
Redo: After performing an undo, restore the layer of audio that was removed by initiating the redo function.
To perform a redo, first ensure the selected track is the one that you want to redo. Also, ensure that the UNDO LED is lit—if it is not, there is nothing to redo. Then press and release the UNDO footswitch to perform the redo.
The redo function restores only the last layer of audio that undo removed.
8

MONITORING
Use the monitoring controls to vary the listening volume of various signals. None of the following monitoring controls affect the actual recorded signal levels.
1. DRY OUTPUT L/R Faders and Pan Knobs
The DRY OUTPUT faders and pan knobs allow you to monitor your instrument when recording or to play along with a loop you have already recorded. Adjust the output volume of your instrument with the DRY OUTPUT fader. Use the pan knobs to direct the Left and Right Inputs to the Left and Right Outputs. When pan is set to the full CCW position, the Input is monitored at the Left Output. When pan is set to the full CW position, the Input is monitored at the Right Output. When pan is set to the center-detent middle position, the Input is mixed equally to both Outputs. When monitoring a stereo signal, you will generally position the pan pots hard left and hard right. The settings of the DRY OUTPUT faders and pan pots have no influence on the actual recorded signal.
When recording in mono, both inputs are summed together and recorded onto the same track. When recording in stereo, the two inputs remain separate: the Left Input is sent to the odd-numbered tracks and the Right Input is sent to the even-numbered tracks.
2. CLIX LVL Knob
Use the CLIX LVL knob to set a comfortable volume level for the CLIX metronome within the monitoring chain.
The CLIX metronome is routed to the MONITOR OUT and Headphones outputs only. The CLIX metronome is not present at the L and R OUTPUT jacks.
3. HEADPHONE LVL Knob
The HEADPHONE LVL knob adjusts the output volume of the rear-mounted Headphone Output jack and the MONITOR OUT jack. The HEADPHONE LVL knob is an analog knob placed in the signal path after the 95000’s D/A Converter. Therefore, it has no bearing on the level of the recorded audio that is saved to the microSDHC card. The signal at the MONITOR OUT jack is fed from the headphone amplifier, and so you must turn up the HEADPHONE LVL knob to hear audio at the MONITOR OUT jack.
4. MASTER LVL Knob
This knob is a master volume control for all signals and output jacks including the Loop, Dry levels and CLIX levels, as well as the L, R, Headphone and MONITOR Output jacks. MASTER LVL does not control the AUX IN volume.
9
THE RECORD TRANSPORT
1. INPUT LEVEL L/ R Knobs and CLIP LEDs
Use the INPUT LEVEL L and R knobs to adjust the amplitude of the left and right input signals before they are sent to the A/D Converter. To set the proper level, turn each INPUT LEVEL knob clockwise to the point where the maximum level causes the CLIP LEDs to barely blink or not light up at all. These LEDs light up when the audio signal clips—or is on the verge of clipping—the A/D Converter. In other words, the CLIP LEDs light when the signal’s amplitude is greater than what the A/D Converter can properly handle. The L LED lights when the LEFT Input clips and the R LED lights when the RIGHT Input clips.
The trick to achieving the best quality digital audio is to record the hottest possible signal without clipping (overloading) the A/D converter. Typically, you want to record a signal that is neither too low in volume nor a signal that clips very often (unless that is the sound you are going for).
NOTE: When recording in mono, both the Left and Right inputs are summed together and recorded onto the active track.
Minimize hiss when recording in mono by turning down the unused INPUT LEVEL knob.
10
2. NEW LOOP Button
Press the NEW LOOP button to put the 95000 into Record-Ready mode. The NEW LOOP button lights green whenever the currently selected loop is empty. Upon pressing NEW LOOP, the red RECORD LED above the RECORD footswitch blinks to indicate that the 95000 is ready to record. Press the NEW LOOP button again if you decide you want to exit RecordReady mode. Press the RECORD footswitch to begin recording a New Loop. If the Loop had been previously occupied with audio, the old audio is immediately erased upon pressing the RECORD footswitch. If you press the NEW LOOP button while recording a New Loop, the recording is canceled and whatever you recorded up to that point is discarded. Use the table on the next page to explore how pressing the NEW LOOP button acts depending on the current mode of the 95000.
|
Current Mode |
|
+ NEW LOOP press |
|
NEW LOOP LED state |
|
Idle |
|
Record-Ready |
|
ON |
|
Playback |
|
Record-Ready; continues playing loop |
|
ON |
|
Overdubbing |
|
Overdubbing; NEW LOOP Button is ignored |
|
OFF |
|
Record-Ready |
|
Reverts to previous mode before Record-Ready |
|
OFF |
|
Recording New Loop |
|
Cancels New Loop recording and discards the audio |
|
ON |
|
|
that had been recorded; loop remains empty |
|
||
|
|
|
|
|
3. TRACK Footswitch
Use the TRACK footswitch to advance tracks, erase tracks or to erase an entire loop.
Advance Tracks
Each press and release of the TRACK footswitch advances to the next track or pair of tracks and simultaneously activates the newly selected track(s). The buttons associated with each track or pair of tracks light green when active.
Erase Tracks
Erase a track so that it plays silence. Typically, the Track Erase procedure takes about 2 seconds:
Select a track (or stereo pair).
Press and hold the TRACK footswitch until the TRACK LED and the active Track Select button(s) blink rapidly.
Keep holding the TRACK switch until the LEDs stop blinking; the track is now erased.
To abort the erase track operation, release the TRACK switch early, either while the LED is blinking or prior to the start of it blinking.
Tracks can be erased while the 95000 is idle, playing-back or overdubbing.
A track-erase operation can be undone in the same way as a regular recording. See Undo/Redo later on this page.
Erase a Loop
Completely erase (delete) a loop, including the contents of the loop's folder on the microSDHC card. Once this action is performed, you CANNOT use UNDO to restore an erased loop.
Simultaneously press and hold the TRACK and UNDO footswitches until the TRACK LED and all track-select buttons start to blink rapidly.
Continue holding the TRACK and UNDO footswitches until the LEDs stop blinking. Once the LEDs extinguish, the loop has been erased. The NEW LOOP button lights up green to indicate the loop is empty.
To abort the erase operation, release the TRACK and UNDO footswitches before the buttons stop blinking.
Abort New Loop Recording
While recording a New Loop, you may abort the recording and delete all audio files just recorded by simultaneously pressing both the TRACK and UNDO footswitches. Once both footswitches are pressed, the New Loop recording will be aborted. The audio files are permanently deleted.
4. UNDO Footswitch
The 95000 supports one level of undo/redo per track. This functionality allows the last recorded audio layer on a given track to be removed and then subsequently restored. Each track’s UNDO operation is independent from the other tracks.
Undo/Redo
Press and release the UNDO footswitch to undo the last recording or overdub layer on the currently selected track. You can select and undo either a mono track, a stereo-pair track or a Mixdown track. If only one layer of audio has been recorded on the track, pressing UNDO will cause the track to play back silence.
Press and release the UNDO footswitch again to restore (REDO) the last recording/overdub layer that had previously been undone.
The UNDO footswitch can be pressed while the 95000 is idle, playing or overdubbing. If you are overdubbing, the 95000 will switch to playback mode and then undo the last overdub on the currently selected track. Press the UNDO footswitch again to redo/restore the previous overdub.
The green LED just above the UNDO footswitch lights if an undo operation has been performed on the currently selected track. A lit UNDO LED indicates that redo could be performed. Press UNDO again to redo/restore the last audio layer; the UNDO LED turns off.
11

5. RECORD Footswitch
Depending on the 95000’s current mode, the RECORD footswitch serves a few purposes, all of which enable the 95000 to enter/exit one of the recording modes: Record, Overdub or Punch-In. The red RECORD LED will light up solid anytime the 95000 is recording or overdubbing audio. The RECORD LED blinks at a medium rate when the 95000 is in Record-Ready mode. The table below explains the result of pressing the RECORD footswitch in relation to the current mode of the 95000.
Current Mode |
+ RECORD |
Record LED State |
Idle (no loop in memory) |
Begin Recording New Loop |
LED ON |
|
|
|
Idle (with loop in memory) |
Overdubbing |
LED ON |
|
|
|
Playback |
Overdubbing |
LED ON |
|
|
|
Overdubbing |
Playback |
LED OFF |
|
|
|
Record-Ready |
Begin Recording New Loop |
LED ON |
|
|
|
6. PLAY ( ) Footswitch
The PLAY ( ) footswitch is used to toggle Playback on and off. The green PLAY LED will light anytime the 95000 is playing or overdubbing audio. The table below explains the result of pressing the PLAY button in relation to the current Record/Playback mode of the 95000. NOTE: Each time a loop cycles back to the beginning, the PLAY LED blinks once to signify the start of the loop.
Current Mode |
|
+ PLAY |
|
Play LED State |
|
|
|
|
|
Idle (no loop in memory) |
|
Idle, No Change |
|
LED OFF |
|
|
|
|
|
Idle (with loop in memory) |
|
Playback |
|
LED ON |
|
|
|
|
|
Playback or Overdubbing |
|
Idle |
|
LED OFF |
(Fade-out disabled) |
|
|
||
|
|
|
|
|
Playback or Overdubbing |
|
Fade-Out |
|
LED BLINKS until fade-out is |
(Fade-out enabled) |
|
|
complete, then LED OFF |
|
|
|
|
||
Record-Ready |
|
Playback of current loop if it |
|
LED ON |
(loop in memory) |
|
contains audio |
|
|
|
|
|
||
Recording New Loop |
|
Overdubbing, sets loop length |
|
LED ON |
7. LOOP Selection Footswitches
Loop selection is incremented or decremented using the LOOP UP and LOOP DOWN footswitches. Press and hold either footswitch to advance through the loops at a faster speed. The table below explains the result of pressing the LOOP UP and LOOP DOWN footswitches in relation to the current mode of the 95000. NOTE: You can also change the current loop by using the VALUE knob. Refer to the LED DISPLAY AND CONTROL section later in this manual to learn about the use of the VALUE knob.
Current Mode |
|
+ LOOP or |
Idle |
|
Loop increments or decrements by one with each press and release |
|
of the LOOP and footswitches. |
|
|
|
|
|
|
Current loop continues to play. Loop increments or decrements and |
|
|
loop display number blinks. If the blinking loop number contains |
Playback |
|
audio, the New Loop number begins playback when the old loop |
|
|
reaches its end point. If the blinking loop number has no audio, the |
|
|
old loop continues playing indefinitely. |
Overdubbing |
|
Overdubbing (no change) |
|
|
|
Record-Ready |
|
Cancels Record-Ready. Loop increments or decrements by one with |
|
each press and release of the LOOP and footswitches. |
|
|
|
|
Recording New Loop |
|
Recording New Loop (no change) |
|
|
|
12
 Loading...