

GE-CL 36 Li E
D Originalbetriebsanleitung
Akku-Laubsauger
GB Original operating instructions
Cordless blower vac
F Instructions d’origine
Aspirateur de feuilles sans fi l
I Istruzioni per l’uso originali
Aspiratore di foglie a batteria
DK/ Original betjeningsvejledning
N Akku-løvsuger
S Original-bruksanvisning
batteridriven lövsug
NL Originele handleiding
Accu-bladzuiger
E Manual de instrucciones original
Aspirador de hojas con batería
P Manual de instruções original
Aspirador de folhas secas sem fi o
FIN Alkuperäiskäyttöohje
Akkukäyttöinen lehti-imuri
RUS Оригинальное руководство по
эксплуатации
Пылесос для листвы на
аккумуляторе
PL Instrukcją oryginalną
Akumulatorowy odkurzacz do liści
7
Art.-Nr.: 34.336.00 I.-Nr.: 11015
Anl_GE_CL_36_Li_E_Solo_SPK7.indb 1Anl_GE_CL_36_Li_E_Solo_SPK7.indb 1 22.03.16 09:0222.03.16 09:02

1
5
10
3
6
4
8
2
1
11
9
2
1
2
3
7
5
4
8
11
7
10
12
13
9
- 2 -
Anl_GE_CL_36_Li_E_Solo_SPK7.indb 2Anl_GE_CL_36_Li_E_Solo_SPK7.indb 2 22.03.16 09:0222.03.16 09:02
3a 3b
12
3c 3d
2
12
12
3e 3f
99
13
D
11
- 3 -
Anl_GE_CL_36_Li_E_Solo_SPK7.indb 3Anl_GE_CL_36_Li_E_Solo_SPK7.indb 3 22.03.16 09:0222.03.16 09:02
11
4a 4b
5 6a
6b 7
13
A
3
B
- 4 -
Anl_GE_CL_36_Li_E_Solo_SPK7.indb 4Anl_GE_CL_36_Li_E_Solo_SPK7.indb 4 22.03.16 09:0222.03.16 09:02

8 9
4
C
6
10 11
EE
10
5
BA
8
4
5321
- 5 -
Anl_GE_CL_36_Li_E_Solo_SPK7.indb 5Anl_GE_CL_36_Li_E_Solo_SPK7.indb 5 22.03.16 09:0222.03.16 09:02

D
Gefahr!
Beim Benutzen von Geräten müssen einige Sicherheitsvorkehrungen eingehalten werden, um
Verletzungen und Schäden zu verhindern. Lesen
Sie diese Bedienungsanleitung / Sicherheitshinweise deshalb sorgfältig durch. Bewahren Sie diese gut auf, damit Ihnen die Informationen jederzeit
zur Verfügung stehen. Falls Sie das Gerät an andere Personen übergeben sollten, händigen Sie
diese Bedienungsanleitung / Sicherheitshinweise
bitte mit aus. Wir übernehmen keine Haftung für
Unfälle oder Schäden, die durch Nichtbeachten
dieser Anleitung und den Sicherheitshinweisen
entstehen.
1. Sicherheitshinweise
Die entsprechenden Sicherheitshinweise fi nden
Sie im beiliegenden Heftchen!
Gefahr!
Lesen Sie alle Sicherheitshinweise und Anweisungen. Versäumnisse bei der Einhaltung der
Sicherheitshinweise und Anweisungen können
elektrischen Schlag, Brand und/oder schwere
Verletzungen verursachen. Bewahren Sie alle
Sicherheitshinweise und Anweisungen für
die Zukunft auf.
Erklärung des Hinweisschildes auf dem Gerät (siehe Bild 11)
1. Vor Inbetriebnahme Gebrauchsanleitung lesen.
2. Bei Regen oder Schnee Gerät nicht benutzen. Gerät vor Nässe schützen.
3. Dritte aus dem Gefahrenbereich fernhalten
4. Augen- und Gehörschutz tragen.
5. Rotierende Teile! Halten Sie die Hände und
Füße fern von den Öff nungen
10. Drehzahlregler
11. Radträger
12. 2x Schraube lang
13. 3x Schraube kurz
2.2 Lieferumfang
Bitte überprüfen Sie die Vollständigkeit des Artikels anhand des beschriebenen Lieferumfangs.
Bei Fehlteilen wenden Sie sich bitte spätestens
innerhalb von 5 Arbeitstagen nach Kauf des Artikels unter Vorlage eines gültigen Kaufbeleges an
unser Service Center oder an die Verkaufstelle,
bei der Sie das Gerät erworben haben. Bitte
beachten Sie hierzu die Gewährleistungstabelle
in den Service-Informationen am Ende der Anleitung.
Öffnen Sie die Verpackung und nehmen Sie
•
das Gerät vorsichtig aus der Verpackung.
Entfernen Sie das Verpackungsmaterial so-
•
wie Verpackungs-/ und Transportsicherungen
(falls vorhanden).
Überprüfen Sie, ob der Lieferumfang vollstän-
•
dig ist.
Kontrollieren Sie das Gerät und die Zubehör-
•
teile auf Transportschäden.
Bewahren Sie die Verpackung nach Möglich-
•
keit bis zum Ablauf der Garantiezeit auf.
Gefahr!
Gerät und Verpackungsmaterial sind kein
Kinderspielzeug! Kinder dürfen nicht mit
Kunststoff beuteln, Folien und Kleinteilen
spielen! Es besteht Verschluckungs- und Erstickungsgefahr!
Originalbetriebsanleitung
•
Sicherheitshinweise
•
3. Bestimmungsgemäße
Verwendung
2. Gerätebeschreibung und
Lieferumfang
2.1 Gerätebeschreibung (Bild 1/2)
1. Saugrohr vorne
2. Saugrohr hinten
3. Zusatzhandgriff
4. Tragegurt
5. Ein- /Ausschalter
6. Akkuaufnahme
7. Fangsack
8. Umschalter Saugen/Blasen
9. Laufrollen
Anl_GE_CL_36_Li_E_Solo_SPK7.indb 6Anl_GE_CL_36_Li_E_Solo_SPK7.indb 6 22.03.16 09:0222.03.16 09:02
Der Laubsauger/-Bläser ist nur für Laub und Gartenabfälle wie Gras und kleine Zweige zugelassen. Anderweitige Anwendung ist nicht erlaubt.
Die Maschine darf nur nach ihrer Bestimmung
verwendet werden. Jede weitere darüber hinausgehende Verwendung ist nicht bestimmungsgemäß. Für daraus hervorgerufene Schäden oder
Verletzungen aller Art haftet der Benutzer/Bediener und nicht der Hersteller.
Bitte beachten Sie, dass unsere Geräte bestimmungsgemäß nicht für den gewerblichen, hand-
- 6 -

D
werklichen oder industriellen Einsatz konstruiert
wurden. Wir übernehmen keine Gewährleistung,
wenn das Gerät in Gewerbe-, Handwerks- oder
Industriebetrieben sowie bei gleichzusetzenden
Tätigkeiten eingesetzt wird.
4. Technische Daten
Leerlaufdrehzahl n0 ..................8000-13000 min-1
Luftgeschwindigkeit ..............................210 km/h
Saugleistung ......................................... 720 m
Fangsackvolumen .................................... ca. 45 l
Schall-Leistungspegel L
Unsicherheit K ....................................... 3 dB (A)
Schall-Druckpegel L
Vibration a
Unsicherheit K ........................................1,5 m/s
Gewicht ......................................................3,3 kg
Achtung!
Das Gerät wird ohne Akkus und ohne Ladegerät
geliefert und darf nur mit den Li-Ion Akkus der
Power-X-Change Serie verwendet werden!
Power-X-Change
18 V, 1,5 Ah ...................................5 Li-Ion Zellen
18 V, 2,0 Ah ...................................5 Li-Ion Zellen
18 V, 3,0 Ah .................................10 Li-Ion Zellen
18 V, 4,0 Ah .................................10 Li-Ion Zellen
18 V, 5,2 Ah .................................10 Li-Ion Zellen
Die Li-Ion Akkus der Power-X-Change Serie
dürfen nur mit dem Power-X-Charger geladen
werden.
Ladegerät
Netzspannung ..................200-250 V ~ 50-60 Hz
Ausgang
Nennspannung .....................................21 V d. c.
Nennstrom ........................................... 3.000 mA
Beschränken Sie die Geräuschentwicklung
und Vibration auf ein Minimum!
•
•
•
•
•
.........................................2,354 m/s
hv
Verwenden Sie nur einwandfreie Geräte.
Warten und reinigen Sie das Gerät regelmäßig.
Passen Sie Ihre Arbeitsweise dem Gerät an.
Überlasten Sie das Gerät nicht.
Lassen Sie das Gerät gegebenenfalls überprüfen.
............... 92,68 dB (A)
WA
...................... 83,1 dB (A)
pA
3
/h
Schalten Sie das Gerät aus, wenn es nicht
•
benutzt wird.
Tragen Sie Handschuhe.
•
Vorsicht!
Restrisiken
Auch wenn Sie dieses Elektrowerkzeug
vorschriftsmäßig bedienen, bleiben immer
Restrisiken bestehen. Folgende Gefahren
können im Zusammenhang mit der Bauweise
und Ausführung dieses Elektrowerkzeuges
auftreten:
1. Lungenschäden, falls keine geeignete Staubschutzmaske getragen wird.
2. Gehörschäden, falls kein geeigneter Gehörschutz getragen wird.
3. Gesundheitsschäden, die aus Hand-Arm-
2
2
Schwingungen resultieren, falls das Gerät
über einen längeren Zeitraum verwendet wird
oder nicht ordnungsgemäß geführt und gewartet wird.
5. Vor Inbetriebnahme
Das Gerät wird ohne Akkus und ohne Ladegerät geliefert!
Warnung!
Ziehen Sie immer die Akkus, bevor Sie Einstellungen am Gerät vornehmen.
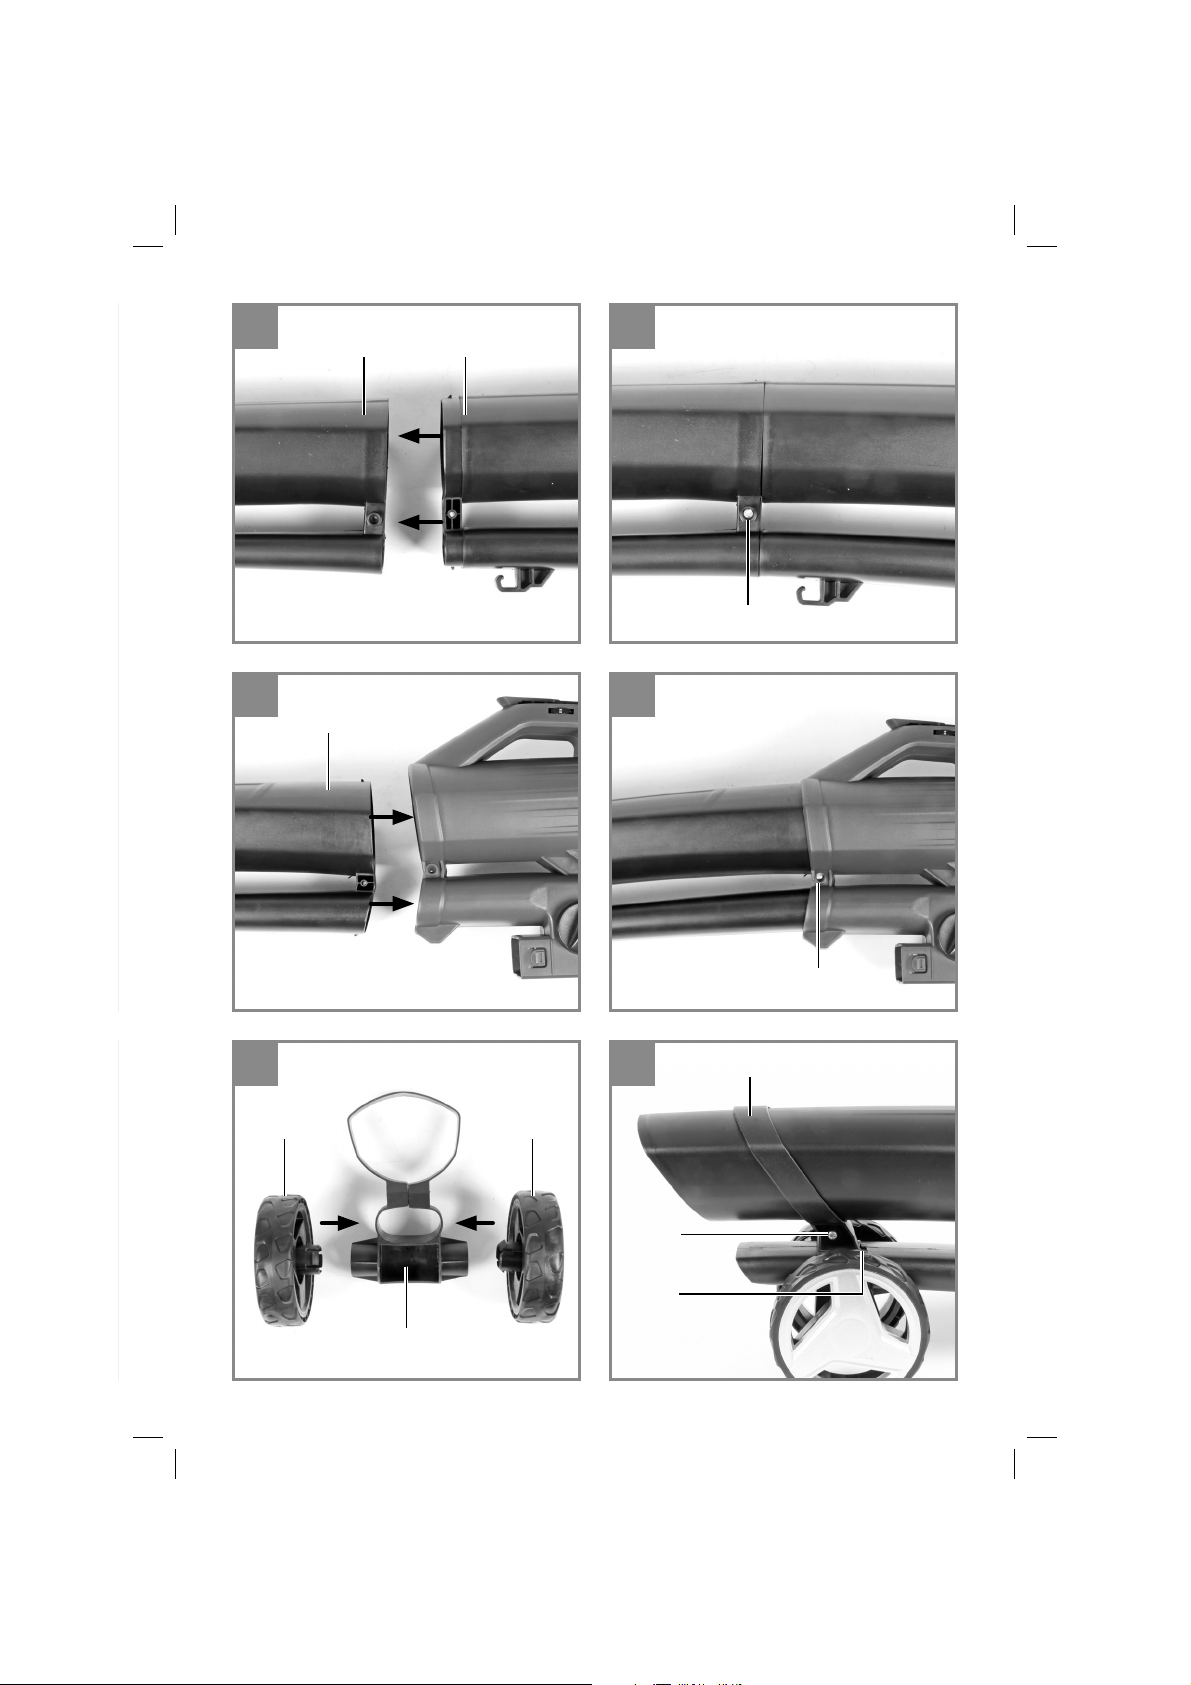
5.1. Montage Saugrohr (Abb. 3a-3f)
Vorderes Saugrohr und hinteres Saugrohr zu-
•
sammenstecken (Abb. 3a) und mit Schraube
(Abb. 3b/Pos. 12) verschrauben.
Nun das komplette Saugrohr in das Motor-
•
gehäuse schieben (Abb. 3c) und mit den
Schrauben (Abb. 3d/Pos. 12) verschrauben.
Die beiden Räder (Abb. 3e/Pos. 9) in den
•
Radträger (Abb. 3e/Pos. 11) einstecken. Auf
hörbares Einrasten achten!
Den Radträger (Abb. 3f/Pos. 11) auf das
•
vordere Saugrohr bis zum Anschlag (Abb. 3f/
Pos. D) aufschieben und mit der Schraube
(Abb. 3f/Pos. 13) fixieren.
Hinweis: Bitte beachten Sie, dass vor dem
Befestigen am Gerät immer zuerst die beiden
Saugrohre fest miteinander verbunden sind
und anschließend nicht mehr zerlegt werden
dürfen!
- 7 -
Anl_GE_CL_36_Li_E_Solo_SPK7.indb 7Anl_GE_CL_36_Li_E_Solo_SPK7.indb 7 22.03.16 09:0222.03.16 09:02

D
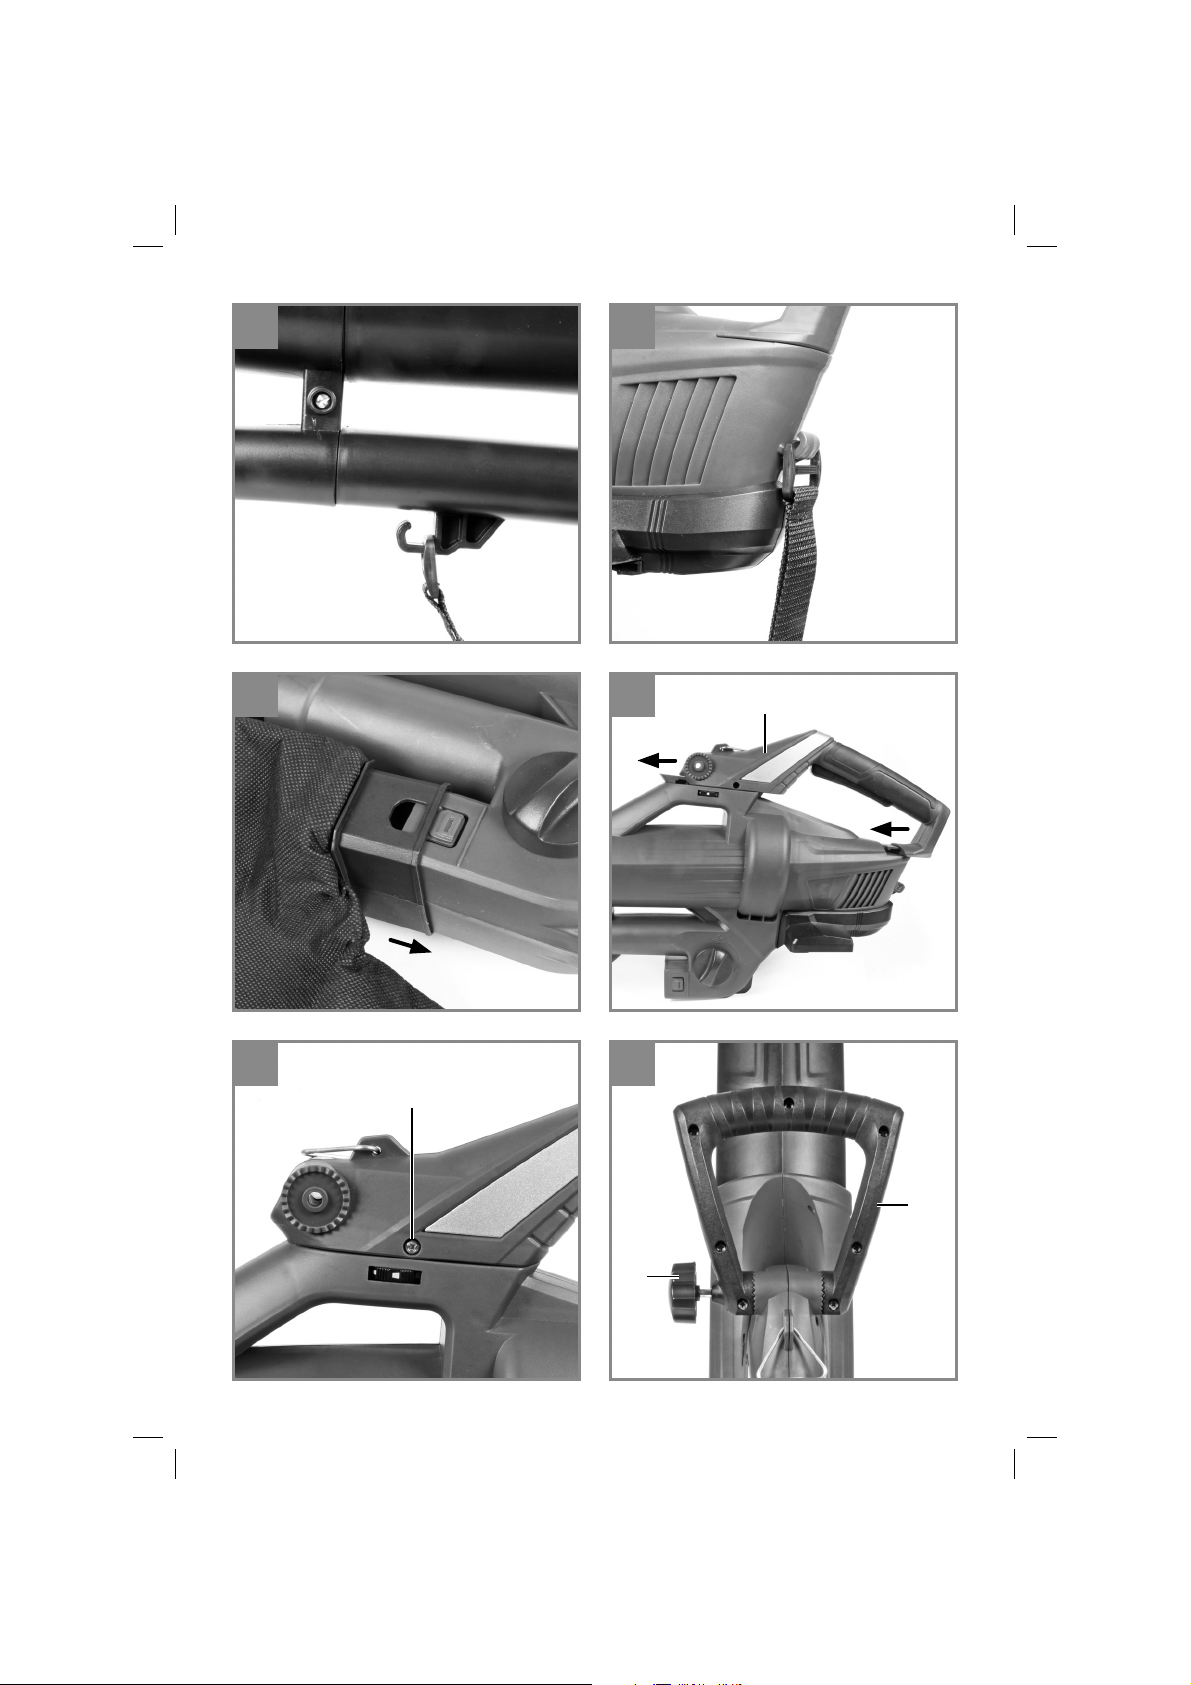
5.2. Fangsack montieren (Abb. 4-5)
Hängen Sie den Haken am Saugrohr (Abb. 4a)
und am Gehäuse (Abb. 4b) ein. Anschließend
stecken Sie den Fangsack über den Stutzen am
Motorgehäuse und achten Sie dabei auf ein hörbares Einrasten (Abb. 5).
5.3. Handgriff montieren
Schieben Sie den Handgriff (Abb. 6a/Pos. A) bis
zum Anschlag auf die Aufnahmen im Gehäuse.
Danach befestigen Sie den Handgriff beidseitig
mit je einer Schraube (Abb. 6b/Pos. 13).
5.4. Zusatzhandgriff montieren
Entfernen Sie die Sternschraube (Abb. 7/Pos. B),
stecken Sie den Handgriff (Abb. 7/Pos. 3) auf die
Aufnahme und fi xieren Sie den Handgriff mit der
Sternschraube in der gewünschten Position.
5.5. Tragegurt montieren
Öff nen Sie den Rändelschraube (Abb. 8/Pos. C),
führen Sie das Gurtband (Abb. 8/Pos. 4) durch die
Öff nung und schließen Sie die Rändelschraube
wieder.
5.6 Montage des Akkus (Bild 9)
Drücken Sie wie in Bild 9 zu sehen die Rasttaste
(Bild 9/Pos. E) des Akkus und schieben Sie den
Akku in die dafür vorgesehene Akkuaufnahme.
Sobald der Akku in einer Position wie in Bild 9
rechts zu sehen ist, auf Einrasten der Rasttaste
achten! Der Ausbau des Akkus erfolgt in umgekehrter Reihenfolge!
Hinweis!
Verwenden Sie nur Akkus mit gleichem Füllstand,
kombinieren Sie nie volle und halbvolle Akkus
miteinander. Laden Sie immer beide Akkus
gleichzeitig auf.
Der Akku mit schwächerem Ladezustand bestimmt die Laufzeit des Gerätes. Vor Betrieb müssen immer beide Akkus vollgeladen werden.
5.7 Laden des Akkus
1. Akku-Pack aus dem Gerät nehmen. Dazu die
seitliche Rasttaste drücken.
2. Vergleichen, ob die auf dem Typenschild
angegebene Netzspannung mit der vorhandenen Netzspannung übereinstimmt. Stecken
Sie den Netzstecker des Ladegeräts in die
Steckdose. Die grüne LED beginnt zu blinken.
3. Stecken Sie den Akku auf das Ladegerät.
4. Unter Punkt „Anzeige Ladegerät“ fi nden Sie
eine Tabelle mit den Bedeutungen der LED
Anzeige am Ladegerät.
Während des Ladens kann sich der Akku etwas
erwärmen. Dies ist jedoch normal.
Sollte das Laden des Akku-Packs nicht möglich
sein, überprüfen Sie bitte,
ob an der Steckdose die Netzspannung vor-
•
handen ist
ob ein einwandfreier Kontakt an den Lade-
•
kontakten vorhanden ist.
Sollte das Laden des Akku-Packs immer noch
nicht möglich sein, bitten wir Sie,
das Ladegerät
•
und den Akku-Pack
•
an unseren Kundendienst zu senden.
Im Interesse einer langen Lebensdauer des AkkuPacks sollten Sie für eine rechtzeitige Wiederaufladung des Akku-Packs sorgen. Dies ist auf jeden
Fall notwendig, wenn Sie feststellen, dass die
Leistung des Akku-Laubbläsers nachlässt. Entladen Sie den Akku-Pack nie vollständig. Dies führt
zu einem Defekt des Akku-Packs!
Nehmen Sie das Gerät erst dann in Betrieb, wenn
Sie die Montage vollständig durchgeführt haben.
6. Bedienung
6.1. Gurtlänge bestimmen (Abb. 1)
Gurtlänge des Tragegurtes (4) so einstellen, dass
das Saugrohr knapp über dem Boden geführt
werden kann. Zusätzlich dienen zur leichteren
Führung des Saugrohres am Boden die Führungsrollen (9) am unteren Ende des Saugrohres.
6.2. Gerät einschalten (Abb. 10)
Drücken Sie zum Einschalten den Ein-/Aus-
•
schalter (5).
Zum Ausschalten lassen Sie den Ein-/Aus-
•
schalter (5) wieder los.
- 8 -
Anl_GE_CL_36_Li_E_Solo_SPK7.indb 8Anl_GE_CL_36_Li_E_Solo_SPK7.indb 8 22.03.16 09:0222.03.16 09:02

D
6.3 Betriebsart wählen
6.3.1 Saugen (Abb. 10)
Drehen Sie den Hebel (Abb. 10/Pos. 8) zur Position A. Dies kann sowohl im Stillstand als auch bei
laufendem Gerät geschehen.
6.3.2 Blasen (Abb. 10)
Drehen Sie den Hebel (Abb. 10/Pos. 8) zur
•
Position B. Dies kann sowohl im Stillstand als
auch bei laufendem Gerät geschehen.
Richten Sie den Luftstrahl nach vorne und
•
bewegen Sie sich langsam um Laub oder
Gartenabfälle zusammenzublasen bzw. von
schwer zugänglichen Stellen zu entfernen.
Achtung!Entleeren Sie vor dem Blasen den
•
Fangsack. Ansonsten könnte aufgesaugtes
Sauggut wieder austreten.
6.4 Fangsack entleeren (Abb. 1)
Entleeren Sie den Fangsack (7) rechtzeitig. Bei
hohem Füllgrad lässt die Saugleistung deutlich
nach. Führen Sie organische Abfälle der Kompostierung zu.
Gerät ausschalten und Akkus ziehen
•
Reißverschluss am Fangsack (7) öffnen und
•
Sauggut ausschütten.
Reißverschluss am Fangsack (7) wieder
•
schließen.
6.5 Drehzahlregelung (Abb. 1)
Das Gerät ist mit einer elektronischen Drehzahlregulierung ausgestattet. Drehen Sie dazu den
Drehzahlregler (Abb. 1/Pos. 10) in die gewünschte Position. Betreiben Sie das Gerät nur mit der
notwendigen Drehzahl und lassen Sie es
7. Reinigung, Wartung und
Ersatzteilbestellung
Gefahr!
Ziehen Sie vor allen Reinigungsarbeiten die Akkus.
feuchten Tuch und etwas Schmierseife. Verwenden Sie keine Reinigungs- oder Lösungsmittel; diese könnten die Kunststoffteile des
Gerätes angreifen. Achten Sie darauf, dass
kein Wasser in das Geräteinnere gelangen
kann. Das Eindringen von Wasser in ein Elektrogerät erhöht das Risiko eines elektrischen
Schlages.
Nach Beendigung der Arbeit Auffangsack ab-
•
nehmen, umstülpen und gründlich reinigen,
um das Entstehen von Schimmel und unangenehmen Gerüchen zu verhindern.
Ein stark verschmutzter Fangsack kann mit
•
Wasser und Seife gewaschen werden.
Bei Schwergängigkeit des Reißverschlusses
•
die Reißverschlusszähne mit einer trockenen
Seife einreiben.
Saug-/Blasrohr bei Verschmutzung mit einer
•
Bürste reinigen.
Aufgrund von Verschmutzung durch Sauggut
•
kann die Gängigkeit des Umschalthebels
(Blasen/Saugen) erschwert werden. In
diesem Fall stellt sich nach mehrmaligem
Umschalten von Saugen auf Blasen die Gängigkeit des Umschalthebels wieder ein.
7.2 Wartung
Bei eventuell auftretenden Störungen das
•
Gerät nur von einem autorisierten Fachmann
bzw. von einer Kundendienstwerkstatt überprüfen lassen.
Im Geräteinneren befinden sich keine weite-
•
ren zu wartenden Teile.
7.3 Ersatzteilbestellung:
Bei der Ersatzteilbestellung sollten folgende Angaben gemacht werden;
Typ des Gerätes
•
Artikelnummer des Gerätes
•
Ident-Nummer des Gerätes
•
Ersatzteilnummer des erforderlichen Ersatz-
•
teils
Aktuelle Preise und Infos fi nden Sie unter
www.isc-gmbh.info
7.1 Reinigung
Halten Sie Schutzvorrichtungen, Luftschlitze
•
und Motorengehäuse so staub- und schmutzfrei wie möglich. Reiben Sie das Gerät mit
einem sauberen Tuch ab oder blasen Sie es
mit Druckluft bei niedrigem Druck aus.
Wir empfehlen, dass Sie das Gerät direkt
•
nach jeder Benutzung reinigen.
Reinigen Sie das Gerät regelmäßig mit einem
•
- 9 -
Anl_GE_CL_36_Li_E_Solo_SPK7.indb 9Anl_GE_CL_36_Li_E_Solo_SPK7.indb 9 22.03.16 09:0222.03.16 09:02

8. Störungen
Gerät läuft nicht:
Überprüfen Sie, ob der Akku geladen ist und ob
das Ladegerät funktioniert. Falls das Gerät trotz
vorhandener Spannung nicht funktioniert, senden
Sie es bitte an die angegebene Kundendienstadresse.
9. Entsorgung und
Wiederverwertung
Das Gerät befi ndet sich in einer Verpackung
um Transportschäden zu verhindern. Diese
Verpackung ist Rohstoff und ist somit wieder
verwendbar oder kann dem Rohstoff kreislauf
zurückgeführt werden. Das Gerät und dessen Zubehör bestehen aus verschiedenen Materialien,
wie z.B. Metall und Kunststoff e. Defekte Geräte
gehören nicht in den Hausmüll. Zur fachgerechten
Entsorgung sollte das Gerät an einer geeigneten
Sammelstellen abgegeben werden. Wenn Ihnen
keine Sammelstelle bekannt ist, sollten Sie bei
der Gemeindeverwaltung nachfragen.
D
10. Lagerung
Lagern Sie das Gerät und dessen Zubehör an
einem dunklen, trockenen und frostfreiem Ort. Die
optimale Lagertemperatur liegt zwischen 5 und
30 ˚C. Bewahren Sie das Elektrowerkzeug in der
Originalverpackung auf.
- 10 -
Anl_GE_CL_36_Li_E_Solo_SPK7.indb 10Anl_GE_CL_36_Li_E_Solo_SPK7.indb 10 22.03.16 09:0222.03.16 09:02
11. Anzeige Ladegerät
D
Anzeigestatus
Rote LED Grüne LED
Bedeutung und Maßnahme
Aus Blinkt Betriebsbereitschaft
Das Ladegerät ist an das Netz angeschlossen und betriebsbereit,
Akku ist nicht im Ladegerät
An Aus Laden
Das Ladegerät lädt den Akku im Schnellladebetrieb.
Aus An Der Akku ist zu 85% aufgeladen und einsatzbereit.
(Ladedauer 1,5 Ah Akku: 30 min)
(Ladedauer 2,0 Ah Akku: 40 min)
(Ladedauer 3,0 Ah Akku: 60 min)
(Ladedauer 4,0 Ah Akku: 80 min)
(Ladedauer 5,2 Ah Akku: 130 min)
Danach wird auf eine Schonladung umgeschaltet bis zur
vollständigen Ladung.
(Ladedauer insgesamt 1,5 Ah Akku: ca. 40 min)
(Ladedauer insgesamt 2,0 Ah Akku: ca. 50 min)
(Ladedauer insgesamt 3,0 Ah Akku: ca. 75 min)
(Ladedauer insgesamt 4,0 Ah Akku: ca. 100 min)
(Ladedauer insgesamt 5,2 Ah Akku: ca. 140 min)
Maßnahme:
Entnehmen Sie den Akku aus dem Ladegerät. Trennen Sie das Ladegerät vom Netz.
Blinkt Aus Anpassungsladung
Das Ladegerät befi ndet sich im Modus für schonende Ladung.
Hierbei wird der Akku aus Sicherheitsgründen langsamer geladen
und benötigt mehr als 1h. Dies kann folgende Ursachen haben:
- Akku wurde sehr lange Zeit nicht mehr geladen oder die Entladung
eines erschöpften Akkus wurde fortgesetzt (Tiefenentladung)
- Die Akkutemperatur liegt nicht im Idealbereich zwischen 25° C und
45° C.
Maßnahme:
Warten Sie bis der Ladevorgang abgeschlossen ist, der
Akku kann trotzdem weiter geladen werden.
Blinkt Blinkt Fehler
Ladevorgang ist nicht mehr möglich. Der Akku ist defekt.
Maßnahme:
Ein defekter Akku darf nicht mehr geladen werden.
Entnehmen Sie den Akku aus dem Ladegerät.
An An Temperaturstörung
Der Akku ist zu heiß (z. B. direkte Sonnenbestrahlung) oder zu kalt
(unter 0° C)
Maßnahme:
Entnehmen Sie den Akku und bewahren Sie diesen
1 Tag bei Raumtemperatur (ca. 20° C) auf.
- 11 -
Anl_GE_CL_36_Li_E_Solo_SPK7.indb 11Anl_GE_CL_36_Li_E_Solo_SPK7.indb 11 22.03.16 09:0222.03.16 09:02

D
Nur für EU-Länder
Werfen Sie Elektrowerkzeuge nicht in den Hausmüll!
Gemäß europäischer Richtlinie 2012/19/EU über Elektro- und Elektronik-Altgeräte und Umsetzung in
nationales Recht müssen verbrauchte Elektrowerkzeuge getrennt gesammelt werden und einer umweltgerechten Wiederverwertung zugeführt werden.
Recycling-Alternative zur Rücksendeauff orderung:
Der Eigentümer des Elektrogerätes ist alternativ anstelle Rücksendung zur Mitwirkung bei der sachgerechten Verwertung im Falle der Eigentumsaufgabe verpfl ichtet. Das Altgerät kann hierfür auch einer
Rücknahmestelle überlassen werden, die eine Beseitigung im Sinne der nationalen Kreislaufwirtschafts- und Abfallgesetze durchführt. Nicht betroff en sind den Altgeräten beigefügte Zubehörteile und
Hilfsmittel ohne Elektrobestandteile.
Der Nachdruck oder sonstige Vervielfältigung von Dokumentation und Begleitpapieren der Produkte,
auch auszugsweise, ist nur mit ausdrücklicher Zustimmung der iSC GmbH zulässig.
Technische Änderungen vorbehalten
- 12 -
Anl_GE_CL_36_Li_E_Solo_SPK7.indb 12Anl_GE_CL_36_Li_E_Solo_SPK7.indb 12 22.03.16 09:0222.03.16 09:02
D
Service-Informationen
Wir unterhalten in allen Ländern, welche in der Garantieurkunde benannt sind, kompetente ServicePartner, deren Kontakte Sie der Garantieurkunde entnehmen. Diese stehen Ihnen für alle ServiceBelange wie Reparatur, Ersatzteil- und Verschleißteil-Versorgung oder den Bezug von Verbrauchsmaterialien zur Verfügung.
Es ist zu beachten, dass bei diesem Produkt folgende Teile einem gebrauchsgemäßen oder natürlichen
Verschleiß unterliegen bzw. folgende Teile als Verbrauchsmaterialien benötigt werden.
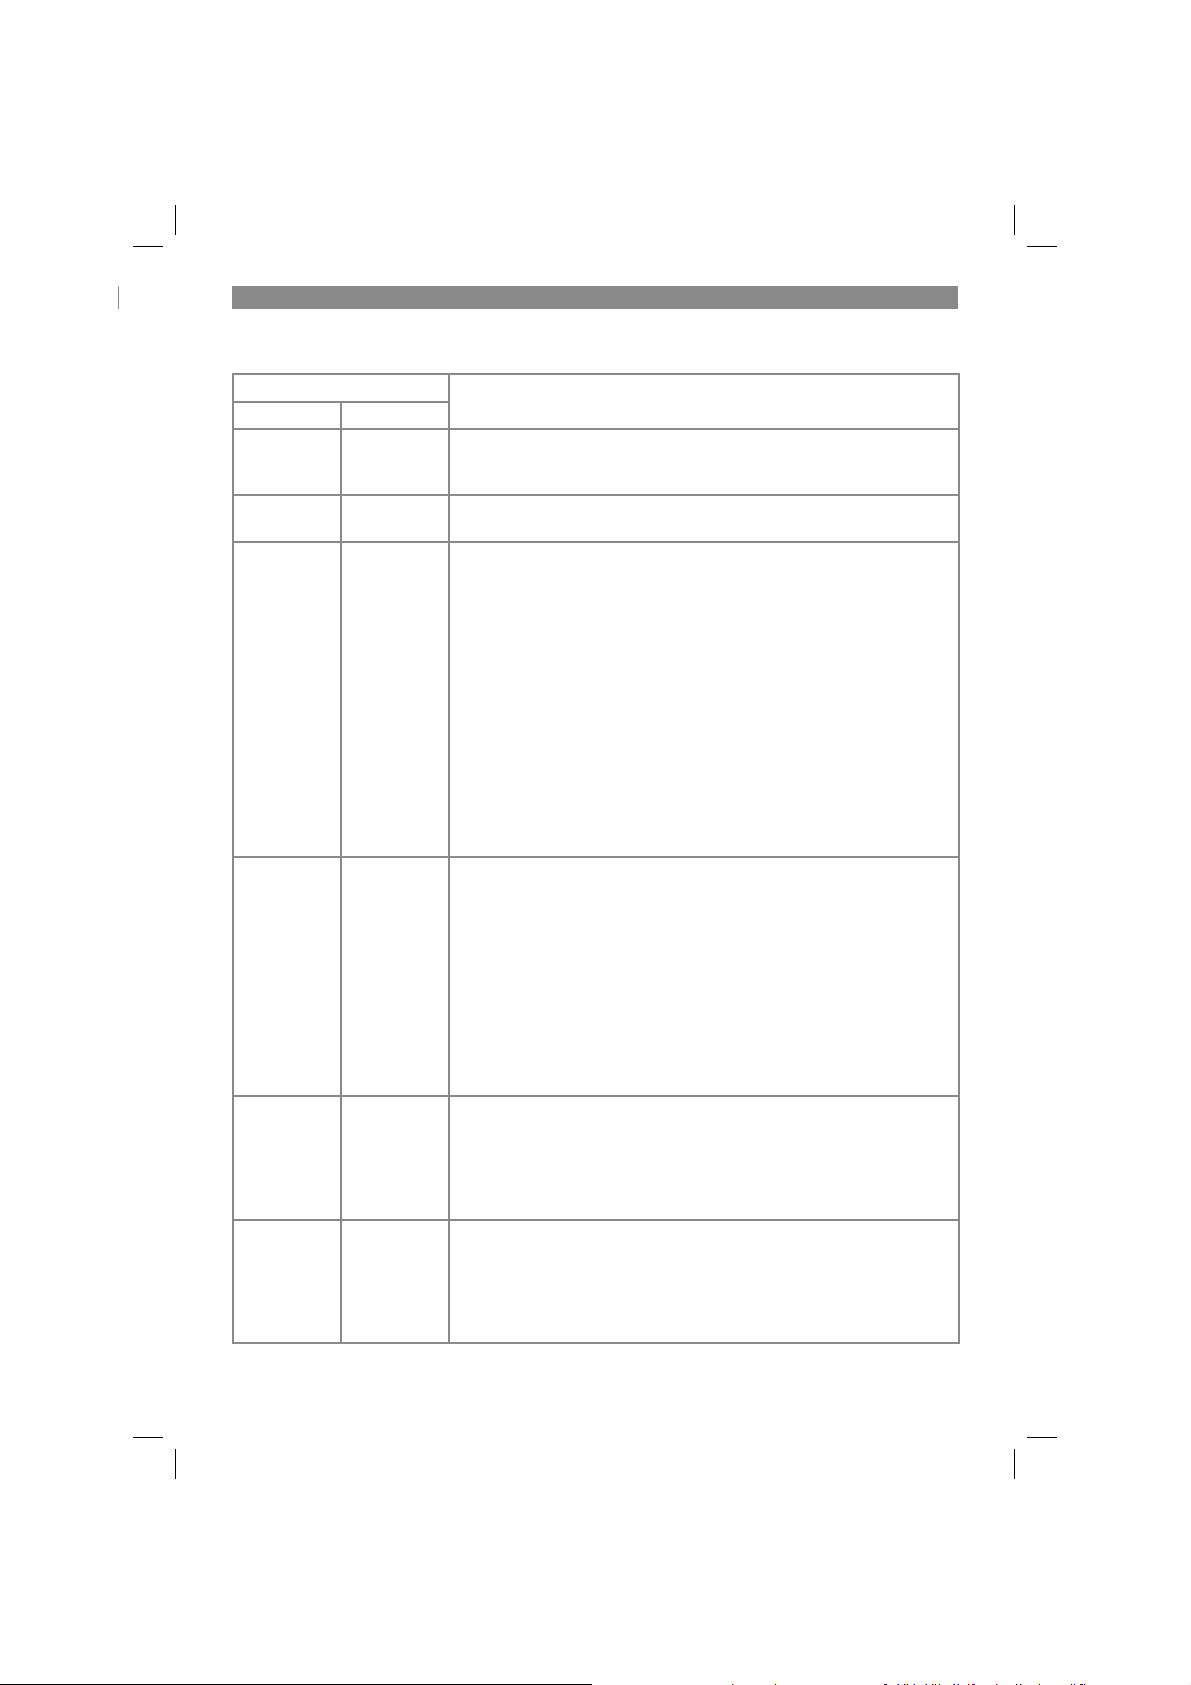
Kategorie Beispiel
Verschleißteile* Akku
Verbrauchsmaterial/ Verbrauchsteile*
Fehlteile
* nicht zwingend im Lieferumfang enthalten!
Bei Mängel oder Fehlern bitten wir Sie, den Fehlerfall im Internet unter www.isc-gmbh.info anzumelden.
Bitte achten Sie auf eine genaue Fehlerbeschreibung und beantworten Sie dazu in jedem Fall folgende
Fragen:
Hat das Gerät bereits einmal funktioniert oder war es von Anfang an defekt?
•
Ist Ihnen vor dem Auftreten des Defektes etwas aufgefallen (Symptom vor Defekt)?
•
Welche Fehlfunktion weist das Gerät Ihrer Meinung nach auf (Hauptsymptom)?
•
Beschreiben Sie diese Fehlfunktion.
- 13 -
Anl_GE_CL_36_Li_E_Solo_SPK7.indb 13Anl_GE_CL_36_Li_E_Solo_SPK7.indb 13 22.03.16 09:0222.03.16 09:02

D
Garantieurkunde
Sehr geehrte Kundin, sehr geehrter Kunde,
unsere Produkte unterliegen einer strengen Qualitätskontrolle. Sollte dieses Gerät dennoch einmal nicht
einwandfrei funktionieren, bedauern wir dies sehr und bitten Sie, sich an unseren Servicedienst unter
der auf dieser Garantiekarte angegebenen Adresse zu wenden. Gerne stehen wir Ihnen auch telefonisch über die angegebene Servicerufnummer zur Verfügung. Für die Geltendmachung von Garantieansprüchen gilt folgendes:
1. Diese Garantiebedingungen richten sich ausschließlich an Verbraucher, d. h. natürliche Personen,
die dieses Produkt weder im Rahmen ihrer gewerblichen noch anderen selbständigen Tätigkeit
nutzen wollen. Diese Garantiebedingungen regeln zusätzliche Garantieleistungen, die der u. g.
Hersteller zusätzlich zur gesetzlichen Gewährleistung Käufern seiner Neugeräte verspricht. Ihre
gesetzlichen Gewährleistungsansprüche werden von dieser Garantie nicht berührt. Unsere Garantieleistung ist für Sie kostenlos.
2. Die Garantieleistung erstreckt sich ausschließlich auf Mängel an einem von Ihnen erworbenen neuen Gerät des u. g. Herstellers, die auf einem Material- oder Herstellungsfehler beruhen und ist nach
unserer Wahl auf die Behebung solcher Mängel am Gerät oder den Austausch des Gerätes beschränkt. Bitte beachten Sie, dass unsere Geräte bestimmungsgemäß nicht für den gewerblichen,
handwerklichen oder berufl ichen Einsatz konstruiert wurden. Ein Garantievertrag kommt daher nicht
zustande, wenn das Gerät innerhalb der Garantiezeit in Gewerbe-, Handwerks- oder Industriebetrieben verwendet wurde oder einer gleichzusetzenden Beanspruchung ausgesetzt war.
3. Von unserer Garantie ausgenommen sind:
- Schäden am Gerät, die durch Nichtbeachtung der Montageanleitung oder aufgrund nicht fachgerechter Installation, Nichtbeachtung der Gebrauchsanleitung (wie durch z.B. Anschluss an eine
falsche Netzspannung oder Stromart) oder Nichtbeachtung der Wartungs- und Sicherheitsbestimmungen oder durch Aussetzen des Geräts an anomale Umweltbedingungen oder durch mangelnde
Pfl ege und Wartung entstanden sind.
- Schäden am Gerät, die durch missbräuchliche oder unsachgemäße Anwendungen (wie z.B. Überlastung des Gerätes oder Verwendung von nicht zugelassenen Einsatzwerkzeugen oder Zubehör),
Eindringen von Fremdkörpern in das Gerät (wie z.B. Sand, Steine oder Staub, Transportschäden),
Gewaltanwendung oder Fremdeinwirkungen (wie z. B. Schäden durch Herunterfallen) entstanden
sind.
- Schäden am Gerät oder an Teilen des Geräts, die auf einen gebrauchsgemäßen, üblichen oder
sonstigen natürlichen Verschleiß zurückzuführen sind.
4. Die Garantiezeit beträgt 24 Monate und beginnt mit dem Kaufdatum des Gerätes. Garantieansprüche sind vor Ablauf der Garantiezeit innerhalb von zwei Wochen, nachdem Sie den Defekt erkannt
haben, geltend zu machen. Die Geltendmachung von Garantieansprüchen nach Ablauf der Garantiezeit ist ausgeschlossen. Die Reparatur oder der Austausch des Gerätes führt weder zu einer
Verlängerung der Garantiezeit noch wird eine neue Garantiezeit durch diese Leistung für das Gerät
oder für etwaige eingebaute Ersatzteile in Gang gesetzt. Dies gilt auch bei Einsatz eines Vor-OrtServices.
5. Für die Geltendmachung Ihres Garantieanspruches melden Sie bitte das defekte Gerät an unter:
www.isc-gmbh.info. Halten Sie bitte den Kaufbeleg oder andere Nachweise Ihres Kaufs des Neugeräts bereit. Geräte, die ohne entsprechende Nachweise oder ohne Typenschild eingesendet werden, sind von der Garantieleistung aufgrund mangelnder Zuordnungsmöglichkeit ausgeschlossen.
Ist der Defekt des Gerätes von unserer Garantieleistung erfasst, erhalten Sie umgehend ein repariertes oder neues Gerät zurück.
Selbstverständlich beheben wir gegen Erstattung der Kosten auch gerne Defekte am Gerät, die vom
Garantieumfang nicht oder nicht mehr erfasst sind. Dazu senden Sie das Gerät bitte an unsere Serviceadresse.
Für Verschleiß-, Verbrauchs- und Fehlteile verweisen wir auf die Einschränkungen dieser Garantie gemäß den Service-Informationen dieser Bedienungsanleitung.
iSC GmbH · Eschenstraße 6 · 94405 Landau/Isar (Deutschland)
- 14 -
Anl_GE_CL_36_Li_E_Solo_SPK7.indb 14Anl_GE_CL_36_Li_E_Solo_SPK7.indb 14 22.03.16 09:0222.03.16 09:02

D
Sehr geehrte Kundin, sehr geehrter Kunde,
um Ihnen noch mehr Service zu bieten, haben Sie die Möglichkeit auf unserem Onlineportal weitere
Informationen abzurufen.
Sollten einmal Probleme oder Fragen zu Ihrem Produkt auftreten, können Sie schnell und einfach unter
www.isc-gmbh.info viele Aktionen durchführen. Hier einige Beispiele:
Ersatzteile bestellen
•
Aktuelle Preisauskünfte
•
Verfügbarkeiten der Ersatzteile
•
Servicestellen Vorort für Benzingeräte
•
Defekte Geräte anmelden
•
Garantieverlängerungen (nur bei bestimmten Geräten)
•
Bestellverfolgung
•
Wir freuen uns auf Ihren Besuch online unter www.isc-gmbh.info!
Telefon: 09951 / 95 920 00 ·Telefax: 09951/95 917 00
E-Mail: info@einhell.de · Internet: www.isc-gmbh.info
iSC GmbH · Eschenstraße 6 · 94405 Landau/Isar (Deutschland)
- 15 -
Anl_GE_CL_36_Li_E_Solo_SPK7.indb 15Anl_GE_CL_36_Li_E_Solo_SPK7.indb 15 22.03.16 09:0222.03.16 09:02

GB
Danger!
When using the equipment, a few safety precautions must be observed to avoid injuries and
damage. Please read the complete operating
instructions and safety regulations with due care.
Keep this manual in a safe place, so that the information is available at all times. If you give the
equipment to any other person, hand over these
operating instructions and safety regulations as
well. We cannot accept any liability for damage
or accidents which arise due to a failure to follow
these instructions and the safety instructions.
1. Safety information
The corresponding safety information can be
found in the enclosed booklet.
Danger!
Read all safety regulations and instructions.
Any errors made in following the safety regulations and instructions may result in an electric
shock, fi re and/or serious injury.
Keep all safety regulations and instructions
in a safe place for future use.
Explanation of the warning signs on the
equipment (see Fig. 11)
1. Read the directions for use before operating
the tool.
2. Do not use the tool in rain or snow. Do not
expose the tool to wet conditions.
3. Keep all other persons away from the danger
zone.
4. Wear goggles and earmuff s.
5. Rotating parts. Keep your hands and feet
away from all openings.
13. 3x short screw
2.2 Items supplied
Please check that the article is complete as
specifi ed in the scope of delivery. If parts are
missing, please contact our service center or the
sales outlet where you made your purchase at
the latest within 5 working days after purchasing
the product and upon presentation of a valid bill
of purchase. Also, refer to the warranty table in
the service information at the end of the operating
instructions.
Open the packaging and take out the equip-
•
ment with care.
Remove the packaging material and any
•
packaging and/or transportation braces (if
available).
Check to see if all items are supplied.
•
Inspect the equipment and accessories for
•
transport damage.
If possible, please keep the packaging until
•
the end of the guarantee period.
Danger!
The equipment and packaging material are
not toys. Do not let children play with plastic
bags, foils or small parts. There is a danger of
swallowing or suff ocating!
Original operating instructions
•
Safety instructions
•
3. Intended use
The leaf blower vac is designed to handle only foliage and garden refuse such as grass and small
branches. Any other use is prohibited.
2. Layout and items supplied
2.1 Layout (Fig. 1/2)
1. Front suction tube
2. Rear suction tube
3. Additional handle
4. Harness
5. On/Off switch
6. Battery mount
7. Catch bag
8. Selector switch for blower/vac
9. Castors
10. Speed controller
11. Wheel support
12. 2x long screw
Anl_GE_CL_36_Li_E_Solo_SPK7.indb 16Anl_GE_CL_36_Li_E_Solo_SPK7.indb 16 22.03.16 09:0222.03.16 09:02
The equipment is to be used only for its prescribed purpose. Any other use is deemed to be a
case of misuse. The user / operator and not the
manufacturer will be liable for any damage or injuries of any kind caused as a result of this.
Please note that our equipment has not been designed for use in commercial, trade or industrial
applications. Our warranty will be voided if the
machine is used in commercial, trade or industrial
businesses or for equivalent purposes.
- 16 -

GB
4. Technical data
Idling speed n0 ........................ 8,000-13,000 rpm
Air speed ................................................ 210 kph
Suction power ....................................... 720 m
Volume of catch bag .................. approx. 45 liters
Sound volume level L
Uncertainty K ........................................ 3 dB (A)
Sound pressure level L
Vibration ahv ....................................... 2.354 m/s
Uncertainty K ..........................................1.5 m/s
Weight ........................................................3.3 kg
Important!
The equipment is supplied without batteries and
without a charger is allowed to be used only with
the lithium-ion batteries of the Power-X-Change
series!
Power-X-Change
18 V, 1.5 Ah .............................. 5 lithium-ion cells
18 V, 2.0 Ah .............................. 5 lithium-ion cells
18 V, 3.0 Ah ............................ 10 lithium-ion cells
18 V, 4.0 Ah ............................ 10 lithium-ion cells
18 V, 5.2 Ah ............................ 10 lithium-ion cells
The lithium-ion batteries of the Power-X-Change
series are allowed to be charged only with the
Power-X charger.
Charger
Mains voltage ....................200-250 V ~ 50-60 Hz
Output
Rated voltage ........................................ 21 V d. c.
Rated current ....................................... 3,000 mA
Keep the noise emissions and vibrations to a
minimum.
Only use appliances which are in perfect wor-
•
king order.
Service and clean the appliance regularly.
•
Adapt your working style to suit the appliance.
•
Do not overload the appliance.
•
Have the appliance serviced whenever ne-
•
cessary.
Switch the appliance off when it is not in use.
•
Wear protective gloves.
•
.................... 92.68 dB(A)
WA
.................... 83.1 dB(A)
pA
3
Caution!
Residual risks
Even if you use this electric power tool in
accordance with instructions, certain residual risks cannot be rules out. The following
/h
hazards may arise in connection with the
equipment’s construction and layout:
1. Lung damage if no suitable protective dust
mask is used.
2. Damage to hearing if no suitable ear protec-
2
2
tion is used.
3. Health damage caused by hand-arm vibrations if the equipment is used over a prolonged period or is not properly guided and
maintained.
5. Before starting the equipment
The equipment is supplied without batteries
and without a charger.
Warning!
Always remove the batteries before making
adjustments to the equipment.
5.1. Mounting the suction tube (Fig. 3a-3f)
Plug together the front and rear suction tube
•
(Fig. 3a) and secure with the screw (Fig. 3b/
Item 12).
Now slide the complete suction tube into the
•
motor housing (Fig. 3c) and secure with the
screws (Fig. 3d/ Item 12).
Fit the two wheels (Fig. 3e/Item 9) into the
•
wheel support (Fig. 3e/ Item 11). Make sure
that there is an audible click when they engage.
Slide the wheel support (Fig. 3f/Item 11) onto
•
the front suction tube as far as the stop (Fig.
3f/Item D) and secure with the screw (Fig. 3f/
Item 13).
Note: Please note that the two vacuum tubes
must always be joined together before they
are mounted on the motor housing, and that
they must never be taken apart when mounted!
5.2. Mounting the catch bag (Figs. 4-5)
Hang the hook on the suction tube (Fig. 4A) and
on the housing (Fig. 4b). Then slip the catch bag
over the socket on the motor housing; it engages
correctly when it makes an audible click (Fig. 5).
- 17 -
Anl_GE_CL_36_Li_E_Solo_SPK7.indb 17Anl_GE_CL_36_Li_E_Solo_SPK7.indb 17 22.03.16 09:0222.03.16 09:02

GB
5.3. Fitting the handle
Slide the handle (Fig. 6a/Item A) onto the mounts
in the housing as far as the stop. Then fasten the
handle on both sides with one screw on each side
(Fig. 6b/Item 13).
5.4. Fitting the additional handle
Remove the star screw (Fig. 7/Item B), fi t the
handle (Fig. 7/Item 3) to the mount and secure the
handle in the required position with the star screw.
5.5. Fitting the harness
Open the knurled screw (Fig. 8/Item C), feed the
belt strap (Fig. 8/Item 4) through the opening and
close the knurled screw again.
5.6 Fitting the battery (Fig. 9)
Press the pushlock button (Fig. 9/Item E) of the
battery as shown in Fig. 9 and push the battery
into the battery mount provided. When the battery is positioned as in Fig. 9, make sure that the
pushlock button latches in place! To remove the
battery pack, proceed in reverse order.
Important!
Use only batteries which are charged to the same
level. Never combine full and half-full batteries.
Always charge the two batteries simultaneously.
The equipment‘s operating time depends on the
battery with the lower charge level. The two batteries must always be fully charged before use.
5.7 Charging the battery
1. Take the battery pack out of the equipment.
Do this by pressing the side pushlock buttons.
2. Check that your mains voltage is the same as
that marked on the rating plate of the battery
charger. Insert the power plug of the charger
into the socket outlet. The green LED will then
begin to fl ash.
3. Insert the battery pack into the charger.
4. In the section entitled „Charger indicator“ you
will fi nd a table with an explanation of the LED
indicator on the charger.
The battery pack can become a little warm during
the charging. This is normal.
If the battery pack fails to charge, check:
whether there is voltage at the socket outlet
•
whether there is good contact at the charging
•
contacts
If the battery pack still fails to charge, send
the charging unit
•
and the battery pack
•
to our customer service center.
To ensure that the battery pack provides long service, you should take care to recharge it promptly.
You must recharge the battery pack when you
notice that the power of the cordless leaf blower
drops. Never allow the battery pack to become
fully discharged. This will cause it to develop a
defect.
Start up the equipment only when fully assembled.
6. Operation
6.1. Sizing the strap (Fig. 1)
Size the length of the carrying strap (4) so that the
vacuum tube just clears the ground. The guide
rollers (9) at the bottom end of the suction tube
will help you to maneuver the suction tube on the
ground.
6.2. Switching on the equipment (Fig. 10)
To switch on, press the On/Off switch (5).
•
To switch off, let go of the On/Off switch (5)
•
again.
6.3 Selecting the mode of operation
6.3.1 Suctioning (Fig. 10)
Turn the lever (Fig. 10/Item 8) to position A. You
can do this both when the equipment is at a
standstill and while it is running.
6.3.2 Blowing (Fig. 10)
Turn the lever (Fig. 10/Item 8) to position B.
•
You can do this both when the equipment is
at a standstill and while it is running.
Channel the air stream forward and walk
•
slowly to blow foliage or garden refuse into a
pile or to clear out hard-to-reach places.
Important! Empty the catch bag before
•
blowing. Otherwise, the material that has
been vacuumed up could drop out.
6.4 Emptying the catch bag (Fig. 1)
Empty the catch bag (7) in good time. With a
nearly full bag, the suction power drops notably.
Organic waste should be composted.
Switch off the equipment and remove the
•
- 18 -
Anl_GE_CL_36_Li_E_Solo_SPK7.indb 18Anl_GE_CL_36_Li_E_Solo_SPK7.indb 18 22.03.16 09:0222.03.16 09:02

GB
batteries.
Open the zipper on the catch bag (7) and
•
shake out the material.
Close the zip on the catch bag (7) again.
•
6.5 Speed control (Fig. 1)
The device is fi tted with an electronic speed con-
troller. To use it, turn the speed controller (Fig. 1/
Item 10) into the required position. Use the device
only with the speed which is actually required and
do not let it run at a speed which is faster than
necessary.
7. Cleaning, maintenance and
ordering of spare parts
Hazard!
Always remove the batteries before starting any
cleaning work.
7.1 Cleaning
After shaking out the catch bag, turn it inside
•
out and thoroughly clean it in order to prevent
mould and unpleasant odours from forming.
You can use soap and water to clean out a
•
heavily soiled catch bag.
Rub a bar of dry soap across the zipper teeth
•
if the zipper becomes difficult to pull.
Clean the vacuum/blower tube with a brush
•
upon evidence of dirt and grime.
Dirt and grime can make the switch (blower/
•
vacuum) more difficult to operate as a result
of the material that swirls up off the ground.
When this occurs, simply flip the switch back
and forth a few times, which should bring it
back to the normal feel.
8. Faults
The equipment does not work:
Check that the battery is charged and whether
the charging unit is working. If the equipment will
not work in spite of the voltage supply being OK,
please send it to the customer service addressbelow.
9. Disposal and recycling
The equipment is supplied in packaging to prevent it from being damaged in transit. The raw
materials in this packaging can be reused or
recycled. The equipment and its accessories are
made of various types of material, such as metal
and plastic. Never place defective equipment in
your household refuse. The equipment should
be taken to a suitable collection center for proper
disposal. If you do not know the whereabouts of
such a collection point, you should ask in your
local council offi ces.
10. Storage
Store the equipment and accessories in a dark
and dry place at above freezing temperature. The
ideal storage temperature is between 5 and 30
°C. Store the electric tool in its original packaging.
7.2 Maintenance
Should the tool experience problems beyond
•
those mentioned above, let only an authorised professional or a customer service shop
perform an inspection.
There are no other parts inside the equipment
•
which require maintenance.
- 19 -
Anl_GE_CL_36_Li_E_Solo_SPK7.indb 19Anl_GE_CL_36_Li_E_Solo_SPK7.indb 19 22.03.16 09:0222.03.16 09:02

11. Charger indicator
GB
Indicator status
Red LED Green LED
Explanations and actions
Off Flashing Ready for use
The charger is connected to the mains and is ready for use; there is no
battery pack in the charger
On Off Charging
The charger is charging the battery pack in quick charge mode.
Off On The battery is 85% charged and ready for use.
(Charging time for 1.5 Ah battery: 30 min)
(Charging time for 2.0 Ah battery: 40 min)
(Charging time for 3.0 Ah battery: 60 min)
(Charging time for 4.0 Ah battery: 80 min)
(Charging time for 5.2 Ah battery: 130 min)
The unit then changes over to gentle charging mode until the battery is
fully charged.
(Total charging time for 1.5 Ah battery: approx. 40 min)
(Total charging time for 2.0 Ah battery: approx. 50 min)
(Total charging time for 3.0 Ah battery: approx. 75 min)
(Total charging time for 4.0 Ah battery: approx. 100 min)
(Total charging time for 5.2 Ah battery: approx. 140 min)
Action:
Take the battery pack out of the charger. Disconnect the charger from
the mains supply.
Flashing Off Adapted charging
The charger is in gentle charging mode.
For safety reasons the charging is performed less quickly and takes
more than 1 hour. The reasons can be:
- The battery pack has not been used for a very long time or an already
fl at battery was further discharged (exhaustive discharge).
- The battery pack temperature is outside the ideal range (between 25°
C and 45° C).
Action:
Wait for the charging to be completed; you can still continue to charge
the battery pack.
Flashing Flashing Fault
Charging is no longer possible. The battery pack is defective.
Action:
Never charge a defective battery pack.
Take the battery pack out of the charger.
On On Temperature fault
The battery pack is too hot (e.g. due to direct sunshine) or too cold
(below 0° C).
Action:
Remove the battery pack and keep it at room temperature (approx. 20°
C) for one day .
- 20 -
Anl_GE_CL_36_Li_E_Solo_SPK7.indb 20Anl_GE_CL_36_Li_E_Solo_SPK7.indb 20 22.03.16 09:0222.03.16 09:02

GB
For EU countries only
Never place any electric power tools in your household refuse.
To comply with European Directive 2012/19/EC concerning old electric and electronic equipment and
its implementation in national laws, old electric power tools have to be separated from other waste and
disposed of in an environment-friendly fashion, e.g. by taking to a recycling depot.
Recycling alternative to the return request:
As an alternative to returning the equipment to the manufacturer, the owner of the electrical equipment
must make sure that the equipment is properly disposed of if he no longer wants to keep the equipment.
The old equipment can be returned to a suitable collection point that will dispose of the equipment in
accordance with the national recycling and waste disposal regulations. This does not apply to any accessories or aids without electrical components supplied with the old equipment.
The reprinting or reproduction by any other means, in whole or in part, of documentation and papers
accompanying products is permitted only with the express consent of the iSC GmbH.
Subject to technical changes
- 21 -
Anl_GE_CL_36_Li_E_Solo_SPK7.indb 21Anl_GE_CL_36_Li_E_Solo_SPK7.indb 21 22.03.16 09:0222.03.16 09:02

GB
Service information
We have competent service partners in all countries named on the guarantee certifi cate whose contact
details can also be found on the guarantee certifi cate. These partners will help you with all service re-
quests such as repairs, spare and wearing part orders or the purchase of consumables.
Please note that the following parts of this product are subject to normal or natural wear and that the
following parts are therefore also required for use as consumables.
Category Example
Wear parts* Battery
Consumables*
Missing parts
* Not necessarily included in the scope of delivery!
In the eff ect of defects or faults, please register the problem on the internet at www.isc-gmbh.info. Ple-
ase ensure that you provide a precise description of the problem and answer the following questions in
all cases:
Did the equipment work at all or was it defective from the beginning?
•
Did you notice anything (symptom or defect) prior to the failure?
•
What malfunction does the equipment have in your opinion (main symptom)?
•
Describe this malfunction.
- 22 -
Anl_GE_CL_36_Li_E_Solo_SPK7.indb 22Anl_GE_CL_36_Li_E_Solo_SPK7.indb 22 22.03.16 09:0222.03.16 09:02

GB
Warranty certifi cate
Dear Customer,
All of our products undergo strict quality checks to ensure that they reach you in perfect condition. In the
unlikely event that your device develops a fault, please contact our service department at the address
shown on this guarantee card. You can also contact us by telephone using the service number shown.
Please note the following terms under which guarantee claims can be made:
1. These guarantee terms apply to consumers only, i.e. natural persons intending to use this product
neither for their commercial activities nor for any other self-employed activities. These warranty
terms regulate additional warranty services, which the manufacturer mentioned below promises to
buyers of its new products in addition to their statutory rights of guarantee. Your statutory guarantee
claims are not aff ected by this guarantee. Our guarantee is free of charge to you.
2. The warranty services cover only defects due to material or manufacturing faults on a product which
you have bought from the manufacturer mentioned below and are limited to either the rectifi cation of
said defects on the product or the replacement of the product, whichever we prefer.
Please note that our devices are not designed for use in commercial, trade or professional applications. A guarantee contract will not be created if the device has been used by commercial, trade or
industrial business or has been exposed to similar stresses during the guarantee period.
3. The following are not covered by our guarantee:
- Damage to the device caused by a failure to follow the assembly instructions or due to incorrect
installation, a failure to follow the operating instructions (for example connecting it to an incorrect
mains voltage or current type) or a failure to follow the maintenance and safety instructions or by exposing the device to abnormal environmental conditions or by lack of care and maintenance.
- Damage to the device caused by abuse or incorrect use (for example overloading the device or the
use or unapproved tools or accessories), ingress of foreign bodies into the device (such as sand,
stones or dust, transport damage), the use of force or damage caused by external forces (for example by dropping it).
- Damage to the device or parts of the device caused by normal or natural wear or tear or by normal
use of the device.
4. The guarantee is valid for a period of 24 months starting from the purchase date of the device. Guarantee claims should be submitted before the end of the guarantee period within two weeks of the
defect being noticed. No guarantee claims will be accepted after the end of the guarantee period.
The original guarantee period remains applicable to the device even if repairs are carried out or
parts are replaced. In such cases, the work performed or parts fi tted will not result in an extension
of the guarantee period, and no new guarantee will become active for the work performed or parts
fi tted. This also applies if an on-site service is used.
5. To make a claim under the guarantee, please register the defective device at: www.isc-gmbh.info.
Please keep your bill of purchase or other proof of purchase for the new device. Devices that are
returned without proof of purchase or without a rating plate shall not be covered by the guarantee,
because appropriate identifi cation will not be possible. If the defect is covered by our guarantee,
then the item in question will either be repaired immediately and returned to you or we will send you
a new replacement.
Of course, we are also happy off er a chargeable repair service for any defects which are not covered by
the scope of this guarantee or for units which are no longer covered. To take advantage of this service,
please send the device to our service address.
Also refer to the restrictions of this warranty concerning wear parts, consumables and missing parts as
set out in the service information in these operating instructions.
- 23 -
Anl_GE_CL_36_Li_E_Solo_SPK7.indb 23Anl_GE_CL_36_Li_E_Solo_SPK7.indb 23 22.03.16 09:0222.03.16 09:02

F
Danger !
Lors de l’utilisation d’appareils, il faut respecter
certaines mesures de sécurité afi n d’éviter des
blessures et dommages. Veuillez donc lire attentivement ce mode d’emploi/ces consignes de
sécurité. Veillez à le conserver en bon état pour
pouvoir accéder aux informations à tout moment.
Si l’appareil doit être remis à d’autres personnes,
veillez à leur remettre aussi ce mode d’emploi/
ces consignes de sécurité. Nous déclinons toute
responsabilité pour les accidents et dommages
dus au non-respect de ce mode d’emploi et des
consignes de sécurité.
1. Consignes de sécurité
Vous trouverez les consignes de sécurité correspondantes dans le cahier en annexe.
Danger !
Veuillez lire toutes les consignes de sécurité
et instructions. Tout non-respect des consignes
de sécurité et instructions peut provoquer une
décharge électrique, un incendie et/ou des blessures graves.
Conservez toutes les consignes de sécurité
et instructions pour une consultation ultérieure.
Explication de la plaque signalétique sur
l‘appareil (Voir fi gure 11)
1. Avant la mise en service, lisez le mode
d‘emploi.
2. Ne pas utiliser l‘appareil par temps de pluie
ou de neige. Protéger l‘appareil de l‘humidité.
3. Éloignez les personnes tierces de la zone de
danger
4. Portez des protections pour les yeux et l‘ouïe.
5. Pièces en rotation ! Éloignez les mains et les
pieds des ouvertures
9. Roues
10. Régulateur de vitesse de rotation
11. Porte roue
12. 2x vis longues
13. 3x vis courte
2.2 Volume de livraison
Veuillez contrôler si l‘article est complet à l‘aide
de la description du volume de livraison. S‘il
manque des pièces, adressez-vous dans un délai
de 5 jours maximum après votre achat à notre
service après-vente ou au magasin où vous avez
acheté l‘appareil muni d‘une preuve d‘achat valable. Veuillez consulter pour cela le tableau des
garanties dans les informations service aprèsvente à la fi n du mode d‘emploi.
Ouvrez l’emballage et prenez l’appareil en le
•
sortant avec précaution de l’emballage.
Retirez le matériel d’emballage tout comme
•
les sécurités d’emballage et de transport (s’il
y en a).
Vérifiez si la livraison est bien complète.
•
Contrôlez si l’appareil et ses accessoires ne
•
sont pas endommagés par le transport.
Conservez l’emballage autant que possible
•
jusqu’à la fin de la période de garantie.
Danger !
L’appareil et le matériel d’emballage ne sont
pas des jouets ! Il est interdit de laisser des
enfants jouer avec des sacs et des fi lms en
plastique et avec des pièces de petite taille.
Ils risquent de les avaler et de s’étouff er !
Mode d’emploi d’origine
•
Consignes de sécurité
•
3. Utilisation conforme à
l‘aff ectation
2. Description de l‘appareil et
contenu de la livraison
2.1 Description de l‘appareil (fi gure 1/2)
1. Tube d’aspiration avant
2. Tube d‘aspiration arrière
3. Poignée supplémentaire
4. Ceinture de port
5. Interrupteur marche/arrêt
6. Logement de l‘accumulateur
7. Sac collecteur
8. Commutateur aspirer/souffl er
Anl_GE_CL_36_Li_E_Solo_SPK7.indb 24Anl_GE_CL_36_Li_E_Solo_SPK7.indb 24 22.03.16 09:0222.03.16 09:02
L‘aspirateur/le souffl eur de feuilles est unique-
ment autorisé pour les feuilles et les déchets de
jardin tels l‘herbe et les petites branches. Tout
autre emploi n‘est pas autorisé.
La machine doit exclusivement être employée
conformément à son aff ectation. Chaque uti-
lisation allant au-delà de cette aff ectation est
considérée comme non conforme. Pour les
dommages en résultant ou les blessures de tout
genre, le producteur décline toute responsabilité
et l’opérateur/l’exploitant est responsable.
- 24 -

F
Veillez au fait que nos appareils, conformément
à leur aff ectation, n’ont pas été construits, pour
être utilisés dans un environnement professionnel, industriel ou artisanal. Nous déclinons toute
responsabilité si l’appareil est utilisé professionnellement, artisanalement ou dans des sociétés
industrielles, tout comme pour toute activité
équivalente.
4. Données techniques
Vitesse de rotation de marche à vide n0 ..............
................................................ 8000-13000 tr/min
Vitesse de l‘air ...................................... 210 km/h
Puissance d‘aspiration .......................... 720 m
Volume du sac collecteur ....................... env. 45 l
Niveau de puissance acoustique L
Imprécision K ........................................ 3 dB (A)
Niveau de pression acoustique L
Vibration ahv ....................................... 2,354 m/s
Imprécision K ..........................................1,5 m/s
Poids ..........................................................3,3 kg
Attention !
L‘appareil est livré sans accumulateur et sans
chargeur et ne doit être utilisé qu‘avec les accumulateurs Li-Ion de la série Power-X-Change !
Power-X-Change
18 V, 1,5 Ah ..................................... 5 piles Li-ion
18 V, 2,0 Ah ...................................... 5 piles Li-ion
18 V, 3,0 Ah ................................... 10 piles Li-ion
18 V, 4,0 Ah ................................... 10 piles Li-ion
18 V, 5,2 Ah ................................... 10 piles Li-ion
Les accumulateurs Li-ion de la série Power-XChange ne doivent être chargés qu‘avec le chargeur Power-X.
Chargeur
Tension du réseau .............200-250 V ~ 50-60 Hz
Sortie
Tension nominale .................................. 21 V d. c.
Courant nominal ................................... 3 000 mA
92,68 dB (A)
WA
.. 83,1 dB (A)
pA
3
/h
Limitez le niveau sonore et les vibrations à
un minimum !
Utilisez exclusivement des appareils en ex-
•
cellent état.
Entretenez et nettoyez l’appareil régulière-
•
ment.
Adaptez votre façon de travailler à l’appareil.
•
Ne surchargez pas l’appareil.
•
Faites contrôler l’appareil le cas échéant.
•
Mettez l’appareil hors circuit lorsque vous ne
•
l’utilisez pas.
Portez des gants.
•
Prudence !
Risques résiduels
Même en utilisant cet outil électrique conformément aux prescriptions, il reste toujours
des risques résiduels. Les dangers suivants
peuvent apparaître en rapport avec la construction et le modèle de cet outil électrique :
1. Lésions des poumons si aucun masque anti-
2
2
poussière adéquat n’est porté.
2. Défi cience auditive si aucun casque anti-bruit
approprié n’est porté.
3. Atteintes à la santé issues des vibrations
main-bras, si l’appareil est utilisé pendant une
longue période ou s’il n’a pas été employé ou
entretenu dans les règles de l’art.
5. Avant la mise en service
L‘appareil est livré sans accumulateurs et
sans chargeur !
Avertissement !
Enlevez systématiquement la fi che de con-
tact avant de paramétrer l‘appareil.
5.1. Montage du tube d‘aspiration (fi g. 3a-3f)
Enfichez le tube d‘aspiration avant dans le
•
tube d‘aspiration arrière (fig. 3a) et visser
avec la vis (fig. 3b/pos. 12).
Enfichez à présent le tube d‘aspiration com-
•
plet dans le carter du moteur (fig. 3c) et visser
avec les vis (fig. 3d/pos. 12).
Enfichez les deux roues (fig. 3e/pos. 9) sur
•
les essieux (fig. 3e/pos. 11). Veillez à un encliquetage correct !
Poussez les roues (fig. 3f/pos. 11) sur le tube
•
d‘aspiration avant jusqu‘à la butée (fig. 3f/
pos. D) et fixez-les à l‘aide de la vis (fig. 3f/
pos. 13).
- 25 -
Anl_GE_CL_36_Li_E_Solo_SPK7.indb 25Anl_GE_CL_36_Li_E_Solo_SPK7.indb 25 22.03.16 09:0222.03.16 09:02

F
Remarque : veuillez prêter attention au fait
qu‘avant de les fi xer sur l‘appareil, les deux
tubes aspirateurs doivent toujours être tout
d‘abord raccordés l‘un à l‘autre et qu‘ils ne
doivent ensuite plus être désassemblés !
5.2. Montage du sac collecteur (fi g. 4-5)
Suspendez le crochet sur le tube d‘aspiration (fi g.
4a) et sur le carter (fi g. 4b). Ensuite, enfi chez le
sac collecteur sur la tubulure du carter et veillez à
qu‘elle s‘enclenche de façon audible (fi g. 5).
5.3. Montage de la poignée
Poussez la poignée (fi g. 6a/pos. A) jusqu‘à la bu-
tée dans les logements du carter. Fixez ensuite la
poignée des deux côtés avec respectivement une
vis (fi g. 6b/pos. 13).
5.4. Montage de la poignée supplémentaire
Retirez la vis en étoile (fi g. 7/pos. B), enfi chez la
poignée (fi g. 7/pos. 3) dans le logement et fi xez la
poignée à l‘aide de la vis en étoile dans la position souhaitée.
5.5. Montage de la ceinture de port
Dévissez la vis moletée (fi g. 8/pos. C), faites pas-
ser la bande de la ceinture (fi g. 8/pos. 4) à travers
l‘ouverture et revissez la vis moletée.
5.6 Montage de l‘accumulateur (fi gure 9)
Enfoncez, comme illustré sur la fi gure 9, la
touche d‘enclenchement (fi gure 9/pos. E) de
l‘accumulateur et poussez l‘accumulateur dans
le logement d‘accumulateur prévu à cet eff et.
Dès que l‘accumulateur est dans une position
comme fi gurant sur la fi gure 9, veillez à ce que
les touches d‘enclenchement s‘enclenchent ! Le
démontage de l‘accumulateur s‘eff ectue dans
l‘ordre inverse !
2. Comparez si la tension réseau indiquée sur la
plaque signalétique correspond à la tension
réseau disponible. Branchez la fi che de con-
tact du chargeur dans la prise de courant. Le
voyant LED vert commence à clignoter.
3. Insérez l‘accumulateur sur le chargeur.
4. Au point « Affi chage chargeur », vous trou-
verez un tableau avec les signifi cations des
affi chages LED sur le chargeur.
Pendant la charge, il est possible que
l‘accumulateur chauff e quelque peu. C‘est cepen-
dant normal.
S‘il est impossible de charger l‘accumulateur,
veuillez contrôler,
si la tension secteur est présente au niveau
•
de la prise de courant
si un contact correct est présent au niveau
•
des contacts de charge du chargeur.
Si le chargement de l‘accumulateur reste toujours
impossible, nous vous prions de bien vouloir
rapporter,
le chargeur
•
et le bloc accumulateur
•
à notre service après-vente.
Dans l‘intérêt d‘une longue durée de fonctionnement du bloc accumulateur, vous devez prendre
soin de recharger le bloc accumulateur en temps
voulu. Ceci devient absolument nécessaire
lorsque vous constatez que la puissance du
souffl eur de feuilles sans fi l baisse. Ne déchargez
jamais complètement le bloc accumulateur. Ceci
cause l‘endommagement du bloc accumulateur !
Ne mettez l‘appareil en service que lorsque vous
avez entièrement terminé le montage.
Remarque !
Utilisez exclusivement des accumulateurs avec
le même niveau de charge, ne combinez jamais
un accumulateur plein avec un accumulateur
partiellement déchargé. Mettez toujours les deux
accumulateurs à charger simultanément.
L’accumulateur le moins chargé déterminera la
durée de fonctionnement de l’appareil. Les deux
accumulateurs doivent toujours être complètement chargés avant utilisation.
5.7 Charge de l’accumulateur
1. Sortez le bloc accumulateur de l‘appareil.
Pour cela appuyez sur la touche
d‘enclenchement latérale.
Anl_GE_CL_36_Li_E_Solo_SPK7.indb 26Anl_GE_CL_36_Li_E_Solo_SPK7.indb 26 22.03.16 09:0222.03.16 09:02
6. Commande
6.1. Régler la longueur de la ceinture (fi g. 1)
Réglez la longueur de la courroie en bandoulière
(4) de telle manière que le tube d‘aspiration puisse être guidé juste au-dessus du sol. En outre, les
rouleaux de guidage (9) sur l‘extrémité inférieure
du tube aspirateur servent à mieux guider le tube
aspirateur au sol.
6.2. Mettre l’appareil en circuit (fi g. 10)
Appuyez sur l‘interrupteur marche/arrêt pour
•
mettre en circuit (5).
- 26 -

Relâchez l‘interrupteur marche/arrêt (5) pour
•
mettre hors circuit.
6.3 Sélection du mode de fonctionnement
6.3.1 Aspirer (fi g. 10)
Tournez le levier (fi g. 10/pos. 8) sur la position A.
Ceci est possible tant à l‘arrêt que pendant que
l‘appareil est en marche.
6.3.2 Souffl er (fi g. 10)
Tournez le levier (fig. 10/pos. 8) sur la position
•
B. Ceci est possible tant à l‘arrêt que pendant
que l‘appareil est en marche.
Dirigez le jet d‘air vers l‘avant et déplacez-
•
vous lentement, afin de rassembler en tas
les feuilles ou les déchets de jardin, ou de les
enlever d‘endroits difficilement accessibles.
Attention ! Videz le sac collecteur avant le
•
soufflage. Sinon, des éléments aspirés au
préalable pourraient ressortir.
6.4 Vider le sac collecteur (fi g. 1)
Videz le sac collecteur (7) à temps. Lorsque le
sac est très rempli, la puissance d‘aspiration diminue de manière signifi cative. Versez les déchets
organiques dans le compost.
Éteignez l‘appareil et débranchez la fiche de
•
contact
Ouvrez la fermeture éclair du sac collecteur
•
(7) et videz les éléments aspirés.
Refermez la fermeture éclair du sac coll-
•
ecteur (7).
6.5 Réglage de la vitesse de rotation (fi g. 1)
L‘appareil est équipé d‘un régulateur de vitesse
de rotation électronique. Pour cela, tournez le
régulateur de vitesse de rotation (fi g. 1/pos. 10)
dans la position souhaitée. Exploitez l‘appareil
uniquement à la vitesse de rotation nécessaire et
ne le faites pas tourner inutilement en surrégime.
F
7. Nettoyage, maintenance et
commande de pièces de
rechange
Danger !
Débranchez l‘accumulateur avant tous travaux de
nettoyage.
7.1 Nettoyage
À la fin du travail, enlevez le sac collecteur,
•
retournez-le et nettoyez-le en profondeur,
afin d‘éviter la formation de moisissures et
l‘apparition d‘odeurs désagréables.
Un sac collecteur très sale peut être nettoyé
•
avec de l‘eau et du savon.
Si la fermeture éclair s‘ouvre mal, frottez les
•
dents de la fermeture éclair avec du savon
sec.
Nettoyez le tube d‘aspiration/de soufflage à
•
l‘aide d‘une brosse en cas d‘encrassement.
La saleté engendrée par les éléments aspirés
•
peut gripper le commutateur (souffler/aspirer). Pour un retour à la normale, il suffit dans
ce cas, de commuter plusieurs fois de suite
sur aspirer puis sur souffler.
7.2 Maintenance
En cas de disfonctionnements éventuels, il
•
convient de faire contrôler et remettre en état
l‘appareil uniquement par un spécialiste autorisé ou par un service après-vente.
Aucune autre pièce à l‘intérieur de l‘appareil
•
n‘a besoin de maintenance.
7.3 Commande de pièces de rechange :
Pour les commandes de pièces de rechange,
veuillez indiquer les références suivantes:
Type de l’appareil
•
No. d’article de l’appareil
•
No. d’identification de l’appareil
•
No. de pièce de rechange de la pièce requise
•
Vous trouverez les prix et informations actuelles à
l’adresse www.isc-gmbh.info
- 27 -
Anl_GE_CL_36_Li_E_Solo_SPK7.indb 27Anl_GE_CL_36_Li_E_Solo_SPK7.indb 27 22.03.16 09:0222.03.16 09:02

9. Mise au rebut et recyclage
L‘appareil se trouve dans un emballage permettant d‘éviter les dommages dus au transport.
Cet emballage est une matière première et peut
donc être réutilisé ultérieurement ou être réintroduit dans le circuit des matières premières.
L‘appareil et ses accessoires sont en matériaux
divers, comme par ex. des métaux et matières
plastiques. Les appareils défectueux ne doivent
pas être jetés dans les poubelles domestiques.
Pour une mise au rebut conforme à la réglementation, l‘appareil doit être déposé dans un centre
de collecte approprié. Si vous ne connaissez pas
de centre de collecte, veuillez vous renseigner
auprès de l‘administration de votre commune.
10. Stockage
Entreposez l’appareil et ses accessoires dans
un endroit sombre, sec et à l’abri du gel tout
comme inaccessible aux enfants. La température
de stockage optimale est comprise entre 5 et 30
°C. Conservez l’outil électrique dans l’emballage
d’origine.
F
- 28 -
Anl_GE_CL_36_Li_E_Solo_SPK7.indb 28Anl_GE_CL_36_Li_E_Solo_SPK7.indb 28 22.03.16 09:0222.03.16 09:02
11. Affi chage chargeur
F
État de l’affi chage
LED rouge LED vert
Signifi cation et mesures
Arrêt Clignote État prêt à l’emploi
Le chargeur est raccordé au réseau et est prêt à l’emploi,
l’accumulateur n’est pas dans le chargeur.
Marche Arrêt Chargement
Le chargeur charge l’accumulateur en mode de charge rapide.
Arrêt Arrêt L‘accumulateur est chargé à 85 % et prêt à l‘emploi.
(Durée de charge 1,5 Ah accumulateur : 30 min)
(Durée de charge 2,0 Ah accumulateur : 40 min)
(Durée de charge 3,0 Ah accumulateur : 60 min)
(Durée de charge 4,0 Ah accumulateur : 80 min)
(Durée de charge 5,2 Ah accumulateur : 130 min)
Ensuite, on commute sur un processus de charge lent jusqu‘au
chargement complet.
(Durée de charge totale 1,5 Ah accumulateur : env. 40 min)
(Durée de charge totale 2,0 Ah accumulateur : env. 50 min)
(Durée de charge totale 3,0 Ah accumulateur : env. 75 min)
(Durée de charge totale 4,0 Ah accumulateur : env. 100 min)
(Durée de charge totale 5,2 Ah accumulateur : env. 140 min)
Mesures :
Retirez l’accumulateur du chargeur. Débranchez le chargeur du réseau.
Clignote Arrêt Charge d’adaptation
Le chargeur est en mode de charge lente.
Dans ce cas, l’accumulateur se charge plus lentement pour des raisons de sécurité et nécessite plus d’une heure. Cela peut avoir les
causes suivantes :
- l’accumulateur n’a pas été chargé depuis longtemps ou la charge
d‘un accumulateur usagé a été poursuivie (décharge profonde)
- la température de l’accumulateur n’est pas dans la zone idéale comprise entre 25 °C et 45 °C.
Mesures :
attendez jusqu’à ce que le processus de charge soit terminé,
l’accumulateur peut quand même encore être chargé.
Clignote Clignote Erreur
Le processus de charge n’est plus possible. L’accumulateur est défectueux.
Mesures :
il ne faut plus charger un accumulateur défectueux.
Retirez l’accumulateur du chargeur.
Marche Marche Perturbation thermique
L’accumulateur est trop chaud (par ex. exposition directe au so
eil) ou trop froid (en dessous de 0 °C)
Mesures :
retirez l’accumulateur et conservez-le un jour à température ambiante
(env. 20 °C).
- 29 -
Anl_GE_CL_36_Li_E_Solo_SPK7.indb 29Anl_GE_CL_36_Li_E_Solo_SPK7.indb 29 22.03.16 09:0222.03.16 09:02

F
Uniquement pour les pays de l’Union Européenne
Ne jetez pas les outils électriques dans les ordures ménagères!
Selon la norme européenne 2012/19/CE relative aux appareils électriques et systèmes électroniques
usés et selon son application dans le droit national, les outils électriques usés doivent être récoltés à
part et apportés à un recyclage respectueux de l’environnement.
Possibilité de recyclage en alternative à la demande de renvoi :
Le propriétaire de l’appareil électrique est obligé, en guise d’alternative à un envoi en retour, à contribuer à un recyclage eff ectué dans les règles de l’art en cas de cessation de la propriété. L’ancien appareil
peut être remis à un point de collecte dans ce but. Cet organisme devra l’éliminer dans le sens de la Loi
sur le cycle des matières et les déchets. Ne sont pas concernés les accessoires et ressources fournies
sans composants électroniques.
Toute réimpression ou autre reproduction de la documentation et des papiers joints aux produits, même
sous forme d’extraits, est uniquement permise une fois l’accord explicite de l’ISC GmbH obtenu.
Sous réserve de modifi cations techniques
- 30 -
Anl_GE_CL_36_Li_E_Solo_SPK7.indb 30Anl_GE_CL_36_Li_E_Solo_SPK7.indb 30 22.03.16 09:0222.03.16 09:02

F
Informations service après-vente
Nous disposons dans tous les pays mentionnés dans le bon de garantie de partenaires de service
après-vente compétents dont vous trouverez les coordonnées dans le bon de garantie. Ceux-ci se
tiennent à votre disposition pour tout ce qui concerne le service après-vente comme les réparations,
l‘approvisionnement en pièces de rechange et d‘usure ou l‘achat de pièces de consommation.
Il faut tenir compte du fait que pour ce produit les pièces suivantes sont soumises à une usure liée à
l‘utilisation ou à une usure naturelle ou que les pièces suivantes sont nécessaires en tant que consommables.
Catégorie Exemple
Pièces d‘usure* accumulateur
Matériel de consommation/
pièces de consommation*
Pièces manquantes
*Pas obligatoirement compris dans la livraison !
En cas de vices ou de défauts, nous vous prions d‘enregistrer le cas du défaut sur internet à l‘adresse
www.isc-gmbh.info. Veuillez donner une description précise du défaut et répondre dans tous les cas aux
questions suivantes :
est-ce que l‘appareil a fonctionné une fois ou était-il défectueux dés le départ ?
•
avez-vous remarqué quelque chose avant la panne (symptôme avant la panne) ?
•
quel est le défaut de fonctionnement de l‘appareil à votre avis (symptôme principal) ?
•
Décrivez ce défaut de fonctionnement.
- 31 -
Anl_GE_CL_36_Li_E_Solo_SPK7.indb 31Anl_GE_CL_36_Li_E_Solo_SPK7.indb 31 22.03.16 09:0222.03.16 09:02

F
Bon de garantie
Chère cliente, cher client,
nos produits sont soumis à un contrôle de qualité très strict. Si toutefois, il arrivait que cet appareil ne
fonctionne pas parfaitement, nous en sommes désolés et nous vous prions de vous adresser à notre
service après-vente à l‘adresse indiquée sur le bon de garantie. Nous nous tenons également volontiers
à votre disposition par téléphone au numéro de service après-vente indiqué. La garantie est valable
dans les conditions suivantes :
1. Ces conditions de garantie s‘adressent uniquement à des consommateurs, c‘est à dire à des personnes physiques qui ne souhaitent ni utiliser ce produit dans le cadre de leur activité industrielle ou
artisanale, ni dans le cadre de toute autre activité indépendante. Les conditions de garantie réglementent les prestations de garantie supplémentaires que le fabricant mentionné ci-dessous promet
aux acheteurs de ses appareils en supplément de la prestation de garantie légale. Vos droits légaux
en matière de garantie restent inchangés. Notre prestation de garanti est gratuite pour vous.
2. La prestation de garantie s‘étend exclusivement aux défauts résultant d‘une erreur de fabrication ou
de matériau d‘un appareil neuf du fabricant mentionné ci-dessous et acheté par vos soins. La prestation de garantie se limite selon notre décision soit à la résolution de tels défauts sur l‘appareil, soit
à l‘échange de l‘appareil.
Veillez au fait que nos appareils, conformément au règlement, n‘ont pas été conçus pour être utilisés dans un environnement professionnel, industriel ou artisanal. Il n‘y a donc pas de contrat de
garantie quand l‘appareil a été utilisé professionnellement, artisanalement ou par des sociétés industrielles ou exposé à une sollicitation semblable pendant la durée de la garantie.
3. Sont exclus de notre garantie :
- les dommages liés au non-respect des instructions de montage ou en raison d‘une installation
incorrecte, au non-respect du mode d‘emploi (en raison par ex. du branchement de l‘appareil sur la
tension de réseau ou le type de courant incorrect), au non-respect des dispositions de maintenance
et de sécurité ou résultant d‘une exposition de l‘appareil à des conditions environnementales anormales ou d‘un manque d‘entretien et de maintenance.
- les dommages résultant d‘une utilisation abusive ou non conforme (comme par ex. une surcharge
de l‘appareil ou une utilisation d‘outils ou d‘accessoires non autorisés), de la pénétration d‘objets
étrangers dans l‘appareil (comme par ex. du sable, des pierres ou de la poussière), de l‘utilisation
de la force ou de la violence (comme par ex. les dommages liés aux chutes).
- les dommages sur l‘appareil ou des parties de l‘appareil résultant de l‘usure normale liée à
l‘utilisation de l‘appareil ou de toute autre usure naturelle.
4. La durée de garantie est de 24 mois et débute à la date d‘achat de l‘appareil. Les droits à la garantie
doivent être revendiqués avant l‘expiration de la durée de garantie dans un délai de deux semaines
après avoir constaté le défaut. La revendication de droits à la garantie après expiration de la durée
de garantie est exclue. La réparation ou l‘échange de l‘appareil n‘entraîne ni une extension de la durée de garantie ni le début d‘une nouvelle durée de garantie pour cet appareil ou toute autre pièce
de rechange installée sur l‘appareil. Cela est valable également dans le cas d‘une intervention du
service après-vente à domicile.
5. Pour faire valoir vos droits à la garantie, veuillez enregistrer l‘appareil défectueux à l‘adresse suivante : www.isc-gmbh.info. Veuillez garder à disposition la preuve d‘achat ou tout autre justifi catif
de l‘achat de votre nouvel appareil. Les appareils envoyés sans les justifi catifs correspondants ou
sans plaque signalétique sont exclus de la prestation de garantie en raison de l‘impossibilité de les
enregistrer. Si le défaut de l‘appareil est inclut dans la garantie, vous recevrez sans délai un appareil
réparé ou un nouvel appareil.
Bien entendu, nous réparons volontiers les défauts de votre appareil qui ne sont pas ou plus compris
dans l‘étendue de la garantie contre le remboursement des frais de réparation. Pour cela, veuillez envoyer l‘appareil à notre adresse de service après-vente.
Pour les pièces d‘usure, de consommation et manquantes, nous renvoyons aux restrictions de cette garantie conformément aux informations du service après-vente de ce mode d‘emploi.
- 32 -
Anl_GE_CL_36_Li_E_Solo_SPK7.indb 32Anl_GE_CL_36_Li_E_Solo_SPK7.indb 32 22.03.16 09:0222.03.16 09:02

I
Pericolo!
Nell’usare gli apparecchi si devono rispettare
diverse avvertenze di sicurezza per evitare lesioni e danni. Quindi leggete attentamente queste
istruzioni per l’uso/le avvertenze di sicurezza.
Conservate bene le informazioni per averle a
disposizione in qualsiasi momento. Se date
l’apparecchio ad altre persone, consegnate queste istruzioni per l’uso/le avvertenze di sicurezza
insieme all’apparecchio. Non ci assumiamo alcuna responsabilità per incidenti o danni causati
dal mancato rispetto di queste istruzioni e delle
avvertenze di sicurezza.
1. Avvertenze sulla sicurezza
Le relative avvertenze di sicurezza si trovano
nell’opuscolo allegato.
Pericolo!
Leggete tutte le avvertenze di sicurezza e le
istruzioni. Dimenticanze nel rispetto delle avver-
tenze di sicurezza e delle istruzioni possono causare scosse elettriche, incendi e/o gravi lesioni.
Conservate tutte le avvertenze e le istruzioni
per eventuali necessità future.
Spiegazione della targhetta di avvertenze
sull’apparecchio (vedi Fig. 11)
1. Prima della messa in funzione leggete le
istruzioni per l‘uso.
2. Non usate l‘apparecchio in caso di pioggia o
neve. Proteggete l‘apparecchio dall‘umidità.
3. Tenete le altre persone lontane dalla zona di
pericolo.
4. Indossate occhiali protettivi e cuffi e antirumo-
re.
5. Parti rotanti! Tenete mani e piedi lontani dalle
aperture
2. Descrizione dell‘apparecchio ed
elementi forniti
2.1 Descrizione dell‘apparecchio (Fig. 1/2)
1. Tubo di aspirazione anteriore
2. Tubo di aspirazione posteriore
3. Impugnatura addizionale
4. Tracolla
5. Interruttore ON/OFF
6. Vano batteria
7. Sacco di raccolta
8. Commutatore aspirazione/soffi aggio
9. Rotelle
10. Regolatore del numero di giri
11. Supporto ruote
12. 2x viti lunghe
13. 3x viti corte
2.2 Elementi forniti
Verifi cate che l‘articolo sia completo sulla base
degli elementi forniti descritti. In caso di parti
mancanti, rivolgetevi al nostro Centro Servizio Assistenza o al punto vendita in cui avete acquistato
l‘apparecchio presentando un documento di acquisto valido entro e non oltre i 5 giorni lavorativi
dall‘acquisto dell‘articolo. Al riguardo fate attenzione alla Tabella Garanzia nelle informazioni sul
Servizio Assistenza alla fi ne delle istruzioni.
Aprite l’imballaggio e togliete con cautela
•
l’apparecchio dalla confezione.
Togliete il materiale d’imballaggio e anche i
•
fermi di trasporto / imballo (se presenti).
Controllate che siano presenti tutti gli elemen-
•
ti forniti.
Verificate che l’apparecchio e gli accessori
•
non presentino danni dovuti al trasporto.
Se possibile, conservate l’imballaggio fino
•
alla scadenza della garanzia.
Pericolo!
L’apparecchio e il materiale d’imballaggio
non sono giocattoli! I bambini non devono
giocare con sacchetti di plastica, fi lm e pic-
coli pezzi! Sussiste pericolo di ingerimento e
soff ocamento!
Istruzioni per l’uso originali
•
Avvertenze di sicurezza
•
3. Utilizzo proprio
Il soffi atore aspiratore è omologato soltanto per
fogliame e rifi uti di giardino come erba e rametti.
Un uso diverso non è consentito.
L’apparecchio deve venire usato solamente per lo
scopo a cui è destinato. Ogni altro tipo di uso che
esuli da quello previsto non è un uso conforme.
L’utilizzatore/l’operatore, e non il costruttore, è
responsabile dei danni e delle lesioni di ogni tipo
che ne risultino.
Tenete presente che i nostri apparecchi non sono
stati costruiti per l’impiego professionale, artigianale o industriale. Non ci assumiamo alcuna
garanzia quando l’apparecchio viene usato in
- 33 -
Anl_GE_CL_36_Li_E_Solo_SPK7.indb 33Anl_GE_CL_36_Li_E_Solo_SPK7.indb 33 22.03.16 09:0222.03.16 09:02

I
imprese commerciali, artigianali o industriali, o in
attività equivalenti.
4. Caratteristiche tecniche
Numero di giri in folle n0 .......... 8000-13.000 min
Velocità dell‘aria .................................... 210 km/h
Potenza di aspirazione .......................... 720 m
Volume del sacco di raccolta ................... ca. 45 l
Livello e potenza della pressione ........................
acustica L
Incertezza K .......................................... 3 dB (A)
Livello e pressione acustica L
Vibrazione ahv .................................... 2,354 m/s
Incertezza K ............................................1,5 m/s
Peso ...........................................................3,3 kg
Attenzione!
L‘apparecchio viene fornito senza batterie e
senza caricabatterie e deve essere utilizzato solo
con le batterie agli ioni di litio della serie Power X
Change!
Power X Change
18 V / 1,5 Ah .......................5 celle agli ioni di litio
18 V / 2,0 Ah ...................... 5 celle agli ioni di litio
18 V / 3,0 Ah .....................10 celle agli ioni di litio
18 V / 4,0 Ah .....................10 celle agli ioni di litio
18 V / 5,2 Ah .....................10 celle agli ioni di litio
Le batterie agli ioni di litio della serie Power X
Change devono essere ricaricate solo con il caricabatterie Power X.
Caricabatterie
Tensione di rete .................200-250 V ~ 50-60 Hz
Uscita
Tensione nominale ................................ 21 V d. c.
Corrente nominale ...............................3.000 mA
Limitate al minimo lo sviluppo di rumore e le
vibrazioni!
•
•
•
•
•
.................................... 92,68 dB (A)
WA
........ 83,1 dB (A)
pA
Utilizzate soltanto apparecchi in perfetto stato.
Eseguite regolarmente la manutenzione e la
pulizia dell’apparecchio.
Adattate il vostro modo di lavorare
all’apparecchio.
Non sovraccaricate l’apparecchio.
Fate eventualmente controllare l’apparecchio.
3
/h
Spegnete l’apparecchio se non lo utilizzate.
•
Indossate i guanti.
•
Attenzione!
Rischi residui
Anche se questo elettroutensile viene utiliz-
-1
zato secondo le norme, continuano a sussistere rischi residui. In relazione alla struttura
e al funzionamento di questo elettroutensile
potrebbero presentarsi i seguenti pericoli:
1. Danni all’apparato respiratorio nel caso in cui
non venga indossata una maschera antipolvere adeguata.
2. Danni all’udito nel caso in cui non vengano
indossate cuffi e antirumore adeguate.
3. Danni alla salute derivanti da vibrazioni ma-
2
2
no-braccio se l’apparecchio viene utilizzato a
lungo, non viene tenuto in modo corretto o se
la manutenzione non è appropriata.
5. Prima della messa in esercizio
L‘apparecchio viene fornito senza batterie e
senza caricabatterie!
Avvertimento!
Staccate sempre le batterie prima di ogni regolazione dell‘apparecchio.
5.1. Montaggio del tubo di aspirazione (Fig.
3a-3f)
Inserite l’uno nell’altro il tubo di aspirazione
•
anteriore e quello posteriore (Fig. 3a) e avvitateli con la vite apposita (Fig. 3b/Pos. 12).
Inserite ora tutto il tubo di aspirazione nella
•
carcassa del motore (Fig. 3c) e avvitatelo con
le viti apposite (Fig. 3d/Pos. 12).
Inserite entrambe le ruote (Fig. 3e/Pos. 9) nel
•
supporto ruote (Fig. 3e/Pos. 11) Assicuratevi
che si senta lo scatto!
Infilate il supporto ruote (Fig. 3f/Pos. 11) sul
•
tubo di aspirazione anteriore fino alla battuta
(Fig. 3f/Pos. D) e fissatelo con la vite apposita
(Fig. 3f/Pos. 13).
Avvertenza: controllate che prima del fi ssag-
gio sull‘apparecchio i due tubi di aspirazione
siano ben collegati tra di loro perché successivamente non possono essere smontati!
- 34 -
Anl_GE_CL_36_Li_E_Solo_SPK7.indb 34Anl_GE_CL_36_Li_E_Solo_SPK7.indb 34 22.03.16 09:0222.03.16 09:02

I
5.2. Montaggio del sacco di raccolta (Fig. 4-5)
Agganciate il gancio al tubo di aspirazione (Fig.
4a) e alla carcassa (Fig. 4b). Poi mettete il sacco
di raccolta sul bocchettone della carcassa del
motore (Fig. 4b) e assicuratevi di sentire lo scatto
di arresto (Fig. 5).
5.3. Montaggio dell‘impugnatura
Spingete l‘impugnatura (Fig. 6a/Pos. A) nelle
sedi sulla carcassa fi no alla battuta. Fissate poi
l‘impugnatura su ciascun lato rispettivamente con
una vite (Fig. 6b/Pos. 13).
5.4. Montaggio dell‘impugnatura addizionale
Togliete la manopola a stella (Fig. 7/Pos. B), inserite l‘impugnatura (Fig. 7/Pos. 3) nella sede e
fi ssatela nella posizione desiderata con la manopola a stella.
5.5. Montaggio della tracolla
Aprite la vite del moschettone (Fig. 8/Pos. C), fate
passare la cinghia della tracolla (Fig. 8/Pos. 4)
nell‘apertura e richiudete la vite.
5.6 Montaggio della batteria (Fig. 9)
Premete il tasto di arresto (Fig. 9/Pos. E) della
batteria come mostrato nella Fig. 9 e spingete la
batteria nell‘apposito vano batteria. Non appena
la batteria è in una posizione come mostrato a
destra nella Fig. 9, fate attenzione che il tasto di
arresto scatti. Lo smontaggio della batteria avviene nell‘ordine inverso!
Avvertenza!
Utilizzate solo batterie con lo stesso livello di
carica, non combinate mai una batteria completamente carica con una carica per metà. Ricaricate
sempre le due batterie contemporaneamente.
La batteria con lo stato di carica inferiore determina la durata di esercizio dell‘apparecchio.
Prima dell‘esercizio le due batterie devono essere
sempre ricaricate completamente.
5.7 Ricarica della batteria
1. Estraete la batteria dall‘apparecchio. Per fare
ciò premete il tasto di arresto laterale.
2. Controllate che la tensione di rete indicata
sulla targhetta corrisponda alla tensione di
rete a disposizione. Inserite la spina di alimentazione del caricabatterie nella presa di
corrente. Il LED verde inizia a lampeggiare.
3. Inserite la batteria nel caricabatterie.
4. Al punto „Indicatori caricabatterie“ trovate una
tabella con i signifi cati degli indicatori LED sul
caricabatterie.
Durante la ricarica la batteria si può riscaldare un
po‘. Ma ciò è del tutto normale.
Se la ricarica della batteria non fosse possibile,
verifi cate
che sia presente tensione di rete sulla presa
•
di corrente;
che ci sia un perfetto contatto dei contatti di
•
ricarica.
Se continuasse a non essere possibile ricaricare
la batteria, inviate
il caricabatterie
•
e la batteria
•
al nostro servizio di assistenza clienti.
Per ottenere una lunga durata della batteria si
deve provvedere a una puntuale ricarica. Ciò è
comunque necessario quando ci si accorge della
diminuzione delle prestazioni del soffi atore aspi-
ratore. Non fate scaricare mai completamente la
batteria. Questo potrebbe danneggiarla!
Mettete in funzione l‘apparecchio solo dopo aver
terminato completamente il montaggio.
6. Uso
6.1. Regolazione della lunghezza della tracolla (Fig. 1)
Regolare la lunghezza della cinghia della tracolla
(4) in modo che il tubo di aspirazione possa venire condotto a pochissima distanza dal terreno.
Inoltre le rotelle di guida (9) all‘estremità del tubo
di aspirazione servono a condurre più facilmente
il tubo di aspirazione per terra.
6.2. Accensione dell‘apparecchio (Fig. 10)
Premete l‘interruttore ON/OFF (5) per accen-
•
dere l‘apparecchio.
Per spegnerlo lasciate andare l’interruttore
•
ON/OFF (5).
6.3 Scegliere la modalità operativa
6.3.1 Aspirazione (Fig. 10)
Ruotate la leva (Fig. 10/Pos.8) posizionandola su
A. Ciò può essere eff ettuato con apparecchio sia
acceso che spento.
- 35 -
Anl_GE_CL_36_Li_E_Solo_SPK7.indb 35Anl_GE_CL_36_Li_E_Solo_SPK7.indb 35 22.03.16 09:0222.03.16 09:02

I
6.3.2 Soffi aggio (Fig. 10)
Ruotate la leva (Fig. 10/Pos.8) portandola su
•
B. Ciò può essere effettuato con apparecchio
sia acceso che spento.
Orientate il getto d‘aria in avanti e muovetevi
•
lentamente per accumulare soffiando fogliame o rifiuti di giardino oppure per eliminarli da
zone difficilmente accessibili.
Attenzione! Svuotate il sacco di raccolta pri-
•
ma di iniziare il soffiaggio. Altrimenti il fogliame aspirato potrebbe uscire di nuovo.
6.4 Svuotare il sacco di raccolta (Fig. 1)
Svuotate tempestivamente il sacco di raccolta (7).
Se è molto pieno la potenza aspirante si indebolisce notevolmente.
I rifi uti organici vanno smaltiti tramite compos-
taggio.
Spegnete l‘apparecchio e togliete la batteria.
•
Aprite la cerniera sul sacco di raccolta (7) e
•
svuotatelo del fogliame.
Richiudete la cerniera del sacco di raccolta
•
(7).
6.5 Regolazione del numero di giri (Fig. 1)
L‘apparecchio è dotato di una regolazione elettronica del numero di giri. Ruotate a tal fi ne il rego-
latore del numero di giri (Fig. 1/Pos. 10) sulla posizione desiderata. Fate funzionare l’apparecchio
solo con il numero di giri necessario. Non fate
aumentare il numero di giri senza motivo.
del commutatore (soffiaggio/aspirazione). In
questo caso, dopo ripetute commutazioni, il
movimento della leva del commutatore, da
aspirazione, si imposta su soffiaggio.
7.2 Manutenzione
In caso di anomalie fate controllare
•
l‘apparecchio soltanto da uno specialista
autorizzato oppure da un‘officina assistenza
clienti.
All‘interno dell‘apparecchio non si trovano alt-
•
re parti che richiedano manutenzione.
7.3 Ordinazione di pezzi di ricambio:
Volendo commissionare dei pezzi di ricambio, si
dovrebbe dichiarare quanto segue:
modello dell’apparecchio
•
numero dell’articolo dell’apparecchio
•
numero d’ident. dell’apparecchio
•
numero del pezzo di ricambio del ricambio
•
necessitato.
Per i prezzi e le informazioni attuali si veda
www.isc-gmbh.info
8. Anomalie
L‘apparecchio non funziona
Controllate che la batteria sia carica e che il caricabatteria funzioni. Nel caso in cui l‘apparecchio
non funzioni pur in presenza di tensione, speditelo all‘indirizzo dell‘assistenza clienti indicato.
7. Pulizia, manutenzione e
ordinazione dei pezzi di ricambio
Pericolo!
Prima di qualsiasi lavoro di pulizia togliete la batteria.
7.1 Pulizia
Dopo aver terminato il lavoro, togliete il sacco
•
di raccolta, rovesciatelo e pulitelo con cura,
per evitare la formazione di muffa o di odori
sgradevoli.
Un sacco di raccolta molto sporco può essere
•
pulito con acqua e sapone.
Se la cerniera del sacco non si apre e chiude
•
facilmente, sfregate una saponetta sui denti
della cerniera.
Pulite dallo sporco il tubo di aspirazione/soffi-
•
aggio con una spazzola.
Lo sporco causato dal materiale aspirato può
•
ostacolare il corretto movimento della leva
Anl_GE_CL_36_Li_E_Solo_SPK7.indb 36Anl_GE_CL_36_Li_E_Solo_SPK7.indb 36 22.03.16 09:0222.03.16 09:02
9. Smaltimento e riciclaggio
L‘apparecchio si trova in un imballaggio per evitare i danni dovuti al trasporto. Questo imballaggio
rappresenta una materia prima e può perciò essere utilizzato di nuovo o riciclato. L‘apparecchio
e i suoi accessori sono fatti di materiali diversi,
per es. metallo e plastica. Gli apparecchi difettosi
non devono essere gettati nei rifi uti domestici. Per
uno smaltimento corretto l‘apparecchio va consegnato ad un apposito centro di raccolta. Se non
vi è noto nessun centro di raccolta, rivolgetevi per
informazioni all‘amministrazione comunale.
- 36 -

10. Conservazione
Conservate l’apparecchio e i suoi accessori in un
luogo buio, asciutto, al riparo dal gelo e non accessibile ai bambini. La temperatura ottimale per
la conservazione è compresa tra i 5 e i 30 °C.
Conservate l’elettroutensile nell’imballaggio originale.
I
- 37 -
Anl_GE_CL_36_Li_E_Solo_SPK7.indb 37Anl_GE_CL_36_Li_E_Solo_SPK7.indb 37 22.03.16 09:0222.03.16 09:02

11. Indicatori del caricabatterie
I
Stato indicatori
LED rosso LED verde
Signifi cato e interventi
Spento Lampeggia Pronto all‘esercizio
Il caricabatterie è collegato alla rete e pronto per l‘uso, la batteria non è
nel caricabatterie.
Acceso Spento Ricarica
Il caricabatterie ricarica la batteria in esercizio di ricarica veloce.
Spento Acceso La batteria è ricaricata all‘85% e pronta per l‘uso.
(Durata di ricarica per batteria da 1,5 Ah: 30 min.)
(Durata di ricarica per batteria da 2,0 Ah: 40 min.)
(Durata di ricarica per batteria da 3,0 Ah: 60 min.)
(Durata di ricarica per batteria da 4,0 Ah: 80 min.)
(Durata di ricarica per batteria da 5,2 Ah: 130 min.)
Dopo tale intervallo l‘apparecchio passa alla ricarica lenta fi no a co
pletare il processo.
(Durata di ricarica totale, batteria da 1,5 Ah: ca. 40 min.)
(Durata di ricarica totale, batteria da 2,0 Ah: ca. 50 min.)
(Durata di ricarica totale, batteria da 3,0 Ah: ca. 75 min.)
(Durata di ricarica totale, batteria da 4,0 Ah: ca. 100 min.)
(Durata di ricarica totale, batteria da 5,2 Ah: ca. 140 min.)
Intervento
Togliete la batteria dal caricabatterie. Staccate il caricaba
terie dalla rete.
Lampeggia Spento Regolatore di carica
Il caricabatterie si trova nella modalità di ricarica lenta.
In questo modo la batteria viene ricaricata più lentamente per motivi
di sicurezza e richiede più di 1 h. Ciò può essere dovuto ai seguenti
motivi:
- la batteria non è stata ricaricata per molto tempo oppure è stata co
tinuata la scarica di una batteria esaurita (scarica profonda)
- la temperatura della batteria non si trova nel range ideale tra i 25°C
e 45°C.
Intervento
Attendete la fi ne della ricarica, si può comunque continuare a ricar
care la batteria.
Lampeggia Lampeggia Errore
La ricarica non è più possibile. La batteria è difettosa.
Intervento
Una batteria difettosa non deve più venire ricaricata.
Togliete la batteria dal caricabatterie.
Acceso Acceso Anomalia termica
La batteria è troppo calda (per es. esposizione diretta al sole) o troppo
fredda (al di sotto dei 0°C)
Intervento
Togliete la batteria e tenetela per un giorno a temperatura ambiente
(ca. 20°C).
- 38 -
Anl_GE_CL_36_Li_E_Solo_SPK7.indb 38Anl_GE_CL_36_Li_E_Solo_SPK7.indb 38 22.03.16 09:0222.03.16 09:02

I
Solo per paesi membri dell’UE
Non smaltite gli elettroutensili nei rifi uti domestici!
Secondo la direttiva europea 2012/19/CE sui rifi uti di apparecchiature elettriche ed elettroniche e il suo
recepimento nelle normative nazionali, gli elettroutensili usati devono venire raccolti separatamente e
venire smaltiti in modo ecocompatibile.
Alternativa di riciclaggio alla richiesta di restituzione:
il proprietario dell’apparecchio elettrico è tenuto in alternativa, invece della restituzione, a collaborare in
modo che lo smaltimento venga eseguito correttamente in caso ceda l’apparecchio. L’apparecchio vecchio può anche venire consegnato ad un centro di raccolta che provvede poi allo smaltimento secondo
le norme nazionali sul riciclaggio e sui rifi uti. Non ne sono interessati gli accessori e i mezzi ausiliari sen-
za elementi elettrici forniti insieme ai vecchi apparecchi.
La ristampa o l’ulteriore riproduzione, anche parziale, della documentazione o dei documenti
d’accompagnamento dei prodotti è consentita solo con l’esplicita autorizzazione da parte della
iSC GmbH.
Con riserva di apportare modifi che tecniche
- 39 -
Anl_GE_CL_36_Li_E_Solo_SPK7.indb 39Anl_GE_CL_36_Li_E_Solo_SPK7.indb 39 22.03.16 09:0222.03.16 09:02

I
Informazioni sul Servizio Assistenza
In tutti i Paesi indicati nel certifi cato di garanzia disponiamo di competenti partner per il Servizio Assis-
tenza (per i relativi dati di contatto si veda il certifi cato di garanzia), che sono a vostra disposizione per
tutte le richieste di assistenza come riparazione, fornitura di pezzi di ricambio e parti di usura o vendita
di materiali di consumo.
Si deve tenere presente che le seguenti parti di questo prodotto sono soggette a un‘usura naturale o
dovuta all‘uso ovvero che le seguenti parti sono necessarie come materiali di consumo.
Categoria Esempio
Parti soggette ad usura * Batteria
Materiale di consumo/parti di consumo *
Parti mancanti
* non necessariamente compreso tra gli elementi forniti!
In presenza di difetti o errori vi preghiamo di denunciare il caso sul sito internet www.isc-gmbh.info. Vi
preghiamo di descrivere con precisione l‘anomalia e a tal riguardo di rispondere in ogni caso alle seguenti domande:
L‘apparecchio ha già funzionato una volta o era difettoso fin dall‘inizio?
•
Avete notato qualcosa prima che si manifestasse il difetto (sintomo prima del difetto)?
•
A vostro parere che cosa non funziona nell‘apparecchio (sintomo principale)?
•
Descrivete che cosa non funziona.
- 40 -
Anl_GE_CL_36_Li_E_Solo_SPK7.indb 40Anl_GE_CL_36_Li_E_Solo_SPK7.indb 40 22.03.16 09:0222.03.16 09:02

I
Certifi cato di garanzia
Gentili clienti,
i nostri prodotti sono soggetti ad un rigido controllo di qualità. Se l‘apparecchio non dovesse tuttavia
funzionare correttamente, ci scusiamo e vi preghiamo di rivolgervi al nostro servizio di assistenza clienti
all‘indirizzo indicato in questa scheda di garanzia. Siamo a vostra disposizione anche telefonicamente al
numero del Servizio Assistenza indicato. Per la rivendicazione dei diritti di garanzia vale quanto segue:
1. Le presenti condizioni di garanzia si rivolgono esclusivamente a consumatori, vale a dire a persone
fi siche che non intendono utilizzare questo prodotto né in ambito professionale né per altre attività
di lavoro autonomo. Le presenti condizioni di garanzia regolano prestazioni di garanzia supplementari che il produttore su indicato concede in aggiunta alla garanzia legale agli acquirenti di nuovi
apparecchi. La presente garanzia non tocca i vostri diritti al ricorso in garanzia previsti dalla legge.
Le nostre prestazioni di garanzia sono per voi gratuite.
2. La prestazione di garanzia riguarda esclusivamente i difetti di un nuovo apparecchio da voi
acquistato del produttore di cui sopra, riconducibili a errori di materiale o di produzione, ed è limitata, a nostra discrezione, all‘eliminazione di questi difetti dell‘apparecchio o alla sostituzione
dell‘apparecchio stesso.
Tenete presente che i nostri apparecchi non sono stati costruiti per l‘impiego artigianale, professionale o imprenditoriale. Pertanto un contratto di garanzia non viene concluso se l‘apparecchio è stato
usato entro il periodo di garanzia in attività artigianali, imprenditoriali o industriali o se è stato sottoposto a sollecitazioni equivalenti.
3. Sono esclusi dalla nostra garanzia:
- Danni all‘apparecchio causati dalla mancata osservanza delle istruzioni di montaggio o per
un‘installazione non corretta, dalla mancata osservanza delle istruzioni per l‘uso (come ad es. collegamento a una tensione di rete o a un tipo di corrente non corretti), dalla mancata osservanza delle
norme relative alla manutenzione e alla sicurezza, dall‘esposizione dell‘apparecchio a condizioni
ambientali anomale o per la mancata esecuzione di pulizia e manutenzione.
- Danni all‘apparecchio dovuti a usi impropri o illeciti (come per es. sovraccarico dell‘apparecchio
o utilizzo di utensili di ricambio o accessori non consentiti), alla penetrazione di corpi estranei
nell‘apparecchio (come per es. sabbia, pietre o polvere, danni dovuti al trasporto), all‘impiego della
forza o a infl ussi esterni (come per es. danni causati da caduta).
- Danni all‘apparecchio o a parti di esso da ricondurre a un‘usura comune, dovuta all‘uso o di altro
tipo naturale.
4. Il periodo di garanzia è 24 mesi e inizia a partire dalla data di acquisto dell‘apparecchio. I diritti di
garanzia devono essere fatti valere prima della scadenza del periodo di garanzia, entro due settimane dopo avere accertato il difetto. È esclusa la rivendicazione di diritti di garanzia dopo la scadenza
del relativo periodo. La riparazione o la sostituzione dell‘apparecchio non comporta una proroga del
periodo di garanzia e con questa prestazione per l‘apparecchio o per pezzi di ricambio eventualmente installati non inizia un nuovo periodo di garanzia. Ciò vale anche nel caso in cui si ricorra a un
servizio sul posto.
5. Per rivendicare il diritto di garanzia vi preghiamo di comunicare che l‘apparecchio è difettoso tramite
sito internet: www.isc-gmbh.info. Tenete a portata di mano il documento di acquisto o altri documenti
come prova dell‘acquisto del vostro apparecchio nuovo. Apparecchi inviati senza i relativi documenti
o senza targhetta d‘identifi cazione sono esclusi dalla prestazione di garanzia perché non possono
essere classifi cati in modo corrispondente. Se il difetto dell‘apparecchio rientra nella nostra presta-
zione di garanzia, ricevete prontamente l‘apparecchio riparato o un apparecchio nuovo.
Naturalmente eff ettuiamo a pagamento anche riparazioni sull‘apparecchio che non rientrano o non rien-
trano più nella garanzia. A tale scopo inviate l‘apparecchio all‘indirizzo del nostro Centro Assistenza.
Per parti mancanti, di consumo e soggette a usura rimandiamo alle limitazioni di questa garanzia secondo le informazioni sul Servizio Assistenza di queste istruzioni per l‘uso.
- 41 -
Anl_GE_CL_36_Li_E_Solo_SPK7.indb 41Anl_GE_CL_36_Li_E_Solo_SPK7.indb 41 22.03.16 09:0222.03.16 09:02

DK/N
Fare!
Ved brug af el-værktøj er der visse sikkerhedsforanstaltninger, der skal respekteres for at undgå
skader på personer og materiel. Læs derfor betjeningsvejledningen / sikkerhedsanvisningerne
grundigt igennem. Opbevar betjeningsvejledningen et praktisk sted, så du altid kan tage den frem
efter behov. Husk at lade betjeningsvejledningen
/ sikkerhedsanvisningerne følge med værktøjet,
hvis du overdrager det til andre. Vi fraskriver
os ethvert ansvar for skader på personer eller
materiel, som måtte opstå som følge af, at anvisningerne i denne betjeningsvejledning, navnlig
vedrørende sikkerhed, tilsidesættes.
1. Sikkerhedsanvisninger
Relevante sikkerhedsanvisninger fi nder du i det
medfølgende hæfte.
Fare!
Læs alle sikkerhedsanvisninger og øvrige anvisninger. Følges anvisningerne, navnlig sikker-
hedsanvisningerne, ikke nøje som beskrevet, kan
elektrisk stød, brand og/eller svære kvæstelser
være følgen. Alle sikkerhedsanvisninger og
øvrige anvisninger skal gemmes.
Oplysningsskiltenes betydning på apparatet
(se fi g. 11)
1. Læs betjeningsvejledningen, inden du tager
produktet i brug.
2. Brug ikke produktet i regn- eller snevejr.
Beskyt produktet mod fugt.
3. Hold tredjeperson borte fra fareområdet.
4. Brug øjen- og høreværn.
5. Roterende dele! Hold hænder og fødder på
afstand af åbningerne
2. Produktbeskrivelse og
leveringsomfang
2.1 Produktbeskrivelse (fi g. 1/2)
1. Sugerør foran
2. Sugerør bagved
3. Hjælpegreb
4. Bæresele
5. Tænd/sluk-knap
6. kkumulatorbatteriholder
7. Opsamlingspose
8. Omskifter indsugning/udblæsning
9. Styrehjul
10. Hastighedsregulator
11. Hjulholder
12. 2x skrue lang
13. 3x skrue kort
2.2 Leveringsomfang
Kontroller på grundlag af det beskrevne leveringsomfang, at varen er komplet. Hvis nogle dele
mangler, bedes du senest inden 5 hverdage efter
købet af varen henvende dig til vores servicecenter eller det sted, hvor du har købt varen, med
forevisning af gyldig købskvittering. Vær her opmærksom på garantioversigten, der er indeholdt i
serviceinformationerne bagest i vejledningen.
Åbn pakken, og tag forsigtigt maskinen ud af
•
emballagen.
Fjern emballagematerialet samt emballage-/
•
og transportsikringer (hvis sådanne forefindes).
Kontroller, at der ikke mangler noget.
•
Kontroller maskine og tilbehør for transports-
•
kader.
Opbevar så vidt muligt emballagen indtil ga-
•
rantiperiodens udløb.
Fare!
Maskinen og emballagematerialet er ikke
legetøj! Børn må ikke lege med plastikposer,
folier og smådele! Fare for indtagelse og
kvælning!
Original betjeningsvejledning
•
Sikkerhedsanvisninger
•
3. Formålsbestemt anvendelse
Løvsugeren/-blæseren er godkendt til brug til løv
og haveaff ald, så som græs og kviste. Enhver
anden form for anvendelse af produktet er ikke
tilladt.
Saven må kun anvendes i overensstemmelse
med dens tiltænkte formål. Enhver anden form
for anvendelse er ikke tilladt. Vi fraskriver os ethvert ansvar for skader, det være sig på personer
eller materiel, som måtte opstå som følge af, at
maskinen ikke er blevet anvendt korrekt. Ansvaret
bæres alene af brugeren/ejeren.
Bemærk, at vore produkter ikke er konstrueret til
erhvervsmæssig, håndværksmæssig eller industriel brug. Vi fraskriver os ethvert ansvar, såfremt
produktet anvendes i erhvervsmæssigt, håndværksmæssigt, industrielt eller lignende øjemed.
- 42 -
Anl_GE_CL_36_Li_E_Solo_SPK7.indb 42Anl_GE_CL_36_Li_E_Solo_SPK7.indb 42 22.03.16 09:0222.03.16 09:02

DK/N
4. Tekniske data
Omdrejningstal, ubelastet n0 .... 8000-13000 min
Lufthastighed ........................................ 210 km/h
Sugeeff ekt ............................................ 720 m
Opsamlingsposens volumen ................... ca. 45 l
Lydeff ektniveau L
Usikkerhed K ........................................ 3 dB (A)
Lydtryksniveau L
Vibration ahv ....................................... 2,354 m/s
Usikkerhed K ..........................................1,5 m/s
Vægt ..........................................................3,3 kg
Vigtigt!
Apparatet leveres uden akkumulatorbatterier og
uden ladeaggregat og må kun bruges sammen
med Li-Ion akkumulatorbatterierne fra Power-XChange serien!
Power-X-Change
18 V, 1,5 Ah .................................... 5 Li-Ion celler
18 V, 2,0 Ah .................................... 5 Li-Ion celler
18 V, 3,0 Ah .................................. 10 Li-Ion celler
18 V, 4,0 Ah .................................. 10 Li-Ion celler
18 V, 5,2 Ah .................................. 10 Li-Ion celler
Li-Ion akkumulatorbatterierne fra Power-XChange serien må kun lades med Power-XCharger.
Ladeaggregat
Netspænding ....................200-250 V ~ 50-60 Hz
Udgang
Nominel spænding ................................ 21 V d. c.
Nominel strøm ...................................... 3.000 mA
Støjudvikling og vibration skal begrænses til
et minimum!
Brug kun intakte og ubeskadigede maskiner.
•
Vedligehold og rengør maskinen med jævne
•
mellemrum.
Tilpas arbejdsmåden efter maskinen.
•
Overbelast ikke maskinen.
•
Lad i givet fald maskinen underkaste et efter-
•
syn.
Sluk maskinen, når den ikke benyttes.
•
Bær handsker.
•
......................... 92,68 dB (A)
WA
............................ 83,1 dB (A)
pA
3
Forsigtig!
Tilbageværende risici
-1
Også selv om du betjener el-værktøjet forskriftsmæssigt, er der stadigvæk nogle risikofaktorer at tage højde for. Følgende farer kan
/h
opstå, alt efter el-værktøjets type og konstruktionsmåde:
1. Lungeskader, såfremt der ikke bæres egnet
støvmaske.
2. Høreskader, såfremt der ikke bæres egnet
2
2
høreværn.
3. Helbredsskader, som følger af hånd-armvibration, såfremt værktøjet benyttes over et
længere tidsrum eller ikke håndteres og vedligeholdes forskriftsmæssigt.
5. Før ibrugtagningen
Apparatet leveres uden akkumulatorbatterier
og uden ladeaggregat!
Advarsel!
Træk altid akkumulatorbatterierne ud, inden
du foretager indstillinger på maskinen.
5.1. Montering af sugerør (fi g. 3a-3f)
Sæt det forreste og det bageste sugerør sam-
•
men (fig. 3a) og skru dem fast med en skrue
(fig. 3b/pos. 12).
Skub nu hele sugerøret ind i motorhuset (fig.
•
3c) og skru det fast med skruerne (fig. 3d/
pos. 12).
Sæt de to hjul (fig. 3e/pos. 9) ind i hjulholde-
•
ren (fig. 3e/pos. 11). Der skal høres et tydeligt
klik!
Skub hjulholderen (fig. 3f/pos. 11) helt fast på
•
det forreste sugerør (fig. 3f/pos. D) og fastgør
den med skruen (fig. 3f/pos. 13).
Bemærk: Vær opmærksom på, at de to sugerør skal være fast forbundede med hinanden, inden de fastgøres til maskinen, hvorefter de ikke må skilles ad!
5.2. Montering af opsamlingspose (fi g. 4-5)
Fastgør krogen på sugerøret (fi g. 4a) og huset
(fi g. 4b). Skub herefter opsamlingsposen op over
studsen på motorhuset, så den klikker fast (fi g. 5).
5.3. Montering af greb
Skub grebet (fi g. 6a/pos. A) helt fast i holderne i
huset. Fastgør herefter grebet med en skrue på
begge sider (fi g. 6b/pos. 13).
- 43 -
Anl_GE_CL_36_Li_E_Solo_SPK7.indb 43Anl_GE_CL_36_Li_E_Solo_SPK7.indb 43 22.03.16 09:0222.03.16 09:02

DK/N
5.4. Montering af hjælpegreb
Fjern stjerneskruen (fi g. 7/pos. B), sæt grebet (fi g.
7/pos. 3) på holderen og fastgør grebet i den ønskede position med stjerneskruen.
5.5. Montering af bærerem
Åbn fi ngerskruen (fi g. 8/pos. C), før båndet (fi g.
8/pos. 4) gennem åbningen og luk fi ngerskruen
igen.
5.6 Montering af akkumulatorbatteri (fi g. 9)
Tryk på akkumulatorbatteriets anslagsknap (fi g.
9/pos. E) som vist på fi g. 9 og skub akkumulator-
batteriet ind i akkumulatorbatteriets holder. Når
akkumulatorbatteriet er i en position som vist til
højre på fi g. 9, skal anslagsknappen gå i indgreb!
Akkumulatorbatteriet afmonteres tilsvarende i
modsat rækkefølge!
Bemærk!
Brug kun akkubatterier med samme påfyldningsniveau, kombiner aldrig fulde og halvfulde
akkubatterier med hinanden. Oplad altid begge
akkubatterier på samme tid.
Akkubatteriet med svag ladetilstand bestemmer
maskinens driftstid. Begge akkubatterier skal
være ladet helt op før driften.
5.7 Opladning af akkumulatorbatteri
1. Tag akkupack‘en ud af holderen på produktet:
Det gøres ved at trykke på anslagsknappen i
siden.
2. Kontroller, at netspændingen, som står anført
på mærkepladen, svarer til den forhåndenværende netspænding. Sæt stikket til ladeaggregatet i stikkontakten. Den grønne LEDlysdiode begynder at blinke.
3. Sæt akkumulatorbatteriet i ladeaggregatet.
4. Under punkt 10 „Visninger på oplader“ fi ndes
en oversigt over LED-visningernes betydning.
Under opladningen kan akkumulatorbatteriet blive
varm. Dette er helt normalt.
Hvis det ikke er muligt at oplade akkupack‘en,
skal du kontrollere,
om der er netspænding i stikkontakten
•
om forbindelsen til ladekontakterne er i orden.
•
Hvis det stadigvæk ikke er muligt at oplade akkupack‘en, bedes du indsende
ladeaggregatet
•
samt akku-pack‘en
•
til vores kundeservice.
Sørg for at genoplade akkupack‘en i god tid for
at sikre en lang levetid. Genopladning skal under
alle omstændigheder ske, hvis du konstaterer,
at den akkudrevede løvblæsers ydelse er nedsat. Undgå, at akkupack‘en afl ades helt. Det vil
ødelægge akkupack‘en!
Tag først maskinen i brug, når den er komplet
samlet.
6. Betjening
6.1. Indstilling af selelængde (fi g. 1)
Længden på bæreselen (4) skal indstilles således, at sugerøret lige netop kan føres en anelse
over jorden. Derudover letter styrehjulene (9) på
den nederste ende af sugerøret føringen af sugerøret ved jorden.
6.2. Tænd for apparatet (fi g. 10)
Tryk på tænd/sluk-knappen (5) for at tænde.
•
Slip tænd/sluk-knappen (5) igen for at slukke.
•
6.3 Valg af driftsmåde
6.3.1 Indsugning (fi g. 10)
Drej armen (fi g. 10/pos. 8) i position A. Dette kan
gøres, både når maskinen står stille, og når den
er i gang.
6.3.2 Blæsning (fi g. 10)
Drej armen (fig. 10/pos. 8) i position B. Dette
•
kan gøres, både når maskinen står stille, og
når den er i gang.
Ret luftstrålen fremad, bevæg dig langsomt
•
og blæs løv og haveaffald sammen eller blæs
det ud fra svært tilgængelige steder.
Vigtigt! Tøm opsamlingsposen inden ud-
•
blæsning. Ellers vil opsuget materiale kunne
trænge ud igen.
6.4 Tømning af opsamlingspose (fi g. 1)
Husk at tømme opsamlingsposen (7) i tide. Når
opsamlingsposen er ved at være fyldt, begynder
sugeydelsen at aftage. Organisk aff ald deponeres
som kompost.
Sluk maskinen og træk akkumulatorbatteriet
•
ud
Rul lynlåsen i opsamlingsposen (7) ned, og
•
ryst det opsugede materiale ud.
Luk lynlåsen i opsamlingsposen (7) til igen.
•
- 44 -
Anl_GE_CL_36_Li_E_Solo_SPK7.indb 44Anl_GE_CL_36_Li_E_Solo_SPK7.indb 44 22.03.16 09:0222.03.16 09:02

DK/N
6.5 Hastighedsregulering (fi g. 1)
Maskinen er udstyret med en elektronisk hastighedsregulering: Drej hastighedsregulatoren (fi g.
1/pos. 10) i den ønskede position. Arbejd kun
med det nødvendige omdrejningstal, og lad det
ikke blive unødigt højt.
7. Renholdelse, vedligeholdelse og
reservedelsbestilling
Fare!
Træk akkumulatorbatterierne ud inden renholdelse.
7.1 Renholdelse
Når arbejdet er udført, tages opsamlingspo-
•
sen af, vrangen vendes ud, og posen rengøres grundigt for at undgå dannelse af svamp
og ubehagelig lugt.
En opsamlingspose, som er meget snavset,
•
kan vaskes med vand og sæbe.
Hvis lynlåsen går trægt, kan tænderne gnides
•
ind i lidt tør sæbe.
Et tilsmudset suge-/blæserør rengøres med
•
en børste.
Omskifterarmen (blæs/sug) kan komme til at
•
gå trægt p.g.a. tilsmudsning. I så fald skiftes
flere gange efter hinanden frem og tilbage
mellem sug og blæs.
9. Bortskaff else og genanvendelse
Produktet leveres indpakket for at undgå transportskader. Emballagen består af råmaterialer
og kan genanvendes eller indleveres på genbrugsstation. Produktet og dets tilbehør består af
forskelligartede materialer, f.eks. metal og plast.
Defekte produkter må ikke smides ud som almindeligt husholdningsaff ald. For at sikre en fagmæs-
sig korrekt bortskaff else skal produktet indleveres
på et aff aldsdepot. Hvis du ikke har kendskab til
lokalt aff aldsdepot, så kontakt din kommune.
10. Opbevaring
Maskinen og dens tilbehør skal opbevares på et
mørkt, tørt og frostfrit sted uden for børns rækkevidde. Den optimale lagertemperatur ligger
mellem 5 og 30˚C. Opbevar el-værktøjet i den
originale emballage.
7.2 Vedligeholdelse
I tilfælde af driftsforstyrrelse skal produktet
•
undersøges af en autoriseret fagmand eller
på et kundeserviceværksted.
Der findes ikke yderligere vedligeholdelses-
•
krævende dele inde i apparatet.
7.3 Reservedelsbestilling:
Ved bestilling af reservedele skal følgende oplyses:
Savens type.
•
Savens artikelnummer.
•
Savens identifikationsnummer.
•
Nummeret på den nødvendige reservedel.
•
Aktuelle priser og øvrige oplysninger fi nder du på
internetadressen www.isc-gmbh.info
- 45 -
Anl_GE_CL_36_Li_E_Solo_SPK7.indb 45Anl_GE_CL_36_Li_E_Solo_SPK7.indb 45 22.03.16 09:0222.03.16 09:02

DK/N
11. Visninger på opladeren
Visning
Rød lysdi-
ode
Grøn lysdiode
Slukket Blinker Standby-modus
Ladeadapteren er sluttet til strømforsyningsnettet og er klar til drift,
batteriet er ikke sat i
Tændt Slukket Opladning
Ladeadapteren lader batteriet op i hurtigladningsmodus.
Slukket Tændt Akkumulatorbatteriet er 85% opladet og klar til brug.
(Opladningstid 1,5 Ah-batteri: 30 min.)
(Opladningstid 2,0 Ah-batteri: 40 min.)
(Opladningstid 3,0 Ah-batteri: 60 min.)
(Opladningstid 4,0 Ah-batteri: 80 min.)
(Opladningstid 5,2 Ah-batteri: 130 min.)
Herefter skiftes om til en skåneladning, indtil fuldstændig opladning er
sket.
(Opladningstid i alt 1,5 Ah-batteri: ca. 40 min)
(Opladningstid i alt 2,0 Ah-batteri: ca. 50 min)
(Opladningstid i alt 3,0 Ah-batteri: ca. 75 min)
(Opladningstid i alt 4,0 Ah-batteri: ca. 100 min)
(Opladningstid i alt 5,2 Ah-batteri: ca. 140 min)
Påkrævet handling:
Tag batteriet ud af opladeren. Kobl ladeadapteren fra strømforsyning
nettet.
Blinker Slukket Tilpasningsopladning
Opladeren befi nder sig i modus for skånsom opladning. Her oplades
batteriet af sikkerhedsgrunde langsommere og skal bruge mere end
1 t. Det kan have følgende årsager:
- Batteriet er ikke blevet opladet i meget lang tid, eller der er sket yderligere afl adning af et fl adt batteri (dybafl adning)
- Batteriets temperatur ligger ikke inden for det ideelle område mellem
25° C og 45° C.
Påkrævet handling:
Vent, indtil ladeprocessen er færdig, batteriet kan stadigvæk oplades.
Blinker Blinker Fejl
Opladning er ikke længere mulig. Batteriet er defekt.
Påkrævet handling:
Et defekt batteri må ikke længere oplades.
Tag batteriet ud af opladeren.
Tændt Tændt Temperaturfejl
Batteriet er for varmt (f.eks. direkte solindfald) eller for koldt (under 0°
C).
Påkrævet handling:
Tag batteriet ud, og opbevar det 1 dag ved stuetemperatur (ca. 20° C).
Betydning og påkrævet handling
- 46 -
Anl_GE_CL_36_Li_E_Solo_SPK7.indb 46Anl_GE_CL_36_Li_E_Solo_SPK7.indb 46 22.03.16 09:0222.03.16 09:02

DK/N
Kun for EU-lande
Smid ikke el-værktøj ud som almindeligt husholdningsaff ald!
I medfør af Rådets direktiv 2012/19/EF om aff ald af elektrisk og elektronisk udstyr og dettes omsættelse
i den nationale lovgivning skal brugt el-værktøj indsamles separat og indleveres til videreanvendende
formål på miljømæssig forsvarlig vis.
Recycling-alternativ til tilbagesendelse:
Ejeren af el-værktøjet er – med mindre denne tilbagesender maskinen – forpligtet til at bortskaff e mas-
kinen og dens dele ifølge miljøforskrifterne. Den brugte maskine kan indleveres hos en genbrugsstation
– spørg evt. personalet her, eller forhør dig hos din kommune. Tilbehør og hjælpemidler, som følger med
maskinen, og som ikke indeholder elektriske dele, er ikke omfattet af ovenstående.
Genoptryk eller anden kopiering af dokumentation og følgedokumenter til produkter, også i uddrag, er
kun tilladt med udtrykkelig tilladelse fra iSC GmbH.
Ret til tekniske ændringer forbeholdes
- 47 -
Anl_GE_CL_36_Li_E_Solo_SPK7.indb 47Anl_GE_CL_36_Li_E_Solo_SPK7.indb 47 22.03.16 09:0222.03.16 09:02

DK/N
Serviceinformationer
I alle lande, der er nævnt i garantibeviset, råder vi over kompetente servicepartnere, hvis kontaktdata
fremgår af garantibeviset. De står til din rådighed i forbindelse med enhver form for service som f.eks.
reparation, anskaff else af reservedele og sliddele eller køb af forbrugsmaterialer.
Vær opmærksom på, at følgende dele på produktet slides som følge af brug eller udsættes for naturligt
slid resp. at følgende dele anses som forbrugsmaterialer.
Kategori Eksempel
Sliddele* Akku
Forbrugsmateriale/ forbrugsdele*
Manglende dele
* er ikke nødvendigvis indeholdt i leveringsomfanget!
Konstateres mangler eller fejl, bedes du melde fejlen på internettet under www.isc-gmbh.info. Det er vigtigt at beskrive fejlen så nøjagtigt som muligt og i hvert fald besvare følgende spørgsmål:
Har produktet fungeret, eller var det defekt fra begyndelsen?
•
Har du bemærket noget usædvandligt, inden defekten opstod (symptom før defekt)?
•
Hvilken fejlfunktion mener du, at produktet er berørt af (hovedsymptom)?
•
Beskriv venligst fejlfunktionen.
- 48 -
Anl_GE_CL_36_Li_E_Solo_SPK7.indb 48Anl_GE_CL_36_Li_E_Solo_SPK7.indb 48 22.03.16 09:0222.03.16 09:02

DK/N
Garantibevis
Kære kunde!
Vore produkter er underlagt en streng kvalitetskontrol. Hvis produktet alligevel på et tidspunkt skulle
udvise fejl, beklager vi naturligvis dette, i dette tilfælde beder vi dig kontakte vores kundeservice på
adressen, som er anført på dette garantibevis. Du kan naturligvis også ringe til os på det anførte servicenummer. For indfrielse af garantikrav gælder følgende:
1. Disse garantibetingelser retter sig udelukkende til forbrugere, dvs. naturlige personer, der hverken
vil bruge dette produkt i forbindelse med udøvelse af deres erhvervsmæssige eller andet selvstændigt arbejde. Disse garantibetingelser regulerer ekstra garantiydelser, som nedenstående producent
lover købere af sine nye apparater som supplement til den lovfastsatte garanti. Garantibestemmelser fastsat ved lov berøres ikke af nærværende garanti. Vores garantiydelse er gratis.
2. Garantiydelsen dækker udelukkende mangler på et nyt apparat fra nedenstående producent, der
skyldes materiale- eller produktionsfejl, og vi har ret til at vælge, om sådanne mangler afhjælpes på
produktet, eller om produktet udskiftes.
Bemærk, at vore produkter ikke er konstrueret til erhvervsmæssig, håndværksmæssig eller faglig
brug. Garantien dækker således ikke forhold, hvor produktet er blevet brugt i erhvervsmæssige,
håndværksmæssige eller faglige virksomheder eller er blevet udsat for lignende belastning.
3. Garantien dækker ikke følgende:
- Skader på produktet som følge af tilsidesættelse af montagevejledningens anvisninger eller som
følge af usagkyndig installation, tilsidesættelse af brugsanvisningen (f.eks. tilslutning til forkert netspænding eller strømtype) eller tilsidesættelse af vedligeholdelses- og sikkerhedsforskrifter eller
som følge af at produktet udsættes for ikke normale miljøbetingelser eller manglende pleje og vedligeholdelse.
- Skader på produktet som følge af misbrug eller usagkyndig anvendelse (f.eks. overbelastning af
produktet eller brug af værktøj eller tilbehør, som ikke er godkendt), indtrængen af fremmedlegemer
i produktet (f.eks. sand, sten eller støv, transportskader), brug af vold eller eksterne påvirkninger
udefra (f.eks. fordi produktet tabes).
- Skader på produktet eller dele af produktet, der skyldes almindelig brug, normalt eller andet naturligt slid.
4. Garantiperioden udgør 24 måneder at regne fra købsdatoen. Garantikrav skal gøres gældende inden garantiperiodens udløb og inden for to uger, efter at defekten er blevet konstateret. Garantikrav
kan ikke gøres gældende efter garantiperiodens udløb. Reparation eller udskiftning af produktet
medfører ikke forlængelse af garantiperioden, heller ikke for eventuelt indbyggede reservedele. Dette gælder også servicearbejder, der foretages på stedet.
5. Hvis du ønsker at gøre brug af garantien, bedes du melde det defekte produkt til: www.isc-gmbh.
info. Sørg for at have købskvitteringen eller anden form for dokumentation af købet af det nye apparat ved hånden. Apparater, der sendes ind uden passende dokumentation eller uden typeskilt, er
udelukket fra garantiydelsen på grund af manglende identifi cering. Er defekten omfattet af garanti-
en, vil produktet omgående blive repareret og returneret, eller du vil modtage et helt nyt.
Mod betaling udbedrer vi naturligvis også gerne defekter på produktet, som ikke/ikke længere er omfattet af garantien. Du skal blot indsende produktet til vores serviceadresse.
Hvad angår slid- og forbrugsdele samt manglende dele henviser vi til garantiens indskrænkninger i henhold til serviceinformationerne i nærværende betjeningsvejledning.
- 49 -
Anl_GE_CL_36_Li_E_Solo_SPK7.indb 49Anl_GE_CL_36_Li_E_Solo_SPK7.indb 49 22.03.16 09:0222.03.16 09:02

S
Fara!
Innan maskinen kan användas måste särskilda
säkerhetsanvisningar beaktas för att förhindra
olyckor och skador. Läs därför noggrant igenom
denna bruksanvisning och dessa säkerhetsanvisningar. Förvara dem på ett säkert ställe så att du
alltid kan hitta önskad information. Om maskinen
ska överlåtas till andra personer måste även
denna bruksanvisning och dessa säkerhetsanvisningar medfölja. Vi övertar inget ansvar för olyckor
eller skador som har uppstått om denna bruksanvisning eller säkerhetsanvisningarna åsidosätts.
1. Säkerhetsanvisningar
Gällande säkerhetsanvisningar fi nns i det bifoga-
de häftet.
Fara!
Läs alla säkerhetsanvisningar och instruktioner. Försummelser vid iakttagandet av säker-
hetsanvisningarna och instruktionerna kan förorsaka elstöt, brand och/eller svåra skador. Förvara
alla säkerhetsanvisningar och instruktioner
för framtiden.
Förklaring av skylten på maskinen
(se bild 11)
1. Läs igenom bruksanvisningen före driftstart.
2. Använd inte maskinen vid regn eller snö.
Skydda maskinen mot fukt.
3. Se till att inga andra personer fi nns i farozo-
nen.
4. Använd ögon- och hörselskydd.
5. Roterande delar! Se till att händer och fötter
inte kommer i närheten av öppningarna
13. 3 st korta skruvar
2.2 Leveransomfattning
Kontrollera att produkten är komplett med hjälp av
beskrivningen av leveransen. Om delar saknas vill
vi be dig ta kontakt med vårt servicecenter eller
butiken där du köpte produkten inom fem dagar
efter att du köpte artikeln. Tänk på att du måste
visa upp ett giltigt kvitto. Beakta även garantitabellen i serviceinformationen i slutet av bruksanvisningen.
Öppna förpackningen och ta försiktigt ut pro-
•
dukten ur förpackningen.
Ta bort förpackningsmaterialet samt förpack-
•
nings- och transportsäkringar (om förhanden).
Kontrollera att leveransen är komplett.
•
Kontrollera om produkten eller tillbehörsdelar-
•
na har skadats i transporten.
Spara om möjligt på förpackningen tills ga-
•
rantitiden har gått ut.
Fara!
Produkten och förpackningsmaterialet är
ingen leksak! Barn får inte leka med plastpåsar, folie eller smådelar! Risk för att barn
sväljer delar och kvävs!
Original-bruksanvisning
•
Säkerhetsanvisningar
•
3. Ändamålsenlig användning
Lövsugen/-blåsaren är endast godkänd för löv
och trädgårdsavfall som gräs eller mindre kvistar.
Andra användningssätt är inte tillåtna.
2. Beskrivning av maskinen samt
leveransomfattning
2.1 Beskrivning av maskinen (bild 12)
1. Främre sugrör
2. Bakre sugrör
3. Stödhandtag
4. Bärsele
5. Strömbrytare
6. Batterifäste
7. Lövsäck
8. Omkopplare sug-/blåsfunktion
9. Hjul
10. Varvtalsreglage
11. Hjulfäste
12. 2 st långa skruvar
Anl_GE_CL_36_Li_E_Solo_SPK7.indb 50Anl_GE_CL_36_Li_E_Solo_SPK7.indb 50 22.03.16 09:0222.03.16 09:02
Maskinen får endast användas till sitt avsedda
ändamål. Användningar som sträcker sig utöver
detta användningsområde är ej ändamålsenliga.
För materialskador eller personskador som resulterar av sådan användning ansvarar användaren/
operatören själv. Tillverkaren påtar sig inget
ansvar.
Tänk på att våra produkter endast får användas
till ändamålsenligt syfte och inte har konstruerats
för yrkesmässig, hantverksmässig eller industriell
användning. Vi ger därför ingen garanti om produkten ska användas inom yrkesmässiga, hantverksmässiga eller industriella verksamheter eller
vid liknande aktiviteter.
- 50 -

S
4. Tekniska data
Tomgångsvarvtal n0.................. 8000-13000 min
Lufthastighet ......................................... 210 km/h
Sugprestanda ....................................... 720 m
Lövsäckens volym ................................... ca. 45 l
Ljudeff ektnivå L
Osäkerhet K .......................................... 3 dB (A)
Ljudtrycksnivå L
Vibration ahv ....................................... 2,354 m/s
Osäkerhet K ............................................1,5 m/s
Vikt .............................................................3,3 kg
Obs!
Maskinen levereras utan batterier och utan laddare. Tänk på att maskinen endast får användas
med Li-jon-batterier från serien Power-X-Change!
Power-X-Change
18 V, 1,5 Ah ....................................5 Li-jon-celler
18 V, 2,0 Ah ....................................5 Li-jon-celler
18 V, 3,0 Ah ..................................10 Li-jon-celler
18 V, 4,0 Ah ..................................10 Li-jon-celler
18 V, 5,2 Ah ..................................10 Li-jon-celler
Li-jon-batterierna i serien Power-X-Change får
endast laddas med Power-X-laddaren.
Laddare
Nätspänning .....................200-250 V ~ 50-60 Hz
Utgång
Nominell spänning .................................21 V DC
Nominell ström ..................................... 3 000 mA
Begränsa uppkomsten av buller och vibration
till ett minimum!
Använd endast intakta maskiner.
•
Underhåll och rengör maskinen regelbundet.
•
Anpassa ditt arbetssätt till maskinen.
•
Överbelasta inte maskinen.
•
Lämna in maskinen för översyn vid behov.
•
Slå ifrån maskinen om den inte används.
•
Bär handskar.
•
Obs!
Kvarstående risker
Kvarstående risker föreligger alltid även om
detta elverktyg används enligt föreskrift. Följande risker kan uppstå på grund av elverktygets konstruktion och utförande:
........................... 92,68 dB (A)
WA
............................ 83,1 dB (A)
pA
3
/h
1. Lungskador om ingen lämplig dammfi lter-
-1
2
2
mask används.
2. Hörselskador om inget lämpligt hörselskydd
används.
3. Hälsoskador som uppstår av hand- och
armvibrationer om maskinen används under
längre tid eller om det inte hanteras och underhålls enligt föreskrift.
5. Innan du använder maskinen
Maskin levereras utan batterier och utan
laddare!
Varning!
Dra alltid ut batterierna innan du gör några
inställningar på maskinen.
5.1. Montera sugröret (bild 3a-3f)
Skjut samman det främre och det bakre
•
sugröret (bild 3a) och skruva samman med
skruven (bild 3b/pos. 12).
Skjut sedan in det kompletta sugröret i motor-
•
kåpan (bild 3c) och skruva fast med skruvarna (bild 3d/pos. 12).
Sätt in de båda hjulen (bild 3e/pos. 9) i hjul-
•
fästet (bild 3e/pos. 11). Du måste höra hur de
snäpper in!
Skjut fast hjulfästet (bild 3f/pos. 11) på det
•
främre sugröret tills det tar emot (bild 3f/pos.
D) och fixera därefter med skruven (bild 3f/
pos. 13).
Märk: Tänk på att de båda sugrören alltid
måste ha monterats samman innan de monteras på maskinen. Därefter får de båda rören
inte tas isär.
5.2. Montera lövsäcken (bild 4-5)
Häng in kroken på sugröret (bild 4a) och på
kåpan (bild 4b). Trä sedan lövsäckens öppning
över stosen på motorkåpan. Hör efter att säcken
snäpper in (bild 5).
5.3. Montera handtaget
Skjut handtaget (bild 6a/pos. A) på fästet i kåpan
tills det tar emot. Fäst därefter handtaget med en
skruv på varje sida (bild 6b/pos. 13).
5.4. Montera stödhandtaget
Ta av stjärnskruven (bild 7/pos. B), sätt handtaget
(bild 7/pos. 3) på fästet och fi xera det i avsett läge
med stjärnskruven.
- 51 -
Anl_GE_CL_36_Li_E_Solo_SPK7.indb 51Anl_GE_CL_36_Li_E_Solo_SPK7.indb 51 22.03.16 09:0222.03.16 09:02

S
5.5. Montera bärselen
Öppna den räffl ade skruven (bild 8/pos. C), för
in bandet (bild 8/pos. 4) genom öppningen och
stäng sedan till den räffl ade skruven igen.
5.6 Montera batteriet (bild 9)
Tryck in spärrknappen på batteriet enligt beskrivningen i bild 9 (bild 9/pos. E) och skjut sedan in
batteriet i det härför avsedda batterifästet.. När
batteriet befi nner sig i läget som visas i bild 9 till
höger måste du se till att spärrknappen snäpper
in. Ta ut batteriet i omvänd ordningsföljd.
Märk
Använd alltid batterier med samma laddningsnivå, och kombinera aldrig laddade och halvfulla
batterier. Ladda alltid båda batterier samtidigt.
Batteriet med den lägre laddningsnivån avgör
maskinens drifttid. Ladda båda batterier komplett
innan maskinen tas i drift.
5.7 Ladda batteriet
1. Dra ut batteriet ur maskinen. Tryck in spärrknappen på batteriets sida.
2. Kontrollera att nätspänningen som anges på
märkskylten stämmer överens med nätspänningen i vägguttaget. Anslut laddarens stickkontakt till vägguttaget. Den gröna lysdioden
börjar blinka.
3. Sätt det laddbara batteriet på laddaren.
4. Under punkten „Lampor på laddaren“ fi nns en
tabell som förklarar vad de olika lysdioderna
på laddaren betyder.
Medan batteriet laddas upp värms det en aning.
Detta är helt normalt.
Om batteripaketet inte kan laddas måste du kontrollera
att nätspänning finns i vägguttaget
•
att det finns fullgod kontakt vid laddningskon-
•
takterna
Om batteripaketet fortfarande inte kan laddas
måste du lämna in
laddaren
•
samt batteripaketet
•
till vår kundtjänstavdelning.
För att batteriets livslängd ska bli så lång som
möjligt ska batteriet alltid laddas i god tid. Detta är
alltid nödvändigt om du märker att den batteridrivna lövblåsarens prestanda börjar försvagas. Se till
att batteriet aldrig laddas ur helt. Detta leder till att
batteriet förstörs!
Ta inte maskinen i drift förrän monteringen har
avslutats komplett.
6. Använda maskinen
6.1. Bestämma selens längd (bild 1)
Ställ in längden på bärselen (4) så att sugröret
kan föras just ovanför marken. Hjulen (9) vid den
nedre delen av sugröret gör det dessutom lättare
att styra sugröret på marken.
6.2. Slå på maskinen (bild 10)
Tryck in strömbrytaren (5) för att slå på mas-
•
kinen.
Släpp strömbrytaren (5) igen för att slå ifrån.
•
6.3 Välja driftslag
6.3.1 Sugfunktion (bild 10)
Vrid vredet (bild 10/pos. 8) till position A. Detta
kan du göra oavsett om maskinen kör eller är
frånkopplad.
6.3.2 Blåsfunktion (bild 10)
Vrid vredet (bild 10/pos. 8) till position B. Det-
•
ta kan du göra oavsett om maskinen kör eller
är frånkopplad.
Rikta luftstrålen framåt och gå långsamt
•
framåt. Blås samman löv eller ta bort dem
från svåråtkomliga ställen.
Obs! Töm lövsäcken innan du använder
•
blåsfunktionen. Annars finns det risk för att
maskinen blåser ut material som redan har
sugits in.
6.4 Tömma lövsäcken (bild 1)
Töm lövsäcken (7) i god tid. Sugprestandan avtar
märkbart om säcken är fylld. Organiskt avfall kan
du kasta på komposten.
Koppla ifrån maskinen och dra ut batteriet.
•
Öppna blixtlåset på lövsäcken (7) och skaka
•
ut materialet.
Stäng blixtlåset på lövsäcken (7) igen.
•
6.5 Varvtalsreglering (bild 1)
Maskinen är utrustad med en varvtalsreglering.
Vrid varvtalsreglaget (bild 1/pos. 10) till avsett
läge. Använd endast maskinen med erforderligt
varvtal och låt den inte varva upp i onödan.
- 52 -
Anl_GE_CL_36_Li_E_Solo_SPK7.indb 52Anl_GE_CL_36_Li_E_Solo_SPK7.indb 52 22.03.16 09:0222.03.16 09:02

S
7. Rengöring, underhåll och
reservdelsbeställning
Fara!
Dra alltid ut batteriet inför rengöring.
7.1 Rengöra maskinen
Efter att du har avslutat arbetet, ta av löv-
•
säcken, vänd den ut och in och rengör den
noggrant. Detta är nödvändigt för att förhindra
att mögel eller obehaglig lukt uppstår.
Om lövsäcken är kraftigt nedsmutsad kan
•
den rengöras med tvål och vatten.
Om blixtlåset går trögt, kan du gnida in blixtlå-
•
sets tänder med torr tvål.
Sug-/blåsröret kan rengöras med en borste.
•
På grund av smuts som följer med materialet
•
som sugs in, är det möjligt att omkopplingsreglaget (blås-/sugfunktion) blir trögt. I sådana fall kan du koppla om reglaget flera gånger
mellan sug- och blåsfunktion tills reglaget inte
längre går trögt.
7.2 Underhåll
Vid eventuella störningar får maskinen endast
•
kontrolleras av en behörig tekniker eller av en
kundtjänstverkstad.
I maskinens inre finns inga delar som kräver
•
underhåll.
9. Skrotning och återvinning
Produkten ligger i en förpackning som fungerar
som skydd mot transportskador. Denna förpackning består av olika material som kan återvinnas.
Lämna in förpackningen till ett insamlingsställe för
återvinning. Produkten och dess tillbehör består
av olika material som t ex metaller och plaster.
Defekta produkter får inte kastas i hushållssoporna. Lämna in produkten till ett insamlingsställe
i din kommun för professionell avfallshantering.
Hör efter med din kommun om du inte vet var
närmsta insamlingsställe fi nns.
10. Förvaring
Förvara produkten och dess tillbehör på en mörk,
torr och frostfri plats samt otillgängligt för barn.
Den bästa förvaringstemperaturen är mellan 5
och 30˚C. Förvara elverktyget i originalförpackningen.
7.3 Reservdelsbeställning
Lämna följande uppgifter vid beställning av reservdelar:
Maskintyp
•
Maskinens artikel-nr.
•
Maskinens ident-nr.
•
Reservdelsnummer för erforderlig reservdel
•
Aktuella priser och ytterligare information fi nns på
www.isc-gmbh.info
8. Störningar
Maskinen startar inte:
Kontrollera att batteriet är fulladdat och att laddaren fungerar. Om maskinen inte fungerar trots att
spänning fi nns i nätet ska den skickas in till kundt-
jänst (se adress).
- 53 -
Anl_GE_CL_36_Li_E_Solo_SPK7.indb 53Anl_GE_CL_36_Li_E_Solo_SPK7.indb 53 22.03.16 09:0222.03.16 09:02

S
11. Lampor på laddaren
Indikeringsstatus
Röd lysdiod Grön
lysdiod
Från Blinkar Driftberedd
Laddaren är ansluten till elnätet och driftberedd, inget batteri i laddaren.
Till Från Laddning
Laddaren snabbladdar batteriet.
Från Till Batteriet har laddats till 85 % och är klar för användning.
(Laddningstid 1,5 Ah-batteri: 30 min )
(Laddningstid 2,0 Ah-batteri: 40 min )
(Laddningstid 3,0 Ah-batteri: 60 min )
(Laddningstid 4,0 Ah-batteri: 80 min )
(Laddningstid 5,2 Ah-batteri: 130 min )
Därefter kopplar laddaren om till skonladdning tills batteriet har laddats
helt.
(Total laddningstid 1,5 Ah-batteri: ca 40 min)
(Total laddningstid 2,0 Ah-batteri: ca 50 min)
(Total laddningstid 3,0 Ah-batteri: ca 75 min)
(Total laddningstid 4,0 Ah-batteri: ca 100 min)
(Total laddningstid 5,2 Ah-batteri: ca 140 min)
Åtgärd:
Ta ut batteriet ur laddaren. Koppla loss laddaren från elnätet.
Blinkar Från Anpassningsladdning
Laddaren har ställts in på ett läge för skonsam laddning.
Av säkerhetsskäl laddas batteriet upp långsammare och behöver mer
än 1 timme. Detta kan ha följande orsaker:
- Batteriet har inte laddats på lång tid eller ett tomt batteri har laddats
ur (djupurladdning).
- Batteriets temperatur befi nner sig inte inom idealintervallet 25°C till
45°C.
Åtgärd:
Vänta tills batteriet har laddats, batteriet kan ändå laddas.
Blinkar Blinkar Störning
Batteriet kan inte längre laddas. Batteriet är defekt.
Åtgärd:
Du får inte längre ladda det defekta batteriet.
Ta ut batteriet ur laddaren.
Till Till Temperaturstörning
Batteriet är för varmt (t ex direkt solstrålning) eller för kallt (under 0°C).
Åtgärd:
Ta ut batteriet och förvara det i rumstemperatur i en dag (ca 20°C).
Betydelse och åtgärder
- 54 -
Anl_GE_CL_36_Li_E_Solo_SPK7.indb 54Anl_GE_CL_36_Li_E_Solo_SPK7.indb 54 22.03.16 09:0222.03.16 09:02

S
Endast för EU-länder
Kasta inte elverktyg i hushållssoporna.
Enligt det europeiska direktivet 2012/19/EG om avfall som utgörs av eller innehåller elektriska eller
elektroniska produkter och dess tillämpning i den nationella lagstiftningen, måste förbrukade elverktyg
källsorteras och lämnas in för miljövänlig återvinning.
Återvinnings-alternativ till begäran om återsändning:
Som ett alternativ till returnering är ägaren av elutrustningen skyldig att bidraga till ändamålsenlig avfallshantering för det fall att utrustningen ska skrotas. Efter att den förbrukade utrustningen har lämnats
in till en avfallsstation kan den omhändertas i enlighet med gällande nationella lagstiftning om återvinning och avfallshantering. Detta gäller inte för tillbehörsdelar och hjälpmedel utan elektriska komponenter vars syfte har varit att komplettera den förbrukade utrustningen.
Eftertryck eller annan duplicering av dokumentation och medföljande underlag för produkterna, även
utdrag, är endast tillåtet med uttryckligt tillstånd från iSC GmbH.
Med förbehåll för tekniska ändringar.
- 55 -
Anl_GE_CL_36_Li_E_Solo_SPK7.indb 55Anl_GE_CL_36_Li_E_Solo_SPK7.indb 55 22.03.16 09:0222.03.16 09:02

S
Serviceinformation
I alla länder som nämns i garantibeviset har vi kompetenta servicepartners. Adresserna till dessa partners fi nns i garantibeviset. Våra partners står gärna till tjänst för alla slags servicearbeten såsom repara-
tion och tillhandahållande av reservdelar, slitagedelar och förbrukningsmaterial.
Kom ihåg att följande delar i denna produkt är utsatta för ett bruksmässigt och naturligt slitage samt att
följande delar krävs som förbrukningsmaterial.
Kategori Exempel
Slitagedelar* Batteri
Förbrukningsmaterial/förbrukningsdelar*
Delar som saknas
* ingår inte tvunget i leveransomfattningen!
Vid brister eller störningar kan du anmäla detta på webbplatsen www.isc-gmbh.info. Ge en detaljerad
beskrivning av felet som har uppstått och besvara alltid följande frågor:
Fungerade produkten först eller var den defekt från början?
•
Märkte du av någonting innan produkten slutade att fungera (symptomer före defekt)?
•
Enligt din åsikt, vilken funktion är felaktig i produkten (huvudsymptom)?
•
Beskriv den felaktiga funktionen.
- 56 -
Anl_GE_CL_36_Li_E_Solo_SPK7.indb 56Anl_GE_CL_36_Li_E_Solo_SPK7.indb 56 22.03.16 09:0222.03.16 09:02

S
Garantibevis
Bästa kund,
våra produkter genomgår en sträng kvalitetskontroll. Om denna produkt mot förmodan inte fungerar på
rätt sätt, beklagar vi detta och ber dig att kontakta vår serviceavdelning under adressen som anges på
garantikortet. Vi står även gärna till tjänst på telefon under servicenumret som anges nedan. Följande
punkter gäller för att du ska kunna göra anspråk på garantin:
1. Dessa garantivillkor vänder sig enbart till konsumenter, dvs. naturliga personer som inte har för avsikt att använda denna produkt i kommersiellt syfte eller inom egen verksamhet. Dessa garantivillkor
reglerar ytterligare garantitjänster som nedanstående tillverkare erbjuder köpare av nya produkter.
Dessa tjänster är en komplettering till den lagstadgade garantin. Garantianspråk som regleras enligt
lag påverkas inte av denna garanti. Våra garantitjänster är gratis för dig.
2. Garantitjänsterna omfattar endast sådana brister som bevisligen kan härledas till material- eller tillverkningsfel. Produkten som du har köpt ska vara ny och härstamma från nedanstående tillverkare.
Vi avgör om sådana brister i produkten ska åtgärdas eller om produkten ska bytas ut.
Tänk på att våra produkter endast får användas till ändamålsenligt syfte och inte har konstruerats
för kommersiell, hantverksmässig eller yrkesmässig användning. Ett garantiavtal sluts därför ej om
produkten inom garantitiden har använts inom yrkesmässiga, hantverksmässiga eller industriella
verksamheter eller har utsatts för liknande påkänning.
3. Garantin omfattar inte:
- Skador på produkten som kan härledas till att monteringsanvisningen missaktats eller på grund av
felaktig installation, åsidosatt bruksanvisning (t ex anslutning till felaktig nätspänning eller strömart),
missaktade underhålls- och säkerhetsbestämmelser, om produkten utsätts för onormala miljöfaktorer eller bristfällig skötsel och underhåll.
- Skador på produkten som kan härledas till missbruk eller ej ändamålsenlig användning (t ex överbelastning av produkten eller användning av ej godkända insatsverktyg eller tillbehör), främmande
partiklar som har trängt in i produkten (t ex sand, sten eller damm, transportskador), yttre våld eller
yttre påverkan (t ex skador efter att produkten fallit ned).
- Skador på produkten eller delar av produkten som kan härledas till bruksmässigt, normalt eller för
övrigt naturligt slitage .
4. Garantitiden uppgår till 24 månader och gäller från datumet när produkten köptes. Medan garantitiden fortfarande gäller ska anspråk på garanti ställas inom två veckor efter att defekten fastställdes.
Det är inte möjligt att ställa anspråk på garanti efter att garantitiden har löpt ut. Garantitiden förlängs
inte när produkten repareras eller byts ut, dessutom medför sådana arbeten inte att en ny garantitid
börjar gälla för produkten eller för ev. reservdelar som har monterats in. Detta gäller även vid hembesök.
5. Anmäl den defekta produkten på följande webbplats för att göra anspråk på garantin: www.iscgmbh.info. Se till att du har sparat på kvittot eller ett annat köpebevis som påvisar att du har köpt
denna produkt i nytt skick. Produkter som sänds in utan köpebevis eller utan märkskylt täcks inte av
våra garantitjänster eftersom de inte kan identifi eras. Om defekten i produkten täcks av våra garan-
titjänster, får du genast en reparerad eller ny produkt av oss.
Givetvis kan vi även, mot debitering, åtgärda skador som antingen inte täcks av garantin eller som har
uppstått efter garantitidens slut. Skicka in produkten till nedanstående serviceadress.
För slitage- och förbrukningsdelar samt för delar som saknas hänvisar vi till begränsningarna i garantin
enligt serviceinformationen som anges i denna bruksanvisning.
- 57 -
Anl_GE_CL_36_Li_E_Solo_SPK7.indb 57Anl_GE_CL_36_Li_E_Solo_SPK7.indb 57 22.03.16 09:0222.03.16 09:02

NL
Gevaar!
Bij het gebruik van toestellen dienen enkele
veiligheidsmaatregelen te worden nageleefd om
lichamelijk gevaar en schade te voorkomen. Lees
daarom deze handleiding / veiligheidsinstructies
zorgvuldig door. Bewaar deze goed zodat u de informatie op elk moment kunt terugvinden. Mocht
u dit toestel aan andere personen doorgeven,
gelieve dan deze handleiding / veiligheidsinstructies mee te geven. Wij zijn niet aansprakelijk
voor ongevallen of schade die te wijten zijn aan
niet-naleving van deze handleiding en van de veiligheidsinstructies.
1. Veiligheidsinstructies
De overeenkomstige veiligheidsinstructies vindt u
in de bijgaande brochure.
Gevaar!
Lees alle veiligheidsinstructies en aanwijzingen. Nalatigheden bij de inachtneming van de
veiligheidsinstructies en aanwijzingen kunnen
elektrische schok, brand en/of zware letsels tot
gevolg hebben. Bewaar alle veiligheidsinstruc-
ties en aanwijzingen voor de toekomst.
Verklaring van het informatiebord op het
apparaat (zie fi g. 11)
1. Vóór inbedrijfstelling de gebruiksaanwijzing
lezen.
2. Bij regen of sneeuw het apparaat niet gebruiken. Apparaat beschermen tegen vocht.
3. Houd derden weg uit de gevarenzone.
4. Oog- en gehoorbescherming dragen.
5. Roterende delen! Houd handen en voeten uit
de buurt van de openingen.
12. 2x schroef lang
13. 3x schroef kort
2.2 Leveringsomvang
Gelieve de volledigheid van het artikel te controleren aan de hand van de beschreven omvang
van de levering. Indien er onderdelen ontbreken,
gelieve u dan binnen 5 werkdagen na aankoop
van het artikel te wenden tot ons servicecenter of
tot het verkooppunt waar u het apparaat heeft gekocht, en leg een geldig bewijs van aankoop voor.
Gelieve daarvoor de garantietabel in de serviceinformatie aan het einde van de handleiding in
acht te nemen.
Open de verpakking en neem het toestel
•
voorzichtig uit de verpakking.
Verwijder het verpakkingsmateriaal alsmede
•
verpakkings-/transportbeveiligingen (indien
aanwezig).
Controleer of de leveringsomvang compleet
•
is.
Controleer het toestel en de accessoires op
•
transportschade.
Bewaar de verpakking indien mogelijk tot het
•
verloop van de garantieperiode.
Gevaar!
Het toestel en het verpakkingsmateriaal zijn
geen speelgoed voor kinderen! Kinderen mogen niet met plastic zakken, folies en kleine
stukken spelen! Er bestaat inslik- en verstikkingsgevaar!
Originele handleiding
•
Veiligheidsinstructies
•
3. Doelmatig gebruik
2. Beschrijving van het apparaat en
omvang van de levering
2.1 Beschrijving van het apparaat (fi g. 1/2)
1. Zuigbuis voor
2. Zuigbuis achter
3. Extra handvat
4. Draagriem
5. Aan/Uit-schakelaar
6. Accuhouder
7. Opvangzak
8. Omschakelaar zuigen/blazen
9. Loopwielen
10. Toerentalregelaar
11. Wieldrager
Anl_GE_CL_36_Li_E_Solo_SPK7.indb 58Anl_GE_CL_36_Li_E_Solo_SPK7.indb 58 22.03.16 09:0222.03.16 09:02
De bladzuiger/-blazer is alleen toegelaten voor
bladeren en tuinafval zoals gras en kleine takken.
Inzet voor andere doeleinden is niet toegestaan.
De machine mag slechts voor werkzaamheden
worden gebruikt waarvoor ze bedoeld is. Elk
ander verder gaand gebruik is niet reglementair.
Voor daaruit voortvloeiende schade of verwondingen van welke aard dan ook is de gebruiker/
bediener, niet de fabrikant, aansprakelijk.
Wij wijzen erop dat onze gereedschappen overeenkomstig hun bestemming niet geconstrueerd
zijn voor commercieel, ambachtelijk of industrieel
gebruik. Wij geven geen garantie indien het ge-
- 58 -

NL
reedschap in ambachtelijke of industriële bedrijven alsmede bij gelijk te stellen activiteiten wordt
gebruikt.
4. Technische gegevens
Nullasttoerental n0 .................... 8000-13000 min
Luchtsnelheid ....................................... 210 km/h
Zuigcapaciteit ....................................... 720 m
Inhoud van de opvangzak ....................... ca. 45 l
Geluidsdrukniveau L
Onzekerheid K ...................................... 3 dB (A)
Geluidsdrukniveau L
Trilling ahv ........................................... 2,354 m/s
Onzekerheid K ........................................1,5 m/s
Gewicht ......................................................3,3 kg
Opgelet!
Het apparaat wordt geleverd zonder accu´s en
zonder lader, en mag alleen worden ingezet met
de Li-Ion accu´s van de Power-X-Change serie!
Power-X-Change
18 V, 1,5 Ah ................................... 5 Li-Ion cellen
18 V, 2,0 Ah ................................... 5 Li-Ion cellen
18 V, 3,0 Ah ................................. 10 Li-Ion cellen
18 V, 4,0 Ah ................................. 10 Li-Ion cellen
18 V, 5,2 Ah ................................. 10 Li-Ion cellen
De Li-Ion accu´s van de Power-X-Change serie
mogen alleen met de Power-X-Charger worden
geladen.
Lader
Netspanning .....................200-250 V ~ 50-60 Hz
Uitgang
Nominale spanning ................................ 21 V DC
Nominale stroom .................................. 3.000 mA
Beperk de geluidsontwikkeling en vibratie tot
een minimum!
Gebruik enkel intacte toestellen.
•
Onderhoud en reinig het toestel regelmatig.
•
Pas uw manier van werken aan het toestel
•
aan.
Overbelast het toestel niet.
•
Laat het toestel indien nodig nazien.
•
Schakel het toestel uit als het niet wordt ge-
•
bruikt.
Draag handschoenen.
•
.................... 92,68 dB (A)
WA
...................... 83,1 dB (A)
pA
3
/h
Voorzichtig!
Restrisico’s
Er blijven altijd restrisico’s over ook al wordt
dit elektrisch gereedschap naar behoren bediend. Volgende gevaren kunnen zich voordoen in verband met de bouwwijze en uitvoering van dit elektrisch gereedschap:
-1
1. Longletsels indien geen gepaste stofmasker
wordt gedragen.
2. Gehoorschade indien geen gepaste gehoorbeschermer wordt gedragen.
3. Schade aan de gezondheid die voortvloeit
uit hand-arm-trillingen indien het toestel lang
zonder onderbreking wordt gebruikt of niet
naar behoren wordt gehanteerd en onder-
2
2
houden.
5. Vóór inbedrijfstelling
Het apparaat wordt geleverd zonder accu´s
en zonder lader!
Waarschuwing!
Trek altijd de accu´s eruit, voordat u instellingen uitvoert aan het apparaat.
5.1. Montage zuigbuis (fi g. 3a-3f)
De voorste zuigbuis en de achterste zuigbuis
•
in elkaar steken (fig. 3a) en vastschroeven
met de schroef (fig. 3b, pos. 12).
Dan de complete zuigbuis in het motorhuis
•
schuiven (fig. 3c) en vastschroeven met de
schroeven (fig. 3d, pos. 12).
De beide wielen (fig. 3e, pos. 9) in de wiel-
•
drager (fig. 3e, pos. 11) steken. Op hoorbaar
vastklikken letten!
De wieldrager (fig. 3f, pos. 11) tot aan de
•
aanslag (fig. 3f, pos. D) op de voorste zuigbuis schuiven en fixeren met de schroef (fig.
3f, pos. 13).
Aanwijzing: Gelieve er op te letten dat vóór
het vastmaken op het apparaat altijd eerst de
beide zuigbuizen vast aan elkaar verbonden
zijn en dat ze vervolgens niet meer uit elkaar
genomen mogen worden!
5.2. Opvangzak monteren (fi g. 4-5)
Hang de haak aan de zuigbuis (afb. 4a) en aan
het huis (fi g. 4b) in. Schuif daarna de opvangzak
över de stomp aan het motorhuis en zorg ervoor
dat de zak hoorbaar vastklikt (fi g. 5).
- 59 -
Anl_GE_CL_36_Li_E_Solo_SPK7.indb 59Anl_GE_CL_36_Li_E_Solo_SPK7.indb 59 22.03.16 09:0222.03.16 09:02

NL
5.3. Handvat monteren
Schuif het handvat (fi g. 6a, pos. A) tot aan de
aanslag op de adapters in het huis. Daarna bevestigt u het handvat aan beide kanten met telkens één schroef (fi g. 6b, pos. 13).
5.4. Extra handvat monteren
Verwijder de stervormige schroef (fi g. 7, pos. B),
steek het handvat (fi g. 7, pos. 3) op de adapter en
fi xeer het handvat met de stervormige schroef in
de gewenste positie.
5.5. Draagriem monteren
Open de kartelschroef (fi g. 8, pos. C), leid de riem
(fi g. 8, pos. 4) door de opening en sluit de kartel-
schroef weer.
5.6 Montage van de accu (fi g. 9)
Druk zoals te zien in fi g. 9 op de grendelknop (fi g.
9, pos. E) van de accu en schuif de accu in de
daartoe voorziene houder. Zodra de accu zich
bevindt in een positie zoals te zien in fi g. 9 rechts
op het vastklikken van de grendeltoets letten! De
demontage van de accu gebeurt in omgekeerde
volgorde!
Aanwijzing!
Gebruik alleen accu´s met dezelfde vulstand,
combineer nooit volle en halfvolle accu´s met elkaar. Laad beide accu´s altijd tegelijkertijd op.
De accu met de zwakkere laadtoestand bepaalt
de looptijd van het apparaat. Vóór bedrijf moeten
altijd beide accu´s vol worden geladen.
5.7 Laden van de accu
1. Accupack uit het apparaat nemen. Daarvoor
de zijdelingse grendelknop indrukken.
2. Vergelijk of de netspanning vermeld op het
typeplaatje overeenstemt met de beschikbare
netspanning. Steek de netstekker van de lader in het stopcontact. De groene LED begint
te knipperen.
3. Steek de accu op de lader.
4. Onder punt „Indicatie lader“ vindt u een tabel
met de betekenissen van de LED-indicatie
aan de lader.
Tijdens het laden kan de accu wat warm worden.
Dit is echter normaal.
Mocht het laden van de accupack niet mogelijk
zijn, controleer dan
of aan het stopcontact de netspanning voor-
•
handen is,
of een foutloos contact aan de laadcontacten
•
voorhanden is.
Indien het laden van het accupack nog altijd niet
mogelijk is, dan verzoeken wij u
de lader
•
en de accupack
•
op te sturen aan onze klantendienst.
In het belang van een lange levensduur van de
accupack is het raadzaam om op tijd voor het
herladen van de accupack te zorgen. Dit is in
ieder geval noodzakelijk wanneer u vaststelt dat
het vermogen van de accu-bladblazer vermindert.
Ontlaad de accupack nooit helemaal. Dat leidt tot
een defect van de accupack!
Neem het apparaat pas in bedrijf als u de montage helemaal heeft afgesloten.
6. Bediening
6.1. Riemlengte bepalen (fi g. 1)
De lengte van de draagriem (4) zo instellen, dat
de zuigbuis dicht over de grond kan worden geleid. De leirollen (9) aan het onderste uiteinde van
de zuigbuis dienen bovendien om de zuigbuis
gemakkelijker over de grond te leiden.
6.2. Apparaat inschakelen (fi g. 10)
Druk om in te schakelen op de Aan/Uit-
•
schakelaar (5).
Om uit te schakelen laat u de Aan/Uit-scha-
•
kelaar (5) weer los.
6.3 Bedrijfsmodus kiezen
6.3.1 Zuigen (fi g. 10)
Draai de hendel (fi g. 10, pos. 8) naar positie A.
Dit kan zowel in stilstand als bij lopend apparaat
gebeuren.
6.3.2 Blazen (fi g. 10)
Draai de hendel (fig. 10, pos. 8) naar positie
•
B. Dit kan zowel in stilstand als bij lopend apparaat gebeuren.
Richt de luchtstraal naar voor en beweeg u
•
langzaam om bladeren of tuinafval bijeen te
blazen resp. van moeilijk toegankelijke plaats-
- 60 -
Anl_GE_CL_36_Li_E_Solo_SPK7.indb 60Anl_GE_CL_36_Li_E_Solo_SPK7.indb 60 22.03.16 09:0222.03.16 09:02

NL
en te verwijderen.
Opgelet! Maak vóór het blazen de opvangzak
•
leeg. Anders zouden opgezogen bladeren/
tuinafval weer kunnen ontsnappen.
6.4 Opvangzak leegmaken (fi g. 1)
Maak de opvangzak (7) op tijd leeg. Bij een hoog
vulniveau neemt de zuigcapaciteit duidelijk af.
Breng organisch afval naar de compostering.
Apparaat uitschakelen en accu´s eruit trek-
•
ken.
Ritssluiting aan de opvangzak (7) openen en
•
opgezogen bladeren/tuinafval uitschudden.
Ritssluiting aan de opvangzak (7) weer slu-
•
iten.
6.5 Toerentalregeling (fi g. 1)
Het apparaat is uitgerust met een elektronische
toerentalregeling. Draai daarvoor de toerentalregelaar (fi g. 1, pos. 10) in de gewenste positie.
Zet het apparaat alleen in met het noodzakelijke
toerental en laat het niet onnodig hoog draaien.
7. Reiniging, onderhoud en
bestelling van onderdelen
Gevaar!
Trek vóór alle reinigingswerkzaamheden de
accu´s eruit.
7.1 Reiniging
Na beëindiging van het werk de opvangzak
•
eraf nemen, omstulpen en grondig reinigen,
om schimmelvorming en onaangename geuren te vermijden.
Een sterk vervuilde opvangzak kan met water
•
en zeep worden gewassen.
Bij stroefheid van de ritssluiting de tanden
•
van de ritssluiting inwrijven met een droge
zeep.
Zuig-/blaasbuis bij vervuiling reinigen met
•
een borstel.
Op grond van vervuiling door opgezogen
•
bladeren/tuinafval kan de beweeglijkheid van
de omschakelhendel (blazen/zuigen) worden
verminderd. In dit geval de omschakelhendel
meermaals omschakelen van zuigen naar
blazen, zodat de hendel weer gemakkelijk
kan worden bewogen.
7.2 Onderhoud
Bij eventueel optredende storingen het
•
apparaat alleen laten controleren door een
geautoriseerde vakman resp. door een werkplaats van de klantendienst.
Binnenin het apparaat zijn er geen andere te
•
onderhouden onderdelen.
7.3 Bestellen van wisselstukken:
Gelieve bij het bestellen van wisselstukken volgende gegevens te vermelden:
Type van het toestel
•
Artikelnummer van het toestel
•
Ident-nummer van het toestel
•
Wisselstuknummer van het benodigd stuk
•
Actuele prijzen en info vindt u terug onder
www.isc-gmbh.info
8. Storingen
Apparaat loopt niet:
Controleer of de accu geladen is en of de lader
functioneert. Indien het apparaat ondanks voorhanden spanning niet werkt, stuur het dan naar
het vermelde adres van de klantendienst.
9. Verwijdering en recyclage
Het toestel bevindt zich in een verpakking om
transportschade te voorkomen. Deze verpakking
is een grondstof en bijgevolg herbruikbaar of kan
naar de grondstofkringloop worden teruggevoerd. Het toestel en zijn accessoires bestaan uit
diverse materialen, zoals b.v. metaal en kunststof.
Defecte toestellen horen niet thuis in het huisvuil.
Om zich van het toestel naar behoren te ontdoen
dient het naar een geschikte verzamelplaats te
worden gebracht. Als u geen verzamelplaats kent
gelieve u dan bij de gemeente te informeren.
10. Opbergen
Bewaar het toestel en de accessoires op een
donkere, droge en vorstvrije plaats die voor
kinderen ontoegankelijk is. De optimale opbergtemperatuur ligt tussen 5° C en 30° C. Bewaar
het elektrische gereedschap in de originele verpakking.
- 61 -
Anl_GE_CL_36_Li_E_Solo_SPK7.indb 61Anl_GE_CL_36_Li_E_Solo_SPK7.indb 61 22.03.16 09:0222.03.16 09:02

NL
11. Indicatie lader
Aanduidingsstatus
Rode LED Groene
LED
UIT Knippert Gebruiksklaarheid
De lader is aangesloten op het net en is gebruiksklaar; de accu is niet
in de lader.
AAN AAN Laden
De lader laadt de accu op in de snelle laadmodus.
UIT AAN De accu is tot 85% opgeladen en gebruiksklaar.
(Laadduur 1,5 Ah accu: 30 min)
(Laadduur 2,0 Ah accu: 40 min)
(Laadduur 3,0 Ah accu: 60 min)
(Laadduur 4,0 Ah accu: 80 min)
(Laadduur 5,2 Ah accu: 130 min)
Daarna wordt overgeschakeld naar ontziende lading tot de accu volledig is geladen.
(Laadduur in het totaal 1,5 Ah accu: ca. 40 min)
(Laadduur in het totaal 2,0 Ah accu: ca. 50 min)
(Laadduur in het totaal 3,0 Ah accu: ca. 75 min)
(Laadduur in het totaal 4,0 Ah accu: ca. 100 min)
(Laadduur in het totaal 5,2 Ah accu: ca. 140 min)
Maatregel:
Neem de accu de lader uit. Scheid de lader van het net.
Knippert UIT Aanpassingslading
De lader bevindt zich in de modus voor ontziend laden.
Daarbij wordt de accu om veiligheidsredenen trager opgeladen en
heeft daarvoor meer dan 1 uur nodig. Dat kan te wijten zijn aan volgende oorzaken:
- Accu werd zeer lang geleden niet meer opgeladen of het ontladen
van een uitgeputte accu werd voortgezet (diepe ontlading).
- De accutemperatuur ligt niet binnen het ideale bereik tussen 25°C en
45°C.
Maatregel:
Wacht tot het laadproces is voltooid; de accu kan desondanks verder
worden geladen.
Knippert Knippert Fout
Er kan niet meer worden opgeladen. De accu is defect.
Maatregel:
Een defecte accu mag niet meer worden opgeladen.
Neem de accu de lader uit.
AAN AAN Temperatuurfout
De accu is te warm (b.v. rechtstreekse zoninstraling) of te koud (onder
0° C).
Maatregel:
Neem de accu de lader uit en bewaar hem 24 u bij kamertemperatuur
(ca. 20° C).
Bedeutung und Maßnahme
- 62 -
Anl_GE_CL_36_Li_E_Solo_SPK7.indb 62Anl_GE_CL_36_Li_E_Solo_SPK7.indb 62 22.03.16 09:0222.03.16 09:02

NL
Enkel voor EU-landen
Elektrisch gereedschap hoort niet bij het huisvuil thuis!
Volgens de Europese richtlijn 2012/19/EG op afgedankte elektrische en elektronische toestellen en
omzetting in nationaal recht dienen afgedankte elektrische gereedschappen afzonderlijk te worden verzameld en milieuvriendelijk te worden gerecycleerd.
Recyclagealternatief i.p.v. het toestel terug te sturen:
De eigenaar van het elektrische toestel is alternatief verplicht, i.p.v. het toestel terug te sturen, mede te
werken bij de behoorlijke recyclage in geval hij zich van het eigendom ontdoet. Het afgedankte toestel
kan hiervoor ook bij een verzamelplaats worden afgegeven die voor een verwijdering als bedoeld in de
wetgeving in zake recyclage en afvalverwerking zorgt. Hieronder vallen niet bij de afgedankte toestellen
gevoegde accessoires en hulpmiddelen zonder elektrische componenten.
Nadruk of andere reproductie van documentatie en geleidepapieren van de producten, geheel of gedeeltelijk, enkel toegestaan mits uitdrukkelijke toestemming van iSC GmbH.
Technische wijzigingen voorbehouden
- 63 -
Anl_GE_CL_36_Li_E_Solo_SPK7.indb 63Anl_GE_CL_36_Li_E_Solo_SPK7.indb 63 22.03.16 09:0222.03.16 09:02

NL
Service-informatie
Wij werken in alle landen die in het garantiebewijs zijn genoemd, samen met competente servicepartners, wier contactgegevens u kunt afl eiden uit het garantiebewijs. Deze staan voor alle diensten zoals
reparatie, het verschaff en van wisselstukken of slijtdelen of voor de aankoop van verbruiksmaterialen te
uwer beschikking.
U moet er rekening mee houden dat bij dit product de volgende delen onderhevig zijn aan een slijtage
door gebruik of een natuurlijke slijtage, resp. dat de volgende delen nodig zijn als verbruiksmaterialen.
Categorie Voorbeeld
Slijtstukken* Accu
Verbruiksmateriaal/verbruiksstukken*
Ontbrekende onderdelen
* niet verplicht bij de leveringsomvang begrepen!
Bij gebreken of defecten verzoeken wij u om de fout te melden op het internet onder www.isc-gmbh.info.
Gelieve te zorgen voor een nauwkeurige beschrijving van de fout en daarbij in elk geval de volgende
vragen te beantwoorden:
Heeft het toestel reeds eenmaal gewerkt of was het vanaf het begin defect?
•
Is u iets opgevallen voordat het defect zich voordeed (symptoom vóór het defect)?
•
Welke foutieve werkwijze vertoont het toestel volgens u (hoofdsymptoom)?
•
Beschrijf deze foutieve werkwijze.
- 64 -
Anl_GE_CL_36_Li_E_Solo_SPK7.indb 64Anl_GE_CL_36_Li_E_Solo_SPK7.indb 64 22.03.16 09:0222.03.16 09:02

NL
Garantiebewijs
Geachte klant,
onze producten worden onderworpen aan een strenge kwaliteitscontrole. Mocht dit apparaat echter ooit
niet naar behoren functioneren, spijt dit ons ten zeerste en vragen u zich te wenden tot onze servicedienst onder het adres vermeld op dit garantiebewijs. Wij staan ook graag telefonisch tot uw dienst via
het vermelde servicetelefoonnummer. Voor eisen in verband met het recht garantie geldt het volgende:
1. Deze garantievoorwaarden zijn uitsluitend gericht aan de gebruikers, d.w.z. natuurlijke personen die
dit product niet in het kader van hun ambachtelijke noch van een andere zelfstandige activiteit willen
gebruiken. Deze garantievoorwaarden regelen aanvullende garantieprestaties, die de hieronder genoemde fabrikant kopers van zijn nieuwe apparaten toezegt in aanvulling tot de wettelijke garantie.
Uw wettelijke garantieclaims blijven onaangetast door deze garantie. Onze garantieprestatie is voor
u gratis.
2. De garantieprestatie geldt uitsluitend voor gebreken aan een door u aangekocht nieuw apparaat
van de hieronder genoemde fabrikant die aantoonbaar berusten op een materiaal- of productiefout,
en is naar onze keuze beperkt tot het verhelpen van zulke gebreken aan het apparaat of de vervanging ervan.
Wij wijzen erop dat onze apparaten overeenkomstig hun bestemming niet ontworpen zijn voor commercieel, ambachtelijk of industrieel gebruik. Van een garantiecontract is derhalve geen sprake, als
het apparaat binnen de garantieperiode in commerciële, ambachtelijke of industriële bedrijven werd
ingezet of aan een daarmee gelijk te stellen belasting werd blootgesteld.
3. Van onze garantie zijn uitgesloten:
- Schade aan het apparaat als gevolg van niet-inachtneming van de montagehandleiding of op
grond van ondeskundige installatie, als gevolg van niet-inachtneming van de gebruiksaanwijzing
(zoals bijv. door aansluiting aan een verkeerde netspanning of stroomsoort) of niet-inachtneming
van de onderhouds- en veiligheidsvoorschriften, door blootstelling van het apparaat aan abnormale
omgevingsvoorwaarden of door nalatig onderhoud en verzorging.
- Schade aan het apparaat als gevolg van misbruik of ondeskundige toepassingen (zoals bijv. overbelasting van het apparaat of de inzet van niet toegelaten gereedschappen of toebehoren), binnendringen van vreemde voorwerpen in het apparaat (zoals bijv. zand, stenen of stof, transportschade),
gebruik van geweld of als gevolg van externe invloeden (zoals bijv. schade door vallen).
- Schade aan het apparaat of aan delen van het apparaat die valt te herleiden tot slijtage als gevolg
van gebruik, en als gevolg van normale of andere natuurlijke slijtage.
4. De garantieperiode bedraagt 24 maanden en gaat in op de datum van aankoop van het apparaat.
Garantieclaims dienen voor het verloop van de garantieperiode binnen de twee weken na het vaststellen van het defect geldend te worden gemaakt. Het indienen van garantieclaims na verloop van
de garantieperiode is uitgesloten. De herstelling of vervanging van het apparaat leidt niet tot een
verlenging van de garantieperiode noch wordt door deze prestatie een nieuwe garantieperiode voor
het apparaat of voor eventueel ingebouwde wisselstukken op gang gebracht. Dit geldt ook bij het ter
plaatse uitvoeren van een serviceactiviteit.
5. Gelieve om een garantieclaim in te dienen het defecte apparaat aan te melden onder: www.iscgmbh.info. Houd het aankoopbewijs of een ander bewijs van uw aankoop van het nieuwe apparaat
bij de hand. Apparaten die zonder bijhorende bewijzen of zonder typeplaatje worden teruggestuurd,
worden op grond van de ontbrekende mogelijkheid om het apparaat toe te kennen uitgesloten van
de garantieprestatie. Valt het defect van het apparaat binnen onze garantieprestatie, dan bezorgen
wij u per omgaande een gerepareerd of nieuw apparaat terug.
Uiteraard staan wij ook tot u dienst om, mits betaling van de kosten, defecten van het apparaat te verhelpen die buiten de garantieomvang vallen. Te dien einde stuurt u het apparaat aan ons serviceadres
op.
Voor slijtstukken, verbruiksmateriaal en ontbrekende onderdelen wordt verwezen naar de beperkingen
van deze garantie conform de service-informatie van deze handleiding.
- 65 -
Anl_GE_CL_36_Li_E_Solo_SPK7.indb 65Anl_GE_CL_36_Li_E_Solo_SPK7.indb 65 22.03.16 09:0222.03.16 09:02

E
Peligro!
Al usar aparatos es preciso tener en cuenta una
serie de medidas de seguridad para evitar lesiones o daños. Por este motivo, es preciso leer
atentamente este manual de instrucciones/advertencias de seguridad. Guardar esta información
cuidadosamente para poder consultarla en cualquier momento. En caso de entregar el aparato
a terceras personas, será preciso entregarles,
asimismo, el manual de instrucciones/advertencias de seguridad. No nos hacemos responsables
de accidentes o daños provocados por no tener
en cuenta este manual y las instrucciones de
seguridad.
1. Instrucciones de seguridad
Encontrará las instrucciones de seguridad correspondientes en el prospecto adjunto.
Peligro!
Lea todas las instrucciones de seguridad e
indicaciones. El incumplimiento de dichas inst-
rucciones e indicaciones puede provocar descargas, incendios y/o daños graves. Guarde todas
las instrucciones de seguridad e indicaciones para posibles consultas posteriores.
Explicación de la placa de advertencia del
aparato (véase fi g. 11)
1. Leer el manual de instrucciones de uso antes
de la puesta en marcha.
2. No utilizar el aparato cuando llueva o nieve.
Proteger el aparato de la humedad.
3. Mantener a terceras personas alejadas de la
zona de peligro.
4. Ponerse un casco, unas gafas de trabajo y
protectores auditivos.
5. ¡Piezas giratorias! Mantener las manos y los
pies alejados de los orifi cios.
9. Ruedecillas
10. Regulador de velocidad
11. Soporte de rueda
12. 2 tornillos largos
13. 3 tornillos cortos
2.2 Volumen de entrega
Sirviéndose de la descripción del volumen de
entrega, comprobar que el artículo esté completo.
Si faltase alguna pieza, dirigirse a nuestro Service Center o a la tienda especializada más cercana en un plazo máximo de 5 días laborales tras
la compra del artículo presentando un recibo de
compra válido. A este respeto, observar la tabla
de garantía de las condiciones de garantía que se
encuentran al fi nal del manual.
Abrir el embalaje y extraer cuidadosamente
•
el aparato.
Retirar el material de embalaje, así como los
•
dispositivos de seguridad del embalaje y para
el transporte (si existen).
Comprobar que el volumen de entrega esté
•
completo.
Comprobar que el aparato y los accesorios
•
no presenten daños ocasionados durante el
transporte.
Si es posible, almacenar el embalaje hasta
•
que transcurra el periodo de garantía.
Peligro!
¡El aparato y el material de embalaje no son
un juguete! ¡No permitir que los niños jueguen con bolsas de plástico, láminas y piezas pequeñas! ¡Riesgo de ingestión y asfi xia!
Manual de instrucciones original
•
Instrucciones de seguridad
•
3. Uso adecuado
El aspirador/soplador de hojas sólo está homolo-
2. Descripción del aparato y
volumen de entrega
2.1 Descripción del aparato (fi g. 1/2)
1. Tubo de aspiración delantero
2. Tubo de aspiración posterior
3. Empuñadura adicional
4. Cinturón de transporte
5. Interruptor ON/OFF
6. Alojamiento para la batería
7. Bolsa de recogida
8. Conmutador aspirar/soplar
Anl_GE_CL_36_Li_E_Solo_SPK7.indb 66Anl_GE_CL_36_Li_E_Solo_SPK7.indb 66 22.03.16 09:0222.03.16 09:02
gado para hojas y residuos del jardín tales como
césped y ramas pequeñas. No está permitido
darle otros usos.
Utilizar la máquina sólo en los casos que se indican explícitamente como de uso adecuado. Cualquier otro uso no será adecuado. En caso de uso
inadecuado, el fabricante no se hace responsable
de daños o lesiones de cualquier tipo; el responsable es el usuario u operario de la máquina.
- 66 -

E
Tener en consideración que nuestro aparato no
está indicado para un uso comercial, industrial o
en taller. No asumiremos ningún tipo de garantía
cuando se utilice el aparato en zonas industriales, comerciales o talleres, así como actividades
similares.
4. Características técnicas
Velocidad en inercia n0 ............. 8000-13000 min
Velocidad del aire ..................................210 km/h
Potencia de aspiración .......................... 720 m
Volumen de la bolsa de recogida ........aprox. 45 l
Nivel de potencia acústica L
Imprecisión K ......................................... 3 dB (A)
Nivel de presión acústica L
Vibración ahv ...................................≤ 2,354 m/s
Imprecisión K ..........................................1,5 m/s
Peso ...........................................................3,3 kg
¡Atención!
¡El aparato se suministra sin baterías y sin cargador y sólo puede utilizarse con las baterías de
iones de litio de la serie Power-X-Change!
Power-X-Change
18 V, 1,5 Ah ...................5 células de iones de litio
18 V, 2,0 Ah ...................5 células de iones de litio
18 V, 3,0 Ah .................10 células de iones de litio
18 V, 4,0 Ah .................10 células de iones de litio
18 V, 5,2 Ah .................10 células de iones de litio
Las baterías de iones de litio de la serie PowerX-Change sólo pueden cargarse con el cargador
Power-X-Charger.
Cargador
Tensión de red: ..................200-250 V ~ 50-60 Hz
Salida
Tensión nominal .................................... 21 V c. c.
Corriente nominal .................................3.000 mA
¡Reducir la emisión de ruido y las vibraciones al mínimo!
Emplear sólo aparatos en perfecto estado.
•
Realizar el mantenimiento del aparato y limpi-
•
arlo con regularidad.
Adaptar el modo de trabajo al aparato.
•
No sobrecargar el aparato.
•
En caso necesario dejar que se compruebe
•
........ 92,68 dB (A)
WA
............ 83,1 dB (A)
pA
3
el aparato.
Apagar el aparato cuando no se esté utilizan-
•
do.
Llevar guantes.
•
Cuidado!
Riesgos residuales
Incluso si esta herramienta se utiliza adecuadamente, siempre existen riesgos residuales.
En función de la estructura y del diseño de
-1
esta herramienta eléctrica pueden producirse los siguientes riesgos:
1. Lesiones pulmonares en caso de que no se
/h
2
2
utilice una mascarilla de protección antipolvo.
2. Lesiones auditivas en caso de que no se utilice una protección para los oídos adecuada.
3. Daños a la salud derivados de las vibraciones de las manos y los brazos si el aparato
se utiliza durante un largo periodo tiempo, no
se sujeta del modo correcto o si no se realiza
un mantenimiento adecuado.
5. Antes de la puesta en marcha
¡El aparato se suministra sin baterías y sin
cargador!
¡Aviso!
Extraer siempre la batería antes de realizar
ajustes en el aparato.
5.1. Montaje del tubo de aspiración (fi g. 3a-3f)
Unir el tubo de aspiración delantero con el
•
trasero (fig. 3a) y fijar con el tornillo (fig. 3b/
pos.12).
A continuación, introducir el tubo de aspiraci-
•
ón completo en la carcasa del motor (fig. 3c)
y fijar con los tornillos (fig. 3d/pos. 12).
Encajar las dos ruedas (fig. 3e/pos 9) en el
•
soporte de las ruedas (fig. 3e/pos. 11). ¡Asegurarse de oír cómo se enclava!
Deslizar el soporte de rueda (fig- 3f/pos. 11)
•
en el tubo de aspiración delantero hasta el
tope (fig. 3f/pos. D) y fijar con el tornillo (fig.
3f/pos. 13).
Aviso: Antes de fi jarlo al aparato, comprobar
siempre primero que ambos tubos estén
unidos entre sí de tal forma que no se puedan desarmar.
- 67 -
Anl_GE_CL_36_Li_E_Solo_SPK7.indb 67Anl_GE_CL_36_Li_E_Solo_SPK7.indb 67 22.03.16 09:0222.03.16 09:02

E
5.2. Montaje bolsa de recogida (fi g. 4-5)
Colgar el gancho en el tubo de aspiración (fi g. 4a)
y en la carcasa (fi g. 4b). A continuación, colocar
la bolsa de recogida sobrë el empalme en la
carcasa del motor y asegurarse de que haga un
ruido al encajar (fi g. 5).
5.3. Montar la empuñadura
Encajar la empuñadura (fi g. 6a/pos. A) hasta el
tope en el alojamiento en la carcasa. A continuación, fi jar la empuñadura en los dos lados con un
tornillo en cada uno (fi g. 6b/pos. 13).
5.4. Montar la empuñadura adicional
Quitar el tornillo estrella (fi g. 7/pos. B), encajar
la empuñadura (fi g. 7/pos. 3) en el alojamiento y
fi jar la empuñadura con el tornillo estrella en la
posición deseada.
5.5. Cómo montar el cinturón de transporte
Abrir el tornillo moleteado (fi g. 8/pos. C), introdu-
cir el cinturón (fi g. 8/pos. 4) a través del orifi cio y
volver a cerrar el tornillo moleteado.
5.6 Montaje de la batería (fi g. 9)
Presionar el dispositivo de retención de la batería
(fi gura 9/pos. E) como se muestra en la fi gura 9a
e introducir la batería en el alojamiento previsto
para ello. En cuanto la batería se encuentre en
la posición de la fi gura 9, asegurarse de que el
dispositivo de retención enclave. Para desmontar
la batería, realizar los mismos pasos en orden
inverso.
¡Advertencia!
Utilizar sólo baterías con el mismo nivel de carga,
no combinar nunca baterías totalmente cargadas
y baterías cargadas a la mitad. Cargar siempre
las dos baterías a la vez.
La batería con el nivel de carga más bajo determina el tiempo de funcionamiento del aparato.
Las dos baterias deben estar cargadas completamente antes de poner el aparato en funcionamiento.
5.7 Carga de la batería
1. Sacar la batería del aparato. Para ello, pulsar
el dispositivo de retención lateral.
2. Comprobar que la tensión de red coincida
con la especifi cada en la placa de identifi -
cación del aparato. Conectar el enchufe del
cargador a la toma de corriente. El LED verde
empieza a parpadear.
3. Enchufar la batería al cargador.
4. El apartado „Indicación cargador“ incluye una
tabla con los signifi cados de las indicaciones
LED del cargador.
Es posible que la batería se caliente durante el
proceso de carga. Esto es normal.
En caso que no sea posible cargar la batería,
comprobar que
exista tensión de red en el enchufe
•
exista buen contacto entre los contactos de
•
carga.
En caso de que todavía no fuera posible cargar la
batería, rogamos enviar
el cargador
•
y la batería
•
a nuestro servicio de asistencia técnica.
Es preciso recargar siempre a tiempo la batería
para procurar que dure lo máximo posible. Esto
es imprescindible si se aprecia una disminución
de la potencia del soplador de hojas a batería.
No descargar jamás la batería por completo. Esto
podría provocar un defecto en la batería.
Poner el aparato en servicio una vez haya realizado el montaje por completo.
6. Manejo
6.1. Determinar la longitud del cinturón
(fi g. 1)
Regular la longitud del cinturón (4) de tal forma
que el tubo de aspiración apenas llegue al suelo.
Adicionalmente, los rodillos guía (9), situados en
el extremo del tubo de aspiración, sirven para
guiar ligeramente a éste.
6.2. Cómo encender el aparato (fi g. 10)
Para conectar la máquina, pulsar el interrup-
•
tor ON/OFF (5).
Para desconectar, volver a soltar el interrup-
•
tor ON/OFF (5).
6.3 Régimen de funcionamiento
6.3.1 Aspirar (fi g. 10)
Girar la palanca (fi g. 10/pos. 8) a la posición A.
Esto se puede realizar tanto cuando el aparato
está parado como cuando está en funcionamiento.
- 68 -
Anl_GE_CL_36_Li_E_Solo_SPK7.indb 68Anl_GE_CL_36_Li_E_Solo_SPK7.indb 68 22.03.16 09:0222.03.16 09:02

E
6.3.2 Soplar (fi g. 10)
Girar la palanca (fig. 10/pos. 8) a la posición
•
B. Esto se puede realizar tanto cuando el
aparato está parado como cuando está en
funcionamiento.
Dirija el chorro de aire hacia delante y mué-
•
vase lentamente para juntar las hojas o los
residuos del jardín o para retirarlos de lugares
de difícil acceso.
¡Atención! Antes de soplar, vacíe la bolsa de
•
recogida. De lo contrario, podría escaparse el
material ya aspiradas.
6.4 Vaciar bolsa de recogida (fi g. 1)
Vacíe a tiempo la bolsa de recogida (7). Cuando
la bolsa está demasiado llena, la fuerza de aspiración se debilita. Lleve los residuos orgánicos al
lugar adecuado para elaborar compost.
Desconectar el aparato y retirar la batería
•
Abrir la cremallera de la bolsa de recogida (7)
•
y vaciar el material aspirado.
Volver a cerrar la cremallera de la bolsa de
•
recogida (7).
6.5 Regulación de velocidad (fi g. 1)
El aparato está provisto de un regulador de velocidad electrónico. Para ello, girar el regulador de
velocidad (fi g. 1/pos. 10) a la posición deseada.
Poner el aparato en funcionamiento solo a la
velocidad necesaria y no permitir que gire innecesariamente.
7. Mantenimiento, limpieza y pedido
de piezas de repuesto
¡Peligro!
Extraer las baterías antes de realizar los trabajos
de limpieza.
7.1 Limpieza
Una vez finalizado el trabajo, retirar la bolsa
•
de recogida, darle la vuelta para limpiarla a
fondo y evitar así que se produzca moho u
olores desagradables.
Una bolsa de recogida muy sucia se podrá
•
limpiar con agua y jabón.
Si la cremallera cierra mal, frotar los dientes
•
de la misma con jabón seco.
Limpiar la suciedad del tubo de aspiración/
•
soplado con un cepillo.
La suciedad producida por el material absor-
•
bido puede reducir la respuesta de la palanca
de cambio (soplar/aspirar). En este caso,
para agilizar de nuevo la palanca es suficiente cambiar vacias veces de aspirar a soplar.
7.2 Mantenimiento
En caso de que se produjeran averías, llevar
•
el aparato a un especialista autorizado o un
taller de servicio técnico.
No es preciso realizar el mantenimiento de
•
otras piezas en el interior del aparato.
7.3 Pedido de piezas de recambio:
Al solicitar recambios se indicarán los datos siguientes:
Tipo de aparato
•
No. de artículo del aparato
•
No. de identidad del aparato
•
No. del recambio de la pieza necesitada.
•
Encontrará los precios y la información actual en
www.isc-gmbh.info
8. Averías
El aparato no funciona:
Comprobar que la batería esté cargada y que el
cargador funcione. En caso de que el aparato
no funcione a pesar de haber tensión, enviarlo a
la dirección indicada del servicio de asistencia
técnica.
9. Eliminación y reciclaje
El aparato está protegido por un embalaje para
evitar daños producidos por el transporte. Este
embalaje es materia prima y, por eso, se puede
volver a utilizar o llevar a un punto de reciclaje. El
aparato y sus accesorios están compuestos de
diversos materiales, como, p. ej., metal y plástico.
Los aparatos defectuosos no deben tirarse a la
basura doméstica. Para su eliminación adecuada, el aparato debe entregarse a una entidad
recolectora prevista para ello. En caso de no
conocer ninguna, será preciso informarse en el
organismo responsable del municipio.
- 69 -
Anl_GE_CL_36_Li_E_Solo_SPK7.indb 69Anl_GE_CL_36_Li_E_Solo_SPK7.indb 69 22.03.16 09:0222.03.16 09:02

10. Almacenamiento
Guardar el aparato y sus accesorios en un
lugar oscuro, seco, protegido de las heladas e
inaccesible para los niños. La temperatura de
almacenamiento óptima se encuentra entre los
5 y 30 ˚C. Guardar la herramienta eléctrica en su
embalaje original.
E
- 70 -
Anl_GE_CL_36_Li_E_Solo_SPK7.indb 70Anl_GE_CL_36_Li_E_Solo_SPK7.indb 70 22.03.16 09:0222.03.16 09:02

11. Indicación cargador
E
Estado de indicación
LED rojo LED verde
Signifi cado y medida
apagado parpadea Listo para funcionamiento
El cargador está conectado a la red y listo para el funcionamiento, la
batería no está en el cargador
encendido apagado Carga
El cargador carga la batería en modo rápido.
apagado encendido La batería está cargada al 85% y se puede utilizar.
(Duración de la carga batería de 1,5 Ah: 30 min)
(Duración de la carga batería de 2,0 Ah: 40 min)
(Duración de la carga batería de 3,0 Ah: 60 min)
(Duración de la carga batería de 4,0 Ah: 80 min)
(Duración de la carga batería de 5,2 Ah: 130 min)
Después se cambia a carga lenta hasta que la batería esté complet
mente cargada.
(Duración de la carga total batería de 1,5 Ah: aprox. 40 min)
(Duración de la carga total batería de 2,0 Ah: aprox. 50 min)
(Duración de la carga total batería de 3,0 Ah: aprox. 75 min)
(Duración de la carga total batería de 4,0 Ah: aprox. 100 min)
(Duración de la carga total batería de 5,2 Ah: aprox. 140 min)
Medida:
Sacar la batería del cargador. Desconectar el cargador de la red.
parpadea apagado Carga adaptada
El cargador se encuentra en el modo de carga lenta.
Por motivos de seguridad, en este modo la batería se carga con mayor
lentitud y tarda más de 1h. Esto puede deberse a las siguientes causas:
- La batería ha estado sin cargarse durante mucho tiempo o se ha
continuado descargando una batería agotada (descarga total)
- La temperatura de la batería no se encuentra dentro de un rango óptimo entre 25° C y 45° C.
Medida:
Esperar hasta que el proceso de carga haya fi nalizado, la batería pue-
de seguir cargándose.
parpadea parpadea Fallo
El proceso de carga ya no es posible. La batería está defectuosa.
Medida:
Está prohibido cargar una batería defectuosa.
Sacar la batería del cargador.
encendido encendido Avería por temperatura
La batería está demasiado caliente (p. ej. por radiación solar directa) o
demasiado fría (por debajo de 0° C)
Medida:
Sacar la batería y guardarla durante 1 día a temperatura ambiente
(aprox. 20° C).
- 71 -
Anl_GE_CL_36_Li_E_Solo_SPK7.indb 71Anl_GE_CL_36_Li_E_Solo_SPK7.indb 71 22.03.16 09:0222.03.16 09:02

E
Sólo para países miembros de la UE
No tirar herramientas eléctricas en la basura casera.
Según la directiva europea 2012/19/CE sobre aparatos usados electrónicos y eléctricos y su aplicación
en el derecho nacional, dichos aparatos deberán recojerse por separado y eliminarse de modo ecológico para facilitar su posterior reciclaje.
Alternativa de reciclaje en caso de devolución:
El propietario del aparato eléctrico, en caso de no optar por su devolución, está obligado a reciclar adecuadamente dicho aparato eléctrico. Para ello, también se puede entregar el aparato usado a un centro
de reciclaje que trate la eliminación de residuos respetando la legislación nacional sobre residuos y
su reciclaje. Esto no afecta a los medios auxiliares ni a los accesorios sin componentes eléctricos que
acompañan a los aparatos usados.
Sólo está permitido copiar la documentación y documentos anexos del producto, o extractos de los
mismos, con autorización expresa de iSC GmbH.
Nos reservamos el derecho a realizar modifi caciones técnicas
- 72 -
Anl_GE_CL_36_Li_E_Solo_SPK7.indb 72Anl_GE_CL_36_Li_E_Solo_SPK7.indb 72 22.03.16 09:0222.03.16 09:02

E
Información de servicio
En todos los países mencionados en el certifi cado de garantía disponemos de distribuidores compe-
tentes cuyos datos de contacto podrán consultar en dicho certifi cado. Dichos distribuidores están a su
disposición para cualquier asunto relacionado con el servicio como reparación, suministro de piezas de
repuesto y desgaste, o con respecto a los materiales de consumo.
Es preciso tener en cuenta, que las siguientes piezas de este producto se someten a desgaste natural
o provocado por el uso o que se necesitan las siguientes piezas como materiales de consumo.
Categoría Ejemplo
Piezas de desgaste* Batería
Material de consumo/Piezas de consumo*
Falta de piezas
*¡no tiene por qué estar incluido en el volumen de entrega!
En caso de defi ciencia o fallo, rogamos que lo registre en la página web www.isc-gmbh.info. Describa
exactamente el fallo y responda siempre a las siguientes preguntas:
¿Ha funcionado el aparato en algún momento o estaba defectuoso desde el principio?
•
¿Le ha llamado algo la atención antes de surgir el fallo (indicio antes del fallo)?
•
¿Qué fallo de funcionamiento le parece que presenta el aparato (indicio principal)?
•
Describa ese fallo en el funcionamiento.
- 73 -
Anl_GE_CL_36_Li_E_Solo_SPK7.indb 73Anl_GE_CL_36_Li_E_Solo_SPK7.indb 73 22.03.16 09:0222.03.16 09:02

E
Certifi cado de garantía
Estimado cliente:
Nuestros productos están sometidos a un estricto control de calidad. No obstante, lamentaríamos que
este aparato dejara de funcionar correctamente, en tal caso, le rogamos que se dirija a nuestro servicio
de atención al cliente en la dirección indicada en la parte inferior de la presente tarjeta de garantía. Con
mucho gusto le atenderemos también telefónicamente en el número de servicio indicado a continuación. Para hacer válido el derecho de garantía, proceda de la siguiente forma:
1. Estas condiciones de garantía van dirigidas exclusivamente a los consumidores, es decir, personas
naturales que no desean emplear este producto en el marco de su actividad comercial ni autónoma. Estas condiciones de garantía regulan prestaciones adicionales de garantía que el fabricante
abajo mencionado se compromete a otorgar, de manera adicional a la garantía legal, a los compradores de sus nuevos aparatos. Las prestaciones de garantía que le corresponden conforme a ley
no se ven afectadas por la presente. Nuestra prestación de garantía es gratuita para usted.
2. La garantía se extiende exclusivamente a defectos en un aparato nuevo adquirido por usted del
fabricante abajo mencionado, ocasionados por fallos de material o de producción, y está limitada,
según nuestra elección, a la reparación de los defectos o al cambio del aparato.
Es preciso tener en consideración que nuestro aparato no está indicado para un uso comercial,
industrial o en taller. Por lo tanto, no procederá un contrato de garantía cuando se utilice el aparato
dentro del periodo de garantía en zonas industriales, comerciales o talleres, así como actividades
similares.
3. Nuestra garantía no cubre:
- Daños en el aparato ocasionados por la no observancia de las instrucciones de montaje o por una
instalación no profesional, no observancia de las instrucciones de uso (como, p. ej., conexión a una
tensión de red o corriente no indicada) o la no observancia de las disposiciones de mantenimiento
y seguridad o por la exposición del aparato a condiciones anormales del entorno o por la falta de
cuidado o mantenimiento.
- Daños en el aparato ocasionados por aplicaciones impropias o indebidas (como, p. ej., sobrecarga del aparato o uso de herramientas o accesorios no homologados), introducción de cuerpos
extraños en el aparato (como, p. ej., arena, piedras o polvo, daños producidos por el transporte),
uso violento o infl uencias externa (como, p. ej., daños por caídas).
- Daños en el aparato o en piezas del aparato provocados por el desgaste natural, habitual o producido por el uso.
4. El periodo de garantía es de 24 meses y comienza en la fecha de la compra del aparato. El derecho
de garantía debe hacerse válido, antes de fi nalizado el plazo de garantía, dentro de un periodo de
dos semanas una vez detectado el defecto. El derecho de garantía vence una vez transcurrido el
plazo de garantía. La reparación o cambio del aparato no conllevará ni una prolongación del plazo
de garantía ni un nuevo plazo de garantía ni para el aparato ni para las piezas de repuesto montadas. Esto también se aplica en el caso de un servicio in situ.
5. Para hacer efectivo su derecho a garantía, registre su aparato defectuoso en: www.isc-gmbh.info.
Tenga a mano el recibo de compra o cualquier otro comprobante que acredite la compra del aparato nuevo. La garantía no cubre aquellos aparatos que se envíen sin el comprobante pertinente
o sin la placa de identifi cación puesto que resulta difícil clasifi carlos del modo correspondiente. Si
nuestra prestación de garantía incluye el defecto aparecido en el aparato, recibirá de inmediato un
aparato reparado o nuevo de vuelta.
Naturalmente, también solucionaremos los defectos del aparato que no se encuentren comprendidos
o ya no se encuentren comprendidos en la garantía, en este caso contra reembolso de los costes. Para
ello, envíe el aparato a nuestra dirección de servicio técnico.
Para piezas de desgaste, de repuesto y falta de piezas nos remitimos a las limitaciones de esta garantía
conforme a la información de servicio de este manual de instrucciones.
- 74 -
Anl_GE_CL_36_Li_E_Solo_SPK7.indb 74Anl_GE_CL_36_Li_E_Solo_SPK7.indb 74 22.03.16 09:0222.03.16 09:02

P
Perigo!
Ao utilizar ferramentas, devem ser respeitadas
algumas medidas de segurança para prevenir ferimentos e danos. Por conseguinte, leia
atentamente este manual de instruções / estas
instruções de segurança. Guarde-o num local
seguro, para que o possa consultar sempre que
necessário. Caso passe o aparelho a outras
pessoas, entregue também este manual de instruções / estas instruções de segurança. Não
nos responsabilizamos pelos acidentes ou danos
causados pela não observância deste manual e
das instruções de segurança.
1. Instruções de segurança
As instruções de segurança correspondentes
encontram-se na brochura fornecida.
Perigo!
Leia todas as instruções de segurança e
indicações. O incumprimento das instruções de
segurança e indicações pode provocar choques
eléctricos, incêndios e/ou ferimentos graves.
Guarde todas as instruções de segurança e
indicações para mais tarde consultar.
Explicação da placa de advertência no
aparelho (ver fi gura 11)
1. Antes da colocação em funcionamento, leia o
manual de instruções.
2. Não utilize o aparelho se estiver a chover ou
a nevar. Proteja o aparelho da humidade.
3. Mantenha as outras pessoas afastadas da
zona de perigo
4. Use óculos de protecção e protecção auditiva.
5. Peças em rotação! Mantenha as mãos e os
pés afastados das aberturas
10. Regulador das rotações
11. Suporte da roda
12. 2 parafusos compridos
13. 3 parafusos curtos
2.2 Material a fornecer
Com a ajuda da descrição do material a fornecer,
verifi que se o artigo se encontra completo. Caso
faltem peças, dirija-se num prazo máximo de 5
dias úteis após a compra do artigo a um dos nossos Service Center ou ao ponto de venda onde
adquiriu o aparelho, fazendo-se acompanhar de
um talão de compra válido. Para o efeito, consulte
a tabela da garantia que se encontra nas informações do serviço de assistência técnica no fi m
do manual.
Abra a embalagem e retire cuidadosamente o
•
aparelho.
Remova o material da embalagem, assim
•
como os dispositivos de segurança da embalagem e de transporte (caso existam).
Verifique se o material a fornecer está com-
•
pleto
Verifique se o aparelho e as peças acessóri-
•
as apresentam danos de transporte.
Se possível, guarde a embalagem até ao ter-
•
mo do período de garantia.
Perigo!
O aparelho e o material da embalagem não
são brinquedos! As crianças não devem
brincar com sacos de plástico, películas ou
peças de pequena dimensão! Existe o perigo
de deglutição e asfi xia!
Manual de instruções original
•
Instruções de segurança
•
3. Utilização adequada
2. Descrição do aparelho e material
a fornecer
2.1 Descrição do aparelho (fi gura 1/2)
1. Tubo de aspiração anterior
2. Tubo de aspiração posterior
3. Punho adicional
4. Alça de transporte
5. Interruptor para ligar/desligar
6. Suporte do acumulador
7. Saco de recolha
8. Comutador para aspirar/soprar
9. Rodízios
Anl_GE_CL_36_Li_E_Solo_SPK7.indb 75Anl_GE_CL_36_Li_E_Solo_SPK7.indb 75 22.03.16 09:0222.03.16 09:02
O aspirador/soprador de folhas destina-se à utilização com folhas secas e resíduos do jardim, tais
como relva e ramos pequenos. Não é permitida
uma utilização de outro tipo.
A máquina só pode ser utilizada para os fi ns a
que se destina. Qualquer outro tipo de utilização
é considerado inadequado. Os danos ou ferimentos de qualquer tipo daí resultantes são da
responsabilidade do utilizador/operador e não do
fabricante.
- 75 -

P
Chamamos a atenção para o facto de os nossos
aparelhos não terem sido concebidos para uso
comercial, artesanal ou industrial. Não assumimos qualquer responsabilidade se o aparelho for
utilizado no comércio, artesanato ou indústria ou
em actividades equiparáveis.
4. Dados técnicos
Rotações em vazio n0 ............. 8000-13000 r.p.m.
Velocidade do ar ................................... 210 km/h
Potência de aspiração .......................... 720 m
Volume do saco de recolha ................ aprox. 45 l
Nível de potência acústica L
Incerteza K ............................................ 3 dB (A)
Nível de pressão acústica L
Vibração ahv ....................................... 2,354 m/s
Incerteza K ..............................................1,5 m/s
Peso ...........................................................3,3 kg
Atenção!
O aparelho é fornecido sem acumuladores nem
carregador e só pode ser usado com os acumuladores de lítio da série Power-X-Change!
Power-X-Change
18 V, 1,5 Ah ................................ 5 células de lítio
18 V, 2,0 Ah ................................ 5 células de lítio
18 V, 3,0 Ah .............................. 10 células de lítio
18 V, 4,0 Ah .............................. 10 células de lítio
18 V, 5,2 Ah .............................. 10 células de lítio
Os acumuladores de lítio da série Power-XChange só podem ser carregados com o carregador Power-X-Charger.
Carregador
Tensão de rede .................200-250 V ~ 50-60 Hz
Saída
Tensão nominal ..................................... 21 V d. c.
Corrente nominal .................................3.000 mA
Reduza a produção de ruído e de vibração
para o mínimo!
Utilize apenas aparelhos em bom estado.
•
Limpe e faça a manutenção do aparelho re-
•
gularmente.
Adapte o seu modo de trabalho ao aparelho.
•
Não sobrecarregue o aparelho.
•
Se necessário, submeta o aparelho a uma
•
........ 92,68 dB (A)
WA
........... 83,1 dB (A)
pA
3
/h
verificação.
Desligue o aparelho, quando este não estiver
•
a ser utilizado.
Use luvas.
•
Cuidado!
Riscos residuais
Mesmo quando esta ferramenta eléctrica é
utilizada adequadamente, existem sempre
riscos residuais. Dependendo do formato e
do modelo desta ferramenta eléctrica podem
ocorrer os seguintes perigos:
1. Lesões pulmonares, caso não seja utilizada
uma máscara de protecção para pó adequada.
2. Lesões auditivas, caso não seja utilizada uma
protecção auditiva adequada.
3. Danos para a saúde resultantes das vib-
2
2
rações na mão e no braço, caso a ferramenta
seja utilizada durante um longo período de
tempo ou se não for operada e feita a manutenção de forma adequada.
5. Antes da colocação em
funcionamento
O aparelho é fornecido sem acumuladores
nem carregador!
Aviso!
Retire sempre os acumuladores antes de
efectuar ajustes no aparelho.
5.1 Montagem do tubo de aspiração
(fi g. 3a-3f)
Encaixe o tubo de aspiração anterior no tubo
•
de aspiração posterior (fig. 3a) e fixe com o
parafuso (fig. 3b/pos. 12).
Empurre agora o tubo de aspiração completo
•
para dentro da carcaça do motor (fig. 3c) e
fixe com os parafusos (fig. 3d/pos. 12).
Encaixe as duas rodas (fig. 3e/pos. 9) nos
•
respectivos suportes (fig. 3e/pos. 11). Certifique-se de que o engate é audível!
Empurre o suporte da roda (fig. 3f/pos. 11)
•
no tubo de aspiração anterior até ao encosto
(fig. 3f/pos. D) e fixe com o parafuso (fig. 3f/
pos. 13).
Nota: Certifi que-se de que os dois tubos de
aspiração estão bem encaixados um no outro antes de serem fi xados ao aparelho, pois
posteriormente já não poderão ser desmon-
- 76 -
Anl_GE_CL_36_Li_E_Solo_SPK7.indb 76Anl_GE_CL_36_Li_E_Solo_SPK7.indb 76 22.03.16 09:0222.03.16 09:02

P
tados!
5.2. Montar o saco de recolha (fi g. 4-5)
Pendure o gancho no tubo de aspiração (fi g. 4a)
e na carcaça (fi g. 4b). De seguida encaixe o saco
de recolha na tubeira da carcaça do motor e
certifi que-se que o engate é audível (fi g. 5).
5.3. Montar o punho
Empurre o punho (fi g. 6a/pos. A) até ao encosto
no encaixe da carcaça. A seguir, fi xe o punho de
ambos os lados com um parafuso, respectivamente (fi g. 6b/pos. 13).
5.4. Montar o punho adicional
Retire o parafuso em estrela (fi g. 7/pos. B), insira
o punho (fi g. 7/pos. 3) no encaixe e fi xe o punho
na posição desejada com o parafuso em estrela.
5.5. Montar a alça de transporte
Abra o parafuso serrilhado (fi g. 8/pos. C), passe a
correia (fi g. 8/pos. 4) pela abertura e feche nova-
mente o parafuso serrilhado.
5.6 Montagem do acumulador (fi gura 9)
Prima a tecla de engate (fi gura 9/pos. E) do acu-
mulador como representado na fi gura 9 e insira o
acumulador no respectivo suporte. Assim que ao
acumulador se encontrar na posição representada do lado direito da fi gura 9, certifi que-se de que
a tecla de engate engata! A desmontagem do
acumulador é realizada na sequência inversa!
Nota!
Utilize apenas acumuladores com o mesmo nível
de enchimento; nunca combine acumuladores
cheios com acumuladores meio cheios. Carregue
sempre os dois acumuladores em simultâneo.
O acumulador com um nível de carga mais reduzido determina o tempo de funcionamento do
aparelho. Antes do funcionamento, tem de se
carregar sempre integralmente os dois carregadores.
5.7 Carregar o acumulador
1. Retirar o pack de acumuladores do aparelho,
premindo para isso a tecla de engate lateral.
2. Verifi que se a tensão de rede indicada na pla-
ca de características corresponde à tensão
de rede existente. Ligue a fi cha de alimen-
tação do carregador à tomada. O LED verde
começa a piscar.
3. Insira o acumulador no carregador.
4. No ponto „Visor do carregador“, encontra
uma tabela com os signifi cados da indicação
LED no carregador.
O acumulador pode aquecer um pouco durante o
carregamento. É normal que isso ocorra.
Se o pack de acumuladores não carregar, verifi que
se existe tensão de rede na tomada
•
ou se existe um contacto correcto nos con-
•
tactos de carregamento.
Se continuar a não ser possível carregar o pack
de acumuladores, envie
o carregador
•
e o pack de acumuladores
•
para o nosso serviço de assistência técnica.
Tendo em vista uma longa vida útil do pack de
acumuladores, deve providenciar o seu recarregamento atempado. Isto é absolutamente necessário se verifi car que a potência do soprador de
folhas com acumulador está a diminuir. Nunca
deixe que o pack de acumuladores se descarregue completamente. Esta situação poderia provocar uma avaria no pack de acumuladores!
O aparelho só deve ser posto em funcionamento
depois de a montagem ter sido devidamente
efectuada.
6. Operação
6.1. Determinar o comprimento da alça (fi g. 1)
Ajuste o comprimento da alça de transporte (4)
de forma a que o tubo de aspiração possa ser
utilizado rente ao solo. Os rolos de guia (9) na
extremidade inferior do tubo de aspiração servem
também para facilitar a sua utilização rente ao
solo.
6.2. Ligar o aparelho (fi g. 10)
Para ligar, prima o interruptor para ligar/des-
•
ligar (5).
Para desligar, solte novamente o interruptor
•
para ligar/desligar (5).
6.3 Seleccionar o modo de funcionamento
6.3.1 Aspirar (fi g. 10)
Rode a alavanca (fi g. 10/pos. 8) para a posição
A. Poderá fazê-lo tanto com o aparelho parado,
como em funcionamento.
- 77 -
Anl_GE_CL_36_Li_E_Solo_SPK7.indb 77Anl_GE_CL_36_Li_E_Solo_SPK7.indb 77 22.03.16 09:0222.03.16 09:02

P
6.3.2 Soprar (fi g. 10)
Rode a alavanca (fig. 10/pos. 8) para a po-
•
sição B. Poderá fazê-lo tanto com o aparelho
parado, como em funcionamento.
Dirija o fluxo de ar para a frente e desloque-
•
se lentamente, de forma a soprar as folhas
secas ou os resíduos do jardim ou então para
os remover de locais de difícil acesso.
Atenção! Esvazie o saco de recolha antes de
•
soprar. Caso contrário, as substâncias aspiradas poderão voltar a sair.
6.4 Esvaziar o saco de recolha (fi g. 1)
Esvazie atempadamente o saco de recolha (7).
Se o saco estiver cheio, a potência de aspiração
é nitidamente reduzida. Elimine os resíduos orgânicos através de compostagem.
Desligue o aparelho e retire o acumulador
•
Abra o fecho de correr do saco de recolha (7)
•
e despeje as substâncias aspiradas.
Feche novamente o fecho de correr do saco
•
de recolha (7).
6.5 Regulação das rotações (fi g. 1)
O aparelho está equipado com uma regulação
das rotações electrónica. Para o efeito, rode o
regulador das rotações (fi g. 1/pos. 10) para a po-
sição pretendida. Opere o aparelho apenas com
as rotações necessárias e não deixe que estas
aumentem desnecessariamente.
7. Limpeza, manutenção
e encomenda de peças
sobressalentes
Perigo!
Retire o acumulador antes de qualquer trabalho
de limpeza.
7.1 Limpeza
Após concluídos os trabalhos, retire o saco
•
de recolha, vire-o e limpe-o bem, de modo a
evitar a formação de bolor e odores desagradáveis.
Se o saco de recolha estiver muito sujo, pode
•
lavá-lo com água e sabão.
Se tiver dificuldades em mover o fecho de
•
correr, aplique sabão seco nos respectivos
dentes.
Se o tubo de aspiração/sopro estiver sujo,
•
limpe-o com uma escova.
A sujidade provocada pelas substâncias
•
aspiradas pode dificultar o movimento da
alavanca de comutação (Soprar/Aspirar).
Neste caso, basta alternar várias vezes entre
Aspirar e Soprar para que a alavanca de comutação recupere a mobilidade.
7.2 Manutenção
Na eventualidade de ocorrer alguma avaria
•
no aparelho, mande verificar por um técnico
autorizado ou por uma oficina de assistência
técnica.
No interior do aparelho, não existem quais-
•
quer peças que necessitem de manutenção.
7.3 Encomenda de peças sobressalentes:
Ao encomendar peças sobressalentes, devem-se
fazer as seguintes indicações:
Tipo da máquina
•
Número de artigo da máquina
•
Número de identificação da máquina
•
Número da peça sobressalente necessária
•
Pode encontrar os preços e informações actuais
em www.isc-gmbh.info
8. Avarias
O aparelho não funciona:
Verifi que se o acumulador está carregado e se
o carregador funciona. Se o aparelho continuar
a não funcionar apesar de existir a tensão necessária, envie-o para o endereço do serviço de
assistência técnica indicado.
9. Eliminação e reciclagem
O aparelho encontra-se dentro de uma embalagem para evitar danos de transporte. Esta embalagem é matéria-prima, podendo ser reutilizada
ou reciclada. O aparelho e os respectivos acessórios são de diferentes materiais, como p. ex.
o metal e o plástico. Não deite os aparelhos defeituosos para o lixo doméstico. Para uma eliminação ecologicamente correcta, o aparelho deve
ser entregue num local de recolha adequado.
Se não tiver conhecimento de nenhum local de
recolha, informe-se junto da sua administração
autárquica.
- 78 -
Anl_GE_CL_36_Li_E_Solo_SPK7.indb 78Anl_GE_CL_36_Li_E_Solo_SPK7.indb 78 22.03.16 09:0222.03.16 09:02

10. Armazenagem
Guarde o aparelho e os respectivos acessórios
em local escuro, seco e sem risco de formação
de gelo, fora do alcance das crianças. A temperatura ideal de armazenamento situa-se entre os
5 e os 30 ˚C. Guarde a ferramenta eléctrica na
embalagem original.
P
- 79 -
Anl_GE_CL_36_Li_E_Solo_SPK7.indb 79Anl_GE_CL_36_Li_E_Solo_SPK7.indb 79 22.03.16 09:0222.03.16 09:02

P
11. Visor do carregador
Estado do visor
LED ver-
LED verde
melho
Desligado A piscar Operacionalidade
O carregador está ligado à rede e encontra-se operacional; o acumulador não está no carregador
Ligado Desligado Carregamento
O carregador carrega o acumulador no modo de carregamento rápido.
Desligado Ligado
O acumulador dispõe de 85% de carga e está operacional.
(Duração da carga no caso de um acumulador de 1,5 Ah: 30 min.)
(Duração da carga no caso de um acumulador de 2,0 Ah: 40 min.)
(Duração da carga no caso de um acumulador de 3,0 Ah: 60 min.)
(Duração da carga no caso de um acumulador de 4,0 Ah: 80 min.)
(Duração da carga no caso de um acumulador de 5,2 Ah: 130 min.)
De seguida, é comutado para um carregamento parcial até estar tota
mente carregado.
(Duração da carga total no caso de um acumulador de 1,5 Ah: 40 min.)
(Duração da carga total no caso de um acumulador de 2,0 Ah: 50 min.)
(Duração da carga total no caso de um acumulador de 3,0 Ah: 75 min.)
(Duração da carga total no caso de um acumulador de 4,0 Ah: 100 min.)
(Duração da carga total no caso de um acumulador de 5,2 Ah: 140 min.)
Medida a tomar:
Remova o acumulador do carregador. Desligue o carregador da rede.
A piscar Desligado Carregamento condicionado
O carregador encontra-se no modo de carregamento moderado.
Aqui, por motivos de segurança, o acumulador é carregado mais
lentamente, precisando de mais de uma hora até estar carregado. Tal
pode dever-se às seguintes causas:
- O acumulador passou muito tempo sem ser carregado ou continuou
a ser utilizado mesmo depois de já se encontrar descarregado (descarregamento total)
- A temperatura do acumulador não se encontra na faixa ideal, entre
os 25° C e os 45° C.
Medida a tomar:
Aguarde até o carregamento estar concluído; o acumulador pode, no
entanto, continuar a ser carregado.
A piscar A piscar Falha
Já não é possível efectuar o carregamento. O acumulador tem um
defeito.
Medida a tomar:
Um acumulador com defeito nunca mais pode voltar a ser carregado.
Remova o acumulador do carregador.
Ligado Ligado Temperatura anómala
O acumulador está demasiado quente (p. ex. radiação solar directa)
ou demasiado frio (abaixo dos 0° C)
Medida a tomar:
Retire o acumulador e guarde-o 1 dia à temperatura ambiente (a
aprox. 20° C).
Signifi cado e medida a adoptar
- 80 -
Anl_GE_CL_36_Li_E_Solo_SPK7.indb 80Anl_GE_CL_36_Li_E_Solo_SPK7.indb 80 22.03.16 09:0222.03.16 09:02

P
Só para países da UE
Não deite as ferramentas eléctricas para o lixo doméstico!
Segundo a directiva europeia 2012/19/CE relativa aos resíduos de equipamentos eléctricos e electrónicos e a respectiva transposição para o direito interno, as ferramentas eléctricas usadas têm de ser
recolhidas separadamente e entregues nos locais de recolha previstos para o efeito.
Alternativa de reciclagem relativa à solicitação de devolução:
O proprietário do aparelho eléctrico, no caso de não optar pela devolução, é obrigado a reciclar adequadamente o aparelho eléctrico. Para tal, o aparelho usado também pode ser entregue a um ponto
de recolha que trate da eliminação de resíduos, respeitando a legislação nacional sobre resíduos e
respectiva reciclagem. Não estão abrangidos os meios auxiliares e os acessórios sem componentes
electrónicos, que acompanham os aparelhos usados.
A reprodução ou duplicação, mesmo que parcial, da documentação e dos anexos dos produtos carece
da autorização expressa da iSC GmbH.
Reservado o direito a alterações técnicas
- 81 -
Anl_GE_CL_36_Li_E_Solo_SPK7.indb 81Anl_GE_CL_36_Li_E_Solo_SPK7.indb 81 22.03.16 09:0222.03.16 09:02

P
Informações do serviço de assistência técnica
Estamos representados em todos os países mencionados no certifi cado de garantia por agentes auto-
rizados competentes, cujos contactos poderá encontrar no certifi cado de garantia. Estes encontram-se
ao seu dispor para todos os serviços de que necessita, tais como reparações, fornecimento de peças
sobressalentes e peças desgastadas ou a aquisição de consumíveis.
Deve-se ter em atenção que, neste produto, as seguintes peças estão sujeitas a um desgaste natural
ou decorrente da sua utilização, ou então são necessárias como consumíveis.
Categoria Exemplo
Peças de desgaste* Acumulador
Consumíveis/peças consumíveis*
Peças em falta
* não incluído obrigatoriamente no material a fornecer!
Em caso de defi ciências ou erros, pedimos-lhe que comunique o problema através da página de In-
ternet www.isc-gmbh.info. Certifi que-se de que faz uma descrição exacta do problema, respondendo
sempre às seguintes questões:
O aparelho já funcionou alguma vez ou possui o defeito desde o início?
•
Antes do surgimento do defeito, apercebeu-se de algo estranho (sintoma antes do defeito)?
•
Na sua opinião, que erro de funcionamento apresenta o aparelho (sintoma principal)?
•
Descreva este erro de funcionamento.
- 82 -
Anl_GE_CL_36_Li_E_Solo_SPK7.indb 82Anl_GE_CL_36_Li_E_Solo_SPK7.indb 82 22.03.16 09:0222.03.16 09:02

P
Certifi cado de garantia
Estimado(a) cliente,
os nossos produtos são submetidos a um rigoroso controlo de qualidade. Se, ainda assim, o aparelho
não funcionar nas devidas condições, lamentamos esse facto e pedimos-lhe que se dirija ao nosso serviço de assistência técnica na morada indicada no presente certifi cado de garantia. Se preferir, também
pode contactar-nos telefonicamente através do número de assistência técnica indicado. O exercício
dos direitos de garantia está sujeito às seguintes condições:
1. As presentes condições de garantia dirigem-se exclusivamente aos consumidores, ou seja, pessoas naturais, que não desejam utilizar este produto quer no âmbito da sua actividade comercial
quer de outra actividade independente. As presentes condições de garantia regem as prestações
de garantia adicionais com que o fabricante abaixo designado se compromete, além dos termos
legais de garantia, para com os compradores dos seus novos aparelhos e não afectam os seus
direitos legais de garantia. O nosso serviço de garantia é prestado gratuitamente.
2. O serviço de garantia cobre exclusivamente as defi ciências num novo aparelho adquirido do fabri-
cante abaixo designado, e que sejam decorrentes de erros de material ou de fabrico comprovados,
e está, por nossa opção, limitado à eliminação de tal falta no aparelho ou à substituição do mesmo.
Chamamos a atenção para o facto de os nossos aparelhos não terem sido concebidos para uso
comercial, artesanal ou profi ssional. Não haverá, por isso, lugar a um contrato de garantia no caso
de o aparelho ter sido utilizado, dentro do período de garantia, em empresas do sector comercial,
artesanal ou industrial ou actividades equiparáveis.
3. Excluídos pela nossa garantia estão:
- Danos no aparelho resultantes da inobservância das instruções de montagem ou de uma instalação incorrecta, da inobservância do manual de instruções (como p. ex. a ligação a uma tensão
de rede ou tipo de corrente errada) ou da inobservância das disposições de segurança ou da
exposição do aparelho a condições ambientais anormais ou de uma conservação e manutenção
insufi cientes.
- Danos no aparelho resultantes de utilizações abusivas ou indevidas (como p. ex. uma sobrecarga
do aparelho ou utilização de ferramentas de trabalho ou acessórios não autorizados), a penetração
de corpos estranhos no aparelho (como p. ex. areia, pedras ou pó, danos de transporte), o uso de
força ou impactos externos (como p. ex. danos resultantes de quedas).
- Danos no aparelho ou nas peças do aparelho associados a um desgaste decorrente do uso, um
desgaste natural habitual ou de outro tipo.
4. O período de garantia é de 24 meses a contar da data de compra do aparelho. Os direitos de garantia devem ser reclamados dentro do período de garantia, no prazo de duas semanas após ter
sido detectado o defeito. Está excluída a reclamação de direitos de garantia após o termo do período de garantia. A reparação ou a substituição do aparelho não implica o prolongamento do período
de garantia nem dá origem à contagem de um novo período de garantia para o aparelho ou para
eventuais peças sobressalentes montadas no mesmo. O mesmo se aplica no caso de a assistência
técnica ter sido prestada no local.
5. Para activar a garantia, denuncie o aparelho defeituoso em: www.isc-gmbh.info. Tenha à disposição
o talão ou outro comprovativo de compra do aparelho novo. Os aparelhos enviados sem o respectivo comprovativo ou sem a placa de características, serão excluídos pelo serviço de garantia devido
à falta de atribuição. Se o defeito do aparelho estiver abrangido pelo nosso serviço de garantia, serlhe-á imediatamente enviado um aparelho novo ou reparado.
Naturalmente, também teremos todo o gosto em efectuar reparações que não estão, ou deixaram de
estar, abrangidas pelo serviço de garantia. Nesse caso, terá de suportar os custos da reparação. Para
este efeito, deverá enviar o aparelho para a morada do nosso serviço de assistência técnica.
Para peças de desgaste, consumíveis e em falta, consulte as restrições desta garantia, de acordo com
as informações do serviço de assistência técnica deste manual de instruções.
- 83 -
Anl_GE_CL_36_Li_E_Solo_SPK7.indb 83Anl_GE_CL_36_Li_E_Solo_SPK7.indb 83 22.03.16 09:0222.03.16 09:02

FIN
Vaara!
Laitteita käytettäessä tulee noudattaa tiettyjä
turvallisuusvarotoimia tapaturmien ja vaurioiden
välttämiseksi. Lue sen vuoksi tämä käyttöohje /
nämä turvallisuusmääräykset huolellisesti läpi.
Säilytä ne hyvin, jotta niissä olevat tiedot ovat
myöhemminkin milloin vain käytettävissäsi. Jos
luovutat laitteen muille henkilöille, ole hyvä ja
anna heille myös tämä käyttöohje / nämä turvallisuusmääräykset laitteen mukana. Emme ota
mitään vastuuta tapaturmista tai vaurioista, jotka
ovat aiheutuneet tämän käyttöohjeen tai turvallisuusohjeiden noudattamisen laiminlyönnistä.
1. Turvallisuusmääräykset
Laitetta koskevat turvallisuusmääräykset löydät
oheistetusta vihkosesta.
Vaara!
Lue kaikki turvallisuusmääräykset ja ohjeet.
Jos turvallisuusmääräyksiä tai muita ohjeita ei
noudateta, saattaa tästä aiheutua sähköiskuja,
tulipaloja ja/tai vaikeita vammoja. Säilytä kaikki
turvallisuusmääräykset ja ohjeet myöhempää
tarvetta varten.
Laitteessa olevan ohjekilven selostus (katso
kuvaa 11)
1. Lue käyttöohje ennen käyttöönottoa.
2. Älä käytä laitetta sateella tai lumessa. Suojaa
laite kosteudelta.
3. Pidä muut henkilöt poissa vaara-alueelta.
4. Käytä silmä- ja kuulosuojuksia.
5. Pyöriviä osia! Pidä kätesi ja jalkasi poissa aukoista
13. 3 lyhyttä ruuvia
2.2 Toimituksen sisältö
Tarkasta tässä kuvatun toimitusselostuksen avulla, että tuote on täysimääräinen. Jos osia puuttuu,
ota viimeistään 5. arkipäivänä oston jälkeen
yhteyttä asiakaspalveluumme tai siihen myyntipisteeseen, josta olet ostanut laitteen, ja esitä
vastaava ostotosite. Huomioi tässä myös tämän
ohjekirjan lopussa olevat asiakaspalveluohjeet ja
takuusuoritustaulukko.
Avaa pakkaus ja ota laite varovasti pakkauk-
•
sesta.
Poista pakkausmateiriaalit sekä pakkaus- ja
•
kuljetusvarmistukset (mikäli käytetty).
Tarkasta, onko toimitus täysilukuinen.
•
Tarksta, onko laitteessa ja varusteissa kulje-
•
tusvaurioita.
Säilytä pakkaus, mikäli mahdollista, takuua-
•
jan loppuun saakka.
Vaara!
Laite ja pakkausmateriaalit eivät ole lasten
leikkikaluja! Lapset eivät saa leikkiä muovipusseilla, kelmuilla tai pienillä osilla! Niistä
uhkaa nielaisu- ja tukehtumisvaara!
Alkuperäiskäyttöohje
•
Turvallisuusmääräykset
•
3. Määräysten mukainen käyttö
Lehti-imuri/-puhaltimen käyttö on sallittu vain lehtien ja puutarhajätteiden kuten ruohon tai pienten
oksien poistamiseen. Muu käyttö ei ole sallittu.
Konetta saa käyttää ainoastaan sille määrättyyn
2. Laitteen kuvaus ja toimituksen
laajuus
2.1 Laitteen kuvaus (kuva 1/2)
1. Imuputki edessä
2. Imuputki takana
3. Tukikahva
4. Kantohihna
5. Päälle-/pois-katkaisin
6. Akun istukka
7. Lehtipussi
8. Vaihtokytkin imu/puhallus
9. Siirtopyörät
10. Kierrosluvun säädin
11. Pyöränkannatin
12. 2 pitkää ruuvia
Anl_GE_CL_36_Li_E_Solo_SPK7.indb 84Anl_GE_CL_36_Li_E_Solo_SPK7.indb 84 22.03.16 09:0222.03.16 09:02
tarkoitukseen. Kaikkinainen tämän ylittävä käyttö
ei ole määräysten mukaista. Kaikista tästä aiheutuvista vahingoista tai loukkaantumisista on vastuussa laitteen omistaja/käyttäjä eikä suinkaan
sen valmistaja.
Ole hyvä ja ota huomioon, että laitteitamme ei ole
suunniteltu ja valmistettu käytettäväksi pienteollisuus- tai teollisuustarkoituksiin. Emme siksi ota
mitään vastuuta vaurioista, jos laitetta käytetään
pienteollisuus-, käsityöläis- tai teollisuustyöpaikoilla tai näihin verrattavissa olevissa toimissa.
- 84 -

FIN
4. Tekniset tiedot
Joutokäyntikierrosluku n0 .......8 000-13 000 min
Ilman virtausnopeus .............................. 210 km/h
Imuteho ................................................. 720 m
Lehtipussin tilavuus ................................... n. 45 l
Äänen tehotaso L
Mittausepätarkkuus K ........................... 3 dB (A)
Äänen painetaso L
Tärinä ahv ........................................... 2,354 m/s
Mittausepätarkkuus K .............................1,5 m/s
Paino ......................................................n. 3,3 kg
Huomio!
Laite toimitetaan ilman akkuja ja ilman latauslaitetta, ja sitä saa käyttää ainoastaan Power-XChange -sarjan litiumi-ioniakkujen kera!
Power-X-Change
18 V, 1,5 Ah ................................. 5 Li-ionikennoa
18 V, 2,0 Ah ................................. 5 Li-ionikennoa
18 V, 3,0 Ah ............................... 10 Li-ionikennoa
18 V, 4,0 Ah ............................... 10 Li-ionikennoa
18 V, 5,2 Ah ............................... 10 Li-ionikennoa
Power-X-Change -sarjan litiumi-ioniakut saa ladata vain Power-X-Charger -latauslaitteella.
Latauslaite
Verkkojännite ....................200-250 V ~ 50-60 Hz
Antoarvot
Nimellisjännite ............................... 21 V tasavirta
Nimellisvirta ......................................... 3 000 mA
Rajoita melunpäästöt ja tärinä mahdollisimman vähäisiksi!
Käytä ainoastaan moitteettomia laitteita.
•
Huolla ja puhdista laite säännöllisesti.
•
Sovita työskentelytapasi laitteen mukaiseksi.
•
Älä ylikuormita laitetta.
•
Tarkastuta laite aina tarvittaessa.
•
Sammuta laite, kun sitä ei käytetä.
•
Käytä suojakäsineitä.
•
Huomio!
Jäämäriskit
Silloinkin, kun käytät tätä sähkötyökalua
määräysten mukaisesti, jää jäljelle aina tietty
jäämäriski. Tämän sähkötyökalun rakenteesta ja mallista riippuen saattaa esiintyä
seuraavia vaaroja:
.......................... 92,68 dB(A)
WA
.......................... 83,1 dB(A)
pA
3
1. keuhkovaurioita, ellei käytetä sopivaa pöly-
-1
/h
2
2
suojanaamaria.
2. kuulovaurioita, ellei käytetä soveliaita kuulosuojaimia.
3. terveydellisiä haittoja, jotka aiheutuvat kädenkäsivarren tärinästä, jos laitetta käytetään
pitemmän aikaa tai sitä ei käsitellä ja huolleta
määräysten mukaisesti.
5. Ennen käyttöönottoa
Laite toimitetaan ilman akkuja ja ilman latauslaitetta!
Varoitus!
Ota akut aina pois, ennen kuin teet laitteeseen säätöjä.
5.1. Imuputken asennus (kuvat 3a – 3f)
Liitä imuputken etuosa ja takaosa (kuva 3a)
•
yhteen ja ruuvaa ne kiinnit ruuvilla (kuva 3b/
nro 12).
Työnnä sitten koko imuputki moottorin kuore-
•
en (kuva 3c) ja kiinnitä se paikalleen ruuveilla
(kuva 3d/nro 12).
Työnnä molemmat pyörät (kuva 3e/nro 9) py-
•
öränkannattimeen (kuva 3e/nro 11). Tarkkaile,
että ne napsahtavat paikalleen!
Työnnä pyöränkannatin (kuva 3f/nro 11) imu-
•
putken etuosaan vasteeseen saakka (kuva
3f/kohta D) ja kiinnitä se ruuvilla (kuve 3f/nro
13).
Viite: Huomaa, että molemmat imuputket on
aina liitettävä kiinteästi yhteen ennen laitteeseen kiinnittämistä eikä niitä saa myöhemmin
enää erottaa!
5.2. Lehtipussin asennus (kuva 4-5)
Ripusta koukku imuputkeen (kuva 4a) ja kuoreen
(4b). Työnnä sitten lehtipussi moottorin kotelossa
olevan nysän päälle ja tarkkaile, että se napsahtaa kuultavasti kiinni (kuva 5).
5.3. Kahvan asennus
Työnnä kahva (kuva 6a/kohta A) vasteeseen
saakka kuoressa oleviin kiinnityskohtiin. Kiinnitä
sitten kahvan molemmat päät kukin yhdellä ruuvilla (kuva 6b/nro 13).
- 85 -
Anl_GE_CL_36_Li_E_Solo_SPK7.indb 85Anl_GE_CL_36_Li_E_Solo_SPK7.indb 85 22.03.16 09:0222.03.16 09:02

FIN
5.4. Tukikahvan asennus
Ota tähtikantaruuvi pois (kuva 7/kohta B), työnnä
kahva (kuva 7/nro 3) kiinnittimeen ja kiinnitä kahva tähtikantaruuvilla haluamaasi asentoon.
5.5. Kantohihnan asennus
Avaa pykäläruuvi (kuva 8/kohta C), vedä hihna
(kuva 8/nro 4) aukon läpi ja kiinnitä pykäläruuvi
jälleen.
5.6 Akun asennus (kuva 9)
Paina kuvan 9 mukaisesti akun lukituspainiketta
(kuva 9/kohta E) ja työnnä akku sille tarkoitettuun
akkukantaan. Kun akku on kuvan 9 esittämässä
asennossa, tulee tarkkailla, että lukitusnäppäin
napsahtaa kiinni! Akun poisottaminen tehdään
päinvastaisessa järjestyksessä!
Viite!
Käytä ainoastaan akkuja, joiden lataustaso on
sama, älä koskaan yhdistele puolityhjiä akkuja
täysien akkujen kanssa. Lataa molemmat akut
aina samanaikaisesti.
Akku, jonka lataustaso on alhaisempi, määrää
laitteen käyttöajan keston. Ennen käyttöä molemmant akut tulee ladata täyteen.
5.7 Akun lataaminen
1. Ota akkusarja laitteesta pois. Paina tätä varten sivulla olevaa lukitusnäppäintä.
2. Tarkasta, että tyyppikilvessä annettu verkkojännite vastaa käytettävissä olevaa verkkojännitettä. Työnnä latauslaitteen verkkopistoke
pistorasiaan. Vihreä valodiodi alkaa vilkkua.
3. Työnnä akku latauslaitteeseen.
4. Kohdasta 8 „Latauslaitteen näyttö“ löydät
taulukon, josta selviävät latauslaitteen valodiodinäytön merkitykset.
Latauksen aikana akku saattaa lämmetä hieman.
Tämä on kuitenkin normaalia.
Jos akkusarjan lataaminen ei onnistu, ole hyvä ja
tarkasta,
onko pistorasiassa verkkojännite
•
ovatko latauskontaktit moitteettomasti yhtey-
•
dessä latauslaitteeseen.
Jos akkusarjan lataaminen ei vieläkään onnistu,
ole hyvä ja lähetä
latauslaite
•
sekä akkusarja
•
tekniseen asiakaspalveluumme.
Jotta akkusarjan elinikä olisi mahdollisimman
pitkä, tulee se aina ladata riittävän ajoissa. Lataaminen on joka tapauksessa tarpeen, kun huomaat
akku-lehtipuhaltimen tehon heikkenevän. Älä
koskaan anna akkusarjan tyhjentyä täysin. Tästä
seuraa akkusarjan vahingoittuminen!
Käynnistä laite vasta kun olet suorittanut kaikki
asennustoimet loppuun.
6. Käyttö
6.1. Hihnan pituuden säätö (kuva 1)
Säädä kantohihnan (4) pituus niin, että imuputkea
voidaan kuljettaa lähellä maan pintaa. Lisäksi
imuputken kuljettamista maata pitkin helpottavat
imuputken alapäässä olevat siirtorullat (9).
6.2. Laitteen käynnistäminen (kuva 10)
Paina päälle-/pois-katkaisinta (5) käynni-
•
stääksesi laitteen.
Pysäytä se päästämällä päälle-/pois-katkaisin
•
(5) jälleen irti.
6.3 Käyttötavan valinta
6.3.1 Imeminen (kuva 10)
Käännä vipu (kuva 10/nro 8) asentoon A. Voit
tehdä tämän sekä laitteen ollessa pysähdyksissä
että sen käydessä.
6.3.2 Puhallus (kuva 10)
Käännä vipu (kuva 10/nro 8) asentoon B. Voit
•
tehdä tämän sekä laitteen ollessa pysähdyksissä että sen käydessä.
Suuntaa ilmavirta eteenpäin ja liiku hitaasti
•
puhaltaaksesi lehdet tai puutarhajätteet kokoon tai poistaaksesi ne vaikeasti tavoitettavista
kohdista.
Huomio! Tyhjennä lehtipussi ennen puhalta-
•
misen aloittamista. Muuten jo sisäänimetyt
lehdet ja roskat voisivat jälleen levitä.
6.4 Lehtipussin tyhjentäminen (kuva 1)
Tyhjennä lehtipussi (7) riittävän ajoissa. Kun se
on lähes täynnä, niin imuteho heikkenee selvästi.
Toimita orgaaniset jätteet kompostointiin.
Sammuta laite ja vedä akut pois.
•
Avaa lehtipussin (7) vetoketju ja kaada imetyt
•
jätteet pois.
Sulje lehtipussin (7) vetoketju jälleen.
•
- 86 -
Anl_GE_CL_36_Li_E_Solo_SPK7.indb 86Anl_GE_CL_36_Li_E_Solo_SPK7.indb 86 22.03.16 09:0222.03.16 09:02

FIN
6.5 Kierrosluvun säätö (kuva 1)
Laite on varustettu elektronisella kierrosluvun
säädöllä. Käännä kierrosluvun säädin (kuva 1/
nro 10) haluttuun asemaan. Käytä laitetta vain
tarvittavalla kierrosluvulla äläkä anna sen käydä
tarpeettoman korkeilla kierroksilla.
7. Puhdistus, huolto ja varaosatilaus
Vaara!
Vedä akut pois ennen kaikkia puhdistustoimia.
7.1 Puhdistus
Työn päätyttyä ota lehtipussi pois, käännä
•
se nurin ja puhdista perusteellisesti, jotta homeen ja epämiellyttävien hajujen syntyminen
estetään.
Pahasti likaantunut lehtipussi voidaan pestä
•
vedellä ja saippualla.
Jos vetoketju liikkuu huonosti, hiero vetoket-
•
jun hampaisiin kuivaa saippuaa.
Puhdista imu-/puhallusputken lika pois har-
•
jalla.
Imettyjen jätteiden aiheuttama likaantuminen
•
voi vaikeuttaa vaihtokytkimen (puhallus/imu)
liikkuvuutta. Siinä tapauksessa kytke vaihtokytkin useamman kerran imusta puhallukselle
ja takaisin, niin sen liikkuvuus palautuu.
9. Käytöstäpoisto ja uusiokäyttö
Laite on pakattu kuljetuspakkaukseen, jotta vältetään kuljetusvauriot. Tämä pakkaus on raaka-ainetta ja sitä voi siksi käyttää uudelleen tai sen voi
toimittaa kierrätyksen kautta takaisin raaka-ainekiertoon. Laite ja sen varusteet on valmistettu eri
materiaaleista, kuten esim. metallista ja muoveista. Vialliset laitteet eivät kuulu kotitalousjätteisiin.
Laite tulee toimittaa asianmukaiseen keräyspisteeseen ammattitaitoista hävittämistä varten. Jos
et tiedä, missä on tällainen keräyspiste, tiedustele
asiaa kuntasi hallinnosta.
10. Säilytys
Säilytä laite ja sen varusteet valolta, kosteudelta
ja pakkaselta suojatussa tilassa poissa lasten
ulottuvilta. Paras säilytyslämpötila on 5°C ja 30°C
välillä. Säilytä sähkötyökalut alkuperäispakkauksissaan.
7.2 Huolto
Jos laitteessa ilmenee häiriöitä, anna ainoastaan
valtuutetun alan ammattihenkilön tai ammattikorjaamon tarkastaa se.
Laitteen sisällä ei ole muita huoltoa tarvitsevia
osia.
7.3 Varaosatilaus:
Varaosia tilatessasi anna seuraavat tiedot:
Laitteen tyyppi
•
Laitteen tuotenumero
•
Laitteen tunnusnumero
•
Tarvittavan varaosan varaosanumero.
•
Ajankohtaiset hinnat ja muut tiedot löydät osoitteesta www.isc-gmbh.info
8. Häiriöt
Laite ei käy:
Tarkasta, onko akku ladattu ja toimiiko latauslaite.
Mikäli laite ei toimi, vaikka se saa jännitettä, niin
se tulee lähettää ilmoitettuun teknisen asiakaspalvelun osoitteeseen.
- 87 -
Anl_GE_CL_36_Li_E_Solo_SPK7.indb 87Anl_GE_CL_36_Li_E_Solo_SPK7.indb 87 22.03.16 09:0222.03.16 09:02

FIN
11. Latauslaitteen näyttö
Näytön tila
Punainen
valodiodi
Vihreä valodiodi
Pois Vilkkuu Käyttövalmiustila
Latauslaite on liitetty sähköverkkoon ja valmis käyttöön, latauslai
teessa ei ole akkua
Palaa Pois Lataaminen
Latauslaite lataa akun pikalatauksella.
Pois Palaa Akku on ladattu 85 % täyteen ja valmis käyttöön.
(Latauksen kesto 1,5 Ah:n akku: 30 minuuttia)
(Latauksen kesto 2,0 Ah:n akku: 40 minuuttia)
(Latauksen kesto 3,0 Ah:n akku: 60 minuuttia)
(Latauksen kesto 4,0 Ah:n akku: 80 minuuttia)
(Latauksen kesto 5,2 Ah:n akku: 130 minuuttia)
Sen jälkeen laite kytkeytyy hellävaraiseen lataukseen, kunnes akku on
ladattu täyteen.
(Latauksen kesto kaikkiaan 1,5 Ah:n akku: n. 40 minuuttia)
(Latauksen kesto kaikkiaan 2,0 Ah:n akku: n. 50 minuuttia)
(Latauksen kesto kaikkiaan 3,0 Ah:n akku: n. 75 minuuttia)
(Latauksen kesto kaikkiaan 4,0 Ah:n akku: n. 100 minuuttia)
(Latauksen kesto kaikkiaan 5,2 Ah:n akku: n. 140 minuuttia)
Toimenpide:
Ota akku pois latauslaitteesta. Irrota latauslaite sähköverkosta.
Vilkkuu Vilkkuu Sovitettu lataaminen
Latauslaite on siirtynyt hellävaraiseen lataustilaan.
Tällöin akkua ladataan turvallisuussyistä hitaammin ja sen lataaminen
kestää pitempään kuin 1 tunnin. Mahdollisia syitä ovat:
- Akkua ei ole ladattu hyvin pitkään aikaan tai tyhjentyneen akun tyhjentäminen on jatkunut (tyhjentyminen kokonaan)
- Akun lämpötila ei ole ihannealueella 25°C ja 45°C välillä.
Toimenpide:
Odota, kunnes lataaminen on päättynyt, akkua voidaan tästä huolimatta ladata edelleen.
Vilkkuu Vilkkuu Häiriö
Lataaminen ei ole mahdollista. Akussa on vika.
Toimenpide:
Viallista akkua ei saa enää ladata.
Ota akku pois latauslaitteesta.
Palaa Palaa Lämpötilahäiriö
Akku on liian kuuma (esim. suorassa auringonpaisteessa) tai liian kylmä (alle 0°C)
Toimenpide:
Ota akku pois ja säilytä sitä 1 päivän ajan huoneenlämmössä (n.
20°C).
Merkitys ja toimenpiteet
- 88 -
Anl_GE_CL_36_Li_E_Solo_SPK7.indb 88Anl_GE_CL_36_Li_E_Solo_SPK7.indb 88 22.03.16 09:0222.03.16 09:02

FIN
Koskee ainoastaan EU-maita
Älä heitä sähkötyökaluja kotitalousjätteisiin!
Euroopan direktiivin 2012/19/EY loppuunkäytetyistä sähkö- ja elektronisista laitteista ja sen kansalliseksi laiksi muuntamisen mukaan tulee käytetyt sähkötyökalut koota erikseen ja toimittaa ne ympäristöystävälliseen kierrätykseen.
Kierrätysvaihtoehto takaisinlähetykselle:
Sähkölaitteen omistaja on velvoitettu laitteen palauttamisen vaihtoehtona vaikuttamaan siihen, että
hänen luovuttamansa omaisuus hävitetään asianmukaisesti. Loppuun käytetty laite voidaan tätä varten
luovuttaa myös keräyspisteeseen, joka suorittaa sen käytöstäpoiston kansallisten kierrätystalous- ja
jätehuoltolakien tarkoittamalla tavalla. Tämä ei koske käytettyihin laitteisiin liitettyjä lisävarusteita ja apuvälineitä, joissa ei ole sähköosia.
Tuotedokumentaation ja tuotteen mukana toimitettujen papereiden osittainenkin kopiointi tai muu monistaminen on sallittu ainoastaan iSC GmbH:n nimenomaisella luvalla.
Oikeus teknisiin muutoksiin pidätetään
- 89 -
Anl_GE_CL_36_Li_E_Solo_SPK7.indb 89Anl_GE_CL_36_Li_E_Solo_SPK7.indb 89 22.03.16 09:0222.03.16 09:02

FIN
Asiakaspalvelutiedot
Meillä on kaikissa takuutodistuksessa mainituissa maissa päteviä asiakaspalvelusta huolehtivia kumppaneita, joiden yhteystiedot löydät takuutodistuksesta. Heidän kauttaan voit saada kaikki asiakaspalvelut, kuten korjaukset, varaosien ja kulumaosien sekä tarvittavien käyttömateriaalien toimitukset.
Huomaa, että seuraaviin tämän tuotteen osiin kohdistuu käytöstä johtuvaa, luonnollista kulumista, ja että
seuraavia osia tarvitaan käyttömateriaaleina.
Laji Esimerkki
Kuluvat osat* Akku
Käyttömateriaali / käyttöosat*
Puuttuvat osat
* ei välttämättä kuulu toimitukseen!
Puutteellisuuksien tai vikojen ilmetessä pyydämme ilmoittamaan virheestä verkossa sivustoon www.
isc-gmbh.info. Ole hyvä ja anna vian tarkka kuvaus ja vastaa sen lisäksi joka tapauksessa seuraaviin
kysymyksiin:
Onko laite toiminut jo ainakin kerran, vai oliko se jo alusta lähtien viallinen?
•
Havaitsitko jotain erikoista ennen vian ilmenemistä (oireita ennen vikaa)?
•
Mikä mielestäsi on laitteessa vikana (pääasiallinen vika)?
•
Kuvaa tätä toimintavirhettä.
- 90 -
Anl_GE_CL_36_Li_E_Solo_SPK7.indb 90Anl_GE_CL_36_Li_E_Solo_SPK7.indb 90 22.03.16 09:0222.03.16 09:02

FIN
Takuutodistus
Arvoisa asiakas,
tuotteemme läpikäyvät erittäin tiukan laadunvalvontatarkastuksen. Mikäli tämä laite ei kuitenkaan toimi
moitteettomasti, valitamme tapahtunutta suuresti ja pyydämme sinua kääntymään teknisen asiakaspalvelumme puoleen käyttäen tässä takuukortissa annettua osoitetta. Selvitämme asian mielellämme
myös puhelimitse allaolevan palvelunumeron kautta. Takuuvaateiden esittämistä koskevat seuraavat
määräykset:
1. Nämä takuuehdot koskevat ainoastaan kuluttajia, ts. luonnollisia henkilöitä, jotka eivät käytä tätä
tuotetta sen enempää pienteollisessa kuin muussakaan itsenäisessä ammatinharjoituksessa. Nämä
takuuehdot säätelevät täydentäviä takuusuorituksia, jotka allamainittu valmistaja lupaa uusien
laitteidensa ostajille lakimääräisen takuun lisäksi. Ne eivät vaikuta lakimääräisiin takuusuoritusvaateisiisi millään tavalla. Takuumme on sinulle maksuton.
2. Takuusuoritus kattaa ainoastaan sellaiset hankkimasi allamainitun valmistajan uuden laitteen
puutteellisuudet, jotka todistettavasti aiheutuvat materiaali- tai valmistusvirheistä, ja se on rajattu
valintamme mukaan ainoastaan näiden laitteen vikojen korjaamiseen tai laitteen korvaamiseen uudella.
Ole hyvä ja ota huomioon, että laitteitamme ei ole suunniteltu käytettäväksi pienteollisuus-, käsityöläis- tai ammattitarkoituksiin. Takuusopimusta ei siksi synny, jos laitetta on takuun kestoaikana
käytetty pienteollisuus-, käsityöläis- tai teollisuustyöpaikoilla tai siihen on kohdistunut näihin verrattavissa oleva rasitus.
3. Antamamme takuu ei kata näitä vaurioita:
- laitteessa esiintyneet vauriot, jotka aiheutuvat asennusohjeen noudattamatta jättämisestä tai asiantuntemattomasta asennuksesta, käyttöohjeen noudattamatta jättämisestä (kuten esim. liitäntä
väärään verkkojännitteeseen tai virtalajiin) tai huolto- ja turvallisuusmääräysten laiminlyönnistä tai
laitteen altistamista epänormaaleille ympäristöolosuhteille tai puutteellisesta hoidosta ja huollosta.
- laitteessa esiintyneet vauriot, jotka aiheutuvat määräysten vastaisesta tai virheellisestä käytöstä
(esim. laitteen ylikuormitus tai hyväksymättömien liitostyökalujen tai varusteiden käyttö), vieraiden
esineiden tunkeutumisesta laitteeseen (esim. hiekka, kivet tai pöly, kuljetusvauriot), väkivoiman käytöstä tai ulkopuolisista tekijöistä (esim. putoamisesta aiheutuneet vahingot).
- laitteessa tai sen osissa esiintyneet vauriot, jotka aiheutuvat käytöstä johtuvasta, tavanomaisesta
tai muuten tavallisesta kulumisesta.
4. Takuuajan kesto on 24 vuotta ja se alkaa laitteen ostopäivästä. Takuuvaateet tulee esittää ennen takuuajan päättymistä kahden viikon kuluessa siitä, kun olet havainnut vian. Takuuvaateiden esittäminen takuuajan päätyttyä ei ole mahdollista. Laitteen korjaus tai vaihto ei johda takuuajan pitenemiseen tai laitteen tai siihen mahdollisesti asennettujen varaosien takuuajan alkamiseen uudelleen
alusta. Tämä koskee myös paikan päällä suoritettuja palveluja.
5. Viallista laitetta koskevat takuuvaateet tulee esittää osoitteella: www.isc-gmbh.info. Pidä uuden
laitteesi ostotosite tai muu ostonäyttö valmiina. Ilman vastaavia tositteita tai tyyppikilpeä meille lähetettyjen laitteiden osalta takuuvaateet on suljettu pois, koska mahdollisuudet laitteen tunnistamiseen
puuttuvat. Mikäli takuumme kattaa laitteen vian, asiakkaalle toimitetaan korjattu tai uusi laite viipymättä.
Tietysti korjaamme mielellämme korvausta vastaan myös sellaiset laitteiden viat, jotka eivät kuulu tai
eivät enää kuulu takuumme piiriin. Lähetä tätä varten laite teknisen asiakaspalvelumme osoitteeseen.
Kuluvien osien, käyttöosien ja puuttuvien osien suhteen viittaamme tämän takuun rajoituksiin, jotka on
selostettu tämän käyttöohjeen asiakaspalvelutiedoissa.
- 91 -
Anl_GE_CL_36_Li_E_Solo_SPK7.indb 91Anl_GE_CL_36_Li_E_Solo_SPK7.indb 91 22.03.16 09:0222.03.16 09:02

RUS
Опасность!
При использовании устройств необходимо
соблюдать определенные правила техники
безопасности для того, чтобы избежать
травм и предотвратить ущерб. Поэтому
внимательно прочитайте настоящее
руководство по эксплуатации / указания по
технике безопасности полностью. Храните
их в надежном месте для того, чтобы иметь
необходимую информацию, когда она
понадобится. Если Вы даете устройство
другим для пользования, то приложите к нему
это руководство по эксплуатации / указания
по технике безопасности. Мы не несем
никакой ответственности за травмы и ущерб,
которые были получены или причинены
в результате несоблюдения указаний
этого руководства и указаний по технике
безопасности.
1. Указания по технике
безопасности
Соответствующие указания по технике
безопасности находятся в приложенных
брошюрах!
Опасность!
Прочитайте все указания по технике
безопасности и технические требования.
При невыполнении указаний по технике
безопасности и технических требований
возможно получение удара током,
возникновение пожара и/или получение
серьезных травм. Храните все указания
по технике безопасности и технические
требования для того, чтобы было
возможно воспользоваться ими в
будущем.
Пояснение к находящимся на
оборудовании указательным табличкам
(см. рис. 11)
1. Перед вводом в эксплуатацию прочтите
руководство по эксплуатации.
2. Не используйте устройство во время
дождя или снегопада. Защитите
устройство от влаги.
3. Не допускайте посторонних лиц в опасную
зону.
4. Используйте защитные очки и наушники.
5. Вращающиеся детали! Не допускайте
ситуации, когда отверстия находятся
возле рук или ног!
2. Описание устройства и объем
поставки
2.1 Описание устройства (рис. 1/2)
1. Передняя часть всасывающей трубы
2. Задняя часть всасывающей трубы
3. Дополнительная рукоятка
4. Ремень для переноски
5. Переключатель «включено-выключено»
6. Крепление для аккумуляторов
7. Сборный мешок
8. Переключатель «Всасывание/выдувание»
9. Ходовые ролики
10. Регулятор числа оборотов
11. Колесная опора
12. Винт длинный (2 шт.)
13. Винт короткий (3 шт.)
2.2 Состав комплекта устройства
Проверьте комплектность изделия на
основании описанного объема поставки.
При обнаружении недостатка компонентов
обратитесь в наш сервисный центр
или магазин, в котором Вы приобрели
устройство, не позднее чем в течение 5-ти
рабочих дней после приобретения изделия,
предъявив действительную квитанцию о
покупке. Обратите внимание на таблицу с
указанием гарантийных сроков в документе с
информацией о сервисном обслуживании.
Откройте упаковку и выньте осторожно из
•
упаковки устройство.
Удалите упаковочный материал, а также
•
приспособления защиты устройства при
упаковывании и транспортировке (при
наличии).
Проверьте комплектность устройства.
•
Проверьте устройство и принадлежности
•
на наличие возникших при
транспортировке повреждений.
Сохраняйте упаковку по возможности
•
до истечения срока гарантийных
обязательств.
Опасность!
Устройство и упаковка не являются
детскими игрушками! Запрещено детям
играть с пластиковыми пакетами,
пленками и мелкими деталями! Опасность
заключается в том, что они могут
проглотить или погибнуть от удушья!
Оригинальное руководство по
•
эксплуатации
- 92 -
Anl_GE_CL_36_Li_E_Solo_SPK7.indb 92Anl_GE_CL_36_Li_E_Solo_SPK7.indb 92 22.03.16 09:0222.03.16 09:02

RUS
Указания по технике безопасности
•
3. Использование по назначению
Садовый пылесос/воздуходувку разрешается
использовать только для сбора листьев
и садовых отходов, например, травы и
небольших веток. Использование устройства
для других целей запрещено.
Разрешается использовать устройство только
в соответствии с его предназначением. Любое
другое, отличающееся от этого использование
считается не соответствующим
предназначению. За все возникшие в
результате такого использования ущерб или
травмы любого вида несет ответственность
пользователь и работающий с устройством, а
не его изготовитель.
Учтите, что конструкция наших устройств
не предназначена для использования
их в промышленной, ремесленной или
индустриальной области. Мы не несем
никакой ответственности по гарантийным
обязательствам при использовании
устройства в промышленной, ремесленной
или индустриальной области, а также в
подобной деятельности.
4. Технические данные
Число оборотов холостого ................................
хода n0 ................................... 8000–13 000 мин
Скорость потока воздуха ................... 210 км/ч
Производительность всасывания ...... 720 м
Емкость сборного мешка ..................... ок. 45 л
Уровень мощности шума L
Погрешность K .................................... 3 дБ (A)
Уровень звукового давления L
Вибрация ahv .................................... 2,354 м/с
Погрешность K ......................................1,5 м/с
Масса ......................................................... 3,3 кг
Внимание!
Устройство поставляется без аккумуляторов
и зарядного устройства. Использовать
устройство можно только с литий-ионными
аккумуляторами серии Power-X-Change.
........ 92,68 дБ (A)
WA
... 83,1 дБ (A)
WA
3
/ч
Power-X-Change
18 В, 1,5 A ч ........... 5 литий-ионных элементов
18 В, 2 A ч .............. 5 литий-ионных элементов
18 В, 3 A ч ............ 10 литий-ионных элементов
18 В, 4,0 A ч ......... 10 литий-ионных элементов
18 В, 5,2 A ч ......... 10 литий-ионных элементов
Литий-ионные аккумуляторы серии Power-XChange можно заряжать
устройства Power-X-Charger.
Зарядное устройство
Напряжение сети ...........200–250 В ~ 50–60 Гц
Выход
Напряжение сети ..................... 21 В пост. тока
Номинальная сила тока .......................3000 мА
Сведите образование шумов и вибрации к
минимуму!
Используйте только безукоризненно
•
работающие устройства.
Регулярно проводите техническое
•
обслуживание и очистку устройства.
При работе учитывайте особенности
•
Вашего устройства.
Не подвергайте устройство перегрузке.
•
При необходимости дайте проверить
•
устройство специалистам.
Отключайте устройство, если вы его не
•
используете.
Используйте перчатки.
•
Осторожно!
Остаточные опасности
-1
Даже в том случае, если Вы используете
описываемый электрический инструмент
в соответствии с предписанием, то и тогда
всегда остается место для риска. Ниже
приведен список остаточных опасностей,
связанных с конструкцией настоящего
электрического инструмента:
1. Заболевание легких, в том случае если
2
2
не используется соответствующий
респиратор.
2. Повреждение слуха,
используется соответствующее средство
защиты слуха.
3. Нарушения здоровья в результате
воздействия вибрации на руку при
длительном использовании устройства
или при неправильном пользовании и
ненадлежащем техническом уходе.
только с помощью
в том случае если не
- 93 -
Anl_GE_CL_36_Li_E_Solo_SPK7.indb 93Anl_GE_CL_36_Li_E_Solo_SPK7.indb 93 22.03.16 09:0222.03.16 09:02

RUS
5. Перед вводом в эксплуатацию
Устройство поставляется без
аккумуляторов и зарядного устройства.
Предупреждение!
Всегда извлекайте аккумуляторы перед
настройкой устройства.
5.1. Монтаж всасывающей трубы (рис.
3a–3f)
Соедините переднюю и заднюю части
•
всасывающей трубы (рис. 3a) и скрепите
их при помощи винтов (рис. 3b, поз. 12).
После этого вставьте собранную
•
всасывающую трубу в корпус двигателя
(рис. 3c) и закрепите ее при помощи
винтов (рис. 3d, поз. 12).
Вставьте оба колеса (рис. 3e, поз. 9)
•
в колесную опору (рис. 3e, поз. 11).
Они должны войти в зацепление с
характерным щелчком.
Надвиньте колесную опору (рис. 3f, поз.
•
11) на переднюю часть всасывающей
трубы до упора (рис. 3f, поз. D) и
зафиксируйте ее при помощи винта (рис.
3f, поз. 13).
Указание: обратите внимание, что перед
креплением на устройстве обе части
всасывающей трубы необходимо надежно
соединить вместе, после чего их нельзя
разделять!
5.2. Монтаж мешка для мусора (рис. 4–5)
Закрепите крючок на всасывающей трубе
(рис. 4a) и на корпусе (рис. 4b). Затем
смонтируйте сборный мешок на штуцере на
корпусе двигателя, при этом должен быть
слышен звук фиксации (рис. 5).
5.3. Монтаж рукоятки
Вставьте рукоятку (рисунок 6a, поз. A) в
крепления на корпусе до упора. Затем
закрепите рукоятку с обеих сторон с помощью
одного винта с каждой
13).
стороны (рис. 6b, поз.
5.5. Монтаж ремня для переноски
Отвинтите винт с накатанной головкой
(рисунок 8, поз. C), пропустите ремень
крепления (рисунок 8, поз. 4) сквозь
отверстие и снова завинтите винт
накатанной головкой.
5.6 Монтаж аккумулятора (рис. 9)
Нажмите фиксирующую клавишу (рис.
9, поз. E) аккумулятора, как показано
на рисунке 9, и вставьте аккумулятор в
предназначенное для этого крепление. Как
только аккумулятор займет положение,
показанное на рисунке 9 справа, следите за
фиксацией фиксирующей клавиши! Демонтаж
аккумулятора осуществляется в обратной
последовательности.
Указание!
Необходимо использовать только
аккумуляторы с одинаковым уровнем
заполнения, запрещается комбинировать
полностью и наполовину заряженные
аккумуляторы. Заряжайте оба аккумулятора
одновременно.
Аккумулятор с более низким уровнем заряда
определяет время работы устройства. До
начала работы необходимо всегда зарядить
два аккумулятора.
5.7 Зарядка аккумулятора
1. Извлеките аккумуляторный блок из
устройства. Для этого следует нажать
боковую фиксирующую клавишу.
2. Убедитесь в том, что указанное
на фирменной табличке значение
напряжения сети соответствует
имеющемуся значению напряжения сети.
Вставьте штекер зарядного устройства в
штепсельную розетку. Зеленый светодиод
начнет мигать.
3. Вставьте аккумулятор в зарядное
устройство.
4. В разделе «Индикаторы зарядного
устройства» приводится таблица с
указанием значений светодиодной
индикации зарядного устройства.
с
5.4. Монтаж дополнительной рукоятки
Удалите звездообразный винт (рис. 7, поз
B), вставьте рукоятку (рисунок 7, поз. 3) в
крепление и зафиксируйте рукоятку в нужном
положении с помощью звездообразного
винта.
Anl_GE_CL_36_Li_E_Solo_SPK7.indb 94Anl_GE_CL_36_Li_E_Solo_SPK7.indb 94 22.03.16 09:0222.03.16 09:02
Во время процесса зарядки аккумулятор
может немного нагреться. Это вполне
нормальное явление.
- 94 -

RUS
Если аккумуляторный блок не заряжается,
необходимо проверить:
наличие напряжения сети в
•
электрической розетке;
наличие плотного соединения на
•
контактах зарядного устройства.
Если аккумуляторный блок все еще не
заряжается, просьба отправить
зарядное устройство
•
и аккумуляторный блок
•
в наш отдел обслуживания.
Для обеспечения длительного срока
службы аккумуляторного блока необходимо
обеспечить его своевременную зарядку.
Зарядку необходимо обязательно проводить,
если вы заметите, что снижается мощность
аккумуляторной воздуходувки. Не допускайте
полной разрядки аккумуляторного блока. Это
ведет к повреждению аккумуляторного блока!
Вводите устройство в эксплуатацию только
после завершения монтажа.
6. Работа с устройством
6.1. Регулировка длины ремня (рис. 1)
Отрегулируйте длину ремня для переноски
(4) таким образом, чтобы всасывающую трубу
можно было перемещать недалеко от земли.
Для облегчения перемещения всасывающей
трубы над землей предусмотрены
дополнительные направляющие ролики (9) на
нижнем конце всасывающей трубы.
6.2. Включение устройства (рис. 10)
Для того, чтобы включить устройство,
•
нажмите переключатель «включеновыключено» (5).
Для того, чтобы выключить устройство,
•
отпустите переключатель «включеновыключено» (5).
6.3 Выбор режима работы
6.3.1 Всасывание (рис. 10)
Поверните рычаг (рис. 10, поз. 8) в положение
А. Это можно сделать как при остановленном,
так и при работающем устройстве.
6.3.2 Выдувание (рис. 10)
Поверните рычаг (рис. 10, поз. 8) в
•
положение В. Это можно сделать как при
остановленном, так и при работающем
устройстве.
Направьте поток воздуха вперед и
•
медленно двигайтесь, чтобы собрать
листья или садовые отходы или удалить
их из труднодоступных мест.
Внимание! Перед выдуванием опорожните
•
мешок для мусора. В противном
случае собранный мусор может снова
выдуваться.
6.4 Опорожнение мешка для мусора
(рис. 1)
Своевременно опорожняйте мешок для
мусора (7). При сильном заполнении
производительность всасывания заметно
уменьшается. Органические отходы
передавайте для компостирования.
Выключите устройство и извлеките
•
аккумуляторы.
Расстегните молнию на мешке для мусора
•
(7) и вытряхните собранные отходы.
Снова застегните молнию на сборном
•
мешке (7).
6.5 Регулирование числа оборотов (рис. 1)
Устройство оборудовано электронной
системой регулирования числа оборотов.
Для регулировки поверните регулятор
скорости вращения (рис. 1, поз. 10) в нужное
положение. Используйте устройство только
с необходимым числом оборотов и не
допускайте без необходимости работы с
высоким числом оборотов.
7. Чистка, техническое
обслуживание и заказ
запасных частей
Опасность!
Перед всеми работами по очистке необходимо
извлечь аккумуляторы из устройства.
7.1 Очистка
После завершения работы снимите мешок
•
для мусора, выверните его наизнанку и
тщательно очистите, чтобы предотвратить
появление плесени и неприятных запахов.
Сильно загрязненный мешок для мусора
•
можно вымыть водой с мылом.
- 95 -
Anl_GE_CL_36_Li_E_Solo_SPK7.indb 95Anl_GE_CL_36_Li_E_Solo_SPK7.indb 95 22.03.16 09:0222.03.16 09:02

RUS
При сложностях с расстегиванием молнии
•
натрите зубья молнии сухим мылом.
Очищайте всасывающую/нагнетательную
•
трубу в случае загрязнения при помощи
щетки.
При загрязнении собранными отходами
•
может затрудняться ход переключающего
рычага (выдувание/всасывание). В таком
случае свободный ход переключающего
рычага можно снова обеспечить путем
многократного переключения с режима
всасывания на режим выдувания.
7.2 Техническое обслуживание
При возможном возникновении
•
неисправностей поручайте проверку
устройства только авторизованному
специалисту или сотрудникам сервисной
мастерской.
Внутри устройства нет никаких
•
деталей, нуждающихся в техническом
обслуживании.
7.3 Заказ запасных деталей:
При заказе запасных деталей необходимо
указать следующие данные;
Тип устройства
•
Номер артикула устройства
•
Идентификационный номер устройства
•
Номер необходимой запасной детали
•
Актуальные цены и информация находятся на
странице www.isc-gmbh.info
материалов, например, металла и пластмасс.
Не выбрасывайте дефектные устройства
вместе с бытовыми отходами. Для правильной
утилизации устройство необходимо сдать в
подходящий пункт приема. Если Вы не знаете,
где находится пункт приема, уточните это в
органах коммунального управления.
10. Хранение
Храните устройство и его принадлежности
в темном, сухом и неподверженном
воздействию мороза, а также недоступном
для детей месте. Оптимальная температура
хранения находится между 5 ˚C и 30 ˚C.
Храните электроинструмент в оригинальной
упаковке.
8. Неисправности
Устройство не запускается:
Проверьте, заряжен ли аккумулятор и
функционирует ли зарядное устройство. Если
устройство не работает, несмотря на наличие
напряжения, необходимо выслать его по
указанному адресу отдела обслуживания.
9. Утилизация и вторичное
использование
Устройство поставляется в упаковке
для предотвращения повреждений при
транспортировке. Эта упаковка является
сырьем и поэтому может быть использована
вновь или направлена на повторную
переработку сырья. Устройство и его
принадлежности изготовлены из различных
- 96 -
Anl_GE_CL_36_Li_E_Solo_SPK7.indb 96Anl_GE_CL_36_Li_E_Solo_SPK7.indb 96 22.03.16 09:0222.03.16 09:02

RUS
11. Индикаторы зарядного устройства
Состояние индикатора
Красный
светодиод
Не горит Мигает Готовность к эксплуатации
Горит Не горит Зарядка
Не горит Горит Аккумулятор заряжен на 85 % и готов к использованию.
Мигает Не горит Бережная зарядка
Мигает Мигает Неисправность
Горит Горит Нарушение температурного режима
Зеленый
светодиод
Зарядное устройство подключено к сети и готово к эксплуатации,
аккумулятор не в зарядном устройстве.
Зарядное устройство заряжает аккумулятор в режиме быстрой
зарядки.
(Продолжительность зарядки аккумулятора 1,5 А·ч: 30 мин)
Продолжительность зарядки аккумулятора 2,0 А·ч: 40 мин)
(
(Продолжительность зарядки аккумулятора 3,0 А·ч: 60 мин)
(Продолжительность зарядки аккумулятора 4,0 А·ч: 80 мин)
(Продолжительность зарядки аккумулятора 5,2 А·ч: 130 мин)
После этого активируется режим бережной зарядки до полной
зарядки.
(Общая продолжительность зарядки аккумулятора 1,5 А·ч: ок. 40 мин)
(Общая продолжительность зарядки аккумулятора 2,0 А·ч: ок. 50 мин)
(Общая продолжительность зарядки аккумулятора 3,0 А·ч: ок. 75 мин)
(Общая продолжительность зарядки аккумулятора 4,0 А·ч: ок. 100 мин)
(Общая продолжительность зарядки аккумулятора 5,2 А·ч: ок. 140 мин)
Действие
Извлеките аккумулятор из зарядного устройства. Отсоедините
зарядное устройство от сети.
Зарядное устройство в режиме бережной зарядки.
При этом аккумулятор заряжается медленнее, исходя
безопасности, и для зарядки требуется более 1 часа. Это может
происходить по нескольким причинам:
- аккумулятор не заряжался в течение длительного времени или
разряженный аккумулятор продолжал разряжаться (глубокий разряд);
- температура аккумулятора не соответствует идеальному диапазону
от 10 °C до 45 °C.
Действие
Дождитесь завершения процесса зарядки, несмотря на это,
аккумулятор может продолжать заряжаться.
невозможна. Аккумулятор неисправен.
Зарядка
Действие
Запрещено заряжать неисправный аккумулятор.
Извлеките аккумулятор из зарядного устройства.
Слишком высокая (например, прямой солнечный свет) или слишком
низкая (ниже 0 °C) температура аккумулятора.
Действие
Извлеките аккумулятор и поместите его на хранение при комнатной
температуре (ок. 20 °C) на 1 день.
Значение и действия
из соображений
- 97 -
Anl_GE_CL_36_Li_E_Solo_SPK7.indb 97Anl_GE_CL_36_Li_E_Solo_SPK7.indb 97 22.03.16 09:0222.03.16 09:02

RUS
Только для стран ЕС
Запрещено выбрасывать электроинструмент в обычный домашний мусор.
Согласно европейской директиве 2012/19/EG об использованных электрических и электронных
устройствах и реализации в правовой системе соответствующей страны необходимо
использованный электрический инструмент утилизировать отдельно и направлять на вторичную
переработку для охраны окружающей среды.
Вторичная переработка - альтернатива обязятельной отсылке устройства назад изґотовителю:
Владелец электрическоґо устройства в случае избавления от собственности обязан,в
качестве альтернативы отсылки назад изґотовителю, содействовать надлежащей утилизации.
Пришедшее в неґодность устройство может быть передано в приемный пункт, который
осуществит ликвидацию в соответствии с законом страны о цикличном производстве
и обращении с мусором. Это не относится к приложенным к пришедшему в неґодность
оборудованию дополнительным устройствам и вспомоґательным средствам, не содержащим
электрические части.
Перепечатывание или прочие виды размножения документации и сопроводительных листов
продукции фирмы, полностью или частично, разрешено производить только с однозначного
разрешения ISC GmbH.
Сохpaняeтcя прaво на тeхничeскиe изменения
- 98 -
Anl_GE_CL_36_Li_E_Solo_SPK7.indb 98Anl_GE_CL_36_Li_E_Solo_SPK7.indb 98 22.03.16 09:0222.03.16 09:02

RUS
Информация о сервисном обслуживании
Во всех странах, указанных в гарантийном свидетельстве, у нас имеются компетентные
сервисные партнеры, контактные данные которых Вы найдете в гарантийном свидетельстве.
Они всегда в Вашем распоряжении для решения любых вопросов, связанных с обслуживанием,
например, для ремонта, поставки запчастей и быстроизнашивающихся деталей, а также
приобретения расходных материалов.
Следует обратить внимание на то
естественному износу или износу в связи с эксплуатацией / следующие детали требуются в
качестве расходных материалов.
Категория Пример
Быстроизнашивающиеся детали* Аккумулятор
Расходный материал/расходные части*
Недостающие компоненты
* Не обязательно входят в объем поставки!
При обнаружении дефектов или неисправностей мы просим Вас заявить о таком случае в сети
Интернет на сайте www.isc-gmbh.info. Обратите внимание на точное описание неисправности и в
любом случае ответьте на следующие вопросы:
Устройство уже работало или оно было неисправным с самого начала?
•
Вам бросилось что-либо в глаза перед возникновением неисправности (признак перед
•
неисправностью)?
Какую неисправность имеет устройство, по Вашему мнению (основной признак)?
•
Опишите эту неисправность.
, что в этом изделии следующие детали подвержены
- 99 -
Anl_GE_CL_36_Li_E_Solo_SPK7.indb 99Anl_GE_CL_36_Li_E_Solo_SPK7.indb 99 22.03.16 09:0222.03.16 09:02

RUS
Гарантийное свидетельство
Уважаемая покупательница, уважаемый покупатель,
наши продукты проходят тщательнейший контроль качества. Если это устройство все же не будет
функционировать безупречно, мы просим Вас обратиться в наш сервисный отдел по адресу,
указанному в этом гарантийном талоне. Мы также охотно ответим на Ваши вопросы по телефону,
номер которого приведен ниже. При предъявлении гарантийных требований
условия.
1. Настоящие правила гарантии действуют исключительно в отношении пользователей, т.е.
физических лиц, которые не намереваются использовать настоящее изделие в рамках своей
профессиональной или другой самостоятельной деятельности. Настоящие правила гарантии
регулируют дополнительные условия оказания гарантийных услуг, которые нижеупомянутый
производитель обеспечивает покупателям своих новых устройств в дополнение к условиям
гарантии в соответствии с законом. Эти гарантийные обязательства не затрагивают Ваши
законные гарантийные требования. Наши гарантийные услуги для Вас бесплатны.
2. Гарантийные услуги распространяются только на дефекты нового устройства нижеупомянутого
производителя, которое вы приобрели, связанные с недостатком материала или
производственным браком, и ограничиваются по нашему выбору устранением таких дефектов
устройства или
заменой устройства. Учтите, что наши устройства не предназначены для
использования в промышленных целях, в ремесленном производстве и на профессиональной
основе. Поэтому гарантийный договор считается недействительным, если устройство
использовалось в течение гарантийного срока на кустарных, промышленных предприятиях или
в ремесленном производстве, а также подвергалось сопоставимой нагрузке.
3. Наша гарантия не распространяется на
:
- повреждения устройства, возникшие в результате несоблюдения руководства по монтажу
или неправильного монтажа, несоблюдения руководства по эксплуатации (например, при
подключении к сети с неправильным напряжением или родом тока), несоблюдения требований
касательно технического обслуживания и требований техники безопасности, воздействия на
устройство аномальных условий окружающей среды или недостаточного ухода и технического
обслуживания;
повреждения устройства, возникшие в результате неправильного или ненадлежащего
-
использования (например, перегрузка устройства или применение не допущенных к
использованию насадок или принадлежностей), попадания в устройство посторонних
предметов (например, песка, камней или пыли, повреждения при транспортировке),
применения силы или внешних воздействий (например, повреждения при падении);
- повреждения устройства или частей устройства, связанные с
износом в связи с
эксплуатацией, обычным или другим естественным износом.
4. Гарантийный срок составляет 24 месяца, отсчет начинается со дня покупки устройства.
Гарантийные права необходимо предъявлять до истечения срока гарантии в течении
двух недель после того как будет обнаружена неисправность. Заявления на гарантийное
обслуживание после истечения срока гарантии не принимаются. Ремонт или
устройства не ведет к продлению гарантийного срока, также при оказании такой услуги отсчет
нового гарантийного срока на устройство или возможно установленные детали не начинается
заново. Это условие действует также при обращении в местный сервисный отдел.
5. Для предъявления гарантийных требований сообщите о неисправности устройства на сайте
www.isc-gmbh.info. Приготовьте квитанцию о покупке
или другие доказательства приобретения
Вами нового устройства. Оказание гарантийных услуг применительно к устройствам,
направленным на рассмотрение без соответствующих доказательств или фирменной
таблички, исключается ввиду недостатка данных для идентификации таких устройств. Если
наша гарантия распространяется на неисправность устройства, Вы немедленно получите
отремонтированное или новое устройство.
действуют следующие
замена
Само собой разумеется, мы можем также
устранить при оплате затрат неисправности устройства,
которые не входят в объем гарантийных услуг или при истечении срока гарантии. Для этого Вам
необходимо выслать устройство на адрес нашей службы сервиса.
Что касается быстроизнашивающихся, расходных деталей и недостающих компонентов,
мы обращаем внимание на ограничения этой гарантии согласно информации о сервисном
обслуживании настоящего руководства
Anl_GE_CL_36_Li_E_Solo_SPK7.indb 100Anl_GE_CL_36_Li_E_Solo_SPK7.indb 100 22.03.16 09:0222.03.16 09:02
по эксплуатации.
- 100 -
 Loading...