

Einhell GC-SC 4240 P Manual for GC-SC 4240 P

D Originalbetriebsanleitung
Benzin-Vertikutierer
GB Original operating instructions
Petrol scarifi er
F Mode d’emploi d’origine
Scarifi cateur à essence
I Istruzioni per l’uso originali
Scarifi catore a benzina
NL Originele handleiding
Benzine verticuteerder
E Manual de instrucciones original
Escarifi cador con motor de
gasolina
P Manual de instruções original
Escarifi cador a gasolina
SLO Originalna navodila za uporabo
Bencinski rahljalnik
GC-SC 4240 P
7
Art.-Nr.: 34.200.19 I.-Nr.: 11018
Anl_GC_SC_4240_P_SPK7.indb 1Anl_GC_SC_4240_P_SPK7.indb 1 15.03.2019 06:25:1015.03.2019 06:25:10
1
7
1
2
3
5
6
4
2
Anl_GC_SC_4240_P_SPK7.indb 2Anl_GC_SC_4240_P_SPK7.indb 2 15.03.2019 06:25:3115.03.2019 06:25:31
128 11 9 10
6
2 3
- 2 -
2
1
3
4a3
2
8
10
9
4b 5
11
12
3
5
6
6 7
7
C
B
1
- 3 -
Anl_GC_SC_4240_P_SPK7.indb 3Anl_GC_SC_4240_P_SPK7.indb 3 15.03.2019 06:25:3215.03.2019 06:25:32
A
8 9
4
10 11
A
B
min.
max.
12 13
a
- 4 -
Anl_GC_SC_4240_P_SPK7.indb 4Anl_GC_SC_4240_P_SPK7.indb 4 15.03.2019 06:25:3715.03.2019 06:25:37
14 15
16
156
23
47
I
ON
0
OFF
8
- 5 -
Anl_GC_SC_4240_P_SPK7.indb 5Anl_GC_SC_4240_P_SPK7.indb 5 15.03.2019 06:25:4115.03.2019 06:25:41

D
Inhaltsverzeichnis
1. Sicherheitshinweise
2. Gerätebeschreibung und Lieferumfang
3. Bestimmungsgemäße Verwendung
4. Technische Daten
5. Vor Inbetriebnahme
6. Bedienung
7. Reinigung, Wartung, Lagerung, Transport und Ersatzteilbestellung
8. Entsorgung und Wiederverwertung
9. Fehlersuchplan
- 6 -
Anl_GC_SC_4240_P_SPK7.indb 6Anl_GC_SC_4240_P_SPK7.indb 6 15.03.2019 06:25:4415.03.2019 06:25:44

D
Gefahr!
Beim Benutzen von Geräten müssen einige Sicherheitsvorkehrungen eingehalten werden, um
Verletzungen und Schäden zu verhindern. Lesen
Sie diese Bedienungsanleitung / Sicherheitshinweise deshalb sorgfältig durch. Bewahren Sie diese gut auf, damit Ihnen die Informationen jederzeit
zur Verfügung stehen. Falls Sie das Gerät an andere Personen übergeben sollten, händigen Sie
diese Bedienungsanleitung / Sicherheitshinweise
bitte mit aus. Wir übernehmen keine Haftung für
Unfälle oder Schäden, die durch Nichtbeachten
dieser Anleitung und den Sicherheitshinweisen
entstehen.
1. Sicherheitshinweise
Die entsprechenden Sicherheitshinweise fi nden
Sie im beiliegenden Heftchen!
Gefahr!
Lesen Sie alle Sicherheitshinweise und Anweisungen. Versäumnisse bei der Einhaltung der
Sicherheitshinweise und Anweisungen können
elektrischen Schlag, Brand und/oder schwere
Verletzungen verursachen. Bewahren Sie alle
Sicherheitshinweise und Anweisungen für
die Zukunft auf.
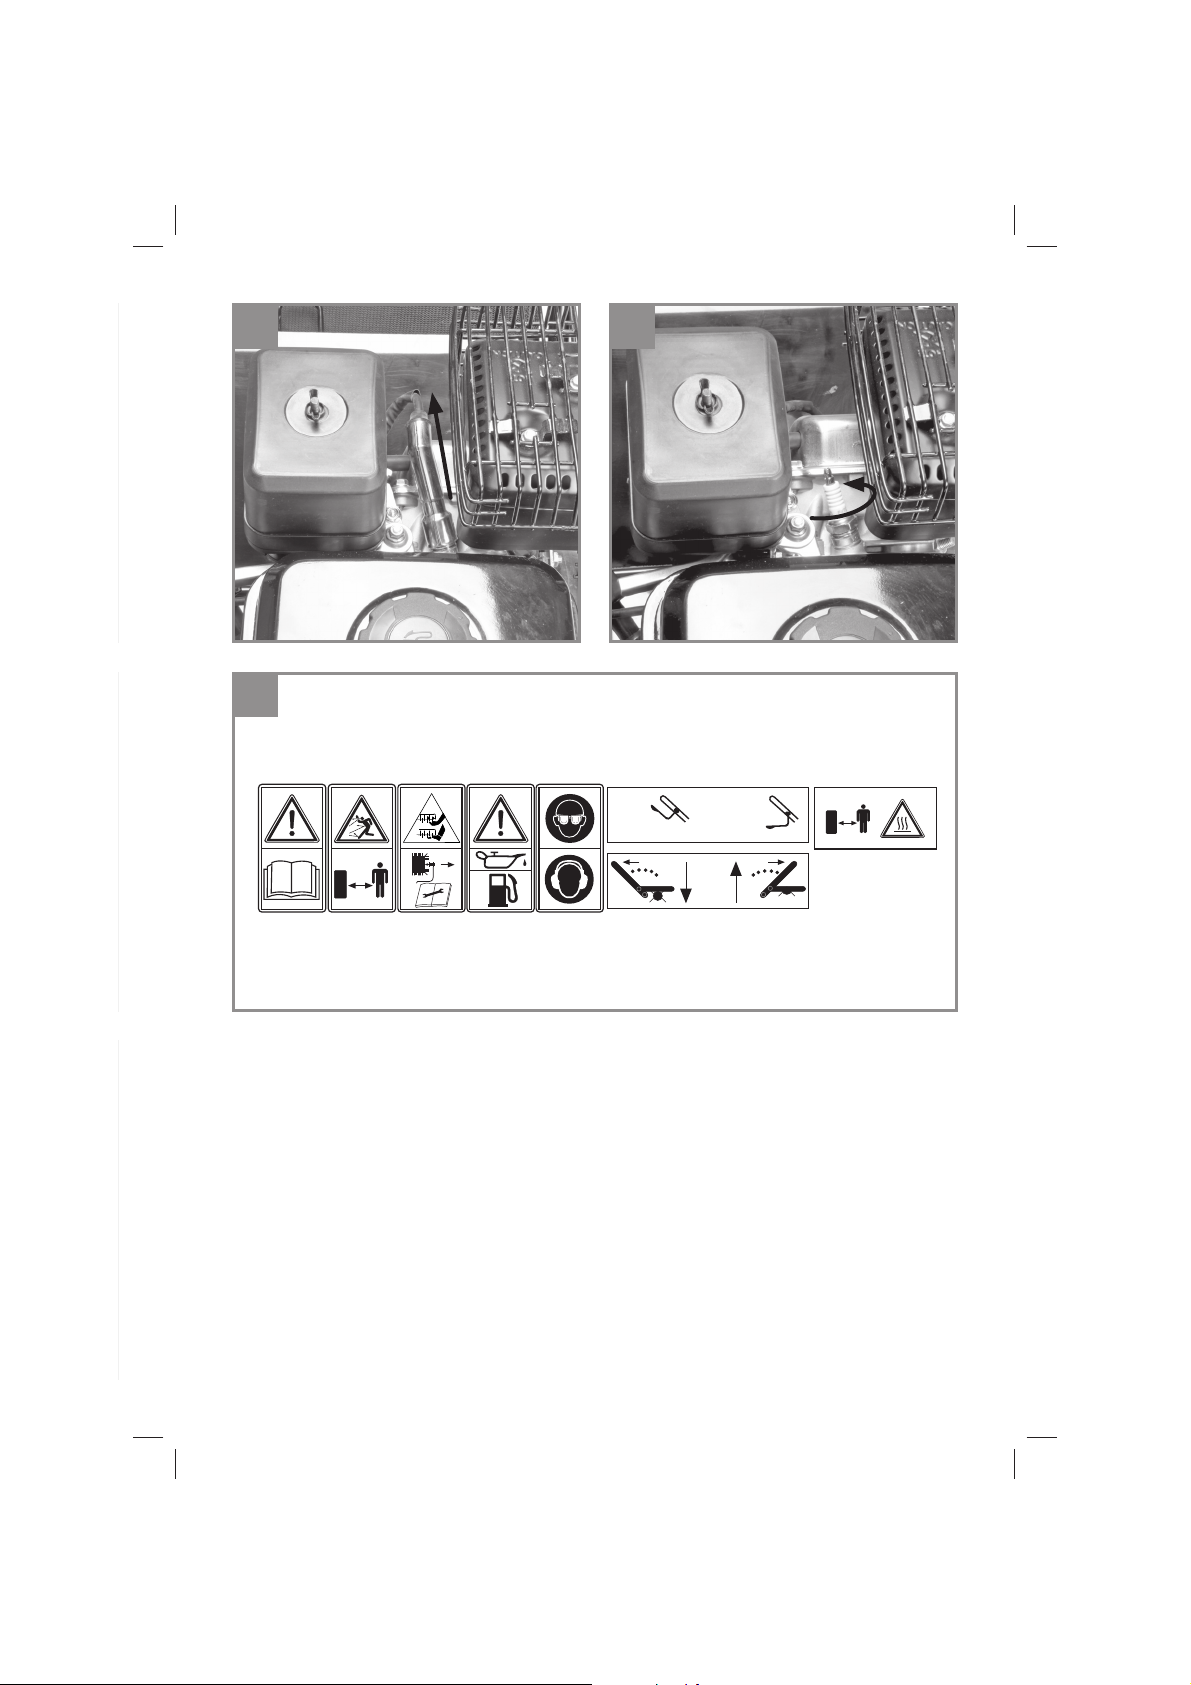
Erklärung der Hinweisschilder auf dem Gerät
(Bild 16)
1. Achtung! Vor Inbetriebnahme Bedienungsanleitung lesen.
2. Dritte (Personen und Tiere) aus dem Gefahrenbereich fernhalten.
3. Scharfe Arbeitswerkzeuge – Schneiden Sie
sich nicht die Finger oder Zehen - Vor Wartung Zündkerzenstecker abziehen.
4. Vor Inbetriebnahme Öl und Treibstoff einfüllen
5. Augen- und Gehörschutz tragen.
6. Motorstart-/ Motorstophebel (I = Motor an; 0 =
Motor aus)
7. Achtung! Heiße Teile.
8. Tiefenverstellung Vertikutierwalze
2. Gerätebeschreibung und
Lieferumfang
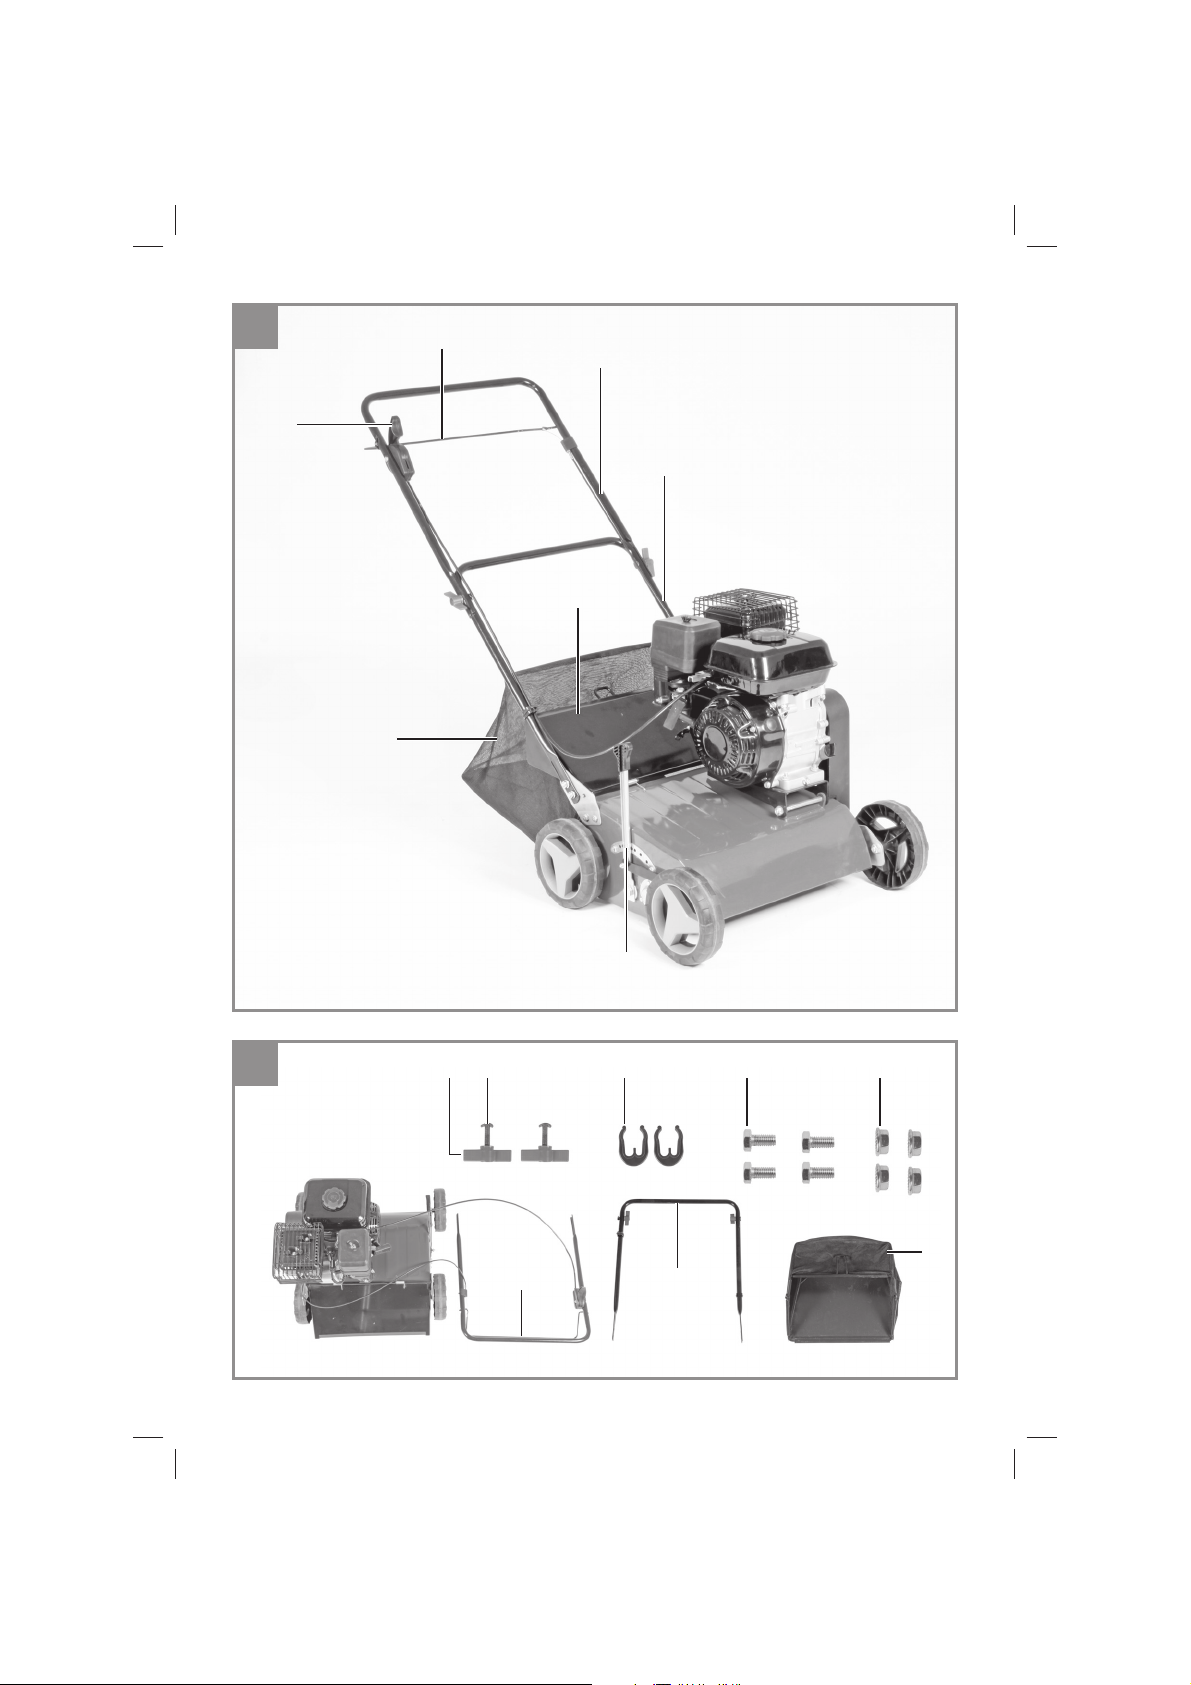
2.1 Gerätebeschreibung (Bild 1/2)
1. Motor Start-/Stopphebel - Motorbremse
2. Oberer Schubbügel
3. Unterer Schubbügel
4. Tiefenverstellung
5. Auswurfklappe
6. Fangkorb
7. Gashebel
8. 2 Befestigungsmuttern für oberen
Schubbügel
9. 4 Befestigungsschrauben für unteren
Schubbügel
10. 4 Befestigungsmuttern für unteren
Schubbügel
11. 2 Kabelbefestigungsklipps
12. 2 Befestigungsschrauben für oberen
Schubbügel
2.2 Lieferumfang
Bitte überprüfen Sie die Vollständigkeit des Artikels anhand des beschriebenen Lieferumfangs.
Bei Fehlteilen wenden Sie sich bitte spätestens
innerhalb von 5 Arbeitstagen nach Kauf des Artikels unter Vorlage eines gültigen Kaufbeleges an
unser Service Center oder an die Verkaufstelle,
bei der Sie das Gerät erworben haben. Bitte
beachten Sie hierzu die Gewährleistungstabelle
in den Service-Informationen am Ende der Anleitung.
Öffnen Sie die Verpackung und nehmen Sie
•
das Gerät vorsichtig aus der Verpackung.
Entfernen Sie das Verpackungsmaterial so-
•
wie Verpackungs-/ und Transportsicherungen
(falls vorhanden).
Überprüfen Sie, ob der Lieferumfang vollstän-
•
dig ist.
Kontrollieren Sie das Gerät und die Zubehör-
•
teile auf Transportschäden.
Bewahren Sie die Verpackung nach Möglich-
•
keit bis zum Ablauf der Garantiezeit auf.
Gefahr!
Gerät und Verpackungsmaterial sind kein
Kinderspielzeug! Kinder dürfen nicht mit
Kunststoff beuteln, Folien und Kleinteilen
spielen! Es besteht Verschluckungs- und Erstickungsgefahr!
Originalbetriebsanleitung
•
Sicherheitshinweise
•
- 7 -
Anl_GC_SC_4240_P_SPK7.indb 7Anl_GC_SC_4240_P_SPK7.indb 7 15.03.2019 06:25:4415.03.2019 06:25:44

D
3. Bestimmungsgemäße
Verwendung
Das Gerät ist bestimmt zum Vertikutieren von Rasenfl ächen. Beim Vertikutieren werden Moos und
Unkraut mitsamt den Wurzeln aus dem Boden
gerissen und der Boden aufgelockert. Dadurch
kann der Rasen Nährstoff e besser aufnehmen
und wird gesäubert. Wir empfehlen, den Rasen
im Frühling (April) und Herbst (Oktober) zu Vertikutieren.
Achtung! Wegen körperlicher Gefährdung des
Benutzers darf das Gerät nicht eingesetzt werden als Häcksler zum Zerkleinern von Ast- und
Heckenabschnitten. Ferner darf das Gerät nicht
verwendet werden als Motorhacke und zum
Einebnen von Bodenerhebungen, wie z.B. Maulwurfshügel. Aus Sicherheitsgründen darf das Gerät nicht verwendet werden als Antriebsaggregat
für andere Arbeitswerkzeuge und Werkzeugsätze
jeglicher Art.
Die Maschine darf nur nach ihrer Bestimmung
verwendet werden. Jede weitere darüber hinausgehende Verwendung ist nicht bestimmungsgemäß. Für daraus hervorgerufene Schäden oder
Verletzungen aller Art haftet der Benutzer/Bediener und nicht der Hersteller.
Bitte beachten Sie, dass unsere Geräte bestimmungsgemäß nicht für den gewerblichen, handwerklichen oder industriellen Einsatz konstruiert
wurden. Wir übernehmen keine Gewährleistung,
wenn das Gerät in Gewerbe-, Handwerks- oder
Industriebetrieben sowie bei gleichzusetzenden
Tätigkeiten eingesetzt wird.
4. Technische Daten
Motortyp: .................................. 1-Zylinder; 4-Takt
Hubraum. ................................................212 ccm
Motor-Leistung max.: ................4,2 kW / (5,7 PS)
Arbeitsdrehzahl: ..................................3600 min
Kraftstoff : .........................................Benzin (E10)
Tankinhalt: ............................................... ca. 3,6 l
Motoröl: ................................................... ca. 0,6 l
Zündkerze: ............................................LG F6TC
Messer (Anzahl): .............................................. 18
Messer-Ø: ............................................... 163 mm
Tiefeneinstellung: .............................. -15 - +5 mm
Arbeitsbreite: .......................................... 400 mm
Schalldruckpegel L
Schallleistungspegel L
Vibration a
hw
: .....85,4 dB(A), K = 2dB (A)
pA
: ...................... 98 dB(A)
WA
: ....................6,74 m/s2, K = 1,5 m/s
Gewicht: ......................................................32 kg
5. Vor Inbetriebnahme
Das Gerät ist bei Auslieferung demontiert. Der
Fangkorb und der komplette Schubbügel müssen
vor dem Gebrauch des Gerätes montiert werden.
Folgen Sie der Gebrauchsanweisung Schritt für
Schritt und orientieren Sie sich an den Bildern,
damit der Zusammenbau für Sie einfach wird.
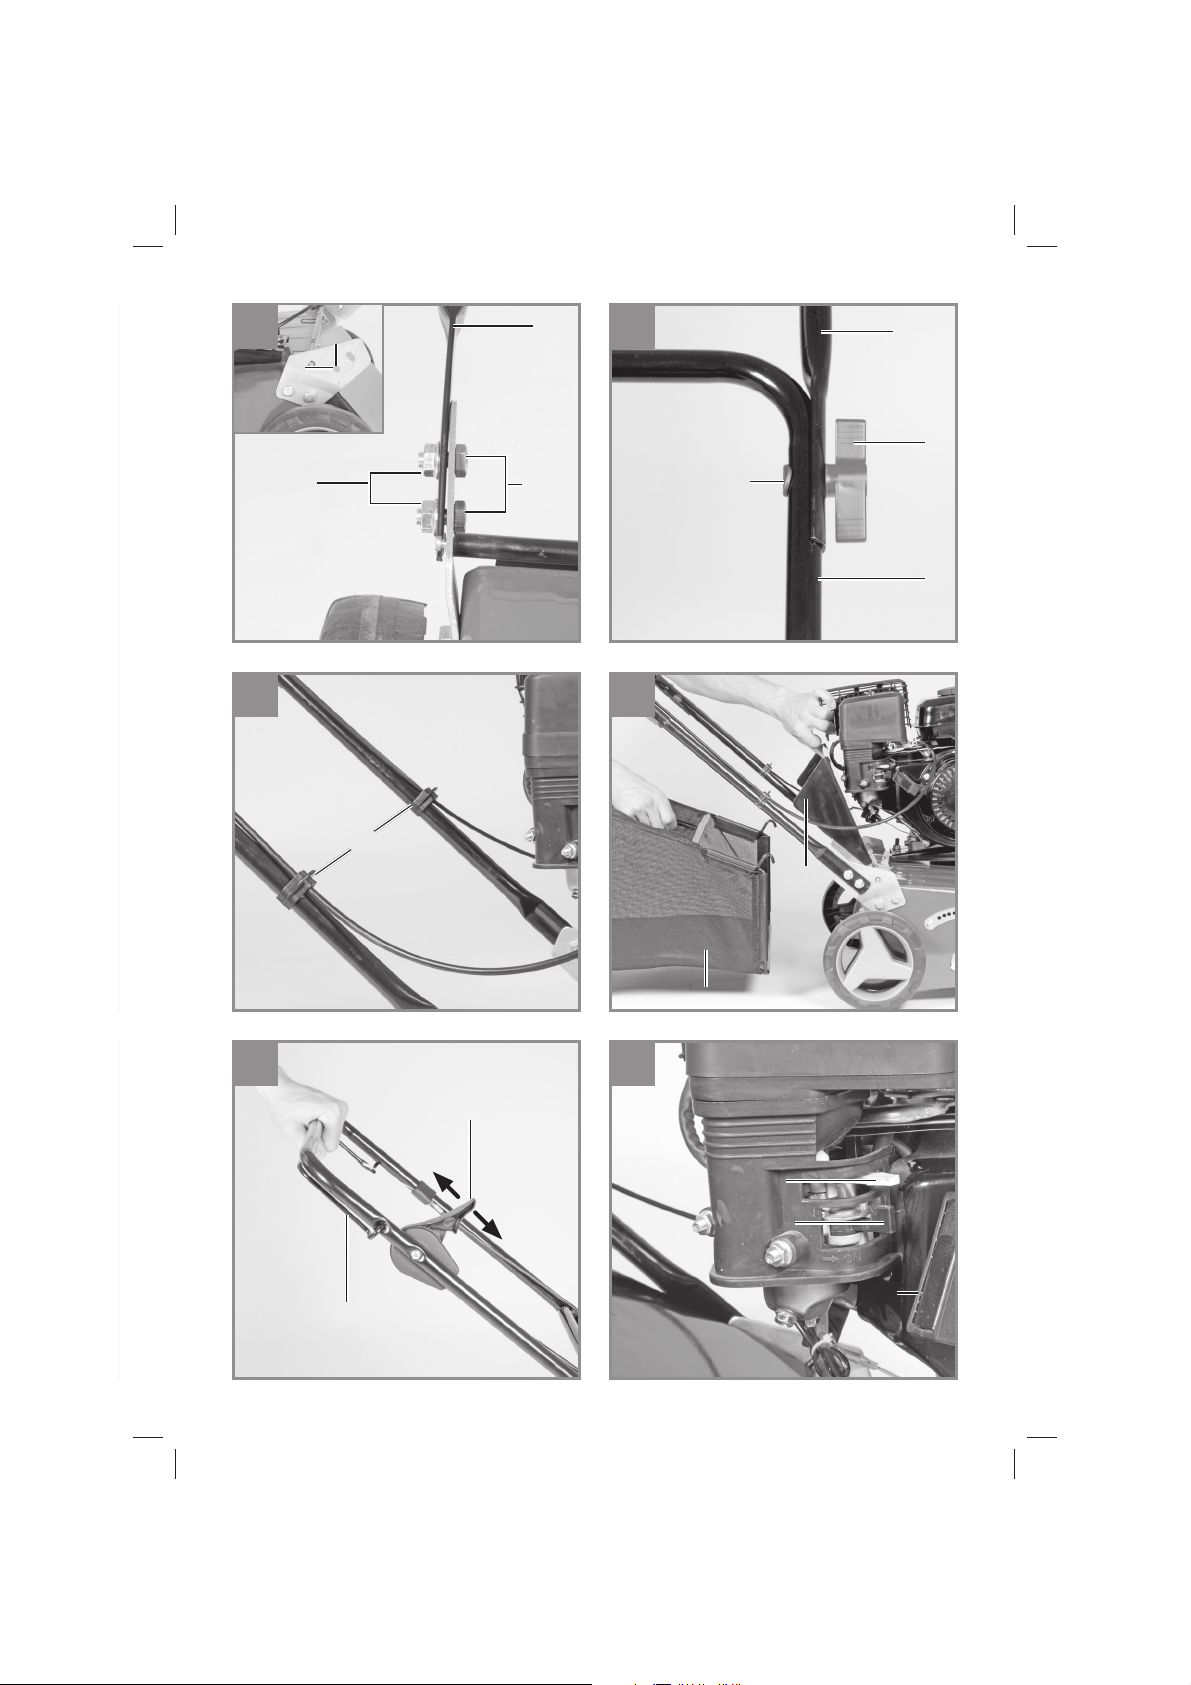
Montage des unteren Schubbügels (Abb. 3)
Den unteren Schubbügel (Abb.3/ Pos. 3) mit den
mitgelieferten Schrauben (Abb. 3/ Pos. 9) und
Muttern (Abb. 3/ Pos. 10) an dem Schubbügelhalter montieren.
Montage des oberen Schubbügelhalters
(Abb. 4a)
Oberen Schubbügel (Abb. 4a/ Pos. 2) so positionieren, dass die Löcher des oberen Schubbügels
mit den Löchern des unteren Schubbügels übereinstimmen. Mit den beiliegenden Schrauben
(Abb. 4a/ Pos. 12) und Muttern (Abb.4a/ Pos. 8)
die Rohre miteinander verschrauben. Mit den beiliegenden Kabelbefestigungsklipps (Abb. 4b/ Pos.
11) das Gasseil und das Motor Start-/Stoppseil
am unteren Schubbügel fi xieren.
-1
2
- 8 -
Anl_GC_SC_4240_P_SPK7.indb 8Anl_GC_SC_4240_P_SPK7.indb 8 15.03.2019 06:25:4415.03.2019 06:25:44

D
Montage des Fangkorbs (Abb. 5)
Auswurfklappe (Abb. 5/ Pos. 5) mit einer Hand anheben und den Fangkorb (Abb. 5/ Pos. 6) mit der
anderen Hand am Handgriff von oben einhängen.
Achtung! Zum Einhängen des Fangkorbes muss
der Motor abgeschaltet sein und die Walze darf
sich nicht drehen!
6. Bedienung
Achtung!
Der Motor wird ohne Öl ausgeliefert. Vor Inbetriebnahme daher unbedingt Öl einfüllen. Der
Ölstand im Motor muss vor jedem Arbeiten
überprüft werden.
Starten des Gerätes (Abb. 6 – 7)
Um ein ungewolltes Starten des Motors zu vermeiden, ist dieser mit einer Motorbremse ausgestattet (Abb. 6/ Pos. 1), welche im Betrieb immer
betätigt werden muss, da sonst der Motor stoppt.
Achtung: Beim Loslassen des Motorbremshebels muss dieser in die Ausgangsposition zurückkehren und der Motor muss stoppen. Ist das nicht
der Fall, darf das Gerät nicht verwendet werden.
1. Benzinhahn öff nen (Abb. 7/ Pos. B). Hierfür
den Hahn auf “ON” stellen.
2. Choke-Hebel (Abb. 7/ Pos. C) auf Stellung
“Choke” stellen.
Hinweis: Der Choke wird gewöhnlich beim
erneuten Starten eines warmen Motors nicht
benötigt.
3. Gashebel (Abb. 6/Pos. 7) in die Mitte stellen.
4. Motorbremshebel (Abb. 6/ Pos. 1) betätigen
und kräftig am Startseilzug (Abb. 7/ Pos. A )
ziehen bis der Motor startet.
5. Motor kurz warmlaufen lassen und anschlie-
ßend den Chokehebel (Abb. 7/ Pos. B) auf
Stellung “RUN” stellen.
6. Mit dem Gashebel (Abb.6/ Pos. 7) kann die
Drehzahl der Vertikutierwalze geregelt werden (Schildkröte=langsam / Hase=schnell)
Achtung: Den Startseilzug immer langsam bis
zum ersten Widerstand herausziehen bevor
dieser zum Starten schnell herausgezogen wird.
Lassen Sie den Startseilzug nach erfolgtem Starten nicht zurückschleudern
Achtung: Die Vertikutierwalze rotiert, wenn der
Motor gestartet wird.
Achtung! Öff nen Sie die Auswurfklappe nie,
wenn der Motor noch läuft. Die umlaufende Walze
kann zu Verletzungen führen. Befestigen Sie die
Auswurfklappe immer sorgfältig. Sie wird durch
die Zugfeder in die „Zu“-Position zurückgeklappt!
Der durch die Führungsholme gegebene Sicherheitsabstand zwischen Gehäuse und Benutzer ist
stets einzuhalten. Beim Arbeiten und Fahrtrichtungsänderungen an Böschungen und Hängen
ist besondere Vorsicht geboten. Achten Sie auf
einen sicheren Stand, tragen Sie Schuhe mit
rutschfesten, griffi gen Sohlen und lange Hosen.
Arbeiten Sie immer quer zum Hang.
Hänge über 15 Grad Schräge dürfen mit dem
Gerät aus Sicherheitsgründen nicht vertikutiert
werden.
Üben Sie besondere Vorsicht beim Rückwärtsbewegen und beim Ziehen des Gerätes, Stolpergefahr!
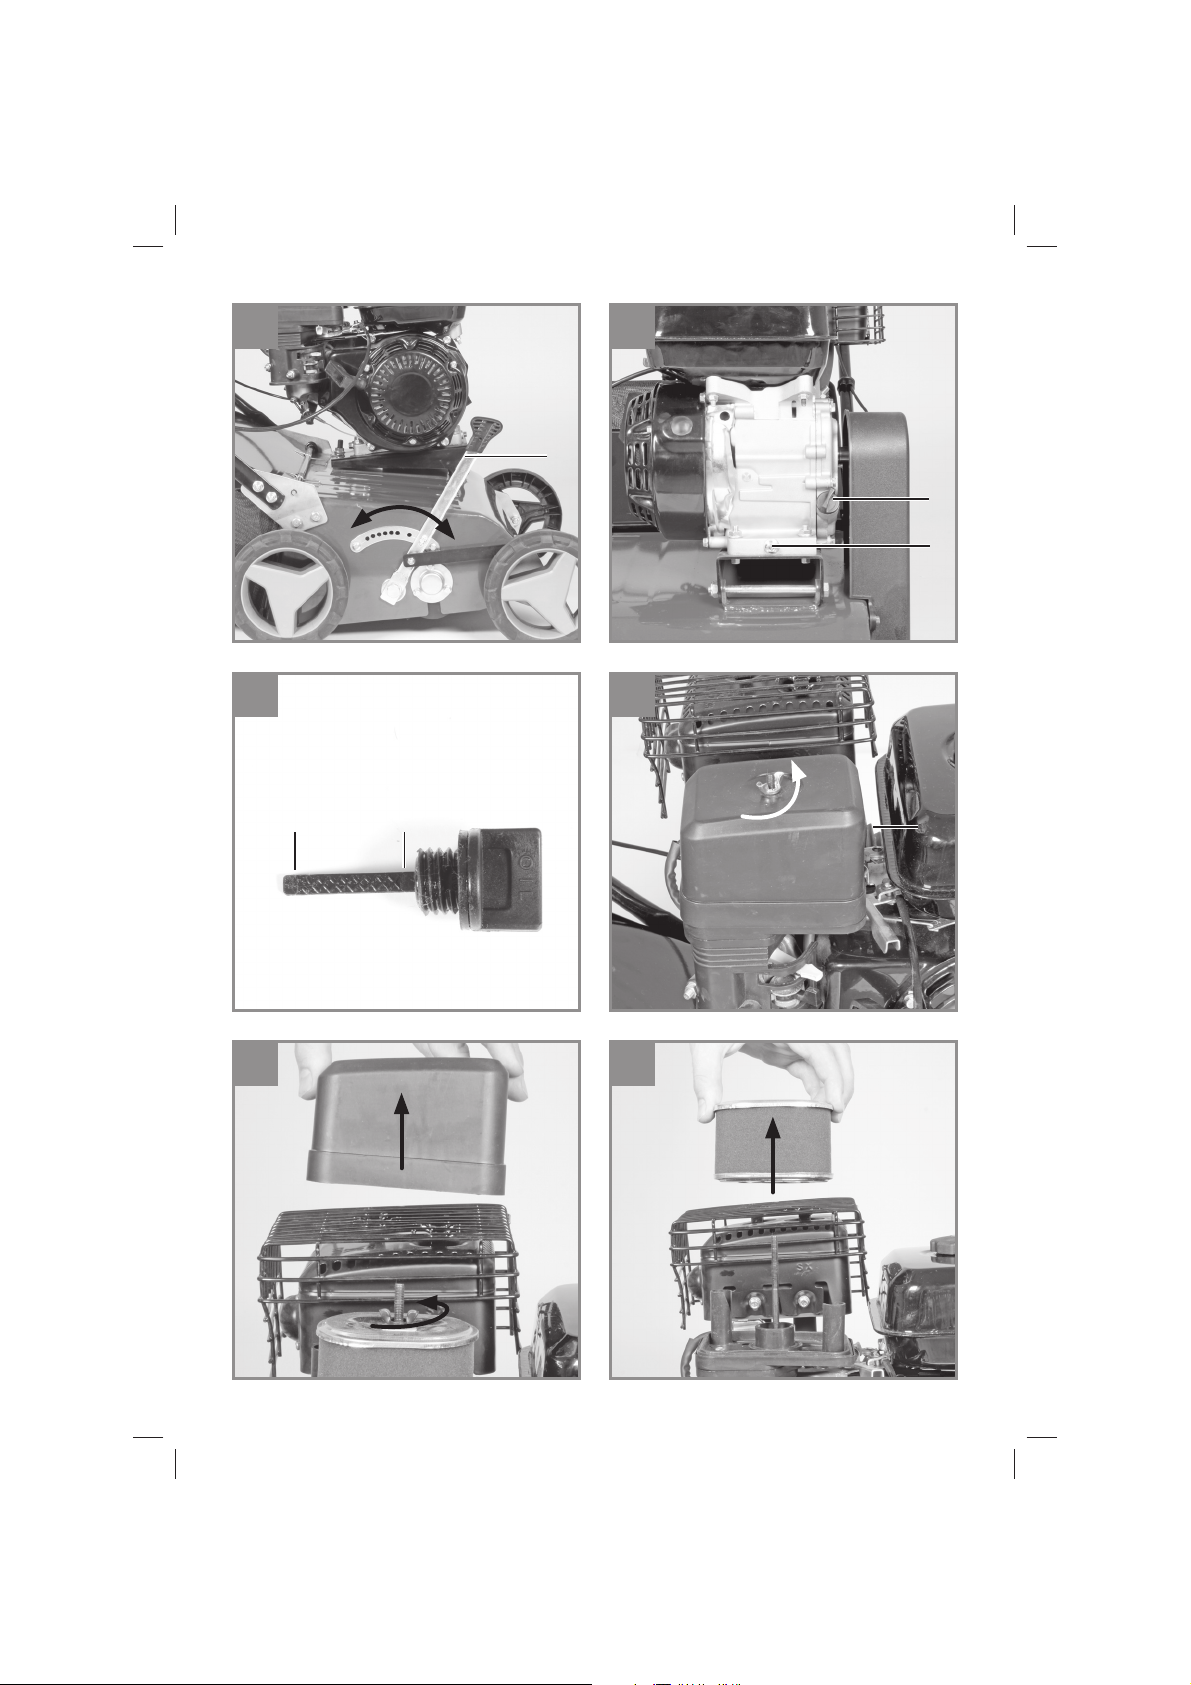
Einstellen der Arbeitstiefe(Abb. 8)
Um die Arbeitstiefe einzustellen, den Hebel für
die Tiefeneinstellung (Abb. 8/ Pos. 4) leicht vom
Gerät wegdrücken, die gewünschte Tiefe einstellen und den Hebel wieder einrasten lassen.
Achtung! Für den Transport den Hebel für die
Tiefeneinstellung in die höchste Position stellen.
Hinweise zum richtigen Arbeiten
Beim Arbeiten wird eine überlappende Arbeitsweise empfohlen. Zur Erzielung eines sauberen
Bildes das Gerät in möglichst geraden Bahnen
führen. Dabei sollten sich diese Bahnen immer
um einige Zentimeter überlappen, damit keine
Streifen übrig bleiben. Sobald während des Arbeitens Grasreste liegenbleiben, muss der Fangkorb
entleert werden.
Achtung! Vor dem Abnehmen des Fangkorbes
den Motor abschalten und den Stillstand der Walze abwarten!
Zum Aushängen des Fangkorbes, Auswurfklappe
mit einer Hand anheben, und mit der anderen
Hand Fangsack entnehmen! Wie oft der Rasen
bearbeitet werden soll, hängt grundsätzlich
vom Graswuchs des Rasens und der Härte des
Bodens ab. Die Unterseite des Gerätes sauber
halten und Erd- und Grasablagerungen unbedingt entfernen. Ablagerungen erschweren den
Startvorgang und beeinträchtigen die Qualität. An
Hängen ist die Bahn quer zum Hang zu legen.
Bevor irgendwelche Kontrollen der Walze durchgeführt werden, Motor abstellen.
Achtung! Die Walze dreht nach dem Ausschalten
- 9 -
Anl_GC_SC_4240_P_SPK7.indb 9Anl_GC_SC_4240_P_SPK7.indb 9 15.03.2019 06:25:4415.03.2019 06:25:44

D
des Motors noch einige Sekunden weiter. Versuchen Sie nie, die Walze zu stoppen. Falls die in
Bewegung befi ndliche Walze auf einen Gegen-
stand schlägt, das Gerät abschalten und warten
bis die Walze vollkommen still steht. Kontrollieren
Sie anschließend den Zustand der Walze. Falls
diese beschädigt ist muss sie ausgewechselt
werden.
7. Reinigung, Wartung,
Lagerung, Transport und
Ersatzteilbestellung
Achtung:
Arbeiten Sie nie bei laufendem Motor an stromführenden Teilen der Zündanlage oder berühren diese. Ziehen Sie vor allen Wartungs- und
Pfl egearbeiten den Zündkerzenstecker von der
Zündkerze ab. Führen Sie niemals irgendwelche
Arbeiten am laufenden Gerät durch. Arbeiten die
in dieser Bedienungsanleitung nicht beschrieben
werden, sollten nur von einer autorisierten Fachwerkstatt durchgeführt werden.
7.1 Reinigung
Nach jedem Gebrauch sollte der Vertikutierer
gründlich gereinigt werden. Besonders die Unterseite und die Messer. Dazu kippen sie den
Vertikutierer leicht zur Seite und entfernen den
Schmutz.
Achtung! Bevor Sie das Gerät kippen, muss der
Benzintank entleert werden um ein auslaufen von
Benzin zu vermeiden. Dazu benutzen Sie am besten eine handelsübliche Benzinabsaugpumpe.
7.2 Wartung
Kontrolle des Ölstandes:
Gerät auf eine ebene, gerade Fläche stellen. Den
Ölmessstab durch Linksdrehung abschrauben.
Der Ölstand muss wie in Abbildung 10 dargestellt
sein.
Achtung: Motor niemals ohne oder mit zu wenig
Öl betreiben. Dies kann schwere Schäden am
Motor verursachen.
Platzieren sie eine geeignete Ölauffangwan-
•
ne unter der Ölablassschraube.
Öleinfüllschraube (Abb.9/ Pos. A) öffnen.
•
Öffnen Sie die Ölablassschraube (Abb.9/
•
Pos.B) und lassen Sie das Öl in einen geeigneten Behälter ab.
Nach Auslaufen des Altöls Ölablassschraube
•
wieder schließen.
Motoröl wie in Abbildung 10 dargestellt auf-
•
füllen.
Das Altöl muss gemäß den geltenden Be-
•
stimmungen entsorgt werden.
Pfl ege und Einstellung der Seilzüge
Die Seilzüge öfters einölen und auf Leichtgängigkeit überprüfen.
Wartung des Luftfi lters
Verschmutzte Luftfi lter verringern die Motorleis-
tung durch zu geringe Luftzufuhr zum Vergaser.
Regelmäßige Kontrolle ist daher unerlässlich.
Der Luftfi lter sollte alle 50 Betriebsstunden kon-
trolliert werden und bei Bedarf gereinigt werden.
Bei sehr staubiger Luft ist der Luftfi lter öfters zu
überprüfen.
Luftfilter wie in Abb. 11-13 dargestellt aus-
•
bauen.
Luftfilter nur mit Druckluft oder durch Aus-
•
klopfen reinigen.
Der Zusammenbau erfolgt in umgekehrter
•
Reihenfolge
Achtung: Luftfi lter nie mit Benzin oder brennba-
ren Lösungsmitteln reinigen.
Wartung/Wechsel der Zündkerze
Überprüfen Sie die Zündkerze erstmals nach 10
Betriebsstunden auf Verschmutzung und reinigen
Sie diese gegebenenfalls mit einer Kupferdrahtbürste. Danach die Zündkerze alle 50 Betriebsstunden warten.
Ziehen Sie den Zündkerzenstecker (Abb.14)
•
mit einer Drehbewegung ab.
Entfernen Sie die Zündkerze mit einem Zünd-
•
kerzenschlüssel (Abb. 15).
Der Zusammenbau erfolgt in umgekehrter
•
Reihenfolge.
Ölwechsel
Der Motorölwechsel sollte jährlich vor Sai-
•
sonbeginn (zusätzlich zu den Informationen
des Serviceheft Benzin) bei betriebswarmem
Motor durchgeführt werden.
Nur empfohlenes Motoröl verwenden.
•
- 10 -
Anl_GC_SC_4240_P_SPK7.indb 10Anl_GC_SC_4240_P_SPK7.indb 10 15.03.2019 06:25:4415.03.2019 06:25:44

D
7.3 Vorbereitung für das Einlagern des
Gerätes
Warnhinweis: Entfernen Sie das Benzin nicht in
geschlossenen Räumen, in der Nähe von Feuer
oder beim Rauchen. Gasdämpfe können Explosionen oder Feuer verursachen.
1. Entleeren Sie den Benzintank mit einer Ben-
zinabsaugpumpe.
2. Starten Sie den Motor und lassen Sie den
Motor solange laufen bis das restliche Benzin
verbraucht ist.
3. Machen Sie nach jeder Saison einen Ölwech-
sel. Dazu entfernen Sie das alte Motoröl vom
warmen Motor und füllen neues nach.
4. Entfernen Sie die Zündkerze vom Zylinder-
kopf. Füllen Sie mit einer Ölkanne ca. 20 ml
Öl in den Zylinder. Ziehen Sie den Startergriff
langsam, so dass das Öl den Zylinder innen
schützt. Schrauben Sie die Zündkerze wieder
ein.
5. Reinigen Sie die Kühlrippen des Zylinders
und das Gehäuse.
6. Reinigen Sie das ganze Gerät, um die Lack-
farbe zu schützen.
7. Bewahren Sie das Gerät an einem gut gelüf-
teten Platz oder Ort auf.
7.4 Vorbereitung des Gerätes für den Trans-
port
1. Entleeren Sie den Benzintank mit einer Ben-
zinabsaugpumpe.
2. Lassen Sie den Motor solange laufen bis das
restliche Benzin verbraucht ist.
3. Entleeren Sie das Motoröl vom warmen Mo-
tor.
4. Entfernen Sie den Zündkerzenstecker von
der Zündkerze.
5. Reinigen Sie die Kühlrippen des Zylinders
und das Gehäuse.
6. Demontieren Sie bei Bedarf die Schubbügel.
Achten Sie darauf, dass die Seilzüge nicht
geknickt werden.
8. Entsorgung und
Wiederverwertung
Das Gerät befi ndet sich in einer Verpackung um
Transportschäden zu verhindern. Diese Verpackung ist Rohstoff und ist somit wieder verwend-
bar oder kann dem Rohstoff kreislauf zurückge-
führt werden. Das Gerät und dessen Zubehör
bestehen aus verschiedenen Materialien, wie
z.B. Metall und Kunststoff e. Defekte Geräte ge-
hören nicht in den Hausmüll. Zur fachgerechten
Entsorgung sollte das Gerät an einer geeigneten
Sammelstellen abgegeben werden. Wenn Ihnen
keine Sammelstelle bekannt ist, sollten Sie bei
der Gemeindeverwaltung nachfragen.
7.5 Ersatzteilbestellung:
Bei der Ersatzteilbestellung sollten folgende Angaben gemacht werden;
Typ des Gerätes
•
Artikelnummer des Gerätes
•
Ident-Nummer des Gerätes
•
Ersatzteilnummer des erforderlichen Ersatz-
•
teils
Aktuelle Preise und Infos fi nden Sie unter
www.isc-gmbh.info
- 11 -
Anl_GC_SC_4240_P_SPK7.indb 11Anl_GC_SC_4240_P_SPK7.indb 11 15.03.2019 06:25:4415.03.2019 06:25:44

D
9. Fehlersuchplan
Fehler Mögliche Ursachen Beseitigung
Motor läuft nicht - Motorbremshebel nicht gedrückt
- Zündkerze defekt
- Kraftstoff tank leer
- Benzinhahn geschlossen
Motor läuft unruhig - Luftfi lter verschmutzt
- Zündkerze verschlissen
- Choke betätigt
Unruhiger Lauf,
- Messer unwuchtig - Messer durch Kundendienstwerkstarkes vibrieren
des Gerätes
Motor läuft, Walze
- Keilriemen gerissen - Keilriemen durch Kundendienstdreht sich nicht
Der Nachdruck oder sonstige Vervielfältigung von Dokumentation und Begleitpapieren der Produkte,
auch auszugsweise, ist nur mit ausdrücklicher Zustimmung der iSC GmbH zulässig.
Technische Änderungen vorbehalten
- Motorbremshebel drücken
- Zündkerze erneuern
- Kraftstoff einfüllen
- Benzinhahn öff nen
- Luftfi lter reinigen
- Zündkerze reinigen/tauschen
- Chokehebel in „Run“ Position stellen
statt tauschen lassen.
werkstatt tauschen lassen.
- 12 -
Anl_GC_SC_4240_P_SPK7.indb 12Anl_GC_SC_4240_P_SPK7.indb 12 15.03.2019 06:25:4415.03.2019 06:25:44

D
Nur für EU-Länder
Werfen Sie Elektrowerkzeuge nicht in den Hausmüll!
Gemäß europäischer Richtlinie 2012/19/EU über Elektro- und Elektronik-Altgeräte und Umsetzung in
nationales Recht müssen verbrauchte Elektrowerkzeuge getrennt gesammelt werden und einer umweltgerechten Wiederverwertung zugeführt werden.
Recycling-Alternative zur Rücksendeauff orderung:
Der Eigentümer des Elektrogerätes ist alternativ anstelle Rücksendung zur Mitwirkung bei der sachgerechten Verwertung im Falle der Eigentumsaufgabe verpfl ichtet. Das Altgerät kann hierfür auch einer
Rücknahmestelle überlassen werden, die eine Beseitigung im Sinne der nationalen Kreislaufwirtschafts- und Abfallgesetze durchführt. Nicht betroff en sind den Altgeräten beigefügte Zubehörteile und
Hilfsmittel ohne Elektrobestandteile.
Der Nachdruck oder sonstige Vervielfältigung von Dokumentation und Begleitpapieren der Produkte,
auch auszugsweise, ist nur mit ausdrücklicher Zustimmung der iSC GmbH zulässig.
Technische Änderungen vorbehalten
- 13 -
Anl_GC_SC_4240_P_SPK7.indb 13Anl_GC_SC_4240_P_SPK7.indb 13 15.03.2019 06:25:4415.03.2019 06:25:44

D
Ser vice-Informationen
Wir unterhalten in allen Ländern, welche in der Garantieurkunde benannt sind, kompetente ServicePartner, deren Kontakte Sie der Garantieurkunde entnehmen. Diese stehen Ihnen für alle ServiceBelange wie Reparatur, Ersatzteil- und Verschleißteil-Versorgung oder den Bezug von Verbrauchsmaterialien zur Verfügung.
Es ist zu beachten, dass bei diesem Produkt folgende Teile einem gebrauchsgemäßen oder natürlichen
Verschleiß unterliegen bzw. folgende Teile als Verbrauchsmaterialien benötigt werden.
Kategorie Beispiel
Verschleißteile* Zündkerze, Luftfi lter, Keilriemen, Kraftstoff fi lter,
Verbrauchsmaterial/ Verbrauchsteile*
Fehlteile
* nicht zwingend im Lieferumfang enthalten!
Bei Mängel oder Fehlern bitten wir Sie, den Fehlerfall im Internet unter www.isc-gmbh.info anzumelden.
Bitte achten Sie auf eine genaue Fehlerbeschreibung und beantworten Sie dazu in jedem Fall folgende
Fragen:
Hat das Gerät bereits einmal funktioniert oder war es von Anfang an defekt?
•
Ist Ihnen vor dem Auftreten des Defektes etwas aufgefallen (Symptom vor Defekt)?
•
Welche Fehlfunktion weist das Gerät Ihrer Meinung nach auf (Hauptsymptom)?
•
Beschreiben Sie diese Fehlfunktion.
Messer (Walze)
- 14 -
Anl_GC_SC_4240_P_SPK7.indb 14Anl_GC_SC_4240_P_SPK7.indb 14 15.03.2019 06:25:4515.03.2019 06:25:45

D
Garantieurkunde
Sehr geehrte Kundin, sehr geehrter Kunde,
unsere Produkte unterliegen einer strengen Qualitätskontrolle. Sollte dieses Gerät dennoch einmal nicht
einwandfrei funktionieren, bedauern wir dies sehr und bitten Sie, sich an unseren Servicedienst unter
der auf dieser Garantiekarte angegebenen Adresse zu wenden. Gerne stehen wir Ihnen auch telefonisch über die angegebene Servicerufnummer zur Verfügung. Für die Geltendmachung von Garantieansprüchen gilt folgendes:
1. Diese Garantiebedingungen richten sich ausschließlich an Verbraucher, d. h. natürliche Personen,
die dieses Produkt weder im Rahmen ihrer gewerblichen noch anderen selbständigen Tätigkeit
nutzen wollen. Diese Garantiebedingungen regeln zusätzliche Garantieleistungen, die der u. g.
Hersteller zusätzlich zur gesetzlichen Gewährleistung Käufern seiner Neugeräte verspricht. Ihre
gesetzlichen Gewährleistungsansprüche werden von dieser Garantie nicht berührt. Unsere Garantieleistung ist für Sie kostenlos.
2. Die Garantieleistung erstreckt sich ausschließlich auf Mängel an einem von Ihnen erworbenen neuen Gerät des u. g. Herstellers, die auf einem Material- oder Herstellungsfehler beruhen und ist nach
unserer Wahl auf die Behebung solcher Mängel am Gerät oder den Austausch des Gerätes beschränkt. Bitte beachten Sie, dass unsere Geräte bestimmungsgemäß nicht für den gewerblichen,
handwerklichen oder berufl ichen Einsatz konstruiert wurden. Ein Garantievertrag kommt daher nicht
zustande, wenn das Gerät innerhalb der Garantiezeit in Gewerbe-, Handwerks- oder Industriebetrieben verwendet wurde oder einer gleichzusetzenden Beanspruchung ausgesetzt war.
3. Von unserer Garantie ausgenommen sind:
- Schäden am Gerät, die durch Nichtbeachtung der Montageanleitung oder aufgrund nicht fachgerechter Installation, Nichtbeachtung der Gebrauchsanleitung (wie durch z.B. Anschluss an eine
falsche Netzspannung oder Stromart) oder Nichtbeachtung der Wartungs- und Sicherheitsbestimmungen oder durch Aussetzen des Geräts an anomale Umweltbedingungen oder durch mangelnde
Pfl ege und Wartung entstanden sind.
- Schäden am Gerät, die durch missbräuchliche oder unsachgemäße Anwendungen (wie z.B. Überlastung des Gerätes oder Verwendung von nicht zugelassenen Einsatzwerkzeugen oder Zubehör),
Eindringen von Fremdkörpern in das Gerät (wie z.B. Sand, Steine oder Staub, Transportschäden),
Gewaltanwendung oder Fremdeinwirkungen (wie z. B. Schäden durch Herunterfallen) entstanden
sind.
- Schäden am Gerät oder an Teilen des Geräts, die auf einen gebrauchsgemäßen, üblichen oder
sonstigen natürlichen Verschleiß zurückzuführen sind.
4. Die Garantiezeit beträgt 24 Monate und beginnt mit dem Kaufdatum des Gerätes. Garantieansprüche sind vor Ablauf der Garantiezeit innerhalb von zwei Wochen, nachdem Sie den Defekt erkannt
haben, geltend zu machen. Die Geltendmachung von Garantieansprüchen nach Ablauf der Garantiezeit ist ausgeschlossen. Die Reparatur oder der Austausch des Gerätes führt weder zu einer
Verlängerung der Garantiezeit noch wird eine neue Garantiezeit durch diese Leistung für das Gerät
oder für etwaige eingebaute Ersatzteile in Gang gesetzt. Dies gilt auch bei Einsatz eines Vor-OrtServices.
5. Für die Geltendmachung Ihres Garantieanspruches melden Sie bitte das defekte Gerät an unter:
www.isc-gmbh.info. Halten Sie bitte den Kaufbeleg oder andere Nachweise Ihres Kaufs des Neugeräts bereit. Geräte, die ohne entsprechende Nachweise oder ohne Typenschild eingesendet werden, sind von der Garantieleistung aufgrund mangelnder Zuordnungsmöglichkeit ausgeschlossen.
Ist der Defekt des Gerätes von unserer Garantieleistung erfasst, erhalten Sie umgehend ein repariertes oder neues Gerät zurück.
Selbstverständlich beheben wir gegen Erstattung der Kosten auch gerne Defekte am Gerät, die vom
Garantieumfang nicht oder nicht mehr erfasst sind. Dazu senden Sie das Gerät bitte an unsere Serviceadresse.
Für Verschleiß-, Verbrauchs- und Fehlteile verweisen wir auf die Einschränkungen dieser Garantie gemäß den Service-Informationen dieser Bedienungsanleitung.
iSC GmbH · Eschenstraße 6 · 94405 Landau/Isar (Deutschland)
- 15 -
Anl_GC_SC_4240_P_SPK7.indb 15Anl_GC_SC_4240_P_SPK7.indb 15 15.03.2019 06:25:4515.03.2019 06:25:45

D
Sehr geehrte Kundin, sehr geehrter Kunde,
um Ihnen noch mehr Service zu bieten, haben Sie die Möglichkeit auf unserem Onlineportal weitere
Informationen abzurufen.
Sollten einmal Probleme oder Fragen zu Ihrem Produkt auftreten, können Sie schnell und einfach unter
www.isc-gmbh.info viele Aktionen durchführen. Hier einige Beispiele:
Ersatzteile bestellen
•
Aktuelle Preisauskünfte
•
Verfügbarkeiten der Ersatzteile
•
Servicestellen Vorort für Benzingeräte
•
Defekte Geräte anmelden
•
Garantieverlängerungen (nur bei bestimmten Geräten)
•
Bestellverfolgung
•
Wir freuen uns auf Ihren Besuch online unter www.isc-gmbh.info!
Telefon: 09951 / 95 920 00 ·Telefax: 09951/95 917 00
E-Mail: info@einhell.de · Internet: www.isc-gmbh.info
iSC GmbH · Eschenstraße 6 · 94405 Landau/Isar (Deutschland)
- 16 -
Anl_GC_SC_4240_P_SPK7.indb 16Anl_GC_SC_4240_P_SPK7.indb 16 15.03.2019 06:25:4515.03.2019 06:25:45

GB
Table of contents
1. Safety regulations
2. Layout and items supplied
3. Proper use
4. Technical data
5. Before starting the equipment
6. Operation
7. Cleaning, maintenance, storage, transport and ordering of spare parts
8. Cleaning, maintenance and ordering of spare parts
9. Troubleshooting guide
- 17 -
Anl_GC_SC_4240_P_SPK7.indb 17Anl_GC_SC_4240_P_SPK7.indb 17 15.03.2019 06:25:4515.03.2019 06:25:45

GB
Danger!
When using the equipment, a few safety precautions must be observed to avoid injuries and
damage. Please read the complete operating
instructions and safety regulations with due care.
Keep this manual in a safe place, so that the information is available at all times. If you give the
equipment to any other person, hand over these
operating instructions and safety regulations as
well. We cannot accept any liability for damage
or accidents which arise due to a failure to follow
these instructions and the safety instructions.
1. Safety regulations
The corresponding safety information can be
found in the enclosed booklet.
Danger!
Read all safety regulations and instructions.
Any errors made in following the safety regulations and instructions may result in an electric
shock, fi re and/or serious injury.
Keep all safety regulations and instructions
in a safe place for future use.
Explanation of the warning signs on the
equipment (Fig. 16)
1. Important. Read the instructions before using
for the fi rst time.
2. Keep other persons (and animals) away from
the danger zone.
3. Sharp tools – do not cut your fi ngers or toes
– remove the spark plug before starting any
maintenance work.
4. Fill with oil and fuel before starting
5. Wear goggles and ear muff s.
6. Engine start / Engine stop lever (I = Engine
On / 0 = Engine Off )
7. Important. Hot parts.
8. Scarifi er roller depth adjustment
2. Layout and items supplied
2.1 Layout (Fig. 1/2)
1. Engine start/stop lever – engine brake
2. Top push bar
3. Bottom push bar
4. Scarifying depth
5. Ejector fl ap
6. Grass basket
7. Throttle lever
8. 2 fastening nuts for top push bar
9. 4 fastening screws for bottom push bar
10. 4 fastening nuts for bottom push bar
11. 2 cable securing clips
12. 2 fastening screws for top push bar
2.2 Items supplied
Please check that the article is complete as
specifi ed in the scope of delivery. If parts are
missing, please contact our service center or the
sales outlet where you made your purchase at
the latest within 5 working days after purchasing
the product and upon presentation of a valid bill
of purchase. Also, refer to the warranty table in
the service information at the end of the operating
instructions.
Open the packaging and take out the equip-
•
ment with care.
Remove the packaging material and any
•
packaging and/or transportation braces (if
available).
Check to see if all items are supplied.
•
Inspect the equipment and accessories for
•
transport damage.
If possible, please keep the packaging until
•
the end of the guarantee period.
Danger!
The equipment and packaging material are
not toys. Do not let children play with plastic
bags, foils or small parts. There is a danger of
swallowing or suff ocating!
Original operating instructions
•
Safety instructions
•
3. Proper use
The equipment is designed for scarifying lawned
areas. The scarifying process is designed for ripping moss and weeds - complete with their roots
- out of the soil and for loosening the soil. As a
result your lawn can absorb nutrients better and is
cleaned. We recommend you to scarify your lawn
in the spring (April) and autumn (October).
- 18 -
Anl_GC_SC_4240_P_SPK7.indb 18Anl_GC_SC_4240_P_SPK7.indb 18 15.03.2019 06:25:4515.03.2019 06:25:45

GB
Important! Due to the high risk of bodily injury
5. Before starting the equipment
to the user, the equipment may not be used to
grind up branch or hedge clippings. Moreover, the
equipment may not be used as a power cultivator
to level out high areas such as mole hills.
For safety reasons, the equipment may not be
used as a drive unit for other work tools or tool
sets of any kind.
The equipment is to be used only for its prescribed purpose. Any other use is deemed to be a
case of misuse. The user / operator and not the
manufacturer will be liable for any damage or injuries of any kind caused as a result of this.
The equipment is delivered unassembled. The
grass basket and the complete push bar must
be assembled and mounted before using the
equipment. Follow the operating instructions stepby-step and use the pictures provided as a visual
guide to easily assemble the equipment.
Fitting the top push bar holder (Fig. 4a)
Position the upper push bar (Fig. 4a / Item 2) such
that its holes line up with the holes of the lower
bar. Screw the tubes together, using the screws
(Fig. 4a / Item 12) and nuts (Fig. 4a / Item 8) supplied. Use the supplied cable clips (Fig. 4b / Item
Please note that our equipment has not been designed for use in commercial, trade or industrial
11) to secure the throttle cable and the engine
Start / Stop cable to the lower push bar.
applications. Our warranty will be voided if the
machine is used in commercial, trade or industrial
businesses or for equivalent purposes.
Fitting the debris box (Fig. 5)
Lift the ejector fl ap (Fig. 5 / Item 5) with one hand
and attach the debris box (Fig. 5/Item 6) to the
handle from above using your other hand.
4. Technical data
Important: Before you attach the debris box you
Engine type: .......................... 1 cylinder, 4-stroke
Displacement ............................................212 cc
Max. engine output .......................4.2 kW / 5.7 hp
Working speed .................................... 3,600 rpm
Fuel: ..................................................petrol (E10)
Tank capacity: ..................................approx. 3.6 l
Engine oil: ........................................ approx. 0.6 l
Spark plug: ............................................ LG F6TC
Blades (number) ............................................. 18
Blade diameter ....................................... 163 mm
Depth setting .................................... -15 - +5 mm
Working width: ........................................ 400 mm
LpA sound pressure level 85,4 dB(A), K = 2dB (A)
LWA sound power level ......................... 98 dB(A)
Vibration ahw ...................6,74 m/s
2
, K = 1,5 m/s
Weight: ........................................................32 kg
must ensure that the engine is switched off and
the roller is not rotating.
6. Operation
Important!
The engine does not come with oil in it.
Therefore, be sure to add oil before starting
the engine. The oil level in the engine must be
checked each time before carrying out any
work.
Starting the equipment (Fig. 6 – 7)
In order to avoid any unintentional start-ups of the
engine, it comes equipped with an engine brake
2
(Fig. 6/Item 1) which must be pressed at all times
whilst the device is in use, otherwise the engine
will stop.
Important: When the engine brake lever is re-
leased it must return to its initial position and the
engine must stop. If this is not the case, do not
use the equipment again.
- 19 -
Anl_GC_SC_4240_P_SPK7.indb 19Anl_GC_SC_4240_P_SPK7.indb 19 15.03.2019 06:25:4515.03.2019 06:25:45

GB
1. Open the petrol cock (Fig. 7 / Item B). Set the
cock to “ON” for this purpose.
2. Set the choke lever (Fig. 7/Item C) to the
“Choke” position.
Note: Normally the choke is not required to
restart a warm engine.
3. Move the throttle lever (Fig. 6 / Item 7) to the
center position.
4. Press the engine brake lever (Fig. 6 / Item
1) and pull the starter cable (Fig. 7 / Item A)
forcefully until the engine starts.
5. Allow the engine to warm up briefl y and then
set the choke lever (Fig. 7 / Item B) to the
“RUN” Position.
6. The speed of the cutter unit can be controlled
using the throttle lever (Fig. 6 / Item 7) (tortoise = slow / rabbit = fast).
Important: Always pull the starter cable slowly
until you feel the initial resistance before you then
pull it quickly to start the engine. Do not allow the
starter cable to whip back of its own accord.
Important: The scarifi er roller begins to rotate as
soon as the engine is started.
Important! Never open the ejector fl ap when the
motor is running. A rotating cutting unit can cause
injuries.
Always fasten the ejector fl ap carefully. The fl ap
fl ips back to the “Closed” position by the tension
springs!
Always ensure that a safe distance (provided
by the long handles) is maintained between the
user and the housing. Be especially careful when
scarifying and changing direction on slopes and
inclines. Maintain a solid footing and wear sturdy,
non-slip footwear and long trousers. Always scarify along the incline (not up and down).
For safety reasons, the scarifi er may not be used
to scarify inclines whose gradient exceeds 15
degrees.
Use special caution when backing up and pulling
the scarifi er (tripping hazard)!
Adjusting the working depth (Fig. 8)
To set the working depth, push the lever for setting the depth (Fig. 8 / Item 4) gently away from
the device, set the required depth and then lock
the lever back into position.
Important. For transport move the lever for setting the depth to the highest position.
Tips for proper working
It is recommended that you overlap scarifying
paths a little. Try to scarify in straight lines for a
nice, clean look. Insodoing, the aeration swaths
should always overlap each other by a few centi-
meters in order to avoid bare strips.
As soon as grass clippings start to trail the scari-
fi er, it is time to empty the grass basket.
Important! Before taking off the grass basket,
switch off the motor and wait until the roller has
come to a stop.
To remove the grass basket, lift up the ejector fl ap
with one hand, while unhooking the basket with
the other.
How frequently you should scarify your lawn is
determined primarily by the speed at which the
grass grows and the hardness of the soil.
Keep the underside of the equipment clean and
remove soil and grass build-up. Deposits make it
more diffi cult to start the aerator and decrease the
quality of the scarifying.
Always scarify along inclines (not up and down).
Switch off the motor before doing any checks on
the roller.
Important!
The roller rotates for a few seconds after the
motor is switched off . Never attempt to stop the
roller. In the event that the rotating roller strikes
an object, immediately switch off the equipment
and wait for the roller to come to a complete stop.
Then inspect the condition of the roller. Replace
any parts that are damaged.
7. Cleaning, maintenance, storage,
transport and ordering of spare
parts
Important:
Never work on or touch conducting parts on the
ignition unit with the engine running. Always pull
the spark plug boot from the spark plug before
starting any work of care or maintenance. Never
perform any work on the machine while it is running. Any work not described in these Operating
Instructions must be performed by an authorized
service workshop only.
- 20 -
Anl_GC_SC_4240_P_SPK7.indb 20Anl_GC_SC_4240_P_SPK7.indb 20 15.03.2019 06:25:4615.03.2019 06:25:46

GB
7.1 Cleaning
The scarifi er should be cleaned thoroughly eve-
ry time after it has been used. This particularly
applies to its underside and the blades. To do so
tip the scarifi er slightly on to its side and remove
the dirt.
Important. Before you tip the equipment, the petrol tank must be emptied to prevent petrol leaking
out. Ideally you should use a conventional petrol
extraction pump for this purpose.
7.2 Servicing
Checking the oil level
Set the equipment down on a fl at, level surface.
Unscrew the oil dipstick by turning it anti-clockwise. The oil level must be as shown in Figure 10.
Important: Never run the engine with no or too
little oil. This can cause serious damage to the
engine.
Changing the oil
Change the engine oil every year before the
•
start of the season (in addition to the information in the petrol service manual) when the
engine is warm.
Use only recommended engine oil.
•
Place a suitable oil drip tray beneath the oil
•
drain screw.
Remove the oil filler screw (Fig. 9 / Item A).
•
Undo the oil drain screw (Fig. 9 / Item B) and
•
drain the oil into a suitable container.
Close the drain screw again when all the
•
used oil has been drained.
Pour engine oil into the equipment as shown
•
in Figure 10.
Dispose of the used oil in accordance with
•
applicable regulations.
Remove the air filter as shown in Fig. 11-13.
•
Clean the air filter only with compressed air or
•
by tapping it.
Assemble in reverse order
•
Important: Never clean the air fi lter with petrol or
infl ammable solvents.
Servicing/Replacing the spark plug
Check the spark plug for dirt and grime after 10
hours of operation and if necessary clean it with
a copper wire brush. Thereafter service the spark
plug after every 50 hours of operation.
Pull off the spark plug boot (Fig. 14) with a
•
twist.
Remove the spark plug using a spark plug
•
wrench (Fig. 15).
Assemble in reverse order.
•
7.3 Preparing the equipment for storage
Caution: Do not empty the petrol tank in enclosed
areas, near fi re or when smoking. Petrol fumes
can cause explosions and fi re.
1. Empty the petrol tank with a petrol suction
pump.
2. Start the engine and let it run until any remai-
ning petrol has been used up.
3. Change the oil at the end of every season.
To do so, remove the used engine oil from a
warm engine and refi ll with fresh oil.
4. Remove the spark plug from the cylinder
head. Fill the cylinder with approx. 20 ml of oil
from an oil can. Slowly pull back the starter
handle, which will bathe the cylinder wall with
oil. Screw the spark plug back in.
5. Clean the cooling fi ns of the cylinder and the
housing.
6. Be sure to clean the entire machine to protect
the paint.
7. Store the machine in a well-ventilated place.
Care and adjustment of the cables
Oil the cables at regular intervals and check that
they move easily.
Servicing the air fi lter
Soiled air fi lters reduce the engine output by sup-
ply too little air to the carburetor.
Regular checks are therefore essential. The air
fi lter should be checked after every 50 hours of
use and cleaned if necessary. If the air contains a
lot of dust, the air fi lter should be checked more
frequently.
Anl_GC_SC_4240_P_SPK7.indb 21Anl_GC_SC_4240_P_SPK7.indb 21 15.03.2019 06:25:4615.03.2019 06:25:46
7.4 Preparing the device for transport
1. Drain the petrol tank using a petrol extraction
pump.
2. Always let the engine run until it has used up
the remainder of petrol in the tank.
3. Empty the engine oil from the warm engine.
4. Remove the spark plug boot from the spark
plug.
5. Clean the cooling fi ns of the cylinder and the
housing.
6. Remove the push bars if necessary. Ensure
that the cables are not kinked.
- 21 -

7.5 Ordering replacement parts
Please quote the following data when ordering
replacement parts:
Type of machine
•
Article number of the machine
•
Identification number of the machine
•
Replacement part number of the part required
•
For our latest prices and information please go to
www.isc-gmbh.info
8. Cleaning, maintenance and
ordering of spare parts
The unit is supplied in packaging to prevent its
being damaged in transit. This packaging is raw
material and can therefore be reused or can be
returned to the raw material system.
The unit and its accessories are made of various
types of material, such as metal and plastic. Defective components must be disposed of as special waste. Ask your dealer or your local council.
GB
- 22 -
Anl_GC_SC_4240_P_SPK7.indb 22Anl_GC_SC_4240_P_SPK7.indb 22 15.03.2019 06:25:4615.03.2019 06:25:46

9. Troubleshooting guide
Fault Possible causes Remedy
The motor does not
start
- Engine brake lever not pressed
- Spark plug defective
- Fuel tank empty
- Petrol cock closed
GB
- Press the engine brake lever
- Replace spark plug
- Top up fuel
- Open petrol cock
Engine does not run
smoothly
The equipment
does not operate
smoothly and vibrates intensively
Motor is running,
roller is not rotating
- Air fi lter dirty
- Spark plug worn
- Choke open
- Clean the air fi lter
- Clean/Replace the spark plug
- Set choke lever to “Run” position
- Blades imbalanced - Have the blades replaced by a customer service workshop.
- V-belt torn - Have the V-belt replaced by a customer service workshop.
- 23 -
Anl_GC_SC_4240_P_SPK7.indb 23Anl_GC_SC_4240_P_SPK7.indb 23 15.03.2019 06:25:4615.03.2019 06:25:46

GB
For EU countries only
Never place any electric power tools in your household refuse.
To comply with European Directive 2012/19/EC concerning old electric and electronic equipment and
its implementation in national laws, old electric power tools have to be separated from other waste and
disposed of in an environment-friendly fashion, e.g. by taking to a recycling depot.
Recycling alternative to the return request:
As an alternative to returning the equipment to the manufacturer, the owner of the electrical equipment
must make sure that the equipment is properly disposed of if he no longer wants to keep the equipment.
The old equipment can be returned to a suitable collection point that will dispose of the equipment in
accordance with the national recycling and waste disposal regulations. This does not apply to any accessories or aids without electrical components supplied with the old equipment.
The reprinting or reproduction by any other means, in whole or in part, of documentation and papers
accompanying products is permitted only with the express consent of the iSC GmbH.
Subject to technical changes
- 24 -
Anl_GC_SC_4240_P_SPK7.indb 24Anl_GC_SC_4240_P_SPK7.indb 24 15.03.2019 06:25:4615.03.2019 06:25:46

GB
Ser vice information
We have competent service partners in all countries named on the guarantee certifi cate whose contact
details can also be found on the guarantee certifi cate. These partners will help you with all service re-
quests such as repairs, spare and wearing part orders or the purchase of consumables.
Please note that the following parts of this product are subject to normal or natural wear and that the
following parts are therefore also required for use as consumables.
Category Example
Wear parts* Spark plug, air fi lter, V-belt, petrol fi lter, blade
Consumables*
Missing parts
* Not necessarily included in the scope of delivery!
In the eff ect of defects or faults, please register the problem on the internet at www.isc-gmbh.info. Ple-
ase ensure that you provide a precise description of the problem and answer the following questions in
all cases:
Did the equipment work at all or was it defective from the beginning?
•
Did you notice anything (symptom or defect) prior to the failure?
•
What malfunction does the equipment have in your opinion (main symptom)?
•
Describe this malfunction.
(roller)
- 25 -
Anl_GC_SC_4240_P_SPK7.indb 25Anl_GC_SC_4240_P_SPK7.indb 25 15.03.2019 06:25:4615.03.2019 06:25:46

GB
Warranty certifi cate
Dear Customer,
All of our products undergo strict quality checks to ensure that they reach you in perfect condition. In the
unlikely event that your device develops a fault, please contact our service department at the address
shown on this guarantee card. You can also contact us by telephone using the service number shown.
Please note the following terms under which guarantee claims can be made:
1. These guarantee terms apply to consumers only, i.e. natural persons intending to use this product
neither for their commercial activities nor for any other self-employed activities. These warranty
terms regulate additional warranty services, which the manufacturer mentioned below promises to
buyers of its new products in addition to their statutory rights of guarantee. Your statutory guarantee
claims are not aff ected by this guarantee. Our guarantee is free of charge to you.
2. The warranty services cover only defects due to material or manufacturing faults on a product which
you have bought from the manufacturer mentioned below and are limited to either the rectifi cation of
said defects on the product or the replacement of the product, whichever we prefer.
Please note that our devices are not designed for use in commercial, trade or professional applications. A guarantee contract will not be created if the device has been used by commercial, trade or
industrial business or has been exposed to similar stresses during the guarantee period.
3. The following are not covered by our guarantee:
- Damage to the device caused by a failure to follow the assembly instructions or due to incorrect
installation, a failure to follow the operating instructions (for example connecting it to an incorrect
mains voltage or current type) or a failure to follow the maintenance and safety instructions or by exposing the device to abnormal environmental conditions or by lack of care and maintenance.
- Damage to the device caused by abuse or incorrect use (for example overloading the device or the
use or unapproved tools or accessories), ingress of foreign bodies into the device (such as sand,
stones or dust, transport damage), the use of force or damage caused by external forces (for example by dropping it).
- Damage to the device or parts of the device caused by normal or natural wear or tear or by normal
use of the device.
4. The guarantee is valid for a period of 24 months starting from the purchase date of the device. Guarantee claims should be submitted before the end of the guarantee period within two weeks of the
defect being noticed. No guarantee claims will be accepted after the end of the guarantee period.
The original guarantee period remains applicable to the device even if repairs are carried out or
parts are replaced. In such cases, the work performed or parts fi tted will not result in an extension
of the guarantee period, and no new guarantee will become active for the work performed or parts
fi tted. This also applies if an on-site service is used.
5. To make a claim under the guarantee, please register the defective device at: www.isc-gmbh.info.
Please keep your bill of purchase or other proof of purchase for the new device. Devices that are
returned without proof of purchase or without a rating plate shall not be covered by the guarantee,
because appropriate identifi cation will not be possible. If the defect is covered by our guarantee,
then the item in question will either be repaired immediately and returned to you or we will send you
a new replacement.
Of course, we are also happy off er a chargeable repair service for any defects which are not covered by
the scope of this guarantee or for units which are no longer covered. To take advantage of this service,
please send the device to our service address.
Also refer to the restrictions of this warranty concerning wear parts, consumables and missing parts as
set out in the service information in these operating instructions.
- 26 -
Anl_GC_SC_4240_P_SPK7.indb 26Anl_GC_SC_4240_P_SPK7.indb 26 15.03.2019 06:25:4615.03.2019 06:25:46

F
Sommaire
1. Consignes de sécurité
2. Description de l’appareil et volume de livraison
3. Utilisation conforme à l’aff ectation
4. Données techniques
5. Avant la mise en service
6. Commande
7. Nettoyage, maintenance, stockage, transport et commande de pièces de rechange
8. Nettoyage, maintenance et commande de pièces de rechange
9. Plan de recherche des erreurs
- 27 -
Anl_GC_SC_4240_P_SPK7.indb 27Anl_GC_SC_4240_P_SPK7.indb 27 15.03.2019 06:25:4615.03.2019 06:25:46

F
Danger !
Lors de l’utilisation d’appareils, il faut respecter
certaines mesures de sécurité afi n d’éviter des
blessures et dommages. Veuillez donc lire attentivement ce mode d’emploi/ces consignes de
sécurité. Veillez à le conserver en bon état pour
pouvoir accéder aux informations à tout moment.
Si l’appareil doit être remis à d’autres personnes,
veillez à leur remettre aussi ce mode d’emploi/
ces consignes de sécurité. Nous déclinons toute
responsabilité pour les accidents et dommages
dus au non-respect de ce mode d’emploi et des
consignes de sécurité.
1. Consignes de sécurité
Vous trouverez les consignes de sécurité correspondantes dans le cahier en annexe.
Danger !
Veuillez lire toutes les consignes de sécurité
et instructions. Tout non-respect des consignes
de sécurité et instructions peut provoquer une
décharge électrique, un incendie et/ou des blessures graves.
Conservez toutes les consignes de sécurité
et instructions pour une consultation ultérieure.
Explication des plaques signalétiques situées sur l’appareil (fi g. 16)
1. Attention! Avant la mise en service, lisez le
mode d’emploi.
2. Tenir les autres (personnes et animaux) hors
de la zone dangereuse.
3. Outils coupants - Ne vous coupez pas les
doigts ni les doigts de pieds - Retirez la cosse
de bougie d’allumage avant tout entretien.
4. Remplir d’huile et de carburant avant la mise
en service
5. Portez des protections pour les yeux et l’ouïe.
6. Levier de démarrage / d’arrêt du moteur (I =
moteur MARCHE ; 0 = moteur ARR T)
7. Attention! Parties brûlantes.
8. Réglage de la profondeur du rouleau du scarifi cateur
2. Description de l’appareil et
volume de livraison
2.1 Description de l’appareil (fi gure 1/2)
1. Levier de démarrage / d’arrêt du moteur -
frein moteur
2. Guidon supérieur
3 Guidon inférieur
4. Réglage de la profondeur
5. Clapet d’éjection
6. Panier collecteur
7. Accélérateur
8. 2 écrous de fi xation pour guidon supérieur
9. 4 vis de fi xation pour le guidon inférieur
10. 4 écrous de fi xation pour guidon inférieur
11. 2 clips de fi xation de câble
12. 2 vis de fi xation pour le guidon supérieur
2.2 Volume de livraison
Veuillez contrôler si l‘article est complet à l‘aide
de la description du volume de livraison. S‘il
manque des pièces, adressez-vous dans un délai
de 5 jours maximum après votre achat à notre
service après-vente ou au magasin où vous avez
acheté l‘appareil muni d‘une preuve d‘achat valable. Veuillez consulter pour cela le tableau des
garanties dans les informations service aprèsvente à la fi n du mode d‘emploi.
Ouvrez l’emballage et prenez l’appareil en le
•
sortant avec précaution de l’emballage.
Retirez le matériel d’emballage tout comme
•
les sécurités d’emballage et de transport (s’il
y en a).
Vérifiez si la livraison est bien complète.
•
Contrôlez si l’appareil et ses accessoires ne
•
sont pas endommagés par le transport.
Conservez l’emballage autant que possible
•
jusqu’à la fin de la période de garantie.
Danger !
L’appareil et le matériel d’emballage ne sont
pas des jouets ! Il est interdit de laisser des
enfants jouer avec des sacs et des fi lms en
plastique et avec des pièces de petite taille.
Ils risquent de les avaler et de s’étouff er !
Mode d’emploi d’origine
•
Consignes de sécurité
•
- 28 -
Anl_GC_SC_4240_P_SPK7.indb 28Anl_GC_SC_4240_P_SPK7.indb 28 15.03.2019 06:25:4615.03.2019 06:25:46

F
3. Utilisation conforme à
l’aff ectation
L’appareil est déterminé à la scarifi cation de sur-
faces à gazon. Lors de la scarifi cation, la mousse
et les mauvaises herbes sont arrachées avec les
racines, ce qui amollit la terre. Le gazon peut ainsi
mieux absorber les substances nutritives, tout en
étant nettoyé. Nous vous recommandons de scarifi er le gazon au printemps (avril) et en automne
(octobre).
Attention ! En raison du risque encouru par
l’utilisateur (l’utilisatrice), l’appareil ne doit pas
être employé comme hacheuse pour hacher des
bouts de branches et de haies. De plus, l’appareil
ne doit pas être utilisé comme motobêche ni pour
aplanir des irrégularités du sol, comme par ex.
des taupinières.
Pour des raisons de sécurité, l’appareil ne doit
pas être utilisé comme module d’entraînement
pour d’autres outils de travail et outillages de
quelque forme que ce soit.
La machine doit exclusivement être employée
conformément à son aff ectation. Chaque uti-
lisation allant au-delà de cette aff ectation est
considérée comme non conforme. Pour les
dommages en résultant ou les blessures de tout
genre, le producteur décline toute responsabilité
et l’opérateur/l’exploitant est responsable.
4. Données techniques
Type de moteur : .......................1-Vérin ; 4 temps
Cylindrée. ............................................... 212 cm
Puissance du moteur maxi. : ...... 4,2 kW / 5,7 CH
Vitesse de travail : ..............................3600 tr/min
Carburant : ................................... Essence (E10)
Contenance du réservoir : ......................env. 3,6 l
Huile moteur : .........................................env. 0,6 l
Bougie d’allumage : ...............................LG F6TC
Lames (nombre) : ............................................ 18
Ø de lame : ............................................. 163 mm
Bague de réglage de profondeur : .... -15 - +5 mm
Largeur de travail : ................................... 400mm
Niveau de pression acoustique L
: .....................
pA
........................................85,4 dB(A), K = 2dB (A)
Niveau de puissance acoustique L
Vibration ahw : ..................6,74 m/s
: ... 98 dB(A)
WA
2
, K = 1,5 m/s
Poids : .........................................................32 kg
5. Avant la mise en service
L’appareil est livré démonté. Il faut monter le panier collecteur et le guidon complet avant d’utiliser
l’appareil. Suivez le mode d’emploi, étape par
étape, et orientez-vous sur les illustrations pour
que le montage vous soit simplifi é.
3
2
Veillez au fait que nos appareils, conformément
à leur aff ectation, n’ont pas été construits, pour
être utilisés dans un environnement professionnel, industriel ou artisanal. Nous déclinons toute
responsabilité si l’appareil est utilisé professionnellement, artisanalement ou dans des sociétés
industrielles, tout comme pour toute activité
équivalente.
Positionnez le montage du guidon supérieur
(fi g. 4a)
De telle manière que les trous du guidon supérieur (fi g. 4a/pos. 2) correspondent au trous du
guidon inférieur.
Vissez les tubes les uns aux autres avec les vis
(fi g. 4a/pos. 12) et les écrous joints (fi g. 4a/pos.
8). Avec le clip de fi xation de câble joint (fi g. 4b/
pos. 11), fi xez le câble de l’accélérateur et le
câble de démarrage/d’arrêt du moteur sur le bas
du guidon.
Montage du panier collecteur (fi g. 5)
Soulever le clapet d’éjection (fi g. 5/pos. 5) d’une
main et suspendre le sac collecteur (fi g. 5/pos. 6)
de l’autre main sur la poignée par le haut.
Attention! Pour accrocher le panier, éteignez le
moteur et assurez-vous que le rouleau ne tourne
pas !
- 29 -
Anl_GC_SC_4240_P_SPK7.indb 29Anl_GC_SC_4240_P_SPK7.indb 29 15.03.2019 06:25:4615.03.2019 06:25:46
 Loading...