


EK-820U
Table of contents
 Loading...
Owner’s Manual
Multimedia Projector
Model EK-820U
(Projection lens is optional.)

Features and Design
This Multimedia Projector is designed with the most advanced technology for portability, durability, and
ease of use. This projector utilizes a high luminance and Eco friendly system, a palette of 1.07 billion
colors, and digital light processing (DLP) technology.
Preface
Simple Computer System Setting
The projector has the Multi-scan system to
conform to almost all computer output signals
quickly. Up to WUXGA resolution can be
accepted.
Useful Functions for Presentations
The digital zoom function allows you to focus on
the crucial information during a presentation.
Laser Diode Control
Brightness of the projection laser diode can be
manually selected (Constant Power, Constant
Luminance, or Eco Mode).
Background Color Function
The Background Color function allows you to
specify the screen background (“Logo”, “Blue”,
“Black”, or “White” screen) when no signal is
available.
Multilanguage Menu Display
Security Function
The Security function helps you ensure security
of the projector.
LAN Network Function
This projector is loaded with the Wired LAN
network function. You can operate and manage
the projector via network.
For details, refer to page 42 and pages
47-54.
Auto Setup Function
This function enables auto input search and auto
signal adjustment simply by pressing the Auto
button on the remote control.
Power Management
The Power management function reduces
power consumption and maintains the laser
diode life.
Operation menu is available in 13 languages;
English, French, Spanish, German, Italian,
Russian, Simplied Chinese, Japanese, Korean,
Portuguese, Indonesian, Dutch, and Arabic.
Note:
The screen menu and pictures in the manual may slightly differ from the real product.
The manual is subject to change without prior notice.
— i —

DLP Projector — Owner’s Manual
Copyright
This publication, including all photographs, illustrations and software, is protected under international
copyright laws, with all rights reserved. Neither this manual, nor any of the material contained herein, may
be reproduced without written consent of the author.
© Copyright 2017
Disclaimer
The information in this document is subject to change without notice. The manufacturer makes no
representations or warranties with respect to the contents hereof and specically disclaims any implied
warranties of merchantability or tness for any particular purpose. The manufacturer reserves the right to
revise this publication and to make changes from time to time in the content hereof without obligation of
the manufacturer to notify any person of such revision or changes.
Trademark Recognition
All other product names used in this manual are the properties of their respective owners and are
acknowledged.
— ii —

Important Safety Information
Important:
It is strongly recommended that you read this section carefully before using the projector. These safety
and usage instructions will ensure that you enjoy many years of safe use of the projector. Keep this
manual for future reference.
Symbols Used
Warning symbols are used on the unit and in this manual to alert you of hazardous situations. The
following styles are used in this manual to alert you to important information.
Note:
Provides additional information on the topic at hand.
Important:
Provides additional information that should not be overlooked.
Preface
Caution:
Alerts you to situations that may damage the unit.
Warning:
Alerts you to situations that may damage the unit, create a hazardous environment, or cause personal
injury.
Throughout this manual, component parts and items in the OSD menus are denoted in bold font as in this
example:
“Push the Menu button on the remote control to open the Main menu.”
General Safety Information
¾ Do not open the unit case. There are no user-serviceable parts in the unit. For servicing, contact
qualied service personnel.
¾ Follow all warnings and cautions in this manual and on the unit case.
¾ The projection laser diode is extremely bright by design. To avoid damage to eyes, do not look into the
lens when the laser diode is on.
¾ Do not place the unit on an unstable surface, cart, or stand.
¾ Avoid using the system near water, in direct sunlight, or near a heating device.
¾ Do not place heavy objects such as books or bags on the unit.
— iii —
DLP Projector — Owner’s Manual
Safety Instructions
• Please read this manual completely before installing and operating the projector.
• The projector provides many convenient features and functions. Proper operation may enable you to
fully utilize the features and keep it in good condition. Otherwise, it will not only shorten the service life
of the unit, but also may cause malfunction, a re, or other accidents.
• If your projector cannot work properly, please read this manual again, check the operating methods and
cable connection, and try the solutions in the part of Troubleshooting. If the problem still exists, contact
the dealer or the service center.
Caution:
ELECTRIC SHOCK DO NOT OPEN
Caution:
To reduce the risk of electric shock, do not remove cover (or back), no user serviceable parts
inside. Refer servicing to qualied service personnel.
This symbol indicates that dangerous voltage constituting a risk of electric shock is present
within this unit.
This symbol indicates that there are important operating and maintenance instructions in the
user’s manual with this unit.
FOR EU USERS
The symbol mark and recycling systems described below apply to EU countries and do not apply to
countries in other areas of the world.
Your product is designed and manufactured with high quality materials and components which can be
recycled and/or reused.
The symbol mark means that electrical and electronic equipment, batteries and accumulators, at their
end-of-life, should be disposed of separately from your household waste.
Note:
If a chemical symbol is printed beneath the symbol mark, this chemical symbol means that the battery
or accumulator contains a heavy metal at a certain concentration. This will be indicated as
follows: Hg: mercury, Cd: cadmium, Pb: lead In the European Union there are separate
collection systems for used electrical and electronic equipment, batteries and accumulators.
Please, dispose of them correctly at your local community waste collection/recycling centre.
Please help us to conserve the environment we live in!
— iv —

Preface
Safety Precautions
Caution:
• The projector must be grounded.
• Donotexposetheprojectortoraindropsorhighhumiditytoavoidareorelectricshock.
• This projector produces intense light from the projection lens. Avoid staring directly into the lens,
otherwise eye damage could be caused. Be especially careful that children do not stare directly into the
beam.
• Place the projector in a proper position. Otherwise it may result in re hazard.
• Leave an appropriate space from the top, sides, and back of the shell in order to ventilate and cool
down the projector. The gures below indicate the minimum distance to be left. It must be satised if the
projector is placed in sealed environment like a cabinet.
≥ 1m
(≥ 39.4”)
≥ 1m
(≥ 39.4”)
≥ 1m
≥ 1m
(≥ 39.4”)
(≥ 39.4”)
• Do not cover the vent of the projector. Poor radiation may shorten the service life or even cause
dangers.
• Remove the AC power plug if the projector is not to be used for a long time.
Caution:
• Do not set the projector in greasy, wet, or smoky conditions such as in a kitchen, to prevent a
malfunction or accident. If the projector comes in contact with oil or chemicals, it may become
deteriorated.
• Read and keep this manual for future reference.
• The mains plug/appliance coupler is used as disconnect device, the disconnect device shall remain
readily operable.
— v —

DLP Projector — Owner’s Manual
Safety Guide
• All the safety and operating instructions should be read before the product is operated.
• Read all of the instructions given here and retain them for later use. Unplug this projector from AC
power supply before cleaning. Do not use liquid or aerosol cleaners.
• Use a damp cloth for cleaning.
• Follow all warnings and instructions marked on the projector.
• For added protection to the projector during a lightning storm, or when it is left unattended and unused
for long periods of time, unplug it from the wall outlet. This will prevent damage due to lightning and
power line surges.
• Do not expose this unit to rain or use near water... for example, in a wet basement, near a swimming
pool, etc...
• Do not use attachments not recommended by the manufacturer as they may cause hazards.
• Do not place this projector on an unstable cart, stand, or table. The projector may fall, causing
serious injury to a child or an adult, and serious damage to the projector.
• Use only with a cart or stand recommended by the manufacturer, or sold with the projector.
Wall or shelf mounting should follow the manufacturer’s instructions, and should use a mounting kit
approved by the manufacturers.
• An appliance and cart combination should be moved with care. Quick stops, excessive force, and
uneven surfaces may cause the appliance and cart combination to overturn.
• Slots and openings in the back and bottom of the cabinet are provided for ventilation, to ensure reliable
operation of the equipment and to protect it from overheating.
• The openings should never be covered with cloth or other materials, and the bottom opening should not
be blocked by placing the projector on a bed, sofa, rug, or other similar surface. This projector should
never be placed near or over a radiator or heat register.
• This projector should not be placed in a build-in installation such as a book case unless proper
ventilation is provided.
• Never push objects of any kind into this projector through cabinet slots as they may touch dangerous
voltage points or short out parts that could result in a re or electric shock. Never spill liquid of any kind
on the projector.
• Do not install the projector near the ventilation duct of air-conditioning equipment.
• This projector should be operated only from the type of power source indicated on the marking label.
• If you are not sure of the type of power supplied, consult your authorized dealer or local power
company.
• Do not overload wall outlets and extension cords as this can result in re or electric shock. Do not allow
anything to rest on the power cord. Do not locate this projector where the cord may be damaged by
persons walking on it.
• Do not attempt to service this projector yourself as opening or removing the covers may expose you to
dangerous voltage or other hazards. Refer all servicing to qualied service personnel.
• Unplug this projector from wall outlet and refer servicing to qualied service personnel under the
following conditions:
¾ When the power cord or plug is damaged or frayed.
¾ If liquid has been spilled into the projector.
¾ If the projector has been exposed to rain or water.
¾ If the projector does not operate normally by following the operating instructions. Adjust only those
controls that are covered by the operating instructions as improper adjustment of other controls
may result in damage and will often require extensive work by a qualied technician to restore the
projector to normal operation.
¾ If the projector has been dropped or the cabinet has been damaged.
— vi —
Preface
¾ When the projector exhibits a distinct change in performance - this indicates a need for service.
• When replacement parts are required, be sure the service technician has used replacement parts
specied by the manufacturer that have the same characteristics as the original part. Unauthorized
substitutions may result in re, electric shock, or injury to persons.
• Upon completion of any service or repairs to this projector, ask the service technician to perform routine
safety checks to determine that the projector is in safe operating condition.
Information for users in the European Union
This is a device to project images onto a screen, etc., and is not intended for use as indoor lighting in a
domestic environment. Directive 2009/125/EC.
Air circulation
Vents in the cabinet are provided for ventilation. To ensure reliable operation of the product and to protect
it from overheating, these openings must not be blocked or covered.
Caution:
• Hot air is exhausted from the exhaust vent. When using or installing the projector, the following
precautions should be taken.
• Donotputanyammableobjects,orspraycanneartheprojector.Hotairisexhaustedfromtheair
vents.
• Keep the exhaust vent at least 1m away from any objects.
• Do not touch a peripheral part of the exhaust vent, especially screws and metallic part. This area
will become hot while the projector is being used.
• Do not put anything on the projector. Objects put on the cabinet will not only get damaged but also
maycauserehazardbyheat.
• Cooling fans are provided to cool down the projector.
• The fan’s running speed is changed according to the temperature inside the projector.
— vii —

DLP Projector — Owner’s Manual
Air Intake Vent Exhaust Vent
Moving the projector
When moving the projector, take care of the lens and retract the adjustable foot to prevent damage to the
lens and cabinet.
Installing the projector properly
• Please set the projector on nearly-level.
• Be sure to install the projector properly. Improper installation may reduce the laser diode lifetime and
even cause a re hazard.
Caution in ceiling installation the projector
• Onlyqualiedpersonalisauthorizedforceilinginstallation.
• We are not responsible for the hurt and damage caused by ceiling bracket that purchased from
unauthorized dealer even in warranty period.
• Remove the ceiling bracket immediately while not use.
• While installing, torque screwdriver is suggested, don’t use electric or impact-type screwdriver.
• Please read the manual of bracket for details.
• The bracket is subject to change without notice.
— viii —

140mm 140mm
280mm
310mm
Preface
M6 x 4
10mm
310mm
Caution in moving or transporting the projector
• Do not drop or bump the projector, otherwise damages or malfunctions may result.
• When carrying the projector, use a suitable carrying case.
• Do not transport the projector by courier or any other transport service in an unsuitable transport
case. This may cause damage to the projector. For information about transporting the projector by
courier or any other transport service, consult your dealer.
— ix —

DLP Projector — Owner’s Manual
Important Information
Laser Safety Cautions
This product is classied as CLASS 1 LASER PRODUCT - RISK GROUP 2 of IEC 60825-1:2014 and
also complies with 21 CFR 1040.10 and 1040.11 as a Risk Group 2, LIP (Laser Illuminated Projector) as
dened in IEC 62471:2006 except for deviations pursuant to Laser Notice No. 50, dated June 24, 2007.
,(&&/$66/$6(5352'8&75,6.*5283
&RPSOLHVZLWK&)5DQGDVD5LVN*URXS/,3
/DVHU,OOXPLQDWHG3URMHFWRUDVGHILQHGLQ,(&H[FHSWIRUGHYLDWLRQV
SXUVXDQWWR/DVHU1RWLFH1RGDWHG-XQH
&$87,21
3RVVLEO\KD]DUGRXVRSWLFDOUDGLDWLRQHPLWWHGIURPWKLVSURGXFW'RQRWVWDUHDW
RSHUDWLQJEHDP0D\EHKDUPIXOWRWKHH\HV
,(&352'8,7/$6(5'(&/$66(*5283('(5,648(
&RQIRUPHDX[QRUPHV&)5HWFRPPH*URXSHGHULVTXH
SURMHFWHXUODVHU/,3/DVHU,OOXPLQDWHG3URMHFWRUGpILQLSDU&(,
VDXIOHVH[FHSWLRQVFLWpHVGDQVOHGRFXPHQW/DVHU1RWLFH1GDWpGX-XLQ
$9(57,66(0(17
5D\RQQHPHQWRSWLTXHGDQJHUHX[SRWHQWLHOpPLVSDUFHSURGXLW1HSDVUHJDUGHU
GLUHFWHPHQWGDQVOHIDLVFHDX&HFLSRXUUDLWrWUHQRFLISRXUOHV\HX[
,(&䱢㾧ℰẎ⒨5*⍘晐䬰于
晋ṭ㠠㍕㾧ℰ⅓䬓⏞㗌㜆⹛㛯㗌Ḳⷕ⻩⣽䬍⏯&)5⑳⏳
,(&㈧⮁ḰḲ/,3㾧ℰ䅎㗵㉼⽘㜡ƌ5*⍘晐䬰于
㳏ヶ
㭋Ẏ⒨⏖僤ἁẎ䔆⍘晐㾧ℰ彷⯫˛寞⋦䛛妭㒴ὃℰ㝆ƏỌℴ⯠䜣䝂㍆⮚˛
• This projector has built-in Class 4 laser module. Disassembly or modication is very dangerous and
should never be attempted.
• Any operation or adjustment not specically instructed in the user’s guide creates the risk of hazardous
laser radiation exposure.
• Do not open or disassemble the projector as this may cause damage by the exposure of laser radiation.
• Do not stare into beam when the projector is on. The bright light may result in permanent eye damage.
• When turning on the projector, make sure no one within projection range is looking at the lens.
• Without following the control, adjustment or operation procedure may cause damage by the exposure of
laser radiation.
• Adequate instructions for the assembly, operation, and maintenance, including clear warnings
concerning precautions to avoid possible exposure to laser.
— x —

Compliance
FCC Caution
Note: This equipment has been tested and found to comply with the limits for a Class A digital device,
pursuant to Part 15 of the FCC Rules. These limits are designed to provide reasonable protection against
harmful interference in a residential installation. This equipment generates, uses, and can radiate radio
frequency energy, and if not installed and used in accordance with the instructions, may cause harmful
interference to radio communications. However, there is no guarantee that interference will not occur in a
particular installation. If this equipment does cause harmful interference to radio or television reception,
which can be determined by turning the equipment off and on, the user is encouraged to try to correct the
interference by one or more of the following measures:
• Reorient or relocate the receiving antenna.
• Increase the separation between the equipment and receiver.
• Connect the equipment into an outlet on a circuit different from that to which the receiver is connected.
• Consult the dealer or an experienced radio/TV technician for help.
Use of shielded cable is required to comply with class A limits in Subpart B of Part 15 of FCC Rules.
Do not make any changes or modications to the equipment unless otherwise specied in the instructions.
If such changes or modications should be made, you could be required to stop operation of the
equipment.
Preface
Model Number : EK-820U
Trade Name : EIKI
Responsible party : EIKI International, Inc.
Address : 30251 Esperanza Rancho Santa Margarita CA 92688-2132
Telephone No. : 800-242-3454 (949-457-0200)
Note:
For use in a commercial, industrial or business environment.
Not for domestic use.
AC Power Cord Requirement
The AC Power Cord supplied with this projector meets the requirement for use in the country you
purchased it.
AC Power Cord for the United States and Canada:
AC Power Cord used in the United States and Canada is listed by the Underwriters Laboratories (UL) and
certied by the Canadian Standard Association (CSA).
AC Power Cord has a grounding-type AC line plug. This is a safety feature to be sure that the plug will t
into the power outlet. Do not try to defeat this safety feature. Should you be unable to insert the plug into
the outlet, contact your electrician.
Warning:
Aplugwithbaredexiblecordishazardousifengagedinalivesocketoutlet.
— xi —

DLP Projector — Owner’s Manual
The Wires in this mains lead are coloured in accordance with the following code:
• Green-and-yellow ......... Earth
• Blue .............................. Neutral
• Brown ........................... Live
As the colours of the wires in the mains lead of this apparatus may not correspond with the coloured
markings identifying the terminals in your plug proceed as follows:
• The wire which is coloured green-and-yellow must be connected to the terminal in the plug which is
marked by the letter E or by the safety earth symbol or coloured green or green-and-yellow.
• The wire which is coloured blue must be connected to the terminal which is marked with the letter N or
coloured black.
• The wire which is coloured brown must be connected to the terminal which is marked with the letter L or
coloured red.
Warning:
This apparatus must be earthed.
Note:
The socket-outlet should be installed near the equipment and easily accessible.
— xii —

Preface
Contents
GETTING STARTED ................................................................................................................ 1
Packing checklist ...................................................................................................................... 1
Views of Projector Parts ......................................................................................................... 2
Front-right View .....................................................................................................................................2
Rear View ..............................................................................................................................................3
Built-in Keypad .......................................................................................................................................4
Bottom View ...........................................................................................................................................5
remote control Parts ............................................................................................................. 6
remote control oPerating range ............................................................................................. 8
Projector and remote control Buttons ................................................................................... 8
remote control code ............................................................................................................... 8
inserting the remote control Batteries .................................................................................. 9
SETUP AND OPERATION .................................................................................................... 10
installing the Projection lens ................................................................................................. 10
starting and shutting down the Projector ............................................................................. 12
Turn the Projector On ..........................................................................................................................12
Turn the Projector Off ..........................................................................................................................12
adjusting the Projector leVel ................................................................................................ 13
adjusting the Zoom, focus, and keystone ............................................................................... 14
using the lens shift adjustment ............................................................................................. 15
Vertical / Horizontal Lens Shift .............................................................................................................15
oPtional lenses and Projection siZe ....................................................................................... 17
Projection Lens ....................................................................................................................................17
Projection Size v.s Throw Distance......................................................................................................19
ON-SCREEN DISPLAY (OSD) MENU SETTINGS ............................................................... 20
osd menu controls ............................................................................................................... 20
Navigating the OSD .............................................................................................................................20
setting the osd language ..................................................................................................... 21
osd menu oVerView ............................................................................................................... 22
Picture menu .......................................................................................................................... 30
3D Display Menu .................................................................................................................................31
HSG Adjustment Menu ........................................................................................................................32
Advanced Menu ...................................................................................................................................33
— xiii —

DLP Projector — Owner’s Manual
outPut menu ........................................................................................................................... 34
PIP/PBP Menu .....................................................................................................................................36
setuP menu ............................................................................................................................. 38
Lens Function Menu ............................................................................................................................39
Menu Preferences Menu .....................................................................................................................40
PIN Menu .............................................................................................................................................41
Communications Menu ........................................................................................................................42
oPtion menu ............................................................................................................................ 44
Power Settings Menu ...........................................................................................................................45
Light Source Settings Menu .................................................................................................................46
control your Projector using weB Browser ........................................................................ 47
Wired LAN Terminal functionalities ......................................................................................................47
Supported External Devices ................................................................................................................47
LAN_RJ45 ...........................................................................................................................................47
RS232 by Telnet Function ....................................................................................................................52
MAINTENANCE AND SECURITY ........................................................................................ 55
rePlacing the Projection lens ................................................................................................ 55
cleaning the Projector ........................................................................................................... 56
Cleaning the Lens ................................................................................................................................56
Cleaning the Case ...............................................................................................................................56
using the kensington® lock .................................................................................................... 57
TROUBLESHOOTING .......................................................................................................... 58
common ProBlems and solutions ............................................................................................. 58
tiPs for trouBleshooting ........................................................................................................ 58
led error messages .............................................................................................................. 59
image ProBlems ....................................................................................................................... 60
laser diode ProBlems ............................................................................................................. 60
remote control ProBlems ...................................................................................................... 61
haVing the Projector serViced ............................................................................................... 61
hdmi Q & a ............................................................................................................................ 62
SPECIFICATIONS ................................................................................................................. 63
sPecifications .......................................................................................................................... 63
Projection distance Vs. Projection siZe .................................................................................. 64
Projection Distance and Size Table .....................................................................................................64
timing mode taBle ................................................................................................................... 65
Projector dimensions .............................................................................................................. 69
— xiv —

Preface
REGULATORY COMPLIANCE ............................................................................................. 70
fcc warning .......................................................................................................................... 70
canada .................................................................................................................................... 70
safety certifications .............................................................................................................. 70
— xv —
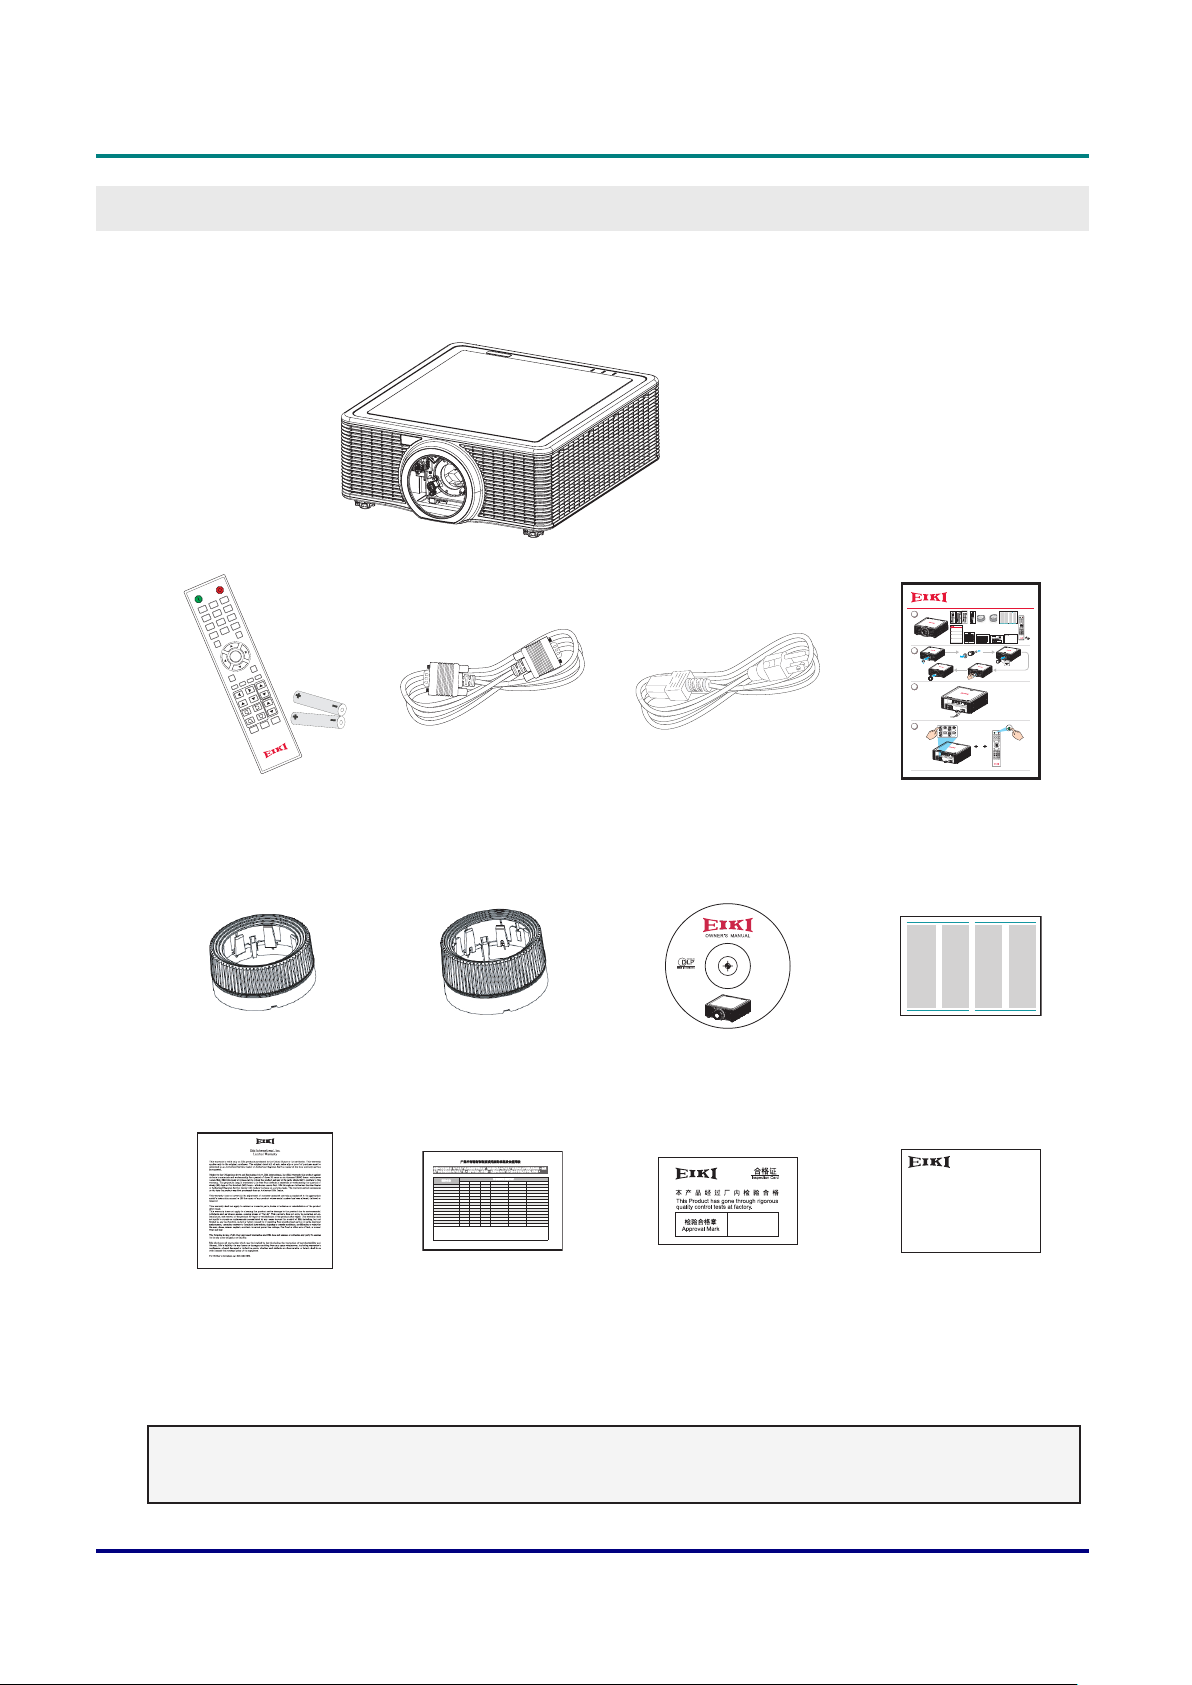
Packing Checklist
Carefully unpack the projector and check that the following items are included:
DLP Projector — Owner’s Manual
GettinG Started
OFF
ON
3
2
6
1
5
9
4
8
7
Mode
0
Source
Info
Auto
Enter
Exit
PIP
Cont.
Menu
Bright
Gamma
Focus
Lens H
Lens V
Zoom
Keystone H
Pattern
Keystone V
Hot Key
Shutter
(AV Mute)
REMOTE CONTROL
(WITH TWO AAA
BATTERIES)
LENS COVER
* For A01, A03, and A13 lens
DLP PROJECTOR
VGA CABLE POWER CORD
*
For other regions except China:
POWER CORD x 2 (US and EU)
* For China: POWER CORD x 1
LENS COVER
* For A06 lens
(THIS OWNER’S MANUAL)
CD-ROM
for China
EK-820U
EK-820U series
Quick Start Guide
1
(Projection lens is optional.)
2
Safety Guide Safety Guide
ON OFF
21 3
54 6
87 9
Mode
Info
0
21
Auto Source
EK-820U series
Quick Start Guide
Enter
Menu Exit
GammaBrightCont. PIP
Focus
Lens H
Lens V
Keystone H
Zoom
Keystone V
Shutter
Hot Key
Pattern
(AV Mute)
3
4
ON
ON OFF
21 3
54 6
87 9
Mode
Info
0
Auto
Source
Enter
Menu Exit
GammaBrightCont. PIP
Focus
Lens H
Lens V
Zoom
Keystone H
Keystone V
Shutter
Hot Key
Pattern
(AV Mute)
QUICK START GUIDE
Safety Guide Safety Guide
1
2
SAFETY GUIDE
ṏ⑩㚱㭺㚱⭛䈑峐ㆾ䳈䘬⎵䦘⍲⏓濌濪堐
ὅ㌖⚥㓧⹄搰⮡“䓝⫸ᾉ〗ṏ⑩㰉㝻㍏⇞䭉瀲≆㱽炱㍏⇞ⅷ⮹䓝⫸ᾉ〗ṏ ⑩⹇⺫⎶⮡䍗⠫忈ㆸ䘬㰉㝻炻Ὣ徃
䓇ṏ撨ⓖỶ㰉㝻䓝⫸ᾉ〗ṏ⑩炻ᾅ㉌䍗⠫Ṣỻ炻ṭ㍸ὃ㚱ℛ㛔ṏ⑩⎗傥⏓㚱㚱㭺⍲㚱⭛䈑 峐⤪⎶烉
㚱㭺㚱⭛䈑峐ㆾ䳈
悐ẞ⎵䦘
摭炷Pb˅ 㰆炷Hg˅ 擱炷Cd˅ 瀟ẟ撔炷Cr(VI)˅ ⣂㹜俼劗炷PBB˅ ⣂㹜Ḵ劗慂炷PBDE˅
XOOO OO
ݹᵪᕅ(
䬍ᡆ䬍䭱䠁)
XOOO OO
䮌ཤ
XXOO OO
⚟⌑
XOOO OO
⛩⚟ಘ
XOOO OO
ᕩ⡷(ᘛࡺ⼧䬌)
XOOO OO
仾ᡷ㓴Ԧ
OOXO OO
⚟⌑ⴆ؍ᣔᔰޣ
OOXO OO
ᓖᔰޣ
XOOO OO
สᶯ㓴Ԧ
XOOO OO
㔶㓯,㓯ᶀ
XOOO OO
⭥Ⓚ㓯
XOOO OO
⭥Ⓚᨂᓗ㓴Ԧ
XOOO OO
䠁Ԧ(ᘛࡺ⼧䬌,䬌䪹ㅹ)
XOOO OO
䚕᧗ಘ
˕烉堐䣢宍㚱㭺㚱⭛䈑峐⛐宍悐ẞ㚱⛯峐㛸瀌䘬⏓濌⛯⛐SJ/T11363-2006㞯Ⅾ奬⭂䘬旸濌天㯪ẍᶳˤ
ʹ烉堐䣢宍㚱㭺㚱⭛䈑峐军⮹⛐宍悐ẞ䘬㝸ᶨ⛯峐㛸瀌䘬⏓濌崭↢SJ/T11363-2006㞯Ⅾ奬⭂䘬旸濌天㯪ˤ
⢯㲐烉戜Ḷ㫏䚇ᶶ⚥⮡ḶRoHS䘬澵⎴奬⭂炻㛔㈽⼙㛢ṏ⑩䫎⎰㫏䚇RoHS㊯濶(䓝㮼ˣ䓝⫸学⢯旸⇞ἧ䓐㝸ṃ㚱⭛䈑峐㊯濶),㛔
堐㞯㚱"X"䘬㚱悐ẞ⛯㫏䚇ROHS㊯濶孠瀃⢾䘬悐ẞˤ
WARRANTY CARD
for USA
RoHS CARD
for China
QC PASS CARD
for China
WARRANTY CARD
for China
Contact your dealer immediately if any items are missing, appear damaged, or if the unit does not work. It
is recommend that you keep the original packing material should you ever need to return the equipment
for warranty service.
Note:
• Avoid using the projector in dusty environments.
— 1 —

DLP Projector — Owner’s Manual
Views of Projector Parts
Front-right View
2
1
43
5
6
Item LabeL DescrIptIon see page
1 Projection Lens Allows automated lens control and adjustment: vertical and
-
horizontal offsets, zoom and focus.
2 Front IR Sensor Receives signals from the IR remote. Keep the signal path to
8
the sensor unobstructed for uninterrupted communication with
3 Top IR Sensor
4 LED Status
the projector.
Displays the status of the projector. 59
Indicators
5 Cooling Air Vents
(Intake)
Keep these vents unobstructed to prevent the projector from
overheating.
-
6 Adjustable Feet Raise or lower the feet to level the projector. 13
Important:
Ventilation openings on the projector allow for good air circulation, which keeps the projector laser
diode cool. Do not obstruct any of the ventilation openings.
— 2 —
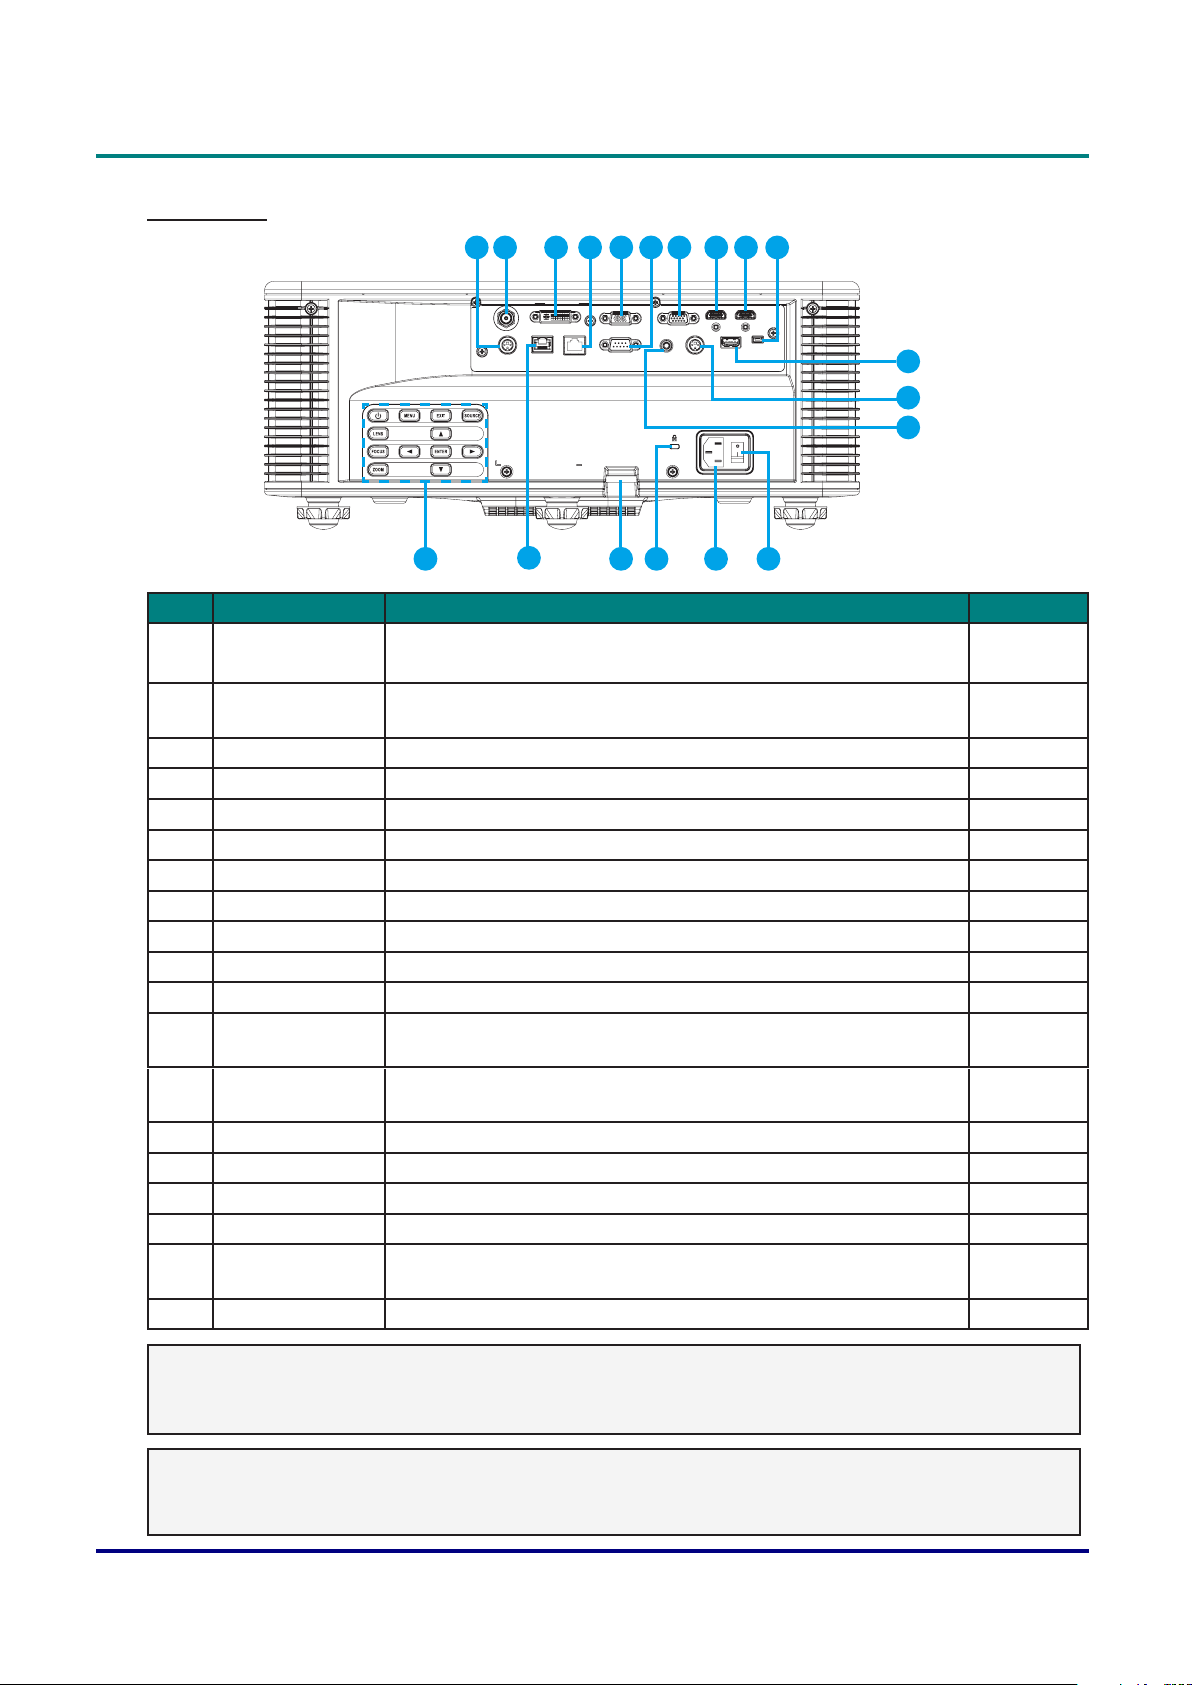
Rear View
DLP Projector — Owner’s Manual
1 2 3 4 5
DVI-D
3G-SDI IN
HDBaseTLAN RS-232C REMOTE IN
3D SYNC OUT
18
6 7 8 9 10
VGA IN VGA OUT
3D SYNC IN
15
HDMI INHDMI OUT
SERVICEUSB
1417 1619
11
12
13
Item LabeL DescrIptIon see page
1 3D SYNC OUT Connect the 3D IR glasses transmitter
-
(Note: For Specic 3D IR glasses only)
2 3G-SDI IN Connect the coaxial cable with BNC connector from a 3G-SDI
-
device.
3 DVI-D Connect to DVI source. -
4 LAN Connect a LAN cable from Ethernet. -
5 VGA IN Connect the VGA cable from a computer or component device. -
6 RS-232C Connect RS-232 serial port cable for remote control. -
7 VGA OUT Connect the VGA cable to a display. -
8 HDMI OUT Connect the HDMI cable to a display. -
9 HDMI IN Connect the HDMI cable from a HDMI device. -
10 SERVICE Service only. -
11 USB Connect the WIFI dongle. -
12 3D SYNC IN Connect 3D sync in cable from your PC or other applicable
-
device.
13 REMOTE IN Connect to the remote control wired terminal for serial control
-
projector.
14 Power Switch Switch the power button to turn on/off the power source. 12
15 AC Input Connect to the supplied power adapter. 12
16 Kensington Lock Use to secure the projector to countertops, tables, etc. 57
17 Security Bar Use to secure the projector. -
18 HDBaseT Connect a RJ45 Cat5/Cat6 Ethernet cable to input
-
uncompressed high-denition video control signals.
19 Built-in Keypad Control the projector. 4
Note:
• To use this feature, you must plug in the power adapter/cable/cord before turn on/off the projector.
• Do not use this jack for anything other than intended use.
Warning:
As a safety precaution, disconnect all power to the projector and connecting devices before making
connections.
— 3 —

DLP Projector — Owner’s Manual
Built-in Keypad
1
9
8
2 3 4
567
Item LabeL DescrIptIon see page
1 Power Turn the projector on or off. 12
2 Menu Display menus. 20
3 Exit Return to previous level or exit menus if at top level. 20
4 Source Select an input for the main or PIP/PBP image. -
5 Enter • Select a highlighted menu item.
20
• Change or accept a value.
6 Arrow keys • Adjust a setting UP or DOWN.
20
• Navigate within a menu.
7 Zoom Adjust zoom. 14
8 Focus Adjust focus. 14
9 Lens Adjust the lens vertical or horizontal offset setting. -
— 4 —
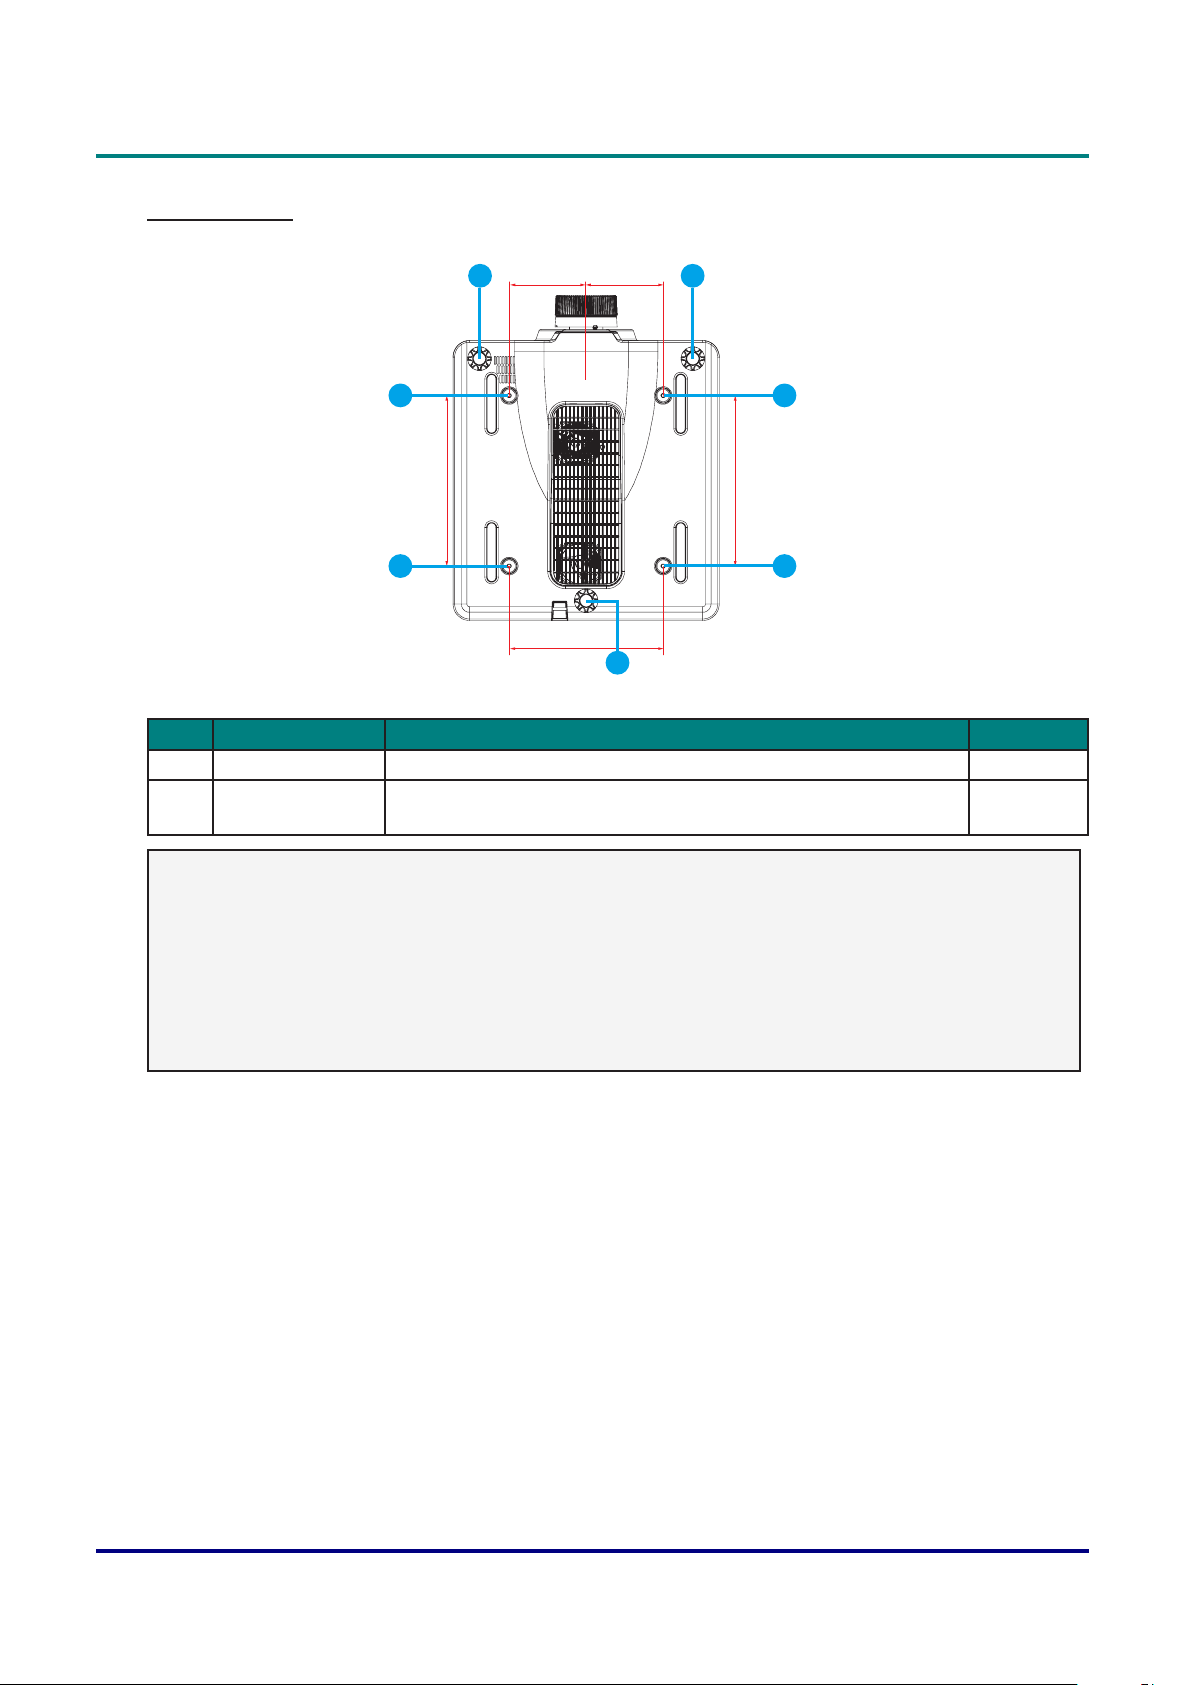
Bottom View
140mm 140mm
310mm
DLP Projector — Owner’s Manual
1
2
2
280mm
1
1
2
310mm
2
Item LabeL DescrIptIon see page
1 Adjustable Feet Raise or lower the feet to level the projector. 13
2 Ceiling support
holes
Contact your dealer for information on mounting the projector on
a ceiling.
-
Note:
• When installing, ensure that you use only UL Listed ceiling mounts.
• For ceiling installations, use approved mounting hardware and M6 screws with a maximum screw
depth of 10 mm (0.39 inch).
• The construction of the ceiling mount must be of a suitable shape and strength. The ceiling mount
load capacity must exceed the weight of the installed equipment, and as an additional precaution
be capable of withstanding three times the weight of the equipment (not less than 71.4 kg) over a
period of 60 seconds.
— 5 —

DLP Projector — Owner’s Manual
Remote Control Parts
ON OFF
1
16
21 3
10
11
12
13
14
15
2
54 6
87 9
3
4
Info
Auto
Mode
0
Source
17
18
5
6
7
8
9
Enter
Menu Exit
Gamma Bright Cont. PIP
Hot Key
Focus
Zoom
Pattern
Keystone H
Keystone V
Shutter
(AV Mute)
Lens H
Lens V
19
20
21
22
23
24
Important:
1.Avoidusingtheprojectorwithbrightuorescentlightingturnedon.Certainhigh-frequency
uorescentlightscandisruptremotecontroloperation.
2. Be sure nothing obstructs the path between the remote control and the projector. If the path
between the remote control and the projector is obstructed, you can bounce the signal off certain
reectivesurfacessuchasprojectorscreens.
3. The buttons and keys on the projector have the same functions as the corresponding buttons on the
remote control. This owner’s manual describes the functions based on the remote control.
Note:
Complies with FDA performance standards for laser products except for deviations pursuant to
Laser Notice No. 50, dated June 24, 2007.
— 6 —
DLP Projector — Owner’s Manual
Item LabeL DescrIptIon see page
1 Power on Turn projector ON. 12
2 Number Keys Enter a number (such as PIN code) or source hotkey.
Source Hotkey Key:
1: VGA
2: HDMI
3: DVI-D
4: HDBaseT
5: LAN
6: 3G-SDI
3 Info Display source image information. -
4 Auto Automatically optimize image. -
5 Enter • Select a highlighted menu item.
• Change or accept a value.
6 Arrow Keys • Adjust a setting UP or DOWN.
• Navigate within a menu.
7 Menu Display menus. 20
8 Gamma Adjust mid-range levels. -
9 Bright Adjust amount of light in the image. -
10 Lens H Adjust the position of the image horizontally. -
11 Lens V Adjust the position of the image vertically. -
12 Keystone H Adjust the horizontal keystone. 14
13 Keystone V Adjust the vertical keystone. 14
14 Shutter
(AV Mute)
15 Hot Key Select your preset keys quickly. -
16 OFF Turn projector OFF. 12
17 Mode Select the preset display mode. -
18 Source Select an input for the main or PIP/PBP image. -
19 Exit Return to previous level or exit menus if at top level. 20
20 PIP Turn PIP/PBP ON/OFF. -
21 Cont. Adjust difference between dark and light. -
22 Focus Adjust focus to improve image clarity as desired. 14
23 Zoom Adjust zoom to achieve a desired image size. 14
24 Pattern Display a test pattern. -
Display or blank the video image. -
-
20
20
— 7 —

DLP Projector — Owner’s Manual
Caution:
Useofcontrols,adjustmentsorperformanceofproceduresotherthanthosespeciedhereinmay
result in hazardous laser light exposure.
Remote Control Operating Range
The remote control uses infrared transmission to control the projector. It is not necessary to point the
remote directly at the projector. Provided you are not holding the remote perpendicular to the sides or the
rear of the projector, the remote will function well within a radius of about 10 meters (32.8 feet) and 30
degrees above or below the projector level. If the projector does not respond to the remote control, move
a little closer.
Projector and Remote Control Buttons
The projector can be operated using the remote control or the buttons on the rear of the projector. All
operations can be carried out with the remote control; however, the buttons on the projector are limited in
use.
Remote Control Code
The ten different remote control modes (Code 0- Code 9) are assigned to this projector. Switching
the remote control codes prevents interference from other remote controls when several projectors or
video equipment next to each other are being operated at the same time. Change the remote control
code for the projector rst before changing that for the remote control. See “ Projector Address” in the
Communications Menu on page 42.
To change the code for the Remote Control:
Press and hold the Mode button for more than three seconds. Then, press a number button (0-9) to switch
among the codes.
Default setting: 0
— 8 —
DLP Projector — Owner’s Manual
To change the Projector Address for the projector:
Select a Projector Address in the Setup Menu. (SETUP → Communications → Projector Address)
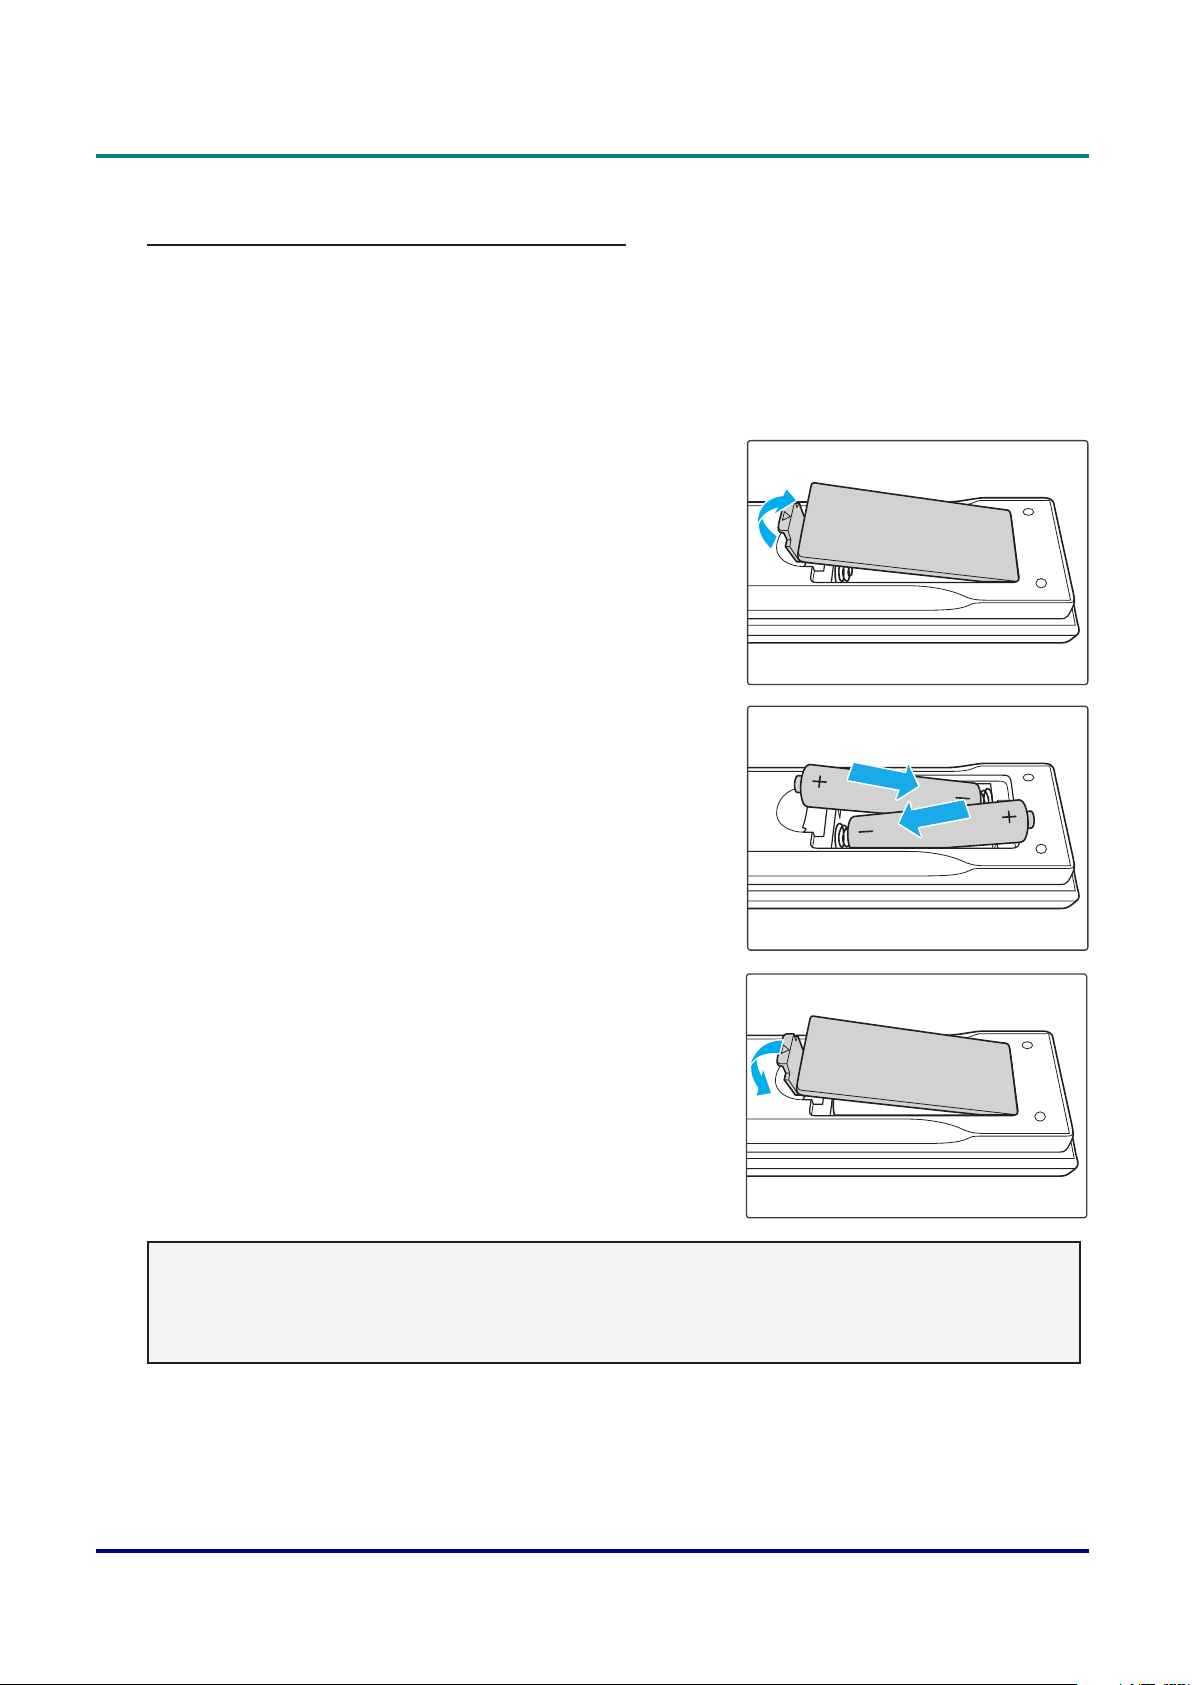
Inserting the Remote Control Batteries
1. Remove the battery compartment cover as shown in the
illustration.
2. Insert the batteries with correct polarity (+/-) as shown inside
the battery compartment.
3. Replace the cover.
Caution:
• Only use AAA batteries (Alkaline batteries are recommended).
• Dispose of used batteries according to local ordinance regulations.
• Remove the batteries when not using the projector for prolonged periods.
— 9 —
DLP Projector — Owner’s Manual
Setup and OperatiOn
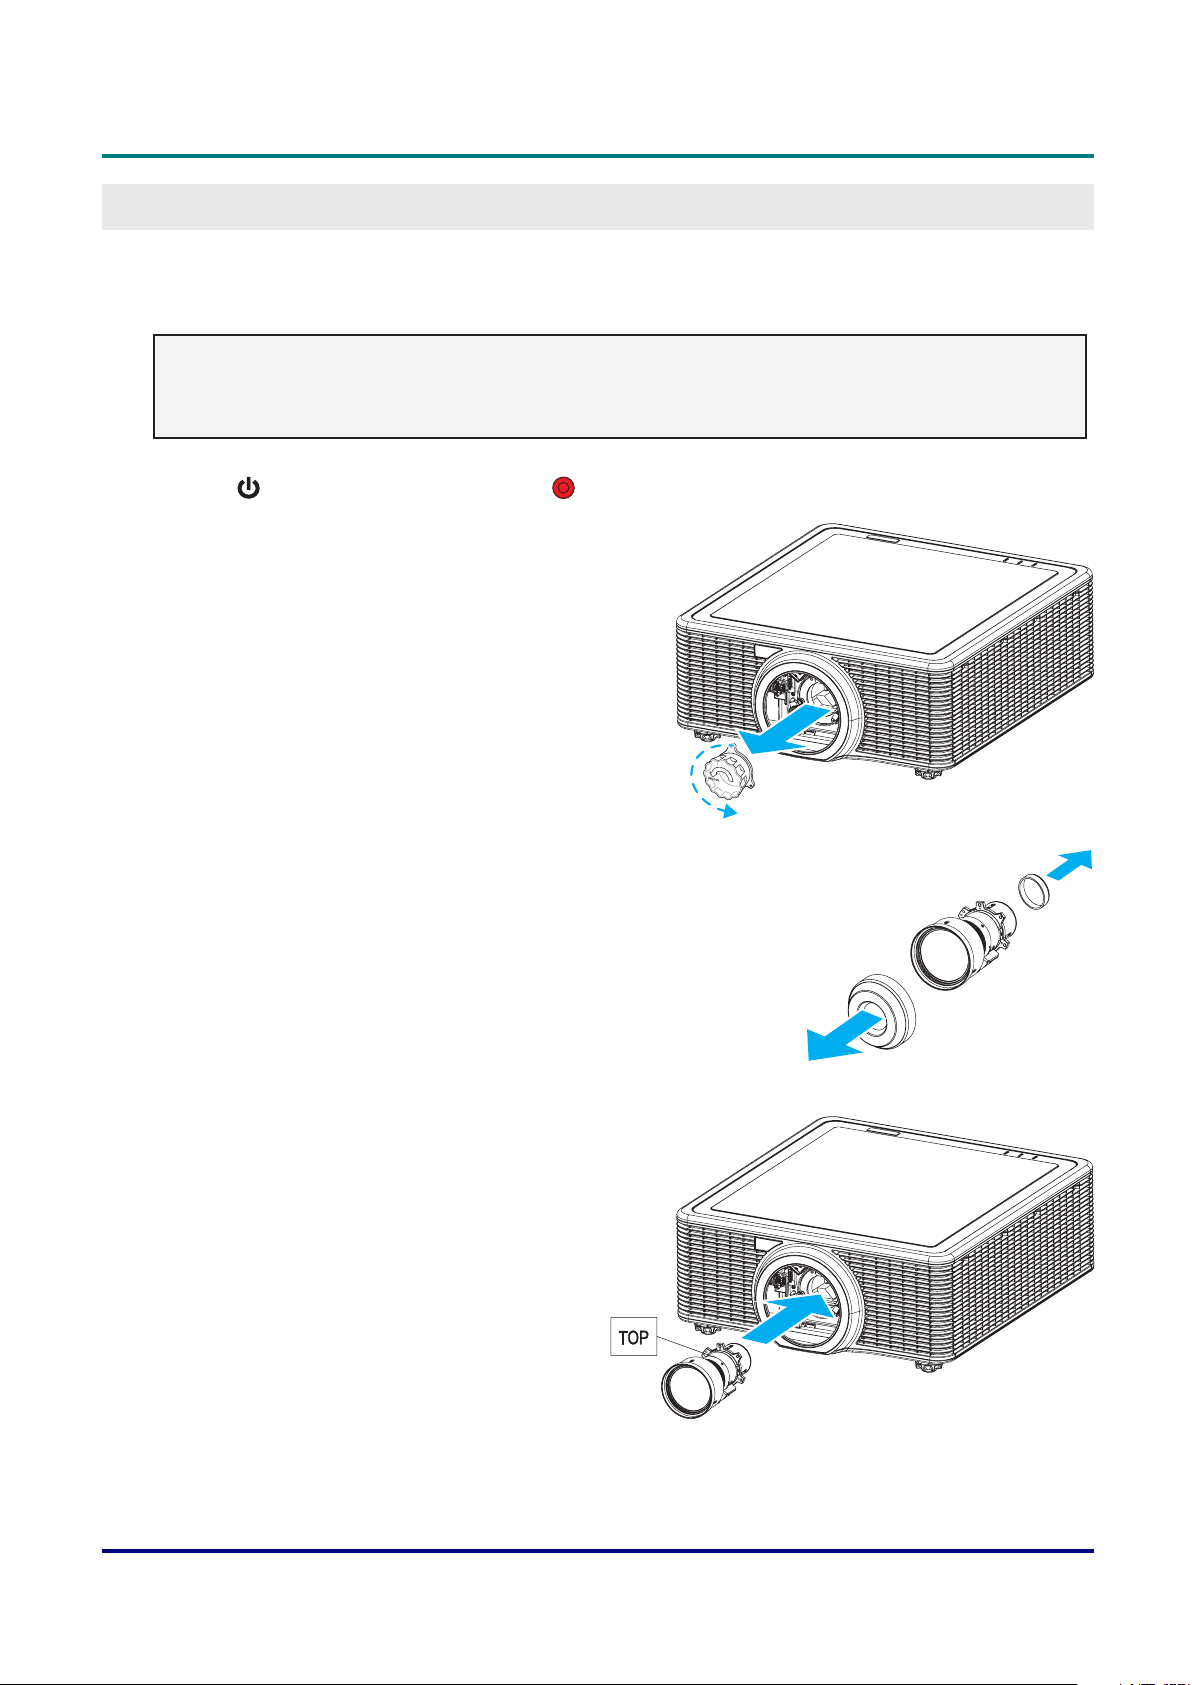
Installing the Projection Lens
Before setting up the projector, install the projection lens on the projector.
Important:
• Before installation, check where the projector is used and prepare a suitable lens.
• For details, contact the sales dealer where you purchased the projector.
1. Press “ ” on the built-in keypad or press “ ” on the remote control twice to turn off the projector.
2. Rotate the lens cap counter-clockwise. Then remove the lens cap.
3. Remove both lens caps (front and back) on the lens.
4. With the label “TOP” on the lens assembly facing up, install
the assembly into the lens mount.
— 10 —

5. Rotate the lens clockwise to lock the lens in place.
6. Firmly install the lens cover onto the lens.
DLP Projector — Owner’s Manual
— 11 —
Loading...