

Page 1
OPERATING MANUAL
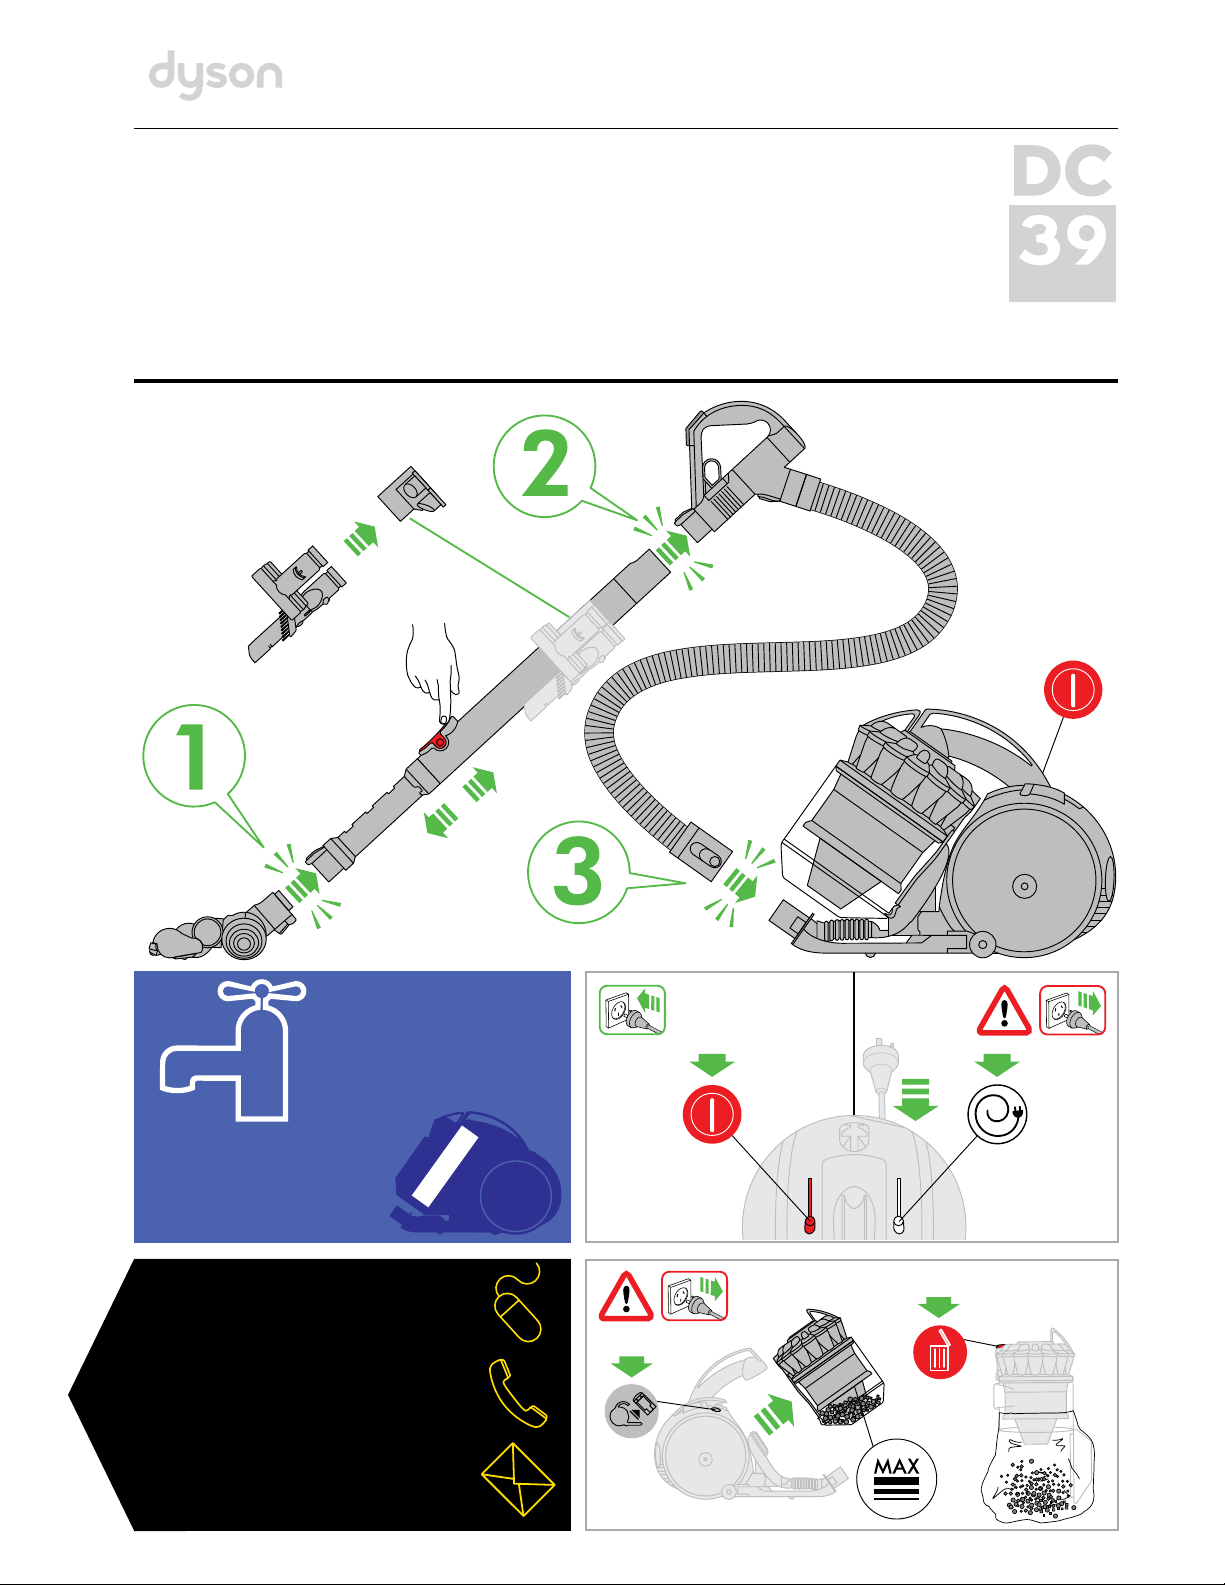
WASH FILTER
Wash filter with cold water
regularly or as required.
ASSEMBLY
click
click
click
DC39
REGISTER
YOUR DYSON
2 YEAR
GUARANTEE
TODAY
Page 2
IMPORTANT SAFETY INSTRUCTIONS
BEFORE USI NG THIS APPLIA NCE READ ALL I NSTRUCTIONS A ND CAUTIONARY M ARKINGS IN THIS
MANUAL A ND ON THE APPLIA NCE
When using an electrical appliance, basic pre cautions should always be followed, including the following:
WARNING
TO REDUCE THE R ISK OF FIRE, ELECT RIC SHOCK, OR INJ URY:
1. This Dyson appliance is not intended for us e by young children or infirm persons with reduced physical, sensor y or
reasoning capabilities, or lack of experience and k nowledge, unless they have been given super vision or instruction
by a responsible person concerning use of the ap pliance to ensure that they can use it safely.
2. Do not allow to be used as a toy. Close attention is necess ary when used by or near young children. Children should
be supervised to ensure t hat they do not play with the appliance.
3. Use only as described in this Dyson O perating Manual. Any other use not recommende d by the manufacturer may
cause fire, electric shock, or injur y to persons.
4. Suitable for dry locations only. Do not use outd oors or on wet surfaces.
5. Do not handle any part of the plug or appliance wit h wet hands.
6. Do not use with a damaged cable or plug. If the s upply cable is damaged it must be replaced by D yson, its service
agent or similarly qualified person in order to avoid a hazard.
7. If the appliance is not working as it should, has received a shar p blow, has been dropped, damaged, left outdoors,
or dropped into water, do not use and contact the Dyson Custo mer Care Helpline.
8. Contact the Dyson Cus tomer Care Helpline when service or repair is required. Do n ot disassemble the appliance as
incorrect reassembly ma y result in an electric shock or fire.
9. Do not stretch the cable or place the cable un der strain. Keep the cable away from heated sur faces. Do not close a
door on the cable, or pull the cable around sharp edges or cor ners. Arrange the cable away from traf fic areas and
where it will not be stepped on or tr ipped over.
10. Do not unplug by pulling on the cable. To unplug, grasp the plug, not the cable. The use of an extension cable is not
recommended.
11. Do not use to pick up water.
12. Do not use to pick up flammable or combustible liquids, such as pe trol, or use in areas where they or their vapours
may be present.
13. Do not pick up anything that is burning or smoking, such as cigare ttes, matches, or hot ashes.
14. Keep hair, loose clothing, fingers, and all parts of the body away from op enings and moving parts. Do not point the
hose, wand or tools at your eyes or ears or put them in your mout h.
15. Do not put any object into openings. Do not us e with any opening blocked; keep free of dust, lint, hair, and anything
that may reduce airflow.
16. Use only Dyson recommende d accessories and replacement par ts.
17. To avoid a tripping hazard rewind the cable when not in use.
18. Do not use without the clear bin and filter in pla ce.
19. Do not leave the appliance when plugge d in. Unplug when not in use and before servicing.
20. Do not pull or carry by the cable or use the c able as a handle.
21. Use extra care when cleaning on s tairs. Do not work with the appliance above you on the stairs.
22. Turn off all controls before unplugging. Unplug before connec ting any tool or accessory.
23. Always extend the c able to the red line but do not stretch or tug the cable.
24. Hold the plug when rewinding onto cable reel. Do not allow the plug to w hip when rewinding.
READ AND SAVE THESE INSTRUCTIONS
THIS DYSON APPLIA NCE IS INTENDE D FOR HOUSEHOLD US E ONLY
2
3
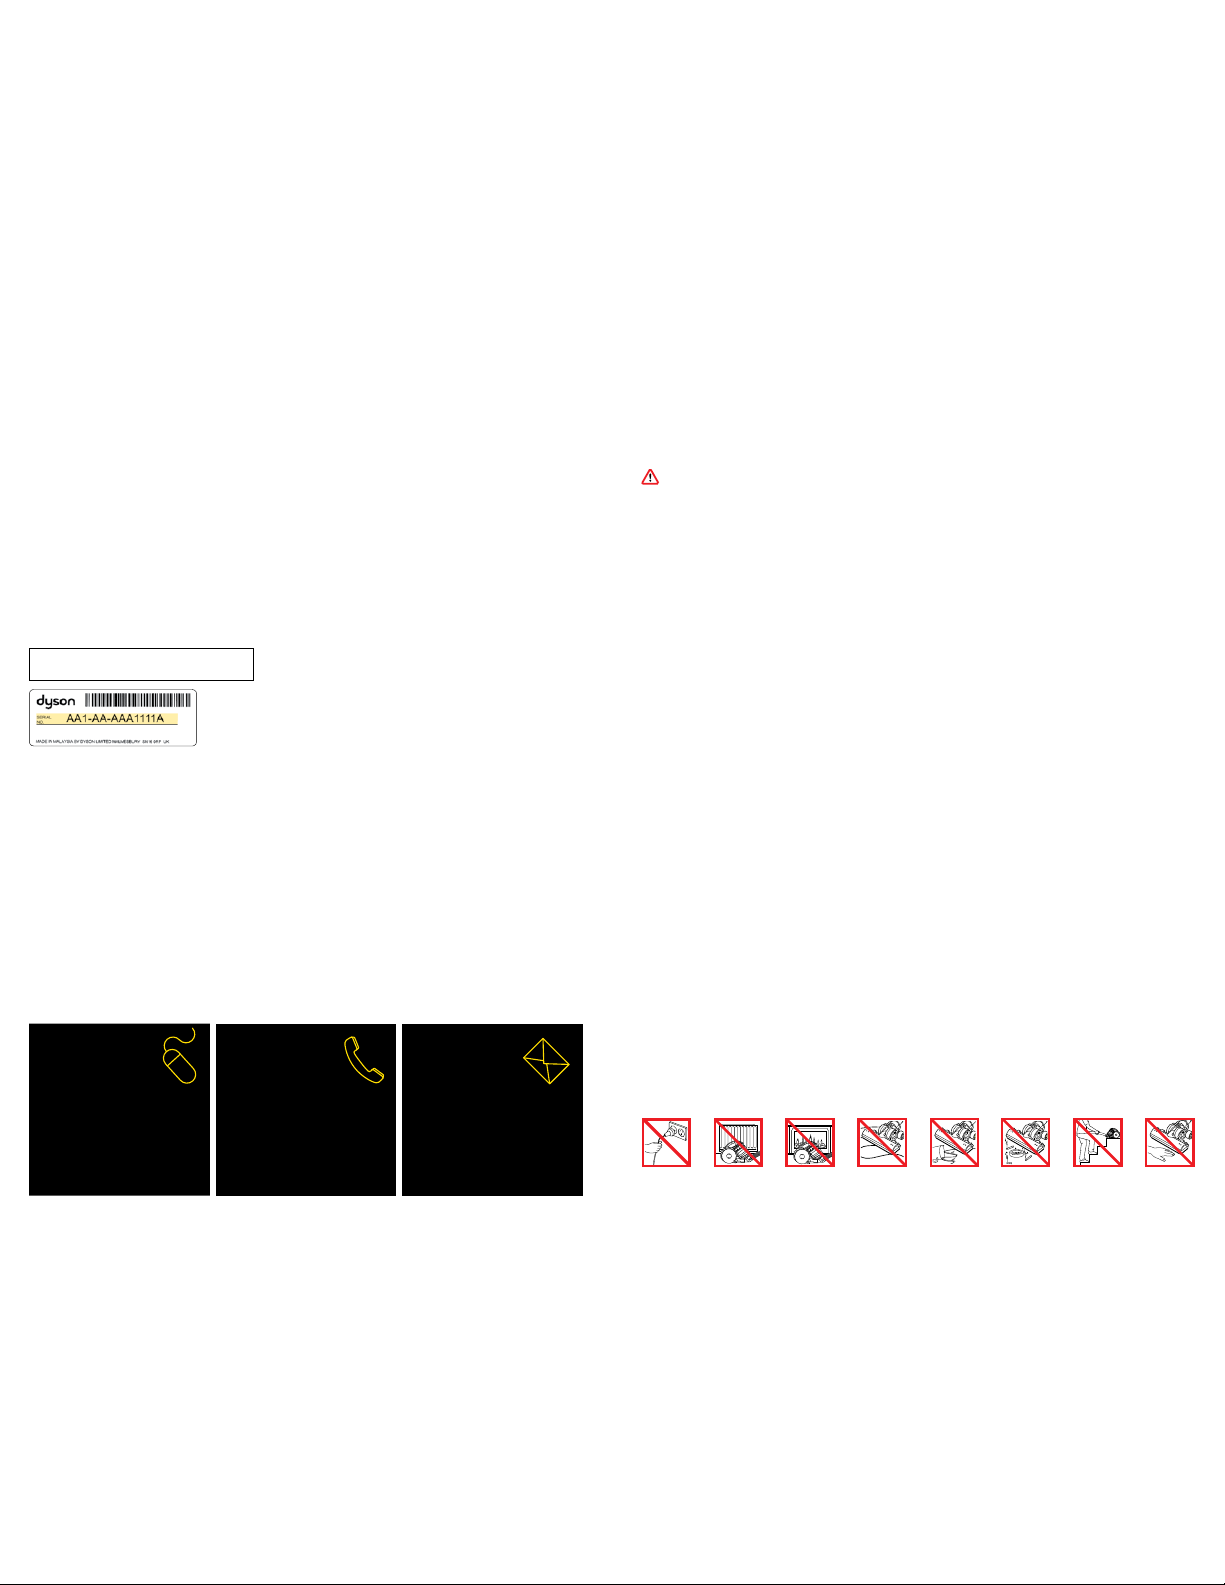
Do not pull on
the cable.
Do not store ne ar
heat sources .
Do not use near
naked flames .
Do not run over
the cable.
Do not pick up
water or liquid s.
Do not pick up
burning obje cts.
Do not use above
you on the stair s.
Do not put hands n ear
the brush bar wh en the
appliance is in us e.
DYSON CUSTOMER CARE
THANK YOU FOR CHOOS ING TO BUY A DYSON APPLIANC E
Your Dyson appliance will be covered for parts and
labour for 2 years from the date of purchase, as detaile d
in the terms of the Dyson guarantee on p age 8 of this
Dyson Operating Manual.
If you have a query about your D yson appliance, call the
Dyson Customer Care Helpline quoting the s erial number
and details of where and when you bought the applianc e.
Your serial number can be found on your rating plate
which is on the base of the appliance.
Most queries can be solved over th e phone by one of our
Dyson Customer Care Helpline st aff (details below).
AU: www.dyson.com.au/register
NZ: www.dyson.co.nz/register
Note your seria l number for future refe rence
This illustra tion is for example pu rposes only.
3 EASY WAYS TO REGISTER YOUR DYSON 2 YEAR GUARANTEE
REGISTER
BY MAIL
Complete and return
the form to Dyson in the
envelope supplied
REGISTER
BY PHONE
AU 1800 239 766
NZ 0 800 397 667
SG 7000 435 7546
ID 021 707 39766
REGISTER
ONLINE
Visit our website to register your
Dyson full parts and labour
guarantee online (Australia and
New Zealand only).
AU: www.dyson.com.au/register
NZ: www.dyson.co.nz/register
Page 3
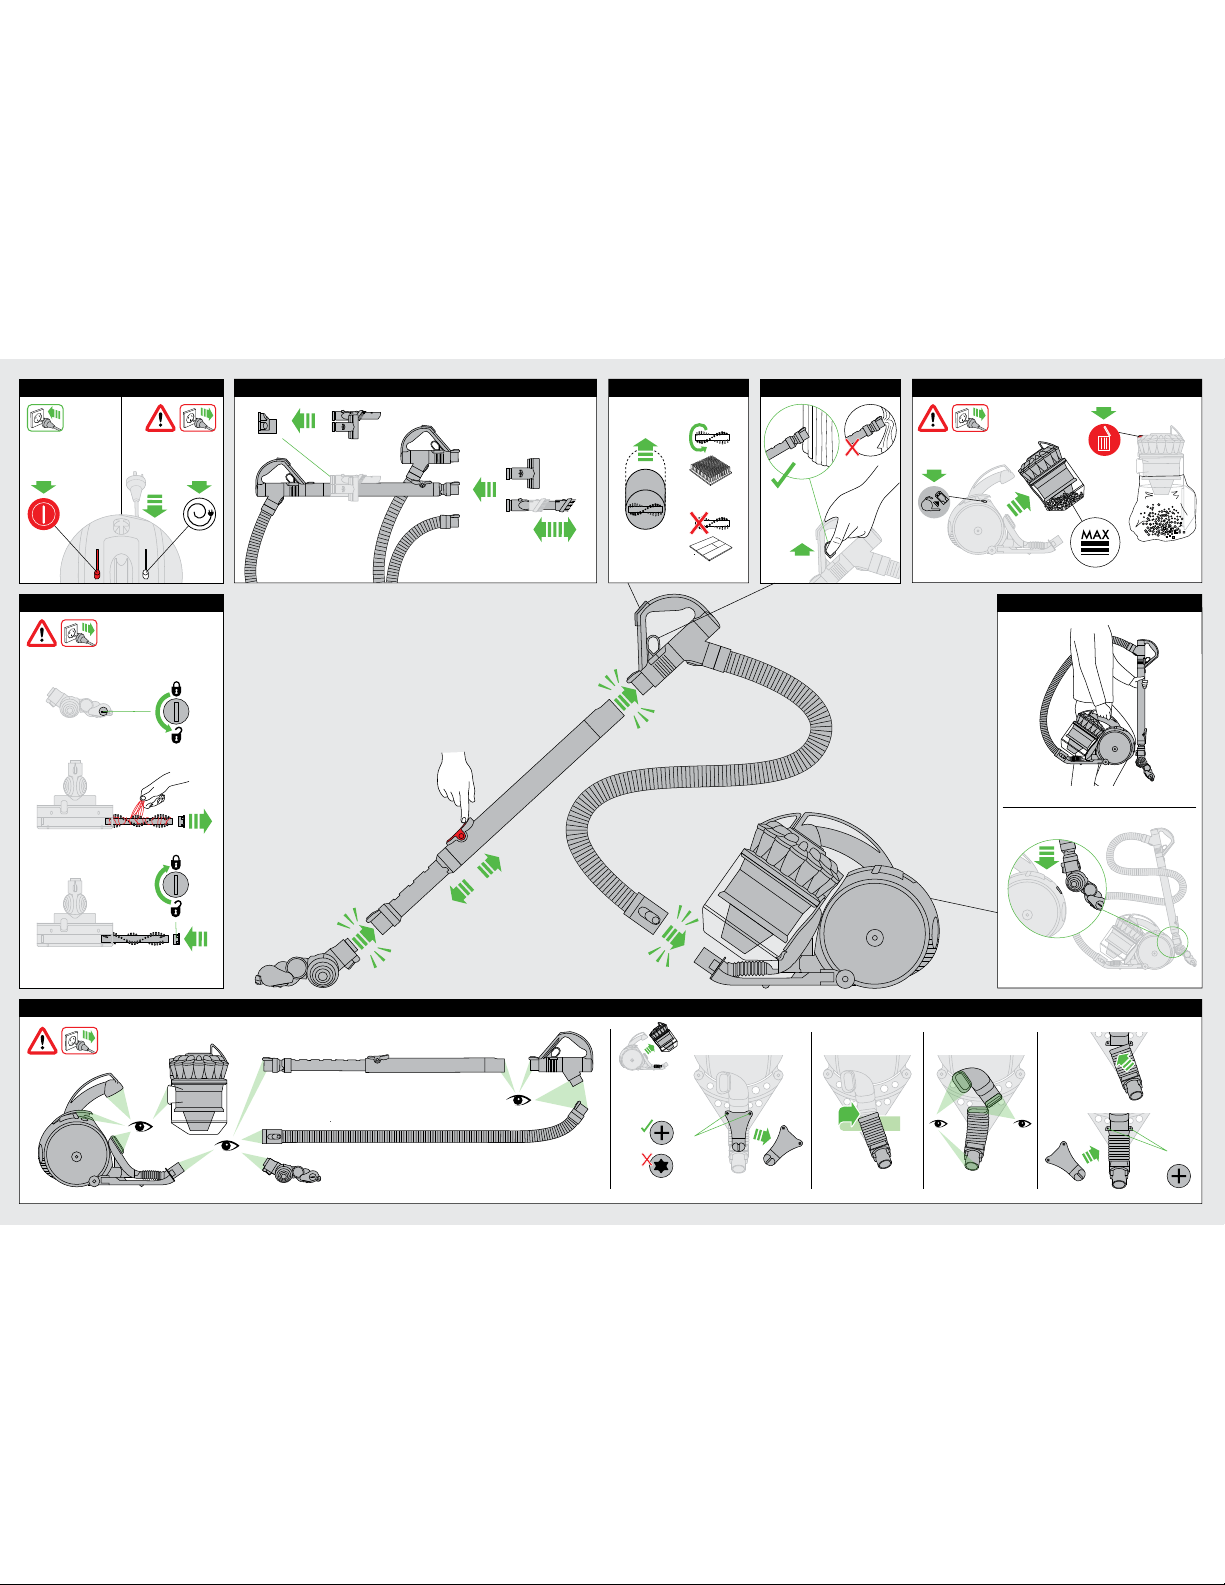
click
click
click
x2
x2
Carpets or hard floors Suction release
Carrying & st orage
Tool attachment s
Emptying
Power & cable
Clearing blockages
4
5
Looking for bloc kages
Page 4

click
Wash filter with cold water regularly or as required.
Register for a filter wash reminder by email
(Australia only): customercare@dyson.com.au
Cleaning
6
7
USING YOUR DYSON APPLIA NCE
PLEASE R EAD THE ‘IMPO RTANT SAFET Y INSTRUCTI ONS’ IN THIS DYSON
OPERATI NG MANUAL B EFORE PROCEE DING.
CARRYING T HE APPLIANCE
• Carry th e appliance by the main ha ndle on the body.
• Do not pres s the cyclone releas e button or shake the ap pliance when carr ying or
the cyclone co uld disengage, fall of f and cause injury.
OPERATION
• Always ex tend the cable ful ly to the red tape befor e use.
• Plug the app liance into the mains el ectricity suppl y.
• To switch ‘ON ’ or ‘OFF’ press the powe r button, located a s shown.
• After u se, unplug the applianc e, retract the cable sa fely, and put the
appliance awa y.
• Switch ‘OF F’ the appliance and un plug before:
– Adjusting th e setting.
– Changing or usin g tools.
– Removing the ho se or airway inspe ction parts.
To watch a short online video vi sit: ww w.dyson.com.au/DC39gettin gstarted
www.dyson.co.nz /DC39gettingstar ted
BRUSH BAR
• The brush b ar will always defaul t to ‘ON’ (spinning) each ti me you switch the
appliance ‘ON ’.
• To switch the br ush bar off (e.g. for hard f loors)
– Switch the mac hine ‘ON’.
– Press the brus h bar ‘ON/OFF’ butt on – the brush bar will st op spinning.
• The brush b ar will automaticall y stop if it becomes ob structed. Se e ‘Brush bar –
clearing obs tructions’ on page s 4 and 7.
• Before va cuuming your flooring, r ugs and carpets, ch eck the manufactu rer’s
recommende d cleaning instruc tions.
• Some carp ets may fuzz if a rota ting brush bar is use d when vacuuming.
If this happe ns, we recommend va cuuming in ‘hard flo or’ mode and
consulting w ith the flooring ma nufacturer.
• The brush b ar on the appliance may d amage some carpet t ypes. If you are
unsure, turn ‘OF F’ the brush bar.
LOOKING AFT ER YOUR DYSON APPLIANCE
• Do not carr y out any maintenanc e or repair work other th an that shown in this
Dyson Oper ating Manual, or advis ed by the Dyson Custo mer Care Helpline.
• Only use par ts recommende d by Dyson. If you do not thi s could invalidate your
Dyson guaran tee.
• Store the ap pliance indoors. Do n ot use or store it below 0 °C. Ensure the
appliance is at ro om temperature bef ore operating.
• Clean the ap pliance only with a dr y cloth. Do not use any lubr icants, cleaning
agents, polis hes or air freshener s on any part of the appli ance.
• If used in a ga rage, always wipe the b ase plate and ball with a d ry cloth after
vacuuming to cle an off any sand, dirt, or p ebbles that could dam age
delicate flo ors.
VACUUMING
CAUTION:
• Do not use wi thout the clear bin and f ilter in place.
• Fine dust su ch as plaster dust or f lour should only be vac uumed in very
small amounts .
• Do not use th e appliance to pick up shar p hard objects, smal l toys, pins, paper
clips, etc. The y may damage the applia nce.
• When vacu uming, certain carp ets may generate sm all static charges in t he
clear bin or wand. T hese are harmless an d are not associated w ith the mains
electrici ty supply. To minimise any ef fect from this, do not pu t your hand or
insert any obj ect into the clear bin u nless you have firs t emptied it and rinsed i t
out with cold wa ter. See ‘Cleaning the cle ar bin’ section on pag es 6 and 7 of this
Dyson Oper ating Manual.
• Powerfu l suction can cause th e hose to ‘pull back’ – pleas e take care.
• Do not work wi th the appliance above y ou on the stairs.
• Do not put th e appliance on chairs, ta bles, etc.
• Before va cuuming highly polishe d floors, such as wood o r lino, first check tha t
the undersid e of the floor tool and it s brushes are free fro m foreign objects th at
could cause mar king.
• Do not push ha rd with the floor tool w hen vacuuming, as this ma y cause
damage.
• Do not leav e the cleaner head in on e place on delicate flo ors.
• On waxed fl oors the movement of th e cleaner head may cr eate an uneven
lustre. If this h appens, wipe with a dam p cloth, polish the area w ith wax, and
wait for it to dry.
EMPT YING THE CLEA R BIN
• Empty as s oon as the dirt reach es the level of the MA X mark – do not overf ill.
• Switch ‘OF F’ and unplug before e mptying the clear b in.
• To remove the cyc lone and clear bin unit, pu sh the release but ton to the side of
the carryin g handle, as shown.
• To release the d irt, press the red bin re lease button.
• To minimise dust/all ergen contact whe n emptying, encas e the clear bin tightly in
a plastic bag an d empty.
• Remove the c lear bin carefully.
• Seal the b ag tightly, dispose as nor mal.
CLEANIN G THE CLEAR BI N
• To remove the cyc lone and clear bin unit, pu sh the release but ton to the side of
the carryin g handle, as shown.
• To separate th e cyclone unit from the c lear bin press the red b in release button
to open the bin ba se. This exposes a sma ll silver button beh ind the red opening
mechanism. Pr ess the silver butt on and separate the cy clone unit from the
clearbin.
• Clean the cl ear bin with cold water o nly.
• Ensure the c lear bin is completel y dry before replaci ng.
• Do not use de tergents, polishe s or air fresheners to cl ean the clear bin.
• Do not put th e clear bin in a dishwasher.
• Do not immer se the whole cyclon e in water or pour water in to the cyclones.
• Clean the c yclone shroud with a dr y cloth or dry brush t o remove lint and dust.
WASHING YOUR FILTER
• Your appliance h as one washable filte r, located as shown on page 6 o f this
Dyson Oper ating Manual.
• Check and wa sh the filter regular ly or as required accor ding to instructio ns to
maintain per formance.
• Switch ‘OF F’ and unplug before ch ecking or removing th e filter.
• Wash the filt er with cold water onl y. Do not use detergents . Hold under a tap
and run water th rough the open end. Turn ups ide down and tap out.
• Squeeze a nd twist with bot h hands to make sure the exce ss water is removed.
• Run water ove r the outside of the fi lter.
• Squeeze a nd twist with bot h hands to make sure the exce ss water is removed.
• Place the f ilter on its side to dr y completely.
• Do not put th e filter in a dishwasher, wash ing machine, tumble dr yer, oven,
microwave or nea r a naked flame.
IMPORTAN T: After washing plea se leave at least 24 hour s to dry completel y
before refit ting.
To watch a short onl ine video visit: www.dyson.com.au/DC3 9filterwash
www.dyson .co.nz/DC39filt erwash
LOOKING FOR BLOCK AGES
• Switch ‘OF F’ and unplug before lo oking for blockages . Failure to do so could
result in pers onal injury.
• Beware of sh arp objects when c hecking for blockag es.
• Refit all p arts securely be fore using.
• Clearing b lockages is not covere d by your Dyson guarant ee.
• To access the f lexible inspecti on hose beneath the c lear bin, first remove t he
clear bin from th e appliance as shown on p age 5.
• Unscrew th e two Phillips screws on t he clear bin locator br acket, as shown on
page5. (Do not re move any other screws.) Re move the bracket.
• Firmly tw ist the top of the flex ible inspection ho se away from the inlet ne xt to the
ball (do not remove t he end next to the conn ection for the main ho se).
• Inspec t for blockages.
• Reasse mble in reverse order.
CLEARI NG BLOCKAGES – TH ERMA L CUT-OUT
• This applia nce is fitted with a n automatically res etting thermal cu t-out.
• Large item s may block the tools or w and inlet. If any part be comes blocked the
appliance may o verheat and automa tically cut-out.
• Switch ‘OF F’ and unplug. Leave to c ool down for 1-2 hours before c hecking
filter or for bl ockages. Do not opera te the wand release ca tch.
• Clear any blo ckage before resta rting.
• Clearing b lockages is not covere d by your Dyson guarant ee.
1
2
3
BRUSH BAR – CLE ARING OBS TRUCTIONS
• If your brus h bar is obstructe d, it may shut ‘OFF’. If this happ ens you will need to
remove the brus hbar as shown.
• Switch ‘OF F’ and unplug before pr oceeding. Failure to do s o could result in
personal inju ry.
• Remove the b rush bar by using a coin to lo osen the fastener m arked with a
padlock as show n on page 4.
• Beware of sh arp objects when c learing obstruc tions.
• Replace t he brush bar and secure i t by tightening the fas tener. Ensure it is fixed
firmly befo re operating.
• Clearing b rush bar obstruc tions is not covered by you r Dyson guarantee.
BRUSH BAR – TRO UBLESHOOTING
If the brush ba r has stopped spinnin g, follow the instruc tions above on clearin g
obstruct ions. Alternativ ely, contact the Dyso n Customer Care Help line or visit
the Dyson web site.
Page 5

8
9
AUSTRA LIAN CONSUMER L AW
The details of th e Dyson guarantee a re set out below. In additi on to your rights
under the Dys on guarantee, we also pro vide the following st atement as required
by the Australi an Consumer Law: In Au stralia, your Dyson a ppliance comes with
statutor y guarantees that c annot be excluded und er the Australian Con sumer
Law. You are entitled to a r eplacement or refu nd for a major failure and f or
compensati on for any other reason ably foreseeable l oss or damage. You are
also entitled t o have your Dyson appl iance repaired or repl aced if it fails to be of
acceptable q uality and the failur e does not amount to a major f ailure.
DYSON 2 YEAR GUAR ANTEE -
TERMS A ND CONDITIONS
TERMS A ND CONDITION S OF YOUR DYSON 2 YEAR G UARANTEE.
• The Dyso n guarantee become s effective fro m the date of purchase.
• All work will b e carried out by Dys on Appliances (Aus t) Pty Ltd., Avery
Robinson Ltd. ( NZ), Singapore’s autho rised agent – Ser vice @Home Pte Ltd . or
Indonesia’s aut horised agent – PT Hi gienis Indonesia or t heir authorised ag ents.
• Any par ts replaced will bec ome the propert y of Dyson Applianc es (Aust) Pty Ltd .,
Avery Robins on Ltd. (NZ), Dyson S ingapore Pte Ltd. o r PT Higienis Indone sia.
• The repair a nd replacement of you r Dyson appliance un der Dyson guarante e
will not exten d the Dyson guarant ee period.
• The Dyso n guarantee provides b enefits which are a dditional to and do not af fect
your statuto ry rights and reme dies as a consumer.
• You must provid e proof of (both the origin al and any subsequent) d elivery/
purchase bef ore any work can be carrie d out on your Dyson app liance. Without
this proof, any work ca rried out pursuant t o the Dyson guarante e and any
associated d elivery charges (b oth to and from us) will be at y our cost, subject to
your statuto ry rights and reme dies as a consumer. Pleas e keep your receipt or
delivery no te.
WHAT IS COVERED
Your Dyson guaran tee covers:
• The repair o r replacement of your D yson appliance if you r Dyson appliance is
found to be defe ctive due to fault y materials, workma nship or function wi thin
2 years of purcha se or delivery (if any p art is no longer avail able or out of
manufactu re, Dyson will replace i t with a functional re placement part ).
• Use of the app liance in the countr y of purchase.
WHAT IS NOT COVERED
Under your Dy son guarantee, Dyso n shall not be liable for co sts of repair or
replacemen t of a product incurred a s a result of:
• Acciden tal damage, faults cau sed by negligent use or c are, neglect, carele ss
operation or h andling of the Dyson ap pliance which is not in acc ordance with
this Dyson Op erating Manual.
• Use of the Dy son appliance for any thing other than nor mal domestic purp oses
in the countr y of purchase.
• Use of par ts not assembled or in stalled in accordan ce with the instruc tions
of Dyson.
• Use of par ts and accessorie s other than those pro duced or recommend ed
by Dyson.
• Repairs or a lterations carrie d out by parties oth er than Dyson or its
authorised a gents.
• Damage fr om external source s such as transit, weath er, electrical outag es or
power surges.
• Failures ca used by circumstance s outside Dyson’s contr ol.
• Blockage s – please refer to pag es 4 and 7 in this Dyson Op erating Manual for
details on how to un block your Dyson app liance.
• Normal we ar and tear (e.g. fuse, brus h bar, etc).
• Industr ial use of the Dyson app liance such as vacuumin g gyprock dust or
builders’ dust m ay void your Dyson gua rantee.
If your Dyson g uarantee does not app ly, you may have statuto ry rights and
remedies avai lable to you as a consumer.
If you are in any doub t as to what is covered by your D yson guarantee, pl ease
call the Dyson C ustomer Care Helpli ne (see details on page 10).
REGISTER ING YOUR DYSON GUARA NTEE
To help us ensure you re ceive prompt and eff icient service, p lease register as a
Dyson applia nce owner. There are three w ays to do this:
• Online (Au stralia and New Zeala nd only)
AU: www.dyso n.com.au/register
NZ: www.dy son.co.nz/register
• By calling th e Dyson Customer Ca re Helpline.
• By complet ing and returning the e nclosed form to us by mai l.
This will confi rm ownership of your Dy son appliance in the eve nt of an insurance
loss and enabl e us to contact you if nec essary.
DYSON CUSTOMER CAR E
• If you have a qu ery about your Dy son appliance, call the D yson Customer Care
Helpline quot ing the serial number a nd details of where and w hen you bought
the appliance o r contact us via the web site.
• Most que ries can be solved over t he phone by one of our Dy son Customer Care
Helpline sta ff.
• If your Dys on appliance needs a s ervice, call the Dy son Customer Care
Helpline so we ca n discuss the available o ptions.
• Your serial numb er can be found on your ra ting plate which is on the b ase
of the applianc e.
• To enable us to car ry out work on your app liance, please conta ct the Dyson
Customer Care H elpline to obtain a repl y paid delivery add ress in your state
(available in Aus tralia only).
If your Dyson a ppliance is under Dys on guarantee and the re pair or
replacemen t is covered, it will be repai red or replaced at no co st. If the repair or
replacemen t is found not to be covered u nder the Dyson guar antee, the repair
or replaceme nt of the Dyson applia nce and any associate d delivery charge s
(both to and from u s) will be at your cost, subje ct to your statuto ry rights and
remedies as a co nsumer.
ABOUT YOUR PRIVACY
Dyson may use t his information for f uture marketing and re search purposes
(including sen ding commercial elec tronic messages) a nd may disclose it to third
parties fo r the purposes of provi ding the services y ou have requested o r to our
business par tners or profess ional advisers. If yo u wish to access your pe rsonal
information o r see our full privac y policy, please contac t us at:
customercar e@dyson.com.au
DISPOSAL IN FORMATION
Dyson produ cts are made from high gr ade recyclable mat erials. Please disp ose
of this product r esponsibly and rec ycle where possibl e.
When your Dys on appliance reache s the end of its life, we are re sponsible for
its safe dispo sal. You can send your old Dys on appliance back to us (a t our cost)
and we will organis e for it to be recycled .*
*Please not e that not all parts are r ecyclable. Recy cling of parts is subj ect to the
capabilities o f 3rd party suppli ers. Available in Aust ralia only.
Simply:
1. Box up your old Dys on appliance.
2. Take the package to you r local post offic e and send to the addres s below:
Dyson We Recy cle
Reply Paid 83215
Dyson Ser vice Centre
Unit 6 & 7, 7-11 Parraweena Rd
Taren Point, NSW 2229
PRODUCT INFO RMATION
Please note: S mall details may vary f rom those shown.
Page 6

www.dyson.com
JN.42592 PN.23290 -05-01 28 .07.11
IMPORTANT!
WASH FILTER
Dyson Cus tomer Care
Your Dyson app liance will be co vered for par ts and labour f or 2 years from the date of
purchase, sub ject to the te rms of the Dys on guarantee.
If you have a query about your Dyson app liance, call the D yson Custome r Care Helpline
quoting the s erial number an d details of wh ere and when yo u bought the app liance.
Most queri es can be solve d over the phon e by one of our D yson Customer Care
Helpline st aff.
QUESTIONNAIRE
Wash filter with cold water re gularly or as required.
Register for a filter wa sh reminder by email
(Australia only): custom ercare@dyson.com.au
DYSON CONTACT DETAILS
Australia
Website: www.dyson.com.au
Dyson Customer Care: 1800 239 766 (Mon-Fri 8:00am to
6:00pm EST, Sat-Sun 8:30am to 4:00pm EST).
Email: customercare@dyson.com.au
Address: Dyson Appliances (Aust) Pty Ltd.,
PO Box 2835, Taren Point, NSW 2229 Australia.
New Zealand
Website: www.dyson.co.nz
Dyson Customer Care: 0800 397 667 (Mon-Fri 8:30am
to 5:00pm).
Email: dyson@averyrobinson.co.nz
Address: Avery Robinson Ltd., Unit F, 151D Marua Road,
Ellerslie, Auckland, 1051 New Zealand.
Singapore
Website: www.dyson.com.sg
Dyson Customer Care: 7000 435 7546 (Mon-Fri 9:00am to
6:00pm).
Email: singapore@dyson.com
Address: Service @ Home Pte Limited, 2 Leng Kee Road,
#04-09A Thye Hong Centre, Singapore 159086.
Indonesia
Website: www.dyson.co.id
Dyson Customer Care: 021 707 39766 (Mon-Fri 9:00am
to 5:00pm).
Email: service@higienis.com
Address: PT. Higienis Indonesia Permata Plaza Top Floor
TF-04, JI, M. H. Thamrin Kav. 57, Jakarta 10350 Indonesia.
1 This vacuum c leaner is:
My first vacuum cleaner, please go to question 3
A replacem ent vacuum cleane r
An additio nal vacuum cleaner
2 Which brand of cleaner are you replacing or adding to?
Dyson Electrolu x
Hoover LG
Miele Panasonic
Samsung Nilfisk
Vax Kambrook
Volta Werth eim
Other, please specify
3 Wh y did you choose to buy a Dyson vacu um cleaner?
(Please rank in order, 1-5. 1 being the most important).
Dyson rep utation
Good for pet hair pick-up
Performs consistently well
No loss of suction
Previous ex perience of Dys on
Easy to manoeuvre
Good for pe ople suffering from a sthma and allergies
Features
HEPA filtration
Hygienic and ge rm free cleaning
Price/specia l offer
Wanted a ba gless cleaner
Compact and easy to store
Store sta ff recommendat ion
Picks up m ore dust than othe rs
Latest m odel/technology
Reliabilit y/quality
Friend/fam ily recommendation
Other
4 Where did yo u first hear ab out this Dyson vacuum cleaner?
From friends and family
Saw it on the internet
From TV/a magazine advert
Saw it in a store catalogue
Saw it in a store
Recommended by salesperson
5 Do you own other Dyson products?
Handheld Handstick
Fan Vacuum cleaner
No
6 Wh at is your average household income?
Less than $45,000
Betwee n $45,000 – $74,999
Betwee n $75,000 – $100,000
Over $100,00 0
7 Do you have any house hold pets?
Dog Cat
No Other
8 Do es anyone in your ho usehold suffer from any of the fo llowing?
Asthma Allergies
No
9 To which age group do you belong?
16 – 24 25 – 34
35 – 44 45 – 54
55 – 64 65+
10 Wou ld you recommend a Dyson vacuum cle aner to your family
and friends?
Yes No
11 Do you have chi ldren?
Pre-school Aged 5-17 years
Aged +17 years Children no longe r at home
Pregnant No children
12 Which bes t describes your house? (Tick one from each column).
Own house Up to 2 beds
Rented house 3-4 be ds
Own apart ment/villa More than 4 b eds
Rented apar tment/villa
Share accommo dation
Live with pare nts
Please take a few moments to answer our quest ions.
They will he lp us develop new p roducts for the future.
THANK YOU FOR YOUR TIM E
Page 7

Cheque/money order made payable to: Dyson Appliances.
Credit card Mastercard Visa
Card Number
Increase your Dyson 2 year guarantee cover to 5 years when you purchase an extended guarantee from Dyson (Australia only). This option is just AU$95.00. Dyson is committed to providing the best
Aftersales Service, which is why we offer the option to extend your Dyson 2 year guarantee to 5 years. The terms of the Dyson 2 year guarantee on page 8 of this Dyson Operating Manual will apply
to the Dyson extended guarantee. The Dyson extended guarantee is underwritten by Dyson Appliances (Aust) Pty Ltd. To purchase, just complete the fields below. Send both sections to us, together with
your cheque/money order or credit card details, within 2 years of your appliance purchase. Offer to purchase the Dyson extended guarantee is only available within 2 years of customers purchasing their
appliance. Offer not available to customers who have purchased an extended warranty from a retailer. The Dyson extended guarantee provides benefits which are additional to, and do not affect, your
statutory rights and remedies as a consumer. If you decide not to extend your Dyson 2 year guarantee, you may have statutory rights and remedies available to you as a consumer.
2 year guarantee – plus option to extend to 5 years.
Declaration
I hereby apply for the Dyson appliance extended guarantee in accordance with the terms and conditions of your plan. I confirm the appliance is in good
working order and used for domestic puposes only and declare that the details on this proposal are true and complete to the best of my knowledge and
belief.
Signature Date
WARNING Any false statement may
render this plan invalid
GUARANTEE FORM
Section 2: Dyson 2+3 year guarantee
REGISTER ONLINE
Visit our website to register your
Dyson full par ts and labour
guarantee online (Australia
and New Zealand only).
AU: www.dyson.com.au/register
NZ: www.dyson.co.nz/register
Serial number
Please complete Section 1 to register as a Dyson appliance owner, and return it in the envelope provided. Alternatively, register online (Australia and New Zealand only).
Section 1: Dyson 2 year guarantee
Date of purchase
/ /
Countr y of purchase AU NZ SG ID
Store of purchase
Yes No
1 year
2 years 3 years
Did you purchase an extended warranty from the retailer?
If yes, for what additional period?
Title
First name Surname
email Contact number
Addres s
Privac y Act
Dyson may use this information for future marketing and research purposes (including sending commercial electronic messages) and may disclose
it to third parties for the purposes of providing the ser vices you have requested or to our business partners or professional advisers. If you wish to
access your personal information or see our full privac y policy, please contact us at customercare@dyson.com.au
If you do not wish to receive marketing information by these methods from Dyson please tick this box.
Postcode
Expiry Date M/M Y/Y
/ /
REGISTER BY MAIL
Complete and return
the form to Dyson in the
envelope supplied.
REGISTER BY PHONE
AU 1800 239 766
NZ 0800 397 667
SG 7000 435 7546
ID 021 707 39766
/ / /
 Loading...