

Page 1
Operating manual
Important!
Weekly and
monthly cleaning
required.
Register
Your free 2 year
Dyson guarantee
today.
Page 2

IMPORTANT SAFETY INSTRUCTIONS
BEFORE USING THIS APPLIANCE READ ALL INSTRUCTIONS AND
CAUTIONARY MARKINGS IN THIS MANUAL AND ON THE APPLIANCE
When using an electrical appliance, basic precautions should always be
followed, including the following:
WARNING
THE APPLIANCE AND THE REMOTE CONTROL BOTH
CONTAIN MAGNETS.
1. Pacemakers and defibrillators may be affected by
strong magnetic fields. If you or someone in your
household has a pacemaker or defibrillator, avoid
placing the remote control in a pocket or near to the
device.
2. Credit cards and electronic storage media may also be
affected by magnets and should be kept away from the
remote control and the top of the appliance.
WARNING
These warnings apply to the appliance, and also where
applicable, to all tools, accessories, chargers or mains
adaptors.
TO REDUCE THE RISK OF FIRE, ELECTRIC SHOCK, OR
IN J URY:
3. Extreme caution is necessary when any appliance
is used by or near children or infirm persons and
whenever it is left operating and unattended.
4. This Dyson appliance is not intended for use by persons
(including children) with reduced physical, sensory
or mental capabilities, or lack of experience and
knowledge, unless they have been given supervision or
instruction by a responsible person concerning use of
the appliance to ensure that they can use it safely.
5. Use only as described in this Dyson Operating
Manual. Do not carry out any maintenance other than
that shown in this manual, or advised by the Dyson
Customer Care Helpline.
6. Ensure appliance is fully assembled in line with the
instructions before use. Do not dismantle the appliance
or use without the loop amplifier fitted.
7. Do not allow to be used as a toy. Close attention is
necessary when used by or near children. Children
should be supervised to ensure that they do not play
with the appliance or remote control.
8. Suitable for dry locations ONLY. Do not use outdoors
or on wet surfaces. Do not use in bathrooms, laundry
areas or similar indoor locations. Never locate the
appliance where it may fall into a bath or other water
container. Do not use or store where it may get wet or
in the immediate surroundings of a bath, a shower, or a
swimming pool.
9. Do not use in areas where petrol, paint, or flammable
liquids are used or stored or where their vapours are
present. Do not use in conjunction with or directly next
to an air freshener or similar products.
10. Do not locate directly below or above a mains electricity
supply socket.
11. Always plug directly into a wall socket.
12. Do not handle any part of the plug or appliance with
wet hands.
13. Do not use with a damaged cable or plug. If the supply
cable is damaged it must be replaced by Dyson, its
service agent or similarly qualified person in order to
avoid a hazard.
14. If the appliance is not working as it should, has received
a sharp blow, has been dropped, damaged, left
outdoors, or dropped into water, do not use and contact
the Dyson Customer Care Helpline.
15. Contact the Dyson Customer Care Helpline when
service or repair is required. Do not disassemble the
appliance as incorrect reassembly may result in an
electric shock or fire.
16. Do not unplug by pulling on the cable. To unplug, grasp
the plug, not the cable.
17. Do not stretch the cable or place the cable under strain.
Keep cable away from heated surfaces.
18. Do not run cable under carpeting. Do not cover cable
with throw rugs, runners or similar coverings. Arrange
cable away from traffic area and where it will not be
tripped over.
19. To prevent a possible fire, do not use with any opening
or exhaust blocked, and keep free of dust, lint, hair,
and anything that may reduce airflow. Do not put any
object into the inlet grill or the exhaust opening as this
may cause an electric shock or fire, or damage the
appliance.
20. Do not use near furnaces, fireplaces, stoves or other
high temperature heat sources.
21. Turn off all controls before unplugging.
2
Page 3

22. Unplug when not in use for extended periods and
before filling, cleaning, maintenance or servicing.
23. When refilling, only do so as described in this Dyson
operating manual. Do not use hot water.
24. Always place the appliance on a firm, flat, level surface.
25. Do not use on soft surfaces, such as a bed, where
openings may become blocked.
26. Do not place the appliance in an area where it is
accessible to children.
27. Always carry the appliance by the base, do not carry it
by the loop amplifier.
28. Do not tilt, move, or attempt to empty the appliance
while it is operating.
29. Do not use unless the appliance has been cleaned
according to instructions.
30. Use only cleaning agents recommended by Dyson.
31. Do not pour water into any openings except for the
water tank.
32. This appliance must only be supplied at safety extra
low voltage corresponding to the marking on the base.
Dyson recommends that this appliance is only to be
used with the power supply unit provided with it.
33. This appliance contains a UV-C emitter. Unintended
use of the appliance or damage to the housing may
result in the escape of dangerous UV-C radiation. UV-C
radiation may, even in little doses, cause harm to the
eyes and skin.
34. WARNING – This appliance contains a UV-C emitter.
Do not stare at the light source.
35. If any part is replaced the replacement must be fitted in
its correct position.
36. Choking hazard - This remote control unit contains
a small battery. Keep the remote control away from
children and do not swallow the battery. If the battery is
swallowed seek medical advice at once.
READ AND SAVE THESE
INSTRUCTIONS
THIS DYSON APPLIANCE IS INTENDED
FOR HOUSEHOLD USE ONLY
IMPORTANT SAFETY
FEATURES
For your safety this appliance is fitted with automatic
cut-out switches that operate if it tips over. If the switches
operate, unplug the appliance. Before restarting, check
and clear any blockages, allow to dry and ensure the
appliance is on a solid level surface.
Do not
pull on the
cable.
Do not store
near heat
sources.
Do not use
near naked
flames.
Do not carry
by the loop
amplifier.
3
Page 4
Thank you for choosing
to buy a Dyson appliance.
Your Dyson appliance will be covered for parts and labour for 2
years from the date of purchase, as detailed in the terms of the
Dyson guarantee in this Dyson Operating Manual.
If you have a query about your Dyson appliance, call the Dyson
Customer Care Helpline quoting your serial number and details of
where and when you bought the appliance. Alternatively, contact us
via the website.
This product is for household use and it is not intended for business
purposes.
Your serial number can be found on your rating plate which is on
the base of the appliance.
Visit our website to register your Dyson full parts and labour
guarantee online.
AU: www.dyson.com.au/register
NZ: www.dyson.co.nz/register
Note your serial number for future reference.
3 Easy ways to register your free
2 year guarantee
Register online
Visit our website to register your Dyson full parts and labour
guarantee online.
AU: www.dyson.com.au/register
NZ: www.dyson.co.nz/register
Register by phone
Call our dedicated Helpline.
AU 1800 239 766
NZ 0800 397 667.
Register by mail
Complete and return the form to Dyson in the envelope supplied.
This illustration is for example purposes only.
For the latest information about this appliance and to make sure
it has the latest software update, please visit the Dyson website.
4
Page 5
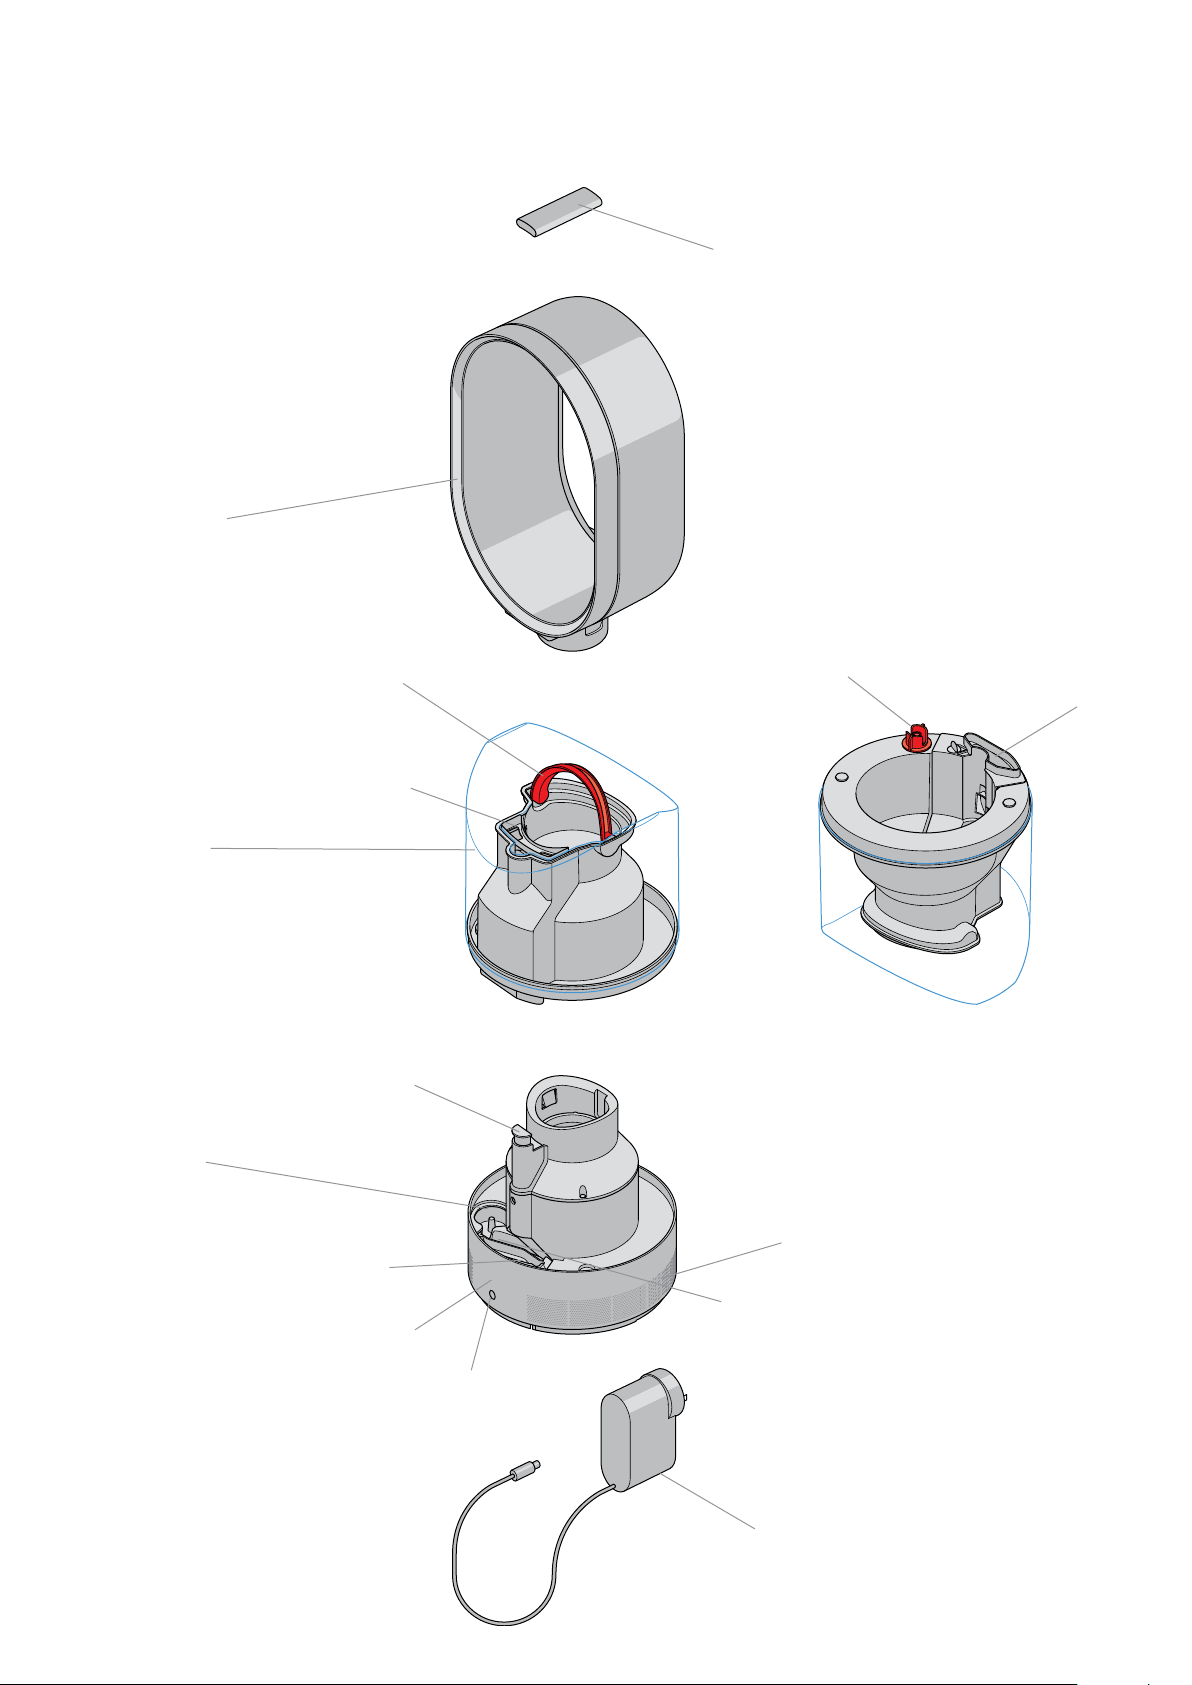
Know your humidifier
Loop
Remote control
Tank
Base
Handle
Seal
Loop release button
Piezo
Cap
Chimney
Inlet
LED display
UV-C emitter
On/ off button
Plug
5
Page 6
Getting started
For the best performance place humidifier on the floor
in the corner of the room, facing into the centre. It should
be at least 1m from any wall. To avoid a cooling effect
while humidifying, the unit should be at least 1m from
any people. Consider placing near to air conditioning
or heating devices to circulate air effectively.
1 2 3
Unscrew the cap and fill the tank to the
top. Replace the cap and screw until
hand tight. Carry by the handle.
6
Place the tank on top of the base.
Ensure the base is on a level surface,
otherwise the appliance will not
operate.
Place the loop amplifier on top of the
tank. Push down until you hear a click.
Remote control docks magnetically.
Attach the remote control to the top of
the appliance with the buttons facing
down.
Page 7

4 5 6
Plug into the socket and base. A small
blue LED on the back of the appliance
lights up to confirm that the appliance
has power.
Switch ‘ON’. The water treatment
procedure automatically starts.
Water passes over a UV-C emitter to
ensure that it is 99.9% bacteria-free
before misting commences. This takes
approximately 3 minutes. (During this
time humidity targets can be set and
fan mode can be switched ON’.)
After 3 minutes the appliance will start
to humidify. The display will show the
target humidity setting.
7
Page 8

How to use
Airflow
Increase airflow.
1 to 10
Decrease airflow.
10 to 1
On/off
Fan/ humidity toggle
ON/ OFF switches between
humidifier and fan modes.
Control with airflow and
timer buttons.
AUTO
Controlling the
humidity manually
Increase target humidity.
30 to 70%
Decrease target humidity.
70 to 30%
The appliance will not mist
unless the target humidity
setting is above the current
room humidity level.
Sleep timer
To set the sleep timer,
press and hold the timer
button to select the desired
time (between 15 minutes
and 9 hours).
To cancel the sleep timer,
press and hold until two
dashes appear.
8
Automatic mode
Comfortable humidity is
automatically selected
by the appliance.
Page 9

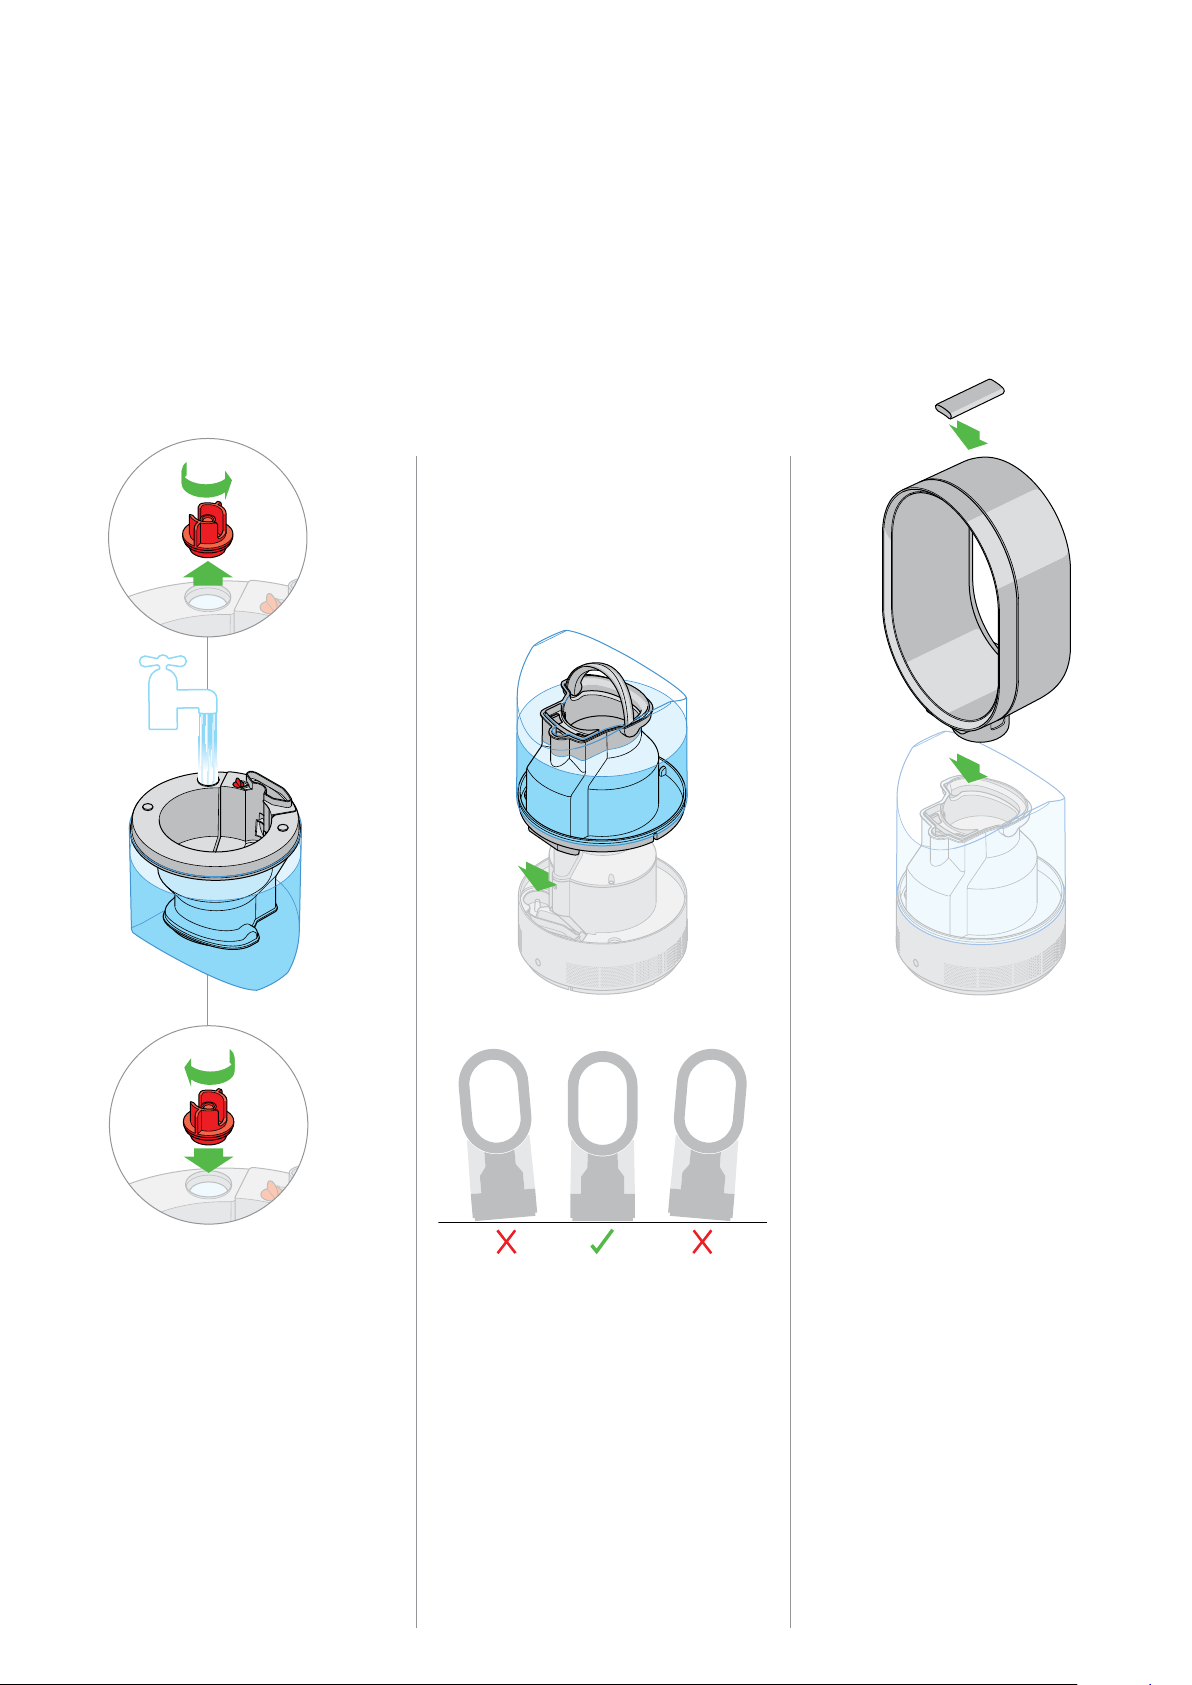
Refilling the tank
When animation sequence shows, the tank is empty.
1
Unplug the appliance and push the button to unlock.
Lift the loop amplifier away from tank, then tank away
from base.
%
Humidity percentage
A
Automatic mode
On/off
Press and hold the power
button on the appliance to
adjust the humidity setting.
Blue light indicates that the
AM10 is in humidity mode.
White light indicates that
the AM10 is in fan mode.
2
Remove the cap and fill tank (no other part) to the top
with cold tap water. Replace the cap, tank and loop
amplifier. Use the handle for easier handling.
3
Switch ‘ON’: the water treatment procedure starts.
After 3 minutes the appliance will start to humidify.
9
Page 10

Cleaning –
important!
Cleaning procedures must be routinely followed
to ensure that the humidifier continues to operate efficiently.
Cleaning regimes are designed to help prevent
the build up of scale within the machine, which
will be more prominent in hard water areas.
Failure to adhere to the cleaning regimes
may invalidate the warranty.
Make your own cleaning solution
+
30 grams
of citric acid
Other cleaning solutions are available. Please check these
are suitable for use with plastics and then use in accordance
with manufacturer’s instructions. Examples of other suitable
cleaning materials are descalers, foam soaps without an
antibacterial agent, and vinegar.
Some cleaning chemicals are harmful to the appliance and
should not be used. Use of these will invalidate your guarantee.
Do not use: Alcohol and strong acid mixes, solvent (acetone)
and oil based products, alkali bleach mixes, air fresheners,
aroma oils, scented oils, hot water, brushes, abrasive materials,
etc. Please do not put in a dishwasher or close to a fire.
1 litre
of water
=
Cleaning
solution
10
Page 11

Once a week
Turn the appliance into standby mode/‘OFF’.
Unplug from the mains electricity supply.
1
Wipe over air loop amplifier, paying close
attention to the air gaps. Wipe with a
lint-free microfibre cloth.
2
Empty the water. Rinse and wipe over all surfaces.
Repeat if necessary.
3
Empty the trough and wipe over all surfaces. Small
spillages may occur. Do not rinse under the tap or put in the
dishwasher. While not dangerous, care should be taken to
avoid water entering the inlets. Wipe the exterior with a lint
free microfibre cloth.
11
Page 12

Once a month
(and before/after storage)
Turn the appliance into standby mode/‘OFF’.
Unplug from the mains electricity supply.
1
Unclip the loop amplifier surround: pull from
the lower edge by hand, gently but firmly.
15 mins
4
Empty the water tank. To release the water chimney, twist
the dial a quarter of a turn. Lift out. Clean thoroughly by
immersing in the citric acid solution for 15 minutes. Rinse and
wipe over all surfaces. Repeat if necessary. Refit in reverse
order, twisting the dial a quarter of a turn to secure.
12
7
Empty the trough of any water, small spillages may occur.
While not dangerous, care should be taken to avoid water
entering the inlets. Clean thoroughly, using the recommended
acid citric solution. Do not rinse under the tap or put in a
Page 13

Cleaning procedures must be routinely followed to ensure
1
2
1
1
2
1
that the humidifier continues to operate efficiently. Cleaning
regimes are designed to help prevent the build up of scale
within the machine, which will be more prominent in hard
water areas. Failure to adhere to the cleaning regimes may
invalidate the warranty.
2 3
Using a damp cloth, wipe over both sections with
the citric acid solution. Do not put in a dishwasher
or rinse under the tap.
5
To remove the seal, pinch the securing tabs together
and pull out. Clean thoroughly by immersing in the
recommended citric acid solution for 15 minutes. Rinse and
wipe over all surfaces. Repeat if necessary. To refit, push
back in so the tabs click and the fit is secure.
To attach the loop amplifier surround, lie flat and align
the surround to the main amplifier. Push firmly until it
clicks into place as shown.
6
Pour in the recommended citric acid solution. Replace the
cap and shake tank for 30 seconds. Then leave to stand.
After 15 minutes, empty the tank. Rinse and wipe over all
surfaces. Repeat if necessary.
15 mins
Piezo
UV-C emitter
dishwasher. Fill the trough with the recommended acid citric
solution until the UV-C emitter and piezo are submerged.
Leave for 15 minutes. Drain, rinse and wipe over all surfaces.
Repeat if necessary.
15 mins
8
Re-assemble. Wipe the exterior with a lint-free
microfibre cloth. Switch ‘ON’: the water treatment
procedure starts. After 3 minutes the appliance will start
to humidify.
13
Page 14

What do the lights mean?
Water treatment
The AM10 is treating the water. This takes 3 minutes.
When the animation stops, the AM10 will start to humidify.
Tank is empty
Switch ‘OFF’ and refill.
Tilted
The base is not level.
Please call
the helpline.
Please call
the helpline.
AM10 is too cold.
Increase room
temperature to
5°C or above.
If the problem persists,
contact the helpline.
Please call
the helpline.
Please call the
helpline.
14
If power button flashes 3 times when
switching on, check that AM10 has
been assembled correctly.
Blue light indicates
that the AM10 is
in humidity mode.
White light indicates
that the AM10 is in
fan mode.
Page 15

Using your humidifier
Please read the ‘Important Safety Instructions’ in this Dyson Operating
Manual before proceeding.
Introduction
• This is a cool mist, ultrasonic type of humidifier. Moist air is
directed into the room from the loop amplifier.
• Water passes over a UV-C emitter to ensure that it is 99.9%
bacteria-free before misting commences.
Location
• Always place the appliance on a firm, flat, level surface.
• Do not place the appliance on a rug, carpet, wooden flooring, or
any other surface that may be damaged by exposure to water or
moisture.
• It is recommended that a waterproof mat or pad is placed under
the appliance.
• Do not place the appliance underneath overhanging surfaces.
• Do not place the appliance in an area where it is accessible to
children.
• Store the appliance indoors. Do not use or store it below 5°C
(41°F). Ensure the appliance is at room temperature before
operating.
• For the best performance, place on the floor, in the corner of the
room, at least 1m from any wall and facing into the centre of the
room.
Operation
• All parts must be securely fitted before use.
• Do not use the appliance unless it has been cleaned according to
instructions.
• In humidifier mode do not use without water in the tank.
• Do not lubricate any part of this appliance.
• When switched on, a small blue LED on the back of the appliance
lights up to show that power is being received by the appliance.
(Note: It does not mean that the appliance itself is operating.)
• Once the water treatment cycle completes the appliance is ready
to begin humidification.
Setting humidity level
• On first use, the display will show ‘70%’, which is the highest
relative humidity setting. The fan will run on lowest airspeed, ‘01’.
For each use after this the appliance will remember the last target
humidity level and airflow speed set.
• The appliance will not operate unless the target humidity setting is
above the current room humidity level.
• The appliance will automatically adjust to avoid excessive
humidity.
• Mist will be visible only in certain conditions (impacted by light,
background colour, etc.) or at the lowest settings.
Automatic mode
• Press the AUTO button on the remote. This is the recommended
mode of operation.
• The appliance selects a comfortable humidity for the room, based
on environmental factors such as current humidity level and air
temperature.
• When the room reaches the appropriate humidity level the
appliance will switch itself ‘ON’ or ‘OFF’ as necessary to maintain
that level. The fan will remain running when the target humidity
has been reached.
Manual mode
• Select the desired humidity level (from 30% to 70%). When the
room reaches the target humidity level the appliance will switch
itself ‘ON’ or ‘OFF’ as necessary to maintain that level. The fan
will remain running when the target humidity has been reached.
Fan mode
• The fan mode button on the remote control turns the humidifier
mode ‘OFF’. Control the fan mode using the airflow and timer
buttons.
• No water is needed for the fan mode.
Control without the remote
• Press the Standby button on the appliance to turn ON/OFF.
• Press and hold the power button on the appliance to adjust the
humidity setting.
• Fan mode and the sleep timer cannot be operated without the
remote control.
• The air speed setting automatically sets to '05'.
Refilling
• When refilling, empty the tank completely (preferably washing
and drying it), then refill – this keeps the water fresh.
• With a full tank of cold tap water (3 litres) the appliance will run
for at least 10 hours, depending on the target humidity setting
and other environmental conditions. Do not add anything to the
water (such as scents, oils etc).
Cleaning the base
• Small water spillages may occur. While the amount of water in
the trough is not significant enough to damage the appliance,
significant care should be taken when emptying it. Ensure that
water does not enter through the inlets of the appliance. If some
water does pass through the inlets, dry the exterior with a cloth
and continue to use as normal.
Cleaning the tank
• Pour in the recommended citric acid solution. Replace the cap
and shake tank for 30 seconds. Then leave to stand. Af ter 15
minutes, empty the tank. Rinse and wipe over all surfaces. Repeat
if necessary.
Storage
• When not in use, unplug from the mains electricity supply.
• Store the appliance in a dry location and arrange the cable away
from traffic areas so that it will not be tripped over or damaged.
• Clean the appliance and tank as instructed before storing and
before re-use.
Battery replacement
CAUTION
• Unscrew the battery compartment on the remote control. Loosen
the base and pull to remove the battery.
• Do not install backwards or short circuit the batteries.
15
Page 16

• Do not attempt to dismantle or charge the batteries. Keep away
from fire.
• Follow battery manufacturers' instructions when installing new
batteries (battery type CR 2032).
• Limited functionality is available without the remote control (see
'Control without the remote').
Automatic cut-out
• If the appliance is tilted by over 5° the display will show a ‘tilted’
graphic. If after 15 minutes the appliance is not levelled it will
switch ’OFF’.
• If the appliance has been tilted make sure it is level and clear up
any spillage.
Troubleshooting
• Do not carry out any maintenance or repair work other than that
shown in this Dyson Operating Manual, or advised by the Dyson
Customer Care Helpline.
• An F3 failure message means the appliance is too cold. The
appliance will operate when it is above 5°C (41°F). If other failure
messages are displayed, contact the Dyson Helpline.
• If the UV-C emitter is exposed for any reason the appliance will
switch ‘OFF’.
• If the piezo or UV-C emitter needs to be replaced, contact the
Dyson Helpline.
AUSTR ALIAN CONSUMER LAW
The details of the Dyson guarantee are set out below. In addition to
your rights under the Dyson guarantee, we also provide the following
statement as required by the Australian Consumer Law: In Australia,
your Dyson appliance comes with statutory guarantees that cannot
be excluded under the Australian Consumer Law. You are entitled to
a replacement or refund for a major failure and for compensation
for any other reasonably foreseeable loss or damage. You are also
entitled to have your Dyson appliance repaired or replaced if it fails to
be of acceptable quality and the failure does not amount to a major
failure.
DYSON 2 YEAR GUARANTEE
TERMS AND CONDITIONS OF YOUR DYSON 2 YEAR GUARANTEE.
• The Dyson guarantee becomes effective from the date of
purchase.
• All work will be carried out by Dyson Appliances (Aust) Pty Ltd.,
Avery Robinson Ltd. (NZ) or their authorised agents.
• Any parts replaced by Dyson or its service agents will become the
property of Dyson Appliances (Aust) Pty Ltd. or Avery Robinson
Ltd. (NZ).
• The repair or replacement of your Dyson appliance under
the Dyson guarantee will not extend the period of the Dyson
guarantee.
• The Dyson guarantee provides benefits which are additional to
and do not affect your statutor y rights as a consumer.
• You must provide proof of (both the original and any subsequent)
delivery/purchase before any work can be carried out on your
Dyson appliance. Without this proof, any work carried out
pursuant to the Dyson guarantee and any associated delivery
charges (both to and from us) will be at your cost, subject to your
statutory rights and remedies as a consumer. Please keep your
receipt or delivery note.
WHAT IS COVERED
Your Dyson guarantee covers:
• The repair or replacement of your Dyson appliance if your
Dyson appliance is found to be defective due to faulty materials,
workmanship or function within 2 years of purchase or delivery (if
any part is no longer available or out of manufacture, Dyson will
replace it with a functional replacement part).
• This Dyson guarantee will only be valid if the appliance is used in
the countr y in which it was sold.
• Accidental damage, faults caused by negligent use or care,
misuse, neglect, carelessness or operation or handling of the
appliance which is not in accordance with the Dyson Operating
Manual.
• Use of the appliance for anything other than normal domestic
household purposes.
• Use of parts not assembled or installed in accordance with the
instructions of Dyson.
• Use of parts and accessories which are not genuine Dyson
components.
• Faulty installation (except where installed by Dyson).
• Repairs or alterations carried out by parties other than Dyson or
its authorised agents.
• Normal wear and tear (e.g. fuse, brush bar etc.).
If you are in any doubt as to what is covered by your guarantee,
please contact the Dyson Helpline.
REGISTERING YOUR DYSON GUARANTEE
To help us ensure you receive prompt and efficient service, please
register as a Dyson appliance owner. There are three ways to do this:
• Online:
AU: ww w.dyson.com.au/register
NZ: www.dyson.co.nz/register
• By calling the Dyson Customer Care Helpline.
• By completing and returning the enclosed form to us by mail.
This will confirm ownership of your Dyson appliance in the event of an
insurance loss, and enable us to contact you if necessary.
ABOUT YOUR PRIVACY
• Dyson may use this information for future marketing and research
purposes (including sending commercial electronic messages)
and may disclose it to third parties for the purposes of providing
the services you have requested or to our business partners or
professional advisers.
• If you wish to access your personal information or see our full
privacy policy, please contact us at: aucustomercare@dyson.com
DISPOSAL INFORMATION
Dyson products are made from high grade recyclable materials.
Please dispose of this product responsibly and recycle where possible.
The battery should be removed from the product before disposal.
Dispose of or recycle the battery in accordance with local ordinances
or regulations.
When your Dyson appliance reaches the end of its life, we are
responsible for its safe disposal. You can send your old Dyson
appliance back to us (at our cost) and we will organise for it to be
recycled. Please note that not all parts are recyclable. Recycling of
parts is subject to the capabilities of 3rd party suppliers. Available in
Australia only.
Simply:
1. Box up your old Dyson appliance.
2. Take the package to your local post office and send to the address
below:
Dyson We Recycle
Reply Paid 83215
Dyson Service Centre
8–10 Mangrove Lane
Taren Point, NSW 2229
PRODUCT INFORMATION
Please note: Small details may vary from those shown.
WHAT IS NOT COVERED
Dyson does not guarantee the repair or replacement of a product
where a defect is the result of:
16
Page 17

17
Page 18

JN.64336 PN.302491-05-02 27.11.14 www.dyson.com
Page 19

Page 20

GUARANTEE FORM
Date of purchase
Serial number
Title
First name
Address
Surname
/ /
Country of purchase Australia New Zealand
Postcode
email
Telephone
Store of purchase
Privacy Act
Dyson Appliances Ltd (Dyson) may collect and use your personal information to provide you updates on latest products and services, to
analyse and research customer’s choice on products, to provide products and services you have requested and for other purposes relating
or incidental to product guarantee (e.g. product guarantee registration, product recalls) (“the Purposes”). To do so, Dyson may disclose your
personal information to its related bodies, business partners or third parties. Some of the recipients are located overseas, including United States
of America, Amsterdam and United Kingdom.
If Dyson does not collect your personal information, then it may not be able to fulfil the Purposes.
Our privacy policy, located at www.dyson.com.au/support/privacy-policy.aspx, contains information about how you may access and correct your
personal information held by Dyson, and the privacy complaints handling process of Dyson.
You may contact Dyson at aucustomercare@dyson.com
If you wish to receive information and updates about Dyson’s products and services, please tick this box.
Under the Australian Privacy Principles, before Dyson discloses personal information overseas, Dyson will take such steps as are reasonable in
the circumstances to ensure that the overseas recipient does not breach the Australian Privacy Principles. However, an individual may consent
to such disclosure without this requirement. If you consent to Dyson disclosing your personal information to business partners or third parties
overseas for the Purposes, please tick this box.
Note: If you do not provide consent, then Dyson may not be able to fulfil the Purposes.
■
Mobile
■
3 EASY WAYS TO REGISTER YOUR DYSON 2 YEAR GUARANTEE
Register
online
Visit our website to
register your Dyson full
parts and labour guarantee online.
AU: www.dyson.com.au/register
NZ: www.dyson.co.nz/register
Register
by phone
Call our dedicated
Helpline.
AU 1800 239 766
NZ 0800 397 667.
Register
by mail
Complete and return
the form to Dyson in
the envelope supplied.
 Loading...