

Page 1
200mm maximum
385mm minimum
200mm maximum
350mm minimum
385mm minimum
300mm minimum
100mm minimum
200mm maximum
PRE-INSTALLATION INFORMATION
distributed by
RESTROOM DIRECT 704 .937. 2673 www.RestroomDirect.com
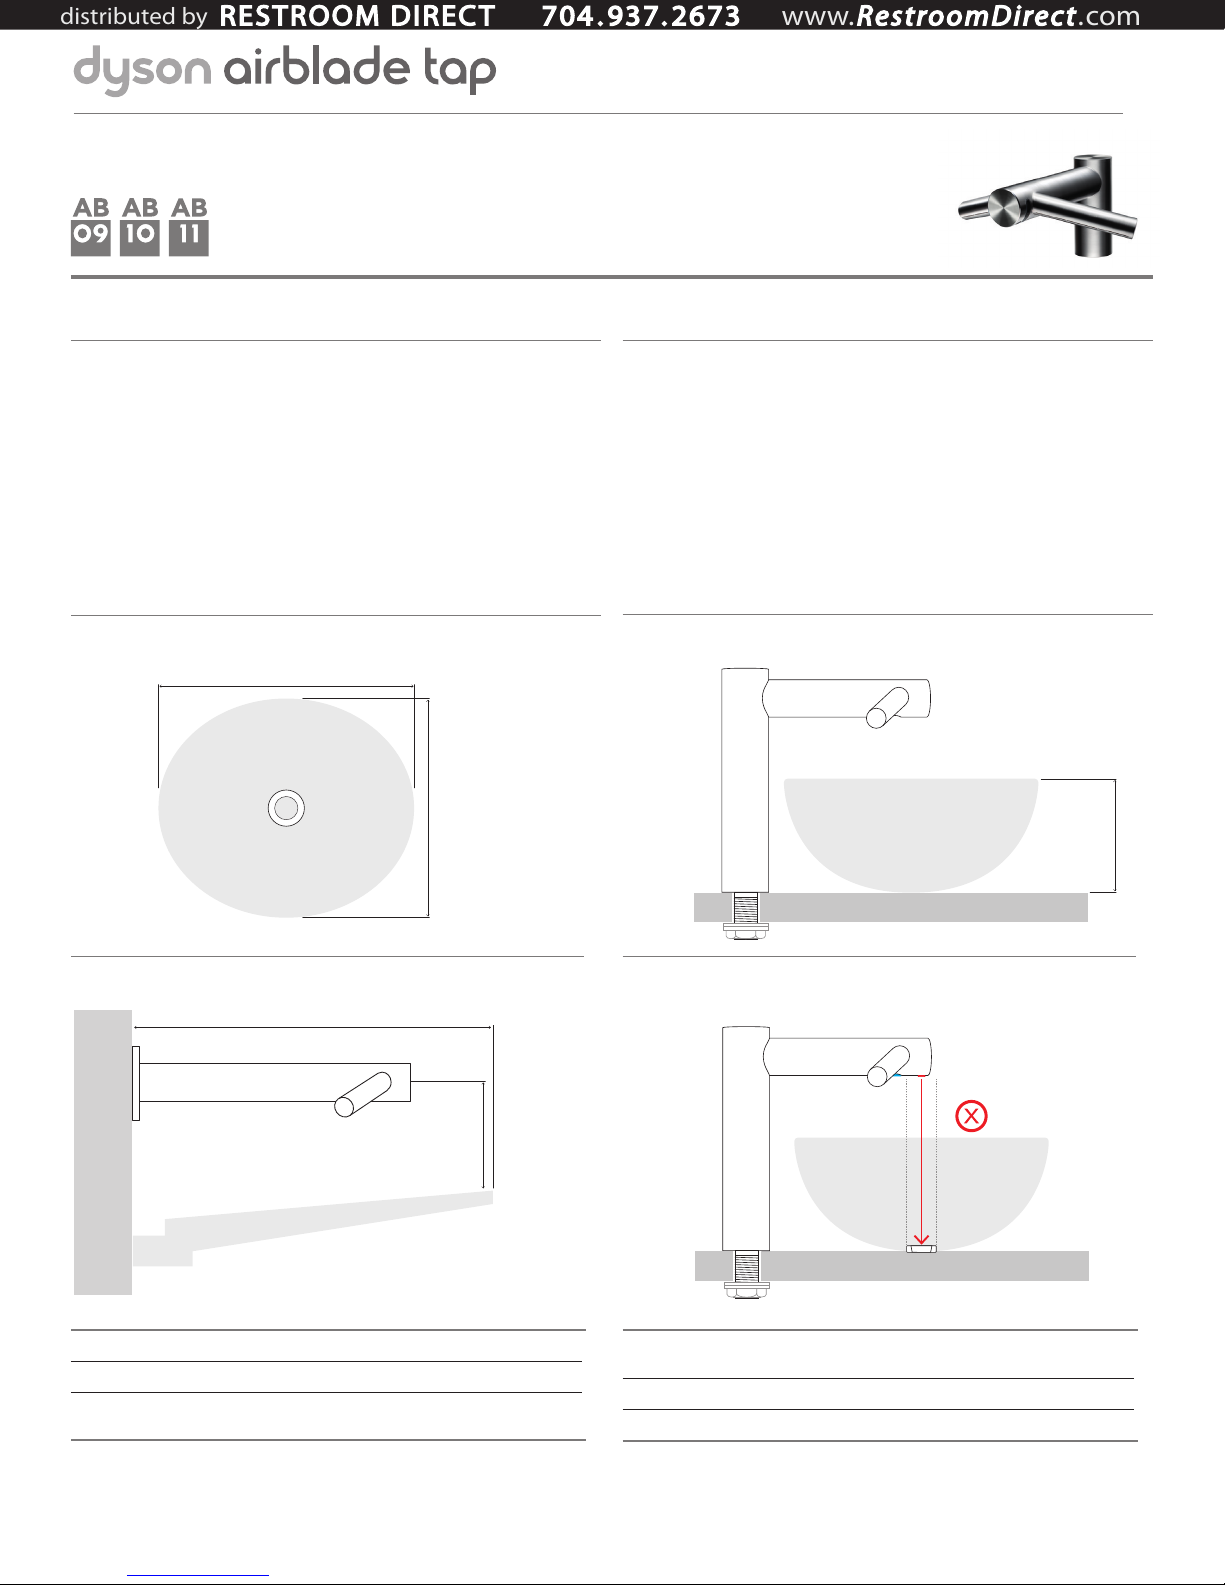
Sink specification guidelines
The Dyson Airblade Tap hand dryer is compatible with
most sink types.
Do not use plugs within the plug holes in sinks.
Due to high velocity air and water being in close proximity,
there is a chance of some water dispersion outside
the sink dimensions.
Sinks with highly polished surfaces should be avoided
e.g. reflective chrome.
Porcelain or brushed metal are ideal.
Fi g .1
1325⁄32" minimum
350mm minimum
" minimum
16
⁄
13
11
300mm minimum
Tap mounting
The tap stem (measured from the outside diameter) should
19
be mounted
⁄32" – 19⁄16" from the outside edge of the sink.
When multiple taps are installed side-by-side, tap centers
should be a minimum of 22
27
⁄64" from tap center to a side wall. This allows sufficient
11
53
⁄64" apart and a minimum of
space for mounting the motor bucket horizontally as well as
enough space for users at the sink (shoulder to shoulder).
Do not place the downward facing water sensor of the tap over
a reflective surface, such as the drainage hole. (Fig.4)
Fig.2
" maximum
8
⁄
7
7
200mm maximum
Fig.3 Fig.4
Sink dimensions (All internal measurements unless otherwise stated)
Fig.1 Width of sink minimum: 13
Fig.2 Maximum depth of sink for Long Neck Tap (AB10) only: 7
(External measurement of vessel/pedestal sink).
155⁄32" minimum
" minimum
16
⁄
15
3
100mm minimum
25
⁄32", Front to back of sink minimum: 1113⁄16"
7
⁄8"
Fig.3 Minimum distance from tap center to top of sink (AB11 only) 315⁄16".
Front edge of sink (all t ypes – pedestal, recessed, slab) to wall minimum 15
Internal depth of sink minimum (for all taps): 315⁄16"
For further information please contact Dyson.
888-397-6622
airbladeinfo@dyson.com
www.dysonairblade.com
5
⁄32".
Page 2
Locating the soap dispenser
distributed by
RESTROOM DIRECT 704 .937. 2673 www.RestroomDirect.com
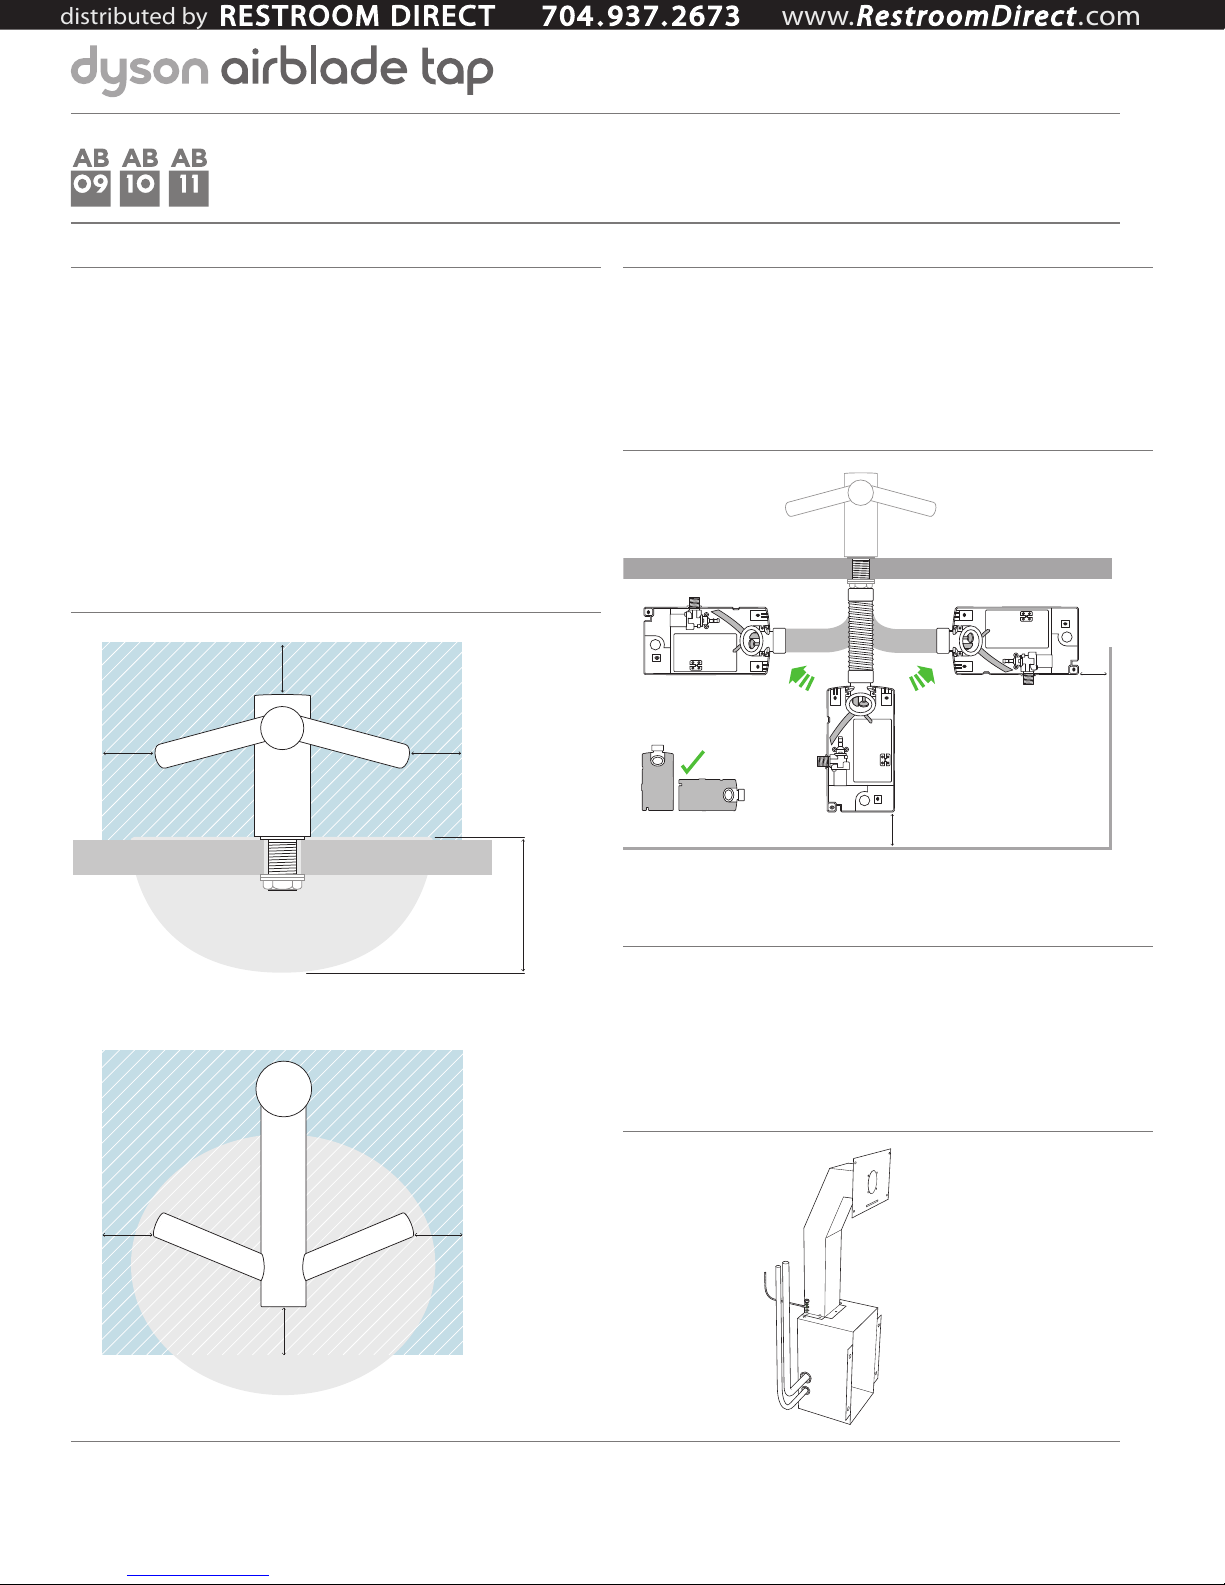
Mounting the motor bucket (AB09/AB10)
The infrared sensing zone for air activation extends along each
tap branch. Therefore, it is the user’s hand route to the soap
dispenser that is most important to prevent nuisance activation.
23
The soap dispenser should be located at least 2
⁄64" outside the
width of the tap. This is so the user can reach around the side of
the branch.
23
The soap dispenser should be located at least 2
⁄64" above
the branches so that the sensors are not activated.
It is also important to note that the user may reach diagonally
across for the soap and this path must not go through the
sensing zone.
"
64
Front on view showing
soap dispenser
clear zone.
⁄
23
2
223⁄64"223⁄64"
The motor bucket cannot be mounted upside down.
The motor bucket cannot be installed above the sink.
15
⁄16" minimum clearance from bottom of motor bucket
3
to floor/wall.
Only the following is advised.
L N
L N
L N
315⁄16"
"
16
⁄
15
3
Over head view
showing soap
dispenser clear zone.
223⁄64" 223⁄64"
"
64
⁄
23
2
For further information please contact Dyson.
888-397-6622
airbladeinfo@dyson.com
www.dysonairblade.com
" minimum
16
⁄
15
3
Mounting the motor bucket (AB11)
Metal enclosure assembly
This Dyson product is designed so the motor unit is located
behind the stud wall. The vertical wall studs must be constructed
so as to allow the metal enclosure to be fitted between them.
One of the horizontal wall studs must be fitted a) so it holds the
main weight of the metal duct and the unit, and b) so it is in the
correct position for the tap stem.
Page 3

Abusive testing
distributed by
RESTROOM DIRECT 704 .937. 2673 www.RestroomDirect.com
The tap has undergone rigorous abusive testing
to ensure that it can withstand substantial forces
and impacts typical of a commercial and public
bathroom environment.
Tools required
To install this unit you will need (4) screws, and appropriate fittings
Torx T15 screw driver – long handle
Electrical drill with 13⁄8" drill bit
Qty 4 Raw plugs (suitable for wall type fixing to)
7mm flat head screwdriver
Flat terminal block screwdriver
Tap spanner
Spanner 11⁄2"
Sharp knife/blade
Pan head screws. Size 13⁄64" dia toggle or masonry type
Conduit as per local electrical regulations
Electrical
Input voltage/Frequency: 220-253V 50 Hz
Isolated by switch fuse spur or RCD as appropriate
Current 6.6 Amps
Cable spec 3 core PVC 1.5mm cross sectional area
Local electrical regulations must be adhered
to when installing or repairing the product
Rated power: 1600 W
Operating temperature range: 32° – 104°F
Standby power consumption: Less than 0.5 W
Water operation
Water flow rate: 4 l/min
Water temperature control: Thermostatic mixer recommended (not supplied)
Water pressure required: 1-8 Bar
1 ½" BSP isolated valve required for service
Water supply cleanliness and biological grow th
In some countries there are regulations or guidelines that require
temperature controlled water supply systems (such as that supplied
to the Dyson Airblade Tap hand dryer) to be subjected to regular
cleaning to minimize any biological growth.
To enable you to meet these regulations, the Dyson Airblade Tap
hand dryer has been designed and tested to withstand internal
cleaning both with hot water up to 203°F and with sodium hypochlorite
at a concentration of 0.45%.
Dyson is unable to advise regarding the details of the cleaning
you should carry out because this will be specific both to the
applicable regulations and to your water supply system.
When carrying out internal cleaning of the Dyson Airblade Tap
hand dryer, please be aware of any safet y considerations when
using hot water or chemicals. Dyson will not be responsible
for any injur y caused by this process.
For further information please contact Dyson.
888-397-6622
airbladeinfo@dyson.com
www.dysonairblade.com
 Loading...