

Dymo Rhino 6000 Industrial Label Printer User Manual

User Guide
Rhino
6000
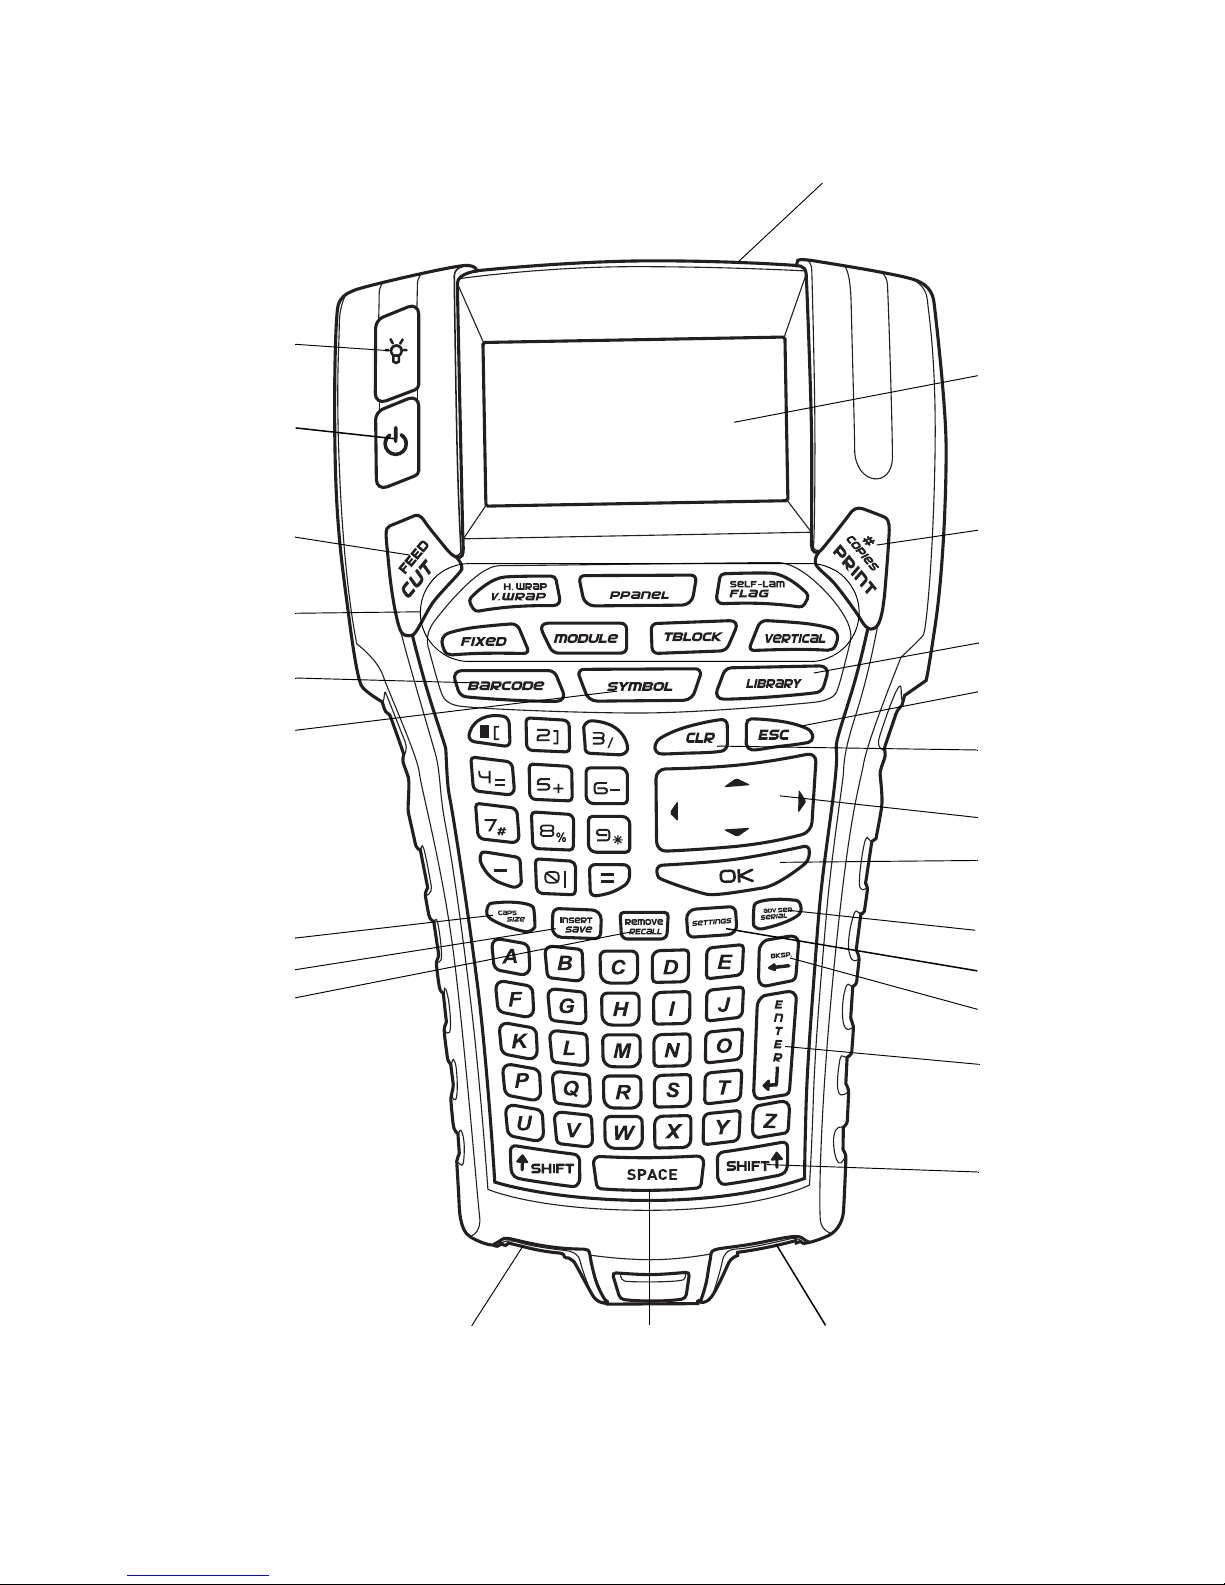
Figure 1 RHINO 6000 LabelPrinter
Cut/Feed
Print/# of copies
Escape
Backspace
Shift
Save/Insert
Barcode
Backlight
Library
Tap e Exi t
LCD display
Symbol
Hot Keys
Navigation keys
USB connector Power connectorSpace bar
Power
Clear
OK
Recall/Remove
Settings
Size/CAPS
Serialization
Enter

Contents
About Your New Printer . . . . . . . . . . . . . . . . . . . . . . . . . . . . . . . . . . . . . . . . . . . . . . . . . . . . . . . . . 1
Getting Started . . . . . . . . . . . . . . . . . . . . . . . . . . . . . . . . . . . . . . . . . . . . . . . . . . . . . . . . . . . . . . . . . 1
Connecting the Power . . . . . . . . . . . . . . . . . . . . . . . . . . . . . . . . . . . . . . . . . . . . . . . . . . . . . . . . . . . . . . . . . . 1
Connecting the Power Adapter . . . . . . . . . . . . . . . . . . . . . . . . . . . . . . . . . . . . . . . . . . . . . . . . . . . . . . . . 1
Inserting the Battery Pack. . . . . . . . . . . . . . . . . . . . . . . . . . . . . . . . . . . . . . . . . . . . . . . . . . . . . . . . . . . . . 1
Recharging the Battery Pack. . . . . . . . . . . . . . . . . . . . . . . . . . . . . . . . . . . . . . . . . . . . . . . . . . . . . . . . . . . 2
Inserting and Removing the Tape Cassette . . . . . . . . . . . . . . . . . . . . . . . . . . . . . . . . . . . . . . . . . . . . . . . . 2
Setting the Tape Width . . . . . . . . . . . . . . . . . . . . . . . . . . . . . . . . . . . . . . . . . . . . . . . . . . . . . . . . . . . . . . . . . 2
Selecting a Language . . . . . . . . . . . . . . . . . . . . . . . . . . . . . . . . . . . . . . . . . . . . . . . . . . . . . . . . . . . . . . . . . . . 2
Selecting Units of Measure . . . . . . . . . . . . . . . . . . . . . . . . . . . . . . . . . . . . . . . . . . . . . . . . . . . . . . . . . . . . . . 3
Getting to Know Your Printer . . . . . . . . . . . . . . . . . . . . . . . . . . . . . . . . . . . . . . . . . . . . . . . . . . . . . 3
Power . . . . . . . . . . . . . . . . . . . . . . . . . . . . . . . . . . . . . . . . . . . . . . . . . . . . . . . . . . . . . . . . . . . . . . . . . . . . . . . . 3
LCD Display . . . . . . . . . . . . . . . . . . . . . . . . . . . . . . . . . . . . . . . . . . . . . . . . . . . . . . . . . . . . . . . . . . . . . . . . . . . 3
Using the Backlight . . . . . . . . . . . . . . . . . . . . . . . . . . . . . . . . . . . . . . . . . . . . . . . . . . . . . . . . . . . . . . . . . . 3
Adjusting the Display Contrast . . . . . . . . . . . . . . . . . . . . . . . . . . . . . . . . . . . . . . . . . . . . . . . . . . . . . . . . . 3
Hiding the Caption Bar. . . . . . . . . . . . . . . . . . . . . . . . . . . . . . . . . . . . . . . . . . . . . . . . . . . . . . . . . . . . . . . . 4
CAPS Mode . . . . . . . . . . . . . . . . . . . . . . . . . . . . . . . . . . . . . . . . . . . . . . . . . . . . . . . . . . . . . . . . . . . . . . . . . . . 4
Shift Key . . . . . . . . . . . . . . . . . . . . . . . . . . . . . . . . . . . . . . . . . . . . . . . . . . . . . . . . . . . . . . . . . . . . . . . . . . . . . 4
Escape Key . . . . . . . . . . . . . . . . . . . . . . . . . . . . . . . . . . . . . . . . . . . . . . . . . . . . . . . . . . . . . . . . . . . . . . . . . . . . 4
Navigation Keys . . . . . . . . . . . . . . . . . . . . . . . . . . . . . . . . . . . . . . . . . . . . . . . . . . . . . . . . . . . . . . . . . . . . . . . 4
Backspace Key . . . . . . . . . . . . . . . . . . . . . . . . . . . . . . . . . . . . . . . . . . . . . . . . . . . . . . . . . . . . . . . . . . . . . . . . . 4
Clear Key . . . . . . . . . . . . . . . . . . . . . . . . . . . . . . . . . . . . . . . . . . . . . . . . . . . . . . . . . . . . . . . . . . . . . . . . . . . . . 4
Cutter Button . . . . . . . . . . . . . . . . . . . . . . . . . . . . . . . . . . . . . . . . . . . . . . . . . . . . . . . . . . . . . . . . . . . . . . . . . 4
Hot Keys . . . . . . . . . . . . . . . . . . . . . . . . . . . . . . . . . . . . . . . . . . . . . . . . . . . . . . . . . . . . . . . . . . . . . . . . . . . . . . 4
Working with Label Files . . . . . . . . . . . . . . . . . . . . . . . . . . . . . . . . . . . . . . . . . . . . . . . . . . . . . . . . . 5
Creating a Label File . . . . . . . . . . . . . . . . . . . . . . . . . . . . . . . . . . . . . . . . . . . . . . . . . . . . . . . . . . . . . . . . . . . . 5
Adding Labels to a Label File . . . . . . . . . . . . . . . . . . . . . . . . . . . . . . . . . . . . . . . . . . . . . . . . . . . . . . . . . . . . 5
Removing Labels from a File . . . . . . . . . . . . . . . . . . . . . . . . . . . . . . . . . . . . . . . . . . . . . . . . . . . . . . . . . . . . . 5
Printing a Label File . . . . . . . . . . . . . . . . . . . . . . . . . . . . . . . . . . . . . . . . . . . . . . . . . . . . . . . . . . . . . . . . . . . . 5
Formatting a Label . . . . . . . . . . . . . . . . . . . . . . . . . . . . . . . . . . . . . . . . . . . . . . . . . . . . . . . . . . . . . 6
Changing the Text Size . . . . . . . . . . . . . . . . . . . . . . . . . . . . . . . . . . . . . . . . . . . . . . . . . . . . . . . . . . . . . . . . . 6
Changing the Text Style . . . . . . . . . . . . . . . . . . . . . . . . . . . . . . . . . . . . . . . . . . . . . . . . . . . . . . . . . . . . . . . . 6

Creating Multi-Line Labels . . . . . . . . . . . . . . . . . . . . . . . . . . . . . . . . . . . . . . . . . . . . . . . . . . . . . . . . . . . . . . . 6
Using International Characters . . . . . . . . . . . . . . . . . . . . . . . . . . . . . . . . . . . . . . . . . . . . . . . . . . . . . . . . . . . 6
Creating Industrial Labels . . . . . . . . . . . . . . . . . . . . . . . . . . . . . . . . . . . . . . . . . . . . . . . . . . . . . . . . 6
Creating Wire Wrap Labels . . . . . . . . . . . . . . . . . . . . . . . . . . . . . . . . . . . . . . . . . . . . . . . . . . . . . . . . . . . . . . . 7
Creating Vertical Wrap Labels . . . . . . . . . . . . . . . . . . . . . . . . . . . . . . . . . . . . . . . . . . . . . . . . . . . . . . . . . . 7
Creating Horizontal Wrap Labels. . . . . . . . . . . . . . . . . . . . . . . . . . . . . . . . . . . . . . . . . . . . . . . . . . . . . . . . 7
Creating Self-Laminating Labels. . . . . . . . . . . . . . . . . . . . . . . . . . . . . . . . . . . . . . . . . . . . . . . . . . . . . . . . 7
Creating Flag Labels . . . . . . . . . . . . . . . . . . . . . . . . . . . . . . . . . . . . . . . . . . . . . . . . . . . . . . . . . . . . . . . . . . 7
Creating Fixed Length Labels . . . . . . . . . . . . . . . . . . . . . . . . . . . . . . . . . . . . . . . . . . . . . . . . . . . . . . . . . . . . . 8
Creating Patch Panel Labels . . . . . . . . . . . . . . . . . . . . . . . . . . . . . . . . . . . . . . . . . . . . . . . . . . . . . . . . . . . . . . 8
Creating Terminal Block Labels . . . . . . . . . . . . . . . . . . . . . . . . . . . . . . . . . . . . . . . . . . . . . . . . . . . . . . . . . . . 8
Creating Module Labels . . . . . . . . . . . . . . . . . . . . . . . . . . . . . . . . . . . . . . . . . . . . . . . . . . . . . . . . . . . . . . . . . 9
Using Fuse Multipliers. . . . . . . . . . . . . . . . . . . . . . . . . . . . . . . . . . . . . . . . . . . . . . . . . . . . . . . . . . . . . . . . . 9
Printing Empty Modules. . . . . . . . . . . . . . . . . . . . . . . . . . . . . . . . . . . . . . . . . . . . . . . . . . . . . . . . . . . . . . . 9
Creating Vertical Labels . . . . . . . . . . . . . . . . . . . . . . . . . . . . . . . . . . . . . . . . . . . . . . . . . . . . . . . . . . . . . . . . . 9
Changing the Label Type . . . . . . . . . . . . . . . . . . . . . . . . . . . . . . . . . . . . . . . . . . . . . . . . . . . . . . . . . . . . . . . . 9
Changing the Label Settings . . . . . . . . . . . . . . . . . . . . . . . . . . . . . . . . . . . . . . . . . . . . . . . . . . . . . . . . . . . .10
Printing Vertical Lines between Cells . . . . . . . . . . . . . . . . . . . . . . . . . . . . . . . . . . . . . . . . . . . . . . . . . . . . .10
Using Barcodes . . . . . . . . . . . . . . . . . . . . . . . . . . . . . . . . . . . . . . . . . . . . . . . . . . . . . . . . . . . . . . . . 10
Adding a Barcode . . . . . . . . . . . . . . . . . . . . . . . . . . . . . . . . . . . . . . . . . . . . . . . . . . . . . . . . . . . . . . . . . . . . . 10
Editing a Barcode . . . . . . . . . . . . . . . . . . . . . . . . . . . . . . . . . . . . . . . . . . . . . . . . . . . . . . . . . . . . . . . . . . . . .10
Deleting a Barcode . . . . . . . . . . . . . . . . . . . . . . . . . . . . . . . . . . . . . . . . . . . . . . . . . . . . . . . . . . . . . . . . . . . .10
Hiding Barcode Text . . . . . . . . . . . . . . . . . . . . . . . . . . . . . . . . . . . . . . . . . . . . . . . . . . . . . . . . . . . . . . . . . . .11
Adding Symbols . . . . . . . . . . . . . . . . . . . . . . . . . . . . . . . . . . . . . . . . . . . . . . . . . . . . . . . . . . . . . . . 11
Inserting Symbols . . . . . . . . . . . . . . . . . . . . . . . . . . . . . . . . . . . . . . . . . . . . . . . . . . . . . . . . . . . . . . . . . . . . . 11
Inserting User Symbols . . . . . . . . . . . . . . . . . . . . . . . . . . . . . . . . . . . . . . . . . . . . . . . . . . . . . . . . . . . . . . . . .11
Using the Text Library . . . . . . . . . . . . . . . . . . . . . . . . . . . . . . . . . . . . . . . . . . . . . . . . . . . . . . . . . .11
Inserting Library Text . . . . . . . . . . . . . . . . . . . . . . . . . . . . . . . . . . . . . . . . . . . . . . . . . . . . . . . . . . . . . . . . . .12
Adding My Library Text . . . . . . . . . . . . . . . . . . . . . . . . . . . . . . . . . . . . . . . . . . . . . . . . . . . . . . . . . . . . . . . .12
Deleting My Library Text . . . . . . . . . . . . . . . . . . . . . . . . . . . . . . . . . . . . . . . . . . . . . . . . . . . . . . . . . . . . . . .12
Adding Graphics . . . . . . . . . . . . . . . . . . . . . . . . . . . . . . . . . . . . . . . . . . . . . . . . . . . . . . . . . . . . . . . 12
Creating a Series of Labels . . . . . . . . . . . . . . . . . . . . . . . . . . . . . . . . . . . . . . . . . . . . . . . . . . . . . . .12
Using Simple Serialization . . . . . . . . . . . . . . . . . . . . . . . . . . . . . . . . . . . . . . . . . . . . . . . . . . . . . . . . . . . . . .13

Using Simultaneous Serialization . . . . . . . . . . . . . . . . . . . . . . . . . . . . . . . . . . . . . . . . . . . . . . . . . . . . . . . 13
Using Advanced Serialization . . . . . . . . . . . . . . . . . . . . . . . . . . . . . . . . . . . . . . . . . . . . . . . . . . . . . . . . . . . 13
Printing Options . . . . . . . . . . . . . . . . . . . . . . . . . . . . . . . . . . . . . . . . . . . . . . . . . . . . . . . . . . . . . . . 14
Printing Multiple Copies . . . . . . . . . . . . . . . . . . . . . . . . . . . . . . . . . . . . . . . . . . . . . . . . . . . . . . . . . . . . . . . 14
Collating Multiple Copies . . . . . . . . . . . . . . . . . . . . . . . . . . . . . . . . . . . . . . . . . . . . . . . . . . . . . . . . . . . . . . 14
Pausing between Labels . . . . . . . . . . . . . . . . . . . . . . . . . . . . . . . . . . . . . . . . . . . . . . . . . . . . . . . . . . . . . . . 14
Advancing the Label Tape . . . . . . . . . . . . . . . . . . . . . . . . . . . . . . . . . . . . . . . . . . . . . . . . . . . . . . . . . . . . . . 14
Adjusting Print Contrast . . . . . . . . . . . . . . . . . . . . . . . . . . . . . . . . . . . . . . . . . . . . . . . . . . . . . . . . . . . . . . . 14
Using Printer Memory . . . . . . . . . . . . . . . . . . . . . . . . . . . . . . . . . . . . . . . . . . . . . . . . . . . . . . . . . . 15
Saving a Label File . . . . . . . . . . . . . . . . . . . . . . . . . . . . . . . . . . . . . . . . . . . . . . . . . . . . . . . . . . . . . . . . . . . . 15
Recalling a Label File from Memory . . . . . . . . . . . . . . . . . . . . . . . . . . . . . . . . . . . . . . . . . . . . . . . . . . . . . . 15
Deleting a Label File from Memory . . . . . . . . . . . . . . . . . . . . . . . . . . . . . . . . . . . . . . . . . . . . . . . . . . . . . . 15
Cleaning Your Printer . . . . . . . . . . . . . . . . . . . . . . . . . . . . . . . . . . . . . . . . . . . . . . . . . . . . . . . . . . 15
Using RHINO Connect Software . . . . . . . . . . . . . . . . . . . . . . . . . . . . . . . . . . . . . . . . . . . . . . . . . . 16
Connecting to your Computer . . . . . . . . . . . . . . . . . . . . . . . . . . . . . . . . . . . . . . . . . . . . . . . . . . . 16
Symbols . . . . . . . . . . . . . . . . . . . . . . . . . . . . . . . . . . . . . . . . . . . . . . . . . . . . . . . . . . . . . . . . . . . . . . 17
Library Text . . . . . . . . . . . . . . . . . . . . . . . . . . . . . . . . . . . . . . . . . . . . . . . . . . . . . . . . . . . . . . . . . . . 18
Troubleshooting . . . . . . . . . . . . . . . . . . . . . . . . . . . . . . . . . . . . . . . . . . . . . . . . . . . . . . . . . . . . . . . 20
Contacting Customer Support . . . . . . . . . . . . . . . . . . . . . . . . . . . . . . . . . . . . . . . . . . . . . . . . . . . 25


1
About Your New Printer
With your new RHINO label printer, you can create a
wide variety of high-quality, self-adhesive labels. You
can choose to print your labels in many different sizes,
and styles. The printer uses RHINO Industrial label tape
cassettes in widths of 6 mm, 9 mm, 12 mm, 19 mm, or
24 mm. RHINO tape cassettes are also available in a
wide range of materials, such as flexible nylon,
permanent polyester, vinyl, non-adhesive tag, and
heat shrink tubes.
Visit www.dymo.com for information on the full line
of labels and accessories for your printer.
Warranty Registration
Please complete the warranty registration card and
return it to the appropriate customer service address
within seven days. Visit www.dymo.com for details.
Getting Started
Follow the instructions in this section to start using
your printer for the first time.
Connecting the Power
The printer can operate on battery or AC power. A
power adapter and a rechargeable battery pack is
included with your printer.
The printer can operate with six AA alkaline
batteries for power; however, alkaline batteries should
only be used as temporary backup power.
To save power, the printer will automatically turn off
after five minutes of inactivity.
Connecting the Power Adapter
The printer uses a 110V-240V power adapter.
Connecting the power adapter with the battery pack
inserted recharges the battery pack.
To connect the power adapter
1. Plug the power adapter into the power connector
on the bottom of the printer. See Figure 2.
Figure 2
2. Plug the other end of the power adapter into a
power outlet.
Inserting the Battery Pack
The printer uses the rechargeable, Lithium-ion battery
pack when not connected to the power adapter. As
temporary backup power, the printer can operate
using six AA alkaline batteries.
To insert the battery pack
1. Press the thumb latch on the back of the printer to
remove battery compartment cover. See Figure 3.
Figure 3
2. Insert the battery pack into the battery
compartment. See Figure 3.
3. Replace the battery compartment cover.
Remove the batteries if the printer will not be
used for a long period of time.
Press thumb
latch to open

2
Recharging the Battery Pack
The battery pack automatically recharges while the
printer is connected to a power source through the
power adapter. Charging the battery pack for the first
time will take approximately eight hours; recharging
the battery pack will take approximately two hours.
Inserting and Removing the Tape Cassette
Your printer comes with a starter tape cassette. Visit
www.dymo.com for information about purchasing
additional tape cassettes.
To insert the tape cassette
1. Gently lift the tape cassette door on the back of
the printer.
2. Make sure the tape and ribbon are taut across the
mouth of the cassette and that the tape passes
between the guides. If necessary, turn the ribbon
rewind spool clockwise to tighten the ribbon.
3. Insert the cassette with the tape and ribbon
positioned between the guideposts.
Figure 4
4. Press gently on the cassette until the cassette
moves into place. The insertion mechanism will
guide the cassette into place.
5. Close the tape cassette door.
To remove the tape cassette
1. Gently lift the tape cassette door on the back of the
printer.
2. Press the cassette eject button. The tape cassette is
lifted from the printer.
3. Gently remove the tape cassette.
4. Insert a new tape cassette as described above.
5. Reset the tape width as described in Setting the
Tape Width.
Setting the Tape Width
Each time you insert a tape cassette into the printer,
you are prompted to set the tape width so the printer
knows what size label tape you are currently using.
Some of the features you use to design labels are
dependent on the width of the tape.
However, to create a label for a tape width different
than what is currently in the printer, you can set the
tape width from the Settings menu.
To set the tape width
1. Press SETTINGS. The Settings menu appears on the
display.
2. Select Tape Width.
3. Select the width of the label tape currently inserted
in the printer.
4. Press OK and then select Done (ESC).
Selecting a Language
Several language-related features on the printer are
determined by the language setting, such as special
characters, menu text, and so on. By default the
language is set to English.
To select a language
1. Press SETTINGS and select Language.
2. Select the language.
3. Press OK and then select Done (ESC).
Eject Button
Lift
Guide posts
Ribbon rewind
spool

3
Selecting Units of Measure
You can choose to work in inches or millimeters.
To select the units of measure
1. Press SETTINGS and select Units.
2. Select Inch or mm.
3. Press OK and then select Done (ESC).
Getting to Know Your Printer
Become familiar with the location of the feature and
function keys on your printer. See Figure 1 on the
inside front cover. The following sections describe each
feature in detail.
Power
The button turns the power on and off. If no keys
are pressed after five minutes, the power is turned off
automatically.
When the printer is turned off, the current label file
and its settings are remembered for the next time the
printer is turned on. If the battery pack and power
adapter are disconnected at the same time, some of
the settings are remembered; however, the current
label file is lost and you will need to reset the tape
width when you reconnect the power and turn on the
printer.
LCD Display
The printer’s LCD display includes a caption bar across
the top, showing the current label type, and feature
indicators on the right side, showing which features
are currently selected. See Figure 5.
Figure 5
When the text you have entered will not fit on the
label as currently defined, the portion of the text that
will not fit is shaded. If you attempt to print the label
containing text that will not fit, the excess text will not
be printed.
Using the Backlight
In low light conditions, you can turn on the backlight
to make it easier to see the display. To save power, the
back light will turn off automatically after 15 seconds
of inactivity. Pressing any key will turn the backlight
back on again. The backlight key acts as a toggle to
turn the light on and off.
To toggle backlighting on and off
♦ Press .
Adjusting the Display Contrast
In addition to backlighting, you can adjust the display
contrast to help in different lighting conditions.
To adjust the display contrast
1. Press SETTINGS.
2. Select LCD contrast and press OK.
3. Use the arrow keys to select a value between
0 (lighter) and 8 (darker). The contrast changes as
you select the different settings.
4. Press OK, and then select Done (ESC).
Feature
indicators
Caption bar
Battery level
indicator

4
Hiding the Caption Bar
The Caption bar at the top of the display shows the
current label type and for some label types, additional
information about the label, such as size or barcode
type. The Caption bar can be hidden to allow more
lines of the label to be shown in the display. This is very
useful for multi-line labels.
To hide the Caption bar
1. Press SETTINGS.
2. Select Caption bar and press OK.
3. Select Hide, press OK, and then select Done (ESC).
CAPS Mode
The CAPS key toggles capitalization on and off. When
CAPS mode is turned on, the CAPS indicator is shown
on the display and all letters that you enter will be
capitalized. The factory default setting is CAPS mode
on. When CAPS mode is off, all letters entered appear
in lower case.
To toggle CAPS on and off
♦ Press CAPS (SHIFT + SIZE).
Shift Key
The SHIFT keys are used to select the function or
symbol printed above a key. For example, when you
press the 9 key, the number 9 appears in the display;
however, if you press SHIFT and then 9, an asterisk (*)
appears in the display. Pressing one of the Shift keys
toggles the function on and off, so you do not need to
hold down both keys together.
Escape Key
The ESC key returns you to the previous menu from
within any menu without making a selection.
Navigation Keys
The navigation keys operate as follows:
Backspace Key
The key removes the character to the left of the
cursor.
Clear Key
The CLR key clears all current text settings and format,
returning the display to the General label type.
Cutter Button
The Cutter button cuts the label tape. When printing
multiple labels, the printer pauses after printing each
label so that you can cut the label. You can turn this
feature off, so that multiple labels will print
continuously. See Pausing between Labels on
page 14.
Hot Keys
A number of hot keys are available for creating specific
types of labels, adding barcodes, inserting symbols,
and using the text from the library. These hot keys are
described in detail later in this user guide.
Key Function
,
Moves one character to the left in the display
Returns to the previous menu (can also use
ESC)
SHIFT
,
Moves one label to the left in the display
=
Moves one character to the right in the display
Moves to the next menu level (can also use
OK)
SHIFT
=
Moves one label to the right in the display
;
Moves up in a list of items
:
Moves down in a list of items
OK
Selects a menu item
 Loading...