

Dymo LM 350D User Manual

Contents
About Your New La bel Maker ................................................................................................................................ 5
Warranty Registration ........................................................................................................................................................................5
Getting Started .................................................................................................................................................... 5
Connecting the Power ........................................................................................................................................................................5
Inserting the Batteries ...................................................................................................................................................................5
Connecting the Power Adapter ......................................................................................................................................................5
Inserting the Tape Casset te ................................................................................................................................................................5
Settings ............................................................................................................................................................... 6
Selecting the Language ......................................................................................................................................................................6
Selecting Units of Measure .................................................................................................................................................................6
Printing Your First Label .....................................................................................................................................................................6
Getting to Know the Label Maker .......................................................................................................................... 7
Power ..................................................................................................................................................................................................7
LCD Display .........................................................................................................................................................................................7
CAPS Mode..........................................................................................................................................................................................7
Shift Key .............................................................................................................................................................................................7
Space Bar ............................................................................................................................................................................................7
Backspace ...........................................................................................................................................................................................7
Cancel .................................................................................................................................................................................................7
Navigation Keys ..................................................................................................................................................................................7
Formatting Your Label .......................................................................................................................................... 8
Changing the Font ..............................................................................................................................................................................8
Adding Font Sty les ..............................................................................................................................................................................8
Adding Boxes and B ackground Styles .................................................................................................................................................8
Creating Multiple-Line Labels ............................................................................................................................................................9
Using Mixed Formats ..........................................................................................................................................................................9
Using Tabs ......................................................................................................................................................................................... 10
Using Symbols and Special Charac ters ..................................................................................................................10
Adding Symbols ................................................................................................................................................................................10
Adding International Characters ...................................................................................................................................................... 11
Currency Symbols .............................................................................................................................................................................11
Printing O ptions ..................................................................................................................................................11
Printing Multiple Copies ...................................................................................................................................................................11
Serializing your Labels ......................................................................................................................................................................11
Setting a Fixed Label Length ............................................................................................................................................................11
Previewing Your Label ......................................................................................................................................................................12
2

Aligning the Text ...............................................................................................................................................................................12
Changing the Cutting Option ............................................................................................................................................................12
Adjusting the Print Contrast .............................................................................................................................................................. 12
Using Label Maker Memory...................................................................................................................................12
Storing Label Text .............................................................................................................................................................................12
Storing Formats .................................................................................................................................................................................13
Recalling Stored Labels and Formats ................................................................................................................................................13
Caring for Your Label Maker ..................................................................................................................................13
Cleaning the Label Maker ..................................................................................................................................................................13
DYMO D1 Tape Cassettes .......................................................................................................................................14
Power Adapter .....................................................................................................................................................14
Troubleshooting ..................................................................................................................................................15
Documentation Feedback .....................................................................................................................................16
Environmental Information .................................................................................................................................16
3

21 22
20
1
19
18
17
16
15
14
13
9
101112
9
7
Figure 1 LabelManager 350D Electronic Label Maker
1 Tape exit 9 Shift 17 Symbols
2 Cutter 10 Box /Al ign 18 Settings
3 Print 11 Styles/Fixed-length 19 Power
4 Cancel 12 Font 20 Memory
5 Navigation 13 Space ba r 21 AC powe r connector
6 Return 14 CAPS 22 LCD display
7 Currency 15 Tab
8 Backspace/Clear 16 Extra
2
3
4
5
68
4
About Your New Label Maker
With your new DYMO LabelManager 350D ele ctronic label
maker, you can create a wide variety of high-quali ty,
self-adhesive labels. You can choose to print your labels in
many different sizes and s tyles. The label maker uses DYMO D1
tape cassettes in widths of 6 mm (1/4”), 9 mm (3/8”), 12 mm
(1/2”), or 19 mm (3/4”). These tape c assettes are available in a
wide range of materials.
Visit www.dymo.com for information on obtaining tapes
and accessories for your label maker.
Warranty Registration
Visit www.dymo.com/registration to register your label
make online.
Getting Started
Follow the instructions in this sec tion to print your fir st label.
Connecting the Power
The label maker can operate on AC or bat tery power. To save
power, the label maker will au tomatically turn off after t wo
minutes of inac tivity.
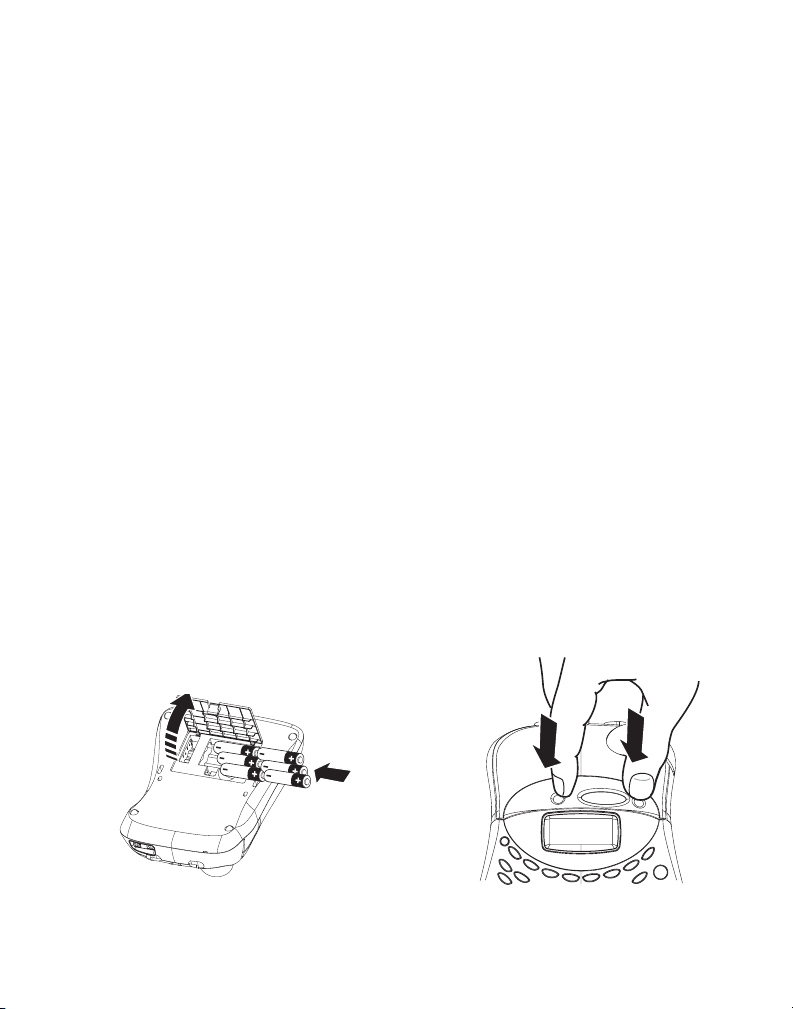
Inserting the Batteries
The label maker uses six AA bat teries.
To insert the batteries
Remove the bat tery compartment cover. See Figure 2.1.
Insert the batteries following the polarit y markings 2.
(+ and –).
Close the comp artment door.3.
x Remove the bat teries if the label maker will not be used
for a long period of time.
Connecting the Power Adapter
Connecting the power adapter to the label maker disconnects
the batter ies as a power source.
To connect the power adapter
Plug the power adapter into the power connector on t he 1.
top, left side of the label maker.
Plug the other end of the power adapter into a power 2.
outlet.
x Make sure you disconnect the label maker from the power
adapter befo re you unplug the adapter from the main power
source. Otherwise, the most recent memory set tings will be
lost.
Inserting the Tape Cassette
Your label maker comes with one DYMO D1 tape cassette.
Visit www.dymo.com for information about purchasing
additional t ape cassettes.
To insert the tape cassette
Press and release the tape c assette cover to open the tape 1.
compartment. See Figure 3.
Figure 2
Figure 3
5
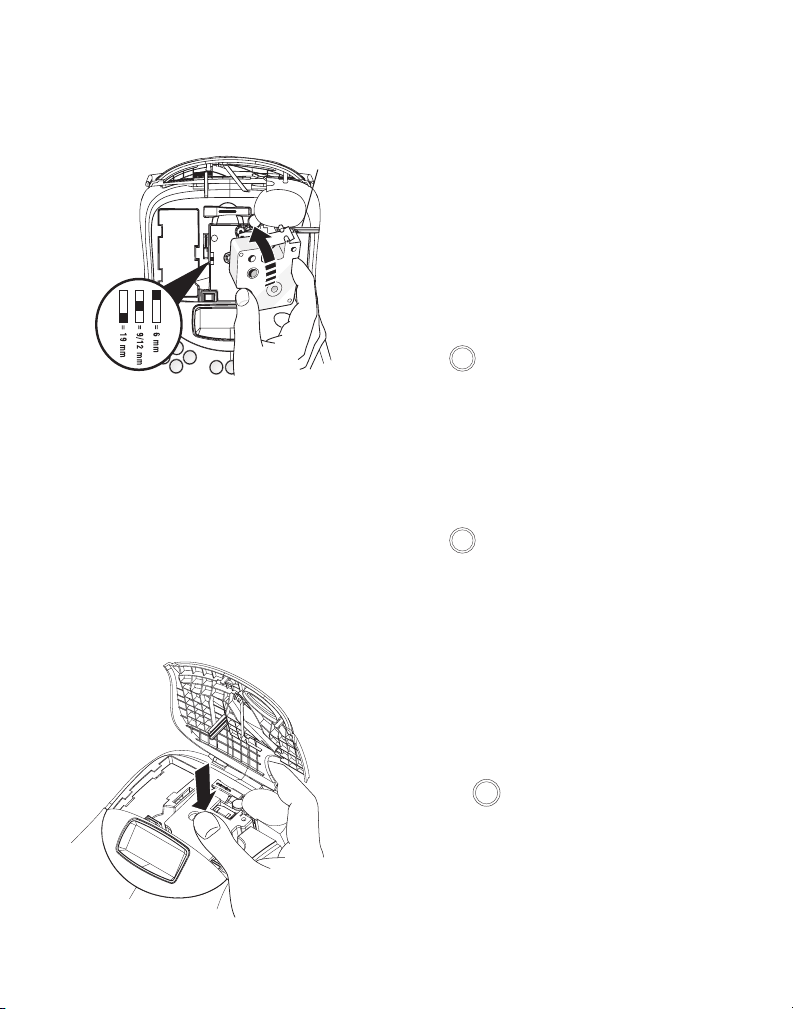
x The first time you use the label maker, remove the
Settings
Settings
Print
CLICK!
protect ive cardboard inser t from between the print head
and pinch roller. See Figure 4.
Figure 4
Remove
cardboard
insert
Press firmly until cassette clicks into place. Make sure the 5.
tape and ribbon are positioned correctly.
Close the tap e cassette cover and press 6.
pow er.
A to turn on the
Settings
You can select the language and cor responding units of
measure you want t he label maker to use.
Selecting the Language
You can select f rom a number of different language options.
By default, the language is se t to English.
To select a language
Press 1.
.
Use the arrow keys to select 2. Set Language and press
Select the language you want and press 3.
H.
H.
Set the cassette switch for the size of the tape cassette that 2.
you are inser ting. See Figure 4.
A notch in the cassette f its over the switch when the
casset te is in the correct posi tion.
Make sure the tape and ribbon are taut across the mouth 3.
of the casse tte and that the tape pass es between the
guideposts. If necessary, turn the spool clock wise to
tighten the ribbon.
Insert the casset te with the tape and ribbon positioned 4.
between t he print head and pinch roller. See Figure 5.
CLICK!
Figure 5
6
Selecting Units of Measure
You can choose to show measurements in inches or millimeters. By default, the units of measure are set to inches.
To set the units of measure
Press 1.
.
Use the up and down arrow keys to sele ct 2. Set Units and
press
H.
Use the up and down arrow keys to toggle between inches 3.
and millimeter s and press
H.
Printing Your First Label
You are now ready to print yo ur first label.
To print a label
Press the 1. A button.
Enter text to create a simple label.2.
Press the3.
button to print the label.
Congratulations! You have printed your fir st label. Continue
reading to learn more about the font, styles, and formatting
options available.
 Loading...