

Page 1
Page 2

Contents
About Your New Label Maker ......................................................5
Product Registration............................................................................ 5
Getting Started ..........................................................................5
Connecting the Power ............................................................................. 5
Inserting the Battery Pack ................................................................... 6
Recharging the Battery Pack ............................................................... 6
Inserting the Label Cassette .................................................................... 7
Using the Label Maker for the First Time ......................................8
Getting to Know the Label Maker ................................................9
Power ...................................................................................................... 9
LCD Display ............................................................................................ 10
Format .................................................................................................. 11
Insert ..................................................................................................... 11
Settings ................................................................................................. 11
CAPS Mode ............................................................................................ 11
Backspace .............................................................................................. 11
Clear ...................................................................................................... 11
Navigation Keys .................................................................................... 12
Cancel ................................................................................................... 12
Formatting Your Label .............................................................. 13
Font Type .............................................................................................. 14
Font Size ................................................................................................ 14
Font Styles ............................................................................................ 15
Adding Borders and Underline Styles .................................................... 15
Using Mirror Text ................................................................................... 16
2
Page 3

en
Aligning the Text ................................................................................... 16
Creating Fixed-Length Labels ................................................................ 17
Creating Two-Line Labels ...................................................................... 18
Using Clip Art, Symbols, and Special Characters .......................... 19
Adding Clip Art ...................................................................................... 19
Adding Symbols ..................................................................................... 20
Using the Symbol Keys .......................................................................... 20
Adding International Characters ............................................................ 21
Printing Options .......................................................................22
Previewing Your Label ........................................................................... 22
Printing Multiple Labels ........................................................................ 22
Using the Label Maker Memory .................................................23
Saving a Label ....................................................................................... 23
Opening Saved Labels ............................................................................ 23
Inserting Saved Text .............................................................................. 24
Caring for Your Label Maker ......................................................25
Troubleshooting .................................................................................... 26
Documentation Feedback .........................................................27
Environmental Information ...................................................... 28
3
Page 4

1
2
3
4
5
7
89
10
11
15
16
18 21 22 23
17
14
6
13
19 20
12
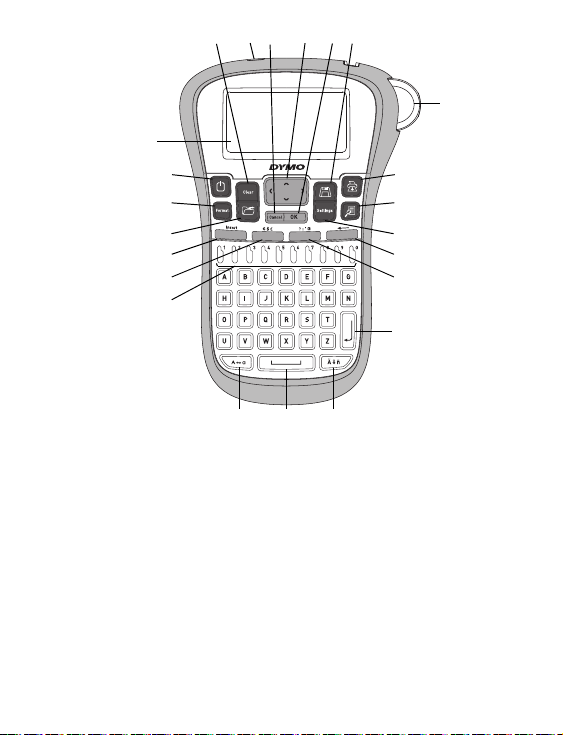
Figure 1 DYMO® LabelManager 260P Elec tronic Label Maker
1 Cutter button 9 Space bar 17 LCD display
2 Print 10 Caps 18 Clear
3 Preview 11 Numeric Keys 19 AC Power adapter
4 Settings 12 Symbols - Currency 20 Cancel
5 Backspace 13 Insert 21 Navigation
6 Symbols - General 14 Open 22 OK
7 Return 15 Format 23 Save
8 Accented character 16 On/Off
4
Page 5

en
About Your New Label Maker
With the DYMO® LabelManager 260P electronic label maker, you can create
a wide variety of high-quality, self-adhesive labels. You can choose to print
your labels in many different fonts, font sizes, and styles. The label maker
uses DYMO D1 label cassettes in widths of 6 mm (1/4”), 9 mm (3/8”), or
12 mm (1/2”). These label cassettes are available in a wide range of colors.
Visi t www.dymo.com for information on obtaining labels and accessories
for your label maker.
Product Registration Visi t www.dymo.com/register to register your label maker online.
Getting Started
Follow the instructions in this section to print your first label.
Connecting the Power
The label maker is powered by a rechargeable, Lithium-ion battery pack.
To save power, the label maker automatically turns off after two minutes
of inactivity.
5
Page 6

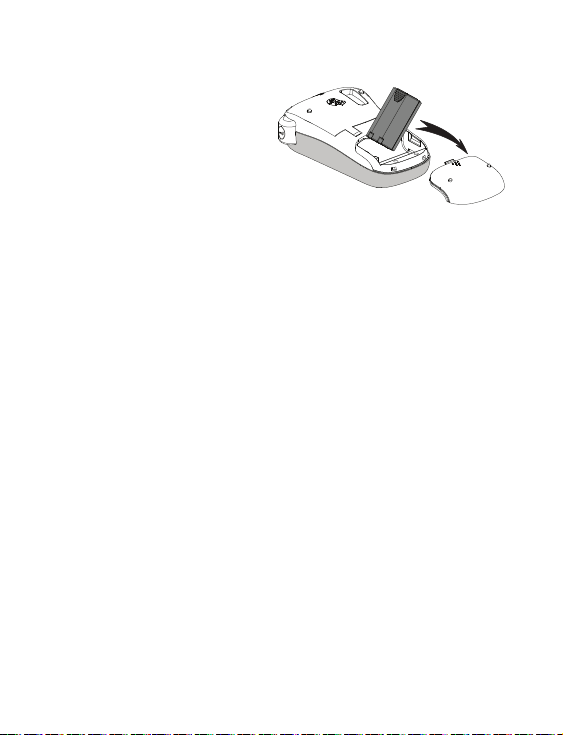
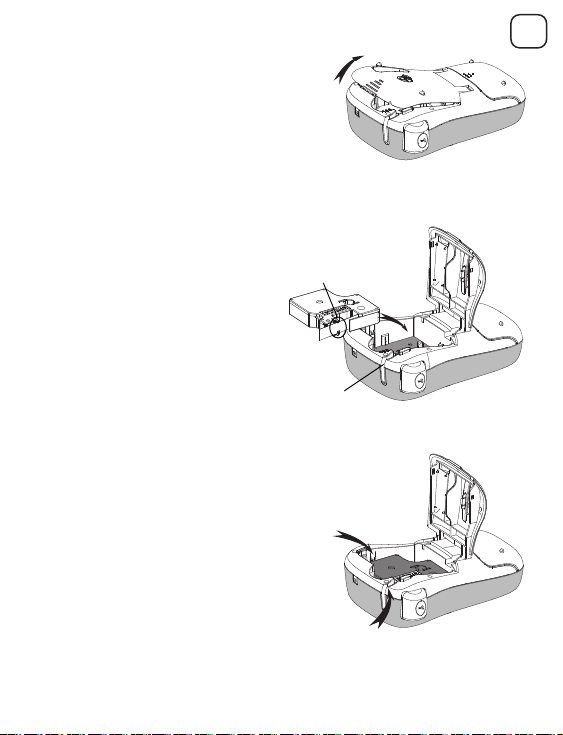
Inserting the Battery Pack
Figure 2
The battery pack included with your
label maker comes partially charged.
You do not need to charge the battery
pack before using your label maker for
the first time.
To insert the battery pack
1 Slide the battery compartment cover away from the label maker.
See Figure 2.
2 Insert the battery pack into the battery compartment.
3 Replace the battery compartment cover.
NOTE Remove the battery pack if the label maker will not be used for a long
period of time.
Recharging the Battery Pack
A power adapter is included with your label maker for recharging the
battery pack.
NOTE The power adapter is only used for recharging the battery pack; the
power adapter cannot be used to power the label maker.
To recharge the battery pack
1 Plug the power adapter into the power connector on the top of the
label maker.
2 Plug the other end of the power adapter into a power outlet.
6
Page 7

en
Inserting the Label Cassette
Figure 3
Label
guides
Remove
cardboard
insert
Figure 4
Figure 5
Click!
Click!
Your label maker comes with one label
cassette. Visit www.dymo.com for
information about purchasing additional
label cassettes.
To insert the label cassette
1 Lift the label cassette cover to
open the label compartment.
See Figure 3.
2 Before using the label maker
for the first time, remove the
protective cardboard insert
from the label exit slot. See
Figure 4.
3 Insert the cassette with the
label facing up and positioned
between the label guides.
4 Press firmly until cassette clicks into
place. See Figure 5.
5 Close the label cassette cover.
7
Page 8

Using the Label Maker for the First Time
The first time you turn on the power, you are asked to select the language and
label width. These selections remain set until you change them.
You can change these selections using the key.
To set up the label maker
1 Press to turn on the power.
2 Select the language and press .
3 Select inches or mm and press .
4 Select the width of the label cassette currently in the label maker and
press .
You are now ready to print your first label.
To print a label
1 Enter text to create a simple label.
2 Press .
3 Select the number of copies.
4 Press or to print.
5 Press the cutter button to cut the label.
Congratulations! You printed your first label. Continue reading to learn
more about the options available for creating labels.
8
Page 9

en
Getting to Know the Label Maker
Become familiar with the location of the feature and function keys on your
label maker. Refer to Figure 1. The following sections describe each feature
in detail.
Power
The button turns the power on and off. After two minutes of
inactivity, the power is switched off automatically. When the printer
switches off automatically, the last label created is remembered and
displayed when the power is turned back on. The previously selected style
settings are also restored.
When the printer is switched off manually, the label text and style settings
are not remembered and a blank label is displayed when the power is turned
back on.
If the current label is not already saved, you are prompted to save the label
when you turn the power off.
9
Page 10

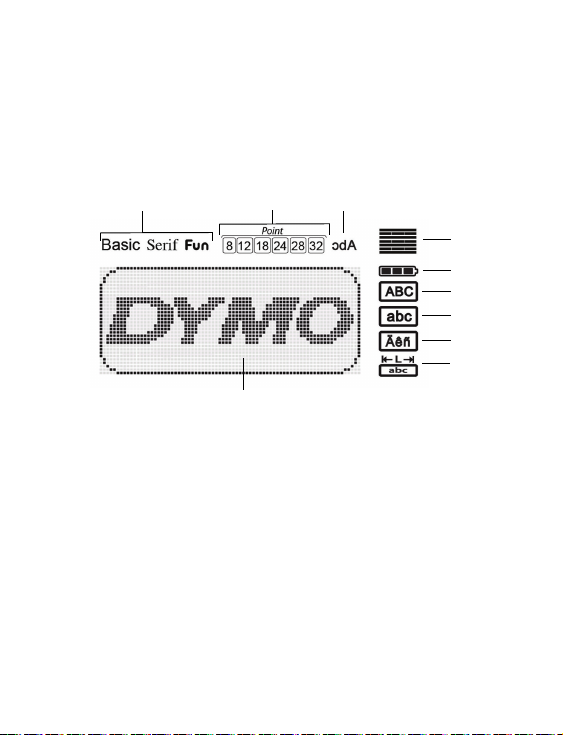
LCD Display
4
2
1 3
5
6
7
8
9
10
The display can show two lines of text at a time. The number of characters
displayed on each line will vary due to proportional spacing.
With DYMO’s exclusive graphical display, most of the formatting you add is
visible instantly.
Feature indicators along the top of the LCD display appear black to let you
know when a feature is selected.
1 Font 6 Uppercase
2 Font size 7 Lowercase
3 Mirror text 8 Accented character
4 Text alignment 9 Fixed label length
5 Battery 10 Edit area
10
Page 11

en
Form at
The key displays the Font, Font Size, Style, Borders and Underline, Label
Length, Alignment, and Mirror submenus. These formatting features are
described later in this User Guide.
Insert
The Insert key allows you to insert symbols, clip art, or saved text on your
label. These features are described later in this User Guide.
Settings
The key displays the language,
information submenus.
units of measure,
label width, and
CAPS Mode
The key toggles capitalization on or off. When Caps mode is on, the
Caps mode indicator is shown on the display and all letters that you enter are
capitalized. The default setting is Caps mode off. When Caps mode is off, all
letters appear in lowercase.
Backspace
The key removes the character to the left of the cursor.
Clear
The key gives you a choice to clear all label text, just the text
formatting, or both.
11
Page 12

Navigation Keys
You can review and edit your label using the left and right navigation keys.
You can also navigate through menu selections using the up and down
navigation keys, and then press to make a selection.
Cancel
The key allows you to exit from a menu without making a selection or
to cancel an action.
12
Page 13

en
Formatting Your Label
4
5
7
1
23
6
You can choose from several format options to enhance the appearance of
your labels.
1 Font type 5 Mirror
2 Font size 6 Alignment
3 Font style 7 Label length
4 Borders/Underline
To adjust t he fo rmatting
1 Press .
2 Use the navigation keys to select the formatting option to change and
press .
3 Select the option to apply to your label and press .
13
Page 14
Font Type
{
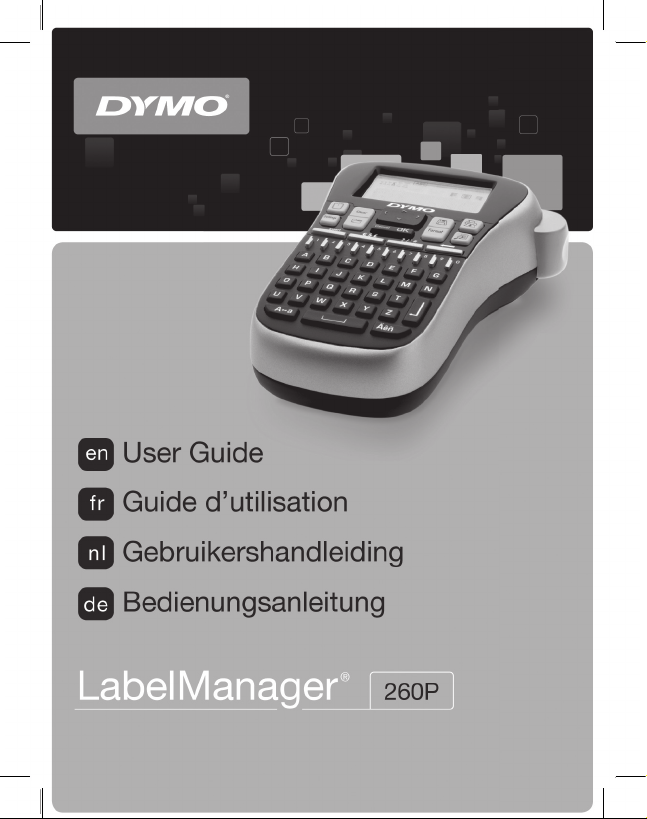
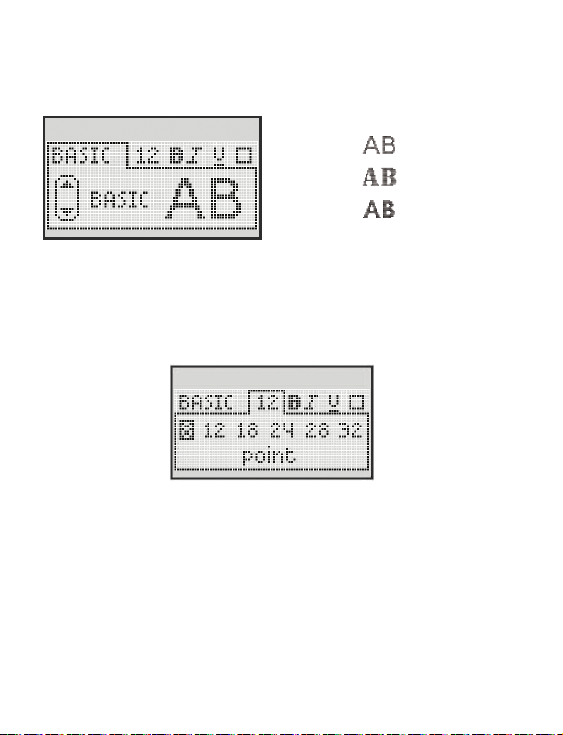
Three font types are available for your labels:
Basic
Serif
Fun
♦ Use the up and down navigation keys to select the font type.
Font Size
Six font sizes are available for your labels:
The font sizes available depend on the label width you have selected. The font
size applies to all characters on a label.
Label Width Font Size Available
6mm (1/4”)
9mm (3/8”)
12 mm (1/2”)
♦ Use the up and down or left and right navigation keys to select the
font size.
8 point
8, 12, 18 point
8, 12, 18, 24, 28, 32 point
14
Page 15

en
{
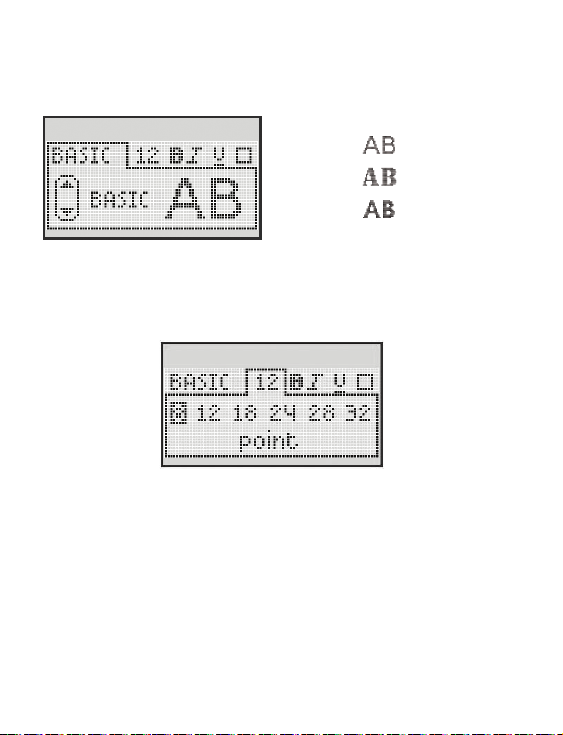
Font Styles
You can choose from six different font styles:
Normal
Bold
Italic
Outline
Shadow
Vertical
♦ Use the up and down navigation keys to select the font style.
Adding Borders and Underline Styles
You can highlight your text by choosing a border or underline style.
Underline Parchment
Square Call Out
Rounded Flowers
Edged Banner
Pointed
15
Page 16
♦ Use the up and down navigation keys to select the border or
underline style.
A label can be underlined or enclosed in a border, but not both together.
When using borders on two-line labels, both lines are enclosed in one border.
When using underline on two-line labels, both lines are underlined.
Using Mirror Text
The mirror format allows you to print text which reads from right to left, as
you would see the text in a mirror.
♦ Use the left and right navigation keys to select the mirror format.
Aligning the Text
You can align the text to print left or right justified on the label. The default
alignment is centered.
♦ Use the left and right navigation keys to select the text alignment.
16
Page 17

en
Creating Fixed-Length Labels
Normally, the length of the label is determined by the length of the
text. However, you can choose to set the length of the label for a
specific application.
When you choose a fixed label length, the size of the label text is
automatically adjusted to fit the label. If the text cannot be adjusted to fit
within the fixed label length, a message is displayed showing the smallest
possible label length for this text. You can choose a fixed length label up to
400 mm (15”) long.
To set a fixed leng th
1 Use the up and down navigation keys to select the fixed option.
2 Use the up and down navigation keys to select the label length, or use
the number keys to enter the label length.
17
Page 18

Creating Two-Line Labels
You can print a maximum of two lines on a label. Only one line of text can be
printed on 6 mm (1/4") labels.
To create a two-line label
1 Type the text for the first line and press .
2 Type the text for the second line.
3 Press to print.
18
Page 19

en
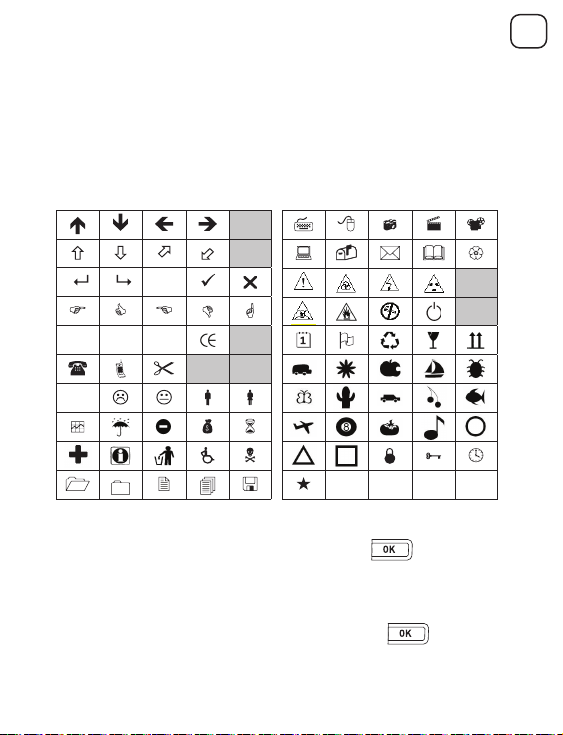
Using Clip Art, Symbols, and Special Characters
↔
©®™
☺
♠♣♥♦
Clip art, symbols, punctuation, and other special characters can be added to
your labels.
Adding Clip Art
The label maker includes the clip art shown below.
To insert clip art
1 Press Insert, select Clip Art, and then press .
2 Use the up and down or left and right navigation keys to select the
desired clip art.
3
When you locate the clip art, pres
your label.
s
to add the clip art to
19
Page 20

Adding Symbols
? ! _ - :
' " , . ;
’ ¡ ¿ / \
& @ # % ‰
| ( ) { }
[ ] ° • *
+ - x ÷ √
^ ~ ≈ = ≠
± < > ≤ ≥
€ £ $ ¢ ¥
⅓ ⅔ ⅛ ⅝ ⅞
¼ ½ ¾ ⅜ §
₀ ₁ ₂ ₃ ₄
₅ ₆ ₇ ₈ ₉
⁰
¹ ² ³
⁴
⁵ ⁶ ⁷ ⁸ ⁹
α β γ δ ε
ζ η θ ι κ
λ μ ν ξ ο
π ρ σ τ υ
φ χ ψ ω
Α Β Γ Δ Ε
Ζ Η Θ Ι Κ
Λ Μ Ν Ξ Ο
Π Ρ Σ Τ Υ
Φ Χ Ψ Ω
The label maker supports the extended symbol set shown below.
To insert a symbol
1 Press Insert, select Symbols, and then press .
2 Use the up and down or left and right navigation keys to select the
desired symbol.
3 When you locate the symbol, press to add the symbol to
your label.
Using the Symbol Keys
You can quickly add symbols by using the symbol shortcut keys.
20
Page 21

en
To qui ckly add symbols
1 Press one of the following:
• ?:’@ to add a general symbol.
• €$£ to add a currency symbol.
2 Select the symbol you want and press .
Adding International Characters
The label maker supports the extended Latin character set.
After pressing the Accent key, pressing a letter brings up a menu containing
all the available variations of that letter.
For example, if French is selected as the language and you press the
Accent key and then the letter a, you will see a à â æ and so on through
all the variations available. The character variations and the order in
which the variations appear depend on the language you have selected.
To add accented characters
1 Press .
The accented character indicator is shown on the display.
2 Press an alpha character.
The accent variations are displayed.
3 Use the left and right navigation keys to select the character you want
and press .
21
Page 22

Printing Options
You can preview your label and print multiple labels.
Previewing Your Label
You can preview the text and formatting of your label prior to printing.
To preview your label
♦ Press .
The label length is displayed. Then, if necessary, the text of the label scrolls
across the display.
Printing Multiple Labels
Each time you print, you are asked how many copies to print. You can print up
to ten copies at one time.
To print multiple labels
1 Press .
2 Select or enter the number of copies to print, and press .
When printing is finished, the number of copies to print returns to the default
value of 1.
22
Page 23
en
Using the Label Maker Memory
The label maker has a powerful memory feature that allows you to save the
text of up to nine frequently-used labels. You can recall saved labels and you
can insert saved text into a label.
Saving a Label
You can save up to nine frequently-used labels. When you save a label, the
text and all formatting are saved.
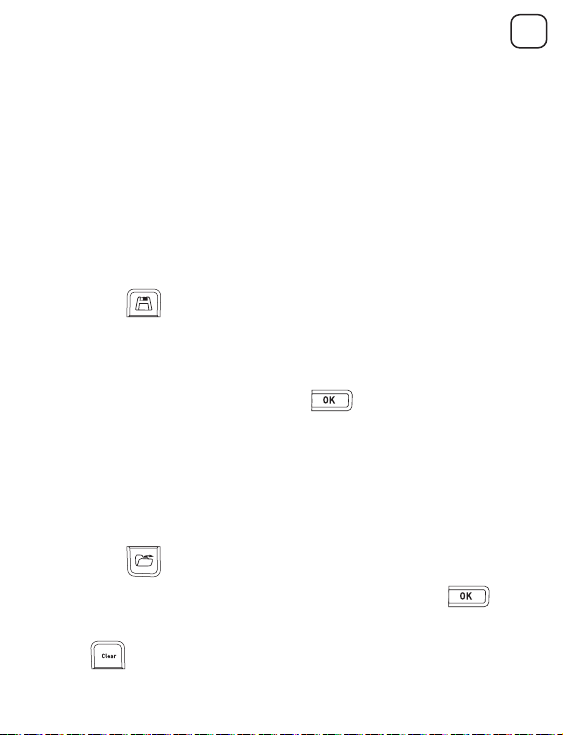
To save the curren t lab el
1 Press . The first available memory location is displayed.
2 Use the navigation keys to move through the locations.
You can store a new label in any of the memory locations.
3 Select a memory location and press .
Your label is saved and you are returned to the label.
Opening Saved Labels
You can easily open labels saved in memory to use at a later time.
To open saved labels
1 Press . The first memory location is displayed
2 Use the navigation keys to select a label to open and press .
To clear a memory location, first select a memory location and then
press .
23
Page 24

Inserting Saved Text
You can insert the text of a saved label into the current label. Only the saved
text is inserted, not the formatting.
To insert saved text
1 Position the cursor at the location in the label where you want to insert
the text.
2 Press Insert, select Saved Text, and press .
The first memory location is displayed.
3 Use the navigation keys to select the text you want to insert.
4 Press .
The text is inserted in the current label.
24
Page 25

en
Caring for Your Label Maker
Print head
Press and hold
Figure 6
Your label maker is designed to give you long and trouble-free service, while
requiring very little maintenance. Clean your label maker from time to time to
keep it working properly. Clean the cutter blade each time you replace the
label cassette.
To clean the cutter blade
1 Remove the label cassette.
2 Press and hold the cutter button
to expose the cutter blade. See
Figure 6.
3 Use a cotton ball and alcohol to
clean both sides of the blade.
To clean the print head
1 Remove the label cassette.
2 Remove the cleaning tool from inside the label compartment cover.
3 Gently wipe the padded side of the tool across the print head.
See Figure 6.
25
Page 26

Troubleshooting
Review the following possible solutions if you encounter a problem while
using your label maker.
Problem/Error Message Solution
• Ensure the label maker is turned on.
No display
Poor Print Quality
Poor Cutter Performance Clean the cutter blade. See Caring for Your
Printing...
Too many characters
Exceeded maximum number of
characters in buffer.
Too many lines
Exceeded maximum number
of lines.
Charge Battery!
Battery pack almost discharged.
• Attach the power adapter to recharge the
battery pack. See Recharging the
Battery Pack.
• Attach the power adapter to recharge the
battery pack. See Recharging the
Battery Pack.
• Clean the print head.
• Ensure the label cassette is installed properly.
• Replace the label cassette.
Label Maker.
No action required.
Message disappears when printing is finished.
Delete some or all of the buffer text.
• Delete a line to fit on the label width.
• Insert a wider label cassette.
Attach the power adapter to recharge the
battery pack. See Recharging the
Battery Pack.
26
Page 27
en
Problem/Error Message Solution
Battery Failure!
Battery pack not inserted properly
or damaged.
Wait - Battery Charging Allow the battery pack to recharge before
Tape Ja m
Motor is stalled due to label jam.
• Ensure the battery pack is inserted correctly.
See Inserting the Battery Pack.
• Replace the battery pack.
unplugging the label maker.
• Remove jammed label; replace labe l cassette.
• Clean cutter blade.
If you still need assistance, visit the DYMO Web site at www.dymo.com.
Documentation Feedback
We are constantly working to produce the highest quality
documentation for our products. We welcome your feedback.
Send us your comments or suggestions about our user guides.
Please include the following information with your feedback:
• Product name, model number, and User Guide page number
• Brief description of instructions that are inaccurate or unclear, areas
where more detail is needed, and so on
We also welcome your suggestions about additional topics you would like to
see covered in the documentation.
Send email messages to: documentation@dymo.com
Please keep in mind that this email address is only for documentation
feedback. If you have a technical question, please contact Customer Support.
27
Page 28
Environmental Information
The equipment that you have bought requires the extraction and use of
natural resources for its production. It may contain substances that are
hazardous to health and the environment.
In order to avoid the dissemination of those substances in our environment,
and to diminish the pressure on natural resources, we encourage you to use
the appropriate take-back systems. These systems will reuse or recycle most of
the materials of your end-of-life equipment in an environmentally sound way.
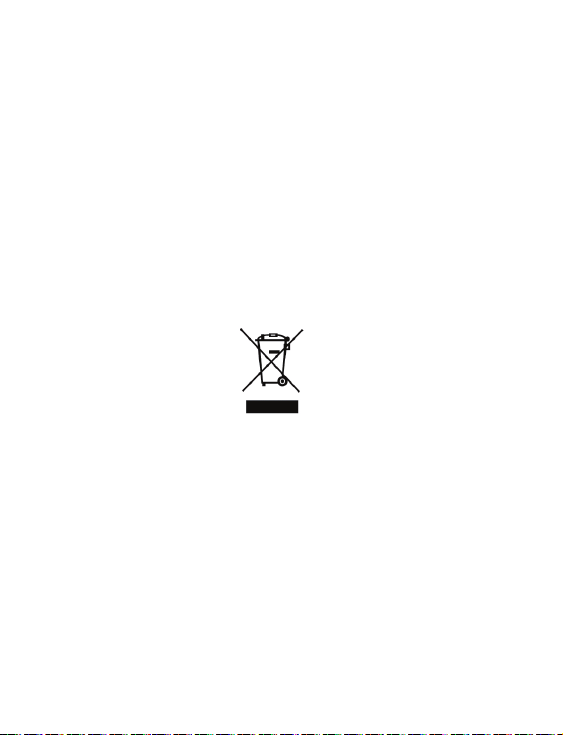
The crossed-bin symbol marked on your device indicates you should use
these systems.
If you need more information on the collection, reuse, and recycling of this
product, please contact your local or regional waste administration.
You can also contact DYMO for more information on the environmental
performance of our products.
This product is CE m arked in accordance with the EMC directive and the low voltage directive and
is designed to conform with the following international standards:
US FCC Class B Compatibility
Safety - UL, CUL, TUV, CE, T-Mark, SAA, BABT, C-Tick
EMC - EMI Compatibility
EN 55022; EN 61000 (+ addendums)
RoHS 2002/95/EC
28
Page 29

29
Page 30

Contenu
A propos de votre nouvelle étiqueteuse ..................................... 33
Enregistrement du produit ................................................................ 33
Démarrage ..............................................................................33
Mise en marche ..................................................................................... 33
Insertion des piles ............................................................................. 34
Rechargement des piles .................................................................... 34
Insertion de la cassette .......................................................................... 35
Première utilisation de l'étiqueteuse ........................................ 36
Découverte de l'étiqueteuse .....................................................37
Marche-arrêt ......................................................................................... 37
Ecran LCD .............................................................................................. 38
Format .................................................................................................. 39
Insérer ................................................................................................... 39
Settings (réglages) ................................................................................ 39
Mode MAJ ............................................................................................. 39
Retour arrière ........................................................................................ 39
Transparent ........................................................................................... 40
Touches de navigation .......................................................................... 40
Cancel (annuler) .................................................................................... 40
Mise en forme des étiquettes ....................................................41
Type de police ....................................................................................... 42
Taille de police ...................................................................................... 42
Styles de police ...................................................................................... 43
Ajout des styles Bordures et Souligné .................................................... 43
Utilisation d'un texte à effet miroir ....................................................... 44
30
Page 31

en
fr
Alignement du texte .............................................................................. 44
Création d'étiquettes de longueur fixe ................................................... 45
Création d'étiquettes à deux lignes ........................................................ 46
Utilisation d'images, de symboles et de caractères spéciaux ........ 47
Ajout d'une image ................................................................................. 47
Insertion de symboles ............................................................................ 48
Utilisation des touches de symboles ...................................................... 48
Insertion de caractères internationaux .................................................. 49
Options d'impression ................................................................50
Aperçu de l'étiquette ............................................................................. 50
Impression de plusieurs étiquettes ........................................................ 50
Utilisation de la mémoire de l'étiqueteuse ................................. 50
Enregistrement d'une étiquette. ........................................................... 51
Ouverture d'étiquettes enregistrées ...................................................... 51
Insertion d'un texte enregistré .............................................................. 52
Entretien de l'étiqueteuse ........................................................53
Dépannage ............................................................................................ 54
Commentaires sur la documentation .........................................55
Informations sur l'environnement .............................................56
31
Page 32
1
2
3
4
5
7
89
10
11
15
16
18 21 22 23
17
14
6
13
19 20
12
Figure 1 Étiq ueteuse électronique DYMO® LabelManager 260PD
1 Bouton Outil de coupe 9 Barre d'espace 17 Ecran LCD
2 Imprimer 10 Majuscules 18 Transparent
3 Aperçu de l'étiquette 11 Touches numériques 19
4 Settings (réglages) 12 Symboles - Monnaies 20 Cancel (annuler)
5 Retour arrière 13 Insérer 21 Navigation
6 Symboles - Signes
de ponctuation
7 Entrée 15 Format 23 Sauvegarder
8 Caractère accentué 16 On/Off
14 Ouvrir 22 OK
Adaptateur secteur AC
32
Page 33

A propos de votre nouvelle étiqueteuse
Votre étiqueteuse électronique DYMO® LabelManager 260P va vous permettre
de créer une large variété d'étiquettes autocollantes de grande qualité.
Plusieurs polices, tailles de police et styles d'étiquette sont disponibles.
L'étiqueteuse DYMO a besoin de rubans d'étiquettes de 6 mm (1/4”), 9 mm
(3/8”), ou de 12 mm (1/2”). Ces rubans sont disponibles en une grande
variété de couleurs.
Pour tout renseignement sur l'achat d'étiquettes et d'accessoires pour
l'étiqueteuse, visitez notre site www.dymo.com.
Enregistrement du produit
Visitez la page www.dymo.com/register pour enregistrer l'étiqueteuse
en ligne.
Démarrage
Suivez les instructions de cette section pour imprimer votre
première étiquette.
Mise en marche
L'étiqueteuse fonctionne grâce à des piles rechargeables lithium-ion.
Pour économiser l'énergie, elle s'éteint automatiquement après deux
minutes d'inactivité.
fr
33
Page 34
Insertion des piles
Figure 2
Les piles fournies avec votre
étiqueteuse sont chargées
partiellement. Vous ne devez pas
recharger les piles avant la première
utilisation de votre étiqueteuse.
Pour insérer les piles
1 Retirez le couvercle du compartiment à piles de l'étiqueteuse en le
faisant glisser. Voir Figure 2.
2 Insérez les piles dans le compartiment.
3 Remettez le couvercle du compartiment à piles.
REMARQUE Retirez les piles si vous n'envisagez pas d'utiliser l'étiqueteuse
pendant longtemps.
Rechargement des piles
Un adaptateur secteur destiné à recharger les piles est fourni avec
votre étiqueteuse.
REMARQUE L'adaptateur secteur sert uniquement à recharger les piles. Il ne
peut pas être utilisé pour faire fonctionner l'étiqueteuse.
Pour recharger les piles
1 Raccordez l'adaptateur secteur au connecteur d'alimentation situé
au sommet de l’étiqueteuse.
2 Branchez l'autre extrémité de l'adaptateur sur une prise secteur.
34
Page 35
Insertion de la cassette
Figure 3
Guides
d'étiquettes
Retirer le
carton de
protection
Figure 4
Figure 5
Clic !
Clic !
Votre étiqueteuse est fournie avec un ruban.
Pour tout renseignement sur l'achat de
rubans supplémentaires, visitez le site
www.dymo.com.
Pour insérer le ruban
1 Soulevez le couvercle du ruban
et ouvrez le compartiment à
étiquettes. Voir Figure 3.
2 Avant d'utiliser pour la
première fois l'étiqueteuse,
retirez le carton de protection
qui se trouve au niveau de la
sortie des étiquettes. Voir
Figure 4.
3 Insérez le ruban de façon à ce que
l'étiquette se trouve face vers le
haut et entre les guides.
4 Appuyez fermement jusqu'à ce
que vous entendiez un clic vous
signalant que le ruban est en
place. Voir Figure 5.
5 Refermez le couvercle du
compartiment à étiquettes.
fr
35
Page 36

Première utilisation de l'étiqueteuse
A la première mise en marche de l'appareil, vous êtes invité à sélectionner la
langue, l'unité de mesure et la largeur d'étiquette de votre choix. Ces
sélections restent enregistrées tant que vous ne les changez pas.
Elles peuvent être modifiées à l'aide de la touche .
Pour paramétrer l'étiqueteuse
1 Appuyez sur pour allumer l'appareil.
2 Sélectionnez la langue et appuyez sur .
3 Sélectionnez les pouces ou les millimètres puis appuyez sur .
4 Sélectionnez la largeur du ruban de l'étiquette qui se trouve dans
l'étiqueteuse et appuyez sur .
Vous êtes maintenant prêt à imprimer la première étiquette.
Pour imprimer une étiquette
1 Tapez votre texte pour créer une étiquette simple.
2 Appuyez sur .
3 Sélectionnez le nombre de copies.
4 Appuyez sur ou pour imprimer.
5 Appuyez sur le bouton de découpe pour couper l'étiquette.
Félicitations ! Vous venez d'imprimer votre première étiquette. Continuez
de lire le chapitre sur les options disponibles pour la création des étiquettes.
36
Page 37

Découverte de l'étiqueteuse
Familiarisez-vous avec l'emplacement des fonctions de l'étiqueteuse et des
touches correspondantes. Référez-vous au schéma 1. Les paragraphes
suivants décrivent en détail chaque fonction.
Marche-arrêt
Le bouton permet d'allumer et d'éteindre l'étiqueteuse. L'étiqueteuse
s'éteint automatiquement si elle n'est pas utilisée pendant 2 minutes
consécutives. Lorsque l'étiqueteuse s'éteint automatiquement, la dernière
étiquette créée est gardée en mémoire et affichée à l'écran lorsque vous
rallumez l'étiqueteuse. Tous les réglages de styles sélectionnés au préalable
seront préservés.
Lorsque l'étiqueteuse est éteinte manuellement, le texte de l'étiquette et les
paramètres de style ne sont pas mémorisés et une étiquette blanche s'affiche
lorsque vous rallumez l'étiqueteuse.
Si l'étiquette en cours n'est pas encore enregistrée, vous êtes invité à
l'enregistrer lorsque vous éteignez l'appareil.
fr
37
Page 38

Ecran LCD
4
2
1 3
5
6
7
8
9
10
L'écran peut afficher deux lignes de texte à la fois. Le nombre de caractères
affichés sur chaque ligne varie en fonction de l'espacement.
Grâce à l'écran graphique exclusif de DYMO, la plupart des mises en forme
ajoutées sont visibles instantanément.
Les indicateurs des fonctions apparaissent en noir en haut de l'écran
de manière à ce que vous sachiez immédiatement lorsqu'une fonction
a été sélectionnée.
1 Police 6 Majuscule
2 Taille de police 7 Minuscule
3 Texte miroir 8 Caractère accentué
4 Alignement du texte 9 Longueur d'étiquette fixée
5 Pile 10 Zone d'édition
38
Page 39

Form at
La touche permet d'afficher la police, la taille de la police, le style, les
bordures et le soulignement, la longueur de l'étiquette, l'alignement et les
sous-menus miroir. Ces caractéristiques de mise en forme sont décrites plus
loin dans ce Guide d'utilisation.
Insérer
La touche Insert permet d'insérer des symboles, des images ou le texte
enregistré sur une étiquette. Ces caractéristiques sont décrites plus loin dans
ce Guide d'utilisation.
Settings (réglages)
La touche permet d'afficher la langue, les unités de mesure, la
largeur de l'étiquette et les sous-menus d'information.
Mode MAJ
La touche permet d'activer et de désactiver le mode Majuscules.
Lorsque le mode Majuscules est enclenché, l'indicateur Majuscules s'affiche à
l'écran et toutes les lettres que vous tapez sont en majuscules. Le mode MAJ
est désactivé par défaut. Lorsque le mode Majuscules est désac tivé, toutes les
lettres apparaissent en minuscules.
Retour arrière
La touche supprime le caractère à gauche du curseur.
fr
39
Page 40
Transparent
La touche permet d'opter pour la suppression de l'ensemble du texte
de l'étiquette, de la mise en forme uniquement ou des deux.
Touches de navigation
Vous pouvez revisualiser et éditer votre étiquette en utilisant les touches de
navigation gauche et droite. Vous pouvez naviguer d’une sélection du menu à
une autre en utilisant les touches de navigation haut et bas, puis en appuyant
sur pour faire un choix.
Cancel (annuler)
La touche permet de sortir d'un menu sans effectuer de sélection ou
d'annuler une action.
40
Page 41

Mise en forme des étiquettes
4
5
7
1
23
6
Vous pouvez choisir parmi plusieurs options de mise en forme pour mettre en
valeur l’apparence de vos étiquettes.
1 Type de police 5 Miroir
2 Taille de police 6 Alignement
3 Style de police 7 Longueur d'étiquette
4 Bordures / Soulignement
Pour régler la mise en forme
1 Appuyez sur .
2 Utilisez les touches de navigation pour sélectionner l'option de mise en
forme à modifier et appuyez sur .
3
Sélectionnez l'option à appliquer à votre étiquette et appuyez
su
r
.
fr
41
Page 42
Type de police
{
Trois types de polices sont disponibles pour vos étiquettes :
Base
Serif
Fun
♦ Les touches de navigation haut et bas permettent de sélectionner le
type de police.
Taille de police
Six tailles de police sont disponibles pour vos étiquettes :
Les tailles de police disponibles dépendent de la largeur d'étiquette
sélectionnée. La taille de police est appliquée à tous les caractères de l'étiquette.
Largeur de l'étiquette Tailles de police disponibles
6mm (1/4”) 8 points
9 mm (3/8”) 8, 12, 18 points
12 mm (1/2”) 8, 12, 18, 24, 28, 32 points
♦ Les touches de navigation gauche et droite permettent de sélectionn er
la taille de la police.
42
Page 43

{
Styles de police
Vous pouvez choisir parmi six styles de police :
Normal
Gras
Italique
Evidé
Ombre
Vertical
♦ Les touches de navigation haut et bas permettent de sélectionner le
style de police.
Ajout des styles Bordures et Souligné
Vous pouvez mettre votre texte en valeur en choisissant une bordure ou en
le soulignant.
Souligné Parchemin
Carré Phylactère
Arrondi Fleurs
fr
Dents de scie Bannière
Fléché
43
Page 44

♦ Les touches de navigation haut et bas permettent de sélectionner les
styles bordure ou souligné.
Une étiquette peut être soulignée ou encadrée, mais pas les deux à la fois.
Lorsque vous utilisez des bordures sur des étiquettes à deux lignes, toutes
les lignes sont encadrées. Sur les étiquettes à deux lignes, chacune des
lignes est soulignée.
Utilisation d'un texte à effet miroir
Le format de miroir permet d'impri mer un texte qu i se lira de droite à gauche,
comme dans un miroir.
♦ Les touches de navigation gauche et droite permettent de sélectionner
le format de miroir.
Alignement du texte
Vous pouvez aligner le texte à imprimer à gauche ou à droite sur l'étiquette.
L´alignement par défaut est centré.
♦ Les touches de navigation gauche et droite permettent de sélectionner
l'alignement du texte.
44
Page 45

Création d'étiquettes de longueur fixe
Normalement, la longueur de l’étiquette est déterminée par la
longueur du texte. Toutefois, vous pouvez choisir de définir la
longueur de l'étiquette en fonction de l'usage que vous lui réservez.
Lorsque vous choisissez une longueur d'étiquette fixe, le texte est
automatiquement redimensionné en conséquence. S'il est impossible
d'adapter le texte à la longueur fixe de l'étiquette, un message indique la plus
petite longueur d'étiquette possible pour ce texte. La longueur fixe
d'étiquette que vous choisissez peut atteindre 400 mm.
Pour définir une longueur fixe
1 Les touches de navigation haut et bas permettent de sélectionner
l'option fixe.
fr
2 Pour entrer la longueur de l'étiquette, il faut utiliser soit les touches de
navigation haut et bas, soit les touches numériques.
45
Page 46
Création d'étiquettes à deux lignes
Vous pouvez imprimer deux lignes maximum par étiquette. Sur les étiquettes
de 6 mm (1/4"), vous pouvez imprimer une seule ligne de texte.
Pour créer une étiquette à deux lignes
1 Tapez le texte de la première ligne puis appuyez sur .
2 Tapez le texte de la seconde ligne.
3 Appuyez sur pour imprimer.
46
Page 47

Utilisation d'images, de symboles et de
↔
©®™
☺
♠♣♥♦
caractères spéciaux
Vous pouvez ajouter des images, des symboles, des signes de ponctuation et
autres caractères spéciaux sur vos étiquettes.
Ajout d'une image
L'étiqueteuse contient les images représentées ci-dessous.
Pour insérer une image
1 Appuyez sur Insert, sélectionnez Clip Art, puis appuyez sur .
2 Les touches de navigation gauche et droite permettent de sélectionner
l'image désirée.
3
Une fois que vous avez localisé l'image souhaitée, appuyez su
pour ajouter l'image à votre étiquette.
fr
r
47
Page 48
Insertion de symboles
L'étiqueteuse prend en charge les jeux de symboles étendus illustrés cidessous.
? ! _ - :
' " , . ;
’ ¡ ¿ / \
& @ # % ‰
| ( ) { }
[ ] ° • *
+ - x ÷ √
^ ~ ≈ = ≠
± < > ≤ ≥
€ £ $ ¢ ¥
⅓ ⅔ ⅛ ⅝ ⅞
¼ ½ ¾ ⅜ §
₀ ₁ ₂ ₃ ₄
₅ ₆ ₇ ₈ ₉
⁰
¹ ² ³
⁵ ⁶ ⁷ ⁸ ⁹
α β γ δ ε
ζ η θ ι κ
λ μ ν ξ ο
π ρ σ τ υ
φ χ ψ ω
Α Β Γ Δ Ε
Ζ Η Θ Ι Κ
Λ Μ Ν Ξ Ο
Π Ρ Σ Τ Υ
Φ Χ Ψ Ω
⁴
Pour insérer un symbole
1
Appuyez su
r Insert
, sélectionnez
Symbols
, puis appuyez su
r
.
2 Les touches de navigation gauche et droite permettent de sélectionner
le symbole désiré.
3 Lorsque vous vous trouvez sur le symbole, appuyez sur
pour l'ajouter sur votre étiquette.
Utilisation des touches de symboles
Vous pouvez ajouter rapidement des symboles à l'aide des touches de
raccourci de symboles généraux, de ponctuation et monétaires.
48
Page 49
Pour ajouter rapidement des symboles
1 Appuyez sur une des touches suivantes :
• ?:’@ pour insérer un signe de ponctuation
• €$£ pour insérer un symbole monétaire
2 Sélectionnez le symbole souhaité et appuyez sur .
Insertion de caractères internationaux
L'étiqueteuse accepte l'ensemble de caractères latins étendus.
Appuyez sur la touche Accent puis sur une lettre. Vous obtiendrez un menu
contenant toutes les variations disponibles de cette lettre.
Par exemple, si le français est sélectionné comme langue et que vous ap puyez
sur la touche Accent, puis sur la lettre a, vous obtiendrez les lettres a à â æ et
toutes les variations disponibles. Les variantes et l'ordre d'apparition des
variations de lettres dépendent de la langue sélectionnée.
Pour ajouter des caractères accentués
1 Appuyez sur .
L'indicateur de caractère accentué apparaît à l'écran.
2 Appuyez sur un caractère alphabétique.
Les variations d'accents sont affichées.
3 Utilisez les touches de navigation gauche et droite pour sélectionner le
caractère souhaité, puis appuyez sur .
fr
49
Page 50

Options d'impression
Vous pouvez prévisualiser votre étiquette et imprimer plusieurs étiquettes.
Aperçu de l'étiquette
Vous pouvez obtenir un aperçu du texte ou de la mise en forme de l'étiquette
avant de l'imprimer.
Pour voir un aperçu de l'étiquette
♦ Appuyez sur .
La longueur de l'étiquette s'affiche. Ensuite, si nécessaire, , le texte de
l’étiquette défilera à l’écran.
Impression de plusieurs étiquettes
À chaque impression, vous êtes invité à indiquer le nombre de copies à
imprimer. Vous pouvez imprimer jusqu’à 10 copies à la fois.
Pour imprimer plusieurs étiquettes
1 Appuyez sur .
2 Sélectionnez ou entrez le nombre de copies à imprimer et appuyez
sur .
Quand l'impression est terminée, le nombre de copie à imprimer revient
automatiquement à la valeur 1 (valeur par défaut).
Utilisation de la mémoire de l'étiqueteuse
L'étiqueteuse est dotée d'une mémoire puissante qui vous permet de stocker
jusqu'à 9 textes d'étiquette, parmi celles que vous utilisez le plus
fréquemment. Vous pouvez rappeler les étiquettes enregistrées et insérer leur
texte sur une nouvelle étiquette.
50
Page 51
Enregistrement d'une étiquette.
Vous pouvez enregistrer jusqu'à 9 étiquettes utilisées fréquemment. Lorsque
vous enregistrez une étiquette, le texte et sa mise en forme sont mémorisés.
Pour enregistrer l'étiquette actuelle
1 Appuyez sur . Le premier emplacement disponible de la mémoire
est affiché.
2 Utilisez les touches de navigation pour vous déplacer entre les
emplacements.
Vous pouvez enregistrer une nouvelle étiquette dans n'importe quel
emplacement de mémoire.
3 Sélectionnez un emplacement de mémoire puis appuyez sur .
Votre étiquette est enregistrée et vous revenez alors à l'étiquette.
Ouverture d'étiquettes enregistrées
Vous pouvez facilement ouvrir les étiquettes enregistrées en mémoire pour
les utiliser ultérieurement.
Pour ouvrir des étiquettes enregistrées
1 Appuyez sur . Le premier emplacement de la mémoire s'affiche.
2 Utilisez les touches de navigation pour sélectionner une étiquette à
ouvrir puis appuyez sur .
Pour effacer un emplacement de mémoire, commencez par le sélectionner,
puis appuyez sur .
fr
51
Page 52

Insertion d'un texte enregistré
Vous pouvez insérer dans l'étiquette actuelle le texte d'une étiquette
enregistrée. Seul le texte enregistré est inséré et non la mise en forme.
Pour insérer un texte enregistré
1 Positionnez le curseur à l'emplacement où vous souhaitez insérer le
texte dans l'étiquette.
2 Appuyez sur Insert, sélectionnez Texte Sauvegardé puis appuyez
sur .
Le premier emplacement de la mémoire est affiché.
3 Utilisez les touches de navigation pour sélectionner le texte à insérer.
4 Appuyez sur .
Le texte est inséré dans l'étiquette actuelle.
52
Page 53

Entretien de l'étiqueteuse
Tête d'impression
Appuyez et
maintenez enfoncé
Figure 6
L'étiqueteuse est conçue pour fournir des années de service sans défaillance
et ne nécessite que peu d'entretien. Nettoyez votre étiqueteuse de temps en
temps pour garantir un bon fonctionnement. Nettoyez la lame chaque fois
que vous remplacez la cassette de ruban.
Pour nettoyer la lame du massicot
1 Retirez le ruban.
2 Appuyez sur le bouton de découpe et
maintenez-le enfoncé pour faire
apparaître la lame. Voir Figure 6.
3 Utilisez un tampon d'ouate et de
l'alcool pour nettoyer les deux côtés
de la lame.
Pour nettoyer la tête d'impression
1 Retirez le ruban.
2 Sortez l'outil de nettoyage du compartiment à étiquettes.
3
Ess uyez dé licate ment l a tête d 'impre ssion avec le côté rem bourré de l'ou til.
Voir Figure 6.
fr
53
Page 54

Dépannage
En cas de problème de fonctionnement, reportez-vous à la liste de
solutions proposées.
Problème/message d'erreur Solution
Aucun affichage
Impression de mauvaise qualité
Le massicot ne fonctionne pas bien Nettoyez le massicot. Voir Entretien de
Impression...
Trop de caractères
Nombre maximum de caractères
en mémoire tampon dépassé.
Trop d e ligne s
Nombre maximal de lignes dépassé.
Charger les piles !
Piles presque déchargées.
Piles défectueuses !
Piles insérées incorrectement ou
endommagées.
• Assurez-vous que l'imprimante e st sous tension.
• Branchez l'adaptateur secteu r pour recharger
les piles. Voir Rechargement des piles.
• Branchez l'adaptateur secteu r pour recharger
les piles. Voir Rechargement des piles.
• Nettoyez la tête d'impression.
• Assurez-vous que la cassette est
correctement insérée.
• Remplacez le ruban.
l'étiqueteuse.
Aucune action nécessaire.
Le message disparaît lorsque l'impression est
terminée.
Effacez quelques caractères du texte mis en tampon.
• Supprimez une ligne afin d'adapter le texte à la
largeur de l'étiquette.
• Insérez une étiq uette plus large.
Branchez l'adaptateur secteur pour recharger
les piles. Voir Rechargement des piles.
• Vérifiez si les piles sont insérées correctement .
Voir Insertion des piles.
• Remplacez les piles.
54
Page 55
Problème/message d'erreur Solution
Veuillez patienter -
Chargement en cours
Bourrage cassette
Le moteur cale en raison d'un
bourrage d'étiquettes.
Chargez les piles avant de débrancher l'étiqueteuse.
• Retirez les étiquet tes bloquées et remplacez
la cassette.
• Nettoyez la lame.
Si vous avez besoin d'une assistance supplémentaire, visitez le site Web de
DYMO sur www.dymo.com.
Commentaires sur la documentation
Nous cherchons en permanence à produire la documentation
de la plus haute qualité pour nos produits. Aussi vos
commentaires sont les bienvenus.
Envoyez-nous vos commentaires ou suggestions sur nos manuels
utilisateur. Indiquez les informations suivantes :
• Nom du produit, numéro de série et numéro de page du
Guide d'utilisation
• Brève description des instructions erronées ou peu claires, des points
nécessitant plus de détails, etc.
Nous attendons également vos suggestions sur d'autres sujets que vous
souhaiteriez voir abordés dans la documentation.
Envoyez vos courriers électroniques à : documentation@dymo.com
N'utilisez cette adresse que pour envoyer des commentaires sur la documen-
tation. En cas de question d'ordre technique, contactez le service à la clientèle.
fr
55
Page 56
Informations sur l'environnement
L'équipement que vous avez acheté nécessite l'extraction et l'utilisation de
ressources naturelles. Il peut contenir des substances nocives pour la santé
et l'environnement.
Pour éviter de répandre ces substances dans l'environnement et limiter
l'exploitation des ressources naturelles, nous vous encourageons à recourir
à des systèmes de récupération adaptés. Ces systèmes permettent de
réutiliser ou recycler la plupart des matériaux de façon écologique à la fin
de vie de l'équipement.
Le symbole de la poubelle barrée figurant sur l'équipement indique que vous
devez utiliser ces systèmes.
Pour obtenir de plus amples informations sur la récupération, la réutilisation
ou le recyclage de ce produit, contactez le centre de traitement des déchets de
votre région.
Vous pouvez également contacter DYMO pour toute information
supplémentaire sur l'impact de nos produits sur l'environnement.
Ce produit porte le label CE conformément à la directive sur la compatibilité électromagné tique
(EMC) et la directive sur la basse tension et est conçu pour répondre aux normes internationales
suivantes :
Compatibilité US FCC Class B
Sécurité – UL, CUL, TUV, CE, T-Mark, SAA, BABT, C-Tick
Compatibilité EMC - EMI
EN 55022; EN 61000 (+ addenda)
RoHS 2002/95/EC
56
Page 57

57
Page 58

Inhoud
Over uw nieuwe labelmaker ......................................................61
Productregistratie ............................................................................. 61
Hoe te beginnen ...................................................................... 61
Stroomvoorziening ................................................................................ 61
Plaatsen van de batterijen................................................................. 62
De batterijen opladen........................................................................ 62
De tapecassette plaatsen ....................................................................... 63
De labelmaker voor het eerst gebruiken ....................................64
Uw labelmaker leren kennen ....................................................65
Aan/Uit ................................................................................................. 65
Het LCD-display ..................................................................................... 66
Format (Opmaak) .................................................................................. 67
Insert (Invoegen) ................................................................................... 67
Instellingen ........................................................................................... 67
CAPS-functie ......................................................................................... 67
Terugtoets ............................................................................................. 67
Wissen ................................................................................................... 68
Navigatietoetsen ................................................................................... 68
Annuleren ............................................................................................. 68
Uw label opmaken ................................................................... 69
Lettertype ............................................................................................. 70
Lettergrootte ......................................................................................... 70
Letterstijl ............................................................................................... 71
Kader- en onderstrepingsstijlen toevoegen .......................................... 71
Tekst spiegelen ..................................................................................... 72
58
Page 59

en
nl
Uitlijnen van tekst ................................................................................. 72
Labels met een vaste lengte maken ...................................................... 73
Labels met twee regels maken .............................................................. 74
Clip-art, symbolen en speciale tekens gebruiken ........................75
Clip-art toevoegen ................................................................................. 75
Symbolen toevoegen ............................................................................. 76
Symbooltoetsen gebruiken .................................................................... 76
Internationale karakters toevoegen ...................................................... 77
Afdrukopties ............................................................................78
Afdrukvoorbeeld van uw label ............................................................... 78
Meerdere labels afdrukken .................................................................... 78
Het geheugen van uw labelmaker gebruiken ............................. 78
Labels opslaan ....................................................................................... 79
Opgeslagen labels openen ..................................................................... 79
Opgeslagen tekst invoegen ................................................................... 80
Uw labelmaker onderhouden ....................................................81
Problemen oplossen .............................................................................. 82
Feedback documentatie ...........................................................83
Informatie over het milieu ........................................................84
59
Page 60

1
2
3
4
5
7
89
10
11
15
16
18 21 22 23
17
14
6
13
19 20
12
Figuur 1 DYMO® LabelManager 260P elektronische labelmaker
1 Snijknop 9 Spatietoets 17 LCD-display
2 Afdrukken 10 Caps 18 Wissen
3 Afdrukvoorbeeld 11 Cijfertoetsen 19 Stroomadapter
4 Instellingen 12 Symbolen - Valuta 20 Annuleren
5 Terugtoets 13 Insert (Invoegen) 21 Navigatie
6 Symbolen - Interpunctie 14 Openen 22 OK
7 Enter 15 Format (Opmaak) 23 Opslaan
8 Teken met accent 16 Aan/uit
60
Page 61

Over uw nieuwe labelmaker
Met de elektronische labelmaker DYMO® LabelManager 260P kunt u een
scala aan zelfklevende labels van hoge kwaliteit creëren. U kunt diverse
lettertypen en stijlen kiezen voor het afdrukken van uw labels. De labelmaker
gebruikt DYMO D1-tapecassettes met breedtes van 6 mm (1/4”), 9 mm
(3/8”), of 12 mm (1/2”). Deze tapecassettes zijn in veel verschillende
kleuren verkrijgbaar.
Bezoek www.dymo.com voor meer informatie over verkoopadressen van
labels en accessoires voor uw labelmaker.
Productregistratie
Surf naar
www.dymo.com/register
om uw labelmaker online te registreren.
Hoe te beginnen
Volg de onderstaande instructies en print uw eerste label.
Stroomvoorziening
De labelmaker werkt op herlaadbare lithium-ionbatterijen. De labelmaker
wordt na twee minuten inactiviteit automatisch uitgeschakeld om energie
te besparen.
nl
61
Page 62

Plaatsen van de batterijen
Figuur 2
De bijgeleverde batterij is gedeeltelijk
opgeladen. Het is niet nodig de batterij
op te laden voordat u de labelmaker
voor de eerste keer gebruikt.
Ga als volgt te werk om de batterij
te plaatsen
1
Schuif het klepje van het batterijvak van de labelmaker open. Zie Figuur 2.
2 Plaats de batterijen in het batterijvak.
3 Plaats het deksel van het batterijcompartiment terug.
OPMERKING Verwijder de batterijen als u de labelmaker gedurende lange tijd
niet gebruikt.
De batterijen opladen
Bij uw labelmaker is een stroomadapter geleverd om de batterijen op te laden.
OPMERKING Deze stroomadapter mag uitsluitend worden gebruikt voor
het opladen van batterijen en is niet bedoeld om de labelmaker van stroom
te voorzien.
Ga als volgt te werk om de batterijen op te laden
1 Sluit de stroomadapter aan op de stroomaansluiting bovenop
de labelmaker.
2 Sluit het andere uiteinde van de adapter aan op een stopcontact.
62
Page 63

De tapecassette plaatsen
Figuur 3
Labelgidsen
Kartonnen
strookje
verwijde ren
Figuur 4
Figuur 5
Klik!
Klik!
Bij de labelmaker wordt één tapecassette
geleverd. Surf naar www.dymo.com voor
meer informatie over het aanschaffen van
extra tapecassette.
Om de tapecassette te plaatsen
1 Om het
tapecassettecompartiment te
openen, tilt u het deksel van
het compartiment op. Zie
Figuur 3.
2 Voordat u de labelmaker voor
de eerste keer gebruikt, moet
u het kartonnen
beschermingsstuk uit de
label-uitvoersleuf verwijderen.
Zie Figuur 4.
3 Plaats de cassette met de label
omhoog en met de tape tussen de
labelgeleiders.
4 Druk stevig tot de cassette op haar
plaats klikt. Zie Figuur 5.
5 Sluit het deksel van de tapecassette.
nl
63
Page 64
De labelmaker voor het eerst gebruiken
Als u de labelmaker voor de eerste keer inschakelt, wordt u gevraagd om de
taal, de maateenheden en de labelbreedte te kiezen. De instellingen blijven
bewaard totdat u deze wijzigt.
U wijzigt deze instellingen met de toets .
De labelmaker instellen
1 Druk op om de labelmaker in te schakelen.
2 Selecteer de taal en druk op .
3 Kies inches of millimeters en druk op .
4 Selecteer de breedte van de huidige tapec assette die in de labelmaker is
geplaatst en druk op .
U bent nu klaar om uw eerste label af te drukken.
Een label afdrukken
1 Voer de tekst in om een eenvoudig label te maken.
2 Druk op .
3 Selecteer het aantal kopieën.
4 Druk op of om af te drukken.
5 Druk op de snijknop om de label af te snijden.
Gefeliciteerd! U hebt uw eerste label afgedrukt. Lees verder om meer
te weten te komen over de beschikbare opties voor het maken van labels.
64
Page 65

Uw labelmaker leren kennen
Maak uzelf vertrouwd met de locatie van elke functie en de functietoetsen
op uw labelmaker. Zie figuur 1. In de volgende gedeelten worden de
verschillende kenmerken in detail beschreven.
Aan/Uit
Met de knop schakelt u de stroom aan of uit. Na twee minuten
inactiviteit wordt de labelmaker automatisch uitgeschakeld. Wanneer de
printer automatisch wordt uitgeschakeld, wordt het laatste label in het
geheugen opgeslagen en weergegeven zodra de labelmaker weer wordt
ingeschakeld. Ook de eerder gekozen stijlinstellingen worden hersteld.
Wanneer de printer handmatig wordt uitgeschakeld, worden de labeltekst en
de stijlinstellingen NIET in het geheugen opgeslagen en wordt er een blanco
label weergegeven zodra de labelmaker weer wordt ingeschakeld.
Als het huidige label nog niet is opgeslagen, wordt u gevraagd het label op te
slaan voordat u de labelmaker uitschakelt.
nl
65
Page 66
Het LCD-display
4
2
1 3
5
6
7
8
9
10
Op het display is ruimte voor twee regels tekst. Het aantal tekens dat op elke
regel wordt weergegeven is afhankelijk van de spatiëring.
Dankzij het exclusieve grafische display van DYMO wordt elke opmaak die u
toevoegt onmiddellijk zichtbaar.
Aan de kenmerkindicatoren bovenaan het display kunt u zien welke
kenmerken geselecteerd zijn.
1 Lettertype 6 Hoofdletters
2 Lettergrootte 7 Kleine letters
3 Spiegelschrift 8 Teken met accent
4 Tekstuitlijning 9 Vaste lengte
5 Batterij 10 Bewerkingsgebied
66
Page 67
Format (Opmaak)
Met de toets geeft u de submenu's Lettertype, Lettergrootte, Stijl,
Kaders en Onderstrepen, Uitlijnen en Spiegel weer. Deze opmaakkenmerken
worden verderop in deze handleiding beschreven.
Insert (Invoegen)
Met de toets Insert kunt u symbolen, clip-art of opgeslagen tekst op
een label invoegen. Deze kenmerken worden verderop in deze
Handleiding beschreven.
Instellingen
Met de toets geeft u de submenu's Taal, Maateenheden,
Labelbreedte en Gegevens weer.
CAPS-functie
Met de toets zet u de hoofdletterfunctie aan en uit. Wanneer de
hoofdlettermodus is ingeschakeld, wordt de hoofdletterindicator op het
display weergegeven en zijn alle letters die u invoert hoofdletters. De
standaardinstelling is hoofdlettermodus uit. Wanneer de hoofdlettermodus
uitstaat, zijn alle letters die u invoert kleine letters.
Terugtoets
Met de toets verwijdert u het teken links van de cursor.
nl
67
Page 68

Wissen
Met toets kunt u kiezen of u alle labeltekst of alleen de tekstopmaak
wilt wissen, of beide.
Navigatietoetsen
U kunt uw label bekijken en bewerken met de linker en rechter
navigatietoetsen. U kunt ook met de navigatietoetsen Omhoog en Omlaag
door de menuopties navigeren en vervolgens op drukken om een
keuze te maken.
Annuleren
Met de -toets kunt u een menu verlaten, zonder een selectie te maken,
of een handeling annuleren.
68
Page 69

Uw label opmaken
4
5
7
1
23
6
U kunt uit een aantal opmaakopties kiezen om de weergave van uw labels
te verbeteren.
1 Lettertype 5 Gespiegeld
2 Lettergrootte 6 Uitlijning
3 Letterstijl 7 Labellengte
4 Kaders/Onderstrepen
Ga als volgt te werk om de opmaak aan te passen
1 Druk op .
2 Gebruik de navigatietoetsen om de opmaakoptie te selecteren die u
wilt wijzigen en druk op .
3 Selecteer de optie die u op het label wilt toepassen en druk op .
nl
69
Page 70

Lettertype
Er zijn drie lettertypes beschikbaar voor uw labels:
Basic
Serif
{
Fun
♦ Gebruik de navigatietoetsen (omhoog en omlaag) om het lettertype
te selecteren.
Lettergrootte
Er zijn zes lettergroottes beschikbaar voor uw labels:
De beschikbare lettergroottes hangen af van de labelbreedte die u hebt
geselecteerd. De lettergrootte geldt voor alle tekens op een label.
Labelbreedte Beschikbare lettergrootte
6mm (1/4”)
9mm (3/8”)
12 mm (1/2”)
♦ Gebruik de navigatietoetsen (omhoog en omlaag) om de lettergrootte
te selecteren.
70
8 punts
8, 12, 18 punts
8, 12, 18, 24, 28, 32 punts
Page 71

{
Letterstijl
U kunt zes verschillende letterstijlen kiezen:
Normaal
Vet
Cursief
Uitgelijnd
Schaduw
Verticaal
♦ Gebruik de navigatietoetsen (omhoog en omlaag) om de letterstijl
te selecteren.
Kader- en onderstrepingsstijlen toevoegen
U kunt een tekst markeren door een kader- of onderstrepingsstijl te kiezen.
Onderstrepen Perkament
Rechthoekig Tek s t ba l l on
Rond Bloemen
nl
Hoekig Spandoek
Puntig
71
Page 72

♦ Gebruik de navigatietoetsen (omhoog en omlaag) om de kaderstijl
of manier van onderstrepen te selecteren.
U kunt de tekst op een label onderstrepen of van een kader voorzien, maar
niet beide tegelijkertijd. Wanneer u kaders gebruikt op labels met twee
tekstregels, worden beide regels in hetzelfde kader geplaatst. Wanneer u
onderstrepen op labels gebruikt, worden beide regels onderstreept.
Tekst spiegelen
Met de spiegelopmaak kunt u tekst gespiegeld afdrukken. Daarbij wordt de
tekst van rechts naar links weergegeven.
♦ Gebruik de navigatietoetsen (links en rechts) om de spiegelopmaak
te selecteren.
Uitlijnen van tekst
U kunt de tekst die u wilt afdrukken links of rechts op de label uitlijnen. De
standaardinstelling voor Uitlijnen is Centreren.
♦ Gebruik de navigatietoetsen (links en rechts) om de tekstuitlijning
te selecteren.
72
Page 73

Labels met een vaste lengte maken
Normaal gesproken wordt de lengte van de label bepaald door de
lengte van de ingevoerde tekst. U kunt de lengte van de label echter
ook instellen voor een specifieke toepassing.
Als u een vaste labellengte kiest, wordt de grootte van de labeltekst
automatisch aan de label aangepast. Als de tekst niet aan de vaste
labellengte kan worden aangepast, verschijnt er een bericht waarin de
minimumlabellengte voor de tekst wordt aangegeven. Een label met een
vaste lengte mag maximaal 400 mm (15") lang zijn.
Ga als volgt te werk om een vaste labellengte in te stellen
1 Gebruik de navigatietoetsen (omhoog en omlaag) om de optie Vast
te selecteren.
nl
2 Gebruik de navigatietoetsen (omhoog en omlaag) om de
labellengte te selecteren of gebruik de nummertoetsen om de
labellengte in te voeren.
73
Page 74

Labels met twee regels maken
U kunt maximaal twee regels op een label afdrukken. Op labels van 6 mm
(1/4") kan uitsluitend 1 regel worden afgedrukt.
Ga als volgt te werk om een label met twee regels te maken
1 Typ de tekst voor de eerste regel en druk op .
2 Typ de tekst voor de tweede regel.
3 Druk op om af te drukken.
74
Page 75
Clip-art, symbolen en speciale tekens gebruiken
↔
©®™
☺
♠♣♥♦
U kunt clip-art, symbolen, interpunctie en andere speciale tekens aan uw
labels toevoegen.
Clip-art toevoegen
De labelmaker ondersteunt de volgende clip-art symbolen.
Ga als volgt te werk om clip-art in te voegen
1 Druk op Insert, selecteer Clip Art en druk op .
2 Gebruik de navigatietoetsen (omhoog en omlaag of rechts en links) om
de gewenste clip-art te selecteren.
3
Wanneer u de clip-art hebt gevonden, drukt u o
aan uw label toe te voegen.
p
nl
om de clip-art
75
Page 76

Symbolen toevoegen
De labelmaker ondersteunt de volgende uitgebreide symbolenreeks.
? ! _ - :
' " , . ;
’ ¡ ¿ / \
& @ # % ‰
| ( ) { }
[ ] ° • *
+ - x ÷ √
^ ~ ≈ = ≠
± < > ≤ ≥
€ £ $ ¢ ¥
⅓ ⅔ ⅛ ⅝ ⅞
¼ ½ ¾ ⅜ §
₀ ₁ ₂ ₃ ₄
₅ ₆ ₇ ₈ ₉
⁰
¹ ² ³
⁵ ⁶ ⁷ ⁸ ⁹
α β γ δ ε
ζ η θ ι κ
λ μ ν ξ ο
π ρ σ τ υ
φ χ ψ ω
Α Β Γ Δ Ε
Ζ Η Θ Ι Κ
Λ Μ Ν Ξ Ο
Π Ρ Σ Τ Υ
Φ Χ Ψ Ω
Ga als volgt te werk om een symbool toe te voegen
1 Druk op Insert, selecteer Symbolen en druk op .
2 Gebruik de navigatietoetsen (omhoog en omlaag of rechts en links) om
het gewenste symbool te selecteren.
3 Wanneer u het symbool gevonden heeft, drukt u op om
het symbool aan uw label toe te voegen.
Symbooltoetsen gebruiken
U kunt snel symbolen toevoegen met de sneltoetsen voor algemene
symbolen, interpunctie en valuta's.
⁴
76
Page 77

Ga als volgt te werk om snel symbolen toe te voegen
1 Druk op één van de volgende toetsen:
• ?:’@ om een leesteken toe te voegen .
• €$£ om een valutasymbool toe te voegen.
2 Selecteer het gewenste symbool en druk op .
Internationale karakters toevoegen
De labelmaker ondersteunt de uitgebreide Latijnse karakterset.
Nadat u op de Accent-toets hebt gedrukt, kunt u door op een bepaalde letter
te drukken door de beschikbare variaties van die letter bladeren.
Bijvoorbeeld, als Frans de gekozen taal is en u herhaaldelijk op de letter a
drukt, ziet u a à â æ en alle andere beschikbare variaties. De tekenvariaties en
de volgorde waarin de variaties verschijnen, zijn afhankelijk van de taal die u
heeft gekozen.
Ga als volgt te werk om tekens met accenten toe te voegen
1 Druk op .
De indicator voor tekens met accenten wordt op het display weergegeven.
2 Druk op een alfabetisch teken.
De varianten met accenten worden weergegeven.
3 Gebruik de navigatietoetsen (links en rechts) om het gewenste teken te
selecteren en druk op .
nl
77
Page 78

Afdrukopties
U kunt uw label voor het afdrukken bekijken en meerdere labels afdrukken.
Afdrukvoorbeeld van uw label
U kunt de tekst of opmaak van uw label bekijken voordat u het label afdrukt.
Ga als volgt te werk om een afdrukvoorbeeld van uw label te bekijken
♦ Druk op .
De labellengte wordt weergegeven. Indien van toepassing scrolt de tekst van
het label over het display.
Meerdere labels afdrukken
Elke keer dat u een label afdrukt, wordt u om het aantal kopieën gevraagd. U
kunt per keer maximaal tien kopieën afdrukken.
Ga als volgt te werk om meerdere labels af te drukken
1 Druk op .
2 Selecteer het aantal kopieën dat u wilt afdrukken en druk op .
Na het afdrukken, wordt het aantal kopieën weer teruggezet op het
standaardaantal van 1.
Het geheugen van uw labelmaker gebruiken
De labelmaker beschikt over een krachtige geheugenfunctie waarmee u tekst
van maar liefst negen veelgebruikte labels kunt opslaan. U kunt opgeslagen
labels ophalen en opgeslagen tekst in labels invoegen.
78
Page 79

Labels opslaan
U kunt maximaal negen veelgebruikte labels opslaan. Als u een label opslaat,
worden zowel de tekst als de opmaak opgeslagen.
Ga als volgt te werk om het huidige label op te slaan
1 Druk op . De eerste beschikbare geheugenlocatie wordt
weergegeven.
2 Gebruik de navigatietoetsen om door de geheugenlocaties te bladeren.
U kunt een nieuw label in elke geheugenlocatie opslaan.
3 Selecteer een geheugenlocatie en druk op .
Uw label wordt bewaard en u keert terug naar het label.
Opgeslagen labels openen
U kunt in het geheugen opgeslagen labels gemakkelijk op een later tijdstip
openen en gebruiken.
Ga als volgt te werk om opgeslagen labels te openen
1 Druk op . De eerste geheugenlocatie wordt weergegeven.
2 Gebruik de navigatietoetsen om een opgeslagen label te selecteren en
druk op .
Als u een geheugenlocatie wilt wissen, selecteert u deze en drukt u
vervolgens op .
nl
79
Page 80

Opgeslagen tekst invoegen
U kunt de tekst van een opgeslagen label in de huidige label invoegen.
Daarbij wordt alleen de opgeslagen tekst ingevoegd en niet de opmaak.
Ga als volgt te werk om opgeslagen tekst in te voegen
1 Plaats de cursor op de plaats in het label waar u de tekst wilt invoegen.
2 Druk op Insert, selecteer Opgeslagen tekst en druk op .
De eerste geheugenlocatie wordt weergegeven.
3 Gebruik de navigatietoetsen om de tekst te selecteren die u
wilt invoegen.
4 Druk op .
De tekst wordt in het huidige label ingevoegd.
80
Page 81

Uw labelmaker onderhouden
Printkop
Ingedrukt
houden
Figuur 6
Uw labelmaker is ontworpen om u lang en probleemloos van dienst te zijn,
waarbij zeer weinig onderhoud nodig is. Reinig uw labelmaker zo nu en dan,
zodat deze goed blijft functioneren. Reinig het afsnijmesje iedere keer als u
de tapecassette vervangt.
Ga als volgt te werk om het snijmes
te reinigen
1 Verwijder de tapecassette.
2 Druk de snijknop in en houd deze
ingedrukt om het afsnijmesje bloot te
leggen. Zie Figuur 6.
3 Reinig beide zijden van het mesje
met watten en alcohol.
Ga als volgt te werk om de printkop te reinigen
1 Verwijder de tapecassette.
2 Verwijder het schoonmaakstaafje uit het tapecassettedeksel.
3 Wrijf voorzichtig met het schoonmaakgereedschap over de printkop.
Zie Figuur 6.
nl
81
Page 82

Problemen oplossen
Raadpleeg de onderstaande mogelijke oplossingen wanneer u een probleem
hebt met uw labelmaker.
Probleem/foutmelding Oplossing
Geen display
Slechte printkwaliteit
Slechte snijkwaliteit Reinig het afsnijmesje. Zie Uw labelmaker
Bezig met afdrukken...
Te veel karakters
Maximaal aantal tekens in buffer
overschreden.
Te v eel r ege ls
Het maximum aantal regels is
overschreden.
Batterij opladen!
De batterij is bijna leeg.
Batterijfout!
De batterij is beschadigd of niet
geplaatst.
• Controleer of de labelmaker is ingeschakeld.
• Sluit de AC-adapter aan om de batterij op te
laden. Zie De batterijen opladen.
• Sluit de AC-adapter aan om de batterij op te
laden. Zie De batterijen opladen.
• Reinig de pr intkop.
• Controleer of de tapecassette correct is geplaatst.
• Vervang de tapecassette.
onderhouden.
Geen handeling nodig.
Boodschap verdwijnt wanneer het afdrukken
beëindigd is.
Wis de buffertekst geheel of gedeeltelijk.
• Verwijder een regel om op de labelbreedte aan
te passen.
• Plaats een bredere tapecassette.
Sluit de stroomadapter aan om de batterij op
te laden. Zie De batterijen opladen.
• Zorg ervoor dat de batterij correct is geplaatst.
Zie Plaatsen van de batterijen.
• Vervang de batterij.
82
Page 83

Probleem/foutmelding Oplossing
Bezig met opladen batterij,
even geduld aub
Tape is vastgelopen
Motor is gestopt als gevolg van een
blokkering van het label.
Laat de batterij opladen voordat u de
stroomadapterstekker uit de labelmaker verwijder t.
• Verwijder het geblokkeerde label en plaats de
tapecassette terug.
• Reinig het snijmes.
Als u nog steeds hulp nodig heeft, surf dan naar de website van DYMO:
www.dymo.com.
Feedback documentatie
We werken er voortdurend aan om documentatie van de hoogste kwaliteit
op te stellen voor onze producten. Wij stellen uw feedback op prijs.
Stuur ons uw opmerkingen of suggesties over onze handleidingen.
Voorzie uw feedback van de volgende informatie:
• Productnaam, modelnummer en paginanummer van de handleiding
• Een korte beschrijving van de instructies die onnauwkeurig of
onduidelijk zijn, tekststukken waar meer informatie moet worden
gegeven, enzovoort
We staan ook open voor suggesties voor extra onderwerpen die u in de
documentatie besproken wilt zien.
Stuur uw e-mailberichten naar: documentation@dymo.com
Gelieve er rekening mee te houden dat dit e-mailadres enkel dient voor
feedback over documentatie. Als u een technische vraag hebt, neemt u
contact op met de DYMO helpdesk.
nl
83
Page 84

Informatie over het milieu
Bij de productie van de apparatuur die u hebt gekocht, is het noodzakelijk
geweest natuurlijke hulpbronnen te onttrekken en te gebruiken. Het apparaat
kan stoffen bevatten die schadelijk zijn voor uw gezondheid en het milieu.
U kunt de verspreiding van deze stoffen in ons milieu beperken en onze
natuurlijke hulpbronnen ontlasten door gebruik te maken van
recyclingvoorzieningen. Deze voorzieningen zullen de meeste materialen van
uw afgedankte apparatuur hergebruiken of recyclen op een
milieuvriendelijke wijze.
Het symbool met de doorkruiste vuilnisbak op uw apparaat is een indicatie
om van deze voorzieningen gebruik te maken.
Voor meer informatie over de inzameling, het hergebruik en de recycling van
dit product, kunt u contact opnemen met uw plaatselijk of regionaal
afvalverwerkingsbedrijf.
U kunt ook contact opnemen met DYMO voor meer informatie over de
milieueffecten van onze producten.
Dit product heeft een CE-markering in overeenstemming met de EMC-richtlij n en de
laagspanningsrichtlijn en is ontworpen om te beantwoorden aan de volgende internationale
standaarden:
US FCC Class B Compatibi lity
Safety - UL, CUL, TUV, CE, T-Mark, SAA, BABT, C-Tick
EMC - EMI Compatibility
EN 55022; EN 61000 (+ addendums)
RoHS 2002/95/EC
84
Page 85

85
Page 86

Inhalt
Ihr neues Beschriftungsgerät .................................................... 89
Produktregistrierung ......................................................................... 89
Erste Schritte ........................................................................... 89
Anschluss an die Stromversorgung ....................................................... 89
Einlegen des Akkus............................................................................ 90
Wiederaufladen des Akkus ................................................................ 90
Einsetzen der Bandkassetten ................................................................. 91
Inbetriebnahme des Etikettendruckers ..................................... 92
Ihr Beschriftungsgerät ............................................................. 93
Ein-/Ausschalten ................................................................................... 93
LCD-Display ........................................................................................... 94
Format .................................................................................................. 95
Einfügen ................................................................................................ 95
Einstellungen ........................................................................................ 95
CAPS-Modus .......................................................................................... 95
Rücktaste .............................................................................................. 95
Löschen ................................................................................................. 96
Navigationstasten ................................................................................. 96
Abbrechen ............................................................................................. 96
Formatieren des Etiketts ..........................................................97
Schriftart ............................................................................................... 98
Schriftgröße .......................................................................................... 98
Schriftstile ............................................................................................. 99
Hinzufügen von Rahmen- und Unterstreichungsstilen .......................... 99
Verwenden von gespiegeltem Text ......................................................100
86
Page 87

de
Ausrichtung des Textes ........................................................................ 100
Etiketten mit fester Länge erstellen ..................................................... 101
Erstellen von Etiketten mit zwei Zeilen ................................................ 102
Verwendung von Cliparts, Symbolen und Sonderzeichen .......... 103
Clipart hinzufügen ............................................................................... 103
Einfügen von Symbolen ....................................................................... 104
Verwendung der Symboltasten ........................................................... 104
Einfügen internationaler Zeichen ........................................................ 105
Druckoptionen .......................................................................106
Vorschau des Etiketts ........................................................................... 106
Drucken von mehreren Exemplaren ..................................................... 106
Verwendung des Etikettenspeichers ........................................ 107
Speichern des Etiketts .......................................................................... 107
Öffnen gespeicherter Etiketten ............................................................ 107
Einfügen von gespeichertem Text ........................................................ 108
Wartung Ihres Beschriftungsgeräts ......................................... 109
Problembehandlung ........................................................................... 110
Rückmeldungen zur Dokumentation ....................................... 111
Informationen zum Umweltschutz .......................................... 112
87
Page 88

1
2
3
4
5
7
89
10
11
15
16
18 21 22 23
17
14
6
13
19 20
12
Abbildung 1 DYMO® LabelManager 260P Elektronisches Beschriftungsgerät
1 Abschneidetaste 9 Leertaste 17 LCD-Display
2 Drucken 10 Großbuchstaben 18 Lösch en
3 Vorschau 11 Zifferntasten 19 Netztadapter
4 Einstellungen 12 Symbole - Währung 20 Abbrechen
5 Rücktaste 13 Einfügen 21 Navigation
6 Symbole - Satzzeichen 14 Öffnen 22 OK
7 Eingabetaste 15 Format 23 Speichern
8 Umlaute 16 Ein/Aus
88
Page 89

Ihr neues Beschriftungsgerät
Mit dem elektronischen Etikettendrucker DYMO® LabelManager 260P können
Sie eine Vielzahl hochwertiger selbstklebender Etiketten erstellen. Sie können
die Etiketten in vielen verschiedenen Schriftarten, Größen und Formatstilen
drucken. Der Etikettendrucker verwendet DYMO D1 Bandkassetten mit
Breiten von 6 mm (1/4”), 9 mm (3/8”), oder 12 mm (1/2”). Die
Bandkassetten erhalten Sie in vielen verschiedenen Farben.
Unter www.dymo.com finden Sie Informationen zu Etiketten und Zubehör
für das Beschriftungsgerät.
Produktregistrierung
Näheres erfahren Sie auf der Website www.dymo.com/register. Hier
können Sie Ihren Etikettendrucker auch online registrieren.
Erste Schritte
Folgen Sie den Anweisungen in diesem Abschnitt, um Ihr erstes Etikett
auszudrucken.
Anschluss an die Stromversorgung
Der Etikettendrucker wird mit einem Lithium-Ionen-Akku betrieben. Um
Strom zu sparen, schaltet sich das Beschriftungsgerät automatisch aus,
wenn es zwei Minuten lang nicht benutzt wurde.
de
89
Page 90

Einlegen des Akkus
Abbildung 2
Der mit dem Beschriftungsgerät
mitgelieferte Akku ist im
Lieferzustand teilweise aufgeladen.
Der Akku muss vor der ersten
Verwendung des Beschriftungsgeräts nicht aufgeladen werden.
So legen Sie den Akku ein
1 Schieben Sie die Abdeckung des
Akkufachs auf und nehmen Sie sie ab. Siehe Abbildung 2.
2 Setzen Sie den Akku in das Akkufach ein.
3 Setzen Sie den Akkufachdeckel wieder auf.
HINWEIS Wenn Sie das Beschriftungsgerät längere Zeit nicht verwenden,
sollten Sie den Akku aus dem Gerät nehmen.
Wiederaufladen des Akkus
Das Beschriftungsgerät wird mit einem Netzteil geliefert, um den
Akku aufzuladen.
HINWEIS Das Netzteil dient nur zum Aufladen des Akkus und kann nicht zur
Stromversorgung für das Beschriftungsgerät verwendet werden.
So laden Sie den Akku auf
1 Stecken Sie das Netzteil in den Netzanschluss an der Oberseite des
Beschriftungsgeräts.
2 Stecken Sie den Netzstecker in eine Netzsteckdose.
90
Page 91
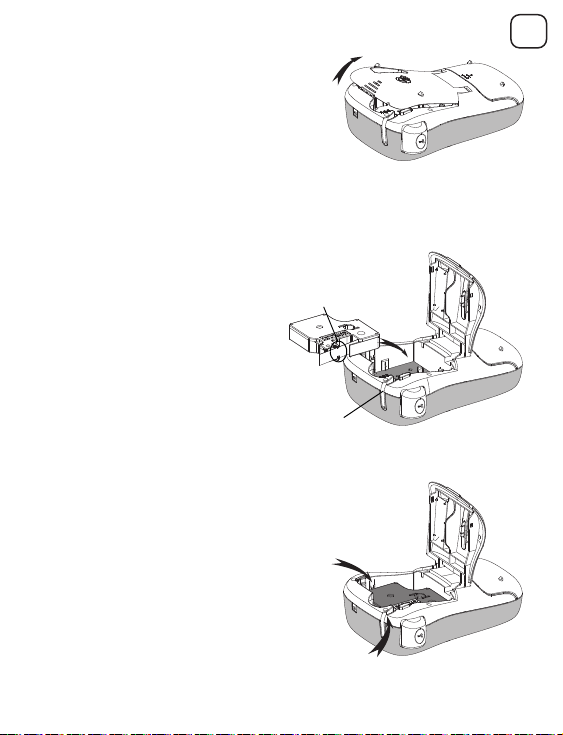
Einsetzen der Bandkassetten
Abbildung 3
Etikettenführungen
Eingelegte
Schutzpappe
entfernen
Abbildung 4
Abbildung 5
Klick!
Klick!
Der Etikettendrucker wird mit einer
Bandkassette geliefert. Unter
www.dymo.com erhalten Sie
Informationen zum Kauf zusätzlicher
Bandkassetten.
So setzen Sie die Bandkassette ein
1 Heben Sie den
Kassettendeckel an, um das
Etikettenfach zu öffnen.
Siehe Abbildung 3.
2 Entfernen Sie vor dem ersten
Gebrauch des
Etikettendruckers die
eingelegte Schutzpappe aus
dem Etikettenauswurf. Siehe
Abbildung 4.
3 Legen Sie die Kassette mit dem
Etikett nach oben zwischen den
Etikettenführungen ein.
4 Drücken Sie die Kassette fest ein, bis
sie einrastet. Seihe Abbildung 5.
5 Schließen Sie das
Bandkassettenfach.
de
91
Page 92

Inbetriebnahme des Etikettendruckers
Wenn Sie das Gerät zum ersten Mal einschalten, werden Sie gebeten, die
gewünschte Sprache, die Maßeinheiten und die Etikettenbreite auszuwählen.
Diese Einstellungen bleiben, bis sie geändert werden.
Sie können diese Einstellungen über die Taste ändern.
So konfigurieren Sie den Etikettendrucker
1 Drücken Sie die Taste , um das Gerät einzuschalten.
2 Wählen Sie die Sprache aus, und drücken die Taste .
3 Wählen Sie Zoll oder Millimeter aus, und drücken Sie .
4 Wählen Sie die Breite der Etikettenkasse aus, die derzeit im
Beschriftungsgerät eingelegt ist, und drücken Sie .
Sie können jetzt Ihr erstes Etikett ausdrucken.
So drucken Sie ein Etikett
1 Geben Sie den Text für Ihr erstes Etikett ein.
2 Drücken Sie .
3 Wählen Sie die Anzahl zu druckender Exemplare aus.
4 Drücken Sie zum Drucken auf oder .
5 Drücken Sie die Abschneidetaste, um das Etikett zuzuschneiden.
Herzlichen Glückwunsch! Sie haben das erste Etikett ausgedruckt.
Im Folgenden werden die verfügbaren Optionen zum Erstellen von
Etiketten erläutert.
92
Page 93

Ihr Beschriftungsgerät
Machen Sie sich zunächst mit den Tasten und Funktionen Ihres
Beschriftungsgeräts vertraut. Siehe Abbildung 1. Im Folgenden wird jede
Funktion detailliert beschrieben.
Ein-/Ausschalten
Mit der Taste schalten Sie das Gerät ein und aus. Wenn das Gerät
zwei Minuten lang nicht benutzt wird, schaltet es sich automatisch aus.
Wenn sich der Drucker automatisch abschaltet, wird das zuletzt erstellte
Etikett gespeichert und angezeigt, wenn das Gerät erneut eingeschaltet
wird. Die vorher gewählten Einstellungen zum Formatstil werden
ebenfalls gespeichert.
Wenn der Drucker manuell abgeschaltet wird, werden der Etikettentext und
die Stileinstellungen nicht gespeichert, und es wird ein leeres Etikett
angezeigt, wenn das Gerät wieder eingeschaltet wird.
Falls das aktuelle Etikett noch nicht gespeichert wurde, werden Sie
aufgefordert, dies zu tun, wenn Sie das Gerät abschalten.
de
93
Page 94
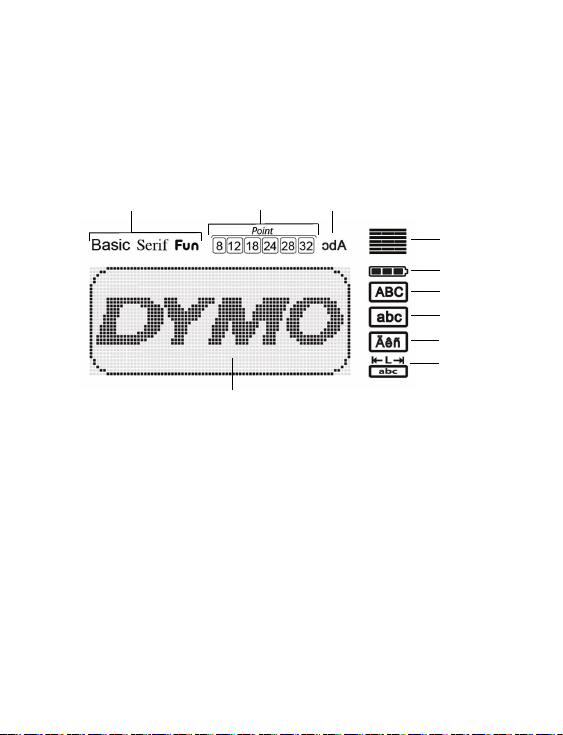
LCD-Display
4
2
1 3
5
6
7
8
9
10
Das Display kann zwei Zeilen auf einmal anzeigen. Die Anzahl der
angezeigten Zeichen in jeder Zeile variiert je nach Laufweite.
Mit dem exklusiven grafischen Display von DYMO wird fast jede Formatierung
sofort sichtbar.
Die Funktionsanzeige am oberen Rand des LCD-Displays wird schwarz
angezeigt, wenn eine Funktion ausgewählt ist.
1 Schriftart 6 Großbuchstaben
2 Schriftgröße 7 Kleinbuchstaben
3 Gespiegelter Text 8 Umlaute
4 Textausrichtung 9 Feststehende Etikettenlänge
5 Ladestandsanzeige 10 Bearbeitungsbereich
94
Page 95

Form at
Mit der Taste werden die Untermenüs für Schriftart, Schriftgröße,
Schriftstil, Rahmen und Unterstreichung, Etikettenlänge, Ausrichtung und
Gespiegelt angezeigt. Diese Formatierungsfunktionen werden weiter hinten
in dieser Bedienungsanleitung beschrieben.
Einfügen
Über die Taste Insert können Sie Symbole, Cliparts oder gespeicher ten Text in
Ihr Etikett einfügen. Diese Funktionen werden weiter hinten in dieser
Bedienungsanleitung beschrieben.
Einstellungen
Über die Taste können die Untermenüs für Sprache, Maßeinheiten,
Etikettenbreite und Informationen ausgewählt werden.
CAPS-Modus
Mit der Taste wird die Großschreibung ein- und ausgeschaltet. Bei
eingeschaltetem CAPS-Modus, wird CAPS auf dem Display angezeigt und alle
eingegebenen Buchstaben erscheinen als Großbuchstaben. Der CAPS-Modus
ist standardmäßig eingeschaltet. Wird der CAPS-Modus ausgeschaltet,
werden alle Buchstaben als Kleinbuchstaben angezeigt.
Rücktaste
Mit der Taste wird das Zeichen links vom Cursor gelöscht.
de
95
Page 96
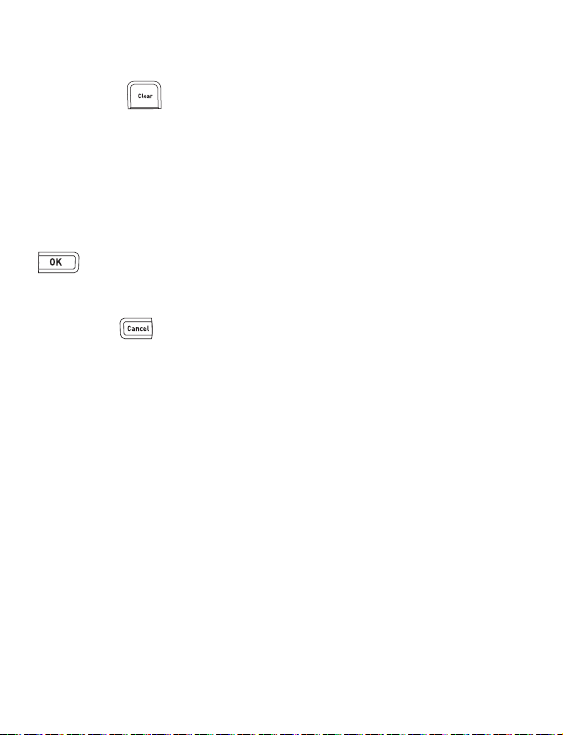
Löschen
Über die Taste können Sie den gesamten Text, die Formatierung oder
beides löschen.
Navigationstasten
Sie können Ihr Etikett mit der linken und rechten Navigationspfeiltaste
überprüfen und bearbeiten. Mit der Aufwär ts- und Abwärtsnavigationstaste
können Sie auch durch die Menüoptionen navigieren und anschließend auf
drücken, um eine Auswahl zu treffen.
Abbrechen
Mit der Taste können Sie ein Menü verlassen, ohne eine Auswahl zu
treffen, oder einen Vorgang abbrechen.
96
Page 97

Formatieren des Etiketts
4
5
7
1
23
6
Sie haben mehrere Formatoptionen zur Auswahl, um Ihr Etikett zu gestalten.
1 Schriftart 5 Gespiegelt
2 Schriftgröße 6 Ausrichtung
3 Schriftstil 7 Etikettenlänge
4 Rahmen/Unterstreichen
de
So stellen Sie die Formatierung ein
1 Drücken Sie .
2 Wählen Sie mit den Navigationspfeiltasten die Formatoption aus, die
geändert werden soll, und drücken Sie .
3 Wählen Sie die Option aus, die auf das Etikett angewendet werden soll,
und drücken Sie die Taste .
97
Page 98

Schriftart
{
Für Ihre Etiketten stehen drei Schriftarten zur Verfügung:
Basic
Serif
Fun
♦ W
ählen Sie mit den Auf- und Abwärtsnavigationstasten den
Schriftart
aus.
Schriftgröße
Für Ihre Etiketten stehen sechs Schriftgrößen zur Verfügung:
Die verfügbaren Schriftgrößen hängen von der gewählten Etikettenbreite ab.
Die Schriftgröße wird auf alle Zeichen auf einem Etikett angewendet.
Etikettenbreite Verfügbare Schriftgrößen
6mm (1/4”)
9mm (3/8”)
12 mm (1/2”)
♦ Wählen Sie mit der Auf- und Abwärts- sowie der linken und rechten
Navigationspfeiltaste die Schriftgröße aus.
8 Punkte
8, 12, 18 Punkte
8, 12, 18, 24, 28, 32 Punkte
98
Page 99

{
Schriftstile
Sie können aus sechs verschiedenen Schriftstilen wählen:
Normal
Fett
Kursiv
Kontur
Schattiert
Vertikale
♦
Wählen Sie mit der Auf- und Abwärtsnavigationstaste den Schriftstil aus.
Hinzufügen von Rahmen- und Unterstreichungsstilen
Sie können Ihren Text durch einen Rahmen- oder
Unterstreichungsstil hervorheben.
Unterstrichen Rolle
Rechteck Sprechblase
Abgerundet Blumen
de
Gezackt Banner
Spitz
99
Page 100

♦ Wählen Sie mit der Auf- und Abwärtsnavigationstaste den Rahmen
oder Unterstreichungsstil aus.
Ein Etikett kann unterstrichen oder in einen Rahmen eingebettet werden,
aber nicht beides zusammen. Wenn Sie Rahmen in zweizeiligen Etiketten
verwenden, wird ein Rahmen um beide Zeilen gezogen. Bei der
Verwendung von Unterstreichung bei Etiketten mit zwei Zeilen werden
beide Zeilen unterstrichen.
Verwenden von gespiegeltem Text
Das Format "Gespiegelt" ermöglicht das Ausdrucken von Texten in Spiegelschrift.
♦ Wählen Sie mit der linken und rechten Navigationspfeiltaste das
Spiegelformat aus.
Ausrichtung des Textes
Sie können den zu druckenden Text rechtsbündig, linksbündig oder mittig
ausrichten. Die voreingestellte Ausrichtung ist zentriert.
♦ Wählen Sie mit der linken und rechten Navigationspfeiltaste die
Tex taus ri cht ung a us.
100
 Loading...