


®
™
™ |
ASSEMBLY AND OPERATION MANUAL
www.duratrax.com
www.warheadmt.com
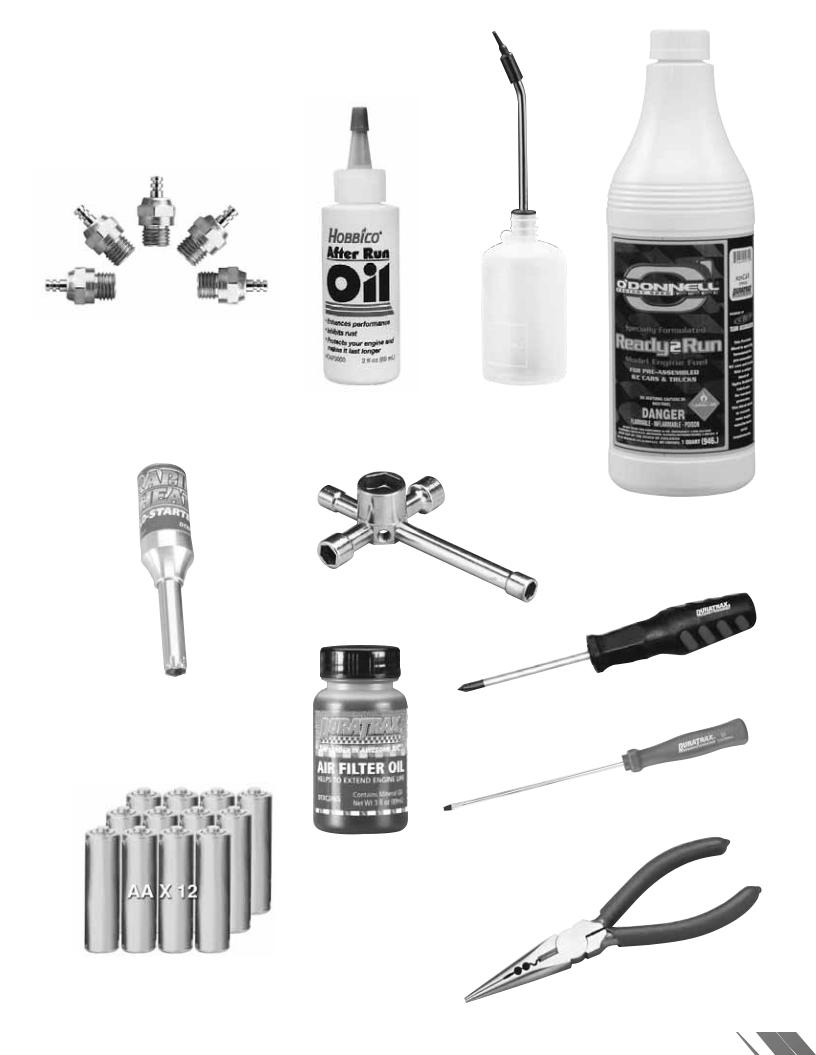
YOU WILL
NEED
SPARE GLOW PLUGS
DTXG3005
GLOW STARTER
DTXP3000
ALKALINE
BATTERIES
AFTER RUN OIL
HCAP3000
FUEL FILLER BOTTLE
DTXP0150
20% O’DONNELL FUEL
DTXP0720
WRENCH
DTXR1170
PHILLIPS HEAD SCREWDRIVER
DTXR0124
ENGINE TUNING SCREWDRIVER
DTXR0185
ADDITIONAL
AIR FILTER OIL
DTXC2465
PLIERS
DTXR0300
2

THINGS TO
KNOW
SAFETY PRECAUTIONS
When the safety precautions are followed, the Warhead will provide years of enjoyment. Use care and good sense at all times when operating this radio controlled monster truck. Failure to use this vehicle in a safe, sensible manner can result in injury or damage to property. You and you alone must insure that the instructions are carefully followed and all safety precautions are obeyed.
•Do not operate the Warhead near people. Spectators should be behind the driver or at a safe distance away from the vehicle.
•Water can cause the electronics to short out and can cause permanent damage.
•Always turn on the transmitter before turning on the receiver.
•Fully extend the transmitter antenna before operating your vehicle.
•Before turning on your radio system, check to make sure that no one else is running on the same frequency.
•The engine and exhaust produce quite a bit of noise. Do not run this vehicle when or where it can disturb others.
•The engine and exhaust can become very hot. Avoid touching any of these parts during use and until they have cooled down.
•Model engine fuel is poisonous. Make sure you read and follow all of the precautions on the fuel container. Keep fuel out of the reach of children.
•Model engine fuel is flammable and when ignited has a flame that is difficult to see. Avoid sparks, flames, smoking, or any other ignition source when fuel is near.
•The engine emits harmful fumes just like real vehicles. Do not operate this model indoors.
•Avoid running the truck in cold weather. The plastic and metal parts can become brittle at low temperatures. In addition, grease and oil become thick, causing premature wear and poor performance.
SPECIFICATION AND DESCRIPTION CHANGES
All pictures, descriptions and specifications found in this instruction manual are subject to change without notice. DuraTrax maintains no responsibility for inadvertent errors in this manual. Visit www.duratrax.com for the latest updates and information for your model.
WARRANTY
•DuraTrax® guarantees this kit to be free from defects in both material and workmanship at the date of purchase. DuraTrax will warranty this kit for 90 days after the purchase date. DuraTrax will repair or replace, at no charge, the incorrectly made part.
•Make sure you save the receipt or invoice you were given when you bought your model! It is your proof of purchase and we must see it before we can honor the warranty. Further, DuraTrax reserves the right to change or modify this warranty without notice.
•In that DuraTrax has no control over the final user assembly or material used for final user assembly, no liability shall be assumed nor accepted for any damage resulting from the use by the user of the final user-assembled product. By the act of using the user-assembled product, the user accepts all resulting liability.
To return your Warhead for repairs covered under warranty you should send your truck to:
Hobby Services
3002 N. Apollo Drive Suite 1
Champaign, Illinois 61822
Attn: Service Department Phone: (217) 398-0007 9:00 am-5:00 pm
Central Time M-F
E-mail: hobbyservices@hobbico.com www.hobbyservices.com
If the buyer is not prepared to accept the liability associated with the use of this product, the buyer is advised to return this kit immediately in new and unused condition to the place of purchase.
STRESS-TECH™ PARTS
GUARANTEE
We have engineered the Warhead MT to take the rough and tumble abuse that makes R/C trucks fun. We are so confident of the quality and durability of the Stress-Tech plastic parts that we will replace any Stress-Tech plastic part you break during the first 12 months you own the truck. Just send in the part to us and we will send you a FREE replacement. Please see the Warhead parts list for the items covered under the Stress-Tech guarantee.
To receive your free replacement part please send the following to the Hobby Services address listed under the warranty on the left.
1. The broken part must be included.
2. The part number and description of the broken part.
3. Copy of your dated invoice or purchase receipt.
4. Your name, phone number and shipping address.
REPAIR SERVICE
Repair service is available anytime.
•After the 90 day warranty, you can still have your Warhead repaired for a small charge by the experts at DuraTrax’s authorized repair facility, Hobby Services.
•To speed up the repair process, please follow the instructions listed below.
1. Under most circumstances return the ENTIRE vehicle. The exception would be sending in a Stress-Tech part. See the instruction under the StressTech Guarantee.
2. Make sure the transmitter is turned off, all of the batteries are removed and the fuel tank is completely empty.
3. Send written instructions which include: a list of all items returned, a THOROUGH explanation of the problem, the service needed and your phone number during the day. If you expect the repair to be covered under warranty, be sure to include a proof of date of purchase (your store receipt or purchase invoice).
3
FINISHING
THE WARHEAD
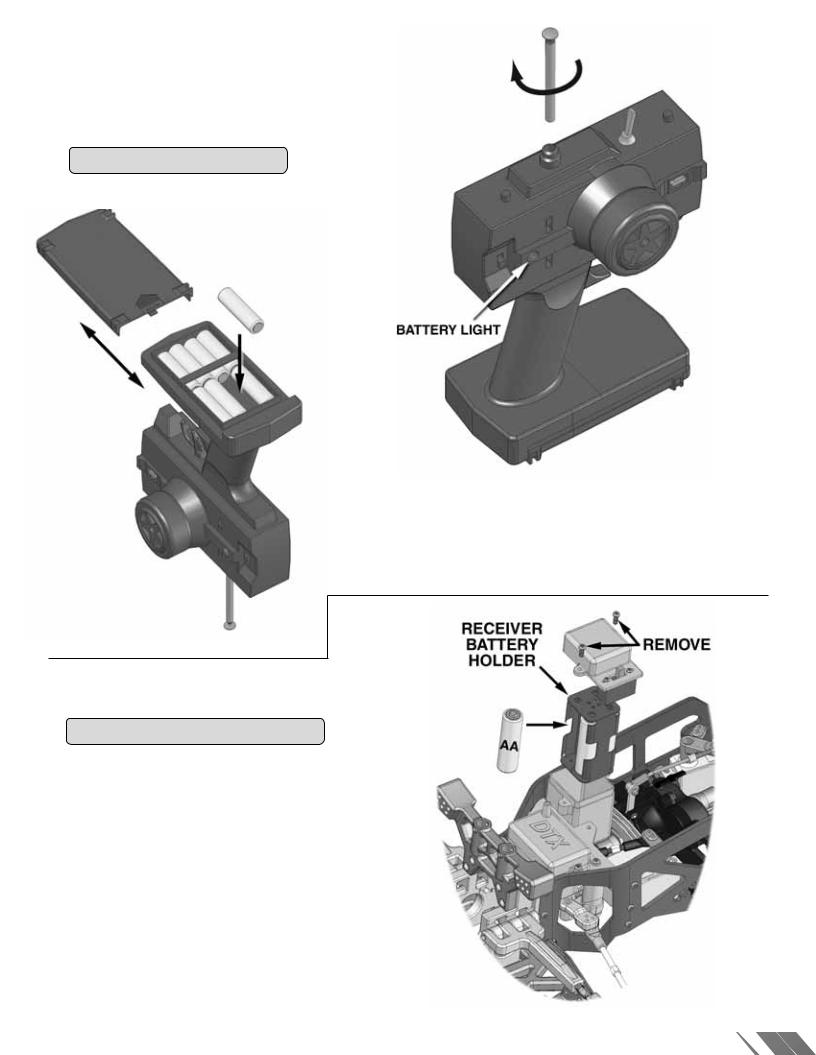
TRANSMITTER PREPARATION
•Install eight “AA” batteries into transmitter.
•Insert the antenna into the top of the transmitter and tighten.
•Turn the transmitter on and check the battery light. If the red light glows steady, turn off the transmitter. If the red light blinks, the batteries are low and should be replaced.
RECEIVER BATTERY INSTALLATION
•Remove the receiver battery holder.
•Install (4) “AA” batteries.
•Reinstall the receiver battery holder and lid.
4
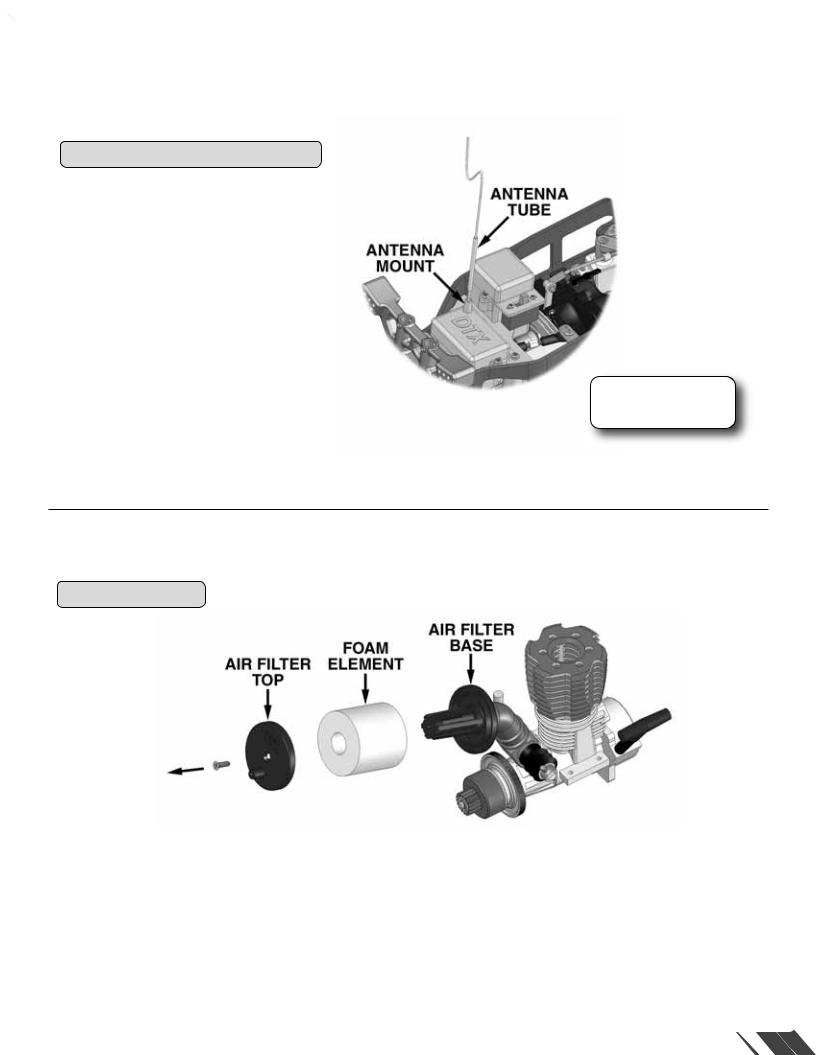
RECEIVER ANTENNA INSTALLATION
•Uncoil and straighten the antenna wire.
•Route the receiver antenna wire through the antenna tube.
•Install the tube into the antenna mount.
X
DO NOT CUT ANTENNA WIRE!
OIL THE AIR FILTER
•Remove the air filter top and foam element.
•Apply both tubes of air filter oil onto the foam element, squeezing the element until it is completely coated with the oil. TIP! Placing the element in a plastic bag will help keep your hands clean.
•Remove any excess oil with a paper towel.
•Reinstall, making sure the filter is properly seated on the base.
5

RADIO SYSTEM CHECK |
CHECK THE RADIO SYSTEM |
|
FOR PROPER FUNCTION |
|
!BEFORE EACH RUN |
•Turn the transmitter on, then turn the receiver on.
•Turn the transmitter wheel to the right—the front wheels should turn to the right. If not, move the steering servo reverse switch.
•When running, adjust the steering trim so the truck track straight.
•Pull the throttle trigger to make sure the carburetor opens fully and the throttle linkage functions properly without binding.
•Adjust the throttle trim so the carb closes completely at idle.
•Push the trigger and roll the truck to make sure the brakes are applied.
•To shift the Warhead from forward to reverse, flip the toggle switch to the opposite position.
•IMPORTANT! Before shifting from forward to reverse or reverse to forward, bring the truck to a complete stop.
BODY INSTALLATION
•Decal the body to your liking. Use the photos on the box as a reference.
•Install the body onto the chassis using four body clips.
•TIP! Cut out the rear window for easy access to the rollbar/handle.
•TIP! Adjust your body mounts high to achieve that “monster” look.
6
ENGINE
TUNING GUIDE
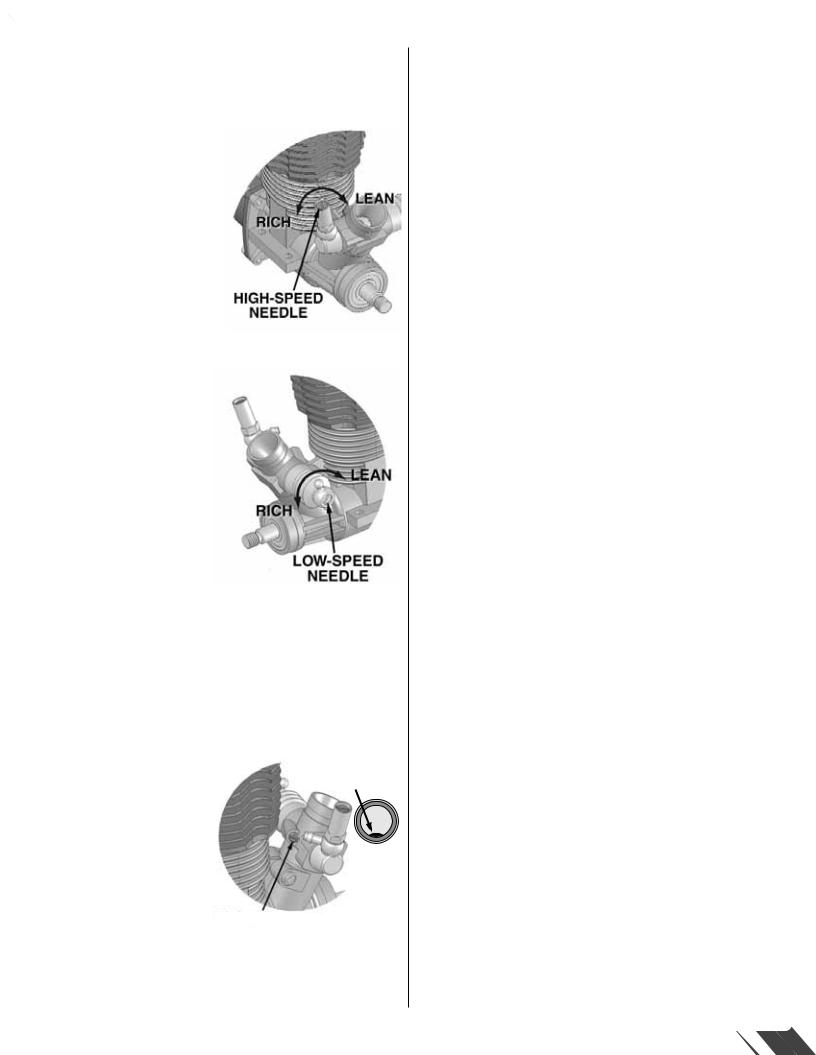
HIGH-SPEED NEEDLE
The “high-speed” needle is sticking up from the carburetor. This controls the fuel to air mixture of the carburetor. The needle is pre-set for break-in from the factory at 4 turns out from fully closed. Once the engine is broken-in, the highspeed needle would typically run from 3-1/2 to 3-3/4 turns out from closed, depending on the weather, humidity and altitude
above sea level. To richen the mixture turn the needle counterclockwise. To lean it, turn the needle clockwise.
LOW-SPEED NEEDLE
The “low-speed” needle is located on the side of the carburetor. It controls the fuel mixture at low throttle settings/idle and is preset from the factory at 14-1/2 turns from fully closed while holding the carburetor open. There is a simple way of adjusting the low-speed needle correctly called the
“pinch test.” With the engine at idle, pinch the fuel line and listen to how the engine speeds up or slows down. If the engine increases its speed for about 2 or 3 seconds and then loses speed, the needle is set correctly. If the engine loses RPM quickly, it is set too lean and the low-speed needle needs to be opened (counterclockwise) to richen the mixture. Pinch again to check the mixture. If the engine takes longer than 4 seconds to slow down, lean (clockwise) the low-speed needle and then pinch again to check the mixture.
IDLE STOP SCREW
The “idle stop” screw is located on the backside of the carburetor.This increases or decreases the idle speed without changing the fuel mixture. The barrel should be approximately 1mm from fully closed.
BARREL 1mm
FROM FULLY
CLOSED
IDLE STOP SCREW
IMPORTANT! To insure long life and good performance from your engine, you MUST break-in the engine. The break-in period is critical for long life of the internal parts of the engine. This should be done over the first 5 tanks of fuel.
RUNNING THE
ENGINE
Before running the engine, read the manual and watch the assembly and engine tuning video that came with this kit.
FUELING THE WARHEAD
IMPORTANT! The Warhead features a fuel tank that holds over 200cc of fuel! This will provide long runs between fill ups. The drawback to this large size is that the engine may flood due to the increased fuel pressure through the fuel lines (siphon effect). This makes starting very difficult when the tank is completely full. When getting ready to start the engine, ONLY fill the Warhead tank to the “starting fuel level” line (1/2-way). Once the engine is warmed up and running, fill the tank to the top.
STARTING THE ENGINE
IMPORTANT! Your radio system must ALWAYS be turned on and the transmitter antenna fully extended when running the engine!
1.Fill the tank to the “starting fuel level” line (half-full).
2.Prime the engine - while the engine is cool you can place your finger over the tuned pipe’s exhaust hole and pull the recoil gently two times.
3.Attach the glow starter to the glow plug.
4.With the throttle at idle, start the engine by pulling the recoil using short, quick pulls. DO NOT pull the recoil starter’s string to the end. You only need 10 to 12 inches of pull to start the engine with the throttle at idle.
Sometimes it is helpful to start the engine at around half throttle. When the engine starts, immediately return the throttle to idle. If this is not done the engine can over-rev and cause engine damage.
FIXING A FLOODED ENGINE
If the engine is difficult to turn over with the recoil starter, especially if it is brand new, loosen the glow plug a half turn before starting the engine. This allows some compression to escape, but the engine will still start. Make sure you tighten the glow plug after the engine starts. If the recoil starter is still difficult to pull, the engine is flooded - there is too much fuel inside the engine. Remove the glow plug, then turn the truck upside down and pull the recoil 5 or 6 times. This will clear the engine of fuel, and you will notice the recoil pulls easier. Replace the glow plug and repeat the starting procedure.
STOPPING THE ENGINE
Pinch the fuel line that runs to the carburetor. Pinching this line will restrict the fuel flow and the engine will quit within a few seconds. Never place your finger over the exhaust to stop the engine. This could result in serious burns on your finger. It also causes fuel to back up in the engine, making it harder to start the next time you run your Warhead.
7

BREAK IN
PROCEDURE
SOME THINGS TO REMEMBER DURING BREAK-IN
1.Run with the body off. This will keep the engine cooler.
2.Keep the air cleaner on at ALL times
3.Run on a smooth, hard surface. An empty parking lot is perfect.
4.Use the same fuel that you will use for normal running.
5.Resist the urge to accelerate and decelerate quickly.
6.Break-in puts stress on the glow plug and can burn it out. Make sure you have an extra plug or two on hand.
7.Do NOT overheat the engine (see page 9).You can check the head temperature by using one of the temperature gauges that are readily available (DuraTrax™ Flashpoint, DTXP3100).
TANK 1
Your first tank of fuel should be running the Warhead at a very rich needle valve setting. This allows the fuel to carry as much oil as possible into the engine to properly lubricate the internal parts during the break-in.
1.Open the high speed needle valve 4 turns from fully closed (counterclockwise). This is factory set already, but check it to make sure. When closing the high-speed needle, close until you feel some resistance. DO NOT overtighten or you will damage the engine.
2.Fill the tank to the “starting fuel level” line (half-full).
3.Start the engine. Once warm (about 1 minute, fill the tank to full.
4.Run the truck on a smooth surface with the body off.
5.Run back and forth at medium speeds, slowly accelerating and decelerating the truck. NOTE: It is normal for the two speed not to shift (see page 10).
6.Run the truck until the tank is almost out of fuel. Do not allow the tank to run out of fuel.This leans out the engine and can cause overheating.
7.Stop the engine and allow it to cool. This normally takes around 10-15 minutes.
TIP! Think of a clock face: 1/12 turn = one hour increment.
TANK 2
Lean the high-speed needle turn (one hour) from “tank setting. Run the truck for complete tank and then let
TANK 3
Lean the high-speed needle another 1/12 turn from “tank 2” setting. Run the truck for the complete tank and then let cool.
TANK 4
Lean the high-speed needle another 1/12 turn from “tank 3” setting. Run the truck for the complete tank and then let cool. You should notice the engine running much better at this point.
TANK 5
Lean the high-speed needle another 1/12 turn from “tank 4” setting. Run the truck for the complete tank and then let cool.
After the fifth tank, the engine is now ready to be tuned for best performance.
TUNING TIPS
After break-in, run the truck where you plan to do most of your driving (grass, street, track, etc). Tune the high speed needle so the engine makes good power without overheating. Using a temperature gauge, tune the engine so that it will consistently stay under 270° F (132° C). Keep in mind, RC engines usually take a minute or two to warm up. It is common not to reach full power right away. Never tune a cold engine!
If needed, tune the low speed needle so that the truck idles and accelerates smoothly and consistently. Note: If you lean the low speed needle, you may need to richen the high speed needle. The idle stop screw should be adjusted so that the wheels do not turn when you lift the truck.
ENGINE CARE
Never store your Warhead with fuel in the tank. We recommend that after the final run of the day, you empty the fuel tank and then run the engine at idle until all the fuel is out of the fuel lines and engine. Remove the air filter and glow plug. Then place two drops of Hobbico® After Run Engine Oil (HCAP3000) in the carburetor and two into the cylinder to help prevent corrosion. Pull the recoil a few times to circulate the oil.
10 WAYS TO ENSURE LONG LIFE FROM YOUR ENGINE
1.Keep your engine and air filter clean. Dirt will act as insulation on an engine. It will not be able to shed heat as easily. Clean and re-oil the element often.
2.Do not over-lean your engine.
3.Do not run your engine with little or no load. Don’t throttle up the engine to full throttle when the wheels are not in contact with the ground.
4.Do not overheat the engine (see page 9).
5.Do not use a fuel with a low oil content. Make sure you use a model car fuel from a reputable manufacturer, such as O’Donnell Fuels.
6.Avoid using old fuels in the engine.
7.Do not use a fuel with a nitromethane (often called nitro) content over 20%.
8.Do not scratch the piston or cylinder sleeve. Avoid jamming something into the exhaust port when removing or re-installing the clutch or flywheel. Use a special tool called the Ultimate Flywheel Wrench (DTXR1105) to keep the crankshaft from moving.
9.Do not use silicone sealer on the engine joints. Silicone sealer contains acetic acid, which is corrosive if it gets inside your engine.
10.Do not allow any water to get inside the engine.This sounds easy, but temperature changes can cause condensation inside the engine. This is a good reason to use an after-run oil. Store your engine inside the house, not in a garage or shed where there will be temperature extremes.
8
 Loading...