


™
Programmable Charger, Discharger and
Analyzer for R/C Cars,Trucks & Boats
INSTRUCTION MANUAL
IntelliPeak™Ice™is a high performance computerized battery charger, discharger, and
cycler.IntelliPeak Ice is flexib le enough to handle NiCd, NiMH, Li-P o and Li-Ion batteries,
and offers a large variety of adjustable functions, yet is very easy to program and
understand its numerous display screens. Quick reference flowcharts are included to
help understand the overall programming structure of IntelliPeak Ice. It is strongly
recommended to read this manual in its entirety, and to fully understand exactly
what types of batteries you have and how to care f or them.Damage resulting from
misuse or modification of this charger will void your warranty.
Specifications................................................................................................2
Special Features............................................................................................2
Important Precautions..................................................................................3
Charger Controls & Connections................................................................4
Determining Battery Type & Specifications................................................5
Care & Handling of NiMH Batteries ............................................................6
Care & Handling of Li-Po & Li-Ion Batteries ..............................................6
DC Input Power..............................................................................................7
Navigating Menus..........................................................................................8
Setting a Battery into Memory – Selecting a Memory ..............................9
Selecting & Naming Battery Memories ....................................................10
Adjusting Settings in the Main Memory Screen ......................................10
Selecting & Starting Charge, Discharge or Cycle ....................................16
Charge & Discharge Status Screens & Graphs ......................................22
Motor Break-In Menu ..................................................................................24
User Set-Up Menu ......................................................................................25
Data View......................................................................................................26
Cycle Displays ............................................................................................29
Four-Step Charge Setup ............................................................................30
Error Messages & Troubleshooting Guide................................................36
INDEX
Made in Korea Entire Contents Copyright © 2004 DTXZ4170 for DTXP4170 V:1.0

Input V oltage: 11-15V DC
Battery Types,# of cells: 1-10 Nickel-Cadmium cells (1.2 - 12.0V NiCd)
1-10 Nickel-Metal Hydride cells (1.2 - 12.0V NiMH)
1-4 Lithium-Ion or Lithium-Polymer cells
(3.6 - 14.8V Li-Ion/Li-Po)
Battery Capacity Range: 100-9900mAh
Fast charge current: 0.1 - 8.0A (1C max for Li-Ion/Li-Po)
Fast charge methods: linear, reflex, impulse and 4-step
Fast charge termination: peak detection for NiCd and NiMH
constant current/constant voltage for
Li-Ion/Li-Po (cc/cv)
optional thermal cutoff for all battery types
Peak Sensitivity: 0 - 25mV adjustable
Trickle Charge Current: 0 - 500mA (n/a for Li-Ion/Li-Po)
Top-off Charge: 0 - 1000mA (NiMH only)
Discharge Current: 0.1 - 10.0A adjustable (2C max for Li-Ion/Li-Po)
Discharge Cutoff Voltage: 0.1 - 1.1V per cell NiCd & NiMH
2.5 - 3.7V per cell Li-Ion/Li-Po
Temperature Cutoff Range: 50 - 132° F
Cycle Count: 1-10 cycles (n/a for Li-Ion/Li-Po)
Cycle Cool-off Delay: 1-30 minutes adjustable
Battery Memories: 10 battery memories
Display T ype: 8 x 21 LCD (168 characters max)
Graphical Displays: graphs charge and discharge voltage curves
Output Connectors: banana jacks (two adapter leads included)
Motor Break-in: 1.0 - 8.0V selectable, 1 - 180 minutes,
10A constant, 30A surge
Case Size: 5.5 x 1.8 x 5.9" [140 x 45 x 150mm]
Weight: 21 oz. [605g]
• Expanded LCD with extremely simple menus and controls!
• Great for electric R/C car, truck and boat batteries
• Peak detection with adjustable sensitivity for NiCd and NiMH batts
• Four charge methods: linear, reflex, impulse and 4-step
• Top-off charge feature fully charges NiMHs without overheating
• Optional fast charge thermal cutoff (requires optional temperature
sensor – DTXP4171)
• Adjustable cool-off delay for cycling (1-30 minutes)
• Recall data for 10 full cycles on an expanded 8-line, 21 character LCD
• Configure up to 10 batteries in memory for instant, easy re-call and charger
setup.Set custom names for all packs in memory.
• Displays input and output voltage, battery resistance, max. battery
temperature, charge and discharge currents, voltages, time, and capacity
and much more
SPECIAL FEATURES
SPECIFICATIONS
2

• Custom display graphs charge and discharge voltage curves – great for
evaluating pack performance!
• Motor break-in feature, adjustable from 1.0-8.0V, 1-180 minutes, and 10A
constant (30A surge) for break-in of motors or operating commutation lathes
• Adjustable sound cues, LCD contrast, fan operation, temperature scale
and more
• Loaded with safety features and warning screens (cool-off time delay,
maximum charge voltage, maximum battery capacity cutoff, improper input
voltage, reverse polarity, open or shorted output, poor battery voltages and
temperatures, poor motor connections, e xcessive charger heating, and more)
• Rugged aluminum case, two pushbuttons, and rotating dial that acts as
pushbutton also for easy navigation of all menus
• Built-in cooling fan, for better charge efficiency and extends life of charger
• Banana jacks on output with two charge adapters included (banana plugs
to large alligator clips, and banana plugs to standard connector)
• Banana plugs pre-installed on input lead. Large alligator clips included
which directly mate to bananas on input.
• Do not attempt to charge incompatible types of rechargeable batteries as
permanent damage to the battery and charger could result.
• Do not use automotive type battery chargers to power the charger.
• Do not allow water, moisture or foreign objects into the charger.
• Do not block the air intake holes, which could cause the charger
to overheat.
• Do not attempt to use batteries with more cells or total voltage than listed
in the specifications
• Do not leave the charger unattended while in use.
• Disconnect the battery and remove input power from charger
immediately if the charger becomes hot!! Allow the charger or battery to
cool down before reconnecting.
• Do not place the charger or any battery on a flammable surface or near a
combustible material while in use.Do not charge or discharge on a carpet,
cluttered workbench, paper, plastic, vinyl, leather, wood, inside an R/C
model or full sized automobile!
• Always turn off the power s witch or disconnect from pow er source when not
in use.
• Do not overcharge batteries as permanent damage could result. Do not use a
charge or discharge current rate which exceeds the safe level of the battery.
• Keep out of reach of children.
IMPORTANT PRECAUTIONS
3
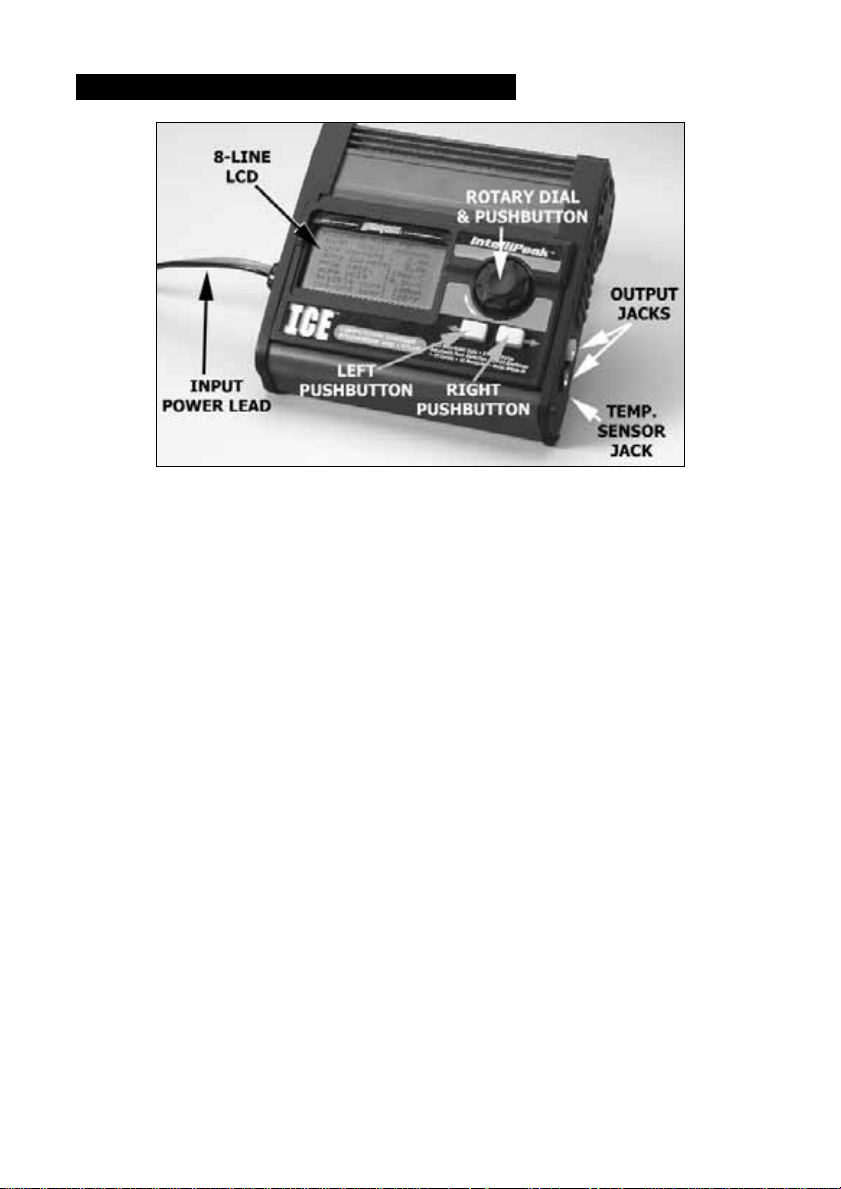
INPUT POWER LEAD: The input power lead is located on the left side.
OUTPUT JACKS:The output banana jacks are located on the right side.
TEMPERATURE SENSOR JACK: The temperature sensor jack is located
directly underneath the output banana jacks on the right side of the charger.
DIAL AND PUSHBUTTONS:Next to the LCD is a rotating dial plus two pushbuttons
which control all of Ice’s programming. The button marked is generally used to
move to the left through the menus.The button marked ➔is generally used to move
to the right in the menus. The dial has two functions: rotating the dial in both
directions will scroll through menus and adjust parameters quickly and easily, and
pressing down on the dial acts as another pushbutton which is often used to select
different parameters on-screen.
BATTERY CONNECTIONS: It is strongly recommended to connect batteries
using pre-assembled charge leads which are widely available from any hobby
retailer. Two adapter leads are included, one having alligator clips for
connecting racing cells to Ice, and another having a standard battery connector
for connecting pre-assembled packs. For transmitters, find a charge lead that
best matches the type of radio that you are charging (see below).These may
be purchased through your local hobby shop.
Part # Radio Charge Leads Description
HCAP0101 Futaba®J Tx and Rx charge leads, except 9VAP
HCAP0102 Futaba J Tx and Rx charge leads, 9VAP only
HCAP0104 Airtronics/Sanwa Tx and Rx charge leads
CHARGER CONTROLS & CONNECTIONS
4
➔

HCAP0105 JR Tx and Rx charge leads
HCAP0106 Hitec Tx and Rx charge leads
HCAP0108 Charge leads, banana plugs to alligator clips
HCAP0110 9V-style Tx connector, Futaba-J Rx charge lead
HCAP0310 Banana Plugs (3 pair)
HCAP0320 Heavy Duty Banana Plugs (2 pair)
Always connect the charge lead to the charger first, then the battery to the
charge lead. The battery’s red, positive (+) lead must always be connected to
the charger’s red, positive (+) jack, and the battery’s black, negative (-) lead to
the charger’s black, negative (-) jack. WARNING! Never allow a battery’s
positive and negative leads to accidentally touch each other. This will
result in a short circuit and cause permanent damage to your battery
and/or charger.
It is always very important to know your battery’s exact type, rated
voltage and capacity!! Failure to know these points is one of the biggest
reasons why batteries are improperly cared for and fail. A few short minutes
learning the basics of battery care can easily prevent unnecessary crashes
(and lost money!).Carefully read y our battery’ s label and/or instruction sheet or
consult your battery supplier and determine:
1. Is the battery
type
Nickel-Cadmium (NiCd), Nickel-Metal Hydride (NiMH),
Lithium-Ion (Li-Ion), or Lithium-Polymer (Li-Po)?
2. What is the battery’s
total rated capacity?
This number indicates how much
charge energy or “capacity” the batter y can store, and should always be
listed on the battery’s label as “mAh” (“milli-amp hours”). Capacity is also
referred to as the “C” rating. Charge and discharge currents are also
expressed as a function of this “C”rating.For example, a 3300mAh battery
would have a “1C”charge or discharge current rate of 3300mA or 3.3 amps.
This battery’s 2C rating would be (3.3 x 2) 6.6 amps, etc.
3. What is the battery’s
nominal rated voltage?
If not printed on the battery’s
outer label, consult your battery supplier or determine pack voltage
as follows:
a. NiCd and NiMH Batteries: Multiply the total number of cells in the pack
by 1.20.A 7-cell pack will have a nominal voltage of 8.40 volts (7 x 1.20).
A 4-cell pack will have a nominal voltage of 4.80 volts (4 x 1.20), etc.
b. Li-Po Batteries: Multiply the total number of cells in the pack by 3.70.
A 3-cell pack wired in series will have a nominal v oltage of 11.1 volts (3
x 3.70), etc.
DETERMINING BATTERY TYPE & SPECIFICATIONS
5

c. Li-Ion Batteries: Multiply the total number of cells in the pack by 3.60.
A 2-cell pack wired in series will have a nominal v oltage of 7.20 volts (2
x 3.60), etc.
• Do not to allow NiMH batteries to overheat! If overheated, disconnect the
battery from the charger immediately and allow to cool.
• Do not attempt to use Ice’s Li-Po/Li-Ion functions with NiMH batteries.
• NiMH cells do not exhibit the “memory effect”like NiCd cells, so little cycling
is needed.
• Store NiMH packs with some voltage remaining on the cells (ref er to battery
supplier).
• NiMH cells have a self-discharge rate of approximately 20-25% (compared
to 15% for NiCd batteries). It is important to recharge NiMH batteries
immediately prior to use.
• “N”, “AAA,” “AA” and “A” size radio batteries can safely be peak charged at
currents up to 1.5C (battery capacity x 1.5). High charge currents can
overheat batteries and thus reduce service life, and is especially more true
for smaller size cells.
Never attempt to care for lithium-polymer (Li-Po) or lithium-ion (Li-Ion)
cells in the same way as other battery types! Li-Po and Li-Ion characteristics
greatly differ from NiCd and NiMH batteries and therefore require different care
and handling. Always read the instructions that are included with your lithium
batteries carefully before use. Failure to follow these care and handling
instructions can quickly result in severe, permanent damage to the batteries
and its surroundings and even start a FIRE!
• ALWAYS charge lithium batteries in a fireproof location, which could be a
container made of metal or ceramic tile. Monitor the area with a smoke or
fire alarm, and have a lithium approved “ABC type” fire extinguisher
available at all times.
• ALWAYS provide adequate ventilation around Li-Po/Li-Ion batteries during
charge, discharge, while in use, and during storage.
• DO NOT allow Li-Po or Li-Ion cells to overheat at any time, as the y can and
usually will become physically damaged and could possibly EXPLODE or
catch FIRE!! If a battery becomes overheated, disconnect it from the
charger IMMEDIATELY!
• DO NOT continue to charge Li-Po or Li-Ion batteries if the charger fails to
recognize full charge.Swelling of Li-Po cells is an indication that they are in
an overcharge condition and they should be disconnected from the
charger immediately.
CARE & HANDLING OF LI-PO & LI-ION BATTERIES
CARE & HANDLING OF NiMH BATTERIES
6
• DO NOT set Ice’s Li-Ion/Li-Po battery voltage to greater than the nominal
rating of the Li-Po or Li-Ion battery, as such cells cannot handle
overcharging in any way.
• DO NOT charge Li-Po or Li-Ion batteries at currents greater than the “1C”
rating of the battery (“C” equals the rated capacity of the batter y).
• DO NOT discharge Li-Po or Li-Ion batteries at currents which exceed the
discharge current rating of the battery , as this can often cause a cell to ov erheat.
• DO NOT allow Li-P o cells to come in contact with moisture or w ater at any time .
• DO NOT allow the internal electrolyte from Li-Po or Li-Ion batteries to get
in the eyes or on skin – wash affected areas immediately if they come in
contact with the electrolyte and contact your physician!
• DO NOT attempt to use Ice’s NiCd and NiMH functions for Li-Po or
Li-Ion batteries.
• ALWAYS store Li-Po cells/packs in a secure location away from children.
To achieve Ice’s absolute maximum output power capabilities the DC power
source must be capable of delivering at least 15 amps of current while
maintaining 12 volts DC (although 12.5A will be enough for most functions).
Once connected to input power, the charger will be turned on as there is no
ON/OFF power switch. Disconnect the charger from input power when not in
use.There are two ways to connect the charger to 12V DC input power:
1. Connect the banana plugs on Ice’s input cord directly to banana jacks on a
separate DC power supply. Always connect the charger’s red lead to the
power source’ s red, positive (+) terminal and the charger’s blac k lead to the
black, negative (-) terminal.
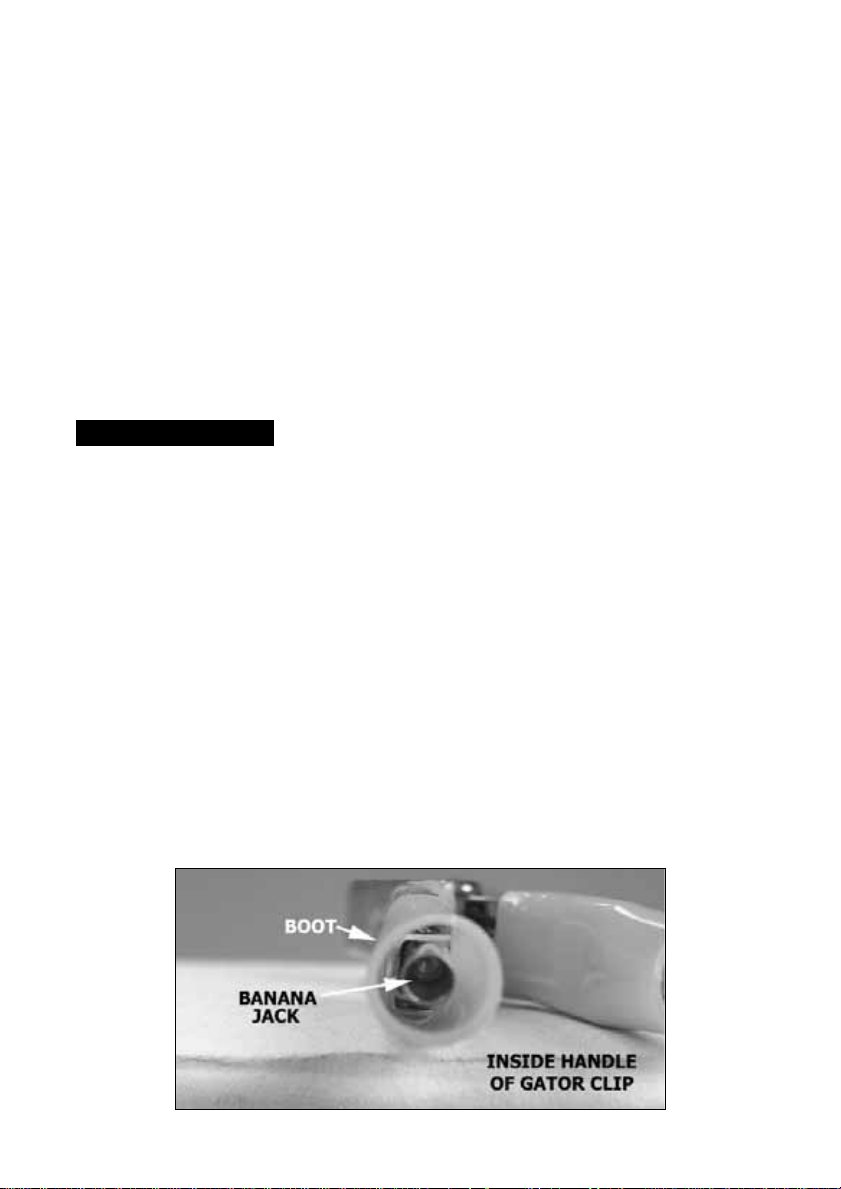
2. A unique set of alligator clip adapters are included which have a female
banana jack built inside the handle of each clip. Securely slide the input
lead’s banana plugs into the female jacks on the alligator clips.Attach each
alligator clip onto the terminals of a 12V battery or power supply noting
proper polarities.
DC INPUT POWER
7
WARNING! Ne ver accidentally short together the positive (+) and negative
(-) input connections when connected to 12V DC power. Failure to do so
could result in permanent damage to the power source and the charger.
It’s recommended to disconnect the charger from input power when not
in use.
IntelliPeak Ice has 6 programming screens. Refer to the Main Programming
Menu flowchart included with this manual for an overall view of Ice’s
programming. The most commonly used screen is the “Main Memory” screen
shown at the far left on the flowchart.To move to any menu to the right of the
Main Memory screen (such as the Motor Break-in or Cycle Data menu, etc.)
press ➔. Press to move left, back towards the Main Memory screen.
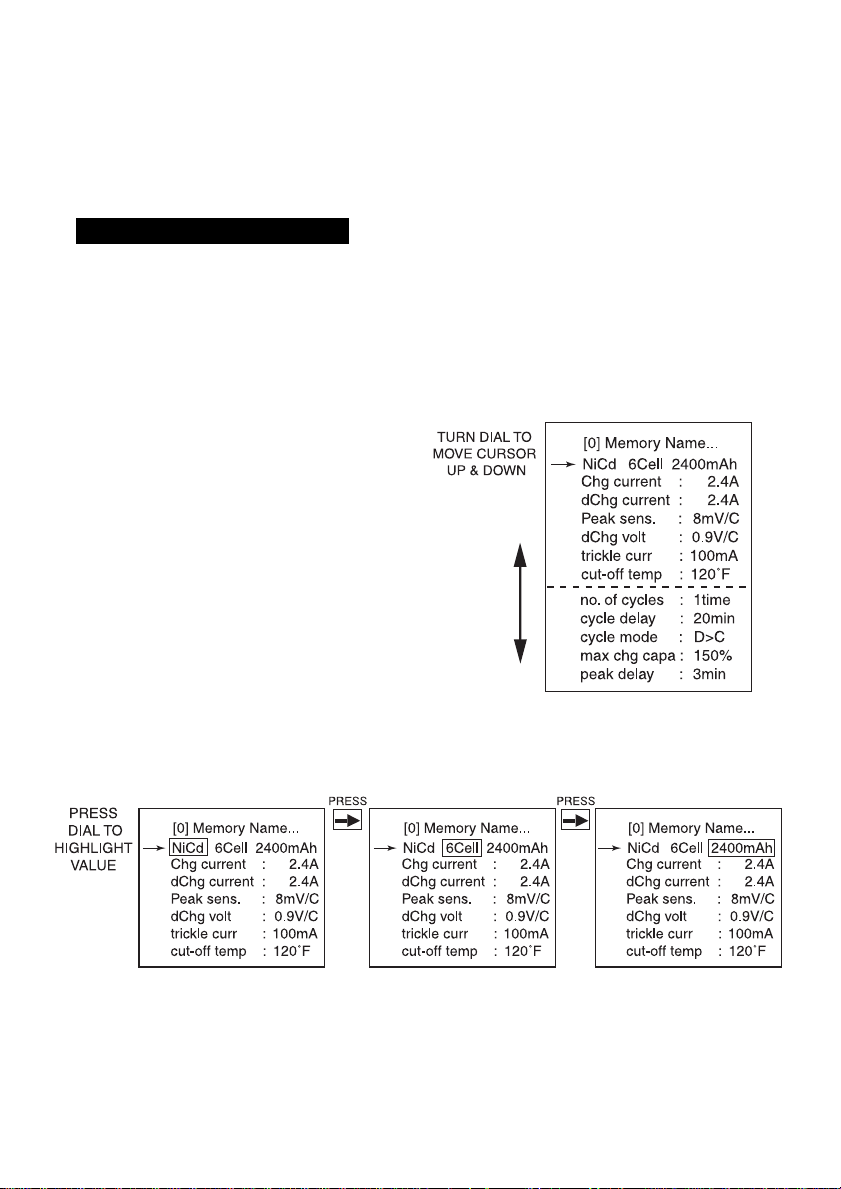
As shown in the Main Memory screen at
right, and within any screen, rotate the
dial to move the cursor arrow up or do wn
the screen. The LCD screen shows 8
lines, but there may be more than 8 lines
of features to be viewed depending on
the menu. If so, continue to move the
cursor downwards and the extr a lines will
automatically scroll up for viewing.
As shown below, press the dial to
highlight the first adjustable feature on
any line. If there is more than one adjustable feature on any line, press or ➔
as necessary to highlight the proper value. Rotate the dial to adjust the
highlighted value.Re-press the dial to confirm the selection.
The purpose of all the menus is as follows:
1. MAIN MEMORY: To store battery information, set battery type, set charge
and discharge currents and voltages, set discharge and cycle parameters,
set maximum battery temperature, and to start charge, discharge or
cycle functions.
NA VIGA TING THE MENUS
8
➔
➔

2. MOTOR BREAK-IN: To break-in brushed motors and adjust all
related settings.
3. USER SETUP: To set various miscellaneous functions, such as fan control,
temperature scale, audible tones, LCD contrast, etc.
4. DA T A VIEW:To see specific data about the operating condition of Ice or the
battery being conditioned, such as input and output voltages, battery
temperature, battery resistance, charge or discharge time, and enter the
charge and discharge voltage graphs.
5. CYCLE DATA: To view all charge or discharge capacity information for
individual cycles, or all 10 cycles.
6. STEP CHARGE SETUP: To set Ice’s “four-step charge” settings.
There are two main ways in which to configure Ice for conditioning of batteries.
A memory bank is available for setting and storing pertinent information for up
to 10 different batteries. After entering batter y data into the memories, simply
recalling the battery’s appropriate memory number makes Ice instantly ready
to go – no need to re-configure settings when changing batteries! Once a
battery’s information is stored into a memory it will be saved until changed
again manually.
Ice’s 10 memories are factory pre-programmed for different battery types, charge
and discharge currents, etc. Refer to the “Battery Memory – Factory Settings”
chart on the fold-out section included with this manual for the default settings in
each memory .Also on this sheet find a large printout of a blank memory chart.Use
the blank chart to record your own personal memory settings.
It is not required to use any of Ice’s memories.In such case, the Main Memory
screen #0 acts as the main setup screen for manually changing the battery,
charge, discharge, or cycle settings. There is no other menu for manually
setting parameters or starting a function. Read further to learn more about
manually setting these parameters.
To RESET all settings to the factory defaults, disconnect the input connectors
from 12V DC power. Press and hold both the ➔ and buttons while reconnecting the input leads to 12V DC power. A brief initialization screen will
appear, then the display will automatically change to the Main Memory screen.
At this time, all previous settings will be CLEARED and reverted back to the
factory defaults. Do NOT perform this reset if you do not wish to clear all
settings in the memory!
SETTING A BATTERY INTO MEMORY – SELECTING A MEMORY
9
➔
NAVIGATING THROUGH ALL OF ICE’S SCREENS WILL START AT THE
MAIN MEMORY SCREEN. If your battery parameters match any of those
already listed in the included memory chart, simply select that memory number
to quickly get Ice ready to handle your battery.
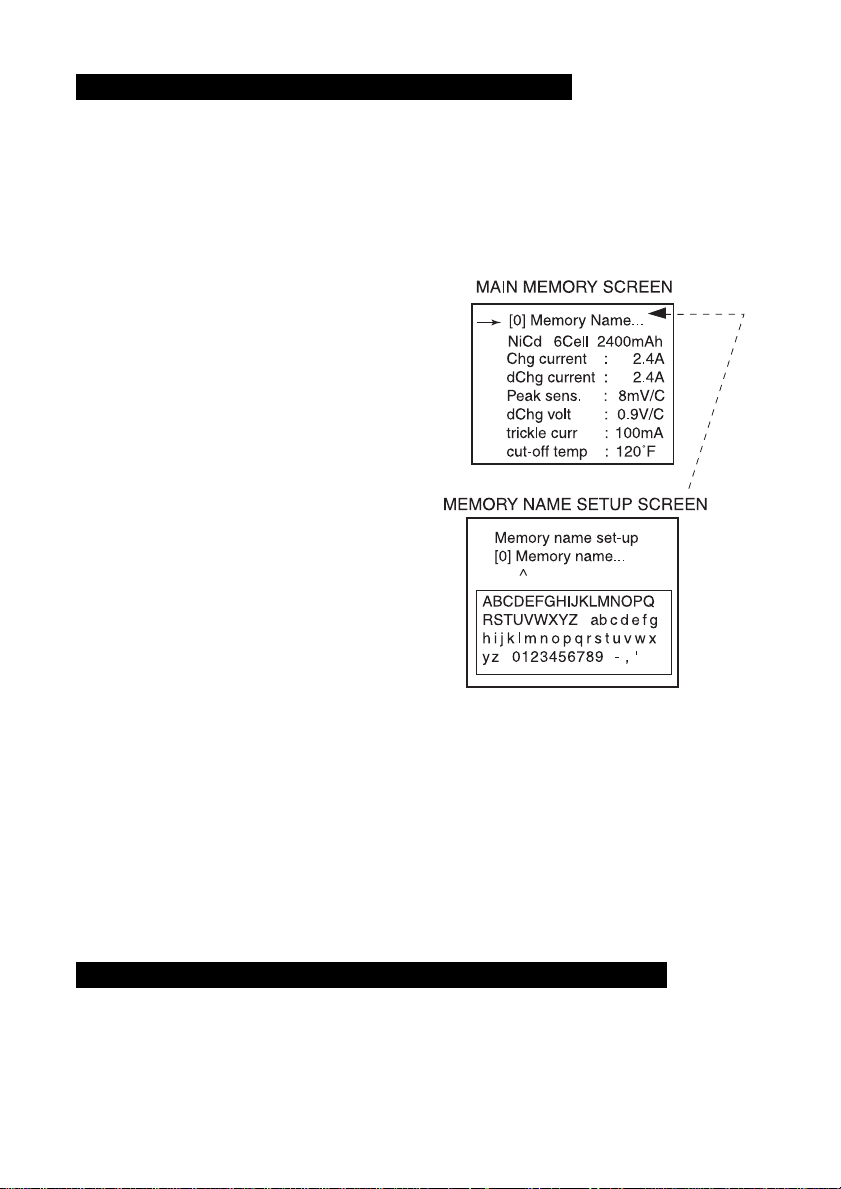
Each memory screen shows a memory number and name. With the cursor
pointing to the top line:
1. Memory Number: To change the
memory number, press the dial
once to highlight the memory
number shown in brackets. Rotate
the dial to find the appropriate
memory number.
2. Memory Name: To change the
memory name, press ➔ to
automatically show the Memory
Name Setup screen as shown at
right. Rotate the dial to move the ^
symbol underneath the characters in
the string of letters. Press dial to
highlight letter, then rotate to change
the letter. Press ➔ to move to the
next letter and repeat this step as
desired. Press dial to confirm all
selections and highlight will disappear. When done press to return to Main
Memory Screen.
3. When memory name and numbers are selected, press the dial to confirm
selections and the highlight will disappear.
If your battery type does not match any of the settings pre-programmed into a
memory, or if you just do not wish to use the battery memories, simply adjust
the settings in memory location #0, then star t the charge, discharge and cycle
functions while in this screen (see next page).
Within the Main Memory screen (as shown above), rotate the dial to move the cursor
up or down.Press the dial to highlight the adjustable value.Rotate the dial to adjust
the highlighted value.Re-press the dial to confirm the selection. Ice will automatically
store parameters into memory one second after being entered.There is no need to
manually confirm settings into memory separately.
ADJUSTING SETTINGS IN THE MAIN MEMORY SCREEN
SELECTING & NAMING BATTERY MEMORIES
10
➔

1. Battery Info: Move the cursor next to the first line under the memory name.
a. Press the dial to highlight the battery type. Rotate the dial to find the
desired battery type that exactly matches your battery (NiCd, NiMH, LiIon or Li-Po).
b. With the battery type still highlighted, press ➔ to highlight the number
of cells (for NiCd/MH) or total voltage (for Li-Ion/Li-P o).Rotate the dial
to find the number of cells or voltage which exactly matches the
number of cells in your battery. For NiCd and NiMH, choose from 1-10
cells. For Li-Ion choose from 3.6, 7.2, 10.8 or 14.4V. For Li-Po, choose
from 3.7, 7.4, 11.1 or 14.8V.
WARNING!! NEVER set this voltage to
a level that is higher than the battery’s rated voltage. Li-Ion/Li-Po
cells cannot handle overcharging in any way!!
If a NiCd or NiMH
battery does not achieve a true peak, the charge process will shut
down automatically if the battery reaches 2.0V per cell. The maximum
voltage for lithium-ion cells is 4.10V, and 4.20V for lithium-polymer
cells.This feature is designed to protect the battery. For this reason, it
is very important to set the proper voltage for your battery.
c. With the #cells/voltage still highlighted, press ➔ to highlight pack
capacity. Rotate the dial to find the battery capacity value which
matches the rating of your battery. If the battery’s exact rated capacity
cannot be found, select the capacity which
most closely
matches the
capacity of the battery .Choose from 100-9900mAh. IMPORTANT!! For
Li-Po and Li-Ion batteries,make sure the capacity setting matches
the rating of the battery as closely as possible. Be very careful
with batteries that are assembled in series or series/parallel
configurations. Check with your battery’s instructions or supplier
if unsure of the pack’s RATED capacity.
d. Press the dial to confirm all of the above settings.
2. Charge Current: Rotate the dial to move the cursor down one line. To
manually adjust charge current, press the dial, then rotate to find the new
charge current which ranges from 0.1A (100mA) to 8.0 amps. For safety
precautions, the maximum charge current value for Li-Ion and Li-Po
batteries will be limited to their 1C value. Re-press dial to confirm setting.
WARNING!! It is NOT RECOMMENDED to charge Li-Ion or Li-Po cells
at a rate greater than their 1C value!! Supplying too much current to a
Li-Ion or Li-Po battery can cause very serious damage (including fire!)
to the batteries and the surrounding area!
3. Discharge Current: To manually adjust, press the dial, then rotate to find the
new discharge current which ranges from 0.1A (100mA) to 10.0 amps. For
safety precautions, the maximum discharge current value for Li-Ion and Li-Po
11

batteries will be limited to their 2C value. Do NOT discharge Li-Ion or Li-Po
batteries at currents which exceed the discharge current rating of the battery
as this can often cause a cell to overheat.Re-press dial to confirm setting.
4. Peak Sensitivity (NiCd and NiMH batteries only): This value determines
the sensitivity/accuracy of the peak detection circuit. Adjustment of this
value can help match the characteristics of your battery to the charger for
better peak charges. For NiCd batteries the range is 5-25mV. For NiMH
batteries the range is 3-15mV. A “ZEROpk” – or “Zero Volt Delta Peak”
setting is also available for NiMHs which means Ice will try to detect the
exact voltage peak, but the battery’s condition m
ust be good and charge
currents and voltages mustbe very clean and stable for ZER Opk to function
properly. A lower number means the charger will try to be more precise in
finding peak charge, but in certain situations could cause the charger to
errantly stop peak charge too quickly, in which case it may be necessary to
increase this number to 8mV or greater (especially if using an external AC
power supply on the input). Press the dial, then rotate to find the desired
peak sensitivity value.Re-press dial to confirm setting.
5. Discharge Cutoff Voltage: This is the voltage level that Ice will stop
discharging the battery, and is shown as volts PER CELL in the pack (not
total pack voltage).Press dial, then rotate to find the correct value.Re-press
dial to confirm setting.
a. Some NiCd and NiMH battery manufacturers rate the capacity (mAh)
of their batteries based on a discharge cutoff voltage of 0.9V per cell.
So, to see if the battery is supplying
the amount of capacity as rated by
the manufacturer,
set the discharge cutoff voltage to 0.8 or 0.9V.This is
also a good voltage for stopping discharge of “sub-C” size cells to
determine their useful run-time in minutes. However, for any “A,” “AA”or
“sub-C”size cells that are used to power
radio transmitters or receivers,
set the discharge cutoff voltage to 1.1V per cell to get an idea of how
long the battery will power the Tx and/or Rx.Most R/C receivers are not
capable of maintaining control with a 4-cell NiCd/MH battery that is
discharged below 1.1V per cell. The adjustable range for NiCd and
NiMH batteries is 0.1 - 1.1V per cell.
b. For Li-Ion/Li-Po batter ies, the adjustable range is 2.5 - 3.7V per cell. A
setting of 2.8 - 3.0V is recommended.
6. Trickle Charge Current (NiCd and NiMH batteries only): This is the
amount of trickle charge current which will be applied to the battery only
after fast charge has ended.To adjust, press the dial then rotate to find the
new current. Re-press dial to confirm selection. The range is 0 - 500mA. If
12

charging “A” or “AA” size radio batteries (Rx or Tx), it is not recommended
to set the trickle current to larger than 50mA. For sub-C batteries, the
recommended trickle current setting is roughly C/20 (battery capacity rating
divided by 20). If fast charge is stopped because the battery temperature
reached the max. temperature setting (see below), trickle charge will not
begin until battery temperature drops about 4°F (2°C) below the max.
temperature setting.
7. Cutoff Temperature:Ice can monitor the temperature of the battery which
is connected to the banana jack outputs.This feature is used in conjunction
with Ice’s optional Temperature Sensor (DTXP4171) which can be found at
local retailers. The Hobbico®Accu-Cycle™Elite Temperature Sensor
(HCAP0281) and the Triton™Thermal Probe from Great Planes
®
(GPMM3151) are also directly compatible. Monitoring a battery’s
temperature in addition to its voltage can result in the most accurate full
charges without damaging the battery, and is highly recommended for use
with Li-Ion/Li-Po batteries. The adjustable range is from 50 - 132°F (10 55°C). The sensor jack is located on the right side of the charger
underneath the banana jacks. When properly connected to the jack, the
sensor’s white wire will be on the left and the black wire will be on the right.
a. If it’s NOT desired to measure the temperature of a battery, make sure
the temperature sensor is NOT connected to the charger.
b. To change the temperature scale from Celsius to Fahrenheit or vise-
versa, see the User Setup Menu on page 25.
c. To adjust the temperature setting, press the dial then rotate to find the
new temperature.Re-press dial to confirm setting.
d. The recommended maximum temperature for NiCd batteries is 113-
130°F (45-55°C). The recommended maximum temperature for NiMH
batteries is 110-125°F (43-52°C). NiCd and NiMH cells which are “AAA”
size or smaller should use lower values .Start with lower temper atures first
and if necessary adjust the temperature setting upward as needed in
small increments and closely monitor the charge progress.
e. The maximum temperature for Li-Ion/Li-Po batteries varies by cell
manufacturer, but as a general recommendation the maximum
temperature should not exceed 90-95°F (32-35°C).
For Li-Ion/Li-Po
batteries, it is better to be safe than sorry!
Start with lower
temperatures first and if necessary adjust the temperature setting
upward as needed in small increments and closely monitor the charge
progress. Note: It’s a good idea to set the temperature cutoff approx.
5°F lower than suggested because battery temperature will continue to
increase for a short time after charge or discharge has ended.
13

f. During charge, if the battery reaches the selected temperature setting
the charge process
will completely stop and will not re-start
.Setting the
temperature value too low may cause Ice to stop charging the battery
before it reaches full charge. In this case, increase the temperature
setting by a small amount, making sure not to allow the battery to
overheat.Setting the temperature value too high may cause the battery
to overheat bef ore full charge has been reached.In this case, decrease
the temperature setting.
g. During discharge, if the battery reaches the temperature that is set in
this screen the discharge process will
temporarily pause
to allow the
battery to cool down to a safe temperature.The discharge process will
automatically resume when the battery’s temperature drops about 4°F
(2°C) below the maximum temperature setting.
8. Number of Cycles (NiCd and NiMH batteries only): This is the number of
times Ice will consecutively perform a charge-to-discharge or discharge-tocharge cycle (see “10. Cycle Mode” below for how to set which function to
perform first).The range is from 1-10 cycles. Press the dial, then rotate to set
the number of times to perform a cycle.Re-press dial to confirm setting.
9. Cycle Delay (NiCd and NiMH batteries only): This sets a time delay to
occur between charge and discharge while cycling in order to allow the
battery to cool. The range is from 1-30 minutes. Press, then rotate the dial
to find the amount of time for the delay. Re-press dial to confirm setting.
10. Cycle Mode (NiCd and NiMH batteries only): This sets the
pattern
in
which cycles are performed. There are two options: charge followed by
discharge (C>D), or discharge followed by charge (D>C).
11. Maximum Charge Capacity: This sets the maximum amount of capacity
that the charger will deliver to the battery during charge.This feature can be
used for two different purposes:
a. If full charge has not been detected on the battery for some reason, fast
charge will stop completely when this max. capacity value has been
reached. This is a safety feature designed to protect the battery pack
and user from an overcharge condition.
b. Cell manufacturers recommend to apply a partial charge to batteries
before being put away for long-term storage (over the winter, for
example). In this application, it is recommended to set this maximum
charge capacity to 30% for NiCd/MH batteries, and 10% for Li-Ion/LiPo batteries.
14

Press, then rotate the dial to find the desired max. capacity. For NiCd and
NiMH batteries the adjustable range is 10-150%. This means, if peak
voltage is not detected first Ice will automatically stop fast charge at the
value equal to the battery capacity setting in point #1c on page 11 (“Pack
Capacity”) multiplied by the percent entered in this maximum charge
capacity setting. So, if the battery capacity entered was “2400” and if the
maximum charge capacity percentage entered here is “150%,” the charger
will automatically stop fast charge when (2400 x 150%) 3600mAh of energy
is delivered to the battery.
For Li-Ion and Li-Po batteries, the adjustable range is 10-120%. It is
recommended not to allow these battery types to charge more than 105%
to 110% of their rated capacity. For safety precautions, it’s recommended to
keep this value close to 100%.
12. Peak Delay (NiCd and NiMH batteries only): Sometimes during the early
stages of peak charge a battery’s voltage can be unstable and cause the
peak detector to accidentally stop peak charge. This peak delay feature
temporarily de-activates the peak detection circuit at the beginning of
charge to prevent the charger from accidentally shutting down too early.
Usually, a battery’s voltage becomes stable in a very short period of time,
whereby the peak detection circuit can be re-activated. The adjustable
range is 1-10 minutes.
13. Top-off Charge (NiMH batteries only): Nickel-metal hydride batteries can
benefit from having a short “top-off charge”applied to the battery after peak
charge has ended. This top-off charge current is typically larger than a
“trickle” current and is designed to help fill the pack to maximum capacity
more quickly. If set, top-off charge will automatically begin 5 minutes after
fast charge has ended in normal and reflex charge modes only (not
automatic, impulse or four-step mode). It’s recommended that the top-off
charge current setting be no greater than 1/5thof the “pack capacity” value
that was entered in #1c on page 11. If the batter y capacity value entered
was 3000mA, the top-off charge current should be no greater than
(3000mAh / 5) 600mA. The adjustable range is off-1000mA (1.0A).Top-off
charge will be applied for 20 minutes. If the battery’s voltage peaks or its
temperature reaches the maximum setting before the timer expires, top-off
charge will end automatically.
15

To start a charge, discharge or cycle function or to change the charge or
discharge mode:
1. While in the Main
Memory screen,
press and HOLD
the dial for 2
seconds. The
“Charge /
Discharge /
Cycle” screen will
show (see right).
2. Charge Mode: Rotate the dial to place the cursor next to “CHARGE.” Press the
dial to highlight the charge mode, then rotate the dial to select the desired charge
mode. Select one of the four charge modes, as designated within the arrows
next to “CHARGE”.Re-press the dial to confirm the selection.
a. Normal Charge Mode (NiCd and NiMH batteries only): Linear current
is delivered to the battery in normal mode.While “NORMAL” is highlighted,
a note about “reserve”time will show at the bottom of the screen.See the
“Reserve Time Function” section on page 17 for full details about the
reserve time function. If it is not desired to use the reserve time function,
leave it set to “off.” To START CHARGE, place the arrow cursor next to
“charge” and press and hold the dial for 2 seconds.
b. Reflex Charge Mode (NiCd and
NiMH batteries only): As shown
in the chart at right, in reflex
charge (sometimes referred to as
“burp” or “reverse pulse charge”)
normal current is delivered to the
battery for 99.6% of every
second, but for the remaining 4
milli-seconds a very deep
discharge current is delivered to
the battery. The quick discharge
current is equal to the charge
current setting multiplied by 4. Reflex charge is believed by some to
help remove oxidizing gas bubbles from the battery’s cell plates,
allowing the battery to charge more efficiently, and is thought to be
especially helpful on older NiCd batteries.Reflex charge mode may not
be recommended by some NiMH battery manufacturers (check with
SELECTING & STARTING CHARGE, DISCHARGE OR CYCLE
16
Press and hold dial to enter
the charge/discharge/cycle
screen.
Press dial to highlight charge mode
inside arrows. Rotate dial to select the
desired charge mode: NORMAL,
REFLEX, RE-PEAK or AUT OMATIC.
your supplier). While “REFLEX” is highlighted a note will be shown at
the bottom of the screen for “reserve” time. See the “Reserve Time
Function” section below for how to use the reserve time function if
desired, otherwise leave it set to “off.” To START CHARGE, place the
arrow cursor next to “charge”and press and hold the dial for 2 seconds.
17
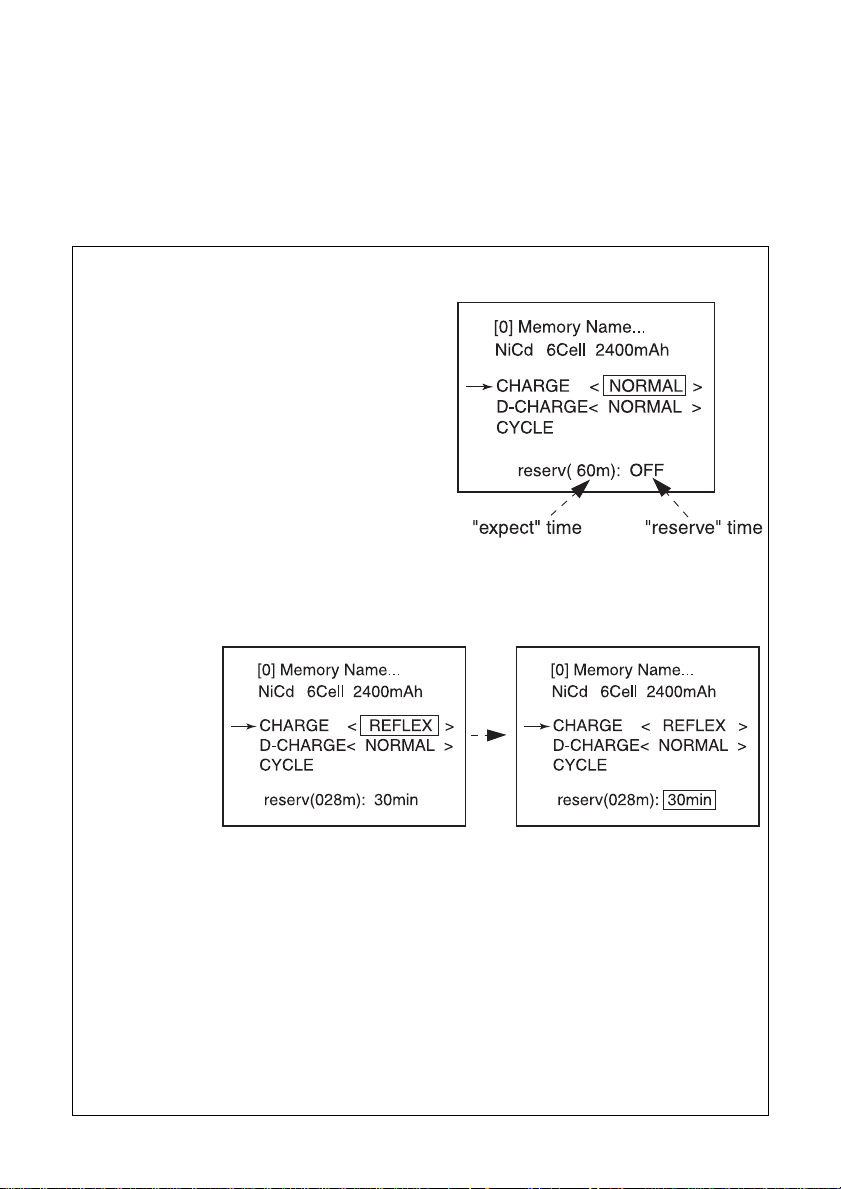
Reserve Time Function
When NORMAL or REFLEX charge mode is
selected, “reserv (00): off” will show at the
bottom of the screen. This “reserve time”
feature can be thought of like a charge
scheduler, by setting a timer which will cause
Ice to finish putting a full charge on the battery
immediately before the start of a race so the
pack is at optimum race-readiness.
Referring to the diagram at right, the number
inside the parenthesis is the “expect” time –
the number of minutes that Ice calculates to
be needed to fully charge the battery (based on charge current and battery capacity
values entered).The number on the right is the “reserve” time – the number of minutes
from now that you want the battery charge process to be finished.
For example:
Say the next
race starts
90 minutes
from now,
and that Ice
calculated an
“expect time”
of 50
minutes
needed to
fully charge
the battery. Setting the “reserve” time to “80min” means Ice will wait 30 minutes (80
min. reser ve time – 50 min. expect time) and THEN start the charge process. In the
end, if the total time needed to charge the battery was indeed 50 minutes, this will
leave 10 minutes (90 min.until race time – 80 min. reserve time) for the battery to cool
and to get to the start line for the race.
It may take some practice and careful attention to get the reserve time function to
work as desired. To maximize the effectiveness of the reserve time function, the “capacity”
setting in the main menu may need to be set to the most realistic possible maximum capacity
When “REFLEX” or “NORMAL” are highlighted, press ➔ to highlight the
reserve time at the bottom. Rotate dial to select a reserve time. Press ➔ to
confirm setting. Press and hold dial to start reserve time charge process.

c. Re-peak Charge Mode (NiCd and NiMH batteries only): In re-peak
charge mode, Ice can peak charge the battery once, twice or three times
in a row automatically. This is good for making certain the batter y is fully
charged, and for checking how w ell the battery receives fast charges.And,
Ice will track how much capacity was added during each re-peak. A good
battery will have low charge capacity values for the 2ndand 3rdre-peak
charges.Batteries having higher capacity values for the 2ndand 3rdre-peak
charges are not likely receiving peak charge as well.A five minute cool-off
delay occurs after each re-peak charge.See the diagram below for using
re-peak charge mode.To START CHARGE, place the arrow cursor next
to “charge” and press and hold the dial for 3 seconds.
18
Reserve Time Function (continued)
for your battery – as
opposed to the
pack’s actual rated
capacity. For
example, if your
3300mAh battery
pack can regularly
accept a charge of
up to, say,
3562mAh, you
should set the
capacity value in
Ice’s Main Memory
Screen to 3600mAh.
The minimum reserve time will be no less than the calculated “expect” time. Max.
reserve time is 600 minutes.
When started, the reserve time delay screen above will show, and
the “START” timer will begin counting down.When the reserve time
delay expires, the charge process will start automatically.
RE-PEAK CHARGE
When “RE-PEAK”
charge mode is
highlighted, “repeak cycle: 1”
will show at the
bottom. Press ➔
to select the repeak cycle number.
Rotate the dial
to find the desired number of times to re-peak charge the battery. Press ➔ to confirm
selection. Press and hold dial to start the re-peak charge process.

d. Automatic Charge Mode (NiCd and NiMH batteries only): Ice can
detect the condition of the battery which is connected to the output and
automatically charge the battery .IMPORT ANT!! Make sure the proper
battery type and temperature settings are entered before starting
auto charge! Ice will likely charge batteries
better
if the normal charge
mode is used (assuming all user settings are properly tailored to the
battery), but the Automatic mode can be used. Peak sensitivities are
pre-set at 5mV for NiCd, and 4mV for NiMH. Fast charge will end if
maximum battery temperature is reached (if set) or if peak charge is
achieved.To START CHARGE, place the arrow cursor next to “charge”
and press and hold the dial for 3 seconds.
19
RE-PEAK CHARGE (continued)
In the re-peak charge status screen, “1” is the repeak charge being performed at this time, and “3”
is the total number of re-peaks that will be
performed. This screen will change to “END:
DELTA-PEAK” when finished.
Shows the charge capacity that was delivered to
the battery BEFORE ANY re-peak charges
were applied.
Shows the total amount of ADDITIONAL charge
capacity that was delivered to the battery during all re-peak charges combined.
When ALL re-peak charges are done, the charge capacity data for all re-peaks can be
seen in the Cycle Data View screen as shown below (see flowchart to find the cycle
date screen).
If a battery was charged or discharged PRIOR to
starting re-peak charge, those capacity values
will be shown for cycle #1.
Charge capacity added during re-peak #1 will be
shown under cycle #2.
Charge capacity added during re-peaks #1, and
#2 will be shown under cycle #3.
Charge capacity added during re-peaks #1, #2 and
#3 will be shown under cycle #4.

e. For Li-Ion and Li-Po batteries, the
“cc/cv” or “constant current/ constant
voltage” is the only charge mode
available. If the battery’s temperature
reaches the maximum setting (if set)
before full charge is detected the
charge process will end automatically.
To START CHARGE, place the arrow
cursor next to “charge,” and press and
hold the dial for 3 seconds.
Note: The cc/cv charge method is
COMPLETELY DIFFERENT than the
peak detection method that is used to
charge NiCd or NiMH batteries. In the
beginning, Ice forces constant current
into the battery at the rate which is set
in the Main Memory screen. When LiPo batteries reach 4.20V per cell, or Li-Ion’s reach 4.10V per cell, Ice
automatically
stops delivering constant current
and
starts applying
constant voltage
to the battery. Here, the charger is no longer forcing
current to the battery. Instead, the battery is only draining the amount
of current from the charger that it can take naturally. As Li-Ion/Li-Po
batteries become more fully charged they will take less and less current
from the charger.Here, the actual current coming from the charger will
gradually drop below the value that was set in the Main Menu.
THIS IS
NORMAL!!
When charge current drops to approx.100mA, Ice will beep
to indicate that regular quick charge has finished. At this time, Ice will
automatically start a unique “LiPo trickle charge” current (based on
application of a constant-voltage) as indicated by “Tr k” which will flash
on the current line on the screen shown above right.When this lithium
trickle current drops to 30mA Ice will completely stop all charge current
and “Trk” will change to “0.00A”.
3. Discharge Mode: While in the Main
Memory Screen, press and hold the dial
for 2 seconds.The designated discharge
mode (automatic or normal) will be
shown within the arrows next to “DCHARGE.” To change the discharge
mode, move the arrow cursor next to “DCHARGE.” Press the dial to highlight the
text inside the arrows, then rotate the dial
to select the discharge mode. Re-press
20

dial to confirm selection. TO START DISCHARGE, press and hold the dial
for 2 seconds. If a temperature sensor is used, discharge will temporarily
pause if maximum battery temperature is reached, and will automatically
resume when the battery temperature drops approx. 4°F (2°C) below the
maximum setting.
a. Normal Mode (all battery types): Discharge is guided by all user
settings in the Main Memory screen. Discharge current is linear, and
cutoff voltages are those which are set in the main memory screen.
b. Automatic Mode (NiCd and NiMH batteries only): Most user settings
are ignored. Ice automatically sets the current based on the condition
of the battery. Discharge cutoff voltage is pre-set in this mode to 0.8V
per cell. Ice will likely discharge batteries
better
if the normal discharge
mode is used (assuming all user settings are properly tailored to the
battery), but the automatic mode can be used.
4. Cycle Mode (NiCd and NiMH batteries
only): While in the Main Memory
Screen, press and hold the dial for 2
seconds. Place the cursor in front of
“CYCLE,” then press and hold the dial
TO START CYCLING (see Main Memory
screen and page 14 for setting # of
cycles, cycle delay, etc.). Note: The
“normal” charge mode and “normal”
discharge mode is used during cycles.
5. To manually abor t any function, press the button at any time to return to
the Main Memory screen.
While a function is being performed a “Status Screen” will automatically show
on-screen (see next page). All information will be updated automatically every
second while the function is being performed. Information shown in the Status
Screen is as follows:
CHARGE & DISCHARGE STATUS SCREENS & GRAPHS
21
➔

Note that the voltage reading in the Status Screen above will show the voltage
of the battery while it’s under a load. Loading will skew the voltage reading,
which is normal. A higher load will skew the reading more than a smaller load.
Ice’s custom display can show graphical images of the battery’s voltage curve
while charge or discharge is in progress.Various types of data can be viewed
and adjusted in the voltage curve graphs.
1. While in the Status Screen shown above, move the cursor to the “volt rng”
or “voltage range” line at the bottom. Press the dial, then rotate to select
either “auto” mode, where most graph settings will be selected
automatically by Ice, or select “manual” mode in which you can manually
adjust more parameters shown on the graph. Re-press the dial to confirm
the selection.
2. Press ➔anytime while the Status Screen is sho wn to see the g r aph.The graph
will show as long as the charge or discharge function has been operating for at
least 5 seconds. Press ➔ again to return to the Status Screen shown above.
Pressing at any time will STOP the function completely.
3. Manual View: Set the “volt rng” line in the Status Screen to “manual” view,
then press ➔ to see the graph. The first adjustable parameter will
automatically be highlighted (graph zoom). Refer to the diagram below for
this and the other adjustments:
22
number of times discharge or charge have been performed
elapsed time, counted in seconds
capacity delivered to battery during charge, or from battery during discharge
voltage measured at the output banana jacks
current being delivered to/from battery
shows the temperature of battery when sensor is used
“additional capacity” provided during “top-off”charge or re-peak charge
the maximum temp.battery reached during a function
the maximum voltage reached by battery during charge
the average voltage of battery during discharge
voltage measured at Ice’s input connection
the internal resistance of battery measured during discharge, in milli-ohms
select the “voltage range”setting that Ice will use in voltage graphs,
select “auto” or “manual”
➔

After adjusting the voltage range “R:”, press the dial to again highlight the
zoom factor. Press ➔ anytime while in a graph screen to return to the
Status Screen.
4. Auto View:When the “auto” mode is selected
on the “volt rng”line of the Status Screen, Ice
will automatically set nearly every graph
parameter. Select “auto”, then press ➔ to
view the graph.Note that “auto” will flash next
to the “R:” mark along the bottom of the
screen. The only adjustable parameter is the
“zoom” factor in the lower-right corner, which
will already be highlighted. Rotate the dial to
adjust the zoom factor.The voltage curve can
be zoomed-in for detailed viewing (“x1”), or a
wider view of the curve can be seen when
zoomed-out (“x5”). At “x1,” the screen width equals 2 minutes of time and
data is updated every second. At “x5,” the width of the screen equals 10
minutes of time and data will be updated every 5 seconds.Note that when
adjusting the zoom value here the “Vc” and “R:” values will automatically
change as well.
On-screen, the graphs always advance from right to left. Along the top of the
auto or manual graph screens the elapsed time will be shown in seconds (topleft), the charge/discharge current level will be sho wn in amps (top-center), and
the voltage at Ice’s output at that instant will be shown (top-right).
When a function ends while a graph is being shown, the audible tones will sound
(if set) and the graph will stop moving the voltage curve to the left. Press ➔ to
23
The zoom factor in the
lower-right will be
highlighted first. Rotate dial
to select zoom factor.“x1” is
the closest view.“x5” is the
widest view.
Press dial to highlight “Vc”
which is the voltage at the
center point of the y-axis
(vertical). Rotate dial to
change the voltage at the
center point of the graph
Press dial to highlight “R”
then rotate to set the voltage
range of the y-axis.As shown
above, with R: being 0.36V,
the highest point on the
y-axis is (4.367 + 0.36)
4.727V, and the lowest point
is (4.367 - 0.36) 4.007V.

return to the Status Screen. The Status Screen will be flashing a message
indicating the final result of the operation which was just completed, such as “END:
DELTA-PEAK” when peak charge has ended, “END: CUT-VOLTAGE” when a
discharge has ended, etc. One unique message is “FLAT-LIMITED” – if during
peak charge the NiCd or NiMH battery’s voltage stops rising, but it also does not
fall (as most NiCd or NiMH batteries will do), this message shows to indicate that
the battery’s peak voltage is flat and unchanging and Ice will automatically stop
charging the battery as a safety precaution.
Press to stop the function and leave the Status Screen.Then, go to the “Data
View” screen to see the finalized data (see the flowchart and Data View section).
While in the Main Memory screen, press ➔ to find the Motor Break-In screen (see
below). The Motor Break-In feature is designed to break-in new brushes on
brushed electric motors by delivering up to 10 amps of current at a selected
voltage for a selected time .Ice will try to maintain 10A on the output, but only if the
motor will allow it.It is important that the power source f or Ice can maintain 12 volts
and 15 amps to fully utilize this feature. Power to the motors is pulsed and
not linear.
1. Rotate the dial to move the cursor up or down to the feature you wish
to adjust.
2. Set Voltage: With the cursor pointing to “set volt,” press the dial once to
highlight the voltage value.Rotate the dial to set the appropr iate voltage of
1.0 - 8.0 volts. Re-press the dial to confirm the voltage setting. Set the
voltage to match the nominal operating voltage specification of your motor
as closely as possible. Do not set the voltage too high, as permanent
damage to the motor could result. Note: Motors with high internal
impedance may have difficulty working properly with the motor break-in
function.It may be necessary to set the voltage slightly higher here in order
to turn such motors.
3. Set Time: Rotate the dial so the cursor
points to “set time.” Press the dial once to
highlight the “0m”value.Rotate the dial to
adjust number of minutes in the
operational time, ranging from 0-180
minutes. Press ➔ to move the cursor to
the “10s” value. Rotate the dial to adjust
the number of seconds in the operational
time. Press the dial to confirm the total
break-in time setting.
MOTOR BREAK-IN MENU
24
➔

4. Make sure the motor is firmly mounted to a motor stand prior to
operation, and that the motor’s output shaft is NOT connected to – or
touching anything prior to starting this function!
5. Connect the motor’s white positive lead to Ice’s red, positive (+) banana
jack, and connect the motor’s blue negative lead to Ice’s black, negative (-)
banana jack.
6. To start the
motor break-in
function, make
sure no values
on-screen are
highlighted,
then press and
hold the dial.
The “RUNNING…” screen will show during operation, followed by the
“END” screen when the motor break-in function has ended. The operating
conditions of the break-in function will show along the bottom of
the screen.
While in the Main Memory screen, press ➔ twice to find the User Setup screen.
Numerous miscellaneous functions can be configured in the User Setup
screen. Rotate the dial to move the cursor up or down to the feature you wish
to adjust (see next page). Press the dial to highlight the adjustable value.
Rotate the dial to adjust the value, then re-press the dial to confirm
the selection.
1. Fan Control: Ice’s built-in fan has two modes, “auto” and “on.” In the “auto”
mode, the fan will automatically turn on when the
internal
temperature of
the charger reaches 122°F (50°C).This is designed to protect the charger’s
circuitry from damage caused by overheating.In the “on”mode, the fan will
run continually until turned off manually.
2. Temperature Mode: The temperature scale can be changed between
Fahrenheit (°F) and Celsius (°C).
3. Button Sound: Ice can be configured so that anytime a button is pressed
or the dial is rotated one click an audible tone will beep. This can help to
confirm that functions are being adjusted. These beeps can also be turned
“off” (but will still sound if errors occur).
USER SET-UP MENU
25

4. Finish Sound: A sound will be emitted to
indicate that a function has been completed.
This feature adjusts the length of time that the
sound will play, ranging from 5 seconds to 3
minutes, or this feature can be turned “off.”
5. Melody: Select from any one of 5 different
tunes to be played to indicate that a feature
has ended.This feature can also be turned off.
6. LCD Contrast: Adjust the contrast of the
LCD screen for best viewing. Adjustable
range is from lightest (1) to darkest (12).
7. User Name: At the bottom of the screen,
enter anything you wish to identify your
charger. This name will appear on the
opening screen when power is initially applied
to Ice. Press the dial to enter the User Name Set-up screen to find the User
Name Set-up Screen (see above). Rotate the dial to move the ^ symbol
underneath the characters in the string of letters. Press dial to highlight letter,
then rotate to change letter.Press ➔ to move to the next letter and repeat this
step as desired.Press dial to confirm all selections and highlight will disappear .
Repeat this step for all other characters as desired. Press to return to the
User Setup screen.
When finished adjusting the User Setup screen, press twice to return to the
Main Memory screen.
While in the Main Memory screen, press ➔
three times to find the Data View screen. This
screen shows various types of data pertaining
to the input or output of the charger. This
screen can be seen only before a function has
started, or after a function has ended (not
while a function is being performed).
1. Input Voltage: Shows the DC voltage at
Ice’s input lead.
2. Output Voltage: Shows the DC voltage at Ice’s banana jacks. It is impor tant
to understand that the condition of the connector lead on the battery and the
charger’s output can affect the accuracy of the voltage reading.
DAT A VIEW
26
➔
➔
DAT A VIEW

3. Battery Temperature: Shows the temperature of the battery as measured
with the optional temperature sensor.If no sensor is connected the display
will show “No. Sens.”
4. Peak Temperature: In conjunction with the Battery Temperature feature
above, Ice will constantly record the highest measured temperature of the
battery which is connected to the output.
5. Battery Resistance: Ice will measure the battery’s internal resistance
starting 2 minutes AFTER discharge has stopped, and is shown in milliohms ( ). Battery resistance will not be measured if cell voltage is lower
than 1.0V for NiCd/MH batteries or 3.0V for Li-Ion/Li-Po batteries. This is
because the most important time to judge a batter y’s internal resistance is
when it is closer to full charge.A lower resistance value is better, indicating
the charger can likely condition the battery more efficiently and accurately.
Important: This value can be greatly affected by the quality of the
connection between the battery and Ice’s output. A solid physical
connection is important to having a good electrical connection. High quality
components in the battery’s own lead and the adapter lead between the
battery and charger is also very impor tant. Silicon insulated wire has lower
resistance, as do gold plated terminals and copper conductors. Larger
gauge wire (with a smaller numerical value) also provides lower resistance .
A battery whose internal resistance gradually worsens over time will be
showing signs of aging, and could also result in poor charge and/or
discharge capacities and may need replacement soon.
6. Charge Time: Records the amount of time needed to complete a charge
function, not counting the time a battery is in trickle charge (NiCd and
NiMH) or top-off charge (NiMH only). Shown in seconds.
7. Discharge Time: Records the amount of time needed to complete a
discharge function. Shown in seconds.
8. Graphic Data View: Ice’s graphic display can also show voltage curve
waveforms after a charge or discharge function has ended (not for cycles).
To view the final voltage curve, scroll the arrow cursor down to the “graphic
data view” line, then press the dial to view the graph.
a. A straight vertical
line will appear in
the middle of this
graph (see diagram
at right). This is the
“graph cursor.”
Rotating the dial
will cause the
27

graph cursor to move side wa ys.To find the voltage at any point on the curve,
move the cursor to that point on the curve. The voltage where the graph
cursor line intersects the curve will be shown in the upper-right corner of
the screen.
b. Press ➔ to select the other adjustable graph parameters, as shown in
the diagrams below:
c. Press the dial anytime to go back to the Data View screen.
The total length of time that battery voltages will be graphed in this screen will
be from the start to finish of either charge or discharge. For NiCd/MH batteries,
the overall graph should be shown in a single display. For lithium batteries, the
overall graph period is designed for a maximum of 3 hours based on a 1C rate
(data past 3 hours won’t be displayed). When using the automatic charge or
discharge mode, the overall graph period will be 2 hours maximum.
28

Information is NOT shown in graph form for re-peak charge mode, time delays,
top-off charge, cycles, or discharge-before-charge steps.
While in the Main Memory screen, press ➔ three
times to find the Cycle Data screen. This screen
shows the battery’s capacity and voltage readings
for each charge and discharge period for up to 10
full cycles.The cycle number is shown on the left
side of the screen. Rotating the dial will scroll the
cursor up and down the screen (continue scrolling
down to view data for cycles 4 through 10).
Charge data is marked by “C:”, with the charge
capacity shown in “mAh” and the
peak battery
voltage
is shown on the right.
Discharge data is marked by “D:”, with the
discharge capacity shown in “mAh” and the
average battery voltage
is shown at right.
Cycling NiCds once monthly can help maximum the overall performance of the
cells. NiMH batteries benefit much less from cycling. Cycling can help to
determine a battery’s ability to store its maximum rated capacity. If a battery
can only store a small fraction of its rated capacity it’s likely reaching the end
of its useful life and may need to be replaced.New batteries, or older batteries
which have not been used or cycled frequently ma y need to be broken-in bef ore
they will perform to their rated capacity.
Comparing how much charge energy, or “mAh,” that was delivered to the
battery vs. the subsequent discharge capacity in “mAh” can help to determine
how well the battery held the previous charge. Also, comparing a battery’s
measured discharge capacity to its rated capacity is an indication of the
battery’s general condition.If a fully charged battery provides less than 70% of
its rated capacity it may no longer be safe to use. Additional cycles can be
attempted to try and increase the battery’s storage capacity to near 100%, but
if repeated attempts fail to improve performance the batteries should
be replaced.
CYCLE DISPLAYS
29

CAUTION! The Four-Step Charge method is recommended for use by
experienced users only!! If set improperly, the Four-Step Charge method
can cause severe, permanent damage to the battery! If you are unsure
about how to use this function, do not use it.
The Four-Step Charge method is
designed for very high charge
efficiency for NiMH batteries. This
feature can be used on NiCd
batteries also, but only if the peak
sensitivity value is set properly (see
page 32). NEVER USE THE FOUR-
STEP CHARGE MODE WITH
LI-ION OR LI-PO BATTERIES AS
SEVERE, PERMANENT DAMAGE
TO THE BATTERY AND ITS
SURROUNDINGS WILL RESULT!!
Parameters which are set in the Four-Step Charge screen do NOT aff ect those
which are set in the Main Memory screen. The Four-Step and Main Memory
screens are completely independent of each other.And, a temperature sensor
is REQUIRED when using the Four-Step Charge mode.Ice will not allow FourStep Charge to start unless a temperature sensor is connected.
The Four-Step Charge method divides the ov erall time needed to charge a battery
into four separate periods or “steps” (see diagram above).The maximum charge
capacity and charge current is set separately for each of the four steps. The
purpose of the Four-Step Charge mode is to deliver as much energy to the battery
as possible for racing “punch” without damaging the battery, but also to allow for
the most accurate peak detection as possible for maximum run-time.
In the beginning, for charge step 1, it’s important that the battery’s voltage
becomes stable, so the charge current setting should be rather conservative.
Then, when the battery voltage is stable, much higher current can be delivered
in step 2.The higher currents in step 2 will cause the battery to generate heat
after a period of time, so it is best to reduce current in step 3. Finally, for step
4, it’s best to reduce current again so the battery’s voltage is more stable which
will allow the peak detection circuit to work more accurately to pack as much
run-time capacity in the battery as possible. It is impor tant to note that in
Four-Step Charge mode the peak detection circuit functions ONLY in step
4 (not steps 1-3).
The maximum amount of charge capacity delivered to the battery during each
step effectively determines how
long
the charge current will be delivered to the
FOUR-STEP CHARGE SETUP
30

battery during the step. Be careful not to set the capacity value too high –
especially in steps 2 and 3 where the current settings are higher.The higher the
capacity setting, the longer that current will be applied to the battery during the
step, and the more likely the temperature sensor will trip due to heating and
stop the charge process prematurely. It may take some practice and careful
attention to dial-in the Four-Step charge mode for your battery. See the chart
that follows for a breakdown of the settings for each step.
For example, see the following chart for how to set the Four-Step charge
process for a 3300mAh battery and 3600mAh NiMH battery.
1. While in the Four-Step charge set-up screen (see next page), rotate the dial so
the cursor is next to the line underneath the “Step Charge Setup”heading:
31

a. Press the dial to highlight the number of cells. Rotate dial to adjust # cells
to match the battery, ranging from 1 to 10 cells.
b. Press ➔ to highlight the peak sensitivity value. Rotate dial to adjust as
desired ranging from 3-15mV/cell (or “ZEROpk”for NiMH batteries). Set this
value slightly higher for NiCd batteries.
c. Press ➔ to highlight the maximum temperature setting. Rotate the
dial to adjust as desired, ranging from 50-132°F (10-55°C).
d. Press dial to confirm settings.
2. Rotate the dial to move the cursor down to the capacity line (just under the
graph). This line shows four different capacity values, each being the
maximum capacity that will be delivered to the battery
during each of the
four steps
. The range for each step is
100-5000mAh.
a. Press the dial to highlight the
capacity value on the left which is
for step #1. Rotate dial to adjust
this capacity value.
b. Press ➔ to highlight the next
capacity value to the right which
is for step #2.Rotate dial to adjust
this capacity value. Repeat this
step 2 more times to adjust the
capacity for steps 3 and 4.
c. Press dial to confirm all
capacity settings.
3. Rotate the dial to move the cursor down one line to the char ge current line.
This line shows four different charge current values that will be delivered to
the battery
during each of the four steps
. The range for each of the four
steps is 0.1 to 8.0 amps.
a. Press the dial to highlight the charge current value on the left which is
for step #1. Rotate dial to adjust this current value.
b. Press ➔ to select the next current value to the right, which is for step
#2. Rotate dial to adjust this current value. Repeat this step 2 more
times to adjust the current for steps 3 and 4.
c. Press dial to confirm all charge current settings.
4. Rotate the dial to move cursor down as there are 7 additional lines of
features in this menu.
32

5. Expect Time: When the battery capacity and charge current values are
entered into the Four-Step Charge menu, Ice will calculate how much time
is “expected” to be needed to fully charge the battery while in four-Step
Charge mode.This time will be shown on the “expect time” line. Note: This
time does not include the temporary pauses that Ice needs to check battery
temperatures (if applicable) and so on.
6. Reserve Time: Setting the
reserve time function for the
Four-Step Charge mode is done
in the main Four-Step Charge
screen as shown at right. Here,
the reserve time feature operates
the same way as in the CHARGE
/ DISCHARGE / CYCLE
screens… Set the reserve time
to be the number of minutes
before the next race starts plus
enough time to let the battery
cool beforehand. The
minimum
reserve time setting cannot be
lower than the calculated
“expect” time above, and
maximum is 600 minutes. The reserve time does NOT include the time
needed for “discharge-before-charge” (see below). It is important to
remember that the reserve time will vary depending on the charge current
selection, capacity rating of battery, etc…
7. Trickle Charge: Rotate the dial to place the cursor in front of this line.This
sets the trickle charge current that will be applied to the battery after fast
charge ends.Press dial to highlight the value , and rotate to select the value
which ranges from 0-500mA.
8. Discharge > Charge: Rotate the dial to place the cursor in front of this line.
This “discharge-before-charge” simply instructs Ice to automatically
discharge the battery before starting the charge process. Press dial, then
rotate to either turn this feature “on” or “off.” The discharge current here is
automatically set to the maximum battery capacity entered in 2b (on page 32)
multiplied by 4.For simplicity, it is best to set this to “on” to empty the battery
before starting the Four-Step Charge mode.
9. Impulse Charge: Refer to diagram at right.This feature functions in Four-Step
mode only, and charges the battery at a current equal to the charge current
setting x 1.5 for 0.5 seconds, every 3 seconds.The charge current at all other
33

times is as set in the Four-Step
Charge screen on page 32. The
impulse charge method is much the
opposite of the reflex charge
method. Instead of applying high
level negative charge pulses to the
battery for short intervals , Ice applies
high level positive charge pulses at
regular intervals. And as with reflex
mode, the impulse method is
thought by some to help clear a cell’s
internal plates from build-up of oxidizing gas bubb les, allowing the batteries to
perform better.Decide which steps to have the impulse mode function, which
can be
any combination
of steps 1, 2 or 3.Impulse charge does NOT function
in step 4. See the diagram below for how to set this function.
Press anytime to remove the adjustment cursor arrow.
10. Reflex Charge: As with the impulse charge mode, reflex charge can be
used in the Four-Step charge mode.Decide which steps to have the reflex
charge mode function, which can be
any combination
of steps 1, 2 or 3.
Reflex charge does NOT function during step 4. See the above diagram for
how to set this feature.
Note that impulse charge and reflex charge can be
applied to the battery at the same time!
11. Temperature Check: The Four-Step Charge mode REQUIRES use of a
temperature sensor! Ice will not allow the Four-Step charge mode to
function without the sensor.This temperature sensing feature can be set to
function in
any combination
of steps 1, 2 or 3 and is set the same way that
34
➔

impulse and reflex functions are set (see diagram on the previous page). In
steps 1-3, if the battery’s temperature reaches the temperature setting at
the top of the Four-Step Charge screen Ice will pause the charge function
until the battery’s temperature drops approx. 4°F (2°C) below the
temperature setting, then charge will re-start automatically. The
temperature sensing feature ALWAYS functions during the 4th step, and if
the battery’s temperature reaches the temperature setting during the 4th
step Ice will automatically stop charging completely.
TO START THE FOUR-STEP CHARGE
mode, when the Four-Step Charge screen is
shown press the dial and hold it for 2
seconds.The Status Screen will then appear
and show which charge step is being
performed.For example, if impulse and reflex
modes are set as shown at right (impulse for
steps 1 and 3, reflex for steps 2 and 3) the
Status Screen will show as below:
35

When Four-Step Charge ends, go to the Data View screen to see the final
charge data.
IntelliPeak Ice’s solid-state circuitry offers protection against damage which could be
caused by short-circuit or reverse polarity conditions, and more.Here is a list of possible
error messages which might show on-screen, and an explanation of the problem:
“Input voltage – The present input voltage is xx.xxV. Please check the input voltage.The
input voltage must be 11V~15V.”
“No battery – A battery is not connected to the output. Please connect the battery to the
output then restart!”
“Reverse polarity – A battery is connected to the output in reverse! Please correctly
connect the battery to the output.”
“Open circuit – A battery is disconnected during an operation. Please reconnect the
battery and restart!”
“Short-circuit – Output short-circuited. Please check the output.”
Note: When short circuit
occurs on the output Ice will continue to try and charge for 2 minutes at the selected
current. This is by design, as sometimes cells which have previously been
completely
discharged
(after a race, with a cell discharger, even with Ice which can discharge to
0.1V) will have such low voltage that it might APPEAR that the output is short circuited
when really it is not. If a fully discharged cell is connected, its voltage will quickly rise
when charge is applied and the charger will continue to charge as normal. However, if
the output is truly short circuited the voltage on the output will never increase and after
2 minutes Ice will stop charge and display this message.
“Low output voltage – Output voltage is lo wer than the selected cells or voltages.Please
select proper cells or voltages.”
Either Ice’s voltage setting is incorrect, or the
battery’s rated voltage exceeds the setting.
ERROR MESSAGES & TROUBLESHOOTING GUIDE
36

“High output voltage – Output voltage is higher than the selected cells or voltages.
Please select proper cells or voltages.”
Either Ice’s voltage setting is incorrect, or the
battery is in poor condition.
“No motor – A motor is not connected to the output. Please connect the motor to
the output.”
“Motor disconnection – A motor has become disconnected during an operation. Please
reconnect the motor and restart!”
“Sensor Connection – A temp sensor must be used in 4 step mode.Connect DTXP4171
temp sensor.”
“Temperature sensor – A temperature sensor is connected in reverse or is defective.”
“Bat.Temp too low – Battery temp is too low to be operated!”
This message will show if
the battery temperature is (a) lower than 32°F (0°C) during an operation, or (b) lower
than 14°F (-10°C) when in idle mode. If this shows, allow battery to warm before
proceeding.
“Bat. Temp too high – Batter y temp is too high to be operated!”
If this shows, allow
battery to cool before proceeding.This message will clear when is pressed.
“Charger too hot! Please wait until the charger cools!”
This message will show when
Ice’s own internal temperature exceeds 239°F (115°C). Here, operations will pause
temporarily, then resume automatically when internal temp. returns to below 158°F
(70°C).This protects Ice’s electronics from damage due to excess heat.
“Internal Sensor - Internal temp is too hot!”
If Ice’s internal temperature exceeds 239°F
(115°C) the display will first show “Charger too hot”and all operations will temporarily
pause. If the internal temperature continues to increase over 257°F (125°C) the
“Internal sensor” error message will show. If this happens a problem must exist with
the charger – contact Hobby Services for details.
“Data Communication – Something is wrong with the internal circuit. Contact Hobby
Services”
This message will show if the charger’s own logic experiences control
problems.Contact Hobby Services if this occurs.
Other possible problems:
PROBLEM: LCD does not work when unit is connected to input power .(1) Check power
supply for improper power. (2) Check input connections for solid contact. (3) DC input
power is connected backwards…reverse input connection. (4) Contact Hobby Services
for further details.
PROBLEM: Charger doesn’t recognize battery. (1) Check for faulty connection or
wiring…correct or replace charge lead. (2) Defective cell in the pack. Replace batter y
pack or cell.
PROBLEM: Battery voltage low after charge (below 1.2V per cell for NiCd/MH, or belo w
3.6V or 3.7V for Li-Ion/Li-Po batteries. (1) “Max chg capacity” setting too low…increase
value. (2) NiCd/MH peak sensitivity setting too low or too high…re-adjust setting. (3)
Poor quality charge leads…replace with new.
PROBLEM: Will not lock into discharge mode. (1) Battery’s rated voltage set
improperly…set battery voltage to exactly match that of the battery. (2) Tx has diode in
37
➔

charge circuit…remove battery and connect directly to charger, or contact your radio
manufacturer for details. (3) Battery is already discharged. (4) Defective cell in
pack…replace battery.
PROBLEM: Motor turning overheating, or turning too fast or slow during break-in. (1)
The “set volt” value is too high or low…re-adjust to match the motor’s specs. (2) The
selected run time is too long…reduce run time setting.
PROBLEM: Low mAh/time readings after discharge. (1) Battery not fully charged pr ior
to discharge. Fully charge batteries prior to discharge. (2) Old or unused
batteries…cycle again to see if capacity improves. (3) Defective battery, needs to be
replaced. (4) Discharge cutoff voltage set too high…reduce setting. (5) Discharge rate
set too high…reduce setting. (6) Battery’s rated voltage set improperly…set to exactly
match that of the battery. (7) Possible internal problem with charger…contact Hobby
Services for further details
PROBLEM: Battery gets too hot during Four-Step Charge mode. (1) Capacity setting is
too high in one or more of the steps…reduce setting.(2) Charge current setting too high
in one or more of the steps…reduce setting. (3) Max. batter y temperature setting too
high…reduce setting. (4) Contact Hobby Services for more information.
DuraTrax®warrants this product to be free from defects in materials and workmanship for a period
of two (2) years from the date of purchase.During that period, DuraTrax will, at its option, repair or
replace without service charge any product deemed defective due to those causes. You will be
required to provide proof of purchase (invoice or receipt).This warranty does not cover damage
caused by abuse, misuse, alteration or accident.If there is damage stemming from these causes
within the stated warranty period, DuraTrax will, at its option, repair or replace it for a service charge
not greater than 50% of its then current retail list price. Be sure to include your daytime telephone
number in case we need to contact you about your repair.This warranty gives you specific rights.
You may also have other rights, which vary from state to state.
For service on your DuraTrax product, warranty or non-warranty, send it post-paid and insured to:
HOBBY SERVICES
3002 N. Apollo Drive Suite 1
Champaign, IL 61822
(217) 398-0007
www.hobbyservices@hobbico.com
*For warranty and service information if purchased outside the USA or Canada, see the additional
warranty information insert (if applicable) or ask your retailer for more information.
2-YEAR LIMITED WARRANTY – USA & CANADA ONLY
38

DuraTrax®20A Discharger
Discharge up to six individual sub-C NiCd or NiMH cells at up to 20 amps! Unique leverlock handles and spring-loaded contacts make cell insertion and removal fast and easy.
Status lights indicate each cell's condition.The built-in cooling fan can be powered by load
cells or an external DC power supply (not included).One-year warranty. DTXP4320
DuraTrax IntelliSpeed
™
8T Pro Racing Forward ESC
Fully programmable and totally affordable, the Pro Racing Forward is ideal for racing
with 6-7 cells and motors with 8 turns or more. Push-button set-up makes it easy to
program any or all of six performance-tuning features, including: traction control, turbo
start, quick start, current limit, independent high/low brake limits and switching
frequency. Also included: 6V/3A BEC, solder posts for motor and battery leads and
120-day warranty protection.DTXM1080
OTHER ITEMS AVAILABLE FROM DURATRAX
39


 Loading...