

Page 1
GE Industrial
Sensing
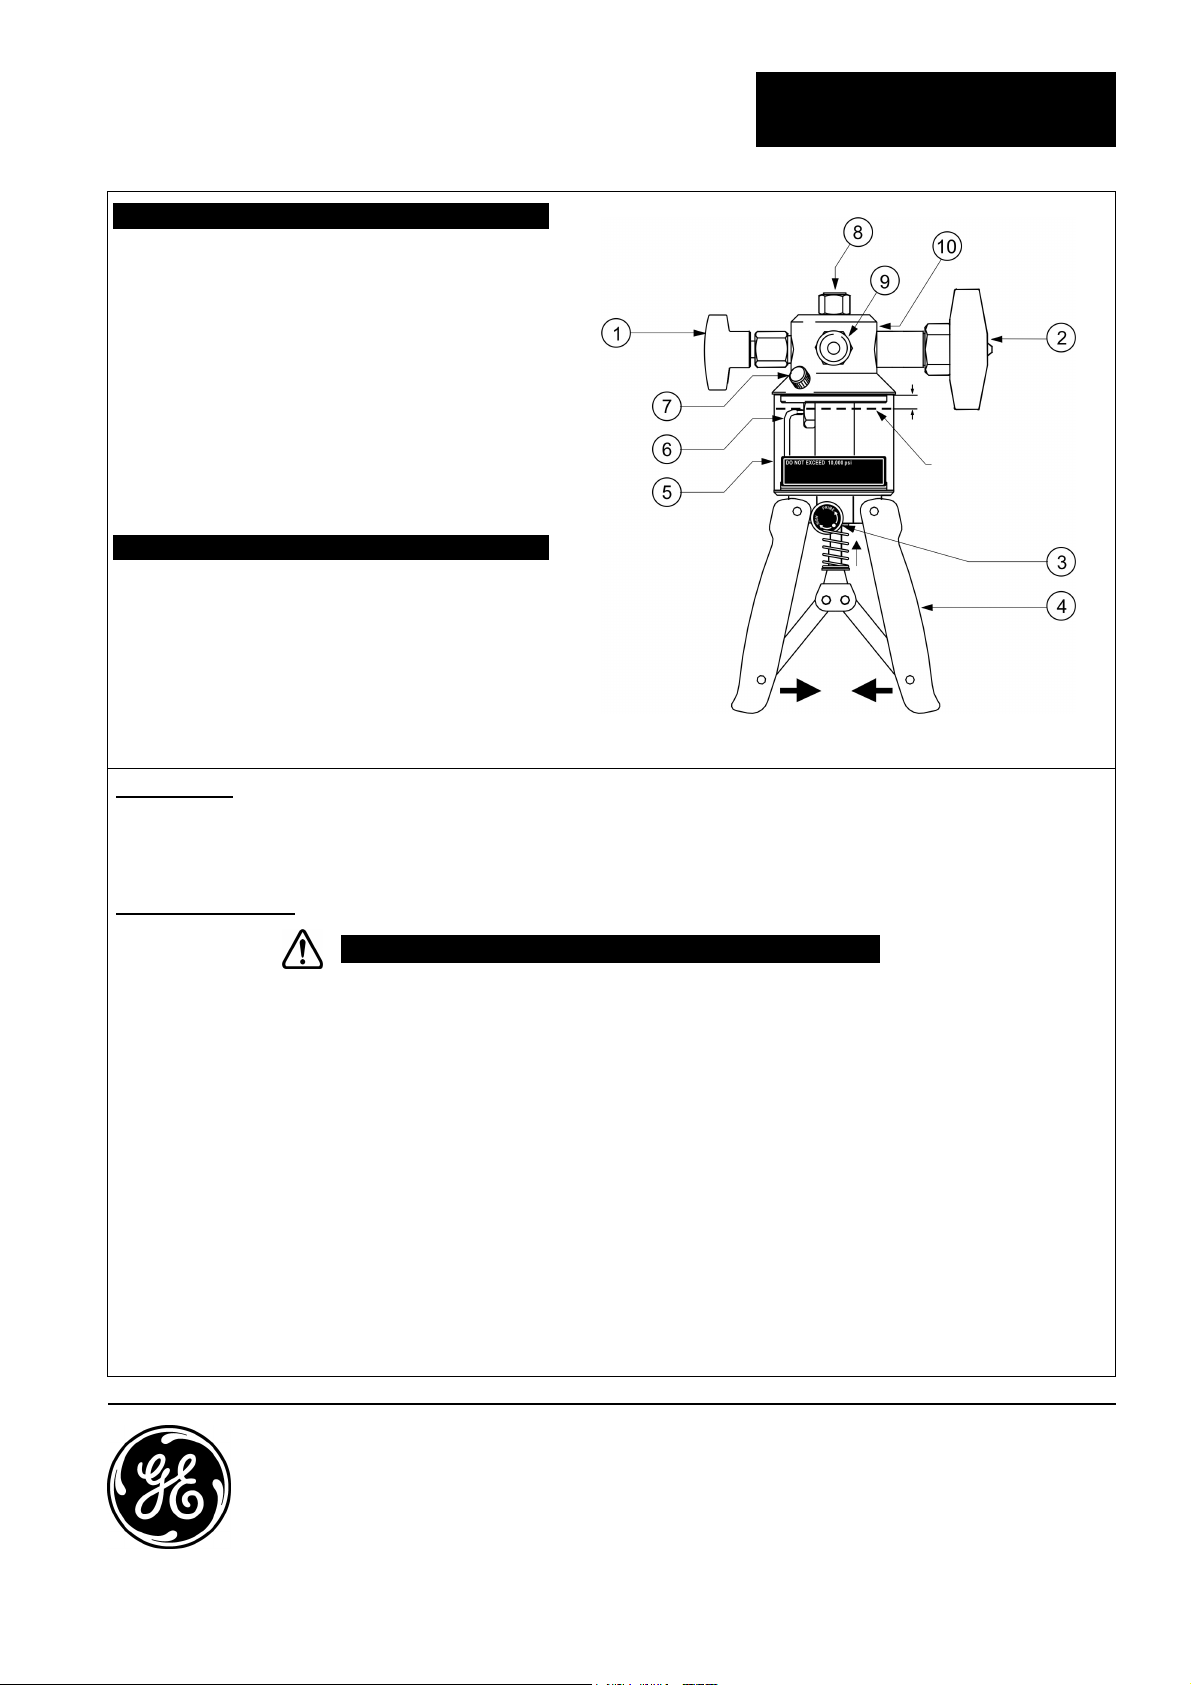
KEY
1. Pressure release valve
2. Fine adjust vernier
3. Prime/High pressure selector
4. Scissor handles
5. Reservoir: 6.1 cubic inch (100 cc)
6. Fluid inlet tube
7. Reservoir fill plug
8. 1/4” NPT female adapter
9. 1/4” NPT female adapter
10. Rear port for an optional pressure relief valve
DO NOT USE IT FOR OTHER FUNCTIONS
SPECIFICATION
Ranges: PV212-10K (0 to 10,000 psi)
PV212-15K (0 to 15,000 psi)
Pressure media: Low viscosity mineral-based
hydraulic oil, distilled water,
“Skydrol/Fyrquel” and brake fluid
versions available
Dimensions: 9”L x 6.25”W x 2.75”D
Weight: 3.2 lb
Druck PV212 series -
Hydraulic hand pumps
K409 Issue 1
1/4”
RECOMMENDED
FLUID LEVEL
DESCRIPTION
This system is a portable source of hydraulic pressure. Each pump includes a reservoir, and a volume control for fine
adjustment. To prevent damage to sensitive instruments, there are five pressure relief valves available for different
pressure ranges.
USER INSTRUCTIONS
WARNING - HIGH PRESSURE
• Uncontrolled release of high pressure is dangerous and may cause damage to equipment. Because the
internal pressure can get very high during operation, make sure that all the connections are made
correctly. DO NOT ignore the maximum operating pressure specified on the pump label.
• Before you connect a pressure component to the PV212, make sure that it is isolated from the pressure
supply and release the internal pressure slowly. DO NOT connect the pump to an external pressure source.
1. Remove the reservoir fill plug (7), fill the reservoir (5) to the indicated level, and replace the fill plug,
2. Connect a reference instrument to connection (8).
Note: Use PTFE tape to seal all NPT connections.
3. Connect the instrument under test to connection (9):
Use pressure-rated flexible hose or use the optional accessories to direct mount it.
4. Set the fine adjust vernier (2) to the midpoint of its travel:
Turn it fully clockwise, then four to six turns counterclockwise.
5. Open the pressure release valve (1):
Turn it fully clockwise and then one turn counterclockwise.
6. Squeeze the scissor handles (4) fully together and turn the selector (3) to the “Prime” position.
Web: www.gesensing.com
Page 2

Operating instructions for the Druck PV212 series - Hydraulic hand pumps
USER INSTRUCTIONS (continued)
7. Remove trapped air from the pump:
Squeeze the scissor handles (4) several times. Make sure that the fluid inlet tube (6) remains immersed in fluid at all
times.
8. Close the pressure release valve (1):
Turn it fully clockwise, and tighten to seal.
9. Prime the system:
Squeeze the scissor handles (4) together and then release them to get the fluid into the pump cylinder. Repeat this
operation until the system is fully primed, as indicated by pressure build-up on the reference instrument or the
instrument under test.
10. Set a pressure that is almost correct:
With the scissor handles (4) fully together, turn the selector (3) to the “High” position, and operate the scissor
handles (4).
!WARNING!
It is dangerous to ignore the maximum operating pressure specified on the pump label.
Note: At higher pressures, it is easier to use short handle strokes.
11. To adjust the pressure to the correct value, turn the fine adjust vernier (2) clockwise to increase the pressure or
counterclockwise to decrease the pressure.
Note: Initially, small pressure changes can occur (thermodynamic effects, the seals settle, the hoses expand). The
pressure will stabilize after a short time.
12. To fully release the pressure from the system, slowly turn the pressure release valve (1) counterclockwise one full
turn. This completes the procedure.
Note: Careful operation of the pressure release valve (1) gives a controlled release of pressure.
FAULT INVESTIGATION/MAINTENANCE
• When in operation, if the fluid level in the reservoir falls by a large amount, this can create a partial vacuum and
affect pump performance. To prevent this, loosen the fill plug (7) and let air into the reservoir.
• For seal replacement refer to the service kit IAS-A111-1 instructions.
2 of 2 K409 Issue 1
 Loading...