

Page 1

Model / Modèle / Modelo 575
Right Angle Attachment Instructions
Mode d’emploi du mandrin d’angle
Instrucciones para Acople en Ángulo Recto
Before you begin, remove the black
protective cap on your attachment. If
cap does not slide off easily, insert
the shank portion of any accessory
(1/8" recommended) through the
housing opening of the attachment
to hold the shaft from rotating. Then
twist off.
Do not use the rotary tool shaft
lock button. Internal damage to the
attachment may occur.
Remove the housing cap from your
existing rotary tool as shown in fig. 2.
Then press the shaft lock button on
your rotary tool, unscrew the collet
nut and remove the collet.
Set your collet nut and collet
aside it will be reinstalled later in
step 4.
Install the drive adapter, included
with your right angle attachment, on
the motor shaft as shown in Fig. 3
and tighten.
Do not over tighten drive adapter.
Tighten the drive adapter finger tight
and then tighten an additional 1/3
turn with the wrench. (Wrench
included with your rotary tool kit.)
Screw the attachment onto your
rotary tool. Hand tighten only.
Reassemble the collet and the
collet nut from step 2, on to the
output shaft of the attachment.
CAUTION
!
Avant de commencer, détacher le
capuchon protecteur noir qui se
trouve sur le mandrin. S’il ne se
glisse pas facilement, introduire la
queue d’un accessoire (queue de 3,2
mm recommandée) dans l’ouverture
du mandrin afin d’empêcher l’arbre
de tourner. Détacher le capuchon en
le tournant.
Ne pas utiliser le bouton de blocage
de l’arbre de l’outil rotatif, car cela
pourrait endommager des
composants internes du mandrin.
Enlever la partie antérieure de l’outil
rotatif, comme le montre la figure 2.
Appuyer ensuite sur le bouton de
blocage de l’arbre, puis dévisser
l’écrou de mors et retirer le mors.
Mettre l’écrou et le mors de côté ;
ils seront réinstallés à l’étape 4.
Installer l’adaptateur d’entraînement,
fourni avec le mandrin d’angle, sur
l’arbre de l’outil, comme le montre la
figure 3. Serrer.
Ne pas serrer excessivement
l’adaptateur. Le serrer avec les
doigts, puis y donner 1/3 de tour
avec la clé. (Clé incluse avec l’outil
rotatif.)
Visser le mandrin d’angle sur l’outil.
Le serrer seulement avec les doigts.
Installer sur l’arbre du mandrin le
mors et l’écrou retirés à l’étape 2.
Antes de empezar, retire la tapa
protectora negra del acople. Si la
tapa no se desliza fácilmente,
inserte el vástago de cualquier
accesorio (1/8" recomendado) a
través de la abertura en el
caparazón del acople para
inmovilizar el eje del acople.
Luego desenrósquelo.
No utilice para ello el botón de
bloqueo de la herramienta rotatoria,
ya que se podrían causar daños
internos al acople.
Retire la tapa del caparazón de su
herramienta rotatoria actual como se
muestra en la Fig. 2. Luego oprima
el botón de bloqueo del eje en su
herramienta rotatoria, desenrosque
la tuerca del collarín y retire el
collarín.
Coloque la tuerca del collarín y el
collarín a un lado. Estos serán
reinstalados posteriormente en el
paso 4.
Instale el adaptador de eje, incluido
con su acople en ángulo recto, en el
eje del motor como se muestra en la
Fig. 3 y luego apriételo.
No apriete excesivamente el
adaptador de eje. Apriete el
adaptador de eje con el dedo y
luego dele 1/3 de vuelta adicional
con la llave. (La llave viene incluida
con el kit de herramientas de la
herramienta rotatoria.)
Enrosque el acople a su herramienta
rotatoria. Apriételo con la mano
únicamente. Reinstale nuevamente
el collarín y la tuerca del collarín del
paso 2 en el eje de salida del
acople.
FIG.4
DREMEL
FIG.1
FIG.2
FIG.3
FIG.4
CAUTION
!
DREMEL
Collet
Nut
Écrou de
mors
Tuerca del
collarín
Drive
Adapter
Adaptateur
d’entraînement
Adaptador
de Eje
ATTENTION
!
ADVERTENCIA
!
ATTENTION
!
ADVERTENCIA
!
Page 2
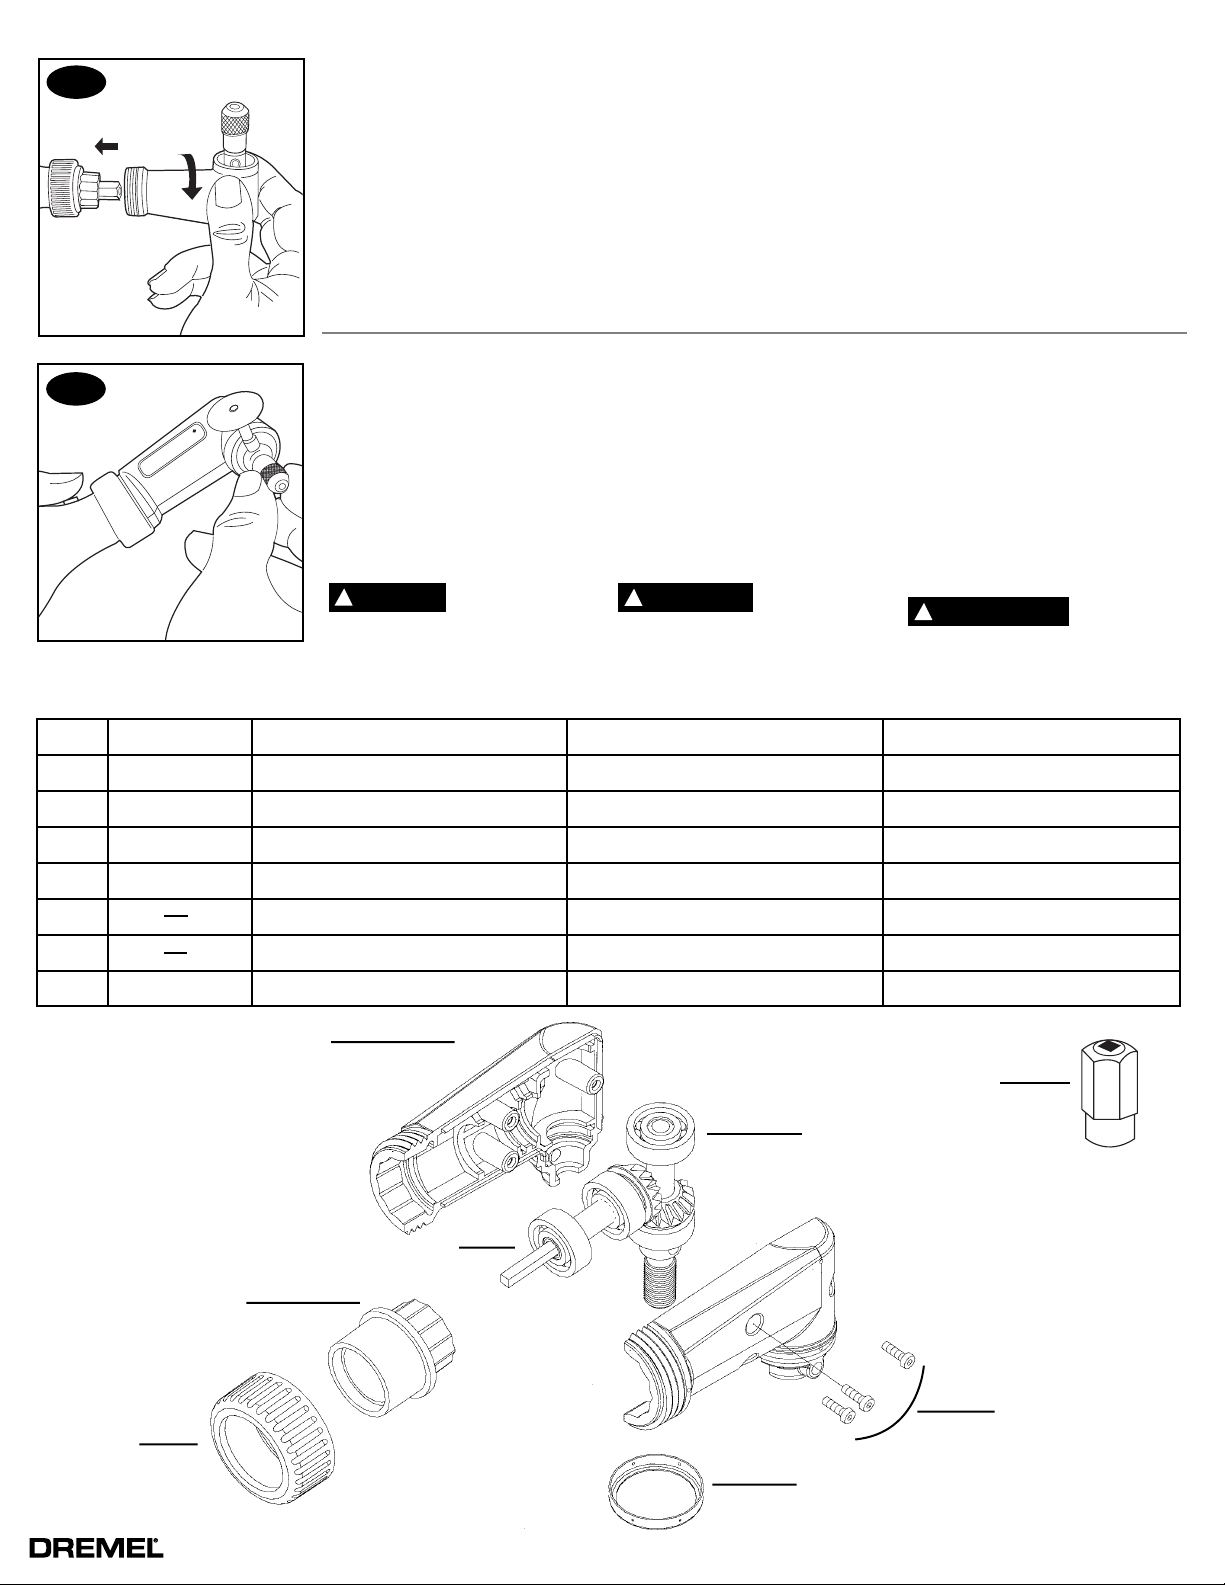
FIG.5
The Right Angle Attachment can be
oriented on your rotary tool in 12
different positions. The attachment
should be positioned so the on/off
speed control switch is easy to
access.
To reposition, unscrew the collar from
the attachment until disengaged. Slide
the attachment off. Then, reposition,
slide the attachment back on the tool
and retighten the collar.
Le mandrin d’angle s’oriente sur
l’outil dans 12 positions distinctes.
Le positionner de manière à ce que
l’interrupteur à variateur de vitesse
soit facile d’accès.
Pour réorienter le mandrin, en
dévisser le collier jusqu’à ce qu’il se
dégage. Détacher le mandrin, le
positionner et le replacer sur l’outil.
Serrer le collier.
El Acople en Ángulo recto puede ser
orientado en su herramienta rotatoria
en 12 posiciones distintas. El acople
debe estar en una posición tal que se
pueda tener acceso fácil al interruptor
de encendido/apagado.
Para cambiar de posición,
desenrosque el collarín del acople
hasta que se suelte. Quite el acople.
Luego reposiciónelo, deslice el acople
de nuevo en la herramienta y apriete
el collarín de nuevo.
FIG.6
1
2
3
4
5
6
7
8
DREMEL
2610907537
2610907538
2914201664
2610907543
2600290025
2615294178
To change an accessory, insert the
shank portion of any accessory (1/8"
recommended) through the housing
opening of the attachment to hold the
shaft from rotating. With the shaft
secured, loosen the collet nut and
insert an accessory as deeply as
possible to avoid wobble during use.
(You may need to pull back the shank
from the housing opening to provide
clearance while inserting the
accessory.) Retighten the collet nut.
CAUTION
!
Do not use the rotary tool shaft
lock button. Internal damage to the
attachment may occur.
Collar
Adapter
Screws (3 required)
Housing Set
Housing Ring
Shaft 1 (not available)
Shaft 2 (not available)
Drive Adapter
Pour changer une fraise, introduire la
queue d’un accessoire (queue de 3,2
mm recommandée) dans l’ouverture
du mandrin afin d’empêcher l’arbre de
tourner. Desserrer l’écrou de mors et
introduire le nouvel accessoire le plus
loin possible afin de prévenir
l’oscillation à l’usage. (Il pourrait être
nécessaire de déloger partiellement la
queue utilisée comme blocage d’arbre
afin d’introduire complètement
l’accessoire.) Serrer l’écrou de mors.
ATTENTION
!
Ne pas utiliser le bouton de blocage
de l’arbre de l’outil rotatif, car cela
pourrait endommager des
composants internes du mandrin.
Collier
Adaptateur
Vis (3 requises)
Carcasse
Anneau de la carcasse
Arbre 1 (non disponible)
Arbre 2 (non disponible)
Adaptateur d’entraînement
Para cambiar un accesorio, inserte el
vástago de cualquier accesorio (1/8"
recomendado) a través de la abertura
en el caparazón del acople para
inmovilizar el eje del acople. Con el
eje bloqueado, suelte la rosca del
collarín e inserte un accesorio tan
profundamente como sea posible para
evitar que tiemble durante el uso. (Es
posible que necesite retirar el vástago
del caparazón para dar vía libre
mientras inserta el accesorio). Apriete
la tuerca del collarín de nuevo.
ADVERTENCIA
!
No utilice el botón de bloqueo de la
herramienta rotatoria, ya que se
podrían causar daños internos al
acople.
Collarín
Adaptador
Tornillos (se requieren 3)
Elementos del Caparazón
Anillo del Caparazón
Eje 1 (No disponible)
Eje 2 (No disponible)
Adaptador de Eje
4
8
6
7
2
3
1
5
4915 21st Street, Racine, WI 53406 1-800-4-DREMEL http://www.dremel,com
2610925520
 Loading...