

Page 1
IMPORTANT: IMPORTANT : IMPORTANTE:
Read Before Using Lire avant usage Leer antes de usar
Operating/Safety Instructions
Consignes de fonctionnement/sécurité
Instrucciones de funcionamiento y seguridad
231
P.O. Box 1468 Racine, Wisconsin 53401
Call Toll Free for
Consumer Information
& Service Locations
Pour obtenir des informations
et les adresses de nos centres
de service après-vente,
appelez ce numéro gratuit
Llame gratis para
obtener información
para el consumidor y
ubicaciones de servicio
1-800-4-DREMEL (1-800-437-3635) http://www.dremel.com
For English Version
See page 2
Version française
Voir page 9
Versión en español
Ver la página16
Page 2

Power Tool Safety Rules
!
WARNING
Read and understand all instructions. Failure to follow all instructions listed
below may result in electric shock, fi re and/or serious personal injury.
SA VE THESE INSTRUCTIONS
Work Area
Keep your work area clean and well lit.
Cluttered benches and dark areas invite
accidents.
Do not operate power tools in explosive
atmospheres, such as in the presence of
fl ammable liquids, gases, or dust. Power
tools create sparks which may ignite the
dust or fumes.
Keep by-standers, children, and visitors
away while operating a power tool.
Distractions can cause you to lose control.
Electrical Safety
Double-insulated tools are equipped
with a polarized plug (one blade is wider
than the other). This plug will fi t in a
polarized outlet only one way. If the plug
does not fi t fully in the outlet, reverse
the plug. If it still does not fi t, contact a
qualifi ed electrician to install a polarized
outlet. Do not change the plug in any
way. Double Insulation
need for the three-wire grounded power
cord and grounded power supply system.
Before plugging in the tool, be certain the
outlet voltage supplied is within the voltage
marked on the nameplate. Do not use “AC
only” rated tools with a DC power supply.
Avoid body contact with grounded
surfaces such as pipes, radiators,
ranges and refrigerators. There is an
increased risk of electric shock if your body
is grounded. If operating the power tool in
damp locations is unavoidable, a Ground
Fault Circuit Interrupter must be used to
supply the power to your tool. Electrician’s
rubber gloves and footwear will further
enhance your personal safety.
Don't expose power tools to rain or wet
conditions. Water entering a power tool
will increase the risk of electric shock.
Do not abuse the cord. Never use the cord
to carry the tools or pull the plug from
an outlet. Keep cord away from heat, oil,
sharp edges or moving parts. Replace
damaged cords immediately. Damaged
cords increase the risk of electric shock.
When operating a power tool outside, use
an outdoor extension cord marked “W-A”
eliminates the
or “W.”
use and reduce the risk of electric shock.
These cords are rated for outdoor
Personal Safety
Stay alert, watch what y ou are doing and
use common sense when operating a
power tool. Do not use tool while tired or
under the infl uence of drugs, alcohol, or
medication.
operating power tools may result in serious
personal injury.
Dress properly. Do not wear loose
clothing or jewelry. Contain long hair.
Keep your hair, clothing, and gloves away
from moving parts. Loose clothes, jewelry,
or long hair can be caught in moving parts.
Keep handles dry , clean and free from oil and
grease.
Avoid accidental starting. Be sure switch
is “OFF” before plugging in. Carrying tools
with your fi nger on the switch or plugging
in tools that have the switch “ON” invites
accidents.
Remove adjusting keys or wrenches
before turning the tool “ON”. A wrench or
a key that is left attached to a rotating part of
the tool may result in personal injury.
Do not overreach. Keep proper footing
and balance at all times. Proper footing and
balance enables better control of the tool in
unexpected situations.
Use safety equipment. Always wear eye
protection. Dust mask, non-skid safety
shoes, hard hat, or hearing protection must
be used for appropriate conditions.
A moment of inattention while
Tool Use and Care
Use clamps or other practical way to
secure and support the workpiece to a
stable platform. Holding the work by hand or
against your body is unstable and may lead
to loss of control.
Do not force tool. Use the correct tool for
your application. The correct tool will do the
job better and safer at the rate for which it is
designed.
Do not use tool if switch does not turn
it “ON” or “OFF”. Any tool that cannot be
controlled with the switch is dangerous and
must be repaired.
2
Page 3

Disconnect the plug from the power
source before making any adjustments,
changing accessories, or storing the tool.
Such preventive safety measures reduce the
risk of starting the tool accidentally.
Store idle tools out of reach of children
and other untrained persons.
dangerous in the hands of untrained users.
Maintain tools with care. Keep cutting
tools sharp and clean.
tools, with sharp cutting edges are less likely
to bind and are easier to control. An y alteration
or modifi cation is a misuse and may result in
a dangerous condition.
Check for misalignment or binding of
moving parts, breakage of parts, and
any other condition that may affect tool
operation. If damaged, have the tool
serviced before using.
caused by poorly maintained tools. Dev elop a
periodic maintenance schedule for your tool.
Properly maintained
Many accidents are
Tools are
Safety Rules for Router/Shaper Tables
Use only accessories that are
recommended by the manufacturer
for your model. Accessories that may
be suitable for one tool may become
hazardous when used on another tool.
Service
Tool service must be performed only
by qualifi ed repair personnel. Service
or maintenance performed by unqualifi ed
personnel could result in a risk of injury. For
example: internal wires may be misplaced or
pinched, safety guard return springs may be
improperly mounted.
When servicing a tool, use only identical
replacement parts. Follow instructions in
the Maintenance section of this manual.
Use of unauthorized parts or failure to follow
Maintenance Instructions may create a risk
of electric shock or injury. Certain cleaning
agents such as gasoline, carbon tetrachloride,
ammonia, etc. may damage plastic parts.
Read and understand the tool manual
and these instructions for the use of this
table with your router. Failure to follow all
instructions listed below may result in serious
personal injury.
Position the tool with the switch in “easy”
reach so you are not blindly searching for
it. Power tool switches and controls need to
be within your zone in emergency situations.
Fully assemble and tighten all the fasteners
required for this table and mounting the
tool. Do not use the router table until all
assembly and installation steps have been
completed. Also remember to occasionally
check the table clamps and tool to make sure
it is still tight. A loose table is unstable and
may shift in use and cause serious injury.
Make certain the tool is not plugged into
a wall outlet when installing into the table,
making adjustments or changing bits.
Accidental start-up of the tool can cause
injury.
Before operating make sure the entire unit
is placed on a solid, fl at, level surface.
Serious injury could occur if tool is unstable
and tips.
Be certain tool is fully and securely clamped
in the collar, periodically check the base
fastener or clamping tightness. Adjustment
devices must be securely tightened.
Tighten as necessary as the motor can
loosen from the base due to vibration
and may drop or fall unexpectedly when
positioned upside down in a table.
After changing the bits or making any
adjustments, make sure the collet nut
and any other adjustment devices are
securely tightened. Loose adjustment
devices can unexpectedly shift, causing loss
of control, and loose rotating components
will be violently thrown.
Do not use the router table without the
overhead guard.
keeping your hands away from the spinning
blade in case of unintended contact with bit.
Never place your fi ngers under the guard
or near the spinning bit. Never hold the
workpiece on the out-feed side of bit.
Pressing the workpiece against the outfeed side of the fence may cause material
binding and possible kickback pulling your
hand back into the bit.
Router bits are intended for wood, wood
products and plastic only. Not for cutting
or shaping metals. Be sure the workpiece
does not contain nails, etc. before routing.
Cutting a nail or the like will cause the carbides
The guard will aid in
3
Page 4

to be dislodged, fl y toward the operator side,
and possibly strike you or bystanders.
Match the appropriate bit and its speed
to your application. Do not use bits that
have a cutting diameter that exceeds the
capacity of the tool. Overloading the tool
can lead to personal injury or tool failure.
Position and securely clamp the router
bit in the collet before making any cuts.
If the bit becomes loose during operation,
it may fl y up and away from table possibly
striking you or bystanders.
Never use dull or damaged bits. Sharp
bits must be handled with care. Damaged
bits can snap during use. Dull bits require more
force to push the workpiece, possibly causing
the bit to break or material to kick back.
The router table is primarily designed to
cut fl at, straight and squared materials,
we do not recommend cutting material
that is warped, wobbly or otherwise
unstable. If the material is slightly
curved cut the material with the concave
side against the table or fence. Cutting
the material with the concave side up or
away from table may cause the warped or
wobbly material to roll; causing you to lose
control; kickbac k and serious personal injury
may result.
Never start the tool when the bit is
engaged in the material. The bit cutting
edge may grab the material causing loss of
control of the workpiece.
Feed the workpiece against the rotation of
the bit. The bit rotates counter-clockwise
as viewed from the top of table. Feeding
the work in the wrong direction will cause the
workpiece to “climb” up on the bit and may
lead to loss of control during operation.
Use push sticks and other jigs to hold
down the workpiece and keep your hands
away from the spinning blade. Router
cuts are blind cuts but the bit still protrudes
through the table and you must be aware
of the position of your hands relative to the
spinning bit.
Use of auxiliary in-feed and out-feed
supports is strongly suggested for long
or wide workpieces. Long workpieces can
fl ip offthe table or cause the table to tip over if
notfully supported.
Use the adjustable fence in straight
cutting applications. When routing along
an entireedge of the work, the fence and
adjustable support wedge will help maintain
stability.
Do not place material between router
bitand the fence while routing the edge.
This placement may cause the material to
become wedged, making kickback possible.
Never touch the bit during or immediately
after use. Contact with a spinning bit will
cause injury and after use the bit is too hot to
be touched by bare hands.
Do not use the table as workbench or
worksurface. The table is not intended to be
used as a workbench or work surface other
than for routing material. Using it for purposes
other than routing may cause damage and
make it unsafe to use in routing.
Never stand on the table or use as ladder
or scaffolding. Serious injury could occur
if the table is tipped or the cutting tool is
accidentally contacted. Do not store materials
on or near the table such that it is necessary to
stand on the table or its stand to reach them.
Use only Dremel replacement parts and
accessories. Any others ma y create a hazard.
Shaper/Router Table, Model 231
ATTACHMENT FOR USE WITH DREMEL ROTARY MODELS
100, 200, 300, 400XPR, 275, 285, 395, 398, 800, 4000, 8200
ATTENTION:
manual carefully before using your Dremel
Shaper/Router Table. Retain instructions for
future reference. This attachment will convert
Read entire instruction
Dremel Rotary Tools to a Shaper/Router
Table for edge forming, routing, grooving,
shaping, sanding edges, jointing, etc
4
Page 5
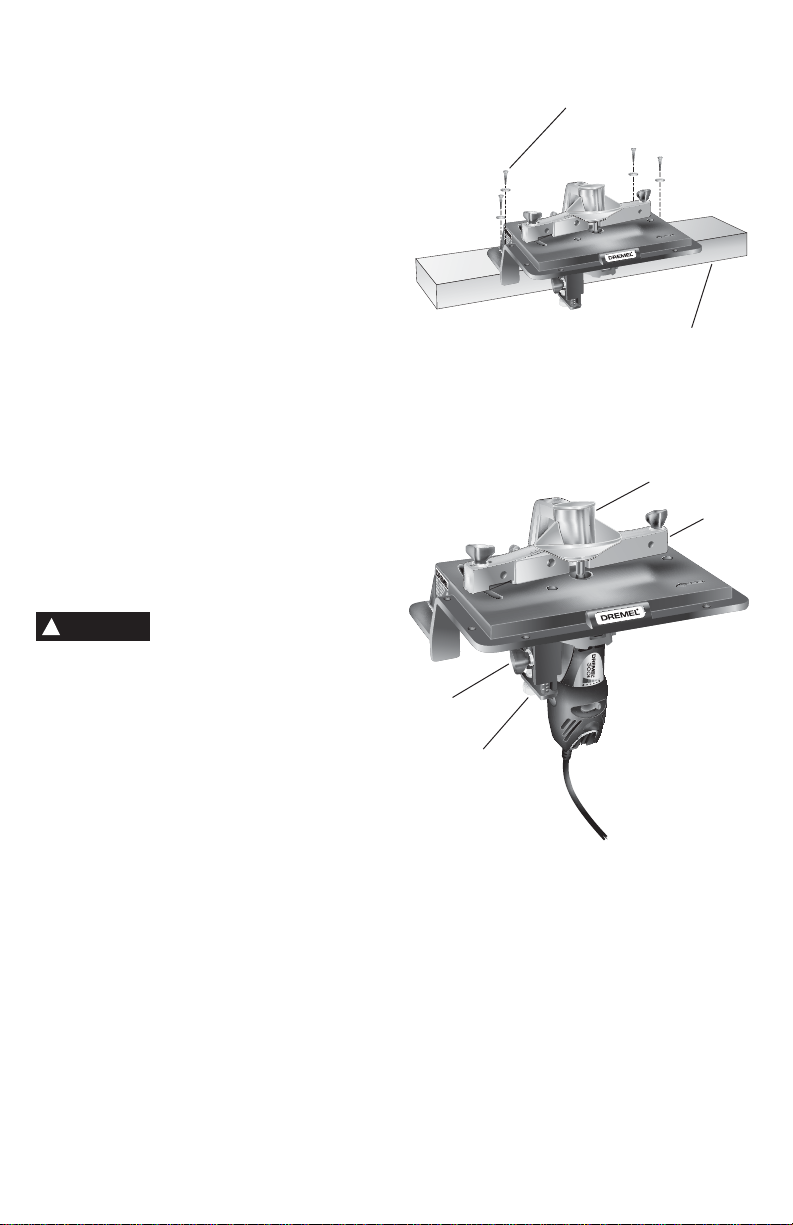
Mount T able to Workbench
The SHAPER/ROUTER TABLE comes
assembled ready to mount to the workbench.
After determining table location, predrill the
bench using a 1/8" diameter drill at the four
mounting hole locations. Secure table to the
bench using the (4) #10 x 1" wood screws,
and washers. (Included with the Shaper/
Router T ab le). (See Fig. 1)
Alternative mounting option: To make your
shaper table more portable, mount to piece
of 2" x 4". Then easily clamp to your work
bench as shown in Fig. 1.
Install Rotary Tool to Table
1. Loosen the clamp knob and turn depth
adjustment knob to lower tool holder .
2. With the Rotary Tool unplugged from a
power source, remove the threaded
housing cap off of tool and set housing cap
aside. The housing cap must be reinstalled
when not using Shaper/Router table.
3. Place tool into attachment with shaft lock
button and on/off button facing forward.
4. Thread locking nut clockwise onto the
threaded portion of your Rotary Tool and
securely tighten with the provided
wrench (See Fig. 2).
Fig. 1
Fig. 2
(4) #10 x 1"Wood
Screws &
Washers
Use 2' x 4" as
alternative
mounting option
Guard
Fence
!
WARNING
manual before using this accessory.
Read and understand these
instructions and the tool
Clamp
Knob
5
Depth
Adjustment
Screw
On/off switch
must face
forward so
that turning off
tool is readily
accessible
Page 6

1. When installing router bits, be sure the
Installing Router Bits
power cord is unplugged, then remove
the tool from the Shaper/Router Table. Fit
the router bit shank into the collet allowing
a maximum of 5/8" to protrude past the
collet nut. Use the shaft button on your
rotary tool and wrench to secure the bit.
(See Fig. 3)
2. Loosen the clamp knob and turn the
depth adjustment screw to set cutting
depth. Depth of cut will be the amount the
bit extends above the shaper/router
table.
Cutting Depth Adjustment
Adjustment markings on the side of the
tool holder facing outward are marked in
inches and millimeters. View the markings
prior to starting your project. Turn the depth
adjustment screw to set desired depth. To
ensure proper settings, rout and measure
cut on scrap material. (See Fig. 4)
Fig. 3
Clamp
Knob
Holder
Assembly
Large Knob
Tool
Depth
Adjustment
Screw
Depth of Cut
5/8"
Table
The router spindle turns in a counter
Router Feed Direction
clockwise direction when viewed from abov e
the table. For best control and quality of cut,
feed the work into the bit in the direction that
the bit will tend to pull the work to the fence.
(Incorrect feed direction will result in the bit
trying to pull the wood through faster than
you want. This is called climb cutting.) Feed
the workpiece from right to left as shown.
Feed direction is extremely important when
using a pilot bit freehand on the edge of a
workpiece as well as when using the fence
with all bits. (See Fig. 5)
Routing T able Tips
1. Wrong Direction – Hard to control.
2. Feeding too fast – Overloads motor.
3. Dull bit – Overloads motor.
4. Cutting too large or deep in one pass –
Overloads motor.
5. Feeding too slow – Leav es friction b urns
on work.
Fig. 5
Fig. 4
Millimeters
in 5mm increments
Depth Adjustment Markings
Inches in 1/8 inch
increments
Direction
Feed Direction Without Fence Feed Direction With Fence
6
Feed
Arrow
Page 7
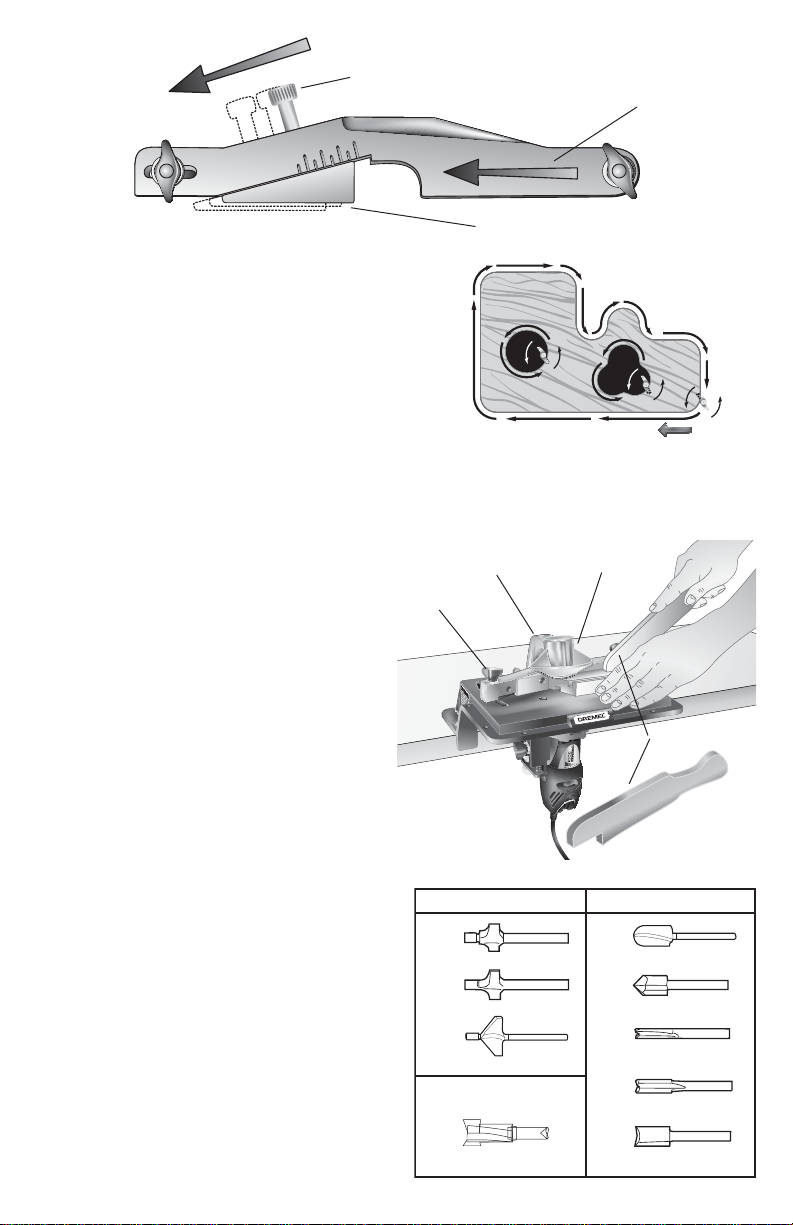
Fig. 6 Fence
Clamp Screw Nut
Routing Using the Fence
1. Unplug the rotary tool before making any
fence adjustments or bit changes. Feed
the work against the rotation of the bit
as shown. (See Fig. 7) Most fence cutting
is done with the support wedge adjusted
to the right, where it is in line with the
fence. (See Fig. 6)
2. Center cylinder of the guard can be
adjusted up when making cuts using the
fence. Loosen thumb nut, lift the cylinder
up and secure by tightening thumb nut.
(See Fig. 8)
3. When shaping small pieces or when
fi nishing the cut on narrow, long pieces,
use a push stick. Use 1/4" x 2" x 8" piece
of lumber notched as shown to make
this push stick. (See Fig. 8) It will enable
you to keep your hands away from the
cutting area.
4. To cut a straight groove, install the bit
and set the depth of cut using the depth
adjustment screw as shown in Fig. 3.
Loosen large knob on left end of fence
and swing fence assembly to proper
distance from bit to give desired groove
location. Retighten large knob. Take a
trial cut on scrap lumber to check depth
and location of groove.
5. When planing the entire edge of a
workpiece, the support wedge may be
adjusted to support the workpiece on the
left side of the table. Take a trial cut
about 2" long and measure the amount of
stock removed. Turn rotary tool off.
Loosen clamp screw nut and slide wedge
to left until wedge contacts cut edge of
workpiece. Retighten clamp screw nut.
Workpiece will now have support on
both sides of the router bit.
When removing more than 1/16" of
mater ial from a long edge, if the support
wedge is not adjusted properly, the edge
will not be planed evenly.
Feed Direction
Support Wedge
Fig. 7
Feed Direction for Streight Cuts
with Fence
Fig. 8
Thumb Nut
Center Cylinder
(not shown)
Large Knob
Piloted Router Bits
612
615
618
Keyhole Bit
655
Router Bits
617
640
650
652
654
Push Stick
7
Page 8
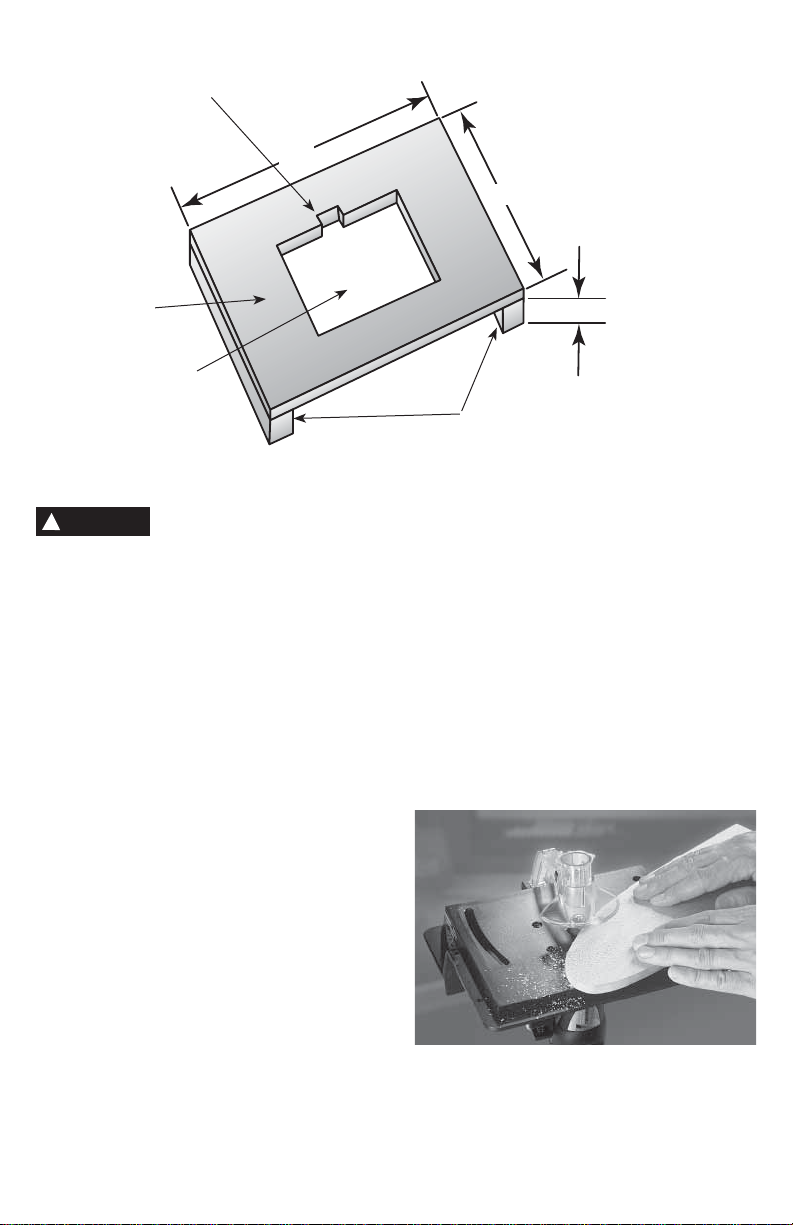
Fig. 9
1-1/2" Slot to Clear Guard
16"
12"
3/8" Plywood
Rectangular Hole
to Fit Over Table
!
WARNING
accessory and fence while routing or
sanding edge. This placement may cause
material to wedge making kickback possible.
Do not place material
between router bit or
Routing Using Pilot Bits
1. When bits with pilots are to be used,
move the fence back only enough to allow
the amount of cut to be made. Keeping
the fence close to the bit allows the fence
to serve as a rear guard. In special cases
when the fence must be remo ved from the
table, adjust the center cylinder of the
guard down to provide protection from
revolving cutter.
2. Only piloted bits can be used without the
fence. The workpiece should be kept
between the cutter and the operator, and
fed from right to left.
3. Feed the workpiece past the cutter
without stopping and with a consistent
speed. A change in feed or a dwell wil
cause an irregular cut.
1-1/2"
1-1/2" High Supports
on Both Ends Will Rest on Bench
secure using (8) #10 wood screws, 1/2" in
length. Support the table at both ends by
securing 1-1/2" high lumber supports to the
plywood base. (See Fig. 9)
(Hardware not included)
Drum Sanding
The Shaper/Router Table is also ideal for
drum sanding irregular shaped parts as
shown. Use Drum Sander 407 (1/2") or 430
(1/4"), with or without the fence assembly.
(See Fig. 10)
Fig. 10
Expanded T able Work Surface
The shaper/router table is designed to easily
expand the size of the working surface. Use
3/8" thick solid core plywood. Cut a rectangular
hole in the plywood to fi t over the table and
8
Page 9

Conseils de sécurité pour les outils électriques
!
AVERTISSEMENT
électrique, un incendie et/ou des blessures personnelles graves..
Maintenir le lieu de travail propre et bien
éclairé. Des établis encombrés et des endroits
sombres sont la cause d’accidents.
Ne pas utiliser d’outils électriques dans des
atmosphères explosives ou en présence de
liquides, gaz et poussière infl ammables. Les
outils électriques créent des étincelles qui peuvent
enfl ammer la poussière ou les vapeurs.
Maintenir les spectateurs, les enfants et les
visiteurs à l’écart lors de l’utilisation d’un outil
électrique. Les distractions peuvent causer une
perte du contrôle.
Sécurité électrique
Les outils à double isolation sont équipés
d’une fi chepolarisée (une des broches est plus
large que l’autre).Cette fi che s’adaptera dans
une prise polarisée d’uneseule manière. Si
la fi che ne s’adaptait pasparfaitement dans la
prise, l’inverser. Si elle nes’adapte toujours
pas, communiquer avec unélectricien qualifi é
pour faire installer une prisepolarisée. Ne pas
modifi er la fi che d’une manièrequelconque. La
double isolation
électrique à trois fi ls pour mise à la terre et d’un
système d’alimentation électrique mis à la terre.
Avant de brancher l’outil, s’assurer que la tension
fournie à la prise correspond à la tension indiquée
sur la plaque signalétique. Ne pas utiliser d’outils
étiquetés «CA seulement» avec une alimentation
électrique à courant continu.
Éviter tout contact du corps avec des objets mis
à la terre comme tuyaux, radiateurs, cuisinières
et réfrigérateurs. Il existe un risque accru de
décharge électrique si votre corps est mis à la
terre. Si le fonctionnement de l’outil électrique
dans des endroits humides ne peut être évité, un
circuit comportant un interrupteur de fuite à la terre
doit être utilisé pour alimenter l’outil. Des gants et
des chaussures encaoutchouc pour électriciens
amélioreront encore votresécurité personnelle.
Ne pas laisser les outils électriques exposés à
la pluie ou à l’humidité. L’eau pénétrant dans un
outil électrique augmentera le risque de décharge
électrique. Éviter d’endommager le cordon.
Ne jamais utiliser le cordon pour transporter
l’outil ou débrancher la fi che de la prise. Maintenir
le cordon à l’écart de chaleur , d’huile, des bords
coupants ou de pièces mobiles. Remplacer les
cordons endommagés immédiatement. Les
cordons endommagés augmentent le risque de
décharge électrique.
Veuillez lire et bien comprendre toutes les directives. Si les directives
indiquées cidessous ne sont pas respectées, il peut en résulter une décharge
VEUILLEZ CONSERVER CES DIRECTIVES
Lieu de travail
élimine le besoin d’un cordon
Lors de l’utilisation d’un outil électrique à
l’extérieur, utiliser un cordon de rallonge électrique
pour l’extérieur, étiqueté «W-A» ou «W». Ces
cordons sont étalonnés pour usage à l’extérieur
et réduisent les risques de décharge électrique.
Soyez alerte, faites attention à ce que vous faites
et faites usage de bon sens lors de l’utilisation
d’un outil électrique. N’utilisez pas un outil si
vous êtes fatigué ou sous l’infl uence de drogue,
alcool ou médicament. Un moment d’inattention
lors de l’usage d’outils électriques peut résulter en
de graves blessures personnelles.
Habillez-vous adéquatement. Ne portez pas
de vêtements lâches ou de bijouterie. Retenez
les cheveux longs. Maintenez les cheveux,
les vêtements et les gants à l’écart de pièces
mobiles. Des vêtements lâches, de la bijouterie
ou des cheveux longs peuvent se prendre dans les
pièces mobiles. Maintenir les poignées propres,
sèches et exemptes de graisse et d’huile.
Éviter toute mise en marche accidentelle.
S’assurer que le contacteur est sur «OFF» (arrêt)
avant de brancher l’outil. Le fait de transporter
des outils avec le doigt sur le contacteur ou de
brancher des outils avec le contacteur en position
«ON» (marche) est souvent la cause d’accidents.
Enlever les clés de réglage avant de mettre
l’outil en marche. Une clé restée attachée sur une
pièce rotative de l’outil peut causer des blessures
personnelles.
Ne pas s’étirer pour atteindre. Maintenir un bon
équilibre en tout temps. Un bon équilibre assure
un meilleur contrôle de l’outil dans des situations
inattendues.
Utiliser l’équipement de sécurité. Toujours
porter des lunettes protectrices. Des masques
anti-poussières, des chaussures de sécurité
antidérapantes, un casque ou une protection
antibruit doit être utilisé selon les conditions.
Utilisation et entretien de l’outil
Utiliser une bride de fi xation ou toute autre pince
de travail pour maintenir et soutenir la pièce de
travail d’une manière stable. Le fait de tenir la
pièce à la main ou contre le corps est instable et
peut causer une perte du contrôle.
Ne pas forcer l’outil. Utiliser le bon outil en
fonction de l’application. Le bon outil fera un
meilleur travail et plus sécuritairement pour lequel
il a été conçu.
9
Sécurité personnelle
Page 10

Ne pas utiliser l’outil si le contacteur «MARCHE/
ARRÊT» ne fonctionne pas. T out outil qui ne peut
être contrôlé par le contacteur est dangereux et
doit être réparé.
Débrancher la fi che de la prise d’alimentation
avant d’effectuer tout réglage, changement
d’accessoires ou rangement de l’outil. Des
mesures de sécurité préventives réduisent le
risque de mise en marche accidentelle de l’outil.
Ranger les outils hors d’atteinte des enfants
et d’autres personnes non formées. Les outils
sont dangereux dans les mains d’un utilisateur
inexpérimenté.
Entretenir les outils avec soin. Maintenir les
outils de coupe bien affûtés et propres. Des
outils adéquatement maintenus avec des bords
de coupe tranchants risquent moins de coincer et
sont plus faciles à contrôler. Toute altération ou
modifi cation est un mésusage et peut résulter en
une situation dangereuse.
Vérifi er le mauvais alignement ou le coincement
des pièces mobiles, le bris des pièces ainsi
que toute autre condition qui peut affecter le
fonctionnement de l’outil. S’il est endommagé,
faire réparer l’outil avant de l’utiliser. De
nombreux accidents sont causés par des outils mal
Directives de sécurité pour les tables à façonner/toupiller
entretenus. Mettre au point un calendrier
d’entretien périodique pour votre outil.
Utiliser uniquement les accessoires qui sont
recommandés par le fabricant pour le modèle.
Les accessoires qui conviennent pour un outil
peuvent devenir dangereux lorsqu’ils sont utilisés
sur un autre.
Service d’entretien
Le service d’entretien de l’outil doit être effectué
uniquement par du personnel de réparation
qualifi é. Le service ou l’entretien effectué par
du personnel inexpérimenté peut résulter en des
risques de blessure. Par exemple : le câblage
interne peut être mal placé ou pincé, les ressorts
de retour des gardes de sécurité peuvent être mal
montés.
Lors de tout service d’entretien d’un outil,
utiliser uniquement des pièces de rechange
identiques. Suivre les directives indiquées dans
la section «Entretien» de ce manuel. L’utilisation
de pièces non autorisées ou le fait de ne pas
suivre les directives d’entretien peut causer un
risque de décharge électrique ou des blessures.
Certains agents de nettoyage commel’essence,
le tétrachlorure de carbone, l’amoniaque, etc.
peuvent endommager les pièces en plastique.
Veuillez lire et comprendre le manuel de l’outil
et ses directives pour l’usage de cette table
avec votre toupie. Si les directives indiquées ci-
dessous ne sont pas respectées, il peut en résulter
de graves blessures personnelles.
Placer l’outil pour que le contacteur soit à «facile
à atteindre» pour éviter d’avoir à le rechercher à
tâtons. Les contacteurs et les commandes d’outils
électriques doivent être dans votre zone visuelle
pour les utiliser en situations d’urgence.
Assembler complètement et serrer toutes les
fi xations requises pour cette table et pour
monter l’outil. Ne pas utiliser la table à toupiller
avant que toutes les étapes d’assemblage et
d’installation aient été terminées. N’oubliez
pas de vérifi er de temps en temps les brides de
fi xation de l’outil pour vous assurer qu’elles sont
bien serrées. Une table desserrée est instable
et peut se déplacer lors de l’usage et causer de
graves blessures.
S’assurer que l’outil n’est pas branché dans
la prise murale lors de l’installation de la
table, lors d’ajustements ou de changement
de mèches. Une mise en marche accidentelle de
l’outil peut causer des blessures.
Avant l’usage, s’assurer que l’unité en entier
est placée sur une surface plate, stable et de
niveau. De graves blessures peuvent se produire
si l’outil est instable et s’il bascule.
S’assurer que l’outil est bien bridé dans le
collier de maintien, en vérifi ant périodiquement
la fi xation de la base ou le serrage de la bride.
Les dispositifs d’ajustement doivent être serrés
fermement. Serrer au besoin car le moteur peut
se desserrer de l a base à la suite de vibrations
et peut basculer ou tomber soudainement lorsqu’il
est monté à l’envers dans une table.
Après avoir changé les mèches ou avoir effectué
tout ajustement, s’assurer que l’écrou de pince
ainsi que les autres dispositifs d’ajustement
sont bien serrés. Des dispositifs d’ajustement
desserrés peuvent causer un déplacement
inattendu, une perte de contrôle, et des éléments
rotatifs peuvent être projetés violemment.
Ne pas utiliser la table à toupiller sans le garde
supérieur. Ce garde aidera à maintenir vos mains
à l’écart de la lame en mouvement dans le cas de
contact inattendu avec la mèche.
Ne jamais placer les doigts sous le garde ou
près de la mèche en mouvement. Ne jamais
tenir la pièce de travail par le côté de sortie
d’alimentation de la mèche. En appuyant sur la
pièce de travail contre le côté de sortie de la mèche,
le matériau risque de se coincer et causer un recul
qui pourrait forcer votre main vers la mèche.
Les mèches à toupiller sont conçues pour usage
uniquement avec du bois, des produits de bois et
de plastique. Ne pas couper ou former de métaux.
10
Page 11

S’assurer que la pièce de travail ne contient
aucun clou, etc. avant le toupillage. Le fait de
couper un clou ou autre pièce métallique risque
de causer le dégagement des pointes de carbure
et les projeter vers l’utilisateur ou toute autre
personne.
Faire correspondre la mèche et sa vitesse à votre
application. Ne pas utiliser de mèches ayant un
diamètre de coupe excédant le rendement de
l’outil. Une surcharge de l’outil peut causer des
blessures personnelles ou une défaillance de
l’outil.
Placer et brider sécuritairement la mèche à
toupiller dans la pince avant d’effectuer toute
coupe. Si la mèche se desserre au cours de
l’usage, elle peut être projetée de la table et vous
heurter ou d’autres personnes.
Ne jamais utiliser de mèches émoussées
ou endommagées. Les mèches tranchantes
doivent être manipulées avec soin. Des mèches
endommagées peuvent casser lors de l’usage. Des
mèches émoussées exigent plus de force pour
pousser la pièce de travail, risquant de casser la
mèche ou de faire sauter la pièce.
La table à toupiller est principalement conçue
pour couper des pièces plates, droites ou
carrées; nous ne recommandons pas de couper
des matériaux gondolés, mous ou instables.
Si la pièce est légèrement incurvée, la couper
avec le côté concave contre la table ou le guide.
Le fait de couper la pièce avec le côté concave ou
incurvé vers le haut peut causer un déplacement
de la pièce, résultant en une perte du contrôle, un
recul de la pièce et des blessures personnelles
graves peuvent en résulter.
Ne jamais démarrer l’outil lorsque la mèche
est prise dans la pièce. Le bord d’attaque de la
mèche peut agripper la pièce et causer une perte
du contrôle de la pièce.
Alimenter la pièce de travail contre la rotation
de la mèche. La mèche tourne dans le sens antihoraire, vu du dessus de la table. L’alimentation
de pièce dans la mauvaise direction risque de
causer un déplacement de la pièce sur la mèche et
résulter en une perte du contrôle lors de la coupe.
Utiliser des pièces et autres dispositifs pour
maintenir la pièce et garder vos mains à
l’écart de la lame en mouvement. Les travaux
de toupillage sont des coupes aveugles, mais
la mèche dépasse de la table et vous devez être
conscient de la position de vos mains en fonction
de celle de la mèche.
L’usage de supports d’alimentation auxiliaires
est fortement suggéré pour les pièces de travail
longues ou surdimensionnées. Les pièces
surdimensionnées peuvent tomber de la table ou
causer un basculement de la table si elles ne sont
pas totalement soutenues.
Utiliser un guide ajustable pour les applications
de coupe droite. Lors de toupillage le long du
bord de la pièce de travail, le guide et le coin de
support ajustable aidera à maintenir la stabilité.
Ne placer aucune pièce entre la mèche de la
toupie et le guide lors du toupillage d’un bord.
Ceci peut causer un coincement de la pièce et
risque de causer un recul.
Ne jamais toucher la mèche pendant l’usage
ou immédiatement après. Tout contact avec une
mèche en mouvement causera des blessures et
après l’usage, la mèche est trop chaude pour être
touchée à mains nues.
Ne pas utiliser la table comme établi ou surface
de travail. La table n’est pas conçue pour être
utilisée comme un établi ou une surface de travail
autre que pour le toupillage de pièces. Le fait de
l’utiliser pour des usages autre que le toupillage
peut l’endommager et compromettre sa sécurité
lors du toupillage.
Ne jamais monter sur la table ou l’utiliser
comme échelle ou échafaudage. Des blessures
graves pourraient se produire si la table bascule
ou si l’outil est mis en marche accidentellement.
Ne pas ranger de matériaux sur ou près de la table
pour éviter qu’il soit nécessaire de s’appuyer sur la
table ou son support pour les atteindre.
Utiliser uniquement des pièces de rechange et
des accessoires Dremel. T ous les autres peuvent
causer un risque.
Table à façonner/toupiller, modèle 231
ACCESSOIRE POUR USAGE AVEC OUTIL ROTATIF DREMEL MODELES
100, 200, 300, 400XPR, 275, 285, 395, 398, 800, 4000, ET 8200
ATTENTION: Lire les directives complètes de ce
manuel avant d’utiliser la table à façonner/toupiller
Dremel. Conserver ces directives pour vous y
reporter à l’avenir . Cet accessoire transformera
votre outil rotatif Dremel en une table à façonner/
toupiller pour faire des bordures, toupiller , rainurer,
façonner, poncer des bords et faire des joints, etc.
11
Page 12

Montage de la table sur un établi
La table à façonner/toupiller est livrée assemblée,
prête au montage sur un établi. Après avoir
déterminé l’emplacement de la table, prépercer
l’établi avec un foret d’un diamètre de 1/8 po aux
quatre emplacements des trous de montage. Fixer
la table à l’établi avec (4) vis à bois No. 10 x 1
po et rondelles (Incluses avec la table à façonner/
toupiller). (Voir fi gure 1.)
Autre option de montage : Pour rendre votre
table à façonner plus portative, montez-la sur un
morceau de 2 x 4 po puis, bridez-la aisément sur
votre établi comme illustré à la fi gure 1.
Montage de l’outil rotatif dans la table
1. Desserrer le bouton de maintien et tourner
lebouton de réglage de la profondeur pour
abaisserle porte-outils inférieur.
2. Après avoir débranché l’outil rotatif de sa source
d’alimentation électrique, retirez le capuchon
fi leté de protection de l’outil et mettez-le de
côté. Le capuchon de protection doit être
réinstallé lorsque vous n’utilisez pas la table de
la toupie/machine à façonner.
3. Placez l’outil dans l’équipement de façon que
le bouton de verrouillage de l’arbre et le bouton/
l’interrupteur de marche/arrêt soient orientés
tous les deux vers l’avant.
4. Enfi lez l’écrou de blocage dans le sens des
aiguilles d’une montre sur la partie fi letée de
votre outil rotatif et serrez solidement avec la
clé fournie (voir fi gure 2)
!
AVERTISSEMENT
ainsi que le manuel de l’outil avant d’utiliser cet
accessoire.
Veuillez lire et bien
comprendre ces directives
fi g. 1
fi g. 2
Bouton de
maintien
réglage de la
(4) vis à bois No.
et rondelles
Vis de
profondeur
10 x 1 po
Utiliser un 2 x 4 po
comme autre
option de montage
Garde
Guide
L’interrupteur de
marche/arrêt doit
être orienté vers
l’avant de façon
qu’il soit facile
d’éteindre l’outil
en cas de besoin.
12
Page 13

Mise en place des mèches de toupie
1. Lors de la mise en place de mèches de toupie,
s’assurer de débrancher le cordon d’alimentation,
puis enlever l’outil de la table à façonner/
toupiller. Placer la tige de la mèche à toupie
dans la pince en laissant dépasser un maximum
de 5/8 po de l’écrou de pince. Utiliser le bouton
de la broche de votre outil rotatif et une clé pour
serrer fermement la mèche. (Voir fi gure 3.)
2. Desserrer le bouton de maintien et tourner
la vis de réglage de profondeur pour ajuster
la profondeur de coupe. La profondeur de
coupe sera la longueur de la mèche qui
dépassera au-dessus de la table à façonner/
toupiller.
Réglage de la profondeur de coupe
Les marques de réglage sur le côté extérieur
du porteoutils sont calibrées en pouces et en
millimètres. Examiner les marques avant de
commencer votre projet. Tourner la vis de réglage
de profondeur pour régler la profondeur voulue.
Pour assurer les bons réglages, effectuer un essai
de coupe et mesurer la profondeur sur une pièce
de rebut. (Voir fi gure 4.)
Direction d’alimentation de la toupie
L’arbre de la toupie tourne dans une direction
antihoraire vue du dessus de la table. Pour assurer
le meilleur contrôle et une bonne qualité de la
coupe, pousser la pièce à travailler vers la mèche,
dans la direction où la mèche aura tendance à
tirer sur le travail vers le guide. (Une direction
d’alimentation incorrecte aura tendance à tirer
sur le bois plus rapidement que vous le désirez,
et la mèche aura tendance à grimper sur le bois.)
Alimenter la pièce de la droite vers la gauche,
comme illustré. La direction d’alimentation est
extrêmement importante lors de l’utilisation d’une
mèche pilote à main levée sur le bord d’une pièce
ainsi que lors de l’usage d’un guide avec toutes les
autres mèches. (Voir fi gure 5.)
Conseils pour table à toupiller
1. Mauvaise direction – Diffi cile à contrôler.
2. Alimentation trop rapide – Surcharge du moteur .
3. Mèche émoussée – Surcharge du moteur.
4. Coupe trop longue ou trop profonde pour
un seul passage – Surcharge du moteur.
5. Alimentation trop lente – Marque des brûlures
de friction sur la pièce.
fi g. 3
Grand bouton
Bouton de
maintien
Ensemble
porte-outils
Vis de réglage
de profondeur
fi g. 4
Millimètres
par intervalles
de 5mm
Marques de réglage de profondeur
Profondeur de
la coupe
5/8 po
Table
Pouces par
intervalles
de 1/8 po
fi g. 5
Direction d’alimentation sans guide Direction d’alimentation avec guide
13
Flèche de
direction
d’alimentation
Page 14

fi g. 6 Guide
Écrou de la vis de maintien
Direction d’alimentation
Coin de support
1. Débrancher l’outil rotatif avant d’effectuer tout
Toupillage avec le guide
réglage du guide ou tout changement de
mèche. Alimenter le travail contre la rotation
de la mèche, comme illustré. (Voir fi gure 7.)
La plupart des coupes avec guide sont
effectuées avec le coin de support ajusté à
droite, aligné avec le guide. (Voir fi gure 6.)
2. Le cylindre central du garde peut être ajusté
vers le haut lors de coupes effectuées avec
le guide. Desserrer l’écrou à oreilles, relever le
cylindre et le sécuriser en serrant l’écrou à oreilles.
(Voir fi gure 8.)
3. Lors du façonnage de petites pièces ou lors de
la fi nition d’une coupe sur des pièces longues et
étroites, utiliser un poussoir. Utiliser un morceau
de bois de 1/4 x 2 x 8 po, encoché comme
illustré pour fabriquer ce poussoir. (Voir fi gure
8.) Il vous permettra de maintenir vos mains à
l’écart de la zone de coupe.
4. Pour couper une rainure droite, monter la
mèche et régler la profondeur de coupe avec la
vis de réglage de profondeur, comme illustré
à la fi gure 3. Desserrer le grand bouton du côté
gauche du guide et placer l’ensemble du guide
à la distance voulue de la mèche pour obtenir
l’emplacement voulu de la rainure. Resserrer
le grand bouton. Faire une coupe d’essai sur
un morceau de bois de rebut pour vérifi er la
profondeur et l’emplacement de la rainure.
5. Lors du rabotage d’un bord d’une pièce de
travail, le coin de support peut être ajusté pour
supporter la pièce de travail du côté gauche de
la table. Faire une coupe d’essai d’environ 2
po. de long et mesurer la quantité de bois
enlevée. Arrêter l’outil rotatif. Desserrer l’écrou
de la vis de maintien et glisser le coin vers
la gauche jusqu’à ce qu’il entre en contact avec
le bord coupé de la pièce de travail. Resserrer
l’écrou de la vis de maintien. La pièce de travail
sera maintenant supportée des deux côtés de la
mèche.
Lorsque l’on enlève plus de 1/16 po. d’un bord
long, si le coin de support n’est pas ajusté
comme il faut, le bord ne sera pas raboté
uniformément.
fi g. 7
Direction d’alimentation pour
coupe droite avec guide
fi g. 8
Cylindre central
Grand bouton
Mèches pilotes
612
615
618
Mèche pour trou
de serrure
655
Écrou à oreilles
(non illustré)
Poussoir
Mèches de toupie
617
640
650
652
654
14
Page 15

fi g. 9
Fente de 1-1/2 po pour
permettre le passage
Contreplaqué
de 3/8 po.
Trou rectangulaire
pour adapter sur
la table
du garde
16 po.
12 po.
1-1/2 po.
Supports de 1-1/2 po de haut aux deux
extrémités, à placer sur l’établi
!
AVERTISSEMENT
ou accessoire et le guide lors de toupillage ou du
ponçage de bords. Ceci peut faire coincer la pièce
et causer un recul.
Ne pas placer de pièce
entre la mèche de la toupie
Toupillage avec des mèches pilotes
1. Lorsque des mèches avec pilotes doivent être
utilisées, reculer le guide suffi samment pour
permettre d’effectuer la coupe prévue. Le fait
de maintenir le guide près de la mèche permet
au guide de servir de protecteur arrière. Dans
certains cas où le guide doit être enlevé de la
table, ajuster le cylindre central du garde vers
le bas pour fournir la protection de la mèche en
mouvement.
2. Seules des mèches pilotes peuvent être utilisées
sans le guide. La pièce de travail doit être
maintenue entre la mèche et l’usager et
alimentée de la droite vers la gauche.
3. Alimenter la pièce de travail jusqu’à la mèche
sans vous arrêter et à une vitesse constante. Un
changement d’alimentation ou un ralentissement
causera une coupe irrégulière.
Agrandissement de la surface
de travail de la table
La table à façonner/toupiller est conçue pour
agrandir aisément la surface de travail. Utiliser une
planche de contreplaqué de 3/8 po d’épaisseur.
Découper un trou rectangulaire dans la planche
pour l’adapter au-dessus de la table et la sécuriser
avec (8) vis à bois No. 10, de 1/2 po. de long. Soutenir
la table aux deux extrémités en sécurisant un
morceau de bois de 1-1/2 po. de haut pour soutenir
la base en contreplaqué.
(Boulonnerie non comprise)
(Voir fi gure 9.)
Ponceuse à tambour
La table à façonner/toupiller est aussi idéale
pour le ponçage au tambour de pièces de formes
irrégulières, comme illustré. Utiliser le tambour
de ponçage 407 (1/2 po) ou 430 (1/4 po) avec ou
sans le guide. (Voir fi gure 10.)
fi g. 10
15
Page 16

Reglas de seguridad de la herramienta eléctrica
!
ADVERTENCIA
Lea y entienda todas las instrucciones. No seguir las siguientes instrucciones
puede resultar en una descarga eléctrica, fuego y/o lesiones personales graves.
GUARDE ESTAS INSTRUCCIONES
Area de trabajo
Mantenga su área de trabajo limpia y bien
iluminada. Bancos desordenados y áreas oscuras
promueven accidentes.
No opere herramientas eléctricas en ambientes
explosivos, como en presencia de líquidos
inlfamables, gases o polvo. Las herramientas
eléctricas crean chispas las cuales pueden encender
el polvo o los gases.
Mantenga a las personas, niños y visitantes
lejos mientras que opere una herramienta
eléctrica. Las distracciones pueden hacer que
pierda el control.
Seguridad eléctrica
Las herramientas doblemente aisladas están
equipadas con un enchufe polarizado (una
clavija es más ancha que la otra). Este enchufe
funcionará en un toma de corriente polarizados
únicamente de una manera. Si el enchufe no entra
completamente voltéelo. Si aún no entra, llame a
un electricista califi cado para que instale un toma
de corriente polarizado. No cambie el enchufe de
ninguna manera. El aislamiento
necesidad de un cable tripolar con toma de tierra y
de un sistema de suministro eléctrico con toma de
tierra. Antes de enchufar la herramienta, cerciórese
de que el voltaje de suministro esté dentro del voltaje
marcado en la placa. No use herramientas clasifi cadas
"sólo AC" con suministros de energía DC.
Evite el contacto del cuerpo con superfi cies con
toma de tierra tales como tubos, radiadores,
fogones y neveras. Hay un mayor riesgo de una
descarga eléctrica si su cuerpo está haciendo
contacto a tierra. Si no se puede evitar la operación
de la herramienta en una área húmeda, se debe usar
un Interruptor que regula la falla de la toma de tierra
para suministrar la energía a su herramienta. El
uso de guantes y calzado de caucho de electricista
mejorará su seguridad personal.
No exponga las herramientas eléctricas a la
lluvia o a la humedad. El agua que entre a una
herramienta eléctrica incrementará el riesgo de
descarga eléctrica.
No abuse del cable. Nunca lo use para sujetar
las herramientas o lo hale para desenchufarlas.
Mantenga el cable alejado del calor, aceite,
bordes afi lados o partes en movimiento.
Reemplace inmediatamente un cable en mal
estado. Los cables dañados aumentan el riesgo de
descargas eléctricas.
Cuando opere una herramienta eléctrica a la
intemperie, use una extensión para trabajo
externo marcada “W-A” o “W.”
doble elimina la
Estas extensiones
están clasifi cadas para uso al aire libre y reducen el
riesgo de descarga eléctrica.
Seguridad personal
Manténgase atento, observe lo que está
haciendo y aplique su sentido común cuando
esté operando una herramienta eléctrica. No
use la herramienta cuando esté cansado o bajo
los efectos de drogas, bebidas alcohólicos o
medicamentos. Un momento de desatención
mientras que esté operando una herramienta
eléctrica puede causar lesiones personales serias.
Vístase de manera apropiada. No use ropa
amplia o joyas. Cójase el cabello largo.
Mantenga su cabello, ropa y guantes lejos de
las partes en movimiento. La ropa suelta, joyas
o el cabello largo pueden quedar atrapados en las
partes en movimiento. Mantenga las manijas secas,
limpias y libres de aceite y grasa.
Evite el encendido accidental. Asegúrese que
el interruptor está “APAGADO (OFF)” antes de
enchufar. Sujetar las herramientas con su dedo en
el interruptor o enchufar herramientas que tengan
el interruptor “ENCENDIDO (ON)” promueve
accidentes.
Quite las llaves de ajuste o cualquier objeto
antes de encender la herramienta. Una llave
o herramienta que sea dejada en una parte
rotatoria de la herramienta puede causar lesiones
personales.
No se estire demasiado. Manténgase bien
apoyado en sus pies y en equilibrio en todo
momento. Un apoyo y equilibrio adecuados
permiten un mejor control de la herramienta en
situaciones inesperadas.
Use un equipo de seguridad. Siempre use
protección para sus ojos.Máscara para el polvo,
zapatos con suela antideslizante de seguridad,
casco o protección para sus oídos deben ser
usados para asegurar condiciones adecuadas.
Uso y cuidado de la herramienta
Use abrazaderas o cualquier otra manera
práctica de asegurar y apoyar la pieza de trabajo
a una plataforma estable. Sostener el trabajo con
las manos o contra su cuerpo resulta inestable y
puede conducir a la pérdida de control.
No fuerce la herramienta. Use la herramienta
apropiada para cada aplicación. La herramienta
apropiada hará el trabajo mejor y de manera más
segura al ritmo para el cual fue diseñada.
No use la herramienta si el interruptor no apaga
o prende la herramienta. Cualquier herramienta
16
Page 17

que no puede ser controlada con el interruptor es
peligrosa y debe ser reparada.
Desconecte el enchufe antes de hacer cualquier
ajuste, de cambiar accesorios o de guardar
la herramienta. Estas medidas de seguridad
preventivas reducen el riesgo de encender la
herramienta de manera accidental.
Guarde las herramientas que no estén en uso
lejos del alcance de los niños y personas sin
entrenamiento. Las herramientas son peligrosas
en las manos de usuarios sin entrenamiento.
Cuide las herramientas. Mantenga las
herramientas para cortar afi ladas y limpias. Las
herramientas mantenidas de manera apropiada, con
bordes afi lados son menos propensas a doblarse
y más fáciles de controlar. Cualquier alteración o
modifi cación consiste en un uso inapropiado y
puede causar una situación peligrosa.
Revise que no haya partes en movimiento
desalineadas o dobladas, partes quebradas,
o cualquier otra condición que pueda afectar
la operación de la herramienta. Si está
dañada, la herramienta debe ser reparada
antes de ser usada. Muchos accidentes son
causados por herramientas que no han sido
Normas de seguridad para mesas para buril/moldeador
Lea y entienda el manual de la herramienta y estas
instrucciones para el uso de la mesa con su buril.
No seguir todas las instrucciones a continuación
puede resultar en lesiones personales graves.
Coloque la herramienta con el interruptor a un
fácil acceso de tal manera que no esté buscándolo
ciegamente. Los interruptores y controles de
electricidad de la herramienta deben estar dentro de
su alcance en caso de una emergencia.
Ensamble completamente y apriete todos los
seguros requeridos para esta mesa y para montar
la herramienta. No use la mesa para el buril
hasta que todos los pasos para la instalación y
el ensamble hayan sido completados. T ambién
recuerde revisar ocasionalmente las abrazaderas
de la mesa y la herramienta para asegurarse de
que todavía estén apretadas. Una mesa suelta es
inestable y puede moverse durante el uso causando
lesiones graves.
Cerciórese de que la herramienta no esté enchufada
mientras que la instale en la mesa, haga ajustes
o cambie de brocas. El encendido accidental de la
herramienta puede casuar lesiones.
Antes de operar, cerciórese de que la unidad entera
esté en una superfi cie fi rme, plana y nivelada.
Pueden presentarse lesiones graves si la herramienta
está inestable y se tambalea.
Asegúrese de que la herramienta esté bien
asegurada en el collar, periódicamente revise el
seguro de la base y que las abrazaderas estén
apretadas. Las piezas de ajuste deben estar
17
mantenidas adecuadamente. Desarrolle un
calendario de mantenimiento periódico para su
herramienta.
Use únicamente accesorios recomendados
por el fabricante de su modelo. Los accesorios
adecuados para una herramienta pueden resultar
peligrosos si se usan en otra.
Reparación
La reparación de la herramienta debe ser
realizada únicamente por personal califi cado.
La reparación o el mantenimiento realizados por
personal no califi cado puede causar el riesgo de
lesiones. Por ejemplo, los cables internos pueden
ser mudados de lugar o chuzados, los resortes
que retornan la barrera pueden ser montados
inadecuadamente.
Cuando repare una herramienta use únicamente
repuestos idénticos. Siga las instrucciones en
la sección de mantenimiento de este manual. El
uso de repuestos no autorizados o no seguir las
Instrucciones de mantenimiento pueden ocasionar
el riesgo de descarga eléctrica o lesiones. Ciertos
agentes limpiadores como gasolina, tetracloruro
de carbono, amoniaco, etc., pueden estropear las
partes plásticas.
apretadas de manera segura.
necesario para que el motor no se suelte de la base
debido a la vibración y pueda caerse inesperadamente
cuando se coloque al revés en la mesa.
Después de cambiar las brocas o hacer cualquier
ajuste, asegúrese de que la tuerca del collarín y
cualquier otra pieza de ajuste estén apretadas de
manera segura. Las piezas de ajuste sueltas pueden
moverse inesperadamente, causando la pérdida de
control, y los componentes rotatorios sueltos serán
arrojados violentamente.
No use la mesa para el buril sin la protección
superior. La protección le ayudará a mantener
sus manos lejos de la cuchilla giratoria en caso de
contacto involuntario con la broca.
Nunca ponga sus dedos bajo la protección o cerca
de la broca girando. Nunca sostenga la pieza
de trabajo por el lado que la broca va a hacer el
agujero.
contraria a la salida de la broca puede causar que el
material se trabe y retroceda empujando su mano
hacia la broca.
Las brocas buriladoras son diseñadas para madera,
y productos de madera y plástico únicamente. No
para cortar o dar forma a metales. Asegúrese de
que la pieza de trabajo no tenga puntillas, etc.
antes de burilar. Hacer un corte en una puntilla
causará que los carburos se desprendan, vuelen
hacia el operador y posiblemente lo golpeen a usted
o a alguien cerca.
Presionar la pieza de trabajo en dirección
Apriete tanto como sea
Page 18

Elija la broca apropiada y su velocidad de
acuerdo con su aplicación. No use brocas que
tengan un diámetro de corte que exceda la
capacidad de la herramienta. Sobrecargar la
herramienta puede causar lesiones personales o
falla de la herramienta.
Coloque y sujete de manera segura la broca
buriladora en el collarín antes de empezar
cualquier corte. Si la broca se afl oja durante su
operación puede volar y posiblemente golpearlo a
usted o a alguien cerca.
Nunca use brocas sin fi lo o dañadas. Las brocas
afi ladas deben manejarse con cuidado. Las
brocas dañadas pueden romperse durante su
uso. Las brocas sin fi lo requieren más fuerza
para empujar la herramienta, ocasionando la
posibilidad de que la broca se quiebre o que el
material retroceda.
La mesa para el buril está diseñada
primordialmente para cortar materiales planos,
rectos y cuadrados, no recomendamos cortar
material deformado, poco fi rme o inestable. Si
el material es ligeramente curvo córtelo con el
lado cóncavo contra la mesa o la barrera. Cortar
el material con el lado cóncavo hacia arriba puede
hacer que el material deforme o inestable dé
vueltas, haciendo que pierda el control, retroceda
y cause lesiones personales graves.
Nunca encienda la herramienta cuando la broca
esté engranada en el material. El fi lo de la broca
de corte puede agarrar el material causando la
pérdida de control de la pieza de trabajo.
Avance con la pieza de trabajo en contra de la
rotación de la broca. El eje del buril gira en
sentido contrario de las manecillas del reloj
cuando se ve desde encima de la mesa. Avanzar
en una dirección contraria causará que la pieza de
trabajo trate de montarse en la broca y cause la
pérdida de control durante la operación.
Use palos de presión o cualquier otra guía
para sostener la pieza de trabajo y mantener
sus manos alejadas de la cuchilla girando. Los
cortes del buril son cortes ciegos pero la broca
sale de todas maneras a través de la mesa y usted
debe estar consciente de la posición de sus manos
con respecto a la broca girando.
El uso de apoyos auxiliares para avanzar es
fuertemente aconsejado en piezas largas o
anchas. Las piezas largas pueden salirse de la
mesa o causar que la mesa se voltee si no está
apoyada fi rmemente.
Use la barrera ajustable para cortes rectos.
Cuando burile a lo largo de todo el borde de una
pieza, la barrera y la cuña de apoyo ajustable le
ayudarán a mantener la estabilidad.
No coloque el material entre la broca buriladora
y la barrera mientras que burile el borde. Esta
posición puede causar que el material se bloquee
haciendo posible que rebote.
Nunca toque la broca durante o inmediatamente
después de su uso. El contacto con una broca
girando causará lesiones y después de su uso la
broca está muy caliente para ser tocada con las
manos.
No use la mesa como banco de trabajo o
superfi cie de trabajo para otra cosa que no sea
para burilar. El uso para propósitos diferentes a
burilar puede causar daños y volverla peligrosa
para burilar.
Nunca se pare en la mesa o la use como escalera
o andamio. Lesiones graves pueden ocurrir si la
mesa se voltea o la herramienta de corte se toca
accidentalmente. No mantenga materiales sobre o
cerca de la mesa de tal manera que sea necesario
pararse en la mesa o en su pie para alcanzarlos.
Use sólo repuestos y accesorios Dremel.
Cualquier otro puede ocasionar peligros.
Mesa para moldeador/buril, modelo 231
ACCESORIO PARA USAR CON LOS MODELOS ROTATORIOS DE DREMEL
100, 200, 300, 400XPR, 275, 285, 395, 398, 800, 4000, Y 8200
ATENCION: Lea cuidadosamente el Manual de
Instrucciones completo antes de usar su mesa para
Moldeador/Buril Dremel. Guarde las instrucciones
para futura consulta. Este accesorio convertirá su
herramienta rotatoria Dremel en una mesa para
Moldeador/Buril para bordear, burilar, acanalar,
moldear, lijar bordes, articular, etc.
18
Page 19

Montar la tabla al banco de trabajo
La mesa para moldeador/buril viene ensamblada
y lista para montar en el banco de trabajo. Después
de determinar la ubicación de la mesa, perfore
previamente el banco usando una broca de 1/8" de
diámetro en la posición de los cuatro agujeros de
montaje. Asegure la mesa al banco usando los (4)
tornillos # 10 x 1" y las arandelas (incluidos con
la mesa para moldeador/buril) (vea la fi gura 1).
Opción alternativa para montaje: para hacer su
mesa para moldeador/buril más portátil, monte
la pieza de 2" x 4". Después asegure fácilmente su
banco de trabajo como se muestra en la fi gura 1.
Instalar la herramienta rotatoria a la mesa
1. Afl oje la perilla de la abrazadera y gire la perilla
de ajuste de profundidad para bajar el soporte de
la herramienta.
2. Con la herramienta rotativa desenchufada
de una fuente de alimentación, retire la
tapa de la carcasa roscada de la herramienta
y ponga dicha tapa de la carcasa a un lado. La
tapa de la carcasa debe ser reinstalada cuando
no se esté utilizando la mesa de perfi ladora /
fresadora.
3. Coloque la herramienta en el aditamento con el
botón de cierre del eje y el botón de encendido
y apagado orientados hacia delante.
4. Enrosque la tuerca de fi jación en el sentido de
las agujas del reloj en la porción roscada de su
herramienta rotativa y apriétela de manera
segura con la llave de tuerca suministrada (vea
la fi gura 2).
!
ADVERTENCIA
de la herramienta antes de usar el accesorio.
Lea y entienda estas
instrucciones y el manual
fi g. 1
fi g. 2
Perilla de la
abrazadera
Tornillo de
ajuste de
profundidad
(4) tornillos para
madera
y arandelas #10 x 1"
Use una tabla
2" x 4" como opción
alternativa de
montaje
Protección
Barrera
El interruptor
de encendido y
apagado debe
estar orientado
hacia delante con
el fi n de brindar
acceso fácil
para apagar la
herramienta
19
Page 20

1. Cuando instale las brocas buriladoras, asegúrese
Instalar las brocas del buril
de que el cable eléctrico esté desenchufado y
retire la herramienta de la mesa para moldeador/
buril. Encaje la espiga de la broca buriladora en
el collarín permitiendo que salga un máximo de
5/8" debajo de la tuerca del collarín. Use el
seguro del eje en su herramienta rotatoria y la
llave para apretar la broca de manera segura
(vea la fi gura 3).
2. Afl oje la perilla de la abrazadera en el soporte
de profundidad y gire el tornillo de ajuste
de profundidad para ajustar la profundidad de
corte. La profundidad de corte será la cantidad
que la broca se extiende encima de la mesa
para moldeador/buril.
Ajustar la profundidad de corte
Las marcas de ajuste en la parte lateral hacia
afuera del soporte de la herramienta vienen en
pulgadas y milímetros. Observe las marcas antes
de comenzar su proyecto. Gire el tornillo de
ajuste de profundidad para ajustar la profundidad
deseada. Para asegurar un ajuste apropiado, burile
y mida el corte en un material de desperdicio (vea
la fi gura 4).
Cómo avanzar el buril
El eje del buril gira en dirección contraria a las
manecillas del reloj cuando se ve desde arriba de
la mesa. Para mejor control y calidad de corte,
mueva la madera hacia la broca en la dirección en
que la broca tiende a dirigir la pieza hacia la barrera.
(Avanzar en una dirección contraria causará que la
broca trate de tirar la madera más rápido de lo que
usted quiere. Esto se llama corte montado). Mueva
la pieza de trabajo de derecha a izquierda como se
muestra. La dirección de avance es extremamente
importante cuando use una broca piloto a pulso en
el borde de una pieza de trabajo, así como también
cuando use la barrera con cualquier broca (vea la
fi gura 5).
Claves para el uso de la mesa para burilar
1. Dirección incorrecta – Difícil de controlar.
2. Avance muy rápido – Sobrecarga del motor.
3. Broca sin fi lo – Sobrecarga del motor.
4. Corte muy largo o profundo en una sola pasada
- Sobrecarga del motor.
5. Avance muy despacioso – Deja marcas de
quemaduras por fricción en el trabajo.
fi g. 3
Perilla grande
Perilla
de la
abrazadera
Estructura del
soporte de la
herramienta
Tornillo de
ajuste de
profundidad
fi g. 4
Milímetros con
incrementos
de 5 mm
Marcas de ajuste de profundidad
Profundidad
de corte
5/8"
Table
Pulgadas con
incrementos de
1/8 de pulgada
fi g. 5
Dirección de avance sin la barrera Dirección de avance con la barrera
20
Flecha de
dirección
de avance
Page 21

fi g. 6 Barrera
Tuerca del tornillo de la
abrazadera
Cuña de apoyo
Dirección de avance
1. Desenchufe la herramienta rotatoria antes de
Burilar usando la barrera
hacer cualquier ajuste a la barrera o antes de
cambiar las brocas. Mueva el trabajo en contra de la
rotación de la broca como se muestra (vea
la fi gura 7). La mayoría de corte con la barrera
se hace con la cuña de apoyo ajustada hacia la
derecha, donde está alineada con la barrera
(vea la fi gura 6).
2.
El cilindro central de la protección puede ser
ajustado hacia arriba cuando se hacen cortes
usando la barrera. Afl oje la tuerca de mariposa,
levante el cilindro y asegúrelo apretando la tuerca
de mariposa (vea la fi gura 8).
3. Cuando esté moldeando piezas pequeñas o
cuando le esté dando acabado a cortes en piezas
estrechas y largas use
piezas de madera de 1/4" x 2" x 8" con muescas
como se muestra para hacer estos palos de
presión
sus manos lejos del área de corte.
4.
ajuste la profundidad de corte usando el tornillo
de ajuste de profundidad como se muestra en
la fi gura 3. Afl oje la perilla grande en el
extremo izquierdo de la barrera gire la estructura
de la barrera a la distancia apropiada de la
broca para lograr la posición deseada de la
canal. Vuelva a apretar la perilla grande. Haga
un corte de prueba en madera de desperdicio
para revisar la profundidad y la posición de
la canal.
5. Cuando alise el borde entero de una pieza
de trabajo, la cuña de apoyo puede ser
ajustada para sostener la pieza de trabajo en
el lado izquierdo de la mesa. Haga un corte
de prueba de aproximadamente 2" de longitud
y mida la cantidad de madera removida. Apague
la herramienta rotatoria. Afl oje la tuerca del
tornillo de la abrazadera y deslice la cuña hacia
la izquierda hasta que toque el borde de corte
de la pieza de trabajo. Vuelva a apretar la tuerca
del tornillo de la abrazadera. La pieza de trabajo
tiene ahora el soporte en ambos lados de la
broca buriladora.
Cuando quite más de 1/16" de material de un
borde largo, si la cuña de apoyo no está
ajustada de manera apropiada, el borde no será
aplanado uniformemente.
(vea la fi gura 8).
Para cortar una canal recta, instale la broca y
palos de presión.
Le permitirán mantener
Use
fi g. 7
Dirección de avance para cortes
rectos con barrera
fi g. 8
Tuerca de
mariposa (no
Cilindro central
se muestra)
Perilla grande
Brocas buriladoras
piloteadas
612
615
618
Broca de calar
655
Palo de presión
Brocas buriladoras
617
640
650
652
654
21
Page 22

fi g. 9
Ranura de 1-1/2" para
desmontar la protección
Triplex de 3/8"
Agujero rectangular
para ajustarse
encima de la mesa
16"
12"
1-1/2"
Soportes altos de 1-1/2" en ambos
extremos que descansan en el banco
!
ADVERTENCIA
el accesorio y la barrera mientras que burile o
lije el borde. Esta posición puede causar que el
material se bloquee haciendo posible que rebote.
No coloque el material
entre la broca buriladora o
Burilar usando brocas piloteadas
1. Cuando se deben usar brocas con pilotos,
mueva la barrera hacia atrás únicamente lo
sufi ciente como para hacer el corte. Mantener
la barrera cerca de la broca permite que la
barrera sirva como protección trasera. En
casos especiales cuando se debe quitar la
barrera de la mesa, ajuste el cilindro central de
la barrera hacia abajo para proteger en contra
de la cortadora giratoria.
2. Sólo se deben usar brocas piloteadas sin la
barrera. La pieza de trabajo se debe mantener
entre la cortadora y el operador, y se debe
avanzar de derecha a izquierda.
3. Avance con la pieza de trabajo hasta pasar la
cortadora sin parar y a una velocidad constante.
Un cambio en el avance o una extensión causará
un corte irregular.
Superfi cie extendida de la mesa de trabajo
La mesa para moldeador/buril está diseñada para
ampliar el tamaño de la superfi cie de trabajo. Use
triplex con alma gruesa sólida de 3/8". Haga un
agujero rectangular en el triplex para que se ajuste
sobre la mesa y asegure usando (8) #10 tornillos
para madera, de 1/2" de longitud. Sostenga la
mesa en ambos extremos asegurando apoyos de
madera de 1-1/2" de altura a la base del triplex
(vea la fi gura 9).
Tornillos y piezas metálicas no incluidas
Lijado con tambor
La mesa para moldeador/buril también es ideal
para lijar con tambor partes con formas irregulares
como se muestra. Use la lijadora de tambor 407
(1/2") ó 430 (1/4"), con o sin la estructura de la
barrera (vea la fi gura 10).
fi g. 10
22
Page 23

MODEL 231
2
16
7
6
15
10
9
15
19
18
17
11
1
4
3
8
5
7
14
7
13
12
23
Page 24

ORDER BY PART NUMBER, NOT CODE NUMBER
CODE NO. PART NO. DESCRIPCION
01 2610914499 Guard
02 2610914500 Sleeve
03 2610914501 Wedge
04 2610914502 Fence
05 2610914503 Base
06 2615294999 Pin
07 2615294956 Carriage Bolt 4 Required
08 2615296105 Wedge Clamp Screw 1 Required
09 2615296106 Mounting Screw 4 Required
10 2615294227 Washer 3/16" 7 Required
11 2610914504 Depth Bracket
12 2615294953 Depth Adjustment Screw
13 2610923360 Tool Holder
14 2615294964 Square Nut
15 2610915058 Large Knob 3 Required
16 2615297202 Thumb Nut
17 2615294960 Bracket Screw 2 Required
18 2610910326 Washer #9 1 Required
19 2615294223 Clamp Screw Nut 1 Required
WRITE FOR CURRENT PRICES
NO C.O.D.’S
24
Page 25

MODÈLE 231
2
16
7
6
15
10
9
15
19
18
17
11
1
4
3
8
5
7
14
7
13
12
25
Page 26

COMMANDER PAR NUMÉRO DE PIÈCE, NON PAS PAR NUMÉRO DE CODE
NO. NO.
DE CODE DE PIÈCE DESCRIPTION
01 2610914499 Garde
02 2610914500 Manchon
03 2610914501 Coin
04 2610914502 Guide
05 2610914503 Base
06 2615294999 Goupille
07 2615294956 Boulons mécaniques – 4 requis
08 2615296105 Vis de maintien du coin – 1 requise
09 2615296106 Vis de montage – 4 requises
10 2615294227 Rondelles de 3/16 po. – 7 requises
11 2610914504 Support de profondeur
12 2615294953 Vis de réglage de profondeur
13 2610923360 Porte-outils
14 2615294964 Écrou carré
15 2610915058 Grands boutons – 3 requis
16 2615297202 Écrou à oreilles
17 2615294960 Vis du support – 2 requises
18 2610910326 Rondelle No. 9 – 1 requise
19 2615294223 Écrou de vis de maintien – 1 requise
ÉCRIVEZ POUR OBTENIR LES PRIX COURANTS
AUCUN ENVOI CONTRE REMBOURSEMENT
26
Page 27

MODELO 231
2
16
7
6
15
10
9
15
19
18
17
11
1
4
3
8
5
7
14
7
13
12
27
Page 28

ORDENE USANDO EL NUMERO DE PARTE, NO EL NUMERO DEL CODIGO
CODIGO NO. PARTE NO. DESCRIPCION
01 2610914499 Protección
02 2610914500 Manga
03 2610914501 Cuña
04 2610914502 Barrera
05 2610914503 Base
06 2615294999 Alfiler
07 2615294956 Tornillo de carrocería – se requieren 4
08 2615296105 Tornillo de la abrazadera de la cuña – se requiere 1
09 2615296106 Tornillo de montaje – se requieren 4
10 2615294227 Arandela de 3/16" – se requieren 7
11 2610914504 Soporte de profundidad
12 2615294953 Tornillo de ajuste de profundidad
13 2610923360 Soporte de la herramienta
14 2615294964 Tuerca cuadrada
15 2610915058 Perilla grande – se requieren 3
16 2615297202 Tuerca de mariposa
17 2615294960 Tornillo de soporte – se requieren 2
18 2610910326 Arandela #9 – se requiere 1
19 2615294223 Tuerca del tornillo de la abrazadera – se requiere 1
ESCRIBA PARA PEDIR PRECIOS ACTUALES
NO COBROS CONTRA ENTREGA
UNITED STATES
Dremel Service Center
4915 Twenty-First Street
Racine, Wisconsin 53406
1-800-437-3635
CANADA
Giles Tool Agency
47 Granger Av.
Scarborough, Ont.
Canada M1K 3K9
1-416-287-3000
See your local distributor or
write to:
Dremel, 4915 Twenty-First St. Racine, Wisconsin 53406
2610914511 8/10 Printed in Taiwan
Consultez votre distributeur local
et écrivez à:
ÉTATS-UNIS
OR
28
ESTADOS UNIDOS
Dremel Service Center
4631 E. Sunny Dunes
Palm Springs, CA 92264
1-800-275-2052
OUTSIDE CONTINENTAL
UNITED STATES
À L’EXTÉRIEUR DU TERRITOIRE
CONTINENTAL DES ÉTATS-UNIS
FUERA DE LOS 48 ESTADOS
CONTIGUOS
Visite su distribuidor local o
escriba a:
 Loading...