

Primo 413 by Doro
Operating Instructions
by Doro
2332
U2

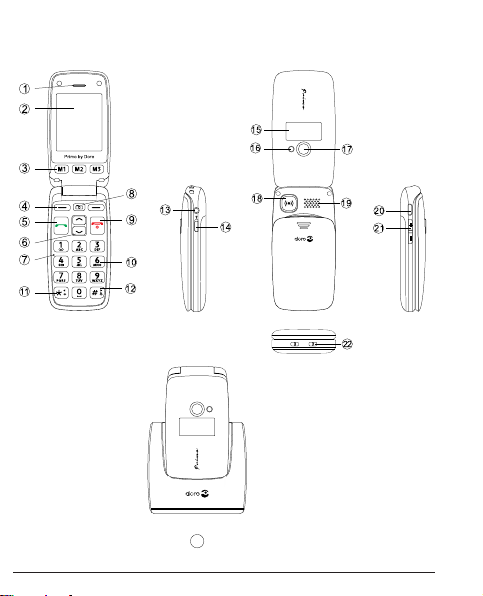
1. Receiver loudspeaker Making phone calls holding the cell phone
to the ear
2. Display
3. Speed-dial buttons Speed-dialling of the numbers saved under
M1, M2 and M3 with one keystroke
4. Left soft key Selection of the main menu
Right soft key Opening the telephone directory
5. Call button Dialling and answering call; opening
the call log.
6. Arrow keys In idle state [up] for opening the quick
access list.
[down] for opening the message. Scrolling up
and down in menus and lists.
7. Microphone
8. Camera key Selection of camera function
9. Exit key Exiting a call, returning to idle state; switching
the phone on/off
10. Numerical keys In idle state: input of phone number; long
keystroke on 1: calling the voice mail box
(telephone number must be saved);
11.
*-
key In idle state: to enter: “*”/ “+” / “P”/“W“;
Input of text: input of special characters
i

12. # key In idle state: long keystroke to toggle between
ring tone on/off; For inputs: shifting between input
modes.
13. Headset connector For standard headset with 3.5 mm phone jack
14. Switch for torch
15. Flip up (clamshell) Shows the time in idle state, display of
display missed calls and notification of received text
messages
16. Flash LED
17. Camera lens
18. Emergency call key
19. Loudspeaker For hands-free mode and ringing
20. Micro USB port For battery charger or connection to PC
21. +/- keys Setts the volume of ring tone/loudspeaker
22. Charging contact To charge the device in the charging cradle
23. Charging cradle To charge the telephone
ii

Content
Installation . . . . . . . . . . . . . . . . . . . . . . . . . . . . . . . . . . .5
Package content . . . . . . . . . . . . . . . . . . . . . . . . . . . . .5
Inserting the SIM card, memory card and
rechargeable battery . . . . . . . . . . . . . . . . . . . . . . . . .5
Charging . . . . . . . . . . . . . . . . . . . . . . . . . . . . . . . . . . . . .8
Symbols . . . . . . . . . . . . . . . . . . . . . . . . . . . . . . . . . . . . . .9
Auxiliary functions. . . . . . . . . . . . . . . . . . . . . . . . . . . . .9
Display status symbols . . . . . . . . . . . . . . . . . . . . . . .10
Operation . . . . . . . . . . . . . . . . . . . . . . . . . . . . . . . . . . .11
Switching the phone on . . . . . . . . . . . . . . . . . . . . . . .11
Standby mode . . . . . . . . . . . . . . . . . . . . . . . . . . . . . .13
Changing the language, time and date . . . . . . . . . . .13
Making calls . . . . . . . . . . . . . . . . . . . . . . . . . . . . . . . .13
Selecting phone numbers from the
telephone directory . . . . . . . . . . . . . . . . . . . . . . . . . . .14
Answering a call . . . . . . . . . . . . . . . . . . . . . . . . . . . . .14
Volume control . . . . . . . . . . . . . . . . . . . . . . . . . . . . . .14
Text input. . . . . . . . . . . . . . . . . . . . . . . . . . . . . . . . . . .15
Call options . . . . . . . . . . . . . . . . . . . . . . . . . . . . . . . . .16
Call waiting . . . . . . . . . . . . . . . . . . . . . . . . . . . . . . . . .17
Call information . . . . . . . . . . . . . . . . . . . . . . . . . . . . . .18
1

Mute . . . . . . . . . . . . . . . . . . . . . . . . . . . . . . . . . . . . . .18
Headset . . . . . . . . . . . . . . . . . . . . . . . . . . . . . . . . . . . .18
Emergency calls . . . . . . . . . . . . . . . . . . . . . . . . . . . . .19
Emergency calls key . . . . . . . . . . . . . . . . . . . . . . . . .20
Telephone directory . . . . . . . . . . . . . . . . . . . . . . . . . . .22
Creating an entry in the directory . . . . . . . . . . . . . . . .22
Creating an ICE entry (In Case of Emergency)
(emergency information) . . . . . . . . . . . . . . . . . . . . . . .24
Managing entries in the telephone directory . . . . . . .24
ICE (In Case of Emergency) . . . . . . . . . . . . . . . . . . . .28
Messages . . . . . . . . . . . . . . . . . . . . . . . . . . . . . . . . . . . .30
Creating and sending SMS . . . . . . . . . . . . . . . . . . . . .30
Creating and sending MMS . . . . . . . . . . . . . . . . . . . .31
Inbox, sent, outbox . . . . . . . . . . . . . . . . . . . . . . . . . . .33
Call log . . . . . . . . . . . . . . . . . . . . . . . . . . . . . . . . . . . . . .34
Camera (taking pictures) . . . . . . . . . . . . . . . . . . . . . . .36
Image viewer . . . . . . . . . . . . . . . . . . . . . . . . . . . . . . . . .38
Audio player . . . . . . . . . . . . . . . . . . . . . . . . . . . . . . . . .39
FM radio . . . . . . . . . . . . . . . . . . . . . . . . . . . . . . . . . . . . .40
File manager . . . . . . . . . . . . . . . . . . . . . . . . . . . . . . . . .41
2

Connecting the mobile phone to a computer . . . . . .42
Moving data between phone and computer
Safely remove USB cable . . . . . . . . . . . . . . . . . . . . . .43
Settings . . . . . . . . . . . . . . . . . . . . . . . . . . . . . . . . . . . . .44
SOS setting . . . . . . . . . . . . . . . . . . . . . . . . . . . . . . . . .44
Basic settings . . . . . . . . . . . . . . . . . . . . . . . . . . . . . . .47
Network settings . . . . . . . . . . . . . . . . . . . . . . . . . . . . .52
Bluetooth® . . . . . . . . . . . . . . . . . . . . . . . . . . . . . . . . .54
Security settings . . . . . . . . . . . . . . . . . . . . . . . . . . . . .54
Services . . . . . . . . . . . . . . . . . . . . . . . . . . . . . . . . . . .57
Abbreviations . . . . . . . . . . . . . . . . . . . . . . . . . . . . . . .59
Restore to default settings . . . . . . . . . . . . . . . . . . . . .60
Call settings . . . . . . . . . . . . . . . . . . . . . . . . . . . . . . . .61
SMS settings . . . . . . . . . . . . . . . . . . . . . . . . . . . . . . . .66
MMS settings . . . . . . . . . . . . . . . . . . . . . . . . . . . . . . .68
Voice mail (mailbox) . . . . . . . . . . . . . . . . . . . . . . . . . .70
User profiles . . . . . . . . . . . . . . . . . . . . . . . . . . . . . . . .70
3

Organiser . . . . . . . . . . . . . . . . . . . . . . . . . . . . . . . . . . . .72
Calendar . . . . . . . . . . . . . . . . . . . . . . . . . . . . . . . . . . .72
Alarm . . . . . . . . . . . . . . . . . . . . . . . . . . . . . . . . . . . . . .73
Services . . . . . . . . . . . . . . . . . . . . . . . . . . . . . . . . . . .74
Calculator . . . . . . . . . . . . . . . . . . . . . . . . . . . . . . . . . .74
Appendix . . . . . . . . . . . . . . . . . . . . . . . . . . . . . . . . . . .75
Safety notes . . . . . . . . . . . . . . . . . . . . . . . . . . . . . . . .75
Network services and network fees . . . . . . . . . . . . . .75
Operating environment . . . . . . . . . . . . . . . . . . . . . . . .75
Medical devices . . . . . . . . . . . . . . . . . . . . . . . . . . . . .76
Cardiac pacemakers . . . . . . . . . . . . . . . . . . . . . . . . .76
Explosive areas . . . . . . . . . . . . . . . . . . . . . . . . . . . . . .77
Ear protection from very high volume level . . . . . . . . .78
Emergency call . . . . . . . . . . . . . . . . . . . . . . . . . . . . . .79
Vehicles . . . . . . . . . . . . . . . . . . . . . . . . . . . . . . . . . . . .79
Maintenance and care . . . . . . . . . . . . . . . . . . . . . . . .80
Warranty and service information . . . . . . . . . . . . . . . .81
Technical data . . . . . . . . . . . . . . . . . . . . . . . . . . . . . . .85
Specific absorption rate (SAR) . . . . . . . . . . . . . . . . . .86
Approval and conformity . . . . . . . . . . . . . . . . . . . . . . .87
4
Installation
Package contents
• 1 mobile phone
• 1 energy-efficient switch-mode power supply
• 1 charging cradle
• 1 USB charging cable with micro USB plug for the connection to the mobile phone or the charging cradle
• 1 rechargeable battery Li-Ion 3.7 V / 1.050 mAh
• 1 stereo headset
• 1 operating instructions
IMPORTANT
First switch the phone off and disconnect it from the battery charger before you remove the cover of the battery compartment.
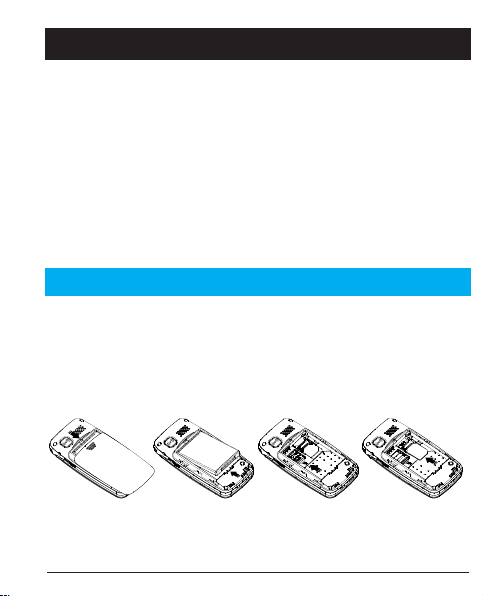
Inserting the SIM card, memory card and rechargeable battery
The SIM card and memory card holder are located behind the
rechargeable battery.
5

1. Remove the cover of the battery compartment by placing a
thumb on the cover’s riffle on the rear of the telephone casing
and pushing the cover downwards. If the rechargeable battery
is inserted, remove it by lifting it on the notch at the bottom
using a finger nail.
2. Insert the SIM card by carefully pushing it under the metal bracket on the right side. Make sure the contacts of the SIM card
point downwards and the cut-off corner fits exactly in the
recessed shaping of the holder. The contacts of the SIM card
must not be scratched or bent. Try not to touch the contacts
with your fingers.
3. Micro SD memory card To use the performance features of your
phone that require more memory, in particular photos, music
etc., a micro SD memory card is needed. This is how you insert
the memory card into the slot: slightly press onto card holder on
the left side and carefully push it in towards the upper casing
edge. The memory card holder now can be folded up vertically.
Place the memory card in the black plastic holder in a formlocking manner. Make sure the contacts of the memory card
point downwards and the "lug" is placed in the marked area.
The contact of the memory card must not be scratched or bent.
6

4. Insert the rechargeable battery by pushing it into the battery
compartment ensuring that the three contacts on the front
touch the three spring contacts on the top in the battery compartment.
5. Replace the cover and push it upward using gentle pressure
with the thumb until it snaps securely into place again.
IMPORTANT
Use memory cards that are compatible with this device only.
Compatible card types are: micro SD, micro SDHC. Incompatible cards may damage the card itself, the device as well as
the data saved on the card.
Compatible card types:
Micro SD, micro SDHC.
7

Charging
CAUTION
Use rechargeable batteries, battery chargers and accessories that are approved for this specific model only. Connecting other accessories involves risks and may lead to
the lapse of the approval of the device type and the loss of
warranty.
When the battery performance is low, the empty battery symbol flashes to indicate the battery state and an alarm signal
will sound. To recharge the battery, connect the main adapter
to the main socket and to the micro USB connector on the left
side of the phone using the USB cable provided. Alternatively,
you can place the telephone into the charging cradle connected to the main adapter via the USB cable.
USB charging or the battery state display is shown in the
flip-up (clamshell phone) display when the battery charger is
connected to the phone. The battery charge status moves
when the battery is charging.
A complete charging process of the rechargeable battery
takes approximately 3 hours. When the battery is fully charged the animation
of the battery charging status stops.
8
Note!
To save energy, the lighting goes out after a while. Press
any key to activate the display lighting.
The full battery power is reached once the rechargeable
battery has been charged 3 - 4 times. The battery performance decreases over time. This means calling and standby times become shorter with regular use.
Saving energy
When the rechargeable battery is fully charged and you have
disconnected the battery charger from the device, remove the
plug of the charger from the main socket.
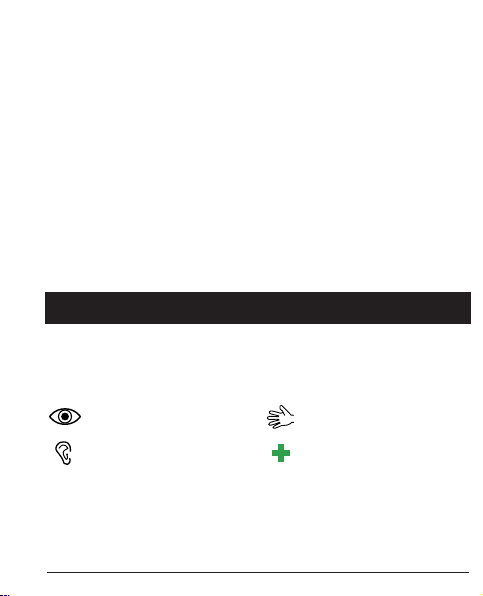
Symbols
Auxiliary functions
The following symbols refer to information on auxiliary functions in the operating instructions for:
visibility handling
listening safety
9

Display status symbols
Signal strength
Battery charging status
New entries in the call log (missed calls)
An alarm time is set
Bluetooth enabled
Existing GPRS connection
A headset is connected
USB connection
MMS is being sent
Only vibration
Sound and vibration
First vibration, then sound
Unread SMS
Unread MMS
10
Indicates that a micro SD card is inserted.
Operation
Switching the telephone on
Press and hold the red button on the phone for approx.
5 seconds to turn it on/off.
If the SIM card is valid but protected with a PIN code (Personal Identification Number),”Enter PIN" will be shown on the
display.
Enter the SIM PIN Code and press OK ( soft key at top
left on the keyboard). You can delete using Delete ( soft
key on top right of the keyboard).
Note!
If your SIM card was not provided with a PIN and PUK code
or if you no longer have them, please contact your network
provider.
11
Remaining attempts shows the number of PIN attempts left. If
no attempts are left, PIN blocked will be shown. The SIM card
then must be unblocked using the PUK code (Personal Unblocking Key).
1. Enter the PUK code and confirm with OK.
2. Enter a new PIN code and confirm with OK.
3. Enter the new PIN code again and confirm it with OK.
SOS emergency call
In emergencies, you can use the phone in some areas even without entering the PIN code. For this purpose, press the key
SOS (right soft key at top of the keyboard).
Note
This function is available only if it was enabled in the menu
under Settings/SOS Setting/Enable emergency calls. More
information can be found in these operating instructions on
page 44.
Please also note that since 2009 it is no longer possible to cal
the emergency number under 112 in Germany without inserting
an activated SIM card. Credit is not required – however, the SIM
card must be registered and activated.
12
Standby mode
When the phone is operational and you have not performed any keystroke, the phone is in the standby mode.
The left soft key in the standby mode is for menu.
The right soft key in the standby mode is for names.
Tip:
You can press at any time, to return to the standby mode.
Changing the language, time and date
The default language is determined by the SIM card. See Telephone
Settings, starting from page 47, for changing the language, time and
date.
Making phone calls
1. Enter the phone number with the area code.
You can delete digits with Delete.
2. Press to dial. Push Cancel to cancel the dialling process.
3. Press to end the call.
Tip:
Always enter + before the country code for international calls to be able to use
the phone directory optimally in each country. Press the
enter the international country code.
*
, key twice to
13
Selecting phone numbers from the phone directory
1. Press Names to open the phone directory.
2. Use the arrow keys , to scroll through the telephone directory or perform a quick search by pressing
the key that corresponds to the initial letter of the entry in
the directory, see text input p. 14.
3. To dial the desired entry press Dialling or press
Back to return to the standby mode.
Answering a call
1. Press or Answer to answer the call or press Reject
to reject the call (busy signal).
Alternatively, you can press to reject the call directly
2. To end the call press .
Volume control
You can adjust the volume during a call using the side buttons
+/–. The volume will be shown on the display.
The values set last will be saved.
14

Text input
You can enter texts by repeatedly pressing the numeric keys for
selection of the characters. Repeatedly press the corresponding
key until the desired character is displayed. Wait until the blue
background of the current character has disappeared until you
enter the next one.
With * you can display a list of special characters. Select the
desired character using or * and # to move left or right
and press OK to enter.
Use the keys , to move the cursor within the text.
With # you can shift between upper-case and lower-case letters
and numeric characters. The symbol at the top left in the display
indicates the input mode:
EN Capitalisation of the first letter after a full stop (beginning
of sentence).
EN CAPITALISATION
en lower-case letters
123 numeric characters
15

Call options
During a call you can access other functions using the soft keys
( )
Options (left soft key)
A menu with the following options will be displayed:
On hold/end on hold function
Put active call on hold/pick up call on hold.
End individual call End active call (as with ).
Telephone directory Search through phone directory.
Call log Open call log.
Messages Read or write SMS messages.
Sound recorder Start recording of a call.
Mute Mutes the microphone.
Hands-free (right soft key). Enables the hands-free
mode which allows you make calls without having to hold the
telephone to your ear. Speak clearly into the microphone from a
distance of maximum 1 m. You can adjust the volume of the
loudspeaker using the side buttons +/–. Press Hands-free again
to return to the normal mode.
16

Tip:
Pressing the emergency key on the back of the unit allows you
to shift comfortably between hands-free function and normal
mode during a call.
Attention:
Before you switch to the hands-free function, hold
the device away from your ear in order to avoid loud
noises and to prevent damage to your hearing!
Note!
While using the hands-free function, only one person can
speak. The shift between speaking/listening is triggered by the
speaking sounds of the respective person. Loud background
noises (music etc.) may impair the hands-free function.
Call waiting
If there is an incoming call while you are having a call, a signal is
emitted. To put the active call on hold and to answer the incoming
call, press Options, select Answer and then OK.
Tip:
Call waiting function must be enabled, see Call waiting, p. 65.
17

Call information
During a call the dialled number or the number of the caller as
well as the call duration will be displayed. With suppressed caller
ID Unknown is shown in the display.
Mute
Mute is a predefined profile where the key tone, message
tone and ring tone are disabled while vibration, tasks and
alarm clock remain unchanged.
Tip:
#
Press and hold the key
Headset
If you connect a headset, the microphone integrated in the
telephone will be switched off automatically. Incoming calls
can be answered or ended using the Answer/Hang up key on
the cable (if available) of the headset.
to switch “Mute” on and off.
18
CAUTION
Using the headset at a very high volume may cause
damage to the hearing. Check the volume before using a
headset.
Emergency calls
If the telephone is switched on, you can make an emergency
call at any time by entering the emergency number valid in
the respective country and then pressing .
In some networks emergency calls are permitted even without a valid SIM card. For more information contact your network provider.
Note!
Please also note that since 2009 it is no longer possible to
call the emergency number 112 in Germany without an activated SIM card.
Credit is not required – however, the SIM card must be
registered and activated.
The misuse of the emergency number 112 may be
persecuted and punished with a fine.
19
Emergency call key
IMPORTANT
Always inform the recipients in the contact list that they are
listed as emergency contacts.
CAUTION
If you make an emergency call, the hands-free function is
enabled automatically. Do not hold the telephone to your
ear while the hands-free mode is activated as the volume
might be very high.
The emergency key allows you to call predefined numbers
effortlessly in case of an emergency.
If you want to use the emergency call function, it must be
enabled in the menu, settings, SOS settings. You can find
information on the activation of this function as well as on the
input of the contacts in the contact list and the editing of the
emergency SMS under “SOS settings” on page 44.
• Press the emergency key on the rear of the phone 3x
briefly. An acoustic signal is emitted. The seconds will be
incremented in the display (lag time). During this time you
can prevent a potential false alarm by pressing or
Cancel.
20

• The telephone sends out an SMS text message to all
phone numbers in the emergency call number list, if the
emergency SMS is enabled in the SOS settings.
• Afterwards, the telephone dials the first phone number in
the list. If the call is not answered within 25 seconds, the
next phone number will be dialled. The sequence of
emergency calls will be repeated three times until the call
is answered or until is pressed.
Note!
Some private security companies accept automatic calls
from their clients. Contact the security company before you
use the corresponding numbers.
After sending the emergency SMS the numbers of the number list will be called one after another.
21
Telephone directory
The directory of the telephone can save 300 entries. The entries
that can be stored on the SIM card depend on the respective
SIM card used.
Creating an entry in the phone directory
1. Press Menu, select Telephone directory and press OK.
2. Select Add new contact and press Add.
3. Choose whether you want to save the contact on the SIM card
or in the telephone.
4. Enter a name for the contact, see Text Input , p. 14.
You can delete characters with Delete.
5. Press .
6. Enter the phone number including the area code.
7. Press .
8. As an option, you can select a different caller image for the con-
tact using the keys * and #. You have the choice between standard, an image saved as file in the telephone or a photo that you
took with the built-in camera.
9. Press .
10. Optionally, you can select a different ring tone for the contact
by using the keys * and #.
11. Then press Options, select Save and press Dial.
22

My Number - Here, you enter your own mobile number or land-
line number. Press Add…, then enter your name and press
Options to save the number or to end the process with Cancel.
Tip:
Always enter + before the country code for international phone
numbers to be able to use the telephone directory in an optimum way in every country.
Press the
*
, key twice to enter the international code +.
23

Creating an ICE entry (In Case of Emergency)
(Emergency Information)
With this additional information and medical data first aiders have
access to this information via the telephone of the patient in cases of
emergency. In medical emergencies it is important that these data
are obtained as fast as possible in order to increase the chances for
survival of the patient. All input fields are optional, however the following applies: The more information you provide, the better. See ICE
(In Case of Emergency), p. 27 for configuring your ICE information.
Managing entries in the phone directory
1. Press Menu, select Telephone directory and press OK.
2. Select a contact and press Options.
3. Choose one of the following options and press Select:
View - Shows details of the selected contact.
Send text message - Press OK to create an SMS message, see Crea-
ting and sending SMS, p. 29.
Send a Multimedia message - Press OK to create an MMS mes-
sage, see Creating and sending MMS, p. 30.
Call - Press OK to call the contact
Edit - 1. Edit the entries. You can delete with Delete.
24

Delete.
2. Then press Options, select Save and press OK. Delete -
press OK to remove the selected entry from the phone
directory. Press Yes to confirm or No to cancel.
Copy - press OK to copy the selected entry from the telephone to the
SIM card and vice-versa. Alternatively, you can save the contact as *.vcf
file on the memory card that is optionally available.
Send contact - After pressing OK you can send the contact data as
SMS or MMS or transfer them via Bluetooth.
Block contact - By pressing Yes you can add the selected contact to
your list of blocked contacts.
Caller group - Adding the selected contact to a caller group with
own group name (e.g. “family”), caller image and ring tone. With
Options you have the choice to add the contact to an existing group
or to create a new group. Select the desired group via Options and
confirm Show members with OK. Then press Add… to add the current contact to the selected group. Alternatively, you can delete one
group (Delete) or delete all groups (Delete All) or edit the Group
settings (group name, caller image, ring tone).
25

Assignment of keys for direct dialling - Here, you have the option to
assign one selected contact each to the three direct dialling keys M1, M2
and M3 to be able to call them in the future through one-touch dialling.
Select one of the storage spaces M1, M2 or M3 for the current contact
and then press on Save. Conform the following query with Yes or cancel
the process with No.
Telephone directory settings
In this menu you will find the following options:
Memory location - Defining the memory location and the view settings of the
contacts (telephone/SIM card/both). Selecting the option “Both” will display contacts from both the SIM card and the telephone memory.
Top 10 Settings - Defining the ten most important telephone numbers.
Select one of the ten memory locations and press Add … to include the
number in the top 10 list. Contacts from the top 10 list will always be displayed at the top of the phone directory, independent of the initial letter of
the name.
To delete a top 10 entry, select the entry in the top 10 list and press
Options, then select Delete and press OK. The contact will be deleted
from the top 10 list only, and not from the telephone memory or the SIM
card!
26

Speed dial - Enable the speed dial function by selecting Status with OK
and then confirming On with OK. Then, select “Setting number”, press
OK and then Edit…to consecutively assign phone numbers to the eight
storage spaces (numeric keys 2 to 9). In this process, confirm each
selection with OK. Telephone numbers once assigned can be deleted by
highlighting them, pressing Options and then selecting “Remove”.
Additional numbers - Here, you have the option to define three other numbers
as well as a fixed dial-up. For the entry of the owner numbers please select a storage space, press Options and then confirm “Edit” with OK to enter names and
telephone numbers. Confirm each entry with Save. Fixed dial-up: - The fixed
dial-up allows the telephone user to call only those phone numbers which are
saved in the fixed dial-up list. In order to call other numbers the user has to enter a
PIN2. If the SIM card inserted does not have a PIN2, this function will not be supported.
Memory status - display of the memory used (telephone/SIM card)
Copy contacts - option to copy selected contacts from the telephone to the SIM
card and vice-versa
Move contacts - option to move selected contacts from the telephone to the
SIM card and vice-versa
27

ATTENTION
When moving contacts, they will be deleted from the original location! Delete
all contacts – all contacts will be deleted either from the phone or the SIM
card. This process is irreversible!
ICE (In Case of Emergency)
In case of emergency, first aiders can get additional, very useful
information through the telephone of the patient. In medical emergencies it is important that this information is available as fast as
possible in order to increase the chances of survival. All input fields
are optional, however, the following applies: The more information
you provide, the better.
1. Press Menü.
2. Press ICE and press OK, then use , to scroll-
through the lines.
3. Press Edit to add information to an entry or to edit information
of an entry, see Text input , p. 14. You can delete charac-
ters using Delete. After entering the information in the ICE
menu, press Save.
Name: Enter your name.
Date of birth: Enter your date of birth.
Height: Enter your height.
28

Weight: Enter your weight.
Language: Enter your mother tongue.
Insurance: Enter the name of your insurance and the number of
the insurance policy.
Contact 1/ contact 2 / general practitioner: Press Options,
select Add and press OK to select a contact from the phone
directory, select Delete to delete an entry or Save to confirm the
current entry.
Health condition: Enter all medical diagnosis /medical aids
(e.g. diabetes, cardiac pacemaker).
Allergies: Enter all diagnosed allergies (e.g. allergy to penicillin,
insect bites).
Blood type: Enter your blood type.
Vaccinations: Enter all important vaccinations.
Medication: Enter all medication you take.
Other: Enter additional information (e.g. organ donor, living will,
capability to grant consent etc.)
29

Messages
Creating and sending SMS
1. Press direct access or press Menu, select Messages and press
OK.
2. Select Write message and press OK.
3. Enter the desired message, see Text input ,
p. 14, and then press Options.
4. Select an already existing recipient from the phone directory using the
function Send to and then Add from phone directory and press OK.
Alternatively, can also select Enter number and press OK to add a
recipient manually and press OK.
5. Press Options again and then select Send to send the message.
6. You can also change the recipient by selecting Edit recipient or delete
the recipient using Remove recipient or Remove all recipients.The
selection Save in drafts saves the SMS in the draft folder for later use.
30

Note!
If you add several recipients, every message will be charged individually. You can send one message to a maximum of 10 recipients.
Always enter + before the country code for international phone
numbers to be able to use your mobile phone in the best possible
way. Press the
Note!
An SMS is transmitted via the message service centre (SMS centre nr.). The number of your SMS centre is provided by your network provider and it usually is pre-allocated on the SIM card. If not,
you can enter the number yourself. See SMSC address, p. 71.
*
,key twice to enter the international code + .
Creating and sending MMS
MMS may contain text and media objects such as images or sound
recordings. Therefore, both you and the recipient need the mobile radio
option for MMS and also a mobile phone which supports sending and
receiving of MMS. The setting parameters for MMS are preset by the
large network providers in Germany. With other mobile radio communication providers these parameters must be modified manually, if and where
required. Contact your provider regarding the parameters required for
this.
31

Important
For this purpose, select the suitable profile for your network provider in
advance in order to be able to send the MMS.
For this, select Menu -> Connections -> Data account. Select the data
account suitable for your provider or adjust it to the settings of your network provider with Options and Edit. Only your network provider will be
able to give you the data necessary for this. After editing press Options
and then Save. Afterwards you can return to the start screen using the
key. If your provider is not in the list, see Services, p. 59 for set-
ting your MMS account.
1. Press Menu, select Messages and press OK
2. Select Multimedia message and press OK.
3. Enter the desired message, see Text input , p. 14 and then
press Options.
4. Add additional elements to your message from the options Add
symbol, add image, add sound, add video, add subject.
Under Input method select between En (Upper-case letter at the
beginning of sentence), EN (capitalisation), en (lower-case letters)
and Numeric (numerical entry).
With MMS preview you can view the MMS, with the Slide options
you can add slides before/after as well as set their time control,
under Advanced you can add an attachment or save the MMS in
32

the draft folder for later use with the option Save in drafts.
5. Select Send to and choose an already existing recipient in the
phone directory with Add from phone directory and press OK.
Alternatively, you may also select Enter recipient and press OK to
add a recipient manually and then press OK.
6. Press Options and select Send to send the message.
Other options are:
Options for transmission - Settings for transmission report, read report,
priority, and transmission time.
Edit recipient - Option to change the number of the recipient
Remove recipient – deleting the recipient
Remove all recipients – deleting all recipients
Save – saves the MMS in the draft folder for later use.
Inbox, Sent, Outbox
1. Press the direct access or press Menu, select Messages and
press OK.
2. Select Inbox / Outbox / Sent messages and press OK.
3. Select a message and press View. Use to scroll through
the message.
4. Press Options for the following options:
Answer with SMS – compose SMS for the sender
Answer with MMS – compose MMS for the sender
Call sender – call the sender
33

Forward – forward the message to another recipient
Delete - delete the message
Advanced
Use number – the number of the sender is available for further use, e.g.
to save the number directly as contact.
Use USSD – if the SMS contains a USSD, the latter will be displayed for
other options.
Copy to telephone / to SIM card – You can copy the SMS from the
SIM card to the telephone and vice-versa.
Move to telephone / to SIM card – You can move the SMS from the
SIM card to the telephone and vice-versa.
Call log
Missed calls, dialled numbers and answered calls are saved in
the call log. 10 calls of each type can be saved. Only the latest
call will be saved for multiple calls to and from the same number.
The total number of call attempts is indicated in brackets.
1. Press to see the list of all calls.
or
Press Menu, select Call log and press OK. Select Missed calls,
Dialled numbers or Received calls and press OK. Select a list
and press OK.
34

2. Use to scroll through the list.
3. Press to dial the phone number or press Options to
access the following settings:
View Displays details on the selected entry.
Call To call the number.
Send text message – send an SMS to the number.
Send Multimedia message – send an MMS to the number.
Save in the telephone directory – save the phone number
in the directory of the phone.
Add to exclusion list – the phone number will be added to
the exclusion list. You can find the exclusion list under
Menu, Settings, Call settings, Advanced settings, Exclusion list In this list you can automatically reject the numbers
in the list with On and Off.
Delete - delete the entry.
35

Camera (taking photos)
For clear photos clean the lens with a dry cloth, if required.
1. Press the Camera button or select Menu, select Multimedia
and press OK or press , to access the camera via the
direct access.
2. Select Camera and press OK.
3. To take a photo, press the Camera button again. Using
you can increase or decrease the image via digital
zoom before taking the picture.
Note!
Zooming in or out may affect the image quality.
4. Press Back to exit the camera function or Options to
access the following options:
Change to video recorder
- changes to the mode for recording of videos
Photos - view of the photos taken so far
Camera settings
Flash - automatic, on and off
Shutter sound - Selection between three different shutter sounds
and off.
LW - Adjustment of the light values.
36

Contrast - low, medium, high
Anti-flickering - 60 Hz are set as default and ideal.
Delay timer - Selection between Off and Release delays between
5 and 15 seconds
Image settings
Settings for the Image size and Image quality. The best results
are with the following setting: image size: 1200x1600 / image
quality: good: (for this it is essential that you use a micro SD
memory card since the images with this quality require considerable memory capacity.) For MMS an image size of 640x480 is
ideal.
White balance - Select between different profiles for different lighting
conditions (e.g. daylight, artificial light …)
Scene mode – setting option Autom. or Night. The night mode enables
an improved picture quality in darkness.
Effect settings – Select between different colour effects.
Storage medium – Define whether you want your photos to be saved on
the internal memory of the telephone or the memory card
(recommended).
Restore default settings - Restoring the camera to factory settings.
37

Image viewer
Viewing saved images.
1. Press Menu, select Multimedia and press OK.
2. Select the image viewer and press OK.
3. Select an image with * and # and press Options.
4. Select one of the following options and press OK to confirm.
View - displays the image. In the image view you can rotate the
image using Options or for example, access image data (file size,
recording date etc.)
Search type – Display in the overview as list or in form of a matrix.
Send
As multimedia message – Send the image as MMS. Press
OK to compose a message, see Creating and sending MMS,
p. 30.
Via Bluetooth – Send image to other Bluetooth devices, see
Bluetooth®, p. 54
Use as – Use the images as background picture. The image will be
displayed behind the clock in the standby display.
Rename – Rename the picture.
Delete – Delete the image.
Sort by – Sort the images by name, type, time or size.
Storage medium - Define whether you want your photos to be
saved on the internal memory of the telephone or the memory card
38

(recommended).
Image data – Display of the different parameters of the image.
Audio Player
To play music files saved in the telephone.
1. Press Menu, select Multimedia and press OK.
2. Select Audio Player and press OK.
3. Press List, select a title and press Options - Play - OK. The title
will be played. You can pause and continue the playback using
To stop the playback, press . You can change to the
previous or next title using they keys * and # You can control
the volume using the keys +/- on the side.
4. Pressing List – Options gives you the following options:
Playback – playback of the selected title.
Details - Details such as size and length of the title.
Update list – updates the list.
Settings
Autom. list genre - lists the titles sorted by genre. To this
end, the genre of the title must be stored in the ID3 (title data
of the file).
Repeat – Select Off to block repetition of the selected title.
Select One to repeat the selected title only or select All to
play back the list content in an endless loop.
39

Shuffle – plays all titles in a random sequence.
Background playback – If you select On, the background
playback can still be heard when the player is exited. To
stop the playback, open the audio player and stop the background playback.
FM Radio
To listen to the radio with your mobile telephone
Tip
The reception will be considerably better if a headset is used since
the cable acts as an antenna.
1. Press or Menu, select Multimedia and press OK.
2. Select FM Radio and press OK.
3. Set the Volume with the keys +/-- on the side of the phone.
4. Select a Frequency using the keys * and #.
5. Mute and unmute the radio with .
6. After pressing Options, you have the following options:
Channel list - list of the saved channels. Options are: playback,
delete and edit.
Manual input – here, you can select a frequency manually via fine
tuning.
Autom. search – radio station scan and saving of the stations found.
40

Settings
Background playback – If you select On, the radio will still be
on after exiting the menu. To deactivate it, stop the background
playback in the menu FM radio.
Loudspeaker – Choose whether the loudspeaker shall be on or
the playback shall take place via the headset only when a headset is connected.
Audio quality – Choose between high and low.
Recording memory - Define whether you want your audio
recording to be saved on the internal memory of the telephone or
on the memory card (recommended).
Recording – Recording of the selected radio program as audio
file.
File list – List of the saved audio recordings.
File Manager
Editing the content of the memory card
1. Press Menu, select Organiser and press OK.
2. Select File Manager and press OK.
3. After pressing Options you have the following available
options:
Open – shows the directory structure. Options are: Open,
New Folder,Rename, Delete.
41

Format - formats the memory card.
ATTENTION: All data will be deleted.
Details – Information on the memory card used.
Connecting the mobile phone to a computer
Connect the telephone to a computer to copy images and music.
You can connect the telephone to the computer via the USB cable provided. Afterwards, you can copy and move data between the telephone
and the computer in the file explorer using the function “drag and drop”.
Note!
You might not be able to transfer copyrighted, protected material.
Moving data between telephone and computer
1. Connect the telephone to the computer via the USB cable provi-
ded (telephone must be switched on). The query Mass Storage
appears in the display of the mobile phone. Confirm this with OK
on the mobile phone.
2. Wait until the telephone/ memory card is displayed as external
drive in the file explorer of your computer.
42

3. Copy marked files from the telephone to the computer and viceversa by dragging and dropping.
Note!
When the memory card is enabled as external drive, you cannot
access the memory card with the telephone. Some telephone functions or applications, such as the camera, might not be accessible.
The data transfer via USB cable works with most devices and operating systems which support a USB mass storage interface.
Safely removing the USB cable
1. Make sure the hardware can be removed safely. To this end,
there is a setting on the computer (as icon in the task bar).
2. Remove the USB cable.
Note!
Do not remove the USB cable during data transfers to avoid
damage to the data. The instructions for the computer depend on
the respective operating system. More information can be found in
the documentation for the operating system used.
43

Settings
Note!
The settings described in this chapter are to be performed in
the standby mode. Press , to return to the standby mode.
SOS Settings
Emergency call function
Switching the emergency call function on or off.
1. Press Menu, select Settings and press OK.
2. Select SOS Setting and press OK.
3. Select Enable emergency calls and press OK.
4. Select On or Off and press OK.
Important
If you have deactivated the emergency call function, pressing the emergency call button on the rear of the telephone
will not work! During an active call, this button can be used
to comfortably shift between hands-free and normal mode.
44

Alarm sound
Switching the alarm sound on and off for the use of the
emergency button
1. Press Menu, select Settings and press OK.
2. Select SOS Setting and press OK.
3. Select Alarm sound and press OK.
4. Select On or Off and press OK.
Call delay
Setting the call delay for the use of the emergency call button
1. Press Menu, select Settings and press OK.
2. Select SOS Setting and press OK.
3. Select Call delay and press OK.
4. Select a time that you want to pass between pressing the
emergency call button and the activation of the first call and
press OK.
45

Emergency call numbers
Input of the phone numbers to be called after pressing the
emergency call button. A maximum of 5 numbers can be saved.
1. Press Menu, select Settings and press OK.
2. Select SOS Settings and press OK.
3. Select Emergency call numbers and press OK.
4. Select one of the 5 spaces, enter the desired phone number of a person, whom you have informed or will inform
about this, and press OK.
5. Confirm the question Save? with Yes.
Emergency-SMS
SMS transmission On or Off for the use of the emergency call
button
1. Press Menu, select Settings and press OK.
2. Select SOS Setting and press OK.
3. Select Emergency SMS and press OK.
4. Select On or Off and press OK.
46

Text for emergency SMS
Input of the SMS text that shall be sent after pressing the emergency call button (Emergency SMS must be enabled).
1. Press Menu, select Settings and press OK.
2. Select SOS Setting and press OK.
3. Select Emergency SMS text and press OK.
4. There is already a predefined text. You can edit, delete or
replace this text, as required, see Text Input , p. 14.
A maximum of 50 characters can be entered. To complete
the process, press Done.
Settings
Basic settings
Time and date
Setting the time and date
1. Press Menu, select Settings and press OK.
2. Select Time and Date and press OK.
3. Select Set hometown and press OK.
4. Select a city from the list using the keys *
OK.
5. Select Set Time/Date and press OK.
6. Enter the time (HH:MM) and then press .
and # and press
47

7. Enter the date (DD/MM/YYYY) and then press .
8. Using *
saving time function shall be on or off and press Save.
Note
The change to daylight saving time means summer/winter time.
ON corresponds to summer time. For a manual change-over
you can simply set the clock to one hour forward or one hour
back.
and # , choose whether the Change to daylight-
Setting the format for time and date
1. Press Menu, select Settings and press OK.
2. Select Time and Date and press OK.
3. Select Set format and press OK.
4. Set the time format (12 or 24 hour) with
* and # and
press .
5. Set the date format with * and # and press .
6. Select the desired date separation symbol using
# and press OK.
* and
48

Language
The default language of the telephone menu, messages and
so on is determined by the SIM card used. You can always
switch between the languages supported by the telephone.
1. Press Menu, select Settings and press OK.
2. Select Telephone settings and press OK.
3. Select Language and press OK.
4. Select a language from the list and press OK.
Preferred input method
Select the preferred input method for entries in the telephone
directory and for SMS/MMS. You can shift the input method
using the
1. Press Menu, select Messages and press OK.
2. Select Write message and press OK.
3. Select Options, then Input method and press OK.
4. Select En (first character after full stop is upper-case let-
# button while entering text.
ter), EN (UPPER-CASE LETTERS), en (lower-case letters) or Numeric (numbers) and press OK.
49

Display
You can adjust the display in the standby display mode.
1. Press Menu, select Settings and press OK.
2. Select Telephone settings and press OK.
3. Select Display and press OK.
4. Select Background image and press OK.
5. Select the source of the image to be selected and press
OK.
System is the phone memory where the black default background image stored.
User-defined allows you to set your own background
images, taken with the camera or copied from the computer to the memory card, through accessing the memory
card.
6. Select the desired file and press View to see the image.
Then press OK to save the image as background image
or Back to return to the selection.
7. Select Show Date and Time and press OK.
8. In standby display, switch the date and time On or Off
and press OK.
50

Flight mode
Flight mode means the radio communication of the mobile
phone is deactivated. You cannot make any phone calls or
send or receive any SMS or MMS when this is activated. All
other functions in the menu are available.
1. Press Menu, select Setting and press OK.
2. Select Flight mode and press OK.
3. Select Flight mode or Normal mode and press OK.
LCD lighting
Settings for brightness and duration of the display lighting
1. Press Menu, select Settings and press OK.
2. Select Telephone settings and press OK.
3. Select LCD lighting and press OK.
4. Mark Brightness or Time (sec.) using and set the
desired values with * and #.
5. Save the settings with OK.
51

Network settings
Your telephone selects the network operator automatically if
this operator can be received in your area. If your network
operator is not available you can also use a different network
if your network operator has a corresponding agreement with
other operators. This then is called “Roaming”. You can
obtain more information from your network operator.
1. Press Menu, select Settings and press OK.
2. Select Network settings and press OK.
3. Select Network selection and press OK.
4. Select one of the following options and press OK to confirm:
New search – Start a new search if the connection has
been interrupted.
Select network – After a short while, a list of available
networks will be displayed. Select the desired operator
and press OK.
Selection mode
Automatic – The network will be selected automatic-
ally. (default setting).
Manual – The network has to be selected manually.
Select the desired operator with Select network.
52

Attention:
If the wrong network is selected you may incur costs.
5. Select GPRS transfer pref. and press OK. Select
between Data preference and call Preference.
Note
A GPRS connection is required for sending/receiving MMS.
53

Bluetooth®
IMPORTANT
If you do not use any Bluetooth connections select Activation / Off.
Do connect to unknown devices.
You can establish a wireless connection to other Bluetooth-compatible devices, such as headsets.
1. Press Menu, select Connections and press OK.
2. Select Bluetooth and press OK to display the following
settings:
Activation – Switch the function On or Off using the left
soft key .
Visibility – Switch the function On or Off using the left
soft key .
Linked devices - Press OK and select from the following
options:
Search for new device – Starts a search for availa-
ble devices.
[Device xy] – After pressing Options you will have the
following options:
Rename - Change the name of the device.
Authorise – Set whether the connection shall be
established again after it has been disconnected
54

Delete - Delete this device from the list.
Delete all – Delete all devices from the list.
Note on authorisations
You may assign an authorisation to a Bluetooth device. This
is practical, for example with a hands-free equipment in the
car to avoid the constantly repeated request. For this pur
pose, set the authorisation to “Always connect”
Change device name – Changes the name.
Security settings
PIN lock
You can select whether or not the PIN of the SIM card shall
be requested once the phone is switched on. With some SIM
card providers switching off the PIN request is not possible.
1. Press Menu, select Settings and press OK.
2. Select Security settings and press OK.
3. Select SIM security and press OK.
4. Select PIN lock and press OK.
5. Enter the PIN of your SIM card and press OK.
6. The following message informs you whether the PIN
entry is required (blocked) or not (unblocked).
55

Changing the PIN
You can change the PIN and PIN2 for your SIM card. For this
purpose, you need the PUK code that was provided with the
documents for your SIM card.
1. Press Menu, select Settings and press OK.
2. Select Security settings and press OK.
3. Select SIM security and press OK
4. Select Change PIN and press OK.
5. Enter the PIN of your SIM card and press OK.
6. Follow the other instructions on the display.
Phone lock
If the telephone lock is activated, you will need the code to
unlock the telephone when switching the phone on. To this
end, you have to enter the blocking code (factory setting is
0000). You can change this blocking code (see below).
1. Press Menu, select Settings and press OK.
2. Select Security settings and press OK.
3. Select Telephone security and press OK.
Select Phone lock and press ON.
4. Enter the blocking code and press OK.
5. The message that follows informs you whether the tele-
phone is locked (Locked) or not (Unlocked).
56

Changing the blocking code
Changing the blocking code for the telephone (factory setting
is 0000).
1. Press Menu, select Settings and press OK.
2. Select Security settings and press OK.
3. Select Telephone security and press OK.
4. Select Change locking code and press OK.
5. Enter the old locking code and press OK.
6. Enter the new locking code and then reconfirm.
Services
Data account
This menu contains information about your data account.
This information is needed for the MMS function. The settings
for MMS will be provided from your service provider and they
can be sent to you via SMS. The setting parameters for MMS
are preset for the large network operators in Germany. With
other mobile service providers these may have to be
changed manually. You can get the parameters necessary for
this from your provider.
1. Press Menu, select Connections and press OK.
2. Select Data accounts and press OK.
3. Select the entry of your service provider and press OK.
4. Select Change standard and press OK.
57

Following this, the profile is created.
Note:
An automatic configuration by your mobile service provider via
SMS is not possible. An SMS that you might receive automatically from the service provider regarding the automatic configuration does not apply. Should your service provider not be on the
list, proceed as follows:
1. Press Menu, select Connections and press OK.
2. Select Data accounts and press OK.
3. Select an entry and press Options.
4. Select Edit to adjust the current data account or Add PS
account and press OK to display the following settings:
Perform the settings for your service provider. You can
request the correct settings from your service provider.
Account name - Adding the account name.
APN – Adding the APN address.
User name – Entering the user name.
Password – Entering the password.
Auth. type – Selection of the authentification type.
58

Advanced settings
Start page – Entering the start website.
Connection type – Selection of the connection type
HTTP or WAP.
Use proxy – Selection whether or not a proxy server
shall be used.
Proxy address – Address of the proxy server.
Proxy port – Entry of the proxy port.
Proxy user name – Entry of the proxy user.
Proxy password – Entry of the proxy password.
Primary DNS – Address of the primary DNS server.
Secondary DNS – Address of the secondary DNS
server.
IP address – IP address provided by the network pro-
vider.
Subnet mask – Subnet mask provided by the network
provider.
1. Press Options and Save.
2. Select your new profile and press Options.
3. Select Change standard and press OK.
You can also activate or change an MMS profile by selecting
it and selecting Options in order to Activate/Change/Delete
the account.
59

Note!
With some service providers you first have send an MMS
message before you are able to receive MMS. Send an MMS
with text only to enable the service. Some service providers
have to be contacted first, before the MMS function for your
account is activated. Contact the customer support of your
service provider. To end the setup without saving your settings,
press .
Restoring factory settings
Zurücksetzen des Telefons in den Auslieferungszustand.
1. Press Menu, select Settings and press OK.
2. Select Restore to factory settings and press OK.
3. Enter the current telephone blocking code (by default
0000) and confirm the restoring process.
60

Important
When restoring the phone to factory settings, all con-
tacts of the phone will be permanently deleted.
Create a backup of your contacts or write them down
prior to performing this process. Contacts saved on
your SIM card will remain unaffected.
Call settings
To some extent, the services depend on the network support
and the subscription. You can obtain more information from
your network operator.
Caller ID transmission
You can select whether or not the recipient will see your
phone number in the display during calls.
1. Press Menu, Settings, select Call settings and press
OK.
2. Select Caller ID and press OK.
3. Select one of the following options and press OK.
Defined by the network - Using the network standard.
Hide ID – The own phone number will never be dis-
played.
Send ID – The own number will always be displayed.
61

Call waiting
You can answer more than one call simultaneously. If there is
an incoming call during a telephone conversation, a signal
tone is emitted. To hold the active call and to answer the
incoming call, press Options, select Answer and then OK.
1. Press Menu, Settings, select Call settings and press
OK.
2. Select Call waiting and press OK.
3. Select one of the following options and press OK:
Enable – enables the call waiting function.
Disable – disables the call waiting function.
Request status – Shows whether Call waiting is enabled
or disabled.
62

Diverting calls
You can divert calls to a telephone service or call answering
service or to another telephone number. Define which calls
shall be diverted. Select a condition and press OK, then
select Enable, Disable or Request status (see Call waiting,
S. 64 for each option).
1. Press Menu, Settings, select Call settings and press
OK.
2. Select Call diversion and press OK.
3. Select one of the following options and press OK:
Divert all voice calls - Diverts all voice calls.
Divert when not available - Incoming calls will be diver-
ted if the telephone is switched off or outside the network
coverage area.
Divert when not answered - Incoming calls will be diver-
ted, if they are not answered.
Divert when line is busy - Incoming calls will be diver-
ted if the line is busy.
Divert all data calls - Diverts all data calls.
Cancel all diversions – Calls will not be diverted.
63

Call barring
To restrict the use of your telephone, specific types of calls
can be blocked.
Note!
To use the call barring function, a password is required. You
have to request this password from your network operator.
1. Press Menu, Settings, select Call settings and press OK.
2. Select Call barring and press OK.
3. Select one of the following options and press OK:
Outgoing calls - Press OK and then select:
All calls – The user can answer incoming calls but
he/she cannot make any calls.
International voice calls – The user cannot call inter-
national phone numbers.
International voice calls, except for Home-P – The
user cannot call international phone numbers, except for
phone numbers inside the country assigned to the
SIM card.
Incoming calls - Press OK and then select:
All calls – The user can make calls but cannot answer
any incoming call.
Voice calls in roaming – The user cannot answer calls
while using the Roaming service (operation in other net-
64

works).
Cancel all – Deletes all call barrings (password required).
Change call barring password – Option to change the
password for call barrings.
Automatic redial
This function performs a redial automatically.
1. Press Menu, Settings, select Call settings and press
OK.
2. Select Advanced settings and press OK.
3. Select Auto-redial and press OK.
4. Switch the function On or Off and press OK.
Call time reminder
If this function is enabled, you will be notified via a notification
sound once or repeatedly about the call time that has elapsed so far.
1. Press Menu, Settings, select Call settings and press
OK.
2. Select Advanced settings and press OK.
3. Select Call time reminder and press OK.
4. Select one of the following options and press OK:
Off – The function is disabled. .
Single - Enter a number for the one-time signal (1…3000 s).
Recurrent - Enter a time for the recurring signal (30…60 s).
65

Answering mode
Setting option for answering of incoming calls
1. Press Menu, Settings, select Call settings and press
OK.
2. Select Advanced settings and press OK.
3. Select Answering mode and press OK.
4. Select one of the following options and press OK:
By flipping open the phone – Calls will be answered
automatically when the phone is flipped open.
Any key - Incoming calls can be answered with any key
(except the right soft key and the red hang-up key).
Auto-answer in headset mode – When the headset is
connected, an incoming call will be answered automatically after a short while.
SMS settings
1. Press Menu, select Messages and press OK.
2. Select Message settings and press OK.
3. Select Text message and press OK.
4. Select one of the following menu points and press Opti-
ons:
SIM/storage location
SMSC address – This number will be needed for the
66

use of the SMS function. The number of your SMS
centre will be provided by your network provider and
usually is stored on the SIM card. If the number of
your SMS centre is saved on the SIM card, it will be
displayed. If not, you can enter the number yourself.
Please contact your network provider for more information.
Select the type using the keys * and #. These options
depend on your network operator. Contact your network
operator for more information, if required.
Memory status – Display of the available / used memory
for SMS on the SIM card and in the telephone.
Sent messages – Using the keys * and #, you can
select whether or not sent SMS shall be saved in the folder “Sent” (On) or (Off).
Storage location – Define the storage location for recei-
ved SMS using the keys * and # (SIM / internal
memory).
67

MMS settings
1. Press Menu, select Messages and press OK.
2. Select Message settings and press OK.
3. Select Multimedia message and press OK.
4. Select one of the following menu points and press OK:
Data account – Select the suitable data account for your
network provider and confirm with OK.
Note:
These settings will be required for the use of the
MMS function. The settings for MMS are provided by
your network provider. For the setting of a new
account or changes to existing accounts, see ser-
vices, p. 59.
General settings
Compose – Setting options for slide time, creation
modes, autom.signature and signature.
Message being sent – Setting options for transmis sion report, read report, priority, transmission time
and send and save.
Query – Setting options for different query criteria
(home network, roaming, filter, read report, transmis-
sion report).
68

Storage location? – To save the MMS in the tele phone or on the memory card
Memory status - Display of the available / used
memory for MMS.
Voice mail (mailbox)
If your service provider has set up a mailbox (answering machine in
the mobile phone network) for you, callers will be able to leave a
voice message if you are unable to answer a call. Voice mail is a service offered by your network operator and you may have to subscribe
to this service first. More information and the number for the voice
mail are available from your service provider.
1. Press Menu, select Settings, Call settings and press OK.
2. Select the item Mailbox and press OK.
3. Select one of the two possible entries and press Options.
4. Define the name (freely selectable) and the number of your
mailbox services with Name and Number. Confirm with OK.
Tip: To call your mailbox press and hold the
approx. 3 seconds. The mailbox must be pre-defined
(name and number)
1
key for
69

User profiles
You can save various profiles (special settings, depending on
the user and the environment) which you can switch quickly,
if required.
Note
The profile with the green arrow is the active profile. If you
make any changes to one of the profiles, these selected
settings will have effect only when the profile is activated!
1. Press Menu, select User profiles and press OK.
2. Select one of the profiles and press Options.
3. Select one of the following options and press OK:
Enable: The profile is enabled with the corresponding
settings.
Adjust: Edit the settings for the selected profile. Select
one of the following menu points using and
press options. Then select Change, Edit the setting and
press OK. Once you have carried out all settings as
required, press Options, select Save and press OK.
Signal type – Define if a call shall be notified by ring
tone, only vibration, by ring tone and vibration or by
vibration and the ring tone starting after a certain time
has passed.
70

Ringing type – You can select between individual sig-
nal, repeated or increasing.
Ring tone – Select the melody for the incoming call.
Ring tone volume – Select the volume for an incoming
call.
Message – Select the melody for an incoming mes-
sage.
SMS tone – Select the volume for an incoming SMS.
Keyboard – Select the tone for key strokes or switch to
silent.
Key tone volume – Select the volume for a key stroke.
Opening or closing the flap of the clamshell phone –
Select tones for flipping open or closing the mobile
phone or Silent.
System tones – Select whether or not signal tones will
sound when system messages are displayed.
RESTORE – All settings of the user profile will be restored to
factory settings.
71

Organiser
Calendar
1. Press Menu, select Organiser and press OK.
2. Select Calendar and press OK.
3. Press Options.
4. Select one of the following options and press OK:
Display – Shows tasks for the selected date.
Display all – Shows all saved tasks.
Add event - Enter the parameters for the event and then
press Save or Options - Save.
When the preset date/time is reached, a signal tone will
be emitted and the description of the task displayed.
Press Stop to switch off the alarm or press Snooze so
that the alarm is repeated after 6 minutes.
Delete event - Delete an event from the list.
Skip to date - Enter the date and press OK.
Switch to today - Shows the current date in the calen-
dar.
Change to weekly/monthly view - Shifts the view bet-
ween weekly and monthly view .
72

Alarm/alarm clock
1. Press Menu, select Organiser and press OK.
2. Select Alarm and press OK.
3. Select an entry from the list and press Edit.
4. Select On or Off using the keys * and # and press .
5. Enter the alarm time using the keypad and press .
6. For a one-time notification select Once and press Opti-
ons. Select Repeat. The selection Once/Daily/Days
appears. For an alarm signal that is repeated daily, select
Daily and press OK. For repetition on specific weekdays,
select Days and press OK. Scroll through the list of
weekdays and press Options / On/ Off to switch the
alarm clock for each weekday on/off, in a final step select
Done and then press OK.
7. Under Signal type select (ringing and vibration, only
vibration, only ringing) using the keys * and # then
press OK.
73

Services
Among other things, this menu contains pre-programmed
services of your network operator. The services depend on
the network support and the subscription.
1. Press Menu, select Connections and press OK.
2. Select Services and press OK.
Calculator
The calculator can perform basic arithmetic operations.
1. Press Menu, select Organiser and press OK.
2. Select Calculator and press OK.
3. Enter the first number. Use # to enter decimal points.
4. Using select the calculation type (+, -, x, ÷).
5. Enter the next number and press OK.
The result will be shown.
6. Repeat the steps 3 to 5, as required.
74

Appendix
Safety instructions
CAUTION
The device and its accessories may contain small parts.
Keep the device out of the reach of small children. The
power supply is used as separating unit between product
and main connection.
The main socket must be in close proximity to the device
and should be easily accessible.
Network services and fees
Your device is approved for GSM 900/1800/1900 MHz networks.
To be able to use the device, you have to insert a SIM card that
has been unlocked and activated by the network operator. When
you use network services you may incur costs. Some of the
functions are only available after requesting them from your operator and they may bring about fees.
Operating environment
Please observe all regulations applicable to your country/ place of
residence, and switch the device off if its use is prohibited or if it can
cause interference or risks. Always use the device in the normal
position of use.The device complies with the guidelines and directi-
75

ves for radiation when it is used at the ear at normal position or at a
distance of at least 1.5 cm from your body. If you carry the device
close to your body, in a bag or belt bag or in storing equipment or
similar means, these storing means must not contain metal parts
and the product should be carried at the distance from the body as
specified above. Make sure the distance guidelines are observed
until you put the device into operation.
Parts of the device are magnetic. Therefore, it may attract metal
objects. Do not keep credit cards or other magnetic data carriers
close to the device. There is a risk of losing all data saved on data
carrier.
Medical devices
The use of devices that transmit radio signals, such as
mobile phones, may impair the function and operation of
medical devices if they are not sufficiently shielded. Consult a doctor or the manufacturer of the device to find out if
it is sufficiently protected against external radio signals or
if you have any other questions.
Cardiac pacemakers
The manufacturers of cardiac pacemakers recommend a
distance of at least 15 cm between the mobile phone and
the cardiac pacemaker in order to avoid malfunctions of
76

the pacemaker. Persons using cardiac pacemakers should
keep the following in mind:
• They should always keep the telephone at a distance
of 15 cm from their pacemaker when the telephone is
switched on.
• They should never wear the telephone in a breast
pocket.
• They should use the ear on the half of the body oppo-
site to the one with the cardiac pacemaker to reduce
the risk of malfunctions.
They should turn the telephone off immediately if there is
a reason to assume that there is a malfunction.
Explosive areas
Always turn the device off when you are in explosive
areas.
Follow all of the instructions and guidelines. A risk of
explosion also exists, for example, in places where you
normally have to switch off the engine of your vehicle. In
these areas sparking may lead to explosion or fire; this
involves risks of injury and danger to life. Switch the
device off at petrol stations and all other places where
there are petrol pumps or vehicle garages and workshops.
Adhere to the restrictions regarding the use of radio-con-
77

trolled devices in places where fuels are stored and sold,
in the area of chemical factories and places where blasting is in progress. Areas with risk of explosion are often –
but not always – clearly marked.
The same applies below deck on ships, to the transport or
storage of chemicals, to vehicles operated by liquid fuel
(such as propane or butane) as well as to areas containing chemicals or particles in the air, such as fibres, dust
or metal powder.
Protection from too high volume at the ear
This device has been tested and it complies with the
requirements for the noise level according to the norms
EN 50332-1 and/or EN 50332-2.
WARNING
Loud noises over an extended period of time
may cause damage to hearing. Loud noises
while driving or steering a vehicle may distract
you or cause an accident. Enjoy music via
a headset at a moderate volume. Do not hold the
device to your ear when it is switched to handsfree mode.
78

Emergency calls
IMPORTANT
Mobil telephones use radio signals, the mobile phone network, the land line network and user-programmed functions. This means a connection cannot be guaranteed
under all circumstances. Thus, never rely on mobile phones only if very important calls are necessary, e.g. in
medical emergencies.
Vehicles
Radio signals may impair the electronic system of motor vehicles
(e.g. electronic fuel injection, anti-lock brake system (ABS), speed
control, air-bags) if the system was incorrectly installed or if it is
not sufficiently protected.
For more information about vehicles or possible additional equipment please contact the manufacturer or its subsidiary.
Combustible liquids, gases or explosive substances must not be
stored or transported together with the device or its accessories.
For vehicles with air-bags please keep in mind that in the event of
a crash the air-bags will be filled with air using a considerable
force. Therefore, do not place objects or stationary or hand-held
radio-controlled devices directly above the air-bag or within the
79

range where it inflates. If the mobile phone is improperly installed,
the inflating of the air-bag may lead to severe injuries. The use of
the device on aircrafts is prohibited. Switch the phone off before
boarding the airplane. The use of wireless telecommunication
devices in airplanes may impair the flight security and disturb the
on-board telecommunication system. Furthermore, the use of
these devices might be forbidden by law.
Maintenance and Care
Your telephone is a technically advanced product and it
must be handled with utmost care. Negligent behaviour
may lead to loss of warranty.
• Protect the device from humidity. Rain/snow and all
types of liquid may contain substances that lead to
corrosion of the electronic system. If the device gets
wet, remove the rechargeable battery and let the
device dry completely before you insert the battery
again.
• Do not store the device in dusty, dirty environments.
The moveable device components and the electronic
system might get damaged.
• Protect the device from heat. High temperatures may
reduce the lifespan of the electronic system, damage
the rechargeable battery and deform plastic parts or
80

even cause them to melt.
• Protect the device from cold. While warming up to
normal temperatures, condensation may form inside
the device which can damage the electronic system.
• Do not attempt to open the device in a way other than
described in this manual.
• Do not drop the device. Protect it from blows, jolts and
vibrations. If the device is handled improperly, conductors and precision-mechanical parts might be
damaged.
• Do not clean the device with abrasive cleaning agents.
These notes apply to the device, the rechargeable bat-
tery, the network adapter and other accessories. If the
telephone does not work properly, please contact your
retailer. Bring along your sales receipt or a copy of the
invoice.
Warranty and service information
If the product shows any defect resulting from manufacturing and/or material faults within 24 months starting from
the purchase date, we kindly ask you to contact our
Hotline at 0180 5 00 50 60 (This call will involve connection fees of 0.14 EUR/Min calling from the German
land line network – maximum 0.42 EUR/Min calling from
81

the German mobile phone network – as of 01/07/2013).
Availability: Monday to Thursday from 08h00 to 17h00
and Friday from 08h00 to 15h30.
The rechargeable battery is a replacable part and has a
warranty of 6 months. Replaced products shall become
the property of IVS GmbH.
We ask you to
- send the product in its original package incl. accessories
- with a copy of the sales receipt
- and a detailed error description
- immediately notify our hotline after noticing the defect.
If we do not find any fault or defect, the product will be returned
to you with a corresponding note.
Defects and damages caused by improper handling of the product or the non-compliance with the operating instructions,
modifications or conversions to the product performed by the
retailer or the client himself (e.g. installations, software downloads) and total losses are excluded from the warranty. In such
cases, IVS GmbH reserves the right to charge the client for the
replacement or repair. IVS GmbH shall inform the client of this
in advance. Total losses are e.g.
82

- Fire damage (e.g. caused by short-circuit)
- Corrosion damage (e.g. caused by liquid that entered the
device)
- Unauthorised modifications (e.g. improperly performed soldering, mechanically incorrect mounting, destroyed seals)
- Mechanical damage (e.g. plastic deformations, tearing off
of soldered joints)
- Damages which indicate a use that was not in accordance
with the manufacturer’s instructions (e.g. foreign objects
inside the product, deposits of chemicals)
- Lightning and surge damages
A change of the regulation regarding the burden of proof
to the detriment of the client is not part of the above regulations.
Operating instructions and software provided are excluded
from the warranty. This warranty is valid for new goods
purchased in Germany. Warrantor is:
IVS GmbH
Im Frauental 14
92224 Amberg / Germany
83

Further or other claims under the manufacturer warranty
shall be excluded. IVS GmbH is not liable for the disruption of services and operation, lost profits or the loss of
data, additional software or information downloaded by the
client. The backup of this software is the client’s responsibility. The exclusion of liability shall not apply in cases
where our liability is mandatory, e.g. product liability act, in
cases of deliberate intention, gross negligence, claims
based on liability for danger to human life, physical injury
or danger to health or due to violation of essential contractual obligations. However, claims for the violation of
essential contractual obligations shall be limited to foreseeable damages that are typical for this type of contract,
provided there is no liability for danger to human life, physical injury or danger to human health or liability pursuant
to product liability law. The duration of the warranty shall
not be extended by services rendered under the terms of
the warranty.
The receipt with purchase date is valid as warranty certificate. Warranty claims must be made within two weeks
after noticing a warranty case.
84

Technical Data
Network: Triband GSM 900 / 1800 / 1900
Display: 2.4”, 320 x 240 Pixels
Bluetooth®: BT 3.0
Camera: 2 MP
MMS: yes
FM radio: yes
Torch: yes
Rechargeable battery: Li-Ionen 3,7V, 1050 mAh
Standby time: up to 8 days
Call duration: up to 4 hours
Phone directory entries: 300
ICE function: yes
Emergency call button: yes 5 SOS numbers
Card slot, upgradeable: micro-SD
Connectors: micro-USB, stereo jack 4-pin
3.5 mm
Organiser: alarm function, calendar,
calculator
Vibration alarm: yes
Direct dialling keys: 3
Illuminated keypad: yes
Additional external display:
yes
85

Separate hands-free button: yes
During call: Yes
Languages: DE,EN,CZ,ES,PO,
TR,FR,HU,IT,NL,PL
Dimensions: 102 x 50 x 20 mm
Weight: 115g
Bluetooth® is a registered trademark of Bluetooth SIG,
Inc.
Specific absorption rate (SAR)
This device complies with the international safety regulations
for the exposure to radio waves.
900MHz:
0.826W/kg 1g
0.646W/kg 10g
1800MHz:
0.680W/kg 1g
0.537W/kg 10g
The upper limit according to WHO is 2.0 W/kg measured for 10 g
of tissue.
86

Approval and Conformity
This mobile phone complies with the fundamental requirements of the R&TTE Directive 1999/5/EC for radio installations and telecommunication transmission devices and is suitable for the connection and operation in the respective country where the device was sold.
The declaration of conformity is available on the following
website: www.ivsgmbh.de
The conformity of the telephone with above
Directive is confirmed by the CE mark.
0700
87

88

U3

Internet:
www.ivsgmbh.de
IVS GmbH
Im Frauental 14
92224 Amberg
© IVS GmbH 2013
All rights reserved
IVSUMGER_Primo 413 by Doro - V 1.01
 Loading...