

Page 1
Doro Magna 4000
English
Page 2
OK
C
A B
R
b
60dB
4
2
3
16
17
11
12
13
14
15
10
8765
1
9
English
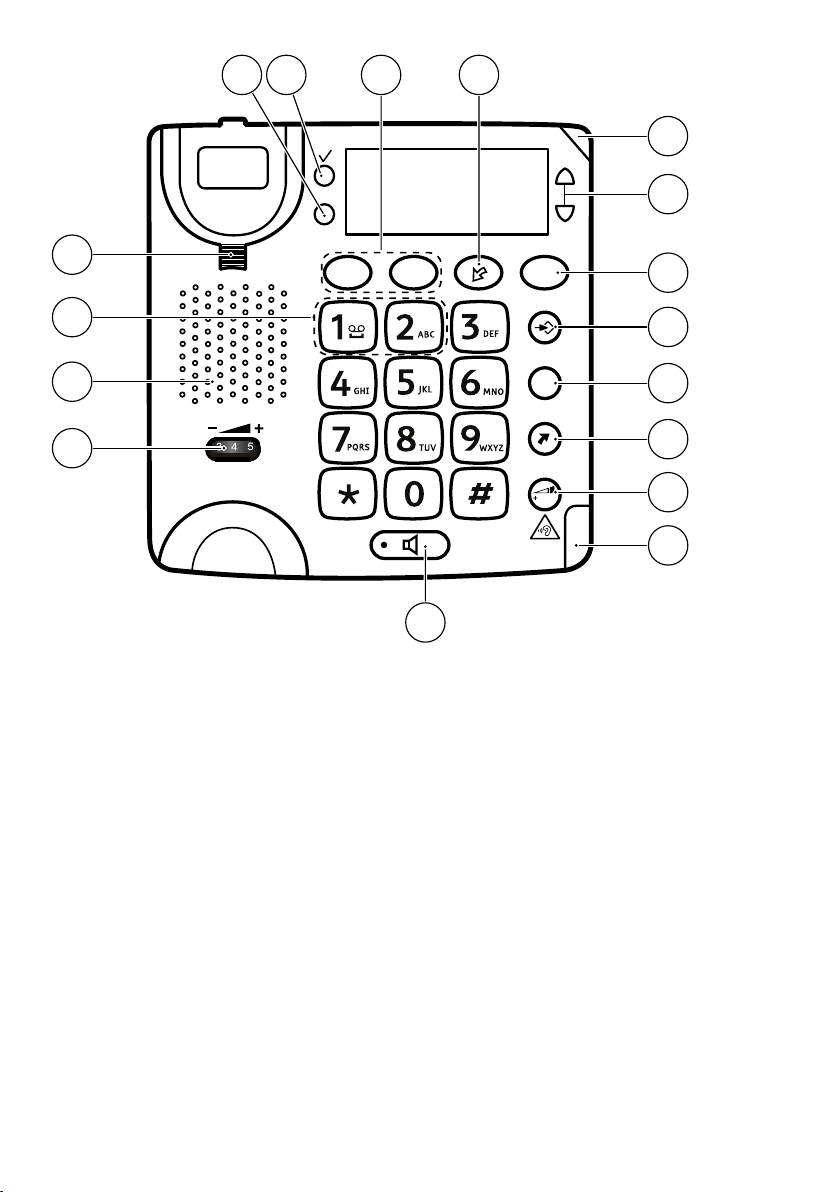
1. Handset volume control
2. Speaker
3. Service access keys
4. Hanging peg for handset
5. Clear
6. OK
7. Speed dial keys
8. Caller ID (access received
numbers)
9. New call indicator
10. Up/Down
11. Phonebook
12. Menu
13. Recall
14. Redial
15. Extra amplification (boost)
16. Amplifier on/ringer indicator
17. Speaker on
Page 3

English
Installation
This device is intended for the analogue telephone network lines in AT, BE,
BG, CH, CY, CZ, DE, DK, EE, ES, FI, FR, GB, GR, HU, IE, IS, IT, LV, LT, LU, MT,
NL, NO, PL, PT, RO, SI, SK, SE.
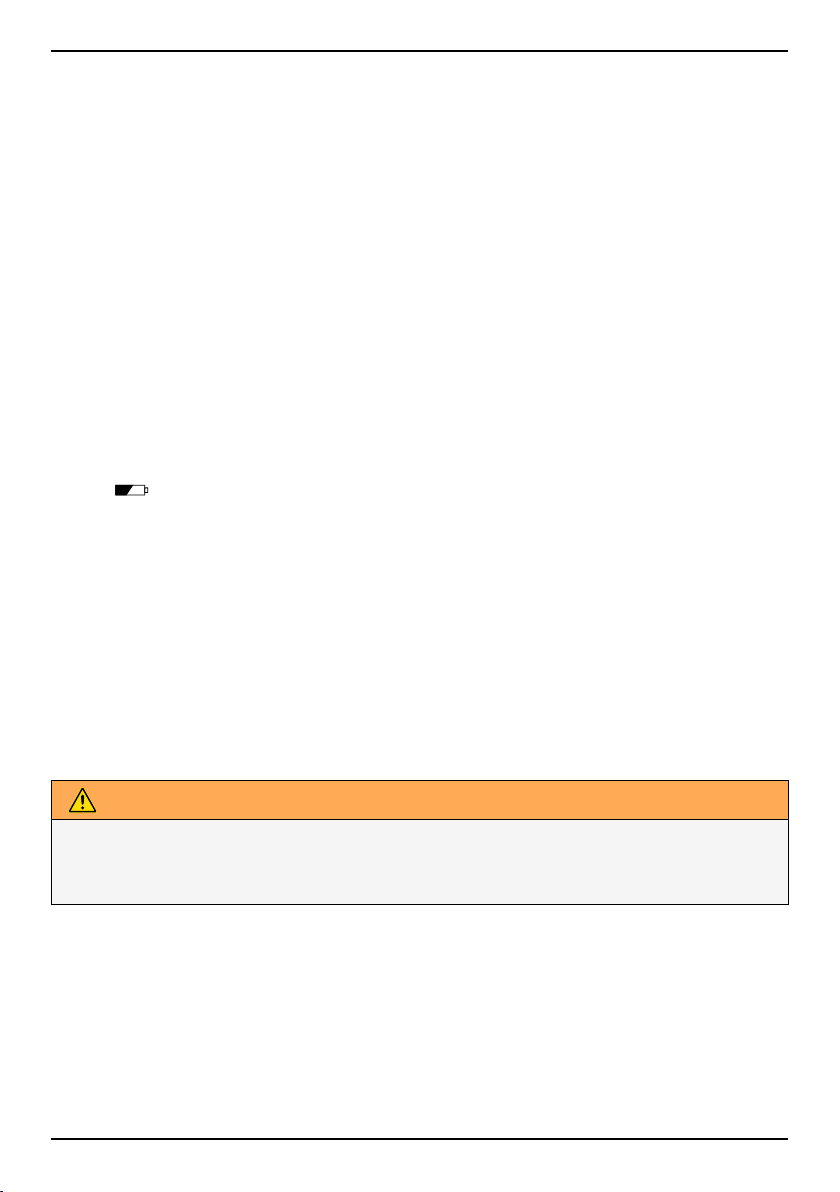
Connection
1. Connect the curly cord to the handset and to the socket marked Q
on the unit.
2. Connect the mains adapter to an electrical wall socket and then to the
socket marked DC 12V on the unit.
3. Connect the telephone line cord to a network wall socket and then to
the socket marked T on the unit.
4. Lift the handset and listen for the dial tone.
Note! Use supplied telephone line cord, an existing cord from a previous
phone may not be compatible.
Setup
The setup menu is opened directly after plugged into the mains. The phone
will return to standby mode after 60 seconds of inactivity or when pressing
b. Confirm with 0 and the next setting is displayed. Scroll with v/V.
Access the setup menu at any time with
.
1. Press
2. ENGLISH is displayed.
3. Select desired language using v/V. Press 0.
4. Select desired contrast setting (LCD CONTRAST, 2=normal) using v/
V. Press 0.
5. Select desired hour (00-23) using v/V. Press 0.
6. Select desired minute using v/V. Press 0.
7. Select desired day using v/V. Press 0.
8. Select desired month using v/V. Press 0.
9. Select TONE or PULSE using v/V. Press 0.
Note! If unsure of which mode to use, select TONE as this works in
most locations.
10. Select FLASH TIME using v/V (100 for EU/GB/AUS, 270 France/
Portugal and 600 New Zealand). Press 0.
.
1
Page 4
English
11. NEW CALL IND. is displayed, press 0. Enable/disable the LED indicator for new calls. Select ON/OFF, and confirm with 0.
12. Buttons1and2can be programmed with service access numbers.
SERVICE ACCESS is displayed, press 0. Use v/V to select KEY 1
or KEY 2, and then press 0. Use the keypad to edit/enter the access
number. Press 0. Enter the name for the service. Press 0.
Changing the clock, language or contrast
If you wish to change the settings for time or language etc. later on, repeat
steps as above.
Batteries
4 x AA alkaline batteries are needed for the display operation (no backlight)
in the event of a power cut. Extra amplification (boost) and speakerphone
will not work in the event of a power cut.
When
batteries.
1. Unplug the telephone cord and remove the battery cover.
2. Insert the batteries (4 x AA) ensuring that the correct battery polarity
3. Replace the battery cover and connect the telephone cord.
is displayed, replace all 4 batteries. Use only good quality
is observed.
Wall mounting
The telephone can be wall mounted by using the included wall mount
bracket and two screws.
WARNING
Make sure that the mounting height is less than 2 meters.
Make sure that no cables, water pipes or gas pipes are located inside the
wall before drilling into it.
1. Drill two holes in the wall, vertically 83 mm apart.
2. Insert the screws, allowing them to project ~5 mm out from the wall.
3. Unplug and remove the handset.
4. Fit the guide tabs (A) on the bracket into the slots (B) on the back of
the telephone, then slide the bracket upwards until it snaps into place.
2
Page 5
English
B
A
C
D
C
5. Position the phone so that the screws on the wall fit into the slots in
the bracket, then slide the phone downwards until it is hanging on the
screws.
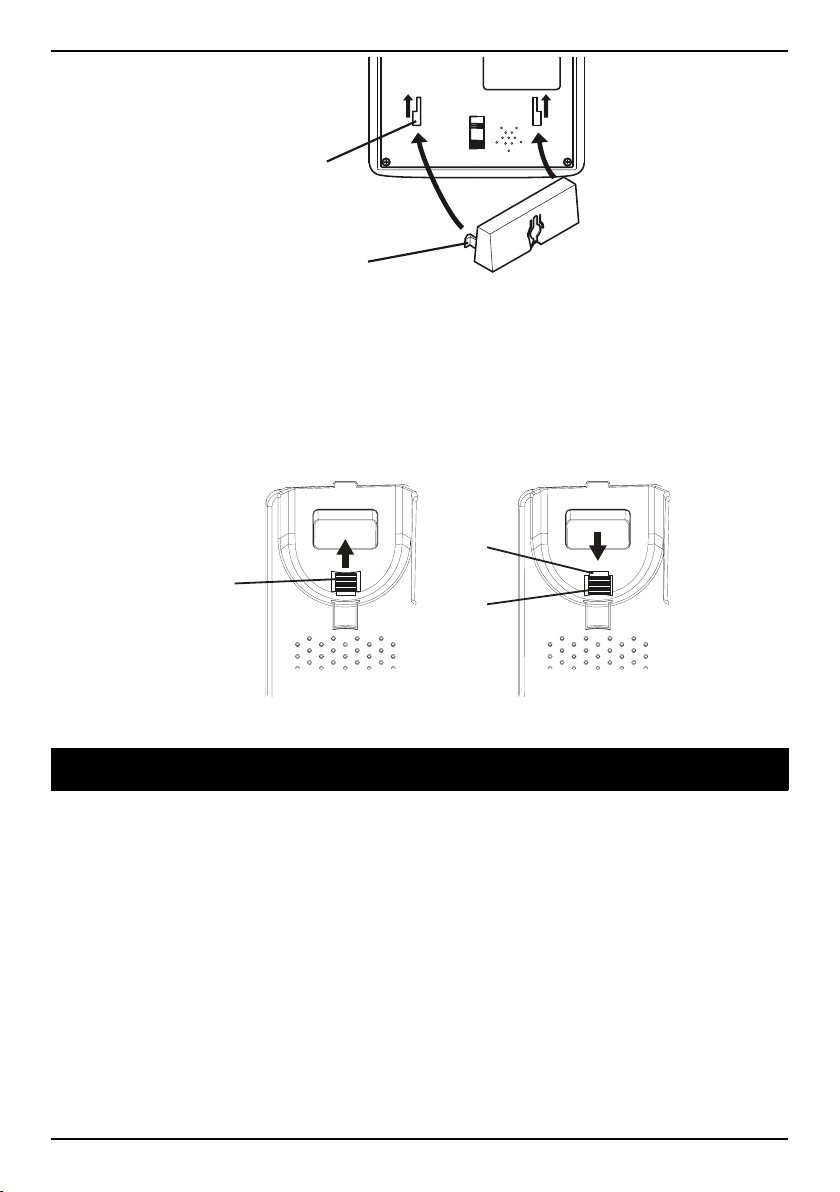
6. Remove the handset hook (C) by pushing it upwards, and insert it in
the reversed position so that the small tab (D) protrudes. The hook
will now keep the handset in the cradle when the phone is wall
mounted.
7. Replace the handset, on the hanging peg, in the hook switch.
Operation
The display
In standby mode the date and time is indicated on the display, the total
number of calls that have been stored in the Caller ID memory, and the
number of new calls. See also Message, p.8.
Timer
During a call the display shows a call timer, indicating the duration of the
call. The timer is a simple way to help you keep track of how long the call
lasts.
3
Page 6

English
Make a call
Normal call
1. Lift the handset.
2. Enter the phone number.
Pre dial
Pre dial allows you to enter and change a phone number before it is dialled.
1. Enter the phone number. Delete with c.
2. Lift the handset to dial.
Re dial
Re dial allows you to call the last dialled phone numbers.
• Lift the handset and press
number.
• Repeatedly press
handset to dial the phone number.
to scroll through the dialled numbers. Lift the
to dial the most recently dialled phone
Handsfree/speakerphone
It is only possible for one person at a time to talk in handsfree mode. Avoid
loud background noises, e.g. music, as this interferes with the handsfree
function.
1. Press
2. Enter the phone number.
3. Press
Tip: You can switch between handset and handsfree mode during a call,
press
to activate the handsfree function.
to end the call.
or lift the handset.
Service access dial
Shortcut keys to operator service access numbers.
1. Press and hold or1or2until the service access number is
displayed.
2. Lift the handset, press 0 or
to dial.
4
Page 7

English
6
0dB
Volume control
The handset volume may be adjusted during a call with located
under the handset when not used.
The handset tone may be adjusted during a call with
located on the
side of the phone.
Note! The tone control only works when the extra amplification is active.
To adjust the speakerphone volume (handsfree), use
located on
the side of the phone.
Extra amplification (boost)
Press the
fier on light is lit. The amplification is deactivated at the end of each call to
avoid harming people with normal hearing.
Note! It is only possible for one person at a time to talk when the Boost
Button is activated. Avoid loud background noises, e.g. music, as this may
interfere with the boost function.
WARNING
The handset/headset volume can be turned up very loud. The
amplification should only be used by people with impaired hearing ability.
button to activate amplification. When activated the Ampli-
Hearing aid compatible
WARNING
Do not use extra amplification (boost) together with a hearing aid if not
necessary. The handset volume can be turned up very loud.
This telephone is hearing aid compatible. Select the T-mode on your hearing aid to use this feature. Hearing-aid compatibility is not a guarantee that
a specific hearing aid will work with a specific telephone. To ensure that a
specific hearing aid works well with this telephone, test them together before making a purchase.
T: To use your hearing aid in this mode, make sure that your hearing aid is
set to "T-mode" or telecoil coupling mode (not all hearing aid have this
5
Page 8

English
mode). For the best results, try using the telephone in different positions
relative to your hearing aid-for example, placing the receiver slightly below
or in front of the ear may result in better performance.
Ringer
The ringer volume may be adjusted using the switch located on the
side of the phone.
Speed dial
You can useA,Bas speed dials.
Storing speed dial numbers
1. Press and hold until STORE NUMBER is displayed.
2. Enter the phone number. Press
3. Enter the name. Press
4. SelectA–Bby pressing the corresponding key. SAVED is displayed
. STORAGE PLACE? is displayed.
Speed dial
1. Press the speed dialling keysAandB. The stored phone number is
displayed.
2. Lift the handset, press 0 or
.
to dial.
Phonebook
The phonebook will store 50 sets of names and phone numbers. Contacts
in the phonebook are arranged alphabetically. Each name can be up to 16
characters in length, and phone numbers can be up to 22 digits in length.
If you subscribe to a Caller ID service, the name/number of the caller will
be shown when you receive an incoming call (for those numbers stored in
the phonebook or the memories).
Note! To access the phonebook features make sure that b is displayed. If
is displayed, press b.
Character table
Each number key has been allocated certain characters.
6
Page 9

English
1
2
3
4
5
6
7
8
9
*
0
#
[Espace] + & - / X 1
A B C Å Ä Æ æ å ä ß 2
D E F ë 3
G H I ï 4
J K L 5
M N O Ñ ñ Ö ə ö 6
P Q R S 7
T U V 8 Ü ü
W X Y Z 9
` @ ( ) * < >
, . : ? = 0
$ _ % ! #
Storing contacts
1. Press b.
2. Press and hold
3. Enter the phone number. Press
4. Enter the name. Press the corresponding digit key for the first letter,
one or more times, see Character table.
5. Press
. SAVED is displayed.
until SAVE? is displayed. Press .
.
If you need to insert a pause in the phone number press
. Mistakes can
be erased with c.
Dialing from the phonebook
1. Press b.
2. Scroll using v/V. Quick search by pressing the corresponding digit
key for the first letter, one or more times, see Character table.
3. Press 0, and lift the handset.
Edit contacts
1. Press b.
2. Scroll to the desired entry using v/V.
7
Page 10

English
3. Press and hold until EDIT? is displayed.
4. Press and hold
5. Correct/change the number using c and v/V. Press
6. Correct/change the name, see Character table. Press
displayed.
.
.
. SAVED is
Deleting contacts
1. Press b.
2. Scroll to the desired contact using v/V.
3. Press c the display shows DELETE?.
Tip: To delete all contacts, press and hold c until DELETE ALL? is
displayed.
4. Hold c down until the number disappears.
Caller ID (caller identification)
Caller ID allows you to see who is calling before you answer a call and to
see who has called in your absence. If the number is stored in the phonebook, the caller’s name will be shown. Received calls are stored chronologically, the sequential number shown on the display.
When the Caller ID memory is full, the oldest number will be deleted automatically as the new call is logged. New calls are indicated on the display
and indicated with T, the New call indicator flashes.
Note! In order for numbers to be shown you must subscribe to the Caller
ID service provided by your network operator. Contact your operator for
more information.
Retrieving and dialling incoming numbers
1. Press .
2. Press v/V to scroll through received phone numbers/calls.
3. Press 0 and lift the handset.
Message
Apart from phone numbers, the display can show:
8
Page 11

English
OUT OF AREA
PRIVATE
T
Z
q
MESSAGE WAITING / 5
No information received, e.g. an international call
The call comes from a withheld number or a PBX
Number not previously seen
Several calls have been received from this particular
person
A call is received while using the Call Waiting function
Message indication*
*Message indication can be erased manually with c.
Deleting phone numbers
1. Scroll to the desired number using v/V.
2. Press c, DELETE? is displayed or press and hold c until DELETE
ALL? is displayed.
3. Hold down c until the number disappears.
Transferring numbers to the phonebook
1. Press .
2. Scroll to the desired entry using v/V.
3. Press and hold
4. Press and hold
Number and name can be added/edited in the same way as Edit contacts,
p.7.
until COPY NUMBER? is displayed.
. SAVED is displayed.
9
Page 12

English
Other
Troubleshooting
Check that the telephone cord is undamaged and properly plugged in. Disconnect any additional equipment, extension cords and other phones. If the problem is resolved, the
fault is with some other equipment.
Test the equipment on a known working line (e.g. at a neighbour’s house). If the equipment works there the fault is probably with your telephone line. Please inform your network operator. If the telephone still does not work, contact the place of purchase for
service. Don’t forget the receipt or a copy of the invoice.
Care and Maintenance
CAUTION
Only use batteries, mains adapter and accessories approved for use with this particular
model. Connecting other accessories may be dangerous and may invalidate the phone's
type approval and guarantee. The mains adapter is the disconnect device between the
product and mains power. The mains socket outlet must be close to the equipment and
easily accessible.
Your unit is a technically advanced product and should be treated with the greatest care.
Negligence may void the warranty.
• Protect the unit from moisture. Rain/snowfall, moisture and all types of liquid can
contain substances that corrode the electronic circuits. If the unit gets wet, you
should disconnect it, remove the battery and allow the unit to dry completely before
you replace it.
• Do not use or keep the unit in dusty, dirty environments. The unit’s moving parts and
electronic components can be damaged.
• Do not keep the unit in warm places. High temperatures can reduce the lifespan for
electronic equipment, damage batteries and distort or melt certain plastics.
• Do not keep the unit in cold places. When the unit warms up to normal temperature,
condensation can form on the inside which can damage the electronic circuits.
• Do not try to open the unit in any other way than that which is indicated here.
• Do not drop the unit. Do not knock or shake it either. If it is treated roughly the cir-
cuits and precision mechanics can be broken.
• Do not use strong chemicals to clean the unit.
The advice above applies to the unit, battery and other accessories. If the unit is not working as it should, please contact the place of purchase for service. Don’t forget the receipt
or a copy of the invoice.
10
Page 13

English
Warranty
This product is guaranteed for a period of 24 months from the date of purchase. In the unlikely event of a fault occurring during this period, please contact the place of purchase.
Proof of purchase is required for any service or support needed during the guarantee period. This guarantee will not apply to a fault caused by an accident or a similar incident or
damage, liquid ingress, negligence, abnormal usage, non-maintenance or any other circumstances on the user’s part.
Furthermore, this guarantee will not apply to any fault caused by a thunderstorm or any
other voltage fluctuations. As a matter of precaution, we recommend disconnecting the
mains adapter during a thunderstorm.
Batteries are consumables and are not included in any guarantee.
Please note that this is a voluntary manufacturer’s warranty and provides rights in addition to, and does not affect statutory rights of end-users.
EU declaration of conformity
Hereby, Doro declares that the equipment type Doro Magna 4000 is in compliance with
Directives: 2014/53/EU and 2011/65/EU. The full text of the EU declaration of conformity
is available at the following internet address: www.doro.com/dofc.
Ecodesign declaration, energy efficiency for external power supply
Hereby, Doro declares the external power supply for this device is in compliance with
Commission Regulation (EU) 2019/1782 regarding ecodesign requirements for external
power supplies pursuant to Directive 2009/125/EC.
Manufacturer’s name or
trade mark, commercial
registration number and
address
Model identifier
Input voltage (VAC)
Input AC frequency (Hz)
Output voltage (VDC)
Output current (A)
Output power (W)
Tenpao International
Address:Room 10-11,6/F., Kwong Sang Hong
Centre, 151-153 Hoi Bun Road,Kwun Tong,Kowloon, HongKong
S005BNV1200030 (EU
version)
S005BNB1200030 (UK
version)
100-240 100-240
50-60 50-60
12.0 12.0
0.3 0.3
3.6 3.6
11
Page 14

English
Average active efficiency (%)
No-load power consumption (W)
78.97 78.97
0.038 0.038
12
Page 15

English
13
Page 16

English
Version 3.0
©2018 Doro AB. All rights reserved.
www.doro.com
REV 19257 — STR 20140115
 Loading...