

Doro CONGRESS 205 User Manual
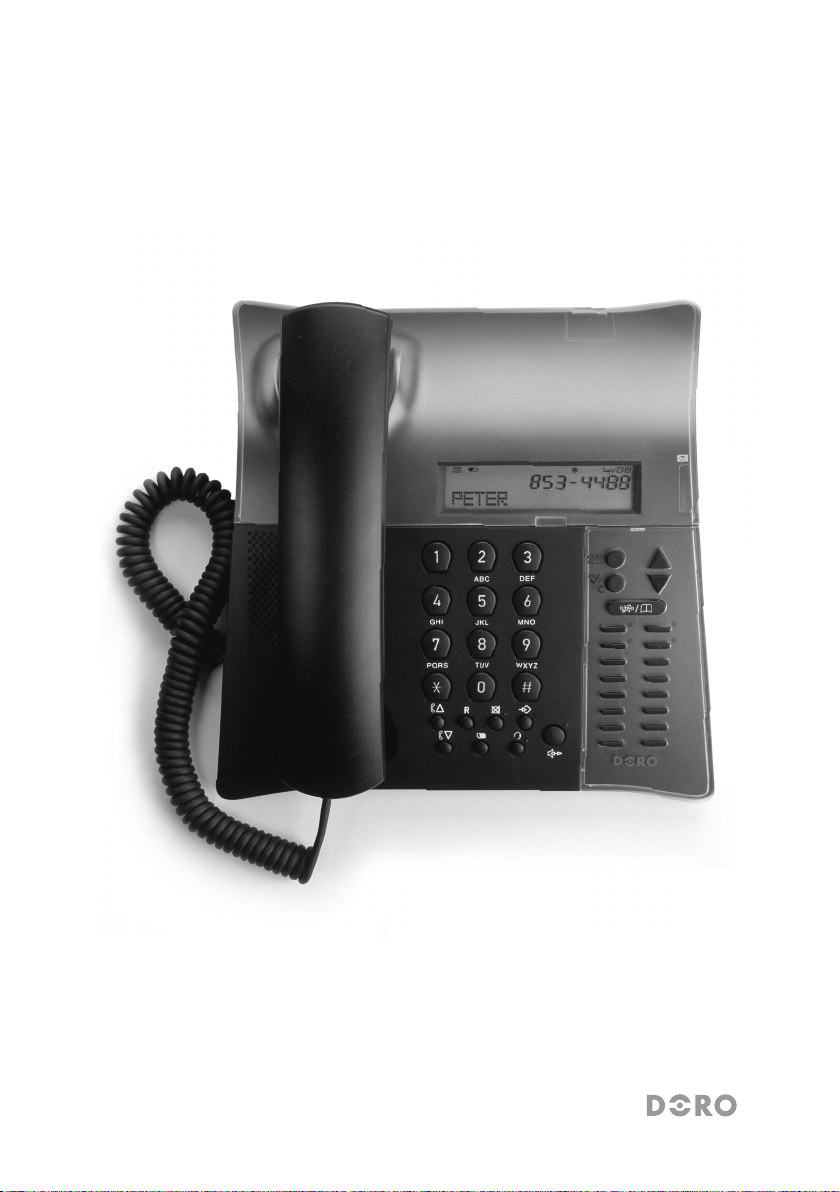
doro congress 205
15
1
2
3
4
5
14
13
12
11
10
9
8
7
6

English (see page EN 1-15)
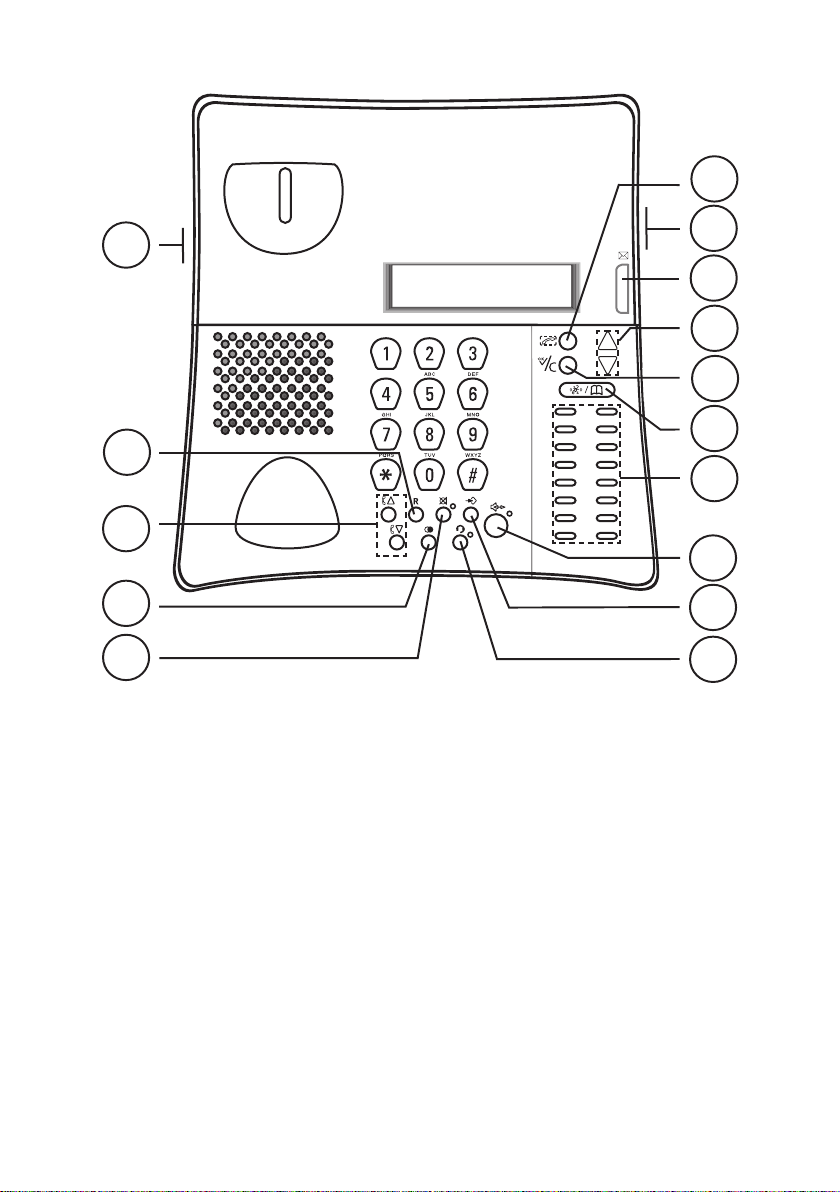
1 Input socket for additional equipment
2 Recall button
3 Handset /Headset volume c ontrol
4 Redial but ton
5 Mute button and LED
6 Headset button and LED
7 Store but ton
8 Hands free button and LED
Français (voir pages FR 1-13)
1 Prise pour connexion modem (Datapor t)
2 Touche R
3 Touches de réglage du volume du c ombiné/
casque
4 Touche Bis
5 Touche Secret
6 Touche Casque avec LED
7 Touche de programmation
8 Touche Mains- libres avec LED
Polski (patrz strony PL 1-20)
1 Podłączaniedodatkowychurządzeń
2 Przyciskprzełączanianainnynrwew.
3 Regulacjagłośnościsłuchawki/zestawu
słuchawkowego
4 Funkcjaponownegowybierania
5 Wyłącznikmikrofonuzkontrolką
6 Przyciskikontrolkazestawusłuchawkowego
7 Przyciskzapisywania
8 Przyciskikontrolkatrybugłośnomówiącego
9 One-Touch memories
10 Caller ID/Phone book
11 Clear/OK button
12 Scroll UP/DOWN buttons
13 Ringer/Message waiting indicator
14 Speaker volume control (on the underside)
15 Call number
9 Touches des mémoires directes
10 Touche du journal des appelants / répertoire
11 Touche pour effacer/OK
12 Touchesdedélement
13 Témoin de message et de sonnerie
14 Molette de réglage du volume du haut-parleur
(sur le côté droit de l’appareil)
15 Touche de numérot ation
9 Pamięciszybkiegowybierania
10 Identykacjanumerudzwoniącego/Książka
telefoniczna
11 Wyczyść/OK
12 Przyciskiprzewijania
13 Sygnalizatorwiadomościoczekująceji
dzwonka
14 Regulacjagłośnościgłośnika(podspodem)
15 Wybierznumer

English
Installation
Important!
The earpiece of the handset may attract small ferromagnetic objects such as staples and pins, care should
be taken when placing the handset near these items.
Batteries
The telephone requires 3 x AAA 1.5V alkaline batteries. When the batteries are
running low will be displayed.
The batteries will maintain the telephones functions for a few days and prevent the loss
of Caller ID, memories and other functions in the event of a power failure.
1.
Check that the mains adapter is correctly connected to avoid losing stored information.
2.
Disconnect the telephone line cord from the network wall socket.
3.
Remove the battery cover by pressing a small screwdriver (up to Ø 2.5mm) or
similar into the hole to the side of the battery cover.
4.
Install the batteries ensuring that the correct battery polarity is observed.
5.
Replace the battery cover.
Connection/Initial programming
1. Connect the curly cord to the handset and to the socket marked q on the
underside of the telephone.
2.
Place the handset into the cradle.
3.
Connect the mains adapter to the DC 9V socket on the underside of the underside
of he telephone, and an electrical wall socket.
4.
The display will now ash the alarm setting.
5.
If the alarm is not shown press and hold v until the alarm setting ashes.
6.
Press 0.
7.
Select the required language using v/V. Press 0.
8.
Select the desired contrast setting (3=normal) using v/V. Press 0.
9.
Set the correct hour (00-23) using v/V. Press 0.
10.
Set the correct minute/s using v/V. Press 0.
11.
Set the correct day using v/V. Press 0.
12.
Set the correct month using v/V. Press 0.
13.
Select the required pause setting (2 seconds=normal) using v/V. Press 0.
14.
Please refer to Batteries above regarding the installation of back up batteries.
15. Connect the telephone line cord to the socket marked T on the telephone, and to
a telephone network wall socket.
16.
Lift the handset and listen for the dial tone. Your telephone is now operational.
EN 1

English
Installation
Changing the clock, alarm settings, language or contrast
If you wish to alter the clock, alarm, language or contrast settings at a later point
please refer to Connection/Initial programming (steps 5-12) on page 1.
The display
In standby mode the date and time, number of new and total number of calls
stored in the Caller ID memory will be displayed.
Ringer
The ringer volume, melody and tone can be selected using the switches located
on the underside of the telephone:
e Ring volume
n Ring melody
Ringer tone
Labels/protective cover
The back cover is fastened by 2 pieces of plastic and secured by two screws,
these have to be removed rst.
Information such as a company logo can be placed under the protective cover.
This is especially useful where the back of the telephone is facing a customer/
visitor on a reception desk.
The memory index cover can also be removed by carefully prising the right
hand side of the cover using a small at blade screwdriver.
EN 2

English
Operation
Making a call
Regular dialling
1.
Lift the handset, dial tone will be heard.
2.
Dial the required telephone number.
Pre-Dialling
You can enter and correct a telephone number before dialling.
1. Dial the required telephone number. Mistakes can be erased using C.
2.
Press OR press s to dial the number.
If you wish, you can switch between handset and hands free mode by simply pressing
s
or lifting the handset.
Redial
The ve most recently dialled numbers can easily be redialled using:
1. Repeatedly press r to scroll through the dialled numbers.
2. Press OR press s to dial the number.
If you wish, you can switch between handset and hands free mode by simply pressing
s
or lifting the handset.
Volume control
The Handset/headset earpiece volume may be increased or decreased during a call.
Press $ to increase, or £ to decrease the volume.
To adjust the speaker volume (hands free and group listening) use 3 on the
underside of the phone.
Recall
Press the recall button R followed by the extension number to transfer calls when
connected to a PBX (TBR only).
Access to additional network services can be gained by using the recall button R, *
and # keys. Contact your network operator for more information.
Mute button
The handset/headset/hands free microphone can be disconnected during a call by
pressing z. Press z once more to reactivate the microphone.
The z LED will illuminate while the function is active.
EN 3

English
Operation
Hands free function
1. Press s. The hands free function will be activated and the LED indicator next to
the button will illuminate.
2. Dial the required telephone number. Adjust the volume using the volume control
located on the underside of the telephone.
3. Speak towards the microphone located on the front edge of the telephone.
4. Press s to terminate the call.
If you wish, you can switch between handset and hands free mode by simply pressing
s
or lifting the handset.
Please note!
Please remember that in hands free mode it is only possible for one person at a time to talk. The switchover between speaker and microphone is automatic and dependent on the sound level of the incoming call
and the microphone respectively. It is therefore essential that there are no loud noises, e.g. music, in the
immediate vicinity of the telephone, as this will disrupt the hands free function.
Group listening
Group listening allows anyone in the same room as the base unit to hear both parties
and follow the conversation through the base units speaker.
The ongoing call is not affected and can continue via the handset or optional headset.
1. Lift the handset or press the headset button, dial the required telephone number.
2.
Once the call has been connected, press s to activate the Group Listening
function. The LED indicator by the button will illuminate and the conversation
can then be heard through the speaker.
3. Adjust the volume using the volume control on the underside of the telephone.
4. To deactivate the Group Listening function, press s again.
EN 4

English
Operation
Timer
Immediately following the connection of a call, a call timer will be shown on the
display. The timer is a simple way to help you keep track of how long the call lasts.
Connection of a headset
An additional headset can be connected to the socket underneath the telephone
marked =.
To access an incoming call or dial tone press =, to terminate a call press = again.
Please note!
DORO original headsets are tested and adapted for this telephone. Other types and makes of
headsets may be used, though the function and sound quality cannot be guaranteed.
In the worst case, these could damage the headset and telephone. This type of damage is not
covered by the telephone guarantee.
Making a call with the headset
1. Press =. Dial tone will be heard in the headset earpiece and the LED next
to the headset button will illuminate.
2. Dial the required telephone number.
3. Press = again to terminate the call.
Hearing aid compatible
This telephone is hearing aid compatible. Select the T mode on your hearing aid
to enable this feature.
EN 5

English
Phonebook
Using the Phone book
Use the Phone book to store names and telephone numbers. A stored phone
number can be dialled using fewer keystrokes than if dialled manually. If you
subscribe to a Caller ID service, the name/number of the caller will be displayed
when you receive an incoming call (only if the number is stored in the Phone
book or one-touch memories).
The Phone book will store 20 sets of names and phone numbers, each entry can
be up to 16 characters (name) and 22 digits (number) in length.
Entries in the Phone book are arranged alphabetically.
Letters
Each number key has been allocated certain characters.
Button Letters/symbols
1..........................................[Spacecharacter]+&-/X1
2..........................................ABCÅÄÆæåäß2
3..........................................DEFë3
4..........................................GHIï4
5..........................................JKL5
6..........................................MNOÑñö@ö6
7..........................................PQRS7
8..........................................TUVÜü8
9..........................................WXYZ9
*..........................................`@()*<>
0..........................................,.:?=0Ø
#..........................................$_%!#
Storing names/numbers
1. Press b repeatedly until the symbol b is displayed.
2. Press p.
3. Press p again.
4.
Enter the telephone number to be stored (up to 22 digits). Mistakes can be
erased by pressing C. Press p.
5.
Enter name. Press the corresponding number key one or more times for
the rst letter (see the table above). Press p.
Please note!
If you need to insert a pause in the telephone number press r.
If you need to change a number, store the new number in the same location as the old one.
EN 6

English
Phonebook
Dialling from the Phone book
1. Press b repeatedly until the symbol b is displayed.
2. Scroll through the entries using v/V. To perform a quick-search press the
corresponding number button one or more times for the rst letter (refer to the
table on the previous page).
3. Press to dial the displayed number, or just wait to return to standby mode.
If you wish, you can switch between handset and hands free mode by simply pressing
s
or lifting the handset.
Changing phone numbers/names
1. Press b repeatedly until the symbol b is displayed.
2. Scroll through the entries using v/V. To perform a quick-search press the
corresponding number button one or more times for the rst letter (refer to the
table on the previous page).
3. Press and hold p until the display shows EDIT? Press p.
4. Correct the number using C and v/V. Press p.
5. Correct the name using C and v/V. Press p to conrm.
DeletingaPhonebookentry
1. Press b repeatedly until the symbol b is displayed.
2. Scroll though the entries using v/V.
3. Press C, DELETE? will be displayed.
4. Press and hold C until the displayed telephone number disappears.
Deleting all entries in the Phone book
1. Press b repeatedly until the symbol b is displayed.
2. Scroll through the entries using v/V.
3. Press and hold C until the display shows DELETE ALL?.
4. Press and hold C again until all the numbers disappear.
EN 7

English
Memory
Memory
This telephone has 16 One-Touch memories numbered M1-M16.
Once a number has been stored in a memory location, you only need to press one
button to make the call.
Storing One-Touch Memories
1. Press p.
2. Enter the telephone number to be stored (up to 22 digits). Press p.
3. Enter name. Press the corresponding number key one or more times for the rst
letter (refer to the table on page 6). Press p.
4. Select a One-Touch memory location (M1-M16) by pressing the corresponding button.
Please note!
If you need to insert a pause in the telephone number press r.
If you need to change a number, store the new number in the same location as the old one.
Dialling using One-Touch Memories
1. Lift the handset (or press s) and wait for a dial tone.
2. Select the required One-Touch memory location (M1-M16) by pressing the
corresponding button.
EN 8
English
Caller ID
Explanation of Caller ID
Caller ID allows you to see who is calling before you answer a call or to see who
has called in your absence. If the number received is stored in the Phone book
its associated name will be displayed instead. The CID memory will store up to
30 names/telephone numbers stored chronologically. The sequence number is
shown in the top right-hand side of the display.
When the memory is full, the oldest number will be deleted automatically as the
new call is logged. New calls are indicated in plain text in the display.
Please note!
In order for numbers to be shown you must subscribe to the Caller ID service provided by your
network operator, and a current subscription in place. Contact your operator for more information.
Retrieving and dialling incoming numbers
1. Press repeatedly until the symbol is displayed.
2. Scroll through the entries using v/V.
3. Press to dial the displayed number, or just wait to return to standby
mode.
If you wish, you can switch between handset mode and hands free mode during
the call by simply pressing s.
Caller ID Messages
Apart from showing telephone numbers, the display can also show:
OUT OF AREA
PRIVATE The call comes from a blocked number or a PBX.
T
New number not previously displayed.
Z (double envelope) Several calls have been received from the same
q
The call was received while using the Call Waiting
Message indication*.
* Message indication can be erased manually by pressing C.
It is an International call or a call from a PBX (no
information received).
telephone number.
function.
EN 9

English
Caller ID
Deleting numbers
1. Scroll to the desired entry using v/V.
2. Press C, DELETE? is displayed, alternatively press and hold C until
DELETE ALL? is displayed.
3. Press and hold C again until the telephone number disappears.
Transferring numbers to the Phone book
1. Scroll to the desired entry using v/V.
2. Press p.
3.
Press p again. To enter a name please refer to Changing phone
numbers/names on page 7.
EN 10

English
Other
Alarm settings
When the alarm clock is activated will be displayed in the standby mode.
Once the alarm clock goes off a tone will be heard for one minute, to switch off
the alarm press any button on the telephone.
1. Press and hold v until the alarm setting ashes.
2. Scroll to the required function (off/on/repeat daily) using v/V. Press 0.
To cancel the alarm, proceed to point 5.
3. Select the hour (00-23) using v/V. Press 0.
4. Select the minute/s using v/V. Press 0 repeatedly to return to standby mode.
5. To cancel the alarm while it is sounding, press 0 or lift and replace the
handset.
Connection of additional equipment
On the side of the telephone there is a socket marked 8, this will allow
additional telephone equipment i.e. cordless, modems etc to be connected
allowing access to the telephone line.
You can recongure the phone ports using the switch (1:2) on the underside of the telephone (behind
the attached cover), so that the telephone port (1) and the outer port (2) are connected in parallel.
Declaration of conformity
Doro hereby declares that this product, Doro Congress 205, conforms with the
essential requirements and other relevant regulations contained in the Directive
1999/5/EC.
A copy of the manufacturer’s declaration is available at www.doro.com/dofc
EN 11
English
Other
Technical information
Within the battery compartment located on the underside of the telephone you
will nd several switches, these switches determine certain technical parameters
when connecting the telephone.
To remove the cover carefully press a small screwdriver (up to Ø 2,5mm) or
similar into the hole to the right of the cover.
Recall time
The recall button timing can be switched between either 100ms (AU/UK/EU)/
300ms (FR)/600ms (NZ), using the R switch located on the underside of the
telephone (within the battery compartment).
Tone/Pulse(Europeonly)
Select the required dialling type, Tone (♫) or Pulse (...) using the ♫/ switch
located on the underside of the telephone (within the battery compartment).
Message Waiting indicator
Some PBX systems use a function called Message Waiting. The telephone will
indicate when a call was received by ashing the Massage Waiting light next to
the display.
The switch is located behind the battery cover on the underside of the
telephone.
The MW function operates differently depending on the PBX in question.
Please contact the system controller for more information.
The following four alternatives are available: LED+, LED-, ringer indicator
( ) and high DC voltage (HV).
When the telephone is used in systems without a telephone exchange ( )
should be selected.
EN 12

English
Other
Troubleshooting
Check that the telephone cord is undamaged and properly plugged in.
Disconnect any additional equipment, extension cords and other telephones. If
the problem is resolved, the fault is with other equipment.
Test the equipment on another working line. If the product works, then the fault
is probably with your line. Please inform your local telephone company.
Nonumbershownindisplaywhenringing
- In order for this feature to function, you must subscribe to the Caller ID
service from your network provider.
- If a text message is shown on the display, the call may be an international
call (no data received), or from a private or withheld number.
- It may not be possible to receive Caller ID information if the phone is
connected to a PBX system.
If the telephone still does not work, contact the place of purchase. Don’t forget
the receipt or a copy of the invoice.
UK
If you cannot resolve the fault using the faultnder section, technical support is
available on the Premium Rate Number: 0906 302 0114. Calls cost 50 pence
per minute (prices correct at the time of going to press), and is operational
between 9AM - 5PM Monday-Friday excluding Bank Holidays. Alternatively,
E-mail on: tech@doro-uk.com
You can contact us in writing: Consumer Support Group, Doro UK Ltd., 22
Walkers Road, North Moons Moat, Redditch, Worcestershire, B98 9HE, (regarding
any Spares or Technical query), or Telephoning (Spares only): 01527 584377
Web site: www.doro-uk.com
Guarantee
This product is guaranteed for a period of 12 months from the date of purchase.
Proof of purchase is required for any service or support required during the
guarantee period.
This guarantee shall not apply to a fault caused by an accident or a similar incident
or damage, liquid ingress, negligence, abnormal usage, not reasonably maintained or
any other circumstances on the purchaser’s part. Furthermore, this guarantee shall
not apply to a fault caused by a thunderstorm or any other voltage uctuations.
This guarantee does not in any way affect your statutory rights. (As a matter of
precaution, we recommend disconnecting the telephone during a thunderstorm.)
EN 13
 Loading...