

Page 1
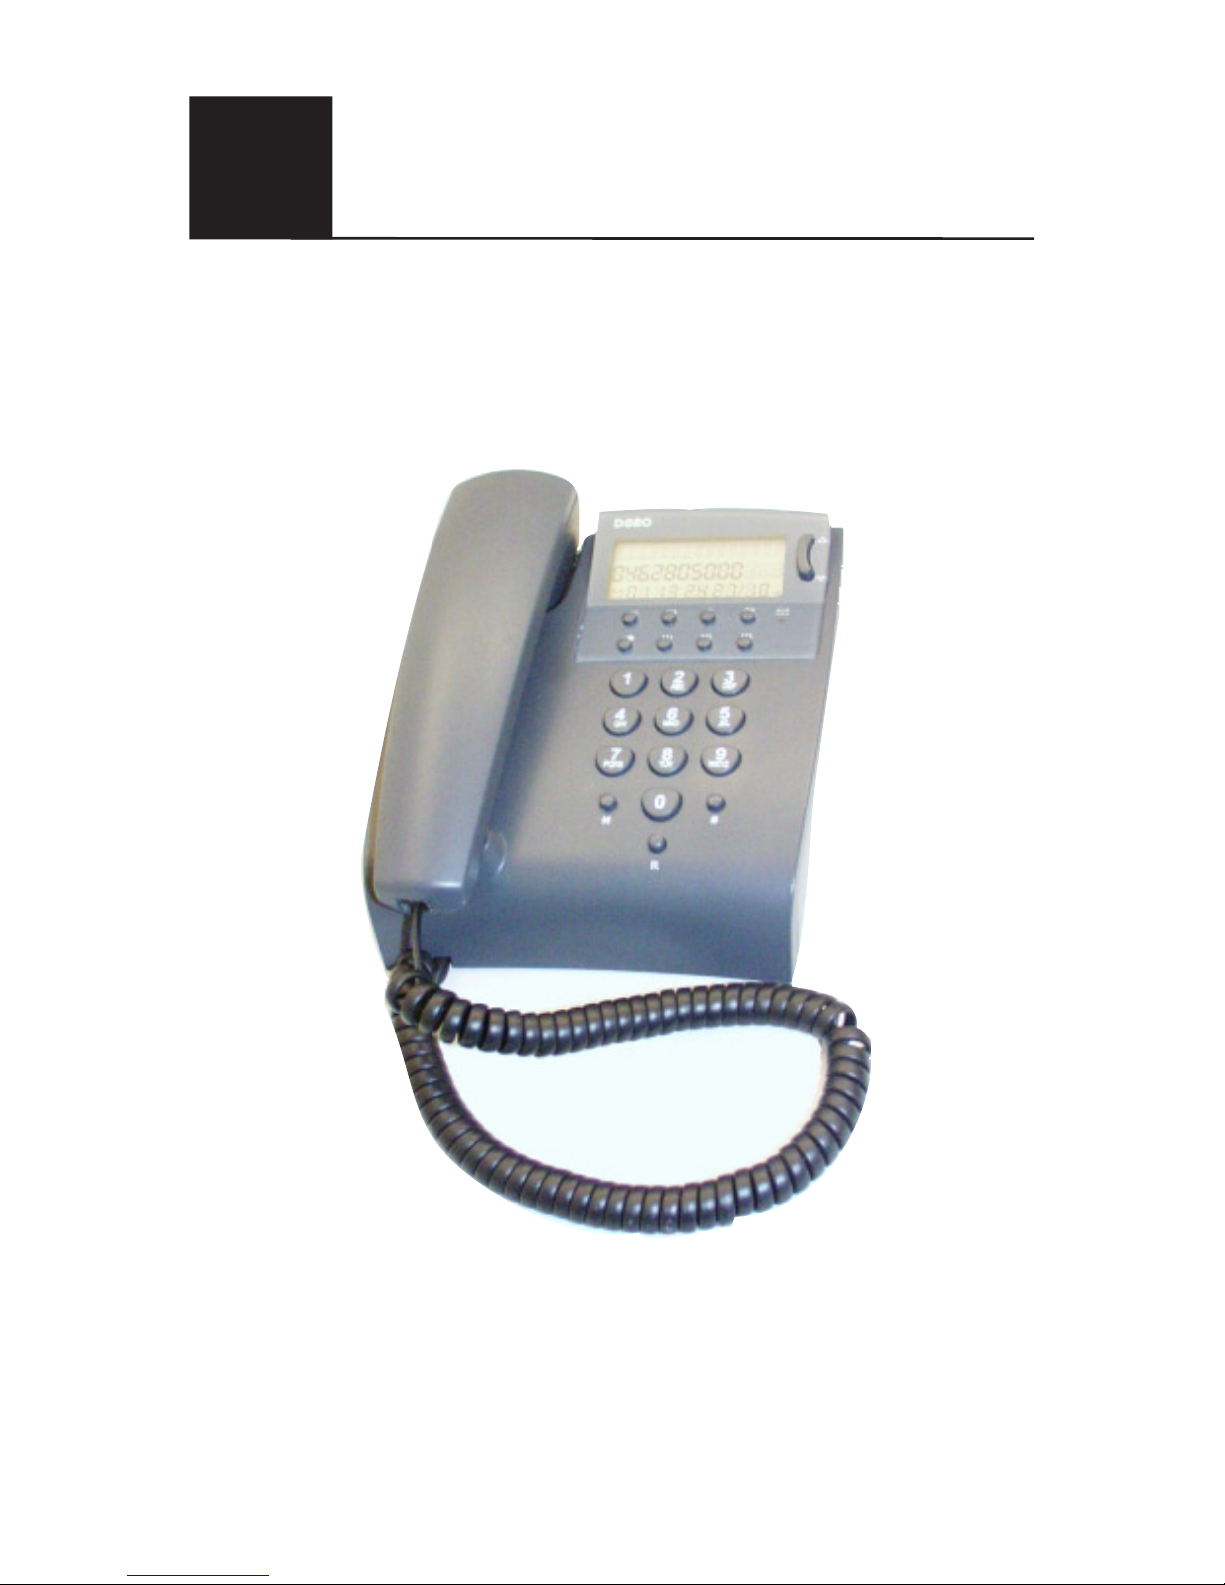
AFTI 45
English
User guide
Telephone with Caller ID
Page 2
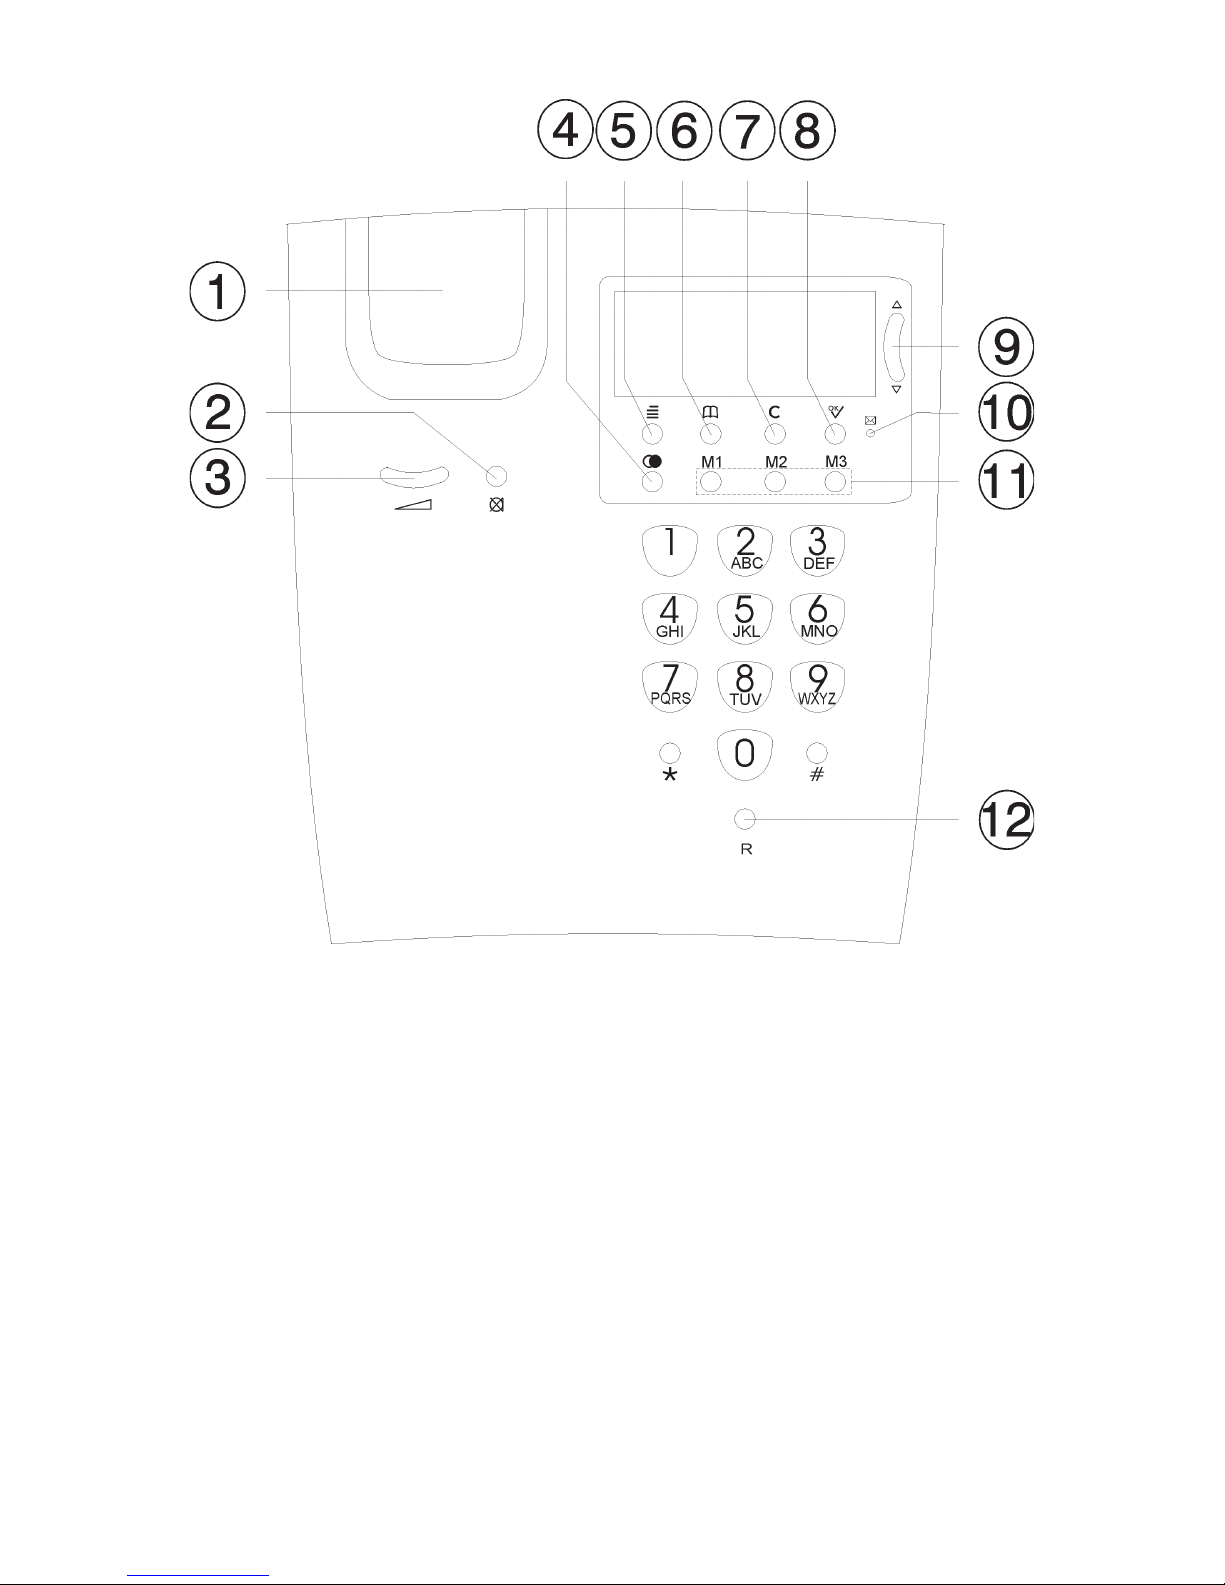
1 Hook Switch/Memory List
2 Mute Button
3 Handset Volume Control
4 Redial/Pause Button
5 Menu Button
6 Phone Book
7 Erase Button
8 Ok Button
9 Scroll Button (Up/Down)
10 Message Waiting Light
11 One-touch Memories
12 Recall Button
Page 3

English
www.doro.com 3
Installation
Batteries
In order for the Caller ID, memory and other functions to operate, the
telephone requires three good quality AAA 1,5 V alkaline batteries to be
installed. If batteries are either not installed or running low, the symbol
will be visible in the display, you will need to change the batteries as soon
as possible.
The battery compartment is located on the underside of the telephone.
1. Ensure the telephone line cord is disconnected to the telephone network
wall socket..
2. Unscrew the retaining screw that holds the battery cover in place and
remove the cover.
3. Install the batteries ensuring correct battery polarity is observed.
4. Replace the battery cover and ret the retaining screw.
Connection
Once the batteries have been installed:
1. Connect the curly cord to the handset and to the socket marked
q
on the
underside of the telephone.
2. Connect the telephone line cord to the socket marked T on the underside
of the telephone and then to a telephone network wall socket.
3. A click will be heard when the modular plug is correctly in place.
4. Position the cables in the grooves underneath the telephone.
5. Lift the handset and listen for the dial tone. Your telephone is now
operational.
Wall Mounting
1. Remove the desktop bracket.
2. Secure two screws, vertically positioned 100 mm apart.
3. The screws should locate into the two ‘keyholes’ on the back of the
telephone.
4. Remove the hanging peg (located by the hook switch) by pushing it upwards.
5. Rotate the hanging peg 180 degrees, and then replace it.
Page 4
English
4 www.doro.com
Installation
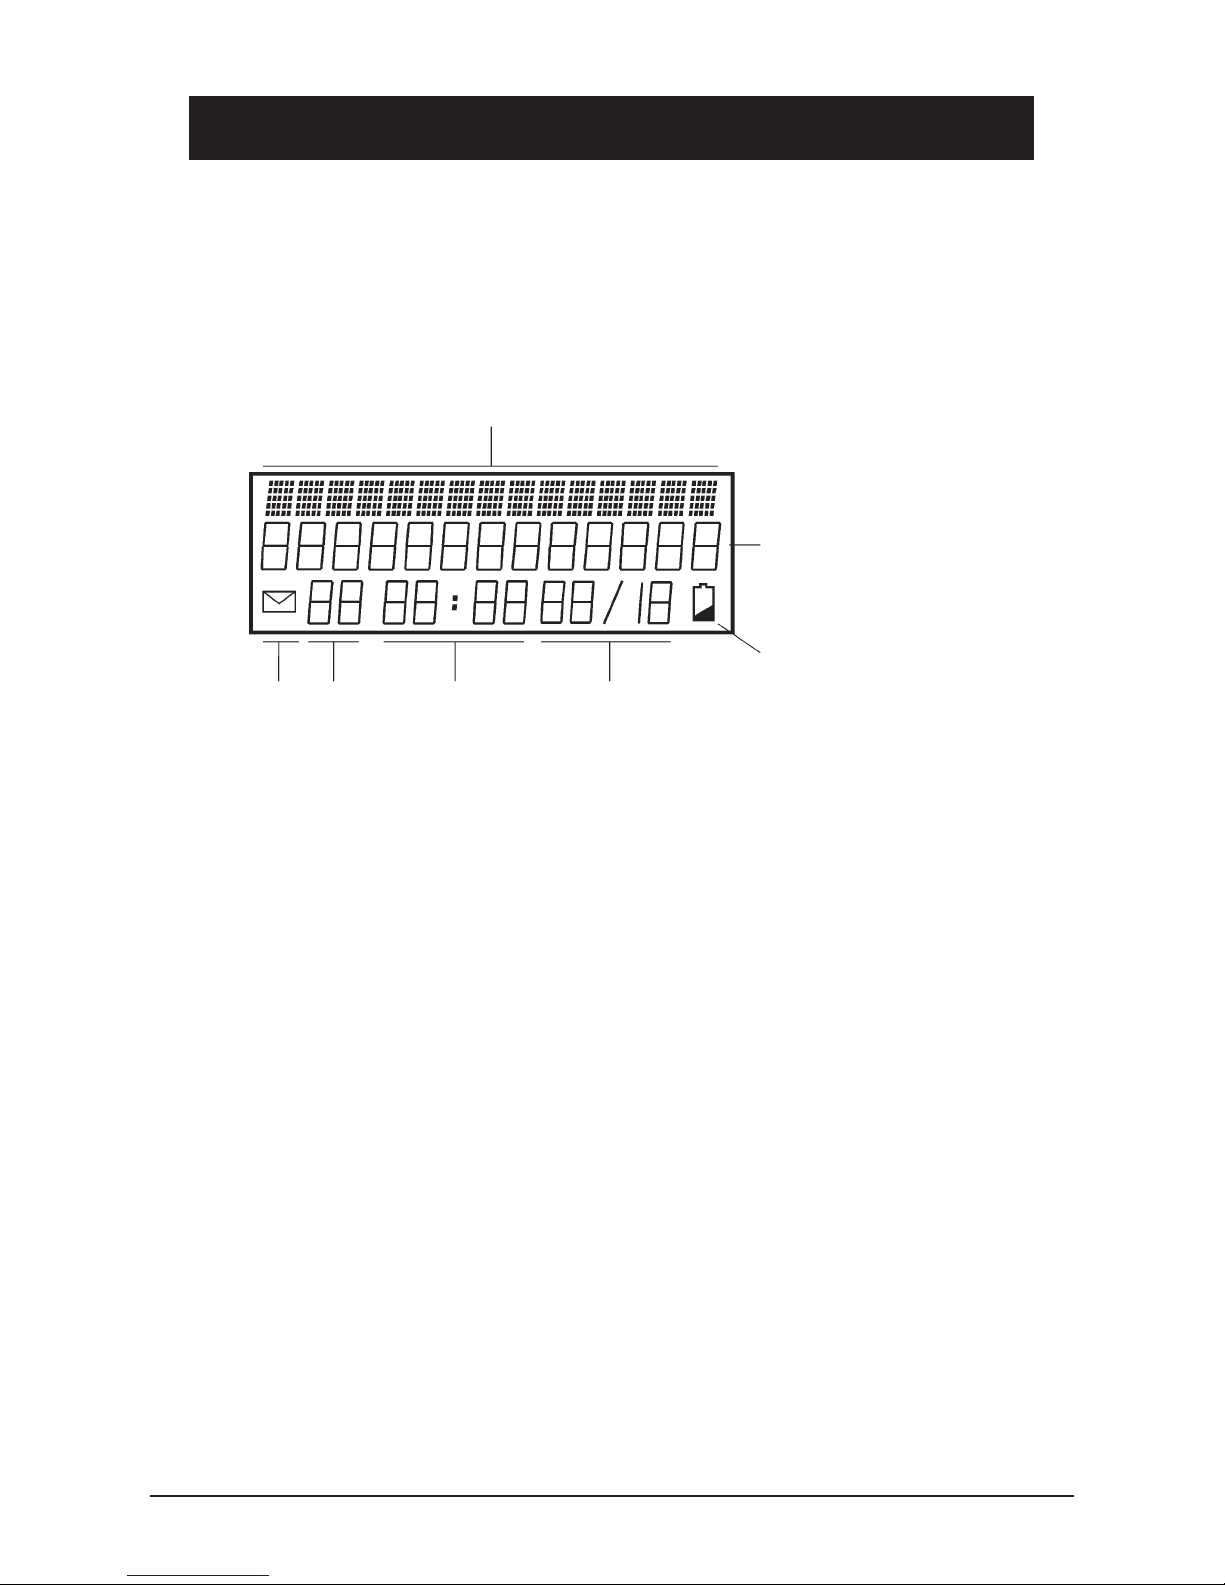
The Display
In the standby mode (handset down, no dial tone) the display will show the
date, time, total number of phone calls and the total number of new phone calls
received and stored in the Caller ID memory.
Text message indication
Caller Identication
Battery low
New Number/ Time Date
Call Entry
Setting the Time and Date
1. Press w until LANGUAGE is shown, and then release.
2. Press v. SET TIME is shown.
3. Press C.
4. The hour digits will now ash. Scroll until the desired hour is displayed
using v/V.
5. Press C to save the setting.
6. Repeat steps 4. and 5. to set minutes, day and month.
7. Conrm the programmed settings by pressing 0.
Language
The display messages can be shown in the following languages: Swedish,
English, Finnish, Danish, Norwegian, Turkish, German, Dutch, Portuguese,
Italian, Spanish and French.
1. Press w until LANGUAGE is shown, and then release.
2. Press C.
3. Scroll to the desired language using v/V.
4. Conrm the programmed settings by pressing 0.
Page 5
English
www.doro.com 5
Operation
Timer
Approximately 5 seconds after dialling a timer will be shown on the display. The
timer helps you keep track of how long the call lasts.
Redial Button
If the number dialled is engaged or if you wish to redial the last number dialled,
lift the handset and press the redial button r.
Volume Control
The handset earpiece volume may be adjusted during a call using . Press the
right side to increase the volume, or the left side to decrease the volume.
Mute Button
The handset microphone can be disabled during a call by pressing z.
Press z once more to reactivate the microphone.
The display will show MUTE for as long as the function is active.
Ringer
On the underside of the telephone there are switches to adjust the ringer tone
and volume.
There are four choices for ringer volume:
high, medium, low and off.
There are three choices of ringer tone.
Optional Network Services
Press the recall button R followed by the extension number to transfer calls
when connected to a PBX (TBR only).
Access to additional network services can be gained by using the recall
button R , * and # keys. Contact your network operator for more information.
Page 6

English
6 www.doro.com
Operation
Pause function
Using r a three second pause can be inserted into a telephone number being
stored (P will be shown in the display) in either the phone book or One-touch
memories.
This is useful when the telephone is connected to a PBX.
One-touch Memories
Apart from the phone book (see page 10) there are three One-touch Memory
buttons, M1, M2 and M3. Using One-Touch Memory dialling, a call can be
made by simply pressing one button.
Enter the name or number stored in memory on the memo list. Use a thin
instrument to take the memo list out of its holder, and to put it back in. The
holder cannot be opened.
Storing One-touch memories
1. Press w. ENTER TEL is shown.
2. Enter phone number to be stored (up to 16 digits).
3. Select a location M1-M3 by pressing the corresponding button.
4. Press w. The number is now stored.
Dialling using One-Touch Memories
1. Lift the handset and wait for a dialling tone.
2. Dial the desired number by pressing the corresponding memory location,
M1, M2 or M3.
Page 7

English
www.doro.com 7
Caller Identication
Explanation of Caller ID (CID)
Caller ID allows you to see who is calling before you answer a call, and to see
who has called in your absence. If the number received is stored in the phone
book, that corresponding entry is shown as well.
Numbers received are logged with date and time, and can easily be retrieved for
review or dialling. The call log will store up to 70 telephone numbers.
New calls are indicated by the message waiting indicator light ashing and an
envelope symbol in the display. The display will also indicate the number of
calls both new and total received. The indicator and the envelope will stop
ashing as soon as the new number(s) are reviewed.
When the log is full, the oldest number will be deleted automatically, as a new
call is logged.
Please note!
In order for numbers to be shown, the Caller ID service must be provided by your network
operator and a current subscription in place. Contact your operator for more information.
Retrieving CID phone numbers
Press v/V to review phone numbers that have been stored in the CID
memory.
v
scrolls from the beginning of the memory (oldest number being shown
rst).
V
scrolls from the end of the memory (newest number being shown rst).
The telephone will automatically return to standby mode after 30 seconds.
Dialling a number from CID
This function allows the telephone number currently shown on the display to
be dialled.
1. Scroll to the desired telephone number using v/V.
2. Pick up the handset and press 0, the displayed telephone number will now
be dialled.
Page 8

English
8 www.doro.com
Caller Identication
Erasing Individual Numbers from CID
1. Scroll to the telephone number you wish to erase (v/V).
2. Press C. The display will show ERASE?.
3. Press C again to conrm.
Erasing ALL numbers from CID
1. Scroll to any telephone number in the CID list.
2. Press and hold C until ERASE ALL? is displayed, and then release it.
3. Press C again to conrm.
Messages
Besides showing telephone numbers, the display may also show a number of
text messages.
UNKNOWN NUMBER It is an International call or a call from a PBX (no
information received)
SECRET NUMBER Information on the number is blocked. The call
could also be from a PBX.
MESS WAITING Indicated when a message has been received to
a message service with your network operator. In
addition, the message waiting light ashes, two
times in sequence.
Please note!
The exact text message may differ from those shown above dependent on the text message
supplied by your telephone exchange.
Page 9

English
www.doro.com 9
Phone Book
Using the Phone Book
The phone book will store 20 sets of names and phone numbers, this allows
a stored phone number to be dialled using fewer button presses than if dialled
manually. The phone book is organised alphabetically.
When the telephone is not in use, the message waiting light will ash two times
in sequence, and the display will show VIP to indicate that a call has been
received from a number stored in the phone book
Letters
Each number key has been allocated certain letters. Some letters and special
characters, e.g. Å, Ä and Ö, are stored in the memory even if they are not
displayed on the buttons. Please see the table below.
Button Letters/symbols
1.......................................... . , ? - ! & ’ 1
2.......................................... A B C Å Ä Æ 2
3.......................................... D E F 3
4.......................................... G H I 4
5.......................................... J K L 5
6.......................................... M N O Ö Ø 6
7.......................................... P Q R S 7
8.......................................... T U V 8
9.......................................... W X Y Z 9
0.......................................... [Space character] 0
* .......................................... *
#.......................................... #
Page 10

English
10 www.doro.com
Phone Book
Storing phone numbers and names
1. Press b. The display will show how many numbers/names that are stored
in the phone book.
2. Press C. In the middle of the display, a number of lines will appear.
3. Enter the telephone number, including the area/std code.
4. Press 0.
5. Enter name. Press the corresponding number button until the rst letter of
the name being entered is displayed. (See table on preceding page). Press C
to move to the next position.
6. Conrm the programmed settings by pressing 0.
7. Press C to store another phone number/name, or press b to nish.
Please note!
C does not have to be pressed so long as the next letter is not located on the same button.
Erasing phone numbers/names
1. Press b. The display will show how many numbers/names are stored in
the phone book.
2. Scroll to the number/name to be erased using v/V.
3. Press C. The display will show ERASE?.
4. Press C again to conrm.
5. Either erase another number/name, or press b to nish.
Dialling numbers from the phone book
1. Press b. The display will show how many numbers/names are stored in
the phone book.
2. Scroll to the desired number/name using v/V.
3. Lift the handset.
4. Press 0, and the number is dialled.
Page 11

English
www.doro.com 11
Economy Routing
Using Least Cost Routing (LCR)
This function will automatically select the telephone network operator of choice.
The telephone can be set up to add digits and/or replace certain digits in
telephone numbers.
To choose a certain network operator, you would normally dial a prex code
before the actual phone number.
f you have chosen a certain LCR operator for international calls, in order to
dial your calls using their service you must dial a prex code before the country
code, for example 9502. You can program the LCR function so whenever you
dial a number beginning with 00, the phone will automatically change this to
950200.
For example: 0046462805000 would automatically be dialled
95020046462805000.
Please note!
In order to place your call with a certain operator you must be a registered subscriber.
Only one LCR setting can be active at a time.
Setting Up LCR
1. Press w until LANGUAGE is shown, and then release.
2. Press V. LCR is shown.
3. Press C. The word OFF or ON will ash on the display.
4. Select either OFF or ON using v/V.
5. Press C. The left side of the display will ash.
6. Enter the dialling sequence to be replaced (up to four digits, e. g. 00).
If there’s already a number entered here, it can be erased using R.
7. If you have entered less than four digits, press C to move on. The right side
of the display will ash.
8. Enter the new dialling sequence (up to eight digits, e. g. 950200).
If there’s already a number entered here, it can be erased using R.
9. Conrm the programmed settings by pressing 0.
Page 12

English
12 www.doro.com
Economy Routing
Automatic network prex using economy routing (LCR)
The LCR function can also be used to insert numbers in front of all telephone
numbers.
1. Press w until LANGUAGE is shown, and then release.
2. Press V. LCR is shown.
3. Press C. The word OFF or ON will ash on the display.
4. Select either OFF or ON using v/V.
5. Press C. The left side of the display will ash.
6. The left side of the display must be empty.
If there’s already a number entered here, erase it using R.
7. If you have entered less than four digits, press C to move on. The right side
of the display will ash.
8. Enter the new dialling sequence (up to eight digits, e. g. 950200).
If there’s already a number entered here, it can be erased using R.
9. Conrm the programmed settings by pressing 0.
Page 13

English
www.doro.com 13
Other
Troubleshooting
Check that the telephone cord is undamaged and properly plugged in.
Disconnect any additional equipment that may be connected. If the problem is
resolved, the fault is with the other equipment.
Test the equipment on a known working line (e. g. at the neighbour’s). If the
product works then the fault is with the line.
No number is shown when a call is received
- In order for this feature to function, you must subscribe to the Caller
Identication service from your network provider.
- If a message shows on the display, the call may be an international call or
from a private or blocked number.
- A call will not be identied if it is coming from a PBX.
Telephone does not work
- Check that the telephone curly cord has been correctly connected to the
base unit and to the handset socket, by disconnecting and reconnecting
both ends.
- Check that the telephone cord has been correctly connected to the base unit
and to the line socket, by disconnecting and reconnecting both ends.
- Try connecting another telephone, known to be in working order, to the
line socket. If that telephone works then it is likely that this equipment is
faulty.
- Check that the telephone cord is undamaged and properly plugged in.
- Disconnect any additional equipment that may be connected. If the problem
is resolved, the fault is with the other equipment.
- Test the equipment on a known working line (e. g. at the neighbour’s). If the
product works then the fault is with the line.
If the telephone still does not work, contact the place of purchase for service.
Do not forget the receipt or a copy of the invoice.
Page 14

English
14 www.doro.com
Other
Technical Support
If you cannot resolve the fault using the faultnder section, technical support is
available on the Premium Rate Number: 0906 302 0114.
Calls cost 50 pence per minute (prices correct at the time of going to
press), and is operational between 9AM - 5PM Monday-Friday excluding Bank
Holidays. Alternatively,
E-mail on: tech@doro-uk.com
You can contact us in writing: Consumer Support Group, Doro UK Ltd.,
22 Walkers Road, North Moons Moat, Redditch, Worcestershire, B98 9HE,
(regarding any Spares or Technical query), or
Telephoning (Spares only): 01527 584377
Web site: www.doro-uk.com
Guarantee
This product is guaranteed for a period of 12 months from the date of purchase.
Proof of purchase is required for any service or support required during the
guarantee period.
This guarantee shall not apply to a fault caused by an accident or any similar
incident or damage, liquid ingress, negligence, abnormal usage or any other
circumstances on the purchaser’s part. Furthermore, this guarantee shall not
apply to a fault caused by a thunderstorm or any other voltage uctuations.
This guarantee does not in any way affect your statutory rights. (As a matter of
precaution, we recommend disconnecting the telephone during a thunderstorm.)
Page 15

Page 16

www.doro.com
 Loading...