

Page 1
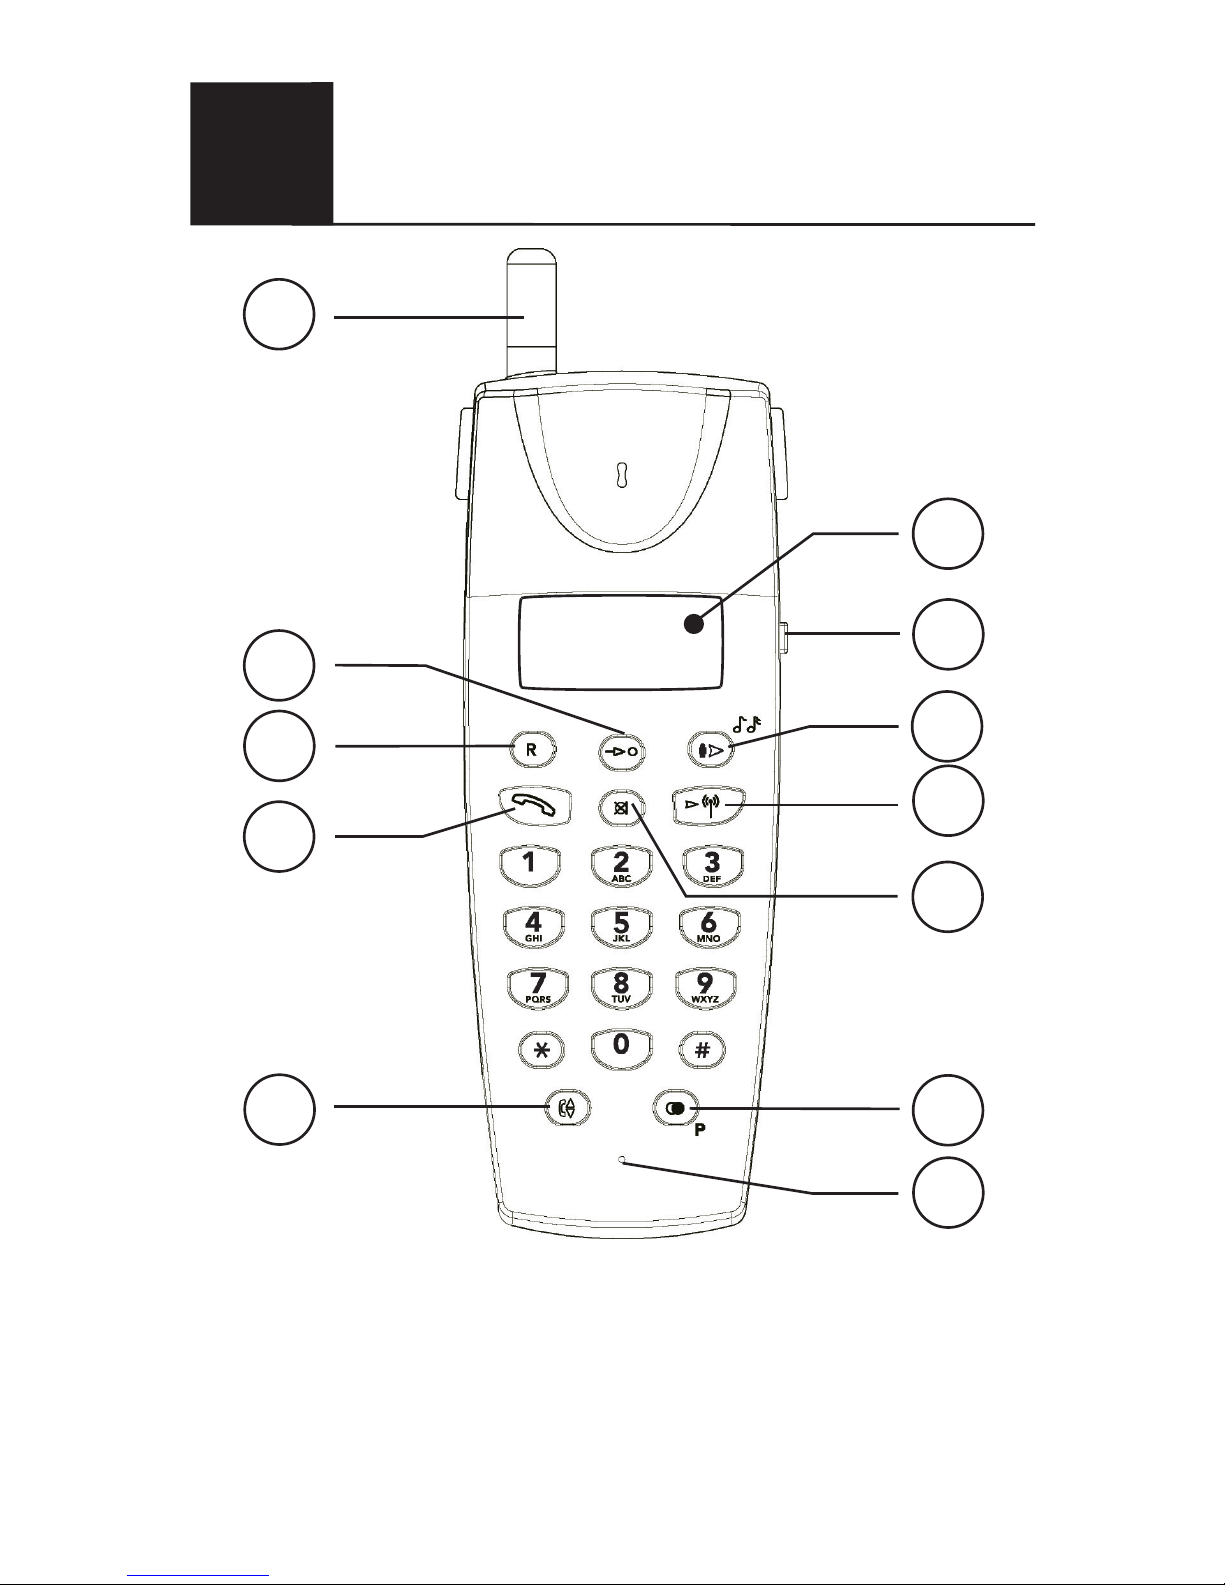
1 Telescopic aerial
2 Memory button
3 Recall (R) button
4 Talk button
5 Earpiece volume control
6 Microphone
7 Redial/Pause button
8 Mute button
9 Channel scan button
10 Transfer/Ringer selection button
11 Ringer volume control
12 Talk/Battery indicator
1
2
3
4
5
6
7
8
9
10
11
12
70 AHS
English
Additional handset
Page 2

2 www.doro.com
English
Connection
Totally 4 handsets can be registered to one base unit.
1. Connect the mains adapter to an electrical wall socket, and to the socket
on the charger.
2. Remove the battery cover from the back of the handset. Insert the battery
pack into the handset ensuring correct polarity is observed on the plug (black
wire is positioned towards the centre of the battery compartment). Replace
the battery cover.
3. Place the handset in the charger, with the keypad facing outwards. The
battery charge indicator on the charger will illuminate when the handset is
correctly positioned.
4. Charge the handset battery without interruption for 24 hours initially
(thereafter fully discharged batteries will take up to 12 hours to recharge)
5. When the handset is fully charged it must be registered to the main base unit.
6. Pull out the telescopic antenna on the handset for the best performance.
7. Keep the base unit paging button j pressed for about 10 seconds until the
indicator o/7 on the base unit starts ashing.
8. On handset 1 (originally included together with base), press and hold * and
#
together until the handset beeps and the LED on the handset ashes.
9. Immediately place the handset on the base and wait for a beep.
10. Remove handset 1 from the base unit.
11. Attach the labels on the handsets with the correct handset number.
12. Repeat steps 8.- 11. for handset 2 and then for handset 3, 4 when applicable.
When you place the handset on the base unit, the indicator o/7 will
ash and a beep/s will be heard(once for handset 1, up to four for handset 4).
13. Press
o
and wait for the tone. Press
o
again to terminate the call.
14. Repeat step 13. for the other handsets.
15. The handsets are now ready to use.
Warning!
Only use the supplied power adapter.
Battery Charge Indicator
The indicator on the charger will illuminate while the handset is placed in the
charger.
A protection circuit ensures that the handset battery can not be overcharged.
Page 3

www.doro.com 3
English
Making a call
1. Extend the handset aerial and press
o
.
2. When you hear the dial tone, enter the required telephone number.
3. Press
o
again to terminate the call.
Receiving a call
1. Wait for the handset to ring.
2. Extend the handset aerial.
3. Press
o
to answer the call.
4. Press
o
again to terminate the call.
If the telephone cannot connect to a line, a warning tone will be heard. In case of mis-operation
please place the handset on the base for 10 seconds.
The problem may also be due to the batteries running low, the handset being too far from the
base unit or all of the transmission channels in the local area are being used.
Please ensure both handset and base aerials are fully extended while making a call.
If you experience strong interference during the call, this may be corrected by changing channel.
Press on the handset to scan the available telephone channels for the best operation.
Transferring calls between handsets
1. With an external call connected on line.
2. Press followed by the handset number to which you wish to transfer
the call (1 to 4).
3. When the selected handset starts to ring extend the handset aerial and press
o
to answer the call, the call has now been transferred.
4. Press
o
again to terminate the call.
If you press the wrong button a long tone will be heard. In this case, repeat point 2 and select
the alternate handset number.
If the call has not been answered on the other handset within 30 seconds, the call will be
returned to the originating handset. To take the call press
o
again.
Other
In the main manual you will nd information on other functions, such as
volume control, mute, redial, product guarantee, troubleshooting, etc.
Page 4

 Loading...