

Page 1
516CR
Page 2
1
2
3
4
5
8
9
10
11
12
13
14
6
7
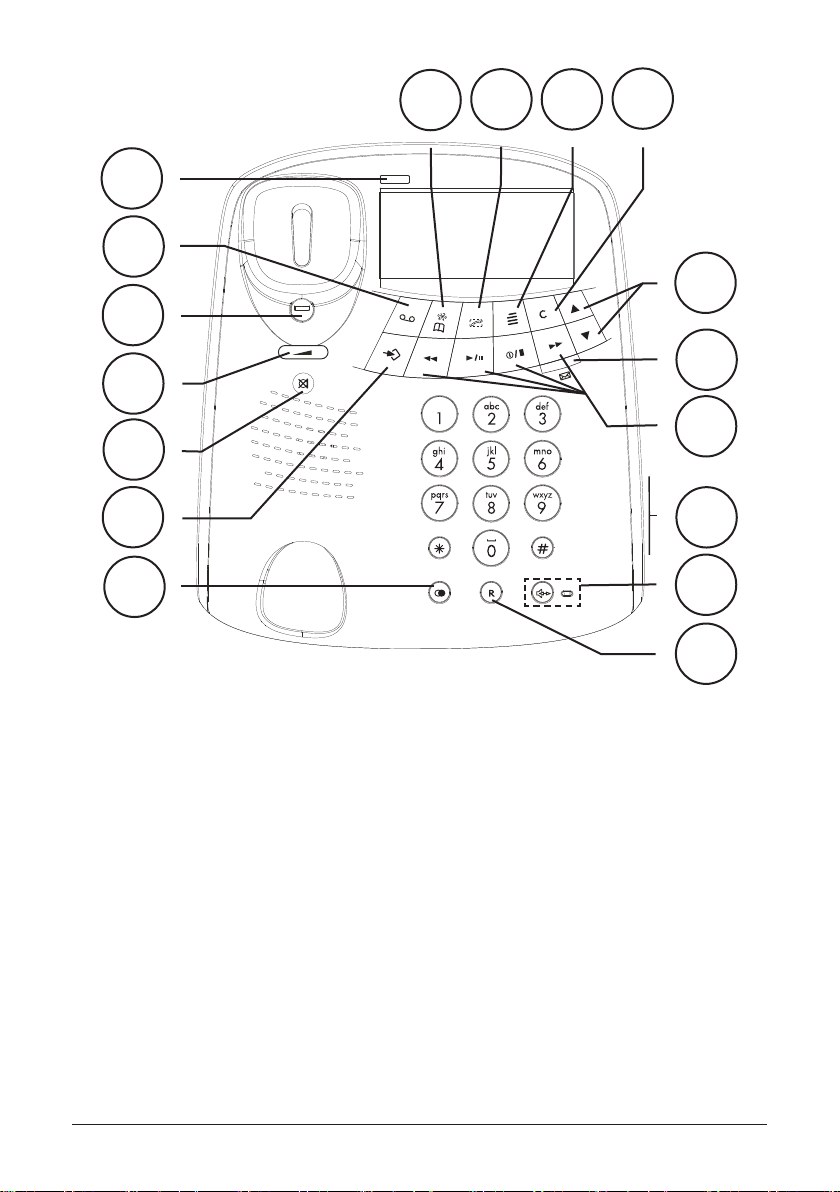
1 New CID message and Visual
Ring Indicator
2 Two-way recording/Memo
3 Hanging Hook for Handset
4 Handset Volume Control
5 Mute Button
6 OK/Store button
7 Redial button
8 Select Caller ID/Phone book
mode
9 Call Number
15
16
17
10 Menu button
11 Cancel Button
12 Scrolling Buttons
13 NewmessageVoice(ashing)/
Answermachineon(on/ashing)/
Answermachineoff(off).
14 Answering machine functions
buttons(pleaserefertopage13)
15 Control for ringer volume
16 Hands Free Button with indicator
17 Recall button
2 www.doro.com
Page 3

English
Index
Installation 4
Connection............................... 4
Battery...................................... 4
The display............................... 4
Wall mounting........................... 5
Operation 6
Making a call............................ 6
Mute button.............................. 6
Redial button............................ 6
Volume control......................... 6
Timer........................................ 7
Hands free function.................. 7
Phone Book 8
CallerIdentication 10
The answering machine 12
About the Answering machine. 12
Outgoing message................... 12
Playback of messages............. 13
Switching the answering
machine On/Off........................ 14
Personal messages - MEMO... 14
Call Monitoring......................... 14
Two-way recording................... 14
Remote control......................... 15
Remote activation.................... 16
Voice Control............................ 16
Out of Memory......................... 16
Settings 17
Contrast.................................... 17
Date and Time.......................... 17
Number of rings........................ 18
Remote code............................ 18
Answer only.............................. 19
Voice prompts.......................... 19
Recall Button timing................. 19
Other 20
Hearing Aid compatible............ 20
Troubleshooting........................ 20
Guarantee................................ 22
www.doro.com 3
Page 4

English
Installation
Connection
1. Connect the curly cord to the handset and to the socket marked q on the
underside of the telephone.
2. Connect the mains adapter to the socket marked DC 9V on the bottom of
the telephone and then to an electrical wall socket.
3. Connect the telephone line cord to the socket marked T on the underside
of the telephone, and then to a network wall socket.
4. Position the cables in the grooves underneath the telephone.
5. Lift the handset and listen for the dial tone.
6. You will need to record an outgoing message (page 12), and also set the date
and time (page 17).
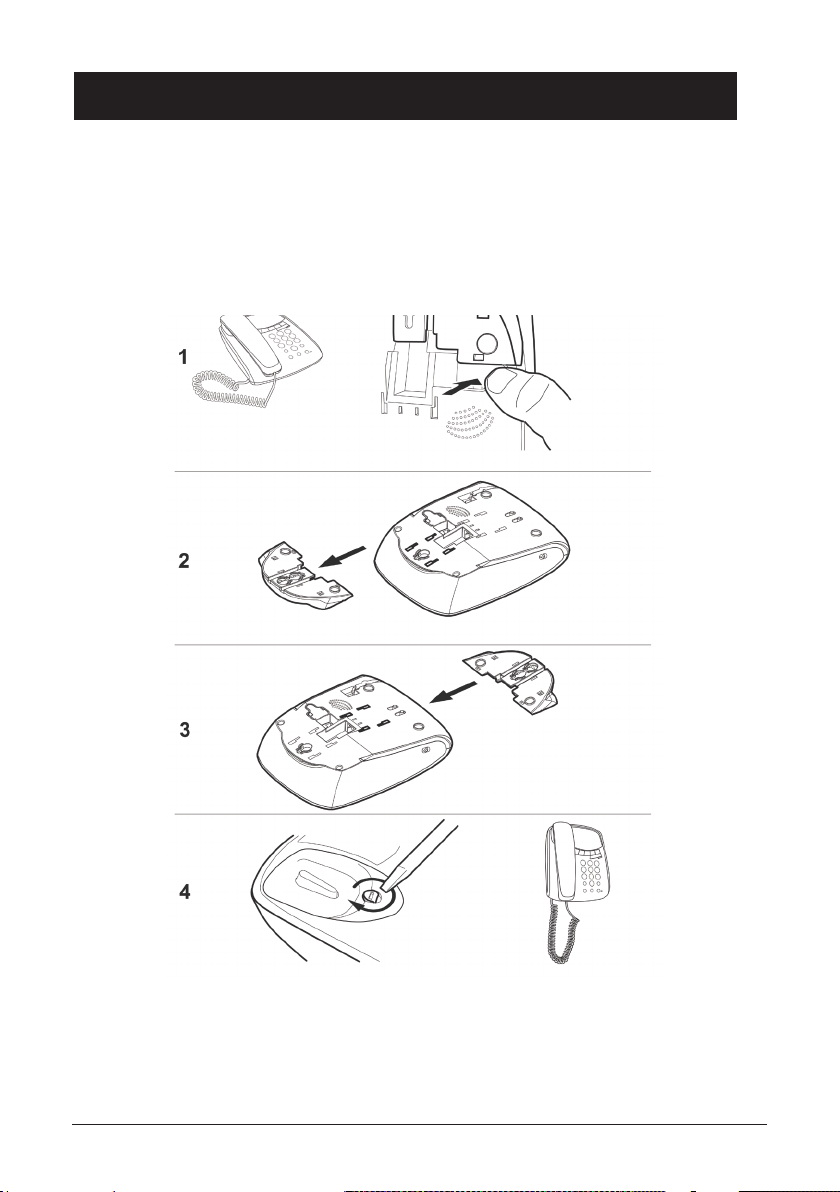
Battery
To ensure that messages and the time/date are retained (maximum 24 hours)
during a power failure, a good quality PP3 9V alkaline battery must be installed.
If a battery is not installed or is running low, the indicator will be displayed,
you will need to change the battery as soon as possible.
The battery compartment is located on the underside of the telephone.
1. Ensure the telephone line cord is disconnected from the telephone network
wall socket.
2. On the underside of the telephone carefully remove the battery cover.
3. Install the battery ensuring the correct battery polarity is observed.
4. Replace the battery cover.
5. Reconnect the telephone line cord.
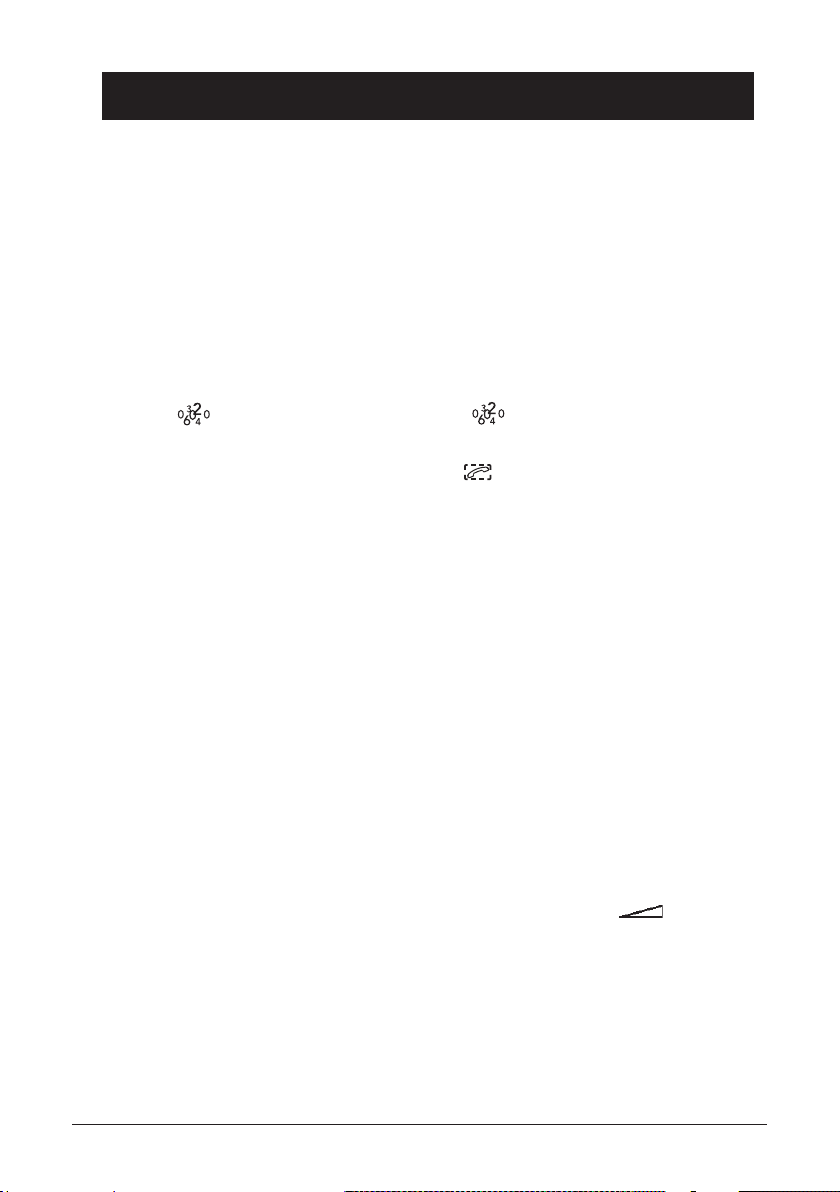
The display
When the telephone is not in use the date and time, number of new and total
number of calls stored in the Caller ID memory will be shown in the display.
Note!
There are separate logs for answering machine and caller-id, and also separate red LED’s.
In order to stop the ashing LED must the corresponding log be reviewed.
4 www.doro.com
Page 5
English
Installation
Wall mounting
The telephone can be wall mounted. Use two screws vertically mounted 100
mm apart the screws should then t into the two ‘keyholes’ on the back of the
telephone. The telephone will mount directly to an Australian standard wall plate.
www.doro.com 5
Page 6
English
Operation
Making a call
Normal Dialling
1. Lift the handset.
2.
Dial the desired telephone number.
Pre-Dialling
This allows you to enter and change a telephone number before it is dialled.
1. Press to select caller-id mode. Ensure shows.
Enter the required telephone number. Mistakes can be erased by pressing C .
2.
3.
You can now either lift the handset, press OR s, the displayed telephone
number will now be dialled.
Please note!
During a conversation, you can switch from the handset to hands free mode at any time by
pressing s. Press s again to terminate the call.
Mute Button
The handset microphone can be disabled during a call by pressing and holding z.
Redial function
If the number dialled is engaged or you wish to redial the last number called
simply lift the handset (or press s) and press r.
Volume control
The handset earpiece volume may be adjusted during a call using .
To adjust the speaker volume (hands free), use {/} during a call.
6 www.doro.com
Page 7

English
Operation
Timer
Immediately after dialling a telephone number a call timer will be shown on the
display. The timer is a simple way to help you keep track of how long the call
lasts.
Hands free function
1. Press s. The speaker will be activated and the Hands free indicator light
will illuminate.
2. Dial the required telephone number. The speaker volume can be adjusted
during a call using {/}.
3. Speak towards the microphone located on the front edge of the telephone.
4. Press s to terminate the call.
Please note!
During a conversation, you can switch from the hands free to handset mode at any time by
picking up the handset. Replace the handset to terminate the call.
Please remember that in hands free speaker mode it is only possible for one person at a time
to talk. The switch over between speaker and microphone is automatic and dependent on the
sound level of the incoming call and the microphone respectively. It is therefore essential that
there are no loud noises, e.g. music, in the immediate vicinity of the telephone, as this will
disrupt the speaker function.
www.doro.com 7
Page 8

English
Phone Book
Using the Phone Book
The Phone Book will store 32 telephone numbers (32 digits max)and their
associated names (16 characters max) with entries arranged alphabetically.
A stored phone number can be dialled using fewer keystrokes than if dialled
manually. If you subscribe to a Caller ID service, the name/number of the caller
will be shown when you receive an incoming call (only for those numbers stored
in the Phone Book).
Letters
Each number key has been allocated certain characters.
Button Letters/symbols
1.......................................... [Space character] + & - / X 1
2.......................................... A B C Å Ä Æ æ å ä ß 2
3.......................................... D E F ë 3
4.......................................... G H I ï 4
5.......................................... J K L 5
6.......................................... M N O Ñ ñ ö 6
7.......................................... P Q R S 7
8.......................................... T U V Ü ü 8
9.......................................... W X Y Z 9
*.......................................... `@()*<>
0.......................................... ,.:?=0
#.......................................... $ _ % ! ; #
Storing names/numbers
1. Press b to select phone book mode. Ensure b shows.
2. Press p. Display will show SAVE?
3. Press p again.
4. Enter the telephone number to be stored (up to 32 digits). Press p.
5. Enter the name (up to 16 characters). Press the corresponding number
button one or more times for the rst letter (see the table above).
6. Press p.
Press r if you need to insert a pause in the telephone number.
If you wish to change a number, store the new number in the same location as the old one.
8 www.doro.com
Page 9

English
Phone Book
Dialling from the Phone Book
1. Press b to select phone book mode. Ensure b shows.
2. Scroll to the required memory location using {/}. To quick-search in the
Phone Book press the corresponding number button one or more times for
the rst letter (refer to the table on the previous page).
3. Press to dial the displayed number. If you do nothing the phone will
return to standby mode.
Please note!
During a conversation, you can switch from the handset to hands free mode at any time by
pressing s. Press s again to terminate the call.
Changing phone numbers/names
1. Press b to select phone book mode. Ensure b shows.
2. Scroll to the required memory location using {/}.
3. Press and hold p until EDIT? is displayed. Press p.
4. Changes to the displayed telephone number can be made using C and {/}.
Press p.
5. Changes to the displayed name can be made using C and {/}.
6. Press p to conrm the changes.
Deleting a phone book entry
1. Press b to select phone book mode. Ensure b shows.
2. Scroll to the required memory location using {/}.
3. Press C. DELETE? will be displayed.
4. Press and hold C until the displayed telephone number disappears.
Deleting all entries in the Phone Book
1. Press b.
2. Scroll to the required memory location using {/}.
3. Press and hold C until the display shows DELETE ALL?
4. Press and hold C until the displayed telephone number disappears.
www.doro.com 9
Page 10

English
Caller Identication
Explanation of Caller ID
Caller ID allows you to see who is calling before you answer a call and to see
who has called in your absence. If the number is stored in the Phone Book, the
callers name will be shown instead. Received calls are stored chronologically
with the sequential number shown in the top right hand side of the display.
When the Caller ID log is full, the oldest number will be deleted automatically
as the new call is logged. New calls are indicated by text in the display and
ashing of the upper red ring indicator light.
Please note!
In order for numbers to be shown, the Caller ID service must be provided by your network
operator and a current subscription in place. Contact you operator for more information.
There are separate logs for answering machine and caller-id, and also separate red LED’s.
In order to stop the ashing LED must the corresponding log be reviewed.
Retrieving and dialling CID numbers
1. Press to select caller-id mode.
2. Press either { or } to review the numbers stored in the Caller ID memory.
3.
To dial a displayed telephone number either press OR s, the displayed
telephone number will now be dialled. If you do nothing the phone will
return to standby mode.
Please note!
During a conversation, you can switch from the handset to hands free mode at any time by
pressing s. Press s again to terminate the call.
Messages
Besides showing telephone numbers, the display can show a number of text
messages or symbols:
OUT OF AREA
PRIVATE
also be from a PBX.
q
New number not previously recorded or logged.
Z Several calls have been received from the same caller.
10 www.doro.com
It is an International call or a call from a PBX (no
information received).
Information on the number is blocked. The call could
Page 11

English
Caller Identication
Deleting Numbers
1. Scroll to the telephone number you wish to erase using {/}.
2. Press C. DELETE? will be displayed, alternatively press and hold c until
the display shows DELETE ALL?
3. Press and hold C until the number disappears.
Transferring Numbers to the Phone Book
1. Scroll to the telephone number you wish to copy using {/}.
2. Press p.
3. Press p again.
4. Name can later be added according to the chapter Changing phone
numbers/names on page 9.
www.doro.com 11
Page 12

English
The Answering Machine
About the Answering Machine
The answering machine has to be turned on in order to receive messages. When a
call is received it will be answered after the selected number of rings (please refer to
page 18).
When the answering machine answers an incoming call, the caller will hear your
outgoing message. After a short beep they can then leave a message up to 120
seconds. Should the caller exceed this limit the call will be disconnected.
The memory will store approximately 40 minutes of incoming messages (including
the outgoing message).
Outgoing Message
The outgoing message is your message to an incoming caller and may be up to 60
seconds in length.
You may want the message to tell the caller that they may start speaking once the
beep is heard after your outgoing message.
If you choose not to record your own outgoing message the caller will hear a
prerecorded message.
An example of an outgoing message:
-“Hello we are unable to take your call right now, please leave a message at the sound
of the beep and we’ll return your call as soon as possible. Thanks for calling.”
Recording an Outgoing Message
1. Press and hold
2. Record your outgoing message. Speak clearly towards the machine from a
distance of 15-20 cm (6-8 inches).
3. Release
4. The outgoing message will be repeated after a few seconds. Repeat this
procedure if you want to change the message, any old outgoing message will
automatically be erased when a new one is recorded.
Checking the Outgoing Message
Press 8 8 . The current outgoing message will now be played.
8 8
. You will hear a short beep, and the display will ash.
8 8
to stop recording.
Please note!
In case of a power failure if no back-up battery is tted your outgoing message will be erased. The
answering machine will then use the pre-recorded outgoing message.
12 www.doro.com
Page 13

English
The Answering Machine
Playback of messages
The red indicator ashes to show that new messages have been received.
Playback will always begin with any new messages, for example if there are three
old messages and two new ones, only the two new ones will be played back,
then the answering machine will return to standby mode.
Press the play button once again to listen to all messages, starting with the
oldest messages.
1. Press 9 to start playback.
2. After each message the day and time the message was received will be
announced, after which a short beep will be heard.
3. When playback is nished you will hear two short beeps, and the machine
will return to standby mode. All incoming messages are saved (unless you
have erased any during playback, see below), new messages will then be
recorded after the old ones.
The following functions are available during playback:
Button Function Function
8 8 Repeat the current message, or hold down until you hear a beep
to step back through the messages.
9 9
Skip to next message.
Stop playback.
C Erase messages.
{/}
Increase or decrease the speaker volume.
9 ||
Pause during playback (max. 7 seconds). Press 9
resume playback.
Delete Incoming Messages
If you want to delete a single incoming message press C while the message is
playing.
To erase all messages after playback, press and hold C until unit beeps.
Please note that new messages cannot be deleted until they have been played.
www.doro.com 13
||
again to
Page 14

English
The Answering Machine
Switching the Answering Machine On/Off
The answering machine can be switched ON or OFF using the 1 button. In the
ON position, incoming calls will be answered by the answering machine, in the
OFF position no calls will be answered and the display will be off.
Please note!
Although turned Off, the Answering Machine will answer a call after 10 Rings. This is to allow
the remote ON and other features to be accessed.
Personal Message - MEMO
A personal message – MEMO – is a message recorded directly onto the answering
machine (120 seconds maximum) without dialling. This means that the answering
machine may be used as an electronic notebook, where messages, reminders or
other notes to family members or colleagues can be recorded.
1. Press and hold the a button. You will hear a beep.
2. Start speaking clearly towards the machine to record your Memo message.
3. Release the a button to stop recording.
4. Memos are played back in the same way as regular incoming messages.
Call Monitoring
Incoming messages can be heard through the loudspeaker as they are received. If
there is no sound adjust the volume using {/}.
You can lift the handset of a parallel telephone and speak directly to the caller. If
the recording does not stop automatically, press on the answering machine.
Two-way Recording
You can record telephone conversations as they occur. There is approximately 40
minutes available recording time in memory, with the answering machine handling
two-way recordings as a regular incoming call.
1. A call is connected.
2. Press
3. Press a to terminate recording.
14 www.doro.com
a
in progress.
. The display will show MEMO , indicating that two-way recording is
Page 15

English
The Answering Machine
Remote Control
This machine can be remotely controlled using the keys of an ordinary tone dialling
telephone. Call up the answering machine and enter the remote code (see page 18)
while the outgoing message is playing. Once the code is accepted, several remote
control commands are available.
Remote Control
1. Call up the answering machine.
2. While the outgoing message is playing, enter the remote code. If the code is
accepted, you will hear two beeps.
3. Select a remote control command (within 10 seconds) from below.
4. When you have nished accessing the machine replace the handset.
Command Function Function
1#........................................ Play new messages
2# ....................................... Play all messages
Duringplayback:
3#........................................ Erase single message during playback
4#........................................ Repeat message/Skip to previous message
5#........................................ Stop playback
6#........................................ Skip to next message
Afterplayback:
7#........................................ TurntheansweringmachineeitherOnorOff.Two
beepsindicateOff–OnebeepindicatesOn.
8#........................................ Record a new outgoing message, to Stop
recordingpress5#.
9#........................................ RecordaMEMO,toStoprecordingpress5#.
0#........................................ Room monitoring (active for 30 seconds press 0#
tocontinue).
Room Monitoring
This remote access feature enables you to call your home and turn ON the
answering machine’s microphone function, allowing you to monitor sounds in the
room where the answering machine is situated.
Please note!
If the machine doesn’t respond correctly to the remote control commands, try pressing the telephone
buttons for a longer or shorter time. In normal cases, the answering machine should react to tones
approximately 0.5 – 1 seconds in length, but longer tones may be necessary in certain telephone
networks. If you do not enter any remote control command, the answering machine will disconnect
after a few seconds.
If you listen to any incoming messages for more than 2 minutes and 40 seconds, you will hear a tone.
Press any key to continue.
www.doro.com 15
Page 16

English
The Answering Machine
Remote Activation
The answering machine can be activated using the remote control functions.
1. Call up the answering machine. After approximately 10 rings, the machine
will answer and emit a long tone.
2. Enter the remote code, see page 18. If the code is accepted, you will hear
two short beeps.
3. Press 7#. One beep conrms that the answering machine is now on.
Replace the handset.
Voice Control (VOX)
The answering machine will record a message as long as the caller keeps
speaking (max. time 120 seconds). If the caller stops speaking, the answering
machine will disconnect after approximately 7 seconds.
Out of Memory
The total capacity of the answering machine’s memory is approximately 40
minutes. The memory space is shared between the outgoing message, personal
memos, and regular incoming messages.
When the memory is full the display will show PLEINE, the answering machine
will answer after 10 rings to allow remote playback and deletion of messages, no
new messages will be accepted until the existing messages have been played and
erased.
16 www.doro.com
Page 17

English
Settings
Contrast
The display contrast can be adjusted between 1 - faint to 4 - dark.
1. Scroll using w until it shows LCD CONTRAST.
2. Select the desired setting using {/}. Press
3. Press 1 to return to standby mode.
Date and Time
In some countries caller ID subscribers have the time and date updated
automatically when a call is received, in other countries the time and date must
be set manually.
1. Scroll using w until it shows SET TIME/DATE.
2. Set the day of the week using {/}. Press
3. Select the time format 12/24H using {/}. Press
4. Set the hour (00-24) using {/}. Press
5. Set the minute using {/}. Press
6. Set the month using {/}. Press
7. Set the date using {/}. Press
8. Press 1 to return to standby mode.
p.
p.
p.
p.
p.
p.
p.
www.doro.com 17
Page 18

English
Settings
Number of Rings
The number of rings before the answering machine answers can be selected
between 2, 4 or TS.
1. Scroll using w until it shows ANSWER DELAY.
2. Select the desired setting using {/}. Press
3. Press 1 to return to standby mode.
Please note:
With TS (Toll Saver) selected, calls will be answered after four rings until a new ICM message
has been recorded, any subsequent calls will be answered after two rings. Once these ICM’s have
been erased this cycle will be repeated. This is useful when remote accessing your unit, if there is
no answer after three rings no ICM messages have been recorded, you can therefore terminate
the call before you are charged.
Remote code
This code is needed in order to gain access to the remote control functions of
the answering machine (factory setting is 000). You can alter the code according
to the description below.
1. Scroll using w until it shows CODE DE SECUR.
5. Enter the new code number (000-99 9). Press
3. Press 1 to return to standby mode.
p.
p.
18 www.doro.com
Page 19

English
Settings
Answer Only
ANSWER ONLY is your announcement message to a caller in which contact
information can be supplied but no incoming message (ICM) will be recorded.
An example:
“Sorry I cannot take your call at this time, if urgent try contacting me on 0746
……. Please do not leave a message as this will not be recorded. Thanks for
calling.”
1. Scroll using w until it shows ANSWER MODE.
2. Select the desired setting (A2=on) using {/}. Press
3. Press 1 to return to standby mode.
Voice prompts
You can set the voice prompts heard on( ) or off( ).
1. Scroll using w until it shows VOICE PROMPT.
2. Select the desired setting using {/}. Press
3. Press 1 to return to standby mode.
p.
p.
Recall button timing
In some advanced PBX system the recall timing may require adjustment. Three
options are available, 100 ms, 270 ms and 600 ms. The 270 ms is the option
mostly used in France.
1. Scroll using w until it shows FLASH TIME
2. Select the desired setting using {/}. Press
www.doro.com 19
p.
Page 20

English
Other
Hearing Aid compatible
This telephone is hearing aid compatible. Select the T mode on your hearing aid
to enable this feature.
Troubleshooting
Check that the telephone cord is undamaged and properly plugged in.
Disconnect any additional equipment, extension cords and other telephones. If
the problem is resolved, the fault is with the other equipment.
Test the equipment on a known working line. If the product works, then the
fault is probably with the line. Please inform your local telephone company.
No number shown in display when ringing
- In order for this feature to function, you must subscribe to the Caller
Identication service from your network provider.
- If a text message is shown on the display, the call may be an international
call (no data received), or from a private or withheld number.
- It may not be possible to receive Caller ID information if the phone operates
in a PBX system.
The Answering Machine Is Not Answering
- Check that the unit is switched on Check that the unit is switched on
- Check that the telephone cable and the mains adapter are correctly
connected
The Answering Machine Does Not Respond to Remote Control
- Check that the telephone you are using to remotely access the answering Check that the telephone you are using to remotely access the answering
machine is tone dialling.
- Telephones that generate only a short tone signal when pressing a button Telephones that generate only a short tone signal when pressing a button
may not allow you to remotely access your machine. In this situation please
use a separate tone transmitter.
- Try holding the buttons down longer, approximately 1 second per digit. Try holding the buttons down longer, approximately 1 second per digit.
20 www.doro.com
Page 21

English
Other
I can�t hear the outgoing message very well�t hear the outgoing message very well
- Record a new outgoing message. Record a new outgoing message.
- Speak closer to the unit/microphone when recording.
Thelineisdisconnectedwhensomeoneleavesamessage:
- The incoming message may be over the maximum recording time (120 The incoming message may be over the maximum recording time (120
seconds). After this time, the call will be disconnected.
- If an incoming caller pauses for approximately 7 seconds while leaving a If an incoming caller pauses for approximately 7 seconds while leaving a
message the call will be disconnected, as the voice control function will
believe that they have hung up.
I hear a tone sequence, but nothing happens when I press the playback
button:
- There are no incoming messages. There are no incoming messages.
If the telephone still does not work, contact Doro or the place of purchase.
Don’t forget the receipt or copy of the invoice will be required for guarantee
purposes.
www.doro.com 21
Page 22

English
Other
Declaration of conformity
Doro declares that the apparatus Doro 516CR complies with the essential
requirements and other relevant positions of Directive 1999/5/EC. A copy of
the Declaration of Conformity can be found at www.doro.com/dofc
Guarantee
This product is guaranteed for a period of 12 months from the date of purchase.
Proof of purchase is required for any service or support required during the
guarantee period.
This guarantee shall not apply to a fault caused by an accident or a similar
incident or damage, liquid ingress, negligence, abnormal usage, not reasonably
maintained or any other circumstances on the purchaser’s part. Furthermore,
this guarantee shall not apply to a fault caused by a thunderstorm or any other
voltage uctuations.
This guarantee does not in any way affect your statutory rights. (As a matter of
precaution, we recommend disconnecting the telephone during a thunderstorm.
22 www.doro.com
Page 23

Page 24

English
Version 1.0
 Loading...