

Page 1
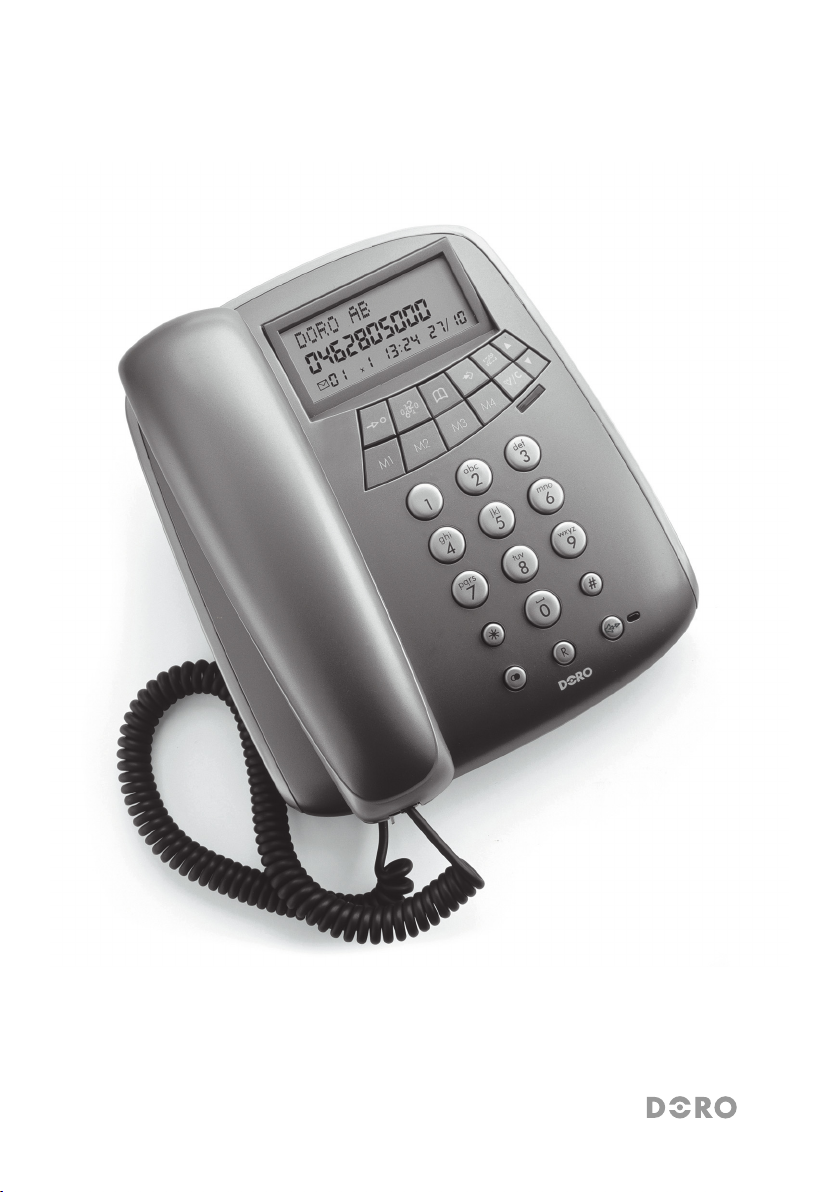
doro 515C
Page 2

4 5 6 7
98
10
1
2
M
3
English (see page EN 1-13)
1 Hanging Peg for Handset
2 Handset Volume Control
3 Mute
4 Memory button
5 Caller ID
6 Phonebook
7 New number/Message Waiting
indicator
8 Store button
M4
3
6
9
#
s
=
O/c
v
V
b
M1
M3
M2
1
2
4
5
8
7
*
0
r
R
9 Dial displayed number
10 Scrolling buttons
11 Conrm/delete
12 Ringer Indicator
13 Speed dial buttons M1 - M4
14 Speaker volume control
15 Speaker/headset button with LED
16 Recall button
17 Redial function
11
12
13
14
15
16
17
Page 3

Français (voir pages FR 1-12)
1 Languette de support du combiné
2 Touche de réglage du volume du
combiné
3 Touche Secret
4 Touche de mémoire abrégée
5 Présentation du numéro
6 Répertoire
7 Témoin lumineux de message en
attente/nouvel appel
8 Touche de programmation
9 Touche de communication
10 Touchesdedélement
11 Touchepourconrmer/effacer
12 Témoin lumineux de sonnerie
13 Touches de mémoire directe M1 à M4
14 Touche de réglage du volume du
haut-parleur
15 Touche Mains-libres/Casque avec
LED
16 Touche R
17 Touche Bis
Page 4

English
Installation
Important!
The earpiece of the handset may attract small ferromagnetic objects such as staples and pins, care should
be taken when placing the handset near these items.
Connection/Basic setting
1. Connect the curly cord to the handset and to the socket marked q on the telephone.
2. Replace the handset.
3. If supplied, connect the mains adapter to the DC 9V socket on the telephone and
to the mains power wall socket. If a power adapter is not used then batteries must
be tted! See “Batteries” section.
4.
The display ashes the alarm setting. If not, hold v pressed down for around 4 seconds.
5.
Press 0.
6. Scroll to the desired language using v/V. Press
7. Scroll to the desired contrast setting (2=normal) using v/V. Press
8. Scroll to the desired hour (00-23) using v/V. Press
9. Scroll to the desired minute using v/V. Press
10. Scroll to the desired day using v/V. Press
11. Scroll to the desired month using v/V. Press
12. Scroll to the desired pause setting (2 seconds=normal) using v/V. Press 0.
13.
Ensure the correct dialling method is displayed (ie: TONE). Press 0.
14.
Ensure the correct Recall time is displayed (ie: 100 (AU/UK/EU)/270 (FR)
/600 (NZ)). Press 0.
15. Connect the telephone cord to the network wall socket and to the socket marked
T
on the telephone.
16. Lift the handset and listen for the dial tone.
0
0
0
0
0
0
Changing the clock, alarm settings, language or contrast
If you want to alter the clock, alarm, language or contrast at a later point, press and
hold v for around 4 seconds and repeat steps 4. - 14. above.
Batteries
For caller identication, memory and other functions to function in the event of a loss
of power, the telephone requires 3 type AAA 1.5V batteries. When the batteries are
running low, the symbol will illuminate. Use high quality batteries only.
1. Unplug the telephone cable and remove the cover.
2. Insert the batteries according to the markings for plus and minus terminals.
3. Replace the battery cover.
EN 1
Page 5

English
Operation
Making a call
Regular dialling
1. Pick up the handset.
2. Enter the desired number.
Dialling using correcting function
You can change the telephone number before it is connected.
Enter the required number. Mistakes can be erased using C .
1.
2.
Lift the handset OR press .
If you wish, you can switch between handset mode and handsfree mode during
the call by simply pressing s or lifting the handset.
Redial function
If the number dialled is engaged or if you wish to redial the last number dialled,
lift the handset (or press s) and press the redial button r.
Volume control
The handset earpiece volume may be adjusted during a call using .
Ring signal
There is a ringer properties switch underneath the telephone:
Ring volume
n Ring melody
Ringer tone
EN 2
Page 6

English
Operation
The display
In standby mode (handset down, no dial tone) the display will show the date and
time, number of new and total number of calls stored in the Caller ID memory.
Immediately following the connection of a call, a call timer will be shown on the
display. The timer is a simple way to help you keep track of how long the call lasts.
Handsfree function
1. Press s. The handsfree function (speaker) will be activated and the LED
indicator next to the button will illuminate.
2. Dial the telephone number. To adjust the speaker volume, use the volume
control on the side.
3. Speak towards the microphone located on the front edge of the telephone.
4. Press s to terminate the call.
If you wish, you can switch between handset mode and handsfree mode during
the call.
Please note!
Please remember that in handsfree mode it is only possible for one person at a time to talk. The
switch-over between speaker and microphone is automatic and dependent on the sound level of the
incoming call and the microphone respectively. It is therefore essential that there are no loud noises,
e.g. music, in the immediate vicinity of the telephone, as this will disrupt the handsfree function.
Message Waiting indicator
Some PBX systems use a function called Message Waiting. The telephone can be
made to indicate this by having the Indicator ash in standby mode.
There is a switch located underneath the telephone for this (MW).
This function operates differently depending on the PBX in question. Please
contact the system controller for more information. The following four
alternatives are available: LED+, LED-, ringer indicator ( ) and high DC
voltage (HV).
When the telephone is used in systems without telephone exchanges, the ringer
indicator ( ) should be selected.
EN 3
Page 7

English
Operation
Selecting headset or handset and speaker function
On delivery, the telephone is set for the handset and speaker function, but there is
also a simpler headset function.
The headset is instead connected to the handset and the s/= button is used to
connect/disconnect to the line (corresponding to lifting and replacing the handset).
Please note that the speaker function will not work when the headset function is
activated.
Activate the function by setting the switch y/= underneath the telephone to =.
Connection of headset
Disconnect the handset coil cord from the y/= socket rstly, then connect
the headset.
Important:
Even though the handset is disconnected it must be kept on the cradle at all times in the
headset mode of operation.
Please note!
DORO original headsets are tested and adapted for this telephone. Other types and makes of
headsets may be used, though the function and sound quality cannot be guaranteed.
In the worst case, these could damage the headset and telephone. This type of damage is not
covered by the telephone guarantee.
Headset function
When the Headset function is activated (see above), please use = to connect/
disconnect (corresponding to lifting and replacing the handset). The handset
and speaker function is not available when the headset function is activated.
1. Press = . The headset function will be activated and the LED indicator next
to the button will illuminate.
2. Dial the telephone number. Adjust the speaker volume using , if
required (underneath the handset).
3. Press = to terminate the call.
EN 4
Page 8

English
Phonebook
Using the Phonebook
Use the Phonebook to store names and telephone numbers. A stored phone
number can be dialled using fewer keystrokes than if dialled manually. If you
subscribe to a Caller ID service, the name/number of the caller will be shown
when you receive an incoming call (for those numbers stored in the Phonebook
or the memories).
The Phonebook will store 32 sets of names and phone numbers. Entries in the
Phonebook are arranged alphabetically. Each name can be up to 16 characters in
length, and telephone numbers can be up to 22 digits in length.
Letters
Each number key has been allocated certain letters.
Button Letters/symbols
1 .......................................... [Space character] + & - / X 1
2 .......................................... A B C Å Ä Æ æ å ä ß 2
3 .......................................... D E F ë 3
4 .......................................... G H I ï 4
5 .......................................... J K L 5
6 .......................................... MNOÑñÖəö6
7 .......................................... P Q R S 7
8 .......................................... T U V Ü ü 8
9 .......................................... W X Y Z 9
* .......................................... ` @ ( ) * < >
0 .......................................... , . : ? = 0
# .......................................... $ _ % ! #
Storing names/numbers
1. Press b.
2. Press P.
3. Press P again.
4. Enter the phone number to be stored (up to 22 digits). Press P.
5. Enter name. Press the corresponding number key one or more times for the
rst letter (see the table above). Press P.
Press r if you want a pause in the telephone number.
If you need to change a number, store the new number in the same location as the old one.
EN 5
Page 9

English
Phonebook
Dialling from the Phonebook
1. Press b.
2. Scroll through the entries using v/V. It is also possible to quick-search
in the Phonebook by pressing the corresponding number key one or more
times for the rst letter (refer to the table on the previous page).
3. Press to dial the number, or just wait to return to standby mode.
Changing phone numbers/names
1. Press b.
2. Scroll to desired entry as above.
3. Press and hold P until the display shows EDIT? Press P.
4. Correct/change the number using C and v/V. Press P.
5. Correct/change the name. Press P.
Deleting a Phonebook entry
1. Press b.
2. Scroll to desired entry as above.
3. Press 0: DELETE ? is displayed.
4. Hold 0 down until the number disappears.
Deleting all entries in the Phonebook
1. Press b.
2. Scroll to any entry as above.
3. Press and hold 0 until the display shows DELETE ALL?
4. Hold 0 down until the number disappears.
EN 6
Page 10

English
Phonebook
Memory
The telephone has 4 one-touch memories and 10 two-touch memories for
frequently dialled telephone numbers.
When a number is stored in memory, you need only press one or two buttons
dependent on location to make a call. The one-touch memories are numbered
M1-M4, two-touch memories are stored using the telephone keypad digits 0-9.
Storing One-Touch Memories
1. Press P.
2. Enter the phone number to be stored (up to 22 digits). Press P.
3. Enter name. Press the corresponding number key one or more times for the
rst letter (see the table for the Phonebook). Press P.
4. Select memory location (M1-M4) by pressing the corresponding button.
Dialling using One-Touch Memories
1. Pick up the receiver and wait for a dialling tone.
2. Select the desired memory location (M1-M4) by pressing the corresponding button.
Storing speed dial memory locations
1. Press P.
2. Enter the phone number to be stored (up to 22 digits). Press P.
3. Enter name. Press the corresponding number key one or more times for the
rst letter (see the table for the Phonebook). Press P.
4. Select a memory location by pressing one of the keypad numbers 0-9.
Dialling using speed dial memories
1. Pick up the receiver and wait for a dialling tone.
2. Press
3. Select the number by pressing the relevant keypad number 0-9.
Press r if you want a pause in the telephone number.
If you need to change a number, store the new number in the same location as the old one.
m
.
EN 7
Page 11

English
Caller ID
Explanation of Caller ID
Caller ID allows you to see who is calling before you answer a call or to see who has
called in your absence. If the number is stored in the Phonebook, the name is shown
instead. Received calls are stored chronologically. The sequence number is shown in the
top right-hand side of the display. When the memory is full, the oldest number will be
deleted automatically as the new call is logged. New calls are indicated in standby mode
in plain text and by the red indicator ashing.
Please note!
You must subscribe to this service from your network operator in order for this feature to function.
Retrieving and dialling incoming numbers
1. Press v and V to scroll through phone numbers of call received.
2. Press to dial the number, or just wait to return to standby mode.
Messages
Apart from phone numbers, the display can show:
OUT OF AREA It is an International call or a call from a PBX
(no information received).
PRIVATE The call comes from a blocked number or a PBX.
T
New number not previously displayed.
Z (double envelope) Several calls have been received from the same telephone
number.
q
The call was received while using the Call Waiting function.
Deleting numbers
1. Scroll to the desired entry using v/V.
2. Press 0: DELETE ? is displayed, or hold 0 until the display shows DELETE ALL?
3. Hold 0 down until the number disappears.
Transferring numbers to the Phonebook
1. Scroll to the desired entry as described above.
2. Press P.
3. Press P again. Name registration is performed in the same way as making changes
to the Phonebook (refer to page 6).
EN 8
Page 12

English
Other
Wall mounting
The telephone can be wall mounted. Use two vertically mounted screws, 100
mm apart. The screws should then t into the two ‘keyholes’ on the back of the
telephone.
EN 9
Page 13

English
Other
Alarm settings
When the alarm clock is activated will be displayed in the standby mode.
Once the alarm clock goes off a tone will be heard for one minute, to switch off
the alarm press any button on the telephone.
1. Press and hold v until the alarm setting ashes.
2. Scroll to the required function (off/on/repeat daily) using v/V. Press 0.
To cancel the alarm, proceed to point 5.
3. Select the hour (00-23) using v/V. Press 0.
4. Select the minute/s using v/V. Press 0 repeatedly to return to standby mode.
5. To cancel the alarm while it is sounding, press 0 or lift and replace the
handset.
Troubleshooting
Check that the telephone cord is undamaged and properly plugged in.
Disconnect any additional equipment that may be connected. If the problem is
resolved, the fault is with the other equipment.
Test the equipment on a known working line. If the product works then the
fault is with the line. Please inform your local telephone company. Check that
charge contacts in handset and base unit are clean
No number shown in display when ringing
- In order for this feature to function, you must subscribe to the Caller ID
service from your network provider.
- If a text message is shown on the display, the call may be an international
call (no data received), or from a private or withheld number.
- It may not be possible to receive Caller ID information if the phone is
connected to a PBX system.
If the telephone still does not work, contact the place of purchase. Don’t forget
the receipt or a copy of the invoice.
EN 10
Page 14

English
Other
UK
If you cannot resolve the fault using the faultnder section, technical support is
available at:
E-mail on: tech@doro-uk.com
You can contact us in writing: Consumer Support Group, Doro UK Ltd., 22
Walkers Road, North Moons Moat, Redditch, Worcestershire, B98 9HE,
or Telephoning: 01527 584377
Web site: www.doro-uk.com
Guarantee
This product is guaranteed for a period of 12 months from the date of purchase.
Proof of purchase is required for any service or support required during the
guarantee period.
This guarantee shall not apply to a fault caused by an accident or a similar
incident or damage, liquid ingress, negligence, abnormal usage, not reasonably
maintained or any other circumstances on the purchaser’s part. Furthermore,
this guarantee shall not apply to a fault caused by a thunderstorm or any other
voltage uctuations.
This guarantee does not in any way affect your statutory rights. (As a matter of
precaution, we recommend disconnecting the telephone during a thunderstorm.)
Recall Time (Australia and New Zealand only)
Access to additional network services such as “Call Waiting” can be gained
by using the recall button R. Example: when the call waiting tones are heard,
press R, listen for the dial tone, then press 2. Please note that some networks
require only the R button to be pressed, contact your network operator for more
services information.
If this product is connected to a business PBX system, press the recall button R
followed by the extension number to transfer a call. The standard setting is 100
ms for UK/Australia and 600 ms for New Zealand.
EN 11
Page 15

English
Other
Australia and New Zealand
Products permitted for connection to the telephone network are marked with
in Australia and in New Zealand. These marks indicate
the products comply with the regulations and can be used without concern in
the country of purchase.
If you believe this product is malfunctioning, please refer to the relevant section
and/or consult the troubleshooting guide in this manual to ensure that you have
followed the instructions carefully. As an alternative you can visit our web site
for FAQ’s or send an e-mail for a prompt reply.
Electro Magnetic Radiation (EMR)
This telephone complies with applicable safety requirements for exposure to
radio waves.
The mean power of this telephone is not greater than X.X mW.
This is below the 20mW limit at which testing is required.
Guarantee
This product is guaranteed for a period of 12 months from the date of purchase.
Should you experience difculties with the product, please contact us for
assistance. If the product is then found to be faulty you will be asked to return
it directly to us with a copy of the purchase receipt. This guarantee shall not
apply to a fault caused by an accident or a similar incident or damage, liquid
ingress negligence, abnormal usage, not reasonably maintained or any other
circumstances on the purchaser’s part. Furthermore, this guarantee shall not
apply to a fault caused by a thunderstorm or lightning, excessive or any other
voltage uctuations or faults on the telephone line. (As a matter of precaution,
we recommend disconnecting the telephone during a thunderstorm).
This guarantee does not affect your statutory rights.
AUSTRALIA NEW ZEALAND
DORO Australia Pty Ltd Atlas Gentech (NZ) Limited
PO Box 6760 Private Bag 14927
Baulkham Hills BC NSW 2153 Panmure
Australia Auckland
New Zealand
Consumer Support Consumer Support
Ph: Ph: 1300 885 023 Ph: 0900-500-25 (Toll Call)
Fax: (02) 8853-8489 Fax: (09) 574-2722
Email: support@doro.com.au Email: support@atlasgentech.co.nz
Web site: www.doro.com.au
EN 12
Page 16

English
Other
ALL PRODUCTS
The grant of a Telepermit for any item of terminal equipment indicates only
that Telecom has accepted that the item complies with the minimum conditions
for connection to its network. It indicates no endorsement of the product by
Telecom, nor does it provide any sort of warranty. Above all, it provides no
assurance that any item will work correctly in all respects with another item of
Telepermitted equipment of a different make or model, nor does it imply that
any product is compatible with all of Telecom’s network services.
This equipment shall not be set to make automatic calls to the Telecom “111“
Emergency Service.
This equipment may not provide for the effective hand-over of a call to another
device connected to the same line.
This equipment should not be used under any circumstances that may constitute
a nuisance to other Telecom Customers.
Declaration of conformity
Doro hereby declares that the product ‘Doro 515C’ conforms with the
essential requirements and other relevant regulations contained in directive
1999/5/EC.
A copy of the manufacturer’s declaration is available at www.doro.com/dofc
CND PRODUCTS
If a charge for local calls is unacceptable, the “DIAL“ button should NOT be
used for local calls. Only the 7 digits of the local number should be dialled from
your telephone. DO NOT dial the area code digit or the “0“ prex.
Numbers longer than 14 digits will not be displayed correctly and Dial back
function should not be used.
EN 13
Page 17

Français
Installation
FR 1
Page 18

Français
Installation
Raccordement/Réglages de base
1. Reliez le cordon spiralé au combiné et à la che du téléphone marquée q.
2.
Raccrochez.
3. Mettez en place les trois piles AAA de 1,5V fournies dans le logement prévu à cet
effet sous le poste en respectant les polarités. Le symbole s’allume lorsque les
batteries doivent être changées. N’utilisez que des batteries de qualité.
Lorsque vous insérez les piles dans leur logement, ALARME ARRET clignote. Vous
pouvez alors soit:
• Valider le mode « Arrêt » (pas d’alarme programmée) en appuyant sur la touche
• Choisir le paramétrage de l’alarme avec les touches de délement v ou V (mode
marche ou quotidien) en validant par la touche 0 et en paramétrant l’heure souhaitée.
Le réglage de l’alarme est décrit à la page FR 11.
Si ALARME ARRET ne clignote plus, ceci signie que le poste est en mode pause.
An d’accéder de nouveau au réglage des menus, il faut appuyer environ 4s sur la touche v.
Une fois le paramétrage de l’alarme effectué, il faut procéder aux réglages suivants :
1. Choix de la langue avec les touches v ou V et touche 0 pour valider.
2. Réglage du contraste (1 = moins élevé) par les touches v ou V, valider par 0.
3. Réglage de l’heure et de la date par les touches v ou V et validation par la touche 0.
4. Réglage du temps de pause. Cette fonction permet d’insérer une pause (de 1 à 4
secondes) entre deux chiffres entrés en mémoire (voir P 6 de la notice). Ceci peut
être utile dans le cas de consultation de services à distance demandant l’introduction
de codes après instructions. Le choix s’effectue grâce aux touches v ou V et la
validation par la touche 0.
5. Réglage du mode de numérotation (FV pour fréquences vocales), valider par 0.
6. Réglage de synchronisation de la touche R (TOUCHER). Sélectionnez 300 par les
touches v ou V puis validez par la touche 0.
0
Enn, reliez le câble téléphonique fourni à votre prise téléphonique et à la prise du
téléphone marquée T.
Changer l’horloge, la langue ou le contraste
Pour changer l’horloge, la langue ou le contraste par la suite, appuyez pendant environ
4 secondes sur la touche v et répétez les étapes 1. à 6. précédentes.
FR 2
Page 19

Français
Utilisation
Appeler
Appel normal
1. Prenez le combiné.
2. Composez le numéro désiré.
Appeler avec la fonction de correction
Vous pouvez changer un numéro de téléphone avant de l’appeler.
1. Composez le numéro. En cas d’erreur, effacez avec la touche C.
2. Prenez le combiné OU appuyez sur .
En cours de conversation vous pouvez alterner entre les modes combiné et haut-parleur.
Touche Bis
Lorsque la ligne de votre correspondant est occupée ou si vous désirez rappeler
le dernier numéro composé, prenez le combiné (ou appuyez sur s) et appuyez
sur la touche Bis r.
Réglage du volume
Utilisez le curseur pour ajuster le volume d’écoute du combiné en cours de
conversation.
Sonnerie
Vous pouvez régler la sonnerie grâce aux curseurs situés au dos du téléphone :
Volume de la sonnerie
n Mélodie
Tonalité d’appel
FR 3
Page 20

Français
Utilisation
L’afcheur
En veille, la date et l’heure sont afchées ainsi que le numéro des nouveaux
appels et le nombre total de numéros de téléphone enregistrés dans le JAP.
Lorsque la communication est établie, un chronomètre s’afche. Ce
chronomètre vous permet de vérier la durée des appels.
Fonction Mains-libres
1. Appuyez sur s. Le haut-parleur est activé et la LED en regard de la touche
s’allume.
2. Composez le numéro de téléphone. Utilisez le bouton de réglage du volume
situé sur le coté du téléphone pour régler le volume du haut-parleur.
3. Parlez face au téléphone.
4. Appuyez sur s pour mettre n à la communication.
En cours de conversation vous pouvez alterner entre les modes combiné et haut-parleur.
Remarque !
Notez qu’en position mains-libres les deux correspondants ne peuvent pas parler simultanément,
mais uniquement un à la fois. L’alternance entre celui qui parle et celui qui écoute se fait
automatiquement, et elle est gérée par le niveau du son de la ligne téléphonique (votre
correspondant) et celui du micro (votre discours). C’est pourquoi il est important qu’il n’y ait pas
trop de bruit dans l’entourage du téléphone, comme par exemple de la musique à haut volume.
Témoin lumineux de message en attente
Certains standards téléphoniques ont une fonction de Message en attente. Les
messages sont alors signalés en veille par le clignotement d’un témoin lumineux.
Le curseur pour cette fonction est situé au dos téléphone (MW).
Cette fonction varie selon le type de standard. Pour de plus amples informations,
contactez le responsable de votre système. Il existe quatre réglages : LED+, LED-,
témoin de sonnerie ( ) et haute tension CC (HV).
Si votre appareil ne fonctionne pas derrière un PABX, sélectionnez le témoin de
sonnerie ( ).
FR 4
Page 21

Français
Utilisation
Sélectionner casque ou combiné et haut-parleur
A la livraison, le téléphone est conguré par défaut sur le mode combiné et haut-
parleur mais vous pouvez utiliser la fonction casque.
La touche s/= permet de prendre/libérer la ligne téléphonique (ce qui
équivaut à prendre et à reposer le combiné).
La fonction combiné avec haut-parleur est désactivée quand celle du casque est
activée.
Activez cette fonction en mettant le curseur s/= situé au dos du téléphone sur =.
Branchement du casque
Le casque se raccorde à la che y/= située au dos du téléphone, à la place du
cordon spiralé.
Remarque !
Le casque DORO d’origine est testé et adapté à ce téléphone. Vous pouvez utiliser d’autres
types ou marques de casques mais dans ce cas nous ne pourrons pas garantir leur qualité sonore
et leur bon fonctionnement.
Il est possible que le casque et le téléphone soient endommagés. La garantie du téléphone ne
couvre pas ce type de dommage.
Fonction Casque
Lorsque la fonction Casque est activée (voir ci-dessus), la touche = permet de
prendre/libérer la ligne téléphonique (ce qui équivaut à prendre et à reposer le
combiné). La fonction combiné avec haut-parleur est désactivée quand celle du
casque est activée.
1. Appuyez sur = . La fonction casque est activée et la LED s’allume.
2. Composez le numéro de téléphone. Réglez éventuellement le volume à l’aide
du bouton situé sous le combiné.
3. Appuyez sur = pour mettre n à la communication.
FR 5
Page 22

Français
Répertoire
Utilisation du répertoire
Le répertoire permet d’enregistrer les noms et numéros de téléphone. Il est plus
rapide d’appeler un numéro en mémoire que de le composer manuellement.
Si vous êtes abonné à la présentation du numéro, le nom/numéro du
correspondant s’afche à la réception d’un appel (uniquement pour les numéros
déjà dans le répertoire ou en mémoire).
Le répertoire enregistre 32 jeux de noms et numéros de téléphone. Il est
présenté en ordre alphabétique. Les noms ont 16 caractères maximum et les
numéros de téléphone jusqu’à 22 chiffres.
Lettres
Vous pouvez saisir les noms dans votre répertoire grâce aux touches numériques
du téléphone y compris certains caractères spéciaux.
Touche Lettres/symboles
1 .......................................... [Espace] + & - / X 1
2 .......................................... A B C Å Ä Æ æ å ä ß 2
3 .......................................... D E F ë 3
4 .......................................... G H I ï 4
5 .......................................... J K L 5
6 .......................................... MNOÑñÖəö6
7 .......................................... P Q R S 7
8 .......................................... T U V Ü ü 8
9 .......................................... W X Y Z 9
* .......................................... ` @ ( ) * < >
0 .......................................... , . : ? = 0
# .......................................... $ _ % ! #
Enregistrer un nom/numéro
1. Appuyez sur b.
2. Appuyez sur P.
3. Appuyez à nouveau sur P.
4. Composez le numéro de téléphone souhaité (22 chiffres maximum).
Appuyez sur P.
5. Entrez le nom. Appuyez une ou plusieurs fois sur la touche numérotée
correspondant à la première lettre (voir le tableau ci-dessus). Appuyez sur P.
Insérez une pause en appuyant sur r.
En cas de changement de numéro, remplacez l’ancien par le nouveau.
FR 6
Page 23

Français
Répertoire
Appeler un numéro du répertoire
1. Appuyez sur b.
2. Faites déler les entrées avec les touches v/V. Vous pouvez aussi faire une
recherche rapide en appuyant une ou plusieurs fois sur la touche numérotée
correspondant à la première lettre du nom recherché (voir le tableau de la
page précédente).
3. Appuyez sur pour appeler le numéro ou attendez pour repasser en veille.
Modierlesnoms/numérosdetéléphone
1. Appuyez sur b.
2. Atteignez le numéro/nom désiré comme indiqué ci-dessus.
3. Appuyez sur P jusqu’à ce que EDITER ? s’afche. Appuyez sur P.
4. Corrigez/changez le numéro avec les touches C et v/V. Appuyez sur p.
5. Corrigez/changez le nom. Appuyez sur P.
Effacer un correspondant du répertoire
1. Appuyez sur b.
2. Atteignez le numéro/nom désiré comme indiqué ci-dessus.
3. Appuyez sur 0. EFFACER ? s’afche.
4. Appuyez sur 0 jusqu’à ce que le numéro s’efface.
Effacer le contenu du répertoire
1. Appuyez sur b.
2. Atteignez n’importe quel numéro/nom comme indiqué ci-dessus.
3. Appuyez sur 0 jusqu’à ce que TOUT EFFACER ? s’afche.
4. Appuyez sur 0 jusqu’à ce que le numéro s’efface.
FR 7
Page 24

Français
Répertoire
Mémoires
Le téléphone a 4 touches de mémoire directe et 10 touches de mémoire abrégée
pour les numéros que vous appelez le plus souvent.
Une fois un numéro de téléphone enregistré, vous le composez en pressant
simplement une ou deux touches. Les numéros des touches de mémoire directe
sont M1 à M4 ; les numéros en mémoire abrégée sont enrégistrés avec les
touches 0-9 du téléphone.
Enregistrer les numéros en mémoire directe
1. Appuyez sur P.
2. Composez le numéro de téléphone souhaité (22 chiffres maximum).
Appuyez sur P.
3. Entrez le nom. Appuyez une ou plusieurs fois sur la touche numérotée
correspondant à la première lettre (voir le tableau du répertoire). Appuyez sur P.
4. Sélectionnez une plage de mémoire (M1 à M4) en appuyant sur la touche
correspondante.
Composer un numéro en mémoire directe.
1. Prenez le combiné et attendez la tonalité.
2. Sélectionnez la plage de mémoire désirée (M1 à M4) en appuyant sur la
touche correspondante.
Enregistrement d’un numéro en mémoire abrégée
1. Appuyez sur P.
2. Composez le numéro de téléphone souhaité (22 chiffres maximum).
Appuyez sur P.
3. Entrez le nom. Appuyez une ou plusieurs fois sur la touche numérotée
correspondant à la première lettre (voir le tableau du répertoire). Appuyez sur P.
4. Sélectionnez une plage de mémoire en appuyant sur une des touches 0-9 du
clavier.
Composer un numéro enregistré en mémoire abrégée
1. Prenez le combiné et attendez la tonalité.
2. Appuyez sur
3. Sélectionnez le correspondant en appuyant sur la touche numérotée
correspondante 0-9.
Insérez une pause en appuyant sur r.
En cas de changement de numéro, remplacez l’ancien par le nouveau.
m
.
FR 8
Page 25

Français
Présentation du numéro
Quesignie‘Présentationdunuméro’?
La présentation du numéro/nom vous permet de voir qui vous appelle avant de
répondre ou qui a appelé en votre absence. Si le nom/numéro du correspondant est
déjà dans votre répertoire, son nom est afché. Les appels entrants sont enregistrés par
ordre chronologique. L’ordre est afché en haut à droite. Quand le journal atteint sa
capacité maximum, les numéros les plus anciens sont effacés automatiquement au fur
et à mesure des nouveaux appels. En veille, un message et le témoin rouge clignotant
signalent les nouveaux appels.
Remarque !
Pour que ceci fonctionne, vous devez vous abonner à ce service auprès de votre opérateur.
Consulter et appeler à partir du journal des appelants (JAP).
1. Appuyez sur v et V pour faire déler les numéros enregistrés.
2. Appuyez sur pour appeler le numéro ou attendez pour repasser en veille.
Messages
En plus des numéros de téléphone, l’afcheur indique :
APPEL EXTERNE Lorsque vous recevez un appel international ou un appel
provenant d’un PABX APPEL EXTERNE s’afche.
INCONNU Lorsque vous recevez un appel proviennant d’un numéro
verrouillé ou masqué ou d’un PABX INCONNU s’afche.
T
Numéro inconnu.
Z(double enveloppe) Vous avez reçu plusieurs appels de cette même personne.
q
S’afche lorsque l’appel reçu est un Appel en attente.
Effacer les numéros
1. Atteignez l’entrée désirée à l’aide des touches v/V.
2. Appuyez sur 0. EFFACER ? s’afche, ou appuyez sur 0 jusqu’à ce que TOUT
EFFACER ? s’afche
3. Appuyez sur 0 jusqu’à ce que le numéro s’efface.
Transférer les numéros dans le répertoire
1. Atteignez le numéro désiré comme décrit précédemment.
2. Appuyez sur P.
3. Appuyez à nouveau sur P. La méthode d’enregistrement des noms est identique à
celle utilisée pour le répertoire (voir page FR 7).
FR 9
Page 26

Français
Autres
Position murale
Vous pouvez xer ce téléphone au mur avec deux vis espacées verticalement de
100 mm. Encastrez la tête des vis dans les trous correspondants situés au dos du
téléphone.
FR 10
Page 27

Français
Autres
Réglage de l’alarme
Lorsque qu’une alarme a été programmée, s’afche en mode veille. La
sonnerie de l’alarme dure une minute. Vous pouvez la couper en appuyant sur
n’importe quelle touche du combiné.
1. Appuyez pendant environ 4 secondes sur la touche v jusqu’à ce que la
programmation de l’alarme clignote.
2. Atteignez le réglage désiré (ALARM QUOTIDIENN/ALARME MARCHE/
ALARME ARRET). Appuyez sur 0.
3. Atteignez l’heure désirée (00-23) avec les touches v/V. Appuyez sur 0.
4. Atteignez la minute désirée avec les touches v/V. Appuyez sur 0.
5. Vous pouvez arrêter l’alarme en appuyant sur n’importe quelle touche du
téléphone ou en décrochant le combiné.
Dépannage
Vériez que le câble téléphonique soit en bon état et qu’il soit branché
correctement. Débranchez tout autre matériel, rallonges et téléphones. Si
l’appareil fonctionne alors normalement, la panne est causée par le matériel
additionnel.
Testez le matériel sur une ligne en état de marche. S’il fonctionne, cela signie
que votre propre raccordement téléphonique est défectueux. Signalez la panne à
votre opérateur.
Pas de présentation du numéro à la réception d’un appel
- Pour que la présentation du numéro fonctionne, vous devez vous abonner à
ce service auprès de votre opérateur.
- Si un message s’afche, il peut s’agir d’un appel international (pas
d’informations disponibles), ou provenant d’un numéro masqué ou hors
annuaire.
- Il est possible que la présentation du numéro ne fonctionne pas si le
téléphone est derrière un PABX.
Si le téléphone ne fonctionne toujours pas, contactez votre revendeur. N’oubliez
pas la quittance ou une copie de la facture.
FR 11
Page 28

Français
Autres
Garantie et S.A.V.
Cet appareil est garanti deux ans à partir de sa date d’achat, la facture faisant foi.
La réparation dans le cadre de cette garantie sera effectuée gratuitement.
La garantie est valable pour un usage normal de l’appareil tel qu’il est déni dans
la notice d’utilisation.
Les fournitures utilisées avec l’appareil ne sont pas couvertes par la garantie.
Sont exclues de cette garantie les détériorations dues à une cause étrangère à
l’appareil.
Les dommages dûs à des manipulations ou à un emploi non conformes, à un
montage ou entreposage dans de mauvaises conditions, à un branchement ou
une installation non conformes ne sont pas pris en charge par la garantie.
Par ailleurs, la garantie ne s’appliquera pas si l’appareil a été endommagé à la
suite d’un choc ou d’une chute, d’une fausse manoeuvre, d’un branchement non
conforme aux instructions mentionnées dans la notice, de l’effet de la foudre, de
surtensions électriques ou électrostatiques, d’une protection insufsante contre
l’humidité, la chaleur ou le gel.
Pour la France
En tout état de cause, la garantie légale pour vices cachés s’appliquera
conformément aux articles 1641 et suivants du Code Civil.
Si vous avez des soucis d’utilisation, contactez notre Service d’Assistance
Téléphonique au 08 92 68 90 18 ( N° Audiotel - 0,34€/min.).
E-Mail : contact@doro.fr
Site Internet : www.doro.com
En cas de panne, adressez-vous au S.A.V. de votre revendeur ou installateur.
Déclaration de conformité
Nous, Doro, déclarons la conformité du produit Doro 515C aux dispositions de
la directive européenne 1999/5/CE.
La déclaration de conformité peut être consultée à l’adresse suivante : www.
doro.com/dofc
FR 12
Page 29

Page 30

Page 31

Page 32

English
French
Version 1.0
 Loading...