


S h o w V a u l t
Digital Cinema Server
User Manual
Version 1.7
The English version of this document is the only legally binding version. Translated versions are not legally binding and are for convenience only.
____________________________________________________________________________________
SHV.OM.001663.DRM |
Page 1 of 276 |
Version 1.7 |
|
Doremi Labs |
|
|
|
|
|
|
Table of Contents |
|
1 |
INTRODUCTION ................................................................................................................ |
10 |
||||
|
1.1 |
PURPOSE |
...................................................................................................................... |
10 |
||
|
1.2 |
SOFTWARE ......................................................................................................VERSION |
10 |
|||
|
1.3 |
CONTACT .................................................................................................INFORMATION |
10 |
|||
2 |
SHOWVAULT ................................................................................................OVERVIEW |
12 |
||||
|
2.1 |
SHOWVAULT ............................................................................................FRONT PANEL |
12 |
|||
|
2.2 |
SHOWVAULT ..............................................................................................REAR PANEL |
14 |
|||
3 |
OPERATING .......................................................................................................SYSTEM |
16 |
||||
|
3.1 |
USERS |
.......................................................................................................................... |
|
17 |
|
4 |
VIRTUAL KEYBOARD....................................................................................................... |
19 |
||||
|
4.1 |
HOW TO ......................................................................ACCESS THE VIRTUAL KEYBOARD |
19 |
|||
5 |
NETWORK ..........................................................................................CONFIGURATION |
21 |
||||
|
5.1 |
DEFAULT ..............................................................................NETWORK CONFIGURATION |
21 |
|||
|
5.2 |
CHANGING ...........................................................................................THE IP ADDRESS |
21 |
|||
|
5.3 |
NETWORK .......................................................................................................RESTART |
22 |
|||
6 |
TIME ZONE .........................................................................................CONFIGURATION |
24 |
||||
|
6.1 |
CHECKING .............................................................................................THE TIME ZONE |
24 |
|||
|
6.2 |
CHANGING .............................................................................................THE TIME ZONE |
25 |
|||
7 |
CONTROL .............................................................................................................PANEL |
28 |
||||
|
7.1 |
ACCOUNT ...............................................................................................MANAGER GUI |
29 |
|||
|
7.1.1 Add .......................................................................................a New User Account |
30 |
||||
|
7.1.2 Edit ................................................................................an Existing User Account |
32 |
||||
|
7.1.3 Delete ............................................................................an Existing User Account |
33 |
||||
|
7.2 |
AUDIO C ..................................................................................................ONFIGURATION |
33 |
|||
|
7.2.1 |
Channel ............................................................................................Mapping Tab |
35 |
|||
|
|
7.2.1.1 .................................................................................... |
Disabled Configuration |
35 |
||
|
|
7.2.1.2 ............................................................... |
Pre - Defined Mapping Configurations |
35 |
||
|
|
7.2.1.2.1 .................................................................................................. |
4 Channels |
35 |
||
|
|
7.2.1.2.2 .................................................................................................. |
6 Channels |
36 |
||
|
|
7.2.1.2.3 .................................................................................................. |
7 Channels |
37 |
||
|
|
7.2.1.2.4 .................................................................................................. |
8 Channels |
38 |
||
|
|
7.2.1.2.5 .................................................................................................. |
9 Channels |
39 |
||
|
|
7.2.1.2.6 ......................................................................................................... |
ISDCF |
40 |
||
|
|
7.2.1.3 .............................................................................. |
Passthrough Configuration |
41 |
||
|
|
7.2.1.4 ....................................................................... |
Custom Mapping Configuration |
42 |
||
|
7.2.2 |
Advanced .......................................................................................................Tab |
43 |
|||
|
7.2.3 |
SMPTE ..................................................................................................Packages |
43 |
|||
|
7.2.4 |
Interop ...................................................................................................Packages |
44 |
|||
|
7.3 |
BACKUP ........................................................................................................MANAGER |
45 |
|||
|
7.3.1 Automatic .................................................................................Backup of System |
45 |
||||
|
|
7.3.1.1 ..................................................................Viewing the Backup File Record(s) |
45 |
|||
|
7.3.2 Restoring ..........................................................the System to a Previous Backup |
46 |
||||
____________________________________________________________________________________
SHV.OM.001663.DRM |
Page 2 of 276 |
Version 1.7 |
|
Doremi Labs |
|
7.3.3 Restoring the Configuration Files ........................................................................... |
47 |
||||
7.3.4 Manual Back Up and Restore ................................................................................ |
48 |
||||
|
7.3.4.1 Manual Back Up to RAID................................................................................. |
48 |
|||
|
7.3.4.2 Manual Back Up to External Drive ................................................................... |
52 |
|||
7.3.5 |
Deleting Backup File(s).......................................................................................... |
54 |
|||
7.3.6 |
Restoring Backup File(s)........................................................................................ |
55 |
|||
|
7.3.6.1 |
Restoring from RAID ....................................................................................... |
55 |
||
|
7.3.6.2 Restoring from an External Drive..................................................................... |
57 |
|||
7.4 |
CONTENT FEED MANAGER ............................................................................................. |
61 |
|||
7.4.1 |
Quick Configuration ............................................................................................... |
61 |
|||
7.4.2 |
Scan for Server...................................................................................................... |
62 |
|||
7.4.3 |
Advanced Options Button ...................................................................................... |
64 |
|||
7.4.4 Adding a Server Manually...................................................................................... |
65 |
||||
|
7.4.4.1 |
Networking the Server(s)................................................................................. |
65 |
||
7.4.5 |
Advanced Options ................................................................................................. |
68 |
|||
7.4.6 |
Deleting a Server ................................................................................................... |
69 |
|||
7.4.7 Ingesting from a Server that was Added ................................................................ |
69 |
||||
7.5 |
CONTENT MANAGER ...................................................................................................... |
70 |
|||
7.5.1 |
Home Page............................................................................................................ |
71 |
|||
7.5.2 |
Composition Playlists Page ................................................................................... |
73 |
|||
|
7.5.2.1 |
Actions Button ................................................................................................. |
73 |
||
|
7.5.2.2 |
Info Button....................................................................................................... |
78 |
||
|
7.5.2.2.1 |
Properties Tab ............................................................................................ |
78 |
||
|
7.5.2.2.2 |
Assets Tab.................................................................................................. |
79 |
||
|
7.5.2.2.3 |
SPL(s) Tab.................................................................................................. |
80 |
||
|
7.5.2.2.4 |
KDM(s) Tab ................................................................................................ |
82 |
||
|
7.5.2.2.5 |
Audio Mapping Tab..................................................................................... |
85 |
||
|
7.5.2.2.6 |
Settings Tab................................................................................................ |
85 |
||
|
7.5.2.3 |
Search Tool..................................................................................................... |
86 |
||
7.5.3 |
Decryption Keys Page ........................................................................................... |
87 |
|||
7.5.4 Performing a KDM Sanity Check ........................................................................... |
88 |
||||
7.5.5 |
Show Playlists Page .............................................................................................. |
90 |
|||
|
7.5.5.1 |
Delete an SPL ................................................................................................. |
90 |
||
|
7.5.5.2 |
Export an SPL ................................................................................................. |
90 |
||
7.5.6 |
Information Button ................................................................................................. |
91 |
|||
7.5.7 |
Licenses Page ....................................................................................................... |
91 |
|||
7.5.8 |
Delete a License .................................................................................................... |
92 |
|||
7.6 |
DEVICE CONTROLLER .................................................................................................... |
93 |
|||
7.6.1 How to Configure the Device Controller GUI.......................................................... |
93 |
||||
7.6.2 |
Registered Tab ...................................................................................................... |
94 |
|||
7.6.3 |
Input Settings Tab.................................................................................................. |
95 |
|||
7.6.4 |
Networking Configuration Tab................................................................................ |
96 |
|||
7.6.5 Color Space Settings Tab ...................................................................................... |
97 |
||||
|
7.6.5.1 HDMI Color Space Settings............................................................................. |
97 |
|||
|
7.6.5.2 HDSDI Color Space Settings........................................................................... |
98 |
|||
|
7.6.5.3 |
HDSDI Input .................................................................................................... |
98 |
||
7.6.6 |
Information Tab...................................................................................................... |
99 |
|||
7.6.7 |
Auto Detect Tab..................................................................................................... |
99 |
|||
7.6.8 |
Manual Tab.......................................................................................................... |
100 |
|||
7.7 |
DEVICE MANAGER........................................................................................................ |
102 |
|||
7.7.1 |
Adding a Projector ............................................................................................... |
102 |
|||
7.7.2 Removing a Device or Projector .......................................................................... |
104 |
||||
____________________________________________________________________________________
SHV.OM.001663.DRM |
Page 3 of 276 |
Version 1.7 |
|
Doremi Labs |
|
7.7.3 |
Automation Libraries Management ...................................................................... |
104 |
||
7.7.4 Adding an eCNA Device ...................................................................................... |
104 |
|||
7.7.4.1 Removing an eCNA Device ........................................................................... |
106 |
|||
7.7.5 Adding a JNior Device ......................................................................................... |
106 |
|||
7.7.5.1 Removing a JNior Device .............................................................................. |
107 |
|||
7.7.6 Adding a Raw Device........................................................................................... |
107 |
|||
7.7.7 Removing a Raw Device...................................................................................... |
108 |
|||
7.7.8 Adding a Serial Device......................................................................................... |
108 |
|||
7.7.9 |
ISE1 Device......................................................................................................... |
111 |
||
7.7.10 |
|
CSS Device ...................................................................................................... |
111 |
|
7.7.11 |
|
3D Configuration............................................................................................... |
111 |
|
7.7.11.1 |
Dolby 3D Support.......................................................................................... |
111 |
||
7.7.11.2 |
RealD 3D Support ......................................................................................... |
111 |
||
7.7.11.3 |
Sensio 3D Support ........................................................................................ |
113 |
||
7.7.12 |
|
Closed Caption Support.................................................................................... |
113 |
|
7.7.13 |
|
Subtitle Engine Configuration ........................................................................... |
113 |
|
7.7.13.1 Process Closed Caption Data as Subtitles .................................................... |
115 |
|||
7.8 |
DIAGNOSTIC TOOL ...................................................................................................... |
115 |
||
7.9 |
FLMX MANAGER.......................................................................................................... |
115 |
||
7.10 |
LANGUAGE SETUP .................................................................................................... |
117 |
||
7.11 |
LICENSE MANAGER ................................................................................................... |
120 |
||
7.11.1 |
|
Adding a License .............................................................................................. |
120 |
|
7.12 |
LIVE MANAGER ......................................................................................................... |
122 |
||
7.12.1 Creating a Live Event ....................................................................................... |
123 |
|||
7.12.2 Deleting a Live CPL.......................................................................................... |
125 |
|||
7.13 |
LOG MANAGER ......................................................................................................... |
126 |
||
7.13.1 |
|
Log Manager Configuration .............................................................................. |
127 |
|
7.14 |
NETWORKING CONFIGURATION.................................................................................. |
128 |
||
7.15 |
OPERATOR MAINTENANCE MONITORING .................................................................... |
129 |
||
7.15.1 |
|
Exporting System Logs..................................................................................... |
132 |
|
7.16 |
THEATER PROPERTIES.............................................................................................. |
136 |
||
7.16.1 |
|
Facility Tab ....................................................................................................... |
136 |
|
7.16.2 |
|
Auditorium Tab ................................................................................................. |
136 |
|
7.16.3 |
|
Contacts Tab .................................................................................................... |
137 |
|
7.16.4 |
|
Address Tab ..................................................................................................... |
138 |
|
7.17 |
TIME SETTING .......................................................................................................... |
139 |
||
7.17.1 Changing the Time Zone .................................................................................. |
140 |
|||
7.17.2 Changing the System Time............................................................................... |
140 |
|||
7.17.3 |
|
NTP Servers..................................................................................................... |
140 |
|
7.18 |
TOUCHSCREEN CALIBRATION .................................................................................... |
141 |
||
8 INGEST MANAGER GUI ................................................................................................. |
144 |
|||
8.1 |
INGESTING CONTENT ................................................................................................... |
144 |
||
8.2 |
CONTENT TYPES.......................................................................................................... |
144 |
||
8.3 |
INGESTING CONTENT ................................................................................................... |
145 |
||
8.3.1 Ingesting Content From a USB Drive ................................................................... |
145 |
|||
8.4 INGESTING CONTENT FROM A REMOTE DOREMI SERVER/LMS........................................ |
146 |
|||
8.4.1 File Transfer Protocol (FTP)................................................................................. |
146 |
|||
8.4.1.1 Ingesting Content From a Doremi Remote Server/LMS................................. |
146 |
|||
8.5 |
INGEST PROGRESS ...................................................................................................... |
147 |
||
8.6 |
PNGEST ...................................................................................................................... |
148 |
||
8.6.1 How to Pngest a CPL........................................................................................... |
148 |
|||
____________________________________________________________________________________
SHV.OM.001663.DRM |
Page 4 of 276 |
Version 1.7 |
|
Doremi Labs |
|
9 SHOW MANAGEMENT USING CINELISTER ................................................................. |
151 |
|||
9.1 |
CINELISTER EDITOR TAB .............................................................................................. |
151 |
||
10 |
SHOW PLAYLISTS ...................................................................................................... |
154 |
||
10.1 |
AUDIO-VISUAL CONTENT........................................................................................... |
154 |
||
10.2 |
SHOW PLAYLIST CREATION ....................................................................................... |
155 |
||
|
10.2.1 How to Create a New Show Playlist.................................................................. |
155 |
||
|
10.2.2 |
Element Re-Ordering........................................................................................ |
156 |
|
|
10.2.2.1 |
Refresh Button .............................................................................................. |
156 |
|
|
10.2.2.2 |
Save Button .................................................................................................. |
156 |
|
10.3 |
EXPORT SHOW PLAYLIST .......................................................................................... |
157 |
||
|
10.3.1 How to Save and Export a Show Playlist .......................................................... |
157 |
||
10.4 |
IMPORTING A SHOW PLAYLIST ................................................................................... |
158 |
||
|
10.4.1 How to Import an SPL....................................................................................... |
158 |
||
11 |
ACCESSING A SHOW PLAYLIST ............................................................................... |
160 |
||
11.1 |
EDITING AN EXISTING SHOW PLAYLIST ....................................................................... |
161 |
||
11.2 |
DELETING A SHOW PLAYLIST ..................................................................................... |
161 |
||
12 |
ELEMENT PROPERTIES ............................................................................................. |
163 |
||
12.1 |
UNENCRYPTED CPLS ............................................................................................... |
164 |
||
12.2 |
ENCRYPTED CPL WITH KDM VALID (MORE THAN 48 HOURS) ...................................... |
164 |
||
12.3 |
ENCRYPTED CPL WITH KDM VALID (LESS THAN 48 HOURS)........................................ |
165 |
||
12.4 |
DETAIL BUTTON........................................................................................................ |
165 |
||
12.5 |
DELETING A CPL FROM THE SERVER......................................................................... |
165 |
||
13 PLAY 2D CONTENT IN 3D MODE ............................................................................... |
168 |
|||
13.1 |
3D MODE CONFIGURATION ....................................................................................... |
168 |
||
|
13.1.1 How to Set the Show Playlist Mode to 3D......................................................... |
168 |
||
14 SEGMENT, MARKER, AND INTERMISSION............................................................... |
171 |
|||
14.1 |
SEGMENT................................................................................................................. |
171 |
||
|
14.1.1 Skip to ShowPlaylist Segment Macro ............................................................... |
174 |
||
14.2 |
MARKER................................................................................................................... |
177 |
||
14.3 |
INTERMISSION .......................................................................................................... |
177 |
||
|
14.3.1 |
Intermission SPL .............................................................................................. |
177 |
|
|
14.3.2 |
Main SPL.......................................................................................................... |
178 |
|
|
14.3.3 Exit from Intermission Macro Creation .............................................................. |
181 |
||
|
14.3.3.1 |
Exit Intermission Marker................................................................................ |
183 |
|
15 |
AUTOMATION CUES ................................................................................................... |
187 |
||
15.1 |
MACRO AUTOMATION CUES ...................................................................................... |
187 |
||
15.2 |
MACRO CREATION USING MACRO EDITOR ................................................................. |
187 |
||
15.3 |
EDITING A MACRO AUTOMATION CUE......................................................................... |
189 |
||
15.4 |
INSERTING ACTIONS INTO MACRO CUES .................................................................... |
190 |
||
|
15.4.1 Add a GPO Action to the Macro Automation Cue ............................................. |
191 |
||
|
15.4.2 |
Playback Action Insertion ................................................................................. |
192 |
|
|
15.4.3 Video Output Action Insertion ........................................................................... |
193 |
||
|
15.4.4 |
Dowser Action Insertion.................................................................................... |
193 |
|
|
15.4.5 Projector Channel Switch Insertion ................................................................... |
194 |
||
15.5 |
AUTOMATION LIBRARY USAGE ................................................................................... |
195 |
||
|
15.5.1 |
Using Automation Library ................................................................................. |
195 |
|
____________________________________________________________________________________
SHV.OM.001663.DRM |
Page 5 of 276 |
Version 1.7 |
|
Doremi Labs |
|
|
15.5.2 |
Resulting Macro Setting.................................................................................... |
196 |
|
|
15.5.3 |
Action List Management ................................................................................... |
197 |
|
|
15.5.3.1 |
Action Re-Ordering ....................................................................................... |
197 |
|
|
15.5.3.2 |
Action Editing ................................................................................................ |
197 |
|
|
15.5.3.3 |
Action Removal............................................................................................. |
197 |
|
|
15.5.4 |
Macro Saving ................................................................................................... |
197 |
|
16 |
TRIGGER CUE TAB ..................................................................................................... |
199 |
||
16.1 |
TRIGGER CUE TAB OVERVIEW .................................................................................. |
199 |
||
16.2 |
TRIGGER CUE CREATION .......................................................................................... |
200 |
||
|
16.2.1 Connection to an Event .................................................................................... |
201 |
||
|
16.2.2 Connection to a Signal Event............................................................................ |
202 |
||
16.3 |
TRIGGER CUE SAVING .............................................................................................. |
203 |
||
16.4 |
PRE-DEFINED MACRO USAGE ................................................................................... |
204 |
||
16.5 |
DEFAULT CUES......................................................................................................... |
204 |
||
16.6 |
STARTUP SCRIPTS .................................................................................................... |
204 |
||
17 ADD A TRIGGER CUE TO A SHOW PLAYLIST.......................................................... |
206 |
|||
17.1 |
ADD A TRIGGER CUE FOR ONE ELEMENT OF THE SHOW PLAYLIST ............................... |
207 |
||
18 |
CINELISTER PLAYBACK TAB .................................................................................... |
209 |
||
18.1 |
PLAYBACK AN EXISTING SPL..................................................................................... |
209 |
||
18.2 |
PLAYBACK PROGRESS .............................................................................................. |
211 |
||
18.3 |
PAUSE MODE ........................................................................................................... |
212 |
||
18.4 |
ADJUSTING THE DEFAULT VALUES ............................................................................. |
213 |
||
18.5 |
PLAYBACK OF A LIVE EVENT ...................................................................................... |
214 |
||
|
18.5.1 How to Add a Live Event CPL........................................................................... |
214 |
||
|
18.5.2 How to Create and Play an SPL Using a Live Event CPL ................................. |
214 |
||
18.6 |
PLAYBACK LOCK MODE............................................................................................. |
215 |
||
18.7 |
PLAYBACK ALERT MESSAGES.................................................................................... |
216 |
||
19 |
CINELISTER SCHEDULE TAB .................................................................................... |
219 |
||
19.1 |
HOW TO SCHEDULE PLAYBACK.................................................................................. |
219 |
||
19.2 |
SCHEDULE PLAYBACK MESSAGES ............................................................................. |
221 |
||
|
19.2.1 |
Schedule Conflict.............................................................................................. |
221 |
|
|
19.2.2 Scheduled Show Did Not Start Error................................................................. |
222 |
||
|
19.2.3 |
Show Playlist Removal ..................................................................................... |
222 |
|
19.3 |
PLAYBACK RECOVERY DUE TO POWER FAILURE......................................................... |
223 |
||
|
19.3.1 How to Recover Playback................................................................................. |
223 |
||
19.4 |
SHUTTING DOWN DURING PLAYBACK......................................................................... |
223 |
||
20 |
CINELISTER CONTROL TAB ...................................................................................... |
225 |
||
20.1 |
ADDING A MACRO ..................................................................................................... |
225 |
||
21 APPENDIX A: CHASE MODE ...................................................................................... |
231 |
|||
21.1 |
REQUIRED SOFTWARE, FIRMWARE, AND LICENSE ....................................................... |
231 |
||
21.2 |
PROCEDURE............................................................................................................. |
231 |
||
21.3 |
DETAILED CONNECTION DIAGRAM ............................................................................. |
233 |
||
21.4 |
HARDWARE SETUP ................................................................................................... |
236 |
||
21.5 |
SOFTWARE CONFIGURATION ..................................................................................... |
236 |
||
22 APPENDIX B: DUAL PROJECTOR SETUP................................................................. |
241 |
|||
____________________________________________________________________________________
SHV.OM.001663.DRM |
Page 6 of 276 |
Version 1.7 |
|
Doremi Labs |
|
22.1 |
REQUIRED MATERIALS .............................................................................................. |
241 |
|||
22.2 |
HFR SETUP ............................................................................................................. |
242 |
|||
22.3 |
NON-HFR SETUP ..................................................................................................... |
242 |
|||
22.4 |
INSTALLATION AND POWER-UP SEQUENCE................................................................. |
242 |
|||
22.5 |
DEVICE MANAGER CONFIGURATION ........................................................................... |
244 |
|||
22.6 |
PLAYLIST CREATION ................................................................................................. |
248 |
|||
22.7 |
KDM INFORMATION .................................................................................................. |
252 |
|||
23 APPENDIX C: DOLBY ATMOS .................................................................................... |
254 |
||||
23.1 |
DOREMI SERVER SECURITY MANAGER AND FIRMWARE VERSIONS............................... |
254 |
|||
23.2 |
DOLBY CP850 (AUDIO PROCESSOR) SOFTWARE VERSION ......................................... |
254 |
|||
23.3 |
REQUIRED ITEMS ...................................................................................................... |
254 |
|||
23.4 |
SHOWVAULT SERVER CONFIGURATION...................................................................... |
254 |
|||
|
23.4.1 |
ShowVault Cable Configuration ........................................................................ |
254 |
||
|
23.4.2 Dolby CP850 (Audio Processor) Cable Configuration ....................................... |
257 |
|||
23.5 |
DOREMI IMB CABLE CONFIGURATION ........................................................................ |
258 |
|||
23.6 |
REQUEST DLM (DOREMI LICENSE MANAGER) ............................................................ |
258 |
|||
23.7 |
ADDING THE AUDIO PROCESSOR ............................................................................... |
258 |
|||
23.8 |
PLAYING DOLBY ATMOS CONTENT............................................................................. |
263 |
|||
23.9 |
VERIFYING ATMOS CONTENT..................................................................................... |
264 |
|||
23.10 |
DOLBY CP850 WEB GUI........................................................................................... |
266 |
|||
|
23.10.1 Accessing the Dolby CP850 Web GUI.............................................................. |
266 |
|||
23.11 |
TROUBLESHOOTING TIPS .......................................................................................... |
269 |
|||
|
23.11.1 |
Channels Not Recognized ................................................................................ |
269 |
||
|
23.11.1.1 |
Check the Cables........................................................................................ |
270 |
||
|
23.11.1.2 |
Disable Template Mapping.......................................................................... |
270 |
||
|
23.11.2 Dolby Atmos Content Not Recognized.............................................................. |
271 |
|||
|
23.11.3 KDMs for Dolby Atmos Content (CPL).............................................................. |
271 |
|||
|
23.11.4 Dolby Atmos Channel Drop Out........................................................................ |
272 |
|||
24 |
ACRONYMS ................................................................................................................. |
274 |
|||
25 |
DOCUMENT REVISION HISTORY ............................................................................... |
276 |
|||
____________________________________________________________________________________
SHV.OM.001663.DRM |
Page 7 of 276 |
Version 1.7 |
|
Doremi Labs |
|

Software License Agreement
The software license agreement can be found at the following location:
http://www.doremilabs.com/support/cinema-support/cinema-warranties/
Hardware Warranty
The hardware warranty can be found at the following location:
http://www.doremilabs.com/support/cinema-support/cinema-warranties/
China Compulsory Certification (CCC)
2000
A
HDMI
The terms HDMI and HDMI High-Definition Multimedia Interface, and the HDMI Logo are trademarks or registered trademarks of HDMI Licensing LLC in the United States and other countries.
____________________________________________________________________________________
SHV.OM.001663.DRM |
Page 8 of 276 |
Version 1.7 |
|
Doremi Labs |
|

ShowVault-3 KC EMC Statement
(User Information)
|
|
A
(A )
(
)
, .
Class A Equipments (Broadcasting and communication equipments for office work) Seller and user shall be noticed that this equipment is suitable for electromagnetic equipments
for office work (Class A) and it can be used outside home.
____________________________________________________________________________________
SHV.OM.001663.DRM |
Page 9 of 276 |
Version 1.7 |
|
Doremi Labs |
|
1 Introduction
1.1 Purpose
This manual is intended to demonstrate to the user how to use the software on the ShowVault.
1.2 Software Version
This manual is intended for use with software version 2.6.3 and higher.
The IMB SM Versions are:
o5.1.4 and higher for Barco Series-2, Christie Series-2, and NEC Series-2 Projectors
For previous versions of the software and earlier IMB Revisions, see previous versions of this document.
1.3Contact Information
If in need of help or assistance, please contact Doremi Labs Technical Services:
USA
24/7 Technical Services line: + 1-866-484-4004
Technical Services Email: cinemasupport@doremilabs.com
Europe
24/7 Technical Services line: + 33 (0) 492-952-847
Technical Services Link: http://support.doremitechno.org/ticketing
Japan
Technical Services line: + 044-966-4855
Technical Services Email: support@doremilabs.co.jp
Australia ~ China ~ India ~ Indonesia ~ Korea ~ Malaysia ~ New Zealand ~ Philippines ~ Singapore ~ Taiwan ~ Thailand
Technical Services Email: supportasia@doremilabs.com
____________________________________________________________________________________
SHV.OM.001663.DRM |
Page 10 of 276 |
Version 1.7 |
|
Doremi Labs |
|
This page was left blank intentionally.
____________________________________________________________________________________
SHV.OM.001663.DRM |
Page 11 of 276 |
Version 1.7 |
|
Doremi Labs |
|
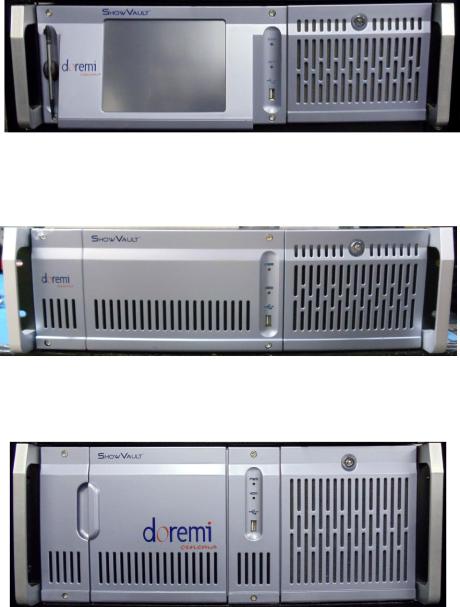
2 ShowVault Overview
The ShowVault is a high quality DCI JPEG-2000 and MPEG2 server/player capable of playing movies and trailer packages in MXF format at up to 250Mbits/sec, when connected to a Series- 2 Projector equipped with a Doremi Integrated Media Block (IMB). The ShowVault features a PCI-Express cable that connects with the IMB board installed in the Series-2 Projector. This connection is used to transfer digital cinema files to the IMB, which supports formats of 12-bit, 4:4:4, or 10-bit 4:2:2 for 2D and 3D applications, at various resolutions and frame rates. Movies are stored on an internal RAID5 storage.
2.1ShowVault Front Panel
A ShowVault-3 front panel with touchscreen is shown below (Figure 1):
Figure 1: ShowVault-3
A ShowVault-3-NTS front panel with no touchscreen screen is shown below (Figure 2):
Figure 2: ShowVault-3-NTS
A ShowVault-4 front panel (without a touchscreen) is shown below (Figure 3):
Figure 3: ShowVault-4
____________________________________________________________________________________
SHV.OM.001663.DRM |
Page 12 of 276 |
Version 1.7 |
|
Doremi Labs |
|
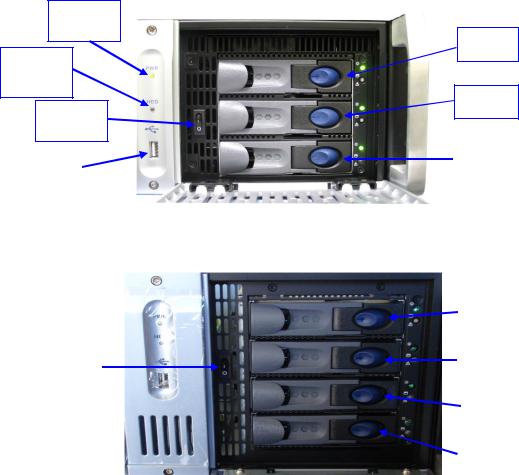
POWER (PWR): The LED turns green when the unit is powered on.
HDD Activity (HDD): Red LED blinking indicates access to the Hard Disk Drives.
The door on the right on all three types of units covers the Power switch and the hard disks that make up the RAID5 storage (Figure 4).
PWR
LED
SDA
HDD
Activity
LED
SDB
Power
Switch
|
|
SDC |
USB |
|
|
|
|
|
Port |
|
|
|
|
|
Figure 4: ShowVault-3 / ShowVault-3-NTS with HDD Door Open
|
|
|
SDA |
|
|
|
|
|
|
|
|
|
|
|
SDB |
Power |
|
|
|
|
|
|
|
Switch |
|
|
|
|
|
|
|
|
|
|
|
|
|
|
SDC |
|
|
|
|
|
|
|
|
|
|
|
SDD |
|
|
|
|
Figure 5: ShowVault-4 with HDD Door Open
Each HDD has a blue button that allows for unlatching of the drive from the chassis (Figure 5).
There is one USB 2.0 port on the center of the front panel that can accommodate an external USB device, such as a mouse, keyboard, or USB flash drive.
____________________________________________________________________________________
SHV.OM.001663.DRM |
Page 13 of 276 |
Version 1.7 |
|
Doremi Labs |
|

LCD
Power Button
Stylus
Figure 6: ShowVault-3 Front Panel LCD Screen
On the front panel of the ShowVault-3, the LCD can be turned on or off by pressing on the LCD power button using the stylus attached to the front panel. This button is located behind the stylus (Figure 6).
Note: The use of the LCD screen requires that the two rear panel VGA connectors (In/Out) are linked using the VGA cable provided with the ShowVault (Figure 7 and Figure 8).
2.2ShowVault Rear Panel
LCD
VGA-In
VGA
Out
Figure 7: ShowVault-3 Rear Panel
Figure 8: ShowVault-4 Rear Panel
____________________________________________________________________________________
SHV.OM.001663.DRM |
Page 14 of 276 |
Version 1.7 |
|
Doremi Labs |
|
This page was left blank intentionally.
____________________________________________________________________________________
SHV.OM.001663.DRM |
Page 15 of 276 |
Version 1.7 |
|
Doremi Labs |
|

3 Operating System
Every time the user logs out of the Operating System and then logs back in again, a Login Authentication window will appear (Figure 9). The default login name is “doremi” and the Password is “doremi.” However, the administrator may have changed and/or added other login usernames and passwords. Please contact the administrator for the appropriate information.
Figure 9: Login Authentication Window
Menu
Button
Figure 10: Menu List
____________________________________________________________________________________
SHV.OM.001663.DRM |
Page 16 of 276 |
Version 1.7 |
|
Doremi Labs |
|
The CineLister application will appear every time the unit is turned on or rebooted. Users can access various applications, as well as the Control Panel, in the Menu (Figure 10).
3.1Users
The user will be prompted to enter a password for various tasks when using the CineLister application. The administrator determines the level of security.
Note: Please contact the administrator for passwords, not Doremi Labs. The following are types of passwords the user may be asked for:
Admin (Administrator)
Manager
Root
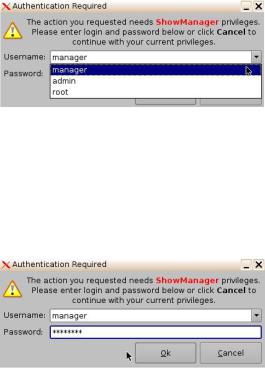
Note: In Figure 11, the user is asked to verify the username and password.
Figure 11: Password Confirmation Window
Note: The server will need authentication to complete certain tasks (Figure 12). For example, the authentication required in the window below is ShowManager privileges; hence the server will automatically prompt the user to the Manager username. However, it is possible to select a different username from the drop-down list as shown in Figure 11 above, depending on the level of security that has been provided.
Figure 12: Password Confirmation Window - Manager Username
____________________________________________________________________________________
SHV.OM.001663.DRM |
Page 17 of 276 |
Version 1.7 |
|
Doremi Labs |
|
This page was left blank intentionally.
____________________________________________________________________________________
SHV.OM.001663.DRM |
Page 18 of 276 |
Version 1.7 |
|
Doremi Labs |
|
4 Virtual Keyboard
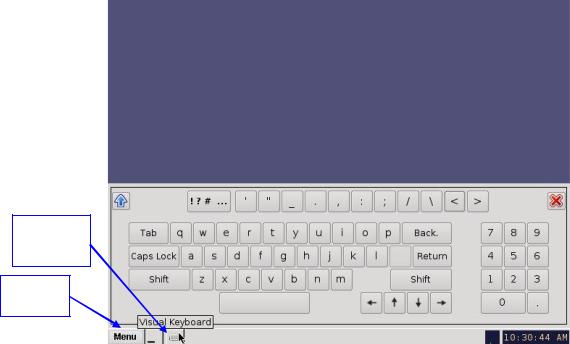
4.1How to Access the Virtual Keyboard
Go to the Menu on the ShowVault home desktop and select Virtual Keyboard.
The keyboard will appear on the GUI, as illustrated in Figure 13 below.
Use the keyboard with a stylus pen or by connecting a mouse to the ShowVault.
Virtual
Keyboard
Key
Menu
Key
Figure 13: Virtual Keyboard
Note: For earlier versions of the CineLister software, the virtual keyboard is available by going to Menu → System → Legacy Virtual Keyboard.
____________________________________________________________________________________
SHV.OM.001663.DRM |
Page 19 of 276 |
Version 1.7 |
|
Doremi Labs |
|
This page was left blank intentionally.
____________________________________________________________________________________
SHV.OM.001663.DRM |
Page 20 of 276 |
Version 1.7 |
|
Doremi Labs |
|
5 Network Configuration
5.1 Default Network Configuration
All servers are shipped from the factory with a default IP address of 192.168.100.50 on the Ethernet port (Eth1) and a DHCP assigned dynamic IP address on the Ethernet port (Eth0).
5.2 Changing the IP Address
To change the IP address of the server, select Menu → System → Networking Configuration and then follow the steps below:
A window will appear asking for a password as illustrated below (Figure 14):
Figure 14: Password Confirmation Window
Follow the steps according to the Ethernet Networking Configuration Wizard (Figure 15).
Figure 15: Network Configuration
Press Enter to confirm the configuration of each page of the Ethernet Networking Configuration Wizard. Press Tab to select an option.
Enter the desired system’s hostname and then press Enter.
oNote: It is a good idea to put the circuit location/screen number in here. For example, “AMC_bir_scr1,” as it will be easier to identify when connecting via
VNC and in the logs.
Enter the desired system domain name and then press Enter.
Select Yes to set eth0 and then press Enter.
____________________________________________________________________________________
SHV.OM.001663.DRM |
Page 21 of 276 |
Version 1.7 |
|
Doremi Labs |
|
Select No for Removable Device and then press Enter.
Select No for Automatically Configure Device with DHCP and then press Enter.
Enter the desired IP address for eth0 and then press Enter.
Enter the desired default gateway or leave empty and then press Enter.
Enter the desired subnet mask and then press Enter.
Select Yes to configure eth1 and then press Enter.
Select No for Removable Device and then press Enter.
Select No for Automatically Configure Device with DHCP and then press Enter.
Enter the IP address of eth1 and select OK – in the example, enter 192.168.100.50 and then press Enter.
oNote: Do not put leading zeroes (0) in front of any numbers. For example, do not input 192.168.100.050.
Enter the desired default gateway or leave empty and then press Enter.
Enter the desired subnet mask and select OK – in our example, enter the same subnet mask as the projector: 255.255.255.0 and then press Enter.
Enter the IP Address of the System's Domain Name Server (or leave empty) and then press Enter to exit the wizard.
To verify the setup, go to Menu → Doremi Apps. → Diagnostic Tool and verify the IP Address under the Diagnostic Tool System Tab.
5.3 Network Restart
If for any reason the network needs to be restarted, use the terminal command line below:
Type: /etc/init.d/networking restart <Enter>
____________________________________________________________________________________
SHV.OM.001663.DRM |
Page 22 of 276 |
Version 1.7 |
|
Doremi Labs |
|
This page was left blank intentionally.
____________________________________________________________________________________
SHV.OM.001663.DRM |
Page 23 of 276 |
Version 1.7 |
|
Doremi Labs |
|

6 Time Zone Configuration
Units are by default set to Pacific Time Zone (PST or PDT). This section provides information on how to check and/or change the time zone.
6.1Checking the Time Zone
There are two ways to check the current time zone: through the terminal and the GUI.
To confirm, through the GUI, that the time zone of the unit is set correctly, go to Menu → Control Panel → Time Setting and open the Date/Time tab (Figure 16). Admin privileges are required to access the application.
Current Date
and Time
Figure 16: Date/Time Tab
To confirm, through the Terminal, that the time zone of the unit is set correctly, open a terminal window by going to the Menu → System → Terminal menu.
Type: date and then press Enter.
The current date, time, and time zone will be displayed (Figure 17).
Figure 17: Terminal Window with Date Displayed
____________________________________________________________________________________
SHV.OM.001663.DRM |
Page 24 of 276 |
Version 1.7 |
|
Doremi Labs |
|
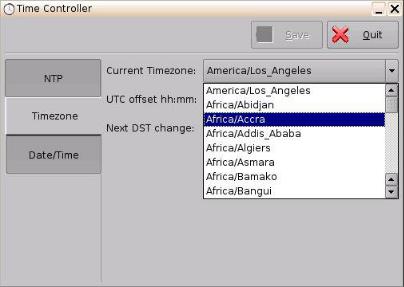
6.2Changing the Time Zone
There are two ways to change the current time zone: through the terminal and the GUI.
To change the time zone, through the GUI, go to Menu → Control Panel → Time Setting and open the Time Zone tab. Using the drop-down menu, select the desired time zone (Figure 18). Admin privileges are required to access the application.
Figure 18: Time Zone Tab
To change the time zone, through the Terminal, follow the steps below in the terminal window
(Menu → System → Terminal):
Type: su and then press Enter.
Type the root password to log in as root. Consult the system administrator to receive the root password or Doremi to know the default root password.
Type: rwdo tzconfig and then press Enter.
Type: Yes (to confirm the change).
Select the number of the geographic area for the time change (Figure 19).
____________________________________________________________________________________
SHV.OM.001663.DRM |
Page 25 of 276 |
Version 1.7 |
|
Doremi Labs |
|

Figure 19: Terminal Window with Time Zone Wizard
Once the geographic area number has been selected, press Enter.
Type the name of the city/region of the preferred time zone (e.g., Singapore, Caribbean, PST, etc.).
Press Enter.
After typing the city/region, the unit will now be set to the desired configuration.
Exit the terminal window.
____________________________________________________________________________________
SHV.OM.001663.DRM |
Page 26 of 276 |
Version 1.7 |
|
Doremi Labs |
|
This page was left blank intentionally.
____________________________________________________________________________________
SHV.OM.001663.DRM |
Page 27 of 276 |
Version 1.7 |
|
Doremi Labs |
|

7Control Panel
To access the Control Panel window, go to Menu and click on Control Panel.
The following window will appear:
Figure 20: Control Panel Window
The Control Panel window provides access to various applications as listed below. See Figure 20 for more information.
Account Manager: Allows the user to add/remove/edit user accounts.
Audio Configuration: Allows the user to route all audio tracks to operator-designated outputs (only SMPTE content).
Backup Manager: Allows users to backup, delete, and restore files saved on a unit.
Content Feed Manager: Allows the user to add an FTP ingest server.
Content Manager: Allows the user to browse, manage and export all the content available on the player including: ShowPlaylists, CPLs, KDMs, and Doremi Licenses.
Device Controller: Allows the user to create/edit/register devices in a simplified manner.
Device Manager: Allows the user to add different projectors, close caption devices, subtitle devices, etc.
Diagnostic Tool: Provides the user with Diagnostic information about the system. See the document, “Diagnostic Tool User Guide.”
FLMx Manager: Allows the user to manage and export FLMx files.
Language Setup window: Allows the user to change the language used on the unit.
License Manager: Displays and manages software licenses installed on the unit.
____________________________________________________________________________________
SHV.OM.001663.DRM |
Page 28 of 276 |
Version 1.7 |
|
Doremi Labs |
|

Live Manager: Allows the user to create a device as source of live events.
Log Manager: Allows the user to automatically configure SMPTE and System logs.
Network Configuration: Set up and modify network connections.
Operator Maintenance Monitoring: Allows the user to log important information (e.g., hard disk replacement, projector lamp replacement, etc.). This application helps the system administrator keep track of any change operated in a theater booth.
Theater Properties: Allows users to set theater attributes to each screen.
Time Setting: Due to DCI requirements, users can only set the time to no more than 30 minutes per calendar year on a Dolphin DCI FIPS 1.0 board. For Dolphin DCI FIPS 1.2 boards, the user can only adjust the RTC (Real Time Clock) time within DCI allowedtime of 6 minutes per calendar year.
Touch Screen Calibration: Initiates the touch screen calibration process (only applicable to models with a touchscreen).
7.1Account Manager GUI
To access the Account Manager GUI, double-click on the Account Manager icon within the Control Panel window or select it and click the Start button located on the right-side of the Control Panel window.
Input the appropriate password to continue and press the Ok button (Figure 21)
Figure 21: Password Confirmation Window
The following window will appear (Figure 22):
Figure 22: Account Manager GUI
The Account Manager GUI allows the user to edit, add, and delete user accounts (Figure 22).
____________________________________________________________________________________
SHV.OM.001663.DRM |
Page 29 of 276 |
Version 1.7 |
|
Doremi Labs |
|
7.1.1 Add a New User Account
To add a new user account, click the Add button (Figure 22).
The following window will appear (Figure 23):
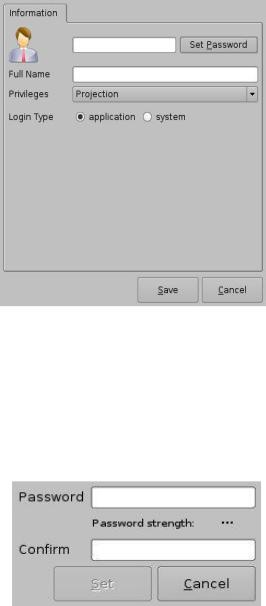
Figure 23: Account Manager GUI – New User Addition
Enter the username (to be used for log in) in the upper empty field and the associated full name used to describe the user. Both names will be displayed in the Control Panel window after the new user addition is completed.
Define the password by clicking the Set Password button.
The following window will appear (Figure 24):
Figure 24: Password Definition Window
Note: The user will be provided information about the strength of the chosen password. Click the Set button when the appropriate password is defined. Confirm the password in the Confirm field. The user privileges need to be defined using the list-box.
Click the Set button to save the new password.
Select the proper privileges. They are listed below from the lowest level to the highest level of privileges (Figure 25):
____________________________________________________________________________________
SHV.OM.001663.DRM |
Page 30 of 276 |
Version 1.7 |
|
Doremi Labs |
|
 Loading...