

Page 1
207.5396.39
RH 465LD
Type: MB20-60
miniBar
Operating Instructions
Bedienungsanleitung
Mode d'emploi
Istruzioni per l'uso
Handleiding
Manual de Instrucciones
Instruções de Utilização
FR
DE
GB
IT
NL
PT
ES
Page 2
Thank you for choosing our appliance. We are sure it will provide you with trouble-free use.
In the following, we would like to familiarise you with some symbols, which we bring to your attention to ensure
the safe and efficient operation of the appliance:
source of danger, in event of improper operation
suggested useful tips to read
information concerning environmental protection
This refrigerator is intended for the storage of food and drinks.
2
Attention!
This appliance is not intended for use by persons (including children) with
reduced physical, sensory or mental capabilities, or lack of experience and
knowledge, unless they have been given supervision or instruction concerning
use of the appliance by a person responsible for their safety.
Children should be supervised to ensure that they do not play with the
appliance.
Any electrical work required to install this appliance should be carried out by a
qualified electrician.
This product should be serviced by an authorised Service Engineer, and only
genuine spare parts should be used.
It is dangerous to alter the specifications or modify this product in any way.
Care must be taken to ensure that the appliance does not stand on the
electrical supply cable.
There are working parts in this product which heat up. Always ensure that there
is adequate ventilation as a failure to do this will result in component failure and
possible content loss. See installation instructions.
Parts which heat up should not be exposed. Wherever possible the back of the
product should be close to a wall but leaving the required distance for
ventilation as stated in the installation instructions.
Before defrosting, cleaning or maintenance work is carried out, be sure to
switch off the appliance and unplug it.
DO NOT USE SHARP INSTRUMENTS to scrape off frost or ice. Under no
circumstances should solid ice be forced off the cooling plate. Solid ice should
be allowed to thaw when defrosting the appliance. See defrost instructions.
This appliance is heavy. Care should be taken when moving it.
Under no circumstances should you attempt to repair the appliance yourself.
Repairs carried out by inexperienced persons may cause injury or more serious
malfunctioning. Refer to your local Service Centre and always insist on genuine
spare parts.
In this appliance the storage of any toxic or explosive substance is forbidden!
Please read these operating instructions carefully before putting the
refrigeration unit into operation. If you later sell or dispose of it, please ensure
that the new owner receives these operating instructions.
Please follow the installation details below carefully. Guarantee is valid for
products installed as described only. (See chapter 4.1.)
GB
Page 3
3
Attention!
Warranty arrangements are in accordance with EC Directive 44/1999/CE and
the normal conditions applicable in the country concerned.
For warranty or other servicing, such as spare-parts, please contact our Dometic
Service Network.
The warranty does not cover any damage due to improper use.
The warranty does not cover any modifications to the appliance or the use of
non-original Dometic spare-parts.
The warranty does not apply if the installing and operating instructions are not
adhered to.
When contacting Dometic Service Network, please state the model, product
number and serial number. You will find this information on the data plate inside
of the refrigerator.
CONTENTS
1. Unpacking
2. View of the appliance
3. Cleaning
4. Positioning the appliance
4.1. Installation instruction
5. Using the appliance
5.1. Initial operation
5.2. Temperature regulation
5.3. Cooling unit control (CUC)
6. Useful suggestions
7. Defrosting, cleaning and maintenance
7.1. Automatic defrost function
7.2. Interior light
7.3. Automatic Door Control LED (ADC) optional
8. Customer service
9. Putting into operation, technical data
9.1. Connecting to electrical mains
10. Environmental protection information
11. Recycling
GB
Page 4
4
1. Unpacking
After removal from the cardboard packaging, make
sure the appliance is not damaged. If you find damage
to the appliance resulting from transport, report it
immediately to the transportation firm.
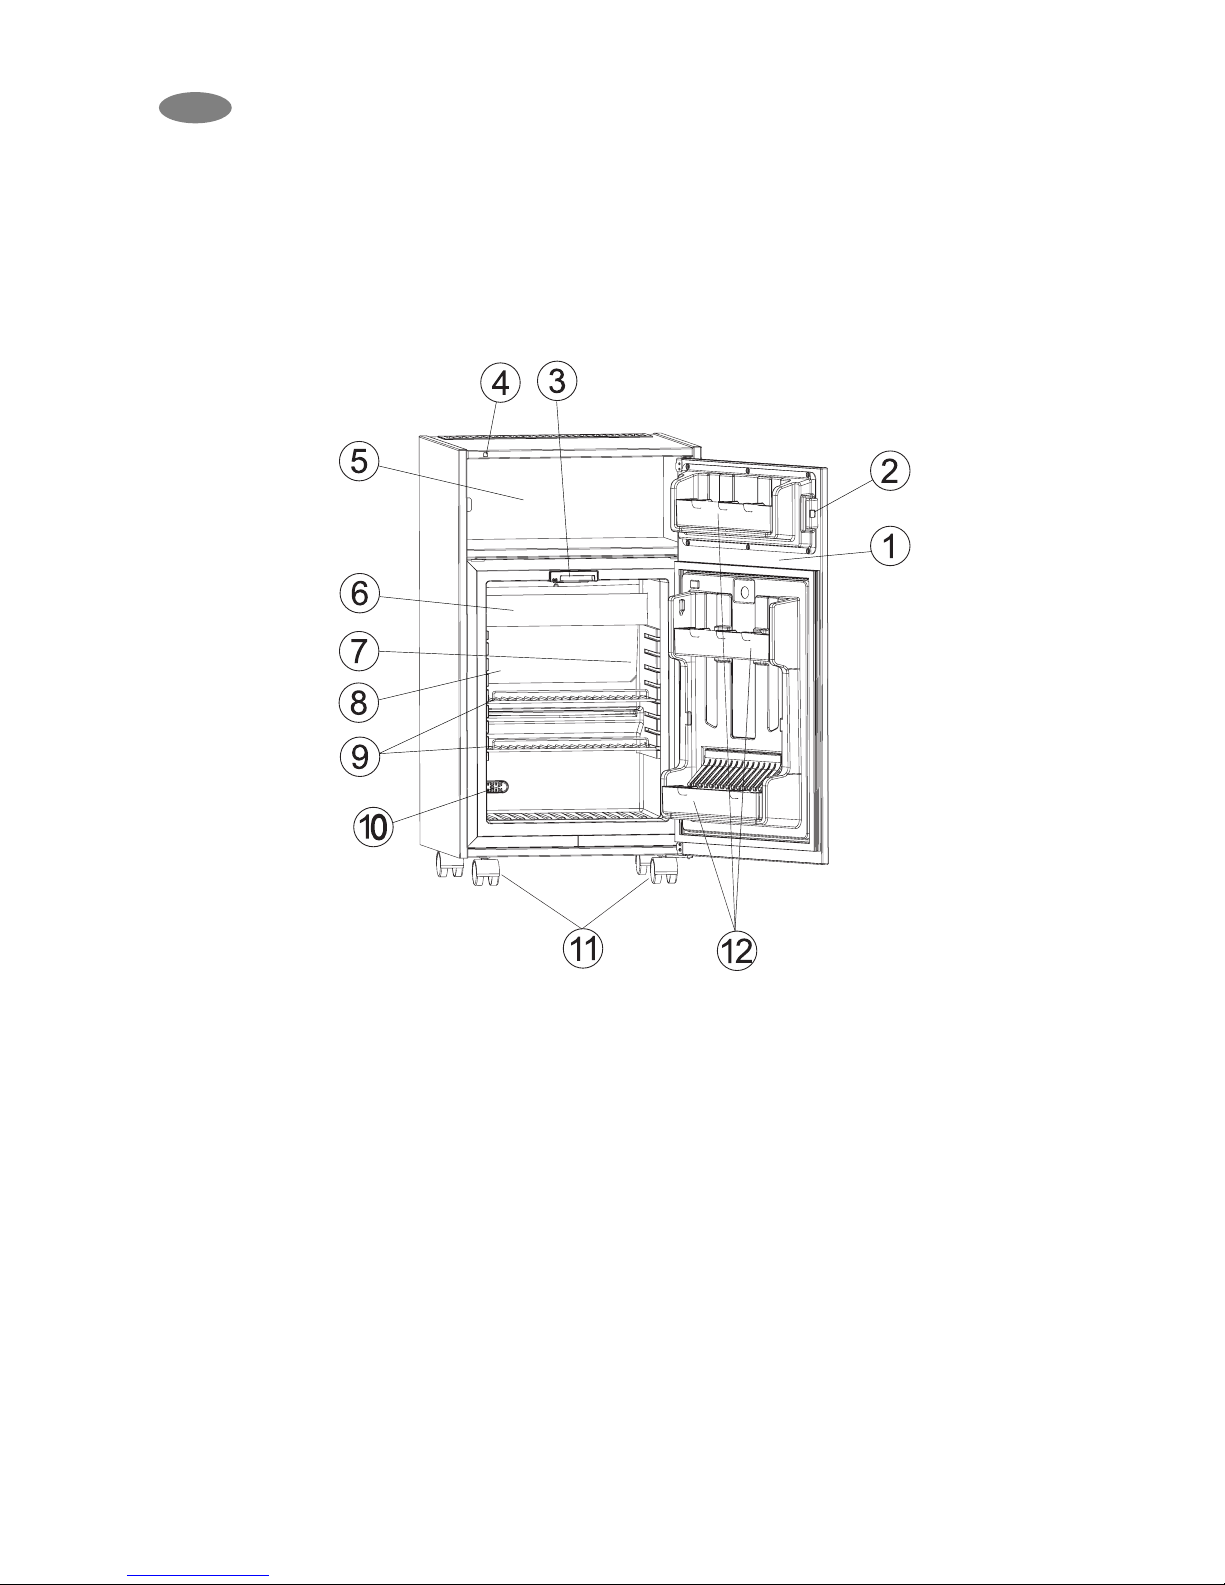
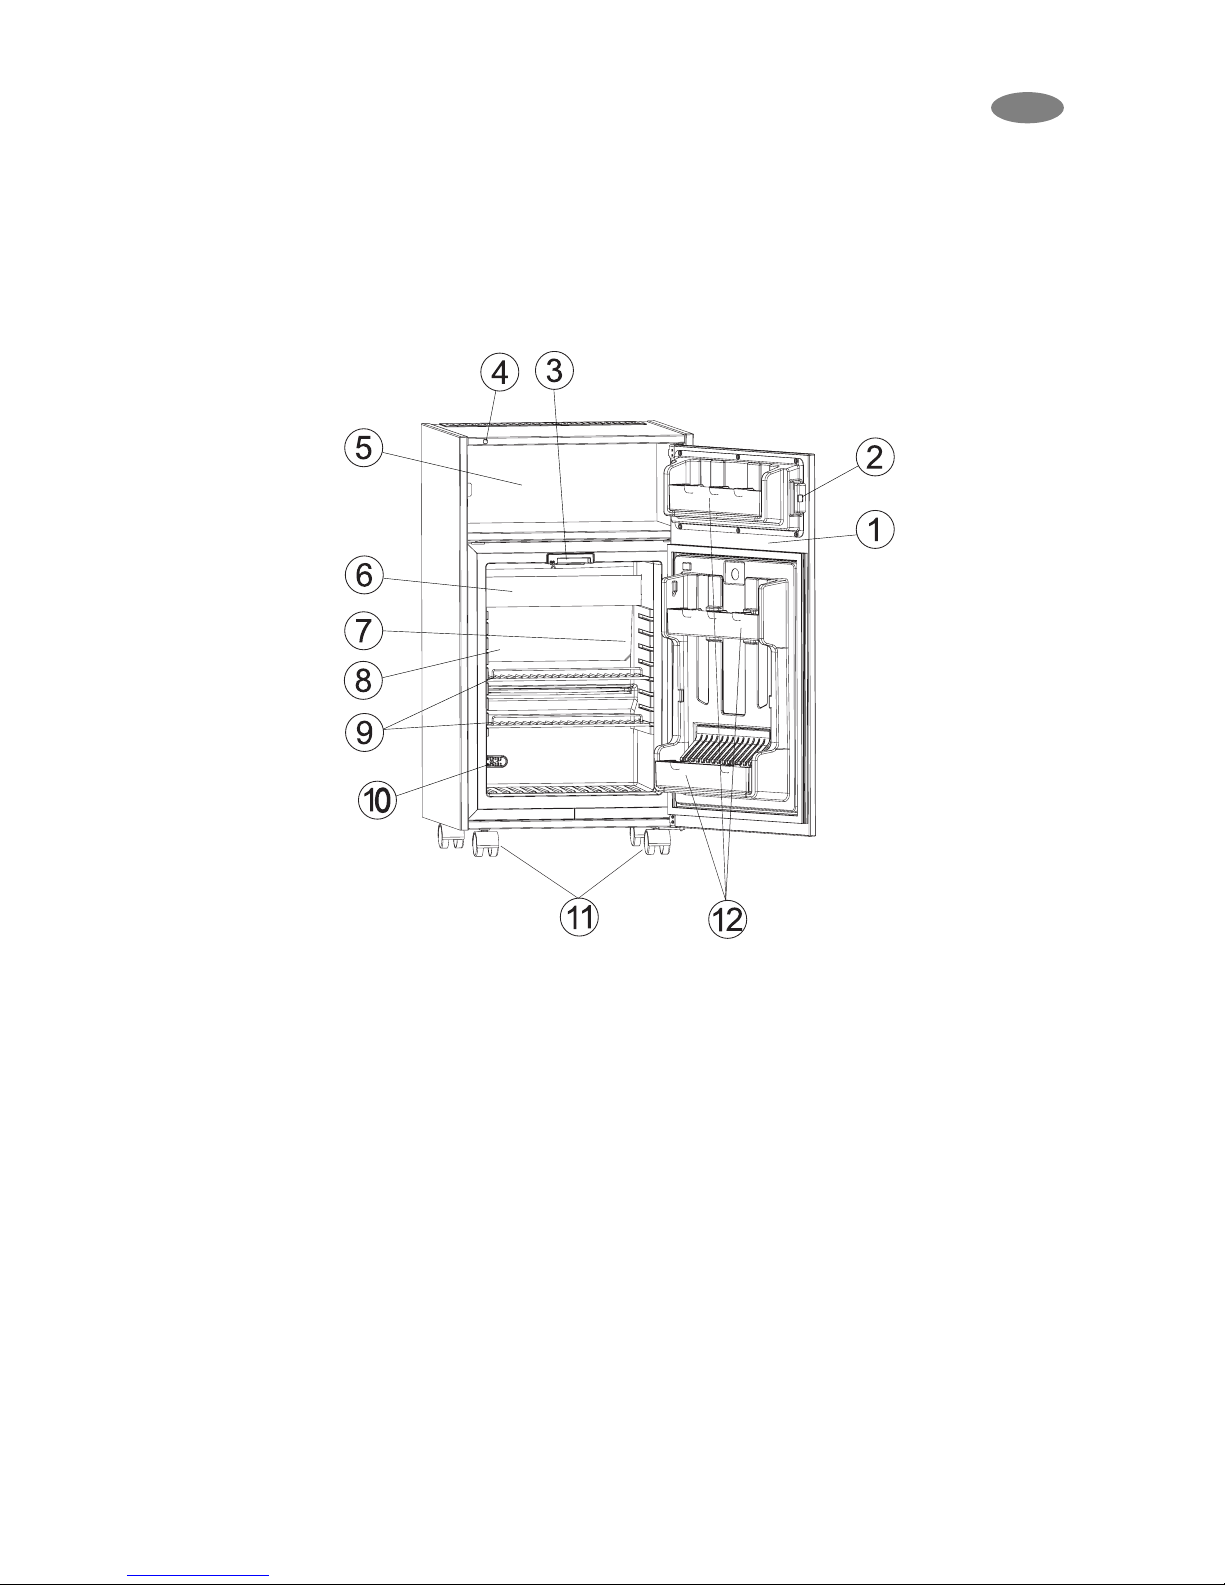
2. View of the appliance
1. Door
2. Door lock (if available)
3. Lamp
4. ADC LED (if available)
5. Storage Compartment
6. Evaporator cover
7. Evaporator sensor (behind evaporator)
8. Evaporator
9. Shelves
10. Air sensor
11. Wheels
12. Door racks
Figure 1.
IN CASE IF YOUR REFRIGERATOR IS EQUIPPED WITH LOCK, DOMETIC ZRT DO NOT ACCEPT
LIABILITY FOR LOSS OR DAMAGE OF KEYS. HOWEVER A COMPLETE LOCK CAN BE SUPPLIED.
GB
Page 5
5
3. Cleaning
Clean the refrigerator thoroughly at intervals, as
necessary. Remove the shelves; these, parts,
as well as the cabinet interior and the door should be
washed with a warm solution of sodium bi-carbonate.
Finally wipe over with a cloth rinsed in warm water
only, and dry with a clean cloth. Do not wash any
plastic parts in water that is more than hand warm, and
do not expose them to dry heat. The outside of the
cabinet should be wiped down regularly with a clean,
damp cloth.
NEVER USE STRONG CHEMICALS OR ABRASIVE
CLEANING MATERIALS ON ANY PART OF THE
CABINET.
4. Positioning the appliance
When first using this refrigerator please consider the
following points:
ENSURE REFRIGERATOR IS LEVEL
THE PIPEWORK AT THE BACK GETS HOT IN USE
THE REFRIGERATOR HAS NO 'MOTOR' AND IS
THEREFORE VIRTUALLY SILENT
ALLOW AT LEAST 3 HRS. FOR SIGNS OF
COOLING
During the refrigeration process, the appliance
gives off heat from the condenser (under the
upper part of the rear cover) into the surrounding air.
The more ventilated the condenser is, the more
effective the refrigeration will be.
The other condition for satisfactory operation is that
the appliance is levelled. This could be checked by
placing a glass of water on top of the appliance.
It is important that the appliance is not directly
exposed to radiated heat (sunlight, radiator, near an
oven, etc.).
4.1. Installation instructions
The refrigerator is equipped with an electrically heated
absorption cooling unit which is virtually silent in
operation.
Inside the refrigerator you will find a plastic bag
containing 4 small wheels. Carefully place the
refrigerator on its back and insert the pins of the
wheels into the metal holders located on the underside
of the refrigerator (Fig. 2.). In this way you can always
move your refrigerator to where it is needed.
Figure 2.
Do not use the refrigerator without installing
the wheels, because in this case there will be
no proper ventillation!
5. Using the appliance
To start the refrigerator connect the plug to the
socket outlet. The empty refrigerator needs about
6-7 hours at normal ambient temperature to reach
the proper temperature in the storage
compartment.
5.1. Initial operation
The device must be plugged into a properly
earthed socket.
The miniBar starts automatically with a self-test.
If the electronics do not detect any fault, the LED
for the interior lighting illuminates for 2 seconds
after approxiametly 10 seconds. If a fault is
detected, the illumination changes to a
continuous flashing light. If this occurs, please
consult your authorised Customer Service.
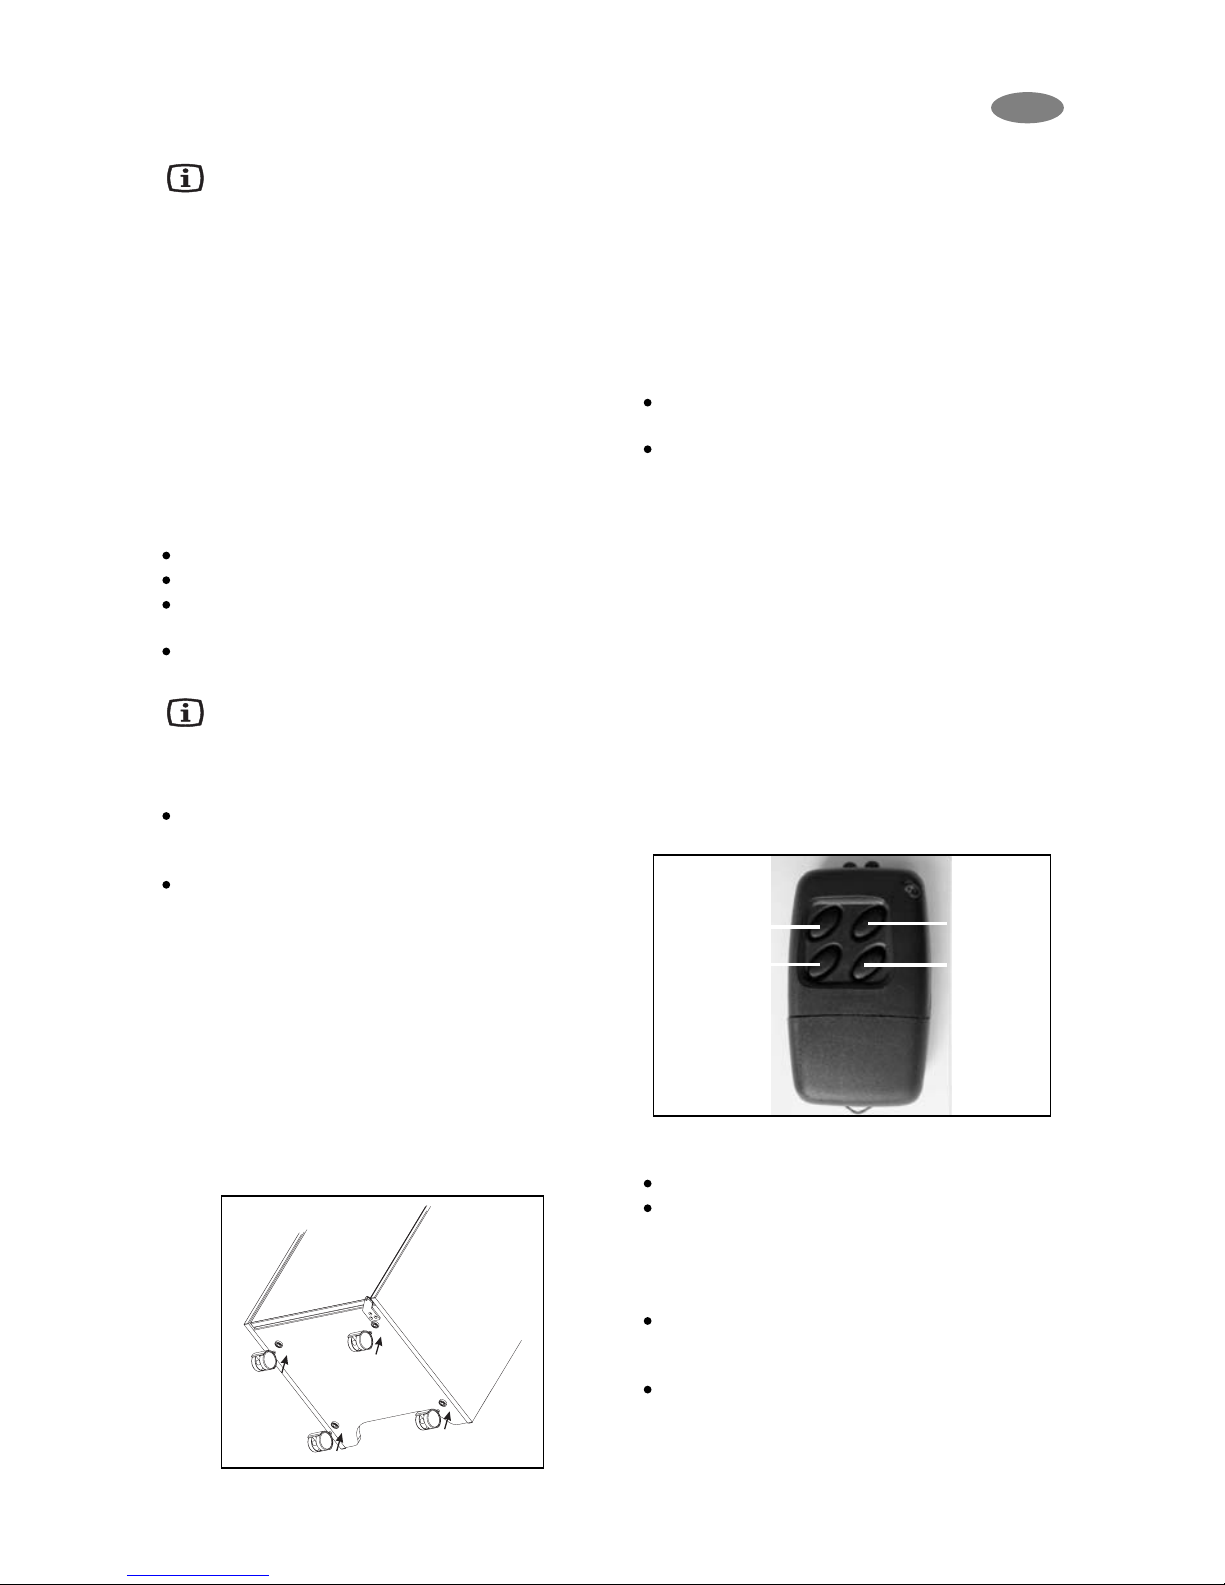
5.2. Temperature regulation
The appliance is fitted with a fully automatic
electronic temperature regulator. The inner
temperature of the refrigerator can be set by using
the optional 4-button remote control device. There
are 4 different temperature preset values: 3°C,
5°C, 7°C, and 12°C. Two buttons of the remote
serve for the temperature setting:
- Yellow button: 3°C and 7°C.
- Blue button: 5°C and 12°C.
For setting e. g. 7°C, please proceed like this:
Open the door of the appliance.
Hold the remote in front of the door sensor, at a
distance of approx. 10 cm. Push the yellow
button once and count the number of flashes of
the interior LED light. If it flashes 3 times, the
preset has been modified to 3°C.
For having 7°C as desired, push the yellow
button once again. The LED will flash 7 times,
and the temperature preset will be 7°C.
For setting e. g. 12°C, please follow the
procedure as above, this time using the blue
button.
GB
Yellow
button
3°C/7°C
Black
button
Reset
cooling unit
Blue
button
5°C/12°C
Red
button
Red Dot
Reset
Page 6

6
5.3. Cooling unit control (CUC)
The electronic checks the function after every
defrosting period (every 24 hours) by measuring the
evaporator temperature drop. If it registers a problem
the refrigerator will shut down and the LEDs of the
interior light will begin to flash continously. If this
happens you should check whether the refrigerator
has been overloaded, that the door was properly
closed, that the cooling unit ventilation is correct and
that the refrigerator is levelled. After checking, unplug
the refrigerator at least for 10 seconds and plug in
again. This resets the unit and it will function again. If
no sign of cooling there is a problem and you should
then contact Dometic service.
6. Useful suggestion
Do not overfill the appliance. If possible, always store
pre-cooled food and/or drinks. It is advisable to leave
some space between the products in the cabinet to
ensure efficient and even cooling. If the shelves are
packed too tightly there may be unacceptable
temperature variations.
7. Defrosting, cleaning and
maintenance
Frost will gradually form on the cooling plate and it
must not be allowed to become too thick since it
restricts the cooling.
This miniBar is fitted with a fully automatic electronic
temperature regulator.
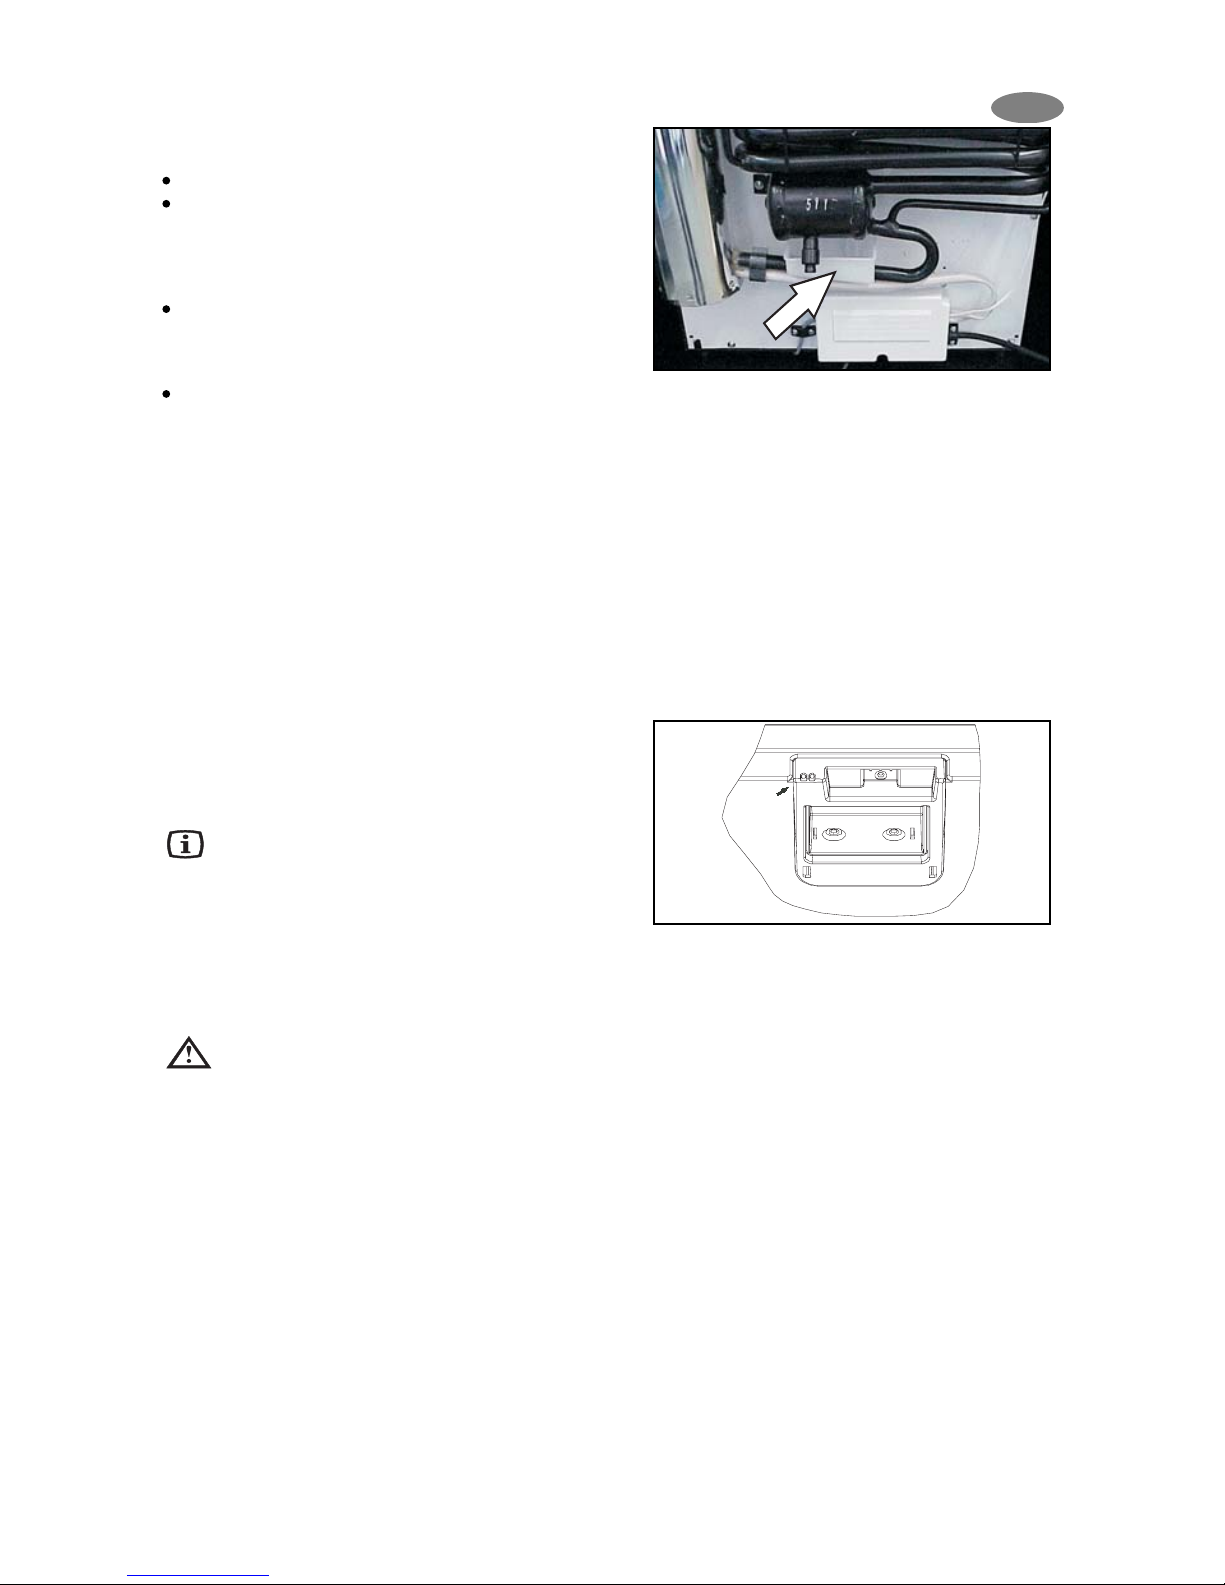
The frost will melt and the defrost water will run
through the drain tube from the drip channel into an
evaporating vessel located at the bottom rear of the
refrigerator. (Fig. 5) The defrost water will evaporate
automatically into the circulating air and the vessel will
not need emptying.
Figure 3.
To switch off the unit, disconnect the refrigerator from
the electricity supply and leave the cabinet door open.
After defrosting the cabinet interior should be wiped
out with a clean, damp cloth.
7.1. Automatic defrost function
The first defrosting phase commences 39 hours
after the start and lasts for two hours.
After this, the device operates for 22 hours at a
time, followed by a defrosting period of 2 hours.
7.2. Interior light (fig. 4.)
Two light-emitting diodes (A) on an electronic PCB
illuminate the cooling compartment when the door
is opened.
Two sensors (B) control whether the door is open
or not and the LEDs and the door control as well
will work accordingly.
Figure 4.
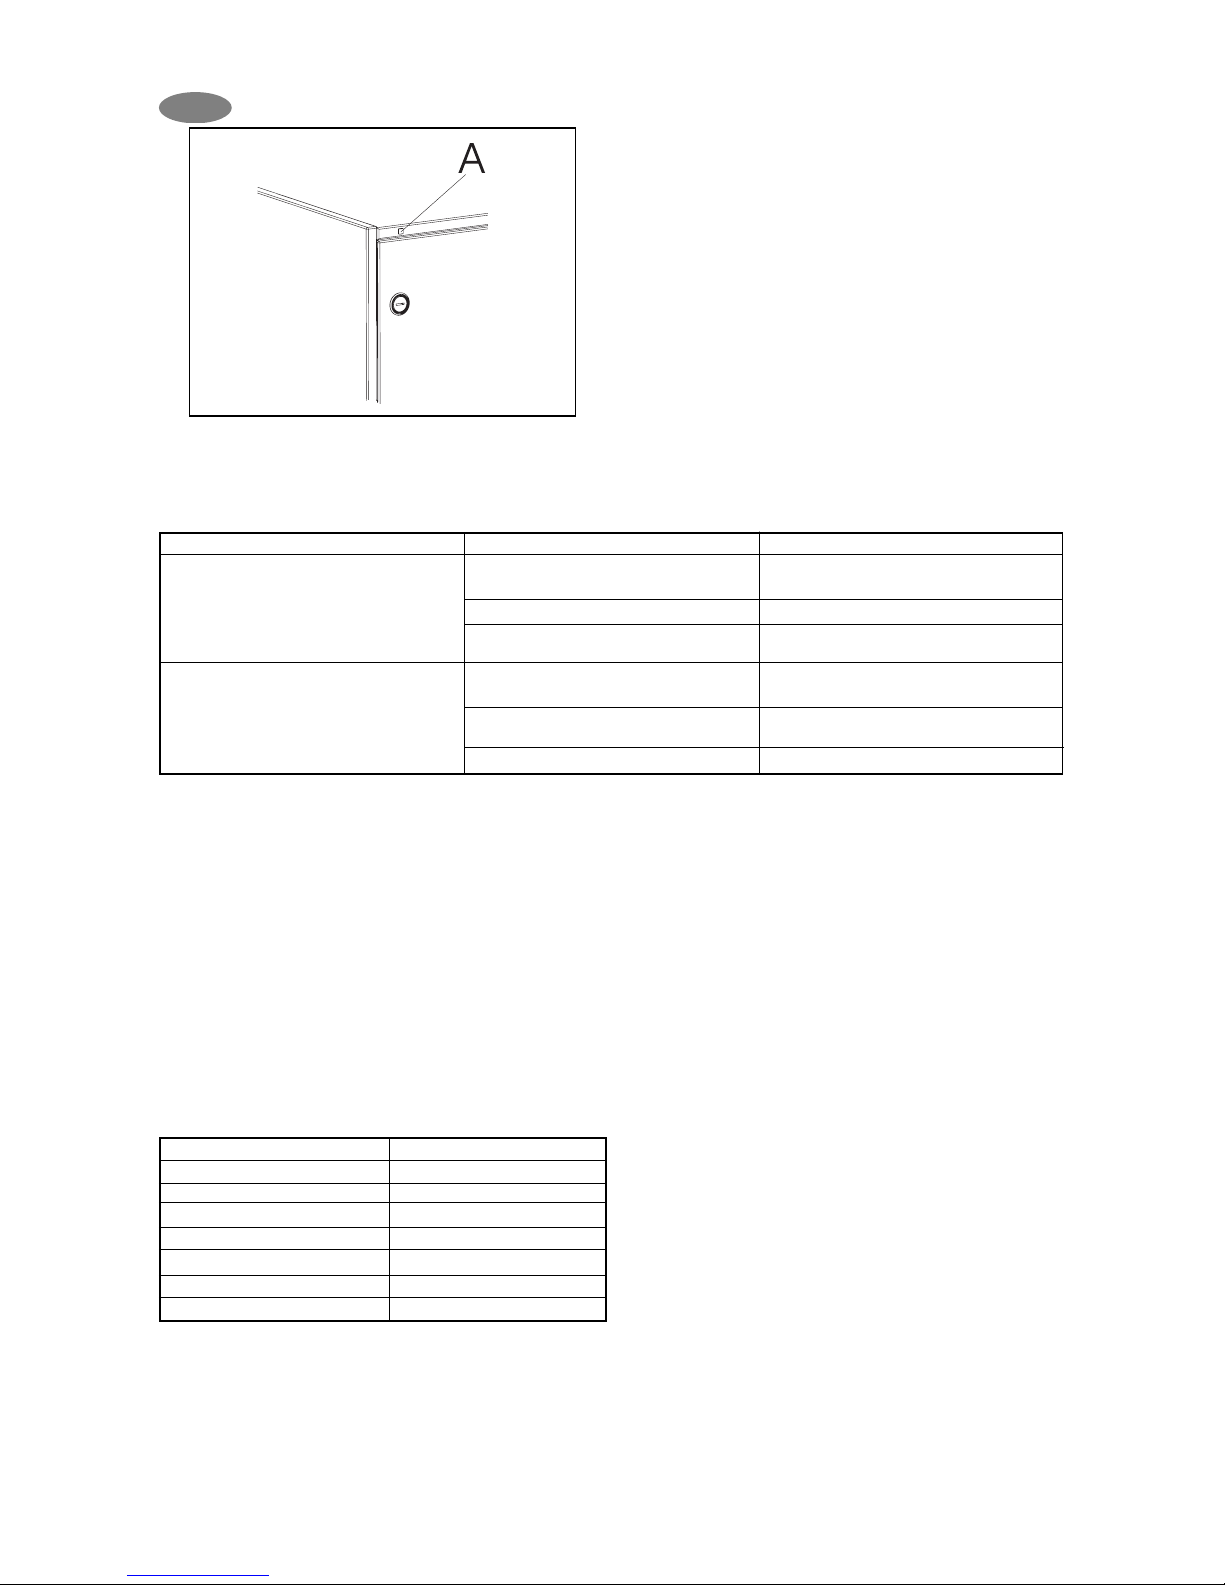
7.3. Automatic Door Control LED
(ADC) optional
The LED (Fig. 5.A) indicated whether the miniBar
door has been opened. If so then:
1. Open the miniBar, check the content in the
compartement and if necessary, replenish.
2. Reset the door control signal by helding the
Remote control against the door opening sensor
(Fig. 4. B) and push the button .
3. Close the miniBar.
Figure 5.
B
A
GB
Page 7
7
8. Customer service
Before you call a service engineer, carry out the
following simple tests:
If after checking all the above points, the refrigerator is
still not working satisfactorily, contact your nearest
service engineer. State the problem, model, productand serial-number.
(Details of the model, product- and serial-number are
to be found on the data label in the top left of the
inside compartment.)
In the event of a fault developing, contact your
nearest Service Centre-see local telephone
directory.
www.dometic.com
GB
Problem
The appliance does not cool
sufficiently
The appliance does not cool at all.
Possible cause
Too much food to be cooled was put in.
Door is not shut properly.
Internal air circulation is restricted.
CUC system stopped the operation.
Plug is not connected to the mains socket
properly
There is no voltage in the mains socket.
Solution
Put in less food to be be cooled.
Check if the door is shut.
Provide inside cool air circulation.
See operating instruction 5.3.
Check if the connection is
proper.
Check if there is voltage.
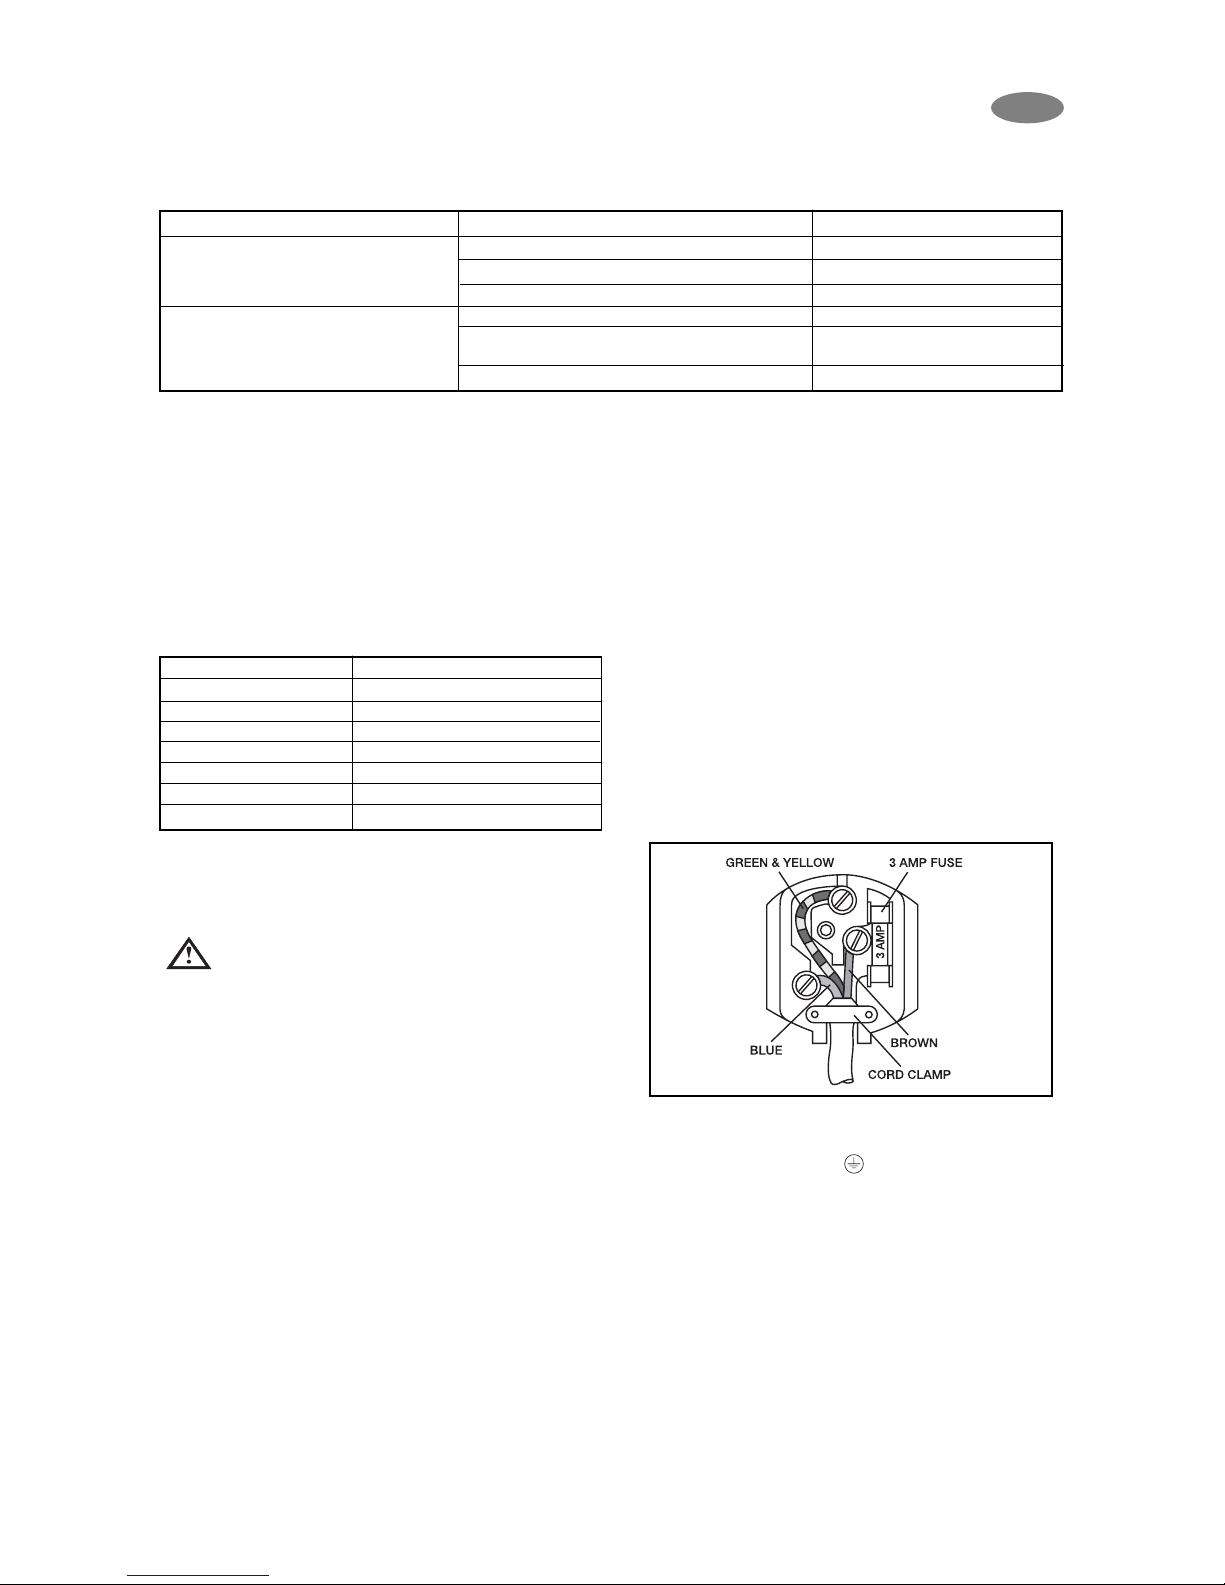
Only for UK:
The appliance is supplied with a 3 Amp plug fitted.
In the event of having to change the fuse in the plug
supplied, a 3 Amp ASTA approved (BS 1362) fuse
must be used. Should the plug need to be replaced
for any reason, the wires in the mains lead are
coloured in accordance with the following code:
Green and Yellow: Earth
Blue: Neutral
Brown: Live
The wire coloured green and yellow must be
connected to the terminal marked with the letter "E"
or by the earth symbol or coloured green and
yellow.
The wire coloured blue must be connected to the
terminal "N" or coloured black.
The wire coloured brown must be connected to the
terminal marked "L" or coloured red.
Upon completion there must be no cut, or stray
strands of wire present and the cord clamp must be
secure over the outer sheath.
9. Putting into operation
Technical data:
9.1. Connecting to electrical mains
The appliance may only be operated from
nominal voltage mains as shown on the data
plate. The appliance mains plug may be connected to
a mains socket earthed in accordance with regulations.
Any electrical work required to install this appliance
should be carried out by a qualified electrician or
competent person.
The manufacturer declines any liability should
these safety measures not be observed.
Electrical Requirements
Before switching on, make sure the electricity supply
voltage is the same as that indicated on the appliance
rating plate.
Model RH 465LD
Type MB20-60
Gross volume 34 litres
Mains operation 220 - 240V (AC)
Input 65W
Energy consumption 0,700 kWh/24h
Climate class N
Refrigerant 147g H2O+98g NH
3
* The energy consumption is measured at 12°C at 25°C environment
temperature (cellar).
Page 8
8
GB
10. Environmental protection
information
Ammonia (natural hydrogen and nitrogen compound)
is used as a refrigerating agent in the refrigeration unit.
The ozone-friendly cyclopentane is activated as a
motive agent for the PU foam insulation.
Sodium chromate is used for corrosion protection
(less than 2 weight % of the coolant).
11. Recycling
After unpacking the appliance, the packing materials
should be delivered to a local collection site. At the
end of its useful lifetime, the appliance should be
delivered to a specialized collection and reprocessing
firm, which reclaims the usable materials. The rest is
properly destroyed.
Appliances bearing this symbol must be
deposited at the designated local
reception point for the disposal of
electrical and electronic equipment.
It is not permitted that this product be
disposed of by way of the normal
household refuse collection system.
Dometic refrigerators bear this symbol on the
specifications plate (data plate) to be found in the
interior of the unit.
This appliance complies with the following EEC
directives:
LVD-Directive 73/23/EEC with amendment
90/683/EEC
EMC-Directive 89/336/EEC
RoHS - Directive 2002/95/EC
Page 9

9
D
Vielen Dank, dass Sie sich für eines unserer Produkte entschieden haben. Wir hoffen, es wird Ihnen jahrelang
zuverlässige Dienste leisten. In dieser Anleitung möchten wir Sie mit einigen Symbolen vertraut machen, die
Ihnen beim sicheren und effizienten Einsatz des Geräts helfen werden:
Gefahr bei unsachgemäßem Einsatz des Geräts
Empfehlungen für die Benutzung des Geräts
Informationen zum Umweltschutz
Dieses Kühlgerät dient ausschließlich der Aufbewahrung von Speisen und Getränken.
Achtung!
Dieses Gerät ist nicht für die Benutzung von Personen (auch Kindern) mit
physischen, sensorischen oder mentalen Beeinträchtigungen oder Mangel an
Erfahrung und Wissen vorgesehen. Außer, die für sie verantwortliche Person
gibt ihnen Anleitung und Beaufsichtigt sie. Kinder sollten Beaufsichtigt werden
um sicher zu stellen, dass sie nicht mit dem Gerät spielen.
Notwendige Arbeiten an der Elektrik zur Installation dieses Geräts dürfen nur
von einem qualifizierten Elektriker durchgeführt werden.
Notwendige Wartungsarbeiten müssen von einem Elektriker durchgeführt und
es dürfen ausschließlich Originalersatzteile verwendet werden.
Es kann gefährlich sein, das Gerät oder einzelne Komponenten in irgendeiner
Weise zu verändern.
Achten Sie darauf, dass das Netzkabel niemals unter dem Gerät eingeklemmt
wird
Einige Komponenten im Geräteinnern heizen sich im Betrieb auf. Stellen Sie
sicher, dass stets ausreichend Luftzirkulation zur Verfügung steht, da das Gerät
sonst beschädigt werden kann und der Inhalt verdirbt. Siehe auch
Installationsanweisungen.
Heiße Gerätekomponenten dürfen nicht frei zugänglich sein. Stellen Sie das
Gerät daher mit der Rückwand gegen eine Wand. Halten Sie dabei aber den in
den Installationsanweisungen angegebenen Mindestabstand ein, damit die
erforderliche Luftzirkulation gewährleistet ist.
Ziehen Sie vor dem Abtauen, der Reinigung oder Wartungsarbeiten stets den
Netzstecker.
Schaben Sie das Eis NICHT MIT EINEM SPITZEN GEGENSTAND ab. Entfernen
Sie fest sitzendes Eis niemals mit Gewalt von den Kühlrippen. Lassen Sie es in
Ruhe abtauen. Siehe dazu Abtauanweisungen.
Das Gerät hat ein beträchtliches Gewicht. Seien Sie vorsichtig, wenn Sie es
bewegen.
Versuchen Sie niemals, das Gerät selbst zu reparieren. Reparaturen durch
fachfremde Personen können zu Verletzungen oder zu Schäden am Gerät
führen. Wenden Sie sich an Ihren örtlichen Händler und verlangen Sie
ausdrücklich Originalersatzteile.
Die Lagerung von giftigen oder explosiven Stoffen in dem Kühlgerät ist nicht
gestattet!
Bitte lesen Sie diese Anleitung sorgfältig, bevor Sie das Gerät einsetzen. Sollten
Sie das Gerät weiter verkaufen oder entsorgen, übergeben Sie bitte diese
Anleitung dem neuen Besitzer.
Bitte beachten Sie die folgenden Installationsanweisungen genau.
Garantieleistungen können nur in Anspruch genommen werden, wenn die
Installation gemäß den Installationsanweisungen erfolgt. (siehe Kapitel 4.1)
Page 10
INHALT
1. Auspacken des Geräts
2. Ansicht des Geräts
3. Reinigung
4. Aufstellung des Geräts
4.1. Installationsanweisungen
5. Einsatz des Geräts
5.1. Erste Inbetriebnahme
5.2. Temperaturregelung
5.3. Steuerung der Kühleinheit (CUC)
6. Nützliche Hinweise
7. Abtauen, Reinigung und Wartung
7.1. Automatische Abtaufunktion
7.2. Innenbeleuchtung
7.3. LED der automatischen Türkontrolle (ADC) optional
8. Kundendienst
9. Inbetriebnahme, Technische Daten
9.1. Anschluss an das Stromnetz
10. Informationen zum Umweltschutz
11. Recycling
Achtung!
Die Garantiebedingungen entsprechen der EU-Richtlinie 44/1999/CE und den
im jeweiligen Bestimmungsland geltenden Gesetzen.
Bei Fragen zu Garantie und Kundendienst sowie für Ersatzteile wenden Sie sich
bitte an unser Dometic Servicenetzwerk.
Die Garantie deckt keine Schäden durch unsachgemäße Benutzung ab.
Die Garantie deckt keine Änderungen am Gerät oder den Einsatz nicht-
originaler Ersatzteile von Dometic ab.
Die Garantie erlischt, wenn das Gerät nicht gemäß den Anweisungen installiert
und benutzt wird.
Nennen Sie bitte das Modell sowie die Produkt- und die Seriennummer des
Geräts, wenn Sie sich mit dem Dometic Servicenetzwerk in Verbindung setzen.
Diese Informationen finden Sie auf dem Typenschild im Innern des Kühlgerätes.
10
D
Page 11
11
D
1. Auspacken des Geräts
Entfernen Sie den Verpackungskarton und prüfen Sie,
ob das Gerät Schäden aufweist. Bei
Transportschäden wenden Sie sich bitte umgehend
an das Transportunternehmen.
2. Ansicht des Geräts
1. Tür
2. Türschloss (falls vorhanden)
3. Innenbeleuchtung
4. ADC-LED (falls vorhanden)
5. Aufbewahrungsfach
6. Vorplatte Verdampfer
7. Verdampfersensor (hinter dem Verdampfer)
8. Verdampfer
9. Einlegeböden
10. Luftsensor
11. Räder
12. Türeinlagen
Abbildung 1.
FALLS IHR KÜHLGERÄT MIT EINEM TÜRSCHLOSS AUSGESTATTET IST, ÜBERNIMMT DOMETIC ZRT
KEINE HAFTUNG FÜR VERLOREN GEGANGENE ODER BESCHÄDIGTE SCHLÜSSEL. SCHLÖSSER
SIND ALS KOMPLETTE EINHEIT ALS ERSATZTEIL ERHÄLTLICH.
Page 12
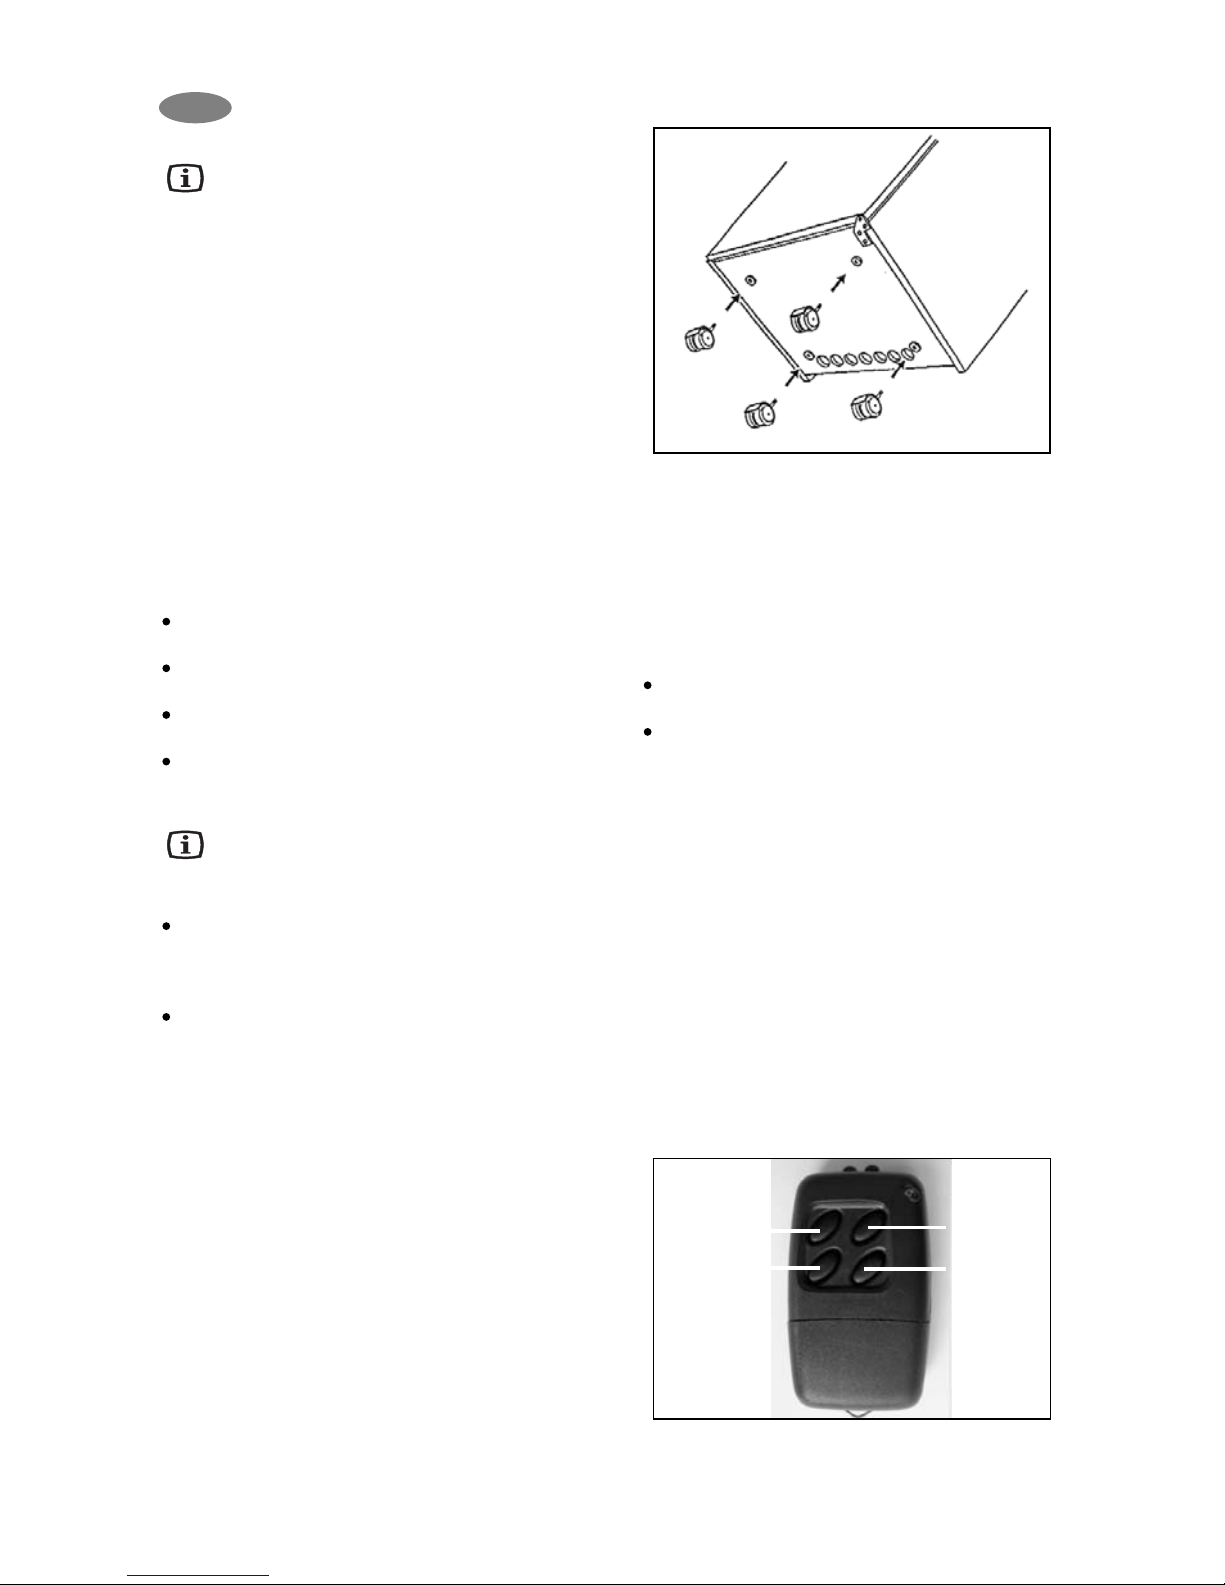
Abbildung 2.
5. Einsatz des Geräts
Um das Gerät in Betrieb zu setzen, stecken Sie den
Netzstecker ein. Ein leeres Kühlgerät benötigt bei
normaler Raumtemperatur etwa 6 - 7 Stunden zur
Erreichung der korrekten Betriebstemperatur.
5.1. Erste Inbetriebnahme
Schließen Sie das Gerät an eine geerdete
Steckdose an.
miniBar startet automatisch mit einem Selbsttest.
Wenn die Elektronik keinen Defekt erkennt,
leuchtet die LED der Innenbeleuchtung nach
etwa 10 Sekunden 2 Sekunden lang auf. Wird
ein Fehler erkannt, beginnt die LED permanent
zu blinken. In diesem Fall benachrichtigen Sie
bitte Ihren zuständigen Kundendienst.
5.2. Temperaturregelung
Die Anlage ist mit einer elektrischen
Temperaturregelung ausgerüstet. Die innere
Temperatur der Kühlanlage ist mit der optionalen
Fernbedienung mit den vier Knöpfen zu regeln. Es
gibt 4 verschiedene im Voraus eingestellten
Temperaturwerte: 3°C, 5°C, 7°C und 12°C. Zwei
Knöpfe der Fernbedienung dienen zur Einstellung
der Temperatur:
- Gelber Knopf: 3°C und 7°C.
- Blauer Knopf: 5°C und 12°C.
3. Reinigung
Reinigen Sie das Kühlgerät gründlich in
regelmäßigen Abständen und bei Bedarf.
Räumen Sie das Gerät aus und entfernen Sie die
Einlegeböden und Türeinlagen. Reinigen Sie die
Innenflächen des Geräts und der Tür mit einer
warmen Lösung aus Natriumhydrogenkarbonat.
Wischen Sie mit klarem, warmem Wasser nach und
trocknen Sie das Gerät mit einem sauberen Tuch.
Reinigen Sie die Kunststoffteile nicht in Wasser, das
mehr als handwarm ist. Setzen Sie diese Teile keiner
Heißluft aus. Reinigen Sie die Außenwände des
Geräts regelmäßig mit einem sauberen, feuchten
Tuch.
VERWENDEN SIE NIEMALS STARKE CHEMIKALIEN
ODER SCHEUERMITTEL ZUR REINIGUNG DES
GERÄTS.
4. Aufstellung des Geräts
Beachten Sie bei der ersten Benutzung des Geräts
folgende Punkte:
ACHTEN SIE DARAUF, DASS DAS GERÄT
WAAGERECHT STEHT
DIE LEITUNGEN AUF DER RÜCKSEITE WERDEN
IM BETRIEB HEISS
DAS GERÄT ARBEITET OHNE KOMPRESSOR. ES
LÄUFT DAHER SEHR LEISE
ERST NACH DREI STUNDEN KANN MIT EINER
WAHRNEHMBAREN KÜHLLEISTUNG
GERECHNET WERDEN
Während des Kühlprozesses gibt das Gerät vom
Kondensator (im oberen Bereich der Rückseite)
Wärme in die Umgebung ab. Je besser die Belüftung
des Geräts ist, desto höher ist die Kühlleistung.
Wichtig für den einwandfreien Betrieb ist auch die
waagerechte Aufstellung des Geräts. Das kann
sehr einfach durch Stellen eines vollen
Wasserglases auf den Deckel geprüft werden.
Setzen Sie das Gerät nicht direkter
Wärmestrahlung aus (Sonnenlicht, Heizkörper,
Ofen, usw.).
4.1. Installationsanweisungen
Das Kühlgerät ist mit einem elektrisch beheizten
Absorptions-Kühlaggregat ausgestattet, das sehr
geräuscharm arbeitet.
Im Inneren des Kühlschrankes finden Sie eine
Plastiktüte, in der sich 4 kleine Räder befinden. Legen
Sie den Kühl-schrank bitte vorsichtig auf die
Rückseite und stecken Sie die Zapfen der Räder in
die im unteren Teil eingebauten Metall-hülsen (Abb.
2.). So können Sie Ihren Kühlschrank immer dorthin
bewegen, wo Sie ihn brauchen.
Der Kühlschrank darf ohne Räder nicht benutzt
werden, weil sonst keine ensprechende
Belüftung vorhanden ist!
12
D
Gelber
Knopf:
3°C/7°C
Schwarzer
Knopf
Rückstellung
der
Kühlanlage
Blauer
Knopf:
5°C/12°C
Roter
Knopf
Rückstell
ung des
roten
Punktes
Page 13
13
D
Z.B. zur Einstellung der Temperatur 7°C gehen Sie
folgendermaßen vor:
Öffnen Sie die Tür der Anlage.
Halten Sie den Fernbediener vor den Sensor auf
der Tür etwa auf 10 cm. Drücken Sie den gelben
Knopf einmal, und zählen Sie, wie vielmal das
innere LED-Licht aufleuchtet. Wenn dreimal, dann
ändert sich der eingestellte Wert auf 3°C-ra.
Zur Einstellung der erwünschten 7°C drücken Sie
den gelben Knopf noch einmal. Das LED leuchtet
siebenmal auf, und die im Voraus eingestellte
Temperatur wird 7°C.
Zur Einstellung von z.B 12°C folgen Sie auch den
obigen Schritten, aber verwenden Sie diesmal den
blauen Knopf.
5.3. Steuerung der Kühleinheit (CUC)
Alle 24 Stunden nach jeder Abtauperiode prüft die
Elektronik die Gerätefunktion durch die Messung des
Verdampfer-Temperaturabfalls. Wird ein Problem
erkannt, schaltet sich das Gerät aus und die LEDs der
Innenbeleuchtung beginnen zu blinken. Prüfen Sie in
diesem Fall, ob der Kühlschrank überladen ist, die Tür
korrekt geschlossen war, die Kühleinheit
ausreichende Luftzirkulation erhält und das Gerät
waagerecht steht. Trennen Sie danach das Gerät für
mindestens 10 Sekunden vom Stromnetz und
schließen es wieder an. Dadurch wird die Elektronik
zurückgesetzt und das Gerät sollte wieder normal
arbeiten. Beginnt das Gerät nicht zu kühlen, liegt eine
ernsthafte Störung vor und Sie sollten Ihren Dometic
Kundendienst informieren.
6. Nützliche Hinweise
Überfüllen Sie das Gerät nicht. Lagern Sie möglichst
nur vorgekühlte Getränke und/oder Speisen im Gerät.
Lassen Sie stets etwas Platz zwischen den Speisen
und Getränken, damit die Kühlluft gleichmäßig und
zuverlässig zirkulieren kann. Bei zu vollen
Einlegeböden kann es zu unerwünscht hohen
Temperaturunterschieden im Gerät kommen.
7. Abtauen, Reinigung und
Wartung
Nach einiger Zeit bildet sich Eis auf den Kühlrippen.
Diese Eisschicht darf nicht zu dick werden, da sie die
Kühlleistung beeinträchtigt.
Die miniBar ist mit einer vollautomatischen,
elektronischen Temperatursteuerung ausgestattet.
Das Eis schmilzt und das entstehende Tauwasser
läuft vom Tropfkanal über einen Dränageschlauch in
eine Verdunstungswanne auf der Rückseite unter dem
Kühlgerät. (Abb. 5). Dort verdunstet das Wasser
automatisch und wird in die Umgebungsluft
abgegeben. Daher muss die Wanne nicht von Hand
entleert werden.
Zum Ausschalten des Geräts ziehen Sie den
Netzstecker und öffnen die Tür. Nach dem Abtauen
reinigen Sie das Innere des Geräts mit einem
sauberen, feuchten Tuch.
Abbildung 3.
7.1. Automatische Abtaufunktion
Die erste Abtauphase beginnt 39 Stunden nach
dem ersten Einschalten und dauert zwei Stunden.
Danach kühlt das Gerät jeweils 22 Stunden
ununterbrochen, gefolgt von einer zweistündigen
Abtauphase.
7.2. Innenbeleuchtung (Abb. 4.)
Zwei Leuchtdioden (A) auf einer elektronischen
Leiterplatte beleuchten den Innenraum des Geräts,
wenn die Tür geöffnet wird.
Zwei Sensoren (B) erkennen, ob die Tür geöffnet
ist und steuern die Leuchtdioden entsprechend.
Abbildung 4.
7.3. Automatische Türkontrolle
(ADC) optional
Die LED (Abb. 5 A), wenn die Tür der miniBar
geöffnet wurde. In diesem Fall:
1. Öffnen Sie die miniBar, prüfen Sie den Inhalt und
füllen Sie bei Bedarf nach.
2. Setzen Sie anschließend das Türsignal zurück,
indem Sie die Fernbedienung auf den Türsensor
richten (Abb. 4 B) und die Taste drücken.
3. Schließen Sie die miniBar.
B
A
Page 14
14
D
Abbildung 5.
8. Kundendienst
Prüfen Sie bitte zuerst Folgendes, bevor Sie unseren
Kundendienst kontaktieren:
Arbeitet das Gerät nach Prüfen der vorgenannten
Punkte trotzdem nicht einwandfrei, kontaktieren Sie
bitte den Kundendienst. Beschreiben Sie das
Problem und nennen Sie bitte Typ und Modell sowie
Produkt- und Seriennummer.
(Einzelheiten zu Modell, Produkt- und Seriennummer
finden auf dem Typenschild im Innern des
Kühlgerätes.)
Kontaktieren Sie bei einem Gerätedefekt Ihren
örtlichen Händler. Die Anschrift finden Sie in Ihrem
Telefonbuch.
www.dometic.com
9. Inbetriebnahme
Technische Daten:
Problem
Die Kühlleistung des Geräts ist zu
gering
Das Gerät kühlt nicht
Mögliche Ursache
Zu viele zu warme Speisen wurden
eingelagert
Die Tür ist nicht korrekt verschlossen
Die Luft kann im Kühlfach nicht
zirkulieren
Das CUC-System hat das Gerät
ausgeschaltet
Der Stecker sitzt nicht korrekt in der
Steckdose
Die Steckdose ist ohne Strom
Abhilfe
Weniger Speisen einlagern
Tür korrekt verschließen
Schaffen Sie Platz zwischen den
Speisen, damit die Luft zirkulieren kann
Siehe Abschnitt 5.3
Stecker korrekt anschließen
Steckdose auf Funktion prüfen
Modell RH 465LD
Typ MB20-60
Bruttovolumen 34 Liter
Netzbetrieb 220 - 240V (AC)
Stromaufnahme 65W
Energieverbrauch 0,700 kWh/24h
Klimaklasse N
Kältemittel 147g H2O+98g NH
3
* Die Feststellung des Energieverbrauchs erfolgt bei
Umgebungstemperaturen von 12°C25°C (Keller).
Page 15
15
D
9.1. Anschluss an das Stromnetz
Das Gerät darf nur mit der auf dem Typenschild
angegebenen Spannung betrieben werden. Der
Netzstecker des Geräts darf nur an eine geerdete und
den örtlichen Vorschriften entsprechende Steckdose
angeschlossen werden.
Notwendige elektrische Installationen zum Anschluss
des Geräts dürfen nur von einem Elektriker oder einer
anderen kompetenten Person durchgeführt werden.
Der Hersteller lehnt jegliche Haftung ab, wenn
diese Sicherheitsmaßnahmen nicht beachtet
werden.
Elektrische Anforderungen
Prüfen Sie vor dem Einschalten, ob die Netzspannung
den Angaben auf dem Typenschild entspricht.
10. Informationen zum
Umweltschutz
Als Kältemittel wird Ammoniak (eine natürliche
Wasserstoff/Stickstoffverbindung) verwendet.
Als Einblasmittel für die PU-Schaumisolierung wird
das ozonfreundliche Zyklopentan verwendet.
Als Korrosionsschutz wird Natriumchromat verwendet
(weniger als 2 Gewichtsprozent des Kältemittels).
11. Recycling
Entsorgen Sie die Verpackung des Geräts bei
Ihrer örtlichen Müllabfuhr. Übergeben Sie das Gerät
am Ende seiner Lebensdauer einem
Entsorgungsunternehmen, dass die wieder
verwendbaren Materialien aufbereiten kann und den
Restmüll fachgerecht entsorgt.
Geräte, die mit diesem Symbol
gekennzeichnet sind, müssen an dem
örtlichen Sammelpunkt für die Entsorgung
von elektrischen und elektronischen
Geräten abgegeben werden.
Dieses Produkt darf nicht über den
normalen Haushaltsabfall entsorgt werden.
Kühlschränke von Dometic enthalten das Symbol auf
dem Datenschild (Typenschild) im Inneren des
Gerätes.
Dieses Gerät entspricht den folgenden EURichtlinien:
LVD-Richtlinie 73/23/EWG, mit Änderung
90/683/EWG
EMV-Richtlinie 89/336/EWG
RoHS-Richtlinie 2002/95/EG
Page 16
16
F
Nous vous remercions d'avoir porté votre choix sur l'un de nos produits. Nous espérons que cet
appareil vous donnera pendant longtemps entière satisfaction. Ce mode d'emploi a pour but de vous
familiariser avec les symboles suivants et de vous permettre une mise en œuvre efficace et sûre de
votre appareil :
Danger lié à une mise en œuvre inappropriée de l'appareil
Recommandations pour l'utilisation de l'appareil
Informations relatives à la protection de l'environnement
L'usage de ce réfrigérateur est destiné uniquement à conserver au frais des denrées alimentaires et
des boissons.
Attention!
Cet appareil n'est pas destiné à être utilisé par des personnes (y compris des
enfants) présentant des troubles physiques, sensoriels ou mentaux, ou ne
possédant pas une expérience ou une connaissance de l'appareil suffisante, à
moins que ces personnes aient été formées à l'utilisation de cet appareil ou soient
supervisées par une personne responsable de leur sécurité.
Les enfants doivent être surveillés pour éviter qu'ils jouent avec cet appareil.
Seul un électricien ayant la compétence nécessaire, pourra se charger des travaux
électriques indispensables à l'installation de l'appareil.
Seul un électricien agréé devra se charger des travaux de maintenance, en utilisant
uniquement des pièces de rechange d'origine.
Toute modification de l'appareil ou de ses composants peut s'avérer dangereuse.
Faites attention à ce que le câble d'alimentation ne se coince jamais sous l'appareil.
La surface de quelques composants peut fortement s'échauffer au cours de
l'exploitation. Veillez à une aération suffisante, sous peine d'un endommagement de
l'appareil ; les denrées périssables à l'intérieur du réfrigérateur pourraient
également s'abîmer. Veuillez bien comparer aux directives d'installation.
Tout contact avec les surfaces brûlantes des composants est à éviter. Il faudra donc
veiller à placer l'appareil, sa partie arrière tournée vers un mur. Tout en veillant à
respecter les distances minimales indiquées dans les directives d'installation afin
de garantir l'aération nécessaire.
Débranchez toujours l'appareil avant de le dégivrer, de le nettoyer ou d'effectuer des
travaux d'entretien.
N'essayez jamais d'enlever le givre EN UTILISANT UN INSTRUMENT POINTU.
N'essayez jamais d'employer la force pour enlever le givre adhérant aux nervures de
refroidissement. Le givre fondra lors du dégivrage de l'appareil. Veuillez bien
comparer aux directives de dégivrage.
L'appareil est assez lourd. Faites donc attention si vous voulez le déplacer.
N'essayez en aucun cas de réparer vous-même l'appareil. Des réparatures
effectuées par un personnel manquant de l'expérience nécessaire, pourront
entraîner des blessures corporelles ou des détoriations de l'appareil. Si vous avez
besoin de pièces détachées, adressez-vous à votre dépositaire local et demandez
explicitement des pièces de rechange d'origine.
Il est interdit de stocker des substances toxiques ou explosives au réfrigérateur !
Veuillez bien lire attentivement ce mode d'emploi avant de mettre cet appareil en
service. Si vous deviez vendre ou céder l'appareil ultérieurement, veuillez bien
remettre ce mode d'emploi à son nouveau propriétaire.
Veillez à respecter scrupuleusement les directives suivantes d'installation. Au cas où
vous n'auriez pas installé l'appareil en vous conformant aux directives d'installation,
vous n'auriez plus aucun droit aux prestations de garantie. (Comparez au chapitre 4.1)
Page 17

17
F
SOMMAIRE
1. Déballage de l'appareil
2. Vue de l'appareil
3. Nettoyage
4. Mise en place de l'appareil
4. 1. Directives d'installation
5. Exploitation de l'appareil
5. 1. Première mise en service
5. 2. Réglage de la température
5. 3. Systèm de contrôle de l'agrégat (CUC system)
6. Conseils utiles
7. Dégivrage, nettoyage et entretien
7. 1. Dégivrage automatique
7. 2. Éclairage intérieur
7. 3. Lampe LED du contrôle automatique de la porte (ADC) en option
8. Service après-vente
9. Mise en service, caractéristiques techniques
9. 1. Raccordement au secteur
10. Informations relatives à la protection de l'environnement
11. Recyclage
Attention!
Les conditions de garantie sont conformes à la Décision du Comité mixte
de l'EEE nº 44/1999 du 26 mars 1999 modifiant l'annexe (environnement) de
l'accord EEE, et également conformes aux lois applicables dans les divers
pays.
Si vous avez des questions concernant la garantie, le service après-vente
ou les pièces de rechange, veuillez bien vous adresser à notre réseau de
services Dometic.
Les dommages résultant d'un usage inapproprié de l'appareil ne sont pas
couverts par la garantie.
Les modifications apportées à l'appareil ou l'utilisation de pièces de
rechange qui ne sont pas d'origine Dometic, ne sont pas couvertes par la
garantie.
Le non-respect des instructions d'installation ou du mode d'emploi,
entraîne l'extinction totale de cette garantie.
Veuillez bien préciser le modèle d'appareil, la référence du produit et le
numéro de série si vous voulez contacter le réseau de services Dometic.
Vous trouverez ces informations sur la plaque signalétique, située à
l'intérieur du réfrigérateur.
Page 18

18
F
1. Déballage de l'appareil
A la réception, assurez-vous après avoir déballé
l'appareil qu'il n'a pas été endommagé pendant le
transport. En cas de dommages de transport,
veuillez bien vous adresser immédiatement à
l'entreprise de transport.
2. Vue de l'appareil
1. Por te
2. Serrure de porte (si existante)
3. Éclairage intérieur
4. Lampe LED de l’ADC (si existante)
5. Compartiment rangement
6. Couvercle pour le compartiment du
bloc réfrigérant
7. Capteur de l’évaporateur
(derriére l’évaporateur)
8. Évaporateur
9. Clayettes de rangement
10. Capteur d'air
11. Roues
12. Balconnets du contre porte lisse
Figure 1.
AU CAS OÙ LE RÉFRIGÉRATEUR EST ÉQUIPÉ D'UNE SERRURE, DOMETIC ZRT N'ASSUME
AUCUNE GARANTIE POUR DES CLÉS PERDUES OU ENDOMMAGÉES. VOUS POURREZ
COMMANDER UNE NOUVELLE SERRURE SOUS FORME D'UNITÉ COMPLÈTE.
Page 19

19
F
3. Nettoyage
Nettoyez le réfrigérateur à intervalles
réguliers et en cas de besoin. Videz
l'appareil, puis retirez les clayettes et les
balconnets. Nettoyez les surfaces intérieures de
l'appareil et de la porte, en utilisant une solution
tiède d'hydrogénocarbonate de sodium. Rincez
ensuite l'appareil à l'eau claire tiède, puis terminez
en le séchant à l'aide d'un chiffon non humidifié.
N'utilisez pas d'eau trop chaude pour nettoyer les
parties en plastique. N'exposez pas ces parties à
de l'air trop chaud. Nettoyez régulièrement les
surfaces extérieures de l'appareil à l'aide d'un
chiffon propre et humide.
NE NETTOYEZ JAMAIS L'APPAREIL EN
UTILISANT DES PRODUITS CHIMIQUES TROP
AGRESSIFS OU DES PRODUITS ABRASIFS.
4. Mise en place de l'appareil
Veillez à respecter les indications suivantes lors
de la première mise en service de l'appareil :
FAITES ATTENTION À CE QUE L'APPAREIL
SE TROUVE SUR UNE SURFACE BIEN
PLANE.
LORS DE L'EXPLOITATION, LA TUYAUTERIE
ARRIÈRE PEUT DÉGAGER UNE FORTE
CHALEUR.
L'APPAREIL NE FAIT APPEL À AUCUN
COMPRESSEUR. ET FONCTIONNE DE CE
FAIT TRÈS SILENCIEUSEMENT.
IL FAUDRA ATTENDRE AU MOINS TROIS
HEURES POUR OBTENIR UNE PERFORMANCE FRIGORIFIQUE SIGNIFIANTE.
Au cours du processus de réfrigération,
l'appareil transmet la chaleur à l'air ambiant
par l'intermédiaire du condensateur (situé à la
partie supérieure du panneau arrière). Une bonne
ventilation de l'appareil améliorera de beaucoup
sa performance frigorifique.
Pour garantir son bon fonctionnement, il faudra
également veiller à placer l'appareil sur une
surface plane. Vous pourrez contrôler très
simplement le niveau en posant un verre d'eau
sur le couvercle de l'appareil.
N'exposez pas l'appareil à une source de
chaleur directe (soleil, radiateur, four, etc.).
4.1. Directives d'installation
Le réfrigérateur est muni d'une unité de
refroidissement à absorption à réchauffement
électrique dont le fonctionnement est
virtuellement silencieux.
Dans le réfrigérateur se trouve un sachet en
plastique contenant 4 petites roues. Posez le
réfrigérateur avec beaucoup de précaution sur sa
face arrière et introdu-isez les tiges des roues
dans les douilles métalliques logées dans la partie
inférieure de l'appareil (fig. 2.). Ainsi vous pouvez déplacer votre réfrigérateur vers l'endroit
choisi.
Figure 2.
Ne pas utiliser le réfrigérateur sans ses
roulettes. Dans le cas contraire, la
ventilation de l'appareil n'est pas correct!
5. Exploitation de l'appareil
Pour mettre l'appareil en marche, branchez la
fiche de prise de courant. À une température
ambiante normale, un réfrigérateur vide
atteindra sa température de service normale
après environ 6 à 7 heures.
5.1. Première mise en service
Branchez l'appareil à une prise de courant
mise à la masse.
Le miniBar procédera automatiquement à un
test d'autocontrôle. Si l'électronique ne
reconnaît aucune défaillance, la lampe LED
de l'éclairage intérieur commencera à
clignoter au bout de 10 secondes pendant 2
secondes. En cas de reconnaissance d'une
défaillance, la lampe LED clignotera en
permanence. Il vous faudra alors en aviser
votre service après vente.
5.2. Réglage de la température
L'appareil est équipé d'un système électrique
de réglage de température automatique. La
température interne du réfrigérateur peut être
réglée à l'aide de la télécommande optionnelle
à quatre boutons. 4 températures préréglées
son possibles: 3°C, 5°C, 7°C et 12°C. Deux
boutons sur la télécommande servent à régler
la température:
- Bouton jaune: 3°C et 7°C.
- Bouton bleu: 5°C et 12°C.
Page 20

20
F
Par ex. pour régler la valeur de 7°C, procédez
comme suit:
Ouvrir la porte de l'appareil
Tenir la télécommande devant le senseur de la
porte à 10 cm. Appuyer sur le bouton jaune une
fois, compter les clignotements du LED interne.
Si le numéro est de trois, la valeur préréglée
change en 3°C.
Pour la température de 7°C, il faut appuyer
encore une fois sur le bouton jaune. Le LED
clignote sept fois, et la valeur change en 7°C.
Pour régler la température de 12°C, il faut faire
la même chose, mais cette fois-ci avec le
bouton bleu.
5.3. Systèm de contrôle de
l'agrégat (CUC system)
Toutes les 24 heures suivant un dégivrage,
l'électronique contrôle le bon fonctionnement de
l'appareil en mesurant la chute de température de
l'évaporateur. En cas de problème, l'appareil
s'arrêtera, les lampes LED de l'éclairage intérieur
commenceront à clignoter. Vérifiez alors si le
réfrigérateur n'est pas surchargé, si la porte est
bien fermée, si la circulation d'air du bloc
réfrigérant est suffisante et si l'appareil se trouve
sur une surface bien plane. Débranchez l'appareil
pour au moins 10 secondes, puis rebranchez-le.
Ce qui permettra de redémarrer l'électronique,
l'appareil devrait alors fonctionner normalement.
Si l'appareil ne recommence pas à fonctionner,
vous devrez en informer immédiatement votre
service aprèsvente Dometic.
6. Conseils utiles
Ne surchargez pas l'appareil. Essayez de ne
stocker au réfrigérateur que des boissons et/ou
des aliments auparavant réfrigérés. Veillez à
toujours laisser un espace suffisant entre les
denrées alimentaires et les boissons afin de
garantir un refroidissement fiable et régulier. En
cas de surchargement des clayettes, les effets
pourront en être des différences indésirables de
température à l'intérieur de l'appareil.
7. Dégivrage, nettoyage et
entretien
La formation de givre après une certaine
période d'exploitation est normale. Cette
couche de givre ne devra cependant pas par
trop s'épaissir, en raison de son influence
négative sur la performance frigorifique.
Le réglage de la température du miniBar se fait
automatiquement, par commande électronique.
L'eau de dégivrage résultant de la fonte du
givre, s'écoulera alors dans un bac collecteur
situé à l'arrière du réfrigérateur, en passant par
la gouttière et un tube d'écoulement. (Fig. 5).
Dans ce bac, l'eau de dégivrage s'évaporera
automatiquement dans l'air ambiant. Il est donc
inutile de vider ce bac manuellement.
Pour arrêter l'appareil, il vous suffira de le
débrancher ; n'oubliez pas de laisser ensuite la
porte ouverte. Le dégivrage une fois effectué,
nettoyez l'intérieur de l'appareil à l'aide d'un
chiffon propre et humide.
Figure 3.
7.1. Dégivrage automatique
La première phase de dégivrage commencera
environ 39 heures après la première mise en
service et durera environ deux heures.
L'appareil fonctionnera ensuite 22 heures sans
interruption, ce cycle sera suivi d'une phase de
dégivrage durant deux heures.
7.2. Éclairage intérieur (Fig. 4)
Deux lampes LED (A) situées sur une carte de
circuit imprimé, éclaireront l'intérieur de
l'appareil en cas d'ouverture de la porte.
Les deux capteurs (B) détectent une porte
ouverte et commandent l'allumage des lampes
LED en conséquence.
Bouton
jaune:
3°C/7°C
Bouton
noir
Rétablisse
ment de
l'unité de
refroidisse
ment
Bouton
bleu:
5°C/12°C
Bouton
rouge:
Rétabliss
ement du
point
rouge
Page 21

21
F
Figure 4.
7. 3. Contrôle automatique de la
porte (ADC) en option
La lampe LED (Figure 5 A) signalera une
ouverture éventuelle de la porte du miniBar. Dans
ce cas :
1. Ouvrez le miniBar, vérifiez-en le contenu,
remplissez-le en cas de besoin.
2. Remettez ensuite le signal de la porte à zéro en
dirigeant la télécommande vers le capteur de la
porte (Figure 4 B) et en appuyant sur la touche.
3. Fermez le miniBar.
Figure 5.
8. Service après-vente
Veuillez bien contrôler d'abord les points suivants
avant de contacter notre service après-vente :
Si l'appareil ne fonctionne toujours pas de
manière satisfaisante après la vérification des
points ci-dessus, veuillez bien contacter le service
B
A
Problème
La performance frigorifique de
l'appareil est insuffisante.
L'appareil ne refroidit pas.
Raison possible
Le compartiment refroidisseur contient une
trop grande quantité d'aliments chauds.
La porte est mal fermée.
L'air ne peut pas circuler dans le
compartiment refroidisseur.
Le régulateur automatique de contrôle a
arrêté l'appareil.
La fiche d'alimentation est mal branchée
dans la prise de courant
La prise de courant n'est pas alimentée.
Solution
Réduire le volume des
denrées stockées.
Bien fermer la porte.
Laissez un espace suffisant
entre les denrées
alimentaires afin que l'air
puisse circuler.
Cf. paragraphe 5.3.
Brancher correctement la
fiche d'alimentation.
Vérifiez la prise de courant.
Page 22

22
F
après-vente. Décrivez le problème et n'oubliez
pas de préciser le type d'appareil, le modèle ainsi
que la référence du produit et le numéro de série.
(Vous trouverez tous les détails sur le modèle
d'appareil, la référence du produit et le numéro de
série sur la plaque signalétique qui se trouve à
l'intérieur du réfrigérateur.)
Dans le cas d'un appareil défectueux, contactez
votre dépositaire local le plus proche. Vous
trouverez son adresse dans l'annuaire
téléphonique.
www.dometic.com
9. Mise en marche
Caractéristiques techniques :
9.1. Raccordement au secteur
La mise sous tension de l'appareil ne se
fera qu'avec la tension indiquée sur la
plaque signalétique. L'appareil ne doit être
branché qu'à une prise de courant mise à la terre
et conforme aux réglementations locales en
vigueur.
Seul un électricien ou d'autres personnes ayant la
compétence nécessaire, pourront se charger des
travaux électriques indispensables au
branchement de l'appareil.
Le fabricant décline toute responsabilité au
cas de non observance de ces consignes de
sécurité.
Exigences électriques
Avant de mettre l'appareil en marche, assurezvous que la tension de secteur correspond à la
valeur indiquée sur la plaque signalétique.
1
0. Informations relatives à
la protection de
l'environnement
Le fluide frigorigène mis en œuvre est
l'ammoniaque (un composé naturel d'hydrogène
et d'azote).
Le cyclopentane ne présentant aucun potentiel
d'appauvrissement de la couche d'ozone, a été
utilisé comme isolant thermique dans la mousse
de polyuréthane.
Le chromate de sodium est utilisé comme
agent anti-corrosion (dosé à moins de 2 % du
pourcentage pondéral du fluide frigorigène).
11. Recyclage
Après avoir déballé l'appareil, les matériaux
d'emballage devraient être acheminés vers
votre site local de collecte des déchets. En fin
de vie, il est recommandé de confier l'appareil
à une entreprise spécialisée de collecte et de
recyclage qui pourra assurer la récupération
des matériaux recyclables et un recyclage
écologique de l'appareil.
Les appareils portant ce symbole
doivent être obligatoirement remis à
un point de collecte local pour la
mise au rebut d'appareils électriques
et électroniques.
Il est interdit de jeter ce produit dans
les ordures ménagères.
Sur les réfrigérateurs Dometic, le symbole
figure sur la plaque des caractéristiques
(plaque signalétique) apposée à l'intérieur de
l'appareil.
Cet appareil est conforme aux directives
CEE suivantes :
Directive LVD 73/23/CEE y compris la
modification 90/683/CEE
Directive EMC 89/336/CEE
Directive RoHS 2002/95/CE
Modèle RH 465LD
Type MB20-60
Contenance utile 34 litres
Alimentation secteur 220 - 240 V (CA)
Courant absorbé 65 W
Consommation d'énergie 0,700 kWh/24h
Classe climatique N
Fluide frigorigène 147g H2O+98g NH
3
* Le calcul de la consommation d'énergie se fait à une température
ambiante de 12°C 25°C (cave).
Page 23

23
IT
Grazie per aver scelto il nostro apparecchio. Siamo certi che vi assicurerà un funzionamento perfetto
nel tempo.
Nel seguente paragrafo vi faremo conoscere alcuni simboli necessari per garantire il funzionamento
sicuro ed efficiente del nostro apparecchio:
Può essere pericoloso in caso di uso improprio dell'apparecchio;
Suggerimenti utili da leggere;
Informazioni riguardanti la protezione ambientale.
Il presente frigorifero è stato progettato e costruito per la conservazione di cibi e bevande.
Attenzione!
Questa apparecchiatura non è intesa per l'uso da parte di persone (compresi i
bambini) con ridotte capacità fisiche, sensoriali o mentali, o la mancanza di
esperienza e conoscenza, a meno che non siano state istruite e siano sotto la
supervisione di personale responsabile per la loro sicurezza.
I bambini devono essere sorvegliati per garantire che essi non possano giocare con
l'apparecchiatura.
I collegamenti elettrici necessari per l'installazione del presente apparecchio devono
essere effettuati da un elettricista qualificato.
Si consiglia di affidare la manutenzione del frigo a un tecnico specializzato
autorizzato e di usare esclusivamente ricambi originali.
È pericoloso alterare le specifiche dell'apparecchio e apportarvi qualsiasi modifica.
Assicurarsi che il frigo non stia sopra il cavo di alimentazione, schiacciandolo.
Alcune parti di questo apparecchio si riscaldano durante il funzionamento.
Garantire sempre un'adeguata ventilazione del prodotto; l'eventuale inosservanza
provocherà dei guasti nei suoi componenti e il degrado dei cibi conservati
all'interno. Vedere le relative istruzioni per l'installazione.
Le parti che si riscaldano non devono essere messe allo scoperto. Pertanto si
consiglia di sistemare il frigo con la parte posteriore vicina al muro, rispettando la
distanza necessaria per garantirne un'adeguata ventilazione, conformemente a
quanto specificato nelle istruzioni per l'installazione.
Prima di procedere alle operazioni di sbrinamento, pulizia o manutenzione spegnere
l'interruttore del frigo e staccare la spina di corrente.
NON UTILIZZARE STRUMENTI TAGLIENTI per rimuovere la brina o il ghiaccio
formatisi. Non rimuovere mai con la forza gli eventuali depositi di ghiaccio formatisi
sulle alette di raffreddamento. Lasciare che gli eventuali depositi di ghiaccio si
sciolgano durante lo sbrinamento del frigorifero. Vedere le apposite istruzioni per lo
sbrinamento del frigo.
Questo apparecchio è pesante. Pertanto prestare particolare attenzione quando lo
si sposta.
Non tentare mai di riparare da soli l'apparecchio. Le eventuali riparazioni eseguite
da soggetti inesperti possono provocare danni alle persone e causare seri
malfunzionamenti. Contattare il proprio Centro di Assistenza tecnica locale e
richiedere sempre ricambi originali.
È severamente vietato utilizzare l'apparecchio per la conservazione di sostanze
tossiche o esplosive.
Leggere attentamente le presenti istruzioni per l'uso prima di mettere in funzione il
refrigeratore. Nel caso di eventuale rivendita o smaltimento del frigorifero, il presente
manuale d'uso dovrà essere consegnato al nuovo proprietario.
Seguire attentamente le istruzioni d'installazione qui elencate: La garanzia è valida
esclusivamente nel caso in cui il prodotto venga installato come specificato qui di
seguito. (Ved. capitolo 4.1.)
Page 24

24
IT
INDICE
INDICE
1. Rimozione dell'imballaggio
2. Vista dell'apparecchio
3. Pulizia
4. Posizionamento dell'apparecchio
4. 1. Istruzioni per l'installazione
5. Funzionamento dell'apparecchio
5. 1. Messa in funzione
5. 2. Regolazione della temperatura
5. 3. Controllo del gruppo refrigerante (Cooling Unit Control, CUC)
6. Suggerimenti utili
7. Sbrinamento, pulizia e manutenzione
7. 1. Funzione di sbrinamento automatico
7. 2. Illuminazione interna
7. 3. Controllo automatico di chiusura porta (ADC) opzionale
8. Assistenza Clienti
9. Messa in servizio, caratteristiche tecniche
9. 1. Collegamento alla rete elettrica
10. Informazioni per la protezione dell'ambiente
11. Riciclaggio
Attenzione!
Le condizioni di garanzia sono conformi alla direttiva CE 44/1999/CE
nonché alle disposizioni specifiche applicabili nel paese interessato.
Per questioni di garanzia o altre esigenze di assistenza tecnica (come p.es.
i ricambi) contattare Dometic Service Network.
La garanzia decade in caso di danni causati da un uso improprio
dell'apparecchio.
La garanzia non comprende qualsiasi modifica apportata all'apparecchio o
qualora non fossero utilizzati ricambi originali Dometic.
La garanzia decade in caso di inosservanza delle istruzioni di installazione
e uso.
Nel contattare Dometic Service Network occorre segnalare il modello, il
codice prodotto e il numero di serie. Queste informazioni sono riportate
sulla targhetta identificativa applicata all'interno del frigorifero.
Page 25

25
IT
1. Rimozione dell'imballaggio
Verificare l'integrità dell'apparecchio dopo averlo
rimosso dalla confezione. Segnalare
immediatamente al trasportatore eventuali danni
riconducibili al trasporto dell'apparecchio stesso.
2. Vista dell'apparecchio
1. Por ta
2. Serratura su porta frigorifero (se presente)
3. Lampada
4. LED del controllo automatico chiusura porta ADC
(se presente)
5. Comparto di conservazione
6. Riparo dell’evaporatore
7. Sensore dell’evaporatore (situato
dietro l’evaporatore)
8. Evaporatore
9. Ripiani interni
10. Sensore aria
11. Ru ot e
12. Balconcini porta
Figura 1.
SE IL FRIGORIFERO FOSSE DOTATO DI SERRATURA, DOMETIC ZRT. NON È RESPONSABILE
DELL'EVENTUALE PERDITA O DANNEGGIAMENTO DELLE RELATIVE CHIAVI. TUTTAVIA
POTRÀ ESSERE FORNITA UNA SERRATURA DI RICAMBIO COMPLETA.
Page 26

26
IT
inferiore (fig. 2.). In tal modo può spostare il
Suo frigorifero, portandolo dove vuole.
Non usare il frigorifero senza aver installato
le ruote. Senza le ruote la ventilazione e’
insufficiente.
Figura 2.
5. Funcionamento
dell'apparecchio
Per la messa in funzione del frigorifero
collegare la spina di alimentazione alla presa
elettrica. Con una temperatura ambiente
normale, al frigorifero vuoto occorrono ca. 6-7
ore per raggiungere la corretta temperatura di
funzionamento all'interno del frigo stesso.
5.1. Messa in funzione
Il frigorifero deve essere connesso a una
presa elettrica debitamente collegata a terra.
Il miniBar si accende automaticamente
effettuando un test di autoverifica. Se il
controllo elettronico non rileva alcun errore,
dopo circa 10 secondi il LED di segnalazione
per l'illuminazione interna del frigo si
accende per 2 secondi. Quando invece viene
rilevato un errore il LED continua a
lampeggiare. Contattare in questo caso il
vostro Centro di assistenza autorizzato.
5.2. Regolazione della
temperatura
L'apparecchio è provvisto di un sistema
elettronico di regolamento di temperatura
automatico. Si può regolare la temperature
interna dell'apparecchio con un telecomando di
4 bottoni. Si può scegliere 4 temperature
preregolate: 3°C, 5°C, 7°C e12°C. Due
bottoni del telecomando servono per regolare
la temperatura:
- Bottone giallo: 3°C e 7°C.
- Bottone azzurro: 5°C e 12°C.
3. Pulizia
Pulire regolarmente i ripiani del frigorifero a
seconda della necessità. Rimuovere i vari
ripiani del frigorifero. Si consiglia di lavare i ripiani
del vano frigorifero e quelli della porta utilizzando
una soluzione di bicarbonato di sodio e acqua
tiepida. Infine, sciacquare usando esclusivamente
uno straccio imbevuto di acqua tiepida e
asciugare con un panno pulito. Usare solo ed
esclusivamente acqua tiepida (non calda) per
lavare le parti di plastica e non esporre queste
ultime a calore per asciugarle. Si consiglia di
pulire il contenitore con regolarità, utilizzando un
panno umido e pulito.
NON UTILIZZARE MAI SOSTANZE CHIMICHE O
PRODOTTI ABRASIVI PER PULIRE LE PARTI
DEL CONTENITORE FRIGORIFERO.
4. Posizionamento
dell'apparecchio
Alla prima messa in funzione del frigorifero
verificare i seguenti punti:
CONTROLLARE CHE IL FRIGORIFERO SIA
PERFETTAMENTE IN PIANO;
LE TUBAZIONI SITUATE SUL RETRO DEL
FRIGORIFERO SI SCALDANO DURANTE IL
FUNZIONAMENTO;
IL FRIGORIFERO NON HA UN VERO E
PROPRIO 'MOTORE',, E PER QUESTO È
VIRTUALMENTE SILENZIOSO.
ATTENDERE ALMENO 3 ORE PER AVERE
UN EFFETTO REFRIGERANTE.
Durante il processo di refrigerazione
l'apparecchio emette calore dal
condensatore (parte superiore del riparo
posteriore) nell'ambiente circostante. Pertanto,
con una migliore ventilazione del condensatore la
refrigerazione sarà più efficente.
L'altra condizione necessaria a un
funzionamento soddisfacente è che
l'apparecchio deve essere posizionato
perfettamente in piano. La suddetta condizione
potrà essere verificata con l'ausilio di un
bicchiere d'acqua posizionato sul piano
superiore dell'apparecchio stesso.
È importante che l'apparecchio non venga
esposto al calore diretto (luce solare, radiatori,
stufe, ecc.).
4.1. Istruzioni per l'installazione
Il frigorifero è dotato di un'unità di refrigerazione
ad assorbimento riscaldata elettricamente che
funziona in modo silenzioso.
All'interno dèl frigorifero trova una busta di
plastica con quattro rotelline. Poggiare con
cautela il frigorifero sul retro e infilare i perni delle
rotelline nei manicotti d'acciaio montati nella parte
Page 27

27
IT
Per esempio per regolare il valore 7°C, bisogna
fare le istruzioni seguenti:
Aprire la porta dell'apparecchio
Tenere il telecomando davanti al sensor della
porta a 10 cm. Premere il bottone giallo una
volta, contare i lampeggi del LED interne. Se si
conta tre lampeggi, il valore preregolato si
cambia in 3°C.
Per la temperatura di 7°C, bisogna premere il
bottone giallo una oltra volta. Il LED lampeggia
7 volte ed il valore si cambia in 7°C.
Per regolare la temperatura di 12°C, bisogna
fare la stessa cosa ma con il bottone azzurro.
5.3. Controllo del gruppo
refrigerante (Cooling Unit
Control, CUC)
Il sistema elettronico controlla il funzionamento
dopo ogni ciclo di sbrinamento (ogni 24 ore)
misurando il calo di temperatura dell'evaporatore.
Se viene registrato un problema il frigorifero si
arresta e i LED dell'illuminazione interna
cominciano a lampeggiare in modo continuo. In
questo caso si consiglia di verificare che il
frigorifero non sia stato riempito in modo
eccessivo, che la porta sia stata chiusa, che la
ventilazione del gruppo refrigerante sia corretta e
che il frigorifero sia a livello. Dopo il controllo,
staccare la spina del frigorifero per almeno 10
secondi e inserirla nuovamente nella presa. Con
questa operazione l'apparecchio riprenderà il
regolare funzionamento. Se no, questo significa
che è presente un'anomalia. In questo caso
contattare il servizio di assistenza tecnica
Dometic.
6. Suggerimenti utili
Evitare di riempire eccessivamente il frigorifero.
Se possibile, introdurre esclusivamente cibi e/o
bevande già freddi all'interno del frigorifero. Si
consiglia di lasciare un po' di spazio tra i prodotti
sistemati all'interno del vano frigorifero per
garantire un raffreddamento stabile ed efficiente.
Il riempimento eccessivo dei ripiani interni può
causare variazioni di temperatura inaccettabili.
7. Sbrinamento, pulizia e
manutenzione
Col tempo si formerà uno strato di ghiaccio
sulla piastra di raffreddamento. Evitare che
questo strato diventi troppo spesso, in quanto il
ghiaccio che si viene a formare impedisce un
corretto raffreddamento.
Il miniBar è dotato di un termoregolatore
elettronico completamente automatico.
Il ghiaccio formatosi verrà sciolto, e l'acqua di
sbrinamento passerà attraverso il tubo di
scarico dalla canalina di raccolta fin dentro
l'apposita vaschetta collocata nella parte
inferiore della parete di fondo del frigorifero.
(Fig. 5). L'acqua di sbrinamento evapora
automaticamente grazie al ricircolo dell'aria,
per cui non occorre svuotare la vaschetta.
Figura 3.
Per spegnere l'apparecchio scollegarlo dalla
rete di alimentazione elettrica e lasciare la
porta del frigorifero aperta. A sbrinamento
terminato, si consiglia di pulire le parti interne
del frigorifero utilizzando un panno umido e
pulito.
7.1. Funzione di sbrinamento
automatico
Il primo ciclo di sbrinamento inizia dopo 39 ore
dalla messa in funzione e dura due ore.
Dopodiché il frigorifero funziona in
raffreddamento continuo per 22 ore, seguito da
un altro ciclo di sbrinamento della durata di 2
ore.
7.2. Illuminazione interna (fig 4.)
Aprendo la porta del frigorifero il vano interno
viene illuminato da due LED (A) posti su una
scheda elettronica.
Lo stato della porta, "aperta" o "chiusa", oltre il
controllo di chiusura porta, è monitorato da due
sensori (B) e segnalato dagli appositi LED.
Bottone
giallo:
3°C/7°C
Bottone
nero:
Ristabilim
ento
dell'unità
di
raffreddam
ento
Bottone
azzurro:
5°C/12°C
Bottone
rosso:
Ristabili
mento
del punto
rosso
Page 28

28
IT
Figura 4.
7.3. Controllo automatico di
chiusura porta (ADC) opzionale
Il LED (fig. 5. A) a vite segnala la condizione di
porta frigorifero miniBar aperta. In questo caso:
1. aprire il miniBar, controllare il contenuto dello
stesso e, se necessario, rifornire con i prodotti
mancanti;
2. risettare il segnale di controllo porta puntando il
telecomando contro il sensore di apertura porta
(fig. 4.B) e premendo il pulsante.
3. chiudere il miniBar.
Figura 5.
8. Assistenza Clienti
Prima di chiamare l'Assistenza tecnica, effettuare
un semplice controllo dei seguenti punti:
B
A
Problema
L'apparecchio non raffredda in
modo sufficiente.
L'apparecchio non raffredda
Causa possibile
Il frigo è stato caricato con troppi cibi e/o
bevande da raffreddare
La porta non è stata chiusa correttamente
Il ricircolo interno dell'aria è ostacolato
Il sistema CUC ha arrestato il
funzionamento del frigo
La spina del cavo di rete non è collegata
correttamente alla presa di alimentazione
Assenza di tensione nella presa di rete
Soluzione
Caricare il frigo con meno cibi
e/o bevande
Verificare che la porta del
frigorifero sia chiusa
Garantire una corretta
ricicolazione dell'aria fredda
all'interno del frigo
Vedere le apposite istruzioni
al par. 5.3.
Verificare il corretto
collegamento tra spina e
presa di rete
Verificare la presenza o meno
della tensione di rete
Page 29

29
IT
Se il frigorifero dovesse continuare a non
funzionare correttamente dopo aver effettuati i
controlli sopra descritti, contattare il Centro di
Assistenza più vicino. Descrivere brevemente il
problema indicando il modello, il codice prodotto e
il numero di serie del frigorifero.
(Il modello, il codice prodotto e il numero seriale
sono riportati sulla targhetta di identificazione
applicata in alto sulla sinistra all'interno del vano
frigorifero).
In caso di guasto o anomalia contattare il Centro
di Assistenza più vicino - consultare l'elenco
telefonico locale.
www.dometic.com
9. Messa in servizio
Caratteristiche tecniche:
9.1. Collegamento alla rete elettrica
L'apparecchio deve essere utilizzato
esclusivamente con la tensione nominale riportata
sull'apposita targhetta identificativa. Il cavo di rete
dell'apparecchio deve essere solo connesso a
una presa collegata a terra secondo le
disposizioni locali vigenti in materia.
I collegamenti elettrici necessari per l'installazione
del presente apparecchio devono essere effettuati
da un elettricista qualificato o da un'altra persona
competente in materia.
Il costruttore declina ogni responsabilità in
caso di non osservanza di questi
provvedimenti di sicurezza.
Requisiti elettrici
Prima di accendere il frigorifero assicurarsi che la
tensione elettrica corrisponda a quella riportata
sulla targhetta identificativa dell'apparecchio
stesso.
10. Informazioni per la
protezione
dell'ambiente
Il refrigerante utilizzato nel circuito frigorifero è
ammoniaca (un composto naturale di idrogeno
e azoto).
L'agente di espansione utilizzato nella
produzione dell'isolante (schiuma di
poliuretano) è il ciclopentano, sostanza non
dannosa per l'ozono.
Per la protezione anticorrosione viene utilizzato
il cromato di sodio (meno del 2 % del peso del
refrigerante).
11. Riciclaggio
Dopo aver tolto l'apparecchio dalla confezione
portare il materiale d'imballaggio in un punto di
raccolta locale. Alla fine del suo ciclo vitale
portare l'apparecchio presso una ditta di
riciclaggio specializzata per la raccolta e il
recupero dei materiali riutilizzabili. I materiali
residui saranno distrutti in base alla normativa
vigente.
Gli apprecchi che sono
contrassegnati con questo simbolo
devono essere consegnati al posto di
raccolta locale per lo smaltimento e il
trattamento di apparecchi elettrici ed
elettronici.
Questo prodotto non deve essere smaltito con i
normali rifiuti domestici.
Il simbolo si trova sulla targhetta dei dati tecnici
dei frigoriferi Dometic (targhetta del modello)
all'interno dell'apparecchio.
Il presente apparecchio è conforme alle
seguenti direttive CEE:
Direttiva 73/23/CEE (Bassa Tensione)
modificata dalla direttiva 90/683/CEE
Direttiva 89/336/CEE (Compatibilità
elettromagnetica)
Direttiva 2002/95/CE (RoHS)
Modello RH 465LD
Tipo MB20-60
Capacità totale 34 litri
Alimentazione a rete 220 - 240V (C.A.)
Assorbimento corrente 65W
Consumo d'energia 0,700 kWh/24h
Classe climatica N
Refrigerante 147g H
2
O+98g NH
3
* Il calcolo del consumo d'energia si fa in base ad una temperature
d'ambiente di 12°C25°C (cave).
Page 30

30
IT
NORME DI GARANZIA
Il periodo di garanzia per i nostri prodotti è di un anno dalla data di vendita.
Durante il periodo di garanzia la Società si impegna a sostituire gratuitamente tutte le parti Che
presentassero difetti di fabbricazione esclusi i pezzi ad usura.
Le riparazioni in garanzia si intendono franco Electrolux Commerciale S.r.l. - Moncalieri (To) o Sedi
dei centri assistenza autorizzati. Eventuali spese di trasporto del materiale, trasferte o trasporto del
personale sono a carica del Cliente.
La garanzia decade automaticamente al verificarsi di una delle seguenti condizioni:
a) cambio di proprietà dell'apparecchio (la garanzia è valida solo per il cliente a cui è intestata);
b) guasto provocato da trascuratezza o imperizia nell'uso (urti o cadute dell'apparecchio, errata
tensione di esercizio, ecc.);
c) guasto provocato da impiego diverso da quello a cui l'apparecchio è destinato;
d) manomissione dell'apparecchio o riparazione eseguita da persone estranee alla nostra
organizzazione (cioè non dipendenti dalle nostre officine o dai centri di assistenza tecnica
autorizzati).
Regione
Abruzzo
Calabria
Campania
Campania
Emilia Romagna
Emilia Romagna
Emilia Romagna
Emilia Romagna
Friuli Venezia Giulia
Friuli Venezia Giulia
Lazio
Lazio
Lombardia
Lombardia
Lombardia
Marche
Piemonte
Piemonte
Piemonte
Puglia
Sardegna
Sicilia
Sicilia
Toscana
Toscana
Trentino Alto Adige
Umbria
Veneto
Veneto
Veneto
Cittŕ
Pescara
Vibo Valentia
Napoli
Salerno
Bologna
Rimini
Vaciglio
Ferrara
Muggia
Beivars
7 Camini
Roma
Milano
Brescia
Varese
Civitanova Marche
Trofarello
Genola
Vercelli
Bari
Olbia
Palermo
Catania
Porcari
Firenze
Bolzano
Perugia
Cavallino
Verona
Rubano
Indirizzo
Via Mazzini, 144
Via Terravecchia Inf. 99
Via Salomone, 23
Via Acquasanta-Zona Ind.
P.zza della Pace, 7/F
Via Paolucci, 14/B
Via Collegarola, 70
Via Darsena, 74
Str. Per I Laghetti, 1
Via Emilia, 127
Via Tiburtina, 1470 Ang.
Via Feo Belcari, 303/A
Via Cadibona, 9
Via Triumplina, 19
Via Beratti, 21
Via De Amicis, 1
Str. Rondello, 11
V.Div.Alp.Cuneense, 2
S.S.142 Biella Laghi
L.go Ciaia, 4
S.S. 127Km. 2,400Loc. Ist
L.go Pisani
V.le Africa, 190
Via Romana Est, 101
Via Sirtori, 39
V.le Europa, 60
Via S. Martino in Campo
Via Fausta, 269
P.zza Carrubbio, 6/A
Via Meucci, 13
Ditta
Centrolux
Vacatello Francesco Paolo
Superfreddo sas
Frigolettieri
Accorsi Prospero
C.R.E.
Caravan Market
Fabbri Claudio
Centro Vacanze
Punto Tre
L.A.R.E. di Botti
Valleriani
Erranti e Farina
Gialdini
Bariati
CAT Cluana Caravan
Camper Home
Grosso Vacanze
Valsesia Centro Caravan
C.A.I.P.
S.A.R.C.
Centro Caravan
SIMA
Emmemme Caravan
Italux
Pedrazzoli
E 7 Caravan
Camping Market
C.A.T.E.
Caravan Service
CAP
65100
89900
80144
84100
40100
47037
4101 0
44100
34015
33100
00131
00138
20100
25100
21100
62012
10028
120 40
13060
70100
07025
90100
91100
55016
50100
39100
06079
30013
37123
35030
Prov
PE
VV
NA
SA
BO
RN
MO
FE
TS
UD
RM
RM
MI
BS
VA
MC
TO
CN
VC
BA
SS
PA
CT
LU
FI
BZ
PG
VE
VR
PD
Prefisso
085
0963
081
089
051
0541
059
0532
040
0432
06
06
02
030
0332
0733
011
0172
015
080
0789
091
095
0583
055
0471
075
041
045
049
Tel_Uff
385128
547496
7803365
302565
6141928
384276
373588
765680
231711
565793
4192204
87121126
5466919
2002385
289596
771287
6804048
68288
985225
5425475
21783
420864
533519
297850
609208
914511
609451
5371001
8000854
8976009
Fax
4510506
547133
6804048
297850
5371031
8976009
Tipo
CAT
CAT
CAT
CAT
CAT
CAT
CAT
CAT
CAT
CAT
CAT
CAT
CAT
CAT
CAT
CAT
CAT
CAT
CAT
CAT
CAT
CAT
CAT
CAT
CAT
CAT
CAT
CAT
CAT
S-CAT
Page 31

31
NL
Hartelijk dank dat u voor ons heeft gekozen! Wij zijn ervan overtuigd dat u vele jaren ongestoord van het
product zult genieten.
Onderstaand vindt u een aantal symbolen om een veilig en efficiënt gebruik van het product te verzekeren:
Gevaar bij onjuist gebruik
Tip
informatie omtrent milieu
Deze koelkast is uitsluitend bestemd voor het bewaren van drank en etenswaren.
Let op!
Dit apparaat is niet bedoeld voor gebruik door personen (inclusief kinderen)
met verminderde lichamelijk, zintuiglijk of geestelijk vermogen of gebrek aan
ervaring en kennis, tenzij aan hen toezicht of instructie is gegeven, over het
gebruik van het apparaat, door een persoon die verantwoordelijk is voor hun
veiligheid.
Er moet worden opgelet dat kinderen niet spelen met het apparaat.
Eventuele installatiewerkzaamheden die betrekking hebben op de energie
mogen uitsluitend door een electrien worden uitgevoerd.
Reparaties en service mogen uitsluitend worden uitgevoerd door een
electricien. Gebruik altijd originele onderdelen.
Het is gevaarlijk het apparaat eigenhandig te wijzigen of te modificeren.
Let erop dat het apparaat niet op de stroomkabel staat.
Het apparaat bevat delen welke zeer warm worden. Zorg voor voldoende
ventilatie om te voorkomen dat de koelprestatie onvoldoende is. Zie installatie
instructies
Let op dat de warme delen van het koelaggregaat niet vrij toegankelijk zijn.
Plaats de koelkast daarom altijd met de achterkant naar een muur. Houdt
hierbij wel rekening met de ventilatiebepalingen zoals genoemd in de
installatie instructies.
Voordat u de koelkast ontdooit, reinigt of onderhoudt dient u zich ervan te
verzekeren dat de koelkast uit staat en de stekker uit het stopcontact is.
GEBRUIK GEEN SCHERPE VOORWERPEN om het ijs af te krabben. IJsafzetting
mag nooit met kracht worden verwijderd; geef het ijs de tijd om te smelten. Zie
ontdooi instructies.
Dit apparaat is zwaar. Houdt daar rekening mee bij tillen of verplaatsen van het
product.
Repareer het apparaat nooit zelf! Reparaties door onervaren technici kunnen
persoonlijk letsel of beschadigingen aan het apparaat veroorzaken. Ga altijd
naar de gespecialiseerde dealer en vraag om originele onderdelen.
Giftige of explosieve stoffen mogen onder geen beding in deze koelkast
worden bewaard!
Lees de gebruiksaanwijzing aandachtig door voordat u het apparaat in gebruik
neemt. Als u het apparaat verkoopt of weggeeft, zorg er dan voor dat de nieuwe
eigenaar de gebruiksaanwijzing krijgt.
Neem aanwijzingen uit de handleiding zorgvuldig in acht. Garantie geldt alleen
voor apparaten welke conform de hier beschreven aanwijzingen zijn
geinstalleerd. (zie hoofdstuk 4.1)
Page 32

32
NL
INHOUD
INHOUD
1. Uitpakken
2. Afbeelding van de koelkast
3. Reiniging
4. Plaatsing van de koelkast
4.1 Installatie
5. Gebruik van de koelkast
5.1. Eerste ingebruikname
5.2. Temperatuurregeling
5. 3. Cool Unit Control (CUC)
6. Nuttige tips
7. Ontdooien, reinigen en onderhoud
7.1. Automatisch ontdooien
7.2 Binnenverlichting
7. 3. Automatisch deurcontrole LED (ADC) optie
8. Klantenservice
9. Inwerkingstelling, technische gegevens
9.1. Aansluiting op het elektriciteitsnet
10. Informatie omtrent milieubescherming
11. Recycling
Let op!
Garantiebepalingen zijn conform EU-richtlijn 44/1999/CE en de wettelijke
bepalingen van het land waarin het product wordt gebruikt.
Voor vragen over garantie, klantenservice en onderdelen kunt u contact
opnemen met Dometic servicedienst.
Schade veroorzaakt door verkeerd gebruik, valt niet onder de garantie.
Schade als gevolg van modificaties of gebruik van onjuiste onderdelen valt niet
onder de garantie.
Als het apparaat niet is ingebouwd conform onze richtlijnen of onjuist wordt
gebruikt, vervalt de garantie.
Als u contact opneemt met onze servicedienst, dient u altijd het model, produkt-
en serienummer van de koelkast bij de hand te hebben. De gegevens vindt u op
het typeplaatje aan de binnenzijde van de koelkast.
Page 33

33
NL
1. Uitpakken
Controleer na het verwijderen van de kartonnen
verpakking of de koelkast onbeschadigd is. Als u een
beschadiging ziet welke is veroorzaakt door het
transport, moet u dit direct melden aan het
transportbedrijf.
2. Afbeelding van de koelkast
1. Deur
2. Slot (indien ingebouwd)
3. Binnenverlichting
4. ACD LED (indien ingebouwd)
5. Opbergvak
6. Verdamperdeksel
7. Verdampervoeler (achter verdamper)
8. Verdamper
9. Legplank
10.Luchtvoeler
11. Wielen
12.Deurvakken
Afbeelding 1.
WANNEER U EEN KOELKAST MET SLOT HEEFT, IS DOMETIC NIET AANSPRAKELIJK VOOR VERLIES
OF BESCHADIGING VAN SLEUTELS. SLOTEN KUNNEN ALS COMPLEET ONDERDEEL WORDEN
VERVANGEN.
Page 34

34
NL
Afbeelding 2.
5. Gebruik van de koelkast
Steek de netstekker in het stopcontact en/of
schakel (indien nodig) het stopcontact in om het
apparaat in gebruik te nemen. De lege koelkast
heeft ongeveer 6-7 uur nodig om de juiste
koeltemperatuur te bereiken als hij
omgevingstemperatuur heeft.
5.1. Eerste inbedrijfstelling
Sluit het toestel aan op een geaard stopcontact.
De miniBar start automatisch met een zelftest.
Als de elektronica geen fout vaststelt, begint de
LED van het interieurlicht na ongeveer 10
seconden 2 seconden lang te branden. Als er
een fout wordt ontdekt, begint de LED continu te
knipperen. Als dat gebeurt, neem dan a.u.b.
contact op met uw geautoriseerde
klantenservice.
5.2. Temperatuurregeling
De installatie is voorzien van een volledig
elektrische temperatuurregelaar. De interne
temperatuur van de koelkast kan met de optionele
afstandsbediening, voorzien van vier knoppen
ingesteld worden. Er zijn 4 verschillende vooraf
ingestelde temperaturen: 3°C, 5°C, 7°C en 12°C.
Twee knoppen van de afstandsbediening dienen
om de temperatuur in te stellen:
- Gele knop: 3°C en 7°C.
- Blauwe knop: 5°C en 12°C.
3. Reinigen
Reinig de koelkast zorgvuldig voor de eerste
ingebruikname en daarna indien nodig. Maak de
koelkast schoon met handwarm water en een zacht
niet bijtend reinigingsmiddel. Neem daarna af met een
droge zachte doek. Droog de koelkast nooit met
behulp van droge warme lucht. De buitenkant kan
regelmatig worden afgenomen met een vochtige
doek. REINIG HET APPARAAT NOOIT MET
BIJTENDE CHEMICALIEN OF SCHUURMIDDELEN.
4. Plaatsing van de koelkast
Voordat u de koelkast aansluit, dient u met de
volgende punten rekening te houden:
ZORG DAT DE KOELKAST WATERPAS STAAT
BIJ GEBRUIK WORDEN DE LEIDINGEN AAN DE
ACHTERKANT WARM
DE KOELKAST WERKT ZONDER COMPRESSOR
EN MAAKT DAAROM GEEN GELUID
NA DRIE UUR TREEDT WAARNEEMBARE
KOELING OP
Tijdens het koelproces geeft de koelkast via de
condensor (bovenste gedeelte van de
achterplaat) warmte af aan de omgeving. Hoe beter de
ventilatie van de condensor, hoe efficiënter de
koeling.
Een andere voorwaarde voor een efficiënt gebruik
is dat de koelkast op een vlakke ondergrond moet
staan. Om te kunnen zien of de koelkast waterpas
staat, kunt u het beste een glas water op de
koelkast plaatsen.
Stel de koelkast niet bloot aan directe
warmtestraling (zonlicht, radiator, dicht bij een
oven, enz.)
4.1. Installatie
De koelkast is uitgerust met een elektrisch
verwarmde absorberende koelingseenheid, die
nagenoeg geruisloos functioneert.
Binnenin de koelkast vindt u een plastic zak
waarin 4 kleine wieltjes aanwezig zijn. Gelieve de
koelkast voorzichtig op de achterkant te leggen en
de assen van de wieltjes in de in het onderste
gedeelte ingebouwde metalen hulzen te steken
(afbeelding 2.). Op die manier kunt u uw koelkast
steeds naar de plaats bewegen, waar u hem wilt
hebben.
Gebruik de koelkast nooit zonder
gemonteerde wieltjes, omdat er anders
onvoldoende ventilatie is!
Gele knop:
3°C/7°C
Zwarte
knop:
Terugstellen
koeleenheid
Blauwe
knop:
5°C/12°C
Rode
knop:
Terugstel
len rood
punt
Page 35

35
NL
Bijv. om 7°C in te stellen doe het volgende:
Open de deur van de installatie.
Houd de afstandsbediening voor de sensor in de
deur, op een afstand van ong. 10 cm ervan. Druk
een keer op de gele knop en tel, hoe vaak het
lichtje van de led aan de binnenkant knippert. Is dit
drie keer, dan is de vooraf ingestelde waarde
gewijzigd in 3°C.
Voor het instellen van de gewenste 7°C druk nog
een keer op de gele knop. De led knippert zeven
keer en de vooraf ingestelde temperatuur wordt
7°C.
Volg voor het instellen van bijv. 12°C ook de
bovenstaande stappen, maar gebruik hiervoor de
blauwe knop.
5.3. Cool Unit Control (CUC)
De elektronica controleert de werking na iedere
ontdooifase (elke 24 uur) door middel van een meting
van de temperatuurdaling van de verdamper. Als er
een probleem wordt vastgesteld, stopt de werking van
de koelkast en de LED's van het binnenlicht beginnen
continu te knipperen. Als dat gebeurt, controleer dan
of de koelkast overbelast is, of de deur correct afsluit,
of de koeleenheid voldoende geventileerd is en of de
koelkast waterpas staat. Na controle de stekker van
de koelkast minstens voor 10 seconden uit het
stopcontact trekken en weer aansluiten. De
koeleenheid wordt gereset en begint weer te werken.
Mocht u merken, dat het toestel niet koelt, dan is er
waarschijnlijk een probleem en dient u contact op te
nemen met de klantenservice.
6. Nuttige tips
Zet de koelkast niet te vol. Indien mogelijk, alleen
afgekoeld voedsel in de koelkast zetten. Zorg voor
ruimte tussen drank en etenswaren, zodat de koele
lucht gelijkmatig en betrouwbaar kan circuleren.
Overvolle plankjes leiden tot ongewenst hoge
temperatuurverschillen in de koelkast.
7. Ontdooien, reinigen en
onderhoud
Na verloop van tijd kan zich een ijslaagje op de
koelribben afzetten. Deze ijslaag mag niet te dik
worden, omdat deze dan isolerend werkt en het
koelvermogen verminderd.
De miniBar beschikt over een volautomatische,
elektronische temperatuurregeling.
Het ijs smelt waarna het dooiwater van de druppelgoot
via een drainageslang in de verdampingsbak aan de
achterkant van de koelkast loopt (afbeeld. 7). Het
water verdampt zelf, waardoor het niet nodig is de bak
handmatig te legen.
Afbeelding 3.
De koelkast wordt uitgeschakeld door de stekker
uit het stopcontact te trekken en de deur open te
laten. Na het ontdooien reinigt u de binnenkant van
de koelkast met een schoon en vochtig doekje (zie
punt 3).
7.1. Automatische ontdooiing
De eerste ontdooifase begint 39 uur na het eerste
inschakelen en duurt twee uur. Daarna koelt het
apparaat 22 uur aan een stuk, opgevolgd door een
ontdooifase, die twee uur duurt.
7.2. Binnenverlichting (afb.4)
Twee lichtgevende diodes (A) op een elektronische
printplaat verlichten de binnenruimte van het
apparaat, wanneer de deur geopend wordt.
Twee sensoren (B)herkennen of de deur geopend
is en geven dit door aan deze lichtgevende diodes.
Afbeelding 4.
7. 3. Automatisch deurcontrole LED
(ADC) optie
De LED (afb. 5. A), toont of de miniBar geopend is
geweest. Als dat het geval is:
1. open dan de miniBar, controleer de inhoud van
de koelkast en vul bij wat er ontbreekt.
2.reset het deurcontrolelampje door de
afstandsbediening tegen de deursensor te
houden (afb. 4. B) en op de knop te drukken.
3. sluit de miniBar.
B
A
Page 36

36
NL
Afbeelding 5.
8. Klantenservice
Bij storingen dient u eerst de onderstaande punten te
controleren voordat u contact opneemt met de
servicedienst:
Als de koelkast na deze controle nog steeds niet goed
functioneert, kunt u contact opnemen met de
servicedienst, telefoon 0172 468 300. Wanneer u de
storing meldt, vertel dan ook wat het probleem is
samen met type-, serie- en productnummer. Deze
gegevens vindt u op het typeplaatje in de koelkast.
Neem hiervoor eventueel contact op met uw
plaatselijke dealer. Het adres staat in uw telefoongids
of in de Goude
www.dometic.com
9. Inwerkingstelling
Technische gegevens:
Model RH 465LD
Type MB20-60
Bruto inhoud 34 l
Spanning 220 - 240V (AC)
Vermogen 65W
Energieverbruik 0,700 kWh/24h
Klimaatklasse N
Koelmiddel 147g H
2
O+98g NH
3
Probleem
Het apparaat koelt niet (voldoende)
Het toestel koelt helemaal niet
Eventuele oorzaak
Te veel warm voedsel in de koelkast
geplaatst
De deur sluit niet volledig.
Interne luchtcirculatie is gestoord
Het CUC-systeem heeft de koelkast buiten
werking gezet
De stekker is niet goed in het stopcontact
gestoken.
Er staat geen spanning op het stopcontact
Oplossing
Zet minder warm voedsel in de
koelkast
Controleer of de deur gesloten is
Maak de interne luchtcirculatie
weer mogelijk
Zie hoofdstuk 5.3.
Controleer stekker en stopcontact.
Controleer of er spanning is.
* Het energieverbruik wordt bij een omgevingstemperatuur van
12°C25°C (kelder) vastgesteld.
Page 37

37
NL
9.1. Aansluiting op het
elektriciteitsnet
Het apparaat mag uitsluitend worden aangesloten op
de op het typeplaatje vermelde netspanning. De
stekker mag uitsluitend worden aangesloten op een
geaard stopcontact, conform de wettelijke
voorschriften.
De vereiste elektrische installaties voor de aansluiting
mag alleen worden uitgevoerd door een elektricien of
een erkend bedrijf.
De producent aanvaardt geen enkele
aansprakelijkheid indien deze
veiligheidsmaatregelen niet in acht worden
genomen.
Elektrische eisen
Controleer of de aanwezige stroomspanning
overeenkomt met de gegevens op het typeplaatje.
10. Informatie omtrent
milieubescherming
Ammoniakgas (natuurlijke waterstof en
stikstofverbinding) wordt gebruikt als koelmiddel in het
koelaggregaat.
Het ozonvriendelijke cyclopentaan dient als
blaasmiddel voor de polyurethaan schuimisolatie.
Natriumchromaat wordt gebruikt als bescherming
tegen corrosie (minder dan 2 procent gewicht van het
koelmiddel).
11. Recycling
Nadat u de koelkast heeft uitgepakt, brengt u het
verpakkingsmateriaal bij voorkeur naar een plaatselijk
inzamelpunt. Na het einde van de levensduur moet de
koelkast worden ingeleverd bij een gemeentelijk
inzameldepot of bij een gespecialiseerd inzamel- en
recyclingbedrijf, dat de nog recyclebare materialen
terug zal winnen. Het restant wordt volledig vernietigd.
Apparaten, die met dit symbool zijn
voorzien, moeten bij het gemeentelijk
verzamelpunt voor afgedankte elektrische
en electronische apparatuur worden
afgegeven.
Ze mogen niet via het gewone huisafval
worden weggegooid.
Bij koelkasten van Dometic staat het symbool op het
typeplaatje aan de binnenkant van het apparaat.
Dit toestel voldoet aan de EU-richtlijnen als volgt:
LVD-Richtlijn 72/23/EEG, gewijzigd bij
90/683/EEG
EMC-Richtlijn 89/336/EEG
RoHS-Richtlijn 2002/95/EG
Page 38

38
ES
Muchas gracias por haber preferido uno de nuestros productos. Estamos seguros de que podrá
usarlo con confianza y sin problemas.
En este manual deseamos familiarizarle con algunos símbolos que le ayudarán a utilizar este aparato
de forma segura y eficiente:
fuente de peligro en caso de manejo indebido
sugerencias útiles a tener en cuenta
información relativa a la protección del medio ambiente
Este refrigerador está diseñado para conservar alimentos y bebidas.
¡Atención!
Este electrodoméstico no debe ser utilizado por personas (incluidos niños) con
capacidades físicas, sensoriales o mentales reducidas, o con falta de experiencia o
sin los conocimientos necesarios, a no ser que sean supervisados o instruidos por
personas que se responsabilicen de su seguridad.
Los niños deben ser supervisados para asegurar que no jueguen con el aparato.
Todos los trabajos de electricidad que se requieran para instalar este aparato
deben ser realizados por un técnico electricista cualificado.
Este producto debe ser reparado por un Ingeniero de servicio autorizado y sólo
deben usarse piezas de recambio originales.
Es peligroso alterar las especificaciones o modificar este producto de cualquier
manera.
Se debe tener cuidado para asegurarse de que el aparato no quede sobre el cable
de alimentación eléctrica.
Este producto tiene componentes que se calientan. Asegúrese siempre de que
tenga una ventilación adecuada, puesto que si no la tiene podrían ocurrir averías y
la posible pérdida del contenido. Vea las Instrucciones de instalación.
Las partes que se calientan no deben dejarse al descubierto. La parte posterior de
este aparato debe estar cerca de una pared, pero dejando la distancia requerida
para la ventilación, como se indica en las instrucciones de instalación.
Antes de descongelarlo, limpiarlo o darle mantenimiento, asegúrese de apagarlo y
desenchufarlo.
NO USE INSTRUMENTOS PUNTIAGUDOS NI CORTANTES para desprender la
escarcha o el hielo. En ningún caso se deberá intentar quitar el hielo
desprendiéndolo de las aletas de enfriamiento a la fuerza. Se debe permitir que el
hielo sólido se derrita al descongelar la unidad. Vea las instrucciones sobre la
descongelación.
Este aparato es pesado. Tenga cuidado al moverlo.
En ningún caso debe intentar reparar el aparato usted mismo. Las reparaciones a
cargo de personas inexpertas pueden causar lesiones o problemas más graves de
funcionamiento. Diríjase al Centro de Servicio de su localidad e insista siempre en
piezas de recambio originales.
¡Se prohíbe guardar cualquier sustancia tóxica o explosiva en este aparato!
Lea atentamente este Manual de Instrucciones antes de poner este aparato en
marcha. Si en el futuro Ud. lo vende o se deshace de él, asegúrese entonces de que
el nuevo propietario reciba también este Manual de Instrucciones.
Le rogamos seguir atentamente los detalles de instalación que presentamos a
continuación. La garantía sólo es válida si los productos se instalan según las
instrucciones. (Vea el Capítulo 4.1.)
Page 39

39
ES
¡Atención!
Las condiciones de la garantía corresponden a la Directiva 44/1999/CE de
la Unión Europea y las respectivas leyes vigentes del país donde se utilice
este aparato.
Si usted tiene alguna pregunta sobre la garantía y el servicio al cliente o si
necesita piezas de recambio, diríjase por favor a la Red de Servicio de
Dometic.
La garantía no cubre daños causados por el uso indebido de este aparato.
La garantía no cubre las modificaciones al aparato ni tampoco el empleo de
piezas de recambio que no sean piezas originales de Dometic.
La garantía quedará anulada si este aparato se instala o se utiliza de forma
contraria a la estipulada en las instrucciones.
Indique por favor el nombre del modelo así como el número del producto y
su número de serie al comunicarse con la Red de Servicio de Dometic.
Hallará estos datos en la placa de características técnicas situada en el
interior del refrigerador.
CONTENTS
1. Desembalaje
2. Componentes del aparato
3. Limpieza
4. Ubicación del aparato
4.1. Instrucciones de instalación
5. Uso del aparato
5.1. Operación inicial
5.2. Regulación de la temperatura
5.3. Control de la Unidad Refrigeradora (CUR)
6. Sugerencias útiles
7. Descongelación, limpieza y mantenimiento
7. 1. Función de descongelación automática
7. 2. Luz interna
7. 3. Diodo del Control de Puerta Automático (ADC) opcional
8. Servicio al cliente
9. Puesta en servicio, datos técnicos
9. 1. Conexión a un circuito eléctrico
10. Información sobre protección medioambiental
11. Reciclaje
Page 40

1. Desembalaje
Después de retirar la caja de embalaje, revise
para detectar cualquier daño que pueda haber
sufrido el aparato. Si usted detecta algún daño
ocurrido durante el transporte, informe entonces
inmediatamente a la empresa de transporte.
2. Componentes del aparato
1. Puerta
2. Cerradura de la puerta (si está disponible)
3. Luz interna
4. Diodo del Control de Puerta Automático
(si está disponible)
5. Secciön de almacenami ento
6. Tapa del evaporador
7. Sensor del evaporador (detrás
del evaporador)
8. Evaporador
9. Estantes
10. Sensor de aire
11. Ruedas
12. Estantes de la puerta
Figura 1.
EN EL CASO DE QUE SU REFRIGERADOR ESTÉ EQUIPADO CON UNA CERRADURA,
DOMETIC ZRT NO ACEPTA NINGUNA RESPONSABILIDAD POR LA PÉRDIDA O EL DAÑO DE
LAS LLAVES. SE PUEDE SUMINISTRAR UNA CERRADURA COMPLETA.
40
ES
Page 41

41
ES
No use la nevera sin haber instalado antes
las ruedas. De no hacerlo así, no tendrá una
ventilación adecuada.
Figura 2.
5. Uso del aparato
Para poner a funcionar el refrigerador,
conéctelo a la toma de corriente. El refrigerador
vacío necesita estar aproximadamente 6-7
horas a temperatura ambiente normal para
alcanzar la temperatura apropiada en su
interior.
5.1. Operación inicial
El aparato debe conectarse a una tomada
corriente que esté puesta correctamente a
tierra.
El miniBar se pone en marcha
automáticamente iniciando también en forma
automática una prueba de su propio
funcionamiento. Si los componentes
electrónicos no detectan alguna falla, el
diodo interno se ilumina durante 2 segundos
después de aproximadamente 10 segundos.
Si detectan alguna falla, dicho diodo interno
cambia a un parpadeo continuo. Si esto
llegase a ocurrir, por favor acuda a un centro
de Servicio al Cliente.
5.2. Regulación de la temperatura
El aparato está provisto de un sistema
electronico de ajuste de temperatura
automática. La temperatura interna del frigorí
fico se puede ajustar con un telecomando
opcional con 4 teclas. Se puede ajustar 4
temperaturas 3°C, 5°C, 7°C y 12°C. Dos
teclas sirven para ajustar la temperatura:
- Tecla amarilla: 3°C y 7°C.
- Tecla azul: 5°C y 12°C.
3. Limpieza
Limpie minuciosamente el refrigerador con
regularidad, según sea necesario. Retire las
bandejas de los estantes para lavarlas, al igual
que debe lavar la parte interior y la puerta del
refrigerador con una solución tibia de bicarbonato
de sodio. Por último, pase un paño empapado
con agua tibia únicamente y séquelo con un paño
limpio. No lave ninguna pieza de plástico en agua
que esté a mayor temperatura que la temperatura
del cuerpo y no exponga esas piezas a una fuente
de calor seco. La parte exterior del refrigerador
debe limpiarse regularmente con un paño
húmedo y limpio.
NUNCA USE AGENTES QUÍMICOS
AGRESIVOS NI MATERIALES ABRASIVOS EN
NINGUNA PARTE DEL REFRIGERADOR.
4. Ubicación del aparato
Al usar por primera vez el refrigerador, considere
por favor los siguientes aspectos:
ASEGÚRESE DE QUE EL REFRIGERADOR
ESTÉ NIVELADO
LOS TUBOS EN LA PARTE POSTERIOR SE
PONEN CALIENTES CON EL USO
EL REFRIGERADOR NO TIENE UN 'MOTOR'
Y, POR TANTO, ES VIRTUALMENTE
SILENCIOSO
ESPERE AL MENOS TRES HORAS PARA
VER LAS PRIMERAS SEÑALES DE
ENFRIAMIENTO
Durante el proceso de refrigeración, el
aparato distribuye aire caliente a través del
condensador (situado en la parte superior de la
cubierta posterior) hacia el aire circundante.
Cuanto más ventilado esté el condensador, tanto
más efectiva será la refrigeración.
La segunda condición para un funcionamiento
satisfactorio es que el aparato quede asentado
sobre una superficie plana. Esto puede
apreciarse colocando un vaso lleno de agua
sobre el aparato.
Es importante que el aparato no esté expuesto
a ninguna fuente directa de radiación de calor
(luz solar, radiador, cerca de un horno, etc.).
4.1. Instrucciones de instalación
El frigorífico está equipado con una unidad
eléctrica de enfriamiento por absorción del calor
que, en la práctica, tiene un funcionamiento
totalmente silencioso.
En el interior del frigorífico se encuentra una bolsa
de plástico en la que se hallan cuatro ruedas
pequeñas. Coloque el frigorifico cuidadosamente
en su lado dorsal, introduciendo las espigas de
las ruedas en los manguitos metálicos
incorporados en la parte inferior (Fig. 2.). Esto
permite desplazar el frigorífico al lugar donde lo
necesite.
Page 42

Por ejemplo para ajustar el valor de 7°C, se debe
seguir las instrucciones siguientes:
Abrir la puerta del aparato
Tener el telecomando delante del sensor de la
puerta, a 10 cm. Pulsar la tecla amarilla una
vez, contar las centellas del LED interno. Si el
número es tres, el valor preajuste se cambia en
3°C.
Para la temperatura de 7°C, se debe pulsar la
tecla una vez más. El LED centellea siete veces
y el valor cambia en 7°C.
Para ajustar la temperatura a 12°C, se debe
hacer la misma cosa pero con la tecla azul.
5.3. Control de la Unidad
Refrigeradora (CUR)
Les componentes electrónicos comprueban el
funcionamiento del refrigerador después de cada
período de descongelación (24 horas), midiendo
el descenso de la temperatura del evaporador. Si
dichos componentes detectan un problema, el
refrigerador se apagará y los diodos luminosos en
su interior comenzarán a parpadear
continuamente. Si estos componentes detectan
un problema, hay que comprobar si no se
hacargado excesivamente el refrigerador, si
lapuerta está cerrada correctamente, si
laventilación de la unidad de refrigeración
esadecuada y si el refrigerador está nivelado.
Después de efectuar estas comprobaciones, hay
que desenchufar el refrigerador para al menos 10
segundos y volver a enchufarlo. Así la unidad
volverá a funcionar. Si la refrigeración no se
lanza, hay algún problema, por eso le pedimos
que acuda al Servicio de Cliente Dometic.
6. Sugerencias útiles
No cargue excesivamente el refrigerador. Siempre
que sea posible, guarde en el refrigerador
alimentos y bebidas previamente enfriados. Es
recomendable dejar algún espacio entre los
productos en el refrigerador para que el aire frío
pueda circular en forma eficiente y pareja. Si las
bandejas del refrigerador se abarrotan con
artículos, es posible que se produzcan
variaciones inaceptables de temperatura.
7. Descongelación,
limpieza
y mantenimiento
La escarcha se formará gradualmente en las
superficies de enfriamiento y no se debe
permitir que llegue a ser demasiado gruesa
puesto que actuaría como un obstáculo
aislante que afectaría el enfriamiento.
Este miniBar está equipado con un regulador
de temperatura totalmente automático y de
control electrónico.
La escarcha se derretirá y el agua de la
descongelación circulará por el tubo de
desagüe desde el canal de goteo cayendo en
un recipiente de evaporación situado en la
parte inferior trasera del refrigerador (Figura 5).
El agua descongelada se evaporará
automáticamente en el aire circulante y no será
necesario vaciar el recipiente manualmente.
Figura 3.
Si desea desactivar la unidad para
descongelarla, desconecte el refrigerador de la
fuente de alimentación eléctrica y deje abierta
la puerta del refrigerador. Después de la
descongelación, la parte interior del
refrigerador debe limpiarse con un paño
húmedo y limpio.
7.1. Función de descongelación
automática
La primera fase de descongelación se inicia 39
horas después de la operación inicial y dura
dos horas.
Después de ese tiempo, el aparato funciona 22
horas seguidas, luego de las cuales viene un
período de descongelación de 2 horas.
7.2. Luz interna (figura 4)
Dos diodos luminosos (A) situados en una
placa de circuitos impresos electrónicos
iluminan el compartimento de refrigeración al
abrir la puerta.
Dos sensores (B) detectan si la puerta está o
no está abierta y los diodos se encienden o se
apagan dependiendo de ese estado.
42
ES
Tecla
amarilla:
3°C/7°C
Tecla
negra:
Restableci
miento de
la unidad
de
refrigeraci
ón
Tecla
azul:
5°C/12°C
Tecla
roja:
Restabl
ecimient
o del
punto
rojo
Page 43

43
ES
Figura 4.
7.3. Diodo del Control de Puerta
Automático (ADC) opcional
El diodo (Fig. 5 A) indica si se ha abierto la puerta
del Minibar y en ese caso:
1. Abra el miniBar, revise el contenido y, si lo
desea, añada algún otro alimento o bebida.
2. Reponga seguidamente la señal de control de
la puerta a su estado anterior dirigiendo el
mando a distancia al sensor de la puerta (Fig. 4
B) y pulsando el botón.
3. Cierre el miniBar.
Figura 5.
8. Servicio al cliente
Antes de avisar al Servicio al Cliente, compruebe
lo siguiente:
B
A
Problema
El aparato no enfría lo suficiente
El aparato no enfría en absoluto
Posible causa
Se introdujeron demasiados
alimentos en su interior.
La puerta no se cerró correctamente.
Hay obstáculos a la circulación del
aire en el interior del refrigerador.
El Control de la Unidad
Refrigeradora dejó de funcionar
El aparato no está correctamente
conectado a una toma de corriente.
No hay voltaje en la toma de
corriente.
Solución
Reduzca la cantidad de alimentos
en el interior del refrigerador.
Cierre la puerta correctamente.
Asegúrese de que haya una buena
circulación en el interior del
refrigerador.
Vea la instrucción de
funcionamiento 5.3.
Compruebe si está correctamente
conectado a una toma de corriente.
Compruebe si hay voltaje en esa
toma.
Page 44

10. Información sobre
protección
medioambiental
Como agente refrigerante del aparato se
emplea amoníaco (un compuesto natural de
nitrógeno e hidrógeno).
El ciclopentano, inocuo para la capa de ozono,
se utiliza como agente de inyección para el
aislamiento de espuma de poliuretano.
Como protección contra la corrosión se utiliza
cromato de sodio (menos del 2 por ciento del
peso del refrigerante).
11. Reciclaje
Después de desempacar el aparato, los
materiales de embalaje deben ser enviados a
un centro local de recogida. Al final de su vida
útil, el aparato deberá enviarse a un centro
especializado de recogida y reprocesamiento,
para que se recuperen los materiales
aprovechables. Deberá disponerse del resto de
los materiales conforme a las normas.
Los aparatos que lleven este
símbolo deberán depositarse en los
lugares locales de recogida de
aparatos eléctricos y electrónicos.
Este producto no debe desecharse
en la basura doméstica
convencional.
Los refrigeradores de Dometic llevan el
símbolo en la placa de datos (placa indicadora)
situada en el interior del aparato.
Este unidad cumple con las siguientes
directivas de la EEC:
Directiva LVD 73/23/EEC, con la modificación
90/683/EEC
Directiva EMC 89/336/EEC
Directiva RoHS 2002/95/EC
44
ES
Si, después de comprobar todos estos aspectos,
el refrigerador sigue sin funcionar correctamente,
avise entonces al ingeniero de servicio más
cercano a su domicilio. Al llamar a este servicio,
describa el problema e indique el tipo y el modelo
del aparato, así como el número de la unidad y el
número de serie.
(Los detalles sobre el modelo, el número de la
unidad y el número de serie se encuentran en la
placa de características técnicas situada en la
parte superior izquierda del compartimento
interior.)
En caso de que ocurra cualquier falla,
comuníquese con su Centro de Servicio más
cercano. De ser necesario, consulte la guía de
teléfonos de su localidad.
www.dometic.com
9. Puesta en servicio
Datos técnicos:
9.1. Conexión a un circuito
eléctrico
Este aparato sólo debe ponerse a funcionar con
la tensión eléctrica nominal de la red indicada en
la placa de características técnicas del fabricante.
El aparato debe enchufarse a una toma de
corriente con puesta a tierra, conforme a las
disposiciones locales vigentes.
Las instalaciones eléctricas necesarias para la
conexión del aparato deben ser realizadas
únicamente por un electricista u otro técnico
cualificado.
El fabricante declina absolutamente cualquier
responsabilidad en caso de que no se tomen
estas medidas de seguridad.
Requisitos eléctricos
Antes de conectar la unidad, compruebe si la
tensión de la red eléctrica se corresponde con la
tensión indicada en la placa de características
técnicas del fabricante.
Modelo RH 465LD
Tipo MB20-60
Volumen bruto 34 litros
Alimentación de red 220 - 240V (AC)
Consumo de corriente 65W
Consumo de energía 0,700 kWh/24h
Clase de clima N
Solución de absorción 147g H
2
O+98g NH
3
* El consumo de energía se calcula con una temperatura
ambientale de 12°C25°C (sótano).
Page 45

45
PT
Obrigado por ter escolhido o nosso produto. Nós temos a certeza que lhe vai propor uma utilização
sem problemas.
De seguida queremos apresentar-lhe alguns símbolos, que apresentamos para assegurar o
funcionamento seguro e eficaz deste aparelho:
Fonte de perigo em caso de utilização imprópria
sugestões para a utilização
Informações relativamente à protecção ambiental
Este miniBar tem como função, o armazenamento de alimentos e bebidas.
Este produto foi concebido para ser utilizado por adultos. As crianças
não devem ser autorizadas a mexer nos controlos ou a brincar com o
produto.
Qualquer trabalho eléctrico requerido para instalar este aparelho, deve
ser executador por um electricista qualificado.
A manutenção deste produto tem de ser efectuada por um electricista e
apenas devem ser utilizadas peças sobresselentes originais.
É perigoso alterar as especificações ou modificar este produto de
qualquer modo.
Tem de se tomar cuidado, para assegurar que o aparelho não se encontra
colocado sobre o cabo eléctrico.
Existem componentes neste produto que aquecem. Assegure-se sempre
de que há uma ventilação adequada, pois em caso de falha isso resultará
em falhas nos componentes e uma possível perda do conteúdo. Veja as
instruções de instalação.
Os componentes que aquecem não devem ser expostos. A parte traseira
do produto deve estar perto de uma parede, deixando no entanto a
distância necessária para a ventilação, como se encontra especificado
nas instruções de instalação.
Antes de proceder aos trabalhos de descongelamento, limpeza e
manutenção, certifique-se de ter desligado o aparelho e de ter retirado a
ficha da tomada.
NÃO USE INSTRUMENTOS CORTANTES para raspar partes congeladas
ou gelo. Não deve forçar, seja em que circunstância for, a saída do gelo
dos elementos de congelação. Deve-se permitir que o gelo derreta,
quando proceder à descongelação do aparelho. Veja as instruções de
descongelação.
Este aparelho é pesado. Deve-se tomar cuidado ao move-lo.
Não deve tentar reparar o aparelho, seja em que circunstância for. As
reparações efectuadas por pessoas inexperientes, podem causar danos
ou avarias. Dirija-se ao seu Centro de Serviço local e insista sempre em
peças sobresselentes originais.
É proibido guardar substâncias tóxicas ou explosivas neste aparelho!
Antes de utilizar esta unidade de refrigeração leia atentamente este manual
de instruções. Caso, mais tarde queira vende-lo ou reciclá-lo, assegure que
o novo proprietário receba este manual de instruções.
Por favor siga os seguintes detalhes de instalação com cuidado. A garantia
é válida para os produtos instalados apenas como descrito. (Veja o
capítulo 4.1)
Page 46

Atenção!
Os acordos referentes à garantia estão em concordância com a directiva
CEE 44/1999/CEE e com as condições normais aplicáveis no país em
questão.
Para garantia ou outros serviços tais como, peças sobresselentes contacte
por favor o nosso Serviço de Rede Dometic.
A garantia não cobre quaisquer danos causados por uso impróprio.
A garantia não cobre quaisquer modificações feitas no aparelho ou o uso
de peças sobresselentes que não sejam originais Dometic.
A garantia não será aplicada, se as instruções de instalação e
funcionamento não forem seguidas.
Ao contactar o Serviço de Rede Dometic, mencione por favor, o modelo,
número do produto e número de série. Encontrará esta informação na placa
de dados, colocada na parte interior da geladeira.
ÍNDICE
1. Desembalar
2. Vista do aparelho
3. Limpeza
4. Colocação do aparelho
4.1. Instruções de instalação
5. Utilização do aparelho
5.1. Operação inicial
5.2. Regulação da temperatura
5.3. Controlo da unidade de congelamento (CUC)
6. Sugestões úteis
7. Descongelar, limpar e manter
7.1. Função de descongelamento automático
7.2. Luz interior
7.3. Díodo luminoso para um controlo automático da porta (ADC) opcional
8. Serviço de cliente
9. Pôr em funcionamento, dados técnicos
9.1. Ligação à rede eléctrica
10. Informações sobre a protecção ambiental
11. Reciclagem
46
PT
Page 47

47
PT
1. Desembalar
Após ter removido a embalagem, verificar se o
aparelho năo está danificado. Caso encontre danos
no aparelho resultantes do transporte, informe de
imediato a empresa transportadora.
2. Vista do aparelho
1. Por ta
2. Fecho da porta (se disponível)
3. Lâmpada
4. Diodo luminoso ADC (se disponivel)
5. Compartimento de arruma
ção
6. Tampa do evaporador
7. Sensor do evaporador
(atras do evaporador)
8. Evaporador
9. Prateleiras
10.Sensor do ar
11. Rodas
12. Prateleiras da porta
Figura 1.
EM CASO DA SUA MINIBAR SE ENCONTRAR EQUIPADA COM FECHAUDA, A DOMETIC ZRT
NÃO SE RESPONSABILIZA POR PERDA OU DANOS DE CHAVES. PODE SER FORNECIDO UM
FECHADURA COMPLETA.
Page 48

Figura 2.
5. Utilização do aparelho
Para ligar a geladeira, insira a ficha na tomada.
A geladeira vazia precisa cerca de 6-7 horas a
uma temperatura ambiente normal, para atingir
a temperatura adequada no compartimento de
armazenamento.
5.1. Operação inicial
O dispositivo tem de ser ligado a uma
tomada de terra apropriada.
O miniBar inicia o seu funcionamento
automaticamente com um auto-teste. Se a
electrónica não detecta qualquer falha, o
díodo luminoso da iluminação interior
ilumina-se por 2 segundos, após cerca de 10
segundos. Caso seja detectada uma falha, a
iluminação muda para um piscar contínuo.
Caso isto aconteça, faça o favor de consultar
o serviço de clientes.
5.2. Regulação da temperatura
O miniBar está equipado com um sistema
electrónico de regulação de temperatura
automática. A temperatura interna do
refrigerado pode ser ajustada com um
telecomando de opção com 4 botões. E
possível regular 4 temperaturas: 3°C, 5°C,
7°C e 12°C. 2 botões do telecomando são pelo
ajuste da temperatura:
- Botão amarelo: 3°C e 7°C.
- Botão azul: 5°C e 12°C.
3. Limpeza
Limpe O MINIBAR bem e regularmente,
sempre que necessário. Retirar as
prateleiras. No interior, as prateleiras e a porta,
devem ser lavadas com uma solução morna de
bicarbonato de sódio. Finalmente, enxagúe com
um esfregão em água morna e seque com um
pano limpo. Não lave quaisquer partes de plástico
com água que não esteja morna e não as exponha
ao calor intenso. A parte exterior deve ser limpa
regularmente, enxaguando com um pano húmido.
NUNCA USE QUÍMICOS FORTES OU
MATERIAIS DE LIMPEZA ABRASIVOS EM
QUALQUER PARTE DO APARELHO.
4. Colocação do aparelho
Ao utilizar a geladeira pela primeira vez, tenha
atenção aos seguintes pontos:
ASSEGURE-SE DE QUE A MINIBAR SE
ENCONTRA NIVELADA
A LIGAÇÃO NA PARTE TRASEIRA AQUECE
COM A UTILIZAÇÃO
A MINIBAR NÃO POSSUI "MOTOR", PELO
QUE SE TORNA MUITO SILENCIOSO
PERMITA UM MÍNIMO DE 3 HORAS PARA
OBTER SINAIS DE CONGELAMENTO
Durante o processo de refrigeração o
aparelho emite calor do condensador (por
baixo da parte superior da cobertura traseira) para
o ar ambiente. Quando mais ventilado se encontre
o condensador, mais eficaz será a refrigeração.
·Outra condição para um funcionamento
satisfatório é, que o aparelho esteja nivelado.
Isto verifica-se da melhor maneira, colocando
um copo de água em cima do aparelho.
É importante que o aparelho não esteja exposto
directamente a calor (raios solares, radiadores,
perto de um forno, etc.).
4.1. Instruções de instalação
O frigorífico está equipado uma unidade
refrigeradora de absorção aquecida
electricamente, que é realmente silenciosa em
funcionamento.
Dentro do frigorífico encontra um saco de plástico
que contém 4 pequenas rodas. Deite
cuidadosamente o frigorífico de costas e insira os
pinos das rodas nos suportes de metal que se
encontram na parte de baixo do frigorífico (fig. 2.).
Desta forma poderá sempre deslocar o seu
frigorífico para onde ele for preciso.
Não utilize a frigideira se não tem instalado
previamente as rodas! Se não, você não
disporá de uma ventilação adequada!
48
PT
Page 49

49
PT
Por exemplo: per regular o valor 7°C, aconselhase o seguinte:
Abrir a porta do refrigerador
Pôr o telecomando diante da sensor da porta a
10 cm. Tocar o botão amarelo uma vez, contar
os cintilaçoes do LED interno. Se há 3
cintilaçoes, o valor ajustado é 3°C.
Pela temperatura de 7°C, tocar o botão
amarelo uma vez mais. Se há 7 cintilaçoes, o
valor ajustado é 7°C.
Pela temperatura de 12°C, fazer a mesma
cosa, mas com o botão azul.
5.3. Controlo da unidade de
congelamento (CUC)
O componente electrónico verifica o
funcionamento, após cada período de
descongelamento (cada 24 horas), medindo a
temperatura das gotas do evaporizador. Se
registar algum problema o refrigerador será
desligado e o díodo luminoso da luz interior
começa a piscar de modo contínuo. Caso isto
aconteça deverá verificar se o refrigerador não foi
sobrecarregado, se a porta está correctamente
fechada e se a ventilação da unidade de
congelamento está correcta e se o refrigerador
está nivelado. Após a verificaçã o, desligue o
refrigerador por 10 segundos e volta a ligá-lo.
Assim o dispositivo voltará a funcionar. Se não,
existe um problema e devia-se contactar o serviço
da Dometic.
6. Sugestão útil
Não encha demasiado o aparelho. Se possível,
meta as bebidas/comida pré-congeladas no
aparelho. É conveniente deixar algum espaço
entre os produtos no aparelho, para assegurar
uma refrigeração mais eficaz e regular. Se as
prateleiras se encontrarem demasiado juntas,
podem existir variações de temperatura
inaceitáveis.
7. Descongelar, limpar e
manter
O gelo formar-se-á gradualmente na placa do
congelador e não deve ser permitido que se
torne muito denso, uma vez que interfere no
congelamento.
O miniBar está equipada com um regulador
electrónico de temperatura totalmente
automático.
O gelo derrete e a água proveniente da
descongelação escorrerá através do tubo de
drenagem da goteira para o recipiente de
evaporação, localizado no fundo da parte
traseira do miniBar. (fig. 5) A água proveniente
do descongelamento evaporar-se-á
automatica-mente no ar circulante e por isso
não é necessário esvaziar o recipiente.
Para desligar a unidade, desligue o miniBar do
fornecimento de electricidade e deixe a porta
do aparelho aberta. Após descongelar, o
interior deve ser seco, com um pano limpo e
húmido.
Figura 3.
7.1. Função de descongelamento
automático
A primeira fase de descongelamento começa
39 horas após o inicio e dura duas horas.
Após isto, o aparelho funciona por um período
de 22 horas, seguido por um período de 2
horas de descongelamento.
7.2. Luz interior (fig 4.)
Dois díodos de iluminação (A) colocados numa
placa de condução electrónica, iluminam o
compartimento de congelação, quando a porta
se encontra aberta.
Dois sensores (B) controlam, se a porta se
encontra fechada ou não e os díodos
luminosos vão trabalhar de acordo com isso.
Botão
amarelo:
3°C/7°C
Botão
negro:
Recuperaç
ão da
unidade de
refrigeração
Botão
azul:
5°C/12°C
Botão
vermelho:
Recupera
ção do
ponto
vermelho
Page 50

50
Figura 4.
7.3. Díodo luminoso para um
controlo automático da porta
(ADC) opcional
O díodo luminoso (fig 5 A) indica se a porta do
miniBar foi aberta. Caso afirmativo:
1. Abra o miniBar e verifique o conteúdo no
compartimento e se necessário reabasteça-o.
2. Reinicialize o sinal de controlo da porta ao
segurar o telecomando contra o sensor de
abertura da porta (Fig. 4 B) e carregue no
botão.
3. Feche o miniBar.
Figura 5.
8. Serviço de cliente
Antes de chamar um técnico de serviço, tente o
seguinte:
Se, após verificar todos os pontos acima
mencionados e, mesmo assim, o miniBar
continua a não funcionar satisfatoriamente,
contacte um serviço técnico Dometic. Mencione o
problema, modelo, produto e número de série.
B
A
Problema
A unidade não arrefece o suficiente
A unidade não arrefece de tod
Possível causa
Comida a mais foi posta a refrigerar
A porta não está propriamente fechada
A circulação de ar interna está
restringida.
O sistema CUC parou a operação
A ficha não está correctamente ligada à
corrente.
Não há tensão na tomada
Solução
Retire alguma comida
Verifique se a porta está fechada
Melhore a circulação de ar
interior
Veja o manual de instruções 5.3.
Verifique a ligação.
Verifique se há tensão
Page 51

51
(Detalhes do modelo, produto e número de série,
podem ser encontrados na placa de dados, que
se encontra na parte esquerda superior do
compartimento interior).
Em caso de avaria no aparelho contacte o seu
centro de serviço mais próximo veja o contacto na
lista telefónica.
www.dometic.com
9. Pôr em funcionamento
Dados técnicos:
9.1. Ligação à rede eléctrica
O aparelho só pode ser utilizado com a tensão
indicada na placa de dados. A ficha de corrente
do aparelho tem de estar ligada a uma tomada de
terra em concordância com as regulações.
Qualquer trabalho eléctrico requerido para
instalar este aparelho deve ser realizado por um
electricista qualificado ou por outra pessoa
igualmente competente.
O fabricante recusa qualquer compromisso
legal, caso estas medidas de segurança não
sejam respeitadas.
Requerimentos eléctricos
Antes de ligar, certifique-se de que o fornecimento
de tensão eléctrica é a mesma que a indicada na
placa de dados do aparelho.
10. Informações sobre a
protecção ambiental
O amónio (hidrogénio natural e nitrogénio
composto) é usado como um agente de
refrigeração na unidade de refrigeração.
O ciclopentano, amigo do ozono, é usado como
um agente espumoso, no isolamento de PU.
O cromato de sódio é usado para protecção de
corrosão (menos de 2 % do peso do refrigerante).
Modelo RH 465LD
Tipo MB20-60
Volume máximo 34 Litros
Corrente 220 - 240V (CA)
Consumo 65W
Consumo de energia 0,700 kWh/24h
Classe climática N
Refrigerante 147g H2O+98g NH
3
11. Reciclagem
Depois de retirar o aparelho da caixa, deve
remover os materiais de embalagem para um
local de recolha. Ao fim do seu tempo de uso,
o aparelho deve ser entregue a uma firma
especializada em recolha e reciclagem que
aproveitará alguns materiais, que ainda
contenham alguma utilidade. O resto será
destruído apropriadamente.
Aparelhos caracterizados com este
símbolo precisam ser jogados fora
nos pontos de recolha locais
especiais para descarte de
aparelhos eléctricos e electrónicos.
Este aparelho não deve ser jogado
fora junto com o lixo doméstico normal!
Os frigoríficos da Dometic levam um símbolo
na placa de características técnicas (placa do
tipo) no interior do aparelho.
Este aparelho está de acordo com as
seguintes directivas da CEE:
Directiva-LVD 73/23/CEE corrida com
90/683/CEE
Directiva-EMC 89/336/CEE
Directiva-RoHS 2002/95/EC
* Het energieverbruik wordt bij een omgevingstemperatuur van
12°C25°C (kelder) vastgesteld.
Page 52

Printed by Océ Hungária Kft. 2012. 02. 24.
 Loading...