

Page 1
1
1 – 2 mm
A
B
700 mm
400 mm
A
C
B
12 mm
12 mm
Ø 24 mm
1.
2.
W
4
5
3
2
1
1
Midi Heki Style
400 x 700
1
2
6
7
8
3
4
9
5
Page 2
2
Dometic WAECO International GmbH
Hollefeldstrasse 63
D-48282 Emsdetten
www.dometic-waeco.com
≤1,5 Nm
1
3
2
ABC
b
a
c
0
4445100705 F 08/2015 MO1139
Page 3
Roof light
Installation and Operating Manual. . . 3
Dachfenster
Montage- und Bedienungsanleitung 13
Dôme de toit
Instructions de montage
et de service . . . . . . . . . . . . . . . . . . 23
Claraboya
Instrucciones de montaje y de uso . 33
Oblò
Istruzioni di montaggio e d’uso . . . . 44
Dakraam
Montagehandleiding en
gebruiksaanwijzing . . . . . . . . . . . . . 54
Tagvindue
Monterings- og
betjeningsvejledning . . . . . . . . . . . . 63
Takfönster
Monterings- och bruksanvisning . . . 72
Takvindu
Monterings- og bruksanvisning . . . . 81
Kattoikkuna
Asennus- ja käyttöohje . . . . . . . . . . 90
Clarabóia
Instruções de montagem e manual de
instruções . . . . . . . . . . . . . . . . . . . . 99
Окно для крыши
Инструкция по монтажу и
эксплуатации . . . . . . . . . . . . . . . . 109
EN
DE
FRESIT
NLDASVNOFI
PT
RU
Okno dachowe
Instrukcja montażu i obsługi . . . . . 120
Střešní okno
Návod k montáži a obsluze. . . . . . 130
Strešné okno
Návod na montáž a uvedenie do
prevádzky . . . . . . . . . . . . . . . . . . . 140
Tetőablak
Szerelési és használati útmutató . 150
PL
CS
SK
HU
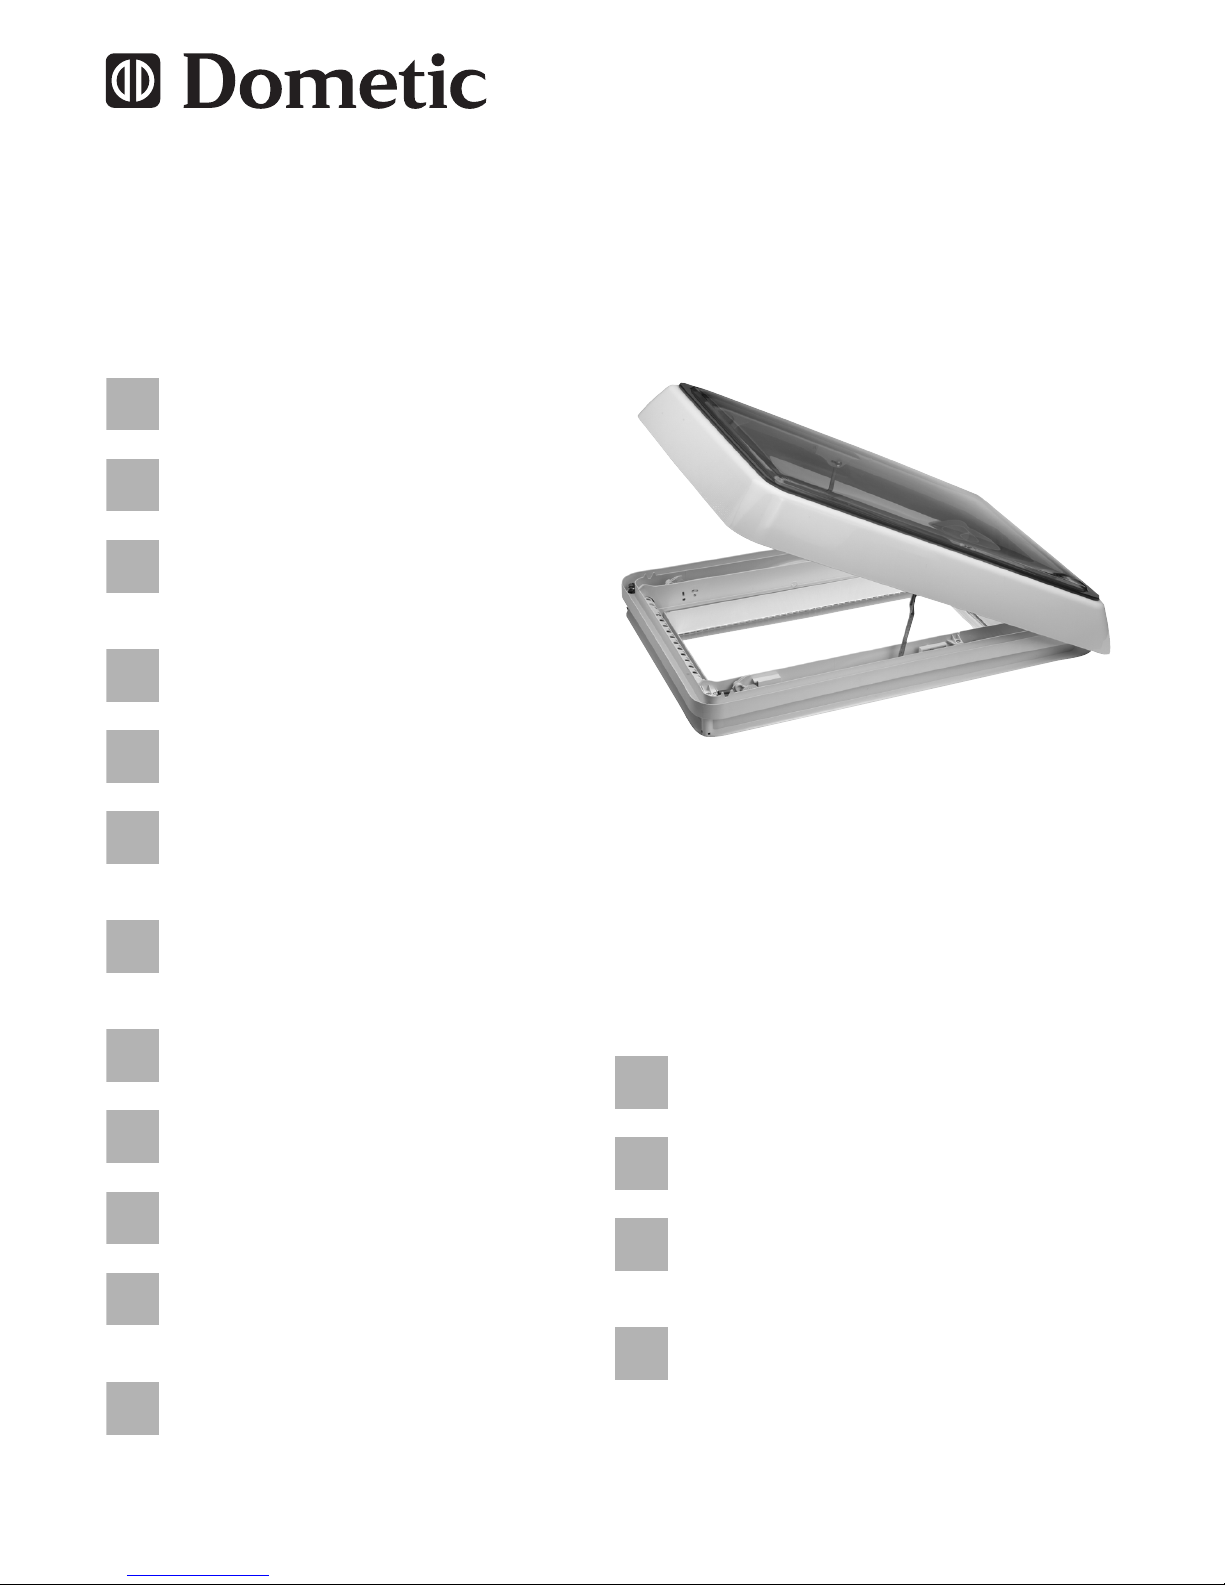
Midi Heki Style
400 x 700
Page 4

Page 5

EN
Midi Heki Style 400 x 700 Explanation of symbols
3
Please read this instruction manual carefully before installation and
first use, and store it in a safe place. If you pass on the product to
another person, hand over this instruction manual along with it.
Table of contents
1 Explanation of symbols . . . . . . . . . . . . . . . . . . . . . . . . . . . . . . . . . . . 3
2 Safety and installation instructions. . . . . . . . . . . . . . . . . . . . . . . . . . . 4
3 Scope of delivery . . . . . . . . . . . . . . . . . . . . . . . . . . . . . . . . . . . . . . . . 5
4 Accessories . . . . . . . . . . . . . . . . . . . . . . . . . . . . . . . . . . . . . . . . . . . . 5
5 Intended use . . . . . . . . . . . . . . . . . . . . . . . . . . . . . . . . . . . . . . . . . . . 5
6 Pre-installation instructions . . . . . . . . . . . . . . . . . . . . . . . . . . . . . . . . 6
7 Installing the Midi Heki Style . . . . . . . . . . . . . . . . . . . . . . . . . . . . . . . 7
8 Using the Midi Heki Style . . . . . . . . . . . . . . . . . . . . . . . . . . . . . . . . . 10
9 Troubleshooting . . . . . . . . . . . . . . . . . . . . . . . . . . . . . . . . . . . . . . . . 11
10 Maintaining and cleaning the Midi Heki Style . . . . . . . . . . . . . . . . . 11
11 Warranty . . . . . . . . . . . . . . . . . . . . . . . . . . . . . . . . . . . . . . . . . . . . . 12
12 Disposal . . . . . . . . . . . . . . . . . . . . . . . . . . . . . . . . . . . . . . . . . . . . . . 12
1 Explanation of symbols
A
I
➤ Action: This symbol indicates that action is required on your part. The
required action is described step-by-step.
✓ This symbol describes the result of an action.
Fig. 1 5, page 3: This refers to an element in an illustration. In this case,
item 5 in figure 1 on page 3.
NOTICE!
Failure to observe this instruction can cause material damage and
impair the function of the product.
NOTE
Supplementary information for operating the product.
Page 6

EN
Safety and installation instructions Midi Heki Style 400 x 700
4
2 Safety and installation instructions
Please observe the prescribed safety instructions and stipulations
from the vehicle manufacturer and service workshops.
The manufacturer accepts no liability for damage in the following cases:
Damage to the product resulting from mechanical influences
Alterations to the product without express permission from the manu-
facturer
Use for purposes other than those described in the operating manual
I
Please note the following:
If faults or disturbances occur, consult a specialist workshop immediately.
Risk of breakage! Do not tread on the glass dome.
Before starting your journey, check that the roof window is locked
properly.
Before starting your journey, check the roof window for damage (such as
tension cracks in the acrylic glass).
Do not open the roof window while driving.
Do not open the window in strong wind or rain.
Close the roof window if it rains or snows.
Do not leave the vehicle with the roof window open.
Keep the roof window free of snow and ice.
NOTE
If you do not have sufficient technical knowledge for installing the
components in vehicles, you should have a specialist install the
roof window in your vehicle.
Page 7

EN
Midi Heki Style 400 x 700 Scope of delivery
5
3 Scope of delivery
4 Accessories
5 Intended use
The Midi Heki Style roof light is suitable for installing in motorhomes or caravans with roof thicknesses of 25–60 mm:
without forced ventilation: Item no. 9104116967
with forced ventilation: Item no. 9104116966
It may not be fitted in vertical surfaces.
The maximum travel speed permitted is 130 km/h, as noise or damage could
occur depending on the vehicle design or installation position.
No. in
fig. 1
Quantity Description
1 1 Outer frame with glass dome
2 1 Inner frame
310
20
Fastening screw ∅ 4mm
Fastening screw ∅ 3.5 mm
4 10 Mounting supports
5 1 Hexagon bolt 68 mm
Description Item no.
Spoiler, 540 mm 9104100260
Page 8

EN
Pre-installation instructions Midi Heki Style 400 x 700
6
6 Pre-installation instructions
➤ Before installation, check the roof thickness of your vehicle. Consult the
vehicle manufacturer if you have any questions.
➤ When choosing the installation location, observe the following:
– Adjoining components (roof rack or attachment and reinforcing parts),
cables and cabinets in the vehicle interior must not get damaged when
sawing the hole.
– Sufficient space needs to be available for installing the inner and outer
frames.
– Only fit the roof light on flat and parallel interior and exterior roof areas
with a maximum inclination of 15° to the horizontal.
– You may use an existing roof hole provided the roof light fits into it.
– The roof light may only be fitted with the hinge-side at the front in the
direction of travel.
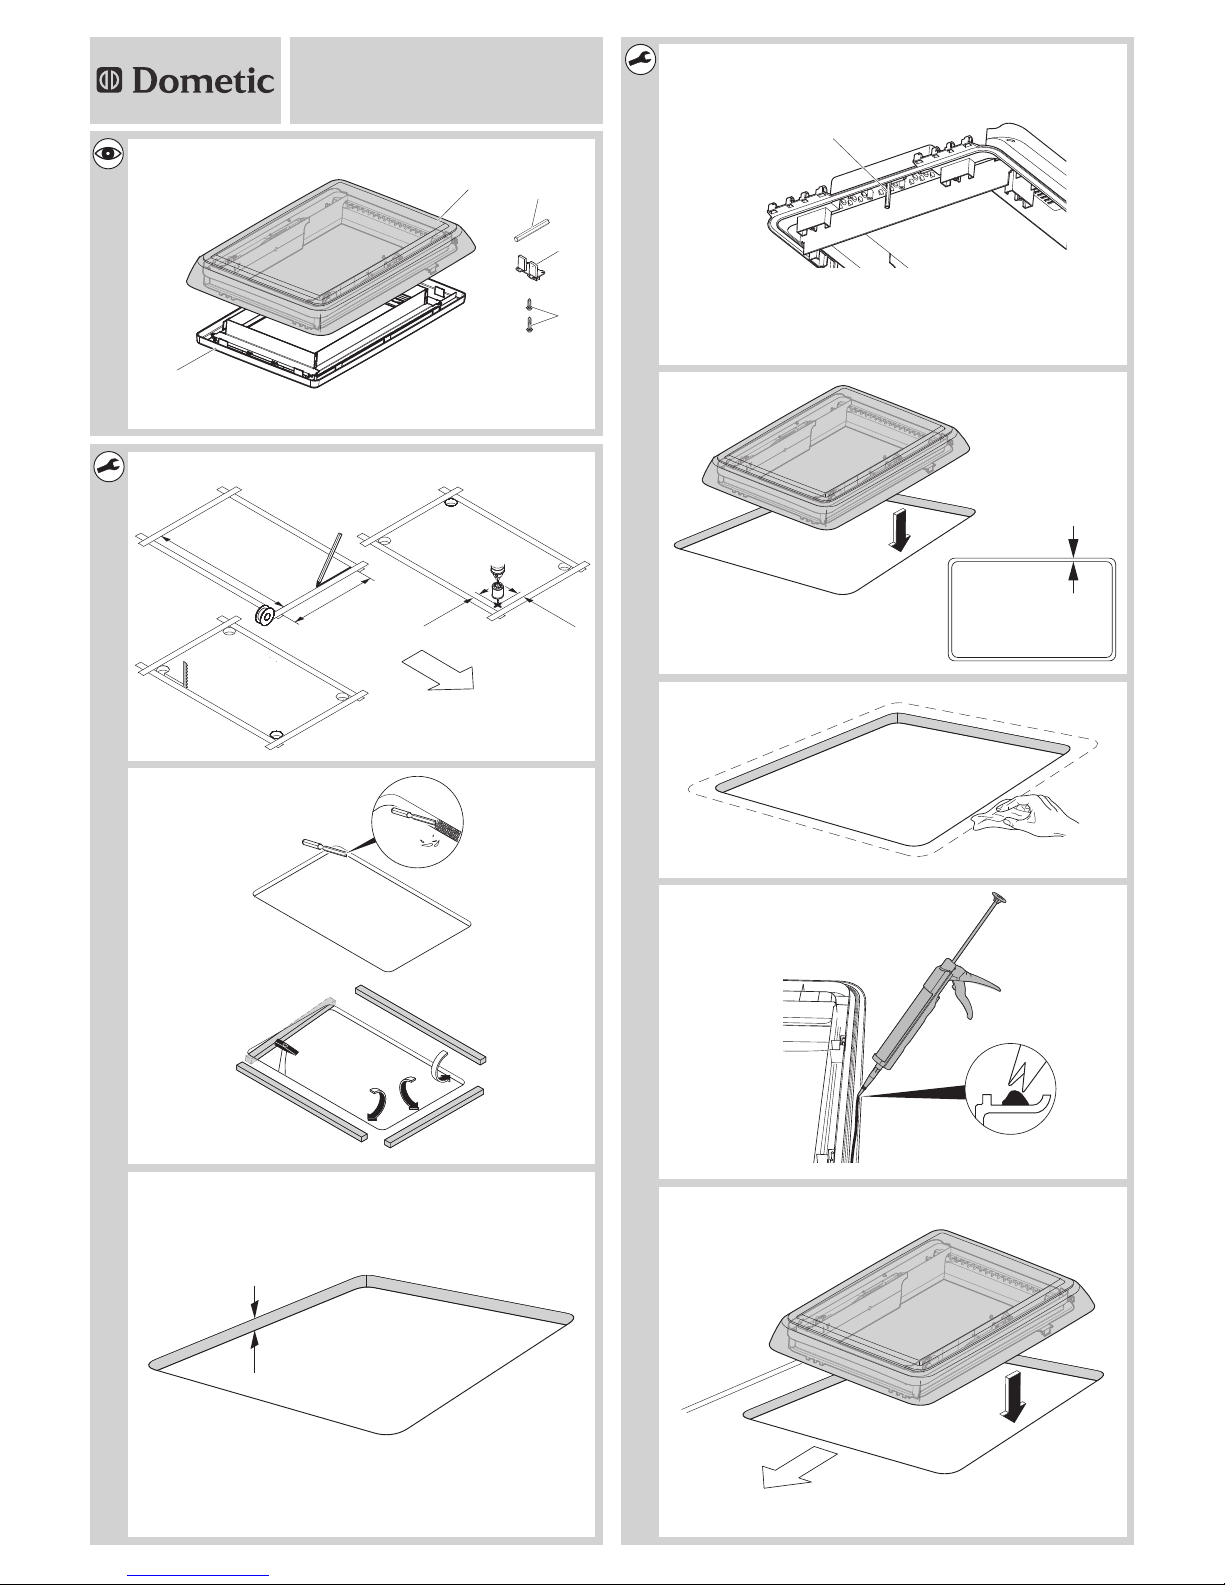
6.1 Pressing out the hole
See fig. 2
6.2 Using reinforcing rails
See fig. 3
I
➤ Remove the foam according to the width of your reinforcing rails (not in
scope of delivery) (A).
➤ Fit the reinforcing rails (B).
NOTE
You must use reinforcing rails to
prevent the insulation from being pressed together and the
room wall from being bent
allow the mounting supports to be fixed on the inside of the
roof
Page 9

EN
Midi Heki Style 400 x 700 Installing the Midi Heki Style
7
7 Installing the Midi Heki Style
See fig. 4
The scope of delivery includes mounting supports, which are suitable for roof
thicknesses of 30–34 mm. For roof thicknesses of 25–29 mm and
35–60 mm, you need to have a suitable mounting set (see table).
➤ Measure your roof thickness W.
➤ Choose a suitable mounting set:
See fig. 5
For roof thicknesses from 35 mm, you must replace the existing hexagon bolt
in the gear with the hexagon bolt included in the scope of delivery (fig. 1 6).
➤ Remove the existing hexagon bolt from the gear.
➤ Insert the hexagon bolt (fig. 1 6) included in the scope of delivery, with
the punched side in the gear.
See fig. 6
➤ Check that the roof light has sufficient space around it (approx. 1 to 2 mm)
in the roof opening.
See fig. 7
➤ Clean the roof opening in the mounting area.
Roof thickness Item no.
25–29 mm 9104107495
30–34 mm Included in the scope of delivery
9104107496
35–42 mm 9104107497
43–52 mm 9104107498
53–60 mm 9104107499
Page 10

EN
Installing the Midi Heki Style Midi Heki Style 400 x 700
8
See fig. 8
A
➤ Seal the mounting frame with a flexible non-hardening butyl sealing com-
pound (e.g. Sika Lastomer-710).
See fig. 9
➤ Check the direction of travel when installing (hinge-side at front in direc-
tion of travel).
➤ Place the outer frame in the middle of the roof opening.
➤ Press the outer frame in the roof slightly so that the packing compound
spreads out.
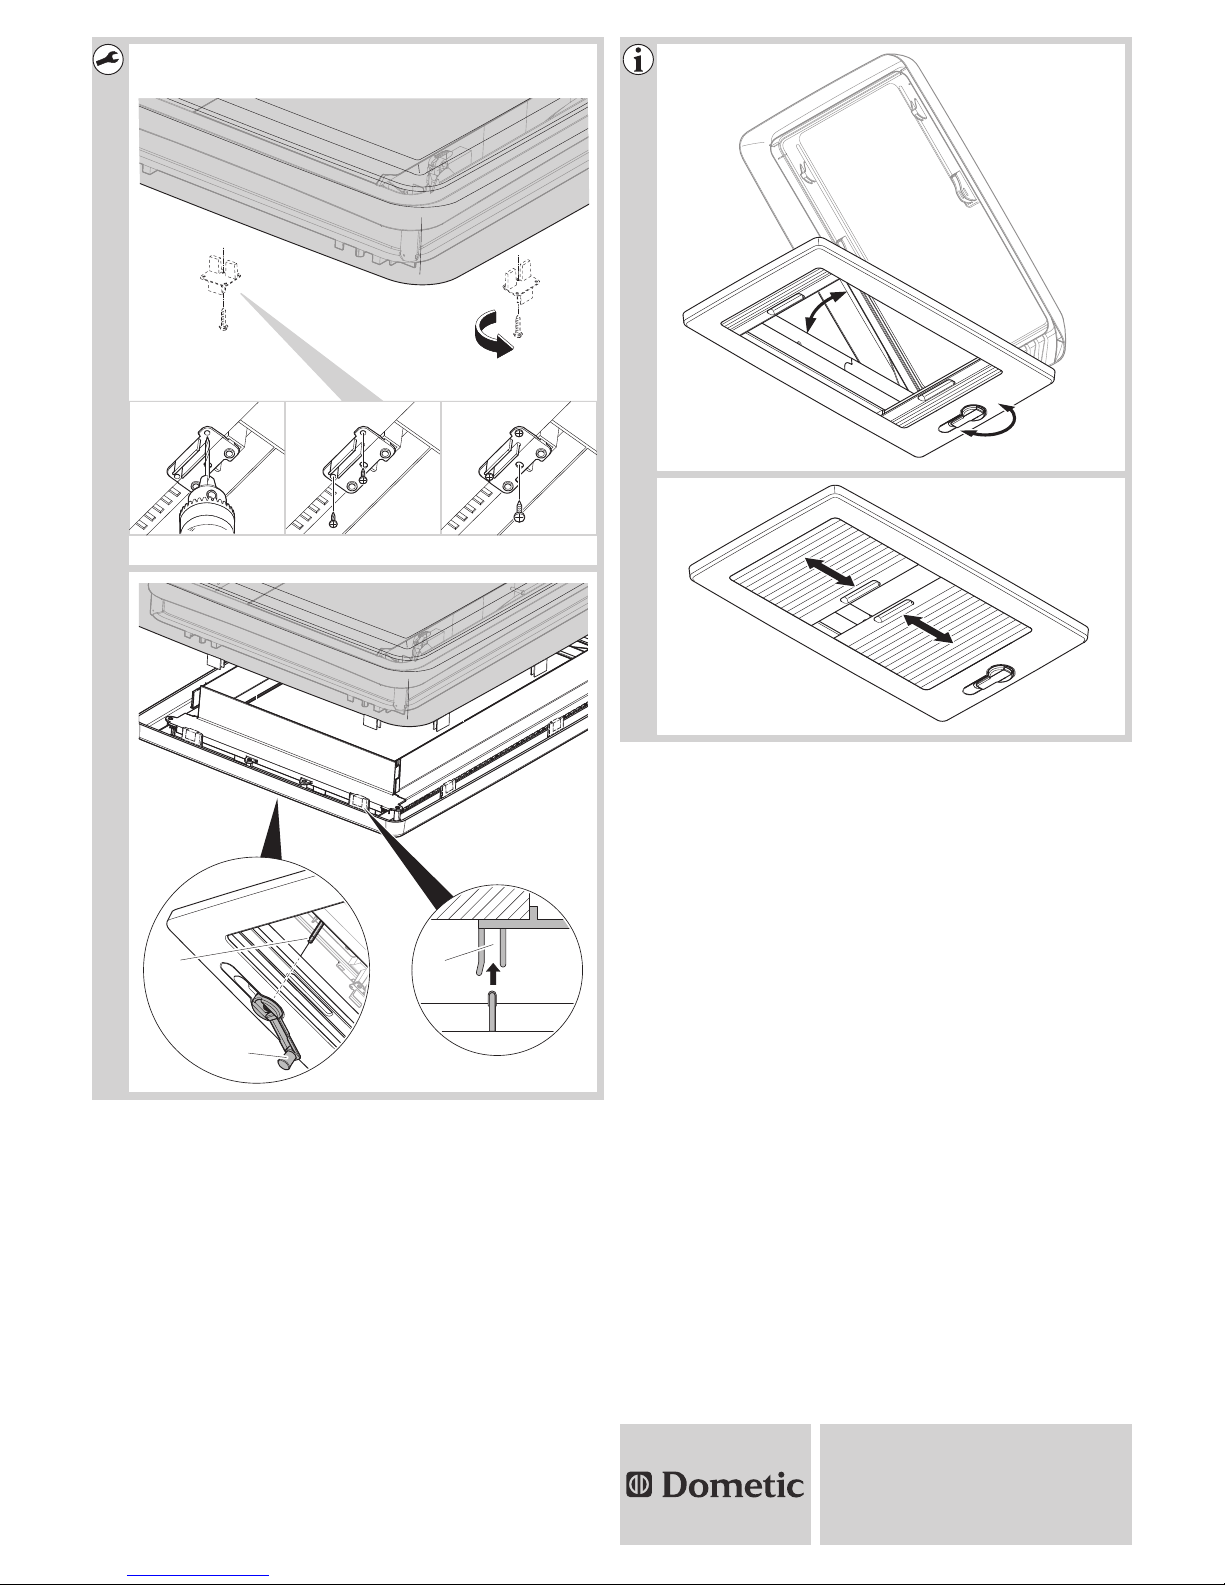
See fig. 0
➤ Place the 10 mounting supports on the inside of the vehicle all the way
into the recess of the outer frame.
If you use wooden rails as reinforcement
A
➤ Pre-drill two 2.2 mm holes for each mounting support in the roof construc-
tion (A).
➤ Fix the mounting supports on the roof with the ∅ 3.5 mm screws
included (B).
For other constructions, suitable screws must be used (not in scope of
delivery).
➤ Fix the 10 mounting supports with the ∅ 4 mm fixing screws to the outer
frame (C).
To do this use the large holes in the mounting supports.
NOTICE!
Observe the sealant manufacturer’s instructions.
NOTICE!
Do not drill through the roof construction.
Page 11

EN
Midi Heki Style 400 x 700 Installing the Midi Heki Style
9
Making a final check
➤ Check visually whether the seal all round the outer frame is against the
roof surface and the mounting supports are aligned.
➤ Tighten the screws about 10 minutes after installation.
See fig. a
A
➤ Press the inner frame into the groove (1) on the mounting supports.
➤ After installing, check the roof light works properly.
➤ Remove the protective film from both sides of the acrylic glass.
I
➤ If necessary, enter the new vehicle height and weight in the vehicle doc-
uments.
NOTICE!
Hold the hand crank in the closed position when placing the inner
frame on the outer frame, otherwise the position of the hand crank
(2) will be misaligned with the hexagon part (3).
NOTE
If the protective film is exposed to sunlight for too long, it cannot
be taken off without leaving a residue.
Page 12

EN
Using the Midi Heki Style Midi Heki Style 400 x 700
10
8 Using the Midi Heki Style
8.1 Opening and closing the Midi Heki Style (fig. b)
➤ Turn the hand crank clockwise to open the roof light.
Turn the hand crank until you feel its resistance. The opening angle of
the roof light is approx. 70°.
➤ Turn the hand crank anti-clockwise to close the roof light.
Turn the hand crank until you feel its resistance.
➤ Fold in the hand crank; you must feel a slight tension on the hand crank
before folding it in.
➤ Check whether the roof light is locked properly: Try to push up the pane
of glass with your hand (without using force).
8.2 Opening and closing the roller blinds (fig. c)
A
I
➤ Hold the recessed handle of the roller blind and pull it into the required
position.
NOTICE! Risk of damage due to a build-up of heat between
the roller blind and the window.
In strong sunlight, only close the blackout roller blind two thirds of
the way.
NOTE
You can adjust the blackout roller blind and the flyscreen separately.
Page 13

EN
Midi Heki Style 400 x 700 Troubleshooting
11
9 Troubleshooting
If you are unable to rectify the fault, get in touch with a specialist workshop.
10 Maintaining and cleaning the
Midi Heki Style
A
➤ Clean the roller blind with mild soap and plenty of water.
➤ Put talcum powder on the rubber seal.
Fault Possible cause Suggested remedy
The roof light does not
close completely.
Dirt between the glass and
frame
Clean the window.
Remove any leaves and twigs
between the glass and frame.
The flyscreen or blackout roller blind cannot
be moved.
Dirt on the side guides Clean the side guides.
NOTICE!
Do not use any sharp or hard objects for cleaning since they may
damage the acrylic glass.
Only use cleaning agents that are approved by the manufacturer.
Acrylic glass polish (item no. 9104100242), special polishing cloth
(item no. 9104100243) and acrylic glass cleaning agent (item no.
9104100244).
Page 14

EN
Warranty Midi Heki Style 400 x 700
12
11 Warranty
The statutory warranty period applies. If the product is defective, please
contact the service partner in your country (addresses on the back on the
instruction manual).
Our experts will be happy to help you and will discuss the warranty process
with you in more detail.
12 Disposal
➤ Place the packaging material in the appropriate recycling waste bins
wherever possible.
M
If you wish to finally dispose of the product, ask your local recycling
centre or specialist dealer for details about how to do this in
accordance with the applicable disposal regulations.
Page 15

DE
Midi Heki Style 400 x 700 Erklärung der Symbole
13
Bitte lesen Sie diese Anleitung vor Einbau und Inbetriebnahme sorgfältig durch und bewahren Sie sie auf. Geben Sie sie im Falle einer
Weitergabe des Produktes an den Nutzer weiter.
Inhaltsverzeichnis
1 Erklärung der Symbole . . . . . . . . . . . . . . . . . . . . . . . . . . . . . . . . . . 13
2 Sicherheits- und Einbauhinweise. . . . . . . . . . . . . . . . . . . . . . . . . . . 14
3 Lieferumfang . . . . . . . . . . . . . . . . . . . . . . . . . . . . . . . . . . . . . . . . . . 15
4 Zubehör . . . . . . . . . . . . . . . . . . . . . . . . . . . . . . . . . . . . . . . . . . . . . . 15
5 Bestimmungsgemäßer Gebrauch . . . . . . . . . . . . . . . . . . . . . . . . . . 15
6 Hinweise vor dem Einbau . . . . . . . . . . . . . . . . . . . . . . . . . . . . . . . . 16
7 Midi Heki Style montieren . . . . . . . . . . . . . . . . . . . . . . . . . . . . . . . . 17
8 Midi Heki Style benutzen . . . . . . . . . . . . . . . . . . . . . . . . . . . . . . . . . 20
9 Störungsbeseitigung . . . . . . . . . . . . . . . . . . . . . . . . . . . . . . . . . . . . 21
10 Midi Heki Style pflegen und reinigen . . . . . . . . . . . . . . . . . . . . . . . . 21
11 Gewährleistung . . . . . . . . . . . . . . . . . . . . . . . . . . . . . . . . . . . . . . . . 22
12 Entsorgung. . . . . . . . . . . . . . . . . . . . . . . . . . . . . . . . . . . . . . . . . . . . 22
1 Erklärung der Symbole
A
I
➤ Handlung: Dieses Symbol zeigt Ihnen, dass Sie etwas tun müssen. Die
erforderlichen Handlungen werden Schritt für Schritt beschrieben.
✓ Dieses Symbol beschreibt das Ergebnis einer Handlung.
Abb. 1 5, Seite 3: Diese Angabe weist Sie auf ein Element in einer Abbildung hin, in diesem Beispiel auf „Position 5 in Abbildung 1 auf Seite 3“.
ACHTUNG!
Nichtbeachtung kann zu Materialschäden führen und die
Funktion des Produktes beeinträchtigen.
HINWEIS
Ergänzende Informationen zur Bedienung des Produktes.
Page 16

DE
Sicherheits- und Einbauhinweise Midi Heki Style 400 x 700
14
2 Sicherheits- und Einbauhinweise
Beachten Sie die vom Fahrzeughersteller und vom Kfz-Handwerk vorgeschriebenen Sicherheitshinweise und Auflagen!
Der Hersteller übernimmt in folgenden Fällen keine Haftung für Schäden:
Beschädigungen am Produkt durch mechanische Einflüsse
Veränderungen am Produkt ohne ausdrückliche Genehmigung vom
Hersteller
Verwendung für andere als die in der Anleitung beschriebenen Zwecke
I
Beachten Sie folgende Hinweise:
Suchen Sie umgehend eine Fachwerkstatt auf, wenn Fehler oder
Störungen auftreten.
Einbruchgefahr! Betreten Sie die Glaskuppel nicht.
Kontrollieren Sie vor Fahrtantritt, ob das Dachfenster ordnungsgemäß
verriegelt ist.
Kontrollieren Sie vor Fahrtantritt das Dachfenster auf Beschädigungen
(z. B. Spannungsrisse im Acrylglas).
Öffnen Sie das Dachfenster nicht während der Fahrt.
Öffnen Sie das Dachfenster nicht bei starkem Wind oder Regen.
Schließen Sie das Dachfenster bei Regen und Schneefall.
Verlassen Sie das Fahrzeug nicht bei geöffnetem Dachfenster.
Halten Sie das Dachfenster schnee- und eisfrei.
HINWEIS
Wenn Sie nicht über ausreichende technische Kenntnisse zum
Einbauen von Komponenten in Fahrzeugen verfügen, sollten Sie
sich das Dachfenster von einem Fachmann ins Fahrzeug einbauen lassen.
Page 17

DE
Midi Heki Style 400 x 700 Lieferumfang
15
3Lieferumfang
4 Zubehör
5 Bestimmungsgemäßer Gebrauch
Das Dachfenster Midi Heki Style ist geeignet zum Einbau in Wohnmobile
oder Wohnwagen mit Dachstärken von 25 – 60 mm:
ohne Zwangsbelüftung: Art.-Nr. 9104116967
mit Zwangsbelüftung: Art.-Nr. 9104116966
Es darf nicht in senkrechte Flächen eingebaut werden.
Die maximal erlaubte Fahrgeschwindigkeit beträgt 130 km/h, da je nach
Fahrzeugaufbau oder Einbauposition Geräuschentwicklungen oder
Beschädigungen auftreten können.
Nr. in
Abb. 1
Menge Bezeichnung
1 1 Außenrahmen mit Glaskuppel
2 1 Innenrahmen
310
20
Befestigungsschraube ∅ 4mm
Befestigungsschraube ∅ 3,5 mm
4 10 Montageböcke
5 1 Sechskantbolzen 68 mm
Bezeichnung Artikel-Nr.
Spoiler, 540 mm 9104100260
Page 18

DE
Hinweise vor dem Einbau Midi Heki Style 400 x 700
16
6 Hinweise vor dem Einbau
➤ Prüfen Sie vor der Montage die Dachstärke lhres Fahrzeugs. Bei Fragen
wenden Sie sich an den Fahrzeughersteller.
➤ Beachten Sie bei der Wahl des Einbauortes:
– Angrenzende Bauteile (Dachreling oder Befestigungs- und Verstär-
kungsteile), Leitungen und Einbauschränke im Fahrzeuginnenraum
dürfen beim Sägen des Ausschnitts nicht beschädigt werden.
– Es muss ausreichend Platz zum Montieren von Innen- und Außen-
rahmen vorhanden sein.
– Montieren Sie das Dachfenster nur an planen und parallelen Innen-
und Außendachflächen mit einer maximalen Schrägstellung von 15°
gegenüber der Horizontalen.
– Sie können einen vorhandenen Dachauschnitt verwenden, wenn das
Dachfenster hinein passt.
– Das Dachfenster darf nur mit der Scharnierseite vorn in Fahrtrichtung
eingebaut werden.
6.1 Ausschnitt ausarbeiten
Siehe Abb. 2
6.2 Verstärkungsleisten verwenden
Siehe Abb. 3
I
➤ Entfernen Sie die Ausschäumung entsprechend der Breite Ihrer
Verstärkungsleisten (nicht im Lieferumfang) (A).
➤ Passen Sie die Verstärkungsleisten ein (B).
HINWEIS
Sie müssen Verstärkungsleisten verwenden, um
ein Zusammendrücken der Isolierung und ein Durchbiegen
der Dachwand zu verhindern
die Montageböcke an der Dachinnenseite befestigen zu
können
Page 19

DE
Midi Heki Style 400 x 700 Midi Heki Style montieren
17
7 Midi Heki Style montieren
Siehe Abb. 4
Der Lieferumfang enthält Montageböcke, die für Dachstärken von
30 – 34 mm geeignet sind. Für Dachstärken von 25 –29 mm und
35 – 60 mm müssen Sie ein passendes Montageset erwerben (siehe
Tabelle).
➤ Messen Sie Ihre Dachstärke W.
➤ Wählen Sie das passende Montageset:
Siehe Abb. 5
Bei Dachstärken ab 35 mm müssen Sie im Getriebe den vorhandenen
Sechskantbolzen durch den im Lieferumfang enthaltenen Sechskantbolzen
(Abb. 1 6) ersetzen.
➤ Ziehen Sie den vorhandenen Sechskantbolzen aus dem Getriebe.
➤ Setzen Sie den im Lieferumfang enthaltenen Sechskantbolzen
(Abb. 1 6) mit der verkörnten Seite ins Getriebe ein.
Siehe Abb. 6
➤ Prüfen Sie, ob das Dachfenster rundum genügend Abstand (ca. 1 bis
2 mm) zum Dachausschnitt hat.
Siehe Abb. 7
➤ Reinigen Sie den Dachausschnitt im Montagebereich.
Dachstärke Artikel-Nr.
25 – 29 mm 9104107495
30 – 34 mm im Lieferumfang enthalten
9104107496
35 – 42 mm 9104107497
43 – 52 mm 9104107498
53 – 60 mm 9104107499
Page 20

DE
Midi Heki Style montieren Midi Heki Style 400 x 700
18
Siehe Abb. 8
A
➤ Dichten Sie den Montagerahmen mit einem plastischen, nicht aus-
härtenden Butyldichtstoff (z. B. Sika-Lastomer-710) ab.
Siehe Abb. 9
➤ Beachten Sie bei der Montage die Fahrtrichtung (Scharnierseite vorn in
Fahrtrichtung).
➤ Setzen Sie den Außenrahmen mittig in den Dachausschnitt ein.
➤ Drücken Sie den Außenrahmen leicht an das Dach, damit sich die Dicht-
masse verteilt.
Siehe Abb. 0
➤ Setzen Sie die 10 Montageböcke auf der Innenseite des Fahrzeuges bis
zum Anschlag in die Aussparungen des Außenrahmens.
Wenn Sie Holzleisten als Verstärkung verwenden
A
➤ Bohren Sie je Montagebock zweimal mit einem Bohrer 2,2 mm im Dach-
aufbau vor (A).
➤ Befestigen Sie die Montageböcke mit den beiliegenden Schrauben
∅ 3,5 mm (B) am Dach.
Für alternative Aufbauten sind dementsprechend geeignete Schrauben
einzusetzen (nicht im Lieferumfang).
➤ Befestigen Sie die 10 Montageböcke mit den Befestigungsschrauben
∅ 4 mm am Außenrahmen (C).
Verwenden Sie hierzu die großen Lochdurchmesser in den Montage-
böcken.
ACHTUNG!
Beachten Sie die Hinweise des Dichtmittel-Herstellers.
ACHTUNG!
Bohren Sie nicht durch den Dachaufbau durch.
Page 21

DE
Midi Heki Style 400 x 700 Midi Heki Style montieren
19
Abschlusskontrolle durchführen
➤ Führen Sie eine Sichtkontrolle durch, ob die Dichtung des Außenrahmens
ringsum an der Dachfläche anliegt und die Montageböcke fluchten.
➤ Ziehen Sie die Schrauben ca. 10 Minuten nach der Montage nach.
Siehe Abb. a
A
➤ Drücken Sie den Innenrahmen in die Nut (1) der Montageböcke.
➤ Prüfen Sie nach der Montage die Funktion des Dachfensters.
➤ Ziehen Sie die PE-Schutzfolie innen und außen vom Acrylglas ab.
I
➤ Lassen Sie die geänderte Fahrzeughöhe und das geänderte Gewicht in
die Fahrzeugpapiere eintragen, falls erforderlich.
ACHTUNG!
Halten Sie die Handkurbel beim Aufsetzen des Innenrahmens an
den Außenrahmen in geschlossener Stellung, da sonst die
Stellung der Kurbel (2) zum Antriebssechskant (3) verstellt wird.
HINWEIS
Falls die PE-Schutzfolie zu lange dem Sonnenlicht ausgesetzt
war, kann sie nicht mehr rückstandsfrei abgelöst werden.
Page 22

DE
Midi Heki Style benutzen Midi Heki Style 400 x 700
20
8 Midi Heki Style benutzen
8.1 Midi Heki Style öffnen und schließen (Abb. b)
➤ Drehen Sie die Handkurbel im Uhrzeigersinn, um das Dachfenster zu
öffnen.
Drehen Sie die Handkurbel nur soweit, bis ein Widerstand spürbar ist.
Der Öffnungswinkel des Dachfensters beträgt ca. 70°.
➤ Drehen Sie die Handkurbel gegen den Uhrzeigersinn, um das Dach-
fenster zu schließen.
Drehen Sie die Handkurbel nur soweit, bis ein Widerstand spürbar ist.
➤ Klappen Sie die Handkurbel ein; eine leichte Vorspannung muss vor dem
Einklappen an der Handkurbel spürbar sein.
➤ Prüfen Sie, ob das Dachfenster verriegelt ist: Versuchen Sie die Glas-
scheibe mit der Hand (ohne Gewaltanwendung) nach oben zu heben.
8.2 Rollos öffnen und schließen (Abb. c)
A
I
➤ Greifen Sie in die Griffmulde des jeweiligen Rollos, und ziehen Sie es in
die gewünschte Stellung.
ACHTUNG! Beschädigungsgefahr durch Hitzestau zwischen
Rollo und Glasscheibe
Bei starker Sonneneinstrahlung dürfen Sie das Verdunklungsrollo
nur zu zwei Dritteln schließen.
HINWEIS
Sie können das Verdunklungsrollo und das Insektenschutzrollo
unabhängig voneinander stufenlos verstellen.
Page 23

DE
Midi Heki Style 400 x 700 Störungsbeseitigung
21
9 Störungsbeseitigung
Wenn Sie den Fehler nicht beheben können, suchen Sie eine Fachwerkstatt
auf.
10 Midi Heki Style pflegen und reinigen
A
➤ Reinigen Sie die Rollos mit milder Seifenlauge und viel Wasser.
➤ Pflegen Sie die Gummidichtungen mit Talkum.
Störung Mögliche Ursache Lösungsvorschlag
Das Dachfenster lässt
sich nicht komplett verschließen.
Schmutz zwischen Glas und
Rahmen
Reinigen Sie das Fenster.
Befreien Sie die Fläche zwischen
Glas und Rahmen von Laub und
Ästen.
Das Insektenschutzoder Verdunklungsrollo
lassen sich nicht verschieben.
Verschmutzungen an den
Seitenführungen
Reinigen Sie die Seitenführungen.
ACHTUNG!
Keine scharfen oder harten Mittel zur Reinigung verwenden, da
dies zu einer Beschädigung des Acrylglases führen kann.
Verwenden Sie ausschließlich die vom Hersteller empfohlenen
Reinigungsmittel: Acrylglas-Politur (Art.-Nr. 9104100242),
Spezial-Politurtuch (Art.-Nr. 9104100243) und Acrylglas-Reiniger
(Art.-Nr. 9104100244).
Page 24

DE
Gewährleistung Midi Heki Style 400 x 700
22
11 Gewährleistung
Es gilt die gesetzliche Gewährleistungsfrist. Sollte das Produkt defekt sein,
wenden Sie sich bitte an einen Service-Partner in Ihrem Land (Adressen
siehe Rückseite der Anleitung).
Unsere Spezialisten helfen Ihnen gerne weiter und besprechen mit Ihnen
den weiteren Verlauf der Gewährleistung.
12 Entsorgung
➤ Geben Sie das Verpackungsmaterial möglichst in den entsprechenden
Recycling-Müll.
M
Wenn Sie das Produkt endgültig außer Betrieb nehmen, informieren Sie sich bitte beim nächsten Recyclingcenter oder bei
Ihrem Fachhändler über die zutreffenden Entsorgungsvorschriften.
Page 25

FR
Midi Heki Style 400 x 700 Explication des symboles
23
Veuillez lire attentivement cette notice avant le montage et la mise en
service. Veuillez ensuite la conserver. En cas de passer le produit,
veuillez le transmettre au nouvel acquéreur.
Table des matières
1 Explication des symboles. . . . . . . . . . . . . . . . . . . . . . . . . . . . . . . . . 23
2 Consignes de sécurité et instructions de montage . . . . . . . . . . . . . 24
3 Contenu de la livraison . . . . . . . . . . . . . . . . . . . . . . . . . . . . . . . . . . 25
4 Accessoires . . . . . . . . . . . . . . . . . . . . . . . . . . . . . . . . . . . . . . . . . . . 25
5 Usage conforme. . . . . . . . . . . . . . . . . . . . . . . . . . . . . . . . . . . . . . . . 25
6 Consignes préalables au montage . . . . . . . . . . . . . . . . . . . . . . . . . 26
7 Montage du Midi Heki Style . . . . . . . . . . . . . . . . . . . . . . . . . . . . . . . 27
8 Utilisation du Midi Heki Style . . . . . . . . . . . . . . . . . . . . . . . . . . . . . . 30
9 Guide de dépannage . . . . . . . . . . . . . . . . . . . . . . . . . . . . . . . . . . . . 31
10 Entretien et nettoyage du Midi Heki Style . . . . . . . . . . . . . . . . . . . . 31
11 Garantie . . . . . . . . . . . . . . . . . . . . . . . . . . . . . . . . . . . . . . . . . . . . . . 32
12 Retraitement . . . . . . . . . . . . . . . . . . . . . . . . . . . . . . . . . . . . . . . . . . 32
1 Explication des symboles
A
I
➤ Manipulation : ce symbole vous indique une action à effectuer. Les
manipulations à effectuer sont décrites étape par étape.
✓ Ce symbole décrit le résultat d’une manipulation.
Fig. 1 5, page 3 : cette information renvoie à un élément figurant sur une
illustration, dans cet exemple à la « position 5 de l'illustration 1 à la page 3 ».
AVIS !
Le non-respect de ces consignes peut entraîner des dommages
matériels et des dysfonctionnements du produit.
REMARQUE
Informations complémentaires sur l'utilisation du produit.
Page 26

FR
Consignes de sécurité et instructions de montage Midi Heki Style 400 x 700
24
2 Consignes de sécurité et instructions
de montage
Respectez les consignes de sécurité et autres prescriptions imposées
par le fabricant du véhicule et par les professionnels de l’automobile !
Le fabricant décline toute responsabilité pour des dommages dans les cas
suivants :
des influences mécaniques ayant endommagé le matériel
des modifications apportées au produit sans autorisation explicite de la
part du fabricant
une utilisation différente de celle décrite dans la notice
I
Tenez compte des remarques suivantes :
Contactez immédiatement une entreprise spécialisée si des pannes ou
des dysfonctionnements surviennent.
Risque de rupture ! Ne marchez pas sur le dôme de toit.
Vérifiez avant le départ que le dôme de toit est correctement verrouillé.
Avant le départ, vérifiez que le dôme de toit ne présente aucun dommage
(p. ex. des fissures dues aux tensions dans le plexiglas).
N’ouvrez pas le dôme de toit pendant le trajet.
N’ouvrez pas le dôme de toit en cas de fort vent ou de forte pluie.
Fermez le dôme de toit en cas de pluie et de neige.
Ne quittez pas le véhicule en laissant le dôme de toit ouvert.
Protégez le dôme de toit de la neige et de la glace.
REMARQUE
Si vos connaissances techniques en matière d’installation d’éléments dans un véhicule sont insuffisantes, nous vous recommandons de faire installer le dôme de toit par un spécialiste.
Page 27

FR
Midi Heki Style 400 x 700 Contenu de la livraison
25
3 Contenu de la livraison
4 Accessoires
5 Usage conforme
Le dôme de toit Midi Heki Style peut être monté sur des camping-cars ou des
caravanes disposant d’une épaisseur de toit de 25–60 mm :
sans aération permanente : N° de produit 9104116967
avec aération permanente : N° de produit 9104116966
Ne doit pas être monté sur des surfaces verticales.
La vitesse de conduite maximale autorisée est de 130 km/h car, selon la
structure du véhicule ou la position de montage, des bruits pourraient se former ou des dommages pourraient survenir.
N° dans
fig. 1
Quantité Désignation
1 1 Cadre extérieur avec dôme en verre
2 1 Cadre intérieur
310
20
Vis de fixation ∅ 4mm
Vis de fixation ∅ 3,5 mm
4 10 Supports de montage
5 1 Boulon à six pans 68 mm
Désignation N° d’article
Déflecteur, 540 mm 9104100260
Page 28

FR
Consignes préalables au montage Midi Heki Style 400 x 700
26
6 Consignes préalables au montage
➤ Avant le montage, veuillez vérifier l’épaisseur de toit de votre véhicule.
Pour de plus amples informations, veuillez vous adresser au constructeur
de votre véhicule.
➤ Pour le choix de l’emplacement de montage, tenez compte des
remarques suivantes :
– Les éléments adjacents (rembarde du toit ou pièces de fixation et de
renfort), les lignes électriques et les meubles de l’habitacle du véhicule
ne doivent pas être endommagés lors du sciage de la découpe.
– Vous devez disposer d’assez de place pour monter les cadres inté-
rieur et extérieur.
– Montez le dôme de toit uniquement sur des surfaces de toit planes et
parallèles, aussi bien à l’intérieur qu’à l’extérieur, avec une pente
maximale de 15° par rapport à l’horizontale.
– Vous pouvez utiliser une découpe de toit existante, si l’ouverture
convient pour le dôme de toit.
– Le dôme de toit doit être monté uniquement avec le côté charnière
tourné dans le sens de la marche.
6.1 Elaboration de la découpe
Voir fig. 2
6.2 Utilisation de barres de renforcement
Voir fig. 3
I
➤ Retirez la mousse en fonction de la largeur de vos barres de renforce-
ment (non comprises dans la livraison) (A).
➤ Insérez les barres de renforcement (B).
REMARQUE
Vous devez utilisez des barres de renforcement dans les cas suivants
pour empêcher que l’isolation ne soit compressée et que le toit
ne soit plié
pour pouvoir fixer les supports de montage sur l’intérieur du
toit
Page 29

FR
Midi Heki Style 400 x 700 Montage du Midi Heki Style
27
7 Montage du Midi Heki Style
Voir fig. 4
Le matériel livré contient des supports de montage convenant pour des
épaisseurs de toit de 30 à 34 mm. Pour les épaisseurs de toit de 25 à 29 mm
et de 35 à 60 mm vous devez vous procurer un kit de montage adapté (voir
tableau).
➤ Mesurez l’épaisseur de toit W.
➤ Choisissez le kit de montage adéquat :
Voir fig. 5
Pour les épaisseurs de toit de plus de 35 mm, vous devez remplacez les boulons à six pans de l’entraînement par ceux livrés (fig. 1 6).
➤ Retirez les boulons à six pans présents dans l’entraînement.
➤ Placez les boulons à six pans (fig. 1 6) livrés dans l’entraînement.
Voir fig. 6
➤ Vérifiez qu’il y a assez d’espace (env. 1 à 2 mm) entre le dôme de toit et
la découpe du toit, sur tout le périmètre.
Voir fig. 7
➤ Nettoyez la découpe du toit dans la zone de montage.
Epaisseur de paroi N° d’article
25–29 mm 9104107495
30–34 mm compris dans la livraison
9104107496
35–42 mm 9104107497
43–52 mm 9104107498
53–60 mm 9104107499
Page 30

FR
Montage du Midi Heki Style Midi Heki Style 400 x 700
28
Voir fig. 8
A
➤ Appliquez sur le cadre de montage un mastic butyle souple (Sika Las-
tomer-710, par exemple).
Voir fig. 9
➤ Lors du montage, veuillez tenir compte du sens de la marche (le côté
charnière doit être dans le sens de la marche).
➤ Installez le cadre extérieur au milieu de la découpe du toit.
➤ Appuyez légèrement le cadre extérieur sur le toit, pour que le mastic se
répartisse.
Voir fig. 0
➤ Placez les 10 supports de montage à l’intérieur du véhicule, jusqu’à la
butée, dans les logements du cadre extérieur.
Si vous utilisez des renforts en bois
A
➤ Percez deux trous de 2,2 mm par support de montage (A).
➤ Fixez les supports de montage au toit avec les vis de ∅ 3,5 mm (B) four-
nies.
Pour des montages différents, vous devez utilisez les vis appropriées
(non livrées).
➤ Fixez les 10 supports de montage au cadre extérieur (C) avec les vis de
fixation de ∅ 4mm.
Pour ce faire, utilisez les trous à gros diamètres des supports de mon-
tage.
AVIS !
Veuillez tenir compte des recommandations du fabricant du produit d’étanchéité.
AVIS !
ne percez pas de trous dans le toit.
Page 31

FR
Midi Heki Style 400 x 700 Montage du Midi Heki Style
29
Effectuer les contrôles une fois le montage terminé
➤ Contrôlez visuellement si les joints du cadre extérieur couvrent bien tout
la surface du toit et si les supports de montage sont bien alignés.
➤ Environ 10 minutes après le montage, resserrez les vis.
Voir fig. a
A
➤ Enfoncez le cadre intérieur dans la rainure (1) du support de montage.
➤ Après le montage, veuillez vérifier le fonctionnement du dôme de toit.
➤ Retirez le film de protection en PE à l’intérieur et à l’extérieur du verre
acrylique.
I
➤ Faites noter les modifications de la hauteur et du poids du véhicule sur les
papiers du véhicule, si nécessaire.
AVIS !
Lorsque vous placez le cadre intérieur sur le cadre extérieur,
tenez la manivelle en position fermée. Sinon, la position de la
manivelle (2) par rapport à l’embout d’entraînement à six pans (3)
se décale.
REMARQUE
Si le film protecteur en PE a été exposé trop longtemps à la
lumière du soleil, il ne peut plus être détaché sans laisser de
traces.
Page 32

FR
Utilisation du Midi Heki Style Midi Heki Style 400 x 700
30
8 Utilisation du Midi Heki Style
8.1 Ouverture et fermeture du Midi Heki Style (fig. b)
➤ Tournez la manivelle dans le sens des aiguilles d’une montre pour ouvrir
le dôme de toit.
Arrêtez de tourner la manivelle dès que vous sentez une résistance.
L’angle d’ouverture du dôme de toit est d’environ 70°.
➤ Tournez la manivelle dans le sens contraire des aiguilles d’une montre
pour fermer le dôme de toit.
Arrêtez de tourner la manivelle dès que vous sentez une résistance.
➤ Rabattez la manivelle. Celle-ci doit offrir une légère résistance lorsque
vous la rabattez.
➤ Vérifiez si le dôme de toit est verrouillé : Essayez de soulever la vitre vers
le haut avec la main (sans forcer).
8.2 Ouverture et fermeture des stores (fig. c)
A
I
➤ Saisissez la poignée du store souhaité et tirez-le dans la position souhai-
tée.
AVIS ! Risque d’endommagement en raison de l’accumulation de chaleur entre le store et la vitre
En cas de fort rayonnement solaire, vous ne devez fermer le store
occultant qu’aux deux tiers.
REMARQUE
Vous pouvez déplacer le store occultant et la moustiquaire séparément l’un de l’autre, en continu.
Page 33

FR
Midi Heki Style 400 x 700 Guide de dépannage
31
9 Guide de dépannage
Si vous ne pouvez pas résoudre le problème, consultez un atelier spécialisé.
10 Entretien et nettoyage du
Midi Heki Style
A
➤ Nettoyez les stores roulants avec une lessive douce et beaucoup d’eau.
➤ Pour l’entretien des joints en caoutchouc, veuillez utiliser du talc.
Dysfonctionnement Cause possible Solution proposée
Le toit ne se ferme pas
complètement.
Il y a de la saleté entre la
vitre et le cadre
Nettoyez la vitre.
Retirez les feuilles mortes et les
branches d’arbres qui se trouveraient entre la vitre et le cadre.
La moustiquaire ou le
store occultant ne coulissent plus.
Il y a de la saleté dans les
guidages latéraux
Nettoyez les guidages latéraux.
AVIS !
N’utilisez aucun objet coupant ou dur pour le nettoyage du verre
acrylique. Cela risquerait de l’endommager.
Utilisez uniquement les détergents recommandés par le
fabricant : Polish pour verre acrylique (n° de produit
9104100242), chiffon spécial à polir (n° de produit 9104100243)
et nettoyant pour verre acrylique (n° de produit 9104100244).
Page 34

FR
Garantie Midi Heki Style 400 x 700
32
11 Garantie
Le délai légal de garantie s'applique. Si le produit s'avérait défectueux,
veuillez vous adresser à un de nos partenaires de service présent dans votre
pays (voir adresses au dos du présent manuel).
Nos spécialistes vous aideront avec plaisir et répondront à vos questions
concernant la suite de la procédure pour la garantie.
12 Retraitement
➤ Jetez les emballages dans les conteneurs de déchets recyclables prévus
à cet effet.
M
Lorsque vous mettrez votre produit définitivement hors service,
informez-vous auprès du centre de recyclage le plus proche ou
auprès de votre revendeur spécialisé sur les prescriptions relatives
au retraitement des déchets.
Page 35

ES
Midi Heki Style 400 x 700
33
Lea detenidamente estas instrucciones antes de llevar a cabo la instalación y puesta en funcionamiento, y consérvelas en un lugar seguro.
En caso de vender o entregar el producto a otra persona, entregue
también estas instrucciones.
Índice
1 Aclaración de los símbolos . . . . . . . . . . . . . . . . . . . . . . . . . . . . . . . 34
2 Modo de instalación y seguridad . . . . . . . . . . . . . . . . . . . . . . . . . . . 34
3 Volumen de entrega. . . . . . . . . . . . . . . . . . . . . . . . . . . . . . . . . . . . . 35
4 Accesorios . . . . . . . . . . . . . . . . . . . . . . . . . . . . . . . . . . . . . . . . . . . . 35
5 Uso adecuado . . . . . . . . . . . . . . . . . . . . . . . . . . . . . . . . . . . . . . . . . 36
6 Notas previas al montaje . . . . . . . . . . . . . . . . . . . . . . . . . . . . . . . . . 36
7 Montaje de Midi Heki Style . . . . . . . . . . . . . . . . . . . . . . . . . . . . . . . 37
8 Uso de Midi Heki Style. . . . . . . . . . . . . . . . . . . . . . . . . . . . . . . . . . . 41
9 Solución de averías . . . . . . . . . . . . . . . . . . . . . . . . . . . . . . . . . . . . . 42
10 Mantenimiento y limpieza de Midi Heki Style. . . . . . . . . . . . . . . . . . 42
11 Garantía legal . . . . . . . . . . . . . . . . . . . . . . . . . . . . . . . . . . . . . . . . . 43
12 Gestión de residuos . . . . . . . . . . . . . . . . . . . . . . . . . . . . . . . . . . . . . 43
Page 36

ES
Aclaración de los símbolos Midi Heki Style 400 x 700
34
1 Aclaración de los símbolos
A
I
➤ Paso a seguir: este símbolo le indica que debe realizar un paso. Todos
los procedimientos necesarios se describen paso a paso.
✓ Este símbolo describe el resultado de un paso realizado.
Fig. 1 5, página 3: esta indicación hace referencia a un elemento de una
figura, en este ejemplo a la “Posición 5 en la figura 1 de la página 3”.
2 Modo de instalación y seguridad
Tenga en cuenta las indicaciones de seguridad y la documentación
suministrada por el fabricante y el taller del vehículo.
El fabricante declina toda responsabilidad ante daños ocurridos en los
siguientes casos:
daños en el producto debido a influencias mecánicas
modificaciones realizadas en el producto sin el expreso consentimiento
del fabricante
utilización del aparato para fines distintos a los descritos en las
instrucciones
I
¡AVISO!
Su incumplimiento puede acarrear daños materiales y perjudicar
el correcto funcionamiento del producto.
NOTA
Información adicional para el manejo del producto.
NOTA
Si no dispone de conocimientos técnicos suficientes para llevar a
cabo el montaje y las conexiones de componentes en el vehículo,
encargue el montaje de la claraboya a personal técnico cualificado.
Page 37

ES
Midi Heki Style 400 x 700 Volumen de entrega
35
Tenga en cuenta las siguientes indicaciones:
En caso de fallos o averías, diríjase inmediatamente a un taller especia-
lizado.
Peligro de hundimiento. No pise la cúpula de vidrio.
Antes del comienzo del viaje, controle si la claraboya está correctamente
cerrada.
Antes de empezar a conducir, controle si la claraboya presenta daños
(por ejemplo, grietas en el vidrio acrílico).
No abra la claraboya durante la conducción.
No abra la claraboya cuando sople un viento fuerte o llueva abundante-
mente.
En caso de lluvia o nieve, cierre la claraboya.
No salga del vehículo dejando la claraboya abierta.
Mantenga la claraboya libre de nieve y hielo.
3 Volumen de entrega
4 Accesorios
N.º en
fig. 1
Cantidad Denominación
1 1 Marco exterior con cúpula de vidrio
2 1 Marco interior
310
20
Tornillos de fijación ∅ 4mm
Tornillos de fijación ∅ 3,5 mm
4 10 Caballetes de montaje
5 1 Perno de cabeza hexagonal de 68 mm
Denominación
N.° de artículo
Deflector de 540 mm 9104100260
Page 38

ES
Uso adecuado Midi Heki Style 400 x 700
36
5 Uso adecuado
La claraboya Midi Heki Style es adecuada para su montaje en caravanas o
autocaravanas con un grosor de techo entre 25 y 60 mm:
sin ventilación forzada: n.° art. 9104116967
con ventilación forzada: n.° art. 9104116966
No puede montarse en superficies verticales.
La velocidad máxima de marcha autorizada es de 130 km/h puesto que,
según sea la estructura del vehículo o la posición de montaje, se pueden producir ruidos o desperfectos.
6 Notas previas al montaje
➤ Antes del montaje, compruebe el grosor del techo de su vehículo. En
caso de duda, consulte al fabricante del vehículo.
➤ Preste atención al elegir el lugar del montaje:
– Los componentes contiguos (soporte portaequipajes o piezas de suje-
ción y de refuerzo), cables y armarios empotrados en el espacio inte-
rior del vehículo no deben resultar dañados al serrar la abertura para
la claraboya.
– Debe haber espacio suficiente para montar los marcos interior y exte-
rior.
– Monte la claraboya únicamente sobre superficies del techo externas e
internas planas y paralelas con una inclinación máxima de 15° res-
pecto al plano horizontal.
– Si la claraboya encaja, puede usar una abertura del techo ya exis-
tente.
– La claraboya solo puede montarse con el lado de las bisagras hacia
delante en el sentido de la marcha.
6.1 Preparar la abertura del techo
Véase la fig. 2
Page 39

ES
Midi Heki Style 400 x 700 Montaje de Midi Heki Style
37
6.2 Utilización de guías de refuerzo
Véase la fig. 3
I
➤ Retire el esponjado en la medida correspondiente al ancho de las guías
de refuerzo (no incluidas en el volumen de entrega) (A).
➤ Adapte las guías de refuerzo (B).
7 Montaje de Midi Heki Style
Véase la fig. 4
El volumen de entrega incluye caballetes de montaje adecuados para grosores de techo entre 30 y 34 mm. Para grosores de techo entre 25 y 29 mm y
entre 35 y 60 mm deberá adquirir un juego de montaje adecuado (ver tabla).
➤ Mida el grosor de su techo W.
➤ Seleccione el juego de montaje adecuado:
NOTA
Debe utilizar guías de refuerzo para
evitar hacer presión contra el aislamiento y que el techo quede
doblado
poder fijar los caballetes de montaje al interior del techo
Grosor de techo N.° artículo
25–29 mm 9104107495
30–34 mm incluido en el volumen de entrega
9104107496
35–42 mm 9104107497
43–52 mm 9104107498
53–60 mm 9104107499
Page 40

ES
Montaje de Midi Heki Style Midi Heki Style 400 x 700
38
Véase la fig. 5
A partir de grosores de techo de 35 mm deben sustituirse en la transmisión
el perno de cabeza hexagonal existente por el perno contenido en el volumen de entrega (fig. 1 6).
➤ Extraiga el perno de cabeza hexagonal existente de la transmisión.
➤ Introduzca el perno de cabeza hexagonal incluido en el volumen de
entrega (fig. 1 6) con el lado graneteado dentro de la transmisión.
Véase la fig. 6
➤ Compruebe si la claraboya tiene la distancia adecuada en torno a la aber-
tura del techo (de 1 a 2 mm aproximadamente).
Véase la fig. 7
➤ Limpie la abertura del techo en la zona de montaje.
Véase la fig. 8
A
➤ Selle el marco de montaje con un material de sellado butílico, plástico y
que no se endurezca (por ejemplo, Sika Lastomer-710).
Véase la fig. 9
➤ Tenga en cuenta el sentido de la marcha durante el montaje (lado de las
bisagras hacia delante en el sentido de la marcha).
➤ Coloque el marco exterior centrado en la abertura del techo.
➤ Presione ligeramente el marco exterior contra el techo para que se
reparta el material de sellado.
Véase la fig. 0
➤ Por la parte interior del vehículo, coloque los 10 caballetes de montaje
hasta el tope en los huecos del marco exterior.
¡AVISO!
Siga también las indicaciones del fabricante del sellador.
Page 41

ES
Midi Heki Style 400 x 700 Montaje de Midi Heki Style
39
Si como refuerzo utiliza listones de madera
A
➤ Taladre cada caballete de montaje dos veces con un taladro de
2,2 mm (A).
➤ Fije los caballetes de montaje con los tornillos adjuntos ∅ 3,5 mm (B) al
techo.
Para componentes alternativos hay que colocar los tornillos adecuados
a los mismos (no incluidos en el volumen de entrega).
➤ Fije los 10 caballetes de montaje con los tornillos de fijación ∅ 4mm al
marco exterior (C).
Para ello, utilice el diámetro de orificio grande en los caballetes de mon-
taje.
¡AVISO!
No taladre directamente el techo.
Page 42

ES
Montaje de Midi Heki Style Midi Heki Style 400 x 700
40
Control final
➤ Realice un control visual para comprobar si la junta alrededor del marco
exterior queda apoyada sobre la superficie del techo y si los caballetes de
montaje están alineados.
➤ Apriete los tornillos unos 10 minutos después del montaje.
Véase la fig. a
A
➤ Presione el marco interior en la ranura (1) de los caballetes de montaje.
➤ Tras el montaje, compruebe el funcionamiento de la claraboya.
➤ Retire la lámina protectora de PE de la parte interior y exterior del cristal
acrílico.
I
➤ En caso necesario, haga registrar en la documentación del vehículo la
nueva altura y el nuevo peso del mismo.
¡AVISO!
Al colocar el marco interior en el exterior, sostenga la manivela en
posición cerrada ya que, en caso contrario, cambiará la posición
de la manivela (2) respecto al hexágono de accionamiento (3).
NOTA
Si la lámina protectora ha estado expuesta durante un tiempo
prolongado a la luz solar no será posible retirarla sin que queden
restos.
Page 43

ES
Midi Heki Style 400 x 700 Uso de Midi Heki Style
41
8 Uso de Midi Heki Style
8.1 Abrir y cerrar Midi Heki Style (fig. b)
➤ Gire la manivela en sentido horario para abrir la claraboya.
Gire la manivela únicamente hasta que empiece a notar resistencia. El
ángulo de apertura es de aprox. 70°.
➤ Gire la manivela en sentido antihorario para cerrar la claraboya.
Gire la manivela únicamente hasta que empiece a notar resistencia.
➤ Abata la manivela hacia dentro; debe notar una ligera resistencia antes
de abatirla.
➤ Compruebe si la claraboya está bloqueada: intente levantar el cristal con
la mano (pero sin forzarlo).
8.2 Abrir y cerrar las persianas (fig. c)
A
I
➤ Agarre el asa cóncava de la persiana en cuestión y tire de ella hasta la
posición que desee.
¡AVISO! Peligro de que se produzcan daños debido a
la acumulación de calor entre persiana y cristal.
Si la radiación solar es muy intensa, la persiana de oscurecimiento solo debe bajarse dos tercios.
NOTA
Puede regular de forma continua y por separado la persiana de
oscurecimiento y la persiana mosquitera.
Page 44

ES
Solución de averías Midi Heki Style 400 x 700
42
9 Solución de averías
Si no ha podido solucionar la avería, contacte con un taller especializado.
10 Mantenimiento y limpieza de
Midi Heki Style
A
➤ Limpie las persianas con agua jabonosa suave y abundante agua.
➤ Cuide las juntas de goma con talco.
Avería Posible causa Propuesta de solución
La claraboya no puede
cerrarse completamente.
Existe suciedad entre el cristal y el marco
Limpie la ventana.
Elimine cualquier resto o suciedad
de la superficie entre el cristal y el
marco.
La persiana de oscurecimiento y la persiana
mosquitera no pueden
cerrarse.
Existe suciedad en las guías
laterales
Limpie las guías laterales.
¡AVISO!
No utilice ningún instrumento afilado o duro en la limpieza, ya que
podría dañar el vidrio acrílico.
Utilice únicamente productos de limpieza recomendados por el
fabricante: pasta para pulir vidrio acrílico (n.º de art.
9104100242), trapo abrillantador especial (n.º de art.
9104100243) y limpiador de vidrio acrílico (n.º de art.
9104100244).
Page 45

ES
Midi Heki Style 400 x 700 Garantía legal
43
11 Garantía legal
Rige el plazo de garantía legal. Si el producto presenta algún defecto,
diríjase a nuestro socio de servicio en su país (ver direcciones en el dorso
de este manual).
Nuestros especialistas estarán encantados de poder ayudarle y de poder
orientarle en los siguientes pasos a dar respecto a la garantía.
12 Gestión de residuos
➤ Deseche el material de embalaje en el contenedor de reciclaje correspon-
diente.
M
Cuando vaya a desechar definitivamente el producto, infórmese en
el centro de reciclaje más cercano o en un comercio especializado
sobre las normas pertinentes de eliminación de materiales.
Page 46

IT
Spiegazione dei simboli Midi Heki Style 400 x 700
44
Prima di effettuare il montaggio e la messa in funzione leggere
accuratamente questo manuale di istruzioni, conservarlo e in caso di
trasmissione del prodotto, consegnarlo all'utente successivo.
Indice
1 Spiegazione dei simboli . . . . . . . . . . . . . . . . . . . . . . . . . . . . . . . . . . 44
2 Indicazioni di sicurezza e montaggio . . . . . . . . . . . . . . . . . . . . . . . . 45
3 Dotazione. . . . . . . . . . . . . . . . . . . . . . . . . . . . . . . . . . . . . . . . . . . . . 46
4 Accessori . . . . . . . . . . . . . . . . . . . . . . . . . . . . . . . . . . . . . . . . . . . . . 46
5 Uso conforme alla destinazione. . . . . . . . . . . . . . . . . . . . . . . . . . . . 46
6 Indicazioni prima del montaggio . . . . . . . . . . . . . . . . . . . . . . . . . . . 47
7 Montaggio dell’oblò Midi Heki Style . . . . . . . . . . . . . . . . . . . . . . . . . 48
8 Impiego dell’oblò Midi Heki Style . . . . . . . . . . . . . . . . . . . . . . . . . . . 51
9 Eliminazione dei disturbi . . . . . . . . . . . . . . . . . . . . . . . . . . . . . . . . . 52
10 Manutenzione e pulizia dell’oblò Midi Heki Style . . . . . . . . . . . . . . . 52
11 Garanzia . . . . . . . . . . . . . . . . . . . . . . . . . . . . . . . . . . . . . . . . . . . . . 53
12 Smaltimento . . . . . . . . . . . . . . . . . . . . . . . . . . . . . . . . . . . . . . . . . . . 53
1 Spiegazione dei simboli
A
I
➤ Modalità di intervento: questo simbolo indica all'utente che è necessario
un intervento. Le modalità di intervento necessarie saranno descritte
passo dopo passo.
✓ Questo simbolo descrive il risultato di un intervento.
AVVISO!
La mancata osservanza di questa nota può causare danni materiali e compromettere il funzionamento del prodotto.
NOTA
Informazioni integranti relative all'impiego del prodotto.
Page 47

IT
Midi Heki Style 400 x 700 Indicazioni di sicurezza e montaggio
45
Fig. 1 5, pagina 3: questi dati si riferiscono ad un elemento in una figura,
in questo caso alla “posizione 5 nella figura 1 a pagina 3”.
2 Indicazioni di sicurezza e montaggio
Osservare le indicazioni di sicurezza e le direttive previste dal produttore del veicolo e dagli specialisti del settore!
Il produttore non si assume nessuna responsabilità per danni nei seguenti
casi:
danni al prodotto dovuti a influenze meccaniche
modifiche al prodotto senza esplicita autorizzazione del produttore
impiego per altri fini rispetto a quelli descritti nel manuale di istruzioni
I
Osservare le seguenti avvertenze:
Se si verificano errori o guasti, rivolgersi immediatamente ad un’officina
specializzata.
Pericolo di rottura! È vietato camminare sulla cupola di vetro.
Prima di mettere in moto il veicolo, controllare se l’oblò è bloccato
correttamente.
Prima di mettere in moto il veicolo, controllare se l'oblò è danneggiato
(ad es. presenza di incrinature dovute alla tensione nel vetro acrilico).
Non aprire l’oblò durante la marcia.
Non aprire l'oblò in caso di forte vento o pioggia.
Chiudere l’oblò quando piove e nevica.
Non lasciare il veicolo con l'oblò aperto.
Tenere sempre l’oblò libero da tracce di neve e ghiaccio.
NOTA
Nel caso in cui non si disponga di sufficienti conoscenze tecniche
per installare i componenti nei veicoli è necessario fare installare
l’oblò nel veicolo da un tecnico.
Page 48

IT
Dotazione Midi Heki Style 400 x 700
46
3Dotazione
4 Accessori
5 Uso conforme alla destinazione
L’oblò Midi Heki Style è adatto per il montaggio in caravan o camper con tetto
dello spessore di 25–60 mm:
senza ventilazione forzata: n. art. 9104116967
con ventilazione forzata n. art. 9104116966
Non deve essere montato su superfici verticali.
La velocità di marcia massima consentita è 130 km/h, poiché, a seconda
della struttura o della posizione di montaggio, possono generarsi rumori o
danni.
N. in
fig. 1
Quantità Denominazione
1 1 Telaio esterno con cupola di vetro
2 1 Telaio interno
310
20
Vite di fissaggio del ∅ di 4 mm
Vite di fissaggio del ∅ di 3,5 mm
4 10 Cavalletti di montaggio
5 1 Bullone a testa esagonale da 68 mm
Denominazione N. articolo
Spoiler, 540 mm 9104100260
Page 49

IT
Midi Heki Style 400 x 700 Indicazioni prima del montaggio
47
6 Indicazioni prima del montaggio
➤ Prima del montaggio controllare lo spessore del tetto del proprio veicolo.
In caso di dubbi, rivolgersi al produttore del veicolo.
➤ Per la scelta del luogo di montaggio fare attenzione a quanto segue:
– Componenti adiacenti (barre portapacchi o elementi di fissaggio e rin-
forzo), cavi e armadi a muro posti nell’abitacolo del veicolo non
devono essere danneggiati quando si realizza l’apertura.
– Deve esserci sufficiente spazio per montare il telaio interno ed
esterno.
– Montare l’oblò esclusivamente su superfici interne ed esterne del tetto
piane e parallele con un’inclinazione max di 15° rispetto alla linea oriz-
zontale.
– È possibile utilizzare un’apertura già disponibile sul tetto, se ha le
dimensioni giuste per accogliere l’oblò.
– L’oblò può essere montato solo con il lato con cerniera posto anterior-
mente rispetto alla direzione di marcia.
6.1 Rifinitura dell’apertura
Vedi fig. 2
6.2 Impiego di listelli di rinforzo
Vedi fig. 3
I
➤ Rimuovere la schiuma a seconda della larghezza dei listelli di rinforzo
(non in dotazione) (A).
➤ Adattare i listelli di rinforzo (B).
NOTA
È necessario utilizzare listelli di rinforzo per
evitare la compressione dell’isolamento e la flessione della
parete del tetto
fissare i cavalletti di montaggio sul lato interno del tetto
Page 50

IT
Montaggio dell’oblò Midi Heki Style Midi Heki Style 400 x 700
48
7 Montaggio dell’oblò Midi Heki Style
Vedi fig. 4
La dotazione contiene cavalletti di montaggio adatti per spessori del tetto di
30–34 mm. Per spessori del tetto di 25–29 mm e 35–60 mm è necessario
acquistare un kit di montaggio adatto (vedi tabella).
➤ Misurare lo spessore W del tetto.
➤ Selezionare il set di montaggio adatto:
Vedi fig. 5
Per gli spessori del tetto a partire da 35 mm è necessario sostituire nell’ingranaggio il bullone a testa esagonale con quello compreso nella fornitura
(fig. 1 6).
➤ Dall’ingranaggio estrarre il bullone a testa esagonale presente.
➤ Inserire il bullone a testa esagonale (fig. 1 6) in dotazione con il lato
bulinato nell’ingranaggio.
Vedi fig. 6
➤ Controllare che lo spazio circostante l’oblò abbia una distanza adeguata
(ca. 1–2 mm) rispetto all’apertura sul tetto.
Vedi fig. 7
➤ Pulire l’apertura sul tetto nella zona dove si effettua il montaggio.
Spessore tetto N. articolo
25–29 mm 9104107495
30–34 mm in dotazione
9104107496
35–42 mm 9104107497
43–52 mm 9104107498
53–60 mm 9104107499
Page 51

IT
Midi Heki Style 400 x 700 Montaggio dell’oblò Midi Heki Style
49
Vedi fig. 8
A
➤ Isolare il telaio di montaggio con materiale di tenuta in butile plastico che
non indurisce (ad es. Sika Lastomer-710).
Vedi fig. 9
➤ Durante il montaggio fare attenzione alla direzione di marcia (lato cerniera
posto anteriormente rispetto alla direzione di marcia).
➤ Inserire il telaio esterno centralmente nell’apertura del tetto.
➤ Premere leggermente il telaio esterno sul tetto affinché la pasta sigillante
si distribuisca.
Vedi fig. 0
➤ Porre i 10 cavalletti di montaggio sul lato interno del veicolo finché non si
innestano negli incavi del telaio esterno.
Se si utilizzano listelli in legno come rinforzo
A
➤ Effettuare 2 fori per ogni cavalletto con una punta da trapano da 2,2 mm
nella struttura del tetto (A).
➤ Fissare i cavalletti di montaggio con le viti in dotazione del
∅ di 3,5 mm (B) sul tetto.
Per costruzioni alternative devono essere impiegate le viti adatte allo
scopo (non comprese nella fornitura).
➤ Fissare i 10 cavalletti di montaggio con le viti di fissaggio del ∅ di 4 mm
sul telaio esterno (C).
A tal fine per i cavalletti di montaggio utilizzare i diametri dei fori grandi.
AVVISO!
Osservare le indicazioni del produttore del mastice.
AVVISO!
Non forare la struttura del tetto.
Page 52

IT
Montaggio dell’oblò Midi Heki Style Midi Heki Style 400 x 700
50
Esecuzione del controllo dei collegamenti
➤ Con un controllo visivo, verificare se la guarnizione del telaio esterno pog-
gia intorno a tutta la superficie del tetto e allineare i cavalletti.
➤ Riserrare le viti dopo ca. 10 minuti dalla conclusione del montaggio.
Vedi fig. a
A
➤ Premere il telaio interno nella scanalatura (1) dei cavalletti di montaggio.
➤ Dopo il montaggio, controllare che l’oblò funzioni correttamente.
➤ Rimuovere la plastica protettiva in PE all’interno e all’esterno del vetro
acrilico.
I
➤ Se necessario far registrare l’altezza e il peso modificati del veicolo nella
carta di circolazione.
AVVISO!
Quando si applica il telaio interno sul telaio esterno, tenere la
manovella in posizione chiusa, altrimenti la posizione della manovella (2) viene spostata rispetto al dado esagonale dell’azionamento (3).
NOTA
Se la pellicola protettiva in PE è stata esposta troppo a lungo alla
luce del sole non può più essere rimossa senza lasciare residui.
Page 53

IT
Midi Heki Style 400 x 700 Impiego dell’oblò Midi Heki Style
51
8 Impiego dell’oblò Midi Heki Style
8.1 Apertura e chiusura del Midi Heki Style (fig. b)
➤ Per aprire l’oblò, ruotare la manovella in senso orario.
Ruotare la manovella solo finché non è percepibile una certa resistenza.
L’angolo di apertura dell’oblò è di ca. 70°.
➤ Per chiudere l’oblò, ruotare la manovella in senso antiorario.
Ruotare la manovella solo finché non è percepibile una certa resistenza.
➤ Abbassare la manovella; sulla manovella deve essere presente una leg-
gera tensione prima dell’abbassamento.
➤ Per verificare se l’oblò è bloccato: cercare di sollevare il cristallo manual-
mente (senza esercitare una forza eccessiva).
8.2 Apertura e chiusura delle tendine avvolgibili
(fig. c)
A
I
➤ Afferrare l’impugnatura concava della rispettiva tendina e tirare fino alla
posizione desiderata.
AVVISO! Pericolo di danni dovuto al ristagno di calore fra la
tendina avvolgibile e il cristallo
In caso di intensa esposizione ai raggi solari, la tendina oscurante
avvolgibile può essere chiusa solo per due terzi.
NOTA
È possibile regolare in modo continuo la tendina oscurante avvolgibile e la zanzariera indipendentemente l’una dall’altra.
Page 54

IT
Eliminazione dei disturbi Midi Heki Style 400 x 700
52
9 Eliminazione dei disturbi
Se non si riesce a rimuovere il guasto rivolgersi ad un’officina specializzata.
10 Manutenzione e pulizia dell’oblò
Midi Heki Style
A
➤ Pulire gli oscuranti con acqua leggermente saponata e molta acqua.
➤ Eseguire la manutenzione delle guarnizioni in gomma con talco.
Disturbo Possibile causa Proposta di soluzione
Non è possibile chiudere completamente
l’oblò.
Presenza di sporcizia fra il
vetro e il telaio
Pulire il finestrino.
Rimuovere dalla superficie fra il
vetro e il telaio eventuali foglie secche e rami.
Non è possibile far
scorrere la zanzariera o
la tendina oscurante
avvolgibile.
Presenza di sporcizia sulle
guide laterali
Pulire le guide laterali della batteria.
AVVISO!
Per la pulizia non impiegare detergenti corrosivi o oggetti ruvidi
perché potrebbero provocare danni al vetro acrilico.
Utilizzare solamente i detergenti consigliati dal costruttore: prodotto per lucidare il vetro acrilico (n. art. 9104100242), panno speciale per lucidare (n. art. 9104100243) e detergente per pulire il
vetro acrilico (n. art. 9104100244).
Page 55

IT
Midi Heki Style 400 x 700 Garanzia
53
11 Garanzia
Vale il termine di garanzia previsto dalla legge. Qualora il prodotto risultasse
difettoso, La preghiamo di contattare il Service Partner del Suo Paese (l'indirizzo si trova sul retro del manuale).
I nostri specialisti sono sempre pronti ad aiutarvi e a concordare con Voi
l'ulteriore disbrigo delle condizioni garanzia.
12 Smaltimento
➤ Raccogliere il materiale di imballaggio possibilmente negli appositi
contenitori di riciclaggio.
M
Quando il prodotto viene messo fuori servizio definitivamente,
informarsi al centro di riciclaggio più vicino, oppure presso il proprio
rivenditore specializzato, sulle prescrizioni adeguate concernenti lo
smaltimento.
Page 56

NL
Verklaring van de symbolen Midi Heki Style 400 x 700
54
Lees deze handleiding voor de montage en de ingebruikname zorgvuldig door en bewaar hem. Geef de handleiding bij het doorgeven van
het product aan de gebruiker.
Inhoudsopgave
1 Verklaring van de symbolen. . . . . . . . . . . . . . . . . . . . . . . . . . . . . . . 54
2 Veiligheids- en montage-instructies . . . . . . . . . . . . . . . . . . . . . . . . . 55
3 Omvang van de levering . . . . . . . . . . . . . . . . . . . . . . . . . . . . . . . . . 56
4 Toebehoren . . . . . . . . . . . . . . . . . . . . . . . . . . . . . . . . . . . . . . . . . . . 56
5 Gebruik volgens de voorschriften . . . . . . . . . . . . . . . . . . . . . . . . . . 56
6 Instructies voor de montage. . . . . . . . . . . . . . . . . . . . . . . . . . . . . . . 57
7 Midi Heki Style monteren . . . . . . . . . . . . . . . . . . . . . . . . . . . . . . . . . 58
8 Midi Heki Style gebruiken . . . . . . . . . . . . . . . . . . . . . . . . . . . . . . . . 60
9 Verhelpen van storingen . . . . . . . . . . . . . . . . . . . . . . . . . . . . . . . . . 61
10 Midi Heki Style onderhouden en reinigen . . . . . . . . . . . . . . . . . . . . 62
11 Garantie . . . . . . . . . . . . . . . . . . . . . . . . . . . . . . . . . . . . . . . . . . . . . . 62
12 Afvoer. . . . . . . . . . . . . . . . . . . . . . . . . . . . . . . . . . . . . . . . . . . . . . . . 62
1 Verklaring van de symbolen
A
I
➤ Handeling: dit symbool geeft aan dat u iets moet doen. De vereiste
handelingen worden stap voor stap beschreven.
✓ Dit symbool beschrijft het resultaat van een handeling.
Afb. 1 5, pagina 3: deze aanduiding wijst u op een element in een afbeelding, in dit voorbeeld op „positie 5 in afbeelding 1 op pagina 3”.
LET OP!
Het niet naleven ervan kan leiden tot materiële schade en de
werking van het product beperken.
INSTRUCTIE
Aanvullende informatie voor het bedienen van het product.
Page 57

NL
Midi Heki Style 400 x 700 Veiligheids- en montage-instructies
55
2 Veiligheids- en montage-instructies
Neem de veiligheidsinstructies en voorschriften van de fabrikant van
het voertuig en het garagebedrijf in acht!
De fabrikant kan in de volgende gevallen niet aansprakelijk worden gesteld
voor schade:
beschadiging van het product door mechanische invloeden
veranderingen aan het product zonder uitdrukkelijke toestemming van de
fabrikant
gebruik voor andere dan de in de handleiding beschreven toepassingen
I
Neem de volgende instructies in acht:
Zoek onmiddellijk een werkplaats op als er fouten of storingen optreden.
Inbraakgevaar! Betreed de glazen koepel niet.
Controleer voor het rijden of het dakvenster goed vergrendeld is.
Controleer voor het rijden of het dakraam is beschadigd (bijv. spannings-
scheuren in het acrylglas).
Open het dakvenster niet tijdens het rijden.
Op het dakraam niet bij sterke wind of regen.
Sluit het dakvenster bij regen en sneeuwval.
Verlaat het voertuig niet bij geopend dakraam.
Houd het dakvenster sneeuw- en ijsvrij.
INSTRUCTIE
Als u niet voldoende technische kennis hebt van het monteren
van componenten in voertuigen, dient u het dakvenster door een
vakman in het voertuig te laten inbouwen.
Page 58

NL
Omvang van de levering Midi Heki Style 400 x 700
56
3 Omvang van de levering
4 Toebehoren
5 Gebruik volgens de voorschriften
Het dakraam Midi Heki Style is geschikt voor de inbouw in campers of caravans met een dakdikte van 25 - 60 mm:
zonder kunstmatige ventilatie: artikelnr. 9104116967
met kunstmatige ventilatie: artikelnr. 9104116966
Het raam mag niet in verticale vlakken worden ingebouwd.
De maximaal toegestane rijsnelheid bedraagt 130 km/h, omdat afhankelijk
van de voertuigconstructie of inbouwpositie geluidsontwikkelingen of
beschadigingen kunnen optreden.
Nr. in
afb. 1
Aantal Omschrijving
1 1 Buitenframe met glazen koepel
2 1 Binnenframe
310
20
Bevestigingsschroef ∅ 4mm
Bevestigingsschroef ∅ 3,5 mm
4 10 Montagebokken
5 1 Inbusbout 68 mm
Omschrijving Artikelnr.
Spoiler, 540 mm 9104100260
Page 59

NL
Midi Heki Style 400 x 700 Instructies voor de montage
57
6 Instructies voor de montage
➤ Controleer voor de montage de dakdikte van uw voertuig. Neem bij vra-
gen contact op met de fabrikant van het voertuig.
➤ Neem bij de keuze van de inbouwplaats het volgende in acht:
– Aangrenzende componenten (dakreling of bevestigings- en verster-
kingsdDakraamelen), leidingen en inbouwkasten in de binnenruimte
van het voertuig mogen bij het zagen van de uitsparing niet beschadigd worden.
– Er moet voldoende ruimte voor het monteren van het binnen- en bui-
tenframe beschikbaar zijn.
– Monteer het dakraam alleen aan vlakke en parallelle inwendige en uit-
wendige dakoppervlakken met een maximale schuine stand van 15°
ten opzichte van de horizontale lijn.
– U kunt een aanwezige dakopening gebruiken als het dakraam erin
past.
– Het dakraam mag alleen met de scharnierzijde van voren in rijrichting
worden ingebouwd.
6.1 Uitsparing bewerken
Zie afb. 2
6.2 Verstevigingslijsten gebruiken
Zie afb. 3
I
➤ Verwijder de schuimvulling overeenkomstig de breedte van uw verstevi-
gingslijsten (niet bij de levering inbegrepen) (A).
➤ Pas de verstevigingslijsten erin (B).
INSTRUCTIE
U dient verstevigingslijsten te gebruiken, om
te voorkomen dat de isolering wordt ingedrukt en de dakwand
doorzakt
de montagebokken aan de binnenkant van het dak te kunnen
bevestigen
Page 60

NL
Midi Heki Style monteren Midi Heki Style 400 x 700
58
7 Midi Heki Style monteren
Zie afb. 4
De levering omvat montagebokken die geschikt zijn voor dakdiktes van
30 – 34 mm. Voor dakdiktes van 25 – 29 mm en 35 – 60 mm dient u een
passende montageset te kopen (zie tabel).
➤ Meet uw dakdikte W.
➤ Kies de passende montageset:
Zie afb. 5
Bij dakdiktes vanaf 35 mm dient u in in de transmissie de aanwezige
inbusbout te vervangen door de meegeleverde inbusbout (afb. 1 6).
➤ Trek de aanwezige inbusbout uit de transmissie.
➤ Plaats de meegeleverde inbusbout (afb. 1 6) met de ruwe kant in de
transmissie.
Zie afb. 6
➤ Controleer of het dakraam rondom voldoende afstand (ca. 1 tot 2 mm) tot
de dakopening heeft.
Zie afb. 7
➤ Reinig de dakopening in het montagebereik.
Dakdikte Artikelnr.
25 - 29 mm 9104107495
30 - 34 mm bij de levering inbegrepen
9104107496
35 - 42 mm 9104107497
43 - 52 mm 9104107498
53 - 60 mm 9104107499
Page 61

NL
Midi Heki Style 400 x 700 Midi Heki Style monteren
59
Zie afb. 8
A
➤ Dicht het montageframe af met een plastisch niet-uithardend butyl-
afdichtingsmateriaal (bijv. Sika-Lastomer-710).
Zie afb. 9
➤ Neem bij de montage de rijrichting in acht (scharnierzijde van voren in
rijrichting).
➤ Plaats het buitenframe in het midden in de dakopening.
➤ Druk het buitenframe lichtjes tegen het dak, zodat de afdichtingsmassa
zich verdeelt.
Zie afb. 0
➤ Plaats de 10 montagebokken aan de binnenkant van het voertuig tot aan
de aanslag in de uitsparingen van het buitenframe.
Indien u houten latten als versteviging gebruikt
A
➤ Boor per montagebok twee keer met een boor 2,2 mm in de dakopbouw
voor (A).
➤ Bevestig de montagebokken met de meegeleverde schroeven
∅ 3,5 mm (B) op het dak.
Voor alternatieve opbouweenheden dient u bijpassende schroeven te
gebruiken (niet bij de levering inbegrepen).
➤ Bevestig de 10 montagebokken met de bevestigingsschroeven ∅ 4 mm
aan het buitenframe (C).
Gebruik hiervoor de grote gatdiameters in de montagebokken.
LET OP!
Neem ook de instructies van de fabrikant van het afdichtingsmiddel in acht.
LET OP!
Boor niet door de dakopbouw heen.
Page 62

NL
Midi Heki Style gebruiken Midi Heki Style 400 x 700
60
Eindcontrole uitvoeren
➤ Controleer visueel of de afdichting van het buitenframe rondom tegen het
dakoppervlak aanzit en de montagebokken in lijn staan.
➤ Draai de schroeven ca. 10 minuten na de montage vast.
Zie afb. a
A
➤ Druk het binnenframe in de gleuf (1) van de montagebokken.
➤ Controleer na de montage de werking van het dakraam.
➤ Trek de PE beschermfolie van binnen en van buiten van het acrylglas.
I
➤ Laat de gewijzigde voertuighoogte en het gewijzigde gewicht in de voer-
tuigpapieren opnemen, indien nodig.
8 Midi Heki Style gebruiken
8.1 Midi Heki Style openen en sluiten (afb. b)
➤ Draai de handkruk rechtsom om het dakraam te openen.
Draai de handkruk slechts zo ver tot een weerstand voelbaar is. De openingshoek van het dakraam bedraagt ca. 70°.
➤ Draai de handkruk linksom om het dakraam te sluiten.
Draai de handkruk slechts zo ver tot een weerstand voelbaar is.
➤ Klap de handkruk in; er moet een lichte voorspanning voor het inklappen
van de handkruk voelbaar zijn.
➤ Controleer of het dakraam vergrendeld is: Probeer de ruit met de hand
(zonder overmatige kracht te gebruiken) omhoog te tillen.
LET OP!
Houd de handkruk bij het aanbrengen van het binnenframe aan
het buitenframe in gesloten stand, omdat anders de stand van de
kruk (2) naar de aandrijfzeskant (3) versteld wordt.
INSTRUCTIE
Indien de PE beschermfolie te lang is blootgesteld aan zonlicht,
kan de folie niet meer restloos worden verwijderd.
Page 63

NL
Midi Heki Style 400 x 700 Verhelpen van storingen
61
8.2 Rolgordijnen openen en sluiten (afb. c)
A
I
➤ Pak de komgreep van het betreffende rolgordijn vast en trek het in de
gewenste stand.
9 Verhelpen van storingen
Als u de storing niet kunt verhelpen, gaat u naar een gespecialiseerde werkplaats.
LET OP! Gevaar voor beschadiging door hittestuwing
tussen rolgordijn en ruit
Bij sterke zonnestralen mag u het verduisteringsrolgordijn slechts
voor twee derde sluiten.
INSTRUCTIE
U kunt het verduisteringsrolgordijn en de hor onafhankelijk van
elkaar traploos verstellen.
Storing Mogelijke oorzaak Voorstel tot oplossing
Het dakraam kan niet
volledig worden gesloten.
Vuil tussen glas en frame Reinig het raam.
Verwijder bladeren en takken uit de
ruimte tussen glas en frame.
De hor of het verduisteringsrolgordijn kunnen
niet worden verschoven.
Verontreinigingen aan de zijgeleiders
Reinig de zijgeleiders.
Page 64

NL
Midi Heki Style onderhouden en reinigen Midi Heki Style 400 x 700
62
10 Midi Heki Style onderhouden en
reinigen
A
➤ Reinig de rolgordijnen met milde zeepoplossing en veel water.
➤ Behandel de rubberafdichting met talkpoeder.
11 Garantie
De wettelijke garantieperiode is van toepassing. Indien het product defect is,
dient u contact op te nemen met een servicepartner in uw land (zie achterzijde van de gebruiksaanwijzing voor adressen).
Onze specialisten helpen u graag verder en bespreken het verdere verloop
van de garantie met u.
12 Afvoer
➤ Laat het verpakkingsmateriaal indien mogelijk recyclen.
M
Als u het product definitief buiten bedrijf stelt, informeer dan bij het
dichtstbijzijnde recyclingcentrum of uw speciaalzaak naar de
betreffende afvoervoorschriften.
LET OP!
Voor het reinigen geen scherpe of bijtende middelen gebruiken,
omdat dit kan leiden tot schade aan het acrylglas.
Gebruik uitsluitend de door de fabrikant aanbevolen reinigingsmiddelen: acrylglaspolitoer (art. nr. 9104100242), speciale
politoerdoek (art. nr. 9104100243) en acrylglasreiniger (art. nr.
9104100244).
Page 65

DA
Midi Heki Style 400 x 700 Forklaring af symbolerne
63
Læs denne vejledning omhyggeligt igennem før installation og ibrugtagning, og opbevar den. Giv den til brugeren, hvis du giver produktet
videre.
Indholdsfortegnelse
1 Forklaring af symbolerne . . . . . . . . . . . . . . . . . . . . . . . . . . . . . . . . . 63
2 Sikkerheds- og installationshenvisninger. . . . . . . . . . . . . . . . . . . . . 64
3 Leveringsomfang . . . . . . . . . . . . . . . . . . . . . . . . . . . . . . . . . . . . . . . 65
4 Tilbehør . . . . . . . . . . . . . . . . . . . . . . . . . . . . . . . . . . . . . . . . . . . . . . 65
5 Korrekt brug . . . . . . . . . . . . . . . . . . . . . . . . . . . . . . . . . . . . . . . . . . . 65
6 Henvisninger før monteringen . . . . . . . . . . . . . . . . . . . . . . . . . . . . . 66
7 Montering af Midi Heki Style . . . . . . . . . . . . . . . . . . . . . . . . . . . . . . 67
8 Anvendelse af Midi Heki Style . . . . . . . . . . . . . . . . . . . . . . . . . . . . . 69
9 Udbedring af fejl. . . . . . . . . . . . . . . . . . . . . . . . . . . . . . . . . . . . . . . . 70
10 Vedligeholdelse og rengøring af Midi Heki Style . . . . . . . . . . . . . . . 71
11 Garanti . . . . . . . . . . . . . . . . . . . . . . . . . . . . . . . . . . . . . . . . . . . . . . . 71
12 Bortskaffelse . . . . . . . . . . . . . . . . . . . . . . . . . . . . . . . . . . . . . . . . . . 71
1 Forklaring af symbolerne
A
I
➤ Handling: Dette symbol viser dig, at du skal gøre noget. De påkrævede
handlinger beskrives trin for trin.
✓ Dette symbol beskriver resultatet af en handling.
Fig. 1 5, side 3: Denne information henviser til et element på en figur, i
dette eksempel til „Position 5 på figur 1 på side 3“.
VIGTIGT!
Manglende overholdelse kan medføre materielle skader og
begrænse produktets funktion.
BEMÆRK
Supplerende informationer om betjening af produktet.
Page 66

DA
Sikkerheds- og installationshenvisninger Midi Heki Style 400 x 700
64
2 Sikkerheds- og installations-
henvisninger
Overhold sikkerhedshenvisningerne og pålæggene, der er foreskrevet
af køretøjsproducenten og af automobilbranchen!
Producenten påtager sig intet ansvar for skader i følgende tilfælde:
Beskadigelser på produktet på grund af mekanisk påvirkning
Ændringer på produktet uden udtrykkelig tilladelse fra producenten
Anvendelse til andre formål end dem, der er beskrevet i vejledningen
I
Overhold følgende henvisninger:
Opsøg omgående et autoriseret værksted, hvis der forekommer fejl.
Fare for gennembrud! Træd ikke på glaskuplen.
Kontrollér, at tagvinduet er låst korrekt, før du kører.
Kontrollér tagvinduet for beskadigelser, før du kører (f.eks. revner i acryl-
glasset på grund af spænding).
Åbn ikke tagvinduet under kørslen.
Åbn ikke tagvinduet ved kraftig vind eller regn.
Luk tagvinduet ved regn og snefald.
Forlad ikke køretøjet, når tagvinduet er åbnet.
Hold tagvinduet fri for sne og is.
BEMÆRK
Hvis du ikke har tilstrækkelig teknisk viden til at installere komponenterne i køretøjer, bør du lade en fagmand installere tagvinduet
i køretøjet.
Page 67

DA
Midi Heki Style 400 x 700 Leveringsomfang
65
3 Leveringsomfang
4 Tilbehør
5 Korrekt brug
Tagvinduet Midi Heki Style er egnet til montering i autocampere eller campingvogne med tagtykkelser på 25 – 60 mm:
Uden tvungen ventilation: Art.nr. 9104116967
Med tvungen ventilation: Art.nr. 9104116966
Det må ikke monteres i lodrette flader.
Den maks. tilladte kørehastighed er 130 km/h, da der afhængigt af køretøjskarosseri eller monteringsposition kan udvikles støj eller forekomme
beskadigelser.
Nr. på
fig. 1
Mængde Betegnelse
1 1 Udvendig ramme med glaskuppel
2 1 Indvendig ramme
310
20
Fastgørelsesskrue ∅ 4mm
Fastgørelsesskrue ∅ 3,5 mm
4 10 Monteringsbukke
5 1 Sekskantbolt 68 mm
Betegnelse Artikel-nr.
Spoiler, 540 mm 9104100260
Page 68

DA
Henvisninger før monteringen Midi Heki Style 400 x 700
66
6 Henvisninger før monteringen
➤ Kontrollér før monteringen køretøjets tagtykkelse. Kontakt køretøjs-
producenten, hvis du har spørgsmål.
➤ Vær opmærksom på følgende ved valg af monteringssted:
– Tilstødende komponenter (tagræling eller fastgørelses- og forstærk-
ningsdele), ledninger og skabe i køretøjets indvendige rum må ikke
beskadiges, når udsnittet saves ud.
– Der skal være tilstrækkelig plads til at montere den indvendige og
udvendige ramme.
– Montér kun tagvinduet på plane og parallelle indvendige og udvendige
tagflader med en maksimal skråstilling på 15° i forhold til vandret.
– Du kan anvende et eksisterende tagudsnit, hvis tagvinduet passer i
det.
– Tagvinduet må kun monteres med hængselssiden foran i kørselsret-
ningen.
6.1 Udarbejdelse af udsnit
Se fig. 2
6.2 Anvendelse af forstærkningslister
Se fig. 3
I
➤ Fjern skummet i overensstemmelse med bredden på forstærkningsli-
sterne (ikke i leveringsomfanget) (A).
➤ Tilpas forstærkningslisterne (B).
BEMÆRK
Du skal anvende forstærkningslister for
at forhindre, at isoleringen trykkes sammen, og at tagvæggen
bøjes
at kunne fastgøre monteringsbukkene på tagets inderside
Page 69

DA
Midi Heki Style 400 x 700 Montering af Midi Heki Style
67
7 Montering af Midi Heki Style
Se fig. 4
Leveringsomfanget indeholder monteringsbukke, der er egnet til tagtykkelser
på 30 – 34 mm. Til tagtykkelser på 25 – 29 mm og 35 – 60 mm skla du købe
et passende monteringssæt (se tabel).
➤ Mål tagtykkelsen W.
➤ Vælg det passende monteringssæt:
Se fig. 5
Ved tagtykkelser fra 35 mm skal du erstatte den eksisterende sekskantbolt i
drevet med sekskantbolten, der er indeholdt i leveringsomfanget (fig. 1 6).
➤ Træk den eksisterende sekskantbolt ud af drevet.
➤ Sæt den kørnede side af sekskantbolten (fig. 1 6), der er indeholdt i
leveringsomfanget, ind i drevet.
Se fig. 6
➤ Kontrollér, om tagvinduet har tilstrækkelig afstand (ca. 1 til 2 mm) til tag-
udsnittet hele vejen rundt.
Se fig. 7
➤ Rengør tagudsnittet i monteringsområdet.
Se fig. 8
A
➤ Sørg for at tætne monteringsrammen med et plastisk, ikke-hærdende
butyltætningsmateriale (f.eks. Sika-Lastomer-710).
Tagtykkelse Artikel-nr.
25 – 29 mm 9104107495
30 – 34 mm Indeholdt i leveringsomfanget
9104107496
35 – 42 mm 9104107497
43 – 52 mm 9104107498
53 – 60 mm 9104107499
VIGTIGT!
Læs henvisningerne fra tætningsmiddelproducenten.
Page 70

DA
Montering af Midi Heki Style Midi Heki Style 400 x 700
68
Se fig. 9
➤ Vær opmærksom på kørselsretningen ved monteringen (hængselsside
fremad i kørselsretningen).
➤ Sæt den udvendige ramme i midt i tagudsnittet.
➤ Tryk den udvendige ramme let mod taget, så tætningsmassen fordeler
sig.
Se fig. 0
➤ Sæt de 10 monteringsbukke ind i den udvendige rammes udsparinger på
indersiden af køretøjet indtil anslag.
Hvis du anvender trælister som forstærkning
A
➤ Bor for hver monteringsbuk to gange for i tagkonstruktionen (A) med et
bor på 2,2 mm.
➤ Fastgør monteringsbukkene på taget med de vedlagte skruer
∅ 3,5 mm (B).
Til alternative konstruktioner skal der anvendes tilsvarende egnede
skruer (ikke indeholdt i leveringsomfanget).
➤ Fastgrø de 10 monteringsbukke på den udvendige ramme (C) med
fastgørelsesskruerne ∅ 4mm.
Anvend hertil de store huldiametre i monteringsbukkene.
VIGTIGT!
Bor ikke gennem tagkonstruktionen.
Page 71

DA
Midi Heki Style 400 x 700 Anvendelse af Midi Heki Style
69
Afsluttende kontrol
➤ Foretag en visuel kontrol, at den udvendige rammes tætning ligger på tag-
fladen hele vejen rundt, og monteringsbukkene flugter.
➤ Efterspænd skruerne ca. 10 minutter efter monteringen.
Se fig. a
A
➤ Tryk den indvendige ramme ind i monteringsbukkenes not (1).
➤ Kontrollér tagvinduets funktion efter monteringen.
➤ Træk PE-beskyttelsesfolien af acrylglasset indvendigt og udvendigt.
I
➤ Få om nødvendigt køretøjets ændrede højde og den ændrede vægt
registreret i indregistreringspapirerne.
8 Anvendelse af Midi Heki Style
8.1 Åbning og lukning af Midi Heki Style (fig. b)
➤ Drej håndsvinget med uret for at åbne tagvinduet.
Drej kun håndtaget, indtil der kan mærkes modstand. Tagvinduets
åbningsvinkel er på ca. 70°.
➤ Drej håndsvinget mod uret for at lukke tagvinduet.
Drej kun håndtaget, indtil der kan mærkes modstand.
➤ Klap håndsvinget ind. Der skal kunne mærkes en let forspænding på
håndsvinget, før det klappes ind.
➤ Kontrollér, om tagvinduet er låst: Forsøg at løfte glasruden med hånden
(uden at anvende vold).
VIGTIGT!
Hold håndsvinget i lukket stilling, når den indvendige ramme
sættes på den udvendige ramme, da håndsvingets stilling (2)
i forhold til drivsekskanten ellers kommer ud af justering (3).
BEMÆRK
Hvis PE-beskyttelsesfolien var udsat for sollyset for længe, kan
den ikke længere løsnes uden at efterlade rester.
Page 72

DA
Udbedring af fejl Midi Heki Style 400 x 700
70
8.2 Åbning og lukning af rullegardiner (fig. c)
A
I
➤ Tag fat i grebsfordybningen på det pågældende rullegardin, og træk det
til den ønskede stilling.
9 Udbedring af fejl
Hvis du ikke kan udbedre fejlen, skal du kontakte et autoriseret værksted.
VIGTIGT! Fare for beskadigelse på grund af ophobet varme
mellem rullegardin og glasrude
Ved kraftigt sollys må rullegardinet kun lukkes to tredjedel.
BEMÆRK
Du kan indstillle rullegardinet og insektrullegardinet trinløst
afhængigt af hinanden.
Fejl Mulig årsag Løsningsforslag
Tagvinduet kan ikke
lukkes helt.
Smuds mellem glas og
ramme
Rengør vinduet.
Fjern løv og grene fra fladen mellem
glas og ramme.
Insektrullegardinet og
rullegardinet kan ikke
forskydes.
Tilsmudsninger på
sideføringerne
Rengør sideføringerne.
Page 73

DA
Midi Heki Style 400 x 700 Vedligeholdelse og rengøring af Midi Heki Style
71
10 Vedligeholdelse og rengøring af
Midi Heki Style
A
➤ Rengør rullegardiner med en mild sæbeopløsning og meget vand.
➤ Plej gummitætningerne med talkum.
11 Garanti
Den lovbestemte garantiperiode gælder. Hvis produktet er defekt, skal du
kontakte en servicepartner i dit land (adresser, se vejledningens bagside).
Vores specialister hjælper gerne videre og diskuterer garantiens videre
forløb.
12 Bortskaffelse
➤ Bortskaf så vidt muligt emballagen sammen med det tilsvarende
genbrugsaffald.
M
Hvis du tager produktet endegyldigt ud af drift, skal du kontakte det
nærmeste recyclingcenter eller din faghandel for at få de pågældende forskrifter om bortskaffelse.
VIGTIGT!
Anvend ikke skarpe eller hårde midler til rengøring, da det kan
beskadige acrylglasset.
Anvend udelukkende rengøringsmidlerne, der anbefales af
producenten: Acrylglas-poleringsmiddel (art. nr. 9104100242),
special-poleringsklud (art. nr. 9104100243) og acrylglasrengøringsmiddel (art. nr. 9104100244).
Page 74

SV
Förklaring till symboler Midi Heki Style 400 x 700
72
Läs igenom anvisningarna noga innan produkten monteras och
används. Spara monterings- och bruksanvisningen för senare bruk.
Överlämna bruksanvisningen till den nya ägaren vid ev. vidareförsäljning.
Innehållsförteckning
1 Förklaring till symboler . . . . . . . . . . . . . . . . . . . . . . . . . . . . . . . . . . . 72
2 Säkerhets- och installationsanvisningar. . . . . . . . . . . . . . . . . . . . . . 73
3 Leveransomfattning . . . . . . . . . . . . . . . . . . . . . . . . . . . . . . . . . . . . . 74
4 Tillbehör . . . . . . . . . . . . . . . . . . . . . . . . . . . . . . . . . . . . . . . . . . . . . . 74
5 Ändamålsenlig användning . . . . . . . . . . . . . . . . . . . . . . . . . . . . . . . 74
6 Före monteringen. . . . . . . . . . . . . . . . . . . . . . . . . . . . . . . . . . . . . . . 75
7 Montera Midi Heki Style . . . . . . . . . . . . . . . . . . . . . . . . . . . . . . . . . . 76
8 Använda Midi Heki Style . . . . . . . . . . . . . . . . . . . . . . . . . . . . . . . . . 78
9 Felsökning . . . . . . . . . . . . . . . . . . . . . . . . . . . . . . . . . . . . . . . . . . . . 79
10 Skötsel och rengöring av Midi Heki Style. . . . . . . . . . . . . . . . . . . . . 80
11 Garanti . . . . . . . . . . . . . . . . . . . . . . . . . . . . . . . . . . . . . . . . . . . . . . . 80
12 Avfallshantering . . . . . . . . . . . . . . . . . . . . . . . . . . . . . . . . . . . . . . . . 80
1 Förklaring till symboler
A
I
➤ Arbetssteg: denna symbol står framför en arbetsinstruktion.
Tillvägagångssättet beskrivs steg för steg.
✓ Denna symbol står framför beskrivningen av resultatet.
OBSERVERA!
Om anvisningarna inte beaktas kan det leda till materialskador
och produktens funktion kan påverkas negativt.
ANVISNING
Kompletterande information om användning av produkten.
Page 75

SV
Midi Heki Style 400 x 700 Säkerhets- och installationsanvisningar
73
Bild 1 5, sidan 3: anger en detalj på en bild, i detta exempel ”position 5 på
bild 1 på sidan 3”.
2 Säkerhets- och installationsanvis-
ningar
Beakta säkerhetsanvisningarna och riktlinjerna från fordonstillverkaren samt reglerna för bilmekaniska arbeten!
Tillverkaren övertar inget ansvar för skador i följande fall:
skador på produkten, orsakade av mekanisk påverkan
ändringar som utförts utan uttryckligt medgivande från tillverkaren
ej ändamålsenlig användning
I
Beakta följande:
Kontakta en auktoriserad verkstad om det uppstür fel eller störningar.
Risk för glasbrott! Gå inte upp på glaskåpan.
Kontrollera att takfönstret är ordentligt stängt och låst innan färden
påbörjas.
Kontrollera takfönstret med avseende på skador (t.ex. spänningssprickor)
innan färden påbörjas.
Öppna inte takfönstret under körningen.
Öppna inte takfönstret vid kraftig blåst eller regn.
Stäng takfönstret vid regn och snöfall.
Lämna inte fordonet när takfönstret är öppet.
Håll takfönstret fritt från snö och is.
ANVISNING
Låt fackfolk montera takfönstret på fordonet om du inte har
erfarenhet med/tillräcklig kännedom om montering av tekniska
komponenter i fordon.
Page 76

SV
Leveransomfattning Midi Heki Style 400 x 700
74
3 Leveransomfattning
4 Tillbehör
5 Ändamålsenlig användning
Takfönstret Midi Heki Style är avsett för montering i husbilar och husvagnar
med en taktjocklek mellan 25 – 60 mm:
utan tvångsventilation: artikel-nr 9104116967
med tvångsventilation: artikel-nr 9104116966
Det får inte monteras på lodräta ytor.
Max. tillåten körhastighet är 130 km/h, beroende på fordonets konstruktion
och monteringsläget kan det uppstå buller eller skador.
Nr på
bild 1
Mängd Beteckning
1 1 Ytterram med glaskåpa
2 1 Innerram
310
20
Fästskruv ∅ 4mm
Fästskruv ∅ 3,5 mm
4 10 Montagebockar
5 1 Sexkantbultar 68 mm
Beteckning Artikelnr.
Spoiler, 540 mm 9104100260
Page 77

SV
Midi Heki Style 400 x 700 Före monteringen
75
6 Före monteringen
➤ Kontrollera taktjockleken på fordonet före monteringen. Kontakta fordon-
stillverkaren om du har frågor.
➤ Beakta följande vid val av monteringsställe:
– Intilliggande komponenter (takreling eller fäst- och förstärkningsdelar),
kablar och inbyggnadsskåp inne i fordonet får inte skadas när öpp-
ningen sågas ut.
– Det måste finnas tillräckligt med plats för inner- och ytterram.
– Montera takfönstret endast på plana och parallella inner- och ytterta-
kytor. Maximal lutning 15°.
– Det är möjligt att använda en befintlig taköpning, om takfönstrets mått
passar.
– Takfönstret får endast monteras med gångjärnen i färdriktningen.
6.1 Urskärningen
Se bild 2
6.2 Använda förstärkningslister
Se bild 3
I
➤ Ta bort en del av skumfyllningen så att det motsvarar förstärkningslister-
nas bredd (ingår ej i leveransen) (A).
➤ Justera in förstärkningslisterna (B).
ANVISNING
Man måste använda förstärkningslister
för att förhindra att isoleringen trycks samman och att taket
böjs
för att kunna fästa montagesbockar på takets innersida
Page 78

SV
Montera Midi Heki Style Midi Heki Style 400 x 700
76
7 Montera Midi Heki Style
Se bild 4
I leveransen ingår montagebockar som är anpassade för en taktjocklek på
30–34mm. För taktjocklekar mellan 25–29mm och 35–60mm måste du
skaffa fram en passande monteringssats (se tabell).
➤ Mät taktjockleken W.
➤ Välj passande monteringssats:
Se bild 5
För taktjocklekar från 35 mm måste du byta ut de befintliga sexkantbultarna
mot sexkantbultarna i leveransomfattningen (bild 1 6).
➤ Dra ut de befintliga bultarna.
➤ Sätt in sexkantbultarna (bild 1 6) från leveransomfattningen med den
strukturerade ytan inåt.
Se bild 6
➤ Kontrollera att takfönstret har tillräckligt stort avstånd (ca 1 till 2 mm) till
taköppningen runt om.
Se bild 7
➤ Rengör monteringsstället på taket (urskärningen).
Takets tjocklek Artikelnr.
25 – 29 mm 9104107495
30 – 34 mm ingår i leveransen
9104107496
35 – 42 mm 9104107497
43 – 52 mm 9104107498
53 – 60 mm 9104107499
Page 79

SV
Midi Heki Style 400 x 700 Montera Midi Heki Style
77
Se bild 8
A
➤ Täta monteringsramen med plastiskt, ej härdande butyl-tätningsmaterial
(t ex. Sika-Lastomer-710).
Se bild 9
➤ Observera färdriktningen vid montering (gångjärnen framåt i färdrikt-
ningen).
➤ Sätt in ytterramen i mitten av urskärningen.
➤ Tryck ytterramen lätt mot taket så att tätningsmassan fördelas.
Se bild 0
➤ Sätt i de 10 montagebockarna på fordonets insida tills anslaget i ytterra-
mens ursparningar.
Om du använder trälister som förstärkning
A
➤ Förborra varje montagebock två gånger med en 2,2 mm borr (A).
➤ Fäst montagebockarna med de medföljande skruvarna ∅ 3,5 mm (B) i
taket.
För alternativa konstruktioner ska lämpliga skruvar användas (ingår inte i
leveransomfattningen).
➤ Fäst de 10 montagebockarna med fästskruvarna ∅ 4 mm på
ytterramen (C).
Använd de stora håldiametrarna i montagebockarna för att göra detta.
OBSERVERA!
Beakta även anvisningarna från tillverkaren av tätningsmedlet.
OBSERVERA!
Borra inte genom taket.
Page 80

SV
Använda Midi Heki Style Midi Heki Style 400 x 700
78
Slutkontroll
➤ Gör en visuell kontroll och kontrollera att tätningarna på ytterramen ligger
mot takets yta hela vägen runt om och att montagebockarna ligger i linje.
➤ Efterdra skruvarna 10 minuter efter monteringen.
Se bild a
A
➤ Tryck in innerramen i spåret (1) i montagebockarna.
➤ Kontrollera takfönstrets funktion efter monteringen.
➤ Dra av PE-skyddsfolien från akrylglaset på både in- och utsidan.
I
➤ Om så krävs, skriv in den ändrade fordonshöjden och den ändrade vikten
i fordonshandlingarna.
8 Använda Midi Heki Style
8.1 Öppna och stänga Midi Heki Style (bild b)
➤ Vrid handveven medurs för att öppna takfönstret.
Vrid endast veven tills du känner ett tydligt motstånd. Takfönstrets
öppningsvinkel är ca 70°.
➤ Vrid handveven moturs för att stänga takfönstret.
Vrid endast veven tills du känner ett tydligt motstånd.
➤ Fäll in veven; en lätt fjädring måste kännas av innan man fäller in veven.
➤ Kontrollera att takfönstret är låst: Försök att fälla upp glasrutan för hand
(utan att använda för mycket kraft).
OBSERVERA!
Håll handveven i låst läge när innerramen sätts in i ytterramen,
annars hamnar veven (2) i fel läge i förhållande till sexkanten (3).
ANVISNING
Om PE-folien har varit för länge i solen går det inte att ta bort den
utan att den lämnar spår.
Page 81

SV
Midi Heki Style 400 x 700 Felsökning
79
8.2 Öppna och stänga rullgardinerna (bild c)
A
I
➤ Ta tag i greppet på respektive rullgardin och dra den till önskat läge.
9 Felsökning
Uppsök en auktoriserad verkstad om du inte kan åtgärda felet.
OBSERVERA! Risk för skador på grund av värmeansamling
mellan rullgardinen och glasskivan
Vid starkt solljus får mörläggningsrullgardinen endast stängas till
två tredjedelar.
ANVISNING
Du kan steglöst justera mörkläggningsrullgardinen och
insektsnätet oberoende av varandra.
Fel Möjlig orsak Lösning
Takfönstret kan inte
stängas helt.
Smuts mellan glaset och
ramen.
Rengör fönstret.
Ta bort grenar och löv mellan glaset
och ramen.
Det går inte att skjuta
insektsnätet eller mörkläggningsrullgardinen.
Smuts i sidoskenorna. Rengör sidoskenorna.
Page 82

SV
Skötsel och rengöring av Midi Heki Style Midi Heki Style 400 x 700
80
10 Skötsel och rengöring av
Midi Heki Style
A
➤ Rengör rullgardinerna med mild tvållösning och mycket vatten.
➤ Använd talk för att behandla gummitätningarna.
11 Garanti
Den lagstadgade garantitiden gäller. Om produkten är defekt: kontakta en
servicepartner i ditt land (adresser, se bruksanvisningens baksida).
Våra specialister står gärna till förfogande och förklarar hur garantiärenden
behandlas.
12 Avfallshantering
➤ Lämna om möjligt förpackningsmaterialet till återvinning.
M
När produkten slutgiltigt tas ur bruk: informera dig om
gällande bestämmelser hos närmaste återvinningscentral
eller hos återförsäljaren.
OBSERVERA!
Använd inga vassa eller hårda föremål för rengöring, det kan
skada akrylglaset.
Använd endast rengöringsmedel som rekommenderas av tillverkaren. Akrylglas-polermedel (artikelnummer 9104100242),
special-polerduk (artikelnummer 9104100243) och akrylglasputsmedel (artikelnummer 9104100244).
Page 83

NO
Midi Heki Style 400 x 700 Symbolforklaringer
81
Les bruksanvisningen nøye før du monterer og tar apparatet i bruk, og
ta vare på den. Hvis produktet selges videre, må du sørge for å gi bruksanvisningen videre også.
Innhold
1 Symbolforklaringer . . . . . . . . . . . . . . . . . . . . . . . . . . . . . . . . . . . . . . 81
2 Råd om sikkerhet og montering . . . . . . . . . . . . . . . . . . . . . . . . . . . . 82
3 Leveringsomfang . . . . . . . . . . . . . . . . . . . . . . . . . . . . . . . . . . . . . . . 83
4 Tilbehør . . . . . . . . . . . . . . . . . . . . . . . . . . . . . . . . . . . . . . . . . . . . . . 83
5 Forskriftsmessig bruk. . . . . . . . . . . . . . . . . . . . . . . . . . . . . . . . . . . . 83
6 Råd før montering . . . . . . . . . . . . . . . . . . . . . . . . . . . . . . . . . . . . . . 84
7 Montere Midi Heki Style . . . . . . . . . . . . . . . . . . . . . . . . . . . . . . . . . . 85
8 Bruke Midi Heki Style. . . . . . . . . . . . . . . . . . . . . . . . . . . . . . . . . . . . 87
9 Feilretting . . . . . . . . . . . . . . . . . . . . . . . . . . . . . . . . . . . . . . . . . . . . . 88
10 Stell og rengjøring av Midi Heki Style . . . . . . . . . . . . . . . . . . . . . . . 89
11 Garanti . . . . . . . . . . . . . . . . . . . . . . . . . . . . . . . . . . . . . . . . . . . . . . . 89
12 Deponering . . . . . . . . . . . . . . . . . . . . . . . . . . . . . . . . . . . . . . . . . . . 89
1 Symbolforklaringer
A
I
➤ Handling: Dette symbolet indikerer at du må gjøre noe. De nødvendige
handlingene beskrives trinnvis.
✓ Dette symbolet beskriver resultatet av en handling.
Fig. 1 5, side 3: Denne angivelsen henviser til et element i en illustrasjon,
i dette eksemplet til «Posisjon 5 i illustrasjon 1 på side 3».
PASS PÅ!
Hvis man ikke overholder denne regelen, kan det føre til materielle skader og skade funksjonen til produktet.
MERK
Utfyllende informasjon om bruk av produktet.
Page 84

NO
Råd om sikkerhet og montering Midi Heki Style 400 x 700
82
2 Råd om sikkerhet og montering
Følg rådene og betingelsene som kjøretøyprodusenten og motorvognprodusenten har bestemt!
Produsenten tar i følgende tilfeller intet ansvar for skader:
Skader på produktet på grunn av mekanisk påvirkning
Endringer på produktet uten at det er gitt uttrykkelig godkjenning av
produsenten
Bruk til andre formål enn det som er beskrevet i veiledningen
I
Følg disse rådene:
Kontakt umiddelbart et fagverksted hvis det oppstår feil.
Innbruddsfare! Ikke trå på glasskuppelen.
Kontroller om takvinduet er forskriftsmessig låst før turen starter.
Kontroller før du begynner å kjøre at ikke takvinduet har skader (f. eks.
spenningssprekker i akrylglasset).
Ikke åpne takvinduet under kjøringen.
Ikke åpne takvinduet hvis det regner eller blåser mye.
Lukk takvinduet når det regner og snør.
Ikke forlat kjøretøyet med åpent takvindu.
Hold takvinduet fritt for snø og is.
MERK
Hvis du ikke har nok teknisk kunnskap om montering av komponenter i kjøretøy, må du få fagfolk til å montere takvinduet.
Page 85

NO
Midi Heki Style 400 x 700 Leveringsomfang
83
3 Leveringsomfang
4 Tilbehør
5 Forskriftsmessig bruk
Takvinduet Midi Heki Style er egnet for montering i bobiler eller campingvogner med taktykkelse på 25 – 60 mm:
Uten tvangslufting: Art.nr. 9104116967
Med tvangslufting: Art.nr. 9104116966
Må ikke monteres på loddrette flater.
Maksimalt tillatt kjørehastighet er 130 km/t, da det kan oppstå støy pga. montering av utstyret, eller fordi det kan oppstå skader.
Nr. i
fig. 1
Antall Betegnelse
1 1 Utvendig ramme med glasskuppel
2 1 Innvendig ramme
310
20
Festeskrue ∅ 4mm
Festeskrue ∅ 3,5 mm
4 10 Montasjebukker
5 1 Sekskantbolt 68 mm
Betegnelse Artikkelnr.
Spoiler, 540 mm 9104100260
Page 86

NO
Råd før montering Midi Heki Style 400 x 700
84
6 Råd før montering
➤ Kontroller kjøretøyets taktykkelse før monteringen. Kontakt kjøretøy-
produsenten hvis du har spørsmål.
➤ Pass på følgende ved valg av montasjested:
– Tilstøtende komponenter (takreling eller feste- og forsterkingsdeler),
ledninger og innbyggingsskap inne i kjøretøyet må ikke bli skadet når
man sager utsparingen.
– Det må være tilstrekkelig plass til montering av innvendige og utven-
dige rammer.
– Monter takvinduet kun på plane og parallelle innvendige og utvendige
takflater med en maks. skråstilling på 15° overfor horisontalene.
– Du kan bruke en eksisterende takutsparing hvis takvinduet passer inn.
– Takvinduet må kun monteres med hengselsiden framover i kjøreret-
ningen.
6.1 Ta på hull
Se fig. 2
6.2 Bruke forsterkingslister
Se fig. 3
I
➤ Fjern skummingen avhengig av bredden på forsterkingslistene (ikke
inkludert) (A).
➤ Tilpass forsterkingslistene (B).
MERK
Du må bruke forsterkingslister for å
hindre at isolasjonen trykkes sammen og at takveggen bøyes
kunne feste montasjebukkene på innsiden av taket
Page 87

NO
Midi Heki Style 400 x 700 Montere Midi Heki Style
85
7 Montere Midi Heki Style
Se fig. 4
Leveransen inneholder montasjebukker som er egnet til taktykkelser på
30–34mm. For taktykkelser på 25–29mm og 35–60mm må du kjøpe et
egnet montasjesett (se tabell).
➤ Mål taktykkelsen W.
➤ Velg et egnet montasjesett:
Se fig. 5
Ved taktykkelser fra 35 mm må du du bytte sekskantbolten i giret med den
sekskantbolten som følger med leveransen (fig. 1 6).
➤ Trekk den eksisterende sekskantbolten ut av giret.
➤ Sett sekskantbolten fra leveransen (fig. 1 6) med den kornete siden inn
i giret.
Se fig. 6
➤ Kontroller om takvinduet har tilstrekkelig avstand (ca. 1 til 2 mm) til takut-
sparingen hele veien rundt.
Se fig. 7
➤ Rengjør hullet i montasjeområdet.
Se fig. 8
A
➤ Tett montasjerammen med et plastisk ikke herdet butyltetningsstoff
(f.eks. Sika-Lastomer-710).
Taktykkelse Artikkelnr.
25 – 29 mm 9104107495
30 – 34 mm inkludert i leveransen
9104107496
35 – 42 mm 9104107497
43 – 52 mm 9104107498
53 – 60 mm 9104107499
PASS PÅ!
Følg også anvisningene fra produsenten av tetningsmidlet.
Page 88

NO
Montere Midi Heki Style Midi Heki Style 400 x 700
86
Se fig. 9
➤ Vær oppmerksom på kjøreretningen under monteringen (hengselsiden
framover i kjøreretningen).
➤ Sett den utvendige rammen midt i takutsparingen.
➤ Trykk den utvendige rammen lett mot taket, slik at tetningsmassen forde-
ler seg.
Se fig. 0
➤ Sett de 10 montasjebukkene inne i kjøretøyet i utsparingene på den
utvendige rammen til de stopper.
Hvis du bruker trelister som forsterking
A
➤ Bor to ganger med et bor 2,2 mm i takoverbygget (A) per montasjebukk.
➤ Fest montasjebukkene på taket med de vedlagte skruene ∅ 3,5 mm (B).
For alternativ påbygging må det benyttes dertil egnede skruer (følger
ikke med i leveransen).
➤ Fest de 10 montasjebukkene med festeskruene ∅ 4 mm på utvendig
ramme (C).
Bruk de store hullene i montasjebukkene til dette.
PASS PÅ!
Ikke bor gjennom takoverbygget.
Page 89

NO
Midi Heki Style 400 x 700 Bruke Midi Heki Style
87
Utføre sluttkontroll
➤ Kontroller visuelt om tetningen på den utvendige rammen ligger an rundt
hele takflaten og at montasjebukkene er i flukt.
➤ Trekk til skruene ca. 10 minutter etter monteringen.
Se fig. a
A
➤ Trykk den innvendige rammen inn i sporet (1) på montasjebukkene.
➤ Etter monteringen må du kontrollere at takvinduet fungerer.
➤ Trekk PE-beskyttelsesfolien av akryglasset på innsiden og utsiden.
I
➤ Sørg for at den endrede kjøretøyhøyden og den endrede vekten blir ført
inn i vognkortet hvis det er nødvendig.
8 Bruke Midi Heki Style
8.1 Åpne og lukke (fig. b) Midi Heki Style
➤ Drei håndsveiven med urviseren for å åpne takvinduet.
Drei håndsveiven bare til du kjenner motstand. Takvinduets åpningsvinkel er ca. 70°.
➤ Drei håndsveiven mot urviseren for å lukke takvinduet.
Drei håndsveiven bare til du kjenner motstand.
➤ Vipp inn håndsveiven. Du skal kjenne en lett forspenning før håndsveiven
vippes inn.
➤ Kontroller om takvinduet er låst: Forsøk å løfte opp glassruten for hånd
(uten å bruke makt).
PASS PÅ!
Når du setter den innvendige rammen på den utvendige rammen,
må du holde håndsveiven i lukket stilling, ellers vil stillingen til
sveiven (2) bli forskjøvet til drevsekskanten (3).
MERK
Hvis PE-beskyttelsesfolien har vært utsatt for sollys for lenge, kan
den ikke lenger løsnes uten motstand.
Page 90

NO
Feilretting Midi Heki Style 400 x 700
88
8.2 Åpne og lukke rullegardiner (fig. c)
A
I
➤ Ta tak i håndtaksforsenkingen på rullegardinene, og trekk det til ønsket
stilling.
9 Feilretting
Hvis du ikke kan utbedre feilen, må du kontakte et fagverksted.
PASS PÅ! Fare for skader pga. oppbygging av varme mellom rullegardin og glassrute
Ved kraftig solinnstråling må rullegardinen kun senkes to tredjedeler.
MERK
Du kan justere blendingsgardinen og insektrullegardinen trinnløst
uavhengig av hverandre.
Feil Mulig årsak Forslag til løsning
Takvinduet kan ikke lukkes helt.
Smuss mellom glasset og
rammen
Rengjør vinduet.
Fjern løv og kvister fra flaten mellom
glasset og rammen.
Insektsrullegardinen
eller blendingsgardinen
kan ikke beveges.
Smuss i sideføringene Rengjør sideføringene.
Page 91

NO
Midi Heki Style 400 x 700 Stell og rengjøring av Midi Heki Style
89
10 Stell og rengjøring av Midi Heki Style
A
➤ Rengjør rullegardinene med rikelige mengder såpevann.
➤ Stell gummitetningen med talkum.
11 Garanti
Lovmessig garantitid gjelder. Hvis produktet skulle være defekt, sender du
det til en servicepartner i ditt land (du finner adressene på baksiden av veiledningen).
Våre spesialister hjelper deg gjerne, og avtaler garantiens videre forløp med
deg.
12 Deponering
➤ Lever emballasje til resirkulering så langt det er mulig.
M
Når du tar produktet ut av drift for siste gang, må du sørge for å få
informasjon om deponeringsforskrifter hos nærmeste resirkuleringsstasjon eller hos din faghandler.
PASS PÅ!
Bruk ikke skarpe eller harde hjelpemidler til rengjøring, da det kan
skade akrylglasset.
Bruk kun rengjøringsmidler som er anbefalt av produsenten:
Akrylglass-politur (art. nr. 9104100242), spesial-politurklut
(art. nr. 9104100243) og akrylglass-rengjøringsmiddel (art. nr.
9104100244).
Page 92

FI
Symbolien selitys Midi Heki Style 400 x 700
90
Lue tämä ohje huolellisesti läpi ennen asennusta ja käyttöönottoa ja
säilytä ohje hyvin. Jos myyt tuotteen eteenpäin, anna ohje tällöin edelleen uudelle käyttäjälle.
Sisällysluettelo
1 Symbolien selitys . . . . . . . . . . . . . . . . . . . . . . . . . . . . . . . . . . . . . . . 90
2 Turvallisuus- ja kiinnitysohjeita . . . . . . . . . . . . . . . . . . . . . . . . . . . . 91
3 Toimituskokonaisuus . . . . . . . . . . . . . . . . . . . . . . . . . . . . . . . . . . . . 92
4 Lisävarusteet . . . . . . . . . . . . . . . . . . . . . . . . . . . . . . . . . . . . . . . . . . 92
5 Tarkoituksenmukainen käyttö . . . . . . . . . . . . . . . . . . . . . . . . . . . . . 92
6 Ohjeita ennen asennusta . . . . . . . . . . . . . . . . . . . . . . . . . . . . . . . . . 93
7 Midi Heki Stylen asentaminen . . . . . . . . . . . . . . . . . . . . . . . . . . . . . 94
8 Midi Heki Stylen käyttäminen. . . . . . . . . . . . . . . . . . . . . . . . . . . . . . 96
9 Häiriöiden poistaminen . . . . . . . . . . . . . . . . . . . . . . . . . . . . . . . . . . 97
10 Midi Heki Stylen hoitaminen ja puhdistaminen . . . . . . . . . . . . . . . . 98
11 Tuotevastuu . . . . . . . . . . . . . . . . . . . . . . . . . . . . . . . . . . . . . . . . . . . 98
12 Hävittäminen . . . . . . . . . . . . . . . . . . . . . . . . . . . . . . . . . . . . . . . . . . 98
1 Symbolien selitys
A
I
➤ Menettely: Tämä symboli ilmaisee, että sinun tulee tehdä jotakin. Tarvit-
tava menettely kuvataan askel askeleelta.
✓ Tämä symboli kuvailee menettelyn tuloksen.
Kuva 1 5, sivulla 3: Tämä tieto viittaa kuvassa olevaan elementtiin, tässä
esimerkissä ”kohteeseen 5 kuvassa 1, sivulla 3”.
HUOMAUTUS!
Huomiotta jättäminen voi johtaa materiaalivaurioihin ja haitata
tuotteen toimintaa.
OHJE
Tuotteen käyttöä koskevia lisätietoja.
Page 93

FI
Midi Heki Style 400 x 700 Turvallisuus- ja kiinnitysohjeita
91
2 Turvallisuus- ja kiinnitysohjeita
Noudata ajoneuvovalmistajan ja autoalan ammattipiirien antamia turvallisuusohjeita ja vaatimuksia!
Valmistaja ei ota mitään vastuuta vahingoista seuraavissa tapauksissa:
tuotteeseen mekaanisen vaikutuksen takia syntyneet vauriot
tuotteeseen ilman valmistajan nimenomaista lupaa tehdyt muutokset
käyttö muuhun kuin käyttöohjeessa ilmoitettuun tarkoitukseen
I
Noudata seuraavia ohjeita:
Ota yhteyttä huoltoliikkeeseen, jos laitteessa ilmenee häiriöitä tai vikaa.
Rikkoutumisvaara! Älä astu lasikuvun päälle.
Tarkasta ennen ajoon lähtemistä, että kattoikkuna on salvattu oikein.
Tarkasta ennen ajoon lähtöä kattoikkunan mahdolliset vauriot
(esim. akryylilasin jänniterepeämät).
Älä avaa kattoikkunaa ajon aikana.
Kattoikkunaa ei saa avata kovalla tuulella tai sateella.
Sulje kattoikkuna, jos sataa vettä tai lunta.
Ajoneuvosta ei saa poistua, jos kattoikkuna on auki.
Pidä kattoikkuna puhtaana lumesta ja jäästä.
OHJE
Anna ammattimiehen asentaa kattoikkuna, jos itselläsi ei
ole riittävää teknistä tietämystä, joka koskee komponenttien
asentamista.
Page 94

FI
Toimituskokonaisuus Midi Heki Style 400 x 700
92
3 Toimituskokonaisuus
4 Lisävarusteet
5 Tarkoituksenmukainen käyttö
Midi Heki Style-kattoikkuna sopii asennettavaksi matkailuautoihin tai asuntovaunuihin, joiden katon paksuus on 25–60 mm:
ilman pakkotuuletusta: Tuotenro 9104116967
pakkotuuletuksella: Tuotenro 9104116966
Sitä ei saa asentaa pystysuoriin pintoihin.
Suurin sallittu ajonopeus on 130 km/h, ajoneuvon rakenteesta ja asennuspaikasta riippuen voi ilmetä ylimääräistä melua tai vaurioita.
Nro
kuva 1
Määrä Nimitys
1 1 Ulkokehys ja lasikupu
2 1 Sisäkehys
310
20
Kiinnitysruuvi ∅ 4mm
Kiinnitysruuvi ∅ 3,5 mm
4 10 Asennuskappaleet
5 1 Kuusiokantapultti 68 mm
Nimitys Tuotenro
Spoileri, 540 mm 9104100260
Page 95

FI
Midi Heki Style 400 x 700 Ohjeita ennen asennusta
93
6 Ohjeita ennen asennusta
➤ Tarkasta kattosi paksuus ennen asennusta. Jos sinulla on epäselvyyksiä,
kysy ajoneuvon valmistajalta.
➤ Huomioi valitessasi asennuspaikkaa:
– Vieressä olevia rakenneosia (kattoteline tai kiinnitys- ja vahvistus-
osat), johtimia ja kiinteitä kaappeja ajoneuvon sisätilassa ei saa vauri-
oittaa, kun aukkoa sahataan.
– Sisä- ja ulkokehyksen asentamiseen täytyy olla käytettävissä riittä-
västi tilaa.
– Asenna kattoikkuna vain tasaisille ja suorille sisä- ja ulkopinnoille, joi-
den maksimikallistus vaakasuoraan nähden on 15°.
– Voit käyttää valmista aukkoa katossa, jos kattoikkuna sopii siihen.
– Kattoikkunan saa asentaa vain siten, että sen saranasivu osoittaa
ajosuuntaan.
6.1 Aukon työstäminen
Ks. kuva 2
6.2 Vahvistuslistojen käyttö
Ks. kuva 3
I
➤ Poista eristeet vahvistuslistojen (ei mukana toimituksessa) (A) leveyden
mukaan.
➤ Sovita vahvistuslistat paikalleen (B).
OHJE
Vahvistuslistoja täytyy käyttää
jotta eristeiden kokoonpuristuminen ja katon taipuminen este-
tään
jotta asennuskappaleiden kiinnittäminen sisäkattoon on mah-
dollista
Page 96

FI
Midi Heki Stylen asentaminen Midi Heki Style 400 x 700
94
7 Midi Heki Stylen asentaminen
Ks. kuva 4
Toimituskokonaisuus sisältää asennuskappaleet, jotka sopivat 30–34 mm
paksuille katoille. Kattopaksuudet 25–29 mm ja 35–60 mm edellyttävät sopivan asennussarjan hankkimista (katso taulukko).
➤ Mittaa kattosi paksuus W.
➤ Valitse sopiva asennussarja:
Ks. kuva 5
Kun katon paksuus on yli 35 mm, joudut vaihtamaan vaihteistossa olevan
kuusiokantapultin toimituskokonaisuuteen sisältyvään kuusiokantapulttiin
(kuva 1 6).
➤ Vedä kuusiokantapultti pois vaihteistosta.
➤ Aseta toimituskokonaisuuteen sisältyvän kuusiokantapultin (kuva 1 6)
karhennettu puoli vaihteistoon.
Ks. kuva 6
➤ Tarkasta onko kattoikkunan ympärillä tarpeeksi väliä (noin 1–2 mm)
katon aukkoon.
Ks. kuva 7
➤ Puhdista katon aukko asennusalueelta.
Katon paksuus Tuotenro
25–29 mm 9104107495
30–34 mm sisältyy toimituskokonaisuuteen
9104107496
35–42 mm 9104107497
43–52 mm 9104107498
53–60 mm 9104107499
Page 97

FI
Midi Heki Style 400 x 700 Midi Heki Stylen asentaminen
95
Ks. kuva 8
A
➤ Tiivistä asennuskehys joustavalla, kovettumattomalla butyylitiivisteellä
(esim. Sika-Lastomer-710).
Ks. kuva 9
➤ Noudata asennuksessa ajosuuntaa (saranasivu ajosuuntaan päin).
➤ Aseta ulkokehys keskelle katon aukkoa.
➤ Paina ulkokehystä kevyesti kattoa vasten, jotta tiivistemassa leviää.
Ks. kuva 0
➤ Laita 10 asennuskappaletta ajoneuvon sisäpuolelta ulkokehyksen auk-
koihin niin pitkälle kuin ne menevät.
Jos käytät vahvisteena puulistoja
A
➤ Esiporaa kutakin asennuskappaletta varten kaksi 2,2 mm -reikää kattora-
kenteeseen (A).
➤ Kiinnitä asennuskappaleet oheisilla ruuveilla ∅ 3,5 mm (B) kattoon.
Vaihtoehtoisissa rakenteissa tulee vastaavasti käyttää tarkoitukseen
sopivia ruuveja (ei toimituskokonaisuudessa).
➤ Kiinnitä 10 asennuskappaletta kiinnitysruuveilla ∅ 4mm
ulkokehykseen (C).
Käytä tähän asennuskappaleiden halkaisijaltaan suuria reikiä.
HUOMAUTUS!
Noudata myös tiivistevalmistajan ohjeita.
HUOMAUTUS!
Älä poraa reikiä kattorakenteen läpi.
Page 98

FI
Midi Heki Stylen käyttäminen Midi Heki Style 400 x 700
96
Suorita lopputarkastus
➤ Tarkasta silmämääräisesti, että ulkokehyksen tiiviste koskettaa koko mat-
kalta kattopintaan ja asennuskappaleet ovat kohdillaan.
➤ Kiristä ruuvit n. 10 minuutin kuluttua asennuksesta.
Ks. kuva a
A
➤ Paina sisäkehys asennuskappaleiden uraan (1).
➤ Tarkasta kattoikkunan toiminta asennuksen jälkeen.
➤ Vedä PE-suojakalvo pois akryylilasin sisä- ja ulkopuolelta.
I
➤ Anna viranomaisen tarvittaessa merkitä muuttunut ajoneuvokorkeus ja
muuttunut paino ajoneuvopapereihin.
8 Midi Heki Stylen käyttäminen
8.1 Midi Heki Stylen avaaminen ja sulkeminen
(kuva b)
➤ Kierrä käsikampea myötäpäivään avataksesi kattoikkunan.
Kierrä käsikampea vain niin pitkälle, että vastusta alkaa tuntua. Kattoikkunan avautumiskulma on n. 70°.
➤ Kierrä käsikampea vastapäivään sulkeaksesi kattoikkunan.
Kierrä käsikampea vain niin pitkälle, että vastusta alkaa tuntua.
➤ taita käsikampi kokoon; kampea kokoon taitettaessa täytyy tuntua kevyt
esijännitys.
➤ Tarkista, onko kattoikkuna salvattu: Koita nostaa lasilevyä ylöspäin käsin
(ilman voimankäyttöä).
HUOMAUTUS!
Pidä käsikampea kiinni-asennossa, kun asetat sisäkehyksen
ulkokehykselle, koska muuten kammen (2) asento suhteessa
käytön kuusiokantaan (3) muuttuu.
OHJE
Jos PE-suojakalvo on ollut liian pitkään alttiina auringonvalolle,
sitä saa enää irrotettua kokonaisena.
Page 99

FI
Midi Heki Style 400 x 700 Häiriöiden poistaminen
97
8.2 Rullaverhojen avaaminen ja sulkeminen (kuva c)
A
I
➤ Tartu kyseisen rullaverhon kahvasyvennykseen ja vedä se haluttuun
asentoon.
9 Häiriöiden poistaminen
Jos et saa vikaa korjattua, käänny ammattikorjaamon puoleen.
HUOMAUTUS! Vaurioitumisvaara lämmön kasautuessa
rullaverhon ja ikkunalasin väliin
Voimakkaalla auringonpaisteella pimennysrullaverhoa saa
sulkea ainoastaan kahden kolmanneksen verran.
OHJE
Voit säätää pimennysrullaverhoa ja hyttysverkkorullaverhoa
toisistaan riippumatta portaattomasti.
Häiriö Mahdollinen syy Ratkaisuehdotus
Kattoikkunaa ei voi
sulkea kokonaan.
Likaa lasin ja kehyksen
välissä
Puhdista ikkuna.
Poista lehdet ja oksat lasin ja
kehyksen väliseltä pinnalta.
Hyttysverkkorullaverhoa tai pimennysrullaverhoa ei voi liikuttaa.
Likaa sivuohjaimissa Puhdista sivuohjaimet.
Page 100

FI
Midi Heki Stylen hoitaminen ja puhdistaminen Midi Heki Style 400 x 700
98
10 Midi Heki Stylen hoitaminen ja
puhdistaminen
A
➤ Puhdista rullaverhot miedolla saippualiuoksella ja runsaalla vedellä.
➤ Hoida kumitiivisteitä talkilla.
11 Tuotevastuu
Laitetta koskee lakisääteinen tuotevastuuaika. Jos tuote sattuu olemaan
viallinen, käänny maasi sopimushuollon puoleen (osoitteet käyttöohjeen
takasivulla).
Asiantuntijamme auttavat sinua ja neuvovat sinua tuotevastuun jatkomenettelyn suhteen.
12 Hävittäminen
➤ Vie pakkausmateriaali mahdollisuuksien mukaan vastaavan kierrätysjät-
teen joukkoon.
M
Jos poistat tuotteen lopullisesti käytöstä, pyydä tietoa sen hävittämistä koskevista määräyksistä lähimmästä kierrätyskeskuksesta
tai ammattiliikkeestäsi.
HUOMAUTUS!
Älä käytä puhdistamiseen teräviä tai kovia välineitä, koska tämä
voi johtaa akryylilasin vahingoittumiseen.
Käytä ainoastaan valmistajan suosittelemia puhdistusaineita:
Akryylilasin kiillote (tuotenro 9104100242), erityinen kiillotusliina
(tuotenro 9104100243) ja akryylilasin puhdistaja (tuotenro
9104100244).
 Loading...