

Page 1

DVG-5112S
VoIP TA
User’s Manual
Version 1.0
(31 Aug 2007)
Page 2

© 2007 D-Link Corporation. All rights reserved.
Reproduction in any manner whatsoever without the written permission of D-Link Corporation is strictly
forbidden.
Trademarks used in this text: D-Link and the D-Link logo are trademarks of D-Link Corporation/D-Link
Systems Inc.; Other trademarks and trade names may be used in this document to refer to either the entities
claiming the marks and names or their products. D-Link Corporation disclaims any proprietary interest in
trademarks and trade names other than its own.
Warranty: please contact your D-Link Authorized Reseller or the D-Link Branch Office nearest your place of
purchase for information about the warranty offered on your D-Link product.
Information in this document is subject to change without notice.
FCC Warning
This equipment has been tested and found to comply with the limits for a Class B digital device, pursuant to
Part 15 of the FCC Rules. These limits are designed to provide reasonable protection against harmful
interference in a residential installation. This equipment generates, uses, and can radiate radio frequency
energy and, if not installed and used in accordance with the instructions, may cause harmful interference to
radio communication. However, there is no guarantee that interference will not occur in a particular installation.
If this equipment does cause harmful interference to radio or television reception, which can be determined by
turning the equipment off and on, the user is encouraged to try to correct the interference by one or more of
the following measures:
‧ Reorient or relocate the receiving antenna.
‧ Increase the separation between the equipment and receiver.
‧ Connect the equipment into an outlet on a circuit different from that to which the receiver is connected.
‧ Consult the dealer or an experienced radio/TV technician for help.
CE Mark Warning
This is a Class B product. In a domestic environment, this product may cause radio interference in which case
the user may be required to take adequate measures.
Warnung!
Dies ist ein Produkt der Klasse B. Im Wohnbereich kann dieses Produkt Funkstoerungen verursachen. In
diesem Fall kann vom Benutzer verlangt werden, angemessene Massnahmen zu ergreifen.
Precaución!
Este es un producto de Clase B. En un entorno doméstico, puede causar interferencias de radio, en cuyo
case, puede requerirse al usuario para que adopte las medidas adecuadas.
Attention!
Ceci est un produit de classe B. Dans un environnement domestique, ce produit pourrait causer des
interférences radio, auquel cas l`utilisateur devrait prendre les mesure s adéquates.
Attenzione!
Il presente prodotto appartiene alla classe B. Se utilizzato in ambiente domestico il prodotto può causare
interferenze radio, nel cui caso è possibile che l`utente debba assumere provvedimenti adeguati.
Page 3

Contents
1. Introduction....................................................................................................4
1-1 Product Overview....................................................................................................................................4
1-2 Hardware Connections and Description.................................................................................................5
2. Installation and Applications........................................................................7
2-1 Network Interface....................................................................................................................................7
3. Setting a DVG-5112S with WEB Browser ..................................................10
3-1 Current St atus....................................................................................................................................... 11
3-2 RTP Packet Summary...........................................................................................................................11
3-3 System Information...............................................................................................................................12
3-4 WAN......................................................................................................................................................13
3-5 LAN.......................................................................................................................................................17
3-6 SIP ........................................................................................................................................................18
3-7 SIP Advanced........................................................................................................................................21
3-8 Phone Book...........................................................................................................................................24
3-9 Caller ID................................................................................................................................................25
3-10 Hot Line...............................................................................................................................................25
3-11 Calling Features ..................................................................................................................................26
3-12 Virtual Server ......................................................................................................................................27
3-13 DMZ ....................................................................................................................................................27
3-14 NAT Traversal .....................................................................................................................................28
3-15 DDNS..................................................................................................................................................29
3-16 FAX Settings.......................................................................................................................................31
3-17 Codec Settings....................................................................................................................................32
3-18 Line Settings .......................................................................................................................................33
3-19 Digit Map.............................................................................................................................................35
3-20 Port Filtering........................................................................................................................................38
3-21 IP Filtering...........................................................................................................................................38
3-22 DTMF & Pulse.....................................................................................................................................39
3-23 CPT/Cadence Settings .......................................................................................................................40
3-24 Provision Settings...............................................................................................................................41
3-25 Caller Filter..........................................................................................................................................42
3-26 CDR Settings ......................................................................................................................................42
3-27 SNMP..................................................................................................................................................43
3-28 Ping Test .............................................................................................................................................43
3-29 STUN Inquiry.......................................................................................................................................43
3-30 NTP (Network Time Protocol).............................................................................................................44
3-31 Language............................................................................................................................................44
3-32 Login Account............................................................................................................. .........................44
3-33 Backup/Restore ..................................................................................................................................45
3-34 System Operations .............................................................................................................................46
3-35 Software Upgrade...............................................................................................................................46
3-36 Logout.................................................................................................................................................47
4. Setting the DVG-5112S through IVR ..........................................................48
4-1 IVR (Interactive Voice Response).........................................................................................................48
4-2 IP Configuration Settings—Setting IP Configuration of WAN Port .......................................................50
Appendix...........................................................................................................53
Product Features List..................................................................................................................................53
Page 4

DVG-5112S User’s Manu al
1. Introduction
1-1 Product Overview
The DVG-5112S VoIP Gateway carries both voice and facsimile over the IP network. It u ses the industry standard
SIP call control protocol so as to be compatible with free registration services or VoIP service providers’ systems.
As a standard user agent, it is compatible with all common Soft Switches and SIP proxy servers. While running
optional server software, the gateway can be configured to establish a private VoIP network over the Internet
without a third-party SIP Proxy Server.
The gateway can be seamlessly integrated into an existing network by connecting to a phone set and fax
machine. With only a broadband connection such as an ADSL bridge/router, a Cable Modem or a leased-line
router, the gateway allows you to use voice and fax services over IP in order to reduce the cost of all long
distance calls.
DDNS support makes the gateway reachable via its domain name where an ISP dynamically assigns an IP
address. By enabling the CDR function, administrators are allowed to log-in and view all call records, for example
call duration, time and date of calls, and latency.
The gateway can be assigned a fixed IP address or it can have one dynamically assigned by DHCP over P PPoE.
It adopts either the G.711, G.726, G.729A or G.723.1 voice compression format to save network bandwidth while
providing real-time, toll quality voice transmission and reception.
D-Link Systems, Inc. 4
Page 5
DVG-5112S User’s Manual
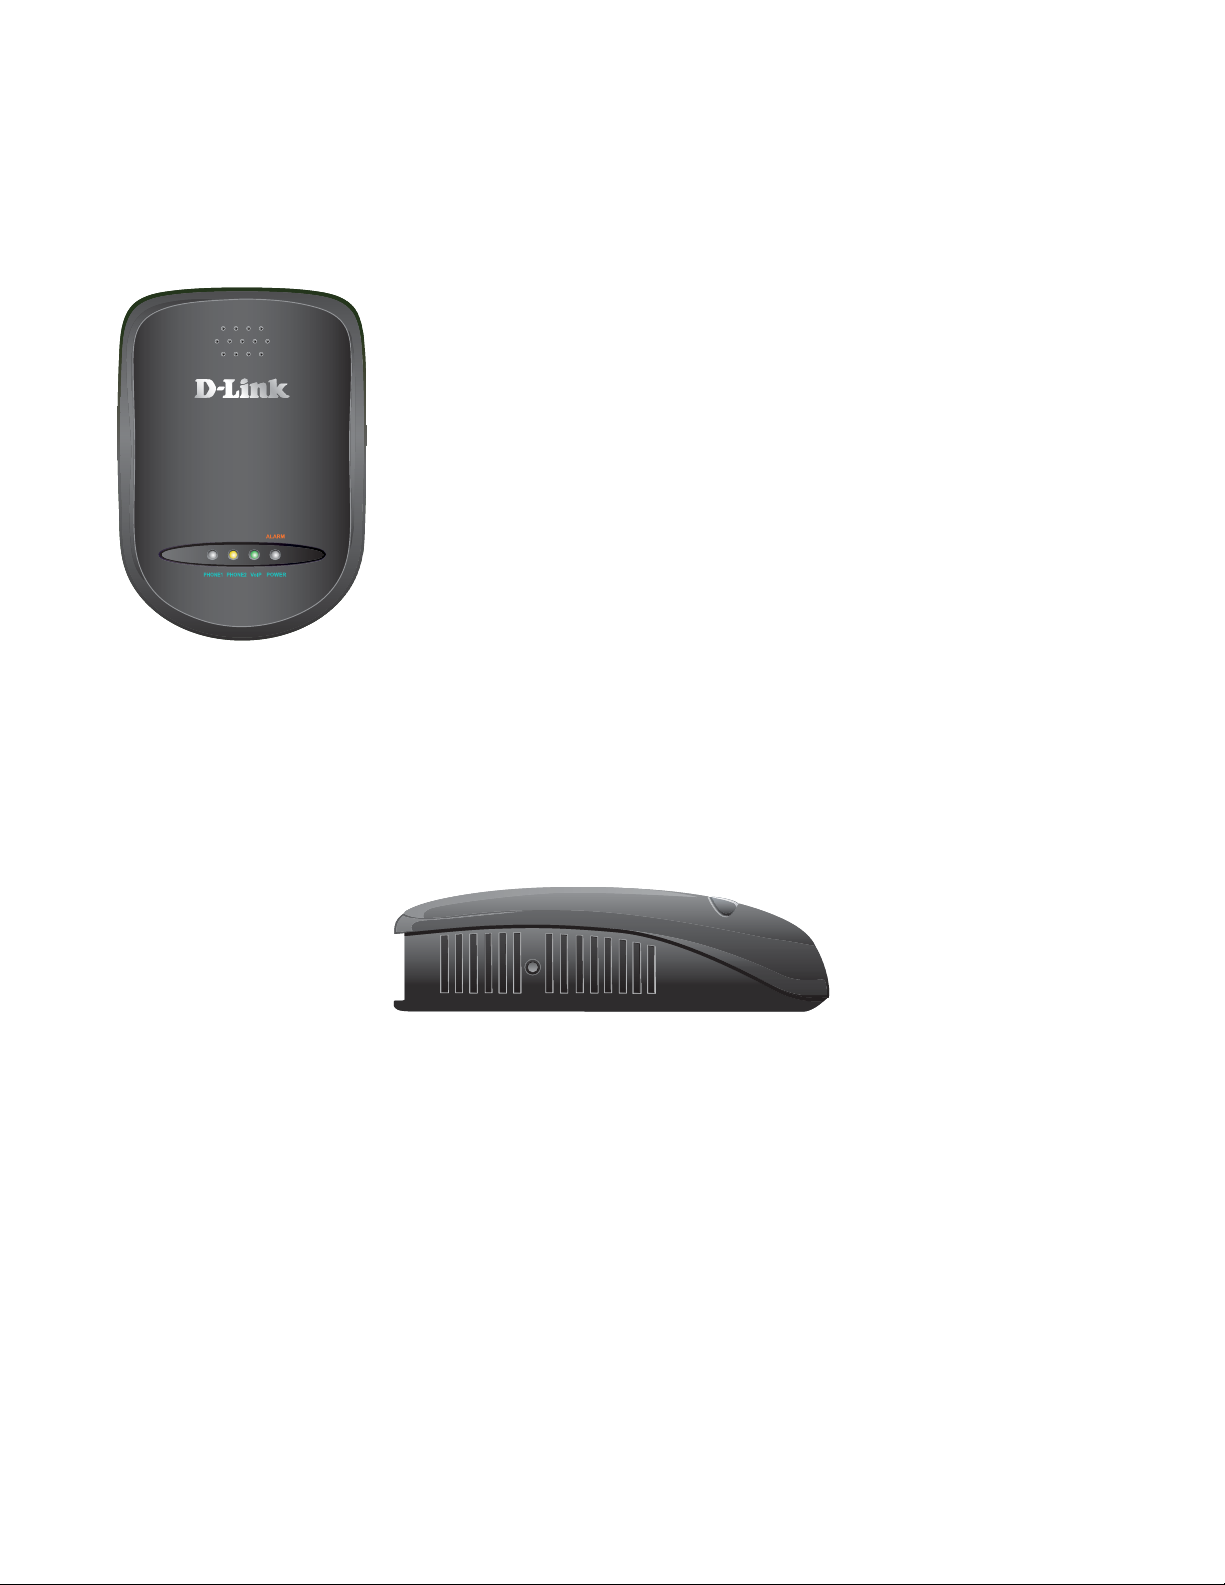
1-2 Hardware Connections and Description
Front Panel
Power/Alarm Indicator: Green light indicates a normal power supply. Red
light indicates when performing a self-test/booting up or the DVG-5112S’s
abnormal operation.
VoIP Indicator: Blinking green light indicates normal operation. It will light
on green when DVG-5112S is registered with the service provider.
Phone1/Phone2 Indicator: Phone LED should be in orange while
Phone in u
Note: When starting up DVG-5112S, the Alarm and VoIP will light up. After about 40 seconds, the VoIP
indicator will blink in green. If the Alarm indicator continues to blink, it means DVG-5112S is
currently communicating with ISP and has yet to obtain an IP address or fail to register to VoIP
Service Provider.
se.
Left Side
RST
RST
RST: Use to Restore to factory default: (IP address, Administrator' s Name and Password)
(1) Disconnect the power plug.
(2) Press and hold the reset button for 6 seconds.
(3) Reconnect the power plug while pressing down on the reset button.
(4) Release the reset button after 6 seconds. Factory setti ngs will be restored.
D-Link Systems, Inc. 5
Page 6

DVG-5112S User’s Manu al
DC+12V PHONE2 PHONE1 LAN WAN
DC+12V PHONE2 PHONE1 LAN WAN
1
2
3 4
INTERNET
1. DC+12V: Connect to the bundled power adaptor. Plug power adapter to a proper power source.
2. Phone: Connect to your analog telephone. These are FXS (Foreign Exchange Station) ports.
3. LAN: Connect to a PC for later DVG-5112S configuration.
4. WAN: Connect to your broadband device with RJ-4 5 cable.
D-Link Systems, Inc. 6
Page 7

DVG-5112S User’s Manu al
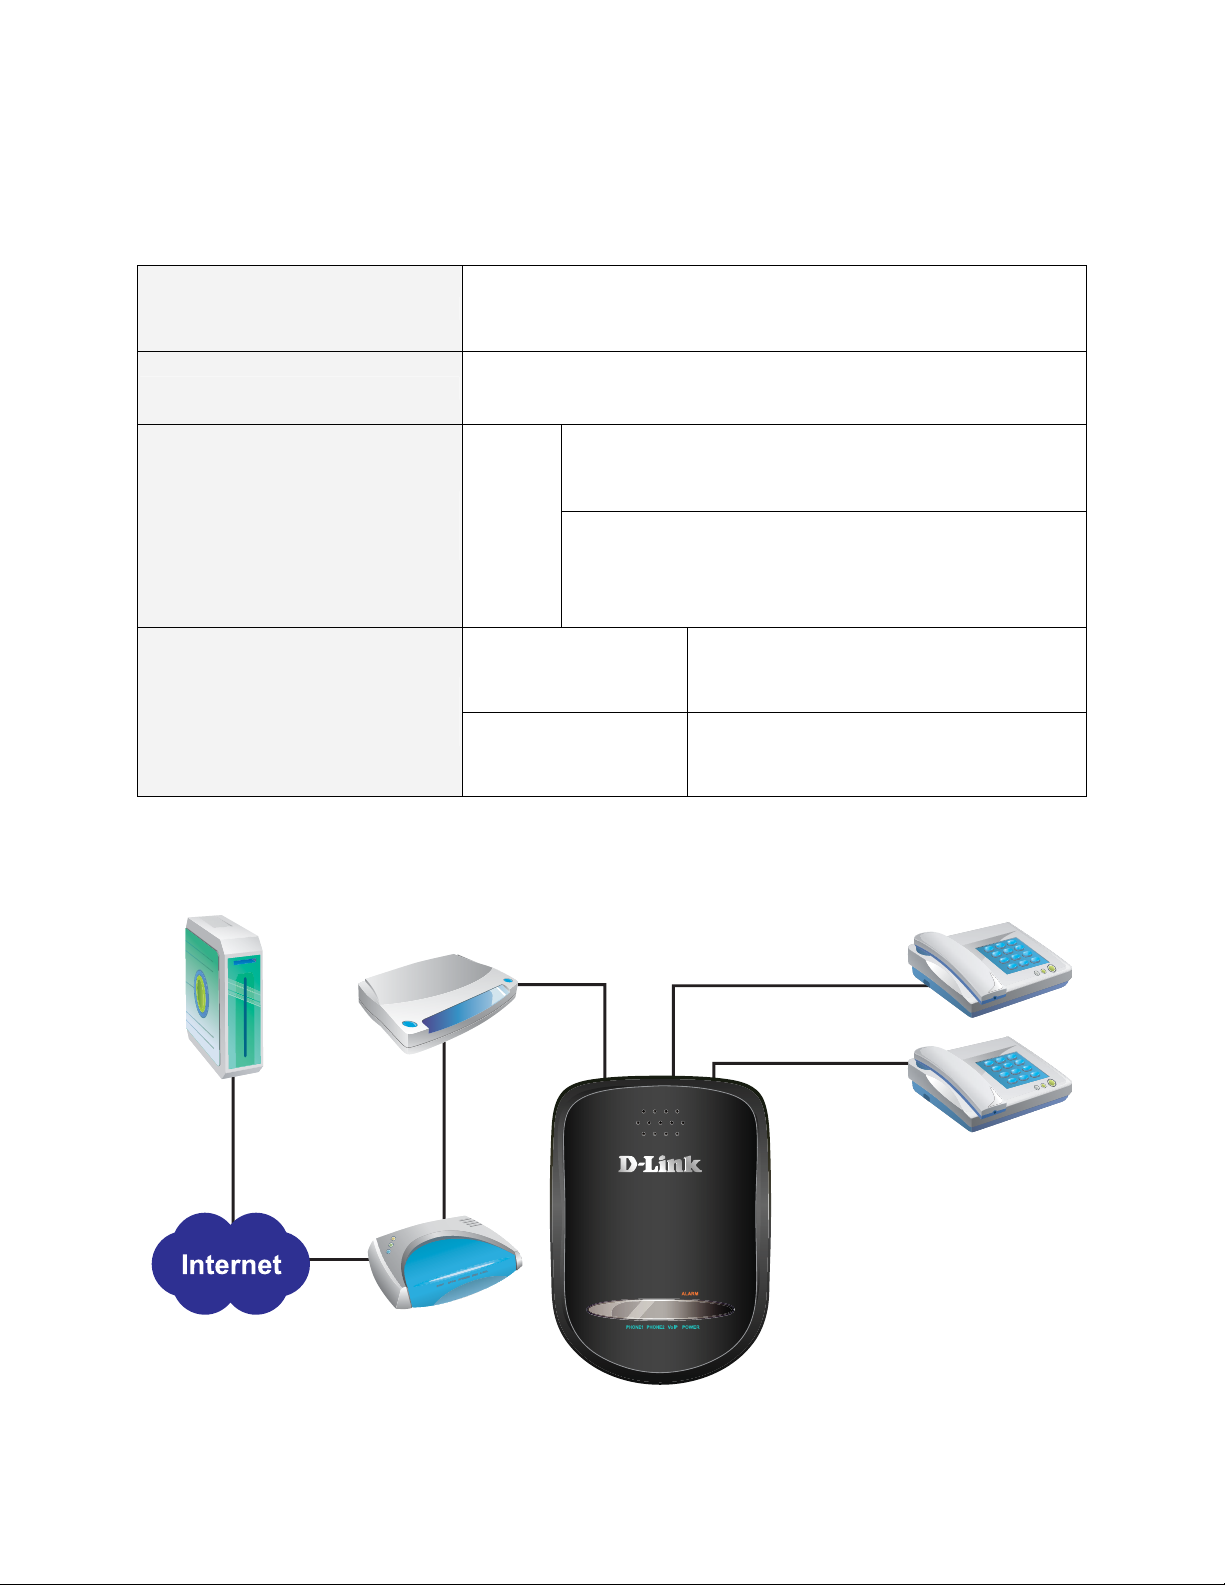
2. Installation and Applications
The network interface is divided into three basic modes as described below:
DVG-5112S can be assigned with a Public IP Address
DVG-5112S can be built under the existing NAT
DVG-5112S can be assigned with a Public IP address and serves as a Bridge device
2-1 Network Interface
DVG-5112S Assigned with a Public IP Address
DVG-5112S will have a Public IP address for Internet connection regardless of whether it is a static IP
address, DHCP (using a Cable Modem), or PPPoE (Dialup / ADSL).
DVG-5112S IP Settings
NAT/STUN Settings
DDNS Settings
Need to be set up as static IP,
DHCP, or PPPoE
Unnecessary (Disabled)
Unnecessary (Disabled)
VSP
(VoIP Service Provider)
Leased Line/ ADSL
/Cable Modem
D-Link Systems, Inc. 7
Page 8
DVG-5112S User’s Manu al
DVG-5112S in a NAT network
Under this mode, the gateway uses a virtual IP address and the IP sharing function of other systems to
connect to the Internet.
Please avoid IP addresses in the following range:
LAN IP address for IP sharing
192.168.8.1-192.168.8.254 (You may need to change the settings of
IP sharing or change SIP series gateway LAN Port IP addressing)
DVG-5112S IP Settings
NAT /STUN Settings
(Please refer to page 14 for
information on using NAT.)
DDNS Settings
(Please refer to page 14 for
information on DDNS settings.)
Router/
IP Sharing
Set as static IP address, and assign the LAN IP address of the IP
sharing to the Default Gateway.
If the WAN of the IP sharing device has a static IP address,
then the NAT IP address is set as the Public IP address for
IP sharing.
Enable
The WAN of the IP
sharing device has a
static IP address.
The WAN of the IP
sharing device has a
dynamic IP address.
If the WAN of the IP sharing device uses a dynamic IP
address, then the gateway has to comply with the DDNS
settings. When using NAT, you must enter the URL
(Uniform Resource Locator) that is registered to the DDNS
server.
Disabled
Enabled: enter the registered URL (Uniform
Resource Locator) into the network settings
under NAT
VSP
Leased Line/ ADSL
/Cable Modem
D-Link Systems, Inc. 8
Page 9

DVG-5112S User’s Manu al
DVG-5112S assigned with a Public IP Address and serving as a Bridge
DVG-5112S will have a public IP address regardless of whether it is a static IP application, DHCP (using a
Cable Modem), or PPPoE (to connect to your ADSL account), which can then use the functions of built-in IP
sharing to allow other PCs to be on-line at the same time.
DVG-5112S IP Settings
NAT/STUN Settings
DDNS Settings
PC IP Address Settings
(for IP sharing through the
gateway)
Leased Line/ ADSL
/Cable Modem
Need to be set up as static IP, DHCP, or PPPoE
Unnecessary (Disabled)
Unnecessary (Disabled)
PCs should use a static IP address in the
following range : 192.168.8.1-192.168.8.253
Subnet Mask : 255.255.255.0
Default Gateway : 192.168.8.254
61.23.45.67 61.23.45.69
VSP
D-Link Systems, Inc. 9
Page 10

DVG-5112S User’s Manu al
3. Setting a DVG-5112S with WEB Browser
DVG-5112S allows users to configure its settings using a web interface (Web UI). You can access the
Configuration Menu by opening a web-browser (e.g., Internet Explorer or Netscape Navigator) and entering the
factory default LAN IP address: 192.168.8.254. The IP address of the Web UI is same as the default LAN IP
noted elsewhere in this user’s manual.
You can also use an ordinary telephone, connect it to the gateway, and dial ”101” to inquire about the current
WAN Port IP address and then use the WAN port to log-in.
Instructions
Open a Web-Browser (e.g., Explorer, Navigator, Opera, Firefox).
Enter the LAN port IP address. The default LAN port IP address is: 192.168.8.254.
The log-in screen below will appear after you conn ect. (The factory default settings for Login ID and
Password are blank (i.e., no login ID, no password).)
DVG-5112S does not allow multiple people to configure the gateway simultaneously. Please remember to
logout or restart the system if you are not using the web configuration function.
D-Link Systems, Inc. 10
Page 11
DVG-5112S User’s Manu al
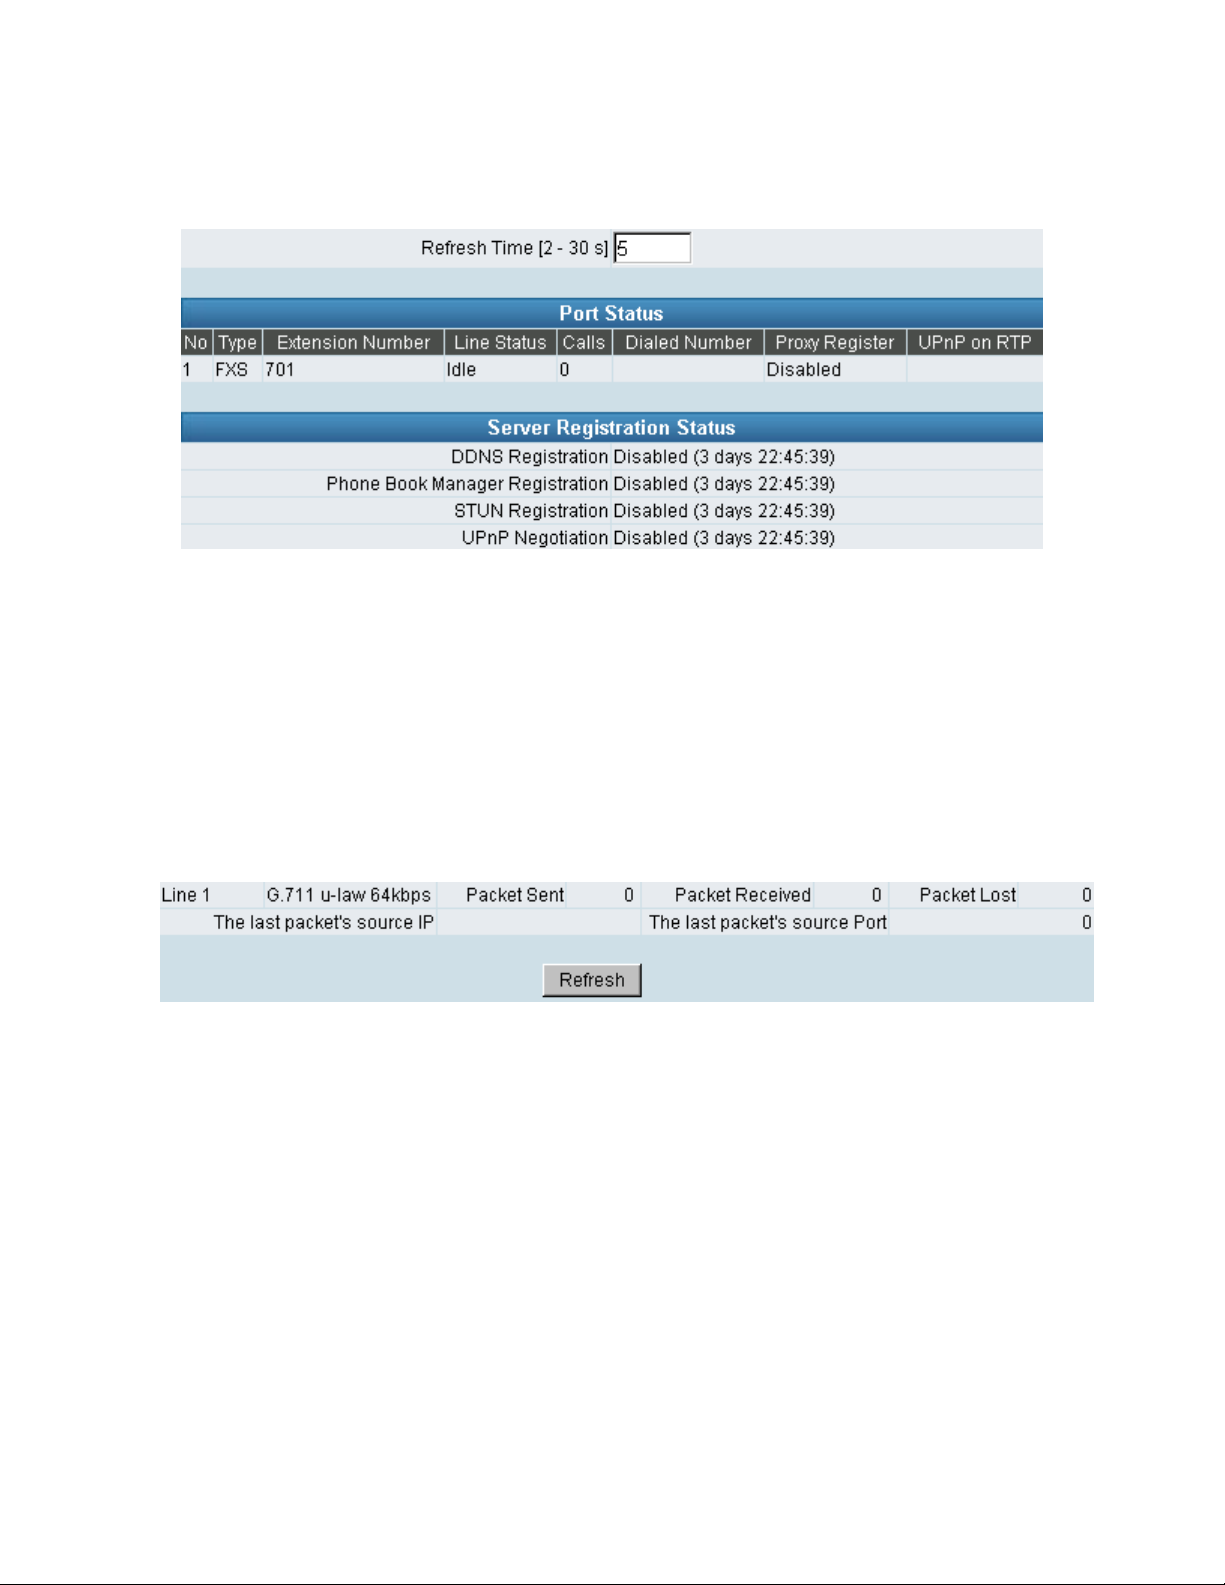
3-1 Current Status
Refresh Time: Set the time to update Port Status and Server Registration Status.
Port Status: It includes if each port registers to Proxy successfully, the lasted dialed number, how
many calls each port had since DVG-5112S is start, etc.
Server Registration Status: It shows the registration status of DDNS, Phone Book Manager, STUN
and UPnP.
3-2 RTP Packet Summary
Display the information of the final call. Press Refresh button to get the latest RTP Packet Summary.
D-Link Systems, Inc. 11
Page 12

DVG-5112S User’s Manu al
3-3 System Information
WAN Port Information: It shows IP address, subnet mask, default gateway and DNS server. If you use
PPPoE to obtain IP, you can know if the IP is obtained through this. If IP address, subnet mask, default
gateway is blank, it means that DVG-5112S does not obtain IP.
LAN Port Information: It shows LAN port IP, subnet mask, and the status of DHCP server.
Hardware: It shows the hardware platform.
D-Link Systems, Inc. 12
Page 13
DVG-5112S User’s Manu al
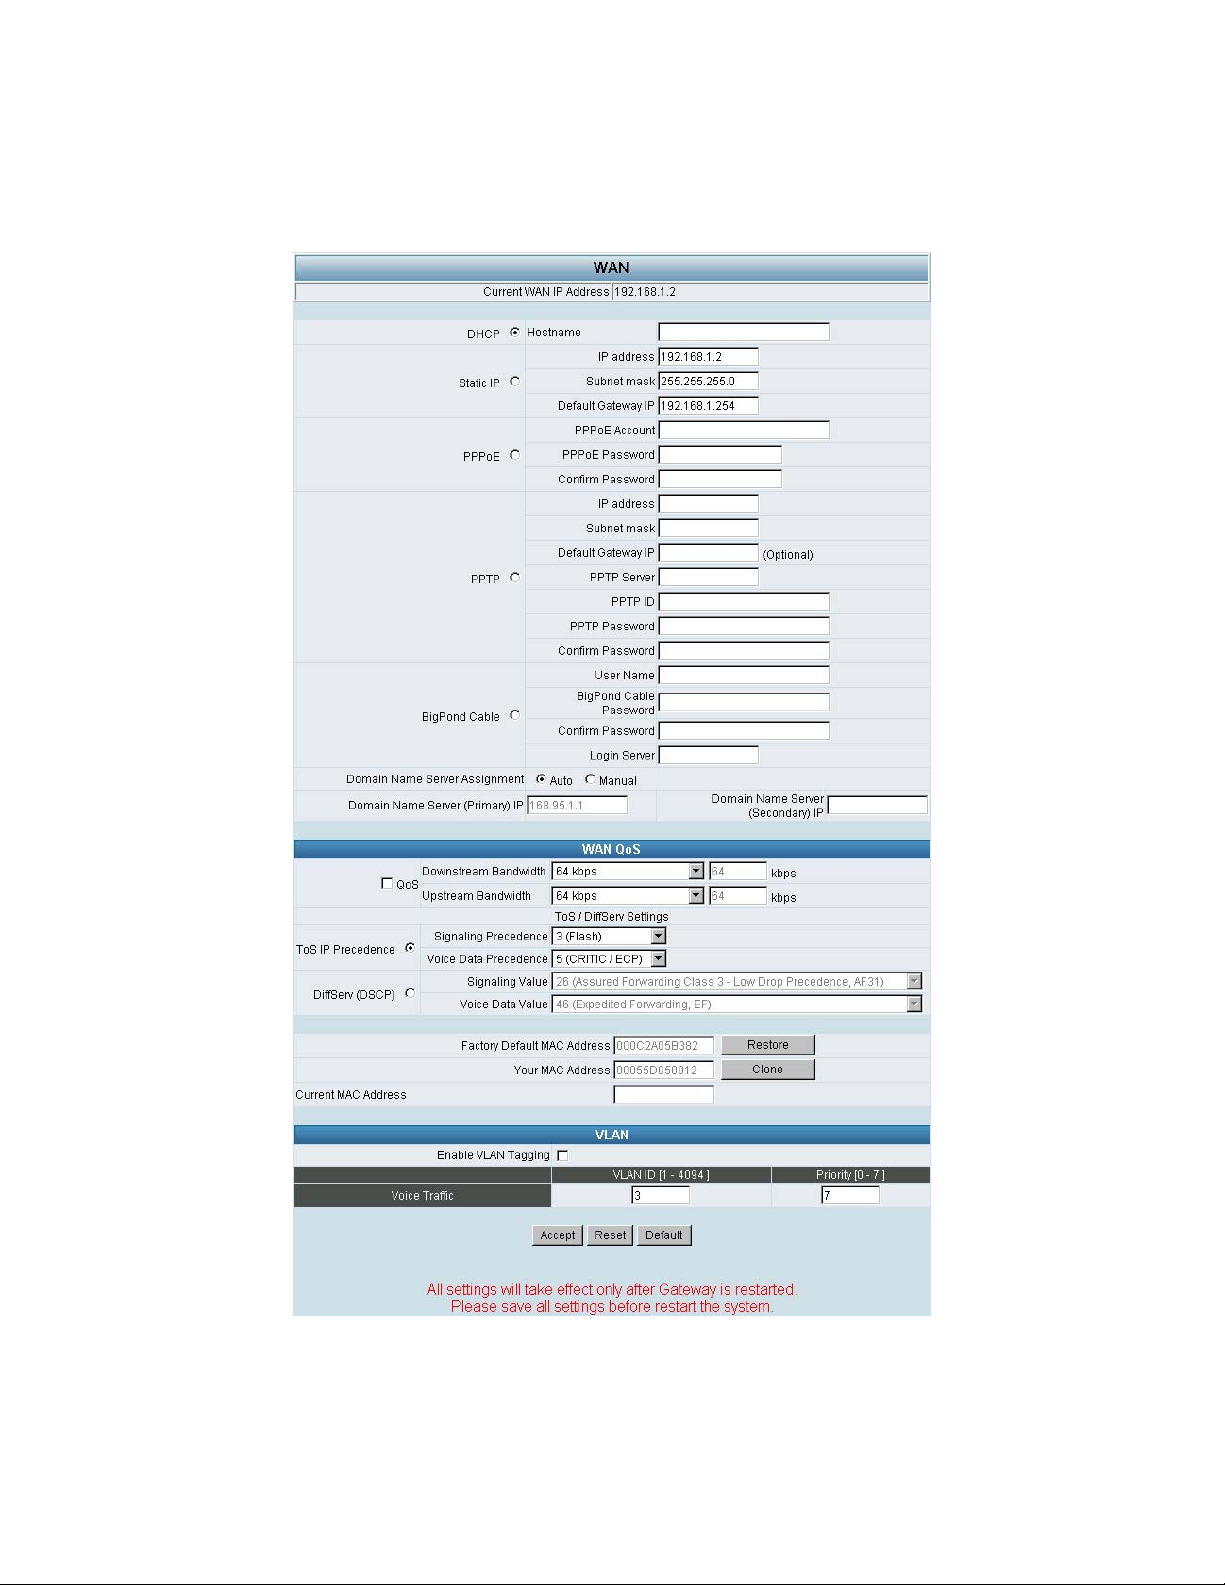
3-4 WAN
WAN Configuration includes the method of obtaining IP, the setting of DNS (Domain Name Server), etc.
Current WAN IP Address: The IP address of the WAN port.
D-Link Systems, Inc. 13
Page 14

DVG-5112S User’s Manu al
IP Configuration
There are five methods of obtaining a WAN port IP address:
1. Static IP
2. DHCP, which means a Dynamic IP (Cable Modem)
3. PPPoE (dial-up ADSL)
4. PPTP
5. BigPond (for Australia only)
Methods for using DHCP and PPPoE for obtaining an IP address may vary. If you are not familiar with
creating a network connection, please contact your local ISP.
Setting Dynamic IP (DHCP)
Click “DHCP” to obtain a Dynamic IP address, and then click the “Accept” b utton at the bottom of the scre en.
Saving the settings: Click System Operation to select “Save Settings”, “Restart”, and then click the ”Accept”
button. Wait for about 40 seconds, and the system will obtain the rquired IP value from the DHCP Server.
NOTE: After the system has obtained a new IP address, if you are using a WAN port to enter the
Web Configuration Screen, the new IP address has to be used. The same principle applies to the
next two settings.
Setting Static IP
Select “Static IP” and enter the IP address, Subnet Mask and Default Gateway values. Then click the
“Accept” button at the bottom of the screen. Save the settings, and then restart the system. Wait for about
40 seconds for the system to restart.
ADSL PPPoE Settings
Select “PPPoE” and enter the Account Number, Password and Reenter Password to confirm. Then click the
“Accept” button at the bottom of the screen. Save the settings, and then restart the system. The system will
take about 49 seconds to restart.
D-Link Systems, Inc. 14
Page 15

DVG-5112S User’s Manu al
PPTP
Select “PPTP” and enter the IP Address, Subnet mask, PPTP Server, PPTP ID and Password. Then click
the “Accept” button at the bottom of the screen.
BigPond (for Australia only)
Click “BigPond Cable” and enter the User Name and Password. Then click the “Accept” button at the
bottom of the screen.
(DNS) Settings
Domain Name Server (DNS): While a gateway is accessing another gateway or a computer with a
hostname, it will look up the IP address from the DNS provided by your ISP. Normally, the ISP assigns DNS
information while negotiating with PPPoE or DHCP. If the DNS is not assigned automatically or the WAN
port is assigned a static IP address, the DNS settings must be assigned manually.
Auto: the gateway learns primary and secondary addresses from the ISP’s DHCP server or PPPoE server.
Manual: enter the primary and secondary addresses manually. Please be sure that the IP addresses are
correct otherwise the gateway will not be able to access hosts using hostnames instead of IPs.
D-Link Systems, Inc. 15
Page 16

DVG-5112S User’s Manu al
VLAN
Enable VLAN Tagging: this tags the packets for VLAN Router or Switch identifying.
VLAN ID: enter a uniq uely user-defined ID to each packet.
Priority: enter the proprietary.
WAN QoS
QoS (Quality of Service): Sets true bandwidth of your Internet connection to ensure sound quality
during transmission. (When this function is enabled, voice packets have the highest priority to ensure
telecommunication quality while less bandwidth is assigned for data transmission.) Some models of
the VoIP gateway without this function will adjust bandwidth automatically.
ToS/DiffServ (Type of Service/DSCP): Voice packets have the highest priority to ensure
telecommunication quality; the larger the value you set, the higher the priority.
NOTE: Please contact your ISP when you configure these values.
Clone MAC
Some Internet Service Providers (ISPs) assign bandwidth via MAC (Media Access Control) addresses. You
can click the "Clone" button to type in a MAC address which will be recognized by your ISP. It is only
necessary to fill in the field if it is required by your ISP.
The “Your MAC Address” field will be blank as you log-in via the WAN port.
D-Link Systems, Inc. 16
Page 17
DVG-5112S User’s Manu al
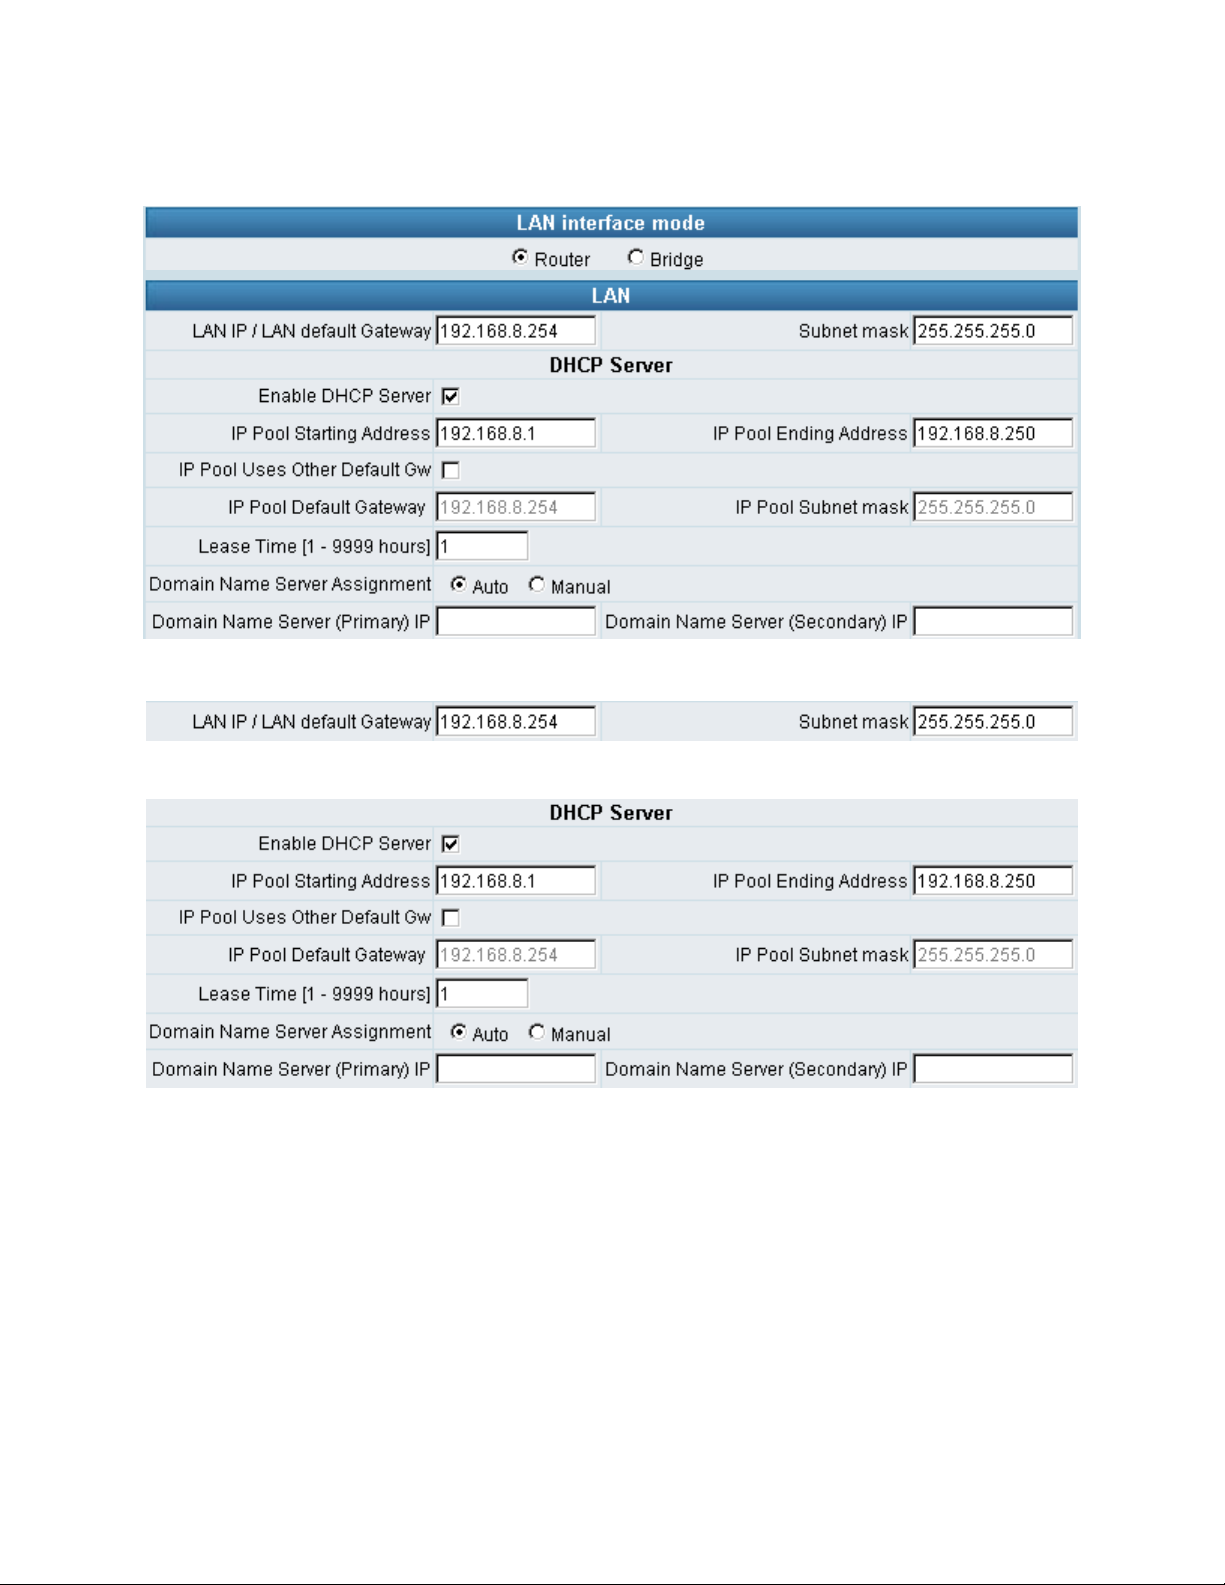
3-5 LAN
LAN IP/Subnet mask
Gateway LAN Port IP address and subnet mask settings.
Enable DHCP Server: Enable or Disable DHCP server service of the gateway.
IP Pool Starting Address: The first IP address to be assigned to DHCP clients.
IP Pool Ending Address: The last IP addre s s to be assigned to DHCP clients.
IP Pool Uses Other Defau l t Gw: Tick the check box to give DHCP client the other default gateway.
IP Pool Default Gateway: Assign the default gateway and subnet mask to DHCP client.
IP Pool Subnet mask: Assign the default gateway and subnet mask to DHCP client.
Lease Time: The valid period of an assigned IP address.
Domain Name Server Assignment: The DNS information to be assigned to DHCP clients.
Auto: the gateway learns primary and secondary addresses from the ISP’s DHCP server or PPPoE
server.
Manual: enter the primary and secondary addresses manually. Please be sure that the IP addresses
are correct otherwise the gateway will not be able to access hosts using hostnames instead of IPs.
D-Link Systems, Inc. 17
Page 18

DVG-5112S User’s Manu al
3-6 SIP
Assuming that your registered ID and password are individual, the settings should be as above.
Number: VoIP phone number
Register: Register to prox y if selected.
Invite with ID / Account: The DVG-5112S can be invited to a VoIP trunk gateway without registeri ng
to a proxy. Please contact your VoIP service provider.
User ID/Account: VoIP account Authentication ID or account name
Password: p assword fo r VoIP account authentication
As there are various Proxy Server providers, the gateway has been desi gned to be compatibl e with as many
SIP VoIP networks as possible using RFC standards. If any kind of registration problem occurs, please
consult your VoIP service provider.
NOTE: When you register with a Proxy Server, dialing principles may vary with different Proxy Servers.
Please consult your VoIP service provider for details.
DNS SRV Settings
Use DNS SRV: The gateway asks for the related IP address of SIP Server from the records of DNS
SRV. DNS SRV uses several servers for a single domain for SIP proxy, to move services from host to
host and design some hosts as primary servers (the highest priority) for a service and others as
backups. If the primary server is not reachable, the gateway will go for backup server, and so forth…
DNS SRV Auto Prefix: This option tells the gateway to send packe t with service type when using DNS
SRV.
Proxy Fallback Interval: Set the preferred Proxy Fallback Interval. After the time expires, the gateway
gets back for registration with the primary server.
D-Link Systems, Inc. 18
Page 19

DVG-5112S User’s Manu al
Enable Support of SIP Proxy Server / Soft Switch
Enable Support of SIP Proxy Server / Soft Switch: Enable the functions to inter-work with Proxy
Server / Soft Switch. When SIP Proxy 1 and 2 are enabled, the system will register to SIP Pro xy 2 after
all lines have failed to register to SIP Proxy 1. SIP Proxy 2 is a backup system.
Proxy Server IP/Domain: Enter the Proxy Server IP address or URL (Uniform Resource Locator). You
can set three redundant Proxy IPs separated by semicolons.
Example: 61.123.231.1;12.34.56.78;proxy.sip.sip
Proxy Server Port: Enter the Proxy Server listen port number. (The default value is 5060)
Proxy Server Realm: This variable is used for gateway SIP account authentication in a SIP server. In
most cases, the gateway can automatically detect your SIP server realm. So you can leave this option
blank. However, if your SIP server requires you to use a specific realm you can manually enter it here.
If you fail to make a call, please contact your VoIP service provider.
TTL (Registration interval) [10-720 0 s]: Enter the desired time interval at which the gateway will
report to your Proxy Server.
SIP Domain/Use Domain to Register: Enter the correct SIP domain to avoid registration failure (it is
not necessary to set this with some Proxy Servers). If you enable “Uses Domain to Register” the VoIP
gateway will register to the proxy with the domain name you filed. Otherwise the VoIP Gateway will
register to a Proxy with the IP it resolves. If you fail to make a call, please contact your VoIP
service provider.
D-Link Systems, Inc. 19
Page 20

DVG-5112S User’s Manu al
Outbound Proxy
All Call through OutBound Proxy:An outbound proxy serve r h andles SIP call signaling as a
standard SIP proxy server would. Further, it receives and transmits phone co nversation traffic (media)
between two communication parties. This option tells the gateway to send and receive all SIP
packets to the destined outbound proxy server rather than the remote gateway. This helps VoIP calls
to pass through any NAT protected network without additional settings or techniques. Please make
sure your VoIP service provider supports outbound proxy services before you en able it.
E.164
International Call Prefix Digit: Enter the International call prefix.
Country Code: Users please select the desired country code.
Long Distance Call Prefix Digit: The long-distance prefix digit for making a long-distance call.
Area Code: Please enter the area code.
E.164 Numbering: This v ariable invites the proxy to follow the E.164 rul e, but it depe nds on the proxy.
If you fail to make a call, please contact your ITSP.
NOTE: All settings in this section are specific to your VoIP network. Please ask your VoIP service
provider whether or not they require these settings.
D-Link Systems, Inc. 20
Page 21

DVG-5112S User’s Manu al
3-7 SIP Advanced
Listen Port UDP: It is not necessary to change the protocol of the communication port used by the
gateway, unless it conflicts with ports used by another device in your network.
RTP Starting Port UDP: The initial value of the port number for transmitting voice data among
gateway(s). Each line requires 2 ports. For the DVG-5112S gateway 4 UDP port s are required . It is not
necessary to change the setting, unless it conflicts with ports used by another network device.
For example, if the starting port is 9000, then Line 1 is using ports 9000 and 9001, and Line 2 is usi ng
ports 9002 and 9003.
Session Timer
Session Expiration: Thi s variable is used to avoid billing for abnormally dropped calls due to Internet
problems. The default is disabled.
Session Refresh Request: Used to resend UPDATE or re-INVITE requests to the Server.
Session Refr esher: Selects whi ch user agent is the session refresher. UAS (User Agent Server) is an
originator, and UAC (User Agent Client) is a replier.
SIP Message Timeout Adjustment
SIP Message Resend Timer Base: SIP packet will resend if response did not arrive in the base time
set in this column. It will send again at "base time" * 2, and send again at "base time" *2 *2. The
maximum resend time is four seconds. Resend will stop and restart when the total resend time has
reached 20 seconds.
Max. Response Time for Invite: If the destination does not reply in the set time, the call is failed.
D-Link Systems, Inc. 21
Page 22

DVG-5112S User’s Manu al
SIP Proxy Server / Soft Switch Settings
VoIP failure announcem ent: As soon as the registration to proxy server is failed, the gateway will
drive IVR system to play out failure announcements for the caller.
Bind Proxy Interval for NAT: This function is able to keep the binding that exists when the VoIP
gateway is behind a NAT and SIP Proxy is not able to keep the binding.
Initial Unregister: After rebooting, the gateway is initially unregistered and then it will perform a
general register process.
Support Message Waiting Indication: The system will play a tone to remind users that there are
messages in the SIP Server.
MWI Subscribe Interval: The subscribe interval is for the gateway check of the voice mail.
Supplementary Features
Anonymous Caller ID (CLIR): When enabled, anyone receiving a call from you will not display your
number if they have caller ID.
NOTE: If you register the gateway to a Proxy and you check this option, you may be unable to make a
call. This is due to the fact that the VoIP gateway doesn’t send the number for authorization.
D-Link Systems, Inc. 22
Page 23

DVG-5112S User’s Manu al
VoIP Calling Notification: The gateway will play a tone to notify that the call is via VoIP.
Enable Built-in Call Hold Music: The default setting is that when receiving a call hold request, the
gateway will play music on hold. Untick the check box to disable this function while necessary.
Enable P-Assert: This variable is for caller ID protection.
Privacy Type: Privacy type is used to disguise the caller ID when queried via an ITSP/Third-Party
Assertion.
Invite URL n eed ‘user=phone’: There is ‘user=phone’ in invite packet.
Reliability of Provisional Responses: Provide information on the progress of the reque st processing
if selected.
Compact Form: It decreases the size of SIP header if selected.
SIP CallerId Obtaining: Defines from which part of the SIP packet will the gateway obtain caller ID.
There are several places where you can put your caller ID.
Remote-Party-Id Display Name: It is locate at SIP→Remote-Party-ID→Before [<sip:]
Remote-Party-Id User Name: It is locate at SIP → Remote-Party-ID → After [<sip:], Before [@]
From-Header Display Name: The standard way is in SIP → Message Header → From → SIP
Display info.
Put Caller ID In URI: There is caller ID in URI if selected.
INVITE With Remote-Party-ID Header: There is Remote-Party-ID in the header if selected.
Support URI Percent-Encoding(RFC 3986): It follows RFC 3986 to encode/decode the letters of the
basic Latin alphabet, digits, and a few special characters.
Enable SIP ‘Allow’ Header: The system will put ‘Allow’ in the sip header if selected.
D-Link Systems, Inc. 23
Page 24

DVG-5112S User’s Manu al
3-8 Phone Book
Using Phone Book Manager
Register to Phone Book Manag er: To register to the Phone Boo k Mana ger.
VoIP failure announcem ent: As soon as the registration to proxy server is failed, the gateway will
drive IVR system to play out failure announcements for the caller.
Gateway Name for Phone Book Manager: The alias registere d with the Phone Book Manager.
Phone Book Manager IP/Domain: Enter the IP address for the Phone Book Manager. (This variable
also supports URL (Uniform Resource Locator).)
Phone Book Manager Login Password: Enter the registered password. If this system is serving as
the Phone Book Manager, the set password is also the password used for registering other gateway
systems.
Using Phone Book
DVG-5112S can set up and store 100 phone numbers to a phone book. If there is no Ph one Books Manag er
exiting in private network, all DVG-5112Ss in a group have to set up each gateway’s number one by one to
communicate with each other.
Gateway Name: Enter another gateway’s code or an easy-to-remember name.
Gateway Number: Enter t he desired number of another gateway.
IP / Domain Name: Enter the IP address or URL (Uniform Resource Locator) of another gateway.
Port: Enter another gateway’s listen port setting.
D-Link Systems, Inc. 24
Page 25

DVG-5112S User’s Manu al
3-9 Caller ID
FXS Caller ID Generation: Select this option to enable the caller ID display function on FXS ports.
When enabled, the caller’s phone number will be displayed on your phone set when the call comes
through. FSK is preferred in some countries.
FSK Caller ID Type: Bellcore is used in Australia caller ID standards.
3-10 Hot Line
Enable: Enable a line; if some lines are not used, disable them (Pause Function) to avoid unnecessary
waiting when an incoming call is diverting to this line.
Hot Line: Wh en the user picks up the phone, the gateway automatically dials your assigned hotline
number. When in hotline mode, other phone numbers cannot be dialed.
Hot Line No.: Enter the hot line number for an automatic dialing function.
Warm Line: Whe n the Warm Line function is in use, user can dial a number. Oth erwise the sy stem will
divert incoming calls from an outside line to the Hot Line Number after a set wait time.
D-Link Systems, Inc. 25
Page 26

DVG-5112S User’s Manu al
3-11 Calling Features
Do Not Dis turb: The particular line will only be able to call out when this variable is enabled. All
incoming calls will be rejected.
Unconditional Forward: All incoming calls will be forwarded to the “Forwarding Number”
automatically.
Busy Forward: Forward incoming calls to the “Forwarding Number” when the port is busy.
No Answer Forward: Forward incoming calls to the “Forwarding Number” after ring timeout expires
without answer.
Call Hold: Enable the call hold feature on the specific FXS port.
NOTE: Call Hold must be checked for Call Transfer or Call Waiting to be active.
Call Transfer: Enable the call transfer feature of the specific FXS port.
Call Waiting: Enable the call waiting feature of the specific FXS port.
Calling Feature Instructions:
Call Hold: The call will be put on hold after the FLASH button is pressed on the phone set. The
gateway will play hold music (provided by your V oIP network) to the remote end.
Call Transfer: The call will be put on hold after the FLASH button is pressed on the phone set (the
gateway plays hold music to the remote end). Once the call is on hold, the local user can dial out to
another number after a dial tone is received. After the handset is replaced on the hook, the call on hold
will then be transferred to the new number regardless of the status of the new cal l. If the wrong number
is dialed for the new call, just press the FLASH button to get the on hold call back. Please notice that
the PBX between the phone sets and the gateway must support FLASH features in order to use this
function. If a phone set is connected directly to the FXS port of the gateway and FLASH functions are
not working, please adjust the settings in “Flash Detect Time” under “Line Settings” on page 24.
NOTE: The availability of the above features also depends on your VoIP network. Please also check
with your service provider on these services.
Examples of establishing a Three-Way call:
1. Phone1 dials to Phone2, Phone2 answers the call.
2. Phone1 presses Flash then calls Phone3 (Phone2 is on hold) and Phone3 answers the call.
3. Phone1 dials *61 and then presses Flash to start the conference call.
Or
4. Phone1 dials to Phone2, Phone2 answers the call.
5. Phone3 dials to Phone1 (Call Waiting), Phone1 presses Flash to pick up the second call and talk to
Phone3.
6. Phone1 dials *61 and then presses Flash to start the conference call.
D-Link Systems, Inc. 26
Page 27

DVG-5112S User’s Manu al
3-12 Virtual Server
Virtual server allows you to enable users to access the Internet, FTP and other services from behind your NAT.
When remote users are accessing web or FTP servers through WAN-end IP addresses, they will be routed to
the server at the internal LAN end as appropriate in accordance with externally required services
WAN Port Range: Input the port range for the WAN side.
TCP/UDP: Select the communication protocol s used by the server, TCP or UDP.
LAN Host IP Address: Enter the IP address that provides various services.
Server Port Range: Input the port used by the LAN host.
3-13 DMZ
DMZ allows the server on the LAN site to be directly exposed to the Internet for accessing data. Either this
function or virtual server can be selected for use in accessing external services.
D-Link Systems, Inc. 27
Page 28

DVG-5112S User’s Manu al
3-14 NAT Traversal
If your gateway is set up behind an Internet sharing device, you can select either the NAT or STUN protocol.
NAT Public IP: The IP address used by the gateway should be a private address. Furthe rmore, users
must set Virtual Server Mapping in the Internet sharing device. (For example, a virtual serve r is usu ally
defined as a Service Port, and all requests to this port will be redirected to this specified server’s
private IP address).
The default ports of the gateway are listed below:
Listen Port (UDP): 5060
RTP Starting Port (UDP): 9000~9015 (Listen Port used for telephone communication).
Port of Web Access from WAN (TCP): the number you set in this option on the Network Settings page.
NAT IP/Domain: Enter the NAT Server IP address (real public IP address of the Internet sharing
device); or enter a true URL (Uniform Resource Locator) when DDNS is used. Please refer to the
DDNS settings.
NOTE: If you are setting a public IP in this field, it has to be a static public IP, otherwise VoIP
communication may not be established properly. Please contact your ISP to check whether your Internet
connection has static public IP addresses.
Enable STUN Client: Using the STUN proto col prevents problems with setting the IP sharing function,
but some NATs do not support this protocol.
NOTE: You can use the “Status STUN Inquiry” page to detect the NAT type of your Internet sharing
device. If the NAT type is “Symmetric NAT,” then the gateway is not able to traverse the NAT. It is not a flaw
of the gateway design, but rather a limitation of the STUN protocol.
STUN Server IP/Domain and Port: Enter the STUN server IP address and Listen Port number. You
can set two STUN server IPs separated by a semicolon.
Enable UPnP Control Point: This variable will enable the gateway’s IP traffic to pass through an
Internet sharing device. This function only works when the Internet sharing device supports UPnP and
has it enabled.
NOTE: The “Status Current Status” page will show the status of UPnP.
D-Link Systems, Inc. 28
Page 29

DVG-5112S User’s Manu al
3-15 DDNS
These settings are only necessary when the gateway is set up behind an Internet sharing device that u ses a
dynamic IP address and does not support DDNS.
Choose a DDNS Server: The current system allows users to choose either DynDNS、TZO、3322.org、PeanutHull
or a private server. You will need to apply for an account with DynDNS、TZO、3322.org、PeanutHull or a private
server before you type in the following information.
D-Link Systems, Inc. 29
Page 30

DVG-5112S User’s Manu al
Server address: the IP addre ss or URL (Uniform Resource Locator) of the DDNS Server.
Hostname: the URL of the system (or NAT) – applied from domain name registration providers (e.g.
www.dyndns.org).
Login ID and Password: The ID and password used to log-in to the DDNS server.
Behind NAT: Select this only when the system is set up behind a NAT device.
NOTE: If the gateway is set up under NAT, then enter the hostname in the NAT IP/Domain that is the
same as the Hostname of the DDNS.
Example:
NAT
DDNS
D-Link Systems, Inc. 30
Page 31

DVG-5112S User’s Manu al
3-16 FAX Settings
T.38: The T.38 protocol is used for better and faster facsimile transmission. So it is recommended to
enable this function to gain better fax quality. When this function is enabled, please select UDP or TCP.
If you select TCP and some gateways cannot use the fax function, please select UDP instead.
NOTE: When a fax tone is detected in a call, the gateway will automatically switch from voice mode to
fax mode. So fax settings will be temporarily applied to a specific port which detects fax tones, instead
of its default voice settings.
Enable High Quality : The system sends the same fax frame twice to get a high quality fax
transmission. Enabling this variable increases bandwidth requirements.
T.30: The system use s T.30 as th e protocol for fax transmi ssi on. T he param eter setting s are the same
as for voice transmission. However, enabling the T.30 protocol will consume more network resou rces
and will affect transmission quality.
NOTE: When you send fax over an IP network it needs your network to support fax over IP
functionality (either T.38 or T.30). Please consult your VoIP service provider for this setting.
D-Link Systems, Inc. 31
Page 32

DVG-5112S User’s Manu al
3-17 Codec Settings
Preferred Co dec Type: Since different voice codecs have different compression ratios, the sound
quality and occupied bandwidths are also different. It is recommended that you use the default
provided (G.723.1) because it occupies less bandwidth and will provide better sound quality.
Jitter Buffer : Adjusts the jitter for receiving packets. If the jitter range is too wide, it will delay voice
transmission.
Silence Suppression: If one side of a connection is not speaking, the system will stop sending voice
data (packets) to decrease bandwidth usage.
Echo Canceling: Prevents poor telecommunication quality caused by echo interference.
Codec: Choose the codec that you need.
Packet Time: Defines how long the gateway send s a RTP packet or voice packet to the receiving side.
The smaller the value, the greater the bandwidth usage, but larger values increase voice delay.
Approximate Bandwidth Required: The bandwidth required varies with codec format and packet
time.
D-Link Systems, Inc. 32
Page 33

DVG-5112S User’s Manu al
3-18 Line Settings
Listening Volume: Adjusts the earpiece or speaker volume.
Speaking Volume: Adjusts the microphone volume.
Tone Volume: Adds a new option to make tone volume adjustable. This setting will be applied to all
tones generated by the gateway including dial tone and busy tone.
Min. FXS Hook Flash Time: It is to set the minimum flash time for FXS detecting.
Flash Time: Used to adjust the detection period for flash signals from a phone set connected to an
FXS port. For example, if pressing the HOLD key sometimes disconnects a call, increasing the “Flash
Detect Time” should fix this issue.
Enable Polarity Reversal: As a remote site answers calls from this extension the FXS port will
reverse polarity.
FXS Chip Option 1: It is to avoid mis-detecting the loop state of a subscriber line or PBX user loop by
FXS interface. In some places, the voltage of off-hook makes it mis-detect the idle state and the active
state by FXS interface. Untick this variable if it mis-detects the state by FXS interface in your place.
Ring (Early Media) Time Limit[10 - 600secs]:The timeout to ca ncel a call when no one answers.
Enable End of Digit Tone:The gateway will play a “Beep-Beep” tone to notify that the call is in
progress.
Early Media Treatm ent: If this variable is disabled, the system will send RTP immediately after a
connection with a proxy is set up. The default setting is enabled. If communicating with other gateways
encounters problems, please disable this function.
Loop Current Drop Trigger Time: It is to set the trigger time for dropping loop current by FXS port. A
setting of zero is to disable this function. It is used to avoid the line engaged if FXS port is conn ected to
PBX.
Loop Curren t Drop Duration: It is to set the drop duration.
D-Link Systems, Inc. 33
Page 34

DVG-5112S User’s Manu al
Enable ROH: The system will play Receiver Off-Hook tone to notify user of hanging up the phone set.
VoIP Centrex Extension Digit Count: Sets the digit counts of VoIP Centrex Extension.
VoIP Centrex Digit: Enter the digit for VoIP Centrex.
Termination Impedance
Choose the correct impedance in your country or area.
Drop Inactive Call
This is used as a standard to determine whether or not to hang up the phone. The system will hang up the
phone automatically to avoid keeping the line engaged if the detected volume is belo w the Silence Detection
Threshold and the time exceeds the Drop Silent Call Timeout.
Silence Detection Threshold: The volume below the threshold is used as a standard to determine
whether or not to hang up the phone.
Drop Silent Call Timeout: If the detected volume is below the threshold and the time exceeds the
silence detection interval, the system will hang up the phone automatically to avoid keeping the line
engaged.
NOTE: Please be careful with these settings. Improper values might cause unexpected automatic
disconnection of a call. Default values are recommended.
Voice Menu Options
Enable: Untick the check box to disable IVR function.
Enable Call Feature Code: Untick the check box to disable Call Feature Code.
NOTE: When disabled, call pickup, Automatic Redial and unattend transfer will be disabled.
D-Link Systems, Inc. 34
Page 35

DVG-5112S User’s Manu al
3-19 Digit Map
Digit Map now is combined the original feature of Digit Map and S peed Dial. You can use “? ” or “%” in the
column of Scan Code, VoIP Dial-out and PSTN Dial-out. “?” is a single digit, and “%” is wildcard. It provides
a mapping between the number received from user and the replaced or modified number for real dial out.
With this function, user can easily add certain leading digits to repla ce full numb er. There are 100 sets of
leading digit entries to choose voice routing interface.
Enable Pound Key ' # ' Function: It is to speed up the connection of a call by entering ' # ' after a
complete phone number is dialed.
Default Call Route: The d efault call ro ute can be Auto, VoIP or Deny.
Auto (VoIP first): The call route is VoIP first, and the next is Deny.
Deny: The call will be denied.
Digit Map Testing
Test Dial No.: You have to set some rules in Digit Map Setting first and enter the number for test.
Result: The gateway will sho w the nu mber for VoIP Dial-out and PSTN Dial-out according to the Digit
Map Setting as below.
Digit Map Rule
Enable: Enable detection of this entry.
Scan Code: Defines the digits for the gateway to scan while user is dialing.
VoIP Dial-out: Defines the dialed number rule for the gateway to call through Internet.
PSTN Dial-out: Define s the dialed number rule for the gateway to call through PSTN.
User Dial Length: Defines total numbe r of digits that user dialed. A setting of zero tells the gateway
scans digits only and disregards the total digit count.
Route: Determine the interface calls should go through if above conditions satisfied.
D-Link Systems, Inc. 35
Page 36

DVG-5112S User’s Manu al
Methods of Digit Map:
Method 1- Single mapping: Fill a short code into the Scan Code column, and enter the desired phone
number into the VoIP Dial-out or PSTN Dial-out column.
For example,
Scan Code: 55
VoIP Dial-out: 07021234567
User Dial Length: 2
Route: Auto
Pick up the handset and dial 55 and the system will dial 07021234567. You also can use Digit Map Testing
to know that the system will dial 07021234567 and go through Internet.
Method 2- Multi mapping: Fill the prefix code into the Scan Code column and the format to transfer into the
VoIP Dial-out or PSTN Dial-out column.
For example,
Scan Code: 2???
PSTN Dial-out: 35106???
User Dial Length: 4
Route: Auto
Pick up the handset and dial 2301. The system will dial 351006301 and go through Internet
D-Link Systems, Inc. 36
Page 37

DVG-5112S User’s Manu al
For example,
Scan Code: 0%
PSTN Dial-out: 1805%
User Dial Length: 0
Route: Auto
Pick up the handset and dial 0423456789. The system will dial 1805423456789 and go through Internet first.
If the call is fail to Internet, the system will play busy tone.
Method 3- Substitution: It helps you dial to destination that you can not dial by phone. Destination like:
test@1.1.1.1. Fill the number into the Scan Code column and enter the desired name into the VoIP Dial-out
column.
For example,
Scan Code: 11
VoIP Dial-out: test
User Dial Length: 2
Route: Auto
Pick up the handset and dial 11. The system will dial “test” and go through Internet. You also can use Digit
Map Testing to know the dialing result.
D-Link Systems, Inc. 37
Page 38

DVG-5112S User’s Manu al
3-20 Port Filtering
Port filtering enables you to control all data that can be transmitted over routers. When the port used at the
source end is within the defined scope, it will be filtered without transmission.
Enable Port Filtering: Select to enabl e this function.
Port Range: Set the range of ports to be filtered. If, for example, the port to be filtered is 80 and the
selected protocol is both or TCP, all computers will be unable to use HTTP services (port 80) and will
be unable to browse normal webpages.
TCP/UDP: Choose to filter TCP, UDP, or both.
Remark: This field allows you to enter comments.
3-21 IP Filtering
IP Filtering is used to limit internal users from accessing the Internet.
IP: Input the IP address that you want to filter. The listed IP address will be unable to transmit data to
and from the Internet.
TCP/UDP: Choose to filter TCP, UDP, or both.
Remark: This field allows you to enter comments.
D-Link Systems, Inc. 38
Page 39

DVG-5112S User’s Manu al
3-22 DTMF & Pulse
Dial Wait Timeout: Use this variable to set the wait time for the user’s first key pressing when dialing a
number. The user will hear a busy tone if he or she does not press the first key within the set time
frame.
Inter Digits Timeout: Set the waiting time between each key press. The numbers input up to that
point will be dialed after the timeout.
Minimum DTMF ON Length (Dial on)/ Minimum DTMF OFF Length (Dial off - between tones):
Used to set the dial tone when a call is being diverted to another extension.
DTMF Detection Sensitivity: Used to a djust the sen sitivity of the telephone keys.
Enable Out-of- Band DTMF: To send DTMF keys (0~9, *, #,) follow the RFC2833 rules or via SIP Info.
NOTE: Out-of-Band DTMF transport method may vary with different VoIP networks, please
contact your VoIP provider for their preferred method.
Payload Type: payload type of RFC2833.
Volume: Defines the volume of RFC2833.
Enable Hook Flash Event: To send Hook Flash event when enabled Out-of-Band DTMF.
Disable: Not to send Hook Flash event.
Auto: To send Hook Flash event followed the type of Out-of-Band DTMF.
SIP_INFO: To send Hook Flash event by SIP_INFO even Out-of-Band DTMF is RFC 2833.
RFC_2833: To send Hook Flash event by RFC 2833.
D-Link Systems, Inc. 39
Page 40

DVG-5112S User’s Manu al
3-23 CPT/Cadence Settings
The CPT has 2 sets of parameter tables. Please adjust the parameters based on local PSTN.
D-Link Systems, Inc. 40
Page 41

DVG-5112S User’s Manu al
3-24 Provision Settings
Options in this section are only required for VoIP networks in which a provisioning system has been
implemented. Fill in the parameters needed by the Provision Server from your service provider.
NOTE: The availability of the above features also depends on your VoIP network. Please check with
your service provider about the availability of these services.
D-Link Systems, Inc. 41
Page 42

DVG-5112S User’s Manu al
3-25 Caller Filter
This function is used to allow or deny SIP invitations from the proxy list ONLY.
Filter IP Address: Enter the start IP you would like to allow or deny.
Subnet mask: Enter the subnet mask y ou would like to allow or deny.
3-26 CDR Settings
The user can set up a CDR Server to record call details for every phone call. CDR provides call detail
recording in a text file and which can be imported to prepare an analysis report.
Send record to CDR Server: Enables call detail recording.
CDR Server IP: Enter the IP address of the CDR server.
Port: Enter the listen port of the CDR server.
Support RADIUS: Enable RADIUS for CDR database.
RADIUS Server Secrect: Enter the secret.
RADIUS User ID/Password: Enter the User ID and password.
D-Link Systems, Inc. 42
Page 43

DVG-5112S User’s Manu al
3-27 SNMP
Enable SNMP Agent: Enable SNMP if selected.
Get/Set/Trap Community: Enter Community name to Read, Write and Trap.
Trap Host: Enter the IP of the Trap Host.
3-28 Ping Test
Use “Ping” to verify if a remote peer is reachable. Enter a remote IP address and click “Test” to ping the
remote host.
3-29 STUN Inquiry
Use “STUN Inquiry” to detect your IP sharing device’s NAT type and communication betwe en a STUN
server and client (built-in to the DVG-5112S gateway).
D-Link Systems, Inc. 43
Page 44

DVG-5112S User’s Manu al
3-30 NTP (Network Time Protocol)
Time Zone: Set the Time Zone where the gateway resides.
Time Server #1~#3: Set the Time Server where the gateway should sync up during start up.
3-31 Language
The system provides English, Traditional Chinese, and Simplified Chinese for di splaying text on web p ages.
Changing the language setting also changes the language for IVR (Interactive Voice Response).
3-32 Login Account
NOTE: There are two operating levels when entering the Web UI. Logging-in as the Administrator
allows you to change all settings. A Web UI user only has access to some settings.
Administrator’s Name and Password: Enter the administrator name and password, which has the
highest level of control of the gateway.
Web UI Login ID and Web UI/IVR Password: Enter log-in ID and password when you log-in to the
Web interface/IVR of the gateway as a normal user.
D-Link Systems, Inc. 44
Page 45

DVG-5112S User’s Manu al
Port of Web Access from WAN: HTTP port for WAN. To change this setting, web configuration must
be accessed via the gateway’s LAN port. The gateway always uses port 80 for HTTP connection via
the LAN port.
W eb UI auto logout: If a user does not act within the effective time range when logging into the web
interface, the user will be disconnected from the web page to allow others to log-in.
NOTE: Due to network security concerns, Web Access for WAN port is disabled by default (port
number “0” in this option means disable web access). To enable it, simply enter a valid port numbe r in
this field.
3-33 Backup/Restore
You can backup settings to a file and restore settings from that file. You also can restore all settings back to
default by selecting Restore Default Configurations and click Restore.
NOTE: the gateway needs for you to Save Settings and Restart so that all settings will be backed up.
Configuration File: Backup all settings.
Configuration Template File: Backup the settings as a template file for editing.
Upload Configuration File: Upload the configuration file from somewh ere to the device.
Restore Default Configurations: Reset the device back to the factory default settings.
D-Link Systems, Inc. 45
Page 46

DVG-5112S User’s Manu al
3-34 System Operations
Some settings are effective only after Restart. Remember to save all settings using Save Settings before
you restart.
Save Settings: Save settings after completing changes. The new settings will take effect after the
system is restarted. Please select “Save Settings”.
Restart: If it is necessary to restart the system, please select “Restart” and click the “Accept” button.
3-35 Software Upgrade
The gateway provides a software upgrade function from a remote source. Please consult your service
provider for information about the following details.
Upgrade Server: Choose the server type given by your provider.
Software Upgrade Serv er IP: Enter the software server IP address.
Software Upgrade Server Port: Enter the port that the server uses. TFTP is 69, and FTP is 21.
User Name/ Password: The account information to access an FTP server.
Directory: The directory path of the upgrade files for TFTP or FTP.
D-Link Systems, Inc. 46
Page 47

DVG-5112S User’s Manu al
3-36 Logout
The gateway only allows one user at a time to log-in, so whenever a change is made, please save the
settings and restart the system, or logout to avoid a situation where other users cannot log-in to change
settings.
D-Link Systems, Inc. 47
Page 48

DVG-5112S User’s Manu al
4. Setting the DVG-5112S through IVR
VoIP transmits voice data (packets) via the Internet. One effect of this is that telecommunications quality is closely
related to the condition and status of the network environment. If any of the parties involved in VoIP
communications has insufficient bandwidth or freque nt packet loss, the telecommunication quality will be poor.
Therefore, excellent telecommunication can only happen when the gateway is connected to the Internet and
when the network environment is stable.
Preparation
Install the gateway according to instructions. Connect the power supply, telephone set, telephone cable,
and network cable properly as described in Chapter 2.
If a static IP is used, confirm the correct IP settings of the WAN Port (IP address, Subnet Mask, and Defa ult
gateway). Please contact your local Internet Service Provider (ISP) if you have any questions.
If you are a using ADSL (PPPoE) for your network connection, co nfirm the account number and password.
If you intend to operate the gateway under a NAT, the Gateway WA N Port IP Address and LAN Port should
not use the same range in order to avoid phone failures.
Basic Setup
The gateway provides two setup modes:
1. Telephone IVR Configuration Mode
2. Browser Configuration Mode
IVR configuration provides basic query and setup functions, while browser configuration provides full setup
functions.
4-1 IVR (Interactive Voice Response)
The gateway provides convenient IVR functions. Users only need to pick up a handset and enter the function
code for query and setup without using a PC.
NOTE: After finishing the setup, make sure the new settings are saved. This will enable the new
settings to take effect after the system is restarted.
Instructions
FXS Port: Connected to telephones. To access IVR mode, you should enter “* * password #”. Character to
number conversion information is provided in the PPPoE Character Conversion Table. After entering the
correct IVR password, you will hear an indication tone after which the system is in IVR setup mode. Enter
function codes to check or set the gateway configuration. (Please refer to page 43 for function codes).
Example: If your password is “1234”, enter “**1234#”
function code to check or configure the gateway. If your password is “admin”, enter “***4144534954#”
Please refer to the IVR Functions Table (page 43) for available functions and codes.
Once the first setting or query has been completed, you will hear a dial tone. Use the same procedure to
make a second query or setting. To exit IVR mode, simply hang up the phone.
Example: enter “**#”
system responds with an IP address you can continue with more settings or queries: enter 111
new IP address) enter 192*168*1*2
(you are now in IVR mode) enter 101 (to query about the current IP address) the
(new IP address).
so that you are now in IVR setup mode. Next enter a
.
(to set a
D-Link Systems, Inc. 48
Page 49

DVG-5112S User’s Manu al
Save Settings
After completing all of your settings, dial 509
(Save Settings). Wait for about three seconds, you should hear
a confirmation tone “1.” You can now hang up the phone. Please reboot the gateway to enable the new
settings.
To inquire about the current gateway WAN Port IP address setting
After completing all your settings, dial 101
. The system will repeat the current WAN Port IP address. If the
system does not repeat the IP address, this indicates that the gateway is not currently connected to the
Internet. Please check to be certain that the cable connection, account number, and password are all
correct.
IVR Functions Table:
Function
Code
111/101 WAN Port IP address Set/Quer y
1 12/102 WAN Port Subnet Mask Set/Query
1 13/103 WAN Port Default Gateway Set/Query
1 14/104 Current Network IP Access Set/Query (1: Static IP, 2: DHCP, 3: PPPoE)
1 15/105 DNS IP address Set/Query
1 16/106 Phone Book manager IP address Set/Query
1 17/107
199/099
066 Querying the connection to Phone Book manager
118 Restart
121 Setup PPPoE Account
122 Set PPPoE Password
123 Set NAT IP address
124 Uses NAT (0: Disable 1: Enable)
31 1/301 LAN Port IP Set/Query
Description Example / Notes
Set/Query whether or not to use a Public Telephone Book
(0: Disable 1: Enable)
Set/Query whether or not this gateway acts as the Phone Book
manager (0: Disable 1: Enable)
First, use function code 114 to select
1 for a Static IP connection then
setup the IP address.
Use function code 114 to select 3 for
a PPPoE connection.
312/302 LAN Port Subnet Mask Set/Query
A static IP address for WAN Port
109 Restore factory default IP address configuration
409 Restore factory default settings
509 Save settings
900
209 Software Upgrade
Set the IVR and the language used on the Web GUI
(1: English, 2: Traditional Chinese, 3: Simplified Chinese)
IP:192.168.1.2
Mask:255.255.255.0
Gateway:192.168.1.254
D-Link Systems, Inc. 49
Page 50

DVG-5112S User’s Manu al
4-2 IP Configuration Settings—Setting IP Configuration of
WAN Port
Static IP Settings
NOTE: Complete static IP settings should include a static IP (option 1 under 114), IP address (111),
Subnet Mask (112
you have any questions.
Function Command
), and Default Gateway (113). Please contact your Internet Service Provider (ISP) if
Select a Static IP
IP address Settings
Subnet Mask Settings
Default Gateway Settings
Save Settings and Restart
Dynamic IP (DHCP) Settings
After entering IVR mode, dial 114
After hearing “Enter value”, dial 2 (to select DHCP).
Saving settings –press 509
check whether or not the IP address was retained.
After entering IVR mode, dial 114.
After hearin g “Enter value”, dial 1 (to select static IP)
After entering IVR mode, dial 111. After hearing “Enter value”, enter your IP
address followed by “#”.
Example: If the IP address is 192.168.1.200, dial 192*168*1*200#.
After entering IVR mode, dial 112. After hearing “Enter value”, enter your
subnet mask followed by “#”.
Example: If the subnet mask value is 255.255.255.0, dial 255*255*255*0#.
After entering IVR mode, dial 113. After hearing “Enter value”, enter your
default gateway’s IP address followed by “#”.
Example: If the default gateway is 192.168.1.254, dial 192*168*1*254#.
To save settings, dial 509
settings. Please restart the system. Wait for about 40 seconds for the
system to restart, and then enter 101
address was retained. If the IP address is not repeated, this indicates that
the gateway is not properly connected. Please check to be certain that the
cable connection, account, and password are all correct.
.
(Save Settings). Please restart the system. After the system is restarted, press 101 to
(Save Settings). The system will save the current
to check whether or not the IP
NOTE: If the system does not repeat the IP address, this indicates that the gateway failed to
communicate with a DHCP server. Please check your DHCP server or ISP.
ADSL PPPoE Settings
NOTE: Complete PPPoE settings should include: Select PPPoE (option 3 of 114), PPPoE account
(121
) and PPPoE password (122).
Please contact your local Internet Service Provider (ISP) if you have any questions.
D-Link Systems, Inc. 50
Page 51

DVG-5112S User’s Manu al
Select a PPPoE
After entering IVR mode, dial 114
.
After hearing “Enter value,” dial 3 (to select PPPoE).
PPPoE Account Settings
After entering IVR mode, dial 121.
After hearing “Enter value”, enter the account number followed by”#”.
Example: If the account is “84943122@hinet.net,” please enter 08 0 4 0 9 0 4 0 3 0 1 0 2 0 2 7 1 4 8 4 9 5 4 4 5 6 0 7 2 5 4 4 5
60 #.
NOTE: it is necessary to enter two digits for each character/number; for example, you must enter
“01” for “1” and “11” for “A”. It is recommended that you use the web Interface to configure your
PPPoE account details. Refer to the PPPoE Character Conversion Table on the next page for key
mappings if you choose to use IVR setup.
PPPoE Password Setting
After entering IVR mode, dial 122,
After hearing “Enter value,” enter the new passwo rd followed by “#”.
Example: If the password is “3ttixike”, please enter “03 60 60 49 64 49 51 45#”.
Save Settings and Restart
To save settings, dial 509
Wait for about 40 seconds for the system to restart, then enter 101
(Save Settings). The system will save the settings. Please restart the system.
to check whether or not the IP address
was retained. If the IP address is not repeated, this indicates that the gateway is not properly connected.
Please check to be certain that the cable connection, account, and password are all correct.
.
D-Link Systems, Inc. 51
Page 52

DVG-5112S User’s Manu al
PPPoE Character Conversion Table:
The table below provides a list of PPPoE conversion codes. The first column in each pair of columns lists
the number, letter or symbol that you want to enter. The second column in each pair (“Input Key”) tells you
what code to enter for the corresponding number, letter or symbol. For example, to enter “D-Link” using the
codes below, enter: 148322495451
Numbers Input Key Upper Case
Letters
0 00 A 11 a 41 @ 71
1 01 B 12 b 42 • 72
2 02 C 13 c 43 ! 73
3 03 D 14 d 44 " 74
4 04 E 15 e 45 $ 75
5 05 F 16 f 46 % 76
6 06 G 17 g 47 & 77
7 07 H 18 h 48 ' 78
8 08 I 19 i 49 ( 79
9 09 J 20 j 50 ) 80
K 21 k 51 + 81
L 22 l 52 , 82
M 23 m 53 - 83
N 24 n 54 / 84
O 25 o 55 : 85
P 26 p 56 ; 86
Q 27 q 57 < 87
R 28 r 58 = 88
S 29 s 59 > 89
T 30 t 60 ? 90
U 31 u 61 [ 91
V 32 v 62 \ 92
W 33 w 63 ] 93
X 34 x 64 ^ 94
Y 35 y 65 _ 95
Z 36 z 66 { 96
| 97
} 98
Input Key Lower Case
Letters
Input Key Symbols Input Key
D-Link Systems, Inc. 52
Page 53

DVG-5112S User’s Manu al
Appendix
Product Features List
WAN
• One 10/100Mbps auto-negotiation, auto-MDI/MDIX RJ-45 Ethernet port
• Support static IP, PPPoE, BigPond Cable and DHCP address assignment and dynami c DNS
(DDNS)
• QoS: IP TOS (Type of Services) and DiffServ (Differentiated Services) for both SIP
signaling and RTP
• NAT Traversal : Port Forwarding, STUN, UPnP and Outbound Proxy
• NTP: (Network Time Protocol RFC 1305), Accepts up to 3 Time Server
• Time Zone Support
• MAC Address Clone
• RTP Packet Summary : packet sent, packet received, packet loss for voice quality
analysis
LAN
• One 10/100Mbps auto-negotiation, auto-MDI/MDIX RJ 45 Ethernet ports
• DHCP server
Advance Firewall
• NAT (Network Address Translation) and PAT (Port Address Translation)
• DMZ, Virtual Server
• Traffic Filtering based on MAC address, IP addre ss, TCP/UDP Port number and URL string
pattern
Voice Features
• 2 FXS (Foreign eXchange Station) ports
• SIP (RFC3261) compatible
• Voice codecs : G.711 a/ulaw, G.726, G.729A, G.723.1
• CNG (Comfort Noise Generation)
• VAD (Voice Activity Detection)
• G.165/G.168 echo cancellation
• Adjustable Jitter Buffer and programmable Gain Control
• In-Band DTMF, Out-Of-Band DTMF relay (RFC2833, SIP INFO)
• Multiple SIP Proxy server entries with failover mechanism
• Polarity reversal generation (FXS)
• T.30 (G.III) / Real time T.38 / Secured T.38 FAX relay
• DTMF, FSK (Bellcore and E TSI) Caller ID detection and generation.
• Support for Caller ID Restriction (CLIR)
• Digit Map for dial plan
• Local phone book for peer-to-peer calling
• E.164 Numbering and ENUM support
• Hot-Line, Warm-Line support
• Call features:
o Call Hold, Call Waiting, Call Pickup
o Call Forward - Unconditional, Busy, No Answer
o Call Transfer - Unattended, Attended
o Three Way Calling (Media Server required)
D-Link Systems, Inc. 53
Page 54

DVG-5112S User’s Manu al
• Analogue interface
o Connector : RJ-11
o Signaling protocol : Loop Start
Configuration and Maintenance
• Configuration methods:
o Web
o IVR
o Telnet
• Status reports:
o Port status
o Registration status
o Ping tests
o STUN/UPnP status
o Hardware / software information
• Firmware Upgrade through TF TP, FTP and HTTP
• Configuration Backup/Restore
• Reset button (with restore factory default function)
• Front Panel LED: voice ports, VoIP, Power / Alarm
• Optional Auto Provisioning Server (APS) for mass deployment
D-Link Systems, Inc. 54
Page 55

Safety Instructions
Please adhere to the following safety guidelines to help ensure your own personal safety and protect your
system from potential damage. Any acts taken that are inconsistent with ordinary use of the product, including
improper testing, etc., and those not expressly approved by D-Link may result in the loss of product warranty.
Unless expressly approved by an authorized representative of D-Link in writing, you may not and may not
permit others to:
• Disassemble or reverse engineer the device or attempt to derive source code (underlying ideas,
algorithms, or structure) from the device or from any other information provided by
D-Link, except to the extent that this restriction is expressly prohibited by local law.
• Modify or alter the device.
• Remove from the device any product identification or other notices, including copyright notices and
patent markings, if any.
To reduce the risk of bodily injury, electrical shock, fire, and damage to the device and other equipment,
observe the following precautions:
Power Sources
• Observe and follow service markings.
• Do not push any objects into the openings of your device unless consistent with the authorized
operation of the device. Doing so can cause a fire or an electrical shock by shorting out interior
components.
• The powering of this device must adhere to the power specifications indicated for this product.
• Do not overload wall outlets and/or extension cords as this will increase the risk of fire or electrical
shock.
• Do not rest anything on the power cord or on the device (unless the device is made and expressly
approved as suitable for stacking).
• Position system cables and power cables carefully; route cables so that they cannot be stepped on
or tripped over. Be sure that nothing rests on any cables.
• Operate the device only from the type of external power source indicated on the electrical ratings
label.
• To help avoid damaging your device, be sure the voltage selection switch (if provided) on the power
supply is set to match the power available at your location.
• Also be sure that attached devices are electrically rated to operate with the power available in your
location.
• Use only approved power cable(s). If you have not been provided a power cable for your device or
for any AC-powered option intended for your device, purchase a power cable that is approved for
use in your country and is suitable for use with your device. The power cable must be rated for the
device and for the voltage and current marked on the device’s electrical ratings label. The voltage
and current rating of the cable should be greater than the ratings marked on the device.
• To help prevent an electrical shock, plug the device and peripheral power cables into properly
grounded electrical outlets. These cables are equipped with three-prong plugs to help ensure proper
grounding. Do not use adapter plugs or remove the grounding prong from a cable. If you must use
an extension cable, use a 3-wire cable with properly grounded plugs.
• Observe extension cable and power strip ratings. Ensure that the total ampere rating of all products
plugged into the extension cable or power strip does not exceed 80 percent of the ampere ratings
limit for the extension cable or power strip.
• To help protect your device from sudden, transient increases and decreases in electrical power, use
a surge suppressor, line conditioner, or uninterruptible power supply (UPS).
• Do not modify power cables or plugs. Consult a licensed electrician or your power company for site
modifications. Always follow your local/national wirin g rules.
Page 56

• When connecting or disconnecting power to hot-pluggable power supplies, if offered with your
device, observe the following guidelines:
• Install the power supply before connecting the power cable to the power supply.
• Unplug the power cable before removing the power supply.
• If the system has multiple sources of power, disconnect power from the device
by unplugging all power cables from the power supplies.
Servicing/Disassembling
• Do not service any product except as expressly set forth in your system documentation.
• Opening or removing covers that are marked with the triangular symbol with a lightning bolt may
expose you to an electrical shock. Only a trained service technician should service components
inside these compartments.
• To reduce the risk of electrical shock, never disassemble this device. None of its internal parts are
user-replaceable; therefore, there is no reason to access the interior.
• Do not spill food or liquids on your system components, and never operate the device in a wet
environment. If the device gets wet, see the appropriate section in your troubleshooting guide or
contact your trained service provider.
• Use the device only with approved equipment.
• Move products with care; ensure that all casters and/or stabilizers are firmly connected to the
system. Avoid sudden stops and uneven surfaces.
Environment
• Do not use this device near water (e.g. near a bathtub, sink, laundry tub, fish tank, in a wet
basement or near a swimming pool).
• Do not use this device in areas with high humidity.
• This device must not be subjected to water or condensation.
• Keep your device away from radiators and heat sources. Also, do not block cooling vents.
Cleaning
• Always unplug the power before cleaning this device.
• Do not use liquid or aerosol cleaners of any kind. Use only compressed air that is recommended for
electronic devices.
• Use a dry cloth for cleaning.
Protecting Against Electrostatic Discharge
Static electricity can harm delicate components inside your system. To prevent static damage, discharge
static electricity from your body before you touch any of the electronic components, such as the
microprocessor. You can do so by periodically touching an unpainted metal surface on the chassis.
You can also take the following steps to help prevent damage from electrostatic discharge (ESD):
1. When unpacking a static-sensitive component from its shipping carton, do not remove the
component from the antistatic packing material until you are ready to install the
component in your system. Just before unwrapping the antistatic packaging, be sure to
discharge static electricity from your body.
2. When transporting a sensitive component, first place it in an antistatic container or
packaging.
3. Handle all sensitive components in a static-safe area. If possible, use antistatic floor pads,
workbench pads, and an antistatic grounding strap.
Page 57

LIMITED WARRANTY
D-Link provides this limited warranty for its product only to the person or entity who originally purchased the product from
D-Link or its authorized reseller or distributor. D-Link would fulfill the warranty obligation according to the local wa rranty
policy in which you purchased our products.
Limited Hardware Warranty: D-Link warrants that the hardware portion of the D-Link products described below (“Hardware”)
will be free from material defects in workmanship and materials from the date of original retail purchase of the Hardware, for
the period set forth below applicable to the product type (“Warranty Period”) if the Hardware is used and serviced in
accordance with applicable documentation; provided that a completed Registration Card is returned to an Authorized D-Link
Service Office within ninety (90) days after the date of original retail purchase of the Hardware. If a completed Registration
Card is not received by an authorized D-Link Service Office within such ninety (90) period, then the Warranty Period shall be
ninety (90) days from the date of purchase.
Product Type Warranty Period
Product (including Power Supplies and Fans) One (1) Year
Spare parts and pare kits Ninety (90) days
D-Link’s sole obligation shall be to repair or replace the defective Hardware at no charge to the original owner. Such repair or
replacement will be rendered by D-Link at an Authorized D-Link Service Office. The replacement Hardware need not be new
or of an identical make, model or part; D-Link may in its discretion may replace the defective Hardware (or an y part thereof)
with any reconditioned product that D-Link reasonably determines is substantially equivalent (or superior) in all material
respects to the defective Hardware. The Warranty Period shall extend for an additional ninety (90) days after any repaired or
replaced Hardware is delivered. If a material defect is incapable of correction, or if D-Link determines in its sole discretion that
it is not practical to repair or replace the defective Hardware, the price paid by the original purchaser for the defective
Hardware will be refunded by D-Link upon return to D-Link of the defective Hardware. All Hardware (or part thereof) that is
replaced by D-Link, or for which the purchase price is refunded, shall become the property of D-Link upon replacement or
refund.
Limited Software Warranty: D-Link warrants that the software portion of the product (“Software”) will substantially conform
to D-Link’s then current functional specificat ions for the Software, as set forth in the applicable documentation, from the date
of original delivery of the Software for a period of ninety (90) days (“Warranty Period”), if the Software is properly installed
on approved hardware and operated a s contemplated in its documentation. D-Link furthe r warrants that, during the Warranty
Period, the magnetic media on which D-Link delivers the Software will be free of physical defects. D-Link’s sole obligation
shall be to replace the non-conforming Software (or defective media) with software that substantially conforms to D-Link’s
functional specifications for the Software. Except as otherwise agreed by D-Link in writing, the replacement Software is
provided only to the original licensee, and is subject to the terms and conditions of the license granted by D-Link for the
Software. The Warranty Period shall extend for an additional ninety (90) days after any replacement Software is delivered. If a
material non-conformance is incapable of correction, or if D-Link determines in its sole discretion that it is not practical to
replace the non-conforming Software, the price paid by the original licensee for the non-conforming Software will be refunded
by D-Link; provided that the non-conforming Software (and all copies thereof) is first returned to D-Link. The license granted
respecting any Software for which a refund is given automatically ter minates.
What You Must Do For Warranty Service:
Registration Card.
D-Link Service Office for each D-Link produc t within ninety (90) days after the product is purcha sed and/or licensed. The
addresses/telephone/fax list of the nearest Authorized D-Link Service Office is provided in the back of this manual. FAILURE
TO PROPERLY COMPLETE AND TIMELY RETURN THE REGISTRATION CARD MAY AFFECT THE WARRANTY
FOR THIS PRODUCT.
Submitting A Claim.
Period to an Authorized D-Link Service Office. The claim must include a written description of the Hardware defect or
Software nonconformance in suffic ient detail to allow D-Link to confirm the same. The original product owner must obtain a
Return Material Authorization (RMA) number from the Authorized D-Link Service Office and, if requested, provide written
proof of purchase of the product (such as a copy of the dated purchase invoice for the product) before the warranty service is
provided. After an RMA number is i ssued, the defective product must be packaged securely in the original or other suitab le
shipping package to ensure that it will not be damaged in transit, and the RMA number must be prominently marked on the
outside of the package. The packaged product shall be insured and shipped to Authorized D-Link Service Office with all
shipping costs prepaid. D-Link may reject or return any prod uct that is not packaged and shipped in strict compliance with the
foregoing requirements, or for which an RMA number is not visible from the outside of the package. The product owner agrees
to pay D-Link’s reasonable handling and return shipping charges for any product that is not packaged and shipped in
accordance with the foregoing requirements, or that is determined by D-Link not to be defective or non-conforming.
The Registration Card provide d at the back of this manual must be completed and returned to an Authorized
Any claim under this limited warranty must be submitted in writing before the end of the Warranty
Page 58

What Is Not Covered:
This limited warranty provided by D-Link does not cover:
Products that have been subjected to abuse, accident, alteration, modification, tampering , negligence, misuse, faulty installation,
lack of reasonable care, repair or service in any way that is not contemplated in the documentation for the product, or if the
model or serial number has been altered, tampered with, defaced or removed; Initial installation, installation and removal of the
product for repair, and shipping costs; Operational adjustments covered in the operating manual for the product, and normal
maintenance; Damage that occurs in shipment, due to act of God, failures due to power surge, and cosmetic damage; and Any
hardware, software, firmware or other products or services provided by anyone other than D-Link.
Disclaimer of Other Warranties: EXCEPT FOR THE LIMITED WARRANTY SPECIFIED HEREIN, THE PRODUCT IS
PROVIDED “AS-IS” WITHOUT ANY WARRANTY OF ANY KIND INCLUDING, WITHOUT LIMITATION, ANY
WARRANTY OF MERCHANTABILITY, FITNESS FOR A PARTICULAR PURPOSE AND NON-INFRINGEMENT. IF
ANY IMPLIED WARRANTY CANNOT BE DISCLAIMED IN ANY TERRITORY WHERE A PRODUCT IS SOLD, THE
DURATION OF SUCH IMPLIED WARRANTY SHALL BE LIMITED TO NINETY (90) DAYS. EXCEPT AS
EXPRESSLY COVERED UNDER THE LIMITED WARRANTY PROVIDED HEREIN, THE ENTIRE RISK AS TO THE
QUALITY, SELECTION AND PERFORMANCE OF THE PRODUCT IS WITH THE PURCHASER OF THE PRODUCT.
Limitation of Liability: TO THE MAXIMUM EXTENT PERMITTED BY LAW, D-LINK IS NOT LIABLE UNDER ANY
CONTRACT, NEGLIGENCE, STRICT LIABILITY OR OTHER LEGAL OR EQUITABLE THEORY FOR ANY LOSS OF
USE OF THE PRODUCT, INCONVENIENCE OR DAMAGES OF ANY CHARACTER, WHETHER DIRECT, SPECIAL,
INCIDENTAL OR CONSEQUENTIAL (INCLUDING, BUT NOT LIMITED TO, DAMAGES FOR LOSS OF GOODWILL,
WORK STOPPAGE, COMPUTER FAILURE OR MALFUNCTION, LOSS OF INFORMATION OR DATA CONTAINED
IN, STORED ON, OR INTEGRATED WITH ANY PRODUCT RETURNED TO D-LINK FOR WARRANTY SERVICE)
RESULTING FROM THE USE OF THE PRODUCT, RELATING TO WARRANTY SERVICE, OR ARISING OUT OF
ANY BREACH OF THIS LIMITED WARRANTY, EVEN IF D-LINK HAS BEEN ADVISED OF THE POSSIBILITY OF
SUCH DAMAGES. THE SOLE REMEDY FOR A BREACH OF THE FOREGOING LIMITED WARRANTY IS REPAIR,
REPLACEMENT OR REFUND OF THE DEFECTIVE OR NON-CONFORMING PRODUCT.
GOVERNING LAW: This Limited Warranty shall be governed by the la ws of the state of California.
Some states do not allow exclusion or limitation of incidental or consequential damages, or limitations on how long an implied
warranty lasts, so the foregoing limitations and exclusions may not apply. This limited warranty provides specific legal rights
and the product owner may also have other rights which vary from state to state.
Trademarks
Copyright .2002 D-Link Corporation. Contents subject to change without prior notice. D-Link is a registered trademark of
D-Link Corporation/D-Link Systems, Inc. All other trademarks belong to their respective proprietors.
Copyright Statement
No part of this publication may be reproduced in any form or by any means or used to make any derivative such as translatio n,
transformation, or adaptation without permission from D-Link Corporation/D-Link Systems Inc., as stipulated by the United
States Copyright Act of 1976.
FCC Warning
This equipment has been tested and found to comply with the limits for a Class B digital device, pursuant to part 15 of the FCC
Rules. These limits are designed to provide reasonable protection against harmful interference in a residential in stallation. This
equipment generates, uses and can radiate radio frequency energy and, if not installed and used in accordance with the
instructions, may cause harmful interference to radio communications. However, there is no guarantee that interference will
not occur in a particular installa tion. If this equipment does cause harmful interference to radio or television reception, which
can be determined by turning the equipment off and on, the user is encouraged to try to correct the interference by one or more
of the following measures:
-Reorient or relocate the receiving antenna.
-Increase the separation between the equipment and receiver.
-Connect the equipment into an outlet on a circuit different from that to which the receiver is connected.
-Consult the dealer or an experienced radio/ TV technician for help.
FCC Radiation Exposure Statement
This equipment complies with FCC radiation exposure limits set forth for an uncontrolled environment. This equipment should
be installed and operated with minimum 20cm between the radiator and your body.
Page 59

International Offices
U.S.A
17595 Mt. Herrmann Street
Fountain Valley, CA 92708
TEL: 1-800-326-1688
URL: www.dlink.com
Canada
2180 Winston Park Drive
Oakville, Ontario, L6H 5W1
Canada
TEL: 1-905-8295033
FAX: 1-905-8295223
URL: www.dlink.ca
Europe (U. K.)
th
Floor, Merit House
4
Edgware Road, Colindale
London NW9 5AB
U.K.
TEL: +44-20-8955-9000
FAX: +44-20-8955-9001
URL: www.dlink.co.uk
Germany
Schwalbacher Strasse 74
D-65760 Eschborn
Germany
TEL: 49-6196-77990
FAX: 49-6196-7799300
URL: www.dlink.de
France
41 boulevard Vauban
78280 Guyancourt
France
TEL: 33-1-30238688
FAX: 33-1-30238689
URL: www.dlink.fr
Netherlands
Weena 290
3012 NJ, Rotterdam
Netherlands
Tel: +31-10-282-1445
Fax: +31-10-282-1331
URL: www.dlink.nl
Belgium
Rue des Colonies 11
B-1000 Brussels
Belgium
Tel: +32(0)2 517 7111
Fax: +32(0)2 517 6500
URL: www.dlink.be
Italy
Via Nino Bonnet n. 6/b
20154 – Milano
Italy
TEL: 39-02-2900-0676
FAX: 39-02-2900-1723
URL: www.dlink.it
Sweden
P.O. Box 15036, S-167 15 Bromma
Sweden
TEL: 46-(0)8564-61900
FAX: 46-(0)8564-61901
URL: www.dlink.se
Denmark
Naverland 2, DK-2600
Glostrup, Copenhagen
Denmark
TEL: 45-43-969040
FAX: 45-43-424347
URL: www.dlink.dk
Norway
Karihaugveien 89
N-1086 Oslo
Norway
TEL: +47 99 300 100
FAX: +47 22 30 95 80
URL: www.dlink.no
Finland
Latokartanontie 7A
FIN-00700 HELSINKI
Finland
TEL: +358-10 309 8840
FAX: +358-10 309 8841
URL: www.dlink.fi
Spain
Avenida Diagonal, 593-95, 9th floor
08014 Barcelona
Spain
TEL: 34 93 4090770
FAX: 34 93 4910795
URL: www.dlink.es
Portugal
Rua Fernando Pahla
50 Edificio Simol
1900 Lisbon Portugal
TEL: +351 21 8688493
URL: www.dlink.es
Czech Republic
Vaclavske namesti 36, Praha 1
Czech Republic
TEL :+420 (603) 276 589
URL: www.dlink.cz
Switzerland
Glatt Tower, 2.OG C H-8301
Glattzentrum Postfach 2.OG
Switzerland
TEL : +41 (0) 1 832 11 00
FAX: +41 (0) 1 832 11 01
URL: www.dlink. ch
Greece
101, Panagoulis Str. 163-43
Helioupolis Athens, Greece
TEL : +30 210 9914 512
FAX: +30 210 9916902
URL: www.dlink. gr
Luxemburg
Rue des Colonies 11,
B-1000 Brussels,
Belgium
TEL: +32 (0)2 517 7111
FAX: +32 (0)2 517 6500
URL: www.dlink. be
Poland
Budynek Aurum ul. Walic-w 11
PL-00-851
Warszawa
Poland
TEL : +48 (0) 22 583 92 75
FAX: +48 (0) 22 583 92 76
URL: www.dlink. pl
Hungary
R-k-czi-t 70-72
HU-1074
Budapest
Hungary
TEL : +36 (0) 1 461 30 00
FAX: +36 (0) 1 461 30 09
URL: www.dlink. hu
Singapore
1 International Business Park
#03-12 The Synergy
Singapore 609917
TEL: 65-6774-6233
FAX: 65-6774-6322
URL: www.dlink-intl. com
Australia
1 Giffnock Avenu e
North Ryde, NSW 2113
Australia
TEL: 61-2-8899-1800
FAX: 61-2-8899-1868
URL: www.dlink.com.a u
India
D-Link House, Kurla Bandra Complex Road
Off CST Road, Santacruz (East)
Mumbai - 400098
India
TEL: 91-022-26526696/56902210
FAX: 91-022-26528914
URL: www.dlink.co.in
Middle East (Dubai)
P.O.Box: 50037 6
Office: 103, Building:3
Dubai Internet City
Dubai, United Arab Emirates
Tel: +971-4-3916480
Fax: +971-4-39 08881
URL: www.dlink-me.c om
Turkey
Cetin Emec Bulvari, 74.sokak, ABC Plaza No:9/3
Ovecler/Ankara- TURKEY
TEL: 0090 312 473 40 55
FAX: 0090 312 473 40 58
URL: www.dlink.com.tr
Egypt
47,El Merghany street,Heliopolis
Cairo-Egypt
+202-2919035, +202-2919047
TEL:
+202-2919051
FAX:
URL: www.dlink-me.com
Israel
11 Hamanofim Street
Ackerstein Towers, Regus Business Center
P.O.B 2148, Hertzelia-Pituach 46120
Israel
TEL: +972-9-9715700
FAX: +972-9-9715601
URL: www.dlink.co.il
LatinAmerica
Isidora Goyeec hea 2934
Ofcina 702
Las Condes
Santiago – Chile
TEL: 56-2-232-3185
FAX: 56-2-232-0923
URL: www.dlink.cl
Brazil
Av das Nacoes Un idas
11857 – 14- andar - cj 141/142
Brooklin Novo
Sao Paulo - SP - Brazil
CEP 04578-000 (Zip Code)
TEL: (55 11) 21859300
FAX: (55 11) 21859322
URL: www.dlinkbrasil.com.br
South Africa
Einstein Park II
Block B
102-106 Witch-Hazel Avenue
Highveld Technopark
Centurion
Gauteng
Republic of South Africa
TEL: 27-12-665-2165
FAX: 27-12-665-2186
URL: www.d-link.co.za
Russia
Grafsky per., 14, floor 6
Moscow
129626 Russia
TEL: 7-495-744-0099
FAX: 7-495-744-0099 #350
URL: www.dlink.ru
China
No.202,C1 Building, Huitong Office Park,
No. 71, Jianguo Road, Chaoyang District, Beijing
100025, China.
TEL +86-10-58635800
FAX: +86-10-58635799
URL: www.dlink.com.cn
Taiwan
No. 289 , Sinhu 3rd Rd., Neihu District ,
Taipei City 114 ,Taiwan
TEL: 886-2-6600-0123
FAX: 886-2-6600-1188
URL: www.dlinktw.com.tw
Page 60

Notes
Page 61

Registration Card
All Countries and Regions Excluding USA
Print, type or use block letters.
Your name: Mr./Ms_____________________________________________________________________________
Organization: ________________________________________________ Dept. ____________________________
Your title at organization: ________________________________________________________________________
Telephone: _______________________________________ Fax:________________________________________
Organization's full address: ______________________________________________________________________
____________________________________________________________________________________________
Country: _____________________________________________________________________________________
Date of purchase (Month/Day/Year): _______________________________________________________________
Product Model Product Serial No. * Product installed in type of
Product was purchased from:
Reseller's name: ______________________________________________________________________________
Telephone: _______________________________________
Answers to the following questions help us to support your product:
1. Where and how will the product primarily be used?
Home Office Travel Company Business Home Business Personal Use
2. How many employees work at installation site?
1 employee 2-9 10-49 50-99 100-499 500-999 1000 or more
3. What network protocol(s) does your organization use ?
XNS/IPX TCP/IP DECnet Others_____________________________
4. What network operating system(s) does your organization use ?
D-Link LANsmart Novell NetWare NetWare Lite SCO Unix/Xenix PC NFS 3Com 3+Open Cisco Network
Banyan Vines DECnet Pathwork Windows NT Windows 98 Windows 2000/ME Windows XP
Others__________________________________________
5. What network management program does your organization use ?
D-View HP OpenView/Windows HP OpenView/Unix SunNet Manager Novell NMS
NetView 6000 Others________________________________________
6. What network medium/media does your organization use ?
Fiber-optics Thick coax Ethernet Thin coax Ethernet 10BASE-T UTP/STP
100BASE-TX 1000BASE-T Wireless 802.11b and 802.11g wireless 802.11a Others_________________
7. What applications are used on your network?
Desktop publishing Spreadsheet Word processing CAD/CAM
Database management Accounting Others_____________________
8. What category best describes your company?
Aerospace Engineering Education Finance Hospital Legal Insurance/Real Estate Manufacturing
Retail/Chain store/Wholesale Government Transportation/Utilities/Communication VAR
System house/company Other________________________________
9. Would you recommend your D-Link product to a friend?
Yes No Don't know yet
10.Your comments on this product?
__________________________________________________________________________________________
__________________________________________________________________________________________
computer
* Product installed in
computer serial No.
(* Applies to adapters only)
Page 62

DI Wired ClassB War ranty Guide_v11
 Loading...