

Page 1

DSL 504/CZ DSL 504/CZ
ADSL RouterADSL Router
Quick Install GuideQuick Install Guide
Page 2

DSL-504/CZ
Quick Install GuideQuick Install Guide
for Windows 98/SE/ME/2000
ADSL Router
This guide is for installation only. For more detailed information regarding the product and its
features, please refer to the user manual located on the included CD-ROM.
Before you begin:
1. Make sure that an Ethernet NIC is installed and functioning in your PC.
2. If you have had a service technician install your DSL line, please skip to
(Follow all installation instructions provided by the manufacturer.)
Step 4: “Connecting the DSL-504/CZ.” If you are installing DSL yourself,
please follow all instructions.
Install a “Z-Blocker” phone filter at Install a “Z-Blocker” phone filter at EACHEACH
telephone wall jack in your home.telephone wall jack in your home.11
Q: Why do I need these filters?
A: DSL service shares the line with your regular telephone service. In-line
filters prevent these services from interfering with each other, improving both
the telephone audio and DSL data rate.
l Disconnect the existing cord from the wall jack.
l Plug the LINE end of the filter into the wall jack.
l Plug the device into the PHONE jack on the filter.
l Use only one filter for all devices sharing the jack.
Page 3

Sharing your phone jack with theSharing your phone jack with the
modem and another device.modem and another device.22
If you would like to share your phone jack with the modem and your phone,
then use a standard 2-line adapter.
lInstall the 2-line adapter into the wall jack.
lPlug the RJ-11 cable into one adapter jack.
lPlug the LINE end of a “Z-Blocker” filter into the other adapter jack.
lPlug your telephone devices into the PHONE jack on the “Z-Blocker” filter.
DSL-504/CZ
Page 4
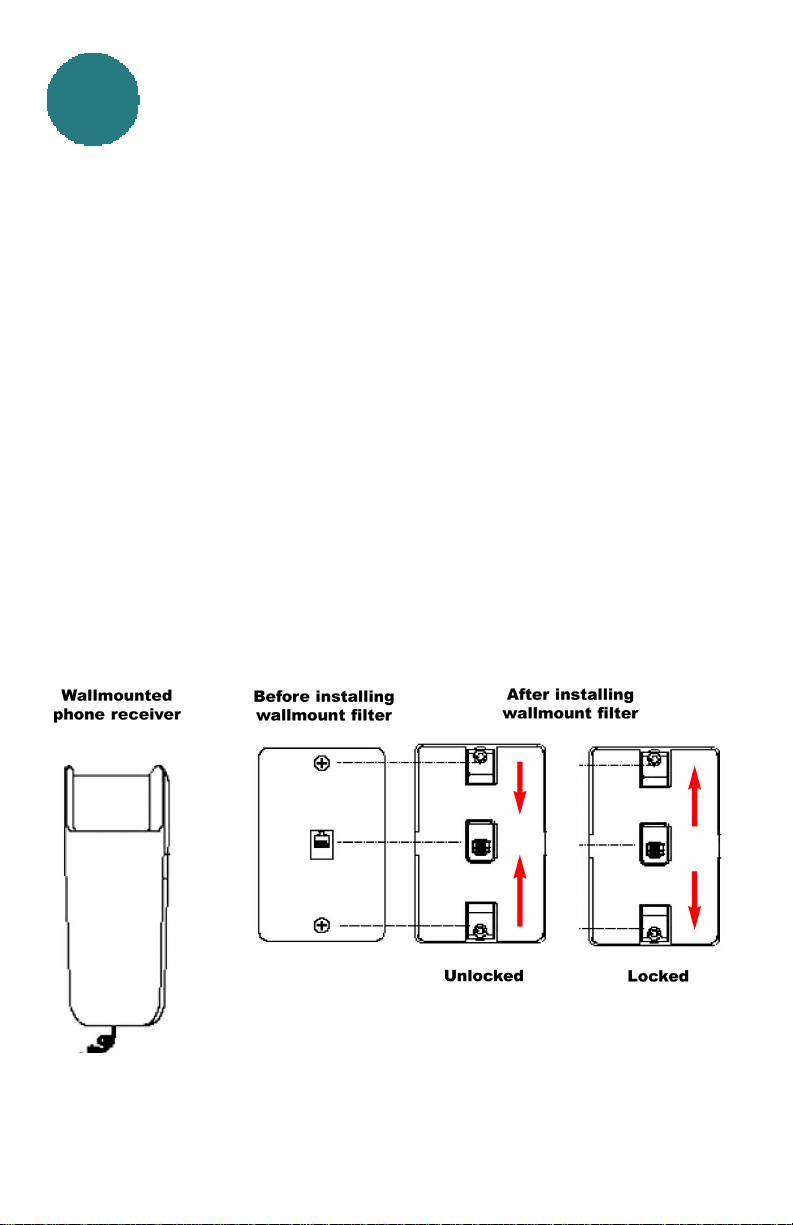
Installing the “Z-Blocker” filter on aInstalling the “Z-Blocker” filter on a
wall-mounted telephone, using thewall-mounted telephone, using the
33
lRemove the phone. On some phones you must pull out a locking lever
before removing the phone. Then push up on the phone and pull it out from
the wall.
lSlide the filter locking tabs (located at the top and bottom on the front of the
filter) to the UNLOCKED position.
lPlace the filter over the existing wall outlet, aligning the plug and mounting
slots with the socket and mounting tabs on the existing outlet, then push into
place.
lMove the locking tabs to the LOCKED position as indicated in the drawing.
lMount the phone. If your phone has a locking lever, be sure it is unlocked
before you mount it. Position the phone’s plug and mounting slots over the
filter jack and metal mounting pegs. Press the phone in and pull down until
secure.
lIf desired, install your ADSL or Home Phoneline Network (HPN) device
cord into the jack on the left side of the adapter. An answering machine may
also be attached to the jack on the right side of the filter.
wall-mount filterwall-mount filter
Page 5

Filter Installation TipsFilter Installation Tips
l DO NOT install a filter on your DSL modem or on any
broadband devices.
l Check the orientation of each filter
1. PHONE jack towards the telephone device.
2. LINE connection towards the wall jack.
l Try to limit the number of filters in your home to the fewest practical.
Do this by
1. Using one filter to isolate several devices.
2. Not installing filters on unused phone jacks.
l Do not use more than one filter for each telephone device or
group of devices.
l Plug the filter directly into the wall jack using only the attached short
cord. If this cannot be done, then use a twisted-pair cable like the data
cable for the modem (i.e., NOT a flat phone cord) to connect the filter to
the wall jack.
Page 6

44
To setup the DSL-504/CZ, begin by connecting it to a power source.
Once the unit power is on, connect one end of the included Ethernet cable to
the DSL-504/CZ’s ethernet port and connect the other end of the cable into
the NIC which is installed in your computer.
Connecting the DSL-504/CZConnecting the DSL-504/CZ
If the cable connection is good, a green LED on the front of the DSL-504/CZ
labeled Ethernet/Link will glow steadily.
Page 7

Connecting the DSL-504/CZ Connecting the DSL-504/CZ continuedcontinued
44
Now connect the phoneline cable from the DSL-504/CZ to your phone jack.
When you have completed all the connections, your DSL-504/CZ will
look like this:
Power Cord
(Plug the other end of the
power cord into the power
outlet.)
(Plug the other end of the
Ethernet cable into the
Ethernet port on the NIC,
which is installed in your
Phone line cable
(Plug the other end of the
phone line cable into the
phone jack.)
Ethernet Cable
computer.)
Page 8

55
Setting up the ComputerSetting up the Computer
Right-Click the Network
Neighborhood (Win 98/98SE) or My
Network Places (Win ME/2000) icon
on your desktop.
Click Properties
Highlight the line that reads TCP/IP and
points to your installed Ethernet NIC.
Click Properties
At this screen, select the IP Address tab.
Select Obtain an IP Address
Automatically.
Click OK
Page 9

55
You will be prompted to
reboot in Win 98/98SE or
ME.
For Windows 2000,
Restart your computer
manually.
Click Yes
When your computer restarts, you will automatically receive an IP address
from the DSL-504/CZ.
66
The DSL-504/CZ requires
Internet Explorer 4.0 or higher, or
Netscape Communicator 4.0 or
higher.
Please open your Web Browser
and enter this URL:
http://192.168.0.1 This will
launch the DSL-504/CZ’s inte grated web-based management
system.
Click on Login to the web-based management module.
Setting up the Computer Setting up the Computer continuedcontinued
Accessing the DSL-504/CZ’s Web BasedAccessing the DSL-504/CZ’s Web Based
ManagementManagement
This Enter Network Password
screen will appear.
The default User Name is admin
and the default Password is also
admin.
Click OK
Page 10

77
Configuring the DSL-504/CZConfiguring the DSL-504/CZ
Click PPPoA Configuration
on WAN in the left column.
Enter the Login User Name
and Password, provided to you
by your Internet Service
Provider (ISP.)
Authentication is set to detect
automatically. If your current
selection does not work, select
“pap.”
Please be certain that
“enabled” is displayed in the
“Connect On Demand” field.
Click OK
Note: VPI: “0” and VCI: “35” settings are most common among DSL
providers. This will not work for others who have different VPI and
VCI settings. Please contact your service provider for the correct VPI
and VCI settings.
Make sure PVC settings
are entered correctly:
VPI: “0”
VCI: “35”
Click OK
Page 11

Configuring the DSL-504/CZ Configuring the DSL-504/CZ continuedcontinued
77
Click on Save
Changes in the left
column of the
screen.
Click on Save
Configuration
Click on Restart
Note: Do not manually restart the modem. It will automatically restart by
itself. Once you are finished with your installation, you should be able to
access the Internet.
You have completed the installation of the DSL-504/CZ.
Page 12

TroubleshootingTroubleshooting
When dealing with networking equipment, the most common source of
problems are the network cables themselves. This can be easily checked.
Verify that the "Link" LEDs under both the ADSL and Ethernet headings
on the front of your DSL-504/CZ are glowing a steady green. If they are
not lit, try using a different cable. You may also need to use a different
kind of cable.
Included with this modem is an Ethernet cross over cable and a straight
through phone line.
If you are connecting the DSL-504/CZ to an Ethernet switch or hub you
will need to purchase an Ethernet straight through cable to make the con nection. For the phoneline, use a crossover box that will convert your
cable. This way if your DSL signal is coming from a different set of
phone wires in your wall this module will check the second set of wires.
If you still can't get a steady ADSL link light call your Internet Service
Provider or Phone Company for instructions as you may have an in the
wall wiring problem.
Most other problems result from improper TCP/IP settings. Run through
the previous instructions again to verify that your product
was set up correctly.
*If you do not connect within five minutes, you may need to connect manually. Go back to Step 6 in this guide to “login to the web-based manage ment module.” Under PPPoA configuration (on the screen as shown in
Step 7), click on “Connect” at the bottom of the window.
 Loading...