

Page 1

DSL-504 for PPPoEDSL-504 for PPPoE
ADSL RouterADSL Router
Quick Install GuideQuick Install Guide
Page 2
Quick Install Guide Quick Install Guide
for Windows 98/SE/ME/2000
DSL-504 for PPPoE
ADSL Router
* Please refer to the Manual on the CD-ROM for more detailed information.
11
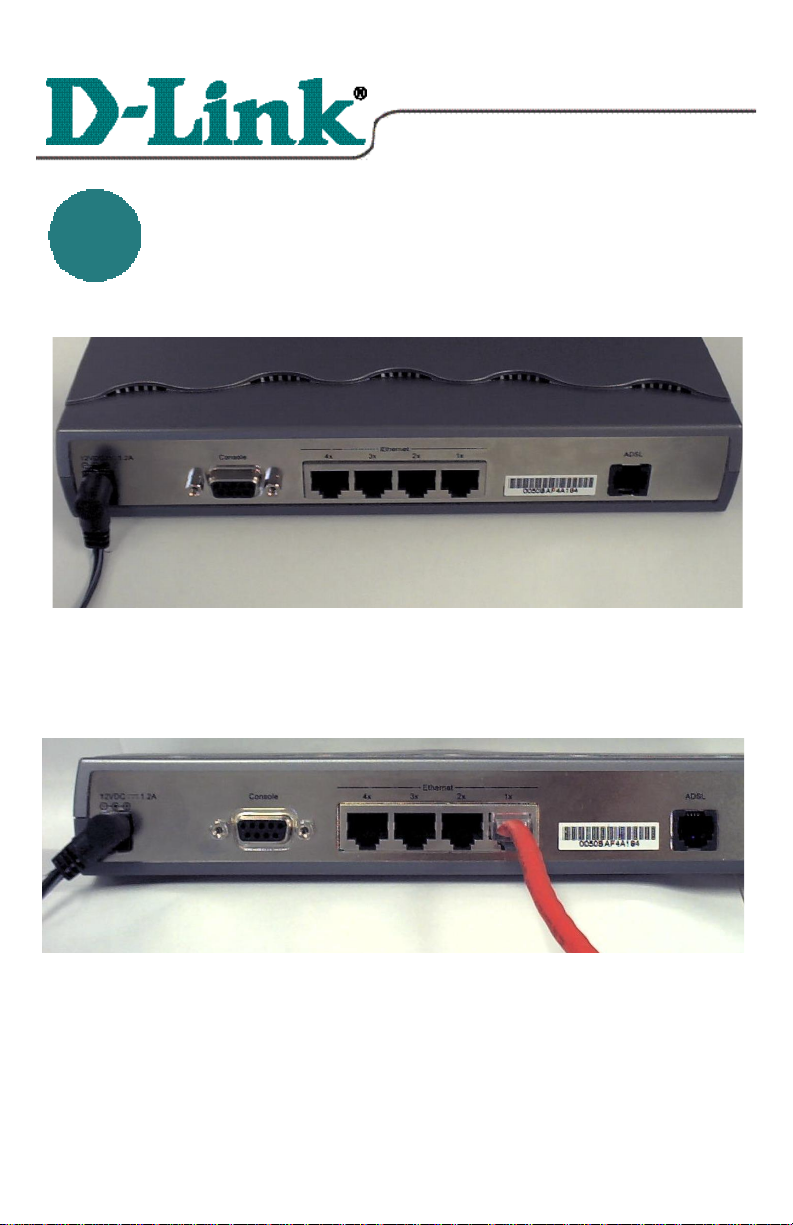
Connecting the DSL-504Connecting the DSL-504
To setup the DSL-504, begin by connecting it to a power source.
Once the unit power is on, connect one end of the included Ethernet cable to
the DSL-504’s ethernet port and connect the other end of the cable into the
NIC which is installed in your computer.
If the cable connection is good, a green LED on the front of the DSL-504
labeled Ethernet/Link will glow steadily.
Page 3
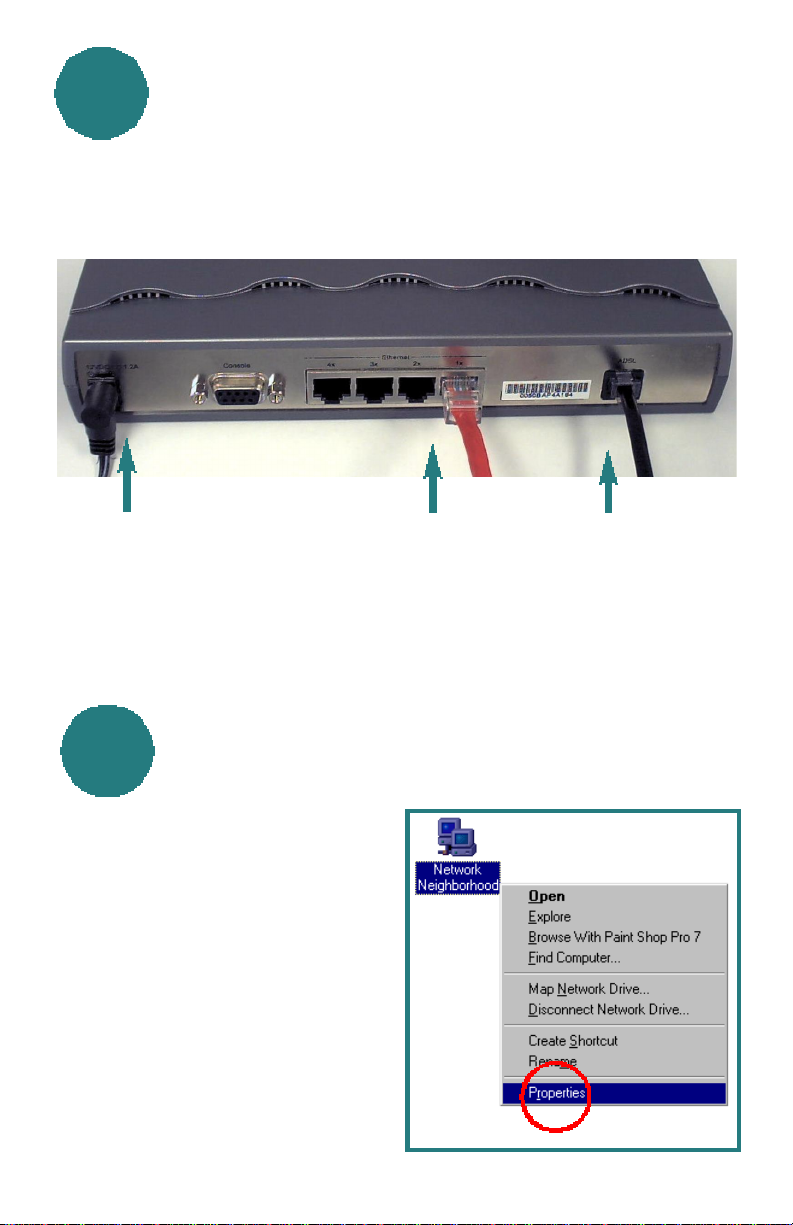
Connecting the DSL-504 Connecting the DSL-504 continued
11
Now connect the phoneline cable from the DSL-504 to your phone jack.
When you have completed all the connections, your DSL-504 will look
like this:
Power Cord
(Plug the other
end of the power
cord into the
power outlet.)
Ethernet Cable
(Plug the other end of the
Ethernet cable into the
Ethernet port on the NIC,
which is installed in your
computer.)
Setting up the ComputerSetting up the Computer
22
Right-Click the Network
Neighborhood (Win 98/98SE) or
My Network Places (Win ME/2000)
icon on your desktop.
Phone line cable
(Plug the other end of
the phone line cable
into the phone jack.)
Select Properties
Page 4

22
Setting up the Computer Setting up the Computer continued
Highlight the line that
reads TCP/IP and
points to your installed
Ethernet NIC.
Click Properties
At this screen, select
the IP Address tab.
Select Obtain an IP
Address
Automatically.
Click OK
You will be prompted to reboot in Win 98/98SE or ME,
For Windows 2000, Restart your computer manually.
Click Yes
When your computer restarts, you will automatically receive an
IP address from the DSL-504.
Page 5

Accessing the DSL-504’s Web BasedAccessing the DSL-504’s Web Based
33
The DSL-504 requires Internet
Explorer 4.0 or higher, or
Netscape Communicator 4.0 or
higher.
Please open your Web Browser
and enter this URL:
http://192.168.0.1 This will
launch the DSL-504’s integrated
web-based management system.
Click on Login to the web-based management module.
This Enter Network
Password screen will appear.
ManagementManagement
The default User Name is
admin
and the default Password
is also admin.
Click OK
Page 6

Configuring the DSL-504Configuring the DSL-504
44
At this window,
Select PPPoE Configuration in
the left column.
Enter the Login User Name and
Password, provided to you by
your Internet Service Provider.
Authentication is set to detect
automatically. If your current
selection does not work, select
the other option whether it
would be “pap” or “chap.”
Please contact your ISP for
your correct authentication setting.
Please be certain that enabled is
displayed in the Connect On
Demand field.
Make sure PVC settings are
entered correctly:
VPI: “0”
VCI: “35”
Click OK
Note: VPI: “0” and VCI: “35” settings are most common among DSL
providers. This will not work for others who have different VPI and VCI
settings. Please contact your service provider for the correct VPI and
VCI settings.
Page 7

44
Click OK
Click on Save
Changes in the
left column of
the screen.
Click on Save
Configuration
Configuring the DSL-504 Configuring the DSL-504 continued
Click on Restart
Note: Do not manually restart the modem. It will automatically restart by
itself. Once you are finished with your installation, you should be able to
access the Internet.
You have completed the installation of the DSL-504.
 Loading...