

Page 1
Quick Install Guide Quick Install Guide
DI-711
Wireless Broadband Router
11
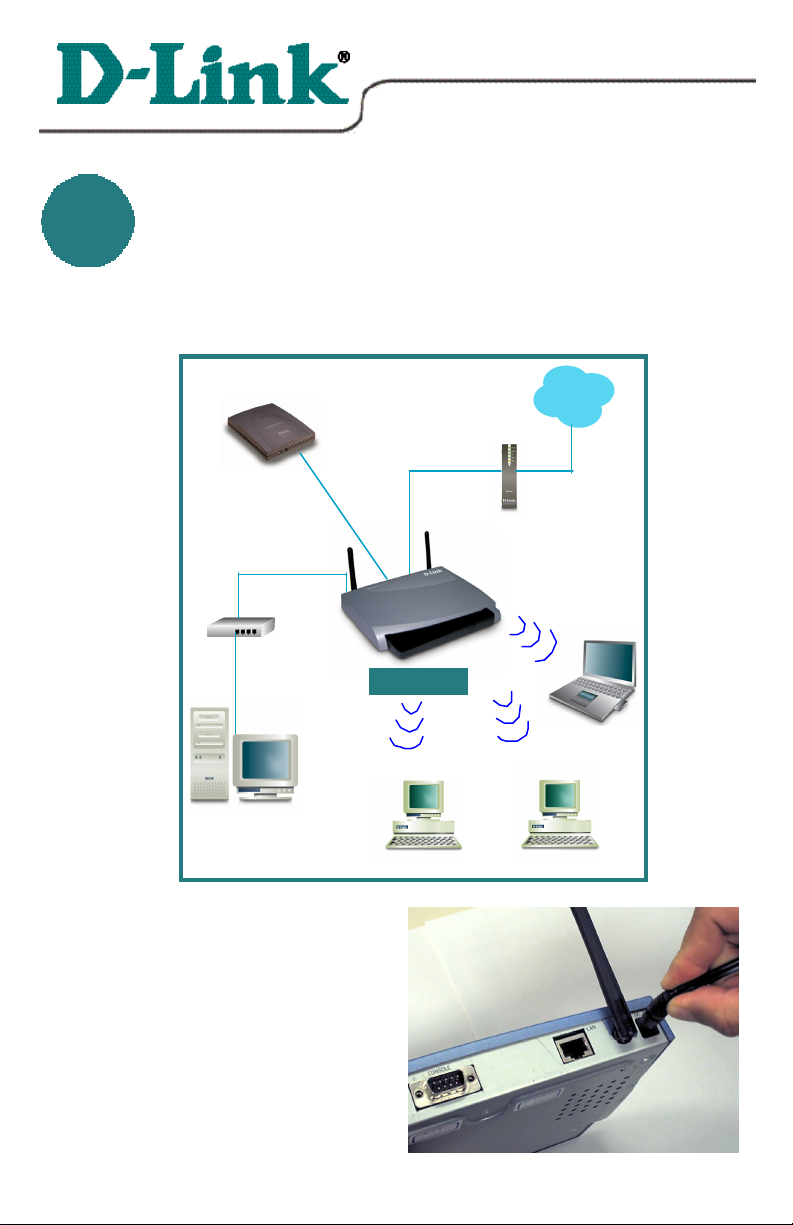
When you have completed the steps in this installation guide, your connected
your networkyour network
network may look someting like this:
Analog Modem
LAN port
Hub/Switch
DI-711
DWL-120
WAN port
Internet
Cable/DSL
Modem
Wireless
Networking
DWL-650
DWL-500
Connecting the DI-711 Wireless Router toConnecting the DI-711 Wireless Router to
DFE-530TX+
First,
Plug in the power supply as shown.
The Power LED will turn on
to indicate proper operation.
DI-711.03.01.01
Page 2
Connecting the DI-711 Wireless Router toConnecting the DI-711 Wireless Router to
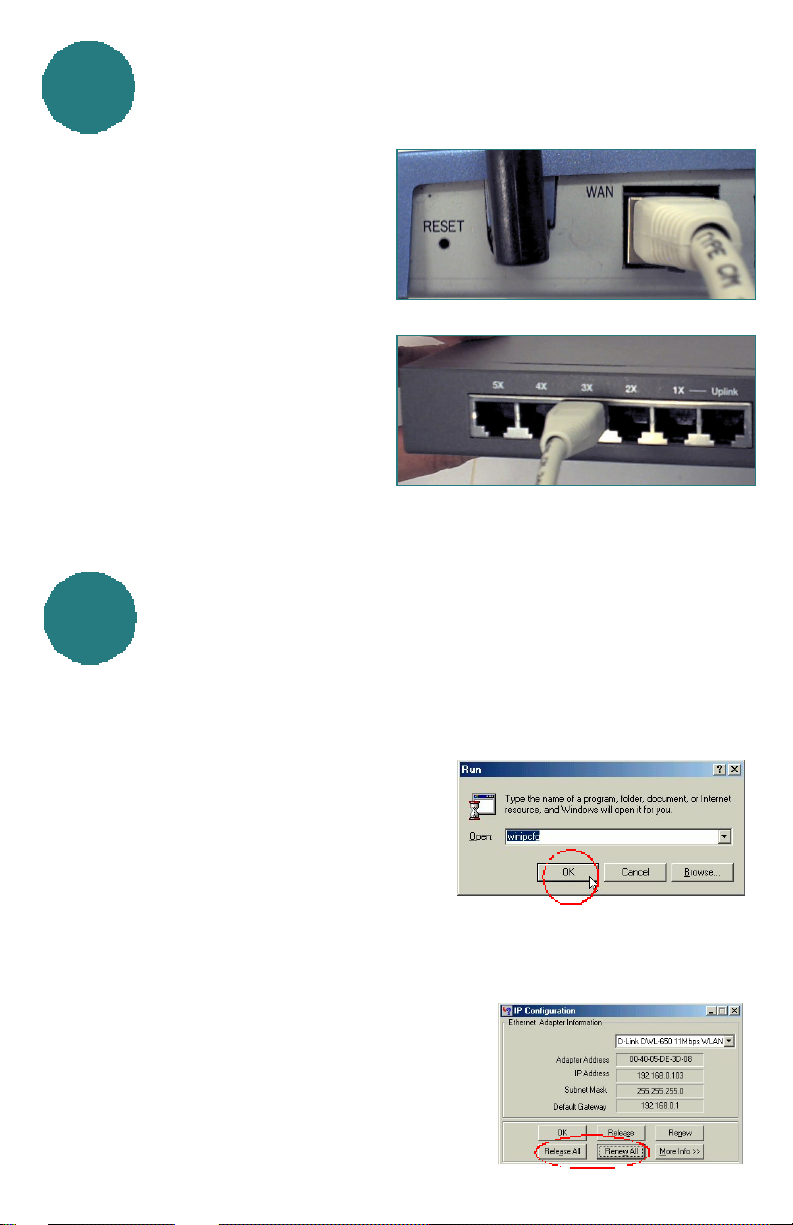
static IP, please refer to Appendix A.
your network your network continuedcontinued
11
Next, connect the WAN port to the
Cable/DSL modem. The WAN LED
will indicate connection.
Finally, connect the LAN port to a
hub or switch.
Note: A computer with a network
adapter can also be connected to the
LAN port with a crossover cable.
Installing the DI-711 using the SetupInstalling the DI-711 using the Setup
22
WizardWizard
Checking the IP Address of the computer being
used to configure the DI-711 Wireless Router
Go to Start>Run
Type in “WINIPCFG” .
The IP address of the computer must
be between 192.168.0.2 and
192.168.0.254 in order to configure
the router.
Click on the “Release All” and then
on the “Renew All” button to obtain
an IP address from the broadband
router between 192.168.0.100. and
192.168.0.199.
Note: If you are manually assigning a
Page 3
Installing the DI-711 using the SetupInstalling the DI-711 using the Setup
22
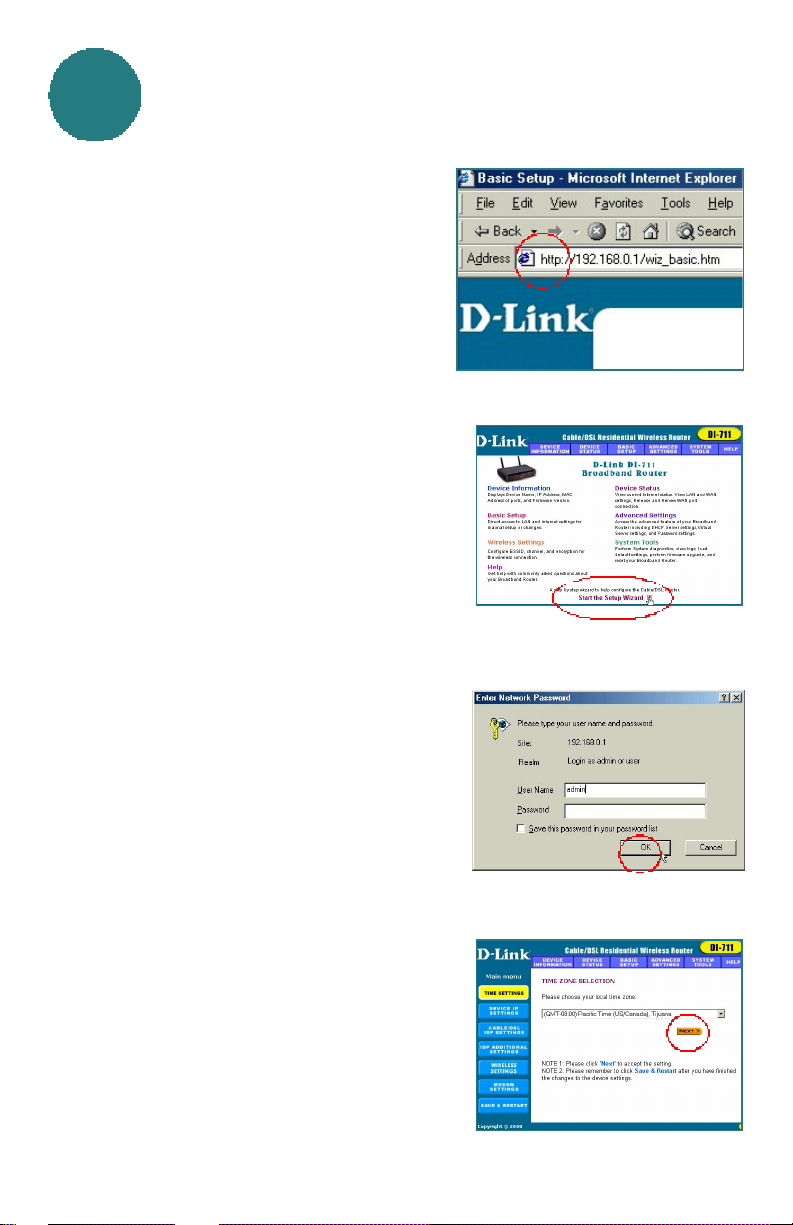
Open the web browser, and type
192.168.0.1 into the URL address box.
Note: Please disable any proxy server setting for the web browser.
Click on “Start the Setup Wizard”
at the bottom of the Main Menu.
Wizard Wizard continuedcontinued
When the login screen appears, type
“admin” in the User Name box, and
leave the Password field blank.
Click OK.
At this window, select the local time
zone.
Click Next, to continue .
Page 4

Installing the DI-711 using the SetupInstalling the DI-711 using the Setup
22
The default IP address of the LAN
port is set to 192.168.0.1.
Click Next to accept the default settings.
By default, the WAN port is set to
automatically obtain an IP address
from the ISP.
To assign a static IP for the WAN
port, remove the checkmark and
enter the settings.
Click Next.
Wizard Wizard continuedcontinued
DSL users:
If you are using a PPPoE client to
connect to your DSL provider, then
place a checkmark on the first box,
and enter the user name and password in the appropriate box.
Cable modem users:
If you are using a cable modem, then
place a checkmark on the second box
and enter the host and domain name
given by your cable provider.
Click Next.
Page 5

22
Installing the DI-711 using the SetupInstalling the DI-711 using the Setup
Wizard Wizard continuedcontinued
The DI-711 default wireless settings
will work out of the box with any
other D-Link Air products.
Click Next to accept the default settings.
If you are using a backup dial-up
modem with the wireless router,
place a checkmark in the box and
enter the settings for the dial-up
connection.
Click Next.
At this window,
Click “Save and Restart,” to finish
the Setup Wizard.
After the DI-711 has restarted, the
installation is complete!
di-711.3.2.01
Page 6

Checking the connection to the InternetChecking the connection to the Internet
33
To check the connection, open
the web browser and go to your
favorite website.
If you are unable to browse,
please do the following:
1. Refer to Appendix B to
check your connection to the
wireless router.
2. Use “Help” on the Main
Menu.
3. Refer to the troubleshooting
section in the user’s manual.
Page 7

APPENDIXAPPENDIX
AA
Assigning a Static IP Address
If the network adapter is unable to obtain an IP
address automatically from the Broadband Router,
Click on “Specify an IP Address.”
Enter an IP address between 192.168.0.2 to
192.168.0.99 into the IP Address box.
Enter the Subnet mask of 255.255.255.0
Enter the Gateway IP Address of 192.168.0.1
Click OK
Note: Most Operating Systems will require a
restart.
BBAPPENDIXAPPENDIX
Checking Your Network Connections
Use “Ping” to check your network
connections.
Go to START>RUN
Type “command” in the box.
Click OK.
Type “ping 192.168.0.1” , which is
the IP address of the LAN port of the
Broadband Router.
Hit the “Enter” key.
A successful connection will show
four replies, as show at left.
di-711.03.02.01
 Loading...