

Page 1

5566K
K VV..9922
DD--LLiinnkk DDFFMM--556600EELL 5566KK EExxtteerrnnaall MMooddeem
Mooddee
M
User’s Guide
m
m
m
Page 2

D-Link DFM-560EL External Modem Us er’s Guide
FCC Requirements
This equipment complies with Part 68 of the FCC Rules. On the bottom of this equipment is a label that
contains, among other information, the FCC Registration Number and Ringer Equivalence Number (REN)
for this equipment. IF REQUESTED. THIS INFORMATION MUST BE GIVEN TO THE TELEPHONE
COMPANY.
The REN is useful to determi ne the quantity of devices y ou may conne ct to your teleph one line and st ill have
these entire devices ring when your telephone number is called in most. But not all areas the sum of the
REN’s of all devices connected to one line should not exceed five (5.0). To be certain of the number of
devices you may connect to your line. As determined by the REN. You should contact your local telephone
company to determine the maximum REN of the area you are calling from. If your telephone equipment
causes harm to the tel ephone network. T he Telephone Company may discont inue your ser vice temporally. If
possible, they will notify you in advance. But if the advanced notice is failed, you will be notified as soon as
possible. You will be informed of your right to file a complaint with the FCC.
Your telephone company may change in its facilities, equipment, operations or procedures that could af fect
the proper functions of your equipment. If this occurs, you will be notified in advance to give you an
opportunity to maintain uninterrupted telephone service.
If you experience trouble with this telephone equipment, please contact the following address and phone
number for information on obta ining servic e or repairs. The Telephone Company may ask you to di sconnect
this equipment from the network until the problem is solved or until that the equipment is not detected
malfunctioning. This equipment may not be used on coin service provided by the Telephone Company.
Connection to party lines is subject to state Tariffs.
Federal Communications Commission
Radio Frequency Interference Statement.
Note: This equipment has been tested and found to comply with the limitation for a lass B digital device
pursuant to Part 15 of the FCC Rules. These restrictions are designed to provide reasonable protection
against harmful interference when the equipment is operated in a residential installation. This equipment
generates, uses, and c an radia te radio fre quency e nergy and if not i nstalled and used in acc ordance w ith the
instruction manual may cause harmful interference to radio communications. However, there is no
guarantee that interference will not occur in a particular installation. If the equipment does cause harmful
interference to radio or televi sion rece ption, w hich can be d et ermine by tuni ng the e quipme nt of f and on, th e
user is suggested to try to correct the interference by one or more of the following measures:
-Reorient or relocate the receiving antenna.
-Increase the distance between the equipment and receiver.
-Connect the equipment into an outlet on a circuit different from that to which the receiver is connected.
Consult the dealer or an experienced radio TV technician for help.
Notices:
(1) The changes or modifications not expressly approved by the party responsible for compliance could
void the user’s authority to operate the equipment.
(2) Shielded interface cables and AC power cord if any must be used in order to comply with the emission
limits.
Notices to Australian users:
The modem card must only be used in a data terminal equipment (DTE) e.g. computer, that has a screw
down cover (lid). As unsafe voltages (TNV) exist on the modem card, disconnect the modem card from the
telephone line while the cover (lid) of the DTE (computer) is removed.
Installation of the modem card in a DTE (computer) which does not require a tool to open the cover (lid) will
render the permit void.
Disconnect the telephone line before opening the cover (lid) of the DTE (computer). Do not connect the
customer equipment to the telephone line while the cover (lid) of the DTE (computer) is open.
2
Page 3

CO
D-Link DFM-560EL External Modem Us er’s Guide
Modems connected to the Australian telecommunications network must be marked in accordance with the
Labeling Notice. This modem has been specifically configured to ensure compliance with the ACA
Standards. Do not adjust your modem or software outside the values indicated as below. To do so would
result in your modem being operated in a non-compliant manner.
Modem Commands:
Command
ATA - Do not use
ATB B0 Do not set to B1
AT&G &G0 &G2
AT&P &P0 &P1
ATSn see table below
S register
s6 2 2 to 6
Call Attempts/Retries:
Applications software shall be configured so that no more than 3 attempts are made to
establish a connection to a given number (N ote : if the modem can detect service tone s, u p to 10 att em pts
can be made). If the call sequence is unsuccessful, there shall be a delay of at least 30 minutes before
attempting to call the number again.
Failure to set the modem and any application software used with the modem, to the values
shown as above will result in the modem being operated in a non-compliant manner.
Consequently, this would be in violation of the Labeling Notice for this equipment, and the
Telecommunications ACT 1997 prescribes penalties for the connection of non-compliant equipment.
Default Permissible Range
Default Permissible Range
ONLY CONNECT EQUIPMENT WITH A TELECOMMUNICATIONS
FOR SAFETY REASONS, ONLY CONNECT EQUIP M ENT WITH A
TELECOMMUNICATIOS COM PLIANCE LABEL. THIS INCLUDES
CUSTOMER EQUIPMENT PREVIOUSLY LABELLED
PERMITTED OR CERTIFIED.
WARNING
MPLIANCE LABEL
WARNING
3
Page 4

D-Link DFM-560EL External Modem Us er’s Guide
Table of Contents
Chapter 1 Introduction.....................................................................................5
1.1 Introduction...............................................................................................................................5
1.2 What’s in the package...............................................................................................................5
Chapter 2 Specifications..................................................................................6
Chapter 3 Hardware Installation......................................................................7
Chapter 4 Software Installation........................................................................8
4.1 Windows 95 B (OSR2)..............................................................................................................8
4.2 Windows 98................................................................................................................. ...........12
4.3 Windows ME...........................................................................................................................17
4.4 Windows NT 4.0 .....................................................................................................................21
4.5 Windows 2000............................................................................................................... .........38
4.6 Window XP.............................................................................................................................41
Chapter 5 Diagnostics...................................................................................43
5.1 Windows 95/98/ME.................................................................................................................43
5.2 Windows 2000............................................................................................................... .........45
5.3 Windows XP ...........................................................................................................................47
Chapter 6 Uninstalling...................................................................................51
6.1 Windows 95/98/ME.................................................................................................................51
6.2 Windows NT 4.0 .....................................................................................................................53
6.3 Windows 2000............................................................................................................... .........55
6.4 Windows XP ...........................................................................................................................59
Chapter 7 Troubleshooting............................................................................63
Chapter 8 Command.....................................................................................64
8.1 Typing Commands..................................................................................................................64
8.2 AT Commands........................................................................................................................65
8.3 S-Register Definitions.............................................................................................................66
4
Page 5

D-Link DFM-560EL External Modem Us er’s Guide
Chapter 1 Introduction
1.1 Introduction
Thank you for selecting the 56K V .90 modem with IC+ chipset. This modem with IC+ chipset
is a hardware modem that uses the state-of-the-art single chip and Silicon DAA design. Besides,
it has the advantages of high quality, high reliability, more compact and low cost. This modem
with IC+ chipset is compatible with current Windows 98, ME, NT 4.0, 2000,XP operation systems
because of its independent OS. Moreover, it follows the V.90 standard, so you can surf the
Internet at 56K speed, but it depends on the condition of the telephone line and the ISP you
connected to. We truly hope that our series products with IC+ chipset can meet your needs.
1.2 What’s in the Package
•
56K V.90 Modem with IC+ Chipset
•
CD-ROM (Comprises Application Software, Modem Drivers and User’s Guide)
•
Quick Guide for Installing Modem Drivers
•
Phone Cord
5
Page 6

D-Link DFM-560EL External Modem Us er’s Guide
Chapter 2 Specifications
Specifications:
Chipset (Internal type) IC+ TP560x
Line Connection PSTN, 2 Wires
Data Transmission Rate ITU-T V.90
56000/33600/28800/14400/9600/7200/4800/2400/
1200/300 bps BELL 103 and BELL 212A
Fax Compatibility Send/Receive G3 Fax, 14400/9600/4800 bps
Error Correction MNP 2-4/V.42 LAPM
Data Compression MNP 5/V.42 bis
Command Set Enhanced AT Command, Fax Class 1
Communication Model Asynchronous
DTE Speed (MAX) 115,200 bps
Transmit Level -11(±1dBm)
Flow Control XON/XOFF
RTS/CTS
Dialing Mode Touch Tone / Rotary Pulse (Countries depend)
Auto Dial & Auto Answer YES
Noted Features NVRAM Directory and Stored Profile,
Speed Buffering, Auto Format/Speed sensing
Auto Retrain
Te lephone Interface PSTN Line through RJ-11
Card Dimension 12.2mm*7.5mm*1.6mm
Applicable PTT Approval Countries depend
Safety FCC, CE
Features
IC+ single chip solution
Surf the Internet at blazing 56K speed
Independent OS – Compatible with Windows 98/ME/NT4.0/2000/XP
Fully software upgradeable
6
Page 7
D-Link DFM-560EL External Modem Us er’s Guide
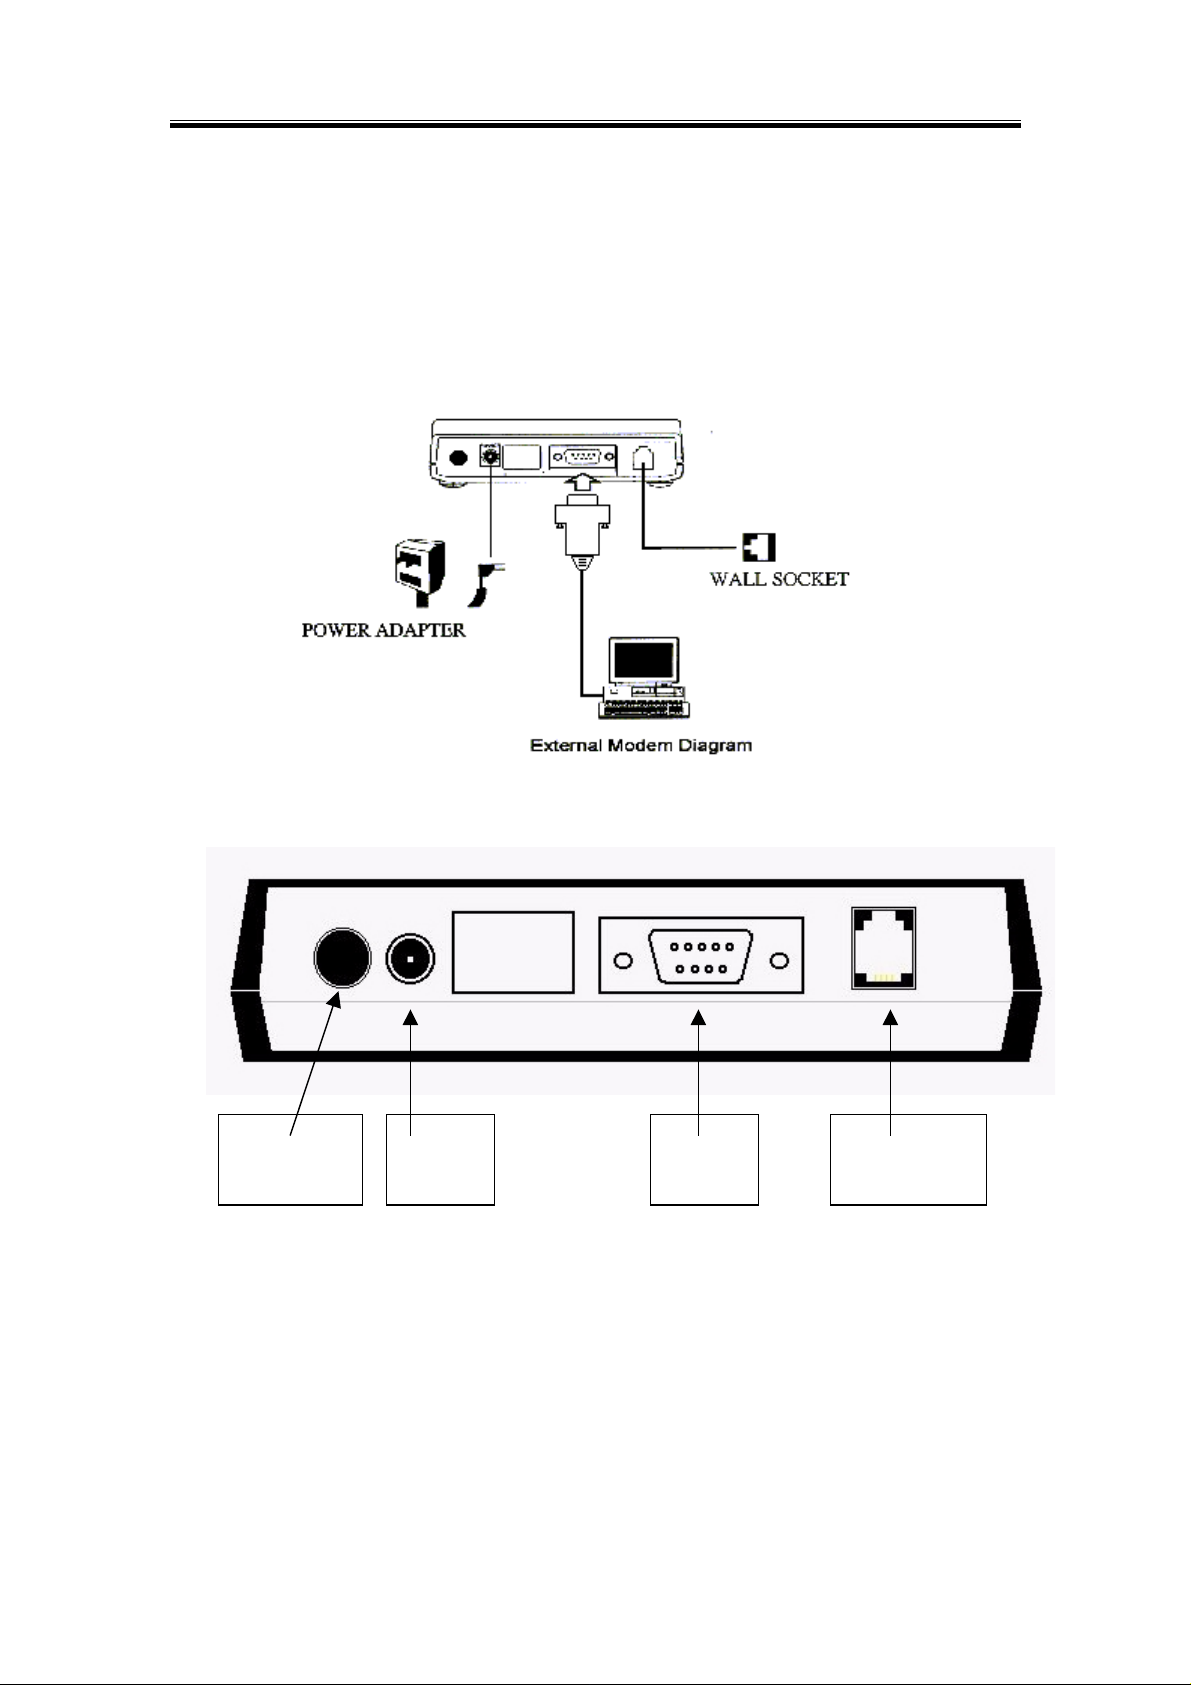
Chapter 3 Hardware Installation
1.Unplug the telephone from the wall socket, then plug the telephone into the socket on the
back of the modem marked PHONE.
2.Plug the telephone cord supplied into the socket on the back of the modem marked LINE.
3.Plug the other end of the cord into the wall socket.
Push Buttom
Switch
Power
Connect
RS-232C
Connect
Telephone Line
Socket
7
Page 8
D-Link DFM-560EL External Modem Us er’s Guide
Chapter 4 Software Installation
The following sections explain how to install the modem drivers under Windows
98/ME/NT4.0/2000/XP. Refer to the section, which best suites, your operating system.
4.1 Windows 95 B (OSR2)
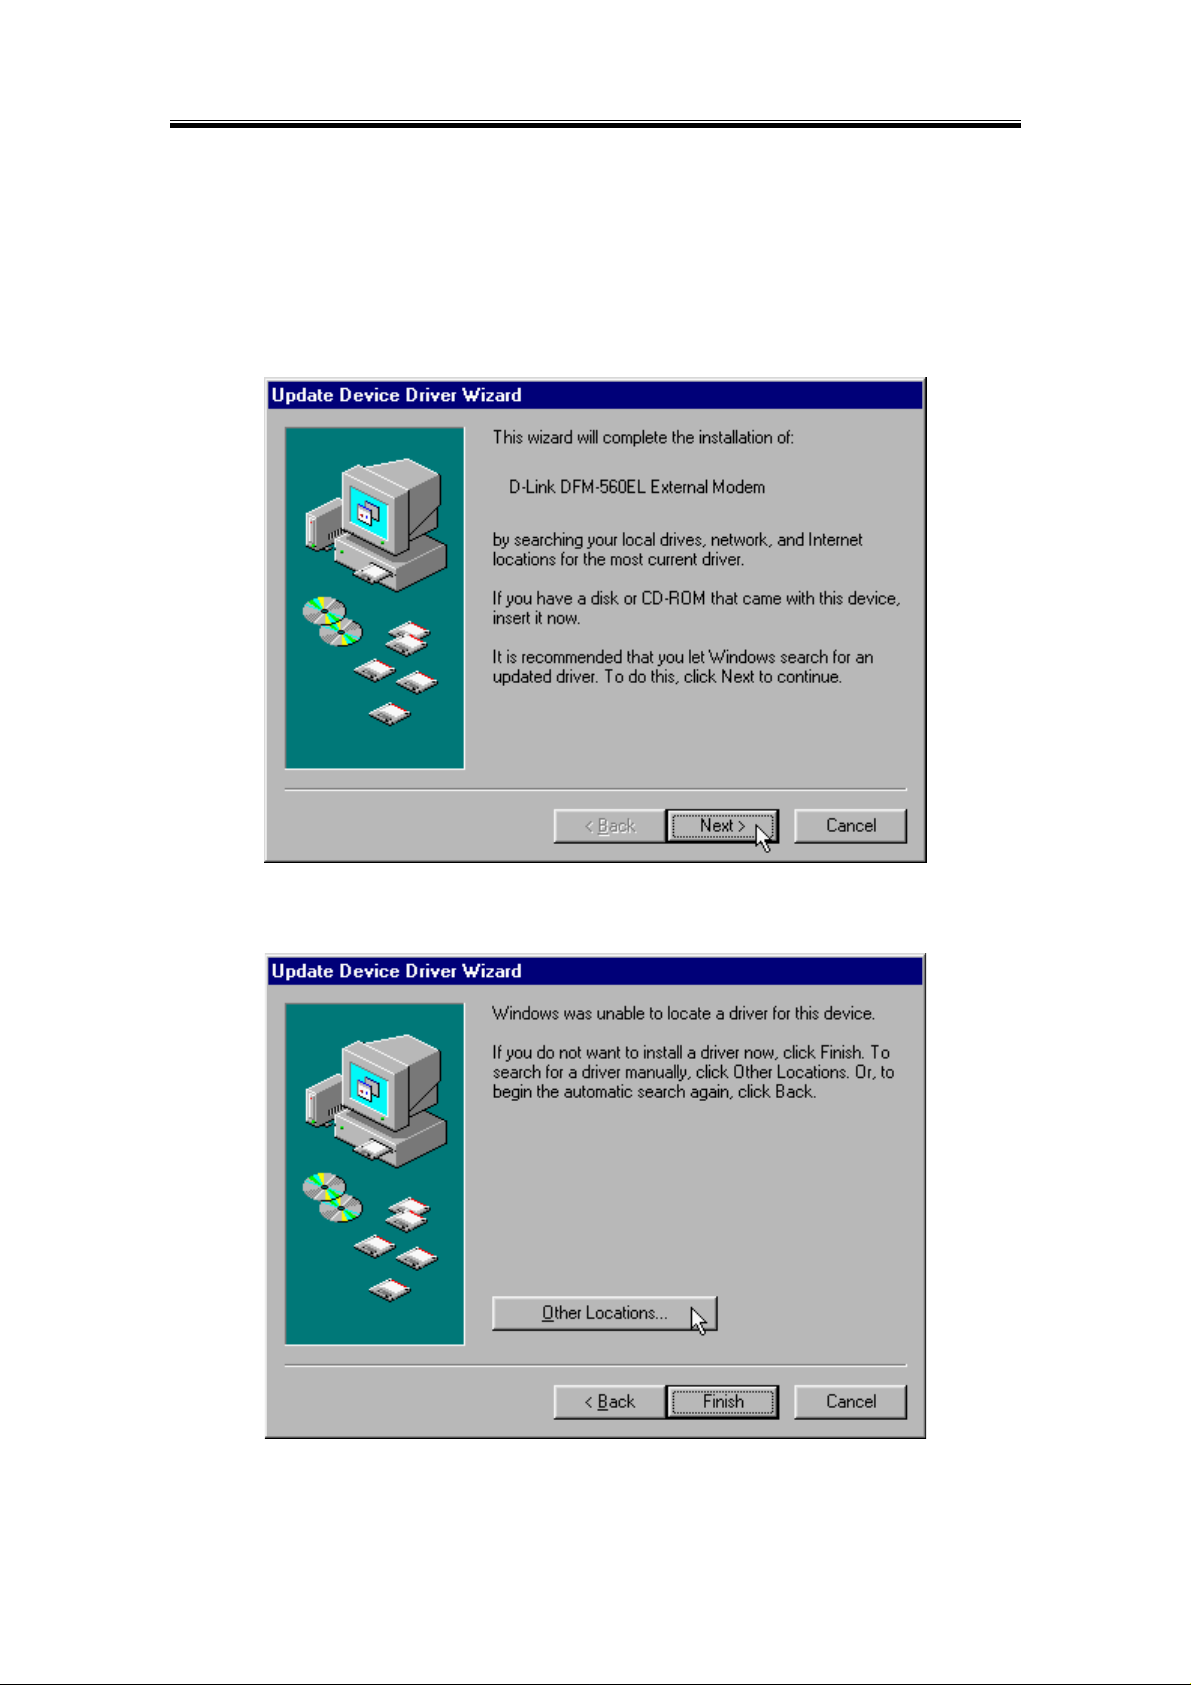
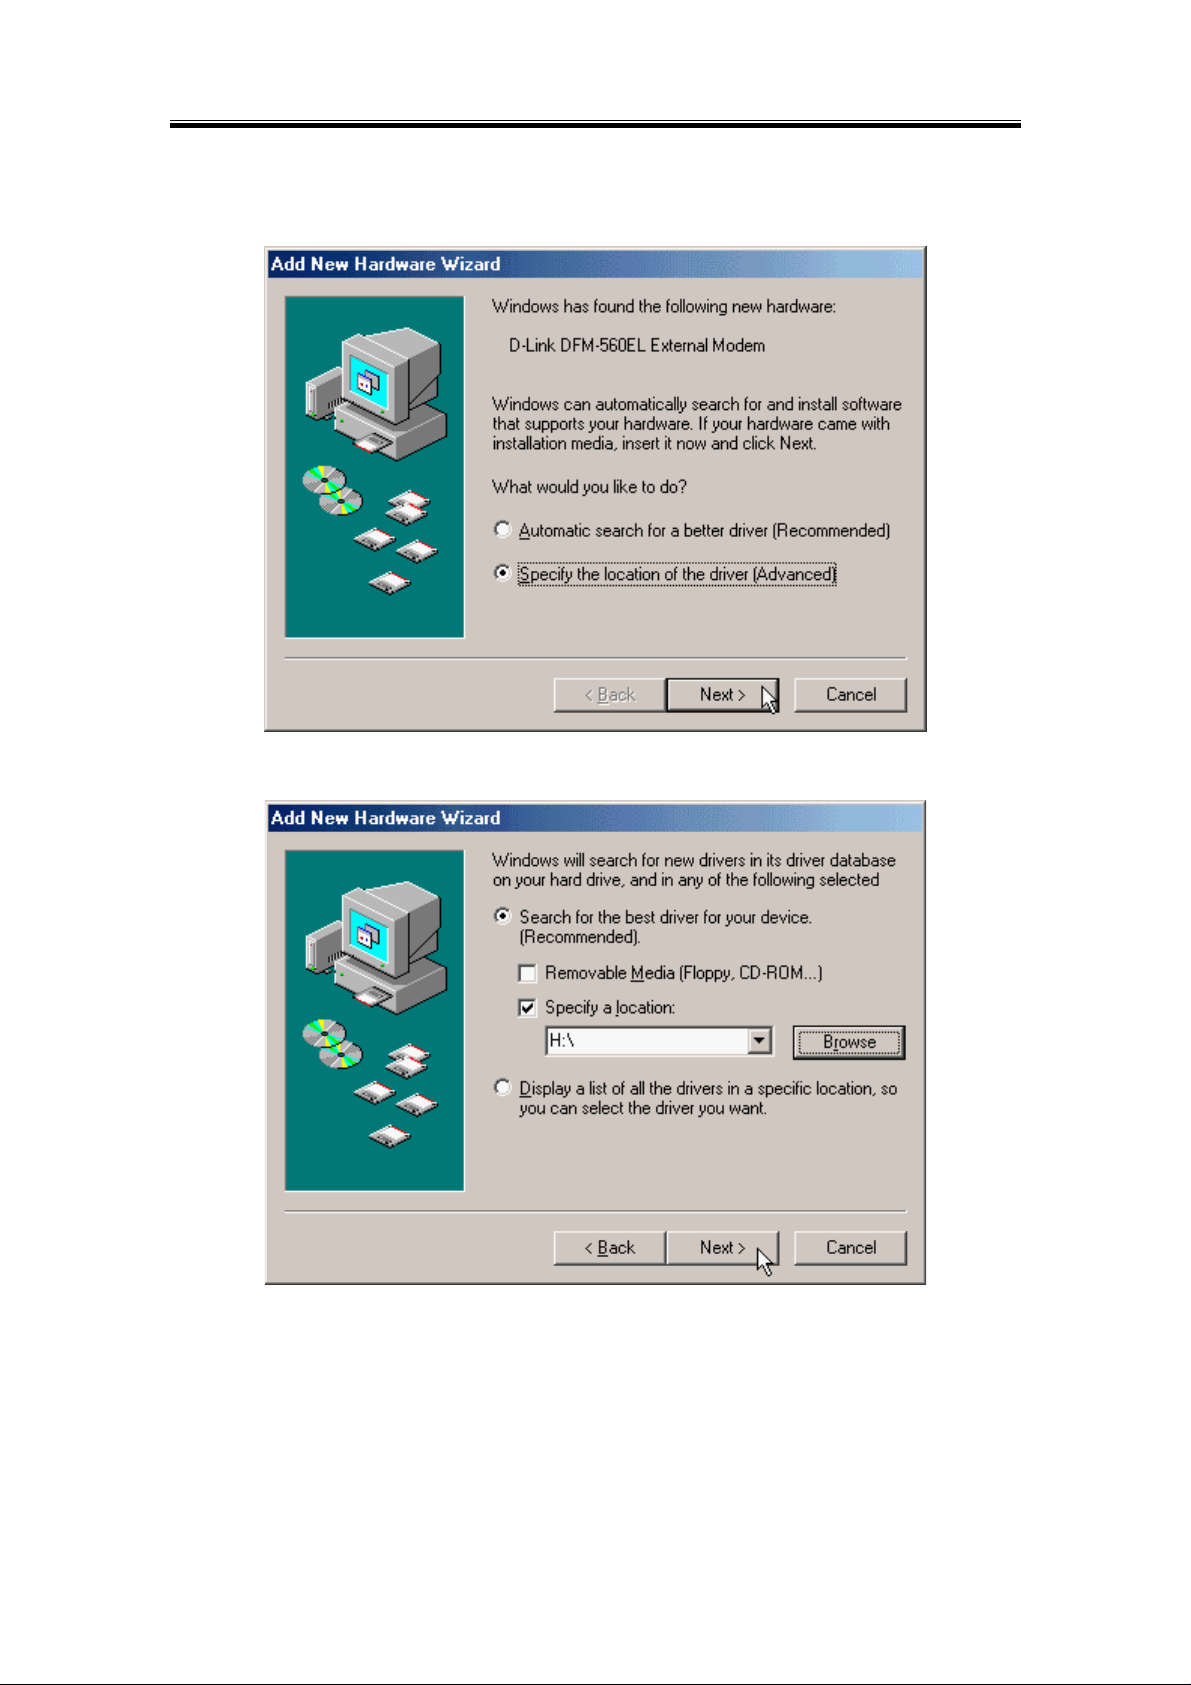
Please insert the driver CD supplied when you see the message of
1.
D-Link DFM-560E L E xter nal M odem
appearing on the screen, then click
Click
2.
Other Locations…
to search for the driver.
Next
to install from the installation disk.
8
Page 9
D-Link DFM-560EL External Modem Us er’s Guide
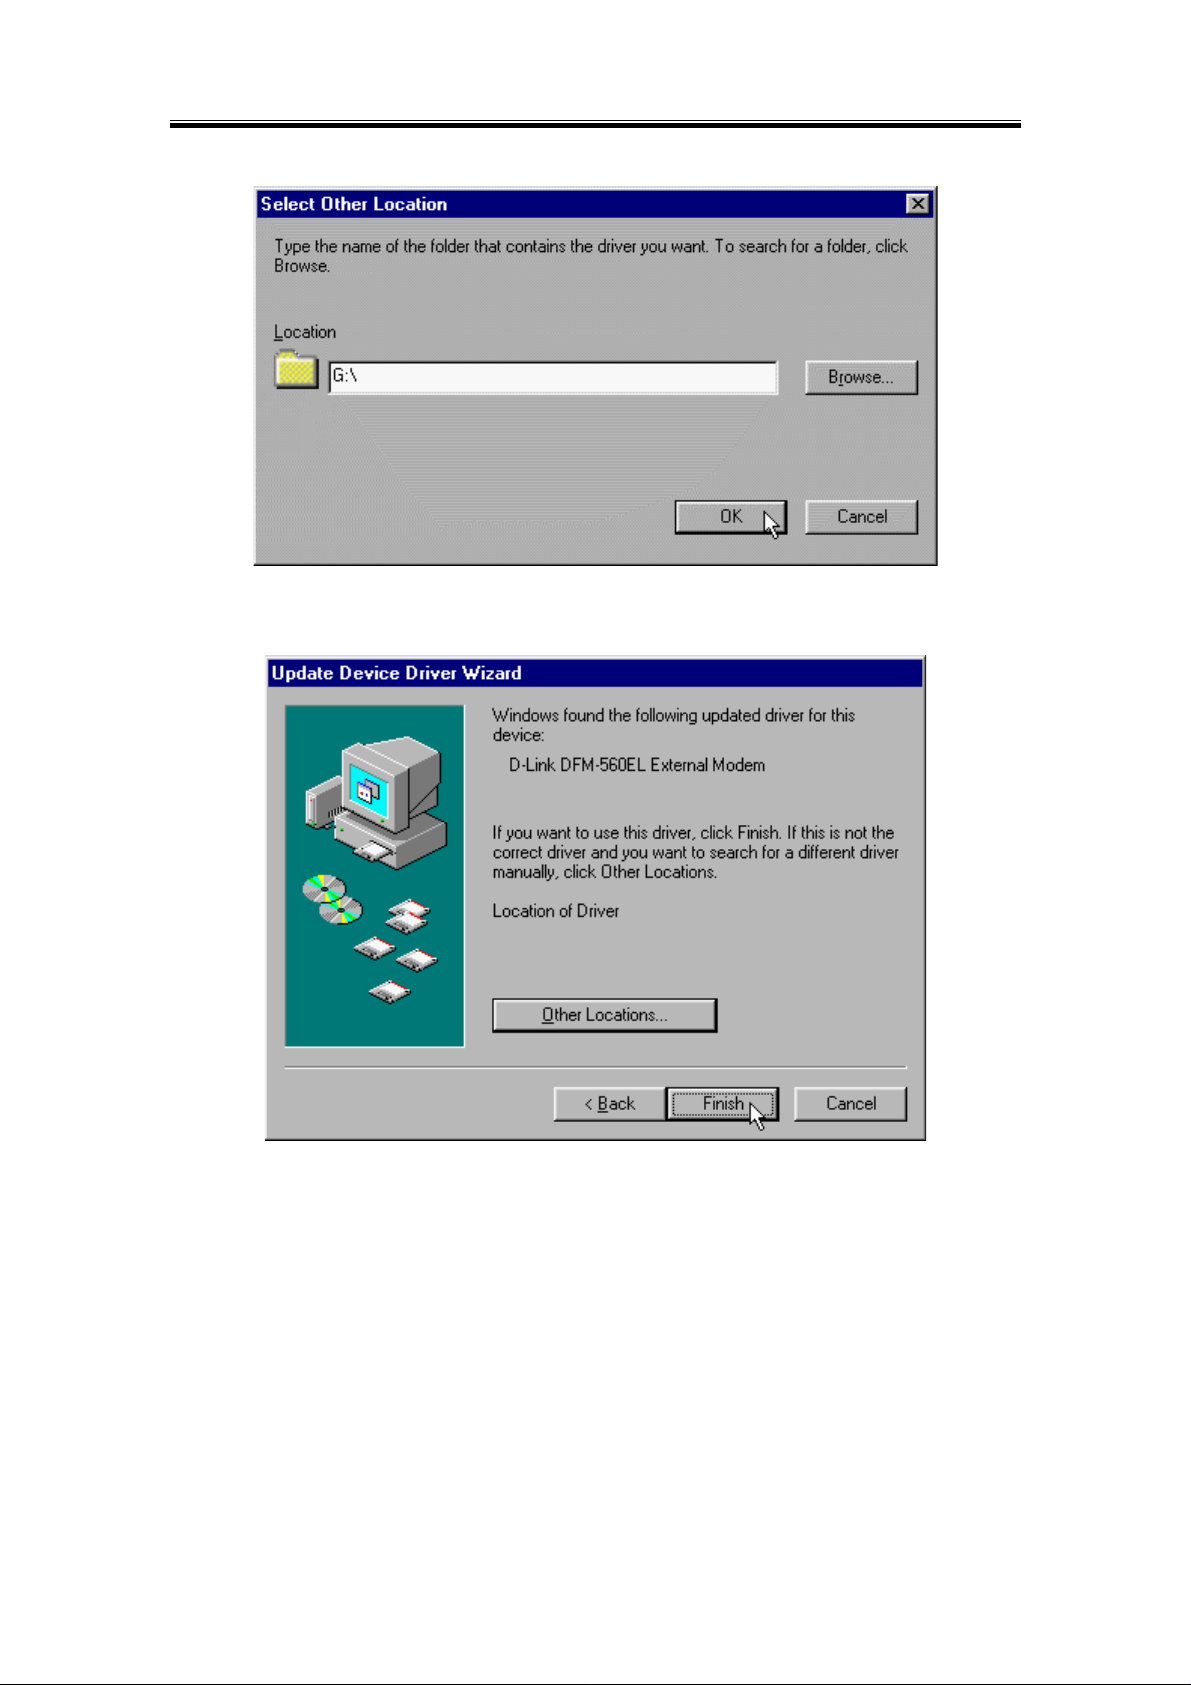
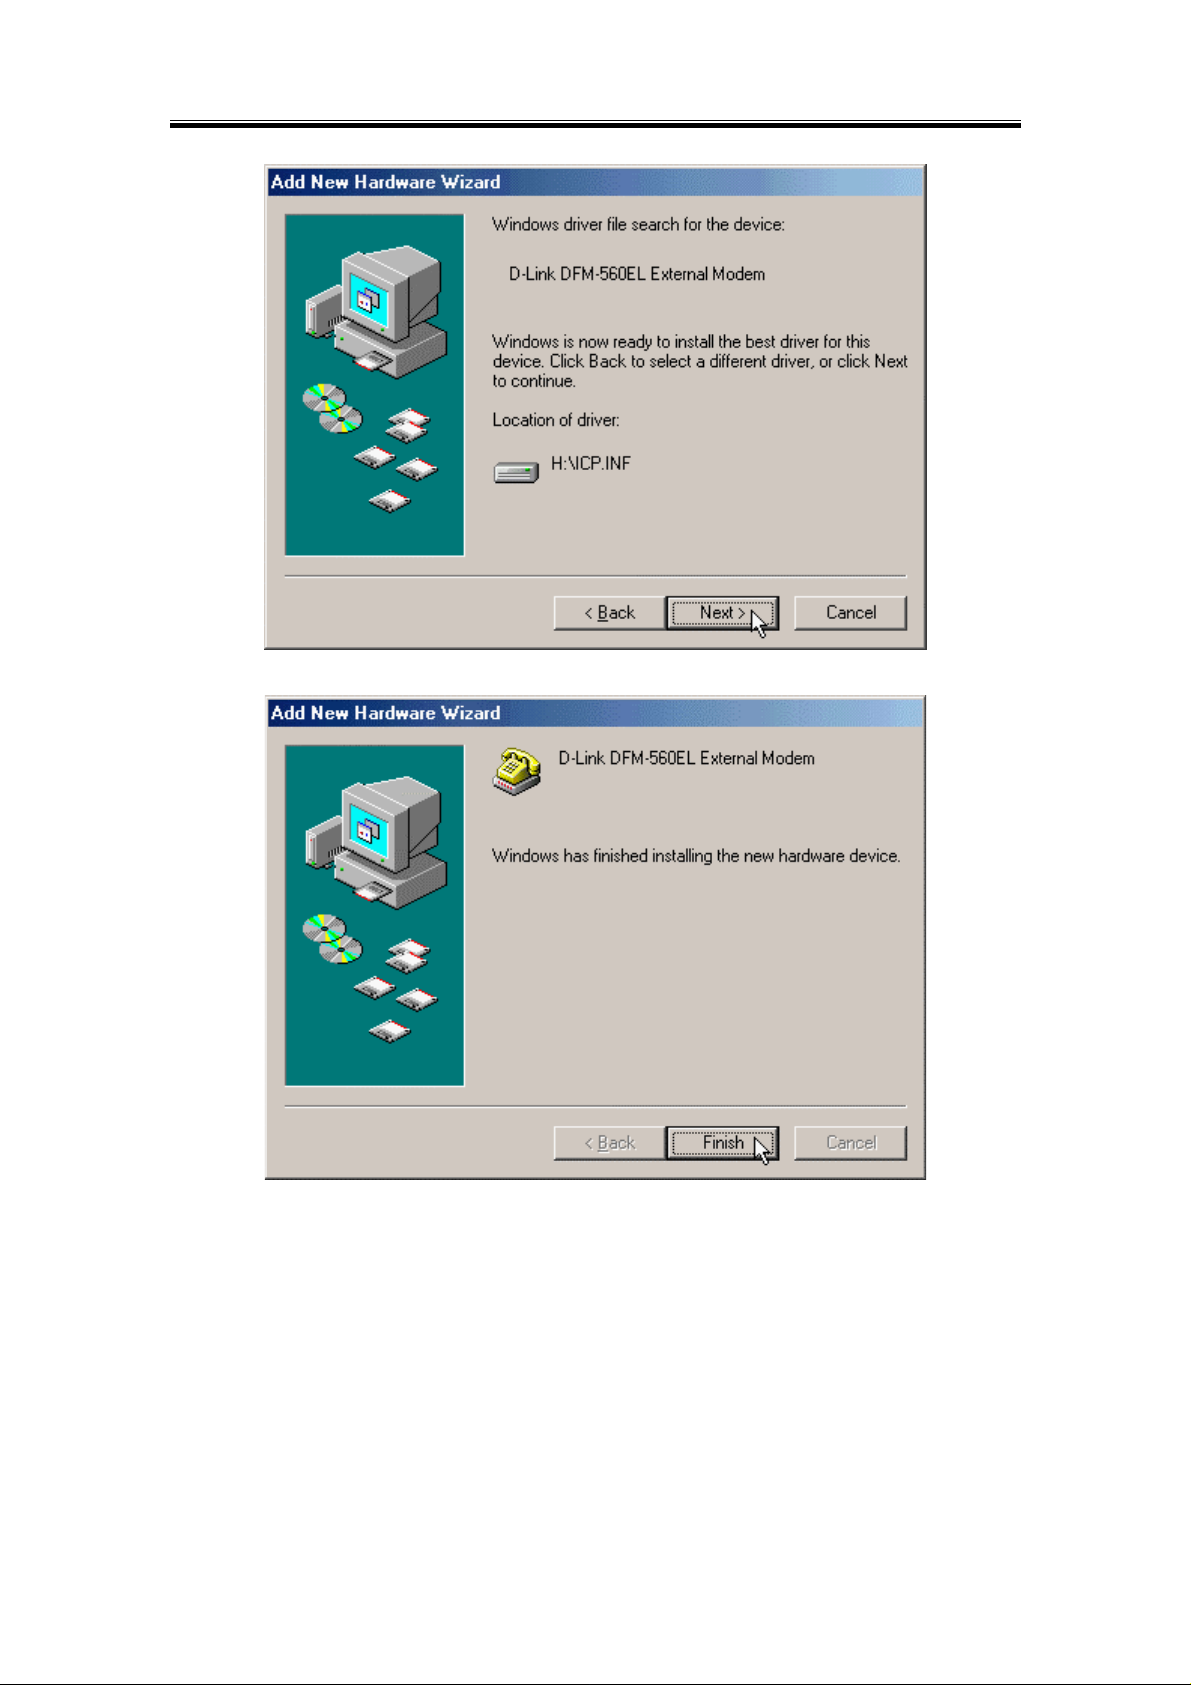
Select the locatio n of
3.
4. Click
and click OK to continue. (G is the letter of CD-ROM drive).
G:
to end this installation procedure.
Finish
9
Page 10
D-Link DFM-560EL External Modem Us er’s Guide
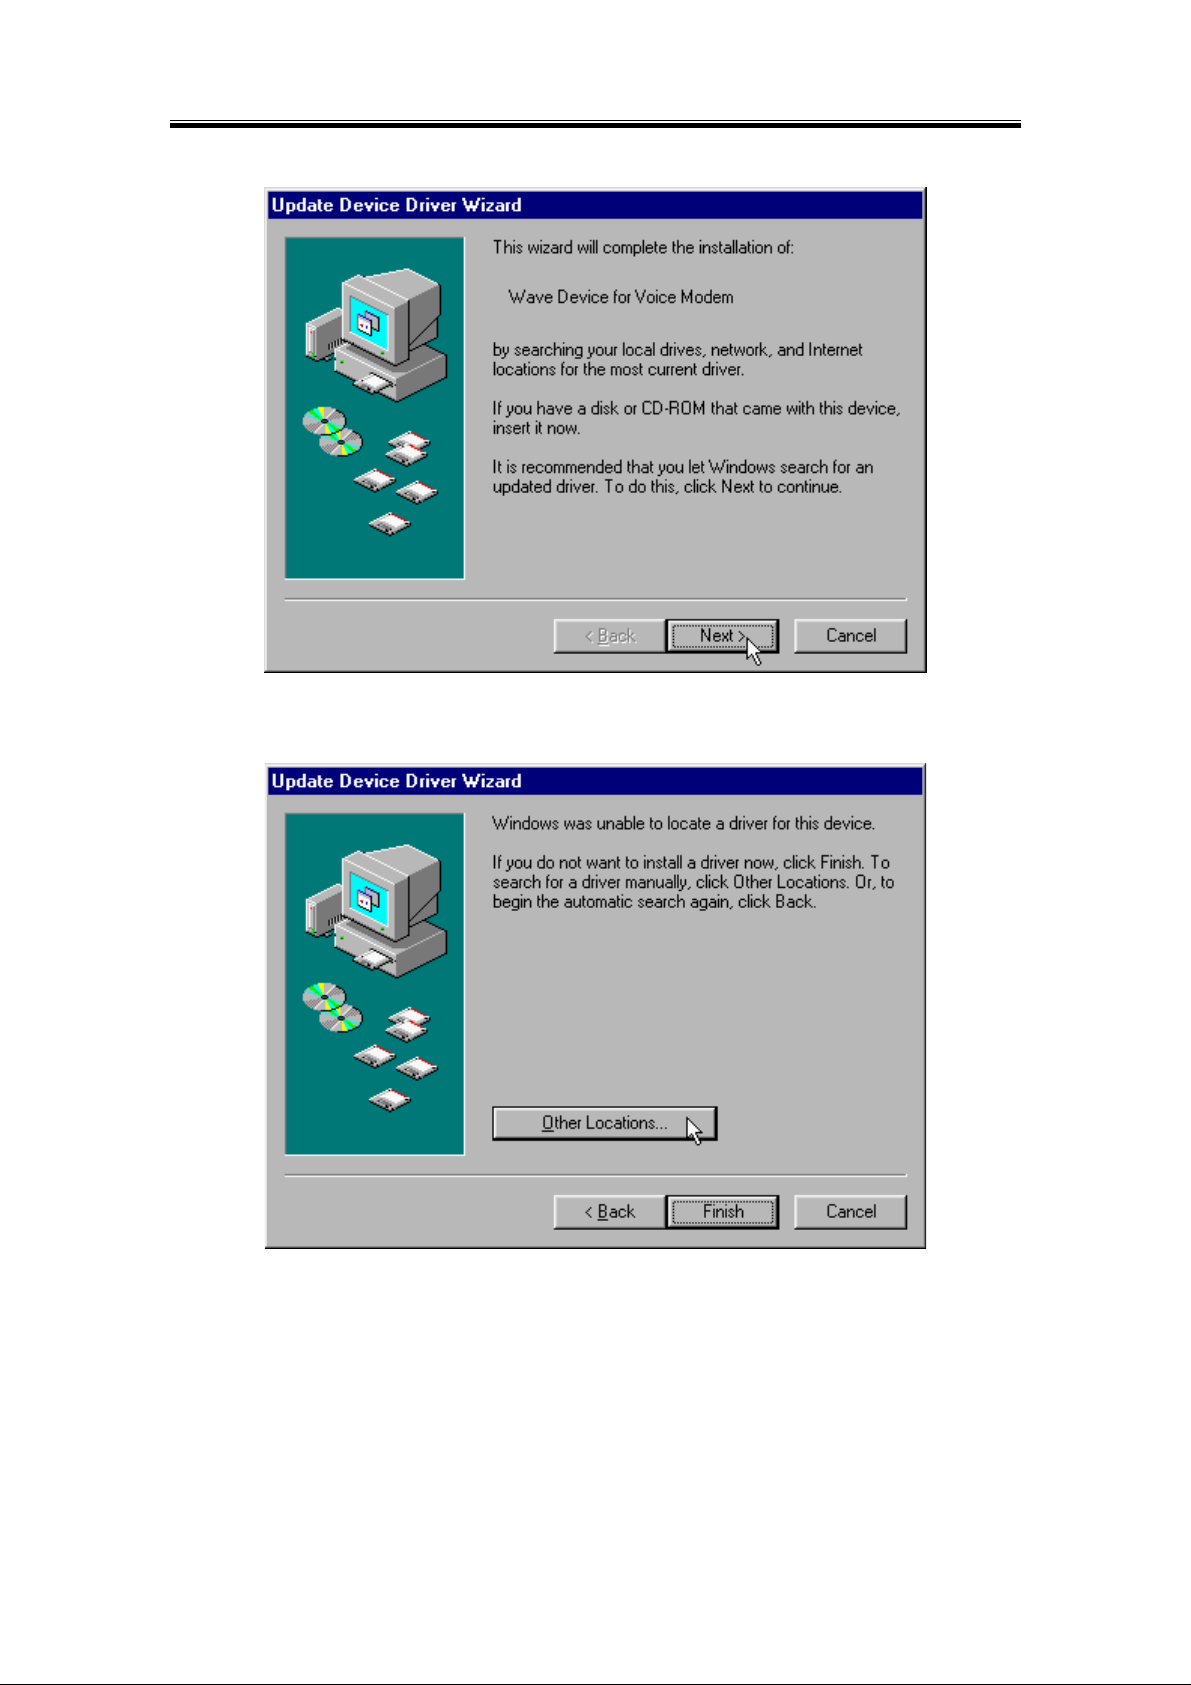
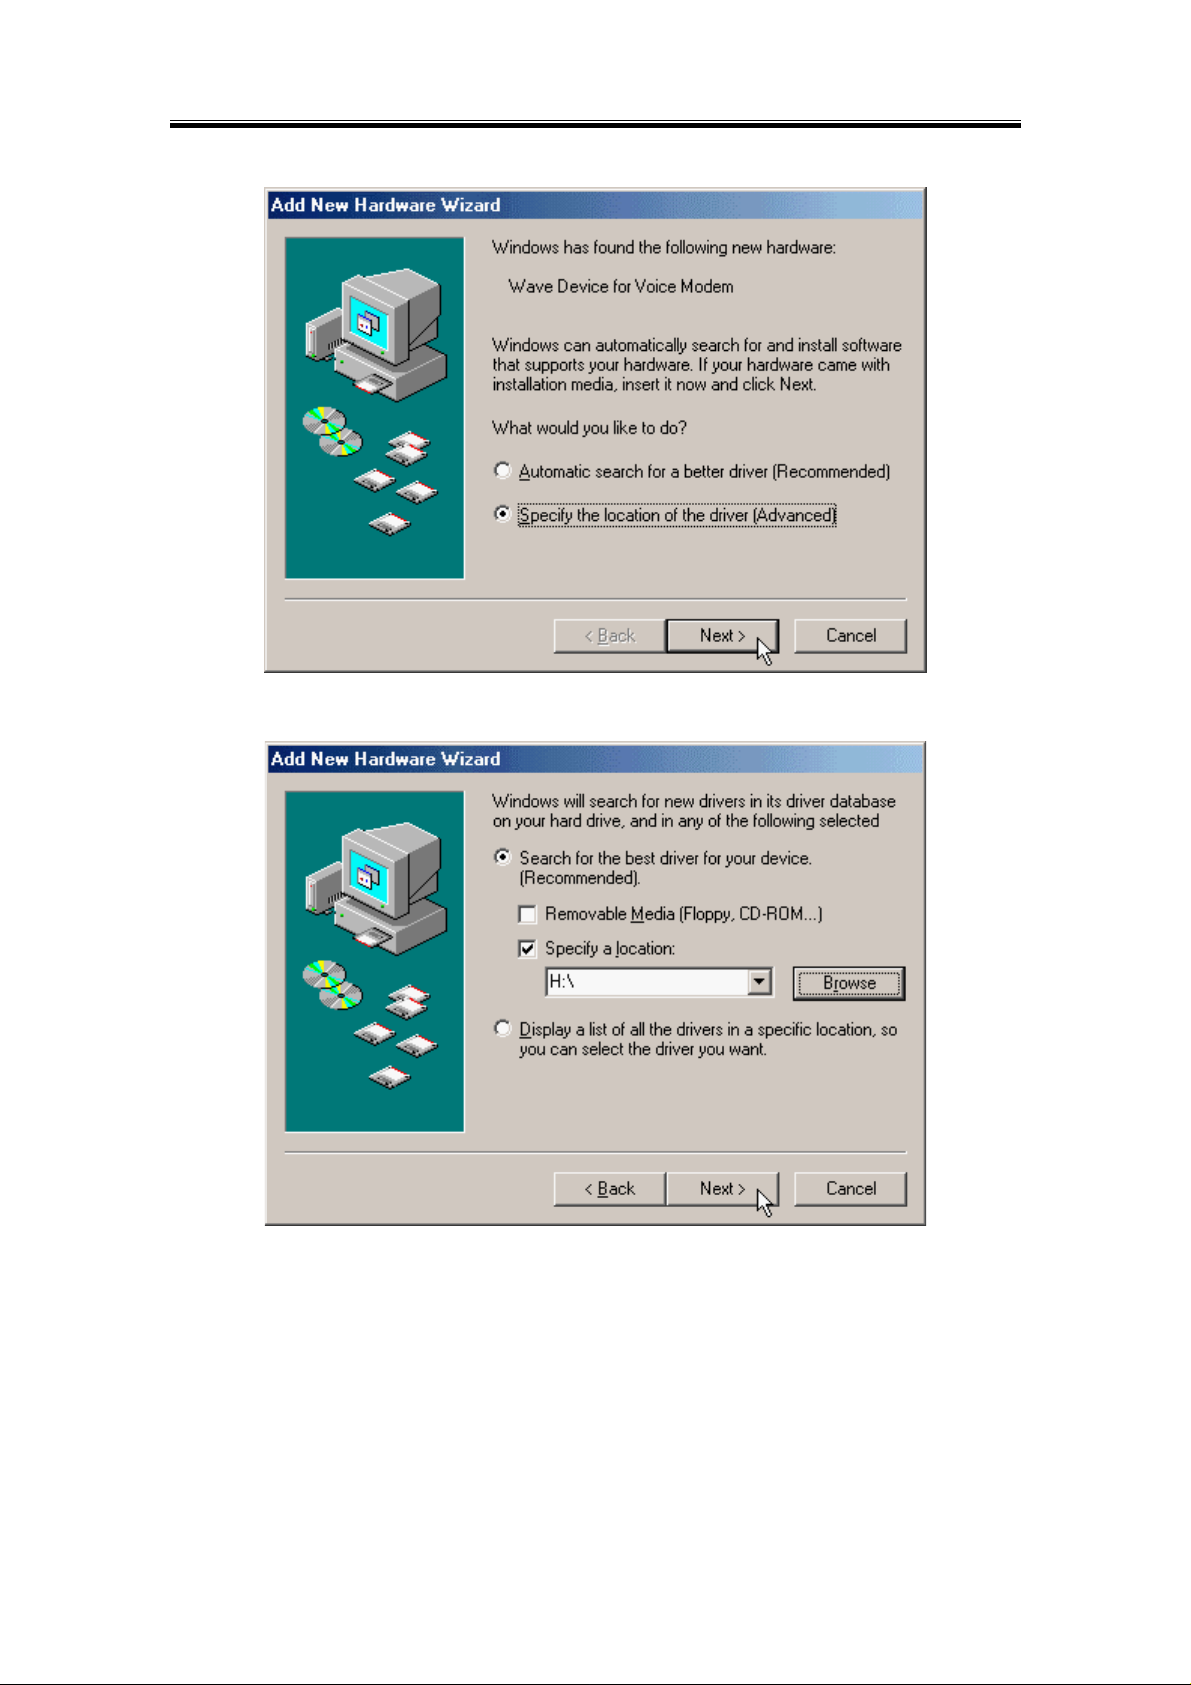
5. When you see the message of
6.
Click
Other Locations…
to install from the installation disk.
Wave Device for Voice Modem
, then click
to search the driver.
Next
10
Page 11

D-Link DFM-560EL External Modem Us er’s Guide
Select the locatio n of
7.
8. Click
and click OK to continue. (G is the letter of CD-ROM drive).
G:
to end this installation procedure.
Finish
11
Page 12
D-Link DFM-560EL External Modem Us er’s Guide
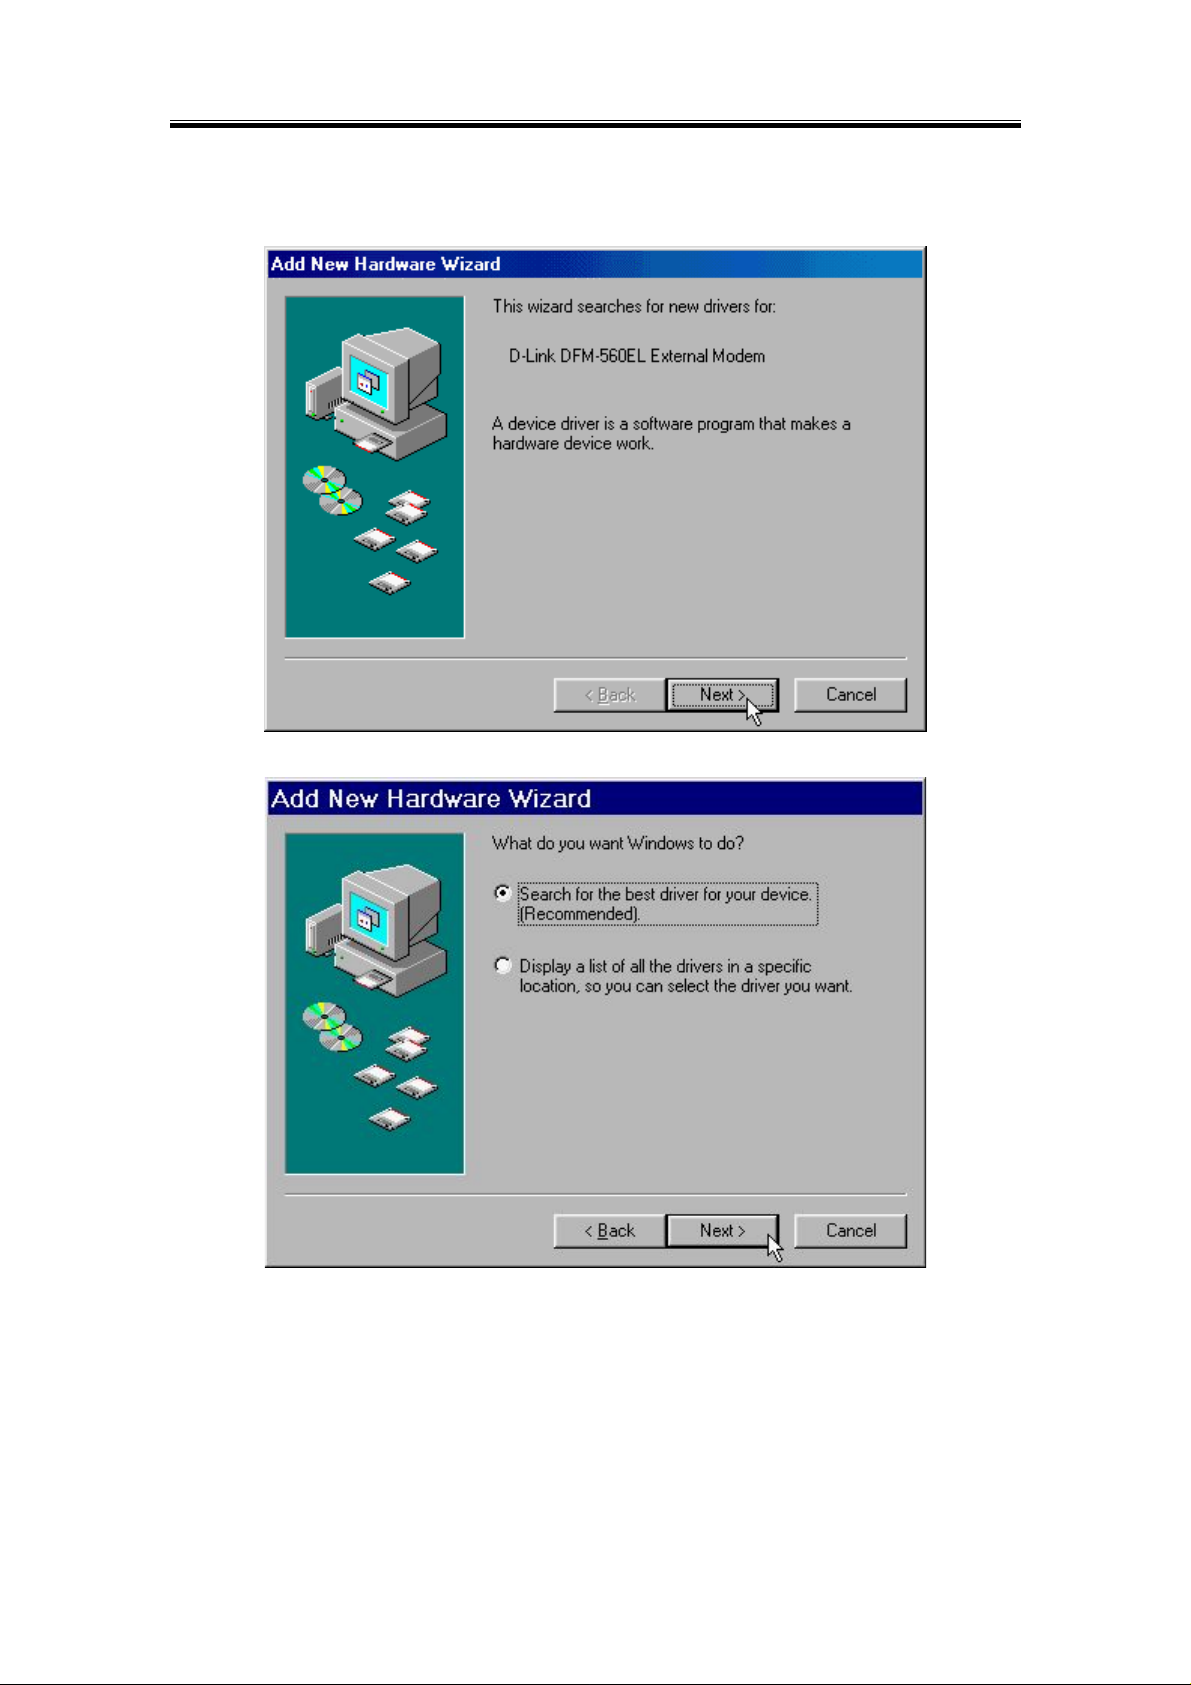
4.2 Windows 98
1. Please insert the driver CD supplied when you see the message of
Modem
, then click
to search for the driver.
Next
D-Link DFM-560EL Exter nal
2. Select the
Search for the best driver for your device. [Recommended]
and click
to continue.
Next
12
Page 13
D-Link DFM-560EL External Modem Us er’s Guide
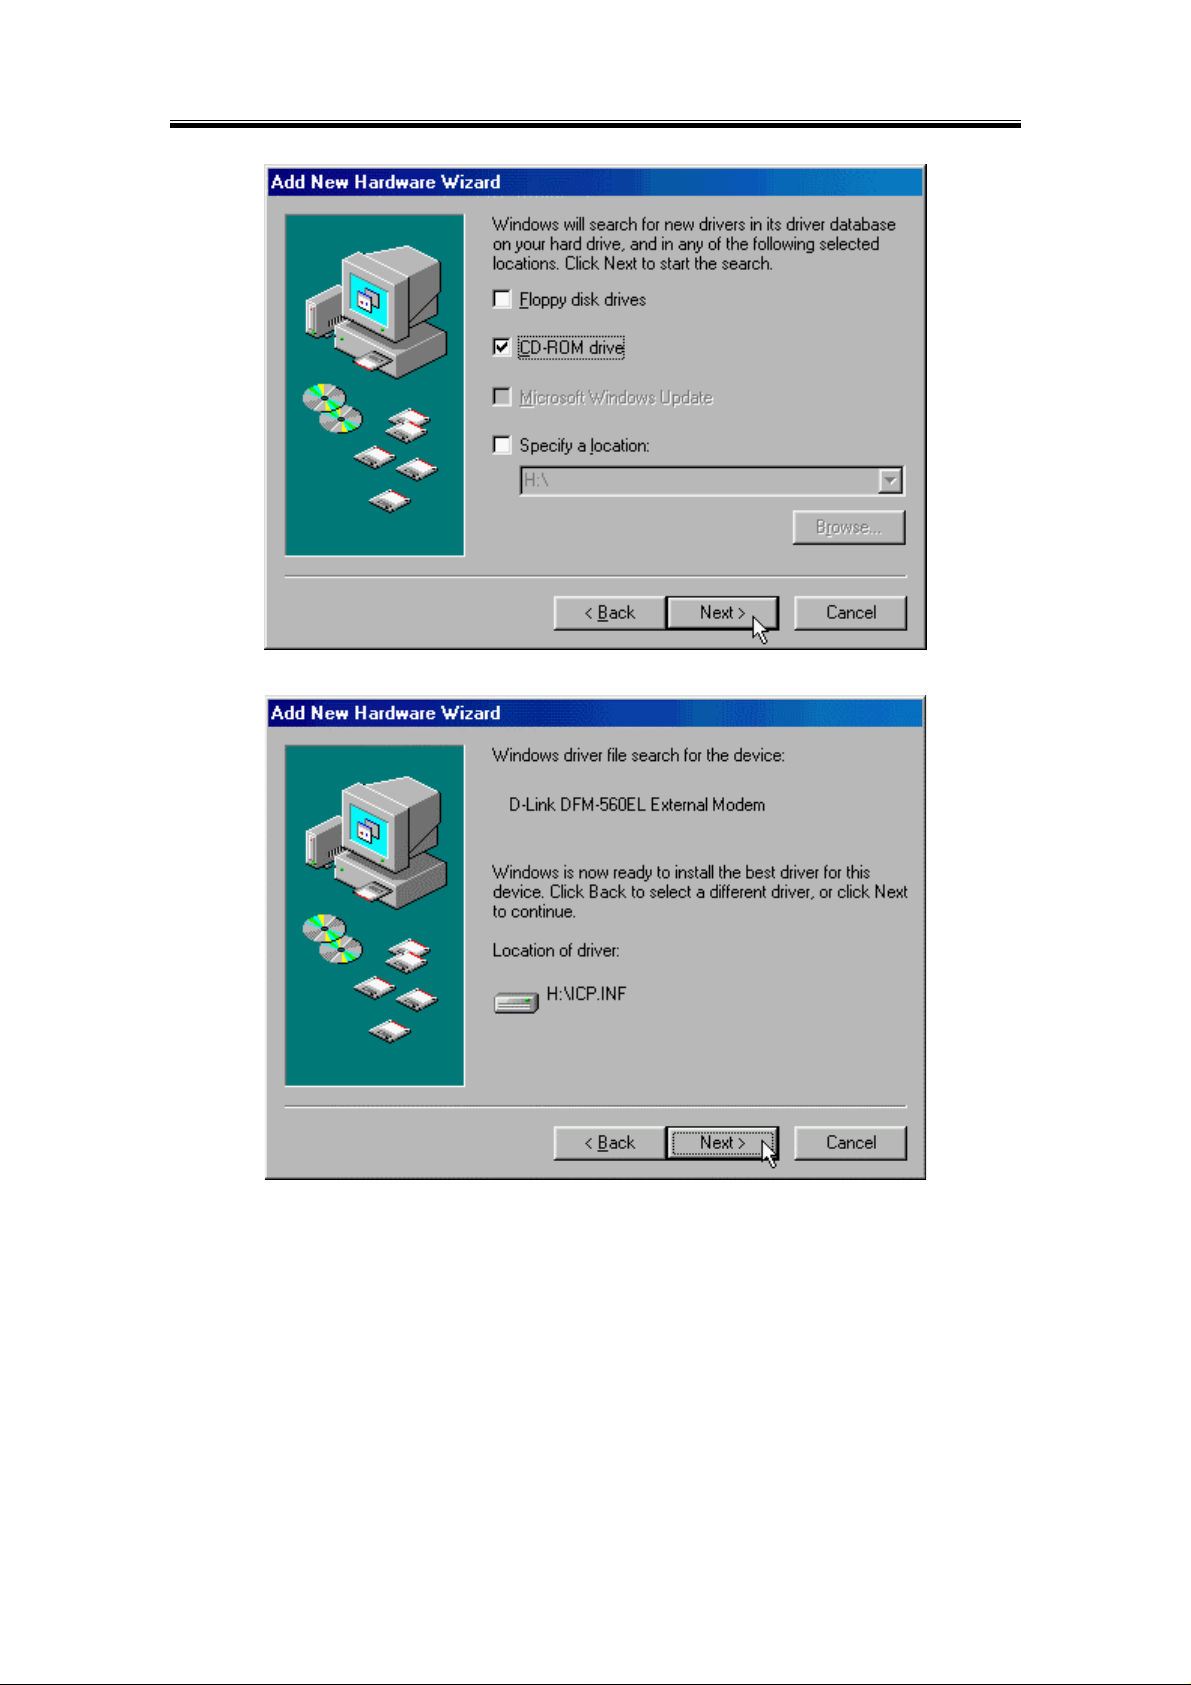
3. Select the
4. Click
CD-ROM drive
to start the installation.
Next
and click
to start the search.
Next
13
Page 14

D-Link DFM-560EL External Modem Us er’s Guide
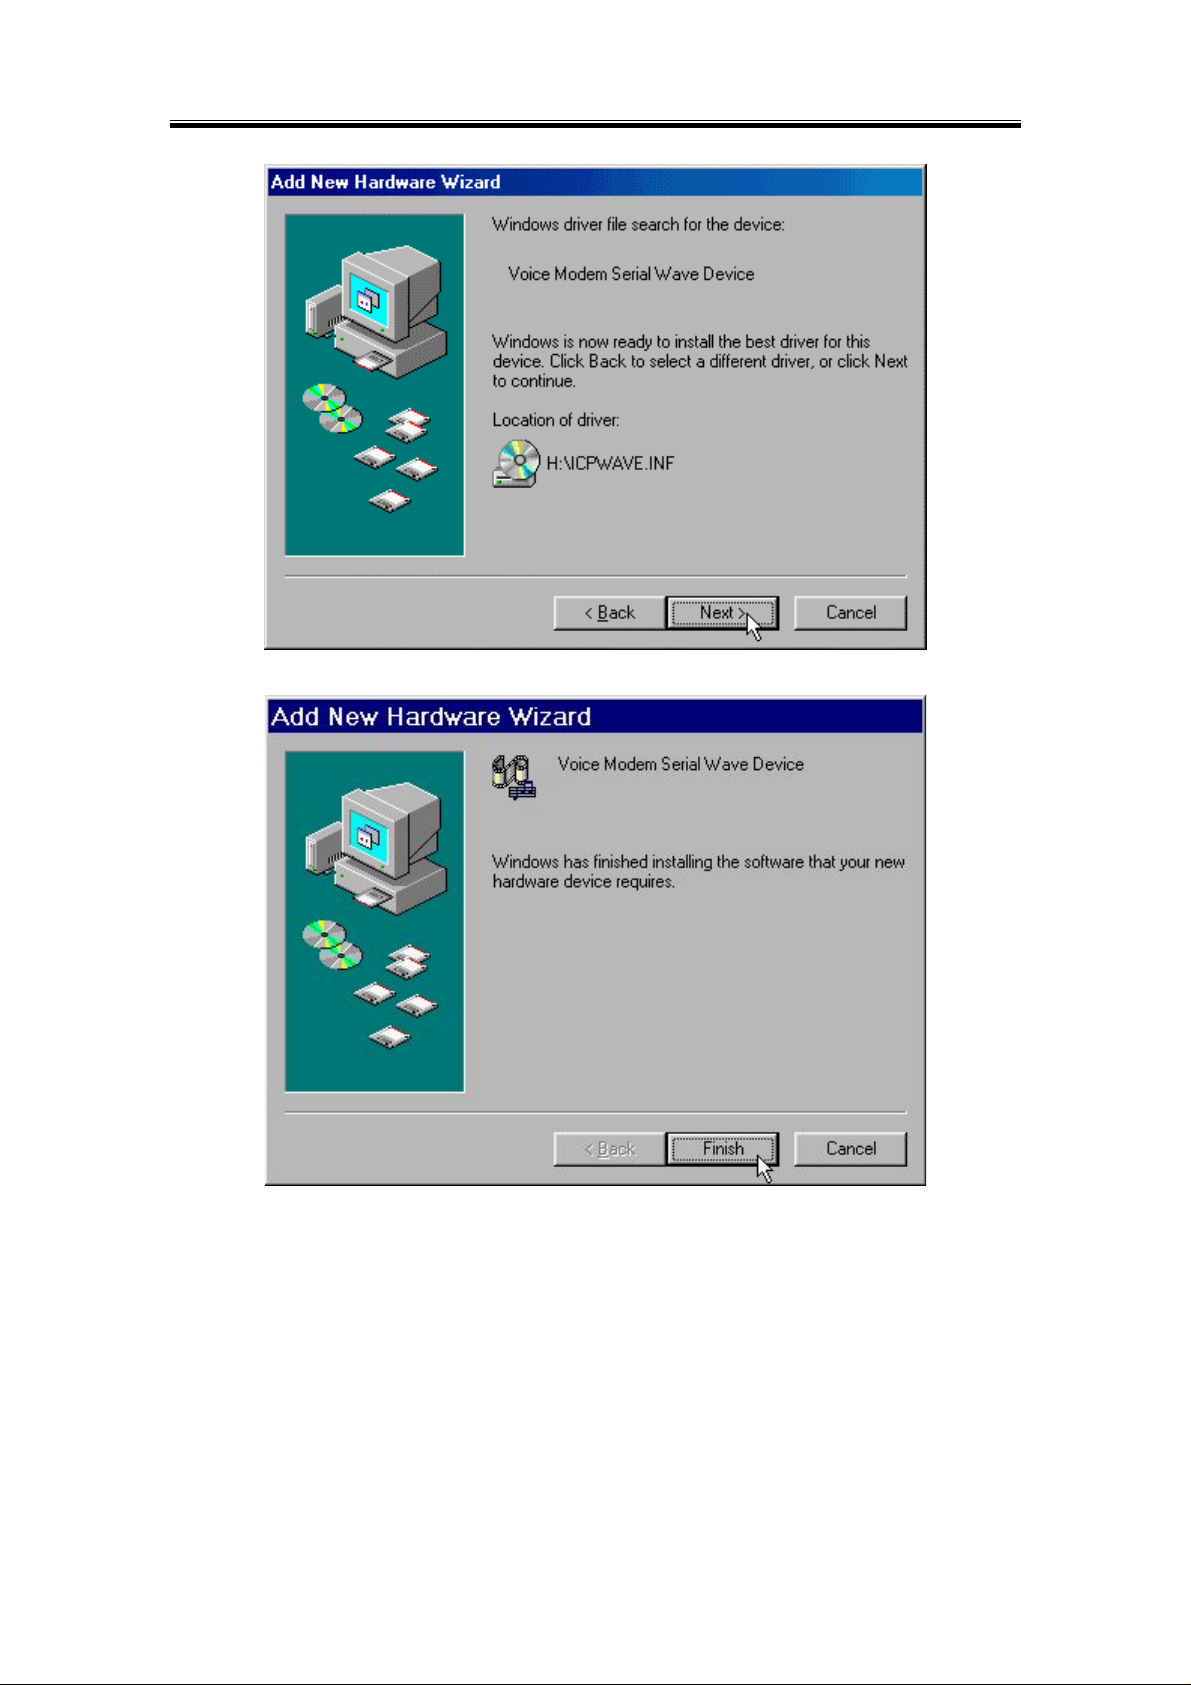
5. Click
6. When you see the message of
to end this installation procedure.
Finish
Wave Device for Voice Modem
, then click
to search the driver.
Next
14
Page 15
D-Link DFM-560EL External Modem Us er’s Guide
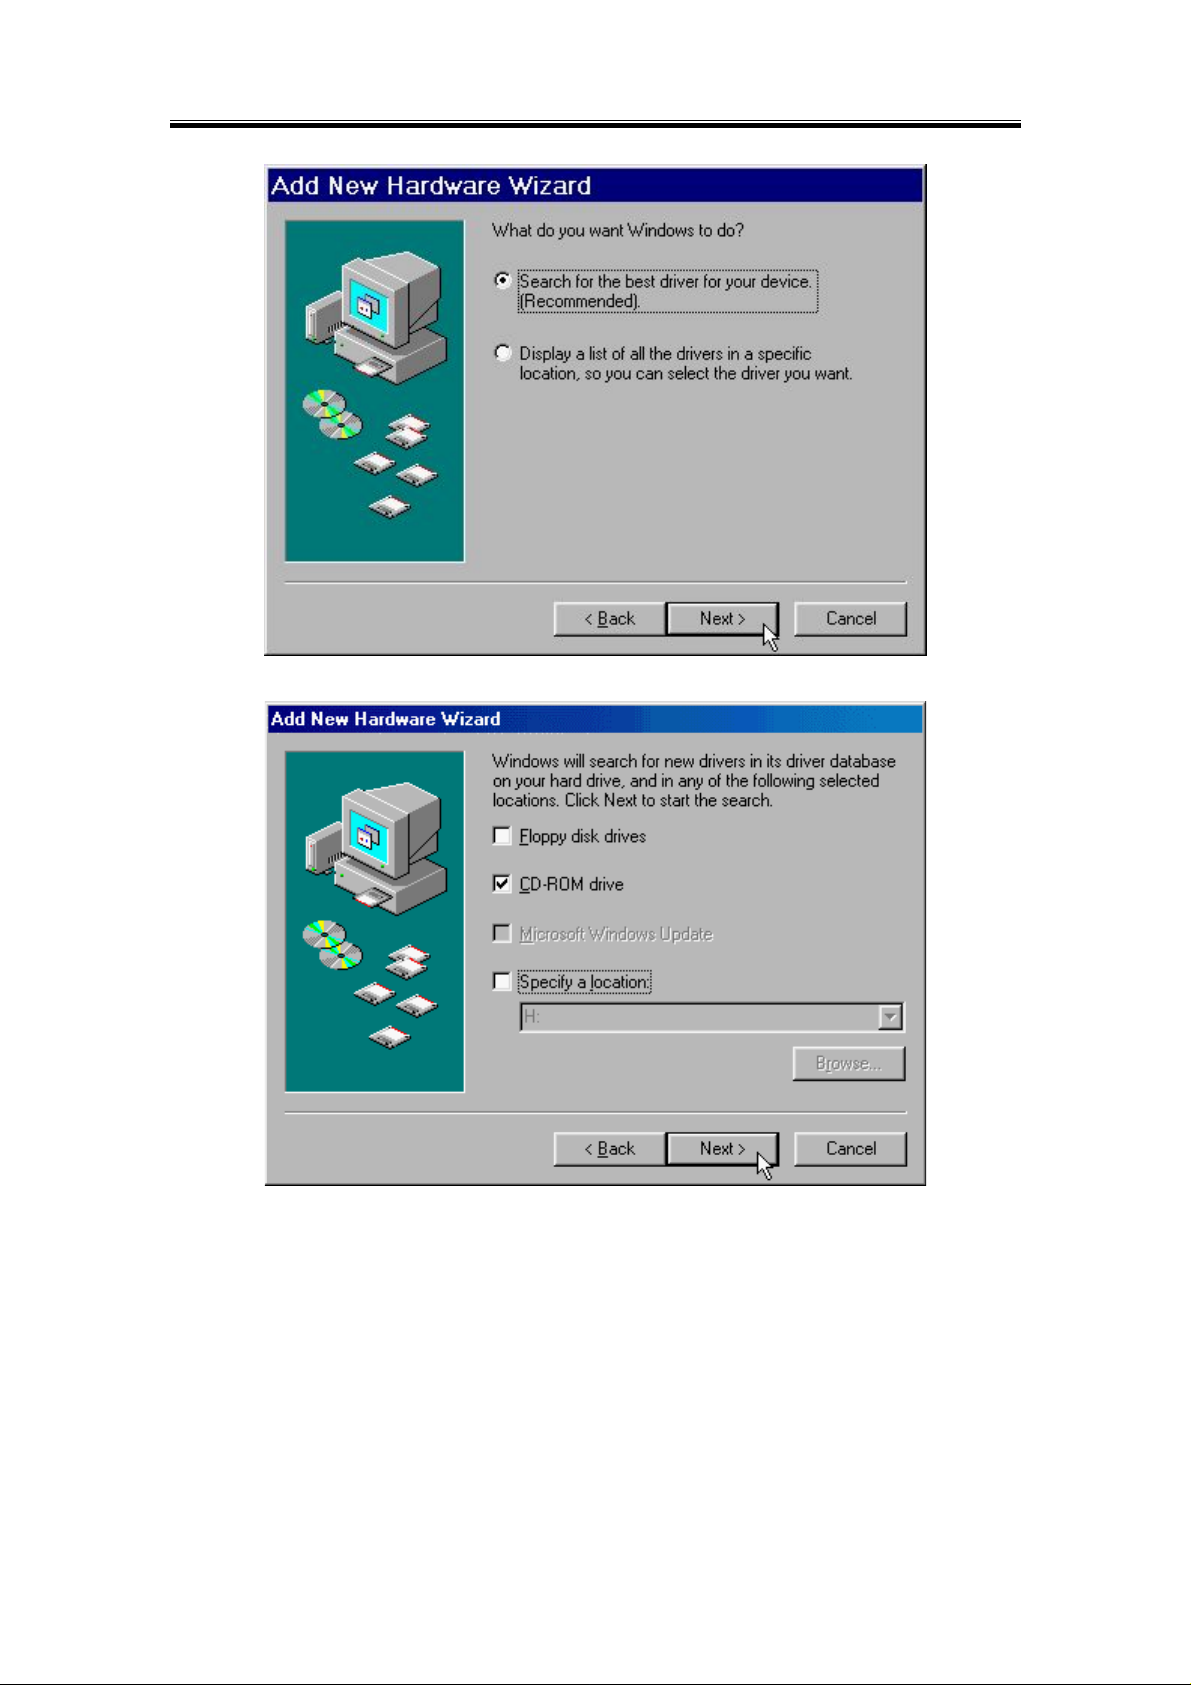
7. Select the
8. Select the
Search for the best driver for your device. [Recommended]
CD-ROM drive
and click
to start the search.
Next
and click
to continue.
Next
15
Page 16
D-Link DFM-560EL External Modem Us er’s Guide
9. Click
10. Click
Next
Finish
to start the installation.
to end this procedure.
16
Page 17
D-Link DFM-560EL External Modem Us er’s Guide
4.3 Windows ME
1. Please insert the driver CD supplied when you see the message of
Modem
for the driver.
2. Select the
type in
appearing., select
H:\
Specify the location of the driver [Advanced]
Search for the best driver for your device. [Recommended], Specify a location
(H is the letter of the CD-ROM drive), then click
Next
D-Link DFM-560EL Exter nal
then click
to continue.
Next
to search
and
17
Page 18
D-Link DFM-560EL External Modem Us er’s Guide
3. Click
4. Click
Next
Finish
to start the installation.
to end this installation procedure.
18
Page 19
D-Link DFM-560EL External Modem Us er’s Guide
5. When you see the message of
driver [Advanced]
6. Select the
type in
Search for the best driver for your device. [Recommended], Specify a location
(H is the letter of the CD-ROM drive), then click
H:\
then click
Wave Device for Voice Modem
to install the wave device.
Next
Next
, select
Specify the location of the
to continue.
and
19
Page 20

D-Link DFM-560EL External Modem Us er’s Guide
7. Click
8. Click
Next
Finish
to start the installation.
to end this procedure.
20
Page 21
D-Link DFM-560EL External Modem Us er’s Guide
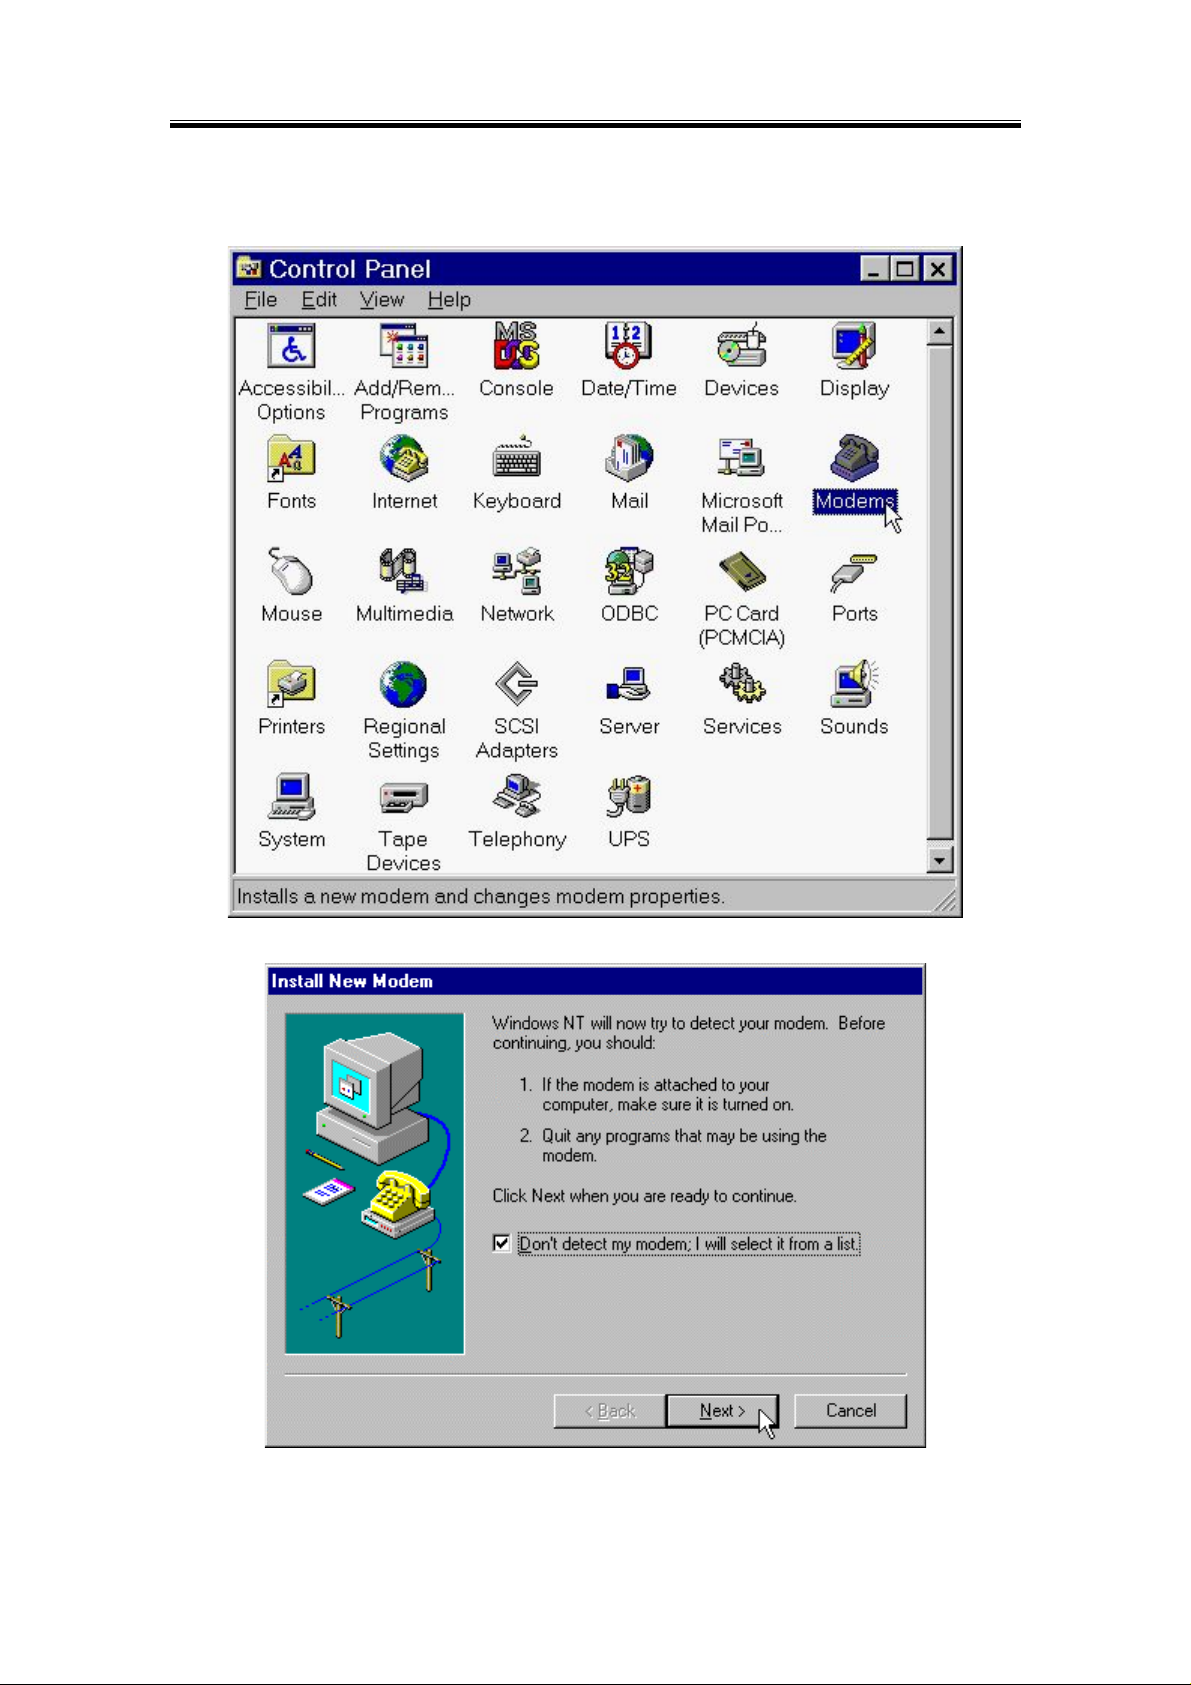
4.4 Windows NT4.0
1. Please go to
new modem..
Start>My Computer\ Control Panel
, then double-click on
Modems
icon to install a
2. Select
Don’t detect my modem; I will select it from a list
, then click
to continue.
Next
21
Page 22
D-Link DFM-560EL External Modem Us er’s Guide
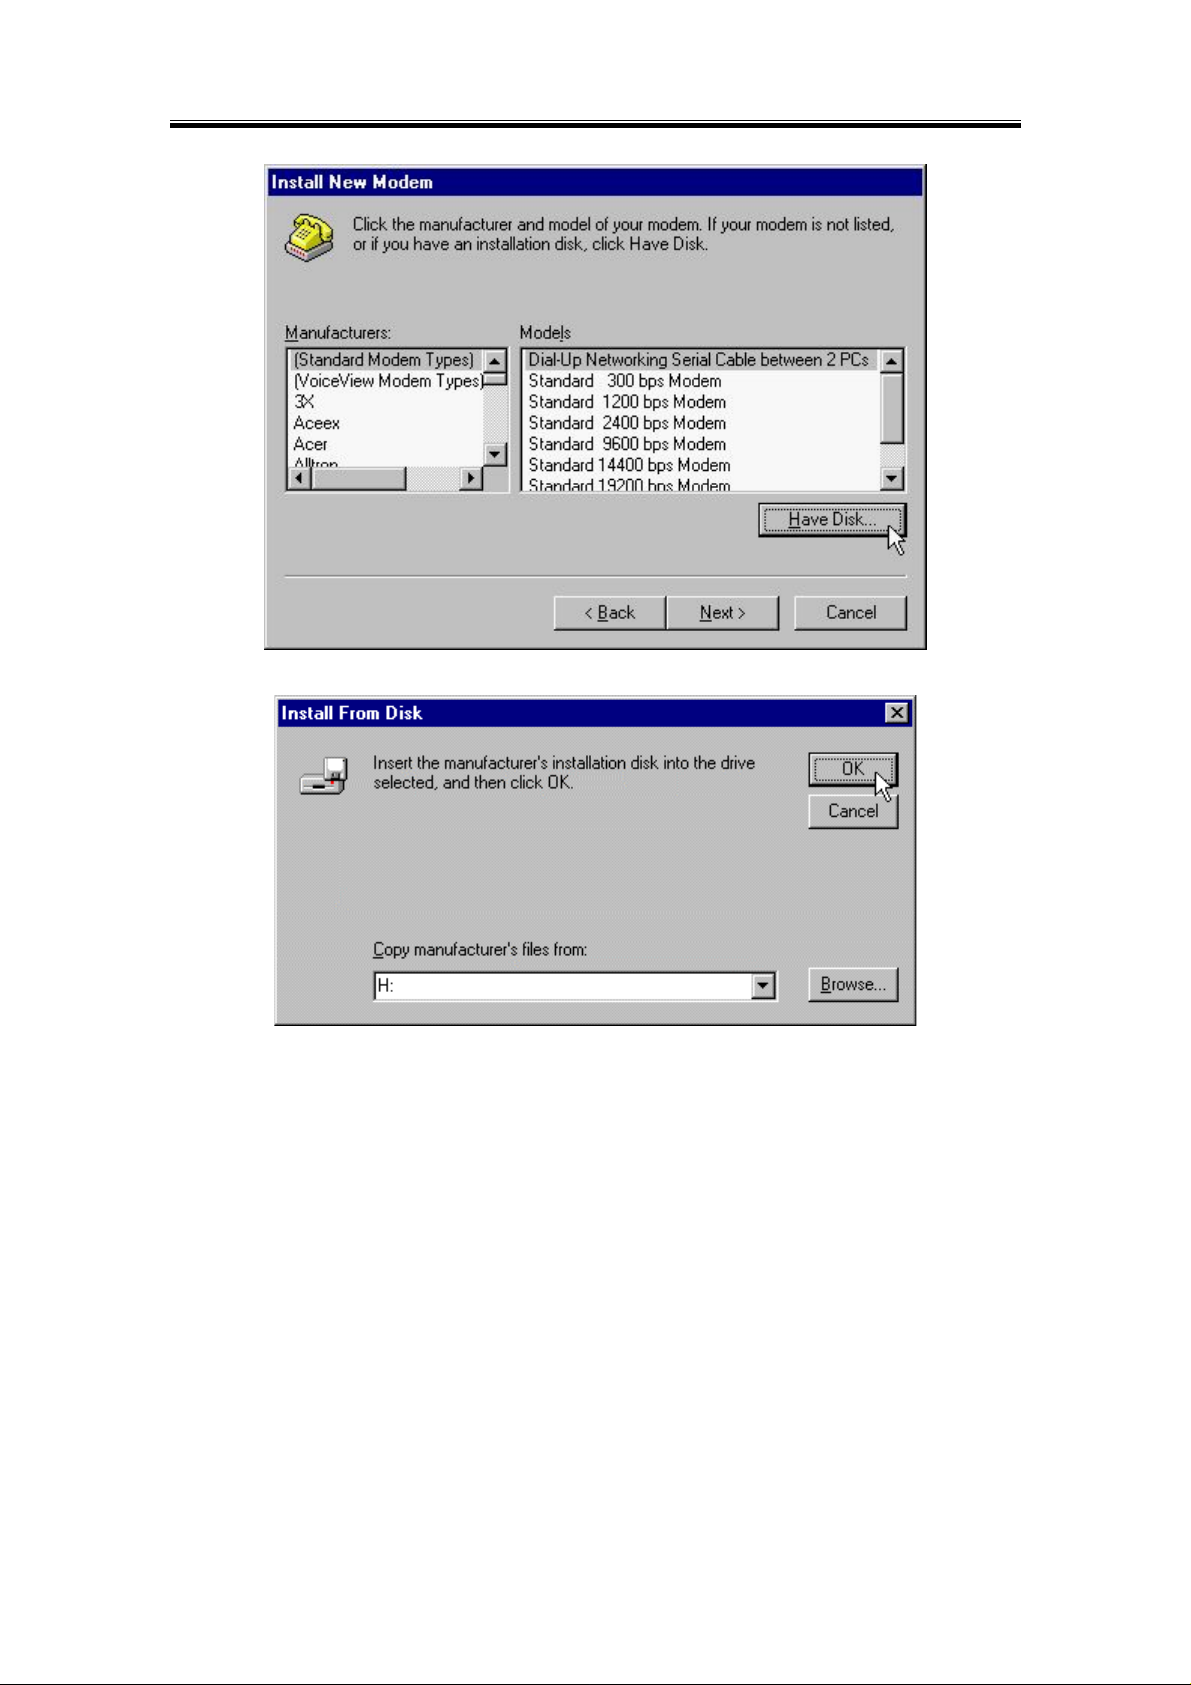
3. Click
4. Select the location of
Have Disk…
to install from the installation disk.
and click OK to continue. (H is the letter of CD-ROM drive).
H:
22
Page 23

D-Link DFM-560EL External Modem Us er’s Guide
5. Select
6. Select
selected modem.
D-Link DFM-560EL Exter nal Modem
Selected ports
and then
select COM port
from the list of Models, then click
that selected before. Click
to start installing the
Next
to continue.
Next
23
Page 24

D-Link DFM-560EL External Modem Us er’s Guide
7. Click
to complete the installation.
Finish
8. Click
Remote Access Service (RAS)
to end this procedure as y ou see th e
Close
is installed on your computer, Windows NT will ask you to
reconfigure Dial-Up Networking for the new Modem.
D-Link DFM-560EL Exter nal Modem. NOTE
: If
24
Page 25

D-Link DFM-560EL External Modem Us er’s Guide
9. Move your cursor as following sequence
Then double-click on the
Network
icon to configure the
Start\Settings\Control Panel
Dial-Up Networking
and click
.
Control Panel
.
25
Page 26

D-Link DFM-560EL External Modem Us er’s Guide
10. Click on the
Remote Access Service
Services
tab and select
on the screen click
Remote Access Service
Add
to install
, then click
Remote Access Service
Properties
. If you can’t see
.
11. Click on the
button to add modem. If there is any modem in the list, please click
Add
Remove
first.
26
Page 27

D-Link DFM-560EL External Modem Us er’s Guide
12. Select
13. Click
D-Link DFM-560EL Exter nal Modem
Configure…
, then click OK to confirm the settings.
to configure port usage.
14. Select
Dial out only
for Port Usage and click OK to confirm the settings.
27
Page 28

D-Link DFM-560EL External Modem Us er’s Guide
15. Click
Network…
16. Select
TCP/IP
to configure t he network.
lick OK to confirm the settings.
17. Click
Continue
Click
18.
Yes
to complete the setup.
restart Windows NT.
28
Page 29

D-Link DFM-560EL External Modem Us er’s Guide
19. After restarting your computer, please double-click on the
double-click on the
Dial-Up Networking
icon.
My Computer
icon on the desktop and
20. If your phonebook is empty, please click OK to add an entry.
29
Page 30

D-Link DFM-560EL External Modem Us er’s Guide
21. You may use the name provided or enter a different one, then click
22. Select
The non-Windows NT server I am calling
…then click
Next
Next
.
.
30
Page 31

D-Link DFM-560EL External Modem Us er’s Guide
23. Enter the phone number of your local ISP and click
24. Select
Point-to-Point Protocol (PPP)
and click
Next
Next
.
.
31
Page 32

D-Link DFM-560EL External Modem Us er’s Guide
25. Consult with your local ISP for the choice and click
Next
.
26. Enter your IP address if you have a fixed one or leave the value:
0.0.0.0
, then click
Next
.
32
Page 33

D-Link DFM-560EL External Modem Us er’s Guide
27. Enter the IP addresses of a
sure. Then click
28. Click
Finish
.
Next
.
DNS
and/or
server for your local ISP or set
WINS
0.0.0.0
if you are not
33
Page 34

D-Link DFM-560EL External Modem Us er’s Guide
29. Click on the
30. Select
D-Link DFM-560EL Exter nal Modem (COM3)
Configure
More
button..
buttons and select
Edit entry and modem properties
from Dial using list and click on the
.
34
Page 35

D-Link DFM-560EL External Modem Us er’s Guide
31. Enable all the
Hardware Features
32. Click on the
Server
Enable PPP LCP extensions
and select
115200
tab and enable three options of
.
from
Initial speed(bps)
list, then click OK.
TCP/IP, Enable software compression
and
35
Page 36

D-Link DFM-560EL External Modem Us er’s Guide
33. Click on the
then click OK.
34. Click
to connect to.
Dial
Security
tab and enable the option:
Accept any authentication including clear text
,
36
Page 37

D-Link DFM-560EL External Modem Us er’s Guide
35. Enter
User name
connection.
and
Password
and click OK, and the modem will dial out to your ISP and get a
37
Page 38

D-Link DFM-560EL External Modem Us er’s Guide
4.5 Windows 2000
1. Windows will detect the modem automatic, please insert the driver CD supplied and click
Next
.
2. Select
Search for a suitable driver for my device [recommended]
, then click
Next
.
38
Page 39

D-Link DFM-560EL External Modem Us er’s Guide
3. Select
CD-ROM drives
, then click
Next
.
4. Windows will found a driver for this device, then click
Next
.
39
Page 40

D-Link DFM-560EL External Modem Us er’s Guide
5. Click
6. Click
Yes
Finish
to continue.
to end this procedure.
40
Page 41

D-Link DFM-560EL External Modem Us er’s Guide
4.6 Windows XP
1. Please insert the driver CD supplied when you see the message of
Modem
the driver.
, Select the
Install from a list or specific location [Ad vanced]
D-Link DFM-560EL Exter nal
then click
to search for
Next
2. Select
Include this location in the search:
use
Browse
to search, then click
to continue.
Next
and type in
(H is the letter of the CD-ROM drive) or
H:\
41
Page 42

D-Link DFM-560EL External Modem Us er’s Guide
3. Click
4. Click
Continue Anyway
Finish
to continue.
to end this procedure.
42
Page 43

D-Link DFM-560EL External Modem Us er’s Guide
Chapter 5 Diagnostics
5.1 Windows 95/98/ME
1. Please go to
Start\ Settings\ Control Panel
and double-click on the
Modems
icon.
2. To test the modem by clicking on the
Modem is setting and click on the
More Info…
Diagnostics
tab. Then select the
button to start the test.
COM Port
where Topic
43
Page 44

D-Link DFM-560EL External Modem Us er’s Guide
3. If your modem is responding to AT commands and functioning correctly, it means that your modem
is working properly. Click OK to end this procedure.
44
Page 45

D-Link DFM-560EL External Modem Us er’s Guide
5.2 Windows 2000
1. Move your cursor as following sequence
Then double-click on the
Phone and Modem Options
Start\ Settings\ Control Panel
icon.
and click
Control Pane
l.
2. Click
Modems
tab, then select
D-Link DFM-560EL Exter nal Modem
and click
Properties
.
45
Page 46

D-Link DFM-560EL External Modem Us er’s Guide
3. Click
Diagnostics
tab, then click
Query Modem
.
4. If your modem is responding to AT commands and functioning correctly, it means that your modem
is working properly. Click OK.
46
Page 47

D-Link DFM-560EL External Modem Us er’s Guide
5.3 Windows XP
1. Move your cursor as following sequence
Start\ Settings\ Control Panel
. Click on the
System
icon.
47
Page 48

D-Link DFM-560EL External Modem Us er’s Guide
2. Click
Hardware
tab and select the modem, then click
Device Manager
.
48
Page 49

D-Link DFM-560EL External Modem Us er’s Guide
3. Click
Modem
Modems
.
tab and select the modem. Then double-click on the
D-Link DFM-560EL Exter nal
4. Click
Diagnostics
tab, then click
Query Modem
.
49
Page 50

D-Link DFM-560EL External Modem Us er’s Guide
5. If your modem is respon ding to AT commands and func tioning correct ly, it means that your modem is
working properly. Click OK.
50
Page 51

D-Link DFM-560EL External Modem Us er’s Guide
Chapter 6 Uninstalling
6.1 Windows 95/98/ME
1. Please go to
Start\ Settings\ Control Panel
and double-click on the
modems
icon.
51
Page 52

D-Link DFM-560EL External Modem Us er’s Guide
2. Select
D-Link DFM-560EL Exter nal Modem
.
then click
Remove
.
3. Click
Close
.
52
Page 53

D-Link DFM-560EL External Modem Us er’s Guide
6.2 Windows NT 4.0
1. Please go to
new modem.
Start\ My Computer\ Control Panel
, then double-click on
Modems
icon to install a
2. Select
D-Link DFM-560EL Exter nal Modem
then click
Remove
.
53
Page 54

D-Link DFM-560EL External Modem Us er’s Guide
3. Click
4. Click
.
Yes
Close
.
54
Page 55

D-Link DFM-560EL External Modem Us er’s Guide
6.3 Windows 2000
1. Move your cursor as following sequence
Add/Remove Hardware
icon.
Start\ Settings\ Control Panel
. Then double-click on the
2. Click
Next.
55
Page 56

D-Link DFM-560EL External Modem Us er’s Guide
3. Select
Uninstall\ Unplug a device
, then click
Next
.
4. Select
Uninstall a device
and click
Next
to continue
56
Page 57

D-Link DFM-560EL External Modem Us er’s Guide
5. Select
D-Link DFM-560EL Exter nal Modem
, then click
Next
to continue.
6. Select
YES, I want to uninstall this device
, then click
to continue.
Next
57
Page 58

D-Link DFM-560EL External Modem Us er’s Guide
7. Click
to end this procedure.
Finish
58
Page 59

D-Link DFM-560EL External Modem Us er’s Guide
6.4 Windows XP
1. Move your cursor as following sequence
Start\ Settings\ Control Panel
. Click on the
System
icon.
59
Page 60

D-Link DFM-560EL External Modem Us er’s Guide
2. Click
Hardware
tab and select the modem, then click
Device Manager
.
60
Page 61

D-Link DFM-560EL External Modem Us er’s Guide
3. Click
Modem
Modems
.
tab and select the modem. Then double-click on the
D-Link DFM-560EL Exter nal
4. Click
Driver
tab, then click
Uninstall
.
61
Page 62

D-Link DFM-560EL External Modem Us er’s Guide
5. Click
to end this procedure.
OK
62
Page 63

D-Link DFM-560EL External Modem Us er’s Guide
Chapter 7 Troubleshooting
Modem will not dial-out
Check your phone cable connected properly into LINE jack.
z
If you use the Tone-dialing on a line, but required the Pulse-dialing method, please change the
z
command T to P in your dial command line.
Modem will not answer an incoming call
Check your phone cable connected properly into LINE jack.
z
By connect a Telephone to the PHONE jack. The attached telephone will ring if you try calling from
z
another telephone line.
Configured the modem to Auto-answer modem.
z
No connection after modem dial out
Remote modem may be not setting to answer mode, if you aren’t hearing a high-pitch tone when
z
remote modem answering.
Perhaps poor-quality or noise telephone lines try another call.
z
Data error when modem connection
Make sure your software data format is match to remote side (for example: 8,N, 1).
z
Make sure the modem flow control method is matched to communication software.
z
Try another call may be poor quality or noise telephone lines.
z
Fax and voice problems
Be sure the Data Communication is installed and worked properly, otherwise check the mentioned
z
procedure carefully and consult the Fax/Voice manual step by step.
63
Page 64

D-Link DFM-560EL External Modem Us er’s Guide
Chapter
Commands
8
Most people use the communication software programs to tell modems
what to do. Therefore, you may not use the commands in this chapter.
However, if you prefer to communicate with your modem directly, you
can type the commands described below. Here describes how to work in the terminal mode.
8.1 Typing Commands
Use the BACKSPACE key to delete typing errors.
z
Every command (except A/ and +++) must begin with the AT or
z
at prefix and be entered by pressing the <Enter> key. For
example, to execute the V command, you would type ATV and
press the <Enter> key.
When you see an n, replace the n with one of the letter or numeric
z
options listed for that command. For example, for the En
Command, you might type ATE1.
64
Page 65

D-Link DFM-560EL External Modem Us er’s Guide
8.2 AT Commands
A Go off-hook and attempt to answer a call.
&Cn Control Carrier Detect (CD) Signal
&C0 CD override
&C1 Normal CD operations
Dn Dial
0-9 DTMF digits 0 to 9
P Pulse (rotary) dial
T Tone dial
W Wait for second dial tone
&Dn DTR Option
&D0 Ignore an on-to-off transition of DTR
&D1 Switch to on-line command mode without disconnection
&D2 Normal DTR operations.
&F Load Factory Configuration (Profile)
Hn Disconnect (Hang-up)
H0 Hang up (go on-hook)
H1 Go off-hook
In Identification
I0 Report product code
I3 Report OEM defined identifier string
I4 Report firmwave version
Mn Speaker Control
M0 Speaker is always off
M1 Speaker ON until CONNECT
M2 Speaker is always on
M3 Speaker off during ㄅ dialing and receiving carrier and turn
Speaker on during answering.
On Return to On-Line Data Mode
O0 Go on-line
O1 Go on-line and restrain
65
Page 66

D-Link DFM-560EL External Modem Us er’s Guide
8.3 S-Register Definitions
Sr=n Set Register r to n
Sr? Display contents of S-Register
S0 Number of Rings to Auto-Answer
The number of ring the modem waits for before it auto
Answers.
Range 0-255 (rings)
Default 0 (Country dependent)
S6 Wait Time before Blind Dialing
The time to pause after off-hook before blind dialing.
Range 2-255
Default 2 (Seconds, Country dependent)
S8 Pause Time For Dial Delay
The time to pause for the pause dial modifier, “Comma”
Range 0-255
Default 2 (seconds)
S9 Carrier Detect Response Time
The time a signal is detected an qualified as a carrier.
This timing lets your modem ignore spurious signals
that are the same frequency as the carrier. Higher S9
Values reduce the chance of a carrier being detected.
Ranges 1-255
Default 6 (0.6 seconds)
S10 Lost Carrier To Hang Up Delay
The time the mode m waits b efore hanging up for ca rrier loss.
Range 1-255
Default 14 (1.4 seconds)
S11 DTMF Tone Duration
The time for DTMF tone dialing and the time between the tone
Spacing.
Range 5-255
Default 95 (ms, Country dependent)
66
Page 67

D-Link DFM-560EL External Modem Us er’s Guide
LIMITED WARRANTY
D-Link provides this limited warranty for its product o nly to the person or entity who or ig ina lly purchased the product
from D-Link or its authorized reseller or distributor.
Limited Hardw are Warranty:
(“Hardware”) will be free from material defects in w orkmanship and materials from the da te of orig in a l re tail purchase
of the Hardware, for the period set forth below applicable to the product type (“Warranty Period”) if the Hardware is
used and serviced in accordance with applicable documentation; provided that a completed Registration Card is
returned to an Authorized D-Link Servic e Off ice within ninety (90) da y s after the da te of origina l retail purc hase of the
Hardware. If a completed Registration Card is not received by an authorized D-Link Service Office within such ninety
(90) period, then the Warranty Period shall be ninety (90) days from the date of purchase.
Product Type Warranty Period
Product (excluding power supplies and fans) One (1) Year
Power Supplies and Fans One (1) Year
Spare parts and spare kits Ninety (90) days
D-Link warrants that the hardware portion of the D-Link products described below
D-Link’s sole obligation shall be to repair or replace the defective Hardware at no charge to the original owner. Such
repair or replacement will be rendered by D-Link at an Authorized D-Link Service Office. The replacement Hardware
need not be new or o f an identical make, model or part; D-Link may in its discretion may replace the defective
Hardware (or any part thereof) with any reconditioned product that D-Link reasonably determines is substantially
equivalent (or superior) in all material respects to the defective Hardware. The Warranty Period shall extend for an
additional ninety (90) days after any repaired or replaced Hardware is delivered. If a material defect is incapable of
correction, or if D-Link determines in its sole discretion that it is not practical to repair or replace the defective
Hardware, the price paid by the original purchaser for the defective Hardware will be refunded by D-Link upon return
to D-Link of the defective Hardware. All Hardware (or part thereof) that is repl aced by D-Link, or for which the
purchase price is refunded, shall become the property of D-Link upon replacement or refund.
Limited Software Warranty:
conform to D-Link’s then current functional specifications for the Software, as set forth in the applicable
documentation, f r om the date of origina l de liv e ry of the Software f or a pe ri o d of ninety (90) day s (“Warranty Period”),
if the Softwa re is pr oper ly installed on a pproved hardware a nd o pe r a t ed a s c on te mplated in its docum e nta tion . D -Link
further warrants that, during the Warranty Period, the magnetic media on which D-Link delivers the Software will be
free of physical defects. D-Link’s sole obligation shall be to replace the non-conforming Software (or defective media)
with software that substantially conforms to D-Link’s functional specifications for the Software. Except as otherwise
agreed by D-Link in writing, the replacement Software is provided only to the original licensee, and is subject to the
terms and conditions of the license granted by D-Link for the Software. The Warranty Period shall extend for an
additional ninety ( 90) da ys after any re plac em e nt Sof tw a r e is de livered. If a material non-c o nformance is incapable of
correction, or if D-Link determines in its sole discretion that it is not practical to replace the non-conforming Software,
the price paid by the original licensee for the non-conforming Software will be refunded by D-Link; provided that the
non-conforming Software (and all copies thereof) is first returned to D-Link. The license granted respecting any
Software for which a refund is given automatically terminates.
D-Link warrants that the softwa re portion of the product (“ Sof twa re”) will substantia lly
67
Page 68

D-Link DFM-560EL External Modem Us er’s Guide
What You Must Do For Warranty Service:
Registration Card
Authorized D-Link Service Office for each D-Link product within ninety (90) days after the product is purchased
and/or licensed. The addresses/telephone/fax list of the nearest Authorized D-Link Service Office is provided in the
back of this manual. FAILURE TO P ROPERLY COMPLETE AND TIMELY RETURN THE REGISTRATION
CARD MAY AFFECT THE WARRANTY FOR THIS PRODUCT.
Submitting A Claim
W arranty Period t o an Authorized D-L ink Service Off ice. The claim m ust include a written de scription of the Hardwa re
defect or Software nonconformance in sufficient detail to allow D-Link to confirm the same. The original product
owner must obta in a Return Material Authorization (RMA) number from the A uthor ize d D -Link Service Office and, if
requested, provide w ritten proof o f purcha se of t he pro duct (suc h as a copy of the dated p urchase i nvoic e for the prod uct)
before the warranty service is provided. After an RMA number is issued, the defective product must be packaged
securely in the original or othe r suitable shipping pa ck age to ensure that it w ill not be da m age d in transit, and t he RMA
number must be promine ntly m arked on t he outside of the pack age. The pack aged prod uct shall be ins ured and s hipped
to D-Link, 53 Discovery Drive, Irvine CA 92618, with all shipping costs prepaid. D-Link may reject or return any
product that is not packaged and shipped in strict compliance with the foregoing requirements, or for which an RMA
number is not visible from the outside of the package. The product owner agrees to pay D-Link’s reasonable handling
and return shipping charges for any product that is not packaged and shipped in accordance with th e fo regoing
requirements, or that is determined by D-Link not to be defective or non-conforming.
What Is Not Covered:
This limited warranty provided by D-Link does not cover
Products that have been subjected to abuse, accident, alteration, mod ification, tampering, negligence, misuse, faulty
installation, l ack of reasonable care, repair or service in any way that is not contemplated in the documentat i on for the
product, or if the model or serial number has been altered, tampered with, defaced or removed; initial installation,
installation and rem ov a l of the pr oduct for repair, and s h ip ping c os t s ; ope r ationa l a djustments covered in the o pe ra ting
manual for the product, and normal maintenance; damage that occurs in shipment, due to act of God, failures due to
power surge, and cosmetic damage; and any hardware, software, firmware or other products or services provided by
anyone other than D-Link.
. The Registration Card provided at the back of this manual must be completed and returned to an
. Any claim under this limited warranty must be submitted in writing before the end of the
:
Disclaimer of Other Warranties:
PRODUCT IS PROVIDED “AS-IS” WITHOUT ANY WARRANTY OF ANY KIND INCLUDING, WITHOUT
LIMITATION, ANY WARRANTY OF MERCHANTABILITY, FITNESS FOR A PARTICULAR PURP OS E AND
NON-INFRINGEMENT. IF ANY IMPLIED WARRANTY CANNOT BE DISCLAIMED IN ANY TERRITORY
WHERE A PRODUCT IS SOLD, THE DURATION OF SUCH IMPLIED WARRANTY SHALL BE LIMITED TO
NINETY (90) DAYS. EXCEPT AS EXPRESSLY COVERED UNDER THE LIMITED WARRANTY PROVIDED
HEREIN, THE ENTIRE RISK AS TO THE QUALITY, SELECTION AND PERFORMANCE OF THE PRODUCT
IS WITH THE PURCHASER OF THE PRODUCT.
EXCEPT FOR THE LIMITED WARRANTY SPECIFIED HEREIN, THE
68
Page 69

D-Link DFM-560EL External Modem Us er’s Guide
Limitation of Liability:
ANY CONTRACT, NEGLIGENCE, STRICT LIABILITY OR OTHER L EG AL OR EQUIT ABLE THEORY FO R ANY
LOSS OF USE OF THE PRODUCT , INCONVENIENCE OR DAMAGES OF ANY CHARACTER, WHETHER
DIRECT, SPECIAL, INCIDENT AL OR CONSEQUENTIAL (INCLUDING, BUT NOT LIMITED TO, DAMAGES
FOR LOSS OF GOODWILL, WORK STOPPAGE, COMPUTER FAILURE OR MALFUNCTION, LOSS OF
INFORMATION OR DATA CONTAINED IN, STORED ON, OR INTEGRATED WITH ANY PRODUCT
RETURNED TO D-LINK FOR WARRANTY SERVICE) RESULTING FROM THE USE OF THE PRODUCT,
RELATING TO WA RRANTY SER VICE, OR ARISING OUT OF ANY BREACH OF THIS LIMITED WARRANTY,
EVEN IF D-LINK HAS BEEN ADVISED OF THE POSSIBILITY OF SUCH DAMAGES. THE SOLE REMEDY
FOR A BREACH OF THE FOREGOING LIMITED WARRANTY IS REPAIR, REPLACEMENT OR REFUND OF
THE DEFECTIVE OR NON-CONFORMING PRODUCT.
TO THE MAXIMUM EXTENT PERMITTED BY LAW, D-LINK IS NOT LIABL E UNDER
GOVERNING LAW:
Some states do not a llow exclusion or limitation of inc ide nta l or c onse que ntia l da mages, or limitations on how long an
implied warranty lasts, so the foreg oing limitations and exclusions m a y not apply. This limited war ra nty provides specif ic
legal rights and the produc t owner may als o ha v e othe r r ig hts which vary from state to state.
Wichtige Sicherheitshinweise
1. Bitte lesen Sie sich diese Hinweise sorgfältig durch.
2. Heben Sie diese Anleitung für den spätern Gebrauch auf.
3. Vor jedem Reinigen ist das Gerät vom Stromnetz zu trennen. Vervenden Sie keine Flüssig- oder Aerosolreiniger.
Am besten dient ein angefeuchtet es Tuch zur Reini gung.
4. Um eine Beschädigung des Gerätes zu vermeiden sollten Sie nur Zubehörteile verwenden, die vom Hersteller
zugelassen sind.
5. Das Gerät is vor Feuchtigkeit zu schützen.
6. Bei der Aufstellung des Gerätes ist auf sichern Stand zu achten. Ein Kippen oder Fallen könnte Verletzungen
hervorrufen. Verwenden Sie nur sichere Standorte und beachten Sie die Aufstellhinweise des Herst el lers.
7. Die Belüftungsöffnungen dienen zur Luftzirkulation die das Gerät vor Überhitzung schützt. Sorgen Sie dafür, daß
This Limited Warranty shall be governed by the laws of the state of California.
diese Öffnungen nicht abgedeckt werden.
8. Beachten Sie beim Anschluß an das Stromnetz die Anschlußwerte.
9. Die Netzanschlußsteckdose muß aus Gründen der elektrischen Sicherheit einen Schutzleiterkontakt haben.
10. Verlegen Sie die Netzanschlußleitung so, daß niemand darüber fallen kann. Es sollete auch nichts auf der Leitung
abgestellt werden.
11. Alle Hinweise und Warnungen die sich am Geräten befinden sind zu beachten.
12. Wird das Gerät über einen längeren Zeitraum nicht benutzt, sollten Sie es vom Stromnetz trennen. Somit wird im
Falle einer Überspannung eine Beschädigung vermieden.
69
Page 70

D-Link DFM-560EL External Modem Us er’s Guide
13. Durch die Lüftungsöffnungen dürfen niemals Gegenstände oder Flüssigkeiten in das Gerät gelangen. Dies könnte
einen Brand bzw. Elektrischen Schlag auslösen.
14. Öffnen Sie niemals das Gerät. Das Gerät darf aus Gründen der elektrischen Sicherheit nur von authorisiertem
Servicepersonal geöffnet werden.
15. Wenn folgende Situationen auftreten ist das Gerät vom Stromnetz zu trennen und von einer qualifizierten
Servicestelle zu überprüfen:
a – Netzkabel oder Netzstecker sint beschädigt.
b – Flüssigkeit ist in das Gerät eingedrungen.
c – Das Gerät war Feuchtigkeit au sgeset zt.
d – Wenn das Gerät nicht der Bedienungsanleitung ensprechend funktioniert oder Sie mit Hilfe dieser Anleitung
keine Verbesserung erzielen.
e – Das Gerät ist gefallen und/oder das Gehäuse ist beschädigt.
f – Wenn das Gerät deutliche Anzeichen eines Defektes aufweist.
16. Bei Reparaturen dürfen nur Orginalersatzteile bzw. den Orginalteilen entsprechende Teile verwendet werden. Der
Einsatz von ungeeigneten Ersatzteilen kann eine weitere Beschädigung hervorrufen.
17. Wenden Sie sich mit allen Fragen die Service und Repar tur betreffen an Ihren Serv icepa rtner. Somit stellen Sie die
Betriebssicherheit des Gerätes sicher.
18. Zum Netzanschluß dieses Gerä tes is t e ine g e pr üf te Leitung z u v e rwe nde n, Für einen Nennstrom bis 6A und einem
Gerätegewicht gr ßer 3kg ist eine Leitung nicht leichter als H05VV-F, 3G, 0.75mm2 einzusetzen.
T rademarks
Copyright 1999 D-Link Corporation. Contents subject to change without prior notice. D-Link is a registered
trademark of D-Link Corporation/D-Link Systems, Inc. All other trademarks belong to their respective proprietors.
Copyright Statement
No part of this publication may be reproduced in any form or by any means or used to make any derivative such as
translation, transformation, or adaptation without permission from D-Link Corporation/D-Link Systems Inc., as
stipulated by the United States Copyright Act of 1976.
70
Page 71

D-Link DFM-560EL External Modem Us er’s Guide
CE Mark Warning
This is a Class B product. In a domestic environment, this product may cause radio interference, in which
case the user may be required to take adequate measures
Warnung!
Dies ist in Produkt der Klasse B. Im Wohnbereich kann dieses Produkt Funkstoerungen verursachen. In diesem Fall
kann vom Benutzer verlangt werden, angemessene Massnahmen zu ergreifen.
Advertencia de Marca de la CE
Este es un producto de Clase B. En un entorno doméstico, puede causar interferencias de radio, en cuyo
case, puede requerirse al usuario para que adopte las medidas adecuadas.
Attention!
Ceci est un produit de classe B. Dans un environnement domestique, ce produit pourrait causer des
interférences radio, auquel cas l`utilisateur devrait prendre les mesures adéquates.
Attenzione!
Il presente prodotto appartiene alla classe B. Se utilizzato in a mbiente domestico il prodotto può causare
interferenze radio, nel cui caso è possibile che l`utente debba assumere provvedimenti adeguati.
FCC W arning
This equipment has been tested and found to comply with the limits for a Class B dig ital device, pursuant to
part 15 of the FCC Rules. These limits are designed to provide reasonable protection against harmful
interference in a residential installation. This equipment generates, uses and can radiate radio frequency
energy and, if not inst alled and u sed in accor dan ce w ith th e in s tructions, m ay cause h armful interf eren ce to
radio communications. However, there is no guarantee that interference will not occur in a particular
installation. If this equipment does cause harmful interference to radio or television reception, which can be
determined by turning the equipment off an d on , th e user is en cou rag ed to try to correct th e in terference by
one or more of the following measures:
-Reorient or relocate the receiving antenna.
-Increase the separation between the equipment and receiver.
-Connect the equipment into an outlet on a circuit different from that to which the receiver is connected.
-Consult the dealer or an experienced radio/ TV technician for help.
71
 Loading...