

Page 1
Review Package Contents
Make sure that the package contains the following items. If
any items are missing, contact the reseller.
§ DFL-300 Firewall
§ Manual
§ Quick Install Guide
§ AC Power Adapter
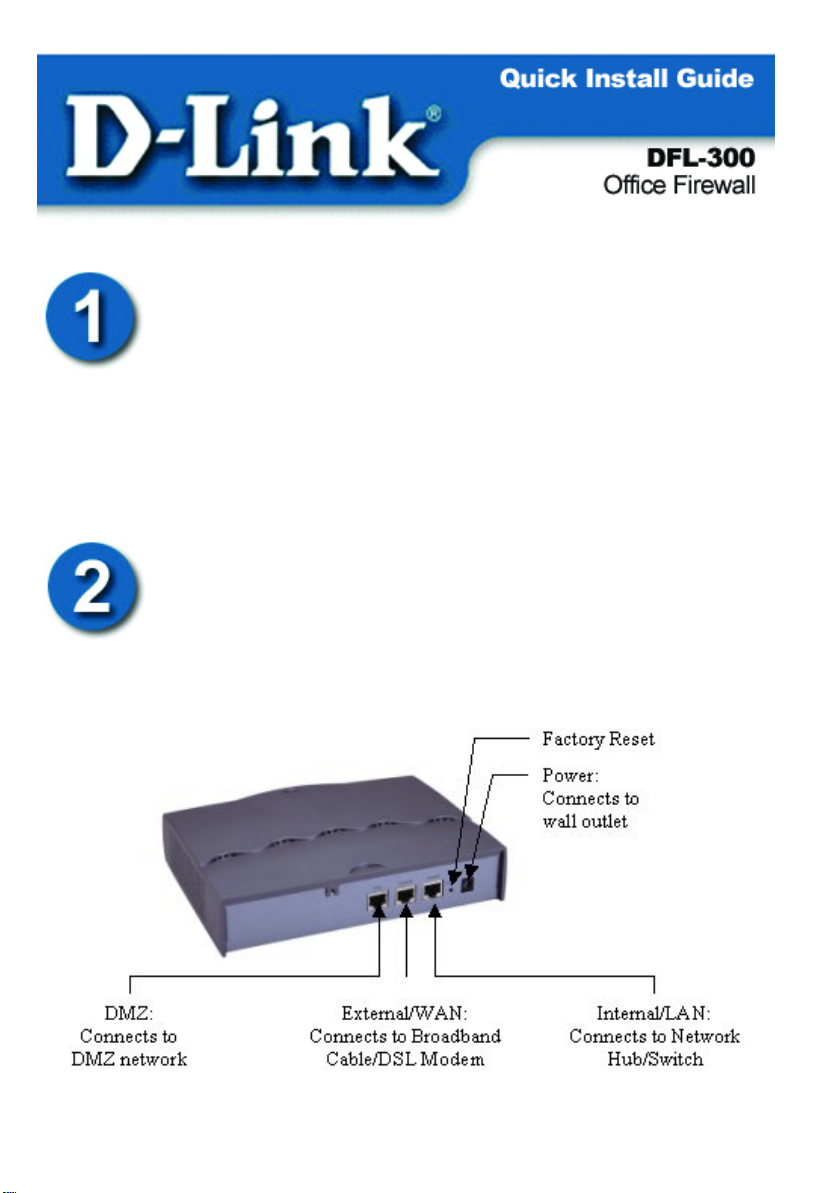
Connecting the DFL-300
Page 2
Connecting the DFL-300 continued…
To setup the DFL-300, begin by connecting the AC adapter to a power source.
The Power LED on the front of the DFL-300 should now be on.
Connect one end of the Ethernet cable to the Internal/LAN port of the
DFL-300 and the other end of the cable into a hub or switch on your network.
If the cable connection is good, a green LED on the front of the DFL-300
should come on for Internal Link.
Now with another Ethernet cable, connect one end to the External/WAN port
of the DFL-300 and the other end to your Broadband modem. The External
Link LED on the front should now also come on.
Setting Up the Computer
By default, the DFL-300 firewall is a DHCP Server. You can set your
computer to obtain an IP address. Follow the below steps to do so. If yo u
prefer, you can set your computer up with a static IP address in the range of
192.168.1.2 ~ 192.168.1.254.
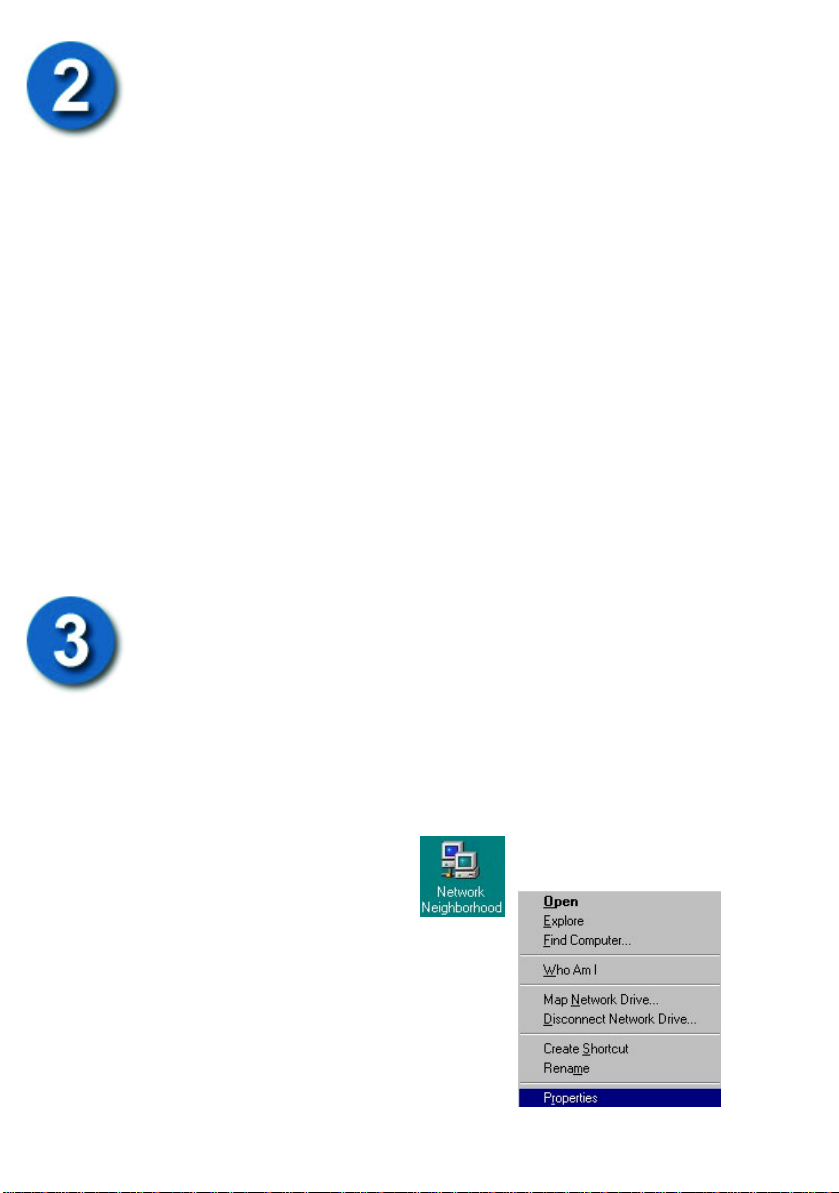
Right-Click the Network
Neighborhood (Win 98/98SE)
or My Network Places (Win ME/2K/XP)
icon on your desktop.
Select properties
-2-
Page 3
Setting Up the Computer continued…
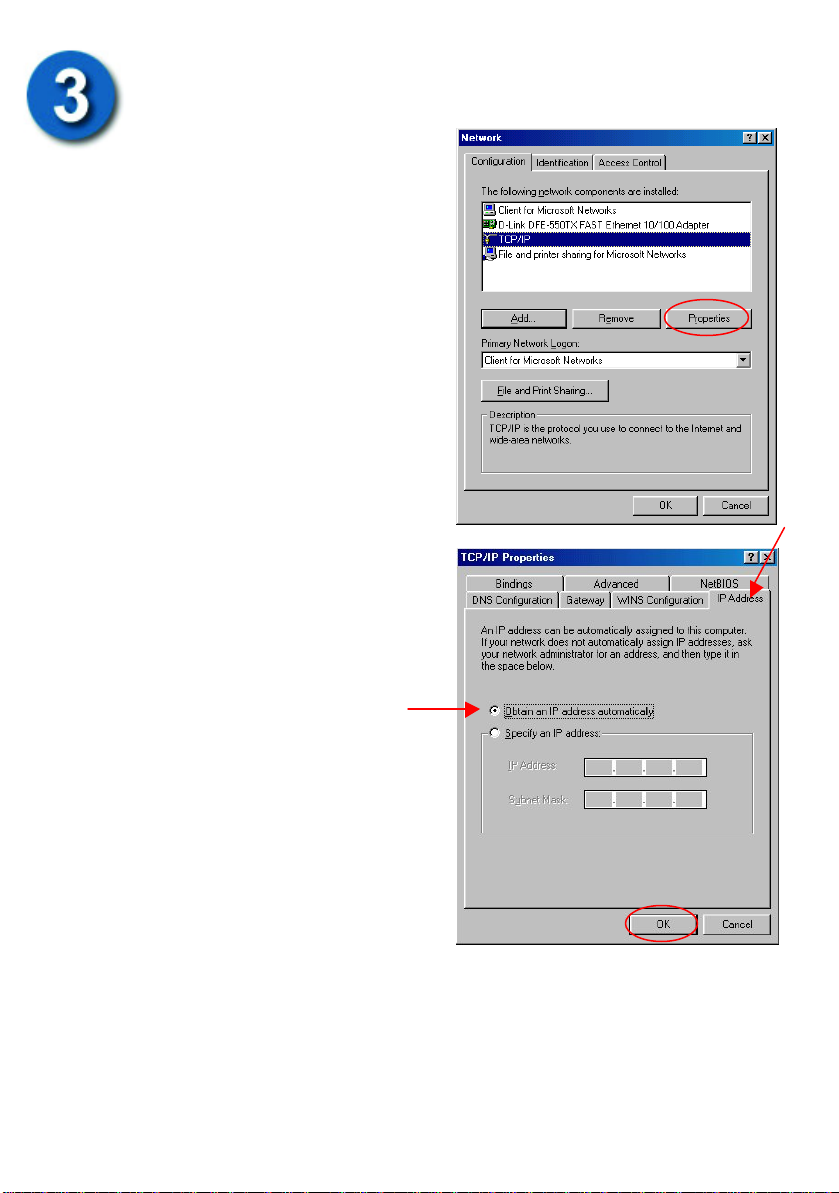
Highlight the TCP/IP setting for the
installed Ethernet Network Adapter.
Click Properties
At this screen, select the
IP address tab. Select
Obtain an IP Address
Automatically.
Click OK
If you are prompted to restart your computer, please do so. When the
computer restarts, it will automatically receive an IP address from the
DFL-300 firewall.
-3-
Page 4
Configuring the DFL-300
Note: The DFL-300 requires Internet Explorer 4.0 or higher, or
Netscape Communicato r 4.0 or higher.
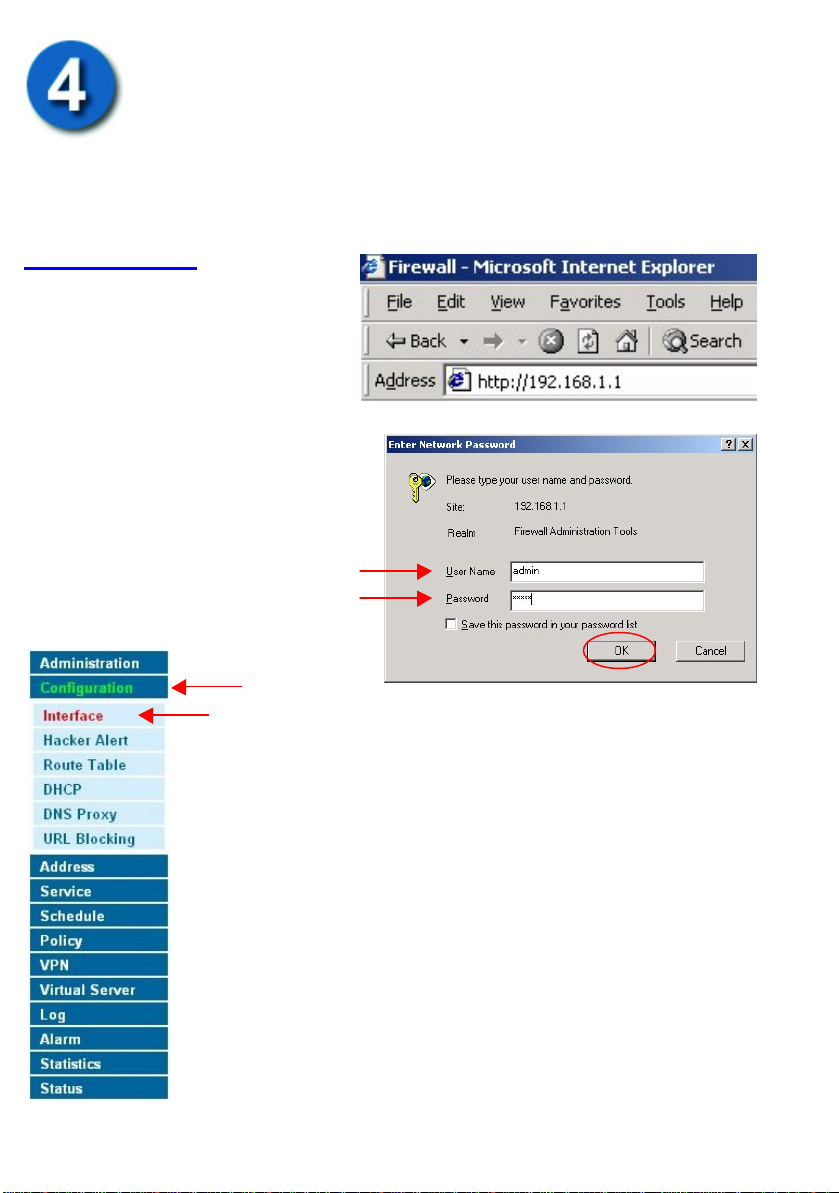
Please open your Web Browser and enter this URL:
http://192.168.1.1
This will launch the DFL-300’s
integrated web-based
management system.
This Enter Network Password
pop-up screen will appear.
The default User Name is admin
and the default Password is also
admin. Click OK
Once the D-Link DFL-300 screen appears, click
Configuration on the left side menu. Then click Interface
below it. (See left)
You will now need to choose the External Interface option
that your Broadband connection uses.
-4-
Page 5

Configuring the DFL-300 continued…
If your ISP requires you to enter a username/password for a PPPoE
connection, choose PPPoE (ADSL User)
Fill in your PPPoE username and password provided by your ISP. Click Ok
at the bottom when done.
-5-
Page 6

Configuring the DFL-300 continued…
If your ISP assigns you a dynamic IP address, choose Dynamic IP Address
(Cable Modem User)
Fill in the Hostname if provided by your ISP.
Click Ok at the bottom when done.
-6-
Page 7

Configuring the DFL-300 continued…
If your ISP assigns you a static IP address, choose Static IP Address
Fill in the static IP information provided by your ISP. Click Ok at the
bottom when done.
Now set up the Outgoing Policy. Click on Policy on the left
menu. Then click Outgoing below it.
-7-
Page 8

Configuring the DFL-300 continued…
Click on New Entry and enter the following:
Source Address:
Inside_Any
Destination Address:
Outside_Any
Service: Any
Action: Permit
Click Ok
There should now be an Outgoing Policy created. This policy will allow all
computers in the Internal network to access the Internet.
Note: You do not need to manually restart the DFL-300 Firewall. The changes
will take place immediately once you click Ok. Once you are finished with
the installation, you should be able to access the Internet.
-8-
Page 9

Appendix
Creating a VPN IPSec Tunnel
This example will demonstrate how to create a Virtual Private Network (VPN)
between two remote locations through the Internet. The VPN policy will use
IPSec to securely send/receive encrypted data over the Internet. This example
will consist of two DFL-300 Office Firewalls with a simple setup to enable
VPN.
The two remote locations in this example will be call Site A and Site B.
Both firewalls must already be set up and able to access each other.
Please note the differences in the IP addresses for each site.
-9-
Page 10

We will begin by configuring the DFL-300 at Site A . Start by going into the
web configuration. Once in, go to the VPN menu. You should now be under
VPN>Autokey IKE.
Click New Entry
Please fill in the appropriate information for Site A.
Name: Site_A
From Source: Internal
Subnet/Mask:
192.168.10.0/255.255.255.0
Remote Gateway – Fixed
IP: 192.170.0.200
Subnet/Mask:
192.168.20.0/255.255.255.0
Authentication Method:
Preshare
Preshare Key: 123456
Encapsulation: Encryption
(ESP)
Click OK
Note: 123456 is an example of a preshare key, please fill in any secret preshare key you desire.
Keep in mind that both sites require the same preshare key.
-10-
Page 11

There should now be a VPN
Policy created for Site A.
Site A is now complete, we
will now configure Site B with the other DFL-300. Follow the same steps
previously with Site A to create a VPN policy. Please change the appropriate
IP information.
Name: Site_B
From Source: Internal
Subnet/Mask:
192.168.20.0/255.255.255.0
Remote Gateway – Fixed IP:
192.170.0.100
Subnet/Mask:
192.168.10.0/255.255.255.0
Authentication Method:
Preshare
Preshare Key: 123456
Encapsulation: Encryption (ESP)
Click OK
There should now be a VPN
policy created for Site B.
After the VPN policies have been created for the two remote locations, click
Connect at both Sites to enable the VPN policy. The two remote locations
will authenticate and the VPN status should now say Connected.
Congratulations, you have created a simple IPSec VPN tunnel. Site A and Site
B should now be able to communicate with each other securely over the
Internet. All IP traffic from the two Sites are now encrypted strongly with
168-bit 3DES encryption.
-11-
Page 12

Technical Support
D-Link provides free technical support for customers within the United
States during the warranty period. U.S. customers can contact D-Link
Technical Support through our web site, by e-mail or by phone.
D-Link Technical Support over Telephone:
(949) 790-5290
6 a.m. to 6 p.m. Monday thru Friday
D-Link Technical Support over the Internet:
www.dlink.com
If you are a customer residing outside of the United States, please refer to the list
of D-Link locations that is included in the User’s Manual.
113001F
 Loading...