

Page 1
EN
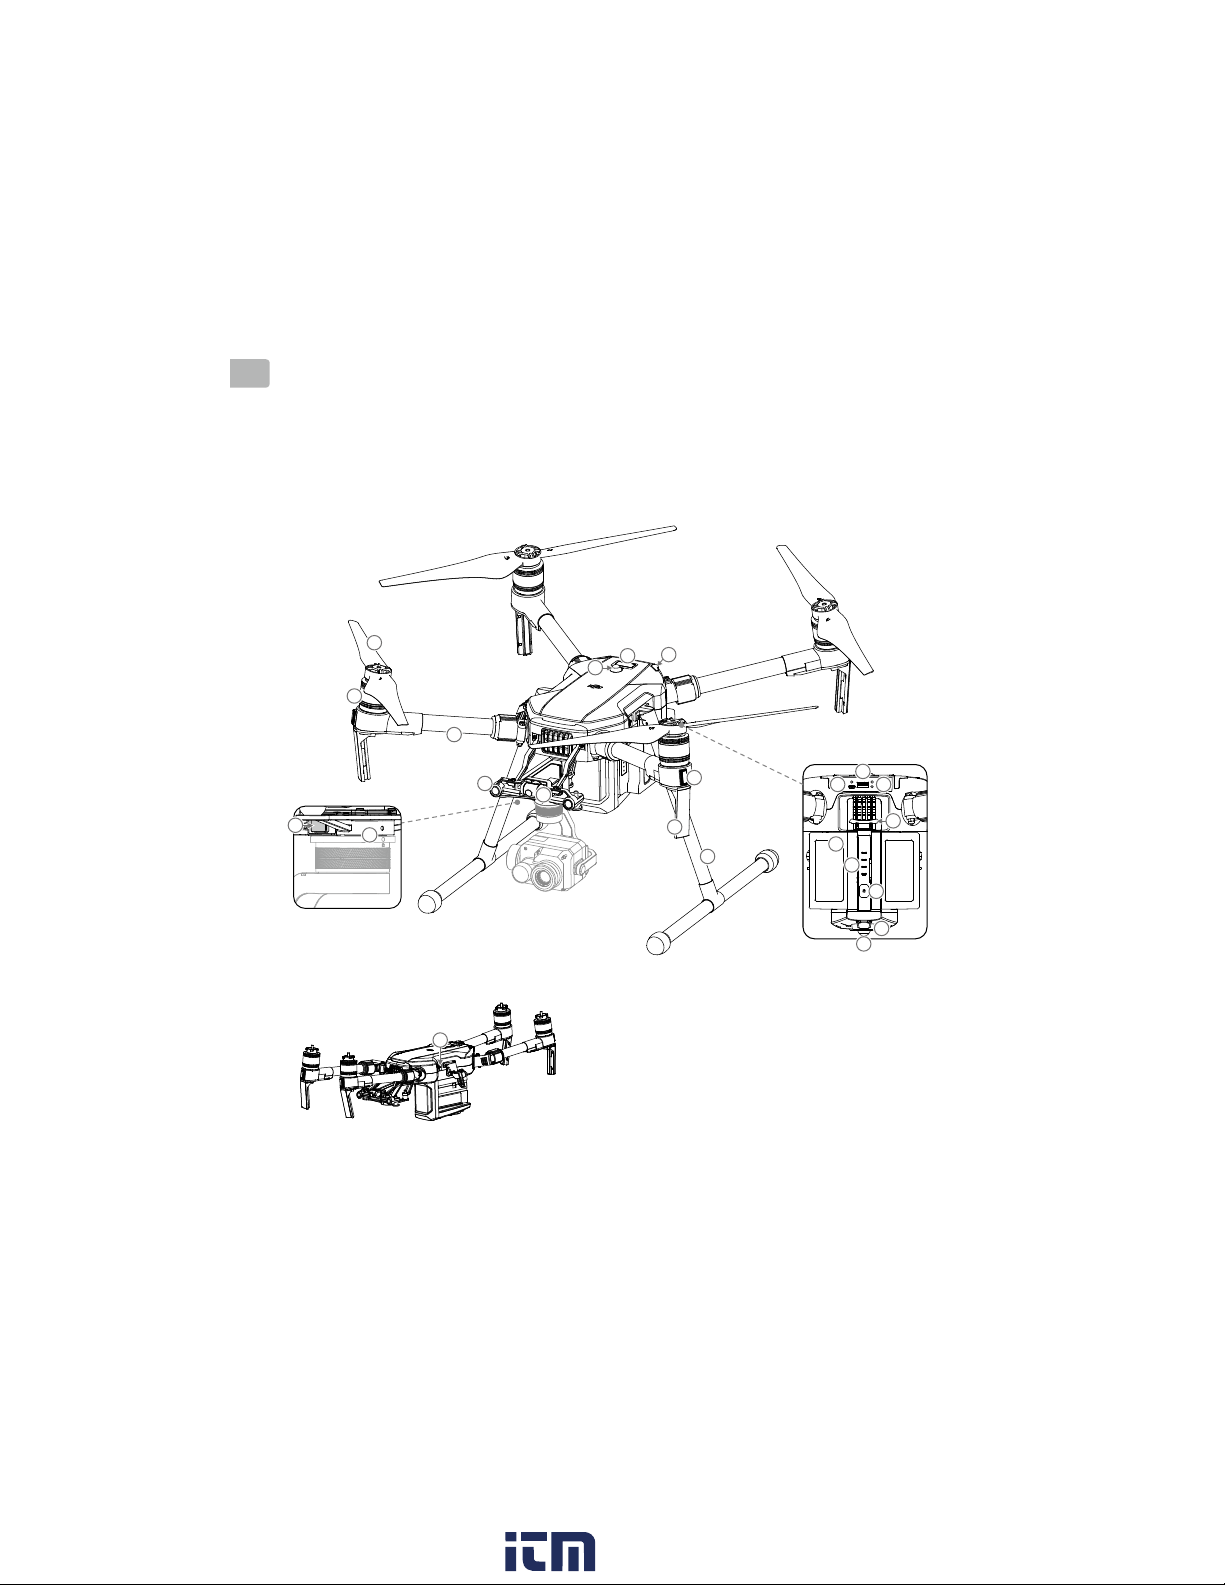
Matrice 200 V2
The DJITM MATRICETM 200 V2 (M200 V2) is a powerful industrial drone platform with world-class agility and speed, redundant
barometers and IMUs for maximum reliability, and smart ight features that make capturing complex shots easy. The aircraft’s visual
sensors* enable enhanced hovering precision even when ying indoors or in environments where GNSS is unavailable. The built-in
AirSense makes you aware of nearby aircraft in the surrounding airspace to ensure safety. Its airframe design gives it an IP43 Ingress
Protection, in accordance with the global IEC 60529 standard. The mechanical design, along with quick-release landing gears and
mounted folding arms, makes it easy to transport, store, and prepare for ight. The safety beacons on both the top and the bottom
of the aircraft allow the aircraft to be identied at night or in low light conditions. An advanced power management system along with
dual batteries ensures power supply and enhances ight safety. Without a payload, the M200 V2 has a ight time of up to 38 minutes
with standard batteries (TB55).*
The M200 V2 is compatible with many of DJI’s DGC2.0 connector gimbals.* This manual uses the DJI ZENMUSE
example to demonstrate the M200 V2’s remarkable functions.
TM
XT 2 as an
7
6
5
2
1
4
3
22
Folded
11
12
8
9
10
1. FPV Camera
2. Forward Vision System
3. DJI Gimbal Connector V2.0
(DGC2.0)
4. Gimbal Detachment Button
5. Frame Arms
6. Motors
7. Propellers
8. ESC LEDs
9. Transmission Antennas
10. Landing Gear
11. Upward Infrared Sensor
15
141316
17
18
19
20
21
12
12. Beacons
13. Aircraft Status Indicators
14. USB Mode Switch
15. USB Port
16. Linking Button and Indicator
17. Battery Removal Button
18. Intelligent Flight Batteries
19. Battery Level Indicators
20. Power Button
21. Downward Vision System
22. microSD Card Slot
* The Vision and Infrared Sensing Systems are affected by surrounding conditions. Read the Disclaimer and Safety Guidelines to learn more.
Maximum run-time is tested in a lab environment. Performance may vary depending on local conditions.
Gimbals can be purchased separately from the ofcial DJI website.
DO NOT disassemble the aircraft shell, otherwise it will not be covered under warranty.
2
www. .com
information@itm.com1.800.561.8187
Page 2

EN
Cendence S Remote Controller
The CENDENCETM S remote controller features DJI’s OCUSYNCTM 2.0 technology for a maximum transmission distance of
up to 5 mi (8 km).* While ying the aircraft, you have a HD live view directly within the DJI Pilot app on your paired device
for a precise and responsive ying experience. Dual frequency* support makes the HD video downlink more stable. In Dual
Remote Controller Mode, two remote controllers control the aircraft and camera separately, even when they are up to 656
feet (200 m) apart.*
The remote controller works with a WB37 Intelligent Battery, which can be fully charged via the charging port in about 2 hours with
the standard charger, or with the Intelligent Battery Charging Hub* in about 1 hour and 11 minutes. The maximum run time of the
remote controller is approximately 4 hours.*
1. Mobile Device Holder
2. Antennas
1
2
4
3
6
5
6
7
10
17
8
18
16
14
11
15
12
13
9
20
3. Monitor Mounting Bracket
4. USB Port (Reserved Port)
5. Control Sticks
6. Strap Hook
7. Focal Adjustment Knob
8. Return-to-Home (RTH) Button
9. Power Port
10-13. Reserved Buttons
14. Pause Button
15. Power Button
16. Remote Control Display
17. Camera Settings Dial
18. Customizable Button Setting Menu
19. Customizable Buttons (BA-BH)
19
20. Support Rig
21. Left Lever
22. Left Dial (Gimbal Pitch)
23. Flight Mode Switch
24. Handle Bar
25. USB Port
(for Mobile Device Connection)
26. HDMI A Port (for Video Output)
Folded
27. CAN Bus Port (Extension Port)
28. Micro USB Port
29. SDI Port (for Video Output)
30. Right Lever
31. Right Dial (Gimbal Pan)
32. AF Button (Autofocus)
33. Record Button
34. Shutter Button
35. Customizable Buttons (C1-C4)
* The remote controller can reach its maximum transmission distance (FCC) in an unobstructed area with no electro-magnetic interference at an altitude of
about 400 feet (120 meters). The actual maximum transmission distance may be less than the distance mentioned above due to interference in the operating
environment, and the actual value will uctuate according to the strength of interference.
To comply with local regulations, the 5.8 GHz frequency is not available in some countries and regions.
For more information about Dual Remote Controller mode, please refer to the user manual.
The Charging Hub can be purchased separately from the ofcial DJI website.
Maximum run time is estimated in a lab environment without supplying power to a smart device or monitor, for reference only.
21
22
25
23
24
26 27 28 29
3535
33
30
31
32
34
3
www. .com
information@itm.com1.800.561.8187
Page 3

EN
Using Matrice 200 V2
1. Downloading the DJI Pilot App
Search for DJI Pilot in Google Play Store or scan the QR code to download the app onto
your mobile device.
First-time activation requires your DJI account and an internet connection.
Internet
DJI Pilot supports Android 5.0 or later.
If using a DJI CRYSTALSKYTM Monitor, it is recommended to use the built-in DJI Pilot app.
DJI Pilot App
2. Charging the Batteries
Press the release button and open the corresponding charging port cover.
Insert the Intelligent Flight Battery into the charging port to begin charging.
Be sure to press the release button when removing fully charged batteries.
1
A
2
B
Using the IN2CH Charging Hub, charging time
is approximately
TB55: 2 hours and 24 min (two batteries)*
When charging is complete, the LED lights on the Intelligent Flight Battery will turn off, and the LED on the Charging Hub will turn solid green.
When charging is complete, the display on the remote controller will show 100%.
The Charging Hub will sound an alert when the battery has been fully charged. The alert can be turned on or off by toggling the switch under the
hub.
Install the battery into the aircraft and power on. If a low battery temperature is detected, the battery will automatically heat up to maintain a
temperature between 16° and 20° C.
Ensure two Intelligent Flight Batteries are charged and discharged simultaneously to prolong their service life and for a better ight experience.
Charging Time:
2 hours*
B
Using the WCH2 Charging Hub,
charging time is approximately
1 hour and 11 min (one battery)*
B
A
* Provided charger.
The battery must be fully charged
before using it for the rst time.
Power Outlet
100~240 V
(50Hz/60Hz)
3. Preparing the Remote Controller
Mounting the Remote Controller Battery
Put the battery into the Battery Slot, then slide it to the end
until you hear a click.
Low
Press the Battery Release Button before removing the battery.
Press the Battery Level Button once to check the battery level.
High
4
www. .com
information@itm.com1.800.561.8187
Page 4

EN
Mounting the Monitor to the Remote Controller
A
B
Ensure that Part B is
unlocked. Connect Part B
to Part A.
Connecting the Mobile Device
Lock the Mounting Bracket. Use a coin or the screwdriver
Press the button to
release the clamp.
1
included to adjust the
tightness of the tilt axis.
2
3
Place your mobile
device and adjust
the clamp to secure.
Connect your mobile
device with a USB cable.
Using the Remote Controller
The Stick Mode is set to Mode 2 by default. In Mode 2, the left stick controls the aircraft’s elevation and heading, and the right
stick controls the aircraft’s forward, backward, and lateral movements. To adjust the FPV camera, press and hold the C2 Button
and rotate the left dial.
Left Stick Right Stick FPV Camera
Up
Down
Forward
Backward
Turn RightTurn Left
For more information about how to connect and use the remote controller, please refer to the user manual.
You can change the stick mode and customize the C1-C4 and BA-BH buttons’ functions in the DJI Pilot app.
RightLeft
5
www. .com
information@itm.com1.800.561.8187
Page 5

EN
4. Preparing the Aircraft
1
2
3
Mounting the Landing Gear
Mounting the Propellers
Unfolding the Aircraft
Unfold the frame arm, slide the arm lock to the end of the frame
arm, and rotate it about 90° until the silver line lies within the range
icon.
of the
Propellers without
silver rings should
be installed on
motors without
marks.
Press the propeller
down onto the
mounting plate and
rotate in the lock
until
direction
secure.
Check that the propellers are
secure before each ight.
Mounting the Gimbal and Camera
11
Press the Gimbal
Detachment Button
to remove the cover.
Make sure to press down the gimbal detachment button when rotating the gimbal lock to remove the gimbal and camera. The gimbal lock should be
fully rotated when removing the gimbal for the next installation.
Align the white and
red dots and insert the
gimbal.
2
3
Rotate the gimbal lock
to the locked position.
6
Propellers with silver
rings should be
installed on motors
with the same color
marks.
www. .com
information@itm.com1.800.561.8187
Page 6

EN
Mounting the Intelligent Flight Batteries
Insert a pair of batteries.
Press once to check the battery level.
Press again and hold until the batteries turn on or off.
Only use battery slot B when using one battery to supply power. In this case, the aircraft can only be powered on, but cannot take off.
If for any reason only one battery is available during ight, land the aircraft immediately and replace the batteries as soon as possible.
Make sure to press the Battery Removal button when removing the battery.
Make sure to use the included TB55 batteries. DO NOT use any other type of batteries.
A
B
5. Flight
High
Low
DJI Pilot
App
Toggle the Flight
Mode switch to
P-mode, the safest
ight mode.
If using a CrystalSky Monitor, after the monitor is powered on, wait for a pop-up window that asks for a selection of USB device use, and then
select “DJI Pilot”. Otherwise, the app cannot be connected to the remote controller.
Always set an appropriate RTH altitude before takeoff. Refer to the Disclaimer and Safety Guidelines for more details.
Power on the remote controller,
and aircraft.
Launch the DJI
Pilot app.
Manual Takeoff
OR
Combination Stick Command to start/stop the motors Left stick up
(slowly) to take off
Return-to-Home (RC)
Press and hold to initiate the RTH procedure. Press again to cancel.
Rotating propellers can be dangerous. DO NOT start the motors in narrow spaces or
when there are people nearby.
Always keep your hands on the remote controller so long as the motor is still spinning.
After landing, power off the aircraft before turning off the remote controller.
Ready to Go (GPS)
Before taking off, ensure that the Aircraft Status Bar in the
DJI Pilot app reads ‘Ready to Go (GPS)’ or ‘Ready to Go
(Vision)’ if ying indoors.
Manual Landing
Pull left stick down (slowly)
until you touch the ground.
Hold for a few seconds to
stop the motors.
To stop the motors mid-flight, press
the RTH button while simultaneously
pulling the left stick to the bottom inner
corner. Stop motors mid-flight will
cause the aircraft to crash. The motor
can only be stopped mid-ight when
the flight controller detects critical
error.
It is important to understand basic ight guidelines for the safety of both
you and those around you.
Refer to the Disclaimer and Safety Guidelines for more information.
www. .com
GEO Zones
7
information@itm.com1.800.561.8187
Page 7

EN
Specications
Aircraft (M200 V2)
Dimensions Unfolded, propellers and landing gears included, 883×886×398 mm
Folded, propellers and landing gears excluded, 722×247×242 mm
Diagonal Wheelbase 643 mm
Weight Approx. 4.69 kg (with two TB55 batteries)
Max Takeoff Weight 6.14 kg
Max Payload 1.45 kg
Operating Frequency 2.4000-2.4835 GHz; 5.725-5.850 GHz
EIRP 2.4 GHz: ≤ 26 dBm (NCC/FCC); ≤ 20 dBm (CE/MIC); ≤ 20 dBm (SRRC)
5.8 GHz: ≤ 26 dBm (NCC/FCC); ≤ 14 dBm (CE); ≤ 26 dBm (SRRC)
Hovering Accuracy (P-mode with GPS) Vertical: ±1.64 feet (±0.5 m) or ±0.33 feet (±0.1 m, Downward Vision System enabled)
Horizontal: ±4.92 feet (±1.5 m) or ±0.98 feet (±0.3 m, Downward Vision System enabled)
Max Angular Velocity Pitch: 300°/s, Yaw: 120°/s
Max Pitch Angle S-mode: 35°; P-mode: 30° (Forward Vision System enabled: 25°); A-mode: 30°
Max Ascent Speed 16.4 ft/s (5 m/s)
Max Descent Speed (vertical) 9.8 ft/s (3 m/s)
Max Speed S-mode/A-mode: 81 kph (50.3 mph); P-mode: 61.2 kph (38 mph)
Max Service Ceiling Above Sea Level 9842 feet (3000 m, with 1760S propellers)
Max Wind Resistance 39.4 ft/s (12 m/s)
Max Flight Time (with two TB55 batteries) 38 min (no payload), 24 min (takeoff weight: 6.14 kg)
Supported DJI Gimbals Zenmuse X4S/X5S/X7/XT/XT2/Z30
Supported Gimbal Mounting Single Gimbal, Downward
Ingress Protection Rating IP43
GNSS GPS+GLONASS
Operating Temperature -4° to 122° F (-20° to 50° C)
Remote Controller (GL900A)
Operating Frequency 2.4000-2.4835 GHz; 5.725-5.850 GHz
Max Transmitting Distance
(unobstructed, free of interference) NCC/FCC: 5 mi (8 km); CE/MIC: 3.1 mi (5 km); SRRC: 3.1 mi (5 km)
EIRP 2.4 GHz: ≤ 26 dBm (NCC/FCC); ≤ 20 dBm (CE/MIC); ≤ 20 dBm (SRRC)
5.8 GHz: ≤ 26 dBm (NCC/FCC); ≤ 14 dBm (CE); ≤ 26 dBm (SRRC)
Power Supply Extended Intelligent Battery (Model: WB37-4920mAh-7.6V)
Output Power (max) 13 W (Without supplying power to monitor)
USB Power Supply 1 A 5.2 V (max)
Operating Temperature -4° to 122° F (-20° to 50° C)
Downward Vision System
Velocity Range <32.8 ft/s (10 m/s) at the height of 6.56 feet (2 m)
Altitude Range <32.8 feet (10 m)
Operating Range <32.8 feet (10 m)
Operating Environment Surfaces with clear patterns and adequate lighting (> 15 lux)
Ultrasonic Sensor Operating Range 0.33-16.4 feet (0.1-5 m)
Ultrasonic Sensor Operating Environment Non-absorbing material, rigid surface (thick indoor carpeting will reduce performance)
Forward Vision System
Obstacle Sensing Range 2.3-98.4 feet (0.7-30 m)
FOV Horizontal: 60°; Vertical: 54°
Operating Environment Surfaces with clear patterns and adequate lighting (> 15 lux)
Upward Infrared Sensing System
Obstacle Sensing Range 0-16.4 feet (0-5 m)
FOV ±5°
Operating Environment Large, diffuse and reective obstacles (reectivity >10%)
Intelligent Flight Battery (TB55-7660mAh-22.8V)
Capacity 7660 mAh
Voltage 22.8 V
Battery Type LiPo 6S
Energy 174.6 Wh
Net Weight (Single One) Approx. 885 g
Operating Temperature -4° to 122° F (-20° to 50° C)
Charging Temperature 41° to 104° F (5° to 40° C)
Max Charging Power 180 W
Charger (IN2C180)
Voltage 26.1 V
Rated Power 180 W
Charging Hub (IN2CH)
Input Voltage 26.1 V
Input Current 6.9 A
DJI incorporates HDMITM technology.
The terms HDMI and HDMI High-Definition Multimedia
Interface, and the HDMI Logo are trademarks or registered
trademarks of HDMI Licensing LLC in the United States and
other countries.
※
This content is subject to change without prior notice.
8
www. .com
MATRICE and DJI are trademarks of DJI.
Copyright © 2019 DJI All Rights Reserved.
Printed in China.
information@itm.com1.800.561.8187
 Loading...