

Page 1

ZENMUSE H3-2D Gimbal
User ManualV1.16
For Firmware IMU V1.4, GCU V1.6, CMU V1.0
& Assistant SoftwareV1.02
2013.11.21 Revision
©2013 DJI Innovations. All Rights Reserved.
www.dji.com
Page 2

Warning & Disclaimer
No adjusting or amending is allowed to the H3-2D!!!
Before use, make sure to mount the camera to gimbal first, and then mount the
gimbal to aircraft. After this, you can power on the gimbal.
H3-2D is specialized for Camera and Lens before it leaves the factory. Please mount your camera to H3-2D when
get it. No adjusting or amending is allowed to H3-2D. Do not modify or add any other component/device (such as
filter, lens hood, etc.) to the camera; make sure to use the original battery; otherwise it may end up with worse
performance or even internal malfunction.
The gimbal can only work with Autopilot system specified by DJI Innovations (NAZA-M/NAZA-M V2/WooKong-M),
so as to ensure the highest stability and precision. Please download the corresponding assistant software and
upgrade the autopilot system MC firmware, otherwise may lead the gimbal work abnormally.
Make sure the Autopilot system operates in the safest manner when the main power battery is connected. We
strongly recommend customers to remove all propellers, use power supply from R/C system or flight pack battery,
and keep children away during gimbal calibration and parameter setup. Please strictly follow these steps to mount
and connect gimbal on your aircraft, as well as to install the assistant software on your computer. Please respect
the AMA’s National Model Aircraft Safety Code.
As DJI Innovations has no control over use, setup, final assembly, modification (including use of non-specified DJI
parts i.e. motors, ESCs, propellers, etc.) or misuse, no liability shall be assumed nor accepted for any resulting
damage or injury. By the act of use, setup or assembly, the user accepts all resulting liability. DJI assumes no
liability for damage(s) or injuries incurred directly or indirectly from the use of this product.
DJI and H3-2D are registered trademarks of DJI Innovations Names of product, brand, etc., appearing in this
manual are trademarks or registered trademarks of their respective owner companies. This product and manual are
copyrighted by DJI Innovations with all rights reserved. No part of this product or manual shall be reproduced in
any form without the prior written consent or authorization of DJI Innovations. No patent liability is assumed with
respect to the use of the product or information contained herein.
Product Profile
This product is an excellent gimbal designed for AP. Excellent job can be done by this gimbal. The gimbal has
built-in slip ring in the mechanical structure, preventing wire rod from winding up. It also has built-in
independent IMU (Inertial Measurement Unit) module, special servos drive module, etc.
©2013 DJI Innovations. All Rights Reserved. 2
Page 3
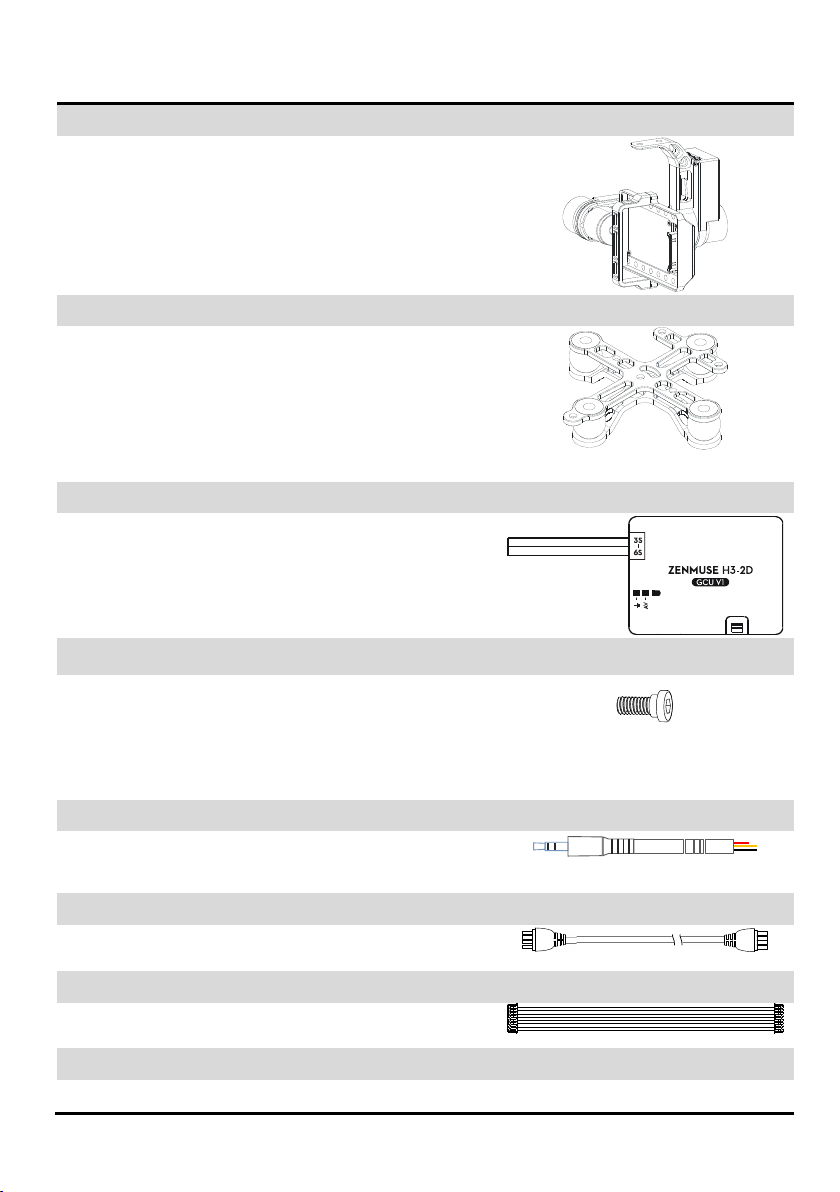
In The Box
Gimbal×1
The gimbal has built-in special servos drive module, and
independent IMU module. It controls both the tilt and the roll axis,
to enhance the attitude stabilization.
Damping Unit×1
Connect the aircraft and the gimbal, in order to reduce the
mechanical vibration. There are three types of Vibration Absorber,
the White is softest, the Black is hardest, and the Grey is in the
middle. It is recommended to use the White on DJI F450, not use
any on DJI F550, and the DJI PHANTOM can use any type.
Gimbal Controller Unit (GCU)×1
Connect the gimbal controller to the autopilot system by
CAN-Bus. And Use the 3S~6S power cable to supply power for the
GCU and gimbal.
Screw Package ×1
M2.5x6.3: For fixing the camera to the gimbal.
M2.5x5: For fixing the gimbal to the damping unit.
M3x8 (with M3 nuts and M3 spacers): For mounting the damping
unit to the aircraft.
Gimbal Video signal Cable×1
For the gimbal controller unit and your Wireless Video
Transmission Unit connecting, transmitting the video signal.
CAN-Bus Cable×1
Use CAN-Bus to communicate with the autopilot system.
DJI
DJI
8-Pin Cable×1
For the gimbal and the GCU connecting,
Spare Package×1
Spare Screw
©2013 DJI Innovations. All Rights Reserved. 3
Page 4

Index
WARNING & DISCLAIMER ............................................................................................... 2
PRODUCT PROFILE .......................................................................................................... 2
IN THE BOX ..................................................................................................................... 3
INDEX ............................................................................................................................. 4
ASSEMBLY ...................................................................................................................... 5
GIMBAL DESCRIPTION ............................................................................................................ 5
STEP1. MOUNT THE GIMBAL TO THE AIRCRAFT OR LANDING GEAR ......................................... 5
STEP2. MOUNT THE CAMERA TO THE GIMBAL ..................................................................... 7
STEP3. DOUBLE CHECK ................................................................................................... 7
AUTOPILOT SYSTEM, GCU AND GIMBAL WIRING ............................................................ 8
GCU PORT DESCRIPTION ........................................................................................................ 8
STEP1. MOUNT THE GCU HORIZONTALLY OR VERTICALLY ON THE AIRCRAFT. .............................. 8
STEP2. CONNECT GCU AND AUTOPILOT SYSTEM ................................................................. 8
STEP3. VIDEO SIGNAL TRANSMISSION .............................................................................. 11
ASSISTANT .................................................................................................................... 12
STEP1. INSTALL DRIVER AND SOFTWARE ........................................................................... 12
STEP2. GUI ................................................................................................................ 12
STEP3. CHANNEL SETTING ............................................................................................. 12
STEP4. FIRMWARE & SOFTWARE UPGRADE ...................................................................... 13
TEST ............................................................................................................................. 14
STEP1. CHECK LIST BEFORE EVERY FLIGHT ........................................................................ 14
STEP2. GIMBAL TEST .................................................................................................... 14
APPENDIX ..................................................................................................................... 15
TROUBLE SHOOTING ............................................................................................................ 15
SETTINGS USING WITH THE A2 FLIGHT CONTROL SYSTEM............................................................ 15
SPECIFICATIONS ................................................................................................................... 16
©2013 DJI Innovations. All Rights Reserved. 4
Page 5
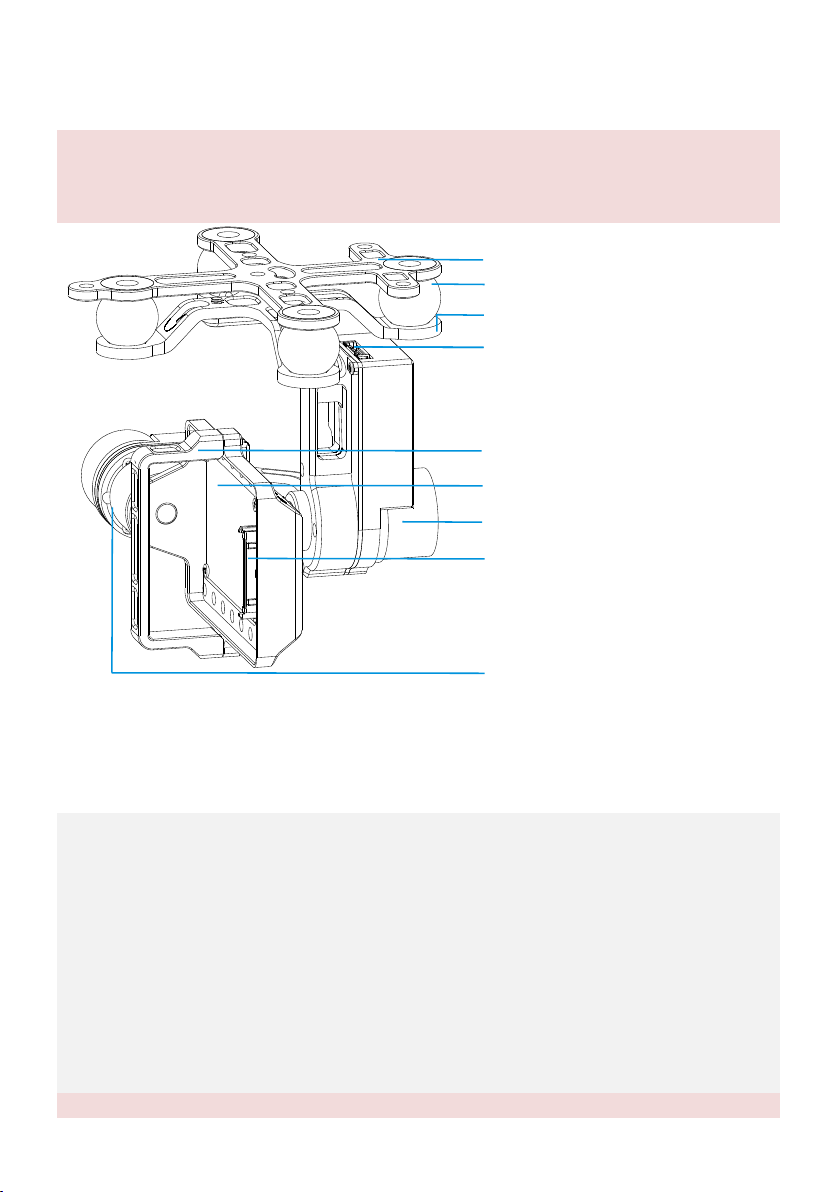
Assembly
Notes:
(1) Mack sure nothing blocks the servo driver module rotation, to avoid Servo Driver Module damage.
(2) Clear obstacle at once if the rotating gimbal is blocked.
Top oard o f the D amping Unit B
Servo Driver Mod ul e(Roll)
Camera Fix ed M ounting
Camera In terface
Servo Driver Mod ul e(Tilt)
Port of 8 -P in C ab le
To GCU G8( )
Camera Mounting Ba se
Vibrat io n Ab sorber
Bottom oard of th e Dampi ng Unit B
1. Attach the Vibration Absorber to the Top Board of Damper Unit shown in Fig.1.
2. Mount the Top Board of Damper Unit to the Bottom Board of aircraft; fix the M3x8screws, M3 spacers
and M3 nuts shown in Fig.2.
3. Plug one port of the 8-Pin cable into the 8-Pin port on the gimbal shown in Fig.3.
4. Tighten the M2.5x5 screws to fix the gimbal to the Bottom Board of Damper Unit shown in the Fig.4 or
Fig5, select one of the steps according the position of screw threads.
5. Attach the Vibration Absorber to the Bottom Board of Damper Unit shown in Fig.6.
6. Make sure the damping unit is horizontally mounted and both damping boards are paralleled to the
bottom of the aircraft, further to make sure the gimbal is precisely and firmly assembled.
Notes:
Gimbal Description
STEP1. Mount the Gimbal to the Aircraft or Landing Gear
The following procedure applies to DJI F450, DJI other type of aircraft or to your own aircraft. For DJI F450,
there are diagrams for your reference.
©2013 DJI Innovations. All Rights Reserved. 5
Page 6

(1) This product does not include any extra aircraft, landing gear or camera, please prepare them by yourself.
(2) Make sure the Camera Mounting Base is pointing to the aircraft nose direction.
(3) The gimbal center of gravity has been set, whose position directly determine gimbal performance. Please
do not adjust the gimbal center of gravity by yourself.
(4) The gimbal is high-precision controlled. Do not remove any other screws in the gimbal, which may result
in bad performance or even damage.
(5) Do not unplug any cable attaching to the gimbal ports, or even change the mechanical structure.
(6) The 8-pin port on the H3-2D gimbal should only be used for connecting to aircraft. Do not connect other
devices (such as a video downlink transmitter) to this port, otherwise the gimbal may be damaged.
Fig.1 Fig.2
Fig.3 Fig.4
Fig.5 Fig.6
©2013 DJI Innovations. All Rights Reserved. 6
Page 7

1. Mount the camera into the Camera Mounting Base of gimbal and fix the camera by the Camera Fixed
Mounting, shown as Fig.1.
2. Plug the Camera Interface of gimbal into the System Port of camera, and make sure they are in good
contact, which are marked in Red shown as Fig.2.
3. Tighten the M2.5x6.3 screw , shown as Fig.3.
4. Please put you hand at the position in red mark shown as Fig.4, and then remove the camera from gimbal
with appropriate strength, as the Camera Interface is easily damaged.
Fig.1 Fig.2
Fig.3 Fig.4
STEP2. Mount the Camera to the Gimbal
STEP3. Double Check
Make sure the Lens of camera is pointing to the aircraft nose direction.
©2013 DJI Innovations. All Rights Reserved. 7
Page 8

Autopilot System, GCU and Gimbal Wiring
Gimbal Controller Unit (GCU) Port Description
3S~6S
To the battery. Power for the GCU and gimbal.
G8
To Gimbal, transmitting the signal.
Micro-USB port: PC connection for configuration and firmware upgrades.
CAN-Bus port: Use a CAN-Bus cable to connect the GCU to the autopilot system.
To Wireless Video Transmission Module, transmitting the Video signal.
WKM
NAZA-M V2
NAZA-M
Assistant Software
V2.00(or above)
V2.12(or above)
V2.12(or above)
Firmware Version
V5.22(or above)
V3.12(or above)
V3.12(or above)
WKM
NAZA-M V2
NAZA-M
(1) Main Controller and PMU
connection
Connect the X1 port of PMU to X1
port of Main Controller.
Connect the X3 port of PMU V2 to
X3 port of Main Controller.
GCU Port Description
STEP1. Mount the GCU horizontally or vertically on the aircraft.
STEP2. Connect GCU and Autopilot System
Carry out the following procedures to finish the connection.
1. Keep the Autopilot system in the same state as it was, and upgrade the Main Controller to the latest
Firmware (shown as the following table).
2. Connect the Autopilot System (shown as the following table). For NAZA-M user, you are asked to prepare a
PMU V2 module (Accessory of NAZA-M V2) and do some reconnection of the system.
©2013 DJI Innovations. All Rights Reserved. 8
Page 9

(2)PMU Power Cable
connection
Connect the Power Cable to a connecter, if DJI Multi-rotor is used, solder the
power cable to the power pad on aircraft.
(3) GPS/Compass module and
Autopilot system connection
Connect the GPS/Compass module
to any spare CAN-Bus port on PMU.
Connect the GPS/Compass module
to the GPS port of PMU V2.
Please refer to the following diagrams for more GCU connection details. And refer to the Autopilot system manual
WKM
NAZA-M V2
NAZA-M
(1) GCU and Autopilot System
connection
Connect the GCU to any spare
CAN-Bus port on the WKM system.
Connect the GCU to the CAN-Bus
port on the PMU V2 module.
(2) GCU Power Cable
connection
Connect the GCU Power Cable to a connecter, if DJI Multi-rotor is used,
solder the power cable to the power pad on aircraft.
(3) Gimbal TILT Control channel
X3
X1
Notes:
(1) For H3-2D to work; it MUST be used in conjunction with Naza or WKM; do not power up the gimbal
without Naza or WKM connected.
(2) Make sure to power on the gimbal after camera mounting, since the wrong center of gravity will cause
motor overheating and then lead to damage.
(3) Re-do the Transmitter calibration after NAZA-M Firmware upgrade and double check other items.
(4) Make sure connections are correct; otherwise may lead to the gimbal work abnormally or damage,even
cause the autopilot system working abnormally.
for more connection and configuration details.
3. Connect the GCU to Autopilot System. And then connect the 8-Pin cable of gimbal to the G8 port of GCU.
4. Connection has been finished. They can come into use after power on.
5. The tilt direction of gimbal can be controlled by one channel of Autopilot System (WKM is X3, NAZA-M and
NAZA-M V2 is X1). You are asked to set the corresponding channel on your Transmitter, and connect the
corresponding port of Receiver to the Main Controller. Use the Gimbal Assistant Software to help you with
configuration.
GCU and DJI Autopilot System Connection
©2013 DJI Innovations. All Rights Reserved. 9
Page 10
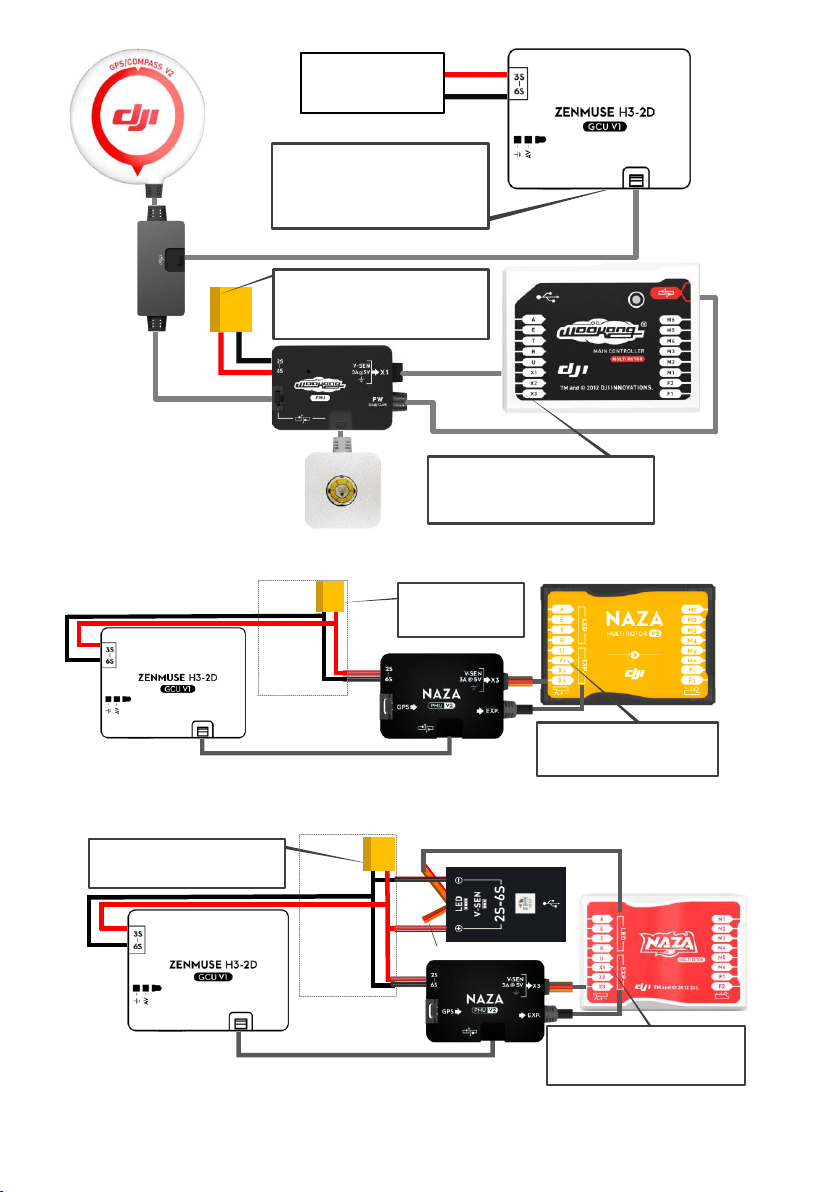
positive pole(+)
negative pole(-)
Battery
(3S~6S)
Note:
The GCU can be connected to any CAN
ports on the PMU or to the CAN port on
the GPS.(Any spare CAN port on the
WKM system.)
To Battery
Note:
The PMU and GCU can both connect to
the same battery of LiPo 3S-6S.
Gimbal TILT Control
Channel X3 is for Gimbal TILT Control,
connect it correctly, and configure the right
channel on your Transmitter.
Fig.1 GCU and WKM Connection Diagram
To Battery
Note: The PMU and GCU can
both connect to the same
battery of LiPo 3S-6S.
Connecter made
by yourself
Gimbal TILT Control
Channel X1 is for Gimbal TILT Control,
connect it correctly, and configure the right
channel on your Transmitter.
Disconnected
To Battery
Note: The PMU and GCU can both
connect to the same battery of LiPo 3S-6S.
Connecter made
by yourself
Gimbal TILT Control
Channel X1 is for Gimbal TILT Control,
correctly configure the right channel on
your Transmitter.
Fig.3 GCU and NAZA-M Connection Diagram with PMU V2 (NAZA-M V2 Accessory)
©2013 DJI Innovations. All Rights Reserved. 10
Fig.2 GCU and NAZA-M V2 Connection Diagram
Page 11

STEP3. Video Signal Transmission
Wireless Video
Transmission Module
Air End
Video Signal Port
GND(Black: )
Gimbal Video Signal Cable
Video Signal
GND
Disconnected
Video Signal(Yellow:AV)
Power
Extra power supply
1. Respectively solder the Video Signal/GND cables to wireless video transmission module (Air End).
2. Plug the gimbal video signal cable head into the GCU Video Signal Port.
Notes
(1) Make sure to connect Wireless Video Transmission Unit to GCU first, then power on.
(2) The standard gimbal video signal cable is recommended. Make sure you solder the gimbal video signal
cable to the wireless video transmission unit correctly. And ensure the cables are insulated, to prevent
from short circuit.
Disconnected
Video Signal Cable(AV)
GND Cable
(3) Please refer to your wireless vedio transmitter module manual to supply power,
since GCU can't supply power for it.
Tips:
(1) Following diagram shows how video signal transit when gimbal working.
(2) If video signal access fails, please check each step.
Camera
System Port
Gimbal
Camera Interface
GCU
G8
AV signal
Wireless video
transmission module
Air end
8-Pins cable
Gimbal Video
Signal Cable
Wireless video
transmission module
Ground end
Wireless signal
Monitor
AV input
5.8G/2.4G/1.2G
Self-prepared by user
AV signal
AV signal
AV signal
A wireless video transmission module is necessary for video signal accessing remotely.
©2013 DJI Innovations. All Rights Reserved. 11
Page 12
Assistant
1. Make sure driver is installed correctly, which has been installed before you use WooKong-M, NAZA-M or
NAZA-M V2.
2. Please download H3-2D gimbal assistant software from DJI Innovations website.
3. Click assistant software Installer and follow the steps to finish installation.
4. Run the assistant software.
Communication indicator
· Blue LED On: Without communication
· Blue LED Blink: Communicating with PC
· Red LED On: Disconnected with PC
· Green LED On: Connected with PC
Text Description
Connection indicator
· Mouse over each item on the (3) area will display
the corresponding content
1
2
6
5
1
2
6
5
4
3
4
Language
· 中文or English
Menu
· Basic: Basic function setting
· Upgrade: For upgrading the gimbal firmware
· Info: For version and SN access
3
STEP1. Install Driver and Software
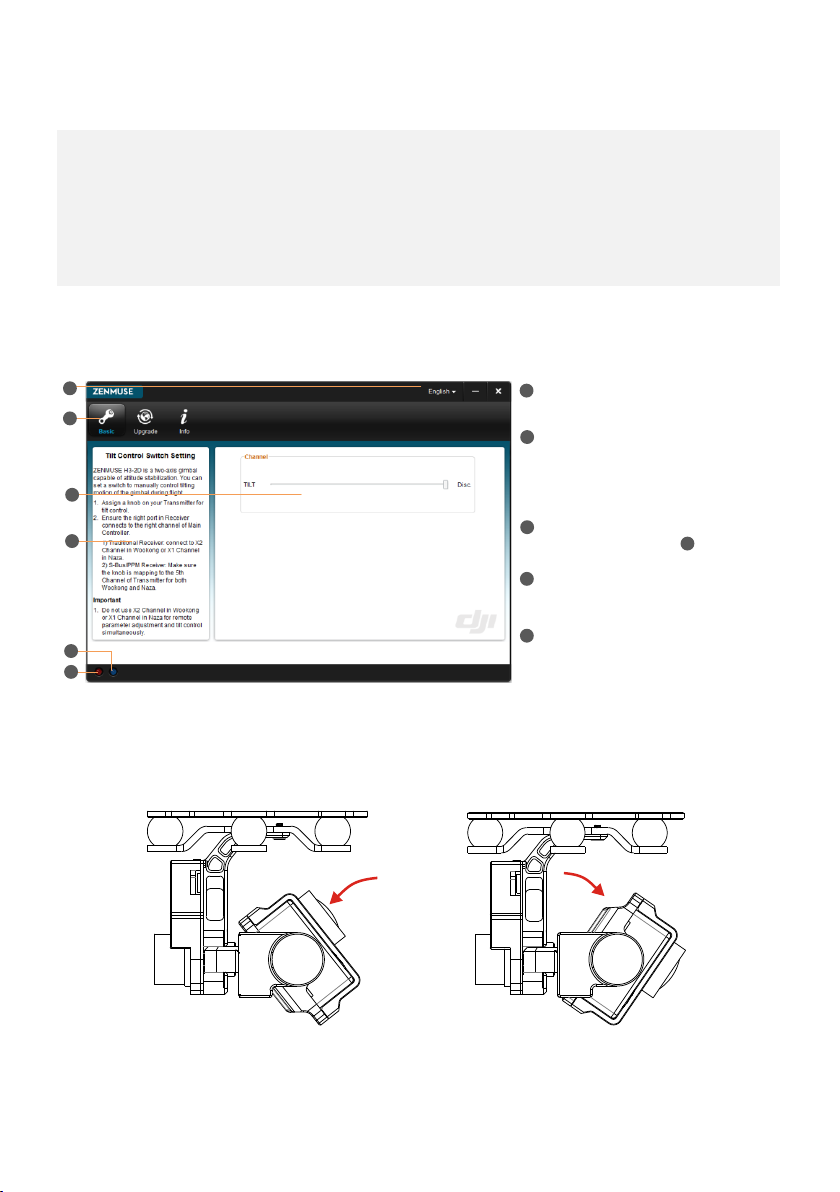
STEP2. GUI
Connect GCU and PC via a Micro-USB cable, power on GCU.
STEP3. Channel Setting
TILT: Slide the TX switch, the corresponding slider of cursor will move, and you can see the gimbal moving by
rotating the pitch axis, shown as the following chart.
©2013 DJI Innovations. All Rights Reserved. 12
Fig.1 Moving Upwards Fig.2 Moving Downwards
Page 13

STEP4. Firmware & Software Upgrade
1. Make sure your computer is connected to the Internet.
2. Please close all the other applications during firmware upgrade, including anti-virus software and firewall.
3. Make sure the power supply is securely connected. DO NOT un-plug the power supply until firmware
upgrade has finished.
4. Connect the GCU to PC with a Micro-USB cable, DO NOT break connection until firmware upgrade has
finished.
5. Run the Software and wait for connection.
6. Select UpgradeMain Control, IMU and CMU.
7. DJI Innovations server will check current firmware version, and get the latest firmware prepared for the
unit.
8. If there is a firmware version more up-to-date than your current version, you will be able to click the
Upgrade Version.
9. Wait until Assistant software finishes Upgrade.
10. Click OK and power cycle the unit after at least 5 seconds.
Notes:
(1) CMU is short for Camera Multi Unit, which is used for camera functions control.
(2) During IMU and CMU upgrade, it is recommended to unplug the CAN-Bus cable between GCU and MC
to avoid MC disturbing the upgrade.
(3) After firmware upgrade, please re-recognize setup using Assistant software.
(4) If it is notified that the network or DJI Innovations server is busy, please try again later with above
procedures.
(5) If firmware upgrade failed, please try again with the above procedures.
Firmware Upgrade
Please strictly follow the operation procedures for firmware upgrade; otherwise the gimbal might not work
properly.
Software Upgrade
Click Info Software Info, if there is a software version more up-to-date than your current version, you will be able
to download the Upgrade Version.
You can also check the product version via Info SN. This includes Hardware ID,IMU,GCU,Software.
SN is a 32 digits authorization code for unit function activations. We had already filled in the authorization code for
your unit after manufacture. You might be asking to fill in the new SN in the future if you brought new function
upgrades. Fill in the SN and then click Write button. If you filled in an invalid SN over 30 times, your product will be
locked and you have to contact our customer support.
©2013 DJI Innovations. All Rights Reserved. 13
Page 14

Test
For safety reasons, please pay serious attention to all following items Before Every Flight.
(1) Gimbal is installed firmly to aircraft, and camera mounted correctly and stably. Make sure the Lens of
camera is pointing to the aircraft nose direction.
(2) All cables are in correct and firm connection, without anyone in backwards.
(3) Gimbal video signal cable is in good soldered condition if wireless video transmission module used. Make
sure to connect Wireless Video Transmission Unit to GCU first, then power on.
(4) Correct TX settings.
(5) Correct camera settings.
(6) Normal connection between GCU and autopilot system.
(7) Upgrade Autopilot System MC Firmware.
1. Make sure the batteries are fully charged for transmitter, GCU and all the other devices on your aircraft.
2. Switch on the TX.
3. Turn on the camera first then power up the gimbal and wait for gimbal self-testing.
4. After initializing, camera lens will point to aircraft nose direction, that is, the three axes of gimbal should
be in the condition as the above diagram shows.
5. Toggle the Tilt Control switch on your transmitter, and make sure it is working properly. Then try to feel if
your gimbal moves to the corresponding direction. If not, check your settings.
6. When finishing test, please power off the gimbal first then turn off the camera.
Note:
If the gimbal is abnormal (unlike the diagram shows) after initializing, turn to
Trouble Shooting
in
Appendix
.
Keep the power-on gimbal system still and horizontally during test. If you have to hold and move the
STEP1. Check List Before Every Flight
STEP2. Gimbal Test
©2013 DJI Innovations. All Rights Reserved. 14
Page 15

aircraft with power-on gimbal, the inclination angle of the aircraft should not exceed 35°.
Please do not land the aircraft with power-on gimbal on uneven ground (such as grass lawn or rocky
roads), in which environment there may have external forces act on the gimbal or the gimbal will get
shocked, then the gimbal will enter into Hibernation Mode.
Hibernation Mode for gimbal protection. In the condition that the camera is not mounted on the gimbal
the gimbal will enter into Hibernation Mode, in which the gimbal is out of control from Transmitter. You
must mount the camera correctly and power cycle the system to activate the gimbal.
Hibernation Mode for gimbal protection. When certain external forces act on the gimbal, it will enter
Hibernation Mode too. You must take notes to avoid too large forces affecting the normal working status
of gimbal and power cycle the system to activate the gimbal.
It’s better to use separate battery pack to test the gimbal at the beginning to ensure functionality before
making steps to power on of flight controller, gimbal, OSD, FPV gears etc.
NO.
What
Why
How to
1
Gimbal keeps drifting
after initialization
(1) TX trims are too much
(1) Adjust the TX trims
(2)GCU and autopilot system is
disconnected
(3)Gimbal mounting direction is
disaccording to aircraft nose
(2)Connect GCU and autopilot
system
(3)Ensure Gimbal mounting direction
is the same with aircraft nose
2
The gimbal is abnormal
after initializing
Abnormal calibration after
manufacture
Please contact local dealer or DJI
Innovations customer service
3
Can’t distinguish gimbal
pointing when using
BVR flight
Try to use a wireless video
transmission module.
Appendix
Trouble Shooting
Settings Using with the A2 Flight Control System
Users should configure the H3-2D’s pitch control in the A2 assistant software when using with the A2 Flight
Control System. Map the H3-2D channel to a switch on the transmitter. It is recommended to use a Knob switch
channel, which is only used for H3-2D pitch control on the “Channel Map” page (as the following diagram shown).
©2013 DJI Innovations. All Rights Reserved. 15
Page 16

Specifications
General
Built-In Functions
(1) 2-axis gimbal
(2) DJI gimbal special servos drive module
(3) All aluminum alloy manufacture
(4) Built-in independent IMU module
(5) Light-weight
(6) WKM, NAZA-M, NAZA-M V2 ,PHANTOM supported
(7) GoPro3 supported
(8) Based on Zenmuse technology
Peripheral
Supported Camera
GoPro3 Silver and Black
GCU Input Power
3S~6S LiPo (12V~26V)
Assistant Software System Requirement
Windows XP SP3; Windows 7; Windows 8
Mechanical& Electrical Characteristics
Working Current
Static current: 400mA (@12V)
Dynamic current: 600mA (@12V)
Gimbal Input Power
3S~6S (12V ~26V)
Operating Temperature
-10°C ~ 50°C
Gimbal Weight
230g(With GoPro3)
Gimbal Dimensions (With Damping Unit)
99.5mm ×85.5mm ×92.75mm
GCU Weight
22g
GCU Dimensions
42 mm X32 mm X9.3 mm
Working Performance
Controlled Angle Accuracy
0.08°
Maximum Controlled Rotation Speed
Roll axis:±30°/s
Tilt axis: ±130°/s
Controlled Rotation Range
Roll axis control: ±39°
Tilt axis control: -130~+50°
Regulatory Approvals
FCC (USA)
Yes
CE (EU)
Yes
ROHS(EU)
Yes
©2013 DJI Innovations. All Rights Reserved. 16
 Loading...