


Duo ViP 222
Warning and Attention Symbols
You must be aware of safety when you install and use this system. This User Guide provides various procedures. If you do
some of these procedures carelessly, you could injure or kill yourself or damage equipment or property. Some other
procedures require special attention.
The WARNING! symbol means that if you are not careful,
You could injure or kill yourself, or
You could damage equipment or property.
ATTENTION! symbol means you should pay special attention to:
The
Important instructions for using the system, or
Important instructions for maintaining the system.
Class II symbol alerts qualified service personnel to use only identical replacement
The
parts in this apparatus.
For Your Safety
Do not try to open the case of the receiver . There is risk of electrical shock, which may cause damage to
the receiver and/or personal injury or death to you. There are no user-serviceable parts inside the
receiver. Opening the receiver case or making unauthorized changes will void the warranty.
To reduce the risk of fire or electric shock, do not expose this appliance to rain or moisture.
Important Software Notice
As with all software controlled products, unexpected behavior could arise if the user tries to perform operations in a nonroutine manner. This product, like almost any other high tech product, is subject to bugs and hence EchoStar CANNOT
AND DOES NOT GUARANTEE OR WARRANT THAT ALL FEATURES, SUCH AS PARENTAL CONTROL, WILL WORK
AS INTENDED UNDER ALL CIRCUMSTANCES. EchoStar endeavors to improve such conditions and will periodically
download improvements.
In compliance with the terms of the GNU Public License (GPL), EchoStar is making some source code available to the
public to download from www.echostar.com.
Equipment and Software Covered by this User’s Guide
This User Guide covers the ViP222 receiver and software model ViP222. This Guide may cover other devices, not listed
here.
Copyright Notice
Copyright © 2010 EchoStar Technologies L.L.C., Englewood, Colorado 80112. All rights reserved.
The information in this User Guide may change without notice. We may issue revisions to tell you about such changes.
Please send comments or questions about this User Guide to: T echnical Publications, EchoStar Technologies Corporation, 100 Inverness
Terrace East, Englewood, Colorado 80112.
Part Number: 181686
Printed in the United States of America.
DISH Network is a registered trademark of EchoStar Satellite L.L.C. For information about DISH Network, please visit our website at
www.dishnetwork.com.
We acknowledge all product names, trade names, or corporate names we mention in this User Guide to be the proprietary property of the
registered owners.
Manufactured under license from Dolby Laboratories. “Dolby” and the double-D symbol are trademarks of Dolby Laboratories.

Table of Contents
Important Safety Precautions v
1 Introduction
WELCOME 2
HOW TO USE THIS GUIDE 2
ABOUT YOUR DISH NETWORK ACCOUNT 4
WATCHING TV NOW 5
ADDITIONAL SERVICES 6
ABOUT SATELLITE TV RECEPTION 6
WHY CONNECT TO A PHONE LINE OR BROADBAND 7
OVING ON-SCREEN LOGO 7
M
2 Receiver and Remote Controls
SATELLITE RECEIVER OVERVIEW 10
DUAL AND SINGLE MODES 10
R
EMOTE CONTROLS 13
SATELLITE RECEIVER FRONT PANEL 19
ATELLITE RECEIVER BACK PANEL 19
S
USING THE ON-SCREEN MENUS 20
U
SING TEXT FIELDS 21
i

Table of Contents
3 Finding Programs to Watch
CHANGING CHANNELS 24
USING THE PROGRAM GUIDE 24
USING THE BROWSE BANNER 26
USING SEARCH TO FIND A PROGRAM 27
FINDING A PROGRAM BY ITS THEME 28
USING PICTURE-IN-PICTURE 28
4 Pay-Per-View
ORDERING A PAY-PER-VIEW PROGRAM 32
REVIEWING PAY-PER-VIEW PURCHASES 32
5 Favorites Lists
WHAT ARE FAVORITES LISTS? 36
CREATING OR CHANGING FAVORITES LISTS 37
NAMING FAVORITES LISTS 37
USING FAVORITES LISTS 37
6 Parental Controls
WHAT ARE PARENTAL CONTROLS/LOCKS? 40
REATING OR CHANGING A PASSWORD 41
C
L
OCKING AND UNLOCKING YOUR RECEIVER 41
REATING OR CHANGING RATINGS LOCKS 42
C
CREATING OR CHANGING CHANNEL LOCKS 45
L
OCKING OR UNLOCKING PAY-PER-VIEW CHANNELS 46
HIDING ADULT CONTENT OR LOCKED CHANNELS 46
OCKING OR UNLOCKING THE FRONT PANEL 47
L
ii

Table of Contents
7 Interactive TV
DISHHOME INTERACTIVE TV 50
CUSTOMER SUPPORT 50
8Timers
TIMERS 52
USING THE TIMERS LIST 54
SETTING UP AN AUTOMATIC TIMER 54
SETTING UP A MANUAL TIMER 55
DELETING A TIMER 56
OVERLAPPING TIMERS 56
9 Remote Control Setup
IMPROVING RECEIVER CONTROL 58
CONTROLLING OTHER COMPONENTS 61
THE RECOVER BUTTON 70
SENDING DISCRETE POWER ON AND OFF 72
10 Receiver Customization
USING SHARED VIEW 76
ODULATOR SETUP 76
M
U
SING CALLER ID 77
HANGING LANGUAGES 78
C
USING CLOSED CAPTIONING 79
U
SING DOLBY® DIGITAL AUDIO OUTPUT 80
CHANGING THE PROGRAM GUIDE ORDER 81
HANGING THE GUIDE DISPLAY 81
C
RESETTING TO FACTORY DEFAULTS 82
S
CHEDULING RECEIVER UPDATES 82
NACTIVITY STANDBY 83
I
iii

Table of Contents
11 Connections and Setup
CONNECTING TO THE NEARBY TV (TV1) 86
CONNECTING TO THE REMOTE TVS (TV1 OR TV2) 89
CONNECTING TO YOUR DISH ANTENNA 93
CONNECTING THE PHONE LINE 94
CONNECTING TO A BROADBAND NETWORK 95
CONNECTING A VCR TO THE REMOTE TV 96
CONNECTING USING DISHCOMM 97
CONNECTING AN OVER-THE-AIR ANTENNA 98
USING TROUBLESHOOTING TOOLS 103
Reference
TROUBLESHOOTING TABLES 106
REMOTE CONTROL DEVICE CODES 118
Appendix 127
Index 139
iv
Important Safety Instructions
1 Read these instructions.
2 Keep these instructions.
3 Heed all warnings.
4 Follow all instructions.
5 Do not use this appara tus near water.
6 Clean only with a dry cloth.
7 Do not block any ventilation openings. Install in accordance with the manufacturer’s instructions.
8 Do not install near any heat sources such as radiators, heat registers, stoves, or other apparatus
(including amplifiers) that produce heat.
9 Do not defeat the safety purpose of th e polarized or grounding-type plug. A polarized plug has
two blades with one wider than the other. A grounding-type plug has two blades and a third
grounding prong. The wide blade or the third prong are provided for your safety. If the provided
plug does not fit into your outlet, consult an electrician for replacement of the obsolete outlet.
10 Protect the power cord from being walked on or pinched, particularly at plugs, convenience
receptacles, and the point where they exit from the apparatus.
11 Use only attachments/accessories specified by the manufacturer.
12 Unplug this apparatus during lightning storms or when unused for long periods of time.
13 Refer all servicing to qualified service personnel. Servicing is required when the apparatus has
been damaged in any way, such as the power supply cord or plug is damaged, liquid has been
spilled or objects have fallen into the apparatus, the apparatus has been exposed to rain or
moisture, does not operate normally, or has been dropped.
14 The power plug must be readily accessible so that the app aratus can be easily discon nected from
the AC power.
15 Tighten all of the coaxial cable connections only by hand. If you use a wrench, you may
overtighten the connections and damage your equipment.
16 The receiver is still connected to the AC power whenever it is plugged into a live power outlet,
even if it is “turned off” (in standby mode) using a remote-control or front-panel POWER button.
v
Safety
Apparatus shall not be exposed to dripping or splashing and no objects filled with liquids, such
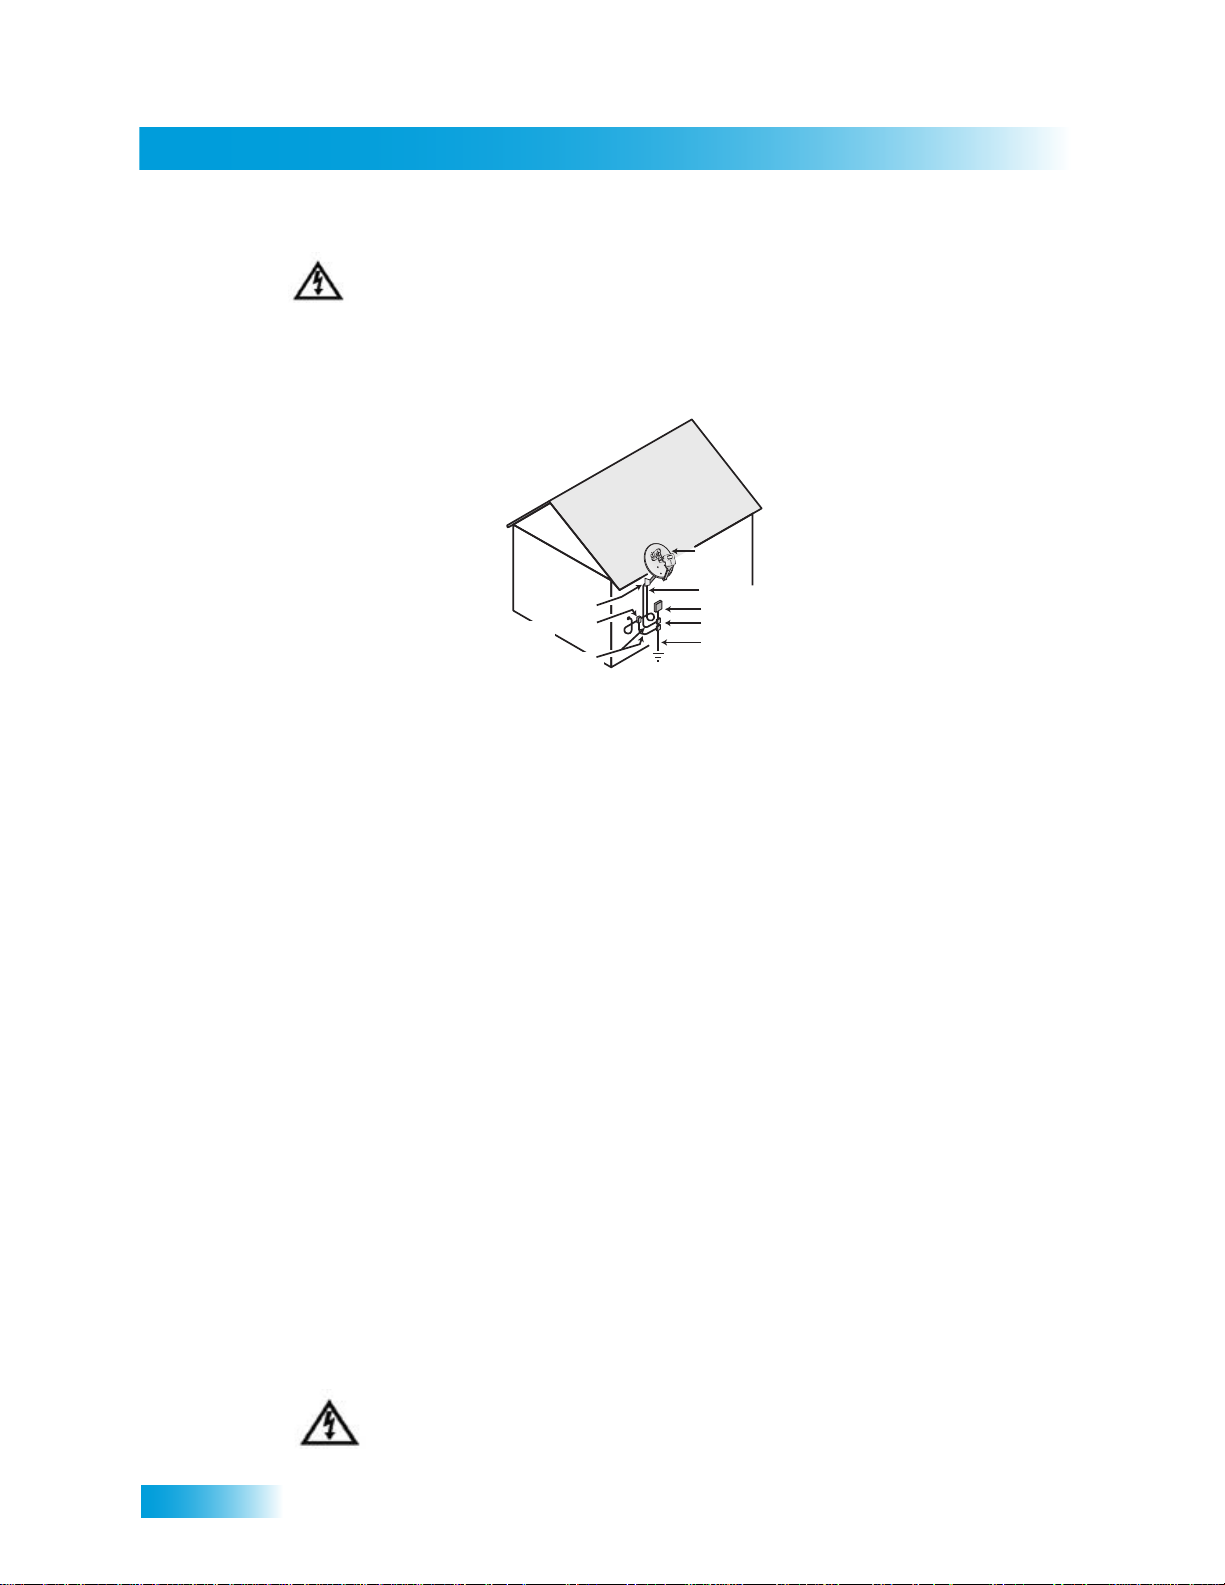
Satellite Dish
Coaxial Cable
from Satellite Dish
Electric Service Equipment
Ground Clamps
Power Service Grounding
Electrode System
(NEC Art. 250, Part H)
Antenna Discharge
Unit
Ground Clamp
Grounding Conductors
(NEC Section 810-21)
as vases, shall be placed on the app aratus. Also, no sources o f fl ame, such as lit candles, shall
be placed on the apparatus.
Note to Satellite TV System Installer: This reminder is provided to call the satellite TV system installer’s
attention to Article 820-40 of the National Electrical Code (NEC) that provides guidelines for proper grounding
and, in particular, specifies that the cable ground shall be connected to the grounding system of the building as
close to the point of cable entry as practical.
• Operate the receiver using only the type of power source indicated on the marking label. Unplug the
receiver power cord by gripping the power plug, not the cord.
• Do not overload wall outlets or extension cords; this can result in a risk of fire or electrical shock.
• Never insert objects of any kind into the receiver through openings, as the objects may touch dangerous
voltage points or short out parts. This could cause fire or electrical shock.
• Do not locate the antenna near overhead light or power circuits, or where it can fall into such power lines or
circuits. When installing the antenna, take extreme care to avoid touching such power lines or circuits, as
contact with them can be fatal.
• Do not attempt to service the receiver yourself, as opening or removing covers may expose you to
dangerous voltage, and will void the Limited Warranty. Refer all servicing to authorized service personnel.
vi
Proper Care of Your Equipment
• Always handle the satellite receiver carefully. Excessive shock and vibration can damage the hard drive.
• Unplug the receiver from the AC power outlet before cleaning.
• Always turn the receiver off, unplug it and let it sit for at least 30 seconds before moving it.
• The use of accessories or attachments not recommended by the receiver manufacturer will void the Limited
Warranty.
• Do not place the receiver in an enclosure (such as a cabinet) without proper ventilation.
• Do not stack the receiver on top of or below other electronic devices as this can cause heat build-up and
vibration.
• Do not install the receiver in any area where the temperature can be less than 40°F or more than 113°F. If
the receiver is cold to the touch, do not plug it in immediately . Let it sit unplugged at room temperature for at
least 45 minutes before plugging it in.
• Use an outlet that contains surge suppression or ground fault protection. During an electrical storm or when
the receiver is left unattended and unused for long periods of time, unplug the power cord from the wall
outlet, disconnect the lines between the receiver and the antenna, and disconnect the telephone line. This
will provide additional protection against damage caused by lightning or power line sur ges.
On some TVs, the presence of fixed images for extended periods of time may cause them to be
permanently imprinted on the screen. Consult your TV user guide for information on whether this is
a problem for your TV, what operating/viewing restrictions apply to avoid this problem, and
associated TV warranty coverage.
Introduction to DISH Network
Introduction
So you bought yourself a new receiver and you want to know how it works, right? Take a
look through this guide and you’ll quickly learn how to use all of the features. This chapter
familiarizes you with your DISH Network satellite TV receiver.
• WELCOME
• HOW TO USE THIS GUIDE
• ABOUT YOUR DISH NETWORK ACCOUNT
• WATCHING TV NOW
• ADDITIONAL SERVICES
• A
BOUT SATELLITE TV RECEPTION
• WHY CONNECT TO A PHONE LINE OR
B
ROADBAND
• MOVING ON-SCREEN LOGO
1

Chapter 1
Welcome
WELCOME
Thank you for choosing DISH Network. You are about to experience the excitement and
convenience of our Direct Broadcast Satellite (DBS) service, which delivers the very best picture
and sound quality. DISH Network consistently provides the latest products and satellite-delivered
services—with high performance, ease of operation, and a wide variety of entertainment options.
Y our new DISH Network receiver has two built-in satellite TV tuners supporting viewing in standard
or high definition. In addition, an over-the-air (OTA) tuner is also available. After attaching an
antenna to the OTA tuner input on your receiver back panel (see details on page 98 and any
installation instructions that came with your OTA antenna), you can watch programs on digital
channels received over the air, selecting them from the Program Guide much the same way you
do with satellite-delivered TV channels. Additionally, a host of other functions make your new
receiver one of the most versatile and exciting devic es in ho m e en te rtainme nt .
This satellite receiver lets you decide how you watch TV. You can experience audio and video with
full digital quality. You can create reminders for your favorite programs and not miss any of the
action, or you can record a program on your VCR to watch later.
HOW TO USE THIS GUIDE
This section explains how the guide is divided and the conventions used throughout.
Guide Overview
The information in this guide is separated into several chapters to make it easy for you to find
exactly what you’re looking for:
• Chapter 1: Introduction gives you a brief overview of DISH Network and your new receiver.
• Chapter 2: Receiver & Remote Controls explains the basic features of your system and how to
use the remote controls, front panel buttons, and back panel connections.
• Chapter 3: Finding Programs to Watch describes how to change channels and look for
programs.
• Chapter 4: Pay-Per-Programs shows you how to order and watch Pay-Per-View and DISH On
Demand programs.
• Chapter 5: Favorites Lists explains how to create, name, and use favorites lists.
• Chapter 6: Locks explains how to set locks and passwords.
• Chapter 7: Interactive TV describes how to use the DishHOME Interactive TV
features of your satellite TV system.
• Chapter 8: Timers describes how to set up and use timers and the timers list.
• Chapter 9: Remote Control Setup contains instructions for programming your remote to
control your satellite receiver and equipment like a TV, VCR, or DVD player.
• Chapter 10: Receiver Customization shows you how to customize your receiver.
• Chapter 11: Connections and Setup explains how to connect your satellite receiver to your TV,
as well as to other equipment like a VCR.
2
Introduction
How to Use this Guide
Guide Conventions
• The names of remote control buttons are all uppercase.
Example: Press SAT.
• Select means to move the highlight to an on-screen option or choice in a list and press
SELECT on the remote control.
Example: Select the Locks option.
• This guide uses HD for high definition and SD for standard definition.
• Where this guide mentions the nearby TV, it is referring to TV1, the TV nearest the receiver.
The nearby TV receives TV1 menus and programming from the receiver’s TV1 outputs and is
connected using short audio/video cables.
• Where this guide mentions the remote TV, it is referring to TV2, the cable-ready TV(s) located
in a room away from the receiver. The remote TV receives TV2 menus and prog ramming fr om
the receiver’s TV2 outputs through your in-home cable system.
• Where this guide mentions the remote control, it refers to either Remote Control 1 when
viewing a nearby TV or Remote Control 2 when viewing the remote TV(s). If a specific remote
control must be used, this guide will refer directly to Remote Control 1 or Remote Control 2.
• The instructions in this guide are shown in two ways:
– Instructions in the form of pictures are handy if you’d like to learn something quickly.
These instructions are numbered left to right as shown in the sample below.
– Instructions that are written out are helpful if you’d like to learn more details.
Tips and Questions
At then end of most chapters, you’ll find two important sections that are there to give you additional
information:
Tips that let you in on secrets of using your satellite TV system more efficiently.
Answers to Questions you might have about the features described in the chapte r.
3
Chapter 1
About Your DISH Network Account
ABOUT YOUR DISH NETWORK ACCOUNT
This section describes how to order your packages and provides information on how to find
information about your DISH Network account.
Ordering Your Programming Packages
Before you can enjoy your new receiver, order your programming packages.
1 Press POWER on the front panel to turn on the receiver.
2 Press SYSTEM INFO on the front panel to display the receiver’s System Information menu on the
nearby TV screen.
3 Call 1-800-894-9131 and tell the Customer Service Center the system has been installed and you
would like to begin receiving services. A representative will explain the available program
packages. Give the representative information from the System Information screen, as requested.
4 Your services will be turned on via the satellite signal. This process usually takes just a few min-
utes.
5 Select Done.
Where to Find Information on Your Account
If you want to know about charges to your DISH Network account or if you would like to make
changes to your programming packages, be sure to have your account information handy and
choose one of the following:
• Go to our website at www.dishnetwork.com/my account
• Press MENU on your remote control and then select Customer Support.
• Call DISH Network at 1-800-894-9131.
Note: Additional authorization may be required before high definition programming and/or over-
the-air broadcasts can be viewed; additional fees may apply.
4
Introduction
WATCHING TV NOW
After you have ordered your programming package, you can begin enjoying the features of your
new satellite TV receiver. When you complete these simple tours, you’ll be familiar with the remote
control and be able to find a program to watch; pause live TV; and record your favorite shows.
Finding a Program to Watch
You’re already itching to use your remote control, so pick it up now and find something to watch. If
you want to know more about watching TV, see Chapter 3: Finding Progra ms to W atch st arting o n
page 23.
Watching TV Now
5
Chapter 1
Additional Services
ADDITIONAL SERVICES
Pay-Per-View
Catch all the action on Pay-Per-View. Take a break from regular TV and order the latest movies,
sports, and special events. For details on ordering Pay-Per-View events, see page 31. Be sure to
connect your receiver to an active telephone line (see the instructions on p age 94) or a broadband
(high-speed) Internet connection (see ) before you order a Pay-Per-View event.
DishHOME
At DishHOME (press DISH on your remote control), you’ll find news, sports, weather information,
TV and movie buzz, customer service, games, and more.
ABOUT SATELLITE TV RECEPTION
Satellite television uses satellites in a stationary orbit over the Earth to deliver television and audio
programming. This type of orbit enables th e satellites to st ay aligned over one pla ce on the surface
of the Earth. Once the satellite dish is aimed at the satellite, the dish does not have to move to
follow it.
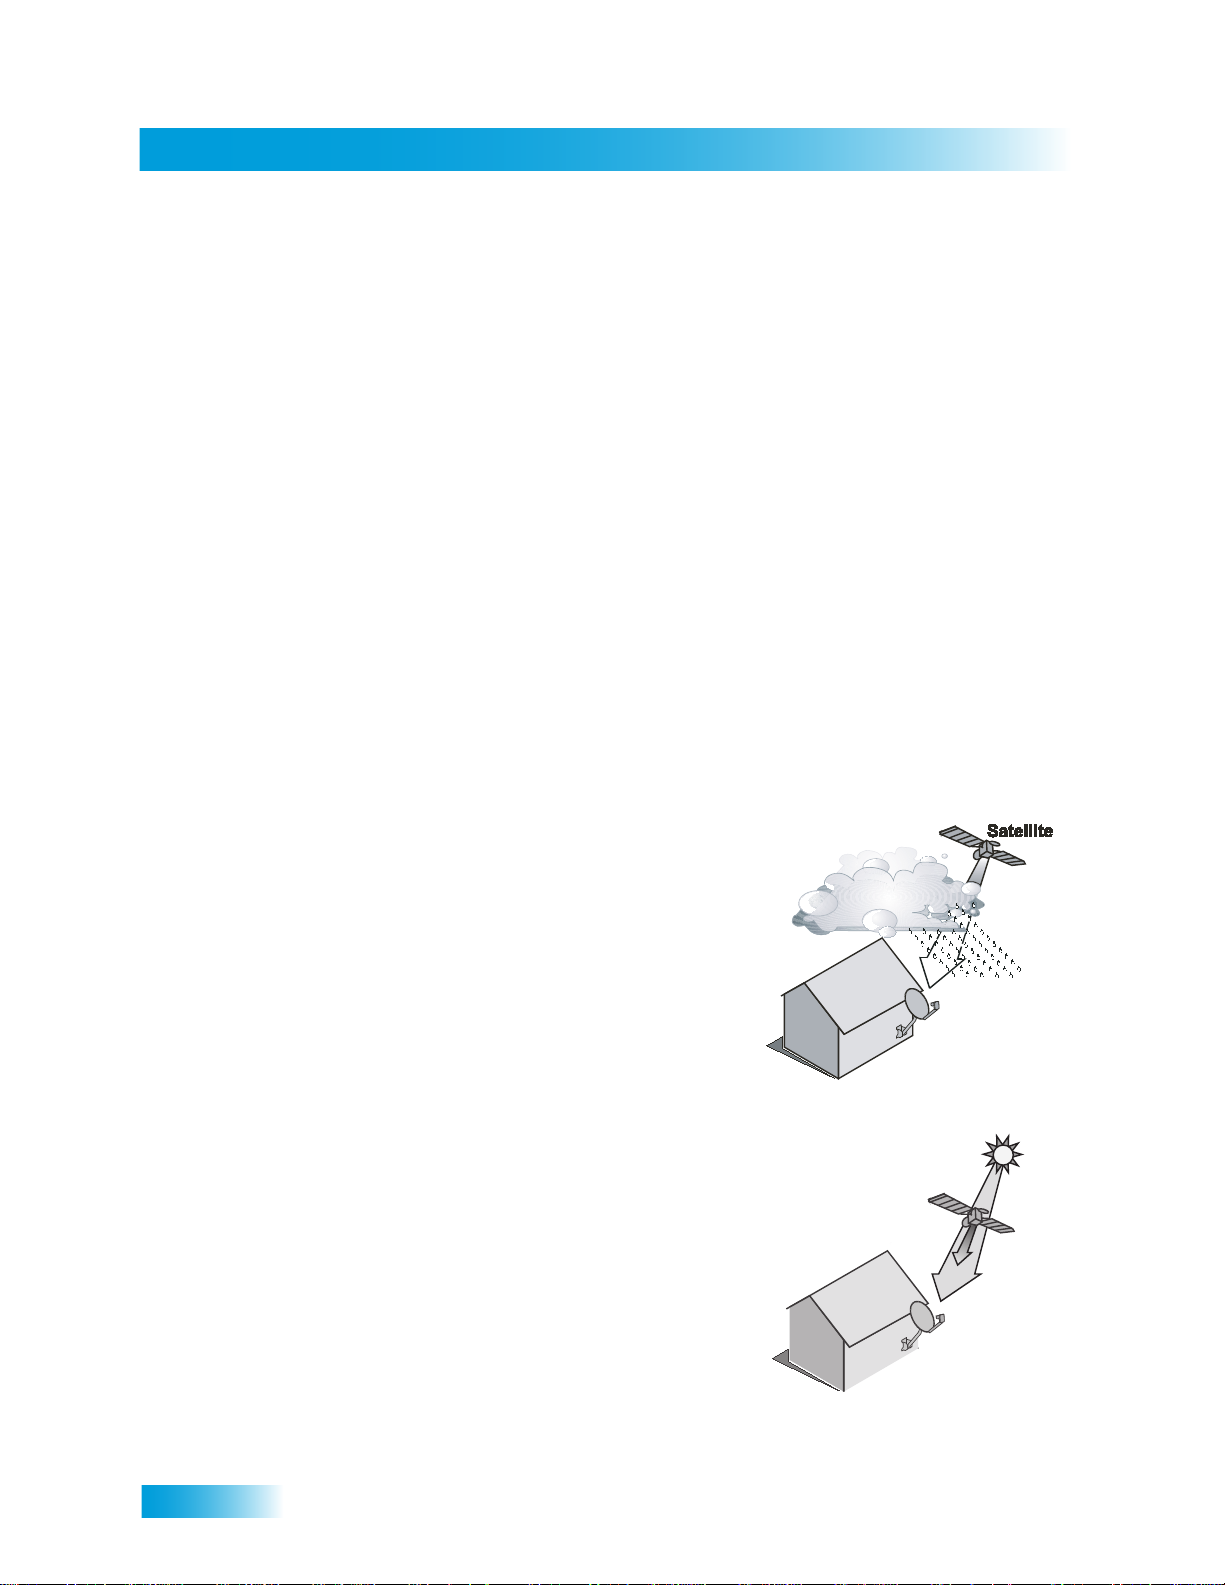
Rain and Snow Fade
Heavy rain, snow, or dense cloud cover can reduce the
satellite signal, which may interrupt your programming
service. Your service will return after the weather
condition has passed. Aiming the satellite dish to get the
strongest signal during installation will help prevent rain
and snow from interrupting the signal.
Solar Interference
Twice a year, the sun moves to a position behind the
DISH Network satellites as they orbit the Earth. This
event occurs during a few days at the beginning of the
spring and the beginning of the autumn and lasts only a
few minutes.
During these brief periods, you will not be able to see
programs on DISH Network. When the sun has moved
from behind the satellites, the programs will reappear.
This is an unavoidable natural event and has an adverse
effect on many satellite program providers.
6
Introduction
Why Connect to a Phone Line or Broadband
WHY CONNECT TO A PHONE LINE OR BROADBAND
Your satellite receiver is equipped with a standard telephone jack that you use to connect to an
active telephone line. Keep the receiver connected to an active telephone line so that you will be
able to order pay-per-view programs using your remote control, use all of the DishHOME
Interactive TV features, and other services from DISH Network (see the instructions on page 94).
A connected phone line also supports the Caller ID feature of your ViP-series receiver (see the
instructions on ).
Your satellite receiver can be connected to your broadband home network. Currently this
connection allows you to order additional content not usually available through your satellite
subscription, and you can order pay-per-view events using your remote control (if you do not
connect a phone line to your receiver). See th e connection instructions on and more information
about Pay-Per-View programming on .
MOVING ON-SCREEN LOGO
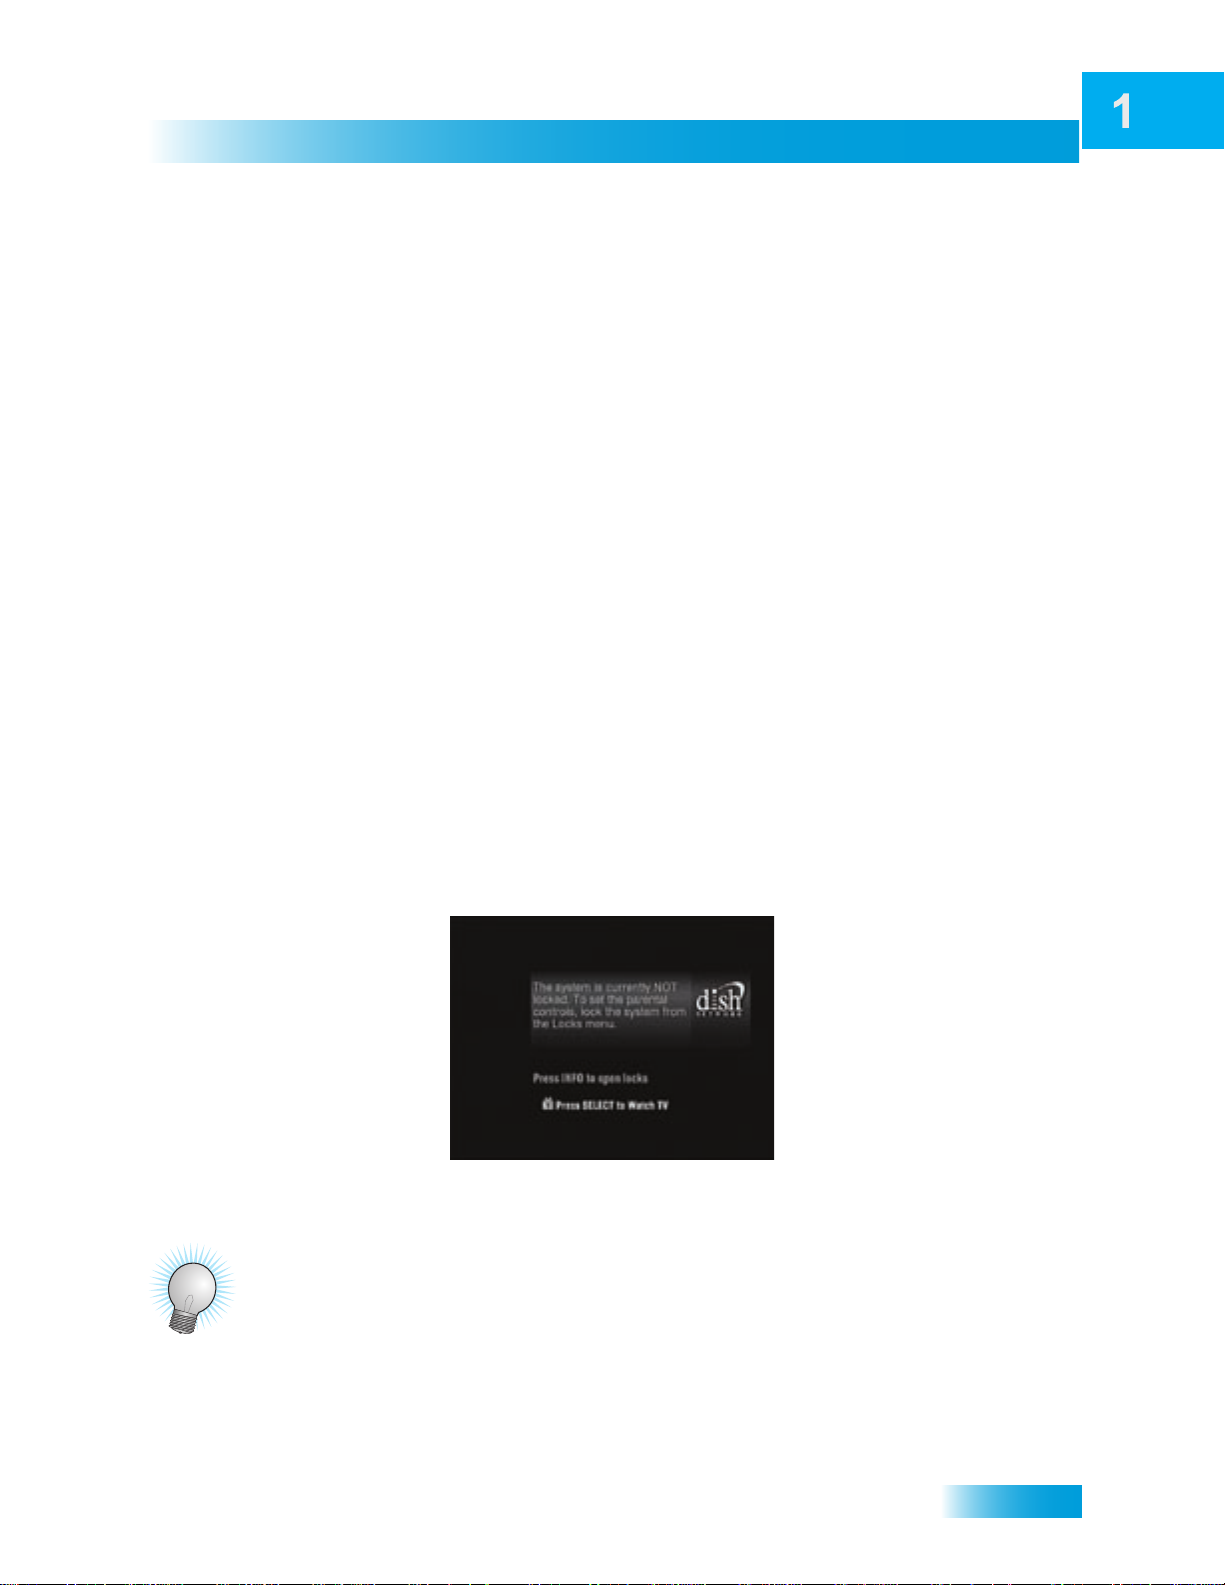
Whenever the receiver is turned off using the remote control or front-panel POWER button, you
will see the DISH Network logo and helpful tips on your TV screen. This feature is included with
your receiver to assure you that the connections between your receiver and TV(s) are not lost, and
also provides useful information about your receiver and its features. Press the POWER or
SELECT button on the remote control to resume watching your satellite TV programming. Make
sure you are using the correct remote control for your current TV-viewing location (see for
details).
TIPS
• Always have the latest software—Turn off the receiver when you’re not using it.
• Order Pay-Per-View with your remote control—Keep an active telephone line or broadband
network connected to the receiver. Not only will you have Pay-Per-View at your fingertips, but
you’ll also avoid unnecessary charges.
7

Chapter 1
Questions
• How do I find something to watch? Refer to page 5. For more information on finding
• Why are some of the channels red in the Program Guide? The channels that ar e red in the
• I’m looking at program information in a guide I bought at the grocery store, but nothing
QUESTIONS
something to watch, see Chapter 3: Finding Programs to Watch.
Program Guide are those which are not currently a part of your subscription. If you’d like to
watch those channels, then please call 1-800-894-9131or go to www.dishnetwork.com
matches what’s on my DISH Network receiver; is something wrong? No. DISH Network
programming may vary from what you’ll find in a local publication. For best results, use the
Program Guide on your receiver to obtain information or order DISH Entertainment Magazine.
.
8
About Your Satellite TV System
Receiver and Remote Controls
This chapter helps you get to know your receiver and remote co nt ro ls, whic h let you us e
all your receiver’s functions. After you read the information here, be sure to practice what
you learn so that you can quickly understand what’s presented in later chapters.
What you’ll find in this chapter:
• SATELLITE RECEIVER OVERVIEW
• DUAL AND SINGLE MODES
• REMOTE CONTROLS
• SATELLITE RECEIVER FRONT PANEL
• SATELLITE RECEIVER BACK PANEL
• USING THE ON-SCREEN MENUS
• USING TEXT FIELDS
9

Chapter 2
Satellite Receiver Overview
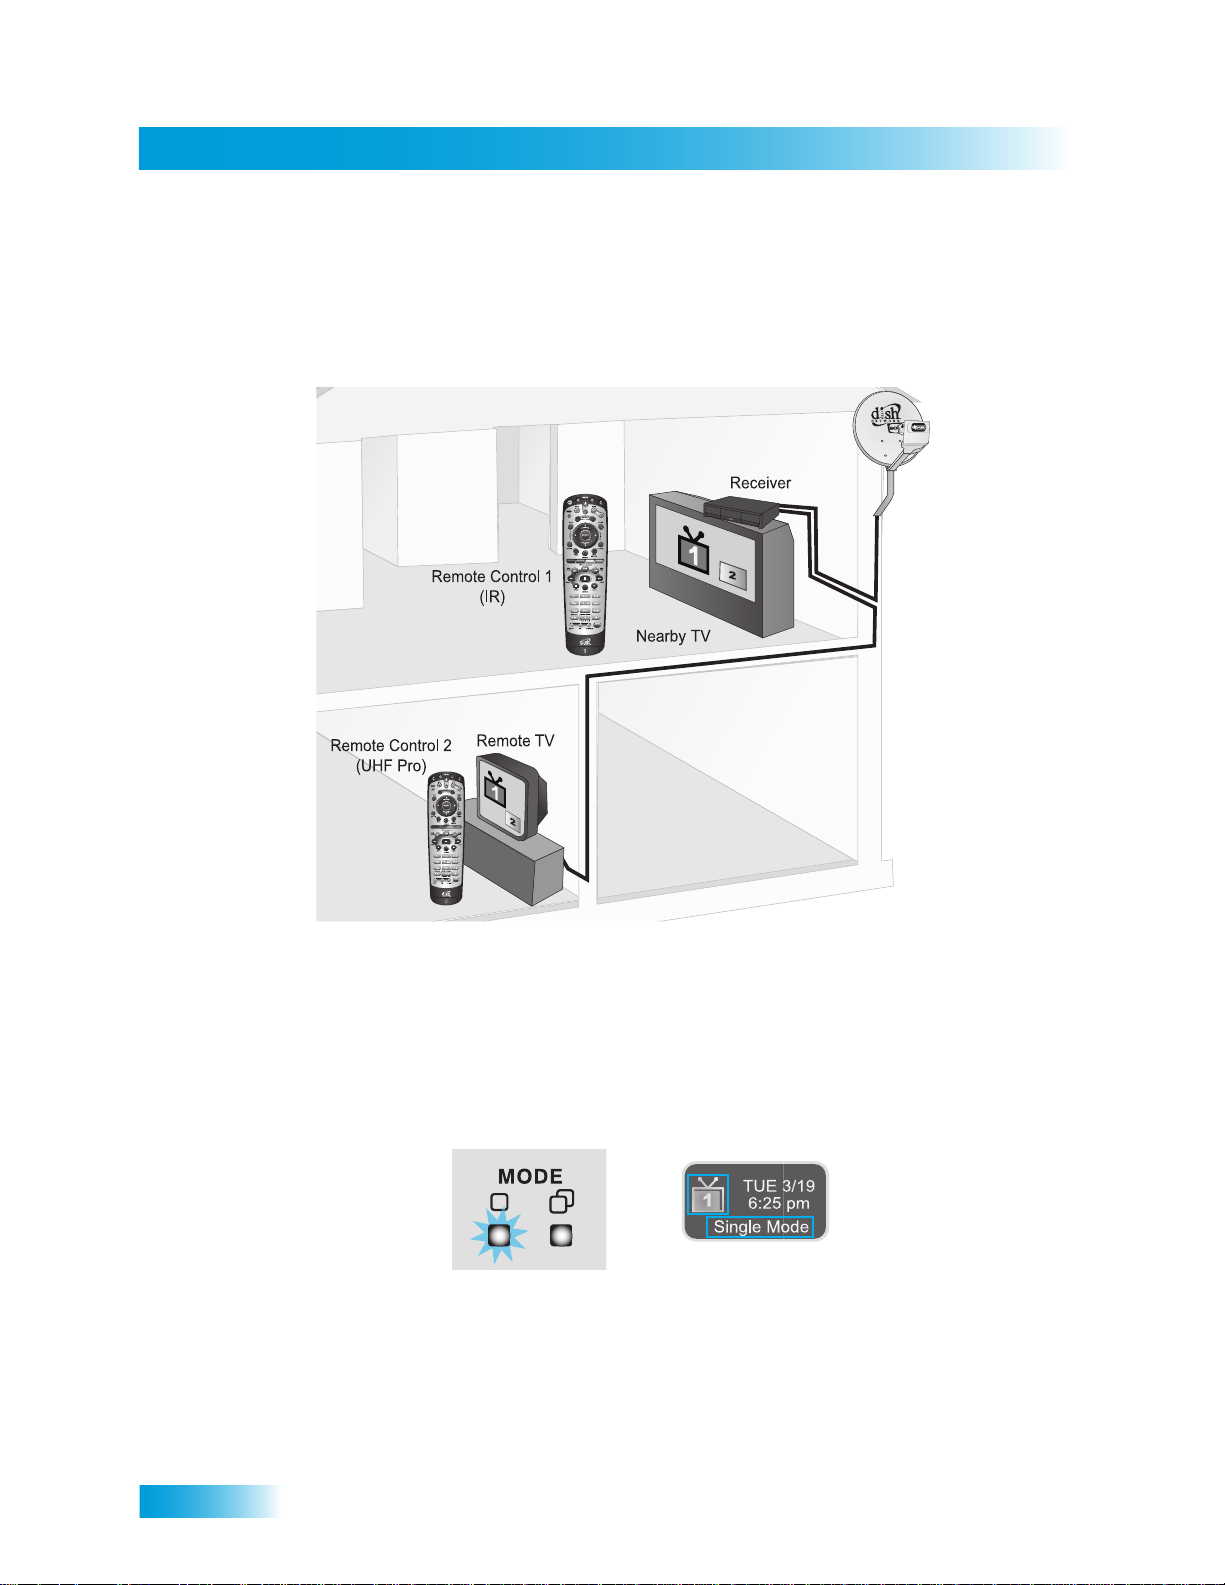
SATELLITE RECEIVER OVERVIEW
This section gives you an overview of your DISH Network satellite TV receiver system.
Satellite Receiver
This dual satellite-tuner receiver can view standard-definition (SD) and high-definition
(HD) DISH Network programming on two TVs, or (with an attached over-the-air antenna)
view over-the-air digital/HD broadcasts on the nearb y HDTV.
• Nearby TV (TV1)—Connect to an HDTV to view SD and HD DISH Network
programming and (with an antenna) over-the-air digital/HD broadcasts. Programming
from the receiver is delivered to the nearby TV using short audio/video cables.
• Remote TV(s) (TV2)—Connect to an SDTV to view SD and down-converted HD
broadcasts. Programming from the receiver is usually delivered to the remote TV(s)
using existing in-home coaxial cable.
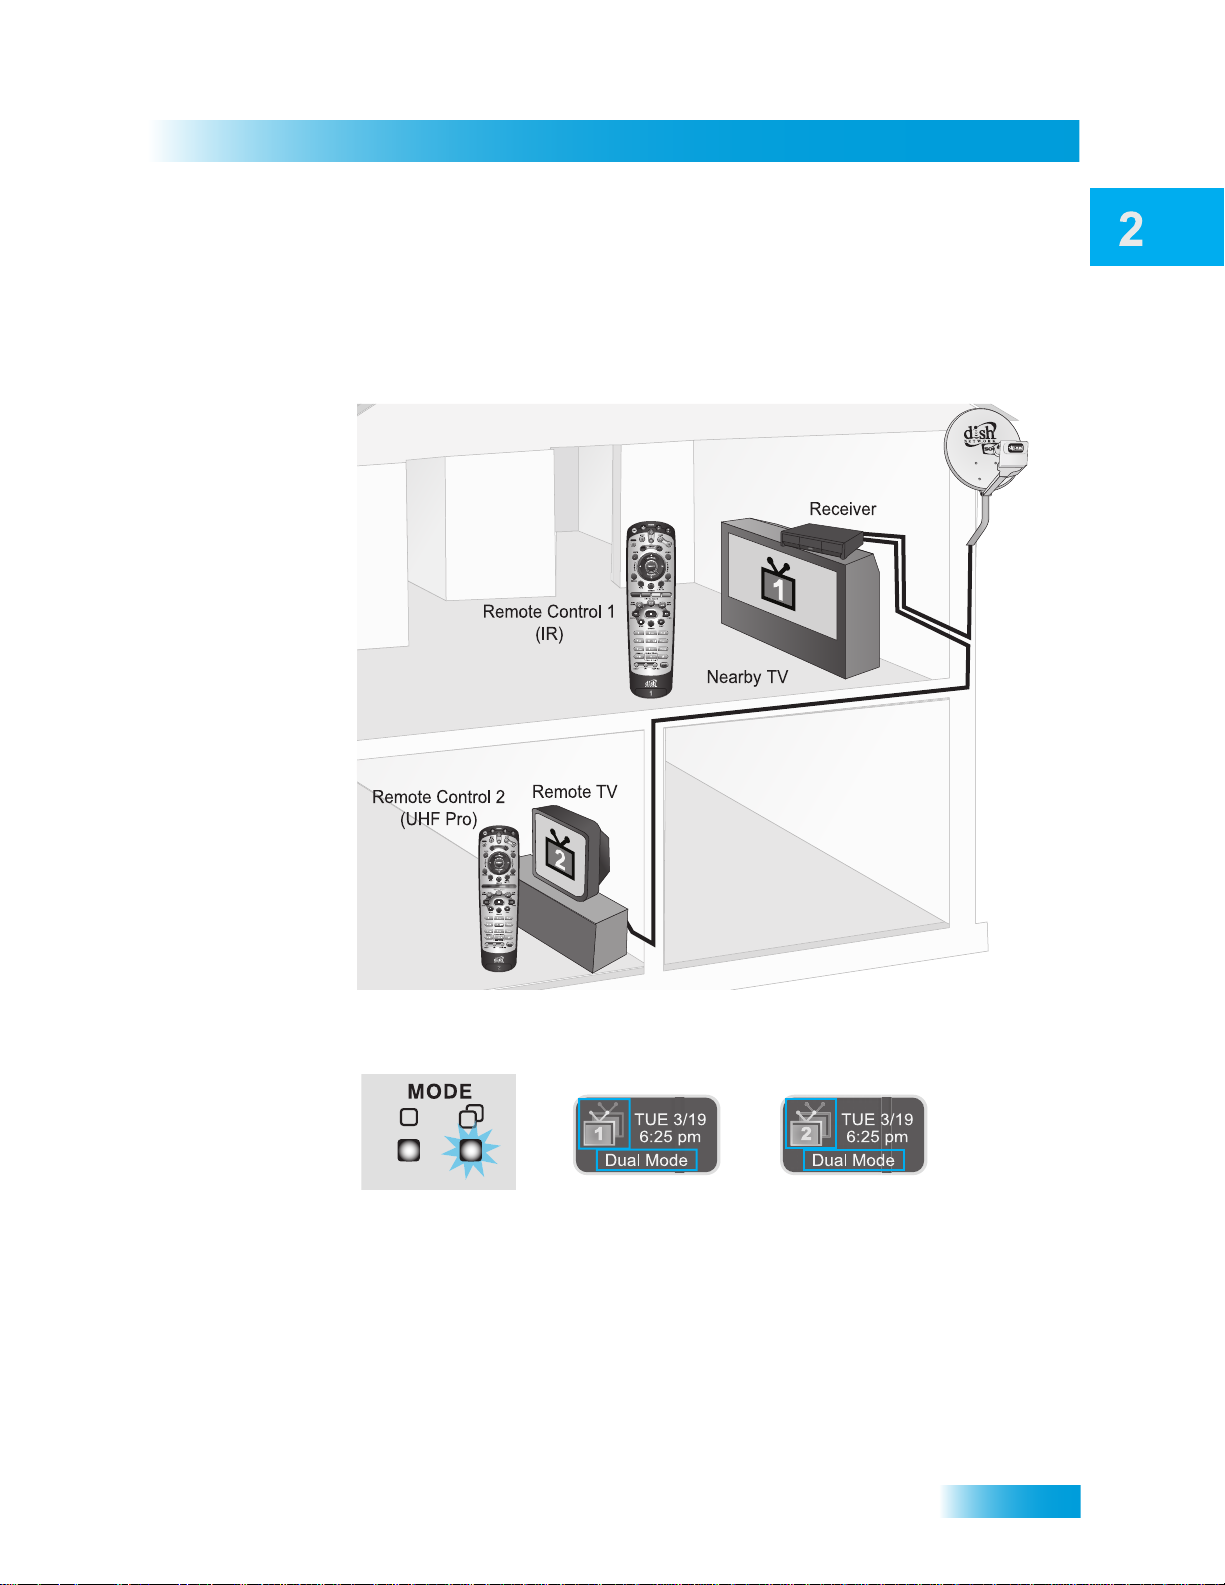
Remote Controls
Two remote controls come with your receiver:
• Remote Control 1 - An Infrared (IR) remote to control programming for the nearby TV
(TV1). This remote control is labeled with a green number 1, which matches similar
markings on the receiver output connections and on-scr een men us for the ne arby T V.
• Remote Control 2 - An Ultra-High Frequency Pro (UHF Pro) remote to control programming at a remote TV (TV2). This remote control is labeled with a blue number 2,
which matches similar markings on the receiver output connections and on-screen
menus for the remote TV . Be sure to set up the remote control to ope rate the rece iver
(see page 58).
DUAL AND SINGLE MODES
Your satellite receiver includes two modes of operation: Dual and Single. These modes
increase your entertainment options because you’ll be able to choose how you watch your
favorite programs.
Dual Mode
While in Dual Mode, you can use this dual satellite-tuner receiver to watch different
programming in separate TV locations:
• Nearby TV—Programming from the receiver is delivered to the TV near the receiver
using short audio/video cables and is controlled using Remote Control 1. The nearby
TV is also referred to as “TV1.”
10
Satellite Receiver
Dual and Single Modes
• Remote TV—Programming from the receiver is delivered to a TV located in another
room using existing in-home coaxial cable and is controlled using Remote Control 2.
The video displayed on the remote TV is always in standard definition (SD). High-definition satellite programming (for example, on channels that display the HD markings)
can be viewed on the remote TV; however, such programs are down-converted for
viewing on the remote TV.
You can tell your receiver is in Dual Mode because the Mode front panel indicator will light
and the menu and other screens on both TVs will display Dual Mode (as shown below).
11
Chapter 2
Dual and Single Modes
Single Mode
Single Mode provides the unique features of your dual-tuner receiver—like Picture-inPicture (PIP)—to all connected TVs.
12
Single Mode delivers the same programming to all of the TVs connected to the satellite
receiver and allows control by either remote control. The format of the programming
shown on the remote TV(s) is standard-definition (SD); high-definition (HD) is shown only
on a compatible nearby TV. High-definition programming (for example, on channels
displaying the HD markings) can be viewed at either TV locatio n; however, such programs
are down-converted for viewing on the remote TV. You can tell you are in Single Mode
because the mode indicator on the front panel will light and the menus and other screens
on all connected TVs will display Single Mode (as shown below).
Satellite Receiver
Remote Controls
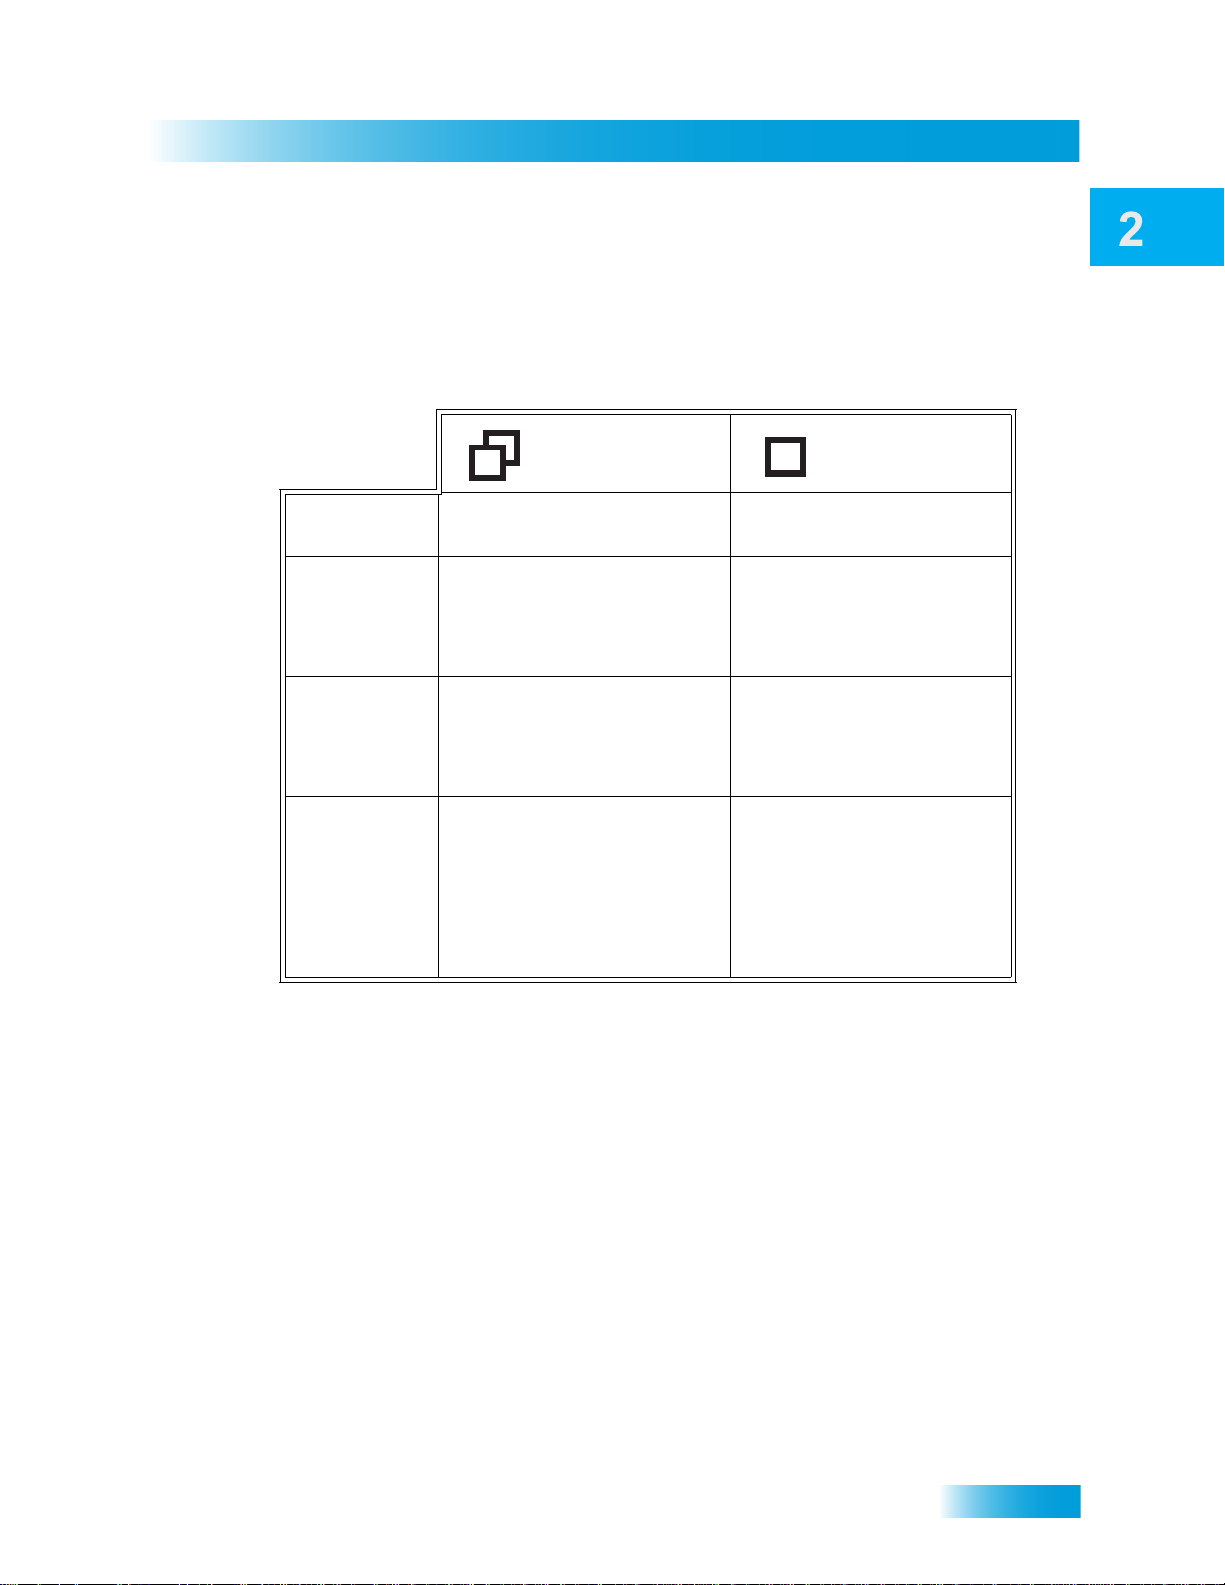
Switching Between Dual and Single Mode
Put the satellite receiver in Single or Dual Mode by pressing the front panel MODE button.
Keep the following items in mind when switching the satellite receiver between Dual and
Single Mode:
Dual Mode Single Mode
Indications
Favorites
Lists
Parental
Controls
Closed
Captioning
Note: If you press the MODE button on the front panel and someone is viewing a remote
TV while the receiver is in Dual Mode, you will see a popup on the nearby TV warning you
that you are about to disrupt the use of the TV2 output(s).
Dual Mode front panel
indicator lights.
Favorites Lists set up for
both outputs (TV1 and TV2)
are available at their
respective TV locations.
Locks set up for both outputs
(TV1 and TV2) are available
at their respective TV
locations.
Closed Captioning (CC)
from SD and HD
programming is available on
TV1. CC from only SD
programming is available on
TV2 (CC also must be
enabled on the TV itself).
Single Mode front panel
indicator lights.
Only Favorites Lists set up
for TV1 are available. The
lists for TV2 are not lost,
they are simply unavailable
in Single Mode.
Locks set up for only TV1
are available. The locks for
TV2 are not lost, they are
simply unavailable in Single
Mode.
CC set up on the receiver is
available on both outputs
(TV1 and TV2).
REMOTE CONTROLS
The two remote controls give you access to all the features of your satellite receiver. You
can set up each remote to control the satellite receiver and up to three other devices (see
page 61). These devices can be a TV, a VCR or DVD player, and a third (AUX) device.
This section describes how to use the various features on the two types of remote controls
included with your satellite TV system.
13
Chapter 2
Remote Controls
Types of Remote Controls
Remote Control 1 uses infrared (IR)
signals to:
• Control TV1 menus for the nearby
TV in Dual Mode.
• Control the satellite receiver in
Single Mode.
IR signals travel only short distances
(40 feet or less), and cannot go
through walls or other solid objects.
You must point the remote control
directly at the receiver , with no objects
blocking the line of sight.
Remote Control 1 uses IR signals
to control the receiver and other
devices it is programmed to operate.
This remote control is identified by the
green number 1 at the bottom of the
remote control.
Remote Control 2 uses UHF Pro
signals to:
• Control TV2 menus for the remote
TV(s) in Dual Mode.
• Control the satellite receiver in
Single Mode.
UHF Pro signals travel long distances
and go through walls and other solid
objects.
To use Remote Control 2 to control
the receiver, you must attach the
remote control antenna to the receiver
back panel jack (see page 15).
Remote Control 2 uses IR signals to
operate other devices programmed
into the remote control. You must
point the remote control directly at
these devices, with no objects
blocking the line of sight.
This remote control is identified by the
blue number 2 at the bottom of the
remote control.
14
Satellite Receiver
Remote Controls
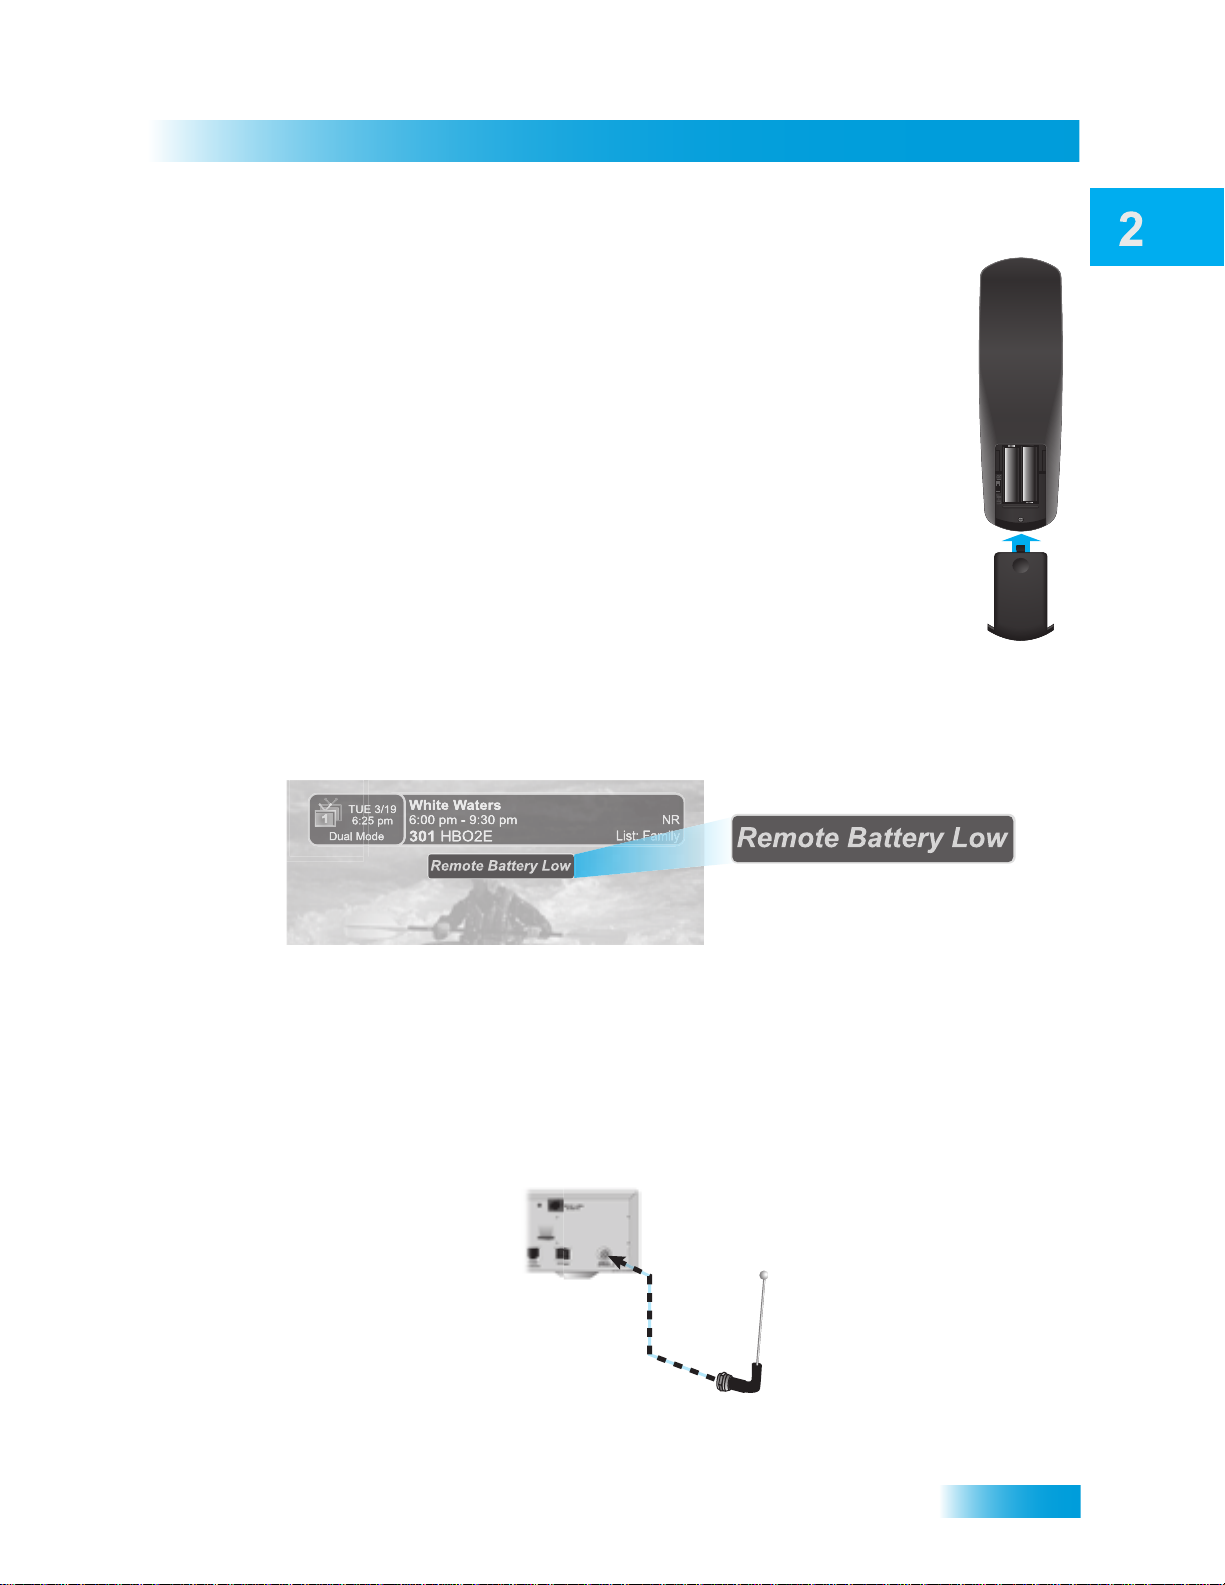
Remote Control Batteries
The remote control comes with AAA batteries. When you replace old
batteries, you should replace all of the batteries. Use batteries of the same
kind, for example, alkaline or carbon zinc. Don’t mix batteries of different
kinds. Alkaline batteries last longer.
1 Press down on the top of the battery cover and slide the cover off.
2 Take out all of the old batteries.
3 Put the new batteries in. Make sure you match the plus (“+”) ends with the
plus markings on the battery case.
4 Slide the cover back into place.
Low Battery Warning
When you see a low-battery warning message on your screen below the Program Banner,
the batteries in your remote control are weak and need to be replaced.
Attach the Remote Antenna
Attach the remote control antenna to the receiver's back panel REMOTE ANTENNA input
jack so you can use your UHF Pro Remote Control 2. Without the remote control antenna,
you cannot use this remote to control the receiver. See Adjusting the Remote Antenna on
page 60 for more detailed information about improving the performance of your UHF
remote control.
15
Chapter 2
Remote Controls
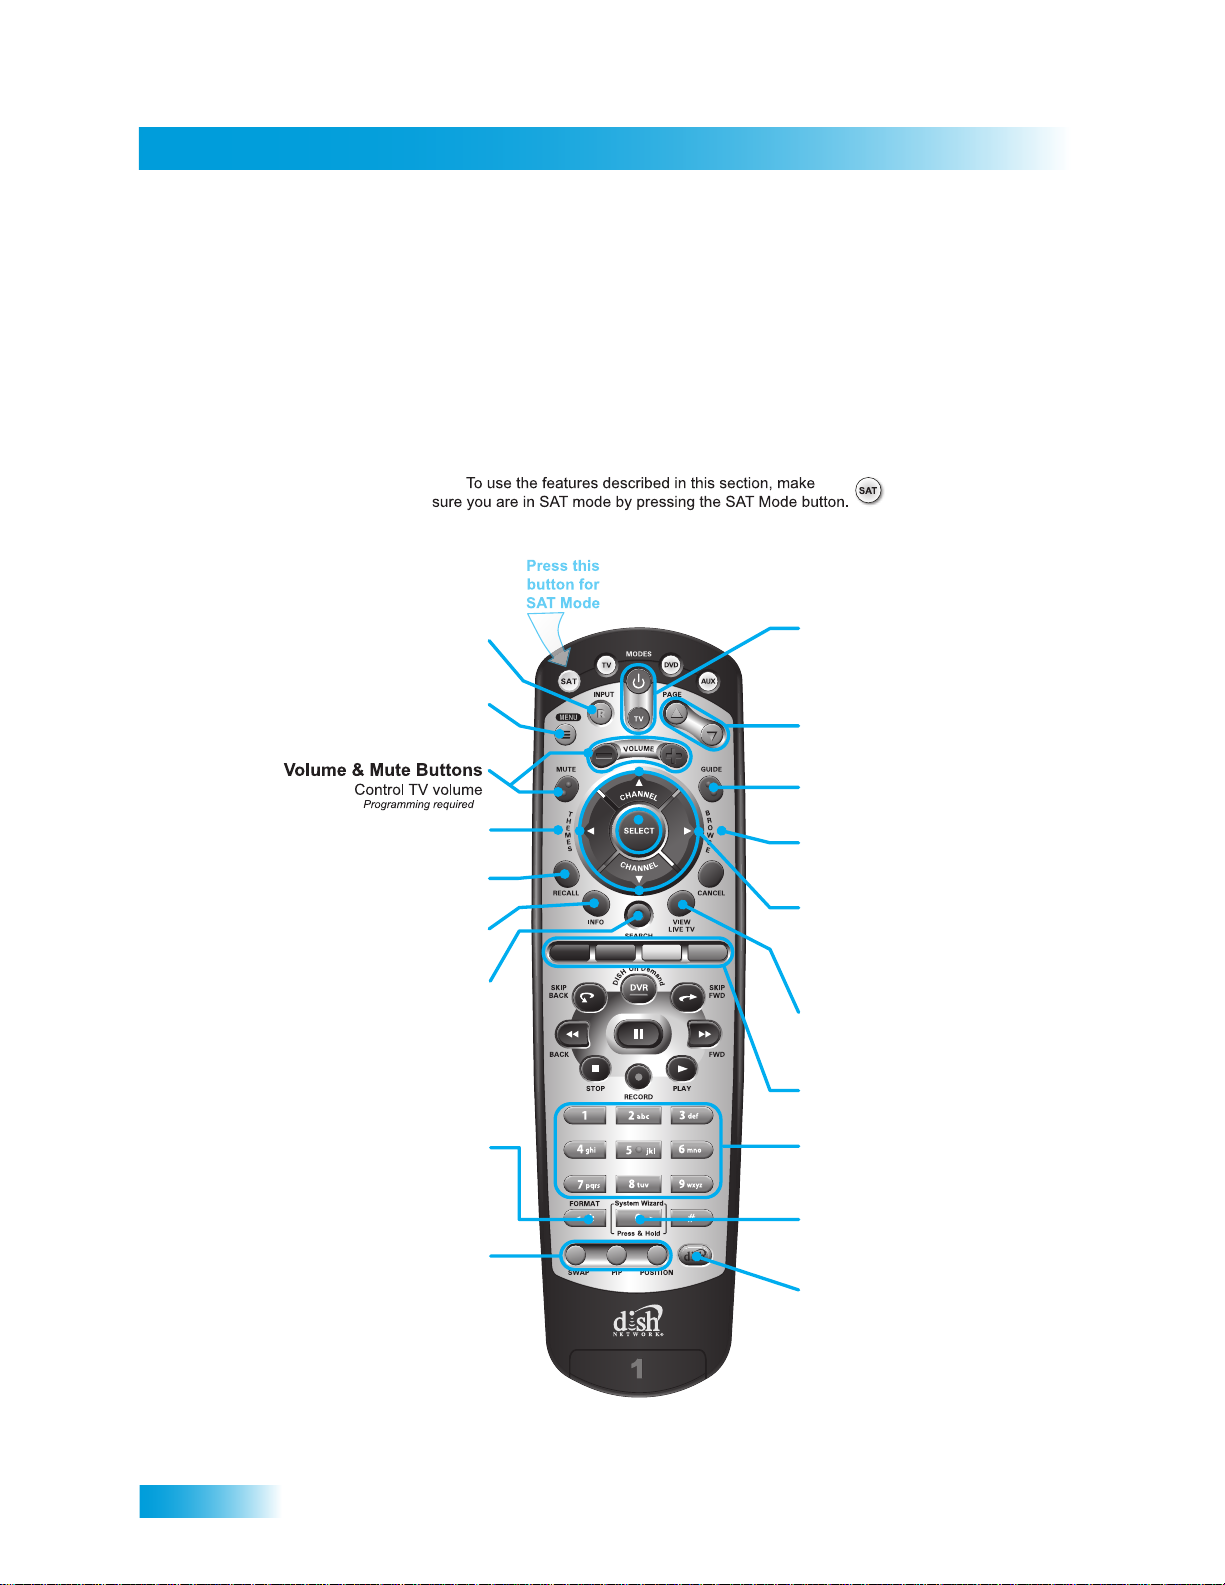
Page Buttons
Page up/down in menus
Receiver Power & TV Power
Top button turns the receiver on/off,
Bottom button turns the TV on/off
(programming required)
Program Guide
Display the on-screen guide
Arrows/Select Buttons
Channel up/down, navigate
through menus/guides and
select a desired option
Browse
See what is on other channels
while watching TV
View Satellite Programming
Exit out of any menu/guide and
go back to viewing live TV
Shortcut Keys
(for future use)
Number Buttons
Enter a desired channel number,
or navigate thorugh menus
System Wizard
Press and hold to set up
receiver and remote control
DishHOME
Explore interactive TV features
Receiver Menu
Access features and settings
in your satellite receiver
Themes
Search for programs using Themes
Recall
Go back to last channel viewed
Info
Get info on programs
Search
Search for a program
Input
Press once for Input
Press and hold for Recover
Picture-In-Picture
(PIP) Buttons
Watch two separate
programs at once
(in Single Mode)
Format
Format the picture to the
desired width to match
the program you are viewing
SAT Mode
SAT Mode
Remote Control Buttons
16
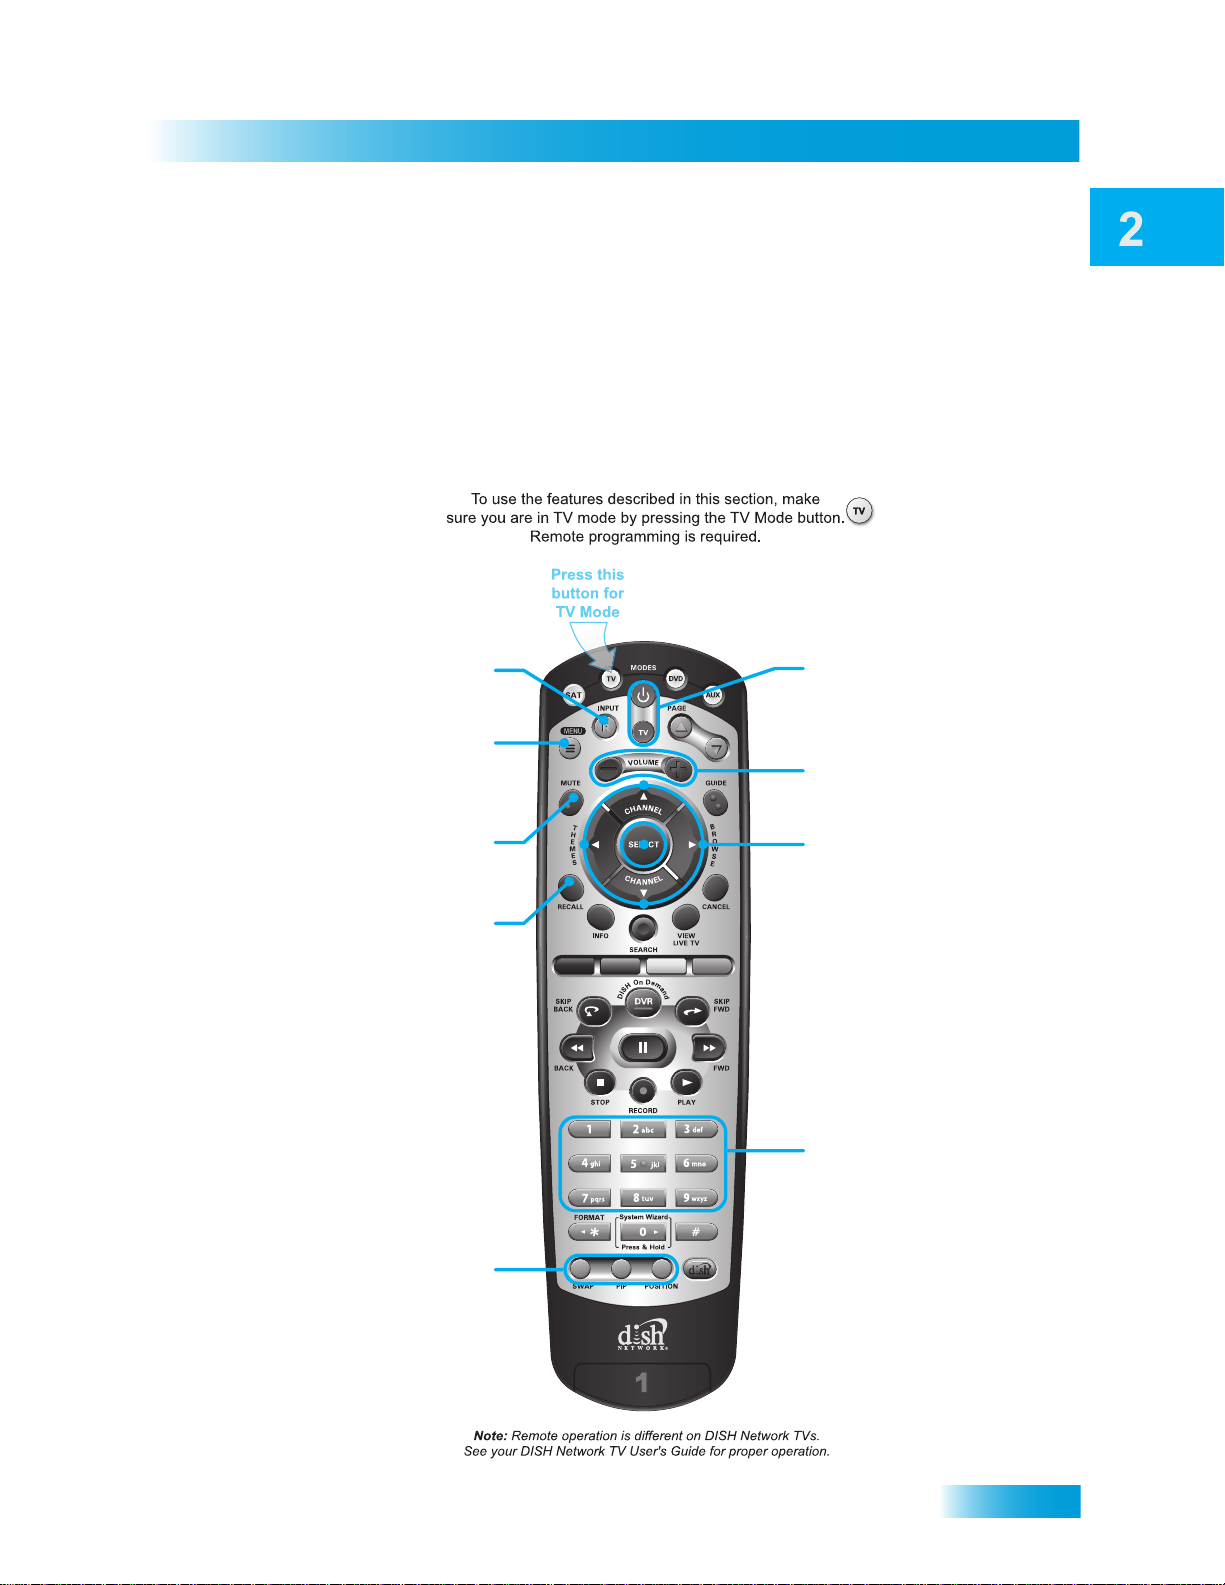
Satellite Receiver
Volume
Control TV volume
TV Power
top and bottom button
Turn TV on/off
Arrows/Select Buttons
Channel up/down on TV,
navigate TV menus/modes
and select desired TV option
Number Buttons
Enter a desired channel number,
or navigate thorugh menus
TV Menu
Access menu features
available on some TVs
Recall
Go back to last channel viewed
(or input, depending on your TV)
TV/Video
Switch between TV inputs
Picture-In-Picture
(PIP) Buttons
Watch two separate
programs at once
on TVs that support this
Mute
Turn TV volume on or off
TV Mode
Remote Controls
17
Chapter 2
Remote Controls
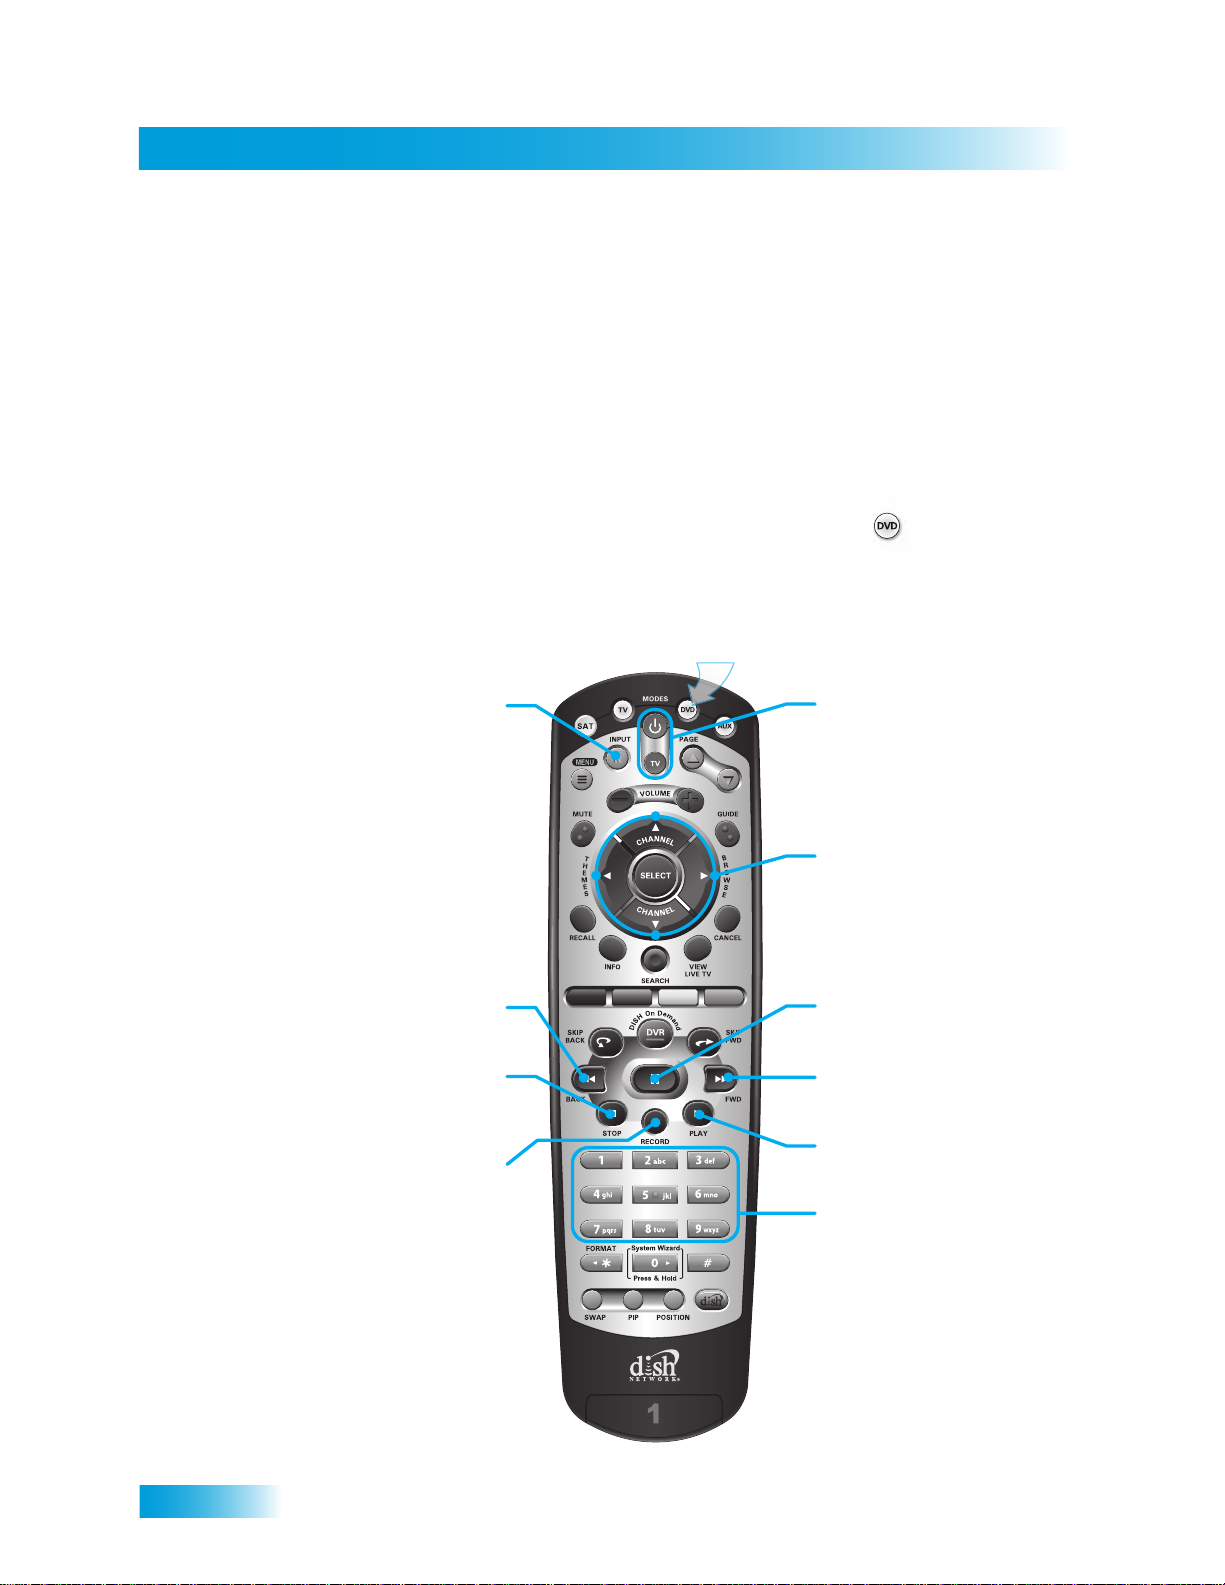
DVD/VCR Power
& TV Power
Top button turns the
DVD player/VCR on/off,
Bottom button turns
the TV on/off
Arrows/Select Buttons
Channel up/down on your VCR,
navigate through DVD or VCR
menus, and select desired option
Number Buttons
Enter a desired channel number
on your VCR, or navigate through
DVD or VCR menus
Input
Switch VCR between its
TV and videotape mode
Pause
Pause a DVD or videotape
FWD
Forward a DVD or videotape
Play
Play a DVD or videotape
Back
Reverse a DVD or videotape
Stop
Stop playing or recording a videotape,
stop playing a DVD
Record
Record on a videotape
Press this
button for
DVD Mode
To use the features described in this section, make
sure your are in DVD mode by pressing the DVD Mode button.
You can also use this mode to operate a VCR instead of a DVD player.
Remote programming is required.
DVD Mode
18
Satellite Receiver
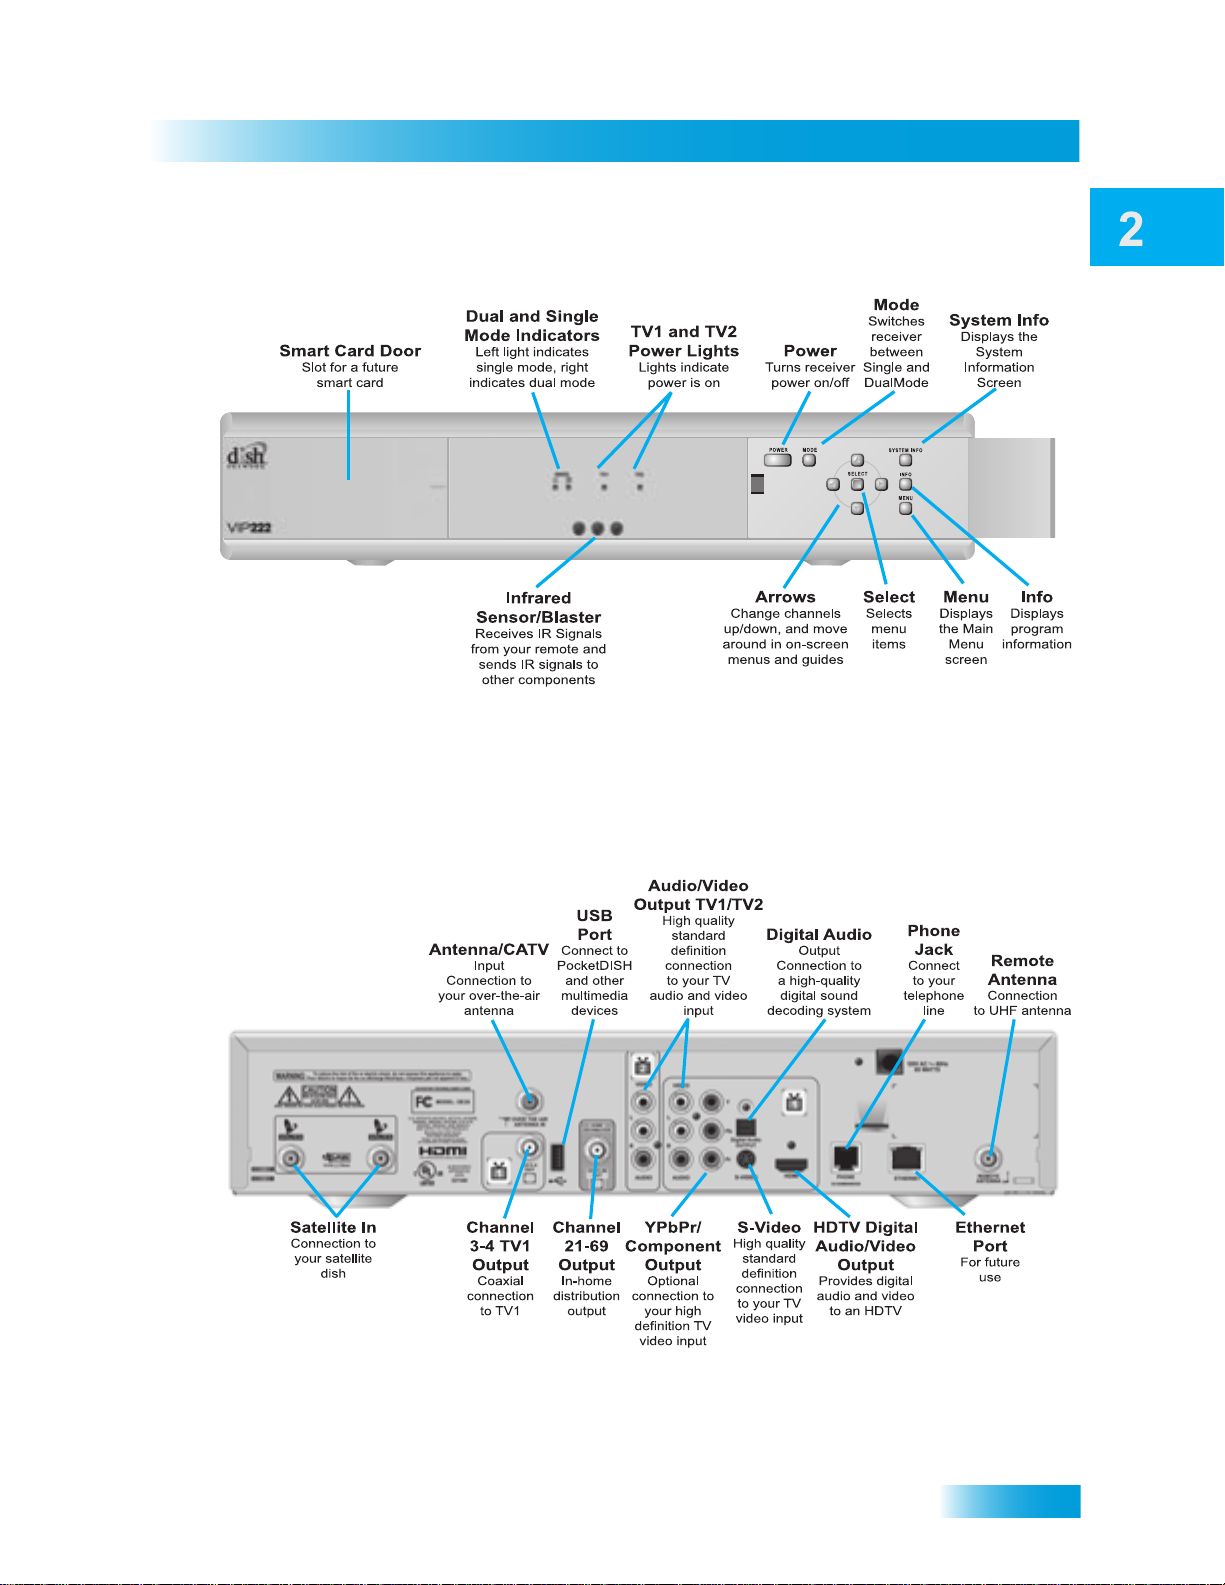
SATELLITE RECEIVER FRONT PANEL
Note: Your receiver may look slightly different than the unit shown above.
Note: Your receiver may look slightly different than the unit shown above.
Satellite Receiver Front Panel
SATELLITE RECEIVER BACK PANEL
19
Chapter 2
Using the On-Screen Menus
USING THE ON-SCREEN MENUS
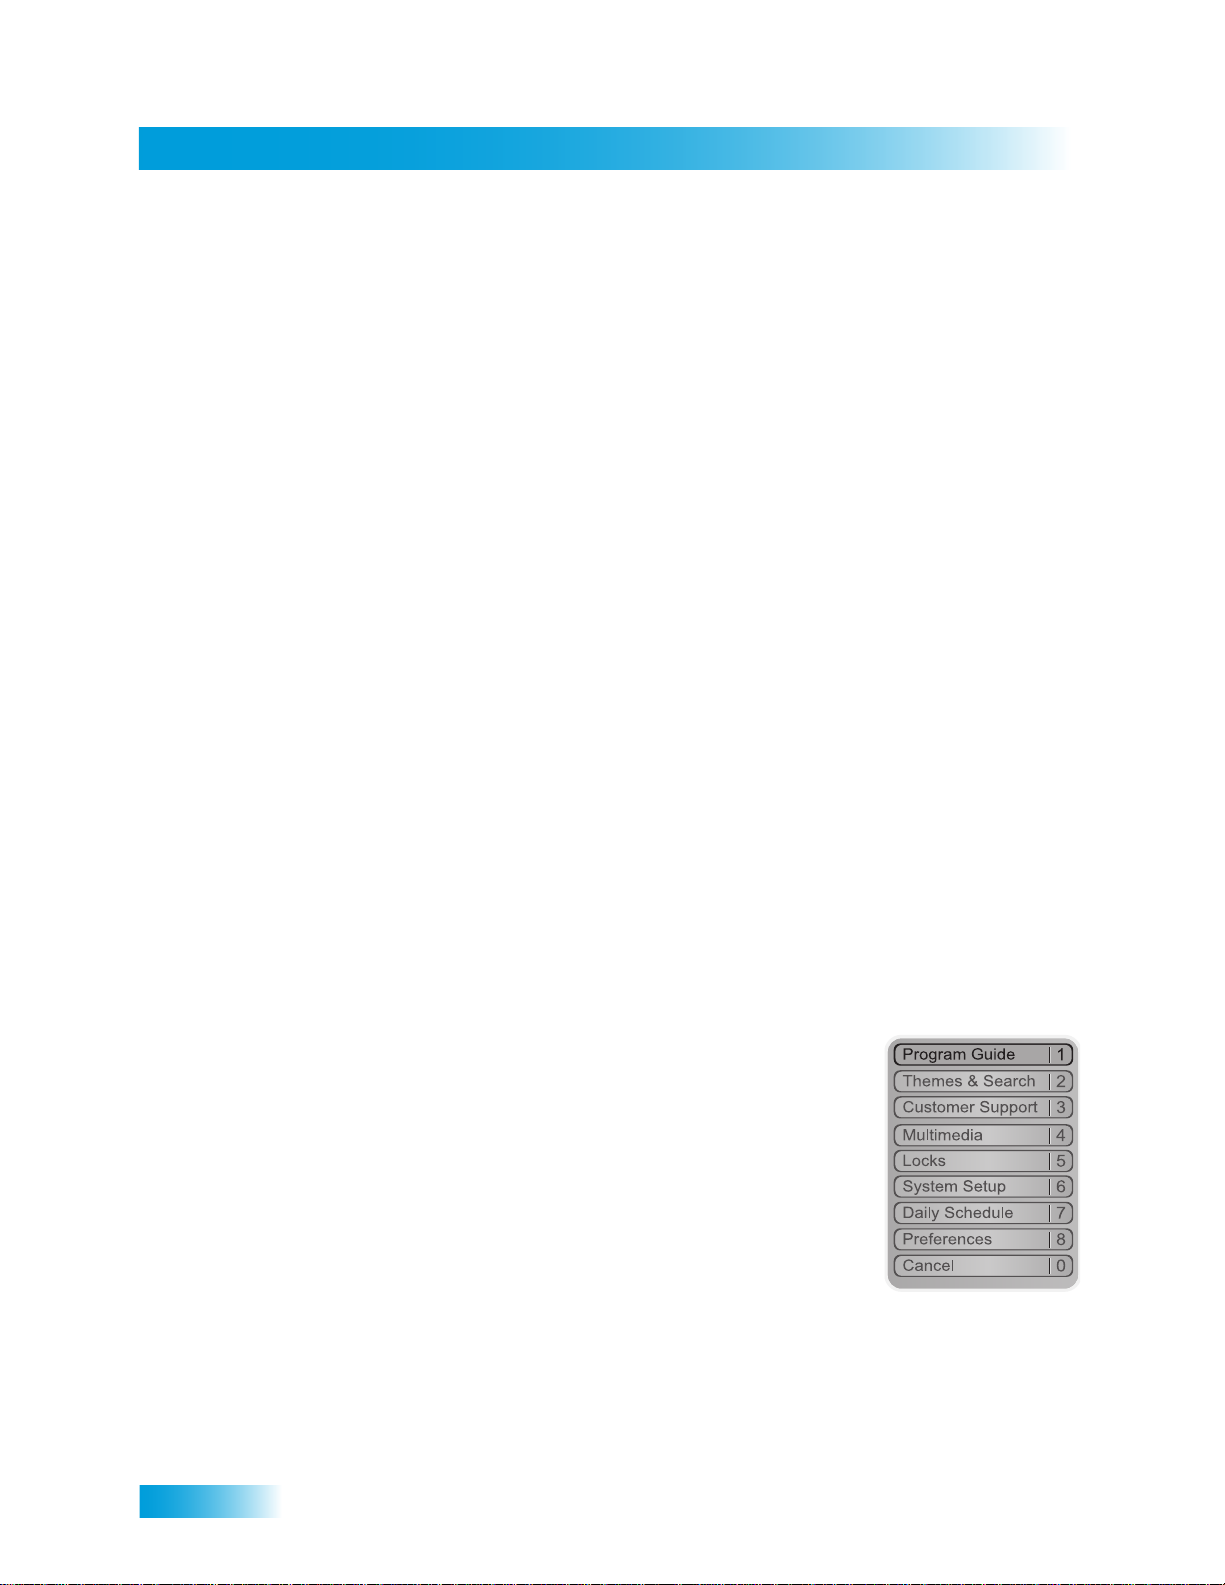
The menus make using your receiver and selecting programs to watch quick and easy.
Use the menus to control the receiver and to use its features, such as setting locks for
parental controls, choosing a program to watch, or creating a new Favorites list.
Open and Close Menus
You can open the menus in either of two ways:
• Press the MENU button on the receiver’s front panel or remote control to open the
Main Menu, and then access any of the other menus from the Main Menu.
• Use the following buttons on the remote control:
– Press GUIDE to open the Program Guide.
– Press THEMES (LEFT ARROW) when watching a program to open the Themes
and Search menu.
– Press BROWSE (RIGHT ARROW) to display the Browse Banner.
To close a menu and return to watching a program, press VIEW LIVE TV.
Highlighting Menu Options
Use the remote control ARROWS to move the on-screen highlight to the menu option.
When you move the on-screen highlight, the option becomes orange.
Selecting Menu Options
When you select a menu option, that option takes effect right
away. You can select a menu option in either of two ways:
• Move the highlight to the menu option using the remote control
ARROWS. In the example, Program Guide is highlighted.
Then pressSELECT.
• If the menu option has a number next to it, press the number
on the NUMBER PAD button that matches this number. When
you use the NUMBER PAD, you do not need to highlight the
option first.
List of Choices in the Menus
When you make a choice in a list, the receiver does not apply the change until you select
Save or Done. If you do not want to save any changes, select Cancel to discard all the
changes made in the menu. There are two types of lists:
20
Satellite Receiver
Using Text Fields
• A single-choice list allows you to select only one choice at a time.
If you select another choice, your previous choice is deselected.
• A multiple-choice list allows you to select more than one choice at
one time. If you select another choice, your previous choice(s)
stays selected. To deselect a previous choice, select it again.
Canceling a Procedure
You can cancel a procedure in any of three ways:
• If you want to return to watching a program, press the VIEW LIVE TV button.
• If you want to return to the previous menu, pres s the CAN CEL but ton .
• If you do nothing in the menu for a few moments, the menu will close automatically,
discarding any changes you selected but did not save.
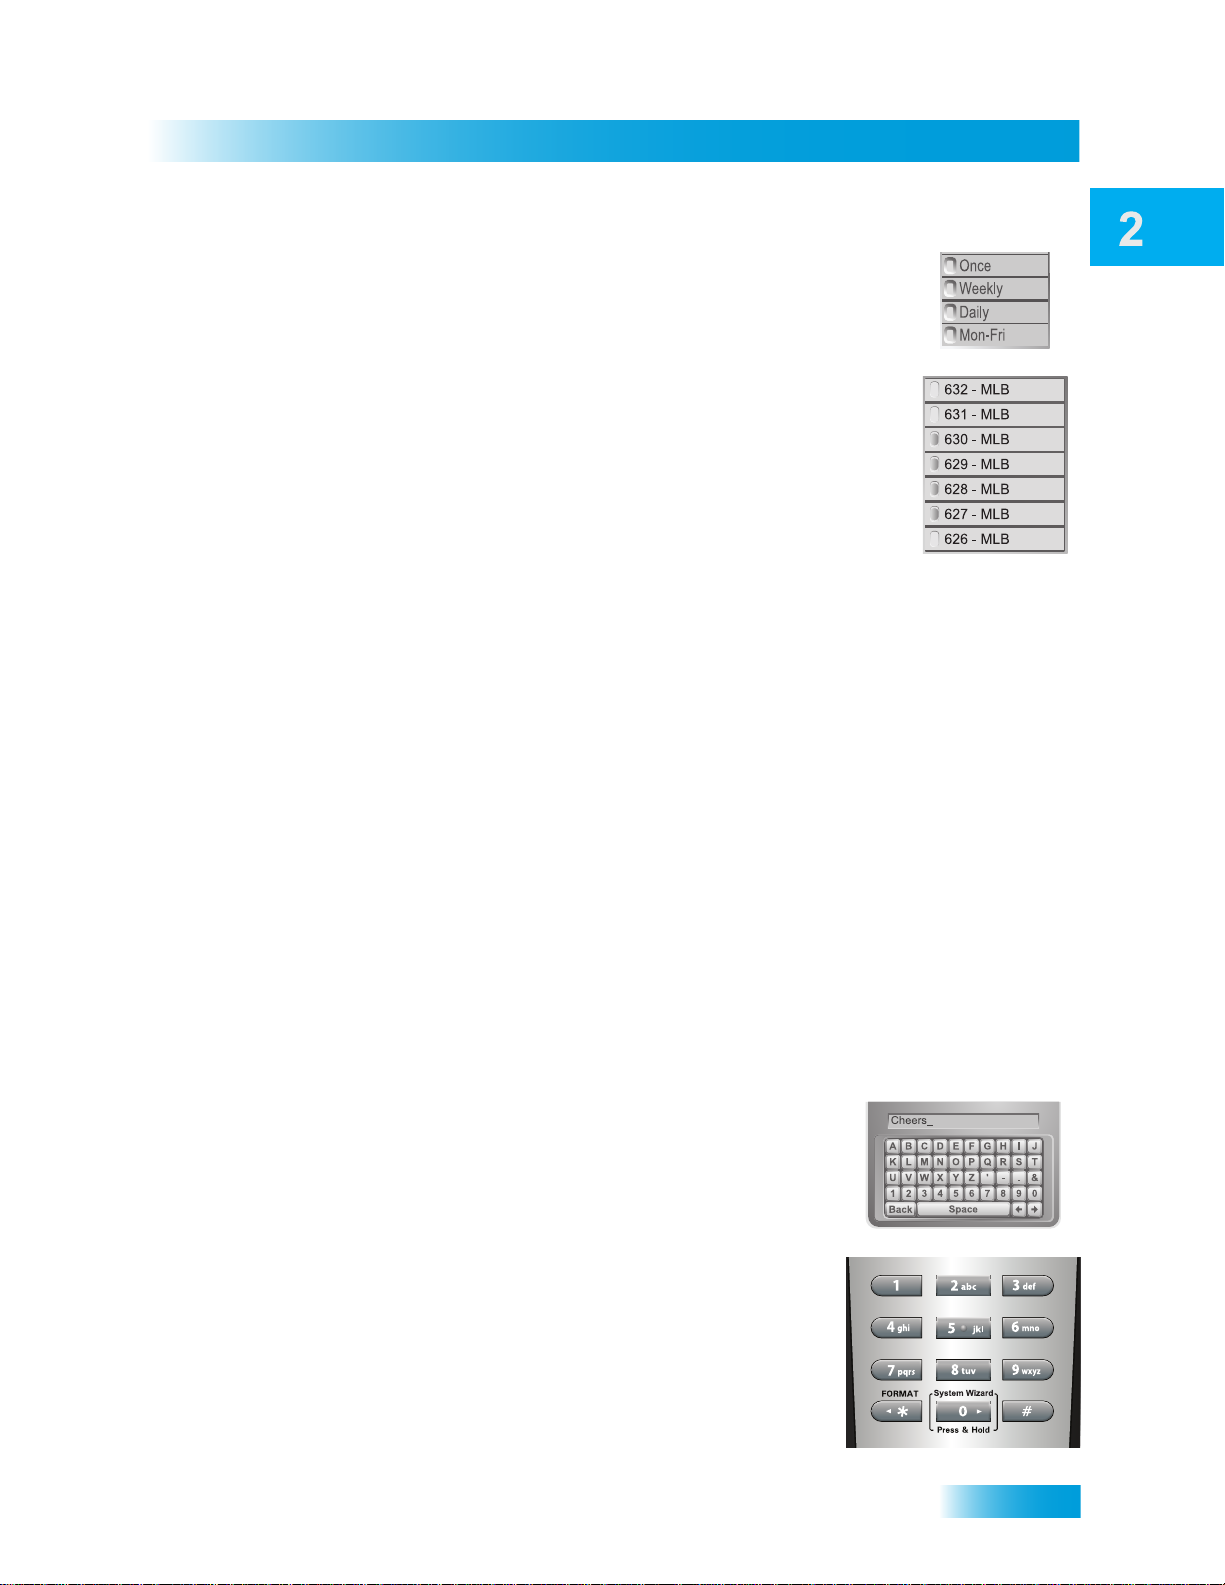
USING TEXT FIELDS
When you use features on the receiver, you might be required to enter information, such
as the name of a movie when using Search, into areas known as text fields. Your receiver
has two basic ways to enter the information:
• Virtual Keyboard
• Remote Control NUMBER PAD
Using the Virtual Keyboard
Use the virtual keyboard letters to type the information. Use
the LEFT, RIGHT, UP, and DOWN ARROWS to navigate
around the keyboard. Select the characters you want.
Using the Number Pad
Use the letters above the NUMBER PAD on the remote
control—just like on a telephone—while the highlight is in the
field. For example, when looking for the channel and times to
watch Rudy Friml Presents, you press 7 three times for an R,
8 two times for a U, 3 one time for a D, and 9 three times for a
Y to spell the word “Rudy.”
21

Chapter 2
Questions
While in the Text Field
When the cursor is in the text field:
Press the LEFT ARROW to delete characters.
Press FORMAT(*) to backspace without deleting characters.
Press 0 to enter a blank space, such as between words.
Use the RIGHT ARROW to forward space without deleting characters.
QUESTIONS
• Why would I want to put the receiver in Single Mode? When the satellite receiver
is in Single Mode, you can use the PIP functions. See for more information.
• How can I watch the same program on all of the TVs in my house? Put the
receiver in Single Mode ( ), and then enable Shared View ( ).
TIPS
• You can use the Front Panel Locks to prevent the mode from being changed
accidentally. See for instructions.
• The only way to turn off the TV2 output s is by pr essing POWER on Remote Control 2.
• In Dual Mode, Remote Control 1 is used to control TV1 menus on the nearby TV.
Remote Control 2 is used to control TV2 menus on the remote TV(s).
• If you would like to put the receiver in a remote location (such as a closet or cabinet),
be sure to get a replacement remote control that uses UHF Pro signals to control TV1.
Please call your DISH Network retailer, or go to www.dishnetwork.com
Technology, and then Remotes & Accessories.
• To use Remote Control 2, be sure to attach the Remote Control Antenna to the input
jack on the receiver back panel. See for details.
• On Remote Control 2, press FORMA T (*) to change the aspe ct ratio (display shape) of
HD channels displayed on remote TV(s).
, select
22
 Loading...