

Page 1

User Manual for
Digital Voice Recorder
Model No.: XC-0381
Page 2

1
Contents
I. Button Description Part Description .............. 2
II. Features ................................................................ 2
III. Battery Installation ............................................... 3
IV. Power .................................................................... 4
IV. 2 Power off
IV. 3 Idle time
V. Fi rst time use ........................................................ 5
VI. Recording ............................................................. 5
VII. Playback ............................................................... 6
VII.2 Playback files
VIII. Playback settings ................................................. 8
VIII.2 EQ settings
IX. Delete files .......................................................... 10
X. Hold key lock ...................................................... 10
XI. Computer back up .............................................. 10
XII. Upload MP3 ........................................................ 11
IV. 1 Power on
VII.1 Selecting fi les
VII.3 Pause playback
VII.4 Stop pla y back
VII.5 Fast fo r ward
VII.6 Rewind
VII.7 Volume adjustment
VIII.1 Loop Settings
VIII.3 A-B (time frame) repeat settings
Page 3
2
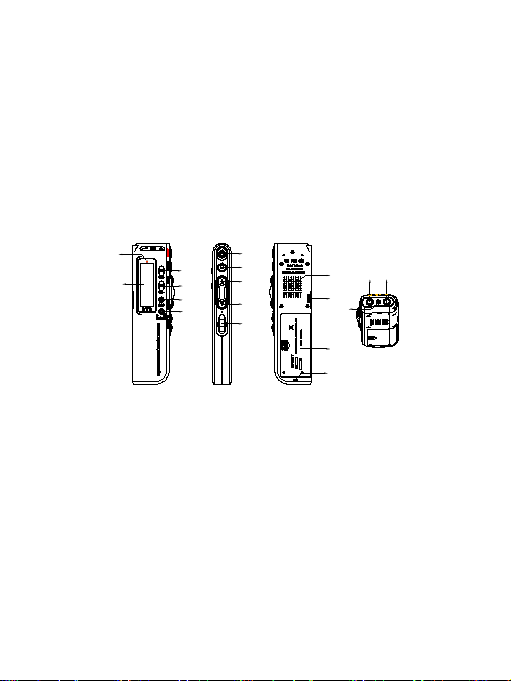
I. Button Description Part Description
1. Record 10. Record indicator
2. Stop/Power off 11. LCD
3. Previous file/rewind 12. Built-in speaker
4. Next file/fast forw a r d 13. USB interface
5. Key lock 14. Battery cover
6. Volume increase 15. Lanyard hole
7. Volum e decrease 16. Headset socket
8. Change mode button 17. External micro phon e so cket
9. Play/Pause/Power on 18. Built-in microphone
10
11
6
7
8
9
1
2
3
4
5
12
17
16
13
18
14
15
II. Features
Memory 512MB
Record up to 99 voice messages
MP3, WMA and ADPCN format s upport
Plays MP3 music
Recording time:
Loop modes
I. Short Play 1920 minutes
II. Long Play 8640 minutes
No loop, Repeat 1 song, Repeat All
Page 4
3
A-B Repeat mode
Delete function
USB interface
Built-in speaker
Battery indicator
Key lock
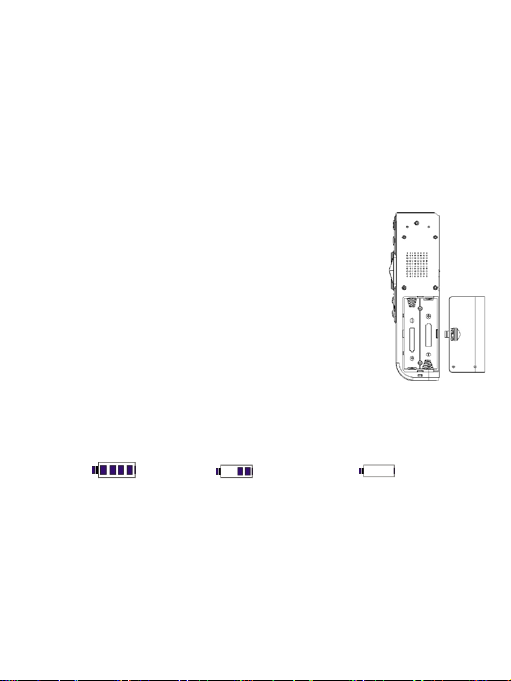
III. Battery Installation
III.1 Slide the battery cover open and
insert 2 x AAA batteries, follow the
correct polarity marked inside the
battery holder.
III.2 The battery indicator is located on
the top of th e LCD. When the un it
is off, the batter y i n dicator does not
show the capacity status. When
the unit is on, the battery indicator
will show the capacity status in 4
Below are some examples of the capacity status :
Full Capacity Half Capaci ty Low or No Capacity
segment s.
III.3 W hen the voice recorder reaches half capacity,
recorded playback mode may not be available
when using the built in speaker. Recorded
playback mode will only be available when using
headphones at a lower volume. However, other
functions will still be available.
Page 5

4
III.4 W hen the vo ice reco rder reac hes low
capacity, a ‘Lo’ will flash on the LCD
as well. During MP3 playback mode,
the volume will decrease to indicate
battery is at a low capacity and a
battery change will be required.
During record mode, the voice
recorder will automatically save the
Notes:
current file before it powers down.
Please remove batteries before storing the voice
recorder over a long period. This will prevent
corrosion to the batte ry terminals or damag e to
the unit.
Recharg eable bat teries c an be used i n the voice
recorder. But the battery indicator may show the
capacity status. This is because most
rechargeable batteries start at a lower voltage of
1.2V.
IV. Power
IV.1 Power on
Hold down the Play/Pause button for 2 seconds,
the LCD will show ‘ON’ when initialising. It will
then briefly show the rated capacity of the unit.
IV.2 Power off
Hold down the Stop button for 2 second, the LCD
will show ‘OFF’ when shutting down.
Page 6

5
IV.3 Idle time
The voice recorder will automatically power off
when idle for 2 minutes.
V. First time use
Image to the right will be displayed on
the LCD when first powered and is
part of the main menu.
The ‘battery icon’ indicates the
battery capacity.
‘DVR’ means the unit is set to record
mode, alternatively, MP3 will be
shown when MP3 playback mode is
selected.
‘00’ shows which file (that’s stored in
numeric order) is selected,
alternatively 01, 02, 03, etc will be shown when a
file is selected.
‘F 00’ shows the total files available within a
selected mode. Figures will be shown depending on
the amount of files stored, i.e. ‘F 21’ means 21 files
stored. Th e LCD will also flash the file leng t h time.
VI. Recording
The unit will enter the main menu and record mode
Page 7

6
(DVR) will be selected once booted up.
2 recording modes to choose from:
‘SP’ – Short Play
‘LP’ – Long Play
To select which recording mode press buttons
‘VOL+’ to scroll up or ‘VOL-‘ to scroll down.
00 – Means VOX recording is off
01 – Means VOX recording is on
Before recording Initialising Recording
Voice activated recording (VOX):
When recording mode is selected, press the mode
button to confirm.
While on main menu, press the REC button to start
recording.
To finish recording, press the STOP button.
VII. Playback
VII.1 Selecting files
While on main menu, select recorded play back
mode (DVR) or MP3 play mode by pressing the
Page 8

7
MODE button (once pressed, it may take 2
seconds before changing modes). Then press
the UP or DOWN button to change the stored
files, the file number will change in numeric
sequence.
VII.2 Play back files
When on main menu, press the PLAY/PAUSE
button to begin play back.
VII.3 Pause play back
Press the PLAY/PAUSE button during play back
to pause file.
VII.4 Stop play back
Press the STOP button during play back during
play back to stop fi le
VII.5 Fast forward
Hold the DOWN button to fast forward during
play back. Let go of t he DOWN but ton to resum e
play back.
VII.6 Rewind
Hold the UP button to rewind during play back.
Let go of the UP button to resume
play back.
VII.7 Volume Adjustment
During play back, press the VOL+
or VOL- button to increase or
decrease the volume. The volume
is adjustable in 32 levels, as
Page 9

8
shown in the figure
VIII. Playback settings
Only during play back, the Loop mode setting, EQ
setting or A-B repeat sett ing a re access ible. Press
the mode button to scroll through each function:
- Loop settings
- EQ settings
- A-B settings
VIII.1 Loop settings
During playback, press the MODE button to enter
loop settings. When rEP is displayed on the LCD,
press the UP or DOWN key to select:
- ALL (
- 1 (
- No icon indicate no l oop mode is s elected
Press the MODE button to confirm the selected loop
setting a nd to ent er the next settin g which is f or EQ. The
voice recorder will exit this setting if left idle for 10
seconds.
VIII.2 EQ settings
Press the MODE button while on LOOP settings to
access the E Q settings.
) to loop all files
) to repeat one file
Page 10

9
When EQ is displayed on the LCD, press the UP or
DOWN key to select:
00 - Normal
01 - Rock
02 - Pop
03 - Classical
04 - Soft
05 - Jazz
06 - Bass Boost
Press the MODE button to confirm the selected EQ
setting and to enter the next setting which is for A-B
repeat. The voice recorder will exit this setting if left idle
for 10 seconds.
Note: EQ mode is not applicable to recorded play back
VIII.3 A-B (Time frame) repeat settings
mode
Press the M ODE button while o n EQ settings to
access the A-B repeat settings. A-B will appear
on top of the track file number and position ‘A’ will
be selected. Then press DOWN button to confirm
‘B’ position, the selected A (start) and B (end)
time frame will start to repeat. To resume normal
play back, press the MODE button to exit the
function.
A-B repeats a selected time frame within a file
during playback. ‘A’ marks the start of the section
for repeat and ‘B’ marks the end of the section for
repeat.
Page 11

10
IX. Delete files
Select a file in DVR or MP3 mode then hold the
MODE button for 2 seconds.
When ‘deL’ is displayed on the LCD, press the
PLAY/PAUSE button to delete the selected file. ‘Er
aSE’ will appear on the LCD to confirm the file has
been deleted
To delete all files, hold the MODE button for 2
seconds again.
When ‘deLa’ is displayed on the LCD, press the
PLAY/PAUSE button to delete all fi les.
‘Er aSE’ will appear on the LCD to confirm the all
files have been deleted.
Press the M ODE button to exit.
X. Hold key lock
When the voice recorder is off, slide the HOLD
switch to the LOCK symbol to turn on keylock. The
voice recorder will still be able to turn on but it will
lock all the buttons and its functions.
XI. Computer back up
While on, connect the Voice recorder to a
computer’s USB socket using the provided USB
cable. The voice recorder will confrim connection
Page 12

11
when ‘USB’ appears on the LCD.
The voice recorder will come up as a Removable
Disk or a Mass Storage Device on My Computer.
Access the voice recorder then open the Record
folder t hen th e DVR fo lder. The DV R fol der contai ns
recorded files which you can save on your
computers hard drive.
XII. Upload MP3
To upload MP3 files on to your Voice Record,
access the voice recorder and transfer MP3 in to
this location. There is no folder to save MP3’s in.
Note: The LCD on the voice recorder will indicate
“busy” during data transfers between the voice
recorder and PC. Never disconnect during this time
or a data loss may occur.
 Loading...