

Page 1

Page 2

Program List . . . . . . . . . . . . . . . . . . . . . . . . . . . . . . . . . . . . . . . . . . . . . . . . . . . . . . . . 2
Introduction . . . . . . . . . . . . . . . . . . . . . . . . . . . . . . . . . . . . . . . . . . . . . . . . . . . . . . . . 3
Setup Front Panel . . . . . . . . . . . . . . . . . . . . . . . . . . . . . . . . . . . . . . . . . . . . . . 6
Back Panel . . . . . . . . . . . . . . . . . . . . . . . . . . . . . . . . . . . . . . . . . . . . . . . 8
Audio Connection Examples . . . . . . . . . . . . . . . . . . . . . . . . . . . . . . . . 9
MIDI Connection Examples . . . . . . . . . . . . . . . . . . . . . . . . . . . . . . . . 10
Performance Setting Levels, Generating a Good Signal . . . . . . . . . . . . . . . . . . . . . 11
Loading Programs from the Front Panel,The LCD Display Window .12
The Harmony Controls, Understanding the Five Harmony Types: . . .13
Chordal, Scalic . . . . . . . . . . . . . . . . . . . . . . . . . . . . . . . . . . . . . . . . . . 14
Vocoder . . . . . . . . . . . . . . . . . . . . . . . . . . . . . . . . . . . . . . . . . . . . . . . .15
Chromatic, Pitch Correct, Changing Harmonies with the Softkeys . .16
Editing Using Styles . . . . . . . . . . . . . . . . . . . . . . . . . . . . . . . . . . . . . . . . . . . . .17
Gender . . . . . . . . . . . . . . . . . . . . . . . . . . . . . . . . . . . . . . . . . . . . . . . . . 19
Detune . . . . . . . . . . . . . . . . . . . . . . . . . . . . . . . . . . . . . . . . . . . . . . . . . 20
Vibrato . . . . . . . . . . . . . . . . . . . . . . . . . . . . . . . . . . . . . . . . . . . . . . . . 21
Scoop . . . . . . . . . . . . . . . . . . . . . . . . . . . . . . . . . . . . . . . . . . . . . . . . . . 22
Reverb . . . . . . . . . . . . . . . . . . . . . . . . . . . . . . . . . . . . . . . . . . . . . . . . . 23
Mix . . . . . . . . . . . . . . . . . . . . . . . . . . . . . . . . . . . . . . . . . . . . . . . . . . . 24
Harmony Editing, Changing Softkey Assignments . . . . . . . . . . . . . .26
Editing Individual Harmony Styles . . . . . . . . . . . . . . . . . . . . . . . . . . 27
Customizing A Harmony, Naming Programs and Styles . . . . . . . . . . 30
Storing Your Edits . . . . . . . . . . . . . . . . . . . . . . . . . . . . . . . . . . . . . . . 32
Utilities MIDI . . . . . . . . . . . . . . . . . . . . . . . . . . . . . . . . . . . . . . . . . . . . . . . . . . 33
MIDI Selection of Key and Harmony . . . . . . . . . . . . . . . . . . . . . . . . .35
MIDI Keyboard Split Point, MIDI Song Utilities . . . . . . . . . . . . . . . .40
MIDI Program Dump Utilities . . . . . . . . . . . . . . . . . . . . . . . . . . . . . . .42
Initialization Utilities . . . . . . . . . . . . . . . . . . . . . . . . . . . . . . . . . . . . . .44
Footswitch Utilities . . . . . . . . . . . . . . . . . . . . . . . . . . . . . . . . . . . . . . .46
User Utilities . . . . . . . . . . . . . . . . . . . . . . . . . . . . . . . . . . . . . . . . . . . .47
Synthesizer Mode . . . . . . . . . . . . . . . . . . . . . . . . . . . . . . . . . . . . . . . . .48
Audio Utilities . . . . . . . . . . . . . . . . . . . . . . . . . . . . . . . . . . . . . . . . . . .49
Song Mode Playing, Creating, Editing, Naming, Arranging Songs . . . . . . . . . . . .51
Basic Harmony Concepts . . . . . . . . . . . . . . . . . . . . . . . . . . . . . . . . . . . . . . . . . . . . . . . . . . . . . . . 57
Appendix 1 Specifications
Appendix 2 - MIDI MIDI Implementation chart
MIDI Messages
MIDI SysEx Dump Formats
MIDI SysEx Parameters
Decimal / Binary / Hex equivalents
Page 3

1 Silky Thickener Auto Doubling
2 Stereo Doubler
3 Mono Doubler
4 Group Doubler
5 Octave Down
6 Octave Up
7 Up and Down
8 Blow Me Down Special Effects
9 Cher A Like
10 Cyberian One
11 Cyberian Two
12 Cyberian Three
13 I Can't Sing
14 Ethyl Merman
15 Barry Tone
16 Oakridge Chordal Harmony
17 Steve ÔNÕ Edie
18 Heavenly
19 One Up On Ya
20 Midgrade
21 Take Six
22 Barber Pole
23 Fill ÔEr Up
24 Deep Choir
25 Double Up
26 Keyboard:Notes Vocoder
27 Keyboard: Male
28 Keyboard: Female
29 Keyboard: Mixed
30 Keyboard: Scoops
31 Keyboard: Layer
32 Keyboard: Stereo
33 Keyboard: Plain
34 Keyboard: 4 chan
35 Keyboard: Auto Trans
36 Everlys Scalic Harmony
37 Eagles
38 Manhattan
39 Doobies
40 Thirds Below
41 Nashville
42 Cluster Six
43 Deep Six
44 Suite Judy
45 Third & Gender
46 PCorr 1 hit note Pitch Correction
47 PCorr 2 Maj scale
48 PCorr 3 Min scale
49 PCorr 4 Nearest semi
50 PCorr 5 2 semi bend
Sing or play a vocal track. No front panel or MIDI
input required
Sing or play a vocal track. No front panel or MIDI
input required
Play chords on a MIDI keyboard or the front panel
while you sing. The harmony voices will move with
your voice.
Play individual notes or chords on a MIDI keyboard
while you sing. The harmony voices will not move
automatically with your voice.
Play one note only for thick effect
Requires 4 MIDI channels to work
Select the key and scale of your song from the front
panel. Once you have set the key and scale there is
no more button pushing required beyond activating
Bypass. Experiment with different Major and Minor
scales by pressing the softkeys under the LCD.
Hit a note from the front panel or a MIDI keyboard
Select the key from the front panel keyboard
Select the key from the front panel keyboard
Sing - all notes will be corrected
Use the pitch wheel on a MIDI keyboard
Page 4

3
Congratulations and thank you for purchasing the DigiTech Vocalist
Workstation EX. This product incorporates a high quality, editable reverberation effect with the innovative vocal harmony technology that has
made DigiTech a world leader in vocal harmony processing. We are confident you will be satisfied with its ease of use, elegant ergonomic design
and sound quality whether your application is live performance or studio
recording.
The Vocalist Workstation EXÕs features include:
❷ up to 5 part harmony generation including input vocal
❷ harmony voice ÒgenderÓ feature
❷ extensive ÒhumanizingÓ options
❷ front panel mixing for quick access during performance
❷ built-in digital reverb
❷ transmits and receives single program dumps from Studio Vocalist
and/or another Vocalist Workstation
❷ bright LCD display
❷ 8 softkeys for additional harmony options and to simplify editing
❷ one octave front panel keyboard for key and chord entry
❷ song mode for harmonies without MIDI
❷ comprehensive MIDI SysEx implementation: many parameters are
accessible via MIDI
Page 5

4
The Vocalist Workstation EX is equipped with an AC adapter.
Use only the 9.75V AC, 820mA adapter supplied with the
Vocalist Workstation EX (Harmon Pro Group PS750). Any other
adapter may cause damage to the Vocalist Workstation EX.
The Vocalist Workstation EX, like any piece of computer hardware, is sensitive to voltage drops, spikes and surges. Interference
such as lightning or power ÒbrownoutsÓ can erase your program
memory, or even permanently damage the circuitry inside the unit.
Here are some suggestions to help protect your Vocalist
Workstation EX from such a fate:
¥ Turn it off when not in use: Make a habit of turning off all of
your gear when it is not in use. If there is a lightning or severe
windstorm, unplug all of your equipment: A surge from a nearby lightning strike or downed power line can destroy electronic
equipment even if the switch is off.
¥ Use Spike and Surge Protectors: An inexpensive solution to all
but the most severe of AC line conditions. Surge protected
power strips are usually only slightly more expensive than
unprotected strips, and higher quality multi-stage surge suppressors are usually under $50 Ð a worthy investment for the
protection of all your valuable electronic equipment.
¥ Use AC Line Conditioners: This is the best and most expensive
way to protect your Vocalist Workstation EX from line voltage
fluctuations. Line conditioners constantly monitor the incoming voltage for excessive peaks and dips and make adjustments
accordingly, thereby delivering consistent power levels. For
very expensive equipment, AC line conditioners are an
absolute requirement.
The symbols shown below are internationally accepted symbols
that warn of potential hazards with electrical products. The lightning flash with arrowpoint in a equilateral triangle means that
there are dangerous voltages present within the unit. The exclamation point in an equilateral triangle indicates that it is necessary for
the user to refer to the ownerÕs manual,
These symbols warn that there are no user serviceable parts inside
the unit. Do not open the unit. Do not attempt to service the unit
yourself. Refer all servicing to qualified personnel. Opening the
chassis for any reason will void the manufacturerÕs warranty. Do
not get the Vocalist Workstation EX wet. If liquid is spilled on the
unit, unplug it immediately and take it to a dealer for service.
Disconnect the equipment during storms to prevent damage.
Water and Moisture: Appliance should not be used near water
(e.g. near a bathtub, washbowl, kitchen sink, laundry tub, in a wet
basement, or near a swimming pool, etc). Care should be taken so
that objects do not fall and liquids are not spilled into the enclosure through openings.
POWER SOURCES: The appliance should be connected to a
power supply only of the type described in the operating
instructions or as marked on the appliance.
POWER CORD PROTECTION: Power supply cords should be
routed so that they are not likely to be walked on or pinched by
items placed upon or against them, paying particular attention
to cords at plugs, convenience receptacles, and the point where
they exit from the appliance.
SERVICING: To reduce the risk of fire or electric shock, the user
should not attempt to service the appliance beyond that
described in the operating instructions. All other servicing
should be referred to qualified service personnel.
CAUTION! This product contains a lithium battery. There is danger of explosion if battery is incorrectly replaced. Replace only
with an Sony CR2032 or equivalent. Make sure the battery is
installed with the correct polarity. Discard used batteries according to manufacturerÕs instructions.
ADVARSEL! Lithiumbatteri - Eksplosjonsfare. Ved utskifting
benyttes kun batteri som anbefalt (Sony CR2032) av apparatfabrikanten. Brukt batteri returneres apparatleverand¿ren.
ADVARSEL! Lithiumbatteri - Eksplosjonsfare ved fejlagtig
hŒndtering. Udskiftning mŒ kun ske med batteri av samme fabrik(Sony CR2032) at og type. LevŽr det brugte batteri tilbage til
leverand¿ren.
VAROITUS! Paristo voi rŠfŠhtŠŠ, jos se on virheellisesti asennettu. Vaihda paristo ainoastaan laitevalmistajan suosittelemaan
tyyppin (Sony CR2032). HŠvitŠ kŠytetty paristovalmistajan ohjeiden mukaisesti.
VARNING! Explosionsfar vid felaktigt batteribyte. AnvŠnd
samma batterityp eller en ekvivalent typ (Sony CR2032) som rekommenderas av apparattillverkaren. Kassera anvŠnt batteri enligt
fabrikantens instruktion.
ATTENTION! Il y a danger dÕexplsion sÕil y a remplacement
incorrect de la batterie. Remplacer uniquement avec une batterie
du m•me type (Sony CR2032) ou dÕun type Žquivalent recommandŽ par le constructeur. Mettre au rebut les batteries usagŽes
conformŽment aux instructions du fabricant.
This unit conforms to the Product Specifications noted on the
Declaration of Conformity. Operation is subject to the following
two conditions:
¥ this device may not cause harmful interference, and
¥ this device must accept any interference received, including
interference that may cause undesired operation. Operation of
this unit within significant electromagnetic fields should be
avoided.
¥ use only shielded interconnecting cables.
CAUTION
RISK OF ELECTRIC SHOCK
DO NOT OPEN
ATTENTION:RISQUE DE CHOC ELECTRIQUE - NE PAS OUVRIR
WARNING:TOREDUCETHE RISK OF FIRE OR ELECTRIC
SHOCK DO NOT EXPOSE THIS EQUIPMENTTO RAIN OR MOISTURE
Page 6

Page 7
6
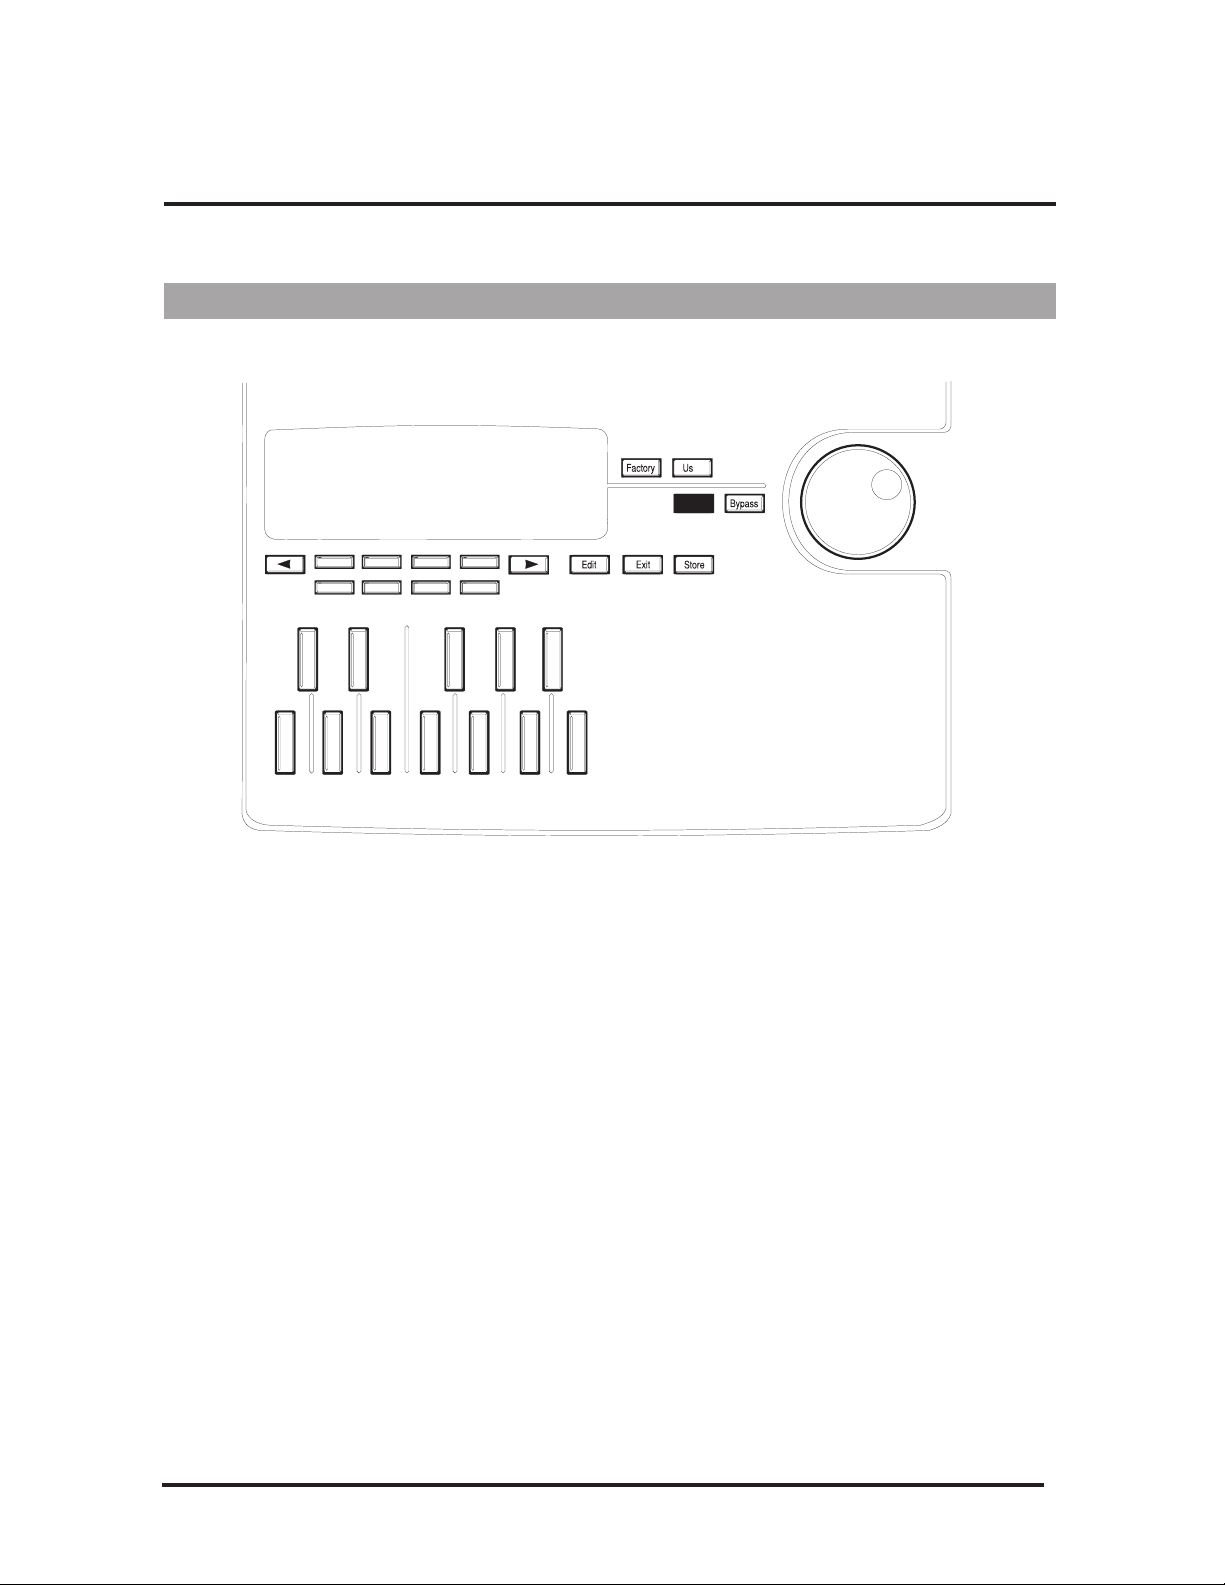
Provides visual feedback of all operating modes including performance, editing and utility modes.
The Input LED monitors the incoming signal from the Mic and Line inputs.
The 0dB LED lights 3 dB before the onset of clipping.
The MIDI LED indicates that the Vocalist Workstation EX is receiving MIDI.
The Overflow LED indicates an overload of the digital signal processor. If it
lights, reduce the input gain or front panel mixer faders.
The Lock LED shows that the pitch detection circuitry has recognized the
input pitch.
The Factory button selects the factory-designed program bank for perfor-
mance or editing.
The User button selects the user-programmable bank for performance and
editing.
The Bypass button mutes the Harmony components from the mix, leaving the
Lead Vocal and Reverb. Note that if the Lead level is set to zero, Bypass will
mute all sound.
Utility mode allows access to system, MIDI, footswitch and user preference
configurations.
Page 8

7
Song mode is for editing and performance of ÒsongsÓ which are sequences
of chord changes, key types and variations triggered by MIDI, the front
panel, or a footswitch.
In Factory, User and Song modes, the Data Wheel selects and loads programs. In Edit mode, it increases or decreases the value of the selected parameter.
These keys perform different functions in each different mode; They select
harmony variations in the Programs mode and configuration parameters in
the Program or Song Edit and Utilities modes. For further information on
how these relate to different Programs, see pages 13, 16 & 18.
The Left and the Right Arrow button become active when the ♦and ∅characters are seen in the top corners of the LCD within Edit or Utility mode.
Pressing either of the page buttons will present the next or previous editing
screen.
This one-octave keyboard allows you to input musical information such as
Key and Chord root note. The keyboard can also be used to select a cue-in
note, which is selectable from the Utilities menu.
The Edit button presents the parameter editing screens from within Factory,
User and Song modes.
The Exit button backtracks through successive menu layers in all editing and
programming modes.
The Store button offers the option of saving an edited program in the User
bank. For more information on editing Programs, see the Editing chapter.
These faders allow you to modify mix levels quickly. They are ÒglobalÓ
controls in that they affect all programs. They are also relative to the mixer
settings within each program. To allow you room to Ònudge the level up a
bitÓ and to reproduce the factory programs as they were mixed, you should
align the Lead, Harmony and Reverb faders with the raised bump placed at
70% of each faderÕs travel, which is called the Ònominal level".
The Lead level fader controls the amount of your dry, unprocessed voice in
the mix. If the Lead voice is turned off in any particular program, this control
will have no effect, and there will be no dry, unprocessed voice output from
the Workstation regardless of the Bypass position.
The Harmony level fader controls the level of the harmony voices in the
mix. If the Harmony voice is turned off in a particular program, this control
will have no effect
The Reverb Level fader controls the amount of reverb added to the combined lead and harmony voice mix. Each Program allows you to store unique
lead and harmony reverb levels.
The Input control varies the input level for the microphone and line inputs.
The raised bump in the control corresponds to 0 dB.
The Output control varies the output level for both left and right outputs
and the Headphone jack. The raised bump in the control corresponds to 0
dB at +4 dBu nominal, the professional standard for signal levels. If your
mixer accepts semi-pro signal levels (-10 dBu) you should reduce this
fader.
Page 9

Page 10

Page 11

Page 12

Page 13

Page 14

Page 15

Page 16

Page 17

Page 18
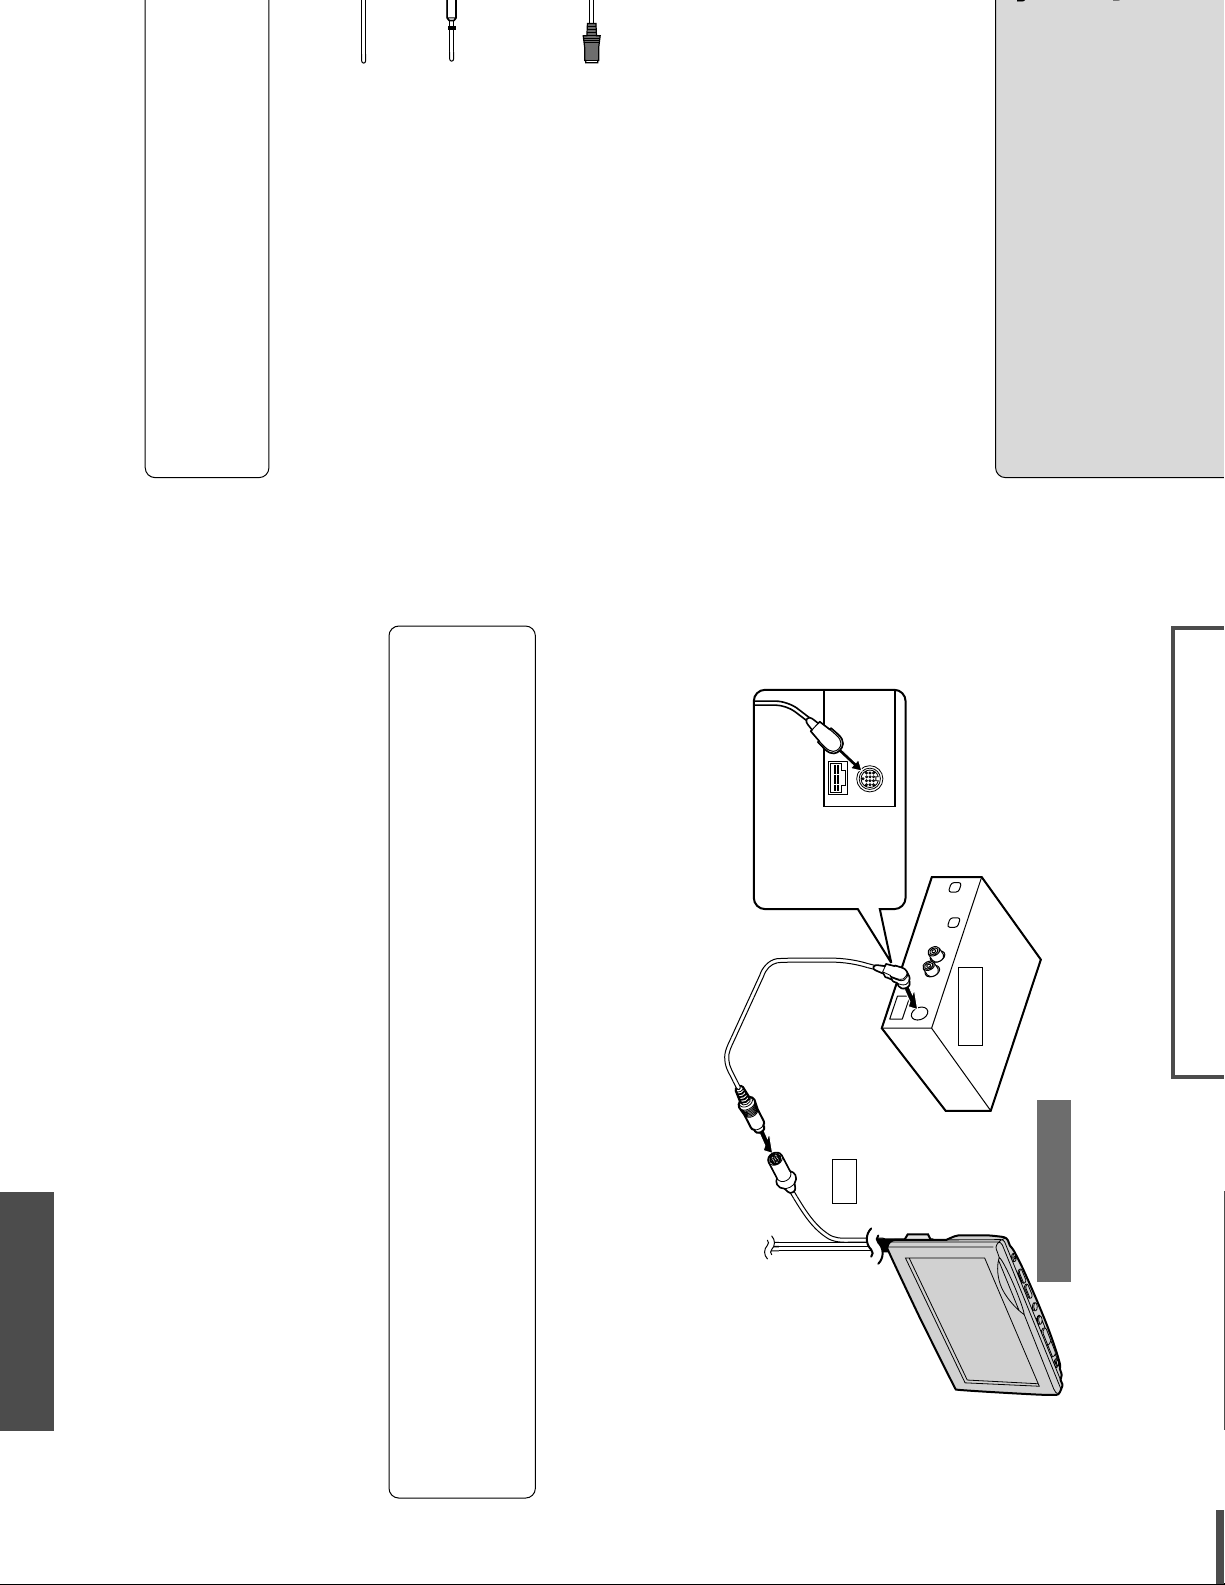
CY-VMR5800N
19
ACC
(Red)
(Black)
Fuse 3 A
ACC power lead
To ACC power, 12 V DC.
Ground lead
To a clean, bare metallic part of the car chassis.
RGB/control cord
To the RGB-OUT connector of the Panasonic
mobile navigation system (CN-DV1800EN,
CN-DV2000EN, etc.).
Color LCD monitor
Power connector
2
1
Example combination
Mobile navigation system (CN-DV1800EN)
Notes:
Be sure to fully plug in the connector.
Refer to the operating instructions for the connected devices, in addition.
The RGB input cord is applicable only to Panasonic mobile navigation system (CN-DV1800EN,
CN-DV2000EN, etc.).
Mobile navigation system
(CN-DV1800EN)
RGB-OUT
RGB
CY-VMR5800N
Power connector
RGB cord
(supplied to CN-DV1800EN)
2
Insert the connector
obliquely.
Page 19
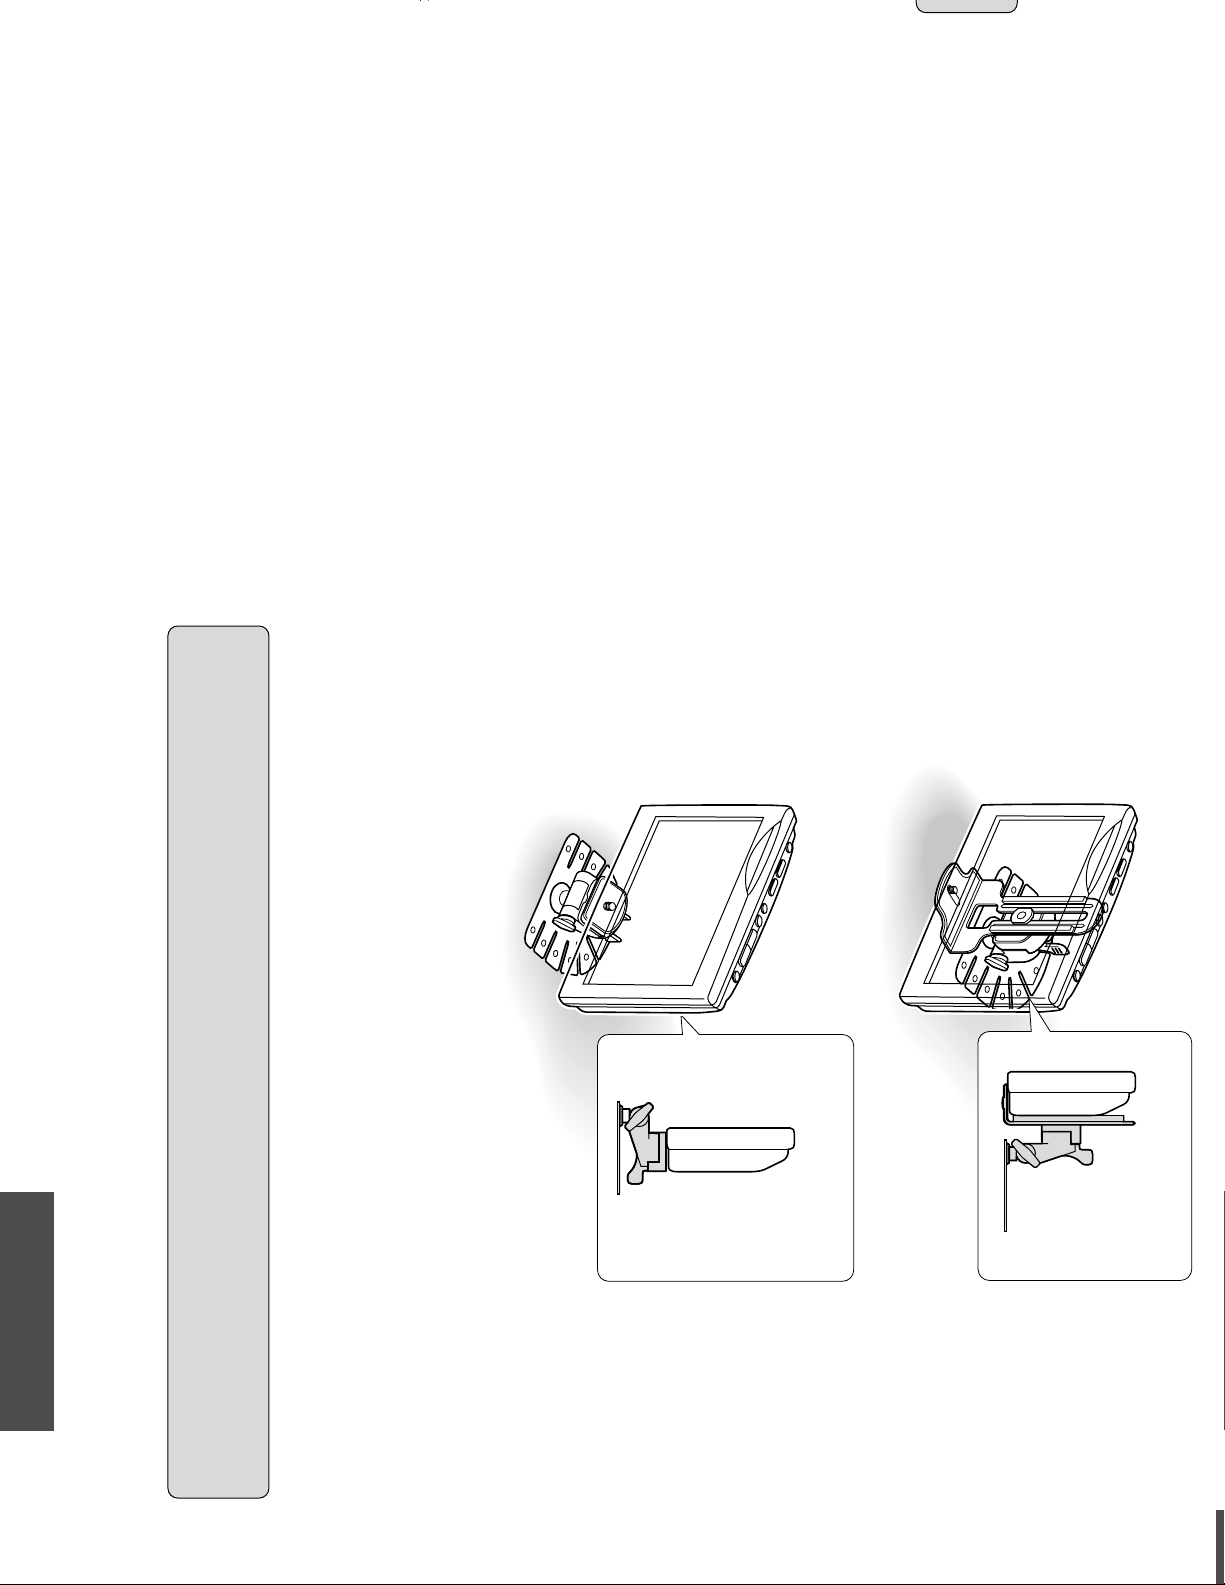
CY-VMR5800N
17
If using the metal fitting body (CA-FN10X, optional)
Refer to the instructions for the CA-FN10X and consult your nearest professional installer for the installation.
If not using the metal fitting body (CA-FN10X, optional)
Please purchase your favorite kits for the display installation, refer to the instructions for the kits and consult
your nearest professional installer for the installation.
WARNING:
In some areas, dashboard installation is prohibited. Observe local regulations when installing the
monitor.
Side panel view
Side panel view
Page 20
Page 21

Page 22

21
4. To modify the amount of Detune effect on the first voice, turn the
Data Wheel. Press the softkeys below the other voices to select them
for editing. The softkeys can also be used to change values.
5. To edit the Randomness parameter, press the Right Arrow button to
move to the next edit screen. Select the voices with the softkeys and
increase or decrease the amount of Randomness with the Data
Wheel.
6. To edit the amount of Pitch Randomization, press the Right Arrow
button. Turn the Data Wheel to adjust to the desired value.
Adding Vibrato to the Vocalist Workstation EXÕs harmonies is another
way of adding realism. Vibrato is the regular modulation of a voiceÕs
pitch that lends interest to an otherwise static note. You can edit five different vibrato parameters for each voice allowing you to construct the
most realistic vibrato performance possible.
Depth
This varies the amount of pitch deviation above and below the root pitch
of the harmony note. This varies in 1 cent increments between 0 and 100
cents.
Rate
This is the modulation speed of the vibrato. It is measured in Hertz (Hz:
the number of cycles per second). This can be varied in tenths of one Hz
between 0 and 9.9 Hz.
Type
This gives you a selection of four different vibrato waveforms. They are:
sine wave, square wave, sawtooth up and sawtooth down.
Delay
This changes the time between when the Vocalist Workstation EX produces a harmony note and the onset of vibrato. Vibrato does not immediately occur after the delay period; instead it increases gradually in intensity. It is edited in 20 millisecond increments from 0 to 2.5 seconds.
Randomness
Randomness applies random values to the combination of Depth and
Rate. Each new note you sing will have a slightly faster or slower vibrato
rate and slightly increased or decreased depth. This parameter is set from
1 to 10.
1. Use the Data Wheel to select the program you want to edit and press
the Edit button.
2. Press the softkey that corresponds to Vibrato. (Vibr)
Page 23

22
3. Select a different style preset using the Data Wheel. If you are satisfied with loading a different style, refer to the ÒStoring your EditsÓ
section on page 30. Press the Edit button again to modify the current Vibrato style or, to create a new Vibrato style from scratch, load
one of the blank styles (BlnkVibr #) and then press the Edit button.
4. To increase and decrease the Vibrato Depth on voice number one,
turn the Data Wheel. Press the softkeys below the LCD to select
other voices for editing. The softkeys are also be used to raise or
lower values.
5. To edit the Vibrato Rate, press the Right Arrow button to move to
the next edit screen. Select one of the voices with the softkeys and
use the Data Wheel to edit the value.
6. To vary the Vibrato Delay, press the Right Arrow button to move to
the next edit screen. Select one of the voices with the softkeys and
use the Data Wheel to edit the value.
7. To edit the Randomness parameter, press the Right Arrow button to
move to the next edit screen. Select one of the voices with the softkeys and increase or decrease the amount of Randomness with the
Data Wheel while you sing.
ÒScoopingÓ refers to a technique singers use where they bend the pitch
into a note from below the target pitch. This feature makes your Vocalist
Workstation EX harmonies sound like a group of singers improvising
their parts.
There are two ways of introducing Scoop: you can use the Randomness
factor in the Scalic, Chromatic and Vocoder modes to have the voices
scoop automatically at random intervals or, in Vocoder mode only, you
can introduce it deliberately via MIDI velocity. Scoop does not function
in Pitch Correct mode.
Scoop Occurrence
This parameter allows you to set how often you would like the Vocalist
Workstation EX to produce a scoop. A 50 percent occurrence rate means
that, on average, one in every two notes you sing will scoop into pitch.
Scoop Amount
The amount of Scoop is applied in cents, from 0 to 900. Zero is no scoop
and 900 is equivalent to 9 semitones. The higher values are not intended
to produce long portamento-type slides into a note; they are intended to
sound more like the voice has quickly come up from a non-pitched note
below the input note.
Scoop Rate
Scoop time is variable from 0 (slowest) to 10 (fastest). The numbers represent a range of acceptable rates but are not referenced to any specific
time scale.
Page 24

23
Vocoder Scoop Threshold (Vocoderstyles only)
With a Vocoder style currently loaded, this parameter allows you to produce a scooped harmony note only when you hit a keyboard note (or
notes) above a certain velocity. The MIDI velocity range can be set from
0 to 127 although you will most likely be using the higher velocities.
1. Use the Data Wheel to select the program you want to edit and press
the Edit button.
2. Press the softkey that corresponds to Scoop. (Scp)
3. Select a different style preset using the Data Wheel. If you are satisfied with loading a different style, refer to the ÒStoring your EditsÓ
section on page 30. Press the Edit button again to modify the current Scoop style or, to create a new Scoop style from scratch, load
one of the blank styles (BlnkScp #) and then press the Edit button.
4. The first screen is the Scoop Occurrence setting. This should be set
to the maximum value (100%) while you are experimenting with the
other Scoop parameters. When you have set the other parameters to
your liking the Occurrence setting can be reduced.
5. To set the Scoop amount press the right arrow button. Turn the Data
Wheel to edit voice #1. Select the other voices with the softkeys
beneath them and modify them with the Data Wheel.
6. To set the Scoop rate press the right arrow button. Turn the Data
Wheel to edit voice #1. Zero is the slowest and 10 is the fastest rate.
Select the other voices with the softkeys beneath them and modify
them with the Data Wheel. To get your bearings, start by setting the
rates at the lower settings and increase once you find the Scoop
Amount that you like.
7. (Vocoder styles only) Press the right arrow button to advance to the
Vocoder Threshold screen. The Data Wheel changes the value above
which scoops are triggered by keyboard velocity.
The Vocalist Workstation EXÕs reverb effect is designed to surround
your voice and the harmony voices with an acoustic environment.
Because humans seldom if ever hear sounds without also hearing reflections off of nearby objects, the reverb effect adds realism to your performance.
The control parameters are very flexible and can simulate everything
from an intimate studio to a large reflective hall and points in between.
The factory programmed reverb styles allow quick changes and provide a
starting point for your reverb explorations.
Each program may be stored with its own reverb setting to allow different effects for the songs in your repertoire. For more information on
reverb, see the Vocalist EX Series Applications Guide.
Page 25

24
Room Type
There are 5 room types available: Studio, Chamber, Club, Hall and
Arena. The difference between them is the timing of the reflections.
Decay Time
This determines the amount of time it takes the particular room you have
chosen to stop reverberating. Each room type has a slightly different
range of decay times: Studio: .1-1 seconds, Chamber: .2-2 seconds,
Club: .5-2.5 seconds, Hall: 1.5-4 seconds, Arena: 2-20 seconds.
Brightness
This parameter controls the decay time of the high frequencies only. This
simulates different absorbing properties of the walls in your environment.
The ÒdarkÓ value is fully damped, that is, high frequencies die off very
quickly. The ÒbrightÓ value means that the highs take the same time as
the low frequencies to die away.
HF Rolloff
This is the high frequency rolloff control which applies a lowpass (hi cut)
filter to the overall reverb. As opposed to the Brightness control which
adjusts the time of high frequency decay, the HF Rolloff control adjusts
the amount of high frequencies present. The range of control is from 500
Hz through to Flat.
Reverb Enable
This is merely an on/off switch for the reverb effect. It allows you a convenient way to mute the reverb without affecting the programÕs controls.
Mix
Each program in the Vocalist Workstation EX can be stored with unique
mixer settings (there are no ÒMixÓ Styles). This allows you to bring up the
level of a single harmony voice for example or to turn the lead voice off
for a 100% wet special effect. Each program can also have its own pan
settings and reverb levels.
The front panel faders add and subtract to the mixer settings within the
currently selected program. If any of the programmed levels are at zero,
the front panel faders will not have any effect.
Note: If the Lead (dry) Voice is selected to zero in a program, all audio
(not just the harmonies) will be muted when the Bypass is activated.
Page 26

25
Harmony/Lead Mix
This parameter varies the mix between your uneffected input voice and
the sum of the harmony voices. Both settings are interactive, that is, setting either sets both. The relative levels are displayed in percent.
Harmony Voice Levels
The volume of each of the four voices are adjusted independently. The
levels are edited in 1 dB increments between 0 dB (full volume) and off.
Harmony Voice Pan
Each harmony voice can have its left/right orientation in the stereo field
edited between 50 increments left and 50 right with the center point
being 0. A graphical display shows the relative positions.
Input Vocal Pan
The lead voice (also known as ÒdryÓ) can be panned to any point in the
stereo field in the same way as the harmony voices.
Lead Reverb Wet/ Dry Mix
The amount of reverb applied to the lead voice can be adjusted independently with this control.
Harmony Reverb Wet/ Dry Mix
The amount of reverb on the harmony voices only can be adjusted with
this control. This works in conjunction with the individual harmony
voice levels. For example, a harmony voice that is lower in volume than
the other three voices would also have proportionately less reverb.Each
program has its own mixer settings. There are no Mix styles as there are
for the other edit parameters.
1. Use the Data Wheel to select the program you want to edit and press
the Edit button then the softkey corresponding to Mix.
2. To adjust the Harmony/Lead mix, turn the Data Wheel. The bar
graphs showing the relative levels move together.
3. To adjust the individual harmony levels, press the Right Arrow button. The LCD shows the current attenuation as a vertical bar with a
numerical dB level. Remember, 0 dB is full volume for the selected
voice. Press the softkeys below the other voices to select them for
level adjustment. The softkeys may also be used to raise or lower
values.
4. To edit the individual voice pans, press the Right Arrow button. In
this screen, the voices are stacked vertically but still correspond to
the softkeys in the same way as the other edit screens. When you
move the Data Wheel, the pan pointers move diagonally across the
screen to give you a visual indication of where the voice is placed in
the stereo field. The stereo position is also shown by the letters ÒLÓ
(left), ÒRÓ (right) and ÒCÓ (center) with a number from 1 to 50 showing how far the voice is from the center position.
Page 27

26
5. To change the panning of the lead voice, press the Right Arrow button to move to the Dry Pan screen. Turn the Data Wheel to change
the pan position as described in the individual pans.
6 To change the Harmony Reverb Wet/Dry mix, press the Right
Arrow button to move to the Harmony Reverb Mix screen. Turn the
Data Wheel to change the pan position as described in the individual
pans.
7 To change the Lead Reverb Wet/Dry mix, press the Right Arrow
button to move to the Lead Reverb Mix screen. Turn the Data Wheel
to change the pan position as described in the individual pans.
8. Press Store to save your changes or press the Exit button three times
to return to the top level.
The Vocalist Workstation EX has automatic functions capable of producing musically correct harmonies and a large number of factory programs
crafted to fit many performance situations. There may be, however,
instances where the factory harmonies need to be edited to to suit your
requirements.
The Vocalist Workstation EX allows you to shape the harmonies from
the point of replacing one chord type with another in a Chordal harmony
program for example, to the point of determining exactly which notes the
Vocalist Workstation EX generates for any series of input notes in a
Scalic harmony program.
Harmony styles work in a slightly different way from the humanizing
styles. Where only one Detune or Vibrato style can be assigned to a particular program, there are 8 different harmony styles assignable per program that can be called up using the softkeys.
We will divide the harmony editing section into 3 levels for simplicity:
Level 1. Changing the Softkey assignments of Harmony Styles
Level 2. Editing Harmony Styles
Level 3. Customizing Harmony Styles
This is the simplest level in which to modify the harmony component of
a program. You have a choice of pre-programmed harmony styles that
can be attached to the various programs to suit your needs.
Assignment of Harmony Styles to Softkeys
Each of the eight softkeys can be re-designated to enable a different harmony style when pressed. The same styles can be shuffled or a different
style can be chosen for a particular softkey.
An example could be if you have chosen a program that produces a
Chordal harmony with the voicing you want but it doesnÕt have an aug-
Page 28

27
mented 7th chord assigned to any of the softkeys, you could change its
assignment from something you donÕt need such as a diminished 7th.
1. Use the Data Wheel to select the program you want to edit and press
the Edit button.
2. Press the softkey that corresponds to the Harmony parameter. The
LCD shows the the current softkey selected by an arrow, its harmony style in quotation marks, and the other softkey assignments.
3. Press the softkey you want to reassign. The style display shows the
keyÕs current assignment.
4. Turn the Data Wheel to select a different harmony style. You have a
number of different styles to assign to each softkey. See ÒStyle Type,
Scale or Chord SelectÓ described below for their descriptions.
5. If you want to reassign another softkey, press it and repeat step #4.
6. When you are satisfied, press Store once or Exit twice to save your
changes. See ÒStoring Your EditsÓ at the end of this chapter for more
details on saving.
If you canÕt find the harmony style you need from the pre-programmed
harmony styles, you can enter the next editing level and create or modify
one for yourself.
You have a choice of the following harmony style editing parameters:
Harmony Type, Scale or Chord Select
You can choose between Chromatic, Scalic, Chordal, Vocoder and Pitch
Correct harmony types to assign to your harmony style.
For Chordal harmonies, this screen allows you to choose between major,
major 7th, minor, minor 7th, dominant 7th, minor 7th flat 5, diminished
7th, augmented 7th, suspended and suspended 7th chord types.
If you choose Scalic harmony, this screen also allows you to choose the
scale type which can be Major, Minor,Whole tone, Diminished, Blues,
Dorian, Harmonic Minor and Melodic Minor.
The Chromatic, Vocoder and Pitch Correct types do not require any scale
or chord selection.
Unison is not a specific Harmony Type, but you will see it in some of the
Program titles. It is a Chromatic harmony set to double the lead voice at
the same pitch, or very close to it.
Harmony Voicing (Except Pitch Correct and Vocoder)
This parameter allows you to arrange the intervals relative to your input
note such as a 3rd above or 5th below harmony. The Harmony Voicing
screen is available only to the Chordal, Scalic and Chromatic harmony
types only. Each of the three types has a different number of voicing
intervals available because of the nature of each type of harmony.
Page 29

28
Chordal harmonies allow you to choose intervals that belong to the current
chord type only. The range is plus or minus 2 octaves with a separate bass
voicing. The Bass voicing stays on the chord root and does not move with
your voice like the other voicings.
Scalic harmonies allow you to choose intervals that belong to the scale
type only. The same ranges apply (plus or minus 2 octaves). There is no
bass voicing in Scalic harmonies.
Chromatic harmonies allow you to choose any interval between 2 octaves
up or down.
Bending (Chromatic and Scalic only)
Bending relates to pitch correction of the harmony voices and is independent of pitch bending. In Chromatic and Scalic harmony types, you have
the option of pitch-correcting the harmony notes or not. When you want
the harmony notes to be corrected, this is referred to as ÒSteppedÓ bending.
Because they are corrected, the harmony notes ÒstepÓ up and down even
when your voice is sliding between notes.
When you want the harmonies to follow your exact pitch, out-of-tune notes
and all, you can set this parameter to ÒSmoothÓ bending. Smooth harmonies sound more natural and allow you to perform ÒBlueÓ notes but you
must be accurate with your pitch for the harmonies to sound acceptable.
Harmony Motion (Chordal mode only)
Harmony motion gives you control over the number of Òbreak pointsÓ in
each octave. A break point is the note at which the harmony interval
changes up or down depending on the voicing and the number of voices in
your harmony. Normal harmony motion has more break points, creating a
more active harmony part. The other option, ÒfixedÓ, reduces the number
of break points to only two regardless of voicing and the number of harmony voices.
Pitch Bend
This is where you set the amount of pitch bend that can be introduced
through MIDI. Each of the 8 styles can have a different range with the
range being 0 to 12 semitones.
Portamento Rate
Portamento is a feature available to all harmony types that reduces the
ÒsteppingÓ that can occur between successive harmony notes. This can
make harmonies sound more like a human singer would. Each note slides
its pitch into the next at a specific rate that you determine. A small amount
of portamento has been built into many of the factory programs. The values range from 0 to 10 with 10 being the slowest rate or the maximum
amount of portamento.
Vocoder Mode Select (VocoderMode only)
There are 7 different Vocoder modes to choose from. The first 4 deal with
voice assignment. In order for the Vocalist Workstation EXÕs intelligent
Vocoder panning to work correctly, it is often necessary to limit the number of voices available to those required by your harmony part. The lay-
Page 30

29
ered modes create thickening on single or two part harmonies. The 4 MIDI
Channel mode allows individual control of each of the four harmony voices for complete pan position stability and independent pitch bend.
Transpose (Vocoder and Pitch Correct only)
In Vocoder mode, this feature allows you to transpose your harmonies +/Ð
3 octaves. You could use this when you are triggering your Vocoder harmonies from the bottom or top of your keyboard and the untransposed harmonies would be in the wrong octaves. The auto option allows the Vocalist
Workstation EX to trigger notes in the octave closest to your input note.
In Pitch Correct mode, transposing works in conjunction with MIDI or
front panel keyboard input. When you sing and press a key, the resulting
pitch can be transposed up to 3 octaves up or down for special effects. The
auto option works as described above.
1. Use the Data Wheel to select the program you want to edit and press
the Edit button.
2. Press the softkey that corresponds to the Harmony parameter. The
LCD shows the the current softkey selected by an arrow, its harmony
style in quotation marks, and the other softkey assignments.
3. Press the softkey you wish to edit. The style display show this keyÕs
assignment.
4. Press the Edit button. The Harmony Type selection screen is displayed.
Your choice here affects the order and selection of editing screens because
each different harmony type has its own set of parameters. Rather than
explaining the location of editing screens in text, what follows is a table
showing the screens in the order in which they appear.
The Arrow buttons guide you to the next or previous screen, the softkeys
select the different editing fields and the Data Wheel is used to change the
values.
CHROMATIC:
SCALIC:
CHORDAL:
VOCODER:
PITCH CORRECT:
Page 31

30
When you are satisfied, press Store once or Exit twice to save your
changes. See ÒStoring Your EditsÓ at the end of this chapter for more
details on saving.
Customizing allows you to determine exactly which notes are produced
for any given input note. It is the deepest harmony editing level and it is
only available with Chordal, Scalic and Chromatic harmony types.
Examples of customized harmonies are the Blu1, Blu2 and Blu3 harmony styles shown in the ÒBlues Third AboveÓ program. All three styles are
based on a major Scalic harmony that has been edited so that certain
input notes produce different harmonies from those in the strict definition
of a Major scale.
Once you have customized a harmony, the Voicing edit screen disappears and is replaced by the Customize Voicing screens. The Customize
Voicing screens work differently in that you have all twelve notes of the
scale to apply to input notes where you previously could choose only the
notes within a major or minor scale for Scalics and notes from a particular chord in Chordal harmonies.
The Custom Harmonies screens are as follows:
Custom Voicing
You have a range of twelve input notes within one octave to assign alternative harmony voicings to. You can, however, choose any of the notes
within a four octave range to apply to the input notes in your octave.
You also have the option of inserting a Òno changeÓ shown by Òn/cÓ in
the Custom Voicing screen. This is a way of handling non-scale or nonchord notes gracefully and to control harmony motion. Instead of assigning a particular note, you can assign a Òno changeÓ which locks the harmony note on the previous one regardless of whether it was higher or
lower. In fact, Òno changeÓ forms the basis for the Chordal harmony concept where the harmony notes are confined to two or three notes per
octave for any of twelve input notes.
Custom Harmony Key
You must tell the Vocalist Workstation EX what key your input notes are
referenced to before you begin customizing. The default key from the
factory is C but you can change it to any of the 12 keys.
1. Select a program with harmony styles close to what you want and
press the Edit button.
2. Press the softkey that corresponds to Harmony. Select the harmony
style closest to what you want. This will save you extra effort.
3. Press the Edit button.
Page 32

4. Press the Left Arrow button twice to locate the Ò[Edit] to
CustomizeÓ screen. Press the Edit button. This presents the Custom
Harmony Voicing screen showing the note assignments for the harmony style you have chosen.
5. Use the softkeys to select each of the four voices for editing and use
the Data Wheel to change the voicings.
6. Press the Store button to save your new harmony style. Remember,
you have to assign this new style to the current program; it is not
done automatically.
When you have completed your editing you have the option of modifying
or creating a 15 character name for the program. Fifteen character style
names are available for harmony styles as well. The humanizing styles
can also be named but with 12 character names only.
You may use a mixture of upper and lower case letters, numbers and
symbols for naming. If you want to enter a letter in a blank space, the
default assignment is from the lower case alphabet. Also included are
insert and delete functions to speed naming.
1. Select the program or style you want to rename and press the Edit
button.
2. For programs, press the softkey that corresponds to Name. For
styles, press the Left Arrow button. The naming screen will be
shown in the LCD.
3. Select a character type from the top row of softkeys. These are upper
(uppr) and lower (lowr) case characters, numbers (numr) and symbols (symb). The default for a blank space is lower case. The bottom
row of softkeys controls cursor left (<<<) and right (>>>) movement
and allows you to insert or delete characters at the cursor position.
4. Spin the Data Wheel to change the character underscored by the cursor.
5. Press Store to save your changes or press the Program button to can-
cel your changes and return to the top level.
Note:
31
Page 33

There are two ways to save your edits using the Store function:
1. Program Store - This is the term for saving any change you make
such as attaching a different humanizing style to a program, loading
different harmony styles or changing the mix. Factory programs cannot be overwritten; they can only be copied to the user bank where
any changes are stored permanently.
2. Style Store - This is the term for saving an edited version of a
humanizing or harmony style. Styles are stored independently of
programs and are stored in a separate library to be shared by the programs. Factory styles cannot be over-written after they have been
modified; they can only be copied to user locations.
1. When you are satisfied with your editing, press the Store button. A
Program Store is initiated from either the Performance (top) layer or
the Select Parameter layer.
2. The LCD shows that the new program name is the same as the current name. It also shows that the Vocalist Workstation EX has automatically chosen the next blank user slot to store the new program
to.
3. Press Store again to accept the default name and destination. If you
want to, you can change the destination with the Data Wheel.
1. After editing the parameters of a style, press the Store button. A
Style Store is initiated only from Style Modify layer.
2. The LCD will show that the new style name is the same as the current with a Ò■Ó character tagged onto the end. It will also show that
the Vocalist Workstation EX has automatically chosen the next
blank user slot to store the new style to.
3. Press Store again to accept the default name and destination. If you
want, you can change the destination with the Data Wheel.
4. Press Exit.
5. Follow the Program Store procedure to attach the new style to your
program permanently.
Note:
Note:
32
Page 34

The Utilities mode allows you to make global (affecting all programs)
configuration changes to the Vocalist Workstation EX, including MIDI
channel assignments, audio configurations, program, song and style initialization and user preferences.
Press the Utilities button in any of the other operating modes including Programs, Edit, and Songs modes. Once you have altered one of
the configuration settings, you can press the Utilities button again to
exit to the screen you started from. For example, this makes it convenient during editing to change MIDI channel assignments.
After entering Utilities mode, you can select the configuration menu
you need from the softkeys.
This is represented by the abbreviation Vers. Pressing this soft key produces the introduction screen as shown when the product is first powered
up. Displayed on the second line of this screen is the software version
number. The software version number indicates whether software
updates, if any, have occurred.
Pressing the MIDI soft key within Utilities mode presents the MIDI
Utilities sub menu. From this screen you can choose a MIDI Utility to
modify.
MIDI Channel Select
To provide maximum flexibility and to reduce conflicts, the Vocalist
Workstation EX can control the channel assignments of more than just
the usual program changes and continuous controllers. There are three
areas in the Vocalist Workstation EX that can have their own MIDI channel assignments if required.
The System & Vocoder channel determines which channel program
changes, continuous controller (Pitch Bend, Modulation etc.) and singlechannel Vocoder messages are received upon. When you use the 4 channel Vocoder mode, the System & Vocoder setting determines the channel
for voice one only.
33
Page 35

The Key & Harmony channel allows you to select different keys or
chords (depending on the harmony type) and any of the eight different
harmony styles assigned to a program via MIDI.
The 4 MIDI Channel Vocoder setting allows each of the four individual
voices to have its own channel when using the Ò4MIDÓ Vocoder style
within any Vocoder program. Assigning each voice its own MIDI channel and using the program stops Òvoice swappingÓ which causes voices
panned in the stereo field to switch positions. If you run in mono, or
stereo mode and you donÕt mind the voice swapping, you can use a
Ò4MIDÓ Vocoder style on the same MIDI channel as the system.
The 4 channel Vocoder mode also allows you to use separate pitch bending on each of the four voices.
Voice one in 4 channel Vocoder mode is always the same as the System
& Vocoder channel. The remaining three voices are set independently.
1. Press the Utilities button from any mode. This presents the
UTILITIES main menu.
2. Press the soft key corresponding to MIDI. This presents the MIDI
Utilities sub-menu.
3. Press the soft key corresponding to Channel.
4. Select either System & Vocoder or Key & Harmony by pressing the
corresponding softkeys below the options. Turn the Data Wheel or
use the upper and lower softkeys to select the desired channel.
Selecting the ÒoffÓ option disables the MIDI program change feature. Selecting the ÒomniÓ option causes the Vocalist Workstation
EX to respond to MIDI messages on all 16 MIDI channels.
5. Press the Utilities button again to exit. This returns you to the mode
from which you entered.
1. Press the Utilities button from any mode. This presents the
UTILITIES main menu.
2. Press the soft key corresponding to MIDI. This presents the MIDI
Utilities sub-menu.
3. Press the soft key corresponding to Channel.
4. Press the Right Arrow button.
5. You can select Vocoder voices 2, 3 and 4 using the softkeys below
them. Voice 1 follows the system channel and cannot be changed in
this screen. The channel settings can be changed with the upper and
lower softkeys or the Data Wheel.
Selecting the ÒoffÓ option by turning the Data Wheel to the right disables external control of the Vocoder. Selecting the ÒomniÓ option
causes the Vocoder to respond to notes on any and all MIDI channels.
6. Press the Utilities button again to exit. This returns you to the mode
from which you entered.
Note:
34
Page 36

MIDI Selection of Key & Harmony
Controlling your harmonies can be done through MIDI as an alternative
to using the front panel. You have the option of independently selecting
key or chord root and style. There are several ways in which this can be
done to provide you the most flexibility in live performance or sequencing.
MIDI options for selecting key and harmony style:
¥ Chord Recognition
¥ Controller #16 (transmitted from front panel)
¥ Notes
¥ Program Change
Using Chord Recognition and a Chordal harmony program is the most
useful combination when you want to just Òplug in and playÓ. The chord
voicings you use in your playing are interpreted by the Vocalist
Workstation EX as key and harmony information. You can also set chord
recognition so that it only recognizes chords played on the upper or lower
part of your keyboard with a split point that you set. This way, left hand
bass lines donÕt cause the harmonies to jump around. See page 39 for
more information on setting the split point.
The program you have loaded must contain styles that are related to the
chords you play. As an example, if you play a C augmented 7th chord
and the Vocalist Workstation EX program has no augmented 7th styles
the Vocalist Workstation EX selects the closest sounding chord. See the
Harmony Editing section on page 27 for instructions on adding or modifying chord styles.
35
Page 37

Controller 16 is a MIDI continuous controller that can be used to select
key and harmony together. The Vocalist Workstation EXÕs front panel
keyboard and softkeys transmit this information over MIDI when you
press them and can be recorded and played back from a sequencer. Each
button has its own CC16 value and is shown in the following graphic:
MIDI Notes give you another way to combine program changes and key
and harmony changes into one MIDI channel. Each MIDI note in the following reference table represents both a key and a style in a single message. Select your key or chord root from the octave matched to the softkey you want.
60 62 64 65 67 69 71
61 63 66 68 70
0246
1357
36
1
2468
12345678
357
Page 38

Program Change messages can also be used to select key and harmony
simultaneously. The following table shows how they are assigned. The
top row represents the softkeys, the keyboard represents the chord root or
key and the table shows the resulting program change number.
1. Press the Utilities button from any mode. This presents the
UTILITIES main menu.
2. Press the soft key corresponding to MIDI. This presents the MIDI
Utilities sub-menu.
3. Press the soft key corresponding to Key & Harmony.
4. The first page allows you to to set the receive and transmit options
with the Data Wheel.
5. Press the Right Arrow button to change between Chord
Recognition+CC16, Program Change, and Notes with the Data
Wheel.
6. Press the Right Arrow button again to set the keyboard split point for
chord recognition. The softkeys are used to select the ÒaboveÓ or
ÒbelowÓ options and the split point note selection.
7. Press the Utilities button to exit to the previous mode.
MIDI Continuous Controllers (CC)
The Vocalist Workstation EX responds to MIDI CC messages like any
synthesizer module. This section of the Utilities menu allows you to
remap which MIDI controllers affect Vocalist Workstation EX parameters. Any of the 120 MIDI continuous controllers and Aftertouch (which
is not an official CC) can control the Vocalist Workstation EX. You can
also select Ònone,Ó which disables MIDI control of any parameter.
A continuous controller is a specific type of message transmitted by a
MIDI keyboard. You are transmitting CCÕs for example, when you move
your pitch bend or modulation wheels, press down harder on the keys or
37
24
B#
A#
F#
B
A
G
F
12
11
10
9
8
7
6
23
22
20
20
19
18
36
35
34
33
32
31
30
48
47
46
45
44
43
42
60
59
58
57
56
55
54
72
71
70
69
68
67
66
84
83
82
81
80
79
78
96
95
94
93
92
91
90
E
E#
D
C#
C
17
5
4
3
2
1
16
15
14
13
29
28
27
26
25
41
40
39
38
37
53
52
51
50
49
65
64
63
62
61
77
76
75
74
73
89
88
87
86
85
Page 39

38
blow into a breath control device. It is with CCÕs that you introduce
dynamics and emotion into your harmony performance.
Vocalist Workstation EX parameters you can modify by continuous control and their default MIDI mappings:
¥ Volume to MIDI Volume (CC 7)
¥ Detune to Expression Controller (CC 11)
¥ Vibrato Depth to Modulation Wheel (CC 1)
¥ Vibrato Rate to Effect Control 1 (CC 12)
¥ Harmony Hold to Effect Control 2 (CC 13)
The Harmony Hold works with Chordal and Scalic harmony programs
to freeze the current harmonies while you continue to sing notes that
would otherwise cause the harmonies to change. ItÕs useful when you
want to throw some vocal ÒriffsÓ in a part of song and donÕt want the harmonies to follow.
1. Press the Utilities button from any mode. This presents the
UTILITIES main menu.
2. Press the soft key corresponding to MIDI. This presents the MIDI
Utilities sub-menu.
3. Press the soft key corresponding to CC.
4. Use the softkeys to select one of the three editable fields in the MIDI
Controllers screen: the internal parameter you want to control, the
CC that controls it and the control polarity. The control polarity can
be used to reverse the response of the controller.
5. Press the Utilities button to exit to the previous mode.
MIDI Program Change mapping
Incoming MIDI Program Change messages can be remapped to any of
the Vocalist Workstation EXÕs internal programs. Remapping simply
means that when you send the product a MIDI program change number
1, you have the option of making that number call up some other program instead. This allows the product to adapt to existing program
changes in MIDI sequences or MIDI performance controllers.
Any incoming Program Change command can be:
¥ Mapped to the same program number in the Vocalist Workstation
EX
¥ Mapped to any other program number
¥ Mapped to enable Bypass mode
¥ Ignored by the Vocalist Workstation EX (no change from previously
loaded program)
Note:
Page 40

This utility can also control the reception and transmission of program
changes. This is handy if you want the Vocalist Workstation EX to
retransmit any program remappings you have created. These messages
are sent from the MIDI Output jack
The program change receive and transmit options are:
¥ Off Ignore MIDI program changes
¥ Receive only Enable external MIDI program changes
¥ Transmit only Transmit front panel program changes
¥ Receive and transmit Receive external and send remapped programs
1. Press the Utilities button from any mode. This presents the
UTILITIES main menu.
2. Press the soft key corresponding to MIDI. This presents the MIDI
Utilities sub-menu.
3. Press the soft key corresponding to Program then the Left Arrow
button. This shows the MIDI Program Mapping screen with the
mapping for internal program number 1.
4. Use the Data Wheel to scroll through the incoming program numbers
and find the one you would like remapped. The display shows the
names of the internal programs these numbers are currently mapped
to.
5. Press a soft key under the Òmaps toÓ prompt to move the brackets to
the internal program selection field. Use the Data Wheel to scroll
through the program numbers.
6. Press Utilities button to exit to previous mode.
1. Enter Utilities and MIDI program Change mode as above.
2. Use the Data Wheel to scroll through the options explained above.
3. Press Utilities button to exit to previous mode.
Vocoder keyboard split point
You can define the area of your controller keyboard that triggers
Vocoder notes. You can choose which half of your keyboard generates
Vocoder harmonies and where the split point is. Setting the Vocoder to
respond only to the top half of your keyboard could help when you are
playing left-handed bass lines and donÕt want them interfering with your
Vocoder harmonies. You could also set the Vocalist Workstation EX to
respond only to the lower octaves if you are performing right-handed
melody lines and you would like to hold Vocoder chords with your left.
39
Page 41

1. Press the Utilities button from any mode; this presents the
UTILITIES main menu.
2. Press the MIDI softkey; this presents the MIDI Utilities sub-menu.
3. Press the softkey corresponding to Voco.
4. Use the softkeys to select either the above/below or note number
fields. Use the Data Wheel to modify the settings.
5. Press the Utilities button once again to exit; this returns you to the
mode from which you entered.
MIDI Song Utilities
The MIDI Song Utilities allow you to have full MIDI control over the
reception and transmission of Song Selection, Song Mapping, and Song
Steps.
Songs you have created in the Vocalist Workstation EX can be selected
via external MIDI Song Select messages sent from devices capable of
sending them. The front panel of the Vocalist Workstation EX can be
used to send Song Select messages to other devices such as your
sequencer in order to automate song changes during performance.
The MIDI Song Select receive and transmit options are:
¥ off Ignore MIDI Song Select messages
¥ receive Enable external MIDI Song changes
¥ transmit Transmit front-panel Song changes
¥ receive + transmit Receive external and transmit front-
panel Song changes
1. Press the Utilities button from any mode; this presents the
UTILITIES main menu.
2. Press the MIDI softkey; this presents the MIDI Utilities sub-menu.
3. Press the softkey corresponding to Song.
4. Use the Data Wheel to select the desired Song Select option.
5. Press the Utilities button once again to exit; this will return you to
the mode from which you entered.
The MIDI Song Mapping feature allows you to change the relationship
between incoming Song Select messages and which song is actually
loaded.
Note:
40
Page 42

Any incoming Song Select command can be:
¥ Mapped to the same song number in the Vocalist Workstation EX
¥ Mapped to any other song number
¥ Ignored by the Vocalist Workstation EX (no change from previously
loaded song)
1. Press the Utilities button from any mode; this will present the
UTILITIES main menu.
2. Press the MIDI softkey; this will present the MIDI Utilities submenu.
3. Press the softkey corresponding to Song.
4. Press the Right Arrow button; this will show the MIDI Song
Mapping screen with the mapping for internal song number 1.
5. Use the Data Wheel to scroll through the incoming song numbers
and find the one you would like to remap. In the second line of the
display you will see the titles of the internal songs change as you
scroll. Press a softkey under the Òmaps toÓ prompt to move the indicator arrow to the internal song selection field. Use the Data Wheel
to select the desired internal song number.
6. Press the Utilities button again to exit.
MIDI Song Step messages allow you to step sequentially through the
various sections of a song in either forward or reverse directions. There
are several ways to configure the reception and transmission of Song
Step MIDI control.
The Song Step receive and transmit options are:
¥ off Ignore MIDI Song Step messages
¥ receive Enable external MIDI Song Step
changes
¥ transmit Transmit front-panel Song Steps
¥ receive + transmit Receive external and transmit Song
Steps
1. Press the Utilities button from any mode; this will present the
UTILITIES main menu.
2. Press the MIDI softkey; this will present the MIDI Utilities submenu.
3. Press the softkey corresponding to Song.
4. Press the Right Arrow button twice.
41
Page 43

5. Use the Data Wheel to select the desired Song Step option.
6. Press the Utilities button once again to exit; this returns you to the
mode from which you entered.
Song Step Direction can be controlled in various ways. The Vocalist
Workstation EXÕs Song Step Forward messages can be assigned to MIDI
Continuous Controller number 17, or any MIDI note from C -1 to G 9.
Song Step Backward messages can be assigned to MIDI Continuous
Controller 18, or any MIDI note from C -1 to G 9. If MIDI notes are used
to control song steps, be sure to assign unique notes to the forward and
backward directions to avoid conflicts.
The Song Step direction control options are:
¥ CC17 (value equals # of Steps) Step forward
¥ CC18 (value equals # of Steps) Step back
¥ MIDI Notes (any two) Step forward and back
1. Press the Utilities button from any mode; this presents the
UTILITIES main menu.
2. Press the MIDI softkey; this presents the MIDI Utilities sub-menu.
3. Press the softkey corresponding to Song.
4. Press the Right Arrow button three times.
5. Use the softkeys to select Forward or Backward direction fields and
the Data Wheel to select the desired controller.
6. Press the Utilities button once again to exit; this will return you to
the mode from which you entered.
MIDI Dump Utilities
The Vocalist Workstation EXÕs MIDI Dump Utilities allow you transmit
programs, songs, and utility settings as MIDI system exclusive messages
to other Vocalist Workstation EXs, or computer-based sysex (system
exclusive) librarian programs for future retrieval.
1. Press the Utilities button from any mode; this presents the
UTILITIES main menu.
2. Press the MIDI softkey; this presents the MIDI Utilities sub-menu. If
you are dumping the program to a sysex librarian, ensure that the
librarian is ready to receive a sysex dump.
3. Press the softkey corresponding to Dump.
4. Use the Data Wheel to select the desired program to dump.
5. Press the Store button to dump the program; the unit will display
ÒDumping...completedÓ after about one second to indicate that the
dump is finished.
6. Press the Utilities button once again to exit; this will return you to
the mode from which you entered.
Note - Supporting earlier
DigiTech Harmony products:
42
Page 44

1. Press the Utilities button from any mode; this presents the
UTILITIES main menu.
2. Press the MIDI softkey; this presents the MIDI Utilities sub-menu. If
you are dumping all programs to a sysex librarian, ensure that the
librarian is ready to receive a sysex dump.
3. Press the softkey corresponding to Dump.
4. Press the Right Arrow button once.
5. Press the Store button to dump all programs; the unit will display
ÒDumping...Ó while the dump is in progress. When the dump has
been transmitted in full, the unit will display ÒDumping...completedÓ.
The time required to perform a bulk dump will vary with the number
of programs, styles and songs stored in the unit at any given time.
Typically, a bulk dump will take about ten seconds to complete.
6. Press the Utilities button once again to exit; this will return you to the
mode from which you entered.
1. Press the Utilities button from any mode; this presents the
UTILITIES main menu.
2. Press the MIDI softkey; this presents the MIDI Utilities sub-menu. If
you are dumping all programs to a sysex librarian, ensure that the
librarian is ready to receive a sysex dump.
3. Press the softkey corresponding to Dump.
4. Press the Right Arrow button twice.
5. Press the Store button to dump all programs; the unit will display
ÒDumping...Ó while the dump is in progress. When the dump has
been transmitted in full, the unit will display ÒDumping...completedÓ.
The time required to perform a bulk dump will vary with the number
of programs, styles and songs stored in the unit at any given time.
Typically, a bulk dump will take about ten seconds to complete.
6. Press the Utilities button once again to exit; this will return you to the
mode from which you entered.
1. Press the Utilities button from any mode; this presents the
UTILITIES main menu.
2. Press the MIDI softkey; this presents the MIDI Utilities sub-menu. If
you are dumping the song to a sysex librarian, ensure that the librarian is ready to receive a sysex dump.
3. Press the softkey corresponding to Dump.
4. Press the Right Arrow button three times.
5. Use the Data Wheel to select the desired song to dump.
Note- Vocalist
Workstation EX and
Vocalist Workstation
Compatibility:
43
Page 45

6. Press the Store button to dump the song; the unit will display
ÒDumping...completedÓ after about one second to indicate that the
dump is finished.
7. Press the Utilities button once again to exit; this will return you to the
mode from which you entered.
1. Press the Utilities button from any mode; this presents the
UTILITIES main menu.
2. Press the MIDI softkey; this presents the MIDI Utilities sub-menu. If
you are dumping all programs to a sysex librarian, ensure that the
librarian is ready to receive a sysex dump.
3. Press the softkey corresponding to Dump.
4. Press the Right Arrow button four times.
5. Press the Store button to dump all songs; the unit will display
ÒDumping...Ó while the dump is in progress. When the dump has
been transmitted in full, the unit will display ÒDumping...completedÓ.
6. Press the Utilities button once again to exit; this will return you to the
mode from which you entered.
The Vocalist Workstation EXÕs MIDI Dump Utilities also allow you to
dump all utility settings; this includes all global parameters as well as
Continuous Controller, Program Select, and Song Select mappings.
1. Press the Utilities button from any mode; this presents the
UTILITIES main menu.
2. Press the MIDI softkey; this presents the MIDI Utilities sub-menu. If
you are dumping all programs to a sysex librarian, ensure that the
librarian is ready to receive a sysex dump.
3. Press the softkey corresponding to Dump.
4. Press the Right Arrow button five times.
5. Press the Store button to dump the utility settings; the unit will dis-
play ÒDumping...completedÓ after about one second to indicate that
the dump is finished.
6. Press the Utilities button once again to exit; this will return you to the
mode from which you entered.
From time to time, you may find that you have a few user programs or
songs which you no longer use, or no longer want to keep. The Vocalist
Workstation EXÕs Initialization Utilities allow you to clear an unwanted
program or song from memory, resulting in a Òclean slateÓ from which
you can create a new one. Note that once a program or song is initialized,
it is gone for good! If you want to save your program or song before initializing it, dump it via MIDI either to another Vocalist Workstation EX
44
Page 46

or a sysex librarian program for later retrieval. (Refer to the MIDI Dump
Utilities section above for help.)
An easy way to free up memory in your Vocalist Workstation EX is to
occasionally initialize all unused user styles. This procedure will initialize only the styles which are currently not used by any program, so there
is no danger of changing the sound of existing programs. Initializing
unused styles periodically as a Òroutine maintenanceÓ activity will ensure
that you always have some available memory with which to create and
store new styles.
You also have the option of restoring all factory programs, styles and
songs (factory restore). This option should be used cautiously, since all
user programs, styles and songs are erased in this procedure! Use the factory restore option only if you are sure that you wish to return the
Vocalist Workstation EX to its initial factory state.
Pressing the Init softkey from within the Utilities mode presents the
Initialize Utilities sub menu.
From the Init screen you can choose to initialize:
¥ a user Program
¥ any Song
¥ all unused styles
¥ all programs, styles and songs (factory restore)
1. Press the Utilities button from any mode; this presents the
UTILITIES main menu.
2. Press the Init softkey; this presents the Initialize Utilities sub-menu.
3. Press the softkey corresponding to Programs.
4. Use the Data Wheel to select the program to initialize.
5. Press the Store button to initialize the program; the unit will respond
with ÒProg Init completeÓ.
6. Press the Utilities button once again to exit; this will return you to
the mode from which you entered.
1. Press the Utilities button from any mode; this presents the
UTILITIES main menu.
2. Press the Init softkey; this presents the Initialize Utilities sub-menu.
3. Press the softkey corresponding to Song.
4. Use the Data Wheel to select the song to initialize.
45
Page 47

5. Press the Store button to initialize the song; the unit will respond
with ÒSong Init completeÓ.
6. Press the Utilities button once again to exit; this will return you to
the mode from which you entered.
1. Press the Utilities button from any mode; this presents the
UTILITIES main menu.
2. Press the Init softkey; this presents the Initialize Utilities sub-menu.
3. Press the softkey corresponding to Style.
4. Press the Store button to initialize all unused styles; the unit will
respond with ÒStyle Init completeÓ.
5. Press the Utilities button once again to exit; this will return you to
the mode from which you entered.
1. Press the Utilities button from any mode; this presents the
UTILITIES main menu.
2. Press the Init softkey; this presents the Initialize Utilities sub-menu.
3. Press the softkey corresponding to All.
4. Press the Store button. A warning tells you that all user programs,
songs and styles will be lost. To cancel the factory initialization,
press the Exit button; otherwise, press the Store button to perform
the initialization. During the initialization process the version screen
will appear; when initialization is complete, factory program F 1 will
be loaded and the unit is ready to use.
The Vocalist Workstation EX Footswitch Utilities allow you to reconfigure the functions of the DigiTech FS300 3-button footswitch to meet
your personal preferences.
Any button on the FS300 can be configured to control:
¥ Bypass Latching (BypL) bypass is activated when the
footswitch is pressed and released, stays activated until the footswitch is pressed and
released again.
¥ Bypass Momentary (BypM) bypass activated only while
footswitch is held down.
¥ Program up (Pgm )
¥ Program down (Pgm¬)
46
Page 48

¥ Song up (Sng )
¥ Song down (Sng¬)
¥ Song Step up (Stp )
¥ Song Step down (Stp¬)
¥ Data up (Dat )
¥ Data down (Dat¬)
The default switch assignment for the FS300, from left to right, is
Program up Program down Bypass.
1. Press the Utilities button from any mode; this presents the
UTILITIES main menu.
2. Press the Foot softkey; this presents the Footswitch Controls sub-
menu.
3. Press the softkey corresponding to the footswitch button to be reassigned, either left, center or right.
4. Use the Data Wheel to select the desired footswitch action.
5. Repeat steps 3 and 4 for other button assignments, if desired.
6. Press the Utilities button once again to exit; this will return you to
the mode from which you entered.
The User Utilities allow you to select between eight different levels of
LCD display contrast, and to enable or disable voice editing of harmony
intervals. Voice editing of harmony intervals needs some explanation:
when editing the voicing interval or customizing a harmony style, you
have the option of entering the note with the Data Wheel or by actually
singing the note. The Vocalist Workstation EX will recognize the note
and you will see the display change to the note you have just sung.
1. Press the Utilities button from any mode; this presents the
UTILITIES main menu.
2. Press the User softkey.
3. Use the Data Wheel to select the desired contrast level.
4. Press the Utilities button once again to exit; this will return you to
the mode from which you entered.
Note:
47
Page 49

1. Press the Utilities button from any mode; this presents the
UTILITIES main menu.
2. Press the User softkey.
3. Press the Right Arrow button.
4. Use the Data Wheel to toggle voice editing of intervals on or off as
desired.
5. Press the Utilities button once again to exit; this will return you to
the mode from which you entered.
The Vocalist Workstation EX includes an on-board synthesizer that has
two modes of operation:
¥ It can provide a cue-in note to help you find a starting pitch to sing to.
¥ It can assist you in auditioning and editing programs.
Upon entering the Synthesizer screen (see below) and the synthesizer is
set to Off, you can press a note on the front panel keyboard and a single
cue-in note will be produced at the outputs. This feature is only available
within Utilities mode.
When you set the internal synthesizer to On, you can return to Programs
mode and press any note on the front panel keyboard to play the note
through the Vocalist Workstation EXÕs pitch shifters. This will allow you
to hear the harmonies currently defined for that note within the current
program.
You can also adjust the output volume of the synthesizer if desired. The
default volume level is -6 dB.
1. Press the Utilities button from any mode; this presents the
UTILITIES main menu.
2. Press the Synth softkey.
3. Use the Data Wheel to toggle the synthesizer tone on or off as desired.
4. Press the Utilities button once again to exit; this will return you to
the mode from which you entered.
1. Press the Utilities button from any mode; this presents the
UTILITIES main menu.
2. Press the Synth softkey.
3. Press the Right Arrow button.
48
Page 50

4. Use the Data Wheel to set the desired synthesizer volume level.
5. Press the Utilities button once again to exit; this will return you to
the mode from which you entered.
There are several important audio parameters that you can adjust to optimize the performance of the Vocalist Workstation EX.
The Audio configuration parameters include:
¥ Ess Sensitivity
¥ Bass Rejection Threshold
¥ Anti-feedback Control
¥ Tuning Reference
Ess Sensitivity
The Ess Sensitivity adjustment allows you to decrease the amount of
sibilant energy (i.e. ÒessÓ, ÒteeÓ and ÒchÓ sounds) presented to the input
of the Vocalist Workstation EXÕs pitch recognition circuitry. An increase
in the Ess Sensitivity parameter increases the Vocalist Workstation EXÕs
ability to ÒignoreÓ sibilant sounds, thereby minimizing the chance of
pitch tracking errors. This setting can need to be adjusted to accommodate different singers. It is easily modified while the singer sings.
1. Press the Utilities button from any mode; this presents the
UTILITIES main menu.
2. Press the Audio softkey.
3. Use the Data Wheel to increase or decrease the Ess Sensitivity as desired.
4. Press the Utilities button once again to exit; this will return you to
the mode from which you entered.
Bass Rejection
The Bass Rejection Threshold control is used to increase the Vocalist
Workstation EXÕs immunity to pitch tracking errors caused by low frequency noise at the input. Increasing the Bass Rejection Threshold is useful for filtering out wind, background, or microphone handling noise.
Once again, the frequency response of the audio path is not affected.
1. Press the Utilities button from any mode; this presents the
UTILITIES main menu.
2. Press the Audio softkey.
3. Press the Right Arrow button.
Note:
49
Page 51

4. Use the Data Wheel to increase or decrease the Bass Rejection
Threshold as desired.
5. Press the Utilities button once again to exit; this will return you to
the mode from which you entered.
Anti-feedback Control
The Anti-feedback Control is useful for reducing high frequency feed-
back in live or other high volume applications. Increasing the value of
the Anti-Feedback control attenuates sibilant sounds in the audio path.
1. Press the Utilities button from any mode; this presents the
UTILITIES main menu.
2. Press the Audio softkey.
3. Press the Right Arrow button three times.
4. Use the Data Wheel to increase or decrease the Anti-feedback
Control as desired.
5. Press the Utilities button once again to exit; this will return you to
the mode from which you entered.
Tuning Reference
The Tuning Reference in the Vocalist Workstation EX can be adjusted
+ or - 100 cents (one semitone) from a base reference of A = 440 Hz.
1. Press the Utilities button from any mode; this presents the
UTILITIES main menu.
2. Press the Audio softkey.
3. Press the Left Arrow (<) button twice.
4. Use the Data Wheel to set the Tuning Reference as desired.
5. Press the Utilities button once again to exit; this will return you to
the mode from which you entered.
50
Page 52

Page 53

Page 54

Page 55

Page 56

Page 57

Page 58

Page 59

Page 60

Page 61

Page 62

Page 63

Page 64

Page 65

Page 66

Page 67

Page 68

Page 69

Page 70

Page 71

Page 72

Page 73

 Loading...