

Page 1
DiGiCo Waves Operation
Waves MultiRack SoundGrid
Outboard Processing Host for Live
Applications
Issue B - Sept 2010
1-1
Page 2

DiGiCo Waves Operation
1-2
Page 3

DiGiCo Waves Operation
Contents
1.1 Introduction................................................................................ .......1-4
1.1.1 Welcome...............................................................................1-4
1.1.2 Product Overview ................................................................1-4
2.1 Quick Start Guide ...................................................................... .......1-5
2.1.1 Connect Your Console to the SoundGrid Network...........1-6
2.1.2 Set Preferences and Waves I/O................................... .......1-7
2.1.3 Insert a Rack into a channel ...................................... .......1-11
2.1.4 Rack types: Stereo, Mono, Mono to Stereo ....................1-14
2.1.5 Add Plugins for sound processing..................................1-15
2.1.6 Snapshots ..........................................................................1-16
2.1.7 Create Processing Groups ........................................ .......1-17
2.1.8 Saving in MultiRack Soundgrid................................. .......1-18
2.1.9 Recall Safe Mode...............................................................1-19
2.1.10 Overview Window: Viewing Rack Status.......................1-20
2.1.11 Controlling MultiRack SoundGrid by Touch Turn.........1-21
2.1.12 Show Mode ............................................................... .......1-21
2.1.13 Automatic Recovery ........................................................1-22
3.1 MultiRack SoundGrid Windows and Controls Explained ..... .......1-23
3.1.1 Status Bar.................................................................... .......1-23
3.2 A Quick Look at the Windows................................................. .......1-24
3.3 The Windows in Detail............................................................. .......1-26
3.3.1 MultiRack SoundGrid Window: Setting Up .....................1-26
3.3.2 The Rack Control Strip .....................................................1-27
3.3.3 Selecting Racks and Using Keystroke Commands. .......1-27
3.3.3 Input and Output Sections................................................1-28
3.3.4 Adding Plug-ins to a Rack......................................... .......1-28
3.3.5 Rack View: Using Your Plug-ins.......................................1-28
3.3.6 Waves System Toolbar Buttons................................ .......1-29
3.3.7 Group Properties: Organisation & Time Alignment .......1-29
3.3.8 Snapshot Pane: Automating Your Racks ........................1-31
3.3.9 Global Paste and Recall Safe modes ....................... .......1-31
3.3.10 Preferences Window: Global Controls................... .......1-34
4.1 MultiRack SoundGrid Keyboard Shortcuts ........................... .......1-36
1-3
Page 4
DiGiCo Waves Operation
1.1 Introduction
1.1.1 Welcome ...............................................................................
Thank you for choosing Waves! In order to get the most out of Waves MultiRack SoundGrid, please take the time to read through this
manual.
In conjunction, we also suggest you become familiar with www.wavesupport.net. There you will find an extensive Answer Base, the
latest Tech Specs, detailed Installation guides, new Software Updates, and current information on Authorization and Registration.
By signing up at www.wavesupport.net, you will receive personalized information on your registered products, reminders when updates
are available, and information on your authorization status.
IMPORTANT NOTE - IF YOU HAVE RECEIVED AND INSTALLED A DIGICO / WAVES UPGRADE KIT.
THE ILOK THAT IS INCLUDED IN THE KIT DOES NOT CONTAIN ANY PLUGIN AUTHORISATIONS -
THESE MUST BE OBTAINED FROM WAVES BEFORE PROCEEDING WITH CONFIGURATION OF THE
SYSTEM.
1.1.2 Product Overview .................................................................
MultiRack SoundGrid is a host platform for Waves audio processing plug-ins, designed especially for live sound applications. It provides
a software equivalent to outboard hardware processing Racks, and is integrated with your SD console software.
The Waves package consists of both hardware and software upgrades for the SD Console, and allows users to run low latency Waves
plugins on the console. The control of the plugins is full integrated into the SD environment through the MultiRack interface, and the
processing for the plugins is handled by a Waves SoundGrid Server.
Waves MultiRack provides the ability to use 16 mono or stereo racks in the SD8 and SD9, and 32 mono or stereo racks in the SD7.
Each of the racks can contain a chain of up to 8 plugins.
The Waves SoundGrid system delivers low latency I/O at less than 1ms. Depending on the specific plugins used within each rack, the
latency may then increase; some plugins use look-ahead algorithms which inherently add latency, while others may take a few samples
to process the audio.
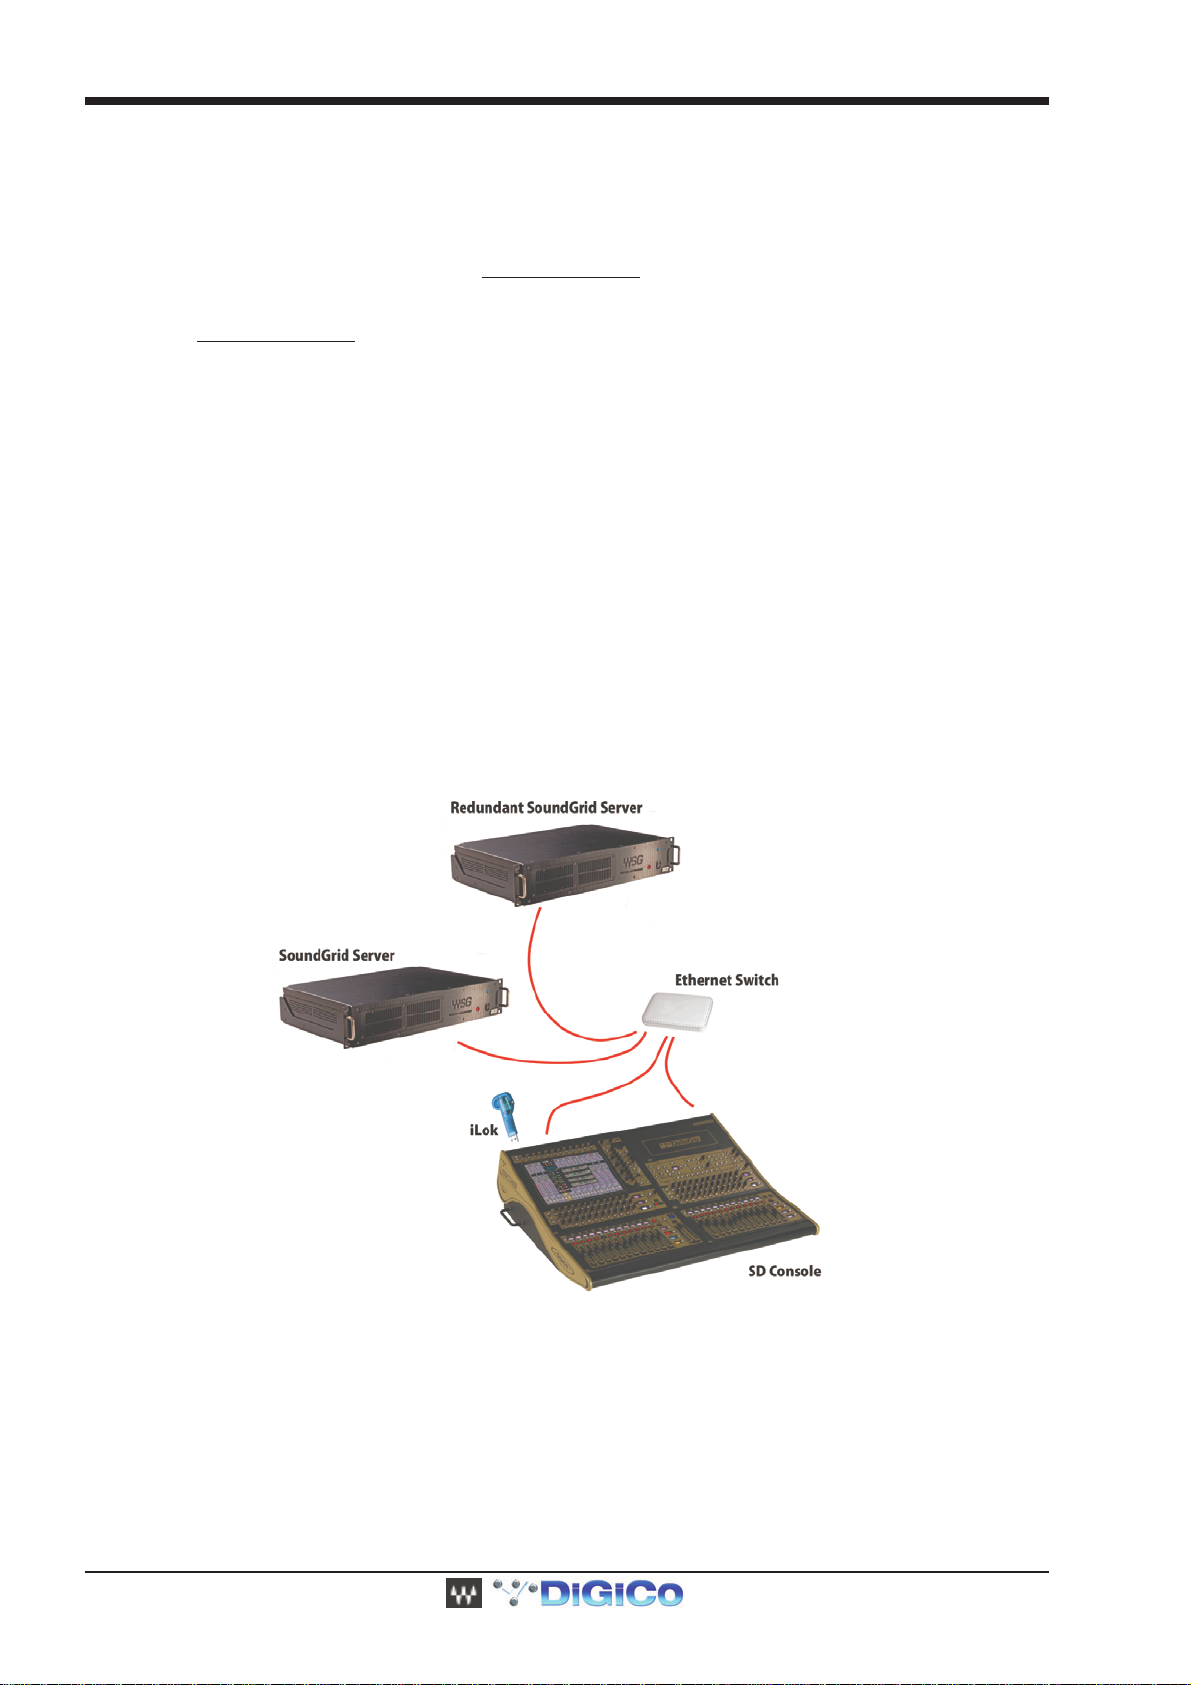
The SoundGrid system connections are all based around Gigabit ethernet network connections using standard CAT5e (or better)
network cabling. The connections shown above are as follows :
1. Connection between SoundGrid Server and network switch
2. SD Console PC Network connection to switch. This is used for control data
3. SoundGrid Audio connection from SoundGrid IO Card fitted to console.
Authorisation for the Waves plugins is handled by a Pace iLok. This needs to be inserted into a free USB socket on the console.
1-4
Page 5

DiGiCo Waves Operation
2.1 Quick Start Guide
The Quick Start section contains all you need to know to configure your system and to get up to speed with the application.
We will follow these steps as we get started:
1. Connect your console to the SoundGrid network.
2. Set preferences and Waves I/O
3. Insert a Rack into a channel.
4. Add plug-ins for sound processing.
5. Use Snapshots for easy recall of Racks and processors.
6. Organize Racks into groups for ease of operation and latency management.
7. Saving in MultiRack SoundGrid.
8. Recall Safe Mode
9. Overview Window: Viewing the Status of All of Your Racks
10. Controlling MultiRack SoundGrid by Touch-n-Turn
11. Show Mode
12. Automatic Recovery
After the Quick Start chapter is a detailed description of the MultiRack SoundGrid interface, so if you have a question about a particular
button, function, or feature, this is the place to look. At the back of this manual, you’ll find details of MultiRack SoundGrid’s keyboard
shortcuts.
Follow the steps in the Quick Start guide, and then experiment with a Session of your own. It won’t be long until you’re managing complex
concert setups with much greater ease than ever before.
What you need:
Hardware
1. Waves I/O card: pre-installed in the console
2. Waves qualified SoundGrid Server: A multi-core PC used for real-time audio processing. See a list of Waves-qualifies
servers at http://www.waveslive.com/html/soundgrid-server.aspx
Looking for redundancy? Get a second server.
3. Network switch: standard off the shelf Gigabit switch. See a list of Waves-qualifies switches at http://
www.waveslive.com/html/soundgrid-switches.aspx
4. iLok USB Key: Holds the license for the software and provides secure protection for Waves software. The iLok USB key
must be connected at all times to the host computer.
5. 2-3 x CAT6/CAT5e network cables: Used to connect all SoundGrid units. Available at your local computer store.
Software and Licenses:
1. MultiRack SoundGrid : Preinstalled
2. SoundGrid Server Software: Free and Preinstalled with Waves SoundGrid Server One or available for purchasing if
you use an off-the-shelf server.
Waves Plug-ins: see a list of SoundGrid-compatible plug-ins at http://www.waveslive.com/html/all-plugins.aspx
1-5
Page 6
DiGiCo Waves Operation
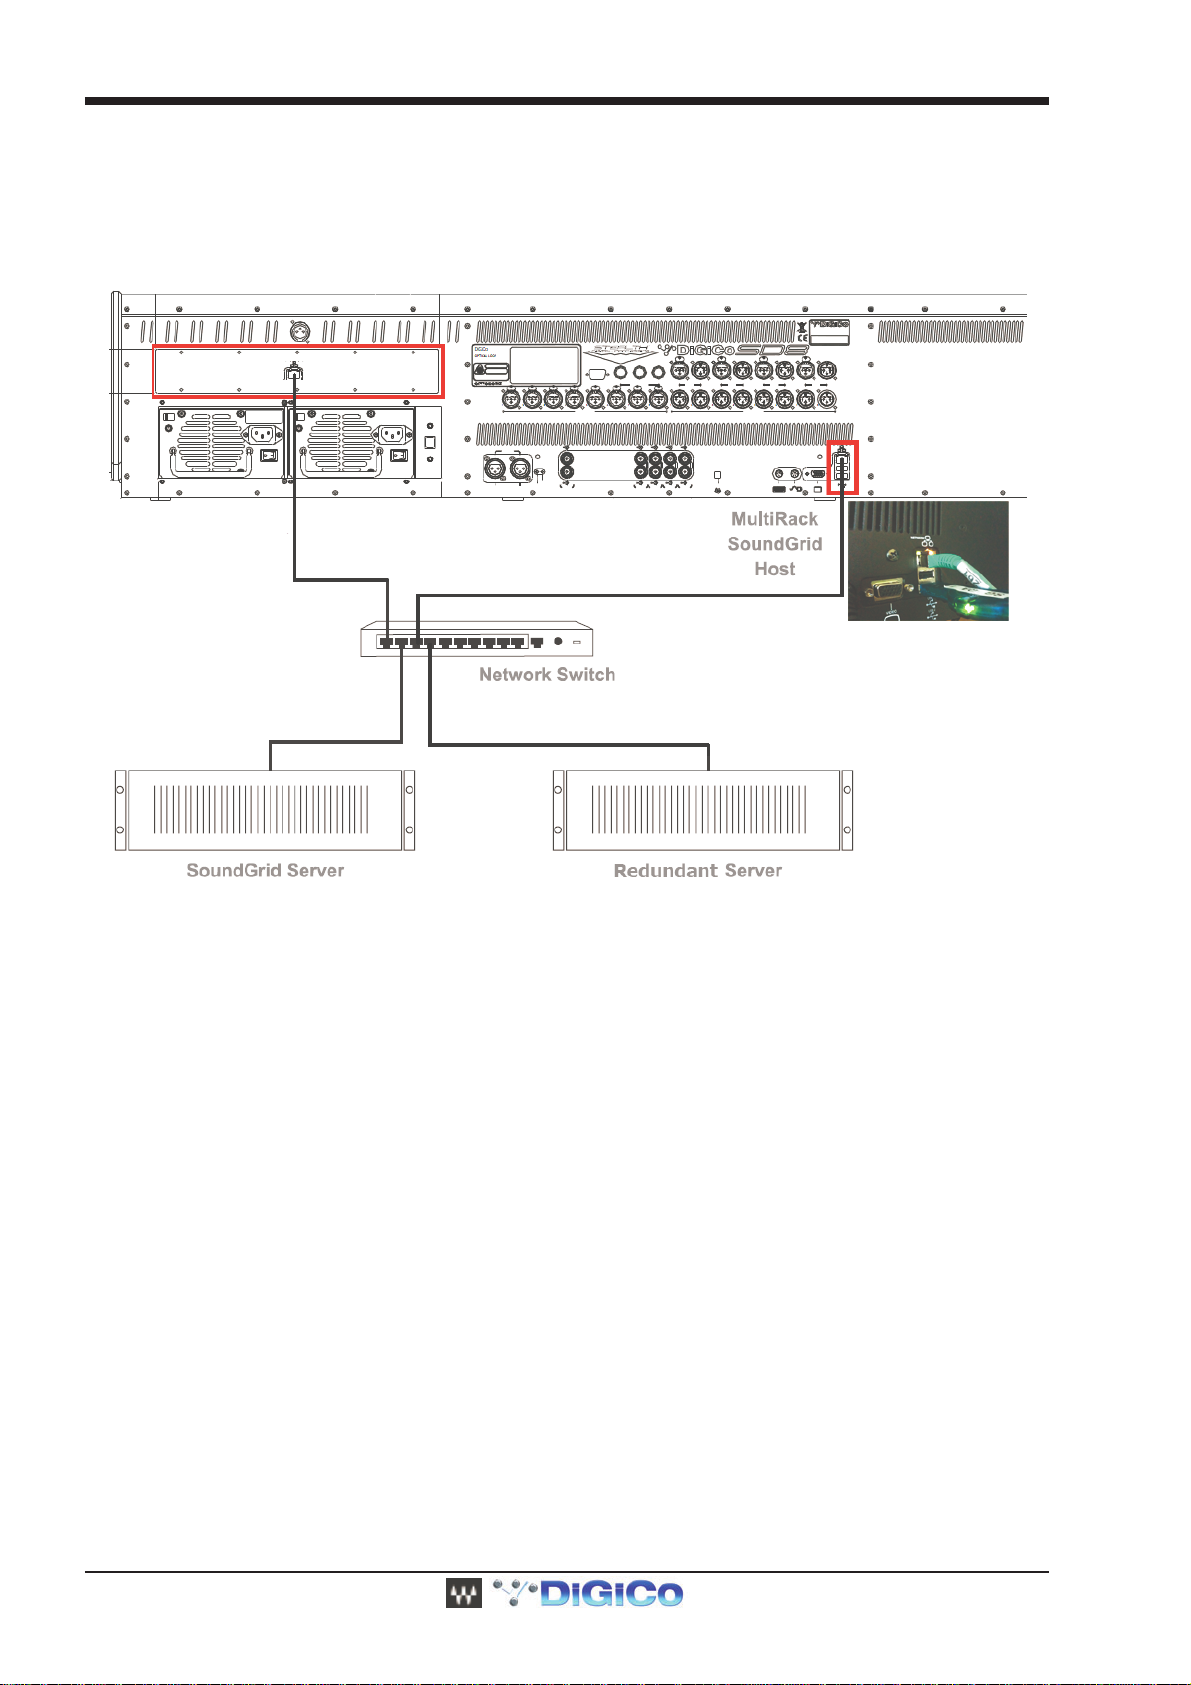
2.1.1 Connect Your Console to the SoundGrid Network ..........
Connect the Waves SoundGrid card Ethernet port to a network switch
Connect the console’s Ethernet port to the network switch with another network cable
Connect SoundGrid server Ethernet port to the network switch with a third network cable
For redundancy: connect the second SoundGrid Server’s Ethernet port to the network switch.
Connect iLok to USB port on the console.
1-6
Page 7
DiGiCo Waves Operation
2.1.2 Set Preferences and Waves I/O...........................................
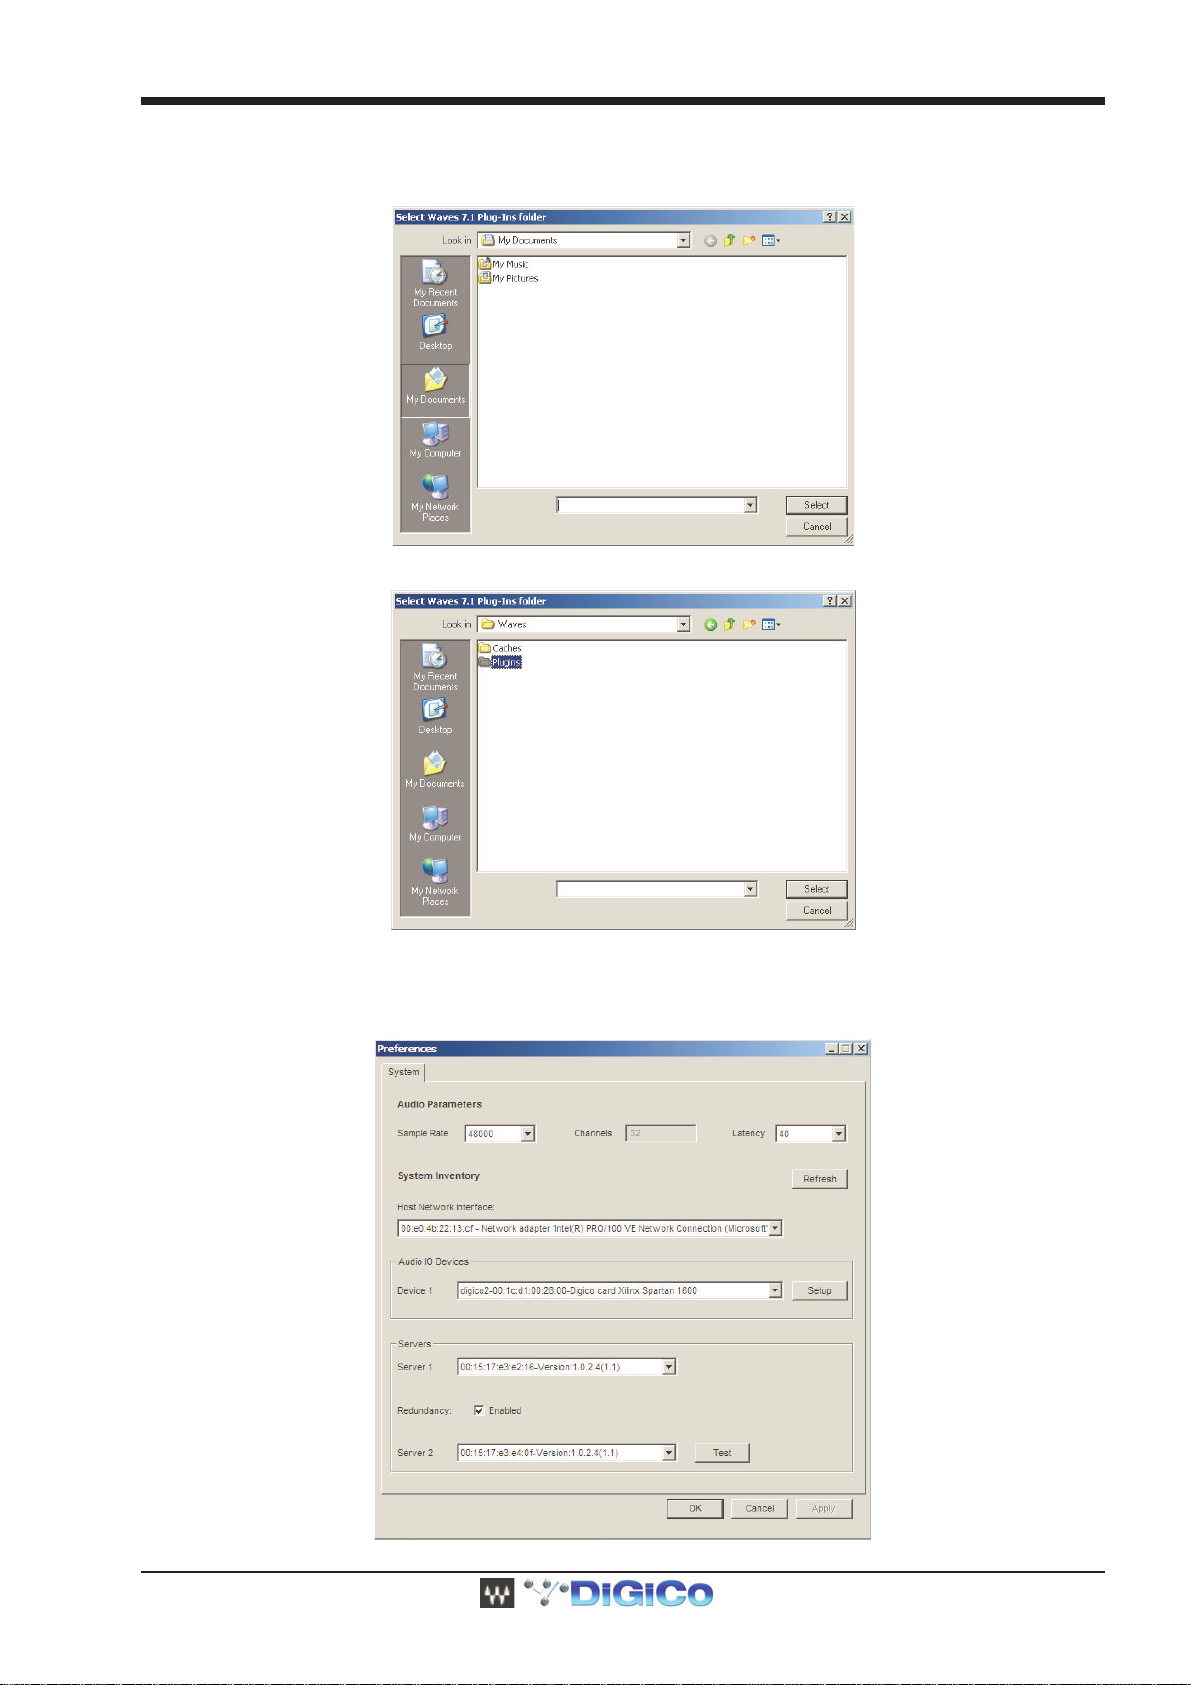
After installing the Waves upgrade kit, if an authorised iLok is connected, when the console software first loads, you will see the following
window which asks you to select your Plugins folder.
Navigate to D:\Waves\Plugins and click the Select button
The Waves Preferences window will now appear.
If the SoundGrid server and network switch are switched on and connected with the appropriate cables, the Waves hardware can defined
in the Audio I/O Device 1 and Server 1. If no Waves hardware is currently connected you can click OK and configure the Preferences
later.
1-7
Page 8
DiGiCo Waves Operation
s
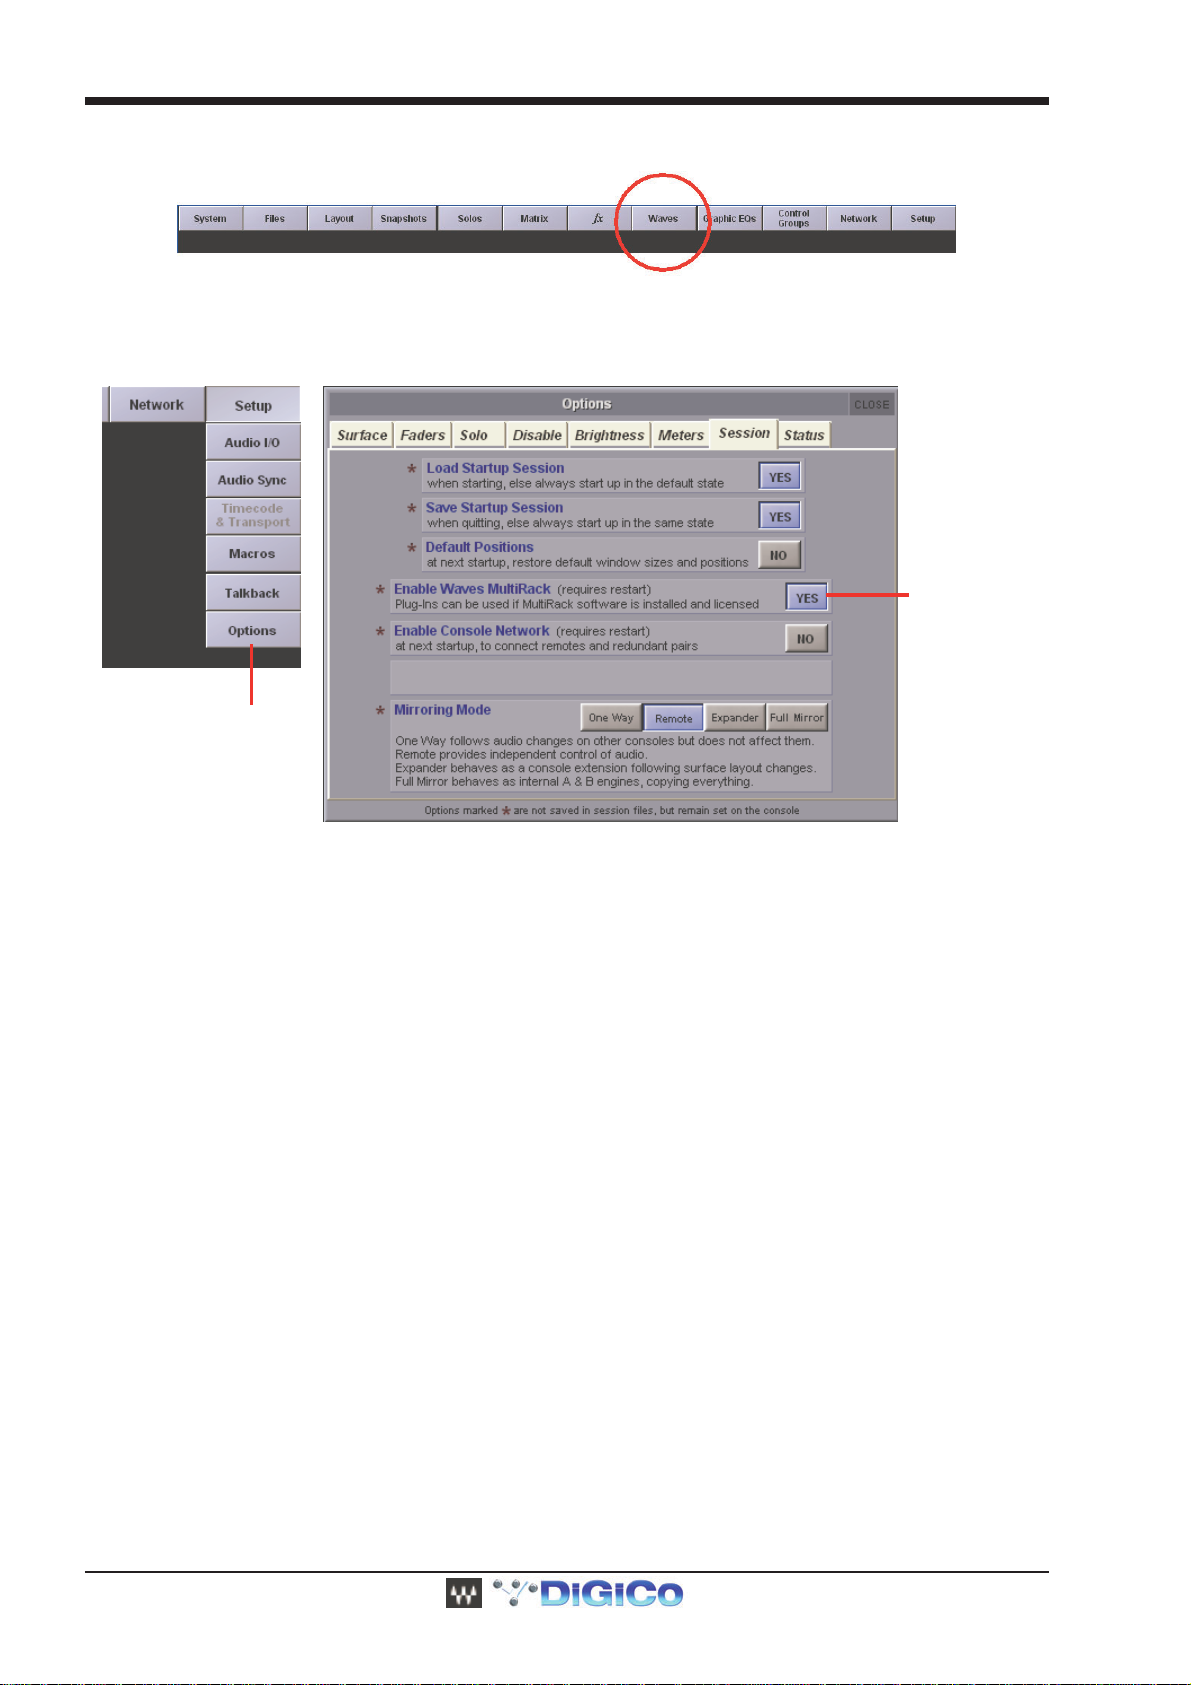
When the Waves option is installed and enabled, the Master Screen Menu’s will include a Waves button. This allows direct access to the
Waves MultiRack. The Option button will move to the Setup Menu.
If there is no Waves button on the Master screen then Waves has not yet been enabled.
Open the Master screen Options panel which is next to the FX button as indicated above and set the Enable Waves MultiRack option to
"Yes". Then Quit To Windows and relaunch the SD application. The Waves button should now be in the menu bar and the Options button
will have moved to the Setup menu as below.
Enable Wave
Press Options
A Session is a collection of Racks, each of which contains plug-in processors. It holds the “architecture” of your setup (input and output
routing, how many Racks, in what order, which plug-ins and their order, etc.), as well as Rack I/O levels and plug-in settings. The
MultiRack Session file is saved alongside your SD session file and is loaded and saved with it.
1-8
Page 9

DiGiCo Waves Operation
et
Waves Inputs
Wave s Ou tputs
Creating, Saving and Loading Sessions with Waves
MultiRack SoundGrid will initially open with a default Session offering 16 processing Racks on the SD8 and SD9 consoles, and 32
processing Racks on the SD7.
Whenever an SD session (filename.ses) is saved or loaded, the corresponding Waves MultiRack session is also saved or loaded.
Waves sessions take the format “filename.mrxs” and are stored in the same Projects folder as the SD session files.
MultiRack mrxs files that have been created independently can be imported directly into Waves MultiRack.
When starting a new session, there is now the option of clearing the Waves Racks, using the Clear Waves button. This will empty the
Waves racks of all inserted plugins. Since routing to and from the Waves racks is handled by the SD application, clearing Waves will not
clear the routing to the Waves racks.
Configuring a Waves Port
On the console’s menu touch Setup > Audio I/O.From the Setup Menu, open Audio IO.
Check ports column on the left, if you don’t see Waves than touch “add port” button and add Waves.
Touch Waves port to turn it blue, you will see 2 added columns of 16 Inputs and Outputs on the SD8 or SD9, 32 I/Os on the SD7.
Add a Port
Select an Input or Output Sock
Naming Waves Racks
Waves Racks are named by selecting either an input or output in the Audio I/O panel and then typing the required name into the white
Socket Name box
1-9
Page 10
DiGiCo Waves Operation
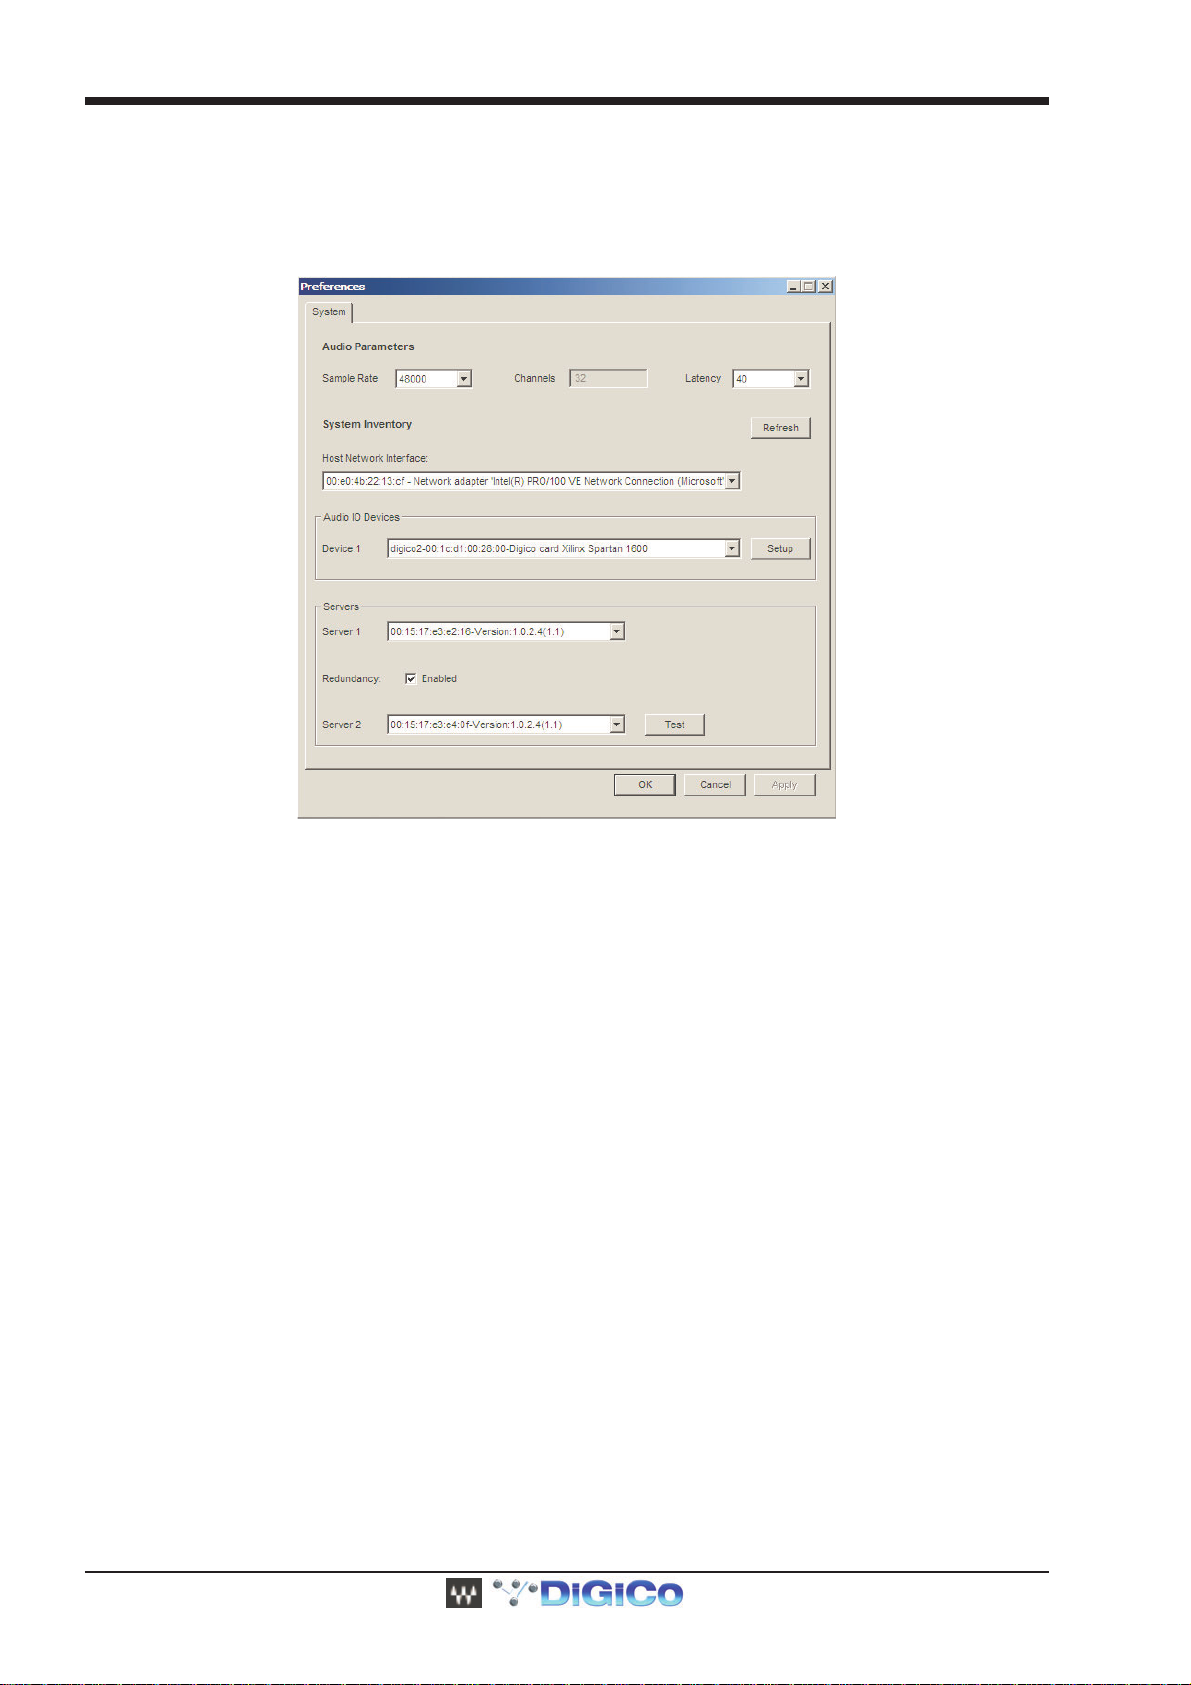
Waves Preferences
Get started by connecting Waves I/O.
Within Waves MultiRack, the connections to the SoundGrid Server (the external Waves processing) and the SoundGrid IO (The option
card fitted to the SD Console) need to be defined.
Within MultiRack, press the Window button and select Preferences
In the Audio IO Devices, and Servers drop-down lists, select the connected devices. ***
The rest of the Preferences can be set later. For more information, please see “Preferences Window: Global Controls”.
1-10
Page 11
DiGiCo Waves Operation
2.1.3 Insert a Rack into a channel ...............................................
Below are two generic examples of how you can use Waves plug-ins in your session, as an Insert and through an Aux.
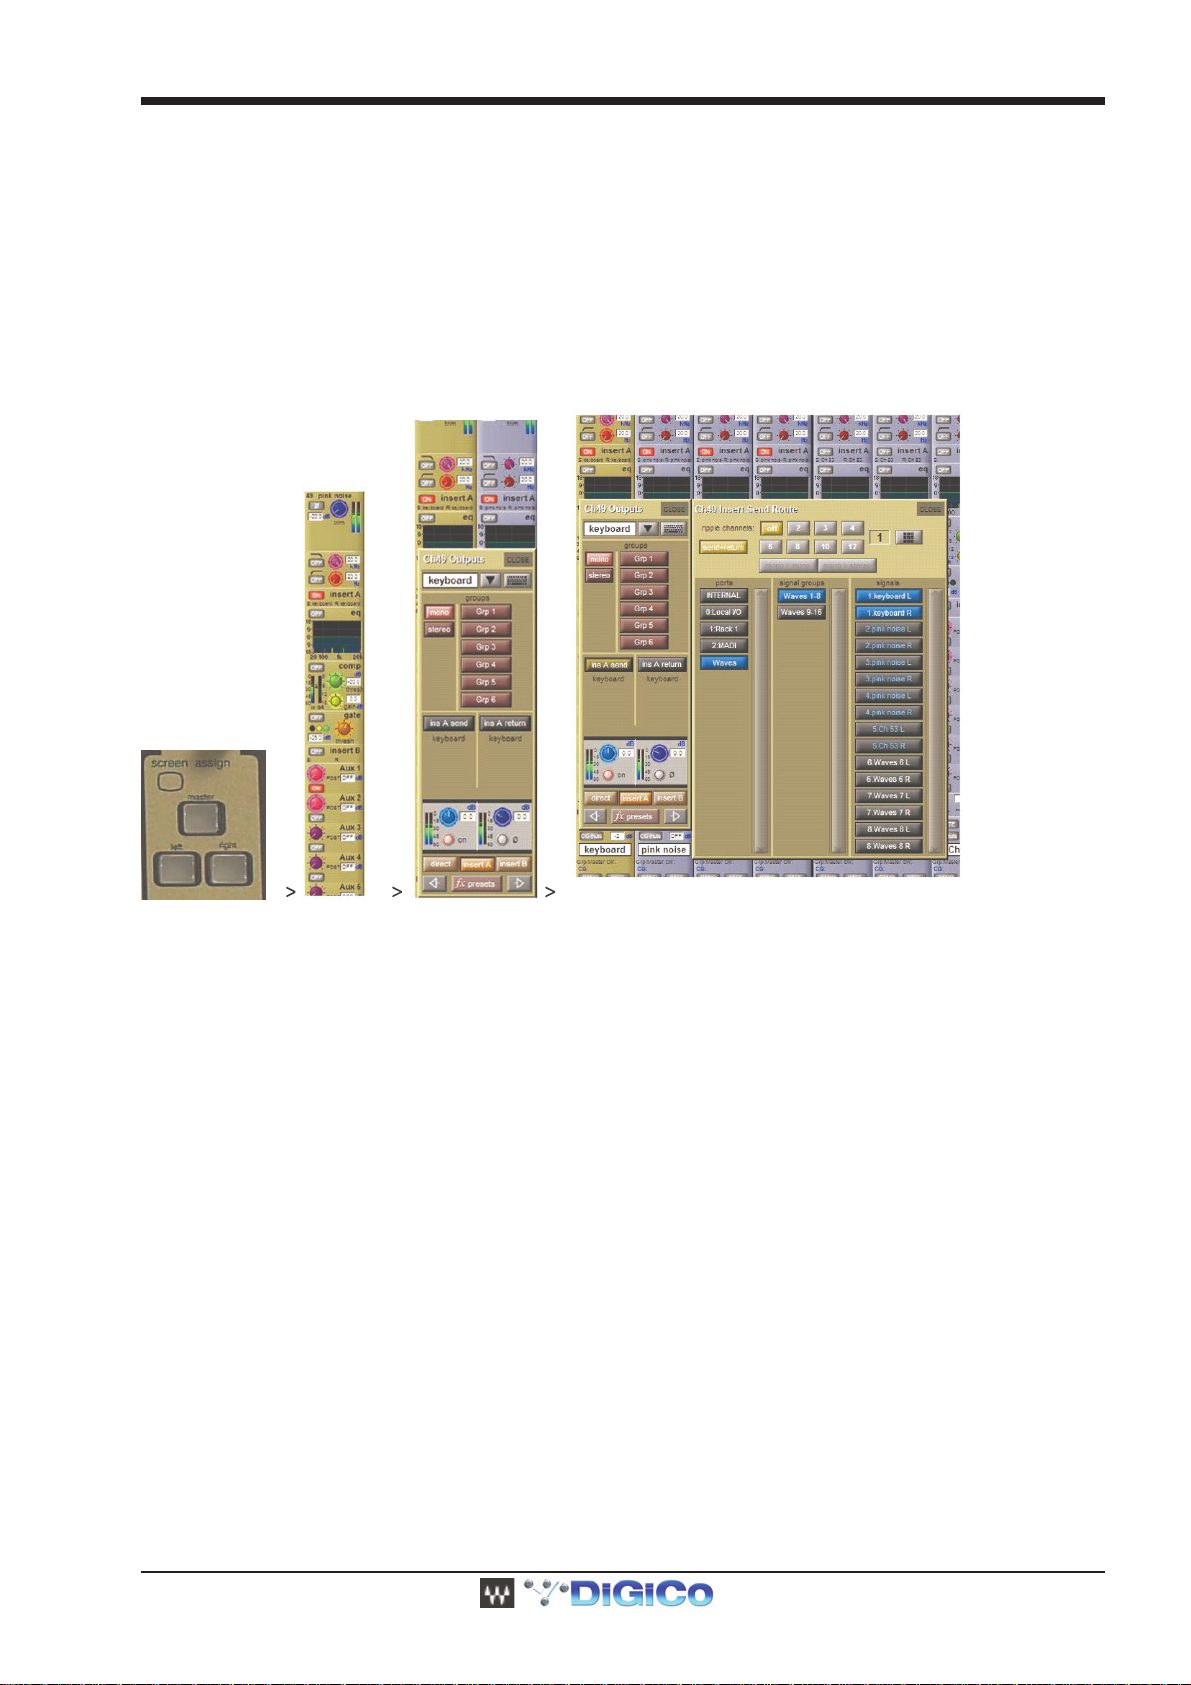
Example 1: Assigning Waves Plugins to a Channels Insert
- Open Channel view by pressing the console’s “Screen Assign” Left or Right button.
- Select the desired channel, then touch Insert area to open sub-menu.
- Touch Insert A to open routing.
Set Routing
- In the Ports column, choose Waves.
- Choose the desired Signal Group.
- Under Signals, choose the desired Waves I/O.
1-11
Page 12

DiGiCo Waves Operation
Example 2: Setting Rack as Parallel FX
a. FX Send
- Open Master channel view by pressing the Screen Assign on the console’s centre section.
- Select the desired Master channel. In the below example we will set Mono Aux 1.
- Touch Outputs to open the routing panel.
Set Routing
- In the Ports column, choose Waves.
- Choose the desired Signal Group.
- Under Signals, choose the desired Waves I/O.
b. FX Return
1-12
Page 13

DiGiCo Waves Operation
Open Channel view by pressing the console’s “Screen Assign” Left or Right button.
- Select the desired input channel for FX RETURN, then touch Input area to open sub-menu.
- In the Ports column, choose Waves.
- Choose the desired Signal Group.
- Under Signals, choose the desired Waves I/O (the same Rack that has been assigned for the FX SEND).
1-13
Page 14

DiGiCo Waves Operation
2.1.4 Rack types: Stereo, Mono, Mono to Stereo.......................
Similar to outboard gear, the Waves Racks are configured to work in different modes:
Stereo processing: stereo channel insert, master, stereo groups, stereo in-ears
Mono processing: individual mono channels, mono Aux EQ’s etc..
Mono to Stereo: reverbs, delays etc…
There are 2 new buttons in the routing panel, just beneath the ripple route controls. These are mono > mono and mono > stereo
When routing a mono channel to a Waves rack, the signal can be routed to either the left side of the Waves rack, by selecting the mono >
mono function; or to both sides of the Waves rack, by selecting the mono > stereo function. If a stereo channel is routed to a Waves rack,
the left and right sides of the source channel feed the left and right sides of the Waves rack.
When a mono source is routed to a Waves rack, MultiRack will display that rack with a single mono input. Note that, depending on the
plugins inserted into the rack (ie. Reverbs) , the output of the rack may still be stereo. If this mono in, stereo rack is used as an insert on a
mono channel, only one side of the racks stereo output will feed the channels mono insert return.
If routing 2 mono channels to the Left and Right sides of a single Waves rack, a combination of ripple routing 2 channels and mono >
mono routing will achieve the desired result.
Waves Racks types are set by default through Console’s routing:
Depending on type of input (mono or stereo) Waves will automatically load the correct Rack type.
For Mono to Stereo configuration ( Reverb) turn on mono>stereo button
1-14
Page 15

DiGiCo Waves Operation
2.1.5 Add Plugins for sound processing ....................................
Once you’ve inserted, it’s time to add plug-ins to each Rack. A Rack can hold up to eight plug-in processors, and the signal will always
flow from left-to-right.
Touch the “plus” (+) sign near the Input Fader to add a plug-in from the pull-down list. Plug-ins are organized by type of processor. Add
another plug-in by touching on the “plus” button to the right of the first plug-in, and so forth. You can always rearrange the plug-in order
touching a processor and dragging it to the desired position.
As with the SD Internal FX, the control of the plugin parameters is handled using the Master screen Touch n Turn controller.
Parameters that are continuously adjustable are mapped to the touch n turns rotary control
Stepped parameters can be controlled using the touch n touch button, or rotary controller.
To view a plug-in and adjust its parameters, double touch (1st touch to select, 2nd touch to open) on the box representing it. The plug-in’s
interface will appear below the Rack.
1-15
Page 16

DiGiCo Waves Operation
This view is called Rack View.
Set the plug-in parameters as desired. At the top of the interface of all Waves plug-ins is the Wave System toolbar, which is used to load
or save your favorite settings for that plug-in. Learn more about the Wave System Toolbar in this manual’s section entitled “Rack View:
Using Your Plug-ins.”
To exit Rack View and return to MultiRack SoundGrid window, double-click on any empty area at the top of the Rack (if you’re using the
mouse), touch the red [X] button on the left or press the [Esc] key (if you’re using a keyboard). To move to another plug-in interface, simply
touch the plug-in you’d like to see. You can also navigate between the plug-ins in a Rack by using the left/right arrows on your keyboard.
To delete a plug-in, right click on it (with the mouse) and choose Remove Plug-in, or drag it out of chain.
2.1.6 Snapshots.............................................................................
A Snapshot is sort of a “super preset,” a picture of all of the Racks in your MultiRack SoundGrid Session. It contains the following
parameters:
· Rack input and output gain
· Rack in/out and mute states
· Current plug-in parameters
Snapshots are contained and saved as part of a Session file and are synchronized with the console’s snapshots.
1-16
Page 17

DiGiCo Waves Operation
Use Snapshots to change the state of Racks (mute/out), levels, and most importantly, the settings for the plug-ins. Snapshots do not
change the physical configuration of a Session, so you cannot use a Snapshot to change Rack routing, the Rack order, or the plug-ins in a
Rack. However, since Snapshots can take plug-ins in and out of the processing path, you can insert several plug-ins into a Rack, and then
control which are in use in specific Snapshots.
Snapshots are viewed in the Snapshot Pane. To open this window, select “Open Snapshot Pane” from the Window menu.
We’ll discuss the Snapshots Pane in greater detail later in this manual. For now, it’s sufficient to know that first you should set your I/O
levels and plug-in parameters as desired, then store the snapshot on your console as usual.
Storing and recalling a snapshot is done using the console’s Snapshots window you are already familiar with.
Within the SD snapshot recall scope, it is possible to enable and disable the recall of Waves snapshots, per SD snapshot.
2.1.7 Create Processing Groups..................................................
Since MultiRack SoundGrid allows you to use up to 16 Racks (SD8 and SD9) or 32 Racks (SD7), each of which are specific processing
chains, you may choose to organize related Racks into groups to better manage your Session. Grouping Racks offers a few advantages
- Group related Racks together (such as all drum channels), and they will share a common group name.
- Groups are colour-coded, making visual identification of similar Racks much easier.
- Grouped tracks can be latency-aligned, offsetting unequal delays caused by each channel’s chain of plug-ins, which may have
different latencies.
1-17
Page 18

DiGiCo Waves Operation
Create a group by touching the grouping pull-down menu and choosing Open Group Properties window. Here you create Rack groups
and determine if and how Racks within the group will be latency-aligned.
In this example, we named the group “Drums.” Each new group is automatically assigned a color. (We will discuss latency alignment in
more detail in the section “Group Properties Window: For Organization and Latency Alignment.”) For now, choose Auto, which sets the
latency of all Racks in the group to match that of the Rack with the greatest latency.
Touch “Apply” and close the window.
To add more Racks to a group, touch the grouping pull-down menu, where the group name will appear, and then select the group that you
want the Rack to belong to
2.1.8 Saving in MultiRack Soundgrid..........................................
MultiRack SoundGrid offers four different levels of “Save,” enabling you to quickly and confidently store and recall needed Session
information. From most specific to most general, here are your options for saving information:
· Per Plug-in: Each plug-in has its own Wave System Toolbar, so you can load and save your favourite plug-in settings without
affecting the rest of the processing environment. Say you have a C4 preset that you’d like to use for the bass. Simply load the
preset from the C4’s Wave System Toolbar’s Load menu. Plug-in ·
Per Rack: There’s a Wave System Toolbar at the top of each Rack, so you can load and save settings for an entire Rack,
independent of the Snapshots. Plug-in settings can be saved to an external USB key and loaded into another console, given that
the same plug-ins are installed and authorized on both consoles.
· Sessions hold the settings for every plug-in and all Racks. MultiRack Sessions are saved alongside the console’s Session file
and are loaded in synchronization when the corresponding console Session file is loaded.
· Snapshots hold the settings for every plug-in and Rack, and contain the information about the architecture and signal flow for the
entire setup. Snapshots are created and stored on the console main Snapshot window.
The chart below illustrates the relationship between Functions and Snapshots/Presets/Session Management – within the Waves
Multirack and DiGiCo system.
1-18
Page 19

DiGiCo Waves Operation
Plugin Rack Sessions Snapshot
Rack Routing
Rack input and
output gain
Rack in/out and
mu t e stat es
Pl ugin s chain
and parameters
Only preset for
individual plugin
- - - All Racks
- Single Rack All Racks All Racks
- Single Rack All Racks All Racks
All Plugins in
sing l e rack
All Plugins All Plugins
2.1.9 Recall Safe Mode..................................................................
There are times when you don’t want certain Racks or specific plug-ins to be affected by Snapshot changes. The Recall Safe Mode
allows you to select the Racks and/or plug-ins that won’t be affected as you change Snapshots that would normally affect them. The
recall-safe option applies within the Session (not a specific Snapshot).
To set a Rack or plug-in to Recall Safe:
-· Touch the Recall Safe On button in the Snapshot pane.
- Racks: Select a Rack or multi-select several Racks, then touch the Set button. A Rack’s blue input/output rails indicate
that in the Rack is Recall Safed.
- Plug-ins: Select the plug-in or plug-ins you want to set to Recall Safe. Touch the Set button. Recall Safe plug-ins glow
blue.
-· To remove a Rack or plug-in from Recall Safe mode, select the Rack or plug-in and touch the Set (now labelled Unset) again.
-· Plug-ins or Racks that are set to Recall Safe can be edited. However, their Recall Safe status can be viewed only while in Recall
Safe mode.
-· Turning Recall Safe on in the Snapshots pane does not activate or deactivate Recall Safe. Rather, it only allows you to see plug-
ins and Racks and set them to Recall Safe. When you turn Recall Safe mode off, Racks and plug-ins which have been Recall
Safe remain so; they just don’t glow blue.
1-19
Page 20

DiGiCo Waves Operation
2.1.10 Overview Window: Viewing Rack Status ...........................................................................................
Once you’ve filled several Racks, you’ll want a convenient way to keep track of everything happening within your processing environment.
To get an overview of your Racks, select Overview from the View menu. This will reveal the Overview Window, where you’ll see a
condensed view of each Rack.
The Overview Window tells you if a Rack or an individual plug-in is functioning, and it enables you to turn on or off, bypass, or mute a
Rack. Clipping is also indicated for each Rack.
Use the Overview Window when you want to keep an eye on the entire processing setup. Since each mini-Rack in the Overview Window
displays clipping information, you can easily watch out for over-level clipping across your entire setup.
1-20
Page 21

DiGiCo Waves Operation
2.1.11 Controlling MultiRack SoundGrid by Touch Turn .........
Controlling Plugins
- Touch plugin for full view.
- Touch the parameter you want to adjust; a yellow outline will appear on your selection.
- On your console, use the Touch-n-Turn knob to adjust settings.
Note: you can adjust plugin parameters by touch also, but for more precise operation we recommend using the “Touch-n-Turn” surface’s
controls.
Each and every Waves plug-in has a dedicated Manual explaining applications and controls.
For Easy Access – select the Question mark(?) and the plug-in manual will appear.
All manuals can be downloaded from Waves website,
2.1.12 Show Mode .........................................................................
Show Mode is a “safe mode,” used during performances, that lets you adjust parameters within plugins, but not change routing, configuration, and other settings that could cause problems in a live situation. When Show is selected you’re locked out from much of the interface.
To Switch between Setup and Show modes, go to the Master view->System tab->Security and switch between Setup and Live.
When choosing Setup, MultiRack will switch to Setup mode, When choosing Live, MultiRack will switch to Show Mode.
1-21
Page 22

DiGiCo Waves Operation
2.1.13 Automatic Recovery...........................................................
As MultiRack SoundGrid is an application for live usage, it is equipped with an automatic recovery mechanism. This means that if
MultiRack SoundGrid quits unexpectedly, it will automatically re-launch and re-open the same Session file it was running when it crashed,
with the same Snapshot that was recalled when the crash occurred (if applicable). While MultiRack SoundGrid re-launches itself,
streaming and processing audio continues without interruption; only user control is lost until MultiRack SoundGrid reloads its Session.
Any signal routed to Waves is output direct from the SD engine into the SoundGrid IO Card (fitted to the SD Console). It then passes
through the network connection to the SoundGrid server for processing, and then returns back to the SoundGrid IO Card and into the SD
engine.
If the SD application detects that any part of the SoundGrid system is not longer able to pass audio, or communication with any element of
the SoundGrid system is lost, the SD engine automatically places the Waves IO port into loopback mode.
While loopback is enabled, audio will return to the console as routed, but without any processing applied (ie.. the correct signal, but
without EQ, dynamics, reverb etc)
When the SD application detects that normal SoundGrid operation has resumed, loopback mode is released, and the audio returning from
the Waves routing will be processed as required.
There may be a short mute period when loopback is enabled or disabled.
1-22
Page 23

DiGiCo Waves Operation
3.1 MultiRack SoundGrid Windows and Controls Explained
In this section, we take a look at each of MultiRack SoundGrid’s windows in greater detail. If you’ve not read the first section of this
manual, “MultiRack SoundGrid Quick Start,” please do so before continuing. There are terms and concepts discussed in the Quick Start
that are essential to understanding MultiRack SoundGrid workflow.
3.1.1 Status Bar .............................................................................
At the top of the interface, above all of the Racks, is the Status Bar, with which you view modes and monitor system status. This information bar is visible from any view.
Audio On/Off LED Indicates audio engine on and off status.
Show/Setup LED Indicates Show or Setup modes in correspondence to the SD Live/Setup modes
Sessions Menu
Import or Export Sessions - Only plug-in and Rack settings are exported between sessions (snapshots and other settings are not
exported).
View Menu
Use to switch between Main View, Rack View and Overview.
Main View Mode – Default view displaying 16 Racks (on SD8/9) or 32 Racks (SD7) and Inserted Plug-ins.
Rack View Mode – Displays the selected Rack, its housed plug-ins and the selected plug-in interface and controls.
Rack Overview Mode – Displays all racks in a single window, offering a convenient way to keep track of everything happening within your
processing environment.
Window Menu
Open Snapshot pane - Displays a side pane for managing snapshots
Group Properties - Opens the Group Properties window for latency management of grouped Racks
Show System monitor - Opens the System Monitor window to display real time status info on your SoundGrid network, I/O devices, and
Servers.
Preferences - Contains global settings for SoundGrid and MultiRack
Advanced menu
Used for debugging and troubleshooting only!
Message area
Error and alert messages are displayed in this area
SYS (system resources meter)
This meter displays MultiRack SoundGrid’s overall system resources consumption, as a percentage and in color. A red indicator indicates
significant audio dropouts. This warning will hold for one second.
1-23
Page 24

DiGiCo Waves Operation
3.2 A Quick Look at the Windows
The MultiRack SoundGrid interface consists of just five windows, each of which displays details about your Session. Here is a brief
description of the windows, after which each will be described in more detail.
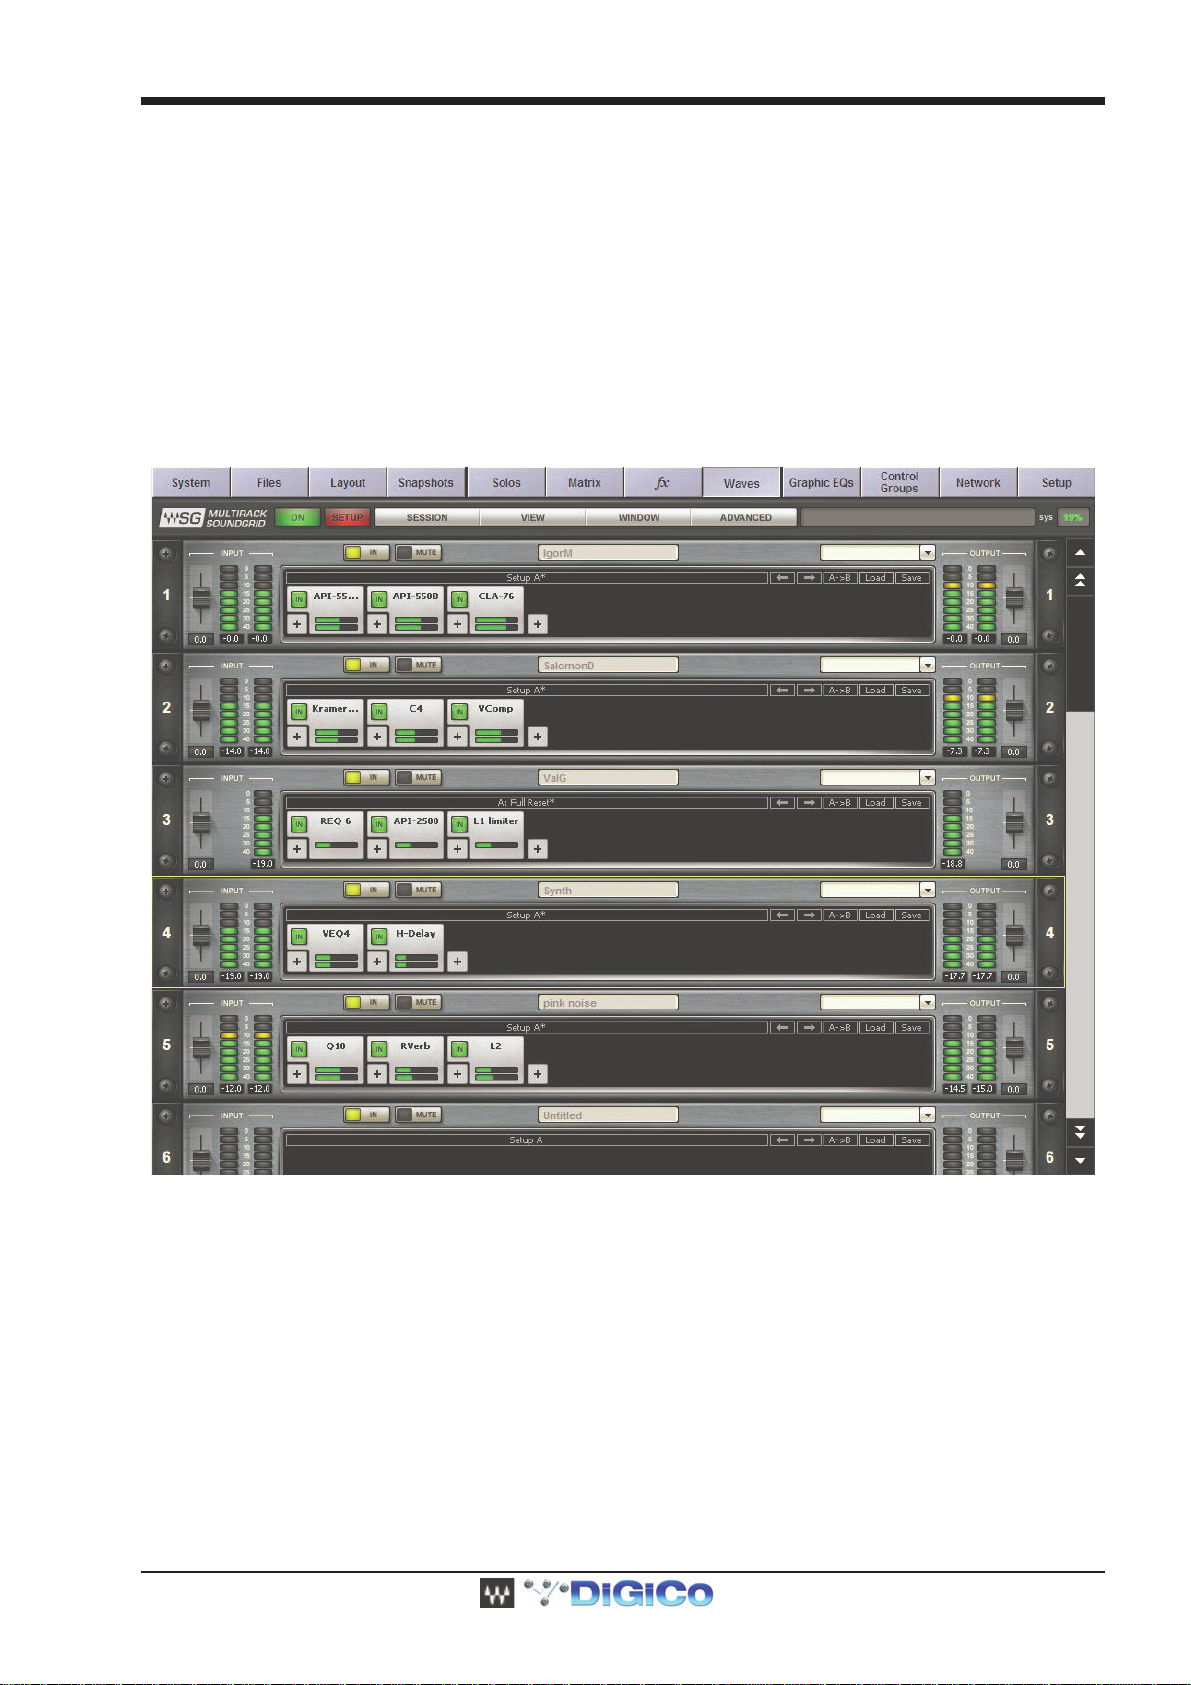
MultiRack SoundGrid Window
This is the main user window, where Racks are connected and controlled. Here you select Racks, fill Racks with plug-ins, adjust levels,
and generally get organized.
Rack View Window
This window opens when you double touch on a plug-in within a Rack. It displays the selected plug-in interface, as well as the Rack where
it’s located. This is where you edit plug-in parameters, import your favourite plug-in presets, and control the levels of individual plug-ins. In
this view, each plug-in has its own Wave System toolbar for loading and saving plug-in presets.
1-24
Page 25

DiGiCo Waves Operation
Group Properties Window
Here you group sets of Racks for easier organization and to adjust for latency alignment between the group’s Racks.
Snapshots Pane
Lists all Session Snapshots and allows Snapshot Recall Safe and Global Paste operations
1-25
Page 26

DiGiCo Waves Operation
Preferences Window
Contains global settings that affect the MultiRack and SoundGrid. This window is accessed from the Window menu.
3.3 The Windows in Detail
3.3.1 MultiRack SoundGrid Window: Setting Up .......................
This is the window where you’ll probably spend most of your setup time. It’s here that you build Racks of processors.
Racks are stacked one below another; there are no unoccupied slots between Racks. By default, MultiRack SoundGrid opens 16 or 32
empty Racks.
To select a Rack, touch anywhere on the Rack.
To select multiple Racks, Ctrl +Click on the Racks you want to select (using a mouse), or click/draw a rectangle over the contiguous
Racks you want to include.
1-26
Page 27

DiGiCo Waves Operation
3.3.2 The Rack Control Strip ........................................................
At the top of each Rack is its control strip allowing you to control the Rack and assign it to processing groups. The control strip has the
following windows and buttons:
this view, each plug-in has its own Wave System toolbar for loading and saving plug-in presets.
In/Out
Disables the Rack’s plug-ins and passes the signal directly from Rack input to Rack output. Typically used for “before and after” comparison or to bypass processing.
Mute
Silences the Rack, but doesn’t remove it from CPU processing. Muting is performed on the Rack’s input to allow reverb tails and delay
taps to fade gracefully.
Rack Name
Displays the Rack’s name as entered on the SD channel it’s inserted into, or the channel name to its output the Rack is routed.
Group Name (“Drums” in this example)
Refers to the name of the processing group, if any, to which the Rack has been assigned. Use the pull-down menu to assign the Rack to
another processing group.
3.3.3 Selecting Racks and Using Keystroke Commands ..........
You can copy, paste, delete, duplicate, and perform other operations on a Rack or Racks you have selected.
- To select a Rack, touch any empty area of the Rack.
- To select multiple adjacent Racks using a keyboard, click on a Rack, then Shift+Click on the most distant Rack of the group you
want to select.
- To select multiple non-adjacent Racks using a keyboard, Ctrl+Click on several Racks.
Using a mouse, right click on the top part of a selected Rack and you will see a pull-down menu that offers several functions:
Active (On)
The Rack is always active.
Bypass
Disables the Rack’s plug-in processing and passes signal from Rack input to Rack output.
Mute
Mutes entire Rack but doesn’t remove plug-ins from CPU.
Global Paste Rack
Copies the Rack’s parameters from the recalled Snapshot and pastes them into the selected Snapshots when “Global Paste” is selected
in the Snapshot Pane. For example, if your singer has a cold and you need to EQ the vocals differently, Global Paste allows you to change
specific settings, then embed these parameter changes into all of the Snapshots you’ve made, rather than having to adjust each Snapshot
separately. The Global Paste function is discussed in detail in the “Snapshots” section of this manual.
Recall Safe
Places the selected Rack or plug-in into a “safe” mode that protects it from Snapshot recalls. Recall Safe Racks or plug-ins are unaffected
by all Snapshot recalls, even if a Snapshot has parameters that should be changed on Snapshot recall This command is allowed only
when Recall Safe Mode is selected in the Snapshots menu.
Assign the Rack to a processing group
Presents a list of available processing groups from which to choose.
Latency
Displays the Rack’s overall latency (accumulated inserted plug-in latencies)
CPU Consumption
Displays the Rack’s CPU consumption (usage) on the SoundGrid Server and the core it runs on
1-27
Page 28

DiGiCo Waves Operation
3.3.3 Input and Output Sections..................................................
To the right of the Input Rail is the Input Audio Fader, with a range of ±18dB.
On the far right side of each Rack are the Output Rail and the Output Audio Fader. Rack audio input and output levels are stored within
Snapshots.
3.3.4 Adding Plug-ins to a Rack ..................................................
To add a plug-in to a Rack, touch the “plus” (+) sign to the right of the Input Fader. Select a plug-in from the pull-down menu. An icon
representing the plug-in will appear on the Rack, along with a new small arrow that you can touch to add a new plug-in to the right of the
existing one.
Signal flow within a Rack is always from left-to-right.
While in the Main view (or Rack view), you can always change the plug-in sequence within a Rack by grabbing a plug-in and dragging it to
the desired location. Each plug-in icon has an In switch with which you can bypass that processor without disengaging it from the Rack.
There is also a level meter on the icon that shows plug-in output level.
3.3.5 Rack View: Using Your Plug-ins .........................................
Double touch on a plug-in’s icon to open its interface and enter MultiRack SoundGrid’s Rack View.
Here you adjust each plug-in parameters by selecting the parameter on screen and using the Touch-n-Turn knob or toggle to set the
selected parameter. If you’re already familiar with Waves plug-ins, this window will be very easy to use. At the top of each plug-in’s window
is a Wave System Toolbar, used to load, save, and compare processor settings. The layout of the WaveSystem Toolbar may vary from
one plug-in to another. Use this toolbar to save plug-in or Rack-specific presets.
1-28
Page 29

DiGiCo Waves Operation
3.3.6 Waves System Toolbar Buttons .........................................
Setup A (Setup B)
Toggles between two setups, allowing you to compare different settings. This facilitates quick A/B comparisons and lets you determine
which of two settings works best without having to save a preset. An asterisk (*) on the button indicates that changes have been made
since a preset was loaded.
A>B; B>A
Copies the current settings to the second setup register. The direction of copying is from the currently shown setup to the one not shown.
Load
Here you load factory presets, user presets, and other preset files. Factory presets are permanent elements of the Load popup menu,
created by Waves. They cannot be changed or deleted. You can turn the current settings of the plug-in you’re using into a user preset by
clicking the Save button. User presets can be changed and deleted, and the preset files you save through the toolbar will appear as Load
menu presets until you close the preset file or close the plug-in. Some plug-ins have a very large library of presets, too large to display on
the main pull-down menu. To load these library files or load presets from external files, select “Open Preset File.” Waves preset files are
saved with an .XPS extension
Save
Save your plug-in presets here. You can save the current parameters as a user preset in the Preset menu, or create a new file. If you
choose to save the preset as a new file — outside the plug-in’s Preset menu — WaveSystem will ask you where you want to put it.
Clicking on the Waves logo will bring up the “About This Plug-in” page, providing information about the plug-in.
There are several quick ways to move from one plug-in to another within a Rack:
- Use your keyboard’s left and right arrows. This will move you through the list of plug-ins in the Rack, opening each plug-in
interface as it is selected. Note: If you have selected a parameter for editing on the current plug-in , this will not work, and may
change the parameter value instead.
- Touch another plug-in icon. This will move you directly to the new plug-in and open its window.
3.3.7 Group Properties: Organisation & Time Alignment .........
This window allows you to group several Racks together. Racks often have something in common, and it may make sense to assign all of
these similar Racks to a group. Grouping all of the channels of your brass section, or drums, or audience, then assigning these groups a
color, helps you to keep track of Racks in concert situations. Also, each track will display the name of the group, further aiding quick visual
organisation.
Plug-ins may impose a delay (known as “latency”) as signal passes through them. Often, this is not a problem. However, there are times
you will want to time-align all of the Racks in a group, to compensate for different processor latencies that may cause phase-related
problems.
1-29
Page 30

DiGiCo Waves Operation
Use the Group Properties window to create groups of Racks and align their latencies. Open this window from the pull-down menu
located at the top of a Rack or from the Window menu.
In the Group Properties window, you can create up to 16 processing groups, each of which can contain any number of Racks.
Create a group by double clicking on a Group Name cell and typing the name you want to assign the group (using the external keyboard).
Now, decide how you want to align the processors within the group.
None
A group is created, but there is no latency alignment.
Auto
The group is delayed to match the latency of the Rack in the group with the greatest total latency.
Manual
Manually delay the group by a specific value by entering it in the Latency field. The value is displayed in samples, milliseconds, meters or
feet, depending on your choice in the pull-down window. The minimal value allowed for this setting matches the latency of the Rack in the
group with the greatest total latency.
Groups are color-coded to make for easier identification. Color selection is based on placement in the list, and is not user-definable. At the
bottom of the Group Properties page is the Align All section.
Here you can align all of the groups of Racks in order to create a unified timing for all channels. The Auto setting will offset all of the
groups to match the timing of the group with the greatest latency, while Manual will delay all groups by a specific value.
Below the Align All section is the “Speed of Sound” setting. This parameter control, expressed in meters per second, allows you to
calibrate MultiRack SoundGrid’s latency controls to match measured speed of sound. The speed of sound at sea level, at a temperature of
20 degrees Celsius and dry air, is 343 meters per second.
1-30
Page 31

DiGiCo Waves Operation
3.3.8 Snapshot Pane: Automating Your Racks ..........................
Snapshots contain the following parameters:
- Rack input and output gain
- Rack in/out, mute and on/off states
- Current plug-in parameters
Snapshots are contained and saved as part of the Session file and are displayed as a vertical play list.
Use Snapshots to change the state of Racks (Mute/In/Off), levels, and, most importantly, the settings for the plug-ins. Snapshots do not
change the physical configuration of a Session, so you cannot use a Snapshot to change the audio I/O, the Rack order or the plug-ins
embedded in a Rack.
To open the Snapshot Pane (fig. a), select Open Snapshot Pane from the Window menu (Ctrl+Shift+O).
To save a Snapshot of your existing Rack environment, use the console’s snapshot management window (fig. b) (add Waves to the
snapshot’s scope). MultiRack’s snapshots are given the name of their corresponding SD snapshot.
Note that selected Snapshots are highlighted, and the currently recalled Snapshot’s name appears in boldface and its number is highlighted in green. At the bottom of the pane is an area where you can write notes about the selected Snapshot.
3.3.9 Global Paste and Recall Safe modes .................................
There are times when you don’t want certain racks or specific plug-ins to be affected by Snapshot changes and there are times that you
wish to apply a setting of Plug-In rack across several Snapshots.
The Global Paste and Recall Safe are the tools that provide you that ability
1-31
Page 32

DiGiCo Waves Operation
Global Paste
Global Paste enables you to copy a plug-in’s or a Rack’s parameters into one or more other Snapshots. This is useful when you’ve set up
several Racks filled with plug-ins and you decide to change plug-ins settings across several Snapshots.
1. Recall the snapshot from which you want to copy settings.
2. Touch the Global Paste “On” button.
3. Select the target Snapshot or Snapshots that you want to modify. To select multiple Snapshots,
Ctrl +Click on the desired target Snapshots, or Shift+Click to select several contiguous Snapshots. (using a mouse)
4. In the Rack windows, select the plug-in or Rack whose state you want to copy to the selected Snapshots. Right-click on the plug-in and
choose Global Paste Plug-in/Rack from the menu or touch the “Apply” button. Repeat this for each of the plug-ins or Racks whose
settings you want to Global Paste.
5. Touch the Global Paste button “On” in the Snapshot Pane once again to turn this mode off and end the process.
Recall Safe
Recall Safe Mode allows you to select the Racks and/or plug-ins that won’t be affected as you change Snapshots that would normally
affect them. The recall-safe option applies within the Session (not a specific Snapshot).
1. Turn Recall Safe Mode “On” in the Snapshots Pane
1-32
Page 33

DiGiCo Waves Operation
a) Racks: Select a Rack or multiple racks you want to set to Recall Safe. Touch the “Set” button or Right click on any of the selected
Racks and choose Recall Safe from the pull-down menu. Recall Safed Racks glow blue:
b) Plug-ins: Select the plug-in you want to set to Recall Safe. Touch the “Set” button or Right click on any of the selected plug-ins
and choose Recall Safe from the pull-down menu. Recall Safe plug-ins glow blue:
c) To remove a Rack or plug-in from Recall Safe mode, select the respective Rack or plug-in and touch the “Unset” button or de-
select Recall Safe from the right click pull-down menu in Recall Safe mode.
d) Plug-ins or Racks that are set to Recall Safe can be edited. However, their Recall Safe status can be viewed only while in Recall
Safe mode. Selecting Recall Safe in the Snapshots menu does not activate or deactivate Recall Safe. Rather, it only allows you to
see plug-ins and Racks and set them to Recall Safe. When you turn Recall Safe mode off, Racks and plug-ins which have been
Recall Safe remain so; they just don’t glow blue.
e) When a Rack is Recall Safed, all the plug-ins within that Rack are affected, i.e. are effectively recall-safed as well.
1-33
Page 34

DiGiCo Waves Operation
3.3.10 Preferences Window: Global Controls ............................
Open the Preferences window from the Window menu
On this page, you set system-wide audio parameters and choose the SoundGrid audio I/O and server devices you will use for MultiRack
SoundGrid’s audio input/output.
Audio Parameters
Sample Rate - This field allows the selection of sample rate. As MultiRack SoundGrid is slaved to the console’s sample rate, this field
cannot be edited.
Channels - This field displays the maximum number of channels available for processing.
Latency - This field allows the user to change SoundGrid’s throughput latency. Plug-ins that have latency add to the latency (system
latency + plug-in latency) of the specific Rack into which these plug-ins are inserted.
System Inventory
Host Network Interface - This drop-down menu lists the available network adapters on the host machine. Choose the interface that is
connected to the SoundGrid network. Interfaces are displayed by MAC addresses.
Refresh - Click this button to refresh the inventory list if you have changed I/O devices and/or servers.
Audio I/O Devices -The drop-down menu allows you to choose the SoundGrid I/O device with which to work – choose the SoundGrid I/O
card connected to the SoundGrid network. Clicking the Setup button allows you to name the device. The menu displays each device by its
name, MAC address and device type.
Servers
Server 1 - This drop-down menu allows you to choose the audio processing Server. The list displays available servers by MAC address.
Each discovered server also displays its software version.
Redundancy -A Redundant setup is where you have designated a second Server as a backup to the main audio processing Server. If the
main audio processing Server fails, then its backup begins processing automatically. Check-mark “Enabled” to activate redundancy.
Server 2 - Choose the backup (redundant) server by selecting its MAC address from the drop-down menu list. Click the Test button to
make sure that the redundant Server is capable of holding the session being handled by the main Server. This is important when the two
servers are not identical.
1-34
Page 35

DiGiCo Waves Operation
3.3.11 System Monitor Window...................................................
Open this window from the Window menu.
This window displays real time status info on your SoundGrid network, I/O devices, and Servers.
Redundancy displays redundancy status.
Network displays network transport load. High loads may result in audio drops.
Processing/Redundant Server
· Device – Device name
· Status – Server status (online or offline)
· CPU Peak and average loads (AVR) – Displays the load on the processing server. High loads may result in audio drops.
I/O Device 1 and 2
· Device – Device name
· Status – Device status
1-35
Page 36

DiGiCo Waves Operation
4.1 MultiRack SoundGrid Keyboard Shortcuts
If you are using an external keyboard you may want to get familiar with MultiRack’s shortcuts.
Session Item Definition Keyboard shortcut
Import session
Ex p ort session
Window Item Defini tion Keyboard shortcut
O pen Snapshot Pa ne
Group Properties …
System Monitor
Preferences
Opens explorer window,
import session
Opens explorer, export
session
Opens/closes the Snapsh ot
Pane in MultiRack SoundGrid
window.
Opens the Group Properties
window
Opens the System Monitor
window
Opens the Preferences
window
Ctrl+Alt+I
Ctrl+Alt+E
F7
Ctrl+G
Ctrl+M
Ctrl+P
Menu Item Definition Keyboard shortcut
Mainvie w Mode
Overview Mode
Rackview Mode
Opens the m ain application
view (multiple Racks)
O pens the ove r view view F5
Opens the Rack view F6
F4
1-36
 Loading...