

Page 1

Appendix 2 - SD Theatre Operation
SD Operation Manual
Appendix 2:
Version 3 (April 2014)
Theatre Software Operation
For Software Build 680+
A2-1
Page 2

Appendix 2 - SD Theatre Operation
Contents
A2.1 Features Specific to Theatre Option Sof tware ...........................A2-3
A2.1.1 Auto Update Explained........................................... .......A2-3
A2.1.2 Options - Theatre Tab............................................. .......A2-3
A2.1.3 Channel Sets ........................................................... .......A2-4
A2.1.4 Control Group Cues................................................ .......A2-4
A2.1.5 Channel Cues .......................................................... .......A2-6
A2.1.6 Creating Aliases...................................................... .......A2-9
A2.1.7 Module Cues ......................................................... .......A2-10
A2.1.8 Players ...........................................................................A2-11
A2.1.9 Cue List Text Style & Colour................................ .......A2-12
A2.1.10 Matrix Nodal Delays............................................ .......A2-13
A2-2
Page 3
Appendix 2 - SD Theatre Operation
A2.1 Features Specific to Theatre Option Software
(With special thanks to Andrew Bruce of Autograph UK for his invaluable contribution to the design
and explanation of these features)
A2.1.1 Auto Update Explained .....................................................
The Auto Update System (Previously referred to as Live Update in D5T Software) allows users to apply changes to a setting on a channel
in more that one cue at a time. There are conditions and rules to this automatic update, which will be explained later. Auto Update is
switched on & off using the Auto Update button in the Cues Panel, or in the snapshot control section on the Upper Master Worksurface
(SD7T only) to the right of the Master Screen
On a basic level, as an example, with Auto Update ON, making a change to the EQ on Channel 1 in a Cue will update the same EQ in all
the Cues in the show that have a matching EQ.
This automatic update rule works along side the Aliases system (see separate explanation of Aliases). So if a channel uses more than one
alias, then changes to a module (EQ for example) will only be updated to cues that have a matching alias.
Since it may not suit to ripple certain classes of controls to all cues in this way, there is provision for an opt-out. For instance :
- Channel Delay may want to be restricted only to the Cue in which it’s changed in order to track actors around a stage cue-by-cue.
- A channel’s routing may change cue-by-cue between a number of different groups.
- A channel’s soft Mute state would almost certainly never want to ripple to all cues.
The Auto Update across cues is also affected by the Auto Update Exclusions, found in the Theatre Options Tab. If a module is set as an
exclusion to Auto Update, then changes to the excluded module will only occur in the single cue being modified. By default, Mutes are
excluded from Auto Update.
In addition, there is an Option to create settings that apply to different "Players" of the same role in the show.
If several people are playing the same role in different performances, the individual settings for any of them can be recalled according to
who is playing the role on that day.
The settings for these Players can optionally be Auto Updated by changes to other Players or can remain isolated from these updates and
thus provide each Player with settings that are individual to them.
It is also possible to protect controllers and channels from being Auto Updated. The Cues / Scope / Group & Auto Update Scope allows
the protection of controller types on an individual channel basis. Items marked with a red cross in this scope panel will not be updated by
the auto update system.
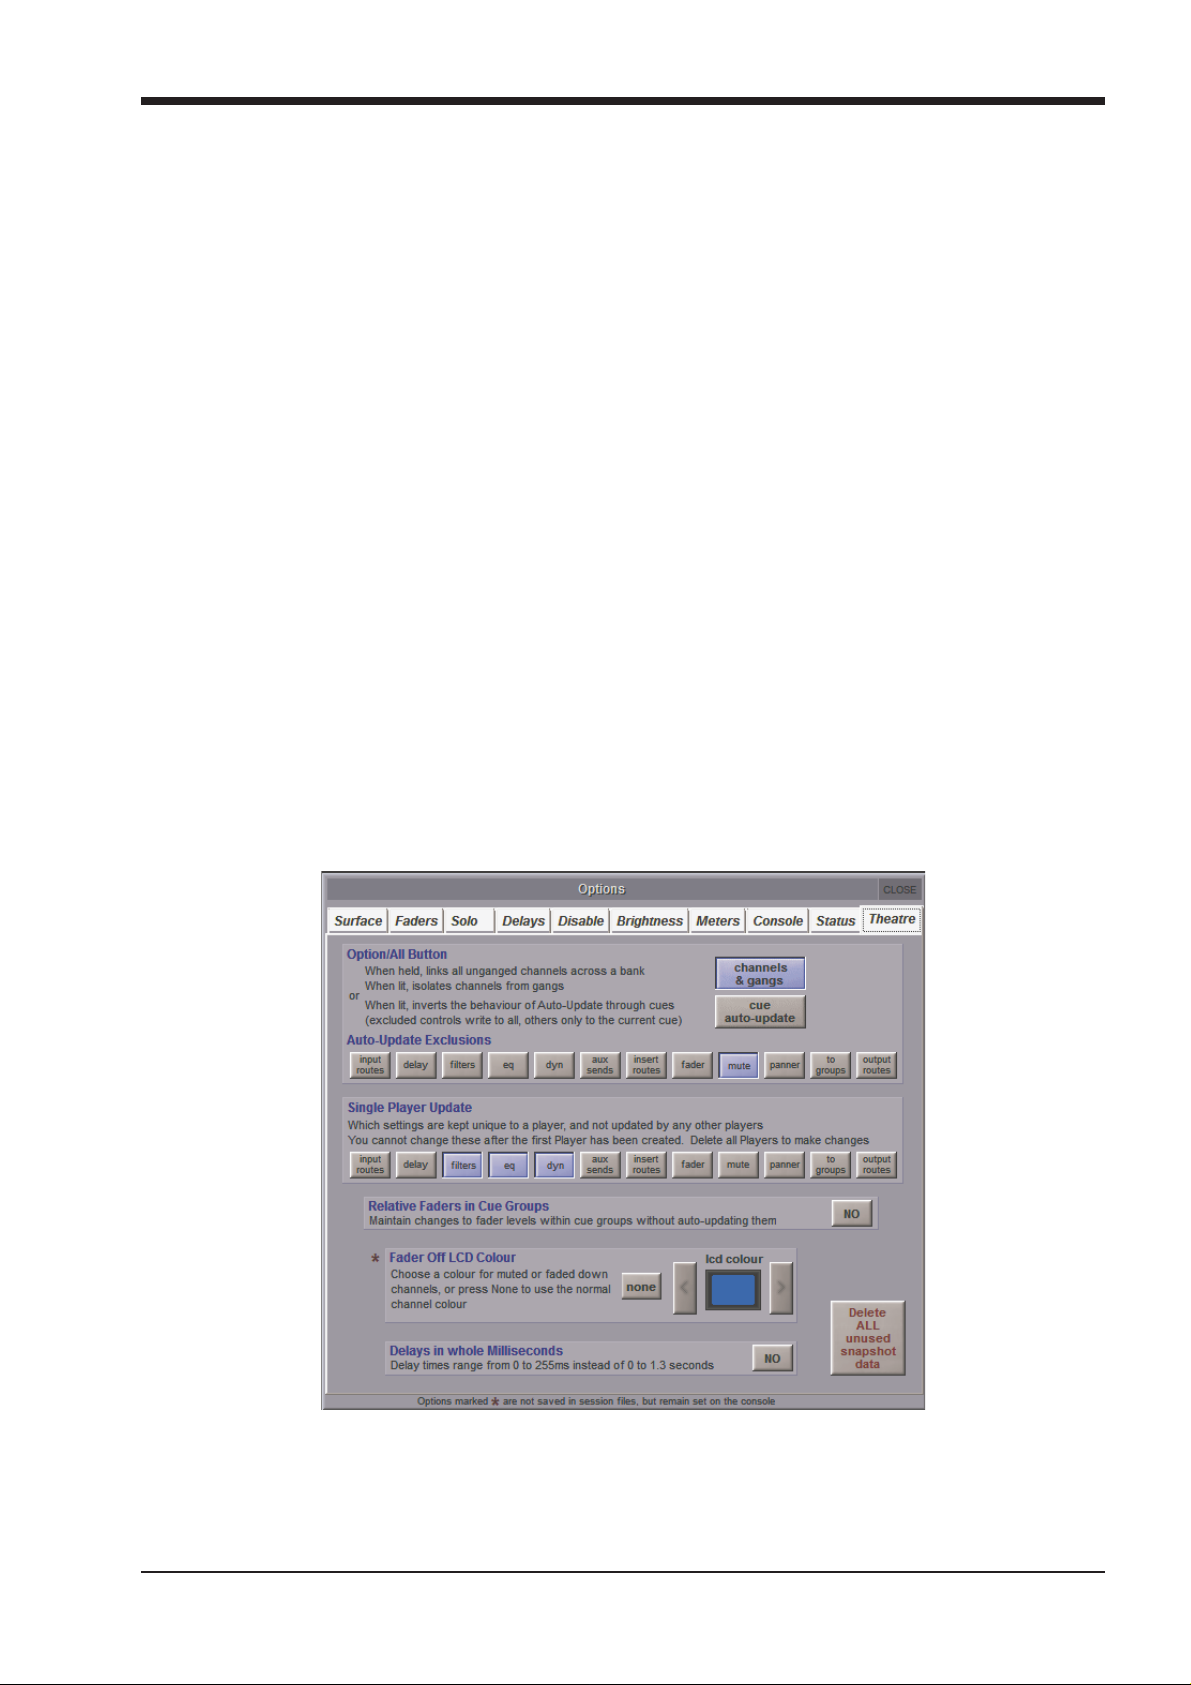
A2.1.2 Options - Theatre Tab .......................................................
Option/All Function. Switch between Channel Gangs and Cue Auto Update
Channel Gangs : Standard SD Live style function, where the Option/All function is used to perform operations on Entire Banks of
controllers, or to defeat Ganging to make relative adjustments between ganged channels.
Cue Auto-Update : No longer performs Gang functions (as above) but inverts the Auto-Update function. (see separate explanation of
Theatre Mode Auto-Update)
A2-3
Page 4
Appendix 2 - SD Theatre Operation
Excluded Controls Scope :Selection of controller types that will be excluded from the Auto Update function. Note that the use of the
Option-All button on an excluded control will write to all cues, as opposed to the current cue (as the Option/All control inverts the AutoUpdate rule)
Fader Off LCD Colour : Choose the colour of channel LCD Buttons when a channel is off (Fader down or channel is muted). If None is
selected, the LCD button colour will remain the same, regardless of the channel being open or closed.
Single Player Update: Selection of cue modules that become unique to individual “Players”. This selection cannot not be changed once
a “Player” has been created.
Delays in whole Milliseconds: When changing delay values using a rotary control, the value is changed in 1ms steps within a range of
0-255ms.
Delete ALL unused snapshot data: This deletes all unused module cue data within a session.
Relative Faders in Cue groups: With Auto-update enabled, relative changes to fader levels can be temporarily applied to the members
of a cue group without auto-update writing the new fader values to the cues. The new fader values can be permanently written to the cue
by pressing the update group (faders only) button in the cue list.
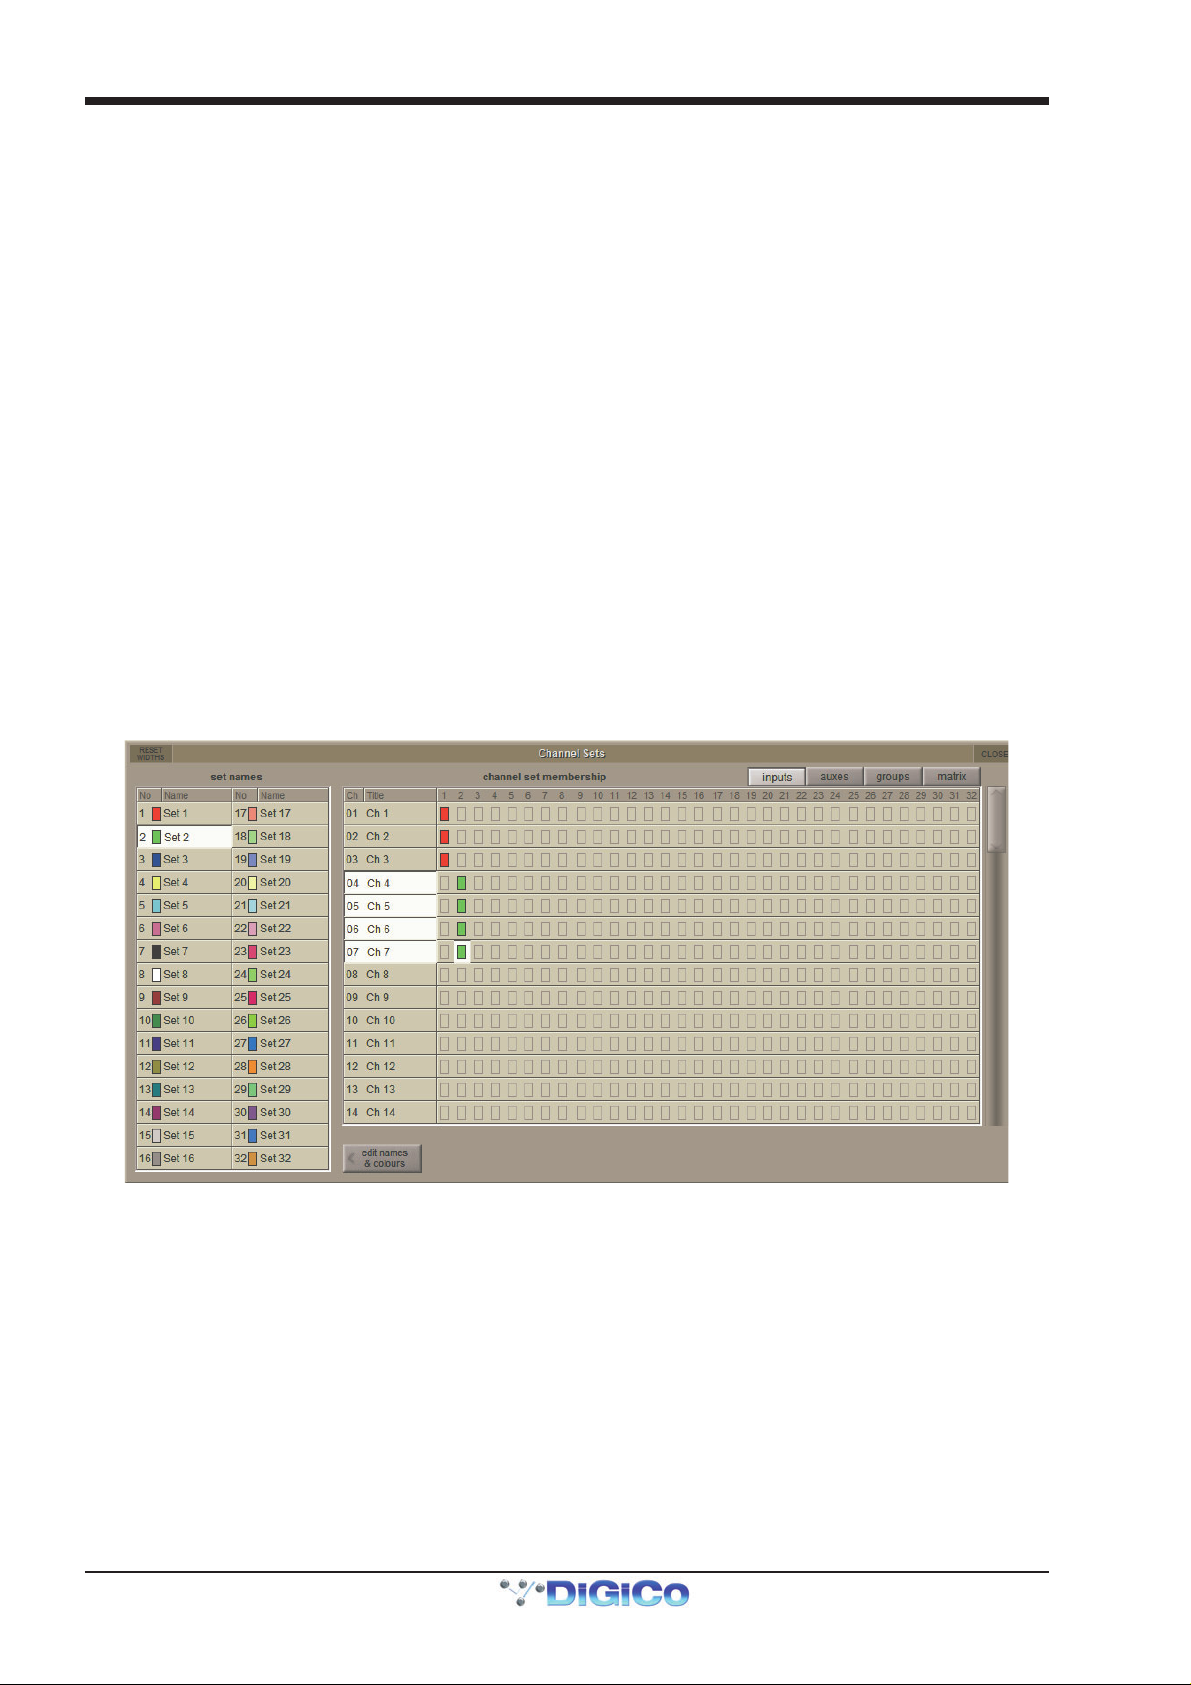
A2.1.3 Channel Sets......................................................................
Located in the master screen Layout menu
A set is a group of channels. The number of sets available varies according to console model and each set can contain any combination of
channels, and a channel can be a member of any number of sets.
Sets are used as a tool in the assigning of members to Control Groups, allowing the quick selection of pre-defined groups (or sets) of
channels.
NOTE: The console's Set Spill function also uses these sets.
The four buttons in the top right of the panel change the channel type which is displayed in the list below it.
To assign channels to a set - touch the set name to highlight it and then, from the list, touch the names of the channels that you want to
include in the sets.
Channels can belong to as many sets as you wish and sets can be updated if roles change.
NOTE: If a Set has already been used to assign a group of channels, changing the membership will not retrospectively change
any assignments that have already been made – they need to be deleted and reassigned in order to reflect the revised
membership.
The Name and colour of each set can be edited - press the edit names & colours button and then select the name or colour to be edited.
A2.1.4 Control Group Cues ..........................................................
Located in the master screen Layout menu, this is a panel for assigning members to Control Groups for each Cue in the session.
Central to the programming of a Theatre show is the ability to control the membership of Control Groups throughout the Cue List. The
Control Group Cues panel allows easy assignment of members to the Control Groups
The Panel shows a list of Cues down the left column, then a grid of Control Groups, with their membership. The Scope column can
contain either a tick or a cross. A tick indicates that any changes in CG membership will be recalled when the cue is fired. A Cross
indicates that any changes will not be recalled.
The Ripple Down Function : If ripple down is off (not highlighted), then assignments made, or cleared, will only happen to the one cell
being edited. If Ripple Down is on, then changes made are duplicated in the following cues until a change of state is met. Then the change
of assignment stops.
Assigning Members : Press the Assign button, then touch the cell to assign. The Assign panel will open. Select the channel or set to
assign. Custom assignments can be made by touching the first channel to assign, then holding the shift-key (on the physical keyboard)
and selecting more cells. When a Set is touched, it’s members are automatically selected. This selection can then be adjusted by holding
the shift-key and selecting cells.
If a channel has Aliases, they will be listed below the channel number. Selecting an Alias assigns the Alias to the Control Group, and also
makes that Alias active in the given channel for that cue.
A2-4
Page 5

Appendix 2 - SD Theatre Operation
rs
d
C
B
B
Red = An Alias that has been created but not yet used
Changes made to CG Assignments are only shown on the worksurface (become active) once a Cue has been fired. For example, add a
Channel 1 to a CG 1 in Cue 3. Channel 1 will not show as a member of CG1 until cue 3 is fired.
All Settings/CG Members Only: This selection allows the option of copying channels settings as well as CG membership of channels
across multiple cues when joining channels to Control Groups.
The Create New Set button will create a new Channel Set with the same set of members as those of the selected CG Cue.
For clarity, only input channels are shown in the assign panel. Output channels can be viewed by switching off the Inputs Only function.
The channels are displayed as you would find them on the surface; left and right worksurfaces, arranged in banks and layers.
Clearing Assignments : To clear an assignment, press the Clear button at the bottom of the Panel, then touch the cell to clear. Assignments can also be cleared using the Right-Click on the Keyboard.
NOTE : When assigning and clearing assignments, make sure that the Ripple Down function is correctly set -There is no Undo
Function !
Renaming : Select a cell, then press the Rename button. Enter a new name.
Control Group Name Colour Coding: The colour of the CG name indicates where changes have taken place in the Cue List.
Black entry = Original selection of a single channel, bank or set of channels.
Green entry = A "Rippled" entry which is the same as the CG in the previous Cue
Blue entry = A variation on the original selection normally created by holding the keyboard SHIFT key and adding or removing selections.
CG Cues Panel Assignment PanelAssign Button
Sets
Channels
Aliases
olour Key
lack = The Channel’s current name
lue = An Alias that has been used elsewhere
Aux & Group Maste
can also be assigne
to CG.s from here
A2-5
Page 6

Appendix 2 - SD Theatre Operation
Cue Name
Channnel Name
input settings
Expanded M odules of Cha nnel
A2.1.5 Channel Cues.....................................................................
Located in the master screen Layout menu
The Channel Cues panel shows the Channel Settings used in each channel in each cue, and allows the selection of alternative settings,
Channel Settings and Aliases
A key feature of SD7T is the ability to manipulate channel settings. If you consider the settings that make up a single channel, there are
11 key modules that when combined, make a single channel (or a channel setting). These are:
Input : The routed input, digital trim, phase, digitube
Delay : The Delay setting
Filters : High and Low Pass Filters (Input Channels only)
EQ : 4 Band EQ on Input Channels, 8 Band EQ on Output Channels
Dynamics : Single / MultiBand Compressor, De-Esser, Ducker & Gate
Inserts : Settings of both insert points (Pre and Post Processing)
Auxes : Aux Send settings
Fader : The Fader, Mute and CG Membership settings
NOTE: Fader, Mute and CG membership are shown in 3 separate columns in the Channel Cues panel
Pan : Channel Pan
Group : Routing to Groups
Output : Any direct out routing, and associated properties.
It is possible for each channel to contain more than 1 set of channel settings; the channel may be shared between two or more different
performers. Alternatively, a single performer may have different roles, or costumes, that require a change in settings.
Each channel setting is also known as an ALIAS. The Aliases may have some common elements, but each Alias contains the 11 modules
that make it up.
At first sight this window can look quite daunting but it does provide you with an invaluable way to examine, manage and fix programming
changes or errors that would otherwise remain unseen until a cue is fired.
- Channel Cues will show you where a channel’s Aliases change in the Cue list.
- It will also show you which Cues have unique settings stored and in which of the 11 sections of the channel it has been made. It won’t
display actual values but it will show you that something was done and, if the unique setting is no longer required in a Cue, allow you to
pick a default or known state from another Cue as a substitute.
· Initially channels are displayed in their condensed mode but each one can be expanded to show the full range of parameters.
Alias changes
Cue 37 - Sarg on
Cue 41 - Recr uiter
Cue 54 - Serg eant
Channel 4 is show n
in expanded mode
Alias inheritance
Shows that Sargon,
Recru i ter & Sergeant
all share the same
Shows Module Cue names including
the number of the cue in which they were created.
NOTE: When Channel Cue information is expanded to show individual modules, busses that are bigger than Mono (Stereo and
Surround) display one column for each of the legs of the buss (eg separate Left and Right legs in stereo)
A2-6
Page 7

Appendix 2 - SD Theatre Operation
Chan ge s * On l y bu t t on
s
Display Filters
Two display filters have been incorporated to make it easier to navigate and manage the potentially huge display of settings and data.
As an alternative to the Show Names display above, you can choose to show a * marker only where settings change.
Colour Coding
As the key on the panel shows, there are different colour codes to represent different things.
Grey entry = no changes
Black entry = changes have been made
Purple entry = some controls in this module will inherit changes
NOTE: If the Channel Cue cell has a red background, this indicates that the module has been removed from either recall or
update scope.
Hides a ll repeated entri e
Other controls in the Channel Cues Panel
Choose Channels : The Grid of Channels contains all Input Channels. To reduce the selection of channels shown in this panel, open the
Channel Selection Panel by pressing Choose Channels. Ticks and crosses show which channels will be shown, and which channels will
be hidden. In the example below, only Input channels 1 and 2 will appear in the grid.
A2-7
Page 8

Appendix 2 - SD Theatre Operation
G
Ripple
Alias
st
e
Alias
Open
lobal Scope
Group & Au to Update
Panel
Open
Recall Scope
Panel
Global Scope / Recall Scope / Group & Auto Update Scope : Shortcut buttons to the appropriate scope in the Cues Panel
Assign : Opens the Assign Panel, allowing the selection of different settings; either Channel Settings, or individual module settings.
This function is dependant on the current Update Type that is selected - by default, Update Single is pressed and only the current cue's
channel or module settings will be updated.
Rename : Allows the renaming of the selected cell either Channel Settings, or individual module settings.
This function is also dependant on the current Update Type that is selected - by default, Update Single is selected and only the current
cue's channel or module settings will be renamed.
Details: Opens the details panel which shows all of the module controller values and the Recall and update scopes of the entire module
as well as each individual controller. The inherit status of the module and the controllers are also shown.
Open
Scope Panel
Assign
Mode
Rename
Mode
Show
Details
Update
Single Cue
All Cues in Group
using the same
Assignment
Down to next
existing change
Update
Update
All Cues in Li
using the sam
Update Single : This Update Type is the default setting and, if pressed, will apply any assignment or name changes to the selected cue
only.
Update Group : This Update Type, if pressed, will apply any assignment or name changes to all the cues in the same group as the
selected cue that are using the same channel or module settings.
Ripple Down : This Update Type, if pressed, will apply any assignment or name changes to all the cues after the selected cue until there
is an existing change of channel setting or module setting in the list.
Update All : This Update Type, if pressed, will apply any assignment or name changes to all the cues in the list that are using the same
channel or module settings.
A2-8
Page 9

Appendix 2 - SD Theatre Operation
CueNumber
Replacing Channel Settings in a Cue
Select the Channel Name Cell in a Cue, then press the Assign Button. The Channel Settings Assign Panel will open.
The Assign Panel lists all of the Channel Settings (Aliases) for the given channel. In this example, Channel 1 has two sets of settings
(Two Aliases).. Bob and Harry
By selecting Harry, you can replace all of the channel settings for Ch 1 in the given Cue (Cue 4 in this example) with Harry’s settings –
the 11 modules that make up Harry’s settings.
Options are available for selecting Channel Settings from this channel, or any other channel.
Expanded View
Touching the Channel Number at the top of the column expands the Channel to show the module components of the channel, for each
cue. The modules will be referred to as Module Snapshots.
Module snapshots can be assigned in the same way as Channel Settings; by touching the appropriate cell in the grid, and pressing the
Assign Button. This allows the selection of settings from a module of the same type (eg. EQ) from the same channel in another cue, or
from another channel in another cue.
Cue Name
Channel Name
Expanded Modules of Channel
A2.1.6 Creating Aliases.................................................................
Aliases are created from an Aliases Panel, accessed from Input Channel Setup Panels.
NOTE: Only unused Aliases can be deleted.
A2-9
Page 10

Appendix 2 - SD Theatre Operation
Choose to “flatten” mod ule sett ings when creating the Alias
e.
Cue Name
Pressing the aliases button opens the Channel Aliases Panel. The current alias will be highlighted; other aliases that are used somewhere
within the session are listed in black text, and aliases that exist but are not used are listed in red text.
There are options for displaying the aliases of either the selected channel or all channels, and showing and hiding unused aliases.
New Aliases : Creates an Alias, and prompts for a name. Enter a Name. The new Alias is created and, if Auto Update is On, used in the
current cue.
The new Alias will take on all the settings from the original Alias, but will then be isolated from inheriting changes in all modules. This
means that changes made to the original alias will not affect the new alias, and changes made to the new alias will not affect the original
alias.
Custom Alias : Custom aliases allow users to decide, at the point of creation, how an alias interacts with other aliases, and what the initial
settings of the alias will be.
Sets the “ inheritance” state of the module
Independent Selection for each of the 11 Modules
All button presses all 11 buttons in the column abov
Copy Settings Column : When a custom Alias is created, a tick indicates the new Alias will keep the current channel settings for the
given module.
Update Changes : A tick indicates that the module will be updated by changes to the original alias, and changes to this alias will update
the settings on the original alias. A red cross indicates that module will be isolated from changes made to the original alias.
NOTE: The Default settings for Custom Alias are shown above - All current Channel Settings are kept - All modules will be
isolated from changes in the original Alias except the Input Trim module which includes Input route, digital trim, phase and
digitube controls.
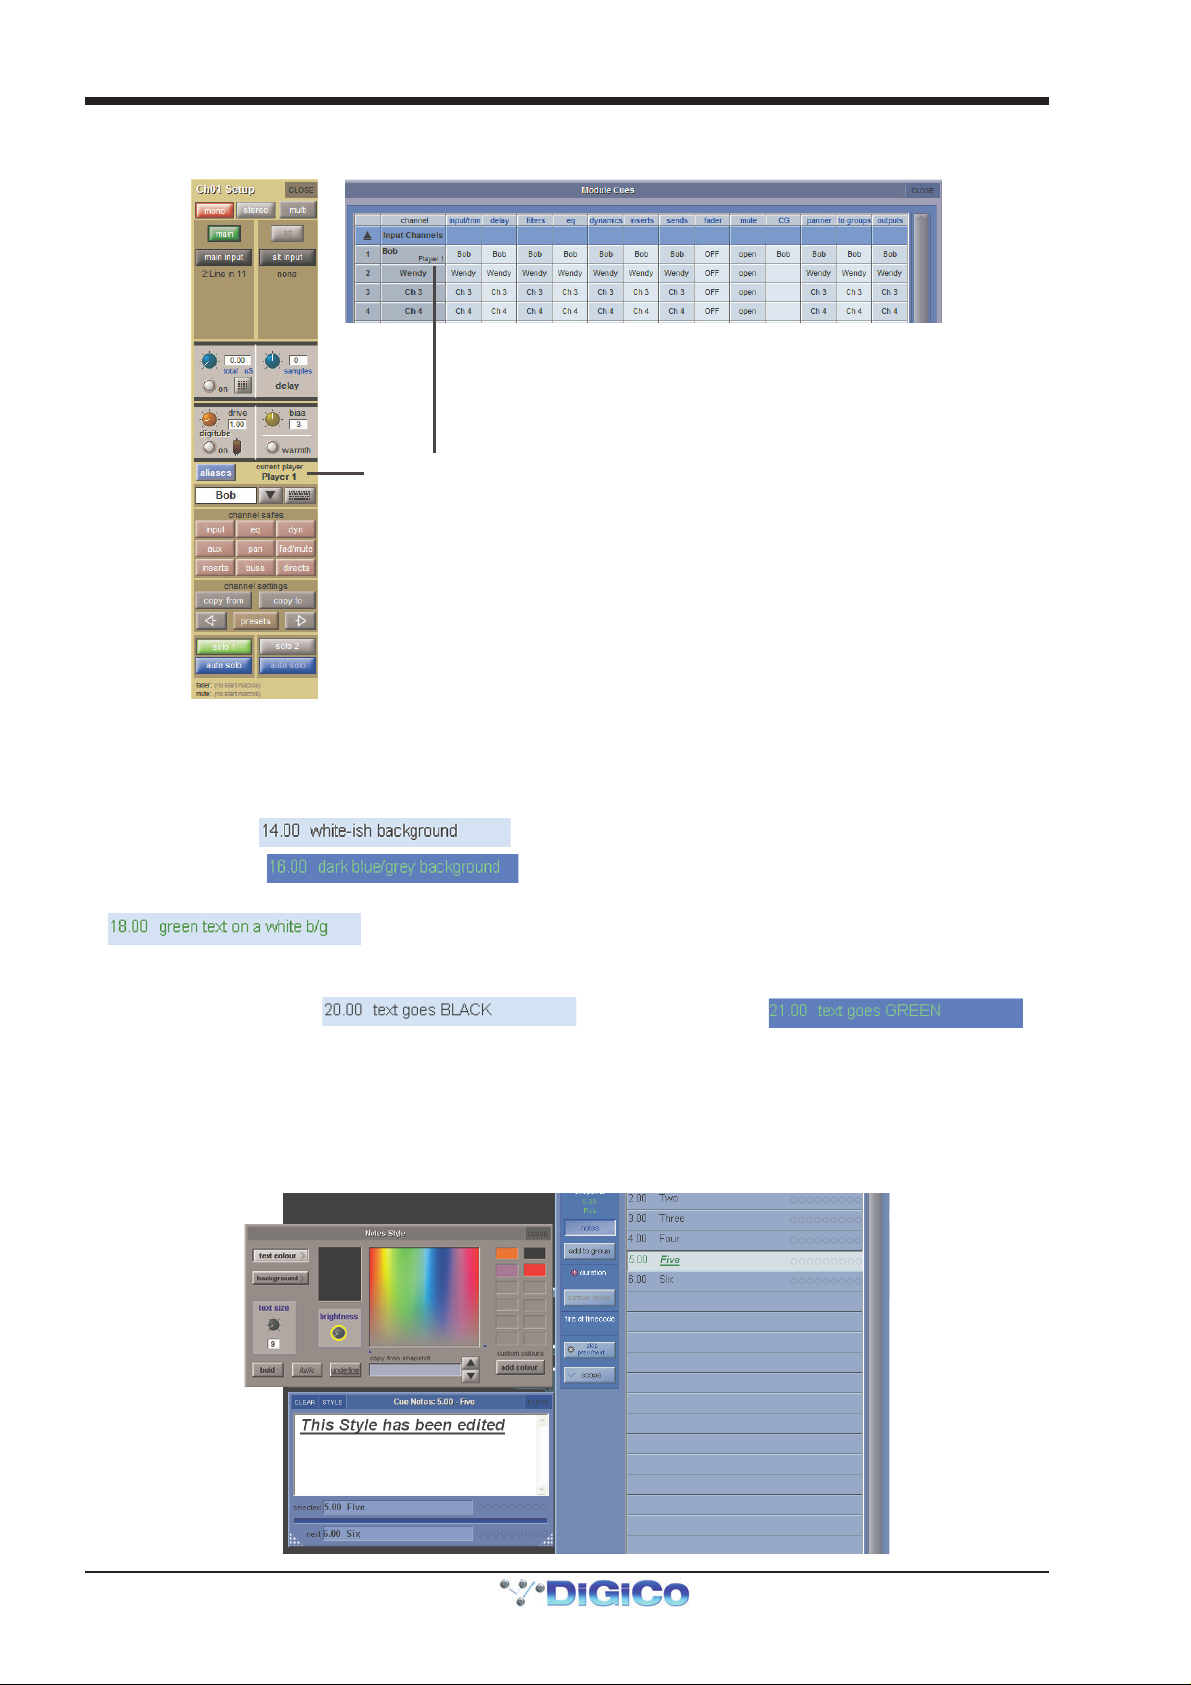
A2.1.7 Module Cues ......................................................................
The Module Cues panel is located in the master screen Layout menu and has very similar functions to the Channel Cues panel.
This panel lists information about the Channel settings and Module Cues for multiple channels within one cue.
The cues are listed and can be selected by touching the list on the left of the panel and the channels with their Module Cues are listed on
the right.
Channel settings and Module Cues can be assigned and renamed using exactly the same procedure as in the Channel Cues panel (see
previous section).
Channnel Name
Expanded Modules of Channel .
Current players only/show all players: For each channel, module cues will display the module data for the only the currently selected
player for a channel or for all “Players” that exist for that channel. (See next section)
A2-10
Page 11

Appendix 2 - SD Theatre Operation
er
O
A2.1.8 Players ................................................................................
The Players panel in the Master screen / Layout menu allows several actors' names and channel settings to be associated with an input
channel and one to be selected as the current player.
ne Input Channel
with 3 Players
By setting the Single Player Update options in the Options Theatre Tab, each “Player” can have unique cue settings stored and recalled
while other settings can be shared between players. The Player Update Option selections are applied to all players and must be set
before the first player is created.
The Default settings for Player Update have Filters, EQ and Dynamics selected and these elements will therefore remain unique to the
individual Player - they will not be updated when other Player's settings are adjusted. All other settings such as Aux Sends and panners
etc will be updated across all the Players in a specific channel.
NOTE: Once the first player has been created, the options cannot be changed.
Create New Player
Edit Player Name
Set Principal Player
Change List Order
Copy Settings from
one Player to anoth
Delete Player
Delete All Players
The Players panel lists all of the input channels in the session and shows any players created for the channels.
New: Creates a new player for the selected channel in the players panel. When you create the first player, you will be asked to confirm
your Player Update options.
When you create a new player, this player will inherit its settings and structure (ie which aliases are used in which cues) from the current
active player.
Edit name: Allows the renaming of the selected player.
Set Principal: The first Player in the list is deemed the principal. Pressing this button will move the selected player to the top of the list.
Move up/Move Down: Allows the reordering of the players in the selected channel.
NOTE: You can only move or set as principal the non current players.
Copy From: Copies the unique module settings from one player to another.
Delete: Deletes the selected player and it’s unique cue data.
Delete All: Deletes all players from ALL channels.
The Red arrow in the right hand column shows the currently selected player for each channel. Touching in this column next to a player
will make it current. The current player will also be shown in the Input Channel Setup up Panel, Module cues and the Channel/Module
Cues details Panels
NOTE: When a Player is made current, that Player's setttings are not applied to the channel until a Cue is fired.
A2-11
Page 12
Appendix 2 - SD Theatre Operation
When Players have been created there is an indication of which Player is current in both the Channel Setup and Modules Cues panels as
below:
Indications of Current P layer in Ch annel Set up and Module Cues panels
A2.1.9 Cue List Text Style & Colour ............................................
There are 2 significant selections of Cue displayed in the SD7T Cuelist at any one time. The Current Cue is the last one that was fired.
The Selected Cue allows you to make changes to certain programmed parameters without actually having to be in the cue. For instance, it
allows you to change a MIDI value before you have fired the Cue that contains it.
- The Current Cue has a (with black text)
- The Selected Cue has a (with green text)
Normally, the Current Cue and the Selected Cue track together and the Current Cue background colour takes precedence.
So shows that the Current Cue and Selected Cue are the same.
On a PC, the two are separated (unlocked) by using the keyboard arrows.
On the console, use the worksurface Cue scroll buttons in the Upper Master section.
Once separated, the Current Cue whereas the Selected Cue
The Cue text can be given a custom colour which is chosen from the Style palette in Notes. When you do this, only the Cue number
remains Green to indicate that it is the Selected Cue. The Cue text always shows in the custom colour.
The text style of the Cue names can be edited by changing the text style of the individual cue's notes.
Select a Cue, press the Notes button and then select STYLE from the Cue Notes panel.
Text can be Normal, Bold, Italic or Underlined and the text and background colours can also be changed.
There are also options to add colours to a user defined library and to copy styles from other cues.
A2-12
Page 13
Appendix 2 - SD Theatre Operation
Touch To Select
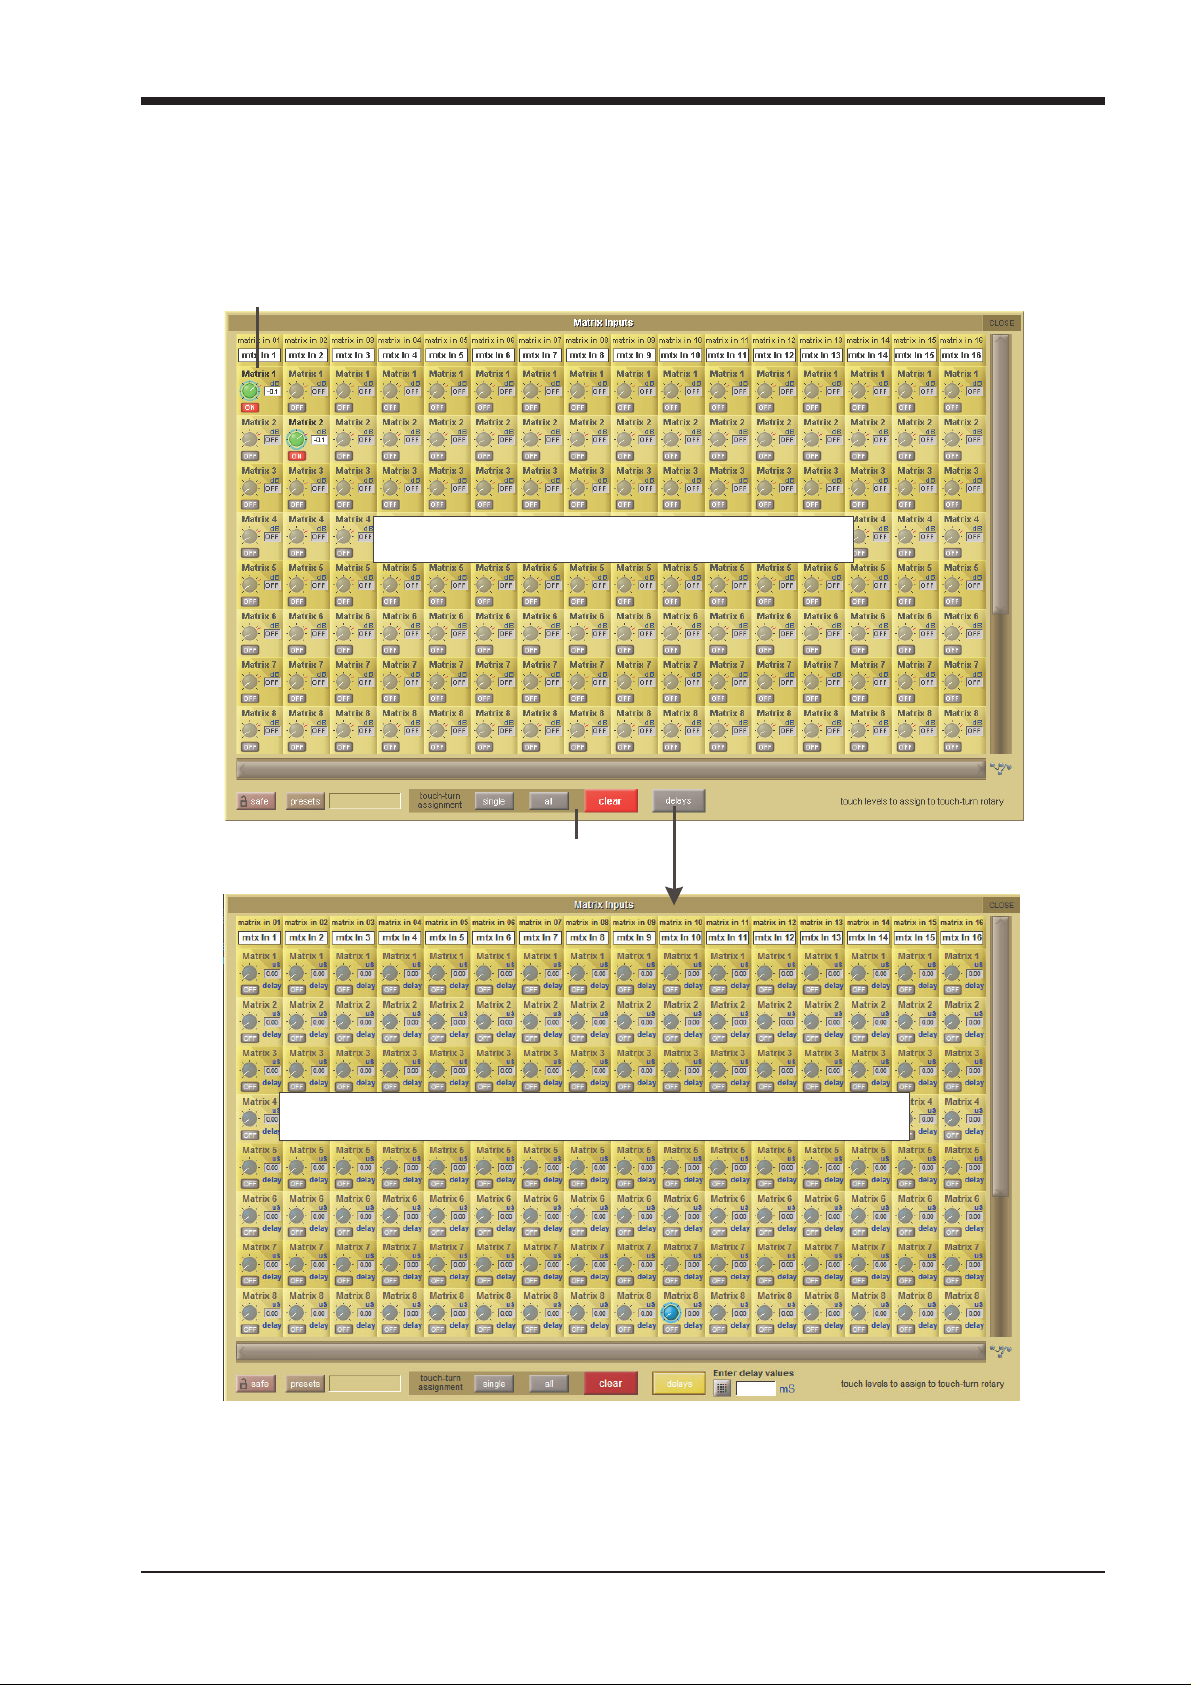
A2.1.10 Matrix Nodal Delays.........................................................
SD7T provides up to 1.3 seconds of delay on each Matrix node.
To Adjust delay times, press the Delays button at the bottom of the matrix panel, touch the required nodes and use either the worksurface
Touch Turn controls to adjust the settings and On/Off status or touch the keypad button to enter a value.
Each node can be selected by to uchi ng and
then the worksurface Touch Turn controls are used to adjust settings
MATRIX LEVEL SETTINGS
Clear Selections
When flashing red, press th is
button to clear all selections
Adjust Nodal Delays
Press thi s bu tto n to vie w
and adjust delay settings
MATRIX NODAL DELAY SETTINGS
A2-13
 Loading...