

Page 1
230 V~, 50 Hz - 2 VA
DCS TYXAL +
FR
Détecteur de coupure secteur Radio
EN
Wireless mains power failure detector
DE
Funk-Netzausfallmelder
IT
Sensore di interruzione di corrente Radio
ES
Detector de corte del suministro eléctrico radio
PL
Radiowy czujnik odcięcia zasilania
NL
Draadloze stroomuitvaldetector
Class II
868,7 -> 869,2 MHz /
868 -> 868,6 MHz
100 m Ý 300m
-10°C / +70°C
+5°C / +40°C
IP
IP 40 - IK 04
75%
77 x 37 x 27 mm
178 gr.
Important product
information (Ê, Ë et Í)
Contenu / Contents / Inhalt /
Contenuto / Contenido / Spis treści
/ Inhoud
2
Emplacement / Location / Einbauort / Posizionamento / Ubicación / Lokalizacja / Locatie
.
n
mi
m
0
5
,
0
3
1
.
n
mi
m
0
5
,
0
.
n
mi
m
0
6
,
0
2
Instructions
DELTA DORE - 08/18
Important
Product
Informations
www.deltadore.com
1
Présentation / Presentation / Beschreibung / Presentazione / Presentación / Prezentacja /
Voorstelling
Le détecteur peut être associé à un système d’alarme DELTA DORE radio X3D ou à un transmetteur
FR
TTRTC ou TTGSM X3D ou une sirène intérieure TYXAL Si.
Lorsque le détecteur TYXAL DCS n’a plus d’alimentation secteur, la centrale génère un défaut
technique après un délai de 30 minutes.
The detector can be associated with a DELTA DORE X3D wireless alarm system or with a TTRTC or
EN
TTGSM X3D or an indoor TYXAL Si. When the TYXAL DCS detector no longer has a mains supply, the
alarm control unit generates a technical fault after 30 minutes.
Der Melder kann einer DELTA DORE X3D-Funk-Alarmanlage und/oder einem Analog- oder
DE
GSM-X3D-Telefonmodem bzw. einer TYXAL Si Innensirene zugeordnet werden. Die Alarmzentrale
signalisiert Netzausfälle beim Melder TYXAL DCS nach 30 Minuten.
Il sensore può essere associato a un sistema di allarme DELTA DORE radio X3D o a un trasmettitore
IT
TTRTC o TTGSM X3D o a una sirena interna TYXAL Si. Quando il sensore TYXAL DCS non ha più
alimentazione di rete, la centrale genera un’anomalia tecnica dopo un intervallo di tempo di 30 minuti.
El detector puede asociarse a un sistema de alarma DELTA DORE radio X3D, a un transmisor TTRTC
ES
o TTGSM X3D, o a una sirena interior TYXAL Si. Cuando el detector TYXAL DCS no tiene alimentación
de red, la central genera un fallo técnico después de 30 minutos.
Czujnik mo¿na powi¹zaæ z radiowym systemem alarmowym DELTA DORE X3D albo z nadajnikiem
PL
TTRTC lub TTGSM X3D albo z syren¹ wewnêtrzn¹ TYXAL Si. Kiedy zasilanie sieciowe czujnika TYXAL
DCS zostanie odciête, po up³ywie 30 minut centrala generuje usterkê techniczn¹.
De detector kan worden gekoppeld aan een alarmsysteem DELTA DORE radio X3D of een TTRTC of
NL
TTGSM X3D zender of een binnenhuissirene TYXAL Si. Wanneer de detector TYXAL DCS geen
netstroom heeft, dan zal de centrale na 30 minuten een technische fout genereren.
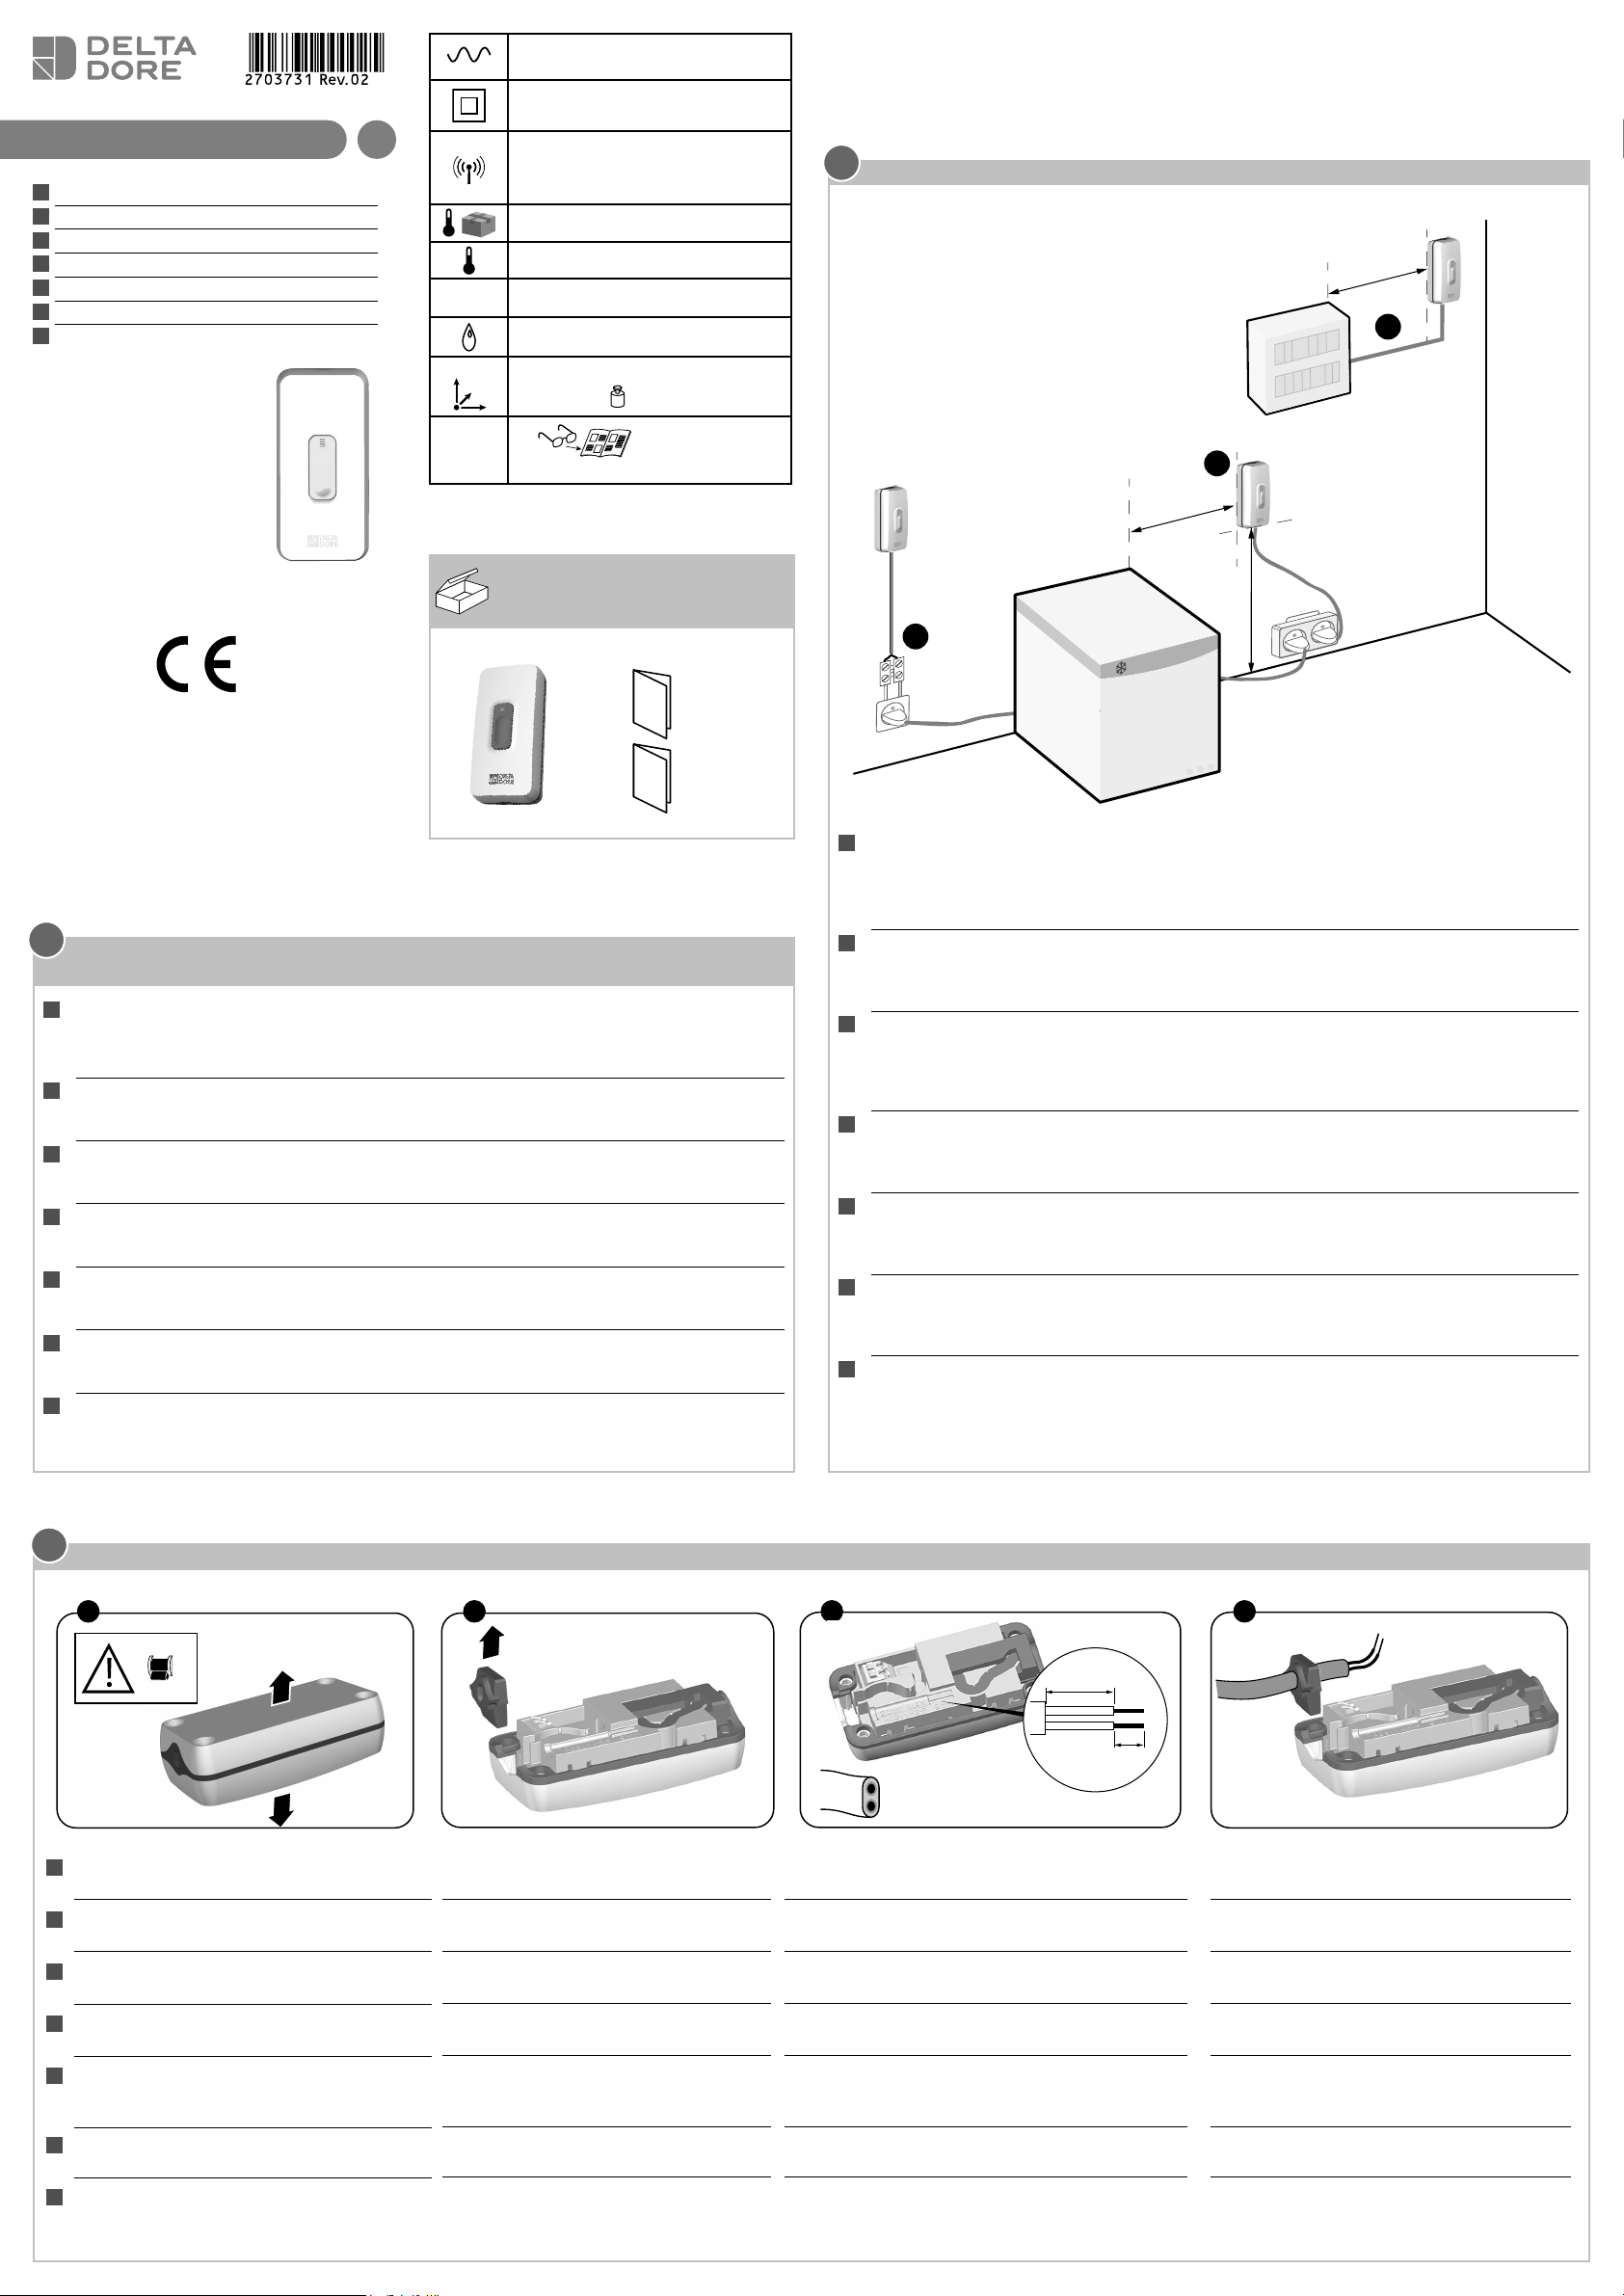
• Le détecteur coupure secteur doit être placé en intérieur.
FR
• Placez le détecteur à proximité d’une prise électrique (Ê ou Ë) ou d’un tableau électrique (Ì)et à une
hauteur minimum de 0,60 m du sol afin de favoriser la propagation radio.
• Fixez le détecteur à une distance minimale de 50 cm d’un tableau électrique ou d’une masse
métallique.
The mains power failure detector must be installed indoors.
EN
•
• Install the detector near a power outlet (Ê or Ë) or an electrical switchboard (Ì) and at a minimum
height of 0.60 m from the floor to increase the wireless propagation.
• Mount the detector at least 50 cm from an electrical switchboard or metal mass.
• Der Netzausfallmelder muss im Innenbereich angebracht werden.
DE
• Melder in der Nähe einer Steckdose (Ê oder Ë) oder einer Schalttafel (Ì) in einer Höhe von mindestens 0,60 m über dem Boden anbringen, um eine einwandfreie Ausbreitung der Funkwellen zu
gewährleisten.
• Melder in einem Abstand von mindestens 50 cm zu Schalttafeln oder Metallteilen befestigen.
• Il sensore di interruzione di alimentazione di rete deve essere posizionato in ambienti interni.
IT
• Posizionare il sensore vicino a una presa elettrica (Ê o Ë) o a un quadro elettrico (Ì) e a un’altezza
minima di 0,60 m dal suolo, al fine di favorire la propagazione radio.
• Fissare il sensore a una distanza minima di 50 cm da un quadro elettrico o da una massa metallica.
El detector de cortes de alimentación se debe colocar en el interior.
ES
•
• Coloque el detector cerca de una toma de corriente (Ê o Ë) o de un cuadro eléctrico (Ì) y a una
altura mínima de 0,60 m del suelo para favorecer la propagación radio.
• Fije el detector a una distancia mínima de 50 cm de un cuadro eléctrico o de una masa metálica.
• Czujnik odciêcia zasilania sieciowego musi byæ umieszczany wewn¹trz.
PL
• Aby u³atwiæ rozprzestrzenianie siê fal radiowych, umieściæ czujnik w pobli¿u gniazdka elektrycznego
(Ê lub Ë) lub tablicy elektrycznej (Ì) i na minimalnej wysokości 0,60 m nad pod³og¹.
• Zamocowaæ czujnik w minimalnej odleg³ości 50 cm od tablicy elektrycznej lub masy metalowej.
• De stroomonderbrekingsdetector moet binnen worden geplaatst.
NL
• Plaats de sensor in de buurt van een stopcontact (Ê of Ë) of een elektrisch paneel (Ì) en op een
minimale hoogte van 0,60 m boven de grond om de radiopropagatie bevorderen.
• Bevestig de schakelaar met een minimale afstand van 50 cm van een elektrisch paneel of metalen
massa.
3
Raccordement / Connection / Anschließen / Collegamento / Conexión / Pod³¹czenie / Aansluiting
1 2 3 4
230V~
OFF
Ê Vérifiez que l’installation est hors tension.
FR
Ouvrez le boîtier du récepteur.
Ê Check that the installation is switched off.
EN
Open the receiver unit.
Ê Vergewissern Sie sich, dass das Gerät aus-
DE
geschaltet ist. Gehäuse des Empfängers öffnen.
Ê Assicurarsi che l’impianto sia fuori.
IT
Aprire la scatola del ricevitore.
Ê Compruebe que la instalación está apagada.
ES
Abra la caja del receptor.
Ê Sprawdź, czy zasilanie instalacji jest
PL
wy³¹czone. Otwórz obudowê odbiornika.
Ë Ôtez le passe-câble.
Ë Remove the cable glands.
Ë Kabeldurchführungen entfernen.
Ë Rimuovere il passacavi.
Ë Retire los pasacables.
Ë Wyjmij przepust kablowy.
H03VVH2-F
Ì Câblez un fil de type H03VVH2-F 2 x 0,75 mm2.
Dénudez les fils selon le gabarit de dénudage.
Ì Fit a cable of the type H03VVH2-F 2 x 0.75 mm2.
Strip the wires using the strip gauge.
Ì Draht vom Typ H03VVH2-F 2 x 0,75 mm2 verkabeln.
Drähte mit Hilfe des Abisolierwerkzeugs abisolieren.
Ì Cablare un filo tipologia H03VVH2-F 2 x 0,75 mm2.
Sguainare i fili con una spelacavi.
Ì Realice el cableado del hilo tipo H03VVH2-F 2 x 0,75
mm2. Pele el cable con la ayuda del dispositivo de pelado de cables
Ì Pod³¹cz przewód typu H03VVH2-F 2 x 0,75 mm2.
Za pomoc¹ szablonu zdejmij izolacjê z przewodów.
20 mm Max.
9 mm
Í Insérez le fil dans le passe-câble en respectant
le sens de montage.
Í Insert the wires into the cable glands.
Ensure the wires are correctly positioned.
Í Drähte in Kabeldurchführung einführen.
Montagerichtung beachten.
Í Inserire i fili nel passacavi.
Attenzione al senso di montaggio.
Í Introduzca los hilos en los pasacables.
Respete el sentido de montaje.
Í Wsuñ przewody do przepustu kablowego.
Uwaga na kierunek monta¿u.
Ê Controleer of de installatie is uitgeschakeld.
NL
Open het kastje van de ontvanger.
Ë Verwijder de ring.
Ì Bekabel een draad van het type H03VVH2-F 2 x 0,75
2
. Strip de kabel met behulp van het sjabloon voor
mm
het kabelstrippen.
Í Steek de kabels door de ring.
Let op de montagerichting.
Page 2
N
L
LN
N
L
3
Raccordement (suite) / Connection / Anschließen / Collegamento / Conexión / Pod³¹czenie / Aansluiting
5 76
LN
1
Î Câblez le fil.
FR
Î Fit the wires of the lamp and mains supply.
EN
Î Drähte der Lampe und des Netzkabels verkabeln.
DE
Î Cablare i fili della lampada e dell’alimentazione di rete.
IT
Î Realice el cableado de los hilos de la lámpara y dela
ES
alimentación de red.
Î Pod³¹cz przewody lampyi zasilania sieciowego.
PL
Î Bekabel de draden van de lamp en de voeding.
NL
2
2
1
Ï Placez le fil dans le chemin de câble.
Ð Fermez le boîtier et vissez les 4 vis.
Insérez le passe-câble dans son logement.
Ï Place the wires in the ducts. Insert the cable glands into their
housing.
Ï Drähte in Kabelkanäle einlegen. Kabeldurchführungen wieder
in das entsprechende Fach einsetzen.
Ï Mettere i fili nelle canalette.
Inserire i passacavi in sede.
Ï Coloque los hilos en las canaletas de cableado.
Introduzca los pasacables en su sitio.
Ï W³ó¿ przewody do koryt kablowych.
Ð Close the receiver unit and tighten the four
screws.
Ð Empfängergehäuse schließen und die 4 Schrau-
ben eindrehen.
Ð Chiudere la scatola del ricevitore ed avvitare le
4 viti.
Ð Cierre la caja del receptor a atornille los cuatro
tornillos.
Ð Zamknij obudowê odbiornika i wkrêæ 4 wkrêty.
W³ó¿ przepusty kablowe do gniazd.
Ï Plaats de kabels in de kabelgoten.
Plaats de ringen in hun behuizing.
Ð Sluit de kast van de ontvanger en draai
de 4 schroeven aan.
4 5
Fixation / Mounting / Montage / Fissaggio / Fijación / Mocowanie / Bevestiging Mise en service / Activation / Inbetriebnahme / Attivazione / Activación / Uruchamianie /
Inbedrijfstelling
1
2
230V~
230V~
ON
ON
230V~
Ê Décollez la partie papier du scotch
FR
double face.
Ê Remove the backing paper from
EN
the double-sided tape.
Ê Schutzfolie vom doppelseitigen
DE
Klebeband abziehen.
Ê Staccare la parte di carta dello
IT
scotch biadesivo.
Ê Despegue el papel del adhesivo
ES
de doble cara.
Ê Odkleiæ zabezpieczenie papierowe
PL
z taśmy dwustronnej.
Ê Verwijder het papieren gedeelte
NL
van de dubbelzijdige kleefband.
Ë Collez le détecteur à proximité de la source d’alimentation
à surveiller et le mettre sous tension.
Ë Fix the detector near the power source to be monitored
and switch it on.
Ë Melder in der Nähe der zu überwachenden Span-
nungsquelle anbringen und einschalten.
Ë Incollare il sensore vicino alla fonte di alimentazione
da sorvegliare e metterlo sotto tensione.
Ë Pegue el detector cerca de la fuente de alimentación a
vigilar y enciéndalo.
Ë Przykleiæ czujnik w pobli¿u źród³a zasilania, które ma byæ
nadzorowane i w³¹czyæ jego zasilanie.
Ë Plak de detector dicht bij de te controleren stroombron
en zet hem aan.
Branchez le détecteur coupure secteur sur une prise électrique 230V.
FR
Connect the mains failure detector to a 230 V power outlet.
EN
Netzausfallmelder an eine 230 V-Steckdose anschließen.
DE
Collegare il sensore di interruzione di alimentazione di rete a una presa elettrica 230V.
IT
Conecte el detector de corte del suministro eléctrico a una toma eléctrica de 230 V.
ES
Pod³¹czyæ czujnik odciêcia zasilania sieciowego do gniazda elektrycznego 230 V.
PL
Sluit de stroomonderbrekingsdetector aan op een 230V AC stopcontact.
NL
6
Fonctionnement avec un système d’alarme / Operation with an alarm system / Betrieb mit einer Alarmanlage / Funzionamento con un sistema d’allarme / Funcionamiento con el sistema de alarma /
Dzia³anie z systemem alarmowym / Werking met alarmsysteem
• Association avec un système d’alarme
FR
• Test
• Retour à la configuration usine
Voir notice
d’intallation
système
• Associazione con un sistema d’allarme
IT
• Test
• Ritorno alla configurazione di fabbrica
Refer to
• Association with an alarm system
EN
• Test
• Restoring factory settings
• Verbindung mit einer Alarmanlage
DE
• Test
• Rückkehr zur Werkseinstellung
7
Fonctionnement en mode autonome / Operation in autonomous mode / Autonomer Betrieb / Funzionamento in modalità autonoma / Funcionamiento en modo autónomo / Dzia³anie w trybie
system
installation
guide
Siehe
Installationsanleitung
System
• Asociación con el sistema de alarma
ES
• Prueba
• Volver a la configuración de serie
Vedi le
istruzioni
“Sistema”
Ver manual
de instalación
del sistema
• Powi¹zanie z systemem alarmowym
PL
• Test
• Przywrócenie konfiguracji fabrycznej
• Koppeling aan alarmsysteem
NL
• Test
• Fabrieksinstellingen herstellen
Patrz
instrukcja
instalacji
systemu
Zie
installatiehandleiding
systeem
niezale¿nym / Werking in autonome modus
• Association avec une sirène ou un
FR
transmetteur téléphonique
• Test
• Retour à la configuration usine
• Association with a siren or a
EN
telephone transmitter
• Test
• Restoring factory settings
• Verbindung mit einer Sirene oder
DE
einem Telefonmodem
• Test
• Rückkehr zur Werkseinstellung
Voir notice
TYXAL Si ou
TYXAL RTC ou
TYXAL GSM
Refer to the user
guide TYXAL Si
or TYXAL RTC
or TYXAL GSM
Siehe Bedienungsanleitung TYXAL
Si oder TYXAL RTC
oder TYXAL GSM
• Associazione con una sirena o un
IT
trasmettitore telefonico
• Test
• Ritorno alla configurazione di fabbrica
• Asociación con una sirena o un
ES
transmisor telefónico
• Prueba
• Volver a la configuración de serie
Vedere istruzioni
TYXAL Si o
TYXAL RTC o
TYXAL GSM
Ver instrucciones
TYXAL Si o
TYXAL RTC o
TYXAL GSM
• Powi¹zanie z syren¹ lub
PL
z nadajnikiem telefonicznym
• Test
• Przywrócenie konfiguracji fabrycznej
• Koppelen met een sirene of
NL
een telefoonzender
• Test
• Fabrieksinstellingen herstellen
Patrz instrukcja
TYXAL Si lub
TYXAL RTC lub
TYXAL GSM
Zie handleiding
TYXAL Si of
TYXAL RTC of
TYXAL GSM
 Loading...