


20
Dear Customer,
Thank you and congratulations on your purchase of our appliance.
All our products are the result of highly accurate planning and meticulous technical testing.
We have prepared this manual to help you make the most of your deep-cleaner and to fully
appreciate its superb quality.
We are certain that, if you follow our suggestions, this appliance will give you maximum
satisfaction and many years of service.
This appliance uses steam power to help you take the hard work of day-to-day household
cleaning.
By using steam power, you will contribute to reduce pollution derived from the dispersion of
chemical household detergents into the environment.
It has been designed to obtain greater hygiene of all hard surfaces and upholstery.
ENGLISH
Accessories provided
(depending on the model)
Vacuuming accessories
30. Multipurpose brush
31. Dry vacuum frame
32. Round dusting brush
33. Multi-purpose attachment
34. Crevice tool
35. Radiator brush attachment
36. Carpet/floor brush
37. Parquet attachment
38. Turbo brush
Tools and accessories-extraction
steam
39. Floor cloth Clips
40. Steam frame
41. Floor cloth
42. Large triangular nozzle
43. Small triangular nozzle
44. “T” nozzle
45. Squeegee insert
46. Bristle-tipped insert
47. Squeegee
48. “T” nozzle with brush-tipped steam insert
49. Steam accessory connector
50. Triangular brush
51. Crevice tool
52. In-line brush
53. Brush
Description
1. Cover
2. Removable liquid/solid tank
3. Air flow conveyer
4. Liquid filter
5. Tank cover
6. Tank removal handle
7. Air filter
8. Float
9. Handle
10. Front cover trigger
11. Rear cover
12. Boiler cap
13. Monotube inlet port
14. Outlet cover
15. On/off button
16. On/off boiler button
17. Power indicator
18. Boiler on indicator
19. Steam ready light
20. Water out indicator
21. Steam adjustment knob
(only for some models)
22. Pressure gauge
23. Suction button ON/OFF
24. Suction adjustment button
25. Steam output button
26. Monotube plug-in
27. Bayonet coupling
28. Full flexible hose
29. Rigid extension tubes
GB 2-04-2002 8:01 Pagina 20

21
1. Important
1) Read the instruction booklet carefully.
2) When in use, the appliance contains pressurized steam: incorrect use could be
dangerous. The appliance is only for domestic uses as shown in the booklet. The
manufacturer disclaims all responsibility for damage caused by incorrect use of the
appliance.
3) Always unplug the appliance before refilling the boiler or carrying out any
maintenance or cleaning work on the machine.
4) Before using, check that the mains voltage corresponds to the voltage specified on
the rating plate of the appliance.
5) Plug the appliance into power outlets of 10A current rating and provided with good
earthing.
6) Do not aim the steam jet at electrical sockets, pressurized elements as you
may damage them and get an electric shock.
7) Do not aim the steam jet at the appliance itself.
8) Do not unplug by pulling the electrical lead or the appliance.
9) To avoid damage to the insulation, do not run the appliance over the electrical
supply lead.
10) Make sure the cap is firmly screwed on and remove any water residue from
the cavity before you switch on the boiler.
11) Do not plug in the boiler without water in it. To add water, unplug the
appliance and wait for about 15 minutes to avoid steam release from the cap.
Place the cloth over the cap and unscrew slowly allowing residual steam to
escape gradually.
12) DO NOT UNSCREW THE BOILER CAP WHEN UNDER PRESSURE.
13) Unplug all electrically operated objects or appliances (stove, fridge, oven
hood, etc.) from their power points before steam cleaning. Before plugging in
again, ensure they are completely dry as any remaining water could cause
electrical discharges.
14) Avoid steam contact with the skin – the high temperature can cause serious burns.
Never aim the steam jet at persons or animals, or use on objects unable to
withstand high temperatures.
15) Do not touch the plug with wet hands.
16) When in use, hold the appliance only by the handle: the machine contains a boiler
so its surface heats up during normal use. Persons with a pathological insensitivity
to heat must exercise particular care when using this appliance.
17) Always keep the appliance level while in operation.
18) Do not put detergents or other cleaning agents in the tank. Use only water.
19) Do not wash the appliance with trichloroethylene or other solvents. Use only
water with ordinary liquid detergent.
20) Do not shut the power cord in doors or rub against sharp corners. Keep away from
hot surfaces.
21) Do not use the appliance to pick up inflammable liquids.
22) Avoid vacuuming hard or sharp objects that could damage the appliance.
23) Before switching on ensure that the right filters are correctly set .
GB 2-04-2002 8:01 Pagina 21

22
24) Do not use the appliance without the polyurethane filter fitted over the float holder.
25) Water is always necessary if the appliance is going to be used for dry vacuuming.
26) Be especially careful when using the appliance on stairs
27) Keep away from children or persons unfit to use it.
28) Do not use the appliance if it seems defective. Return it to the place of purchase or
contact an authorized Technical Service Centre.
29) If the overheating safety control is activated, the iron and controls will cease to
function. The appliance can only be re-set by an authorized Technical Service Centre.
30) Do not expose the appliance to atmospheric agents (rain, frost, sun, etc.)
31) The noises produced when the boiler heats up or cools down are due to the normal
dilation of the stainless steel with which it is made.
32) For all repairs apply only to the place of purchase or to an authorized Technical
Service Centre, this is to maintain the effectiveness of your appliance and the validity of the guarantee. For the same reason, use only original parts.
33) Always have the power cord replaced at an Authorized Service Centre only.
KEEP THESE INSTRUCTIONS
The manufacturer reserves the right to modify the appliance and/or accessories without
prior notice.
This appliance is manufactured to comply with the current legislation on electrical safety
and electromagnetic compatibility.
A) If your appliance comes fitted with a plug, it will incorpora-
te a 13 Amp fuse. If it does not fit your socket, the plug
should be cut off from the mains lead, and an appropriate
plug fitted, as below.
WARNING: Very carefully dispose of the cut off plug after removing the fuse: do not insert in a 13 Amp socket
elsewhere in the house as this could cause a shock hazard.
With alternative plugs not incorporating a fuse, the circuit must be protected by a 15 Amp fuse.
If the plug is a moulded-on type, the fuse cover must be refitted when changing the fuse using a 13 Amp Asta approved fuse to BS 1362. In the event of losing the fuse cover, the plug must NOT be used until a replacement fuse
cover can be obtained from your nearest electrical dealer.
The colour of the correct replacement fuse cover is that as
marked on the base of the plug.
B) If your appliance is not fitted with a plug, please follow
the instructions provided below:
WARNING - THIS APPLIANCE MUST BE EARTHED
IMPORTANT
The wires in the mains lead are coloured in accordance with
the following code:
Green and yellow: Earth
Blue: Neutral
Brown: Live
As the colours of the wires in the mains lead may not correspond with the coloured markings identifying the terminals in
your plug, proceed as follows:
The green and yellow wire must be connected to the terminal
in the plug marked with the letter E or the earth symbol
or coloured green or green and yellow.
The blue wire must be connected to the terminal marked with
the letter N or coloured black.
The brown wire must be connected to the terminal marked
with the letter L or coloured red.
N
E
L
ELECTRICAL CONNECTION (UK ONLY)
GB 2-04-2002 8:01 Pagina 22
23
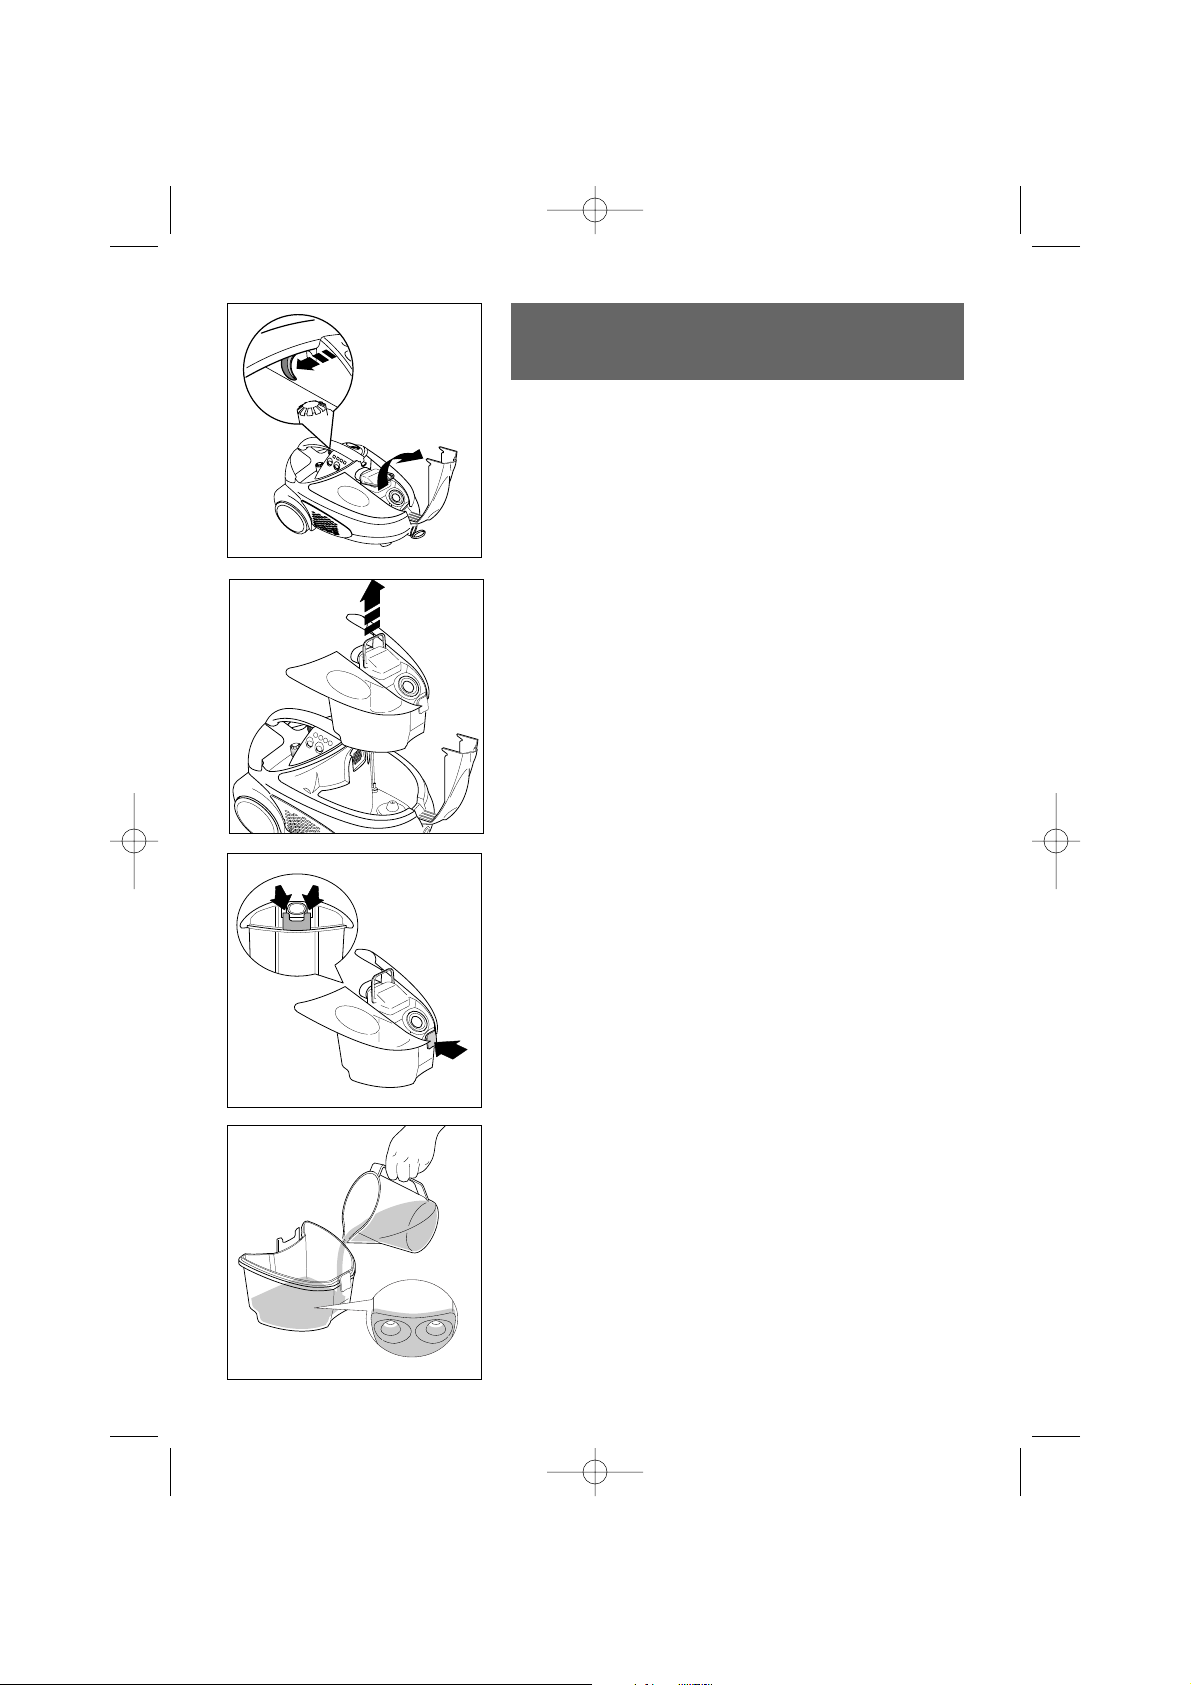
2. Setting up the appliance
for dry/wet vacuuming
Open the front cover (1) by pulling trigger (10) placed
under the handle of the appliance.
Remove the water tank by pulling the trigger and at the
same time lifting the tank by the handle (6).
By means of the hooks, remove the tank cover with float system.
To extract the cover correctly, position the thumbs inside
the central cavity in contact with the two projecting edges of
the tank.
Press on the two projecting edges to facilitate release of the
cover tooth from the slot.
Use the handle to facilitate extraction of the cover from the
front lock.
Press on the bottom of the front locking device to free the
tooth from the slot.
You can also act on the top of the hook to facilitate the operation. Lift the cover and empty the tank.
Remove the air flow conveyer (3) and pour water into the
tank until the two projections on the base of the tank are covered (about 800 cc)
Re-insert the air flow conveyer, to its original position. Replace the tank cover pressing down firmly to ensure the cover is locked in position. Hold down the trigger (10) and replace the tank to its final position. Close the cover.
N.B.: No water is necessary if the appliance is going
to be used for wet vacuuming.
1
2
GB 2-04-2002 8:01 Pagina 23
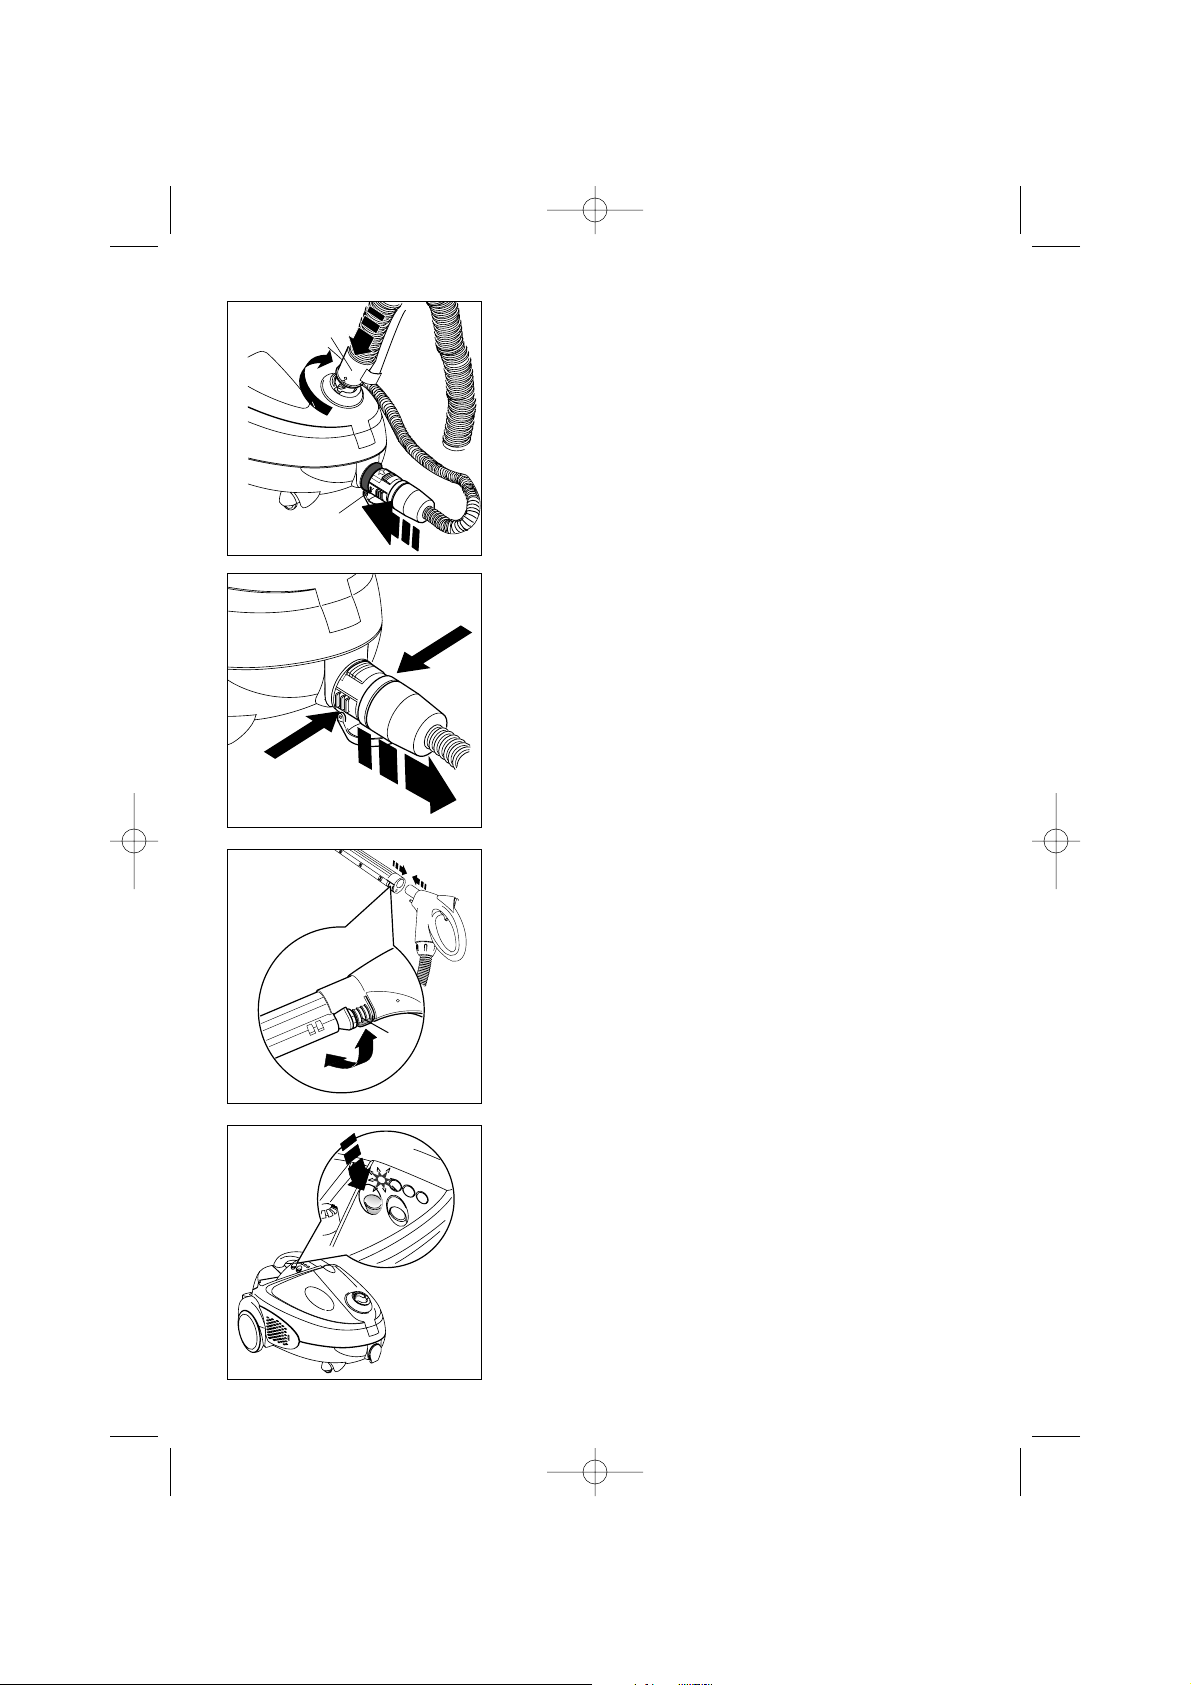
Fit the appliance with flexible hose (28). Insert bayonet
coupling (27) into the hole on front cover (1), pressing it
in firmly and rotating clockwise until it stops.
Open safety hatch (14) and plug in connector (26) into
socket (13) on the bottom of the machine, making sure
the reference arrow is pointing upward. Push in firmly
until securely locked in place.
To disconnect, push on the two side locking tabs and
pull.
Insert extension tube (29) onto the flexible hose
handgrip making sure the handgrip coupling is perfectly
connected with the extension tube coupling. Push firmly
all the way in, then lock into position by rotating the
locking ring (A).
Try to pull the extension tube out to make sure the
connection is perfectly secure.
To add the second extension tube or the brush nozzle,
proceed as described above.
Connect the power cord to the mains, press on/off button
(15) and indicator light (17) will come on. Now your
appliance is ready to start.
24
A
27
26
GB 2-04-2002 8:01 Pagina 24

To activate vacuuming, press Suction button ON/OFF
(23) on the handgrip of the flexible hose. The appliance
will be reach maximum vacuuming power in a few
seconds. To disactivate suction, press Suction button
ON/OFF (23) once more.
To decrease or increase suction power, press button (24)
keeping it depressed until the desired suction power has
been reached.
N.B.: Do not press button (16) to power the boiler
when the appliance is used for vacuuming only.
Important notice: during wet vacuuming, when tank
(2) is full, a special device will shut suction off and the
motor will rev up. At this point, switch off the
appliance by pressing button (15), disconnect it from
the mains, and empty out the wet/dry tank. The
above device will be activated also when filters (7)
and (4) are exhausted – in this case, remove them
and clean them (see chap. 4)
The suction shut-off device may be triggered off also
by any violent impact or shock to the machine. In this
case, switch the motor off and wait a few seconds
before starting the machine once again.
25
GB 2-04-2002 8:01 Pagina 25

26
Vacuuming accessories
(depending on the model)
Multipurpose brush (30)
With this brush attachment you can pick up liquids as
well as dry-vacuum.
When using as a dry-vacuum, you can get better result if
you add brush frame (31).
Before you add the frame, make sure the brush bristles
are withdrawn and check that the pedal is in the position
shown in the picture.
Fit the frame onto the brush taking care to insert the four
connection points into their slots.
Round dusting brush (32)
The attachment swivels to facilitate cleaning operations.
Suitable for removing dust from upholstery, furniture, books,
drapes, picture frames, and clothes.
Multi-purpose attachment (33)
For cleaning sofas, upholstery, car interiors, curtains etc.
When vacuuming drapes, decrease suction power if
necessary by adjusting regulating button (24) on the
handgrip.
Crevice tool (34)
Useful to vacuum crumbs, dust and other small debris. Ideal
for all those hard-to-reach places
GB 2-04-2002 8:01 Pagina 26

Radiator brush attachment (35)
Ideal for vacuuming between the elements of central heating radiators.
Fit onto the crevice tool.
Carpet/floor brush (36)
Effectively vacuums up dust from both hard floors and
carpets or rugs. For hard floors, the brush lever should be
set to the ( ).
For carpets or rugs, the lever should be set to the opposite
side ( ).
Parquet Attachment (37)
Ideal for vacuuming wood floors. Fit the accessory onto the
floor/carpet brush as shown.
27
Position of selector switch
for long pile rugs and carpets
Position of selector switch
for short pile rugs and carpets
Turbo-brush (38)
Fit the turbo brush accessory in place of
the carpet and floor brush supplied.
When the cleaner is turned on, the passage
of air activates the rotating brush.
Avoid touching the underneath of the turbo
brush when the cleaner is in operation.
Always turn the motor off before cleaning
the roller. Avoid passing the brush over the
fringe as this could be damaged by the
movement of the roller. Avoid frequent use
of the turbo brush on particularly delicate
rugs or carpets as over time the fabric
could be damaged.
GB 2-04-2002 8:01 Pagina 27

28
3. Setting up the appliance
for steam cleaning
Steam extraction cleaner
Remove rear cover (11), unscrew boiler cap (12) and fill
the chamber with water without adding any detergent
(the particular shape of the cap seat allows filling without
the use of a funnel). Remove any water residue from the
cap cavity, secure cap and rear cover.
Fit the machine with flexible hose (28), extension tubes
(29) and brush nozzle (30) following the assembly
instructions for the tubes, hose, and brush container in
chapter 2.
Connect the plug of the power cord to the mains, press
on/off button (15) and boiler power button (16). At this
point, indicator lights (17 – power) and (18 boiler on) and
will come on . When the steam-ready light (19) comes
on, your cleaner is ready for use.
For steam output, keep button (25) under the handgrip
of the flexible hose pressed and release when you want
to stop steam output. Start suction by pressing the
ON/OFF button (23), in this way the appliance will wash
and vacuum at the same time. In case of stubborn
stains, first steam and then vacuum the area (See
section on “Extraction cleaning technique”, p. 30.)
N.B.: When the appliance is used for the first time, it
may give off a particular smell for a few minutes due
to heating and the consequent drying of the
sealants used in assembling the boiler.
GB 2-04-2002 8:01 Pagina 28

When the water in the boiler is about to run out, the
water out indicator light (20) will come on. Fill the tank as
follows:
Switch off the appliance by pressing button (15) and the
boiler by pressing button (16). Disconnect from the
mains. Wait for 10-15 minutes until the appliance has
cooled down, then place a cloth over cap (12) and
unscrew slowly allowing residual steam to escape
gradually. Proceed to fill the chamber again as described
above.
Important notice! Never unscrew cap with the boiler
under pressure and never operate it without water.
29
Steam adjustment knob (21)
(only for some models)
Use to adjust steam output.
Keep the knob on the maximum steam output setting
when switching on the appliance.
Pressure gauge (22)
(only for some models)
Allows you check the pressure in the boiler.
Depending on the model, the manometer has a
graduated 0-6 bar scale or coloured segments:
- The normal operating pressure of the appliance is
around 3 - 4 bars (green segment).
- If the pressure remains above 5 bars or around 0
(red or yellow segment), contact an authorised
Service Centre.
GB 2-04-2002 8:01 Pagina 29

Extraction cleaning technique
For extraction cleaning, proceed as follows:
- Spray the steam jet onto the surface to be treated by
pressing spray trigger (25) while simultaneously
vacuuming using ON/OFF button (23).
- Go over the area to be treated several times using dry
vacuum only, after depressing the pedal to withdraw
the bristles: The treated surfaces will be almost fully
dry and dirt will have been effectively removed.
N.B.: Regulate suction power at its maximum output.
Steam cleaning without suction
To use the appliance as a steam cleaner, proceed as
described above without activating the vacuuming
system – do not press suction button (24).
Tools and accessoriesextraction steam
(depending on the model)
Multipurpose brush (30)
To use the brush for steam extraction cleaning hard
flooring, rotate the pedal to extend the bristles. This way,
the combined action of steam + brush will give you more
effective cleaning power.
Caution! Not recommended for fired clay tiles,
waxed floors and parquets.
Frame (40), cloth (41) and clips (39)
For Steam cleaning without suction, fit brush with frame
(40).
After fitting the frame to the brush, secure floor cloth (40)
by means of its clips (39)
N.B.: this type of cleaning is particularly effective on tiled
floors.
30
GB 2-04-2002 8:01 Pagina 30

Triangular brush (50)
Recommended for cleaning roller blinds and vertical
surfaces. Can be fitted with the cloth by using the spring
clips.
Triangular nozzles (42 e 43)
Fit directly onto the extension tube or the handgrip
making sure the coupling is perfectly connected with the
extension tube or the handgrip coupling. Push firmly all
the way in, then lock into position by rotating the
locking ring.
Large triangular nozzle
The large triangular nozzle is indicated for washing and
wet vacuuming on carpeting, carpets and rugs.
Small triangular nozzle
The small triangular nozzle is indicated for washing and
wet vacuuming on upholstery, sofas, furniture, and
vertical fabric coverings.
Important: To avoid damage to delicate colours and fabrics, test colourfastness on a small inconspicuous area
of the carpet or upholstery to be cleaned.
“T” nozzle (44)
This attachment can be used together with the squeegee
or the brush-tipped insert. After fitting the desired insert,
fit the “T” nozzle onto the extension tube or directly onto
the handgrip. Secure with the locking ring provided.
Squeegee insert (45)
Ideal for cleaning small glass surfaces and panes.
Bristle-tipped insert (46)
Ideal for fabrics (drapes, clothes, upholstery, etc.).
31
GB 2-04-2002 8:01 Pagina 31

Squeegee (47)
The squeegee attachment is a very practical tool for
cleaning windows and large glass surfaces. Fit directly
onto the extension tube or the handgrip making sure the
coupling is perfectly connected with the extension tube
or the handgrip coupling. Push firmly all the way in, then
lock into position by rotating the locking ring.
Spray steam onto the surface to be cleaned. To dry it,
skew the squeegee to let it perfectly adhere to the
surface to dry.
Important notice: at low temperatures, it is advisable to
warm window panes with a weak jet of steam to avoid
breakages and cracks due to the sudden change in
temperature.
“T” nozzle with brush-tipped steam insert (48)
Fit directly onto the extension tube or the handgrip
making sure the coupling is perfectly connected with the
extension tube or the handgrip coupling. Push firmly all
the way in, then lock into position by rotating the
locking ring. Tile grouting, radiators, bathroom fixtures
and all other nooks and crannies will be easily dealt with
by using the crevice tool together with the bush-tipped
steam insert. To vacuum and dry the surface more effectively, remove the brush.
Steam accessory connector (49)
It allows you to use more specific attachments for steam
cleaning and can be fitted directly onto the flexible hose
handgrip or the extension tube.
Crevice tool (51) +brushes (round and in-line) (52)
The crevice tool can be fitted with one the brush inserts
provided. The brushed are colour-coded, so that each
can be used for the same task without mixing them (e.g.,
red for oven cleaning, yellow for bathroom fixtures, etc.).
The in-line brush insert is particularly indicated for
cleaning tile grouting.
Important: After fitting the desired accessory onto the
machine, proceed with cleaning operations as indicated
in your instruction manual
32
GB 2-04-2002 8:01 Pagina 32

33
4. Care and maintenance of
the appliance
Caution: Always disconnect the appliance from
mains outlet before performing any cleaning or
maintenance operation.
After the appliance has been used for extraction
cleaning or wet vacuuming, the tools and accessories on
the machine should be rinsed to ensure maximum
hygiene before storing. Clean nozzle, tubes and hose by
vacuuming up a few litres of clean water.
Always empty out the dirty-water tank after use.
If the appliance must be stored away for long periods,
remove all water from the boiler.
After having emptied out the wet/dry tank, remove the
liquid filter, rinse it under running water and dry
thoroughly
The filter must be stored dry to prolong its life.
Exhaust air is filtered by a high-efficiency filter (A) that
captures and retains particles with a size of over 3
microns. When dirty, the filter must be replaced.
Filters B and C can be washed when dirty, carefully
dried and reinserted.
It is important to maintain the filters efficiency unimpaired
as they guarantee the optimal functioning of the
machine.
Spare filters are available at your Authorized Service
Centre.
Periodically check to see that the floater is moving freely
in its casing, and that wet filter (4) and air filter (7) are in
place and correctly positioned in their seats.
GB 2-04-2002 8:01 Pagina 33
C
B
A

5. Warranty
For repairs and spare parts (including accessories, filters
or attachments) contact your dealer or an authorised
Service Centre.
The warranty runs for 12 months from the date of
purchase and includes replacement of any faulty parts
and labour involved.
Use only original spare parts and attachments.
This is to maintain the effectiveness of your appliance
and the validity of the warranty.
The manufacturer reserves the right to modify the
appliance and/or accessories without prior notice.
34
GB 2-04-2002 8:01 Pagina 34

35
Technical characteristics
Voltage / frequency 230 V / 50 Hz
Engine, absorbed power rated output max
1000 Watt 1200W
Boiler, absorbed power 1400 Watt
Boiler capacity 1,5 Litres (2 Litres, in some models)
Operating pressure rated output max
3.5 bar 3.8 bar
350 Kpa 380 Kpa
Commands on machine ON/OFF BUTTON
ON/OFF BOILER BUTTON
Indicator lights Power on indicator
Boiler power indicator
Steam ready light
Water finished light
Safety low-voltage Suction activation
commands on handgrip Suction power variation
Steam delivery
Liquid suction safety Float
Inlet filtration Water filter with 1.3 lt of water
Stainless steel 304 mesh micro-filter
Polyurethane pre-filter
Engine inlet polyurethane filter
Outlet filtration (exhaust air) HEPA filter
Engine-cooling air filter Polyurethane filter
Total levels of filtration 8 stages
Removable collection tank capacity rated output max
2.3 litres 2.7 litres
Cable winding manual
Power supply cable 3x1 length: 6 m
Approval IMQ
Weight in operation (without tubes) 12 kg (approx.)
Dimensions length L = 550
depth P = 370
GB 2-04-2002 8:01 Pagina 35
 Loading...