

Page 1

DESCRIPTION
A Flexible hose with handgrip and steam regulation
B "Steam ready" light
C "No water" light
D ON/OFF switch and light
E Tank cap
F Cable tidies
G Tool holder
H Water level indicator
Accessories
I Extension tubes
L Crevice tool
M In-line brush for crevice tool
N Round brushes for crevice tool
O Carpet/floor brush
P Cleaning cloth
Q Squeegee/Wall cleaner
R Frame for wall cleaner
S Cloth foor wall cleaner
Garment care
T Clothes hook
U Clothes hook base
V Garment care
W Clothes freshening brush
X Garment care’s extension
Y Triangular brush
DO NOT USE THE GARMENT CARE AS STEAM CLEANER OR FLOOR
CLEANER
4
1) Read the instructions carefully
2) The appliance contains pressurised steam. Incorrect or improper
use could be dangerous. The appliance is designed for household
use only as described in the manual. The manufacturer declines
all liability for damage deriving from improper use of the product.
3) Do not leave the appliance unsupervised when plugged into the
mains.
4) After use and before cleaning the appliance or carrying out maintenance, always unplug from the mains.
5) Before use, make sure the mains voltage corresponds to the voltage indicated on the rating plate on the bottom of the appliance.
6) Plug the appliance into an efficiently earthed socket with a minimum rating of 10 A.
7) Never direct the steam jet towards power sockets or appliances
containing electrical components such as those inside ovens. They
could be damaged.
8) Never direct the steam jet towards the appliance.
9) Never unplug the appliance by pulling the power cable or appliance itself. Do not touch the plug with wet hands.
10) Do not run the appliance over the power cable. Avoid closing the
door on the cable or rubbing it over sharp edges. Keep it away
from hot surfaces.
Never place the appliance in a vertical position. Always
keep the appliance in a horizontal position when in use.
11) When filling the tank, never place the appliance under the
tap to add water.
12) Avoid the steam coming into contact with the skin. The high temperature could cause serious burns. Never direct the steam jet
towards persons or animals or towards surfaces or objects with
could be damaged by high temperatures.
13) To move the appliance, hold it by the handgrip. As it contains a
steam generator, surfaces become hot during use. Persons affected by particular pathologies causing abnormal sensitivity to heat
should take special care when using this appliance.
14) Do not add detergent to the tank. Use water only.
15) Never wash the appliance with triethylene or other solvents. Clean
with a damp cloth and normal washing up liquid only. NEVER
immerse the appliance in water.
16) Take the utmost care when using the appliance to clean stairs.
17) The appliance is not intended for use by persons (including children) with reduced physical, sensory or mental capabilities, or lack
of experience and knowledge, unless they have been given supervision or instruction concerning use of the appliance by a person
responsible for their safety. Children should be supervised to
ensure that they do not play with the appliance.
18) Keep the appliance out of reach of children or persons not capable
of using it without supervision.
19) Do not use the appliance if it appears to be faulty. Contact your
local dealer or an authorised service centre.
20) Protect the appliance from atmospheric agents (rain, frost, sun,
etc).
21) For all repairs contact your dealer or an authorised service centre
to maintain the efficiency of your appliance and the validity of the
guarantee. For the same reasons, you are always recommended to
use original spare parts.
22) Each appliance is tested to make sure it works perfectly. Drops of
water may therefore be seen through the water level viewing window (H).
23) If the power cable is damaged, it must be replaced by the manufacturer, an authorised service centre or a qualified electrician in
order to eliminate all risk.
KEEP THESE INSTRUCTIONS CAREFULLY
IMPORTANT SAFEGUARDS
EN
Page 2
PREPARATIONS FOR USE
Filling the tank
Before performing maintenance or cleaning the appliance,
make sure it is unplugged from the mains.
• To open the tank, remove the cap (fig. 1).
• Pour the water into the tank, taking care not to exceed the top
notch on the water level indicator (H) (fig. 2).
• Close the cap.
Fitting the hose to the appliance and preparing the cleaning tools
To fit the hose to the appliance, insert the plug into the socket until it
hooks into place (fig. 3). To remove, press the button and pull out (fig.
4). The tools provided have the same attachment system and can be
used on either the extension tubes or the handgrip.
USING FOR THE FIRST TIME
• The first time you use the appliance and whenever you turn it
on, drops of water will be given off with the first steam dis-
charges. This is caused by the low temperature of the hose which
leads to the formation of condensate. As you use the appliance, the hose warms up and steam discharge is optimised. This
phenomenon is normal and is not a defect.
• When used for the first time, the appliance may give out
smoke and an odour for several minutes. This is caused by
heating and subsequent drying of the sealers used in assembling
the steam generator. You are recommended to ventilate the
room.
USING THE APPLIANCE
• Plug the appliance into the mains.
• Press the ON/OFF switch (D). The light on the switch comes on.
• When the "steam ready" light (B) goes off, the appliance is ready
to use. To use the steam press the button on the handgrip (fig. 5).
To stop steam delivery just release the button.
STEAM REGULATION
The steam regulator is located on the hose at the bottom of the handgrip (fig. 6). This can be used to reduce or increase the quantity of steam
according to the type of surface to be cleaned (eg. hard floors, tile joints
- maximum steam; sofas, upholstery - minimum steam).
When you turn the appliance on, you are recommended to turn
the steam regulator to maximum.
TOPPING UP THE WATER IN THE TANK
When the "no water" light (C) comes on (fig. 7), the tank must be filled.
Proceed as follows:
• Turn the appliance off using the ON/OFF switch (D) and unplug
from the mains socket.
• Remove the cap and fill the tank with cold water. Replace the cap.
IMPORTANT: during operation, the appliance fills the steam generator
with water from the tank (continuous fill). It is normal to hear the noise
caused by filling at regular intervals to maintain constant steam pressure.
If the water in the tank runs out completely, there is still enough
steam left for about 10 minutes operation, depending on the quantity
being used. If you do not fill the tank, the pump vibrates and no more
steam is given off.
When the water in the tank has been topped up, the appliance operates
as if it were turned on for the first time. Before cleaning, you must
therefore wait for the steam to be ready. This takes about three minutes, during which time the water is pumped into the steam generator.
When the water in the tank has run out, you should not continue steam cleaning, leaving the pump vibrating. If continued
over time, this practice could irreparably damage internal
components.
IMPORTANT: there may be water on the surface under the appliance.
This is caused by the pressure relief valve.To avoid water spilling out of
the tank when moving the appliance, always close the tank with the
cap.
AFTER USE
After use, put the appliance away tidily by unplugging, wrapping the
power cable around the cable tidies and putting the tools away on the
tool holder (fig. 8).
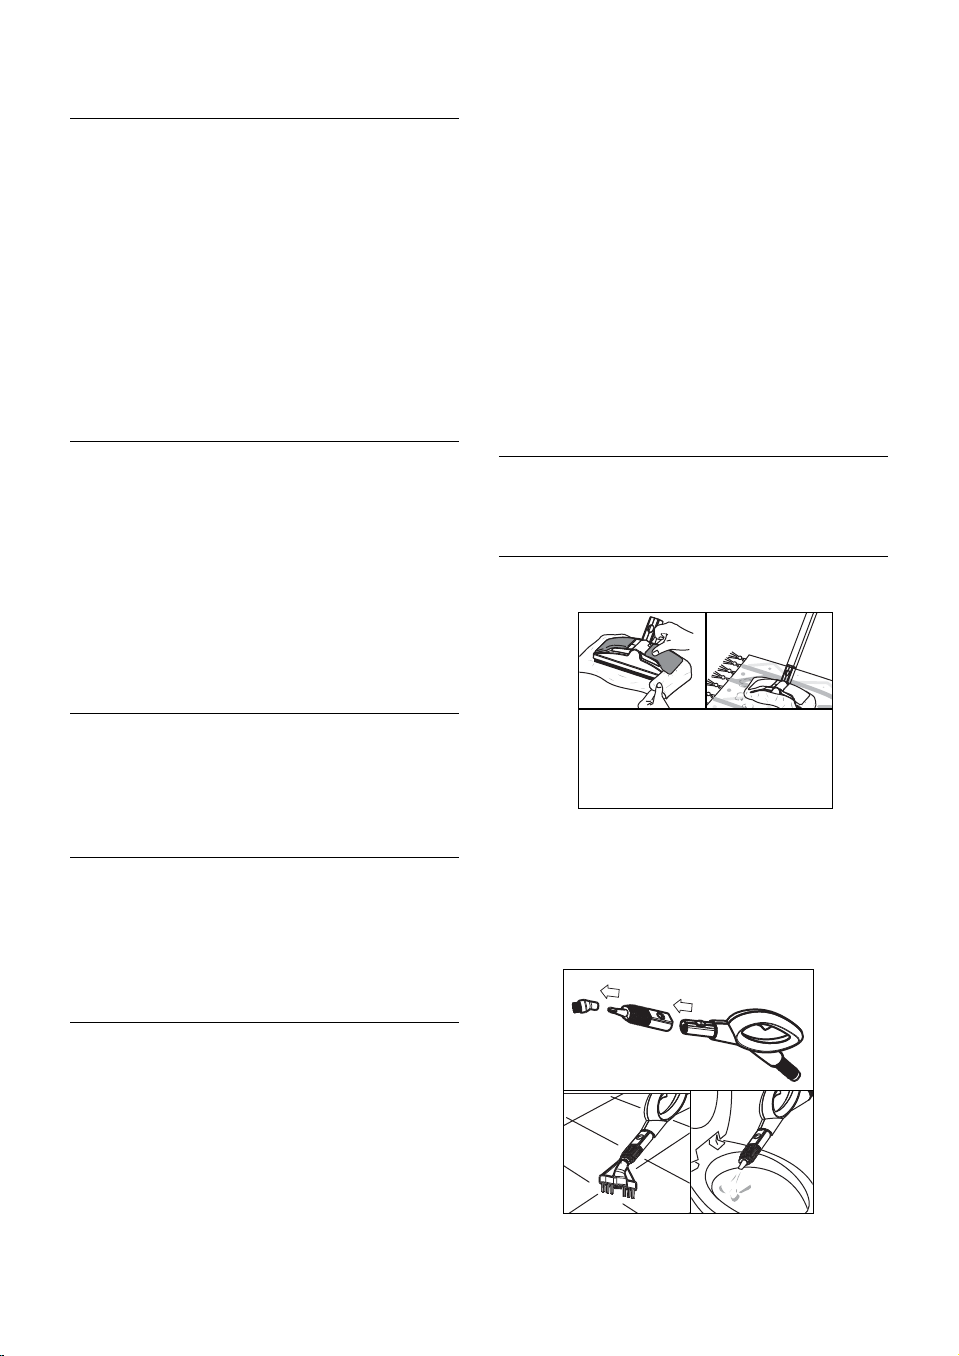
CLEANING TIPS
Rugs and carpet
Tools: carpet/floor brush + cloth attached to the spring clips.
Joints between tiles, radiators, shutters, door jambs,
inaccessible points, vases, bicycles, mountain bikes, car
engines, motorbikes, garden equipment (mower), children's toys (swing)
Tools: crevice tool + brushes (round or in-line).
5
Tips:
* Try out the resistance of fabrics and colours first in a con-
cealed area.
* You should remove dust first using a carpet beater or
vacuum cleaner.
Page 3

Hard floors
Tools: carpet/floor brush + cloth attached to the spring clips.
Tips:
* Not recommended for treated cotto floors, wax polished
floors and parquet.
Mirrors, windows, car windows, verandas and
greenhouses
Tools: squeegee directly on the hose or extension tubes.
Important: in low temperatures, you are recommended to warm the
windows first with a weak jet of steam to avoid the risk of breakage due
to sudden temperature changes.
Walls, vertical surfaces
Tools: Wall cleaner+ frame + cloth.
CLOTHES AND FABRIC FRESHENING SET
Tools: Garment care: Accessory for ironing and revitalization of clothes
and fabrics.
Fitting the garment care
to the appliance
To fit the garment care to the
appliance, insert the plug into the
socket until it hooks into place
(fig. 3). To remove, press the button and pull out (fig. 4).
Using the garment care
• Plug the appliance into the
mains.
• Press the ON/OFF switch (D).
The light on the switch, the
“steam ready light” (B) and
the OK light on the garment
care (fig. 9) come on.
• When “OK” and “steam ready
light” go off, the appliance is
ready to use.
• Hook the relative brush to
the garment care (fig. 10).
• Press and move forward the
button to release
steam. If you want continous
steam, press and move the
button to position. The
button has a safety device
that avoid accidental emissions of steam: that’s the
reason why it is always necessary to press the button
before move it to the steam
position. It is recommended
to unlock the steam button
before switching off the
appliance.
• If you have to refresh curtains, fit the extention tube
and press the button to
position (fig. 11).
• The appliance is fitted with a
accessory ideal for refreshing
clothes (fig. 12).
• You can rest the garment
care on the clothes hook (fig.
13) on a stable surface.
IMPORTANT:
The appliance must not be left
unattended while it is connected
to the mains.
Do not use the garment care if it has been dropped and there are visi-
Armchairs, sofas, cushions, mattresses, car, interiors,
blinds, vertical walls, garden furniture, gazeboes,
garden umbrellas and rocking chairs.
Tools: triangular brush + cloth attached to the spring clips.
6
Tips:
* Try out the resistance of
fabrics and colours first in a
concealed area.
* You should remove dust first
using a vacuum cleaner.
10
W
1
2
1
2
T
I
I
U
9
11
12
13
Page 4

7
ble signs of damage or leaks. When resting the accessory in its hook,
ensure that the surface on which the appliance is rested is stable.
NEVER IMMERSE THE APPLIANCE: IT IS AN ELECTRICAL
PRODUCT! Use a dry soft cloth to clean the appliance.
DANGER OF SCALDINGS!
Always keep attention not to touch the area where
steam is released as it could be hot.
DISPOSAL
In compliance with European Directive 2002/96/EC, the appliance must not be disposed of as household waste, but must be
taken to an official differentiated waste collection centre.
 Loading...