

Page 1
LIMPIADOR DE VAPOR PORTÁTIL
PORTABLE STEAM CLEANER
Instrucciones para el uso
Instructions
Page 2
1
5
6
3
7
8
9
2
4
fig. 1
Page 3

CONSERVE ESTAS INSTRUCCIONES.
ADVERTENCIAS
1) Lea detenidamente el manual de instrucciones antes de utilizar el aparato.
2) Cuando el aparato está funcionando produce vapor: una utilización incorrecta puede ser
peligrosa. El aparato está destinado solamente a usos domésticos para la limpieza de
superficies. El fabricante declina cualquier responsabilidad por los daños derivados de un
uso impropio del aparato.
3) Desenchufe siempre el aparato de la corriente antes de efectuar operaciones para la sustitución de los accesorios y para la limpieza del aparato.
4) Antes de la utilización, compruebe que la tensión de la red corresponde a la indicada en
la placa de datos.
5) Enchufe el aparato únicamente a enchufes de corriente con una capacidad mínima de 10
A y equipados con una eficaz puesta a tierra.
6) NO oriente nunca el chorro de vapor hacia enchufes eléctricos o partes en tensión: podría
estropearlos y exponerle a descargas eléctricas.
7) NO tire nunca del cable de alimentación o del aparato para desenchufarlo de la corriente. Si el cable de alimentación se estropea, únicamente un Centro de Asistencia técnica
autorizado podrá encargarse de su sustitución.
8) Evite el contacto del vapor con la piel. La alta temperatura puede causar graves quemaduras.
No oriente nunca el aparato hacia personas o animales o use el chorro de vapor para la
limpieza de superficies u objetos que no resistan a dicha temperatura.
9) NO vierta detergentes, perfumes u otros productos en el depósito.
USE SOLA Y EXCLUSIVAMENTE AGUA.
10) El aparato no es juguete, por consiguiente, no lo deje sin vigilancia cuando está funcionando, manténgalo fuera del alcance de los niños o de personas incapaces.
11) NO encienda el aparato si le parece defectuoso.
12) NO deje el aparato expuesto a los agentes atmosféricos (lluvia, sol, hielo, etc.).
13) NO SUMERJA EL APARATO EN EL AGUA.
14) Para las reparaciones, póngase en contacto exclusivamente con los Centros de Asistencia
autorizados para conservar inalterada la eficiencia de su aparato y para NO anular la
garantía.
15) Tras haber desenchufado el aparato de la corriente, éste tal vez seguirá emitiendo aún
vapor durante algunos segundos, por lo que debe guardarlo en un lugar no accesible
para los niños.
NO oriente nunca el chorro de vapor hacia enchufes eléctricos o partes en tensión.
Evite el contacto del vapor con la piel. La alta temperatura puede causar graves
quemaduras. No oriente nunca el aparato hacia personas o animales o use el
chorro de vapor para la limpieza de superficies u objetos que no resistan a dicha
temperatura.
NO SUMERJA EL APARATO EN EL AGUA.
3E4
Page 4

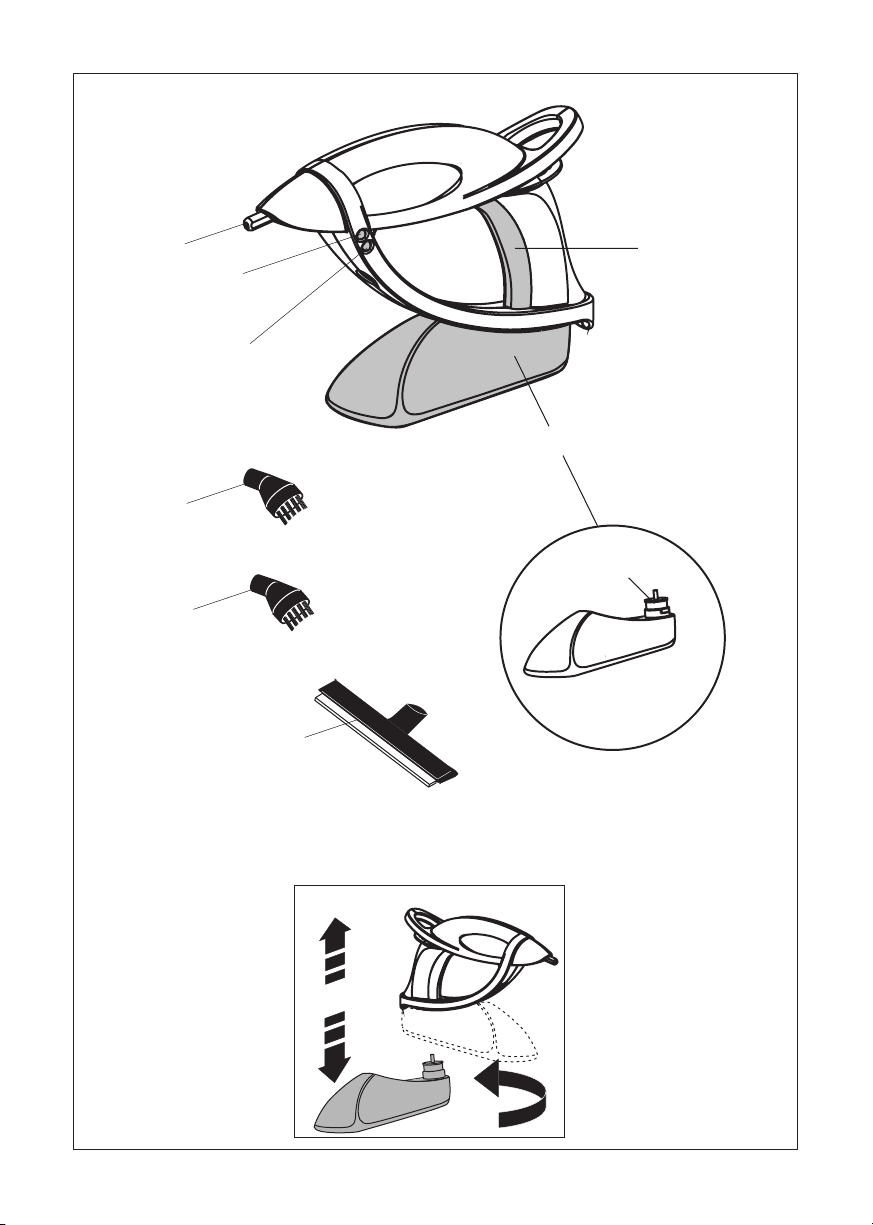
DESCRIPCIÓN DEL APARATO
1 Pulverizador
2 Botón del vapor
3 Depósito del agua
4 Tapón del depósito
5 Indicador luminoso conexión red eléctrica
6 Indicador luminoso vapor listo
7/8
Accesorio en pincel
9 Limpiacristales
INSTRUCCIONES PARA EL USO
• Extraiga el tapón (4) con el tubo de inmersión incorporado y llene el depósito (3).
• El aparato funciona con agua corriente del grifo. Si el agua presenta un alto contenido cal-
cáreo (dureza superior a los 27°F), le aconsejamos usar agua destilada diluida al 50% con
agua del grifo. No use nunca solamente agua destilada.
• Ponga de nuevo el tapón y encaje el depósito en el pulverizador empujándolo hacia arriba
y girándolo de 90°.
• Enchufe el aparato a la corriente eléctrica; se encenderán entonces los indicadores lumino-
sos (5 y 6).
• El indicador luminoso (5) permanecerá encendido constantemente para indicar que el apa-
rato está enchufado a la red eléctrica y el indicador luminoso (6) se apagará cuando el pulverizador esté listo para producir vapor.
• Durante la primera utilización, deberá cebar la bomba. Para ello, presione y suelte el botón
del vapor (2) varias veces seguidas. Con la bomba cebada, obtendrá un chorro de vapor
con cada presión del botón (2). Para obtener un chorro de vapor continuo, presione el botón
de emisión (2) cada dos segundos. Puede también obtener un chorro de agua caliente presionando el botón (2) varias veces seguidas sin interrupciones.
• Cuando el agua del depósito se acabe, antes de pasar a un posterior llenado, apague el
aparato desenchufándolo de la corriente eléctrica.
• Gire el depósito de 90° para poder sacarlo del pulverizador y tire de éste hacia abajo (fig. 1).
• Para conseguir una acción de limpieza más eficaz contra la suciedad más resistente y en
los puntos más difíciles (ej.: juntas de las baldosas, etc.) use el accesorio en pincel (7 y 8),
encajado directamente en el pulverizador (1). Para limpiar ventanas y espejos, use el accesorio limpiacristales (9) encajándolo directamente en el pulverizador (1).
Recomendación: para el uso con temperaturas bajas, es aconsejable calentar primero las ventanas con un chorro de vapor débil para evitar roturas debidas al brusco cambio de temperatura.
ATENCIÓN
Para evitar el peligro de quemaduras y para obtener una mayor eficiencia, le aconsejamos
mantener perfectamente limpio y libre de eventuales incrustaciones el agujero pequeño de salida del vapor tanto del pulverizador como de los accesorios. La obstrucción de dichos agujeros
puede causar un recalentamiento de partes del aparato que se tocan durante el uso.
La garantía del producto vencería automáticamente en caso de no efectuar este mantenimiento.
IMPORTANTE: vacíe siempre el depósito del agua antes de guardar el aparato.
Page 5

KEEP THESE INSTRUCTIONS
IMPORTANT
1) Read this manual thoroughly before using the appliance.
2) When in function, the appliance produces steam. Incorrect use could be dangerous. The
appliance is designed for cleaning surfaces in the home only. The manufacturer declines
all liability for damage deriving from improper use of the appliance.
3) Before changing tools or cleaning the appliance, always unplug from the mains.
4) Before use, make sure the mains voltage corresponds to the voltage indicated on the rating
plate.
5) Connect the appliance to an efficiently earthed socket with a minimum current rating of 10
A only.
6) Never direct the steam jet towards the socket or live parts. They could be damaged, with
the risk of dangerous electrical shock.
7) NEVER unplug the appliance by pulling the power cable or the appliance itself. If the cable
is damaged or requires replacing, contact an authorised service centre only.
8) Avoid the steam coming into contact with the skin. The high temperature could cause
serious burns.
Never direct the steam jet towards persons or animals or towards surfaces or objects which
could be damaged by high temperatures.
9) NEVER add detergents, perfumes or other substances to the tank.
USE WATER ONLY.
10) The appliance is not a toy. Never leave unattended when turned on. Keep away from children and unfit persons.
11) Do not use the appliance if it appears to be faulty.
12) Protect the appliance from atmospheric agents (rain, frost, sun, etc).
13) NEVER IMMERSE THE APPLIANCE IN WATER.
14) For repairs, contact an authorized service centre only to maintain the efficiency of your
appliance and avoid invalidating the guarantee.
15) After unplugging from the mains socket, the appliance may continue to give off steam for
a few seconds. Place it out of reach of children.
NEVER direct the steam jet towards electrical sockets or live parts.
Avoid the steam coming into contact with the skin. The high temperature could
cause serious burns. Never direct the steam jet towards persons or animals or
towards surfaces or objects which could be damaged by high temperatures.
NEVER IMMERSE THE APPLIANCE IN WATER.
5
GB
Page 6

DESCRIPTION OF THE APPLIANCE
6
1) Spray
2) Steam button
3 Water tank
4) Tank cap
5) Power on indicator light
6) Steam ready indicator light
7/8)
Brush tool
9) Squeegee
INSTRUCTIONS FOR USE
• Remove the cap (4) with suction tube and fill the tank (3).
The appliance works with normal tap water. If the water is very hard (hardness above 27°F),
we suggest using distilled water diluted 50% with tap water. Never use distilled water alone.
• Replace the cap and fit the tank onto the sprayer by pushing upwards and rotating through
90°.
• Plug into the mains. Indicator lights 5 and 6 will come on.
• Indicator light (5) remains on to indicate that the appliance is connected to the mains.
Indicator light (6) goes off when the spray is ready to discharge steam.
• The first time you use the appliance, you must prime the pump.
Press and release the steam button (2) a number of times.
When the pump is primed, a jet of steam will be emitted each time you press the button (2).
To obtain a continuous jet of steam press the steam button (2) every two seconds. You can
also obtain a jet of hot water by pressing the button (2) a number of times running without
interruption.
• When the water in the tank has been used up, before refilling, turn off the appliance by
unplugging from the mains.
• Rotate the tank through 90° to separate it from the sprayer and pull downwards (fig.1).
• For more efficient cleaning to remove resistant dirt and in difficult to reach points (eg joints
between tiles etc), use the brush tool (7 and 8) fitted directly to the sprayer (1). To clean windows and mirrors, use the squeegee tool (9) fitted directly to the sprayer (1)..
Recommendation: in low temperatures, you are recommended to warm the windows first with a
weak jet of steam to avoid the risk of breakage due to sudden temperature changes.
IMPORTANT!
To avoid burns and improve efficiency, the steam discharge nozzles of the sprayer and tools
should be kept clean and free from scale. If the nozzles are blocked, parts accessible during use
could overheat.
The guarantee is invalidated if this routine operation is not performed.
IMPORTANT: Always empty the tank of water before putting the appliance away.
Page 7

WARNING - THIS APPLIANCE MUST BE EARTHED
IMPORTANT
The wires in the mains lead are coloured in accordance with
the following code:
Green and yellow: Earth
Blue: Neutral
Brown: Live
As the colours of the wires in the mains lead may not correspond with the coloured markings identifying the terminals in
your plug, proceed as follows:
The green and yellow wire must be connected to the terminal
in the plug marked with the letter E or the earth symbol
or coloured green or green and yellow.
The blue wire must be connected to the terminal marked with
the letter N or coloured black.
The brown wire must be connected to the terminal marked with
the letter L or coloured red.
N
E
L
ELECTRICAL CONNECTION (UK ONLY)
A) If your appliance comes fitted with a plug, it will incorpo-
rate a 13 Amp fuse. If it does not fit your socket, the plug
should be cut off from the mains lead, and an appropriate plug fitted, as below.
WARNING: Very carefully dispose of the cut off plug after
removing the fuse: do not insert in a 13 Amp socket elsewhere in the house as this could cause a shock hazard.
With alternative plugs not incorporating a fuse, the circuit
must be protected by a 15 Amp fuse.
If the plug is a moulded-on type, the fuse cover must be
re-fitted when changing the fuse using a 13 Amp Asta
approved fuse to BS 1362. In the event of losing the fuse
cover, the plug must NOT be used until a replacement fuse
cover can be obtained from your nearest electrical dealer.
The colour of the correct replacement fuse cover is that as
marked on the base of the plug.
B) If your appliance is not fitted with a plug, please follow
the instructions provided below:
7
Advertencias para la eliminación correcta del producto según establece la Directiva Europea
2002/96/CE.
Al final de su vida útil, el producto no debe eliminarse junto a los desechos urbanos.
Puede entregarse a centros específicos de recogida diferenciada dispuestos por las administraciones municipales, o a distribuidores que facilitan este servicio. Eliminar por separado un electrodoméstico significa evitar posibles consecuencias negativas para el medio ambiente y la salud derivadas de una eliminación inadecuada y
permite reciclar los materiales que lo componen, obteniendo así un ahorro importante de energía y recursos.
Para subrayar la obligación de eliminar por separado los electrodomésticos, en el producto aparece un contenedor de basura móvil tachado.
Important information for correct disposal of the product in accordance with EC Directive 2002/96/EC.
At the end of its working life, the product must not be disposed of as urban waste.
It must be taken to a special local authority differentiated waste collection centre or to a dealer providing this service.
Disposing of a household appliance separately avoids possible negative consequences for the environment
and health deriving from inappropriate disposal and enables the constituent materials to be recovered to
obtain significant savings in energy and resources.As a reminder of the need to dispose of household
appliances separately, the product is marked with a crossed-out wheeled dustbin.
Page 8

5793106900/06.06
 Loading...