

Page 1

DIRECTIONS FOR USE
TOASTER-OVEN-BROILER
De’Longhi products are the finest and most versatile products
available. Please read this booklet carefully to ensure that you
obtain the fullest benefit from your appliance.
MODE D'EMPLOI GRILLEPAIN - FOUR - GRIL
Les produits De' Longhi sont les meilleurs et les plus polyvalents
électroménagers disponibles dans le commerce. Nous vous
prions de bien vouloir lire attentivement ce mode d'emploi afin
de tirer les meilleurs avantages de votre nouvel appareil.
INSTRUCCIONES PARA EL
USO TOSTADOR - HORNO GRILL
Los productos De' Longhi son los mejores y los más versátiles
del comercio. Les rogamos que lean atentamente este manual,
para poder utilizar lo mejor posible este electrodoméstico.
INSTRUÇÕES PARA A UTILIZAÇÃO DA TORRADEIRA
- FORNO - GRELHADOR
Os aparelhos da De’Longhi são os produtos mais requintados e
versáteis que existem. Aconselhamos a leitura atenta destas
instruções para assegurar a melhor utilização deste aparelho.
GB
F
E
P
GB F E 21-01-2003 9:22 Pagina 1
Page 2
A B
C
G
H
I
L
D
E
F
N
M
O
2
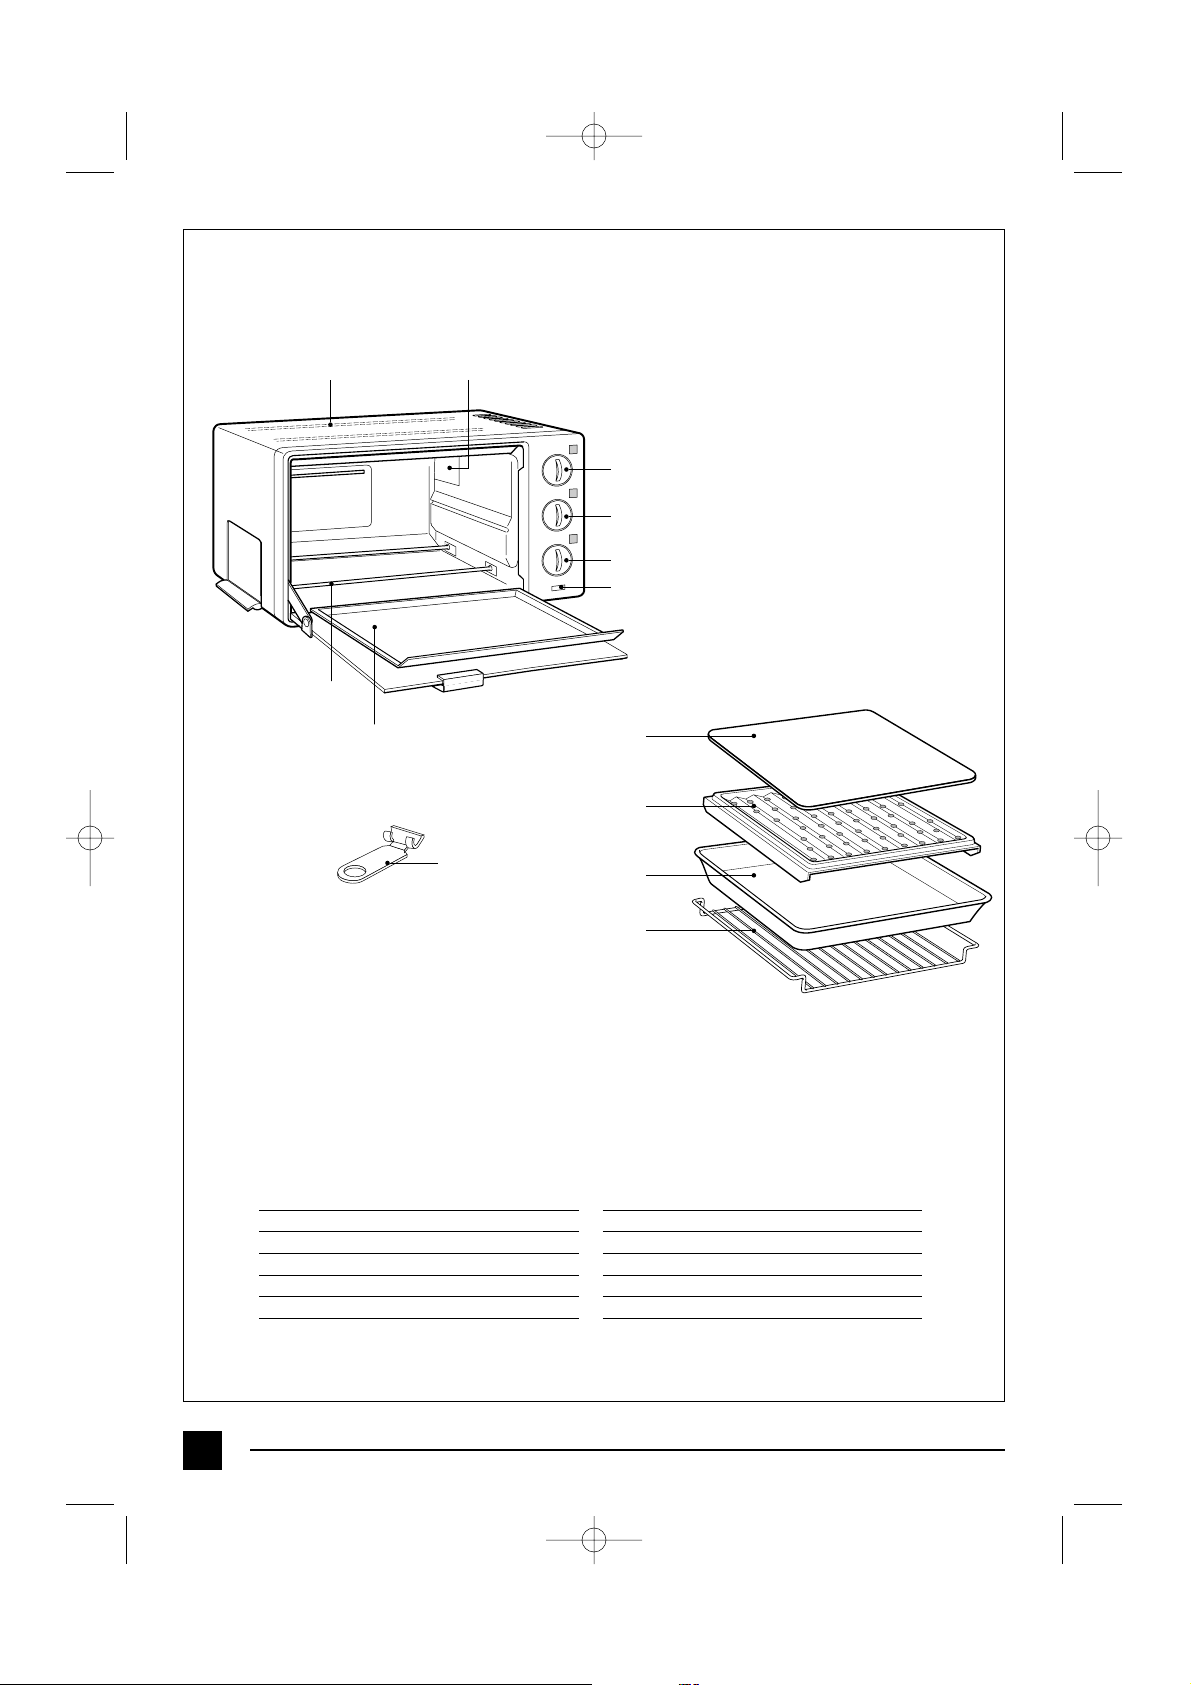
A. Upper element
B. Oven light (*)
C. Thermostat dial
D. On/OFF and Toast programming dial
E. Selector dial
F. Pilot lamp
G. Cookie sheet (*)
H. Broiling rack
I. Oven pan
L. Wire rack
M. Lower element
N. Handgrip for wire rack (*)
O. Crumb Tray (*)
(*) Optional: not for all models
DESCRIPTION
GB F E 21-01-2003 9:22 Pagina 2
Page 3

IMPORTANT SAFEGUARDS
When using electrical appliances, basic safety precautions should always be followed,
including the following:
1. READ ALL INSTRUCTIONS.
2. Do not touch hot surfaces. Use handles or dials.
3. Before using this appliance, move it two to four inches away from the wall or any object on the counter top. Remove
any object that may have been placed on top of the appliance. Do not use on surfaces where heat may cause a
problem.
4. To protect against electrical shock, do not place unit in or under water. See instructions for cleaning.
5. Close supervision is necessary when any appliance is used by or near children.
6. Unplug from outlet when not in use and before cleaning. Always turn the ON/OFF dial to "OFF" and the temperature
dial to " " before unplugging.
7. Do not operate any appliance with a damaged cord or plug or after the appliance malfunctions, or has been damaged
in any manner. Return appliance to the nearest authorized service facility for examination, repair or adjustment.
8. The use of accessory attachments not recommended by the appliance manufacturer may cause injuries.
9. Do not use outdoors.
10. Do not let cord hang over edge of table or counter, or touch hot surfaces.
11. Do not place on or near a hot gas or electric burner.
12. Extreme caution must be used when moving an appliance containing hot oil or other hot liquids.
13. If the plug gets hot, please call a qualified electrician.
14. Do not use this appliance for other than intended use.
15. Use extreme caution when removing the oven pan or disposing of hot grease.
16. Do not clean with metal scouring pads. Pieces can break off the pad and touch electrical parts, creating a risk of
electric shock.
17. To assure safe operation, oversized foods or utensils must not be inserted into the oven.
18. A fire may occur if this appliance is covered or touching flammable material, including curtains, draperies, walls, etc.,
when in operation.
19. CAUTION: Never leave the toaster-oven-broiler unattended when in use (especially when broiling and toasting).
20. When broiling, the oven-pan, the broiling rack and wire rack must be used according to the instructions on page 7.
21. Extreme caution should be exercised when using containers other than oven proof metal glass or ceramic.
22. Do not store any materials, other than the manufacturer's recommended accessories, in the oven when not in use.
23. Do not place any of the following materials in the oven: paper, cardboard, plastic and the like.
24. Do not cover any part of the oven with metal foil. This will cause overheating of the oven.
25. To switch off the toaster-oven broiler, turn the ON/OFF dial to "OFF" and the temperature dial
to " ".
THIS PRODUCT IS FOR HOUSEHOLD USE ONLY
SAVE THESE INSTRUCTIONS
WARNING: Once having removed the appliance from the packaging, check that the door is intact. As the door is made
from glass, it is fragile, and should be replaced if visibly chipped, scored or scratched. Furthermore, when using, cleaning
or moving the appliance, do not slam or bang the door or pour cold liquids on the glass when the appliance is hot.
3
GB F E 21-01-2003 9:22 Pagina 3
Page 4
Notes and tips
4
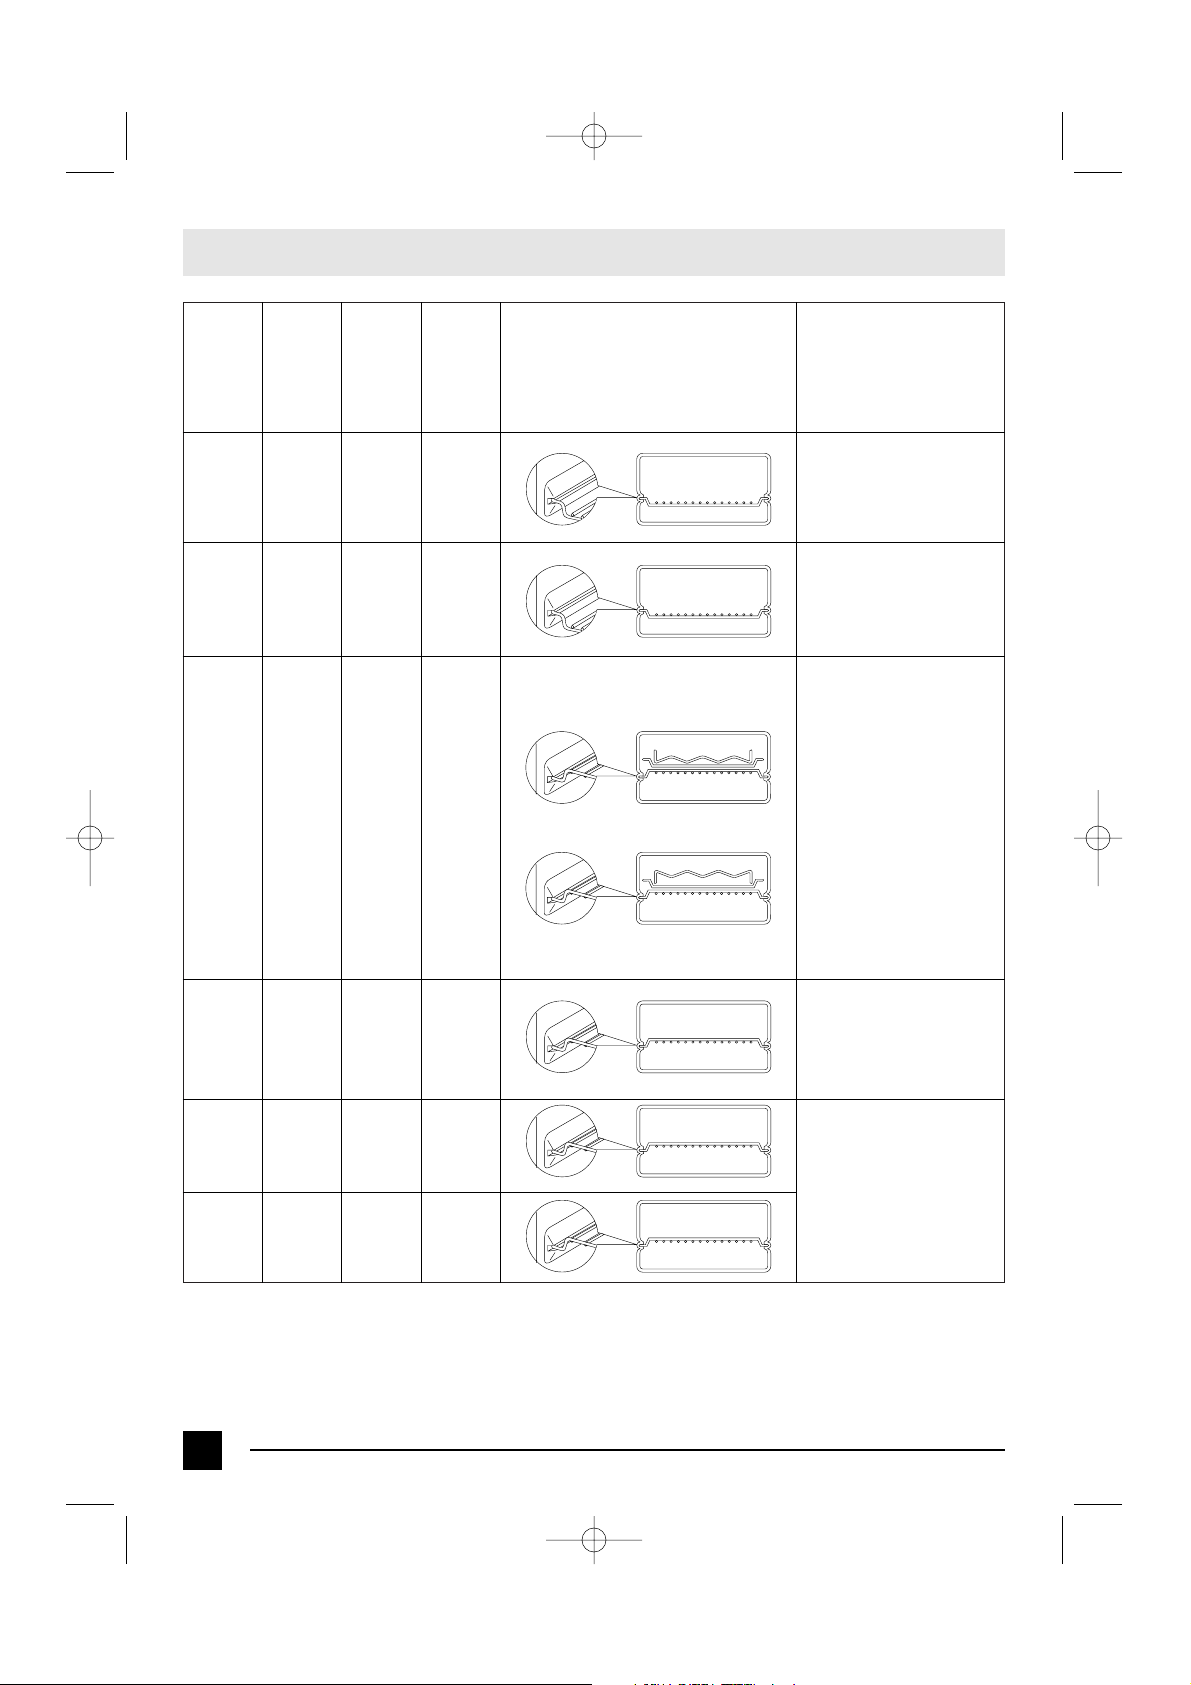
SUMMARY OF OPERATION
Program
Position ON/OFF
and toast
programming dial
Keep
warm
ON
Position of
thermostat
dial
KEEP
WARM
Position of
function
selector dial
Position of wire rack/accessories
BAKE/TOAST
Turn to this setting to keep hot food
warm. Do not hold food more than
an hour or reheat cold food. If not
hot enough for serving turn
temperature dial up.
Bake ON
UP TO
470 °F
BAKE/TOAST
Ideal for meat, pizza, cakes, bake
casseroles, fruit desserts, fish, stuffed vegetables, puddings and other
moist foods that do not require
browning
and crisping.
Broil ON
BROIL
Broil
Always use the broiling rack (H) set in
the oven pan (I).
The oven pan with the broiling rack are
shown in the two broiling positions:
Use the UPPER POSITION when a
faster browning and broiling time is
required. Place the broiling rack with
side well turned downwards to rest in
the pan. Allow 1 inch between the food
and the upper element (A).
Ideal for foods such as hamburghers,
steaks, kebabs.
Use the LOWER POSITION for foods
that require a longer broiling time such
as chicken.
For the lower position, turn the broiling
rack so that it rests in the pan with its
side walls upwards.
Toast
Up to
7 minutes
TOAST
BAKE/TOAST
Set the ON/OFF dial to the color
desired. Some breads, muffins
etc.. will take longer than others.
Reset dial if results are too light.
Place the bread to be toasted
following instructions on page 8.
To p
broiling
ON or
Up to
7 minutes
BROIL
Broil
Use the broil settings to top-brown open-
face sandwiches, cheese toppings, hors
d'ouevres. When using for the first time
keep an eye on the food and reduce the
operating time so that over browning is
thus avoided.
Sandwich
Up to
7 minutes
TOAST
BAKE/TOAST
Upper position
Lower position
GB F E 21-01-2003 9:22 Pagina 4
Page 5
5
OPTIONAL ACCESSORIES
• COOKIE SHEET (G)
Must be placed directly on the wire rack. Indispensable for baking biscuits and pastries.
•OVEN LIGHT (B) AND PILOT LAMP (F)
• If the oven light (B) has been provided for, said light will remain turned ON when the oven is in
function.The pilot lamp (F) will turn OFF once the selected baking temperature inside the oven is reached
and will turn on and off during cooking.
• If your oven is not provided with the oven light (B), the pilot lamp (F) will light continuosly when the oven
is switched on (it will not have the function of a temperature indicator).
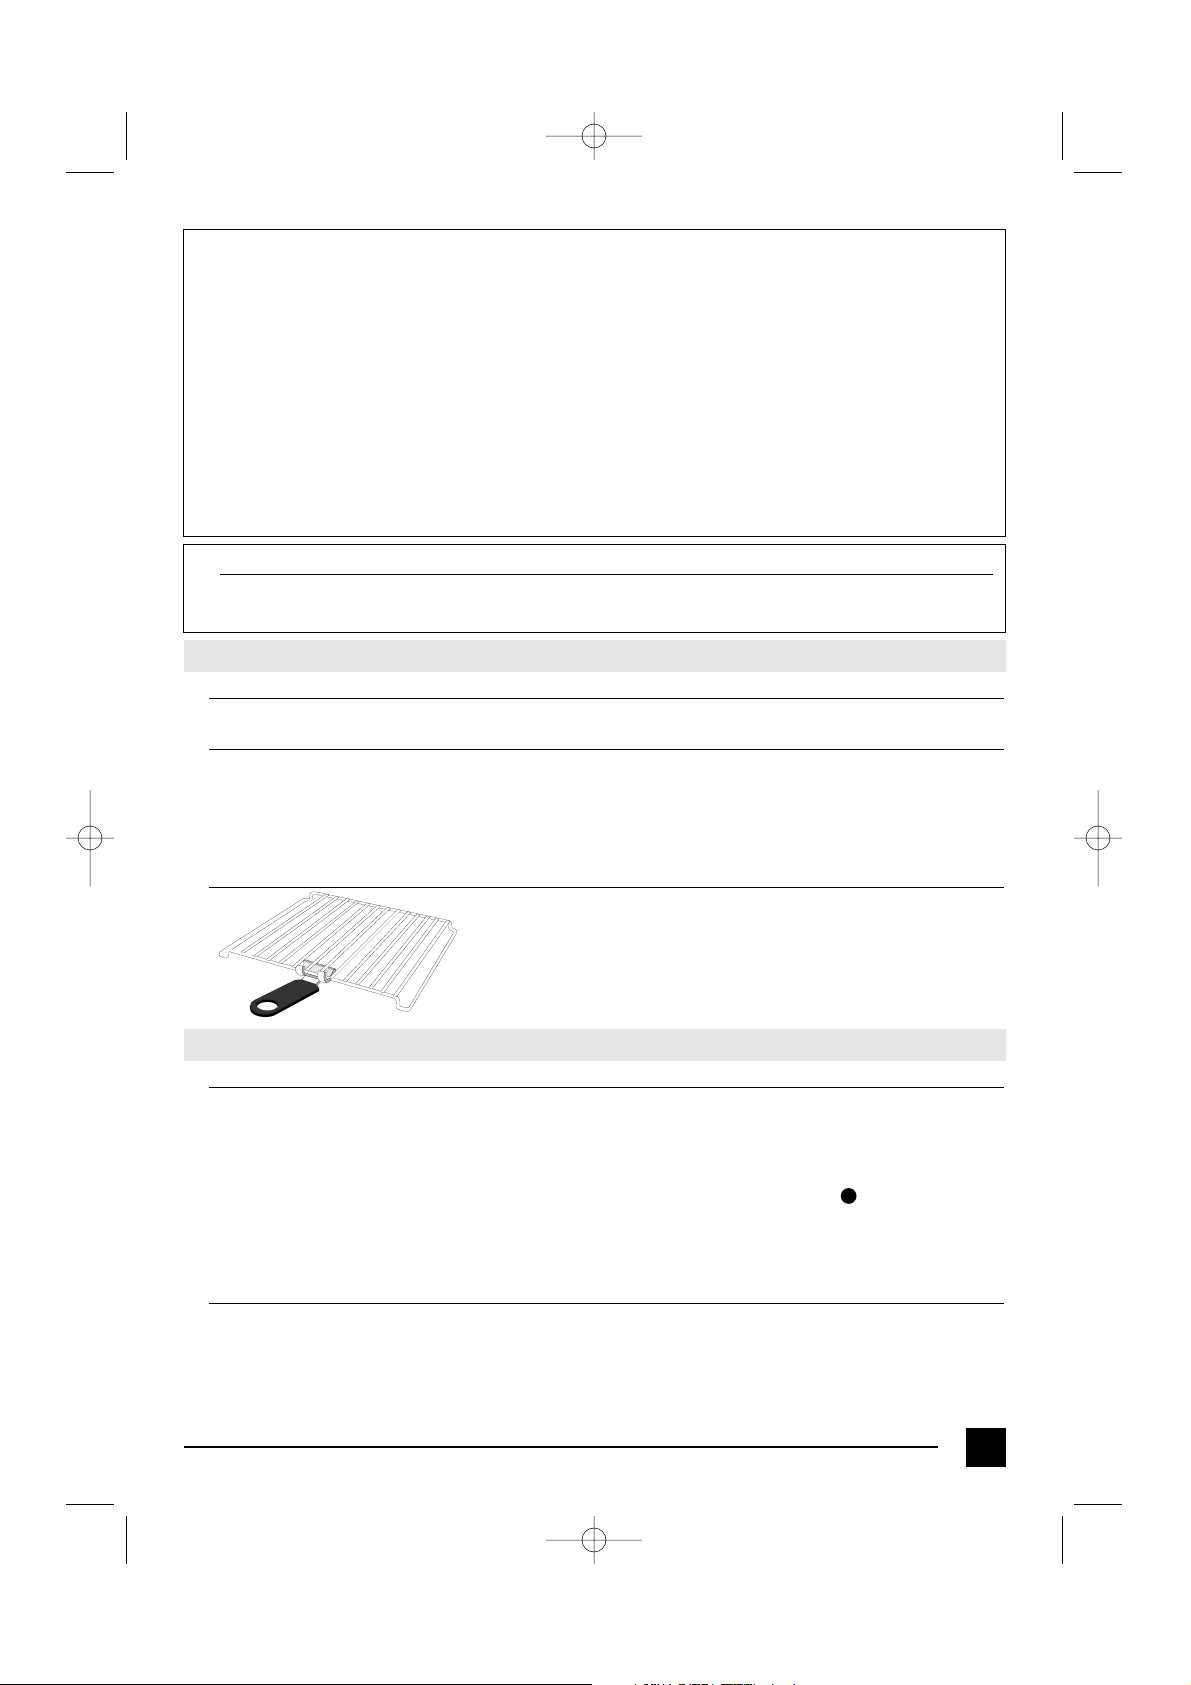
• HANDGRIP FOR WIRE RACK (N)
Use handgrip to bring the wire rack out of the oven when it is hot.
COOKING PROGRAMMES
1. HOW TO KEEP FOOD WARM
Place the food to be kept warm on the wire rack
• Set the thermostat dial (C) to the "KEEP WARM" position.
• Set the ON/OFF (D) dial to the "ON" position.
• Set the function selector dial to the "TOAST BAKE" position.
Once the "keep warm" function is no longer needed, turn the thermostat dial to " " and the ON/OFF
dial to OFF.
This feature is designed to keep foods warm, after they are cooked for short periods of time without overcooking. We
do not recommend keeping foods warm for prolonged periods or using this feature to reheat frozen or cold foods.
2. INSTRUCTIONS FOR BAKING
You can bake foods in your oven, just as in your regular oven. Casseroles or baking dishes may be placed
directly on the removable wire rack (L). Use the oven pan (I)(or cookie sheet, if provided) to bake such
items as cookies, biscuits, rolls and uncovered casserole dishes. Place the oven pan or the cookie sheet
directly on the removable wire rack (please refer to the table on page 4 for wire rack position).
•Your product is equipped with a polarized alternating current line plug (a plug having one blade wider
than the other). This plug will fit into the power outlet only one way. This is a safty feature. If you are
unable to insert the plug fully into the outlet, try reversing the plug. If the plug should still fail to fit, contact
your electrician to replace your obsolete outlet. Do not defeat the safety purpose of the polarized plug.
•Plug the cord into a 120 volt AC outlet.
•The cord length of this product has been selected to reduce the possibility of tangling in or tripping over a
longer cord. If more cord length is needed, an extension cord may be used. It should be rated no less
than 15 amps., 120 volts, and have Underwriters Laboratories/CSA listing.
•A six feet long, 15 amp. extension cord may be purchased from your local authorized service facility. When
using a longer cord, be sure not to let it drape over the working area or dangle where someone could
accidentally pull or trip over it.
• Handle the cord carefully for longer life; avoid jerking or straining the cord at the plug and appliance
connections.
• Note:
Initial start up operation may result in minimal smell and smoke (about 15 min.). This is normal. It is due to the
protective substance on heating elements which protects them from salt effects during shipping from factory.
GB F E 21-01-2003 9:22 Pagina 5
Page 6
1. Close the door
2. Set the thermostat dial (C) to the desired position/ temperature
3. Turn the ON/OFF timer dial to "ON"
4. Turn the function selector dial to the TOAST/BAKE position.
5. When baking is finished turn the thermostat dial to the " " position and the ON/OFF dial
to the "OFF" position.
•NOTE:
We do not recommend the use of glass covers on casseroles.
Glass cooking dishes should never be closer than one inch from the
heating element.
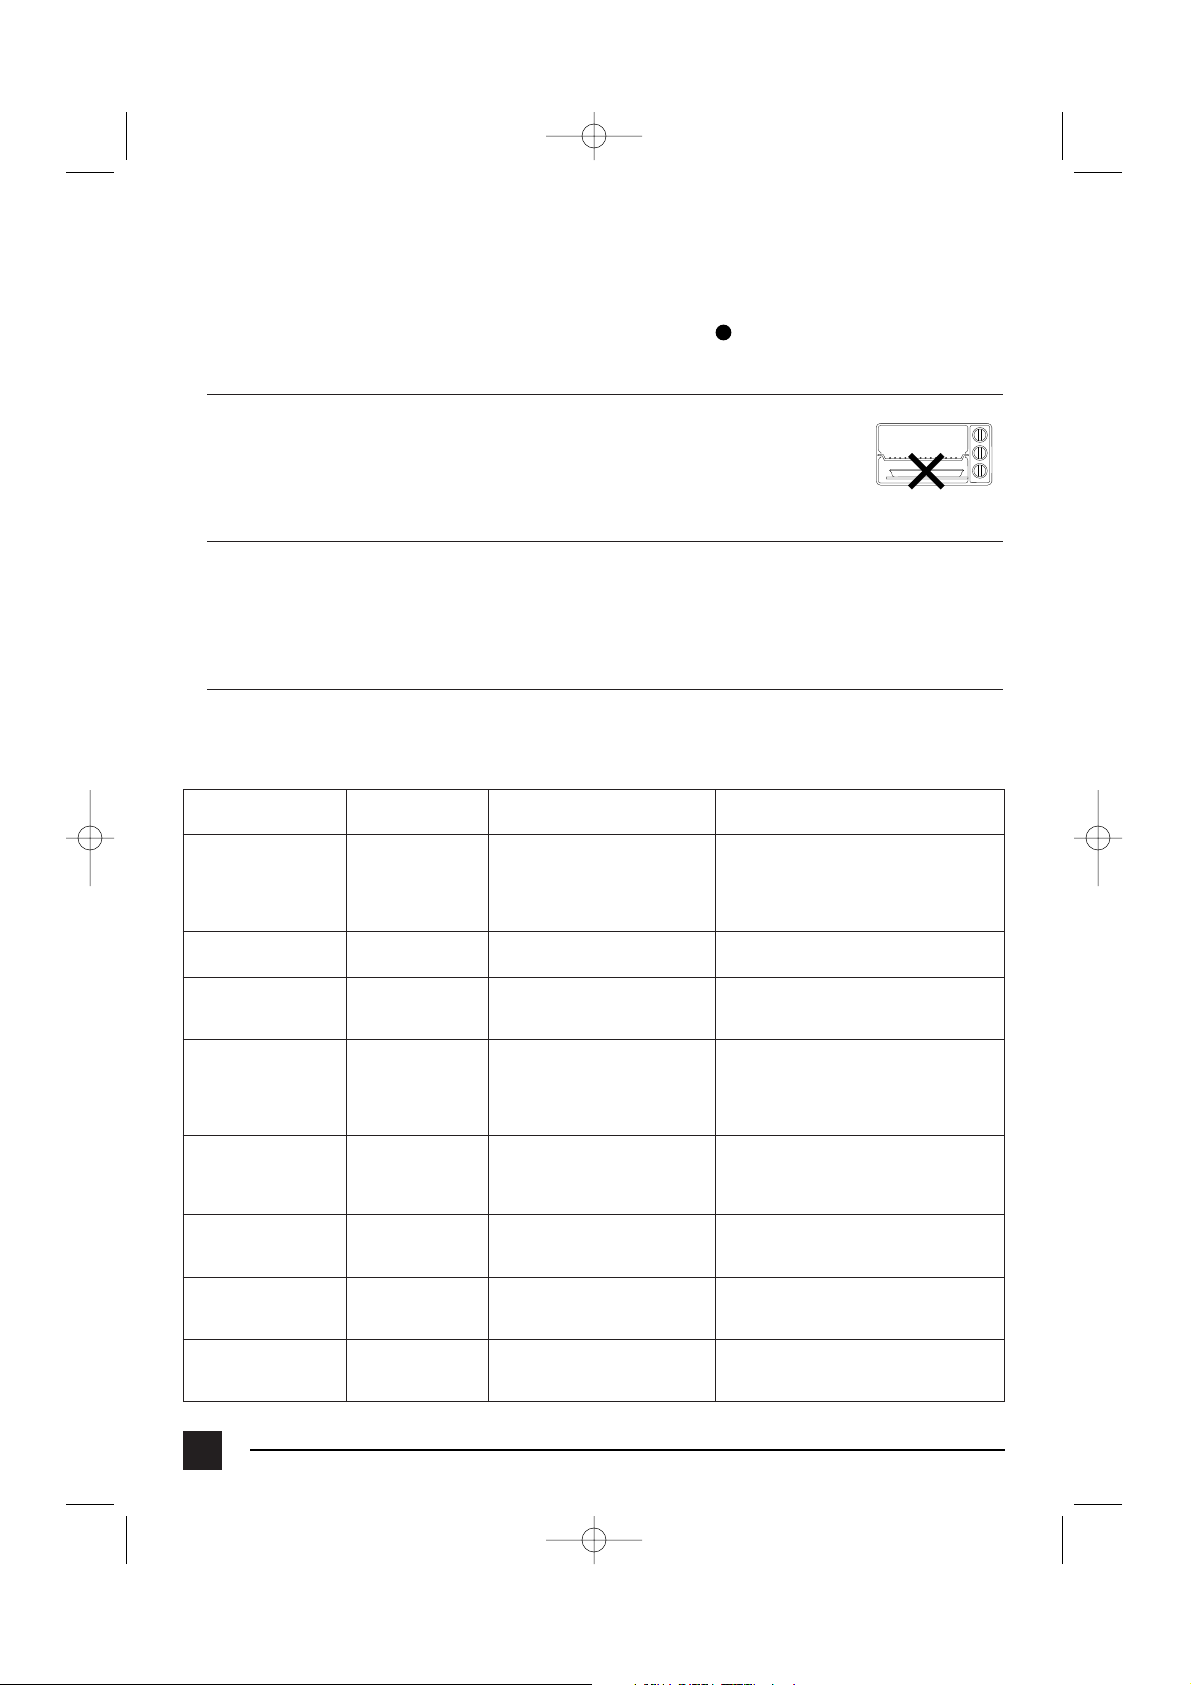
• During the bake and toast function, do not put the oven pan (or any other
accessory/container) directly on the lower heating element.
•HELPFUL BAKING HINTS
To obtain best performance from this toaster-oven-broiler:
• Do not overfill the oven. Whenever possible, place foods in center of oven.
•Avoid opening the door too frequently to prevent heat loss.
•Foil may be used to cover the baking dish or pan. Be sure the ends of foil are tucked closely against the
edge of the baking dish/pan.
•TEMPERATURE AND TIME FOR TYPICAL FOODS ( baking and roasting)
The suggested temperature and times will vary depending on the temperature of the food placed in the oven, the
quantity and personal preference. Times given for meat and poultry are for refrigerator temperature. Add five
minutes for preheating the oven. In order to avoid overcooking when using for the first time we suggest you
to set a low temperature. As you use the oven, the best settings will become familiar.
6
Food
Temperature
setting
Notes and tips. (For wire rack position refer
to table on page 4)
Approximate time
Whole chicken
2,5-3 lbs. Unstuffed
400 °F
Turning at half of cooking time is not
required. It is possible to cook also
above the broiling rack inverted (lower
position) inside the oven pan, in order to
reduce spattering.
80-90 min. or until internal
temperature of 175 °F in thigh
and breast
Pork loin or Rib Roast 2-3
lbs
400 °F
Roast as for whole chicken.
80-90 min. or until internal
temperature of 170 °F is reached
Beef Sirloin or Rib Roast
3 lbs
400 °F
No turning is needed.
60-70 min. or until tender
and brown
Meat loaf
2-2,5 lbs
350 °F
Use the oven pan.
No turning is needed. Mix and beat together
1,5 -2 lbs at minced meat (beef). With eggs,
bread-crumbs, salt, pepper and flavouring.
50-60 min.
Baking potatoes
3-4 large cut into pieces
400 °F
Cut the potatoes into small pieces,
use the oven pan, mix three times when
cooking and after at least 20 minutes.
50-60 min.
Loaf cakes
350 °F
Use metal rectangular moulds.
Follow traditional recipe
timing (slightly lowered)
Pies, uncovered
350 °F
Use metal moulds for cakes
Follow traditional recipe
timing (slightly lowered)
Cookies: drop rolled and
cut, sliced, formed
375 °F
Insert the rack as for TOASTING function.
Use the cookie sheet (G) (if provided) or the
oven pan.
10-15 min.
GB F E 21-01-2003 9:22 Pagina 6
Page 7

•TOP BROWNING
Top browning is ideal for melting, crisping and toasting food surfaces. Use it for open face sandwiches, prebuttered muffins or browning cooked casseroles.
1. Place the food on the oven pan (or on the cookie sheet, if provided) and place it on the wire rack.
2. Close the door, set both the selector and temperature dials to BROIL.
3. Turn the ON/OFF timer knob to MEDIUM or to ON (for longer browning times)
When experimenting with new uses, watch the food to avoid overbrowning.
When the browning cycle is completed (top surface with desired colour) turn the thermostat dial to " " and
the ON/OFF dial to OFF.
3. INSTRUCTIONS FOR BROILING
Always use the oven pan with the broiling rack for broiling. No preheating of the broiler is necessary.
Do not leave the broiler unattended when in use. Before using the broiler for the first time and after use,
wash the pan and the rack with warm, sudsy water. Do not cover the oven wire rack with foil.
This prevents fat and oils from draining, causing spatter and smoking, and also restricts air circulation for
proper ventilation.
•BROILING
1. Place the oven wire rack as shown in the table on page 4.
2. Place the food to be broiled on the broiling rack (H) (set inside the oven pan), then put the assembly on
the wire rack.
3. Always leave the oven door open to the stop position (as shown below).
4. Turn the thermostat dial (C) and the selector dial (E) to "BROIL".
5. Turn the ON/OFF dial to "ON".
6. Turn the function control knob to "BROIL".
7. W hen broiling is finished, turn the ON/OFF dial to the "OFF" position and the
thermostat dial to the " " position. Care should be taken when turning food,
removing the oven pan and disposing of the grease collected while browing. Use hot
pads.
• Note:
While smoke is an inherent characteristic of good broiling, the following tips should eliminate or greatly
reduce smoking:
•Trim excess fat from meat and score the edges to prevent curling. Dry meat, fish and poultry surfaces
with paper towel.
•For best results, thaw frozen meats before broiling. These two precautions will reduce or eliminate smoke
from the broiler.
• Placing the food on the broiling rack allows the juices and fat to drip into the oven pan and decreases
spattering while broiling.
• If frozen steaks and chops are broiled, allow 1 and a half to 2 times the required broiling time as that
required for unfrozen meat.
• If grease "pops" during broiling, turn the temperature control dial to a lower setting.
• Remove grease from the pan and wash the pan and broiling rack after use.
•The broiler should be cleaned inside after each use. Too much grease accumulation causes smoking.
Use any non-abrasive cleaner and hot water.
•For very thick steaks and other thick foods, we recommend using the lower broiling rack position.
• Since fish is non-fatty it can be broiled directly on the oven pan. Broil until it flakes easily with a fork. Thin
fillets need not to be turned.
7
GB F E 21-01-2003 9:22 Pagina 7
Page 8
4. DIRECTIONS FOR AUTOMATIC TOASTING
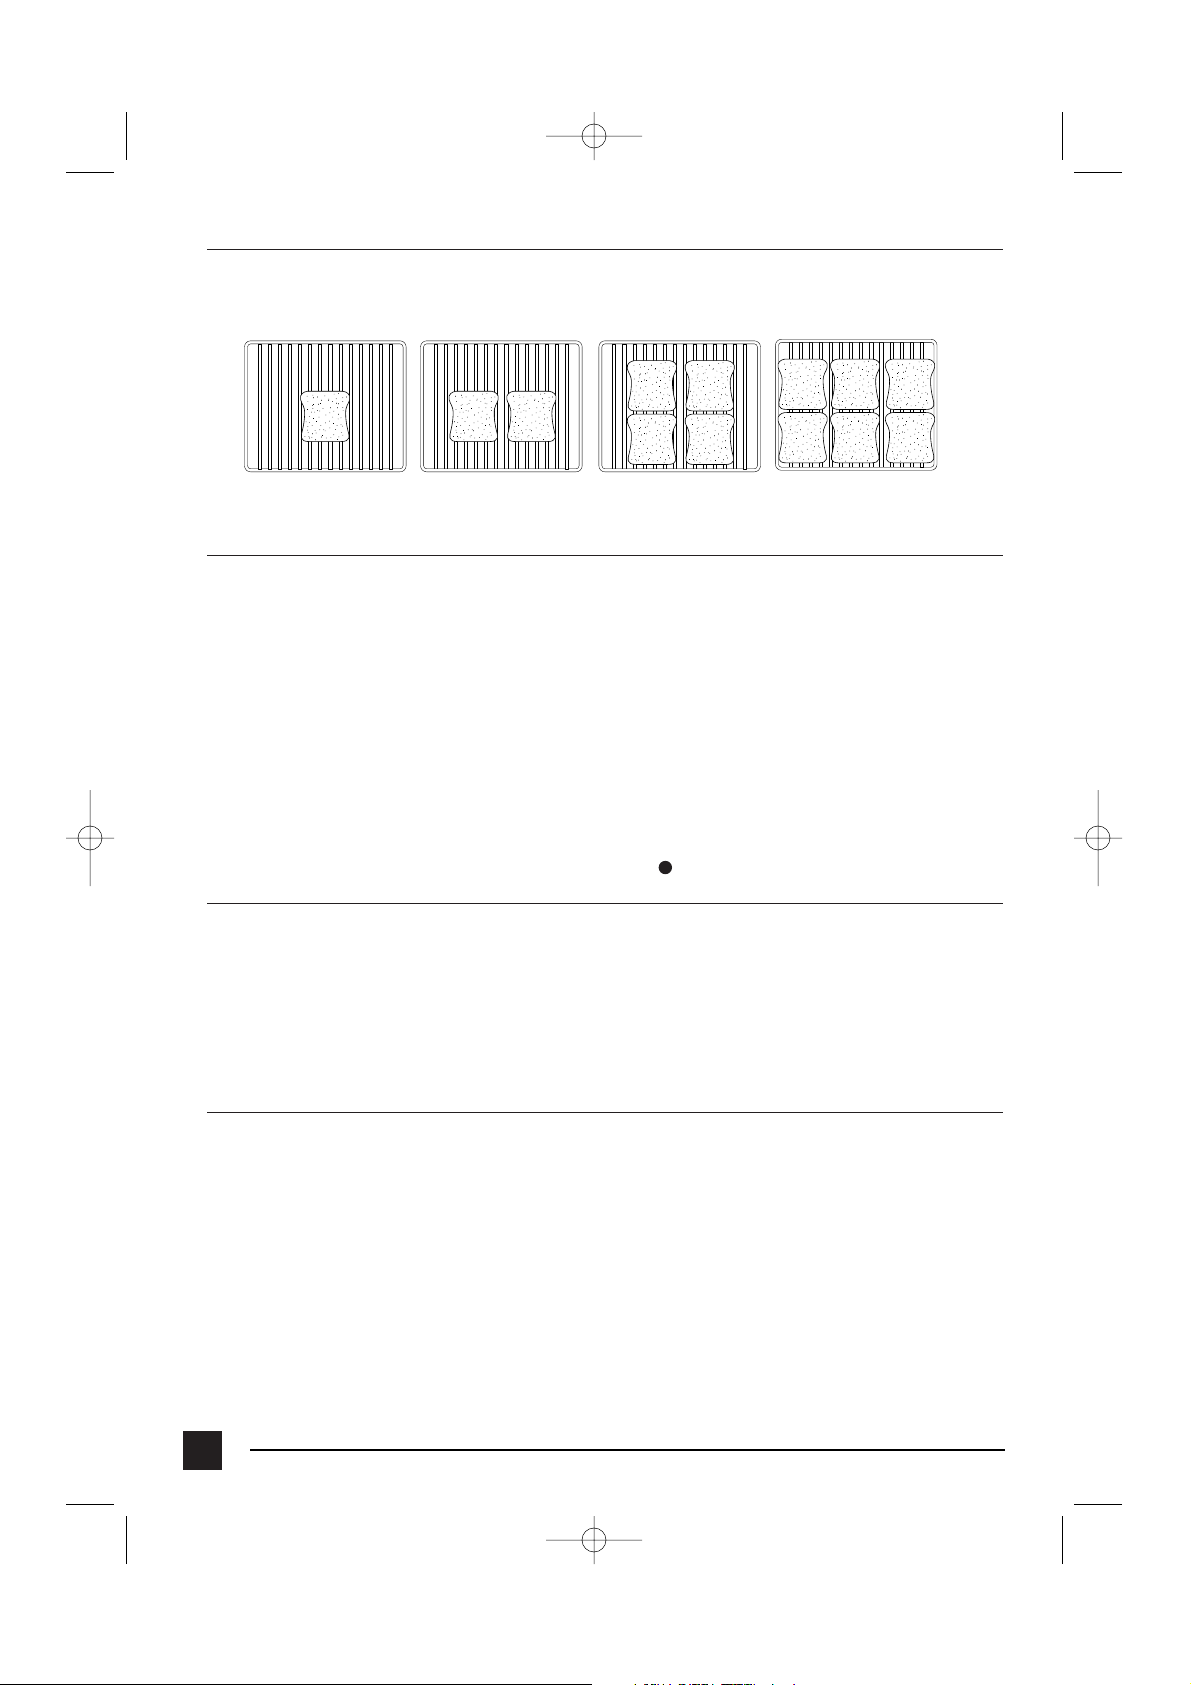
•The capacity of the wire rack (L) is such as to allow the toasting of 6 slices of bread at the same time. In
any case better results are obtained with 4 slices.
•For toasting, place the slices of bread as shown below:
Toasting one slice Toasting two slices Toasting four slices Toasting six slices
For consecutive toasting, turn the toast programming dial to a lower setting.
•INSTRUCTIONS FOR TOASTING
Always use the oven wire rack for toasting bread, sandwiches, English muffins, shelf foods and frozen
waffles automatically.
1. Place the wire rack as shown in the table on page 4.
2. Center the food to be toasted on the wire rack. Close the door.
3. Set the thermostat dial to TOAST/BROIL position and the function selector dial to TOAST/BAKE.
4. The toast programming dial (D) can be set clockwise for light, medium or dark toast or any shade desired
in between.
When using the toaster-oven-broiler for the first time, set the dial (D) to a medium setting. Toast a few
pieces of bread to check for desired brownness. If necessary, adjust the control to suit your preference.
5. When toasting, both the top and bottom heating element switch on to brown both sides of the food at the
same time. Condensation may build up on the inside of the glass door. This is normal.
The condensation will evaporate during the toasting cycle.
6. A ring indicates the end of the set time. The toasting cycle has been completed and the heating elements
will shut off automatically. Turn the thermostat dial to the " " position.
• Note:
This toaster-oven-broiler is capable of toasting in a wide range of colours, automatically from light to dark.
However, if you prefer a lighter shade of toast, simply interrupt the automatic toast cycle by turning the
ON/OFF knob to "OFF". This will shut the unit off without damaging the oven.
If you prefer a darker shade, restart the toasting cycle by turning the dial (D) clockwise until the desired
colour is obtained.
Then switch off manually the thermostat dial and the toast programming dial as described
earlier.
As you use the oven, the best settings for favourite breads will become familiar.
•HINTS FOR TOASTING SUCCESS
Heavier breads and frozen breads will require a darker setting. One slice of bread will require a lighter
setting than several slices.
8
GB F E 21-01-2003 9:22 Pagina 8
Page 9
9
CLEANING AND MAINTENANCE
Always unplug the toaster-oven-broiler and allow it to cool before cleaning. This unit has been
designed and engineered with your safety in mind. To assure maximum safe operation, keep unit clean free
of grease and build up of food particles.
1. Remove the wire oven rack.
2. To clean the inside walls, use a damp cloth and a mild liquid soap solution. Never use harsh abrasives,
corrosive products or spray detergents.
• Note:
Do not clean interior with metal scouring pads. Pieces can break off and touch electrical parts,
creating risk of electrical shock.
3. To clean the glass door, use a glass cleaner or a damp cloth. Wipe dry with a clan cloth.
4. To clean the exterior finish, use a damp, sudsy cloth. For stubborn stains, a non-abrasive liquid cleaner or
spray glass cleaner may be used. Do not use metal scouring pads, as they might mar the finish. Always
remove cleaning agents by polishing with a dry cloth.
5. The wire rack, the oven pan and the broiling rack may be washed as other kitchen ware.
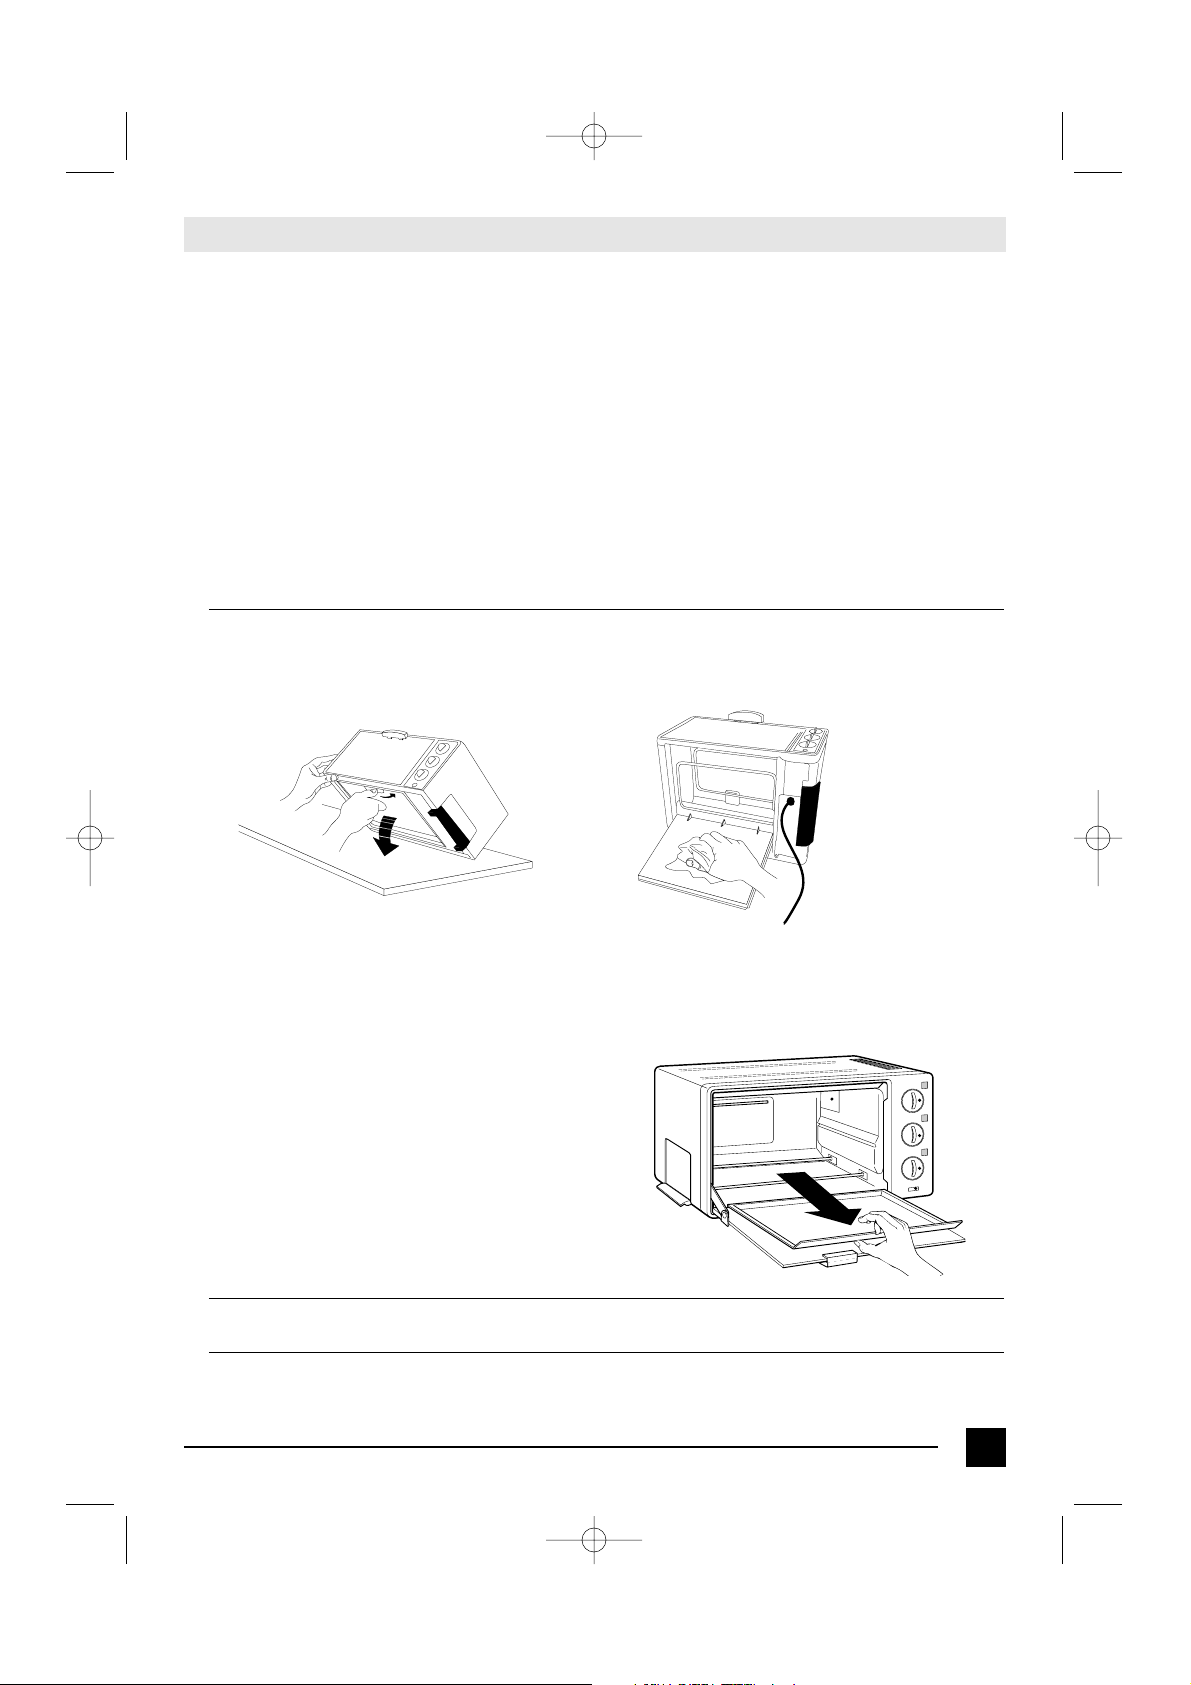
•CLEANING THE BOTTOM OF THE OVEN
If your oven has a bottom that can be opened:
To clean the bottom of the oven, open the access panel by pressing the latch spring then pull the access
panel downwards.(see fig. A/B). Place the oven on its rear panel. This will make cleaning easier.
Clean the oven floor after use to avoid build-up of residue, as this will affect the cooking performance. Brush
off crumbs or wipe the oven floor with a damp cloth. For stubborn stains, use a nylon or plastic scouring pad
or a non-caustic cleaner, dry thoroughly before closing.
After cleaning, close the access panel and check that it is locked securely into position.
If your oven has a crumb tray:
Slide the crumb tray out from under the bottom of
your oven (see Fig. C). Wash by hand. Should the
soilage be difficult to remove, rinse the crumb tray
with hot soapy water and if necessary, scour it
delicately, without scratching it.
•OTHER SERVICING
Any servicing requiring disassembly should be performed by an authorized service representative.
•OVEN LIGHT (optional)
The oven may be used safely even if the oven light is not working. Contact an authorized service
representative for bulb replacement.
Fig. A Fig. B
Fig. C
GB F E 21-01-2003 9:22 Pagina 9
Page 10

10
•NOTE
GB F E 21-01-2003 9:22 Pagina 10
Page 11

11
Limited Warranty
What Does This Warraty Cover? We warrant each appliance to be free from defects in material and work-
manship. Our obligation under this warranty is limited to replacement or repair, free of charge at our factory or
authorized service centers, of any defective part or parts there of other than parts damaged in transit, which shall
be returned to us, transportation prepaid. This warranty shall apply only if the appliance is used in accordance with
the factory directions which accompany it, and on an Alternating Current (AC) circuit.
How Long Does The Coverage Last? This warranty runs for one year from the date of delivery and applies
only to the original purchaser for use.
What Does This Warranty Not Cover? This warranty does not cover defects or damage of the appliance
which result from repairs or alterations to the machine outside our factory or authorized service centers, nor shall it
apply to any appliance which has been subject to abuse, misuse, negligence or accidents. Also, consequential and
incidental damages resulting from the use of this product or arising out of any breach of contract or breach of this
warranty are not recoverable under this warranty. Some states do not allow the exclusion or limitation of incidental
or consequential damages, so the above limitation may not apply to you.
How Do You Get Service? If repairs become necessary or spare parts are needed, plase write to:
De’Longhi America Inc.
Park 80 West Plaza One 4th floor
Saddle Brook, NJ 07663
or call Service Tel. No. 1-800-322-3848
The above warranty is in lieu of all other express warranties and representations; All implied warranties are limited
to the applicable warranty period set forth above. This limitation does apply if you enter into an extended warranty
with De’Longhi. Some states do not allow limitations on how long an implied warranty lasts, so the above exclusions
may not apply to you. De’ Longhi does not authorize any other person or company to assume for it any liability in
connection with the sale or use of its appliance.
How Does State Law Apply? This warranty gives you specific legal rights, and you may also have other rights
which vary from state to state.
De’ Longhi CANADA
1040 Ronsa Court
MISSISSAUGA, ONTARIO
L4W 3Y4 CANADA
GB F E 21-01-2003 9:22 Pagina 11
Page 12

12
A B
C
G
H
I
L
D
E
F
N
M
O
A. Elément supérieur
B. Eclairage enceinte four (*)
C. Sélecteur thermostat
D. Sélecteur ON/OFF et programmation
grille-pain
E. Sélecteur choix fonction
F. Voyant
G. Plaque pour gâteaux (*)
H. Grille pour gril
I. Lèchefrite
L. Grille
M. Elément inférieur
N. Poignée pour grille (*)
O. Ramasse - miettes (*)
(*) Sur requête, pas disponible sur tous les
modèles
DESCRIPTION
GB F E 21-01-2003 9:22 Pagina 12
Page 13

13
MESURES DE SECURITE IMPORTANTES
Lorsque vous utilisez des appareils électriques, il est extrêmement important que vous
respectiez certaines règles de sécurité fondamentales, et notamment:
1. LISEZ ATTENTIVEMENT TOUTES LES INSTRUCTIONS CONTENUES DANS LE MODE D'EMPLOI.
2. Ne touchez pas les surfaces chaudes. Utilisez les poignées ou les sélecteurs.
3. Avant d'utiliser cet appareil, éloignez-le de deux - quatre pouces du mur ou de tout autre objet situé sur la
même étagère. Ne déposez aucun objet sur l'appareil. Ne placez pas l'appareil sur des surfaces ne
supportant pas la chaleur.
4. Afin d'éviter toute secousse électrique, ne placez jamais l'appareil en dessous d'un jet d'eau ou dans l'eau.
Veuillez suivre scrupuleusement les instructions d'entretien.
5. Faites particulièrement attention quand l'appareil est en proximité d'enfants ou est utilisé par des enfants
sous surveillance.
6. Débranchez la prise lorsque l'appareil n'est pas utilisé ou avant de le nettoyer. Avant de débrancher la
prise, placez le sélecteur ON/OFF sur OFF et le sélecteur de la température sur " ". Attendez que
l'appareil se refroidisse avant d'enlever ou de monter des parties, ou avant de le nettoyer.
7. N'utilisez pas un appareil dont le cordon ou la prise est endommagé, ou après un problème de mauvais
fonctionnement, ou si l'appareil a subi des dégâts. Portez votre appareil au centre de service après-vente
agréé le plus proche afin qu'il soit contrôlé, réparé ou réglé.
8. L'utilisation d'accessoires qui ne sont pas recommandés par le fabricant de l'appareil peut provoquer des
dommages.
9. N'utilisez pas l'appareil à l'extérieur.
10. Ne laissez pas pendre le fil hors de la table ou de l'étagère, et veillez à ce qu'il n'entre pas en contact avec
des surfaces chaudes.
11. N'installez pas l'appareil tout près ou au-dessus d'un fourneau, à gaz ou électrique, chaud.
12. Faites particulièrement attention lorsque vous déplacez un appareil contenant de l'huile chaude ou d'autres
liquides chauds.
13. Si la fiche est chaude, faites appel à un électricien qualifié.
14. N'utilisez pas cet appareil pour des usages différents de ceux pour lesquels il a été conçu.
15. Faites très attention lorsque vous enlevez la lèchefrite ou éliminez la graisse chaude.
16. N'utilisez pas d'éponges métalliques pour nettoyer l'appareil. Des particules métalliques pourraient se
détacher de l'éponge et entrer en contact avec des parties électriques, pouvant entraîner ainsi le risque de
secousses électriques.
17. Afin de garantir un fonctionnement en toute sécurité de votre appareil, n'introduisez pas dans le four des
aliments ou des récipients de grandes dimensions.
18. Un incendie peut se produire si, pendant son fonctionnement, l'appareil est couvert ou entre en contact
avec des matériaux inflammables, y compris rideaux, tissus, murs, etc.
19. ATTENTION: Ne laissez jamais le grille-pain - four - gril sans surveillance lorsqu'il est en marche (surtout
lorsqu'il est utilisé comme grille-pain ou gril).
20. Quand la fonction gril est utilisée, la lèchefrite, la grille pour gril et la grille doivent être utilisées comme
indiqué à la page 17.
21.Faites particulièrement attention lorsque vous utilisez des récipients dans des matériaux différents du
métal, verre ou céramique pour four.
22. Ne placez rien à l'intérieur du four quand il n'est pas utilisé, à l'exception des accessoires recommandés
par le fabricant.
23. N'introduisez jamais dans le four les matériaux suivants: papier, carton, plastique et similaires.
24. Ne couvrez jamais les parties du four avec des feuilles d'aluminium: elles provoqueraient en effet une
surchauffe du four.
25. Pour éteindre le grille-pain - four - gril, réglez le sélecteur ON/OFF sur OFF et le sélecteur de la
température sur " ".
CE PRODUIT EST DESTINE EXCLUSIVEMENT A UN USAGE DOMESTIQUE
CONSERVEZ CE MODE D'EMPLOI
ATTENTION : après avoir déballé l’appareil, vérifier si la porte est en parfait état. La porte est en verre, donc
elle est fragile. Si elle est visiblement ébréchée, griffée ou rayée, il est conseillé de la faire remplacer.
Pendant l’utilisation, les opérations de nettoyage et les déplacements de l ‘appareil, éviter de claquer la porte,
de la heurter violemment et de verser des liquides froids sur le verre chaud de l’appareil.
GB F E 21-01-2003 9:22 Pagina 13
Page 14

14
Notes/Conseils
SCHEMA DE TRAVAIL
Programme
Réglage sélec-
teur ON/OFF
et programma-
tion grille-pain
Chauffeplats
ON
Réglage
sélecteur
thermostat
KEEP
WARM
Réglage
sélecteur
choix fonction
Position grille/accessoires
BAKE/TOAST
Utilisez cette fonction pour garder
les aliments au chaud. Ne pas
laisser les aliments plus d’une
heure ni réchauffer des aliments
froids. S’ils ne sont pas assez
chauds pour servir, augmenter la
température à l’aide du bouton.
Four ON
JUSQU’A
470 °F
BAKE/TOAST
Idéal pour viandes, pizza,
gâteaux, flans, desserts aux fruits,
poisson, légumes farcis.
Gril ON
BROIL
Broil
Utilisez toujours la grille pour gril (H),
insérée dans la lèchefrite (I).
La lèchefrite avec la grille pour gril
est conçue pour deux règlages de
gril. Utilisez la COMBINAISON
SUPERIEURE pour grillade et
roussissement plus rapide. Placez la
grille pour gril, avec les bords dirigés
vers le bas, dans la lèchefrite.
Laissez 1" entre l'aliment et l'élément
supérieur (A). Conseillé pour mets
tels que hamburger, biftecks,
brochettes de viande marinée.
Utilisez la COMBINAISON
INFERIEURE pour les aliments qui
nécessitent de temps de cuisson au
gril plus longs, tels que le poulet.
Pour la combinaison inférieure,
placez la grille retournée, avec les
bords dirigés vers le haut, à l'intérieur
de la lèchefrite.
Grille-pain
ON ou
jusqu’à 7
minutes
TOAST
BAKE/TOAST
Réglez le sélecteur ON/OFF sur
la couleur souhaitée.
Certaines types de pains
prendront plus de temps que
d’autres.
Prolonger le temps si le résultat
est trop clair. Centrez les
tranches, etc. sur la grille placée
au centre du four.
Roussisement
ON ou
jusqu’à 7
minutes
BROIL
Broil
Utilisez la combinaison pour cuisson
au gril pour rissoler des sandwichs
ouverts, fromage, garnitures, horsd’oeuvre. Lors de la première
utilisation, surveillez les aliments et
diminuez le temps de cuisson, afin
d’éviter un roussissement excessif.
Pain
ON ou
jusqu’à 7
minutes
TOAST
BAKE/TOAST
Combinaison supérieure
Combinaison inférieure
GB F E 21-01-2003 9:22 Pagina 14
Page 15

15
• Votre appareil est muni d’une fiche polarisée pour courant alternatif (une fiche avec une lame plus large que
l’autre). Cette fiche s’adapte à la prise dans un seul sens. Il s’agit d’un dispositif de sécurité. Si vous ne
parvenez pas à insérer complètement la fiche dans la prise, essayez de retourner la fiche. Si vous ne parvenez
toujours pas à introduire la fiche dans la prise, faites appel à un électricien pour faire remplacer la vieille prise.
Tenez compte de la fonction de sécurité de la fiche polarisée.
• Branchez la fiche dans une prise de 120 Volts CA.
• La longueur du fil de ce produit a été choisie afin de réduire le risque que le fil ne s'emmêle ou que quelqu'un
ne trébuche sur le fil trop long. Si vous avez besoin d'un fil plus long, vous pouvez utiliser une rallonge. Celle-ci
doit être adaptée pour une intensité minimale de 15 ampères, 120 Volts et doit être inclue dans la liste
Underwriters Laboratories/CSA.
• Vous pouvez, en outre, acheter une rallonge de 6 pieds, à 15 ampères, auprès du revendeur agréé le plus
proche de chez vous. Quand vous utilisez une rallonge plus longue, ne la laissez pas traîner sur le plan de
travail ou pendre afin d'éviter que quelqu'un ne puisse trébucher sur elle.
•Prenez soin du fil afin qu'il ait une plus longue durée: évitez de tirer ou d'arracher le fil dans les zones voisines
de la fiche et du raccordement de l'appareil.
• Attention:
Lors de la première utilisation de cet appareil (pendant 15 minutes environ), les substances de
protection utilisées sur les éléments chauffants pour les protéger des effets du sel au cours de
l'expédition dégageront de la fumée et une légère odeur. Ce phénomène est tout à fait normal.
ACCESSOIRES SUR DEMANDE
•PLAQUE POUR GÂTEAUX (G)
Elle doit être déposée directement sur la grille. Son utilisation est indispensable pour cuire dans le four des
biscuits et des petits fours.
•ECLAIRAGE FOUR (B) ET VOYANT (F)
• Si prévu, l'éclairage de l'enceinte du four (B) reste toujours allumé lorsque le four est sur la position ON.
Le voyant (F) s'éteint dès que l'enceinte du four a atteint la température de cuisson souhaitée, puis
s'allume et s'éteint périodiquement pendant la cuisson.
• Dans le cas où l'enceinte de votre four (B) n'est pas munie d'éclairage, le voyant (F) reste toujours allumé
lorsque le four est en marche (mais ne sert pas d'indicateur de la température).
•POIGNEE POUR GRILLE (N)
Un accessoire pratique pour extraire la grille quand elles est chaude.
PROGRAMMES DE CUISSON
1. COMMENT GARDER LES ALIMENTS AU CHAUD
Placez les mets que vous souhaitez garder au chaud au-dessus de la grille.
• Réglez le sélecteur du thermostat (C) sur la position "KEEP WARM".
• Réglez le sélecteur ON/OFF (D) sur "ON".
• Réglez le bouton contrôle fonction sur la position "TOAST/BAKE".
Quand il n'est plus nécessaire de garder les mets au chaud, réglez le sélecteur du thermostat
sur " " et le sélecteur ON/OFF sur OFF.
Cette fonction a été conçue pour garder les mets au chaud, après qu'ils ont été cuits pendant une courte
durée, mais pas trop longtemps. Nous vous déconseillons de garder des aliments au chaud pendant des
longues périodes de temps, et d'utiliser cette fonction pour réchauffer des aliments congelés ou froids.
2. INSTRUCTIONS POUR LA CUISSON AU FOUR
Dans ce four, vous pourrez cuire les aliments comme dans un four traditionnel. Il est possible de placer des
casseroles ou des plats à four directement sur la grille amovible (L). Utilisez la lèchefrite (I) pour préparer des
aliments tels que biscuits, gâteaux, roulés et autres mets dans des casseroles non couvertes. Déposez la
lèchefrite ou la plaque pour gâteaux directement sur la grille amovible Pour la combinaison de la grille,
veuillez vous référer au tableau de la page 14.
GB F E 21-01-2003 9:22 Pagina 15
Page 16

16
1. Fermez la porte.
2. Réglez le sélecteur du thermostat (C) sur la position/température souhaitée.
3. Réglez le sélecteur ON/OFF sur ON.
4. Réglez le sélecteur de contrôle fonction sur la position TOAST/BAKE.
5. A la fin de la cuisson, réglez le sélecteur du thermostat sur la position " " et le sélecteur
ON/OFF sur "OFF".
• Attention:
Nous vous conseillons de ne pas utiliser de couvercles en verre sur les casseroles.
Les plats de cuisson en verre ne doivent jamais être positionnés à moins d'1 pouce de
l'élément chauffant.
• Lors de l'utilisation de la fonction TOAST/BAKE, ne déposez pas la
lèchefrite (ou tout autre accessoire/récipient) directement sur l'élément
chauffant inférieur.
•CONSEILS UTILES POUR LA CUISSON AU FOUR
Pour obtenir les meilleures performances de ce grille-pain - four - gril:
• Ne remplissez pas trop le four. Si possible, placez les aliments au centre de l'enceinte du four.
• N'ouvrez pas la porte trop souvent, afin d'éviter les dispersions de chaleur.
• Il est possible d'utiliser une feuille d'aluminium pour couvrir le plat ou la plaque. Assurez-vous que les
bords de la feuille adhérent parfaitement aux bords du plat ou de la plaque de cuisson.
•TEMPS ET TEMPERATURES POUR LA CUISSON DES ALIMENTS (cuits et rôtis par convection naturelle)
Les temps et les températures conseillés varient en fonction de la température de l'aliment que l'on introduit
dans le four, de la quantité, et des goûts personnels. Les temps indiqués pour la viande et la volaille se
référent à des aliments ayant une température de réfrigérateur. Ajoutez 5 minutes pour le préchauffage
du four. Lors des premières utilisations, nous vous conseillons de sélectionner des temps de cuisson plus
courts afin d'éviter une cuisson excessive. Ensuite, en prenant connaissance avec votre four, vous choisirez
les temps les plus appropriés.
Mets
Température à
sélectionner
Notes et conseils. Pour la combinaison de la
grille, veuillez vous référer au tableau de la page 14.
Temps approximatifs
Poulet entier
2,5-3 livres
Pas farci
400 °F
Il n’est pas nécessaire de le retourner à
moitié cuisson. Vous pouvez le cuire aussi
au-dessus de la grille pour gril retournée,
dans la lèchefrite (combinaison inférieure),
pour diminuer les éclaboussures.
80-90 minutes ou jusqu’à ce que
les cuisses et le blanc atteignent une
température interne de 175 °F
Rôti d’aloyau ou côtelettes
de porc, 2-3 livres
400 °F
Faites rôtir comme pour le poulet entier.
80-90 min. ou jusqu’à ce qu’’ls atteignent
une température interne de 170 °F.
Beef Sirloin or Rib Roast
3 lbs
400 °F
Il n’est pas nécessaire de les retourner.
60-70 minutes, ou jusqu’à ce qu’ils
soient tendres et dorés.
Rouleau de viande
hachée, 2-2,5 livres
350 °F
Utilisez la lèchefrite. Il n’est pas nécessaire de le
retourner. Mélangez et amalgamez ensemble
1,5-2 livres de viande hachée (boeuf), avec
des oeufs, de la chapelure, du sel, du poivre et
des épices.
50-60 min.
Pommes de terre rôties, 3-
4 de grande taille, coupées
en morceaux
400 °F
Coupez les pommes de terre en morceaux,
utilisez la lèchefrite, mélangez trois fois durant
la cuisson et après 20 minutes au moins.
50-60 min.
Gâteaux secs
350 °F
Utilisez des moules métalliques
rectangulaires.
Respectez les temps indiqués dans la
recette traditionnelle (légèrment
réduite)
Ta rtes (non couvertes)
350 °F
Utilisez des moules métalliques pour gâteaux.
Respectez les temps indiqués dans la
recette traditionnelle (légèrment
réduite)
Biscuits: en goutte,
roulés et coupés, en
375 °F
Insérez la grille comme pour la fonction grille-
pain. Utilisez la plaque à gâteaux (G) (si
fournie), ou la lèchefrite.
10-15 min.
GB F E 21-01-2003 9:22 Pagina 16
Page 17

17
•RISSOLER
Il s’agit de la fonction idéale pour faire dorer, rendre croquante et griller la surface des aliments. Utilisez-la
pour des sandwichs ouverts, des petits pains beurrés ou pour faire dorer des flans cuits.
1. Placez les mets sur la lèchefrite (ou sur la plaque à gâteaux, si fournie), et déposez-la sur la grille.
2. Fermez la porte, réglez les sélecteurs fonction et température sur BROIL.
3. Réglez le sélecteur du temporisateur ON/OFF sur MEDIUM ou sur ON (pour des temps de
roussissement plus longs).
Lorsque vous utilisez des nouvelles recettes, contrôlez les mets afin d'éviter un roussissement excessif.
A la fin du cycle de roussissement (quand la surface supérieure des mets présente la couleur souhaitée),
réglez le sélecteur du thermostat " " et le sélecteur ON/OFF sur "OFF".
3. INSTRUCTIONS POUR CUIRE AU GRIL
Pour cuire au gril, utilisez toujours la lèchefrite avec la grille pour le gril. Il n'est pas nécessaire de
préchauffer le four. Ne laissez pas le gril sans surveillance lorsqu'il est en marche. Avant d'utiliser le gril pour
la première fois et après chaque utilisation, lavez la lèchefrite et la grille avec de l'eau chaude et du produit
détergent. Ne couvrez pas la grille du four avec une feuille d'aluminium. Elle empêcherait en effet aux
graisses et à l'huile de couler, provoquant des éclaboussures et de la fumée et diminuant la circulation de
l'air nécessaire pour la ventilation.
•CUISSON AU GRIL
1. Placez la grille du four comme indiqué au tableau de la page 14.
2. Placez les mets à cuire sur la grille pour gril (H) (placée à l'intérieur de la lèchefrite), puis déposez le tout
sur la grille du four.
3. Laissez toujour la porte du four ouverte, jasqu’à la position d’arrêt (comme illustré ci-dessous).
4. Réglez le sélecteur du thermostat (C) et le sélecteur (E)sur BROIL.
5. Réglez le sélecteur ON/OFF sur ON.
6. Réglez le sélecteur du contrôle fonction sur BROIL.
7. Quand la cuisson est terminée, réglez le sélecteur ON/OFF sur OFF et le sélecteur
du thermostat sur " ". Faites attention quand vous retournez les mets ou enlevez la
lèchefrite. Utilisez des poignées pour casseroles. Faites attention lorsque vous
extrayez la lèchefrite et éliminez la graisse recueillie durant la cuisson au gril.
• Attention:
Même si la fumée est une caractéristique d'une bonne grillade, en suivant ces conseils vous pourrez
éliminer ou réduire énormément la fumée:
• Enlevez l'excèdent de graisse et incisez les extrémités des pièces à cuire afin d'éviter qu'elles ne s'enroulent.
Essuyez les surfaces de la viande, du poisson ou de la volaille à l'aide d'une serviette en papier.
•Pour obtenir de meilleurs résultats, décongelez la viande avant de la cuire au gril. Ces deux précautions
réduiront ou élimineront la fumée de la grillade.
• En plaçant les mets sur la grille pour gril, le jus et la graisse couleront dans la lèchefrite et les
éclaboussures diminueront au cours de la cuisson.
• Dans le cas de biftecks et entrecôtes congelés, utilisez un temps de cuisson de 1 1/2 - 2 fois supérieur
par rapport au temps nécessaire pour cuire au gril la viande non congelée.
• Si la graisse "grésille" au cours de la cuisson au gril, réglez le sélecteur du contrôle de la température
sur une valeur plus basse.
• Après l'utilisation, enlevez la graisse de la lèchefrite et lavez la lèchefrite et la grille pour le gril.
•L'intérieur de l'appareil devrait être nettoyé après chaque utilisation. Une accumulation excessive de graisse
provoque la formation de fumée. Utilisez un produit détergent non abrasif et de l'eau chaude pour le nettoyer.
• Dans le cas de biftecks ou autres mets très épais, nous conseillons d'utiliser la combinaison inférieure de
la grille pour le gril.
•Puisque le poisson n'est pas gras, il peut être cuit au gril directement sur la lèchefrite. Cuisez-le jusqu'au
moment où il s'exfolie facilement avec la fourchette. Il n'est pas nécessaire de retourner les minces filets
de poisson.
GB F E 21-01-2003 9:22 Pagina 17
Page 18

18
4) INSTRUCTIONS POUR GRILLER AUTOMATIQUEMENT
• La grande capacité de la grille permet de griller simultanément 6 tranches de pain. Toutefois, les
meilleurs résultats sont obtenus avec 4 tranches de pain.
•Pour griller, placez les tranches de pain comme illustré ci-dessous:
Griller une tranche Griller deux tranches Griller quatre tranches Griller six tranches
Pour griller de manière continue, réglez le sélecteur de la programmation grillage sur une
valeur plus basse.
•INSTRUCTIONS POUR GRILLER
Pour griller automatiquement pain, petits pains, fougasses, tartelettes et gaufres congelées, utilisez toujours
la grille du four.
1. Placez la grille comme indiqué au tableau de la page 14.
2. Placez les mets à griller sur la grille. Fermez la porte.
3. Réglez le sélecteur du thermostat sur la position TOAST/BROIL et le sélecteur choix fonction sur la
position TOAST/BAKE.
4. Il est possible de régler le sélecteur de la programmation (D), en le tournant dans le sens des aiguilles
d'une montre, pour obtenir un grillage clair, moyen, foncé, ou tout autre degré de grillage
intermédiaire. Quand vous utilisez le grille-pain - four - gril pour la première fois, réglez le sélecteur (D)
sur une valeur moyenne. Grillez quelques tranches de pain pour contrôler le degré de grillage. Si
nécessaire, modifiez le réglage pour obtenir le résultat souhaité.
5. Lors du grillage, aussi bien l'élément chauffant supérieur que celui inférieur sont allumés afin de
permettre un grillage uniforme des deux côtés de l'aliment simultanément.
Il est possible que de la condensation se forme à l'intérieur de la vitre de la porte. Ceci est tout à fait
normal. Au cours du cycle de grillage, la condensation s'évaporera.
6. Un signal sonore indique que le temps programmé s'est écoulé. Le cycle de grillage est terminé et les
éléments chauffants s'éteignent automatiquement. Réglez le sélecteur du thermostat sur la position " ".
• Important:
Ce grille-pain - four - gril est en mesure de griller automatiquement dans une vaste gamme de niveaux, du
plus clair au plus foncé. En tout cas, si vous préférez un grillage plus clair, vous pouvez tout simplement
interrompre le cycle automatique de grillage, en amenant le sélecteur supérieur sur OFF. Vous couperez
ainsi le fonctionnement de l'appareil sans abîmer le four.
Si vous préférez un grillage plus foncé, remettez en marche le cycle de grillage, en tournant le sélecteur (D)
dans le sens des aiguilles d'une montre, de manière à obtenir le degré de grillage souhaité.
Eteignez ensuite le sélecteur du thermostat et le sélecteur de la programmation grille-pain,
comme décrit ci-dessus.
En prenant connaissance avec l'appareil, vous effectuerez les sélections qui vous permettront d'obtenir
exactement le pain grillé comme vous le préférez.
• CONSEILS POUR GRILLER AVEC SUCCES
Le pain plus lourd et le pain congelé exigeront un réglage plus foncé.
Une seule tranche de pain exigera un réglage plus clair que celui nécessaire pour griller plusieurs tranches.
GB F E 21-01-2003 9:22 Pagina 18
Page 19

19
ENTRETIEN ET NETTOYAGE
Débranchez toujours l’appareil et laissez-le refroidir avant de commencer. Le grille-pain four a été conçu
pour la sécurité de l’utilisateur. Afin d’éviter les accidents, gardez-le propre, ôtez les corps gras et les
particules d’aliments accumulés durant la cuisson.
1. Retirez la grille.
2. Pou nettoyer les parois, utilisez un chiffon doux et de savon liquide doux. N'utilisez j'amais d'abrasifs, de
produits de nettoyage caustiques ou autres produits similairs.
NOTE : Ne nettoyez pas la partie interne en utilisant des produits métalliques. Des particules pourraient se
détacher et entrer en contact avec les éléments électriques, ce qui risquerait d’entraîner un choc
électrique.
3. Pour nettoyer la porte, utilisez un chiffon humide et un produit pour vitres en vaporisateur. Essuyez
toujours en utilisant un chiffon sec.
4. Pour nettoyer la partie externe, utilisez un chiffon humide et savonneux. Si certaines taches résistent,
utilisez un produit de nettoyage liquide non abrasif ou un produit pour vitres en vaporisateur. Ne frottez
pas la surface sale avec des tampons métalliques qui risqueraient de l’abîmer. Essuyez toujours en
utilisant un chiffon sec.
5. La grille, le plateau de cuisson multifonction et la grille pour gril (si prévue) pouvent être lavés comme
tout autres vaiselles.
• NETTOYAGE DU FOND
Si votre four a un fond ouvrable :
Pour nettoyer le fond, ouvrir le panneau d'accès en pressant le ressort de retenue (fig.A et B) puis
positionner le four verticalement. De cette façon, le nettoyage sera plus facile. Nettoyez le fond aprés
chaque utilisation pour eviter que les résidus donnent lieu à problemes de fonctionnement du four.
Après le nettoyage, refermer le panneau d'accès en s'assurant qu'il soit accroché correctement.
Si votre four est muni de tiroir ramasse - miettes :
Extraire le tiroir ramasse - miettes du fond de votre
four (voir Fig. C). Laver à la main. Dans le cas de
dépôts persistants, mouiller le tiroir ramasse - miettes
avec de l'eau savonneuse chaude et, si nécessaire,
frotter délicatement sans griffer.
• AUTRES OPERATIONS D'ENTRETIEN
Toute opération d'entretien exigeant le démontage du four doit être effectué exclusivement par un personnel
qualifié autorisé.
•ECLAIRAGE ENCEINTE FOUR (sur demande)
Le four peut être utilisé sans danger même si l'éclairage du four ne marche pas. Faites appel au centre de
service après-vente agréé pour faire remplacer la lampe d'éclairage.
Fig. A Fig. B
Fig. C
GB F E 21-01-2003 9:22 Pagina 19
Page 20

20
•NOTE
GB F E 21-01-2003 9:22 Pagina 20
Page 21

21
GARANTIE
Nous garantissons que tous les APPAREILS ELECTRIQUES DE’ LONGHI sont exempts de tout défaut
de matériaux et de manufacture. Notre obligation sous cette garantie est limitée au remplacement ou
à la réparation gratuite dans notre usine de toutes les pièces défectueuses autre que les pièces
endommagées durant le transport, qui nous seront retournées - transport pré-payé - en dedans d’un
an après la livraison à l’acheteur - utilisateur. Cette garantie ne sera applicable que si l’appareil a
été utilisé selon les instructions du fabricant qui accompagnent l’appareil, et sur courant alternatif
(AC). Cette garantie remplace toutes les autres garanties et représentations, exprimées ou impliquées, et toute autre obligation ou responsabilité de notre part. Nous n’autorisons aucune autre personne ou compagnie à assumer pour nous une quelconque responsabilité en relation avec la vente
ou l’utilisation de nos appareils.
Cette garantie ne s’appliquera ni aux appareils qui seront réparés ou endommagés hors de notre
usine, ni aux appareils qui auront été sujets à une mauvaise utilisation, à une négligence ou à un
accident.
Si des réparations ou des pièces de rechange sont nécessaires, vous êtes priés d’écrire à:
De’ Longhi CANADA
1040 Ronsa Court
MISSISSAUGA, ONTARIO
L4W 3Y4 CANADA
WARRANTY
All DE’ LONGHI electrical appliances are guaranteed to be free from defects in material
and workmanship. Our obligation under this warranty is limited to the replacement or
repair, free of charge, at our factory or authorized Service Centers, of any defective part
or parts thereof other than parts damaged in transit, which shall be returned to us, transportation pre-paid, within one year from the date of delivery to the purchaser/user. This
warranty shall apply only if the appliance is used in accordance with the factory directions which accompany it, and on an alternating current (AC) circuit. This warranty is in
lieu of all other express or implied warranties and representations and any other obligation or responsibility of the manufacturer. No other person or company is authorized to
assume for us any liability in connection with the sale or use of our products.
This warranty does not cover appliances that have been repaired or modified ouside our
factory, nor to appliances which have been subject to misuse, negligence or accidents.
If repairs become necessary or spare parts are needed, please write to:
De’ Longhi CANADA
1040 Ronsa Court
MISSISSAUGA, ONTARIO
L4W 3Y4 CANADA
GB F E 21-01-2003 9:22 Pagina 21
Page 22

22
A B
C
G
H
I
L
D
E
F
N
M
O
A. Elemento superior
B. Luz interior (*)
C. Selector del termostato
D. Selector ON/OFF y programación
del tostador
E. Selector para elegir la función
F. Indicador
G. Galletera (*)
H. Parrilla para el grill
I. Grasera
L. Parrilla
M. Elemento inferior
N. Punho para grelha (*)
O. Recogedor de migas (*)
(*)
Sólo si pedida, no todos los modelos
disponen de ella.
DESCRIPCIÓN
GB F E 21-01-2003 9:22 Pagina 22
Page 23

23
IMPORTANTES MEDIDAS DE SEGURIDAD
l utilizar aparatos eléctricos, es necesario tomar siempre algunas precauciones fundamentales
para la seguridad, como las siguientes:
1. LEAN TODAS LAS INSTRUCCIONES
2. No toquen las superficies calientes. Usen las asas y los selectores.
3. Antes de utilizar este aparato, sepárenlo unos dos o cuatro pulgadas de la pared o de cualquier otro
objeto colocado en el mismo lugar. Quiten cualquier objeto hayan puesto encima del aparato. No lo
utilicen en superficies que se puedan estropear al colocar a su lado una fuente de calor.
4. Para evitar sacudidas eléctricas, no pongan el aparato en el agua ni debajo del grifo. Lean las
instrucciones para la limpieza.
5. Hay que prestar mucha atención cuando el aparato es utilizado por niños o está cerca de ellos.
6. Desenchufen el aparato cuando no debe funcionar o antes de limpiarlo. Antes de ello, regulen el selector
ON/OFF en OFF y el selector de la temperatura en " ". Esperen hasta que el aparato se haya enfriado,
antes de quitar, introducir o limpiar las partes.
7. No utilicen aparatos que presenten cables o enchufes estropeados, o después de que se hayan verificado
problemas de funcionamiento, o que estos aparatos hayan sido estropeados de alguna forma. Lleven el
aparato al Centro de Asistencia más cercano, para que lo controlen, lo reparen y lo calibren.
8. Utilizar accesorios no aconsejados por el fabricante puede causar daños
9. No utilicen el aparato al aire libre
10. No dejen que el cable cuelgue de la mesa o del rellano, o esté en contacto con superficies calientes.
11. No coloquen el aparato cerca o encima de un hornillo, de gas o eléctrico, caliente.
12. Presten la máxima atención cuando mueven un aparato que contiene aceite caliente u otros líquidos
calientes.
13. Si el enchufe se calienta diríjase a un electricista especializado.
14. No utilicen este aparato para fines diferentes de los previstos.
15. Presten la máxima atención cuando mueven la grasera o eliminan aceite caliente.
16. No utilicen estropajos metálicos para limpiar el aparato. Trocitos metálicos de éste podrían desprenderse
y entrar en contacto con partes eléctricas, creando el riesgo de sacudidas eléctricas.
17. Con el fin de garantizar un funcionamiento seguro, no introduzcan en el horno comidas o recipientes de
grandes dimensiones.
18. Es posible causar un incendio si tapan el aparato o entra en contacto con materiales inflamables como
cortinas, tejidos, paredes etc, cuando está funcionando.
19. ATENCIÓN: No dejen nunca el tostador-horno-grill sin vigilar cuando está funcionando (sobre todo si se
trata del tostador o del grill).
20. Cuando está en la función grill, la grasera, la parrilla para grill y la parrilla deben ser utilizadas según las
instrucciones de la pág. 27.
21.Presten la máxima atención cuando están utilizando recipientes de un material diferente del metal, cristal o
cerámica para horno.
22. Cuando el horno no está funcionando, no coloquen nada en su interior, con excepción de los accesorios
aconsejados por el productor.
23. No pongan en el horno los siguiente materiales: papel, cartón, plástico o cosas parecidas.
24. No cubran partes del horno con hojas de aluminio. Podrían provocar un excesivo sobrecalentamiento del
horno.
25. Para apagar el tostador-horno-grill, regulen el selector ON/OFF en OFF y el selector de la temperatura
en " ".
ESTE PRODUCTO ES ADECUADO EXCLUSIVAMENTE PARA UN USO DOMÉSTICO
CONSERVEN ESTAS INSTRUCCIONES
ATENCIÓN: Tras haber desembalado el aparato, controlar la puerta y su integridad. Al ser la puerta de
cristal es, por lo tanto, frágil. Aconsejamos solicitar su sustitución si resultase visiblemente astillada, rayada o
arañada. Además, durante la utilización del aparato, las operaciones de limpieza y los desplazamientos, evitar
cerrarla bruscamente, golpearla violentamente y derramar líquidos fríos sobre el cristal del aparato caliente.
GB F E 21-01-2003 9:22 Pagina 23
Page 24

24
Notas/Consejos
FICHA DE TRABAJO
Programa
Regulación del
selector ON/OFF
y programación
del tostador
Mantener
caliente
ON
Regulación del
selector del
termostato
KEEP
WARM
Regulación del
selector para
elegir la función
Posición de la parrilla/accesorios
BAKE/TOAST
Utilicen esta función para
mantener caliente la comida.
Horno ON
UP TO
470 °F
BAKE/TOAST
Ideal para carnes, pizza, dulces,
pasteles, postres de fruta,
pescado, hortalizas rellenas.
Grill ON
BROIL
Broil
Utilicen siempre la parrilla para grill
(H) introducida en la grasera (I).
La grasera con la parrilla para grill
está proyectada para dos regulaciones del grill. Utilicen la COMBINACIÓN SUPERIOR para cocinar en
parrilla y para una tostadura más rápida. Coloquen la parrilla para grill con
los bordes revueltos hacia abajo, en
la grasera. Dejen 1" entre la comida y
el elemento superior (A). Sugerido
para comidas como hamburguesas,
bistec, brochetas de carne escabechada. Utilicen la combinación inferior
para comidas que necesitan tiempos
de cocción en parrilla más largos,
como el pollo. Para la COMBINACIÓN INFERIOR, pongan la parrilla
al revés, con los bordes hacia arriba,
en el interior de la grasera.
Empareda
dos
Hasta 7
minutos
TOAST
BAKE/TOAST
Regulen el selector ON/OFF en
el color deseado.
Tostadura
ON o
hasta 7
minutos
BROIL
Broil
Utilicen la combinación para la
cocción en parrilla, para dorar
bocadillos abiertos, queso, aderezos,
entremeses. Cuando la utilizan por
primera vez, tengan vigilada la comida
y reduzcan el tiempo de cocción, con
el fin de evitar una tostadura excesiva.
Pan
Hasta 7
minutos
TOAST
BAKE/TOAST
Combinación superior
Combinación inferior
GB F E 21-01-2003 9:23 Pagina 24
Page 25

25
• Su producto está dotado de una clavija polarizada para corriente alternada (una clavija con un diente
más largo). Dicha clavija se adapta a la toma sólo en un sentido. Se trata de una característica de
seguridad. Si no consiguen introducir completamente la clavija en el enchufe, den la vuelta a la clavija. Si
de todas formas no consiguen introducirla, llamen a su electricista para que sustituya la vieja toma de
corriente. No traten de ignorar la función de seguridad de la clavija polarizada.
• Conecten la clavija con una toma de 120 Volt CA.
• La longitud del cable de este producto ha sido elegida con el fin de reducir el riesgo de que se enrede y
alguien se caiga liándose en el cable que sobra. Si necesitan un cable más largo, pueden utilizar una
prolonga. Esta debe ser calibrada para no menos de 15 amp., 120 Volt, y debe estar comprendida en la
lista Underwrites Laboratories/CSA.
• Pueden comprar una prolonga de 6 pies, a 15 amp, en la tienda del representante más cercano a su
casa. Si utilizan una prolonga más larga, no la dejen demasiado abundante en la zona donde trabajan, o
colgando donde alguien, accidentalmente, podría tirar de ella o liarse en ella.
• Manejen el cable con prudencia para que pueda durar más: eviten tirarlo o arrancarlo en la zona cerca
del enchufe o de la conexión con el aparato.
• Cuidado:
Notarán un blando olor o humo la primera vez que utilizarán este aparato (unos 15 minutos). Es normal.
Se debe a las sustancias protectoras en los elementos de calentamiento, que los protegen de los
efectos de la sal durante la expedición desde la fábrica.
ACCESORIOS QUE PEDIR
• GALLETERA (G)
Debe ser colocada directamente encima de la parrilla. Es indispensable para cocer en el horno bizcochos y
pastelillos.
•LUZ INTERIOR (B) E INDICADOR (F)
• Si consta de ella, la luz interior (B) se queda siempre encendida mientras el horno está en la posición
ON. El indicador (F) se apaga cuando el interior del horno alcanza la temperatura de cocción deseada,
luego se enciende y se apaga de vez en cuando durante la cocción.
• En el caso que su horno no tenga luz interior (B), el indicador (F) se queda encendido siempre mientras
el horno esté funcionando (no sirve como indicador de la temperatura).
•EMPUÑADURA PARA PARILLA (N)
Una pratica ayuda para extraer la parilla cuando está caliente.
PROGRAMAS DE COCCIÓN
1. CÓMO MANTENER CALIENTE LA COMIDA
Pongan la comida que desean mantener caliente encima de la parrilla
• Regulen el selector del termostato (C) en la posición "KEEP WARM".
• Regulen el selector ON/OFF (D) en "ON".
• Regulen el selector de control de la función en la posición "TOAST/BAKE".
uando ya no es necesario mantener caliente la comida, regulen el selector del termostato en
" " y el selector ON/OFF en ON.
Dicha función ha sido estudiada para mantener calientes las comidas que han sido cocidas por breves
periodos, no excesivamente. Aconsejamos no mantener demasiado tiempo las comidas en caliente y no
utilizar esta función para calentar alimentos congelados o fríos.
2. INSTRUCCIONES PARA LA COCCIÓN EN EL HORNO
En este horno pueden cocinar comidas como en su horno normal. Es posible colocar cacerolas o platos de
horno directamente encima de la parrilla de quita y pon. Utilicen la grasera (I) para cocinar alimentos como
bizcochos, dulces, varias comidas en cacerolas no tapadas. Pongan la grasera o la galletera directamente
encima de la parrilla de quita y pon (combinación 2).
GB F E 21-01-2003 9:23 Pagina 25
Page 26

26
1. Cerrar la puertecilla.
2. Regular el selector del termostato (C) en la posición que corresponde a la temperatura deseada.
3. Regulen el selector ON/OFF en ON.
4. Regulen el selector de control de funciones en la posición TOAST/BAKE.
5. Al acabar la cocción, regulen el selector del termostato en la posición " " y el selector
ON/OFF en OFF.
• Cuidado
Aconsejamos no utilizar tapaderas de cristal en las cacerolas.
Los platos de cocción de cristal no deberían estar nunca a menos de 1 pulgada del elemento
calefactor.
• Cuando utilizan la función TOAST/BAKE, no apoyen la grasera (o cualquier
otro accesorio/recipiente) directamente sobre el elemento calefactor inferior.
•SUGERENCIAS ÚTILES PARA LA COCCIÓN EN EL HORNO
Para obtener las mejores prestaciones de este tostador-horno-grill:
• No llenen demasiado el horno. Si es posible coloquen la comida en el centro de la cavidad del horno.
• No abran la puertecilla demasiado a menudo para evitar así dispersiones de calor.
• Es posible utilizar una hoja de aluminio para tapar el plato o la plancha. Comprueben que los márgenes
de la hoja adhieran bien a los lados del plato o de la plancha de cocción.
•TIEMPOS Y TEMPERATURAS PARA COMIDAS TÍPICAS (cocidos y asados por convección)
Los tiempos y la temperaturas sugeridos cambian según la temperatura de la comida que se pone en el
horno, según la cantidad y las preferencias personales. Los tiempos indicados para carne o aves se
refieren al alimento a temperatura de frigorífico. Añadan 5 minutos, necesarios para que se caliente
el horno. Las primeras veces, para evitar que la comida se cueza demasiado, sugerimos seleccionar
tiempos de cocción más breves. Luego, a medida que se usa el horno, los tiempos correctos se vuelven
familiares.
Comida
Selección de la
temperatura
Notas y sugerencias. Para la combinación
con la parrilla, tomen como referencia la pág 24.
Tiempo aproximado
Pollo entero,
2,5-3 libras
No relleno
400 °F
No es necesario voltear a mitad de la
cocción. También se puede cocinar encima
de la parrilla para grill puesta al revés, en la
grasera (combinación inferior) para reducir
salpicaduras.
80-90 minutos o hasta que los
muslos y la pechuga no alcanzan
una temperatura interior de 175º F.
Asado de lomo o di costillas
de cerdo, 2-3 libras
400 °F
Asar como cuando asan el pollo entero.
80-90 minutos o hasta que no alcanzan
una temperatura interior de 170º F.
Asado de lomo o di
costillas de ternera, 3
libras, con hueso
400 °F
No es necesario voltear.
60-70 minutos o hasta que estén
tiernos y dorados 50-60 minutos
Pastel de carne, 2-2,5
libras
350 °F
Usen la grasera. No es necesario voltear.
Mezclar y mover a la vez todo junto 1,5-2
libras de carne triturada (ternera) con huevos,
pan rallado, sal, pimienta y aromas.
50-60 min.
Patatas asadas, 3-4 de
tamaño grande, cortadas
en trozos
400 °F
Corten las patatas en trozos, utilicen la
grasera, mezclar tres veces durante la
cocción y después de al menos 20 minutos.
50-60 min.
Dulces secos
350 °F
Utilicen moldes metálicos rectangulares.
Aténganse a los breves tiempos
indicados en la receta tradicional
(algo reducidos)
Ta rta (no tapadas)
350 °F
Utilicen moldes metálicos para dulces.
Aténganse a los breves tiempos
indicados en la receta tradicional
(algo reducidos)
Bizcochos: a gota,
enrollados y cortados, a
rodajas, con molde
375 °F
Introduzcan la parrilla como para la función
emparedados. Usen la galletera (G) (si
suministrada), o la grasera.
10-15 min.
GB F E 21-01-2003 9:23 Pagina 26
Page 27

27
•TOSTADURA
Esta función es ideal para fundir, volver crujientes y tostar las superficies de los alimentos. Utilícenla cuando
preparan bocadillos abiertos, tortitas con mantequilla o para dorar los pasteles cocidos.
1. Pongan el alimento en la grasera (o en la galletera, si suministrada), y colóquenla encima de la parrilla.
2. Cierren la puertecilla, regulen los selectores de funciones y de la temperatura en BROIL.
3. Regulen el selector del temporizador ON/OFF en MEDIUM o en ON (para tiempos de tostadura más
largos).
Cuando experimentan nuevas utilizaciones, controlen la comida para evitar un excesiva tostadura.
Cuando el ciclo de tostadura se ha acabado (la superficie superior es del color deseado), regulen el
selector del termostato.
3. INSTRUCCIONES PARA COCINAR EN PARRILLA
Para cocinar en parrilla usen siempre la grasera con la parrilla para grill. No es necesario calentar
previamente.
No dejen el grill sin vigilancia cuando está funcionando. Antes de usar el grill por primera vez y cada vez
que lo han utilizado, laven la grasera y la parrilla con agua caliente y detergente. No cubran la parrilla del
horno con papel de aluminio pues impediría que las grasas y al aceite corran, causando además
salpicaduras y humo y reduciendo la circulación de aire necesaria para la ventilación.
INSTRUCCIONES PARA EMPARRILLAR
1. Pongan la parrilla del horno como indicamos en la tabla de la pág. 24.
2. Coloquen lo que desean cocinar encima de la parrilla para grill (H) (colocada en el interior de la
grasera), luego lo ponen todo en la parrilla del horno.
3. Dejen siempre abierta la puertecilla del horno, hasta la posición Stop, (como indicamos aquí
abajo).
4. Regulen el selector del termostato (C) y el selector (E) en BROIL.
5. Regulen el selector ON/OFF en ON.
6. Regulen el selector del control de funciones en BROIL
7. Acabada la cocción, regulen el selector ON/OFF en OFF y el selector del termostato
en " ". Presten atención cuando dan la vuelta al alimento o sacan la grasera. Usen
siempre las manoplas. Lleven mucho cuidado cuando sacan la grasera y eliminan la
grasa recogida durante la emparrillada.
• Cuidado:
Aunque el humo sea una característica de una buena emparrillada, si prestan atención a los siguientes
consejos consiguen eliminar o reducir mucho el humo:
• Quiten la grasa excesiva y hagan cortes en los extremos de los trozos que desean cocinar para evitar
que se enrollen. Sequen la superficie de la carne, del pescado y aves con una servilleta de papel.
•Para obtener los mejores resultados, descongelen la carne antes de emparrillarla. Estas dos
precauciones reducen o eliminan el humo de la emparrillada.
• Colocando la comida en la parrilla para grill, los jugos y la grasa gotean en la grasera, poco a poco,
durante la cocción disminuyen las salpicaduras.
• En caso de bistec y chuletas congeladas, usen un tiempo de cocción de 1 1/2-2 veces superior
respecto al tiempo necesario para cocinar en parrilla la carne no congelada.
•Si la grasa salpica durante la cocción en parrilla, regulen el selector del control de la temperatura a un
nivel inferior.
•Al acabar, quiten la grasa de la grasera y laven la grasera y la parrilla para grill.
• Es mejor limpiar el interior del aparato cada vez que lo utilizan. Una excesiva acumulación de grasas
provoca el formarse de humo. Utilicen un detergente no abrasivo y agua caliente.
•Para emparrillar bistec muy gruesos u otras comidas así, les aconsejamos que utilicen la combinación
inferior de la parrilla para grill.
•Visto que el pescado no tiene grasas, puede ser cocinado en parrilla directamente en la grasera.
Cocínenlo hasta que se deshace fácilmente con el tenedor. No es necesario voltear las chuletas sutiles.
GB F E 21-01-2003 9:23 Pagina 27
Page 28

28
4) INSTRUCCIONES PARA TOSTAR AUTOMÁTICAMENTE
• La parrilla es muy espaciosa pues pueden tostar contemporáneamente 6 rebanadas de pan. De todas
formas los mejores resultados los obtienen con 4 rebanadas.
•Para tostar coloquen las rebanadas de pan como indicamos abajo:
Tostar una rebanada Tostar dos rebanadas Tostar cuatro rebanadas Tostar seis rebanadas
Para tostar continuamente, regulen el selector de la programación tostadura en un valor inferior.
•INSTRUCCIONES PARA TOSTAR
Para tostar automáticamente pan, bocadillos, tortitas, pasteles glaseados y obleas congeladas utilicen
siempre la parrilla de horno.
1. Pongan la parrilla del horno como indicamos en la tabla de la pág. 24.
2. Coloquen lo que desean cocinar encima de la parrilla. Cierren la puertecilla.
3. Regulen el selector del termostato en TOAST/BROIL y el selector para elegir la función en
TOAST/BAKE.
4. Es posible regular el selector de la programación (D), girándolo en sentido de las agujas del reloj para
obtener una tostadura clara, mediana, oscura, o cualquier graduación intermedia.
Tosten algunos trozos de pan para controlar el grado de la tostadura. Si es necesario cambien un poco la
regulación para obtener el resultado deseado.
5. Cuando se tosta, se encienden sea el elemento calefactor superior que el inferior, para conseguir una
tostadura en ambos lados del alimento al mismo tiempo.
Es posible que se forme condensación en el interior del cristal de la puertecilla. Es normal. Durante el
ciclo de tostadura la condensación se evapora.
6. Un indicador acústico señala que el tiempo programado ha transcurrido. El ciclo de tostadura ha llegado
al final y los elementos calefactores se apagan automáticamente. Regulen el selector del termostato en la
posición " ".
• Importante:
Este tostador-horno-grill es capaz de tostar automáticamente una gama de niveles muy amplia, desde el
claro hasta el oscuro. De todas formas si prefieren una tostadura más clara pueden interrumpir
simplemente el ciclo automático de tostadura girando el selector superior hasta la posición OFF. De
esta forma se detiene el aparato sin estropear el horno.
Si prefieren una tostadura más oscura, pongan al principio el ciclo de tostadura girando el selector (D) en
sentido de las agujas del reloj hasta que no obtienen el color deseado.
Apaguen el selector del termostato y el selector de la programación del tostador como hemos
descrito anteriormente.
A medida que usan el aparato se le volverán familiares las programaciones que le consienten obtener el
pan del color que prefiere.
•SUGERENCIAS PARA TOSTAR CON ÉXITO
El pan más sólido y el pan congelado requieren una regulación más oscura. Una sóla rebanada de pan
requiere una regulación más clara que la necesaria para varias rebanadas de pan.
GB F E 21-01-2003 9:23 Pagina 28
Page 29

29
MANUTENCIÓN Y LIMPIEZA
Desenchufar siempre el horno y dejarlo enfriar antes de empezar las operaciones de limpieza.
El aparato ha sido proyectado y concebido teniendo siempre en cuenta su seguridad. Para tener
garantizado un funcionamiento totalmente seguro, es necesario mantener limpio el aparato de grasas o
trocitos de comida acumulados.
1. Quitar la parrilla metálica del horno.
2. Para limpiar la cavidad interior del horno, usar un paño y un detergente líquido no abrasivo. No usar
estropajos metálicos, detergentes abrasivos o detergentes bajo presión.
NOTA No limpiar el interior con estropajos metálicos. Podría separarse alguna pieza y entrar en contacto
con las partes eléctricas, provocando el riesgo de sacudidas eléctricas.
3 - Para limpiar la puertecilla de cristal, usar un detergente para cristales o un paño húmedo. Secar con un
paño limpio.
4. Para limpiar el acabado externo, usar un paño húmedo con un poco de detergente. Para las manchas
difíciles pueden usar un detergente no abrasivo o bien un detergente para cristales pulverizado. No usar
estropajos metálicos, pues podrían estropear el acabado. Eliminar siempre los residuos de productos de
limpieza abrillantando con un paño seco.
5. La parilla metálica, la planche multiuso y la parilla para el gril (sólo si pedida) se pueden lavar como los
otros vajillas.
LIMPIEZA DEL FONDO DEL HORNO
Si vuestro horno tiene el fondo abridero:
Para limpiar el fondo del horno abrir el panel de entrada empujando el resorte (Ver la fig.A/B).
Poner el horno de lado sobre el panel posterior. Esto facilita las operaciones de limpieza.
Limpiar el fondo del horno después cada uso para eliminar residuos que podrían provocar problemas
durante las cocciones. Eliminar las migajas con un paño hûmedo. Para las manchas difíciles pueden usar un
tampón de nylon o de plástico ou un detergente no abrasivo. Secar completamen te antes de cerrar el
horno.
Tras haber limpiado, cerrar el panel de entrada y cerciorarse de que esté bloqueado totalmente en la
posición adecuada.
Si vuestro horno tiene el recogedor de migas:
desensartar el recogedor de migas del fondo de vuestro
horno (ver fig. C). Lavar a mano. En el caso de sucio
persistente, mojar el recogedor de migas con agua jabonada
caliente y si es necesario, limpiar delicadamente sin arañar.
•ULTERIORES OPERACIONES DE CONSERVACIÓN
Cualquier operación de conservación que requiera el desmontaje del horno debe ser efectuada por
personal de asistencia autorizado.
•LUZ INTERIOR (si consta de ella)
El horno puede ser utilizado sin peligros aunque no funcione la luz interior. Pónganse en contacto con un
Centro de Asistencia autorizado para la sustitución de la bombilla.
Fig. A Fig. B
Fig. C
GB F E 21-01-2003 9:23 Pagina 29
Page 30

30
•NOTE
GB F E 21-01-2003 9:23 Pagina 30
Page 31

31
Garantía limitada
Garantizamos todo producto DE’LONGHI por defectos de material y mano de obra. Nuestra
obligación dentro de esta garantía es proporcionar gratuitamente las refacciones y el servicio
durante un año a partir de la fecha de compra. Esta garantía se aplicará únicamente si el
producto se utiliza de acuerdo con las anexas instrucciones del fabricante y con un circuito de
corriente alterna (AC). Esta garantía reemplaza a cualquier otra garantía y acuerdo, expreso
o implícito y a todas las demás obligaciones o responsabilidades de nuestra parte. No autorizamos a ninguna otra persona o compañia a asumir nuestras responsabilidades relacionadas
con la venta y el uso de nuestro producto. Esta garantía no implica ninguna responsabilidad
de parte nuestra en relación con la venta o el uso de nuestro producto. Esta garantía no es
válida para los producto que hayan sido reparados o alterados fuera de nuestra fábrica ni
tampoco para los productos que hayan sido sometidos a uso inadecuado, negligencia o accidentes. Si se necesitan reparaciones o refacciones, se ruega escribir a:
DEMOTECNIC S.A.
Col. Parque San Andrés
COYOCÁN
04120 MÉXICO D.F., MÉXICO
Tel. de servicio (5) 549-8362
GB F E 21-01-2003 9:23 Pagina 31
 Loading...