

Page 1
Istruzioni per l'uso
Instructions for use
Mode d'emploi
Gebrauchsanweisung
Gebruiksaanwijzingen
Instrucciones para el uso
Instruções
√‰ËÁ›Â˜ ¯Ú‹Û˘
RECHARGEABLE VACUUM CLEANER
ASPIRATEUR RECHARGEABLE
AUFLADBARE STAUBSAUGER
ASPIRAPOLVERE RICARICABILE
OPLAADBARE STOFZUIGER
ASPIRADOR RECARGABLES
ASPIRADOR RECARREGÁVEL
º√ƒ∆π∑√ª∂¡√ ∏§∂∫∆ƒπ∫√ ™∫√À¶∞∫π
XM36/48D 3-09-2002 11:59 Pagina 1
Page 2
2
WARNING - THIS APPLIANCE MUST BE
EARTHED
IMPORTANT
The wires in the mains lead are coloured in
accordance with the following code:
Green and yellow: Earth
Blue: Neutral
Brown: Live
As the colours of the wires in the mains lead
may not correspond with the coloured markings
identifying the terminals in your plug, proceed
as follows:
The green and yellow wire must be connected
to the terminal in the plug marked with the letter
E or the earth symbol or coloured green or
green and yellow.
The blue wire must be connected to the terminal
marked with the letter N or coloured black.
The brown wire must be connected to the terminal marked with the letter L or coloured red.
N
E
L
ELECTRICAL CONNECTION (UK ONLY)
A) If your appliance comes fitted with a plug,
it will incorporate a 13 Amp fuse. If it does
not fit your socket, the plug should be cut
off from the mains lead, and an appro-
priate plug fitted, as below.
WARNING: Very carefully dispose of the
cut off plug after removing the fuse: do not
insert in a 13 Amp socket elsewhere in the
house as this could cause a shock hazard.
With alternative plugs not incorporating a
fuse, the circuit must be protected by a 15
Amp fuse.
If the plug is a moulded-on type, the fuse
cover must be re-fitted when changing the
fuse using a 13 Amp Asta approved fuse
to BS 1362. In the event of losing the fuse
cover, the plug must NOT be used until a
replacement fuse cover can be obtained
from your nearest electrical dealer. The
colour of the correct replacement fuse
cover is that as marked on the base of the
plug.
B) If your appliance is not fitted with a plug,
please follow the instructions provided
below:
XM36/48D 3-09-2002 11:59 Pagina 2
1 2 3
4 5
A
B
7
65
8
Page 3
3
XM36/48D 3-09-2002 11:59 Pagina 3
1
5
4
8
6
3
7
2
9
10
11
12
13
Page 4
4
GB
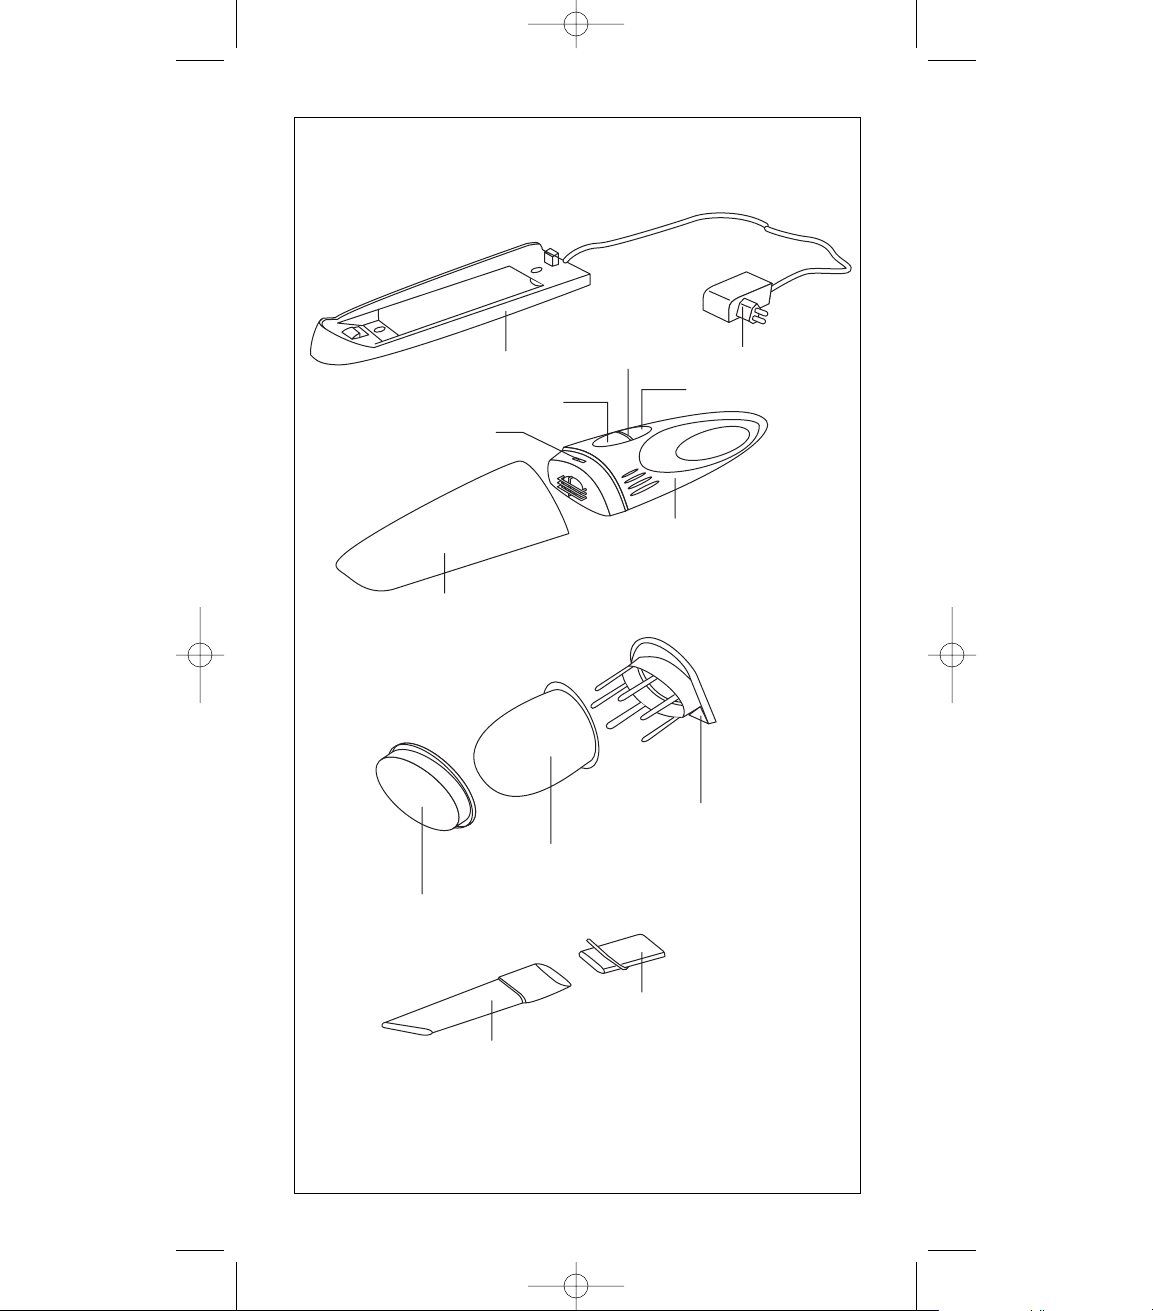
DESCRIPTION
1. Wall support/transformer
2. Contenitore raccoglipolvere
3. Hook for fastening the container
4. Container release button
5. Charge/operating indicator
6. ON/OFF switch
7. Motor body
8. Transformer
9. Motor protection filter support
10. Motor protection filter
11. Anello blocca-filtro
12. Short crevice tool
13. Crevice tool
WARNINGS
- Carefully read the instruction booklet and keep it
for future reference.
- The appliance may only be recharged using its
original transformer
- Do not use the transformer if the power cord is
damaged.
- Never tug on the power cord to unplug it from the
socket.
- Do not leave the appliance unattended, keep it
out of the reach rate of children and unfit per-
sons.
- Before plugging the appliance into the power soc-
ket, check that the mains voltage corresponds to
the voltage indicated on the rating plate.
- Do not immerse the appliance in water.
- Always unplug the appliance from the power soc-
ket and turn the appliance off before carrying out
any maintenance or cleaning operations.
- To clean the appliance simply use a damp cloth.
- For repairs and the purchase of accessories,
always contact your dealer or an authorised
Service Centre.
- Before using the vacuum cleaner for the first
time, check that the filter is positioned correctly.
Never operate the appliance without the filter!
- Always use original filters and accessories.
- If you should decide not to use the vacuum cleaner any longer, it is advisable to cut the power
cord (after having unplugged it from the socket)
so as to make the appliance unusable.
- Do not use the appliance to vacuum lighted matches, cigarette butts or hot ash.
- Do not use the appliance to vacuum needles, drawing pins or string.
- Do not use the appliance to vacuum flammable or
corrosive liquids.
- Always use the appliance as described in the
instruction booklet.
- The manufacturer declines all liability for any
damage caused by the incorrect use of the
appliance.
- Ensure that the power cord is not damaged by
sharp objects.
- Only use extension cords that are in good condition.
• The appliance is not intended for use by young
children or infirm persons without supervision.
•Young children should be supervised to ensure
that they do not play with the appliance.
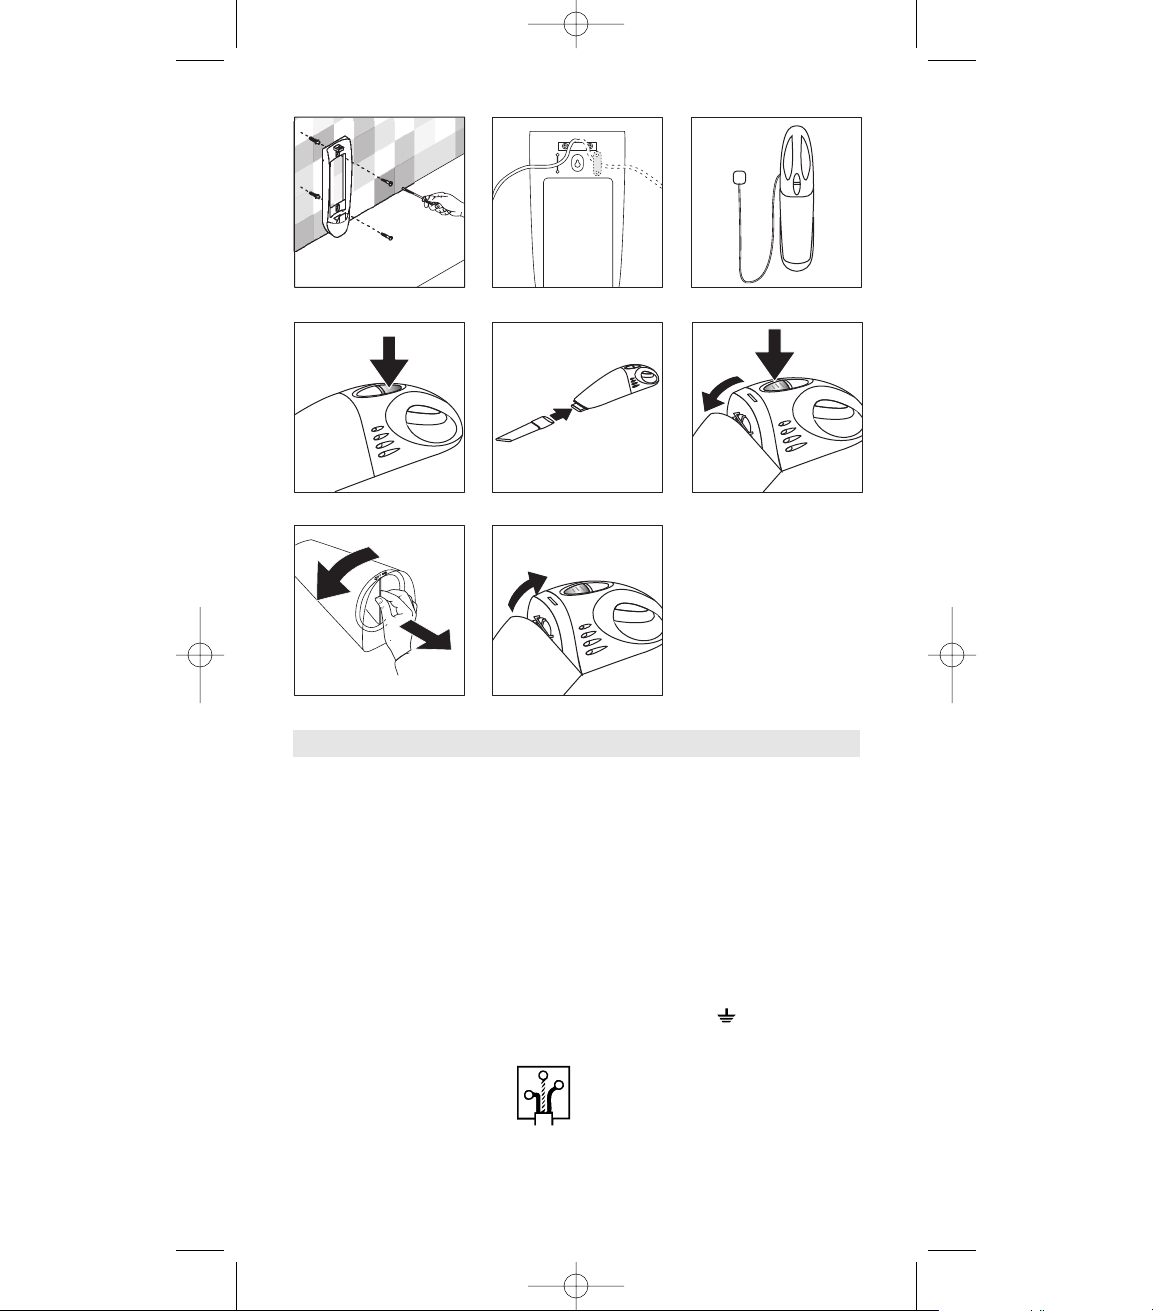
INSTALLING THE WALL SUPPORT /TRANSFORMER
Position the wall support near a power socket
- Fasten the wall support/transformer, using the
two screws supplied (Fig. 1). Make sure that the
cord is positioned so that the two screws secure it
in the desired direction (Fig. 2).
- After use, the appliance must always be attached
to the wall support, in order to recharge it and
ensure maximum operating efficiency.
STARTING THE APPLIANCE FOR THE FIRST
TIME
- Connect the transformer to a power socket
- Attach the vacuum cleaner to the support, as
shown in Fig. 3. The light will switch on to indicate that the appliance is correctly fitted in the support and is being recharged. The light always
remains on when the appliance is in the support.
N.B.: Before being used for the first time, or
when the batteries are discharged, the
vacuum cleaner must be left to charge for
around 16 hours.
XM36/48D 3-09-2002 11:59 Pagina 4
Page 5
5
USING THE VACUUM CLEANER
Remove the vacuum cleaner from the recharging support and press the ON/OFF switch (Fig. 4).
The appliance can be used to remove dust and dirt in
general, etc.It is ideal for the rapid cleaning of blankets, mattresses, rugs, clothes, furniture, etc.
Using the cleaning accessories
Crevice tools (fig. 5)
These tools are useful for vacuuming dust and dirt in
hard-to-get-to places, such as corners, edges, drawers,
etc.
Warning: this appliance must not be used to
vacuum liquids.
CHARGE/OPERATING INDICATOR
The light switches on when the appliance is in the support and when it is on. A reduction in vacuuming power
together with the switching off of the light indicate that
the appliance must be recharged.
RECHARGING THE APPLIANCE
After use, always place the appliance in the wall support for recharging. The appliance is fitted with a protection device that prevents the battery from “overcharging”; as a result, the vacuum cleaner can be left
in the recharging support without damaging the
appliance. When recharging, it is normal for the transformer to get hot. Only if the appliance is not used for
an extended period should the transformer be unplugged from the socket.
FILTER
Correct operation of the vacuum cleaner is closely linked to the condition of the filter. The filter must be
checked and cleaned regularly, depending on how
often the appliance is used. Regularly check that the filter is positioned correctly.
REMOVAL AND CLEANING THE FILTER
-Always turn off the appliance before performing
any cleaning operations.
-Press the dust container release button to separate the motor body from the dust container (Fig.
6).
- Remove the filter from the dust container by gripping the centre of the filter, and then pulling hard
(see Fig. 7).
-Brush the dust and dirt from the filter. For complete cleaning, the filter can be washed in warm
soapy water.
- Before putting the filter back in place, check that
it is completely dry and that it is not damaged, so
as not to compromise the performance of the
appliance.
- Replace the filter if damaged.
- Place the filter in the dust container.
- Attach the motor body to the dust container, pressing lightly. (Fig. 8).
CLEANING AND MAINTENANCE
To clean the outside of the appliance and the accessories, use a damp cloth and soapy water.
Never clean appliance with trichloroethylene or other
solvents.
No other type of care is required.
Never operate the appliance without the dust container
or the filter.
USEFUL TIPS
The battery and the transformer last longer if treated
correctly.
If there is a reduction in vacuuming power or an abnormally high level of noise, switch off the appliance and
check that there are no obstructions in the suction port
or in the dust container.
If the defect persists, have the appliance checked at an
authorised service centre.
XM36/48D 3-09-2002 11:59 Pagina 5
Page 6

6
F
DESCRIPTION
1. Support mural / alimentateur
2. Compartiment sac poussière
3. Crochet fixation compartiment
4. Bouton ouverture compartiment
5. Indicateur charge/fonctionnement
6. Interrupteur ON/OFF
7. Bloc moteur
8. Alimentateur
9. Support filtre protection moteur
10. Filtre protection moteur
11. Collier serrage filtre
12. Suceur plat
13. Suceur plat effilé
AVERTISSEMENTS
- Lire attentivement le mode d’emploi et le conserver soigneusement
- L’appareil ne peut être rechargé que par son alimentateur d’origine.
- Ne pas utiliser l’alimentateur si le cordon d’alimentation est détérioré.
-. Ne jamais tirer le cordon d’alimentation pour retirer la fiche de la prise de courant.
-. Ne jamais laisser l’appareil en marche sans surveillance. Le garder hors de la portée des enfants
et des personnes incapables.
- Avant de brancher l’aspirateur sur la prise électrique, vérifier si la tension du secteur correspond
à celle indiquée sur la plaque signalétique de
l’appareil.
- Ne jamais plonger l’appareil ni l’alimentateur
dans l’eau.
- Toujours arrêter et débrancher l’appareil avant
toute opération d'entretien ou de nettoyage de
celui-ci.
- Pour le nettoyage de l’appareil, un linge humide
suffit.
- Pour les réparations et l’achat de pièces et accessoires, s’adresser exclusivement au revendeur
habituel ou directement à un centre SAV agréé.
- Avant la première mise en service, vérifier si le
filtre est correctement positionné.
- Ne jamais utiliser l’appareil sans filtre !
- Utiliser exclusivement des filtres et des accessoires d’origine.
- Dès que la décision est prise de ne plus utiliser l’aspirateur, il est recommandé de le débrancher et
de couper son cordon d’alimentation afin de rendre l’appareil inutilisable.
- Éviter d’aspirer les allumettes, les cendres et les
mégots encore allumés.
- Éviter d’aspirer les aiguilles, les punaises et la
ficelle.
- Éviter d’aspirer les liquides inflammables ou corrosifs.
- Utiliser l’appareil conformément à son mode
d’emploi.
- Le fabricant ne pourra être tenu pour responsable de dégâts découlant d’un usage impropre de
l’appareil.
- Veiller à ne pas abîmer le cordon d’alimentation
avec des objets tranchants
- Utiliser exclusivement des rallonges en bon état.
INSTALLATION DU SUPPORT MURAL/ ALIMENTATEUR
Positionner le support mural à proximité d’une
prise de courant
- Fixer le support mural/alimentateur en utilisant
les deux vis fournies avec l’appareil (fig. 1).
Attention à positionner le cordon de manière que
les deux vis le bloquent dans la direction souhaitée (fig. 2).
- Après usage, l’appareil doit toujours être rangé
dans son support mural, pour se recharger et
maintenir sa parfaite efficacité.
PREMIÈRE MISE EN MARCHE DE L’APPAREIL
- Brancher l’alimentateur sur une prise de courant.
- Accrocher l’aspirateur au support (fig. 3). Le
voyant s’allumera pour indiquer que l’appareil
est bien accroché et qu’il est en train de se recharger. Il restera allumé tant que l’appareil ne quittera pas le support.
N.B. : Avant la première utilisation ou si les
batteries sont à plat, l'aspirateur doit être
mis à recharger pendant environ 16 heures.
XM36/48D 3-09-2002 11:59 Pagina 6
Page 7

7
UTILISATION DE L’ASPIRATEUR
Sortir l’aspirateur de son support et presser l’interrupteur ON/OFF (fig. 4).
L’appareil peut être utilisé pour éliminer la poussière et
la saleté. Il est parfait pour un nettoyage rapide des
couvertures, matelas, tapis, vêtements, meubles, etc.
Utilisation des accessoires
Suceurs plats (fig. 5)
Ces suceurs facilitent l’aspiration de la poussière et de
la saleté dans les endroits d’accès difficile (coins, bords,
tiroirs, etc.)
Attention : ne pas utiliser cet appareil pour aspirer des liquides !
INDICATEUR DE CHARGE/ FONCTIONNEMENT
La lampe témoin s’allume quand l’appareil est dans son
support et quand il fonctionne. L’appareil doit être
rechargé quand sa force d’aspiration diminue et que la
lampe témoin s’éteint totalement.
RECHARGEMENT DE L’APPAREIL
Après usage, l’appareil doit toujours être rangé dans
son support mural pour se recharger. L’appareil est doté
d’un dispositif de protection qui évite la ‘surcharge’ de
l’accumulateur ; il peut donc rester longtemps dans son
support sans risquer de se détériorer. Pendant le
rechargement, il est normal que l’alimentateur chauffe. Si l’appareil doit rester inutilisé longtemps, il faudra
débrancher l’alimentateur.
FILTRE
Le bon fonctionnement de l’aspirateur est étroitement
lié à la propreté du filtre. Celui-ci doit être contrôlé et
nettoyé régulièrement en fonction de la fréquence d’utilisation. Vérifier régulièrement si le filtre est correctement positionné.
NETTOYAGE DU FILTRE
- Toujours arrêter l’appareil avant toute opération
de nettoyage.
- Presser le bouton d’ouverture du compartiment
sac poussière pour séparer celui-ci du bloc moteur
(fig. 6).
- Saisir le filtre au centre et tirer fort pour le sortir
du compartiment sac poussière (vedi fig. 7).
- Brosser le filtre pour éliminer la poussière et la
saleté. Pour un nettoyage complet, passer le filtre
à l’eau tiède savonneuse.
- Avant de remonter le filtre, vérifier s’il est bien
sec et en bon état, afin de ne pas compromettre
le bon fonctionnement de l’appareil.
- Remplacer les filtres abîmés.
- Remettre le filtre dans le compartiment sac poussière.
- Raccrocher le bloc moteur au compartiment sac
poussière en exerçant une légère pression (fig.
8).
NETTOYAGE ET ENTRETIEN
Pour nettoyer les accessoires et l’extérieur de l’appareil, utiliser un linge humide et de l’eau savonneuse.
Ne jamais laver l’appareil au trichloréthylène ou autre
solvant.
L’appareil n’exige aucun autre entretien.
Ne jamais faire marcher l’aspirateur sans sac poussière
ni sans filtre.
CONSEILS UTILES
Traités convenablement, l’alternateur et les batteries
durent longtemps.
Si l’appareil aspire mal ou s’il devient trop bruyant,
nous vous conseillons de l’arrêter et de contrôler si le
suceur ou le compartiment sac poussière est bouché.
Si le problème persiste, contacter un centre SAV agréé
pour faire vérifier l’appareil.
XM36/48D 3-09-2002 11:59 Pagina 7
Page 8

8
D
BESCHREIBUNG
1. Wandhalterung/Ladegerät
2. Staubbehälter
3. Befestigungshaken Behälter
4. Staubbehälter-Öffnungstaste
5. Lade-/Betriebsanzeige
6. EIN/AUS-Schalter
7. Motorgehäuse
8. Ladegerät
9. Aufnahme Motorschutzfilter
10. Motorschutzfilter
11. Filtersperring
12. Kurze Fugendüse
13. Fugendüse
HINWEISE
- Lesen Sie bitte diese Gebrauchsanweisung aufmerksam durch und bewahren Sie sie sorgfältig auf.
- Das Gerät kann nur mit dem Original-Ladegerät aufgeladen werden.
- Verwenden Sie das Ladegerät niemals mit einem
beschädigten Netzkabel.
- Ziehen Sie niemals am Netzkabel, um den Stecker
aus der Steckdose zu ziehen.
- Lassen Sie das Gerät niemals unbeaufsichtigt im
Betrieb; Kinder und Personen, die mit der
Handhabung des Geräts nicht vertraut sind, sind
davon fernzuhalten.
Überprüfen Sie vor dem Anschluss des Geräts an das
elektrische Netz, dass die Netzspannung mit der auf
dem Typen-Leistungsschild angegebenen Spannung
übereinstimmt.
Weder den Sauger selbst noch das Ladegerät in
Wasser tauchen.
- Vor der Durchführung von Wartungs- oder
Reinigungsvorgängen, stets den Netzstecker ziehen
und das Gerät ausschalten.
- Für die Reinigung des Geräts reicht ein weiches Tuch.
- Wenden Sie sich für eventuelle Reparaturen und für
den Kauf von Zubehörteilen ausschließlich an Ihren
Fachhändler oder direkt an eine autorisierte
Kundendienststelle.
Stellen Sie vor der ersten Inbetriebsetzung des Geräts
sicher, dass der Filter richtig eingesetzt ist.
Nie das Gerät ohne Filter verwenden!
- Verwenden Sie ausschließlich Originalfilter und –
zubehörteile.
Sollte der Staubsauger ausgedient haben und nicht
mehr verwendet werden, so ist dieser unbrauchbar
zu machen, indem Sie zunächst den Stecker aus der
Steckdose ziehen und dann das Netzkabel durchschneiden.
- Keine Streichhölzer, Asche und noch brennende
Zigarettenstummel aufsaugen.
- Keine Nadeln, Reißnägel oder Schnur aufsaugen.
- Keine entflammbaren bzw. korrosiven Flüssigkeiten
aufsaugen.
Betreiben Sie das Gerät nur gemäß den
Anweisungen in dieser Betriebsanleitung.
- Der Hersteller haftet nicht für eventuelle Schäden,
die durch einen unsachgemäßen Gebrauch des
Gerätes verursacht worden sind.
- Achten Sie bitten darauf, dass das Netzkabel nicht
mit scharfen Gegenständen in Berührung kommt, da
es sonst beschädigt werden könnte.
- Verwenden Sie nur einwandfrei betriebstüchtige
Verlängerungskabel.
INSTALLATION DER WANDHALTERUNG/DES
LADEGERÄTS
Positionieren Sie die Wandhalterung in der
Nähe einer Steckdose.
- Befestigen Sie die Wandhalterung bzw. das
Ladegerät mit den beiden mitgelieferten
Schrauben (Abb.1). Achten Sie darauf, das Kabel
so zu positionieren, dass die beiden Schrauben es
in der gewünschten Richtung blockieren (Abb.2).
- Nach dem Gebrauch ist das Gerät stets wieder in
der Wandhalterung einzusetzen, damit es erneut
aufgeladen werden kann und eine effiziente
Betriebstüchtigkeit gewährleistet ist.
ERSTE INBETRIEBSETZUNG DES GERÄTES
- Das Ladegerät an eine Steckdose anschließen.
- Den Staubsauger wie in Abb.3 angezeigt in der
Wandhalterung einsetzen. Die Kontrollanzeige
leuchtet auf und zeigt damit an, dass das Gerät
korrekt eingesetzt ist und sich im Ladezustand
befindet. Solange das Gerät in der
Wandhalterung eingesetzt ist, bleibt die
Kontrollanzeige eingeschaltet.
Hinweis: Bei leeren Batterien oder vor dem
Gebrauch des Gerätes, ist dieses etwa 16
Stunden lang aufzuladen.
XM36/48D 3-09-2002 11:59 Pagina 8
Page 9

9
GEBRAUCH DES STAUBSAUGERS
Den Staubsauger aus der Halterung nehmen und den
EIN/AUS-Schalter drücken (Abb.4).
Das Gerät kann sowohl zum Aufsaugen von Staub
sowie von sonstigem Schmutz, usw. verwendet werden.
Ideal für die schnelle Reinigung von Decken,
Matratzen, Teppichen, Kleidern, Möbeln, usw.
Gebrauch der Zubehörteile für die Reinigung
Fugendüse (Abb.5)
Mit diesen Düsen können Sie leicht Staub und sonstigen
Schmutz an schlecht zugänglichen Stellen, wie Ecken,
Kanten, Schubladen, usw. aufsaugen.
Gummidüse für das Nass-Saugen
Achtung: Dieses Gerät darf nicht zum
Aufsaugen von Flüssigkeiten benutzt werden.
LADE-/BETRIEBSANZEIGE
Die Kontrollanzeige leuchtet auf, wenn das Gerät in der
Halterung sitzt und wenn es in Betrieb ist. Eine
Verringerung der Saugkraft zusammen mit dem vollständigen Erlöschen der Kontrollanzeige zeigen an,
dass das Gerät neu aufgeladen werden muss.
AUFLADEN DES GERÄTS
Das Gerät nach dem Gebrauch stets wieder in die
Wandhalterung einsetzen. Das Gerät ist mit einer
Schutzvorrichtung ausgestattet, die verhindert, dass
sich der Akku „überlädt“; daher ist es möglich, den
Staubsauger stets im Ladezustand zu lassen ohne das
Gerät zu beschädigen. Während des Aufladens ist es
normal, dass sich das Ladegerät erhitzt. Nur wenn das
Gerät längere Zeit unbenutzt bleiben sollte, ist das
Ladegerät aus der Steckdose zu ziehen.
FILTER
Ein einwandfreier Betrieb des Staubsaugers hängt von
der Reinigung des Filters ab. Daher ist dieser ist dieser
regelmäßig zu kontrollieren und je nach Häufigkeit des
Gebrauchs zu reinigen. Regelmäßig überprüfen, dass
der Filter korrekt eingesetzt ist.
ENTNAHME UND REINIGUNG DES FILTERS
- Das Gerät vor allen Reinigungsvorgängen
abschalten.
- Die Staubbehälter-Öffnungstaste drücken, um so
das Motorgehäuse vom Staubbehälter zu trennen
(Abb.6).
- Den Filter aus dem Staubbehälter entnehmen,
indem Sie den Filter am Mittelteil greifen und ihn
dann kräftig herausziehen (siehe Abb.7).
- Den Staub und den Schmutz vom Filter abbürsten. Für eine komplette Reinigung können Sie
den Filter auch in lauwarmem Seifenwasser
waschen.
- Achten Sie darauf, dass der Filter vollkommen
trocken und nicht beschädigt ist, bevor Sie ihn
wieder einsetzen. Nur so wird eine einwandfreie
Betriebstüchtigkeit des Gerätes gewährleistet.
-Wechseln Sie eventuell beschädigte Filter aus.
- Den Filter wieder im Staubbehälter einsetzen.
- Das Motorgehäuse durch leichtes Andrücken wieder am Staubbehälter einhaken (Abb.8).
REINIGUNG UND WARTUNG
Verwenden Sie für die Reinigung der äußeren Teile des
Gerätes und der Zubehörteile ein weiches Tuch und
Seifenwasser.
Das Gerät niemals mit Trichloräthylen oder anderen
Lösungsmitteln reinigen.
Das Gerät bedarf sonst keiner anderen Pflege.
Das Gerät niemals ohne den Staubbehälter und eingesetzten Filter betreiben.
NÜTZLICHE TIPPS
Die Batterie sowie das Ladegerät haben eine lange
Lebensdauer, wenn diese sachgemäß behandelt werden.
Sollte die Saugkraft abnehmen oder das Gerät ungewöhnlich laut sein, empfehlen wir, den Staubsauger
abzuschalten und zu überprüfen, dass die Saugdüse
oder der Staubbehälter nicht verstopft sind.
Sollten sich die Betriebsstörungen trotz der erfolgten
Überprüfung nicht einstellen, so wenden Sie sich bitte
an eine autorisierte Kundendienststelle, um das Gerät
dort kontrollieren zu lassen.
XM36/48D 3-09-2002 11:59 Pagina 9
Page 10

10
DESCRIZIONE
1. Supporto a muro/alimentatore
2. Contenitore raccoglipolvere
3. Gancio per fissaggio contenitore
4. Pulsante di apertura contenitore
5. Indicatore di carica/ funzionamento
6. Interruttore ON/OFF
7. Corpo motore
8. Alimentatore
9. Supporto filtro proteggimotore
10. Filtro proteggimotore
11. Anello blocca-filtro
12. Bocchetta a lancia corta
13. Bocchetta a lancia
AVVERTENZE
- Leggere attentamente il libretto istruzioni e conservarlo con cura.
-L’apparecchio può essere ricaricato solo utilizzando il suo alimentatore originale.
- Non utilizzare l’alimentatore con il cavo di alimentazione danneggiato.
- Non tirare mai il cavo di alimentazione per
estrarre la spina dalla presa.
- Non lasciare mai l’apparecchio acceso incustodito,
tenerlo lontano dalla portata dei bambini e da
persone incapaci.
- Prima di collegare l’alimentatore alla rete elettrica, verificare che la tensione di rete corrisponda a
quella indicata nella targa dati.
- Non immergere mai né l’alimentatore né l’apparecchio in acqua.
- Staccare sempre la spina dalla presa di corrente e
spegnere l’apparecchio prima di eseguire qualsiasi operazione di manutenzione o pulizia dell’apparecchio.
- Per la pulizia dell’apparecchio utilizzare semplicemente un panno umido.
- Per le riparazioni e per l’acquisto di parti accessoriali, rivolgersi esclusivamente al proprio riven-
ditore o direttamente ad un Centro di Assistenza
Tecnica autorizzato.
- Prima di utilizzare l’aspirapolvere per la prima
volta, verificare che il filtro sia posizionato correttamente. Mai utilizzare l’apparecchio senza filtro!
- Utilizzare solo filtri ed accessori originali.
- Allorché si decida di non utilizzare più l’aspirapolvere, si raccomanda di renderlo inoperante
tagliandone il cavo di alimentazione, dopo aver
staccato la spina dalla presa di corrente.
- Non aspirare fiammiferi, cenere e mozziconi di
sigaretta ancora accesi.
- Non aspirare aghi, puntine o spago.
- Non aspirare liquidi infiammabili o corrosivi.
- Usare l’apparecchio soltanto come descritto nel
libretto istruzioni.
- Il costruttore non può essere considerato responsabile per eventuali danni causati da un uso
improprio dello stesso.
- Fare attenzione a non danneggiare il cavo di alimentazione contro parti taglienti.
- Utilizzare solo prolunghe in buono stato di conservazione.
INSTALLAZIONE DEL SUPPORTO A MURO
/ALIMENTATORE
Posizionare il supporto a muro in prossimità di
una presa di corrente
- Fissare il supporto a muro/alimentatore, utilizzando le due viti in dotazione (fig. 1). Attenzione
a posizionare il cavo in modo che le due viti lo
blocchino nella direzione desiderata (fig. 2).
- Dopo l’uso, l’apparecchio deve essere sempre
inserito nel supporto a muro, per ricaricarlo e per
garantire sempre la massima efficienza dello
stesso.
PRIMO AVVIO DELL’APPARECCHIO
- Collegare l’alimentatore ad una presa di corrente
- Agganciare l’aspirapolvere al supporto come indicato in fig. 3. La spia si accende, ad indicare che
l’apparecchio è ben agganciato e che la ricarica è
in corso e rimarrà accesa per tutto il tempo in cui
l’apparecchio è nel supporto.
N.B.: Prima di essere utilizzato per la prima
volta, o a batterie scariche, l'aspirapolvere
deve essere messo sotto carica per circa
16 ore.
I
XM36/48D 3-09-2002 11:59 Pagina 10
Page 11

11
UTILIZZO DELL’ASPIRAPOLVERE
Rimuovere l’aspirapolvere dal supporto di caricamento
e premere l’interruttore ON/OFF (fig. 4).
L’apparecchio può essere utilizzato per rimuovere la
polvere e lo sporco in genere, ecc.
Utilizzo degli accessori per la pulizia
Bocchette a lancia (fig. 5)
Queste bocchette facilitano l’aspirazione della polvere e
dello sporco nelle parti di difficile accesso quali angoli,
bordi, cassetti, ecc.
Attenzione: questo apparecchio non può essere
utilizzato per l'aspirazione di liquidi.
INDICATORE DI CARICA/FUNZIONAMENTO
La lampada spia si accende quando l’apparecchio è nel
supporto e quando è in funzione. Una diminuzione
della capacità di aspirazione contemporaneamente allo
spegnimento totale della lampada spia indicano che
l’apparecchio deve essere ricaricato.
RICARICA DELL’APPARECCHIO
Dopo l’uso rimettere sempre l’apparecchio nel supporto di ricarica a muro. L’apparecchio è dotato di un dispositivo di protezione che evita il “sovraccaricamento”
dell’accumulatore; è quindi possibile lasciare sempre
l’aspirapolvere sotto carica senza danneggiare l’apparecchio. Durante la ricarica, è normale che l’alimentatore si riscaldi. Solo se l’apparecchio non viene utilizzato per lungo tempo l’alimentatore deve essere staccato
dalla presa.
FILTRO
Il buon funzionamento dell’aspirapolvere è strettamente correlato con la pulizia del filtro. Il filtro deve essere
controllato e pulito regolarmente in funzione della frequenza d’utilizzo. Verificare regolarmente che il filtro
sia posizionato correttamente.
RIMOZIONE E PULIZIA DEL FILTRO
- Spegnere sempre l’apparecchio prima di qualsiasi operazione di pulizia.
-Premere il pulsante di sbloccaggio contenitore
raccoglipolvere per separare il corpo motore dal
contenitore raccoglipolvere (fig. 6).
- Estrarre il filtro dal contenitore raccoglipolvere
facendo presa sulla parte centrale del filtro (vedi
fig. 7), quindi tirare con forza.
- Spazzolare la polvere e lo sporco dal filtro. Per
una pulizia completa è possibile lavarlo in acqua
tiepida saponata.
- Prima di reinserire il filtro verificare che sia completamente asciutto e che non sia danneggiato, al
fine di non pregiudicare le prestazioni dell’apparecchio.
- Sostituire eventuali filtri danneggiati.
- Reinserire il filtro nel contenitore raccoglipolvere.
- Agganciare il corpo motore al contenitore raccoglipolvere esercitando una leggera pressione (fig.
8).
PULIZIA E MANUTENZIONE
Per la pulizia delle parti esterne dell’apparecchio e
degli accessori, usare uno straccio umido e acqua saponata. Non lavare mai l’apparecchio con trielina o altri
solventi.
Nessun altro tipo di cura è richiesto.
Non far mai funzionare l’apparecchio senza il contenitore raccoglipolvere o il filtro.
CONSIGLI UTILI
La batteria e l’alimentatore hanno lunga durata se trattati in modo adeguato.
Se si dovesse verificare una riduzione nella capacità di
aspirazione o un anomalo livello di rumorosità, si consiglia di spegnere l’apparecchio e verificare che non ci
siano ostruzioni nella bocchetta di aspirazione o nel
contenitore raccoglipolvere.
Se dopo tali verifiche il difetto dovesse persistere, far
controllare l’apparecchio da un centro assistenza autorizzato.
XM36/48D 3-09-2002 11:59 Pagina 11
Page 12

12
NL
BESCHRIJVING
1. Muurhouder/voedingseenheid
2. Stofopvangbak
3. Bevestigingshaak opvangbak
4. Drukknop opening opvangbak
5. Indicator lading/ werking
6. ON/OFF-schakelaar
7. Motorhuis
8. Voedingseenheid
9. Houder motorbeschermende filter
10. Motorbeschermende filter
11. Blokkeerring filter
12. Kort langwerpig zuigstuk
13. Langwerpig zuigstuk
WAARSCHUWINGEN
- Lees de gebruiksaanwijzingen aandachtig en
bewaar ze zorgvuldig.
- Het apparaat dient uitsluitend te worden opgeladen met de originele voedingseenheid.
- Gebruik de voedingseenheid niet ingeval het netsnoer beschadigd is.
- Trek nooit aan het netsnoer om de stekker uit het
stopcontact te trekken.
- Laat het apparaat nooit onbewaakt aanstaan en
houd het buiten het bereik van kinderen en onbevoegden.
- Controleer of de netspanning overeenkomt met
de spanning aangegeven op het gegevensplaatje,
voordat u de voedingseenheid aansluit op het
elektriciteitsnet.
- Het apparaat of de voedingseenheid niet onderdompelen in water.
- Vóór elke onderhouds- of reinigingsbeurt, altijd
eerst het apparaat uitschakelen en de stekker uit
het stopcontact trekken.
- Gebruik een vochtige doek om het apparaat
schoon te maken.
- Voor reparaties en de aankoop van hulpstukken
dient u zich uitsluitend tot de verkoper of recht-
streeks tot een erkend technisch servicecentrum
te wenden.
- Controleer of de filter goed op zijn plaats zit,
alvorens de stofzuiger voor de eerste keer te
gebruiken.
Gebruik het apparaat nooit zonder filter!
- Gebruik uitsluitend originele filters en hulpstukken.
- Mocht u beslissen het apparaat af te danken,
wordt aanbevolen het onbruikbaar te maken
door het netsnoer door te knippen, nadat u de
stekker uit het stopcontact hebt gehaald.
- Zuig geen brandende lucifers, as of sigarettenpeuken op.
- Zuig geen spelden, punaises of touw op.
- Zuig geen ontvlambare of corrosieve vloeistoffen op.
- Gebruik het apparaat uitsluitend op de manier
beschreven in de gebruiksaanwijzingen.
- De fabrikant kan niet aansprakelijk worden
gesteld voor eventuele schade voortvloeiend uit
een oneigenlijk gebruik van het apparaat.
- Zorg ervoor dat het netsnoer niet beschadigd
wordt door scherpe randen.
- Gebruik alleen verlengsnoeren die in goede staat
verkeren.
INSTALLATIE VAN DE MUURHOUDER /VOEDINGSEENHEID
Installeer de muurhouder vlakbij een stopcontact.
- Bevestig de muurhouder/voedingseenheid met
behulp van de twee bijgeleverde schroeven (fig.
1). Let er bij het positioneren van het netsnoer op
dat het door beide schroeven in de gewenste richting wordt geblokkeerd (fig. 2).
- Na elk gebruik, dient het apparaat in de muurhouder te worden geplaatst, om te worden opgeladen en om borg te staan voor een maximale
doelmatigheid.
EERSTE INGEBRUIKNAME APPARAAT
- Sluit de voedingseenheid aan op een stopcontact.
- Haak de stofzuiger vast in zijn houder, zoals aangegeven in fig. 3. Het controlelampje licht op, wat
betekent dat het apparaat goed geplaatst is en
wordt opgeladen. Het controlelampje blijft branden zolang het apparaat in de houder zit.
N.B.: Alvorens het apparaat voor de eerste keer
te gebruiken, of wanneer de batterijen
ontladen zijn, dient de stofzuiger gedurende circa 16 uur te worden opgeladen.
XM36/48D 3-09-2002 11:59 Pagina 12
Page 13

13
GEBRUIK VAN DE STOFZUIGER
Haal de stofzuiger uit de houder waar hij werd opgeladen en druk op de ON/OFF-schakelaar (fig. 4).
Het apparaat kan worden gebruikt voor het opzuigen
van stof, vuil in het algemeen. Ideaal voor de snelle
reiniging van bedspreien, matrassen, tapijten, kledingstukken, meubels,…
Gebruik van de hulpstukken voor de reiniging
Langwerpige zuigstukken (fig. 5)
Deze zuigstukken vereenvoudigen het opzuigen van
stof of vuil in moeilijk te bereiken plekken zoals hoeken, boorden, laden, enz.
Let op: dit apparaat dient niet te worden
gebruikt om vloeistoffen op te zuigen.
INDICATOR LADING/WERKING
Het controlelampje licht op wanneer het apparaat in
zijn houder zit en wanneer het in werking is. Wanneer
de zuigkracht afneemt en tegelijkertijd het lampje uitgaat, betekent dit dat het apparaat moet worden opgeladen.
OPLADEN VAN HET APPARAAT
Na elk gebruik, dient het apparaat in de muurhouder
te worden geplaatst. Het apparaat is voorzien van een
beveiliging die voorkomt dat de accumulator “oververhit”; het apparaat mag bijgevolg in de oplaadtoestand
blijven zonder hierdoor beschadigd te worden. Tijdens
het opladen, warmt de voedingseenheid op. Dit is normaal. Alleen indien het apparaat lange tijd niet wordt
gebruikt, dient de voedingseenheid uit het stopcontact
te worden gehaald.
FILTER
Om ervoor te zorgen dat de stofzuiger goed blijft werken, is de reiniging van de filter heel belangrijk. Hoe
vaak de filter wordt gecontroleerd en gereinigd, hangt
af van de gebruiksfrequentie van het apparaat.
Controleer regelmatig of de filter goed op zijn plaats
zit.
VERWIJDERING EN REINIGING FILTER
- Vóór elke reinigingsbeurt, altijd eerst het apparaat uitschakelen.
-Druk op de knop voor het vrijgeven van de stofopvangbak, om deze te scheiden van het motorhuis (fig. 6).
- Haal de filter uit de stofopvangbak, door het middelste gedeelte van de filter vast te nemen en stevig te trekken (zie fig. 7).
- Borstel stof en vuil van de filter. Voor een volledige reinigingsbeurt, kan de filter in een lauw
zeepsopje worden gewassen.
- Alvorens de filter terug te plaatsen, dient deze
volledig droog en niet beschadigd te zijn, om de
prestaties van het apparaat niet in het gedrang te
brengen.
-Vervang eventueel beschadigde filters.
- Plaats de filter in de stofopvangbak.
- Haak het motorhuis vast aan de stofopvangbak,
door een lichte druk uit te oefenen (fig. 8).
REINIGING EN ONDERHOUD
Gebruik een vochtige vod en een zeepsopje om de buitenkant van het apparaat en de hulpstukken schoon te
maken.
Reinig het apparaat nooit met trychloorethyleen of
andere oplosmiddelen.
Verdere reiniging is overbodig.
Laat het apparaat nooit werken in afwezigheid van de
stofopvangbak of de filter.
NUTTIGE TIPS
De batterij en de voedingseenheid gaan lang mee, voor
zover ze op correcte wijze worden gehanteerd.
Mocht u een afname van de zuigkracht waarnemen of
indien het apparaat ongewoon veel lawaai maakt, is
het raadzaam het uit te schakelen en te controleren of
het zuigstuk of de stofopvangbak niet belemmerd zijn.
Indien het probleem na deze controle aanhoudt, dient
u zich met het apparaat te wenden tot een erkend servicecentrum.
XM36/48D 3-09-2002 11:59 Pagina 13
Page 14

14
E
DESCRIPCIÓN
1. Soporte para pared/alimentador
2. Contenedor recogepolvo
3. Gancho para fijación contenedor
4. Botón de abertura contenedor
5. Indicador de carta/funcionamiento
6. Interruptor ON/OFF
7. Cuerpo motor
8. Alimentador
9. Soporte filtro protege motor
10. Filtro protege motor
11. Anillo bloquea filtro
12. Boquilla en lanza corta
13. Boquilla en lanza
ADVERTENCIAS
- Leer detenidamente el manual de instrucciones y
conservarlo cuidadosamente.
- El aparato se puede recargar sólo usando su alimentador original.
- No usar el alimentador con el cable de alimentación en mal estado.
- No tirar nunca del cable de alimentación para
desenchufar el aparato.
- No dejar nunca el aparato encendido sin vigilancia. Mantenerlo alejado del alcance de los niños y
de personas incapaces.
- Antes de enchufar el aparato a la corriente, comprobar que la tensión de red corresponde al valor
indicado en la placa de datos.
- No sumergir nunca el alimentador ni el aparato
en el agua.
- Desenchufar siempre el aparato de la corriente y
apagarlo antes de efectuar cualquier operación
de mantenimiento o de limpieza del aparato.
- Utilizar un paño húmedo para la limpieza del
aparato.
- Para las reparaciones y la adquisición de repuestos, ponerse en contacto exclusivamente con el
propio vendedor o con un Centro de Asistencia
Técnica autorizado
- Antes de utilizar el aspirador por primera vez,
comprobar que el filtro esté colocado correctamente.
- ¡No utilizar nunca el aparato sin filtro!
- Utilizar solamente filtros y accesorios originale.
- En caso de decidir dejar de utilizar el aspirador, se
aconseja cortar el cable de alimentación, después
de haber desenchufado el aparato para que éste
sea inutilizable.
- No aspirar cerillas, ceniza o colillas aún encendidas.
- No aspirar agujas, chinchetas o hilo bramante.
- No aspirar líquidos inflamables o corrosivos.
- Usar el aparato solamente según se describe en el
manual de instrucciones.
- El Fabricante no es responsable por los daños
eventuales derivados de un uso inadecuado del
aparato.
- Tener cuidado para no estropear el cable de alimentación con partes cortantes.
- Utilizar solamente alargadores en buen estado de
conservación.
INSTALACIÓN DEL SOPORTE DE PARED /ALIMENTADOR
Colocar el soporte de pared cerca de una toma
de corriente
- Fijar el soporte de pared/alimentador, usando los
dos tornillos que se entregan con el aparato (fig.
1). Vigilar en colocr el cable de forma que los dos
tornillos bloqueen en el dirección deseada (fig.
2).
- Después de usar el aparato dejarlo siempre en el
soporte de pared, para recargarlo y para garantizar siempre la máxima eficacia del mismo.
PRIMERA PUESTA EN MARCHA DEL APARATO
- Conectar el alimentador a una toma de corriente.
- Enganchar el aspirador al soporte como se indica
en la fig. 3. Se enciende el piloto para indicar que
el aparato está bien enganchado y que la recarga está en curso y permanecerá encendido mientras el aparato esté en el soporte.
N.B.: Cargar el aspirador durante aproximada-
mente 16 horas, antes de usarlo por primera vez, o cuando las baterías están
descargadas.
XM36/48D 3-09-2002 11:59 Pagina 14
Page 15

15
USO DEL ASPIRADOR
Retirar el aspirador del soporte de carga y pulsar el
interruptor ON/OFF (fig. 4).
El aparato se pude usar para quitar el polvo y la suciedad en general, etc.
Es ideal para la limpieza rápida de mantas, colchones,
alfombras, trajes, muebles, etc.
Uso de los accesorios para la limpieza
Boquillas en lanza (fig. 5)
Estas boquillas facilitan la aspiración del polvo y la
suciedad en las partes de difícil acceso como ángulos,
bordes, cajones, etc.
Atención: este aparato no se puede usar para
aspirar líquidos.
INDICAR DE CARGA /FUNCIONAMIENTO
La lámpara piloto se enciende cuando el aparato está
en el soporte y cuando está en funcionamiento. Una
disminución de la capacidad de aspiración simultánea
al apagado total de la lámpara piloto indica que el aparato se tiene que recargar.
RECARGA DEL APARATO
Después de usar el aparato colocarlo siempre en el
soporte de recarga en la pared. El aparato está provisto de un dispositivo de protección que evita la "sobrecarga" del acumulador; por lo que se puede dejar siempre el aspirador cargándose sin dañar al aparato.
Durante la recarga, es normal que el alimentador se
caliente. El alimentador sólo se tiene que desenchufar
si el aparato no se tiene que usar durante mucho tiempo.
FILTRO
El buen funcionamiento del aspirador está estrechamente relacionado con la limpieza del filtro. El filtro se
tiene que controlar y limpiar con regularidad en función de la frecuencia de uso. Comprobar regularmente
que el filtro esté bien colocado.
RETIRADA Y LIMPIEZA DEL FILTRO
- Apagar siempre el aparato antes de cualquier
operación de limpieza.
- Apretar el pulsador de desbloqueo del contenedor
recogepolvo para separar el cuerpo del motor del
contenedor recogepolvo (fig. 6).
- Extraer el filtro del contenedor recogepolvo para
ello coge el filtro por su parte central y después
tirar del mismo con fuerza (ver fig. 7).
- Eliminar el polvo y la suciedad del filtro cepillándolo. Para una limpieza completa se puede labar
con agua jabonosa templada.
- Para no perjudicar las prestaciones del aparato,
antes de volver a insertar el filtro comprobar que
esté completamente seco y que no esté dañado.
- Sustituir los posibles filtros dañados.
- Volver a colocar el filtro en el contenedor recogepolvo.
- Enganchar el cuerpo del motor al contenedor
recogepolvo realizando una ligera presión (fig.
8).
LIMPIEZA Y MANTENIMIENTO
Para la limpieza de las partes externas del aparato y de
los accesorios, usar un paño húmedo y agua jabonosa.
No lavar nunca el aparato con tricloroetileno u otros
disolventes.
No es necesario ningún otro tipo de cuidado.
No hacer funcionar nunca el aparato sin el contenedor
recogepolvo o sin el filtro.
CONSEJOS ÚTILES
La batería y el alimentador tienen una larga duración
si se tratan de modo adecuado.
Si se observa una disminución en la capacidad de aspiración o un nivel de ruido anómalo, se aconseja apagar
el aparato y comprobar que no haya ninguna obstrucción en la boquilla de aspiración o en el contenedor
recogepolvo.
Si después de esta comprobación el defecto sigue persistiendo, llevar el aparato a un centro de asistencia
autorizado.
XM36/48D 3-09-2002 11:59 Pagina 15
Page 16

16
P
DESCRIÇÃO
1. Suporte de parede/alimentador
2. Recipiente colector de pó
3. Gancho para fixação do recipiente
4. Botão de abertura do recipiente
5. Indicador de carga/funcionamento
6. Interruptor ON/OFF
7. Corpo do motor
8. Alimentador
9. Suporte do filtro de protecção do motor
10. Filtro de protecção do motor
11. Anel de bloqueio do filtro
12. Bocal curto para cantos
13. Bocal para cantos
ADVERTÊNCIAS
- Leia atentamente este manual de instruções e
conserve-o cuidadosamente.
- O aparelho só pode ser recarregado com o seu
alimentador original.
- Não utilize o alimentador com o cabo de alimentação danificado.
- Nunca puxe pelo cabo de alimentação para retirar a ficha da tomada.
- Nunca deixe o aparelho ligado sem vigilância e
mantenha-o fora do alcance das crianças e de
pessoas incapazes.
- Antes de ligar o alimentador à rede eléctrica, certifique-se de que a tensão da rede corresponde à
indicada na chapa de características.
- Nunca mergulhe o alimentador nem o aparelho
em água.
- Retire sempre a ficha da tomada de alimentação
e desligue o aparelho antes de efectuar qualquer
operação de manutenção ou limpeza.
- Para a limpeza do aparelho, utilize simplesmente
um pano húmido.
- Para eventuais reparações e aquisição de acessórios, contacte única e exclusivamente o próprio
revendedor ou directamente um Centro de
Assistência Técnica autorizado.
- Antes de utilizar o aspirador pela primeira vez,
certifique-se de que o filtro está devidamente
colocado.
Nunca utilize o aparelho sem o filtro!
- Utilize apenas filtros e acessórios originais.
- Se decidir eliminar o aspirador, inutilize-o, cortando-lhe o cabo de alimentação, depois de retirar a ficha da tomada.
- Não aspire fósforos, cinzas ou pontas de cigarro
ainda acesas.
- Não aspire agulhas, pregos ou fios.
- Não aspire líquidos inflamáveis ou corrosivos.
- Utilize o aparelho somente conforme descrito no
manual de instruções.
- O fabricante declina toda e qualquer responsabilidade por eventuais danos provocados por uma
utilização inadequada do aparelho.
- Tenha cuidado para não danificar o cabo de alimentação em superfícies cortantes.
- Utilize apenas extensões que estejam em bom
estado de conservação.
INSTALAÇÃO DO SUPORTE DE PAREDE/ALIMENTADOR
Coloque o suporte de parede próximo de uma
tomada de alimentação
- Fixe o suporte de parede/alimentador, utilizando
os dois parafusos fornecidos (fig. 1). Coloque o
cabo de modo a que os dois parafusos o bloqueiem na direcção desejada (fig. 2).
- Após a utilização, o aparelho deve ser sempre
inserido no suporte de parede para ser recarregado e garantir a máxima eficácia do mesmo.
PRIMEIRA LIGAÇÃO DO APARELHO
- Ligue o alimentador a uma tomada de alimentação
- Encaixe o aspirador no suporte conforme indicado na fig. 3. A luz piloto acende-se, o que indica
que o aparelho está devidamente encaixado e
que a recarga está em curso, e permanecerá
acesa enquanto o aparelho estiver no suporte.
N.B.: Antes de ser utilizado pela primeira vez,
ou em caso de pouca bateria, o aspirador
deve ser posto a recarregar durante cerca
de 16 horas.
XM36/48D 3-09-2002 11:59 Pagina 16
Page 17

17
UTILIZAÇÃO DO ASPIRADOR
Retire o aspirador do suporte de recarga e prima o
interruptor ON/OFF (fig. 4).
O aparelho pode ser utilizado para eliminar poeiras e
sujidade em geral, etc.
É ideal para uma limpeza rápida de cobertas, colchões,
tapetes, vestidos, móveis, etc.
Utilização dos acessórios para a limpeza
Bocal para cantos (fig. 5)
Estes bocais facilitam a aspiração de poeiras e da sujidade em geral nas partes de difícil acesso, tais como
cantos, rebordos, gavetas, etc.
Atenção: este aparelho não pode ser utilizado
para a aspiração de líquidos.
INDICADOR DE CARGA/FUNCIONAMENTO
A lâmpada piloto acende-se quando o aparelho está no
suporte e quando está em funcionamento. Se a capacidade de aspiração diminuir ao mesmo tempo que a
lâmpada piloto se apagar totalmente, é sinal de que o
aparelho deve ser recarregado.
RECARGA DO APARELHO
Após a utilização, coloque sempre o aparelho no suporte de recarga de parede. O aparelho possui um dispositivo de protecção que evita a “sobrecarga” do acumulador. É, por isso, possível deixar sempre o aspirador
a recarregar sem que tal danifique o aparelho. Durante
a recarga, é normal que o alimentador aqueça. O alimentador só deve ser desligado da tomada se o aparelho não for utilizado durante um longo período.
FILTRO
O bom funcionamento do aspirador está estreitamente
relacionado com a limpeza do filtro. O filtro deve ser
controlado e limpo regularmente consoante a frequência de utilização. Verifique regularmente se o filtro está
devidamente posicionado.
REMOÇÃO E LIMPEZA DO FILTRO
- Desligue sempre o aparelho antes de efectuar
qualquer operação de limpeza.
- Prima o botão de desbloqueio do recipiente colector
de pó para o separar do corpo do motor (fig. 6).
- Retire o filtro do recipiente colector de pó pegando na parte central do filtro e, depois, puxe com
força (veja a fig. 7).
- Elimine o pó e a sujidade do filtro com uma escova. Para uma limpeza completa, lave-o em água
tépida com sabão.
- Antes de inserir novamente o filtro, certifique-se
de que ele está completamente seco e de que não
apresenta danos, a fim de não comprometer o
rendimento do aparelho.
- Substitua quaisquer filtros danificados.
- Introduza novamente o filtro no recipiente colector de pó.
- Encaixe o corpo do motor no recipiente colector
de pó pressionando-o ligeiramente. (fig. 8).
LIMPEZA E MANUTENÇÃO
Para a limpeza das partes exteriores do aparelho e dos
acessórios, utilize um pano húmido e água com sabão.
Nunca lave o aparelho com trielina ou outros solventes.
Não são necessários quaisquer outros cuidados.
Nunca faça funcionar o aparelho sem o recipiente
colector de pó ou sem o filtro.
CONSELHOS ÚTEIS
A bateria e o alimentador têm uma longa duração se
forem tratados de modo adequado.
Se se verificar uma redução da capacidade de aspiração ou um nível anómalo de ruído, é aconselhável desligar o aparelho e ver se existem obstruções no bocal
de aspiração ou no recipiente colector de pó.
Se o defeito persistir após tais verificações, leve o aparelho a um centro de assistência autorizado para que
seja examinado.
XM36/48D 3-09-2002 11:59 Pagina 17
Page 18

18
GR
¶∂ƒπ°ƒ∞º∏
1. µ¿ЫЛ ЩФ›¯Ф˘/КФЪЩИЫЩ‹˜
2. ¢Ô¯Â›Ô Û˘ÏÏÔÁ‹˜ ÛÎfiÓ˘
3. °¿ÓÙ˙Ô˜ ÛÙÂÚ¤ˆÛ˘ ‰Ô¯Â›Ô˘
4. ¶Ï‹ÎÙÚÔ ·ÓÔ›ÁÌ·ÙÔ˜ ‰Ô¯Â›Ô˘
5. ŒУ‰ВИНЛ КfiЪЩИЫЛ˜/ ПВИЩФ˘ЪБ›·˜
6. ¢È·ÎfiÙ˘ ON/OFF
7. ªÔÙ¤Ú
8. ªÂÙ·Û¯ËÌ·ÙÈÛÙ‹˜
9. µ¿ÛË Ê›ÏÙÚÔ˘
10. º›ÏÙÚÔ
11. ¢·ÎÙ‡ÏÈÔ˜ ÛÙÂÚ¤ˆÛ˘ Ê›ÏÙÚÔ˘
12. ªÈÎÚfi ÛÙfiÌÈÔ ÁÈ· Û¯ÈṲ̂˜
13. ™ÙfiÌÈÔ ÁÈ· Û¯ÈṲ̂˜
¶ƒ√∂π¢√¶√π∏™∂π™
- ¢И·‚¿ЫЩВ ЪФЫВОЩИО¿ ЩФ ВБ¯ВИЪ›‰ИФ
Ф‰ЛБИТУ О·И К˘П¿НЩВ ЩФ.
- °И· ЩЛ КfiЪЩИЫЛ ЩЛ˜ Ы˘ЫОВ˘‹˜ Ъ¤ВИ У·
¯ЪЛЫИМФФИВ›Щ·И МfiУФ Ф БУ‹ЫИФ˜
КФЪЩИЫЩ‹˜.
- ªЛ ¯ЪЛЫИМФФИВ›ЩВ ЩФ КФЪЩИЫЩ‹ ·У ЩФ
ЛПВОЩЪИОfi О·ПТ‰ИФ ·ЪФ˘ЫИ¿˙ВИ КıФЪ¤˜.
- ªЛУ ЩЪ·‚¿ЩВ ФЩ¤ ЩФ ЛПВОЩЪИОfi О·ПТ‰ИФ
БИ· У· ·ФЫ˘У‰¤ЫВЩВ ЩФ КИ˜ ·fi ЩЛУ
Ъ›˙·.
- ªËÓ ·Ê‹ÓÂÙ ÔÙ¤ ·Ó·Ì̤ÓË ÙË Û˘Û΢‹
¯ˆÚ›˜ ÂÈÙ‹ÚËÛË, Î·È Ê˘Ï¿ÍÙ ÙËÓ Ì·ÎÚÈ¿
·fi ·È‰È¿ Î·È ·Ó‹ÌÔÚ· ¿ÙÔÌ·.
- ¶ЪИУ Ы˘У‰¤ЫВЩВ ЩФ МВЩ·Ы¯ЛМ·ЩИЫЩ‹ ЫЩФ
ЛПВОЩЪИОfi ‰›ОЩ˘Ф, ‚В‚·ИˆıВ›ЩВ fiЩИ Л Щ¿ЫЛ
ЩФ˘ ‰ИОЩ‡Ф˘ В›У·И ›‰И· МВ ·˘Щ‹У Ф˘
·У·БЪ¿КВЩ·И ЫЩЛУ ВЩИО¤Щ·
¯·Ъ·ОЩЛЪИЫЩИОТУ.
-
¶ÔÙ¤ ÌË ‚˘ı›˙ÂÙ ÙÔ ÌÂÙ·Û¯ËÌ·ÙÈÛÙ‹ ‹ ÙË
Û˘Û΢‹ ÛÙÔ ÓÂÚfi.
- ∞ФЫ˘У‰¤ВЩВ ¿УЩ· ЩФ КИ˜ ·fi ЩЛУ Ъ›˙·
ЩФ˘ ЪВ‡М·ЩФ˜ О·И Ы‚‹УВЩВ ЩЛ Ы˘ЫОВ˘‹
ЪИУ ·fi О¿ıВ В¤М‚·ЫЛ Ы˘УЩ‹ЪЛЫЛ˜ ‹
О·ı·ЪИЫМФ‡ ЩЛ˜ Ы˘ЫОВ˘‹˜.
- °И· ЩФУ О·ı·ЪИЫМfi ЩЛ˜ Ы˘ЫОВ˘‹˜
¯ЪЛЫИМФФИВ›ЩВ ·П¿ ¤У· ˘БЪfi ·У›.
- °È· ÙȘ ÂÈÛ΢¤˜ Î·È ÙËÓ ·ÁÔÚ¿
·ÍÂÛÔ˘¿Ú, ·Â˘ı˘Óı›Ù ÌfiÓÔ ÛÙËÓ
∞ÓÙÈÚÔۈ›· ‹ ·Â˘ı›·˜ ÛÙÔ
ÂÍÔ˘ÛÈÔ‰ÔÙË̤ÓÔ ™¤Ú‚Ș.
- ¶ЪИУ ¯ЪЛЫИМФФИ‹ЫВЩВ ЩЛУ ЛПВОЩЪИО‹
ЫОФ‡· БИ· ЪТЩЛ КФЪ¿, ‚В‚·ИˆıВ›ЩВ fiЩИ
ЩФ К›ПЩЪФ В›У·И ЫˆЫЩ¿ ЩФФıВЩЛМ¤УФ.
¶ФЩ¤ МЛ ¯ЪЛЫИМФФИВ›ЩВ ЩЛ Ы˘ЫОВ˘‹
¯ˆЪ›˜ К›ПЩЪФ!
- ГЪЛЫИМФФИВ›ЩВ МfiУФ БУ‹ЫИ· К›ПЩЪ· О·И
·ÍÂÛÔ˘¿Ú.
- ™В ВЪ›ЩˆЫЛ Ф˘ ‰ВУ ЪfiОВИЩ·И У·
¯ЪЛЫИМФФИ‹ЫВЩВ П¤ФУ ЩЛУ ЛПВОЩЪИО‹
ЫОФ‡·, Ы˘УИЫЩ¿Щ·И У· ЩЛУ
·¯ЪЛЫЩВ‡ЫВЩВ Оfi‚ФУЩ·˜ ЩФ ЛПВОЩЪИОfi
О·ПТ‰ИФ, ·КФ‡ ЪТЩ· ·ФЫ˘У‰¤ЫВЩВ ЩФ
КИ˜ ·fi ЩЛУ Ъ›˙· ЩФ˘ ЪВ‡М·ЩФ˜.
- ªЛ ¯ЪЛЫИМФФИВ›ЩВ ЩЛ Ы˘ЫОВ˘‹ БИ·
·Ó·ÚÚfiÊËÛË Û›ÚÙˆÓ, ÛÙ¿¯Ù˘ ηÈ
·Ó·ÌÌ¤ÓˆÓ ·ÔÙÛ›Á·ÚˆÓ.
- ªЛ ¯ЪЛЫИМФФИВ›ЩВ ЩЛ Ы˘ЫОВ˘‹ БИ·
·У·ЪЪfiКЛЫЛ О·ЪКИЩЫТУ, ИУВ˙ТУ ‹
Ы¿БОФ˘.
- ªЛ ¯ЪЛЫИМФФИВ›ЩВ ЩЛ Ы˘ЫОВ˘‹ БИ· ЩЛУ
·У·ЪЪfiКЛЫЛ В‡КПВОЩˆУ ‹ ‰И·‚ЪˆЩИОТУ
˘БЪТУ.
- ГЪЛЫИМФФИВ›ЩВ ЩЛ Ы˘ЫОВ˘‹ МfiУФ
Ы‡МКˆУ· МВ ЩИ˜ Ф‰ЛБ›В˜ ЩФ˘ ВБ¯ВИЪИ‰›Ф˘.
- √ О·Щ·ЫОВ˘·ЫЩ‹˜ ‰ВУ МФЪВ› У·
ıВˆЪЛıВ› ˘В‡ı˘УФ˜ БИ· Щ˘¯fiУ ˙ЛМИ¤˜
Ф˘ ФКВ›ПФУЩ·И ЫВ ·О·Щ¿ППЛПЛ ¯Ъ‹ЫЛ
ЩЛ˜ Ы˘ЫОВ˘‹˜.
- ¶ЪФЫ¤НЩВ У· МЛУ О·Щ·ЫЩЪ¤„ВЩВ ЩФ
ЛПВОЩЪИОfi О·ПТ‰ИФ ЫВ ОФКЩВЪ¿ ЫЛМВ›·.
- ГЪЛЫИМФФИВ›ЩВ МfiУФ ЪФВОЩ¿ЫВИ˜ ЫВ
О·П‹ О·Щ¿ЫЩ·ЫЛ.
∂°∫∞∆∞™∆∞™∏ µ∞™∏™
∆√πÃ√À/º√ƒ∆π™∆∏
∆ÔÔıÂÙ‹ÛÙÂ ÙË ‚¿ÛË ÎÔÓÙ¿ ÛÂ
Ú›˙· Ú‡̷ÙÔ˜
- ™ЩВЪВТЫЩВ ЩЛ ‚¿ЫЛ
ЩФ›¯Ф˘/КФЪЩИЫЩ‹,
¯ЪЛЫИМФФИТУЩ·˜ ЩИ˜ ‰‡Ф
‰И·ЩИı¤МВУВ˜ ‚›‰В˜ (ВИО. 1).
∆ФФıВЩ‹ЫЩВ ЩФ О·ПТ‰ИФ
ЪФЫВОЩИО¿, ¤ЩЫИ ТЫЩВ ФИ ‰‡Ф
‚›‰В˜ У· ЩФ МПФО¿ЪФ˘У ЫЩЛУ
ВИı˘МЛЩ‹ О·ЩВ‡ı˘УЫЛ (ВИО. 2).
- ªВЩ¿ ЩЛ ¯Ъ‹ЫЛ, Л Ы˘ЫОВ˘‹
Ъ¤ВИ У· ЩФФıВЩВ›ЩВ ¿УЩ· ЩЛ
Ы˘ЫОВ˘‹ ЫЩЛ ‚¿ЫЛ ЩФ›¯Ф˘ БИ· У·
КФЪЩ›˙ВЩ·И О·И У· ВН·ЫК·П›˙ВЩ·И
¿УЩ· Л М¤БИЫЩЛ ·fi‰ФЫЛ.
Ã∏™∏ ∆∏™ ™À™∫∂À∏™ °π∞ ¶ƒø∆∏
º√ƒ∞
- ™˘Ó‰¤ÛÙ ÙÔ ÌÂÙ·Û¯ËÌ·ÙÈÛÙ‹ ÛÂ
Ì›· Ú›˙· Ú‡̷ÙÔ˜
- ™ЩВЪВТЫЩВ ЩФ ЫОФ˘¿ОИ ЫЩЛ ‚¿ЫЛ
fiˆ˜ К·›УВЩ·И ЫЩЛУ ВИО. 3. ∏
ВУ‰ВИОЩИО‹ П˘¯У›· ·У¿‚ВИ
˘Ф‰ВИОУ‡ФУЩ·˜ fiЩИ Л Ы˘ЫОВ˘‹
¤¯ВИ ЩФФıВЩЛıВ› ЫˆЫЩ¿ О·И
КФЪЩ›˙ВЩ·И, ·Ъ·М¤УФУЩ·˜
·Ó·Ì̤ÓË fiÛÔ ¯ÚfiÓÔ Ë Û˘Û΢‹
‚Ú›ÛÎÂÙ·È ÛÙË ‚¿ÛË Ù˘.
™∏ª.: ¶ЪИУ ¯ЪЛЫИМФФИ‹ЫВЩВ ЩЛ
Û˘Û΢‹ ÁÈ· ÚÒÙË ÊÔÚ¿ ‹ ÌÂ
¿‰ÂȘ ̷ٷڛ˜, Ú¤ÂÈ Ó·
ÊÔÚÙ›ÛÂÙ ÙÔ ÛÎÔ˘¿ÎÈ ÂÚ›Ô˘
ÁÈ· 16 ÒÚ˜.
XM36/48D 3-09-2002 11:59 Pagina 18
Page 19

19
Ã∏™∏ ∆∏™ ™À™∫∂À∏™
µБ¿ПЩВ ЩФ ЫОФ˘¿ОИ ·fi ЩЛ ‚¿ЫЛ
КfiЪЩИЫЛ˜ О·И И¤ЫЩВ ЩФ ‰И·ОfiЩЛ
ON/OFF (ВИО. 4).
∏ Ы˘ЫОВ˘‹ МФЪВ› У· ¯ЪЛЫИМФФИЛıВ›
БИ· ЩЛУ ·У·ЪЪfiКЛЫЛ ЫОfiУЛ˜, ЫЩВЪВТУ
ЫˆМ·ЩИ‰›ˆУ ОП.
∂›У·И И‰·УИО‹ БИ· БЪ‹БФЪФ О·ı·ЪИЫМfi
ОФ˘‚ВЪЩТУ, ЫЩЪˆМ¿ЩˆУ, ¯·ПИТУ,
ВУ‰˘М¿ЩˆУ, В›ПˆУ ОП.
ГЪ‹ЫЛ ЩˆУ ·НВЫФ˘¿Ъ О·ı·ЪИЫМФ‡
™ЩfiМИ· БИ· Ы¯ИЫМ¤˜ (ВИО. 5)
∆· ÛÙfiÌÈ· ·˘Ù¿ ‰È¢ÎÔχÓÔ˘Ó ÙËÓ
·У·ЪЪfiКЛЫЛ˜ ЩЛ˜ ЫОfiУЛ˜ О·И ЩЛ˜
‚ЪˆМИ¿˜ ·fi ЫЛМВ›· МВ ‰‡ЫОФПЛ
ЪfiЫ‚·ЫЛ fiˆ˜ БˆУ›В˜, ¿ОЪ·,
Ы˘ЪЩ¿ЪИ· ОП.
¶ЪФЫФ¯‹: Л Ы˘ЫОВ˘‹ ·˘Щ‹ ‰ВУ МФЪВ›
У· ¯ЪЛЫИМФФИЛıВ› БИ· ЩЛУ
·Ó·ÚÚfiÊËÛË ˘ÁÚÒÓ.
∂¡¢∂π•∏ º√ƒ∆π™∏™/ §∂π∆√Àƒ°π∞™
∏ ВУ‰ВИОЩИО‹ П˘¯У›· ·У¿‚ВИ fiЩ·У Л
Ы˘ЫОВ˘‹ ‚Ъ›ЫОВЩ·И ЫЩЛ ‚¿ЫЛ О·И fiЩ·У
ПВИЩФ˘ЪБВ›. ∏ МВ›ˆЫЛ ЩЛ˜ ИЫ¯‡Ф˜
·У·ЪЪfiКЛЫЛ˜ МВ ЩФ Щ·˘Щfi¯ЪФУФ
Ы‚‹ЫИМФ ЩЛ˜ ВУ‰ВИОЩИО‹˜ П˘¯У›·˜
˘Ф‰ЛПТУВИ ЩЛУ ·У¿БОЛ
В·У·КfiЪЩИЫЛ˜ ЩЛ˜ Ы˘ЫОВ˘‹˜.
º√ƒ∆π™∏ ∆∏™ ™À™∫∂À∏™
ªВЩ¿ ЩЛ ¯Ъ‹ЫЛ, ЩФФıВЩВ›ЩВ ¿УЩ· ЩЛ
Ы˘ЫОВ˘‹ ЫЩЛУ В›ЩФИ¯Л ‚¿ЫЛ КfiЪЩИЫЛ˜.
∏ Ы˘ЫОВ˘‹ ‰И·ı¤ЩВИ Ы‡ЫЩЛМ·
ЪФЫЩ·Ы›·˜ Ф˘ ‰ВУ ВИЩЪ¤ВИ ЩЛУ
"˘ВЪКfiЪЩˆЫЛ" ЩФ˘ Ы˘ЫЫˆЪВ˘Щ‹;
МФЪВ›ЩВ О·Щ¿ Ы˘У¤ВИ· У· ·К‹УВЩВ
¿УЩ· ЩФ ЫОФ˘¿ОИ ЫЩЛ ‚¿ЫЛ ¯ˆЪ›˜ У·
ЪФО·ПФ‡УЩ·И ‚П¿‚В˜. ∫·Щ¿ ЩЛ ‰И¿ЪОВИ·
ЩЛ˜ КfiЪЩИЫЛ˜ В›У·И К˘ЫИФПФБИОfi У·
ıВЪМ·›УВЩ·И Ф МВЩ·Ы¯ЛМ·ЩИЫЩ‹˜. √
МВЩ·Ы¯ЛМ·ЩИЫЩ‹˜ Ъ¤ВИ У·
·ФЫ˘У‰¤ВЩ·И ·fi ЩЛУ Ъ›˙· ЩФ˘
ЪВ‡М·ЩФ˜ МfiУФ ·У Л Ы˘ЫОВ˘‹ ‰ВУ
¯ЪЛЫИМФФИВ›Щ·И БИ· МВБ¿ПФ ¯ЪФУИОfi
‰И¿ЫЩЛМ·.
ºπ§∆ƒ√
∏ О·П‹ ПВИЩФ˘ЪБ›· ЩЛ˜ Ы˘ЫОВ˘‹˜
ВН·ЪЩ¿Щ·И ·fi ЩЛУ О·ı·ЪИfiЩЛЩ· ЩФ˘
К›ПЩЪФ˘. ¶Ъ¤ВИ У· ВП¤Б¯ВЩВ О·И У·
О·ı·Ъ›˙ВЩВ Щ·ОЩИО¿ ЩФ К›ПЩЪФ ·У¿ПФБ·
МВ ЩЛ Ы˘¯УfiЩЛЩ· ¯Ъ‹ЫЛ˜. ∂П¤Б¯ВЩВ
Щ·ОЩИО¿ ·У ЩФ К›ПЩЪФ В›У·И ЫˆЫЩ¿
ЩФФıВЩЛМ¤УФ.
∞º∞πƒ∂™∏ ∫∞π ∫∞£∞ƒπ™ª√™ ∆√À
ºπ§∆ƒ√À
- ™‚‹ÓÂÙ ¿ÓÙ· ÙË Û˘Û΢‹ ÚÈÓ
·fi О¿ıВ ВУ¤ЪБВИ· О·ı·ЪИЫМФ‡.
- ¶È¤ÛÙ ÙÔ ÎÔ˘Ì› ·ÂÏ¢ı¤ÚˆÛ˘
ÙÔ˘ ‰Ô¯Â›Ô˘ Û˘ÏÏÔÁ‹˜ ÛÎfiÓ˘ ÁÈ·
Ó· ·ÔÛ¿ÛÂÙÂ ÙÔ ÌÔÙ¤Ú ·fi ÙÔ
‰Ô¯Â›Ô (ÂÈÎ. 6).
- µÁ¿ÏÙ ÙÔ Ê›ÏÙÚÔ ·fi ÙÔ ‰Ô¯Â›Ô
Û˘ÏÏÔÁ‹˜ ÛÎfiÓ˘ ÎÚ·ÙÒÓÙ·˜ ÙÔ
Ê›ÏÙÚÔ ·fi ÙÔ Î¤ÓÙÚÔ Î·È
ÙÚ·‚ÒÓÙ·˜ Ì ‰‡Ó·ÌË (ÂÈÎ. 7).
- ∫·ı·Ú›ÛÙ ÙË ÛÎfiÓË Î·È ÙË ‚ÚˆÌÈ¿
·fi ÙÔ Ê›ÏÙÚÔ. °È· ηχÙÂÚÔ
ηı·ÚÈÛÌfi ÌÔÚ›Ù ӷ ÙÔ Ï‡ÓÂÙÂ
Û ¯ÏÈ·Úfi ÓÂÚfi ÌÂ Û·Ô˘Ó¿‰·.
- ¶ЪИУ ЩФФıВЩ‹ЫВЩВ ¿ПИ ЩФ К›ПЩЪФ,
‚В‚·ИˆıВ›ЩВ fiЩИ ¤¯ВИ ЫЩВБУТЫВИ
О·П¿ О·И ‰ВУ ·ЪФ˘ЫИ¿˙ВИ КıФЪ¤˜,
¤ЩЫИ ТЫЩВ У· МЛУ ВЛЪВ¿˙ФУЩ·И ФИ
ВИ‰fiЫВИ˜ ЩЛ˜ Ы˘ЫОВ˘‹˜.
- ∞ÓÙÈηıÈÛٿ٠ٷ Ê›ÏÙÚ· Ô˘
·ÚÔ˘ÛÈ¿˙Ô˘Ó ÊıÔÚ¤˜
- ∆ÔÔıÂÙ‹ÛÙ ¿ÏÈ ÙÔ Ê›ÏÙÚÔ ÛÙÔ
‰Ô¯Â›Ô Û˘ÏÏÔÁ‹˜ ÛÎfiÓ˘.
- ™˘Ó‰¤ÛÙ ÙÔ ÌÔÙ¤Ú ÛÙÔ ‰Ô¯Â›Ô
Û˘ÏÏÔÁ‹˜ ÛÎfiÓ˘ Ȥ˙ÔÓÙ·˜
ÂÏ·ÊÚ¿. (ÂÈÎ. 8).
∫∞£∞ƒπ™ª√™ ∫∞π ™À¡∆∏ƒ∏™∏
°И· ЩФУ О·ı·ЪИЫМfi ЩˆУ ВНˆЩВЪИОТУ
ВИК·УВИТУ ЩЛ˜ Ы˘ЫОВ˘‹˜ О·И ЩˆУ
·НВЫФ˘¿Ъ, ¯ЪЛЫИМФФИВ›ЩВ ¤У· ˘БЪfi
·У› МВ Ы·Ф˘УfiУВЪФ.
ªЛУ П¤УВЩВ ФЩ¤ ЩЛ Ы˘ЫОВ˘‹ МВ
ЩЪИ¯ПˆЪФ·Иı˘П¤УИФ ‹ ¿ППФ˘˜ ‰И·П‡ЩВ˜.
¢ВУ ··ИЩВ›Щ·И О·М›· ¿ППЛ Ы˘УЩ‹ЪЛЫЛ.
ªЛУ ·К‹УВЩВ ФЩ¤ ЩЛ Ы˘ЫОВ˘‹ У·
ПВИЩФ˘ЪБВ› ¯ˆЪ›˜ ЩФ ‰Ф¯В›Ф Ы˘ППФБ‹˜
ЫОfiУЛ˜ ‹ ЩФ К›ПЩЪФ.
Ã∏™πª∂™ ™Àªµ√À§∂™
∏ М·Щ·Ъ›· О·И Ф КФЪЩИЫЩ‹˜ ‰И·ЪОФ‡У
ВЪИЫЫfiЩВЪФ fiЩ·У ¯ЪЛЫИМФФИФ‡УЩ·И
ЫˆЫЩ¿.
∂¿У ·ЪФ˘ЫИ·ЫЩВ› ЩТЫЛ ЩЛ˜ ИЫ¯‡Ф˜
·Ó·ÚÚfiÊËÛ˘ ‹ ·ÓÒÌ·ÏË ¤ÓÙ·ÛË
ıÔÚ‡‚Ô˘, Û˘ÓÈÛÙ¿Ù·È Ó· Û‚‹ÓÂÙ ÙË
Û˘Û΢‹ Î·È Ó· ÂϤÁ¯ÂÙ ·Ó ›ӷÈ
‚Ô˘ÏˆÌ¤ÓÔ ÙÔ ÛÙfiÌÈÔ ·Ó·ÚÚfiÊËÛ˘
‹
ÙÔ ‰Ô¯Â›Ô Û˘ÏÏÔÁ‹˜ ÛÎfiÓ˘.
∂¿Ó ÌÂÙ¿ ÙÔ˘˜ ÂϤÁ¯Ô˘˜ ÙÔ
Úfi‚ÏËÌ· ÂÍ·ÎÔÏÔ˘ı› Ó·
ÂÌÊ·Ó›˙ÂÙ·È, ·Â˘ı˘Óı›Ù ÛÙÔ
ÂÍÔ˘ÛÈÔ‰ÔÙË̤ÓÔ ™¤Ú‚Ș ÁÈ· ¤ÏÂÁ¯Ô
Ù˘ Û˘Û΢‹˜.
XM36/48D 3-09-2002 11:59 Pagina 19
Page 20

176IDL/09.02
XM36/48D 3-09-2002 11:59 Pagina 20
 Loading...