

10
FAN HEATER
INSTRUCTION MANUAL
RADIATEUR SOUFFLANT
MODE D’EMPLOI
HEIZLÜFTER
BEDIENUNGSANLEITUNG
TERMOVENTILATORE
ISTRUZIONI D’USO
TERMOVENTILATOR
GEBRUIKSVOORSCHRIFTEN
TERMOVENTILADOR
INSTRUCCIONES DE USO
TERMOVENTILADOR
INSTRUÇÕES PARA O USO
AAEERROOQQEERRMMOO
OLHGIES CRHSHS
VARMLUFTSBÆSER
BRUGSVEJLEDNING
VÄRMEFLÄKT
BRUKSANVISNING
VIFTE OVN
BRUKS ANVISNING
TUULETINLÄMMITIN
KÄYTTÖOHJEET
TERMOWENTYLATOR
INSTRUKCJA OBS¸UGI
HŐVENTILÁTOR
KEZELÉSI UTASÍTÁS
TEPELN¯ VENTILÁTOR
NÁVOD K POUÎITæ
ííÖÖêêååééÇÇÖÖççííààããüüííééêê
азлнкмдсаь ий щдлигмДнДсаа
GB
F
D
I
NL
E
P
GR
DK
S
N
SF
PL
H
CZ
RUS
2
fig. 1
Abb. 1
Eik. 1
Kuva 1
rys. 1
1.ábra
obr. 1
ËÒ. 1
Voltagem
Potencia
Tensione
potenza
vedi targa caratteristiche
Tension
puissance
voir plaquette données
Voltage
Wattage
See rating label
Spannung
Leistung
siehe Typenschild
Spänning
Effekt
zie plaatje
Tension
Potencia
véase placa de
características
ver placa de especificações
Tavsh Iscuv"
blevpe pinakivda me
carakthristikav
Spænding
effekt
se typepladen
Spänning
effekt
se märkplåt
Spenning se etikett
Jännite watt
kts. arvokilpi ominaisuudet
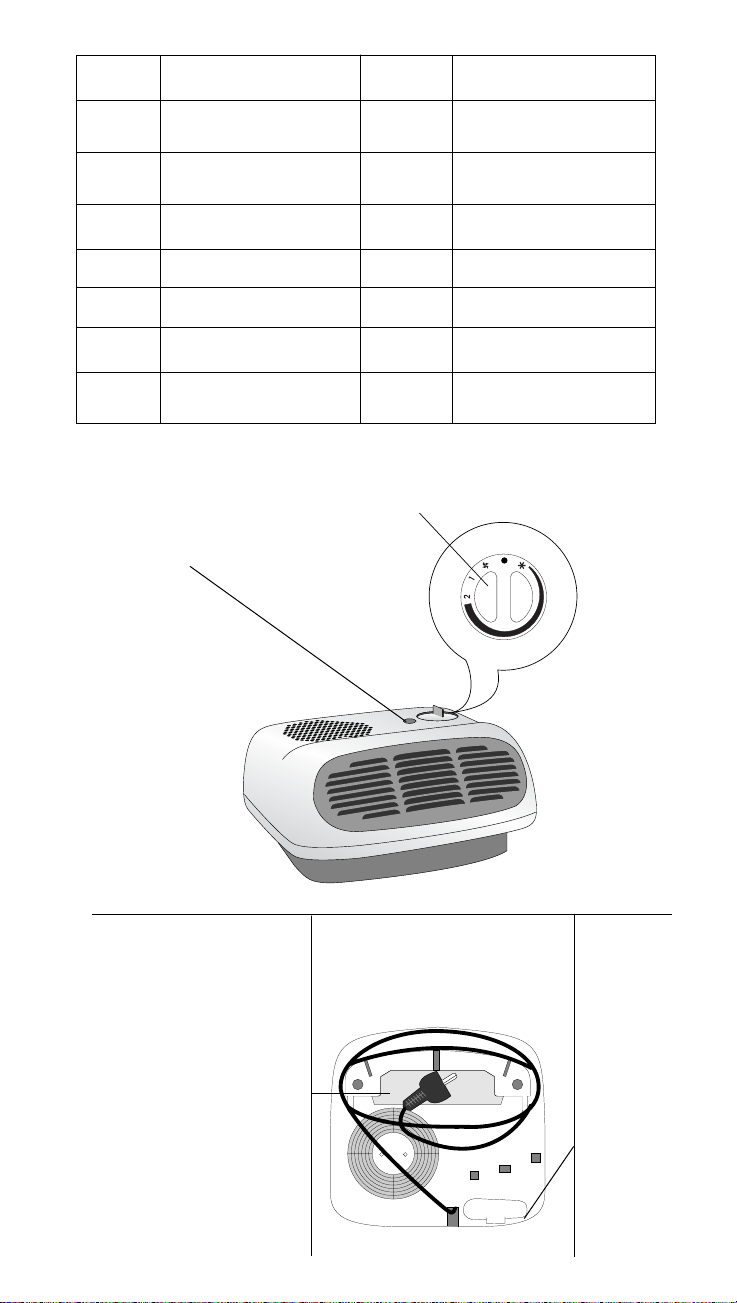
Dial
Bouton
Drehknopf
Manopola
Knop
Mando
Botão
Diakovpth
Termostaten
Knappen
Kontrollen
Termostaattia
Pokr´t∏o
Tárcsa
Otoãn˘ knoflík
ê͇ۘ ÚÂÏÓ„ÛÎflÚÓ‡
Pilot lamp
Bouton
Kontrolleucht
Lampada spia
Indicatielampje
Piloto luminoso
Luzes piloto
Eudeiktikev" lucnive"
Signallampen
Signallamparna
Controll-lampe
Merkkivalot
Lampka sygnlizacyjna
Fényjel
Svûtlená kontrolka
à̉Ë͇ÚÓ̇fl
·ÏÔ‡
fig. 2 rys. 1
Abb. 2 2.ábra
Eik. 2
obr.2
Kuva 2 ËÒ. 2
Cable winder
Enrouleur cordon
Kabelaufwicklung
Avvolgicavo
Snoerhaspel
Enrollador de cable
Compartimento para enrolar o
cabo
Tuvligma kalwdivou
Ledningeholdere
Sladdosa
Kabeloppbevaringsplass
Sähköjohtokela
Schowek na kabel
Vezetéktekercselő
Prostor k navinutí pfiípojného
kabelu
йЪТВН ‰Оfl М‡ПУЪНЛ Н‡·ВОfl
ÔËÚ‡ÌËfl
Handle
Poignée
Griff
Maniglia
Handvat
Tirador
Pega
Labhv
Håndtag
Handtag
Håndtak
Ràczka
Fogó
Otoãn˘
Úchyt
ê͇ۘ
Feszültség
teljesítmény
lásd adatlemez
Napi´cie
moc
patrz tabliczka z danymi
technicznymi
Napûtí v˘kon
viz ‰títek charakteristik
з‡ФflКВМЛВ
˝ОВНЪУФЛЪ‡
ÌËfl
ÒÏ. Ú‡·Î˘ÍÛ Ò
ı‡‡НЪВЛТЪЛН‡ПЛ
3
ELECTRICAL CONNECTION
- Before plugging in the heater, check that the voltage of your domestic supply corre-
sponds to the voltage (V) indicated on the appliance.
- Check that the electrical socket has a rating of 10/16 Amps.
- THIS APPLIANCE COMPLIES WITH EEC DIRECTIVE 89/336, RELATING TO ELECTRO-MAGNETIC COMPATIBILITY.
OPERATION.
- Summer use (ventilation only): turn the knob clockwise to the position.
- Heating at low power: turn the knob to the “1” position. The pilot lamp switches
on.
- Heating at maximum power: turn the knob to the “2” position. The pilot lamp
switches on.
- Setting the thermostat: when the room temperature has reached the desired
level, slowly turn the thermostat dial counter-clockwise until the pilot light goes out (or
until you hear a ‘click’ on models without pilot light) but no further. The thermostat will
now automatically maintain the temperature at the desired level.
- Switching the heater off: turn the knob fully counter-clockwise to the “O” position.
- Antifreeze function (thermostat models only): turn the knob to the position.
The appliance will maintain a minimum room temperature of approximately 5˚C thus
preventing freezing with the minimum energy consumption.
MAINTENANCE
- Always pull the plug out of the power point before cleaning the heater.
- Periodically clean the air intake and outlet grilles during the period in
which the heater is in use with a vacuum cleaner.
- Do not use abrasive cleaning products or solvents.
CAUTION
- Never use the heater near a bath, shower, basin or swimming pool.
- Do not use the heater to dry your laundry. Never obstruct the intake and outlet grilles
(danger of overheating).
- The heater must positioned at least 50 cm from furniture or other objects.
- If the power cable is damaged, it must be replaced by the manufacturer, an authorised service centre or a qualified electrician in order to eliminate all risk.
- The appliance must not be positioned directly underneath a fixed power point.
- Do not use the appliance in rooms less than 4 m2in area.
Important: never cover the appliance when it is in operation as this could cause a fire risk.
The heater is fitted with a safety device which will switch off the heater in case of acci-
dental overheating (eg. obstruction of air intake and outlet grilles, motor turning slowly
or not at all). To reset, disconnect the plug from the power point for a few minutes, remove the cause of overheating then plug the appliance again.
Warning: in order to avoid overheating, do not cover the heater.
GB
A) If your appliance comes fitted with a plug, it will incorporate a 13 Amp fuse. If it does not fit your socket, the plug
should be cut off from the mains lead, and an appropriate plug fitted, as below.
WARNING: Very carefully dispose of the cut off plug after removing the fuse: do not insert in a 13 Amp socket
elsewhere in the house as this could cause a shock hazard.
With alternative plugs not incorporating a fuse, the circuit must be re-fitted when changing the fuse using a 13
Amp Asta approved fuse to BS 1362. In the event of losing the fuse cover, the plug must NOT be used until a
replacement fuse cover can be obtained from your nearest electrical dealer. The colour of the correct replacement
fuse cover is that as marked on the base of the plug.
B) If your appliance is not fitted with a plug, please follow the instructions provided below:
WARNING: THIS APPLIANCE MUST BE EARTHED
IMPORTANT
The wires in the mains lead are coloured in accordance with the followin code:
Blue: Neutral
Brown: Live
As the colours of the wires in the mains lead of this ppliance may not correspond with the coloured markings identifying the
terminals in your plug, proceed as follows:
The wire which is coloured blue must be connected to the terminal which is marked with the letter N or coloured black.
The wire which is coloured brown must be connected to the terminal which si marked with the letter L or coloured red.
ELECTRICAL CONNECTION (U.K. ONLY)
4
RACCORDEMENT AU RESEAU
- Avant de brancher la fiche dans la prise de courant, vérifier attentivement que le voltage de votre secteur corresponde à la valeur en V indiquée sur l’appareil.
- S’assurer que la prise de courant ait une puissance de 10/16 A.
- Cet appareil est conforme à la Directive 89/336 concernant la compatibilité électromagnétique.
FONCTIONNEMENT ET UTILISATION
- Service d’été (uniquement ventilation): tourner le bouton dans le sens des aiguilles
d’une montre sur la position .
- Chauffage à puissance réduite: tourner le bouton sur la position 1. Le voyant
lumineux s’allume.
- Chauffage à puissance maximum: tourner le bouton sur la position 2. Le
voyant lumineux s’allume.
- Réglage du thermostat: quand la pièce a atteint la température voulue, tourner
lentement le bouton du thermostat dans le sens des aiguilles d’une montre jusqu’à ce
que le voyant lumineux s’éteigne (ou jusqu’à la position signalée par un “click” pour
les modèles sans voyant) et pas au-delà. La température ainsi établie sera réglée automatiquement et maintenue constante par le thermostat.
- Arrêt: remettre le bouton sur la position “O”.
- Service anti-gel (seulement pour les modèles avec thermostat); avec le bouton du
thermostat sur la position , l’appareil maintient la pièce à une température de 5˚C
environ et empêche la congélation en toute économie d’énergie.
ENTRETIEN
- Débrancher toujours l’appareil, avant toute opération de nettoyage.
- Nettoyer régulièrement les grilles d’entrée et de sortie de l’air pendant
la période d’utilisation de l’appareil avec un aspirateur.
- Ne jamais utiliser des poudres abrasives ou des solvants.
ATTENTION
- Evitez d’utiliser l’appareil près des douches, baignoires, lavabos, piscines, etc.
- Ne pas utiliser l’appareil pour sécher le linge, ne pas obstruer les grilles d’entrée et
de sortie de l’air (danger de surchauffage).
- Ne laisser aucun meuble ou autre objet à une distance de l’appareil inférieure à 50 cm.
- Si le cable d’alimentation est endommagé, il doit être changé par le fabricant, son
service de maintenance ou par une personne de qualification similaire, afin d’éviter
un danger.
- Cet appareil ne doit pas être placé juste au-dessous d’une prise de courant placée à
poste fixe.
- Ne jamais utiliser cet appareil dans une pièce dont la surface de base est inférieure
à 4 m
2
.
Important: en aucun cas on ne doit couvrir l’appareil en fonctionnement. A defaut, la
température de l’appareil augmenterait dangereusement.
Un dispositif de sécurité interrompt le fonctionnement du thermoventilateur en cas de
surchauffage accidentel (par ex. obstruction des grilles d’entrée et de sortie de l’air,
le moteur qui ne tourne pas ou qui tourne lentement). Pou rétablir le fonctionnement, il est
nécessaire de débrancher la fiche pendant quelques minutes, supprimer la cause du surchauffage et réinserer la fiche dans la prise de courant.
Attention: Ne pas couvrir l’appareil afin d’éviter tout risque de surchauffage.
F
5
ELEKTRISCHER ANSCHLUSS
- Sich vor Anschluß des Netzsteckers vergewissern, daß die Netzspannung der
Wohnung mit der am Gerät angegebenen Betriebsspannung übereinstimmt.
- Sich vergewissern, daß die Steckdose eine Stromfestigkeit von 10/16 Ampere hat.
- DIESES GERÄT ENTSPRICHT DER EU-VORSCHRIFT 89/336 IN BEZUG AUF DIE ELEKTROMAGNETISCHE KOMPABILITÄT.
FUNKTIONSWEISE UND GEBRAUCH
- Sommerbetrieb (nur Gebläsebetrieb): Drehknopf nach rechts auf Stellung
drehen
- Heizbetrieb bei niedriger Leistungsstufe: Drehknopf auf Stellung 1 drehen;
die Betriebskontrollampe leuchtet auf.
- Heizbetrieb bei hoher Leistungsstufe: Drehknopf auf Stellung 2 drehen; die
Betriebskontrollampe leuchtet auf.
- Temperaturregelung: Ist die gewünschte Raumtemperatur erreicht, den
Thermostatknopf langsam nach links drehen, bis die Kontrollampe erlischt (oder bei
Modellen ohne Kontrollampe, bis zum “Klicken” des Thermostats). Die so eingestellte
Temperatur wird dann durch den Thermostat automatisch gesteuert und konstant eingehalten.
- Ausschalten: Den Drehknopf auf Stellung “O” drehen.
- Frostschutzfunktion (nur für Modelle mit Thermostat): Ist der Temperaturregler auf
Stellung wird die Raumtemperatur, bei geringstem Energieverbrauch, auf etwa
5°C gehalten.
PFLEGE
- Vor Reinigungsarbeiten stets den Netzstecker ziehen.
- Während der Einsatzzeit des Gerätes regelmäßig die Lufteintritts-und
Luftaustrittsöffnungen des Gerätes mit einem Staubsauger reinigen.
- Keine Scheuer- und Lösungsmittel verwenden.
ZUR BEACHTUNG
- Das Heizgerät nicht in unmittelbarer Nähe von Badewannen, Duschen, Wasch- und
Schwimmbecken aufstellen und benutzen.
- Das Gerät nicht für das Trocknen von Wäsche benutzen, die Lufteintritts- und
Luftaustrittsöffnungen nicht verdecken (Überhitzungsgefahr).
- Das Gerät soll von Möbeln und anderen Gegenständen einen Abstand von 50 cm
haben.
- Bei Beschädigung des Netzanschlusskabels ist dieses vom Hersteller, von einer seiner
Kundendienststellen oder auf jeden Fall von einem Fachmann zu ersetzen, um jedes
Risiko auszuschließen.
- Das Gerät darf sich nicht unmittelbar unter einer ortsfesten Steckdose befinden.
- Das Gerät nicht in Räumen mit einer Bodenfläche unter 4 m
2
verwenden.
Wichtig: Wegen Brandgefahr das Gerät während des Betriebes nicht abdecken.
Eine Sicherheitseinrichtung unterbricht den Betrieb des Hezilüfters bei Überhitzung
(z.B. Verdeckung der Lufteintritts- und Luftaustrittsöffnung, Motor arbeitet nicht oder nur
langsam). Zum wiedereinschalten des Gerätes sind der Netzstecker zu ziehen und einige
Minuten abzuwarten. Die Störungsursache ist zu beseitigen und der Netzstecker wieder
einzustecken.
Vorsicht: Um überhitzung zu vermeiden, das Gerät nicht abdecken.
D
6
ALLACCIAMENTO ELETTRICO
- Prima di inserire la spina nella presa di corrente verificare attentamente che il
voltaggio della Vostra rete domestica corrisponda al valore in V indicato sull’apparecchio.
- Assicurarsi che la presa di corrente abbia una portata di 10/16 Ampere.
- QUESTO APPARECCHIO È CONFORME ALLADIRETTIVA 89/336/CEE ED AL D.M.
476/92 SULLA COMPATIBILITÀ ELETTROMAGNETICA.
FUNZIONAMENTO ED USO
- Servizio estivo (solo ventilazione): ruotare in senso orario la manopola sulla posizione .
- Riscaldamento a potenza ridotta: ruotare la manopola sulla posizione 1. Si
accende la lampada spia.
- Riscaldamento a potenza massima: ruotare la manopola sulla posizione 2. Si
accende la lampada spia.
- Regolazione del termostato: quando l’ambiente ha raggiunto la temperatura
desiderata, ruotare lentamente la manopola del termostato in senso orario fino allo
spegnimento della spia luminosa (o fino alla posizione segnalata da un “click” per i
modelli senza spia) e non oltre. La temperatura così fissata verrà automaticamente
regolata e mantenuta costante dal termostato.
- Spegnimento: riportare la manopola in posizione “O”.
- Servizio antigelo (solo per modelli con termostato): con la manopola in posizione
“ ” mantiene l’ambiente ad una temperatura di circa 5°C con un minimo dispendio di energia.
MANUTENZIONE
- Prima di qualsiasi pulizia togliere sempre la spina dalla presa di corrente.
- Pulire periodicamente con un aspirapolvere le griglie di entrata ed uscita del-
l’aria durante la stagione di utilizzo dell’apparecchio.
- Non usare mai polveri abrasive o solventi.
AVVERTENZE
- Non utilizzare l’apparecchio nelle immediate vicinanze di vasche da bagno, docce,
lavandini o piscine.
- Non usare l’apparecchio per asciugare la biancheria, non ostruire le griglie di entrata ed uscita dell’aria.
- Per una distanza di 50 cm davanti all’apparecchio non devono esserci mobili od altri
oggetti.
- Se il cavo di alimentazione è danneggiato, esso devo essere sostituito dal costruttore
o dal suo servizio assistenza tecnica o comunque da una persona con qualifica similare, in modo da prevenire ogni rischio.
-L’apparecchio non deve essere posto immediatamente sotto una presa di corrente fissa.
- Non usare questo apparecchio in una stanza la cui area di base è inferiore a 4 m
2
.
Importante: Non coprire in nessun caso l’apparecchio durante il funzionamento, poiché
ciò provocherebbe pericolo di incendio.
L’apparecchio è provvisto di uno speciale dispositivo di sicurezza che interrompe il funzionamento del termoventilatore in caso di surriscaldamento accidentale (es. ostruzione delle griglie di entrata ed uscita dell’aria motore che non gira o gira lento). Per ripristinare il funzionamento, è necessario staccare la spina dalla presa per alcuni minuti, eliminare la causa del
surriscaldamento, e quindi reinserire la spina.
Nota: Al fine di evitare surriscaldamento dell’apparecchio, non coprire
l’apprecchio
I
 Loading...