

Page 1
De'Longhi Appliances
via Seitz, 47
31100 Treviso Italia
FORNO ELETTRICO
ELECTRIC OVEN
FOUR ÉLECTRIQUE
ELEKTRO-BACKOFEN
ELEKTRISCHE OVEN
HORNO ELÉCTRICO
FORNO ELÉCTRICO
∏§∂∫Δƒπ∫√™ º√Àƒ¡√™
щгЦднкауЦлдДь иЦуъ
ELEKTROMOS SÜTŐ
ELEKTRICKÁ TROUBA
ELEKTRYCZNA KUCHENKA MIKROFALOWA
ELEKTRISK UGN
ELEKTRISK OVN
ELOVN
SÄHKÖUUNI
Istruzioni per l’uso
Instructions for use
Mode d'emploi
Bedienungsanleitung
Gebruiksaanwijzingen
Instrucciones para el uso
Instruções
√‰ËÁ›Â˜ ¯Ú‹Û˘
аМТЪЫНˆЛЛ ФУ ˝НТФОЫ‡Ъ‡ˆЛЛ
Használati utasítás
Návod k pouÏití
Instrukcja obs∏ugi
Bruksanvisning
Bruksanvisning
Brugsanvisning
Käyttöohjeet
10
Page 2

22
A
D
P
Q
H
C
B
E
G
NMO
I
L
F
DESCRIPTION
A Bouton thermostat
B Bouton minuterie
C Lampe témoin
D Bouton sélecteur fonctions
E Porte en verre
F Résistance inférieure
G Grille
H Lèchefrite
I Broche (selon le modèle)
L Ramasse-miettes
M Résistance supérieure
N Éclairage intérieur (selon le modèle)
O Logement du tournebroche (selon le modèle)
P Grille diététique (selon le modèle)
Q Poignée pour broche (selon le modèle)
glissière 1
glissière 2
glissière 3
ramasse-miettes
Pour garantir un bon fonctionnement de l'appareil et obtenir
une excellente cuisson, TOUJOURS glisser le plateau
ramasse-miettes (H) à sa place,
dans le bas du four
.
Page 3

23
CARACTERISTIQUES TECHNIQUES
Pour la tension . . . . . . . . . . . . . . . . . . . . . . . . . . . . . . . . . . . . . . . . . . . . .voir la plaque signalétique
Pour la puissance maximale consommée . . . . . . . . . . . . . . . . . . . . . . . . . . .voir la plaque signalétique
CONSOMMATION D'ENERGIE (norme CENELEC HD 376)
Pour atteindre 200° C . . . . . . . . . . . . . . . . . . . . . . . . . . . . . . . . . . . . . . . .0,09 KWh
Pour rester une heure à 200° C . . . . . . . . . . . . . . . . . . . . . . . . . . . . . . . . .0,58 KWh
Total . . . . . . . . . . . . . . . . . . . . . . . . . . . . . . . . . . . . . . . . . . . . . . . . . . . . .1,67 KWh
Cet appareil est conforme à la Directive européenne 2004/108/CE sur la Compatibilité électromagnétique
et au Règlement européen n° 1935/2004 du 27/10/2004 sur les matériaux destinés au contact alimentaire.
CONSIGNES IMPORTANTES
• Lisez attentivement ce mode d’emploi avant d’utiliser l’appareil.
• Ce four a été conçu pour cuire des aliments. Il ne doit pas être utilisé dans d'autres buts et il ne doit en
aucun cas être modifié ni transformé.
• Positionnez l'appareil sur un plan horizontal à une hauteur d'au moins 85 cm, hors de la portée des
enfants.
• Lavez soigneusement tous les accessoires avant l'utilisation.
• Avant de brancher l’appareil, vérifiez toujours si :
- La tension de réseau correspond à celle indiquée sur la plaque signalétique.
- La prise de courant peut supporter une intensité de 16 A et si elle est munie de mise à la terre.
Le fabricant déclinera toute responsabilité si cette norme sur les accidents de travail n’est pas respectée.
• Avant la première utilisation, videz le four de tous les papiers, cartons de protection, livrets, sacs en plastique etc.
• Avant la première utilisation, faites fonctionner l'appareil à vide, thermostat au maximum, pendant au
moins 15 minutes pour éliminer l'odeur de neuf et éventuellement la fumée due aux substances protectrices qui recouvrent les résistances pour le transport.
Pendant cette opération, aérez la pièce.
• ATTENTION : après avoir déballé l’appareil, vérifiez si la porte est en parfait état. La porte est en verre,
donc elle est fragile. Si elle est visiblement ébréchée, griffée ou rayée, il est conseillé de la faire remplacer.
Pendant l’utilisation, les opérations de nettoyage et les déplacements de l’appareil, évitez de claquer la
porte, de la heurter violemment et de verser des liquides froids sur le verre chaud de l’appareil.
• Quand l'appareil est en marche, la température de la porte et la carrosserie peut être très élevée: Ne
touchez que les boutons, les poignées et les touches. Ne touchez jamais les parties métalliques ni le
verre du four. Si besoin est, utilisez des gants.
• Cet appareil électrique fonctionne à des températures élevées qui peuvent provoquer des brûlures.
• Les parties accessibles peuvent atteindre des températures très élevées durant l’utilisation. Ne pas laisser
les enfants s’approcher du four.
• L’appareil ne doit pas être utilisé par des personnes (y compris les enfants) ayant des capacités psychophysiques sensorielles réduites, une expérience ou des connaissances insuffisantes, sans la surveillance vigilante et les instructions d’un responsable de leur sécurité. Surveiller les enfants pour s’assurer
qu’ils ne jouent pas avec l’appareil.
• Ne déplacez pas l’appareil pendant qu’il est en marche.
• N’utilisez pas l’appareil si :
- Son cordon d’alimentation est défectueux
Page 4

24
- L’appareil est tombé ou s’il présente des dégâts visibles ou des anomalies de fonctionnement.
Le cas échéant, afin d’éviter tout risque, apportez l’appareil dans le Centre de Service Après-vente le plus
proche.
• Ne laissez pas pendre le cordon d’alimentation et évitez son contact avec les pièces chaudes du four. Ne
débranchez jamais l’appareil en tirant sur son cordon d’alimentation.
• Si vous devez utiliser une rallonge, assurez-vous qu’elle est en bon état, que sa fiche est munie de mise
à la terre et que la section du conducteur est au moins égale à celle du cordon d’alimentation fourni avec
l’appareil.
• Afin d’éviter tout risque de décharges électriques, n’immergez jamais dans l’eau ni dans d’autres liquides
le cordon d’alimentation, sa fiche ni l’appareil entier.
• Ne positionnez pas l’appareil à proximité de sources de chaleur.
• Ne rangez jamais de produits inflammables à proximité du four ni sous le meuble sur lequel il est posé.
• Le pain peut brûler. Surveillez toujours le four pendant le grillage ou la cuisson au gril. Ne faites jamais
marcher l’appareil sous un meuble suspendu ou une étagère, ni à proximité de matières inflammables
(tentures, rideaux, etc.)
• N’utilisez pas l’appareil comme source de chaleur.
• Ne mettez jamais de papier, carton ou plastique dans le four et ne posez jamais rien dessus (ustensiles,
grilles ou autres objets).
• N’introduisez rien dans les bouches de ventilation. Ne les obturez pas.
• Si les aliments ou d’autres pièces du four prennent feu, n’essayez surtout pas d’éteindre les flammes
avec de l’eau. Laissez la porte fermée, débranchez l’appareil et étouffez les flammes avec un chiffon
humide.
• Ce four n’a pas été conçu pour être encastré.
• Une fois que la porte est ouverte, respectez les points suivants :
- évitez d'exercer une pression excessive en posant des objets trop lourds sur la porte ou en tirant la
poignée vers le bas.
- ne posez jamais, sur la porte ouverte, de récipients lourds ni de plats brûlants à peine sortis du four.
• Compte tenu de la diversité des normes en vigueur, si vous utilisez cet appareil ailleurs que dans le pays
où il a été acheté, faites-le contrôler dans un centre de service agréé.
• Pour votre sécurité personnelle, ne démontez jamais l’appareil vous-même ; adressez-vous toujours à un
centre de service agréé.
• Cet appareil a été conçu pour un usage exclusivement domestique. Tout usage professionnel, non approprié ou non conforme au mode d’emploi n’engage aucunement la responsabilité du fabricant ni sa
garantie.
• Débranchez toujours l'appareil avant de le nettoyer et lorsque vous ne l’utilisez pas.
• Si le câble d’alimentation est endommagé, il doit être changé par le fabricant, son service après-vente
ou par une personne de qualification similaire, afin d’éviter tout danger.
• Ne pas utiliser de produits de nettoyage abrasifs ni de raclettes en métal pour nettoyer la porte en verre
du four, risque d’endommagement de la surface et de rupture.
Conservez ce mode d’emploi
Page 5

25
100°C-220°C
100°C-220°C
100°C-220°C
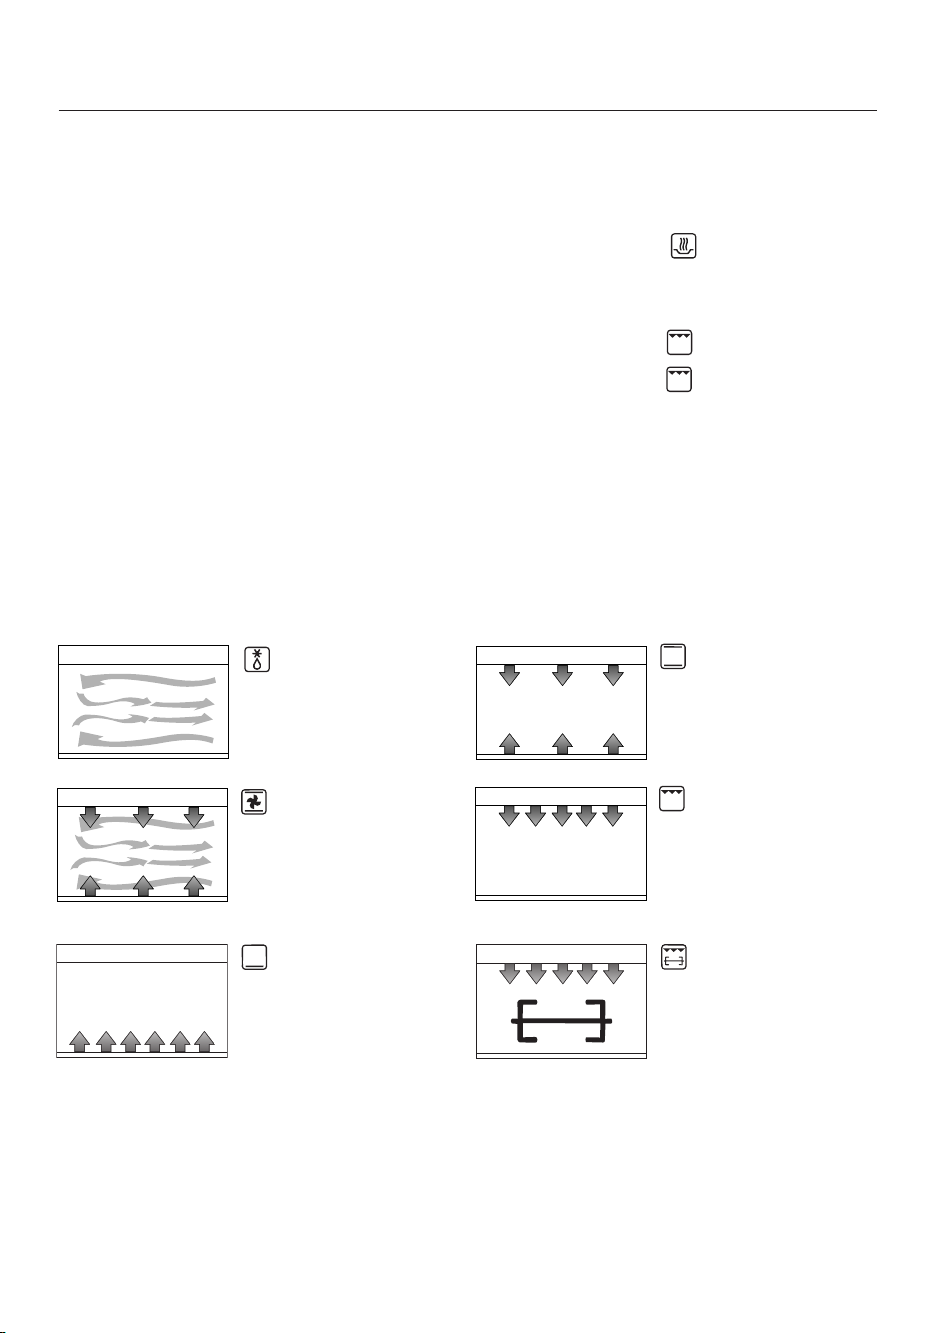
TABLEAU RÉCAPITULATIF
Décongélation
(seulement sur
certains modèles)
•
Placer les aliments
directement sur la
grille (G) inserée
dans la glissière 2.
Maintien au chaud
Cuisson chaleur
tournante
(seulement sur
certains modèles)
Idéale pour lasagne,
viandes, pizzas,
gâteaux en général,
aliments à surface
croustillante (ou gratinés) et pour le pain.
Pour l’utilisation des
accessoires, consultez
le tableau page 28.
Cuisson four
traditionnel
Idéale pour la cuisson
de légumes farcis,
poisson, plum cakes
et petite volaille. Pour
l’utilisation des accessoires, consultez le
tableau page 28.
Cuisson au gril
Placer la grille diététique
(P) (selon le modèle) sur
la lèchefrite; puis, placer
les aliments donc inserer
dan la glissière 1. Idéal
pour griller la viande,
poissons et les légumes.
Cuisson délicate
Insérer la lèchefrite
dans la glissière 3
Toa st
Idéale pour griller les
tranches de pain
ou
Utiliser ces positions
pour maintenir au chaud
les aliments. Ne pas laisser les aliments plus
d’une heure ni réchauffer des aliments froids.
S’ils ne sont pas assez
chauds pour servir, augmenter la température à
l’aide du bouton.
ou
Rotisserie
(Tournebroche)
(seulement sur
certains modèles)
Insérer
la broche dans
le logement du tournebroche
(O) (voir page
30)
Puis placer la
lèchefrite dans la glissière 3. Idéale pour
volailles, bœuf etc
Programme
Position bouton
sélecteur fonctions
Position bouton
thermostat
Position grille et
accessoires
Notes/Conseils
P
1
2
3
1
2
3
1
2
3
1
2
3
1
2
3
1
2
3
1
2
3
1
2
3
1
2
3
1
2
3
Page 6
26
UTILISATION DES COMMANDES
Bouton thermostat (A)
Sélectionnez la température désirée de la façon suivante:
• Pour décongeler
(seulement sur certains modèles)
(voir page 27): . . . . . . . . . . . . . . . . . . . . . . . . . . .Bouton thermostat sur “•”.
• Pour maintenir les aliments au chaud (voir page 27): Bouton thermostat sur .
• Pour cuisson chaleur tournante
(seulement sur certains modèles)
ou cuisson traditionnelle (voir pages 27-28): . . . . .Bouton thermostat de 100°C - 220°C..
• Pour griller (voir page 29): . . . . . . . . . . . . . . . . . . . .Bouton thermostat sur .
• Pour tous les types de grillage (voir page 30): . . . . . .Bouton thermostat sur .
Bouton Timer (B)
• Pour allumer le four: . . . . . . . . . . . . . . . . . . . . . . . .Tourner le bouton dans le sens des aiguilles d’une
montre. . . . . . . . . . . . . . . . . . . . . . . . . . . . . . . . . .
• Pour arrêter le four: . . . . . . . . . . . . . . . . . . . . . . . .Reporter le bouton en position "0".
Bouton sélecteur fonctions (D)
En actionnant ce bouton, vous sélectionnez les fonctions disponibles pour vos cuissons, soit:
(seulement sur certains
modèles)
(seulement chaleur tournante
en marche)
(seulement résistance supérieure et résistance inférieure en marche)
(seulement sur certains
modèles)
(résistance supérieure, résistance inférieure et chaleur
tournante en marche)
(seulement résistance supérieure en marche à la puissance maximale)
(seulement résistance
inférieure en marche)
Éclairage du four (N)
(seulement sur certains modèles)
et Lampe Témoin (C)
Lorsque le four est sur la position ON, la lampe témoin (C) et l'éclairage du four (N)
(seulement sur certains
modèles)
restent allumées.
(seulement résistance supérieure en marche à la puissance maximale + tournebroche)
Page 7

27
UTILISATION DU FOUR
Conseils
• Pour les cuissons chaleur tournante, four traditionnel et gril, il est conseillé, de préchauffer le four pendant 5 minutes à la température désirée.
• Les temps de cuisson dépendent de la qualité des produits, de la température des aliments et du goût personnel.
Les temps indiqués dans les tableaux sont indicatifs et peuvent subir des variations. Ils ne tiennent pas
compte du temps nécessaire pour préchauffer le four.
• Pour la cuisson de surgelés, consultez les temps conseillés sur l’emballage des produits.
Décongélation
(seulement sur certains modèles)
Pour obtenir une bonne décongélation en un bref délai:
• Tournez le bouton du sélecteur de fonctions (D) sur .
• Tournez le bouton du thermostat (A) sur “•”.
• Tourner le bouton Timer (B) dans le sens des aiguilles d’une montre.
• Insérez la lèchefrite (H) dans la glissière 3 et la grille (G) dans la glissière 2 et posez dessus l’aliment à
décongeler. Refermez la porte.
• Après la décongélation, reporter manuellement le bouton Timer (B) en position "0".
Exemple de décongélation : 1 kg de viande 80-90 minutes sans jamais la retourner.
Cuisson délicate
Idéale pour les pâtisseries et les gâteaux avec de la glace. Excellents résultats aussi pour compléter la cuisson de la base des aliments ou pour les cuissons qui exigent de la chaleur essentiellement par le fond.
• Insérez la lèchefrite (H) dans la glissière 3 (voir figure page 25).
• Tournez le bouton du sélecteur de fonctions (D) sur .
• Sélectionnez la température désirée à l’aide du bouton thermostat (A).
• Tourner le bouton Timer (B) dans le sens des aiguilles d’une montre; à la fin de la cuisson, reporter
manuellement le bouton Timer (B) en position "0".
Maintien au chaud
• Tournez le bouton thermostat (A) sur .
• Tournez le bouton du sélecteur de fonctions (D) sur .
• Tourner le bouton Timer (B) dans le sens des aiguilles d’une montre.
• Insérez la lèchefrite (H) dans la glissière 3 et posez dessus l’aliment.
• Pour terminer l’opération, reporter manuellement le bouton Timer (B) en position "0".
Il est conseillé de ne pas laisser longtemps les aliments dans le four, ils pourraient se dessécher.
Cuisson chaleur tournante
(seulement sur certains modèles)
Cette fonction est idéale pour obtenir d’excellentes pizzas, lasagne, pâtes gratinées, pour toutes les viandes
(à part la petite volaille) pommes de terre rôties, gâteaux en général et pour le pain. Opérez de la façon suivante :
• Insérez la grille (G) ou la lèchefrite (H) dans la position indiquée au tableau (voir page 25).
• Tournez le bouton du sélecteur de fonctions (D) sur .
• Sélectionnez la température désirée à l’aide du bouton thermostat (A).
• Tourner le bouton Timer (B) dans le sens des aiguilles d’une montre.
• Préchauffez le four pendant 5 minutes et introduisez l’aliment à cuisiner.
• A la fin de la cuisson, reporter manuellement le bouton Timer (B) en position "0".
Page 8

Cuisson four traditionnel
Cette fonction est idéale pour tous les types de poisson, les légumes farcis, les gâteaux à base de blancs en
neige et pour les gâteaux qui demandent des temps de cuisson très longs (plus de 60 min). Opérez de la
façon suivante :
• Insérez la grille (G) ou la lèchefrite (H) dans la position indiquée au tableau.
• Tournez le bouton du sélecteur de fonctions (D) sur .
• Sélectionnez la température désirée à l’aide du bouton thermostat (A).
• Tourner le bouton Timer (B) dans le sens des aiguilles d’une montre.
• Préchauffez le four pendant 5 minutes et introduisez l’aliment.
• A la fin de la cuisson, reporter manuellement le bouton Timer (B) en position "0".
28
Quiche 700 g
Poulet 1 kg
Rôti de porc 900 g
Roulade de viande 650 g
Pommes de terre rôties 500 g
Tarte confiture 700 g
Strudel 1 kg
Gâteau “margherita” 800 g
Biscuits 100 g
Pain 500 g
Utilisez la lèchefrite.
Utilisez la lèchefrite, tournez après 38
min environ.
Utilisez la lèchefrite, tournez après 30
min environ.
Utilizzare la leccarda, girare dopo 20
min.
Utilizzare la leccarda, mescolare 2 volte.
Utilisez une tourtière.
Utilisez la lèchefrite.
Utilisez une tourtière.
Utilisez la lèchefrite.
Utilisez la lèchefrite huilée.
200°C
200°C
200°C
200°C
200°C
180°C
200°C
180°C
180°C
200°C
30-35 min.
60-70 min.
50-60 min.
35-40 min.
40-50 min.
35-40 min.
35-40 min.
25-30 min.
15-20 min.
20-25 min.
3
3
3
3
2
3
2
3
2
3
Bouton
thermostat
Tem ps
Grille/
lèchefrite
position
Observations et conseils
Programme
Macaroni gratinés 1 kg
Lasagne 1 kg
Pizza 500 g
Truite 500 g
Calmars farcis 450 g
Tomates gratinées 550 g
Courgettes au thon 750 g
Plum cake 1 kg
Utilisez un plat allant au four.
Utilisez un plat allant au four.
Utilisez la lèchefrite.
Utilisez la lèchefrite, tournez après 16 min.
Utilisez un plat allant au four, tournez
à mi-cuisson.
Utilisez une lèchefrite huilée et tournez après 20 min.
Utilisez la lèchefrite ; mettez de l’huile, de la tomate et de l’eau ; tournez
la lèchefrite après 20 min.
Utilisez un moule et tournez à mi-cuisson.
200°C
200°C
200°C
180°C
180°C
180°C
180°C
180°C
25-30 min.
25-30 min.
30-35 min.
30-35 min.
25-30 min.
35-40 min.
35-40 min.
65-75 min.
2
2
3
3
3
2
2
3
Bouton
thermostat
Tem ps
Grille/
lèchefrite
position
Observations et conseilsProgramme
Page 9

29
Toast
• Les dimensions de la grille (G) permettent de griller six tranches de pain en même temps. Mais on obtient
les meilleurs résultats en grillant 4 tranches à la fois.
• Pour griller le pain, placez les tranches comme ci-dessous:
Griller une tranche Griller deux tranches Griller quatre tranches Griller six tranches
Pour les utilisations consécutives, réduisez le temps de grillage programmé.
Conseils pour griller le pain
Pour griller automatiquement pain, sandwiches, muffins, fougasses et gaufres surgelées, utilisez toujours la
grille.
1. Mettez la grille dans la glissière 2.
2. Disposez les aliments à griller au centre de la grille. Refermez la porte.
3. Tournez le bouton du thermostat (A) sur et celui du sélecteur de fonctions (D) sur .
4. Tournez le bouton Timer (B) dans le sens des aiguilles d’une montre. En général, pour un grillage moyen,
programmer le bouton Timer (B) sur 4-5 minutes. Griller quelques morceaux de pain pour vérifier la
durée.
5. Lorsque vous grillez du pain, allumez les deux résistances (inférieure et supérieure) pour dorer des deux
côtés en même temps.
Il peut se former de la condensation à l’intérieur de la porte en verre. Cela est normal. La condensation
s’évaporera pendant le grillage.
6. Un signal sonore indique la fin du temps programmé. Une fois le cycle terminé, les résistances
s’éteignent automatiquement. Tournez le bouton thermostat (A) sur “•”.
Notes:
Si vous préférez un grillage plus léger, il suffit d’interrompre le cycle automatique en tournant le bouton Timer
(B) sur “ 0” pour éteindre le four sans l’endommager en aucune façon.
Si vous préférez un doré plus foncé, redémarrez le cycle en tournant le bouton Timer (B) dans le sens des
aiguilles d’une montre jusqu’à obtenir la couleur désirée.
Après quoi, arrêtez manuellement le bouton thermostat et celui de la programmation du grille-pain
comme indiqué précédemment.
Un usage régulier du four vous permettra de régler au mieux selon le type de pain.
Conseils pour bien griller:
Les gros morceaux de pain et le pain surgelé demandent un réglage plus fort. Une seule tranche de pain
demande un réglage plus léger que plusieurs tranches.
Page 10

Cottura con girarrosto (
solo in alcuni modelli
)
Cette fonction est idéale pour cuire à la broche les poulets, et la volaille en général,
les rôtis de porc et de veau. La quantité maximum d'aliments permise avec ce type de
cuisson est 2 Kg.
• Placez l'aliment sur la broche (I) et le maintenir à l'aide des fourches (fig. 2) (pour un meilleur résultat,
ficelez la viande).
• Insérez la lèchefrite (H) dans la glissière 3 et s’assurer que la broche (I) est correctement introduite dans
le Logement du tournebroche (fig. 3).
• Refermez la porte, jusq’à entendre an “déclick” (voir figure 1).
• Placez le bouton thermostat (A) sur la pos. .
• Tourner le bouton de sélecteur de fonction (M) en pos. .
• Tournez le bouton du Timer (B) sur “ON”.
30
Cuisson au gril
• Posez l’aliment à griller sur la grille diététique (P) insérée sur
la lèchefrite (H) et posez le tout dans la glissière 1.
• Refermez la porte, jusq’à entendre an “déclick” (voir figure
1).
• Tournez le bouton du sélecteur de fonctions (D) sur .
• Tournez le bouton du Timer (B) sur “ON”.
• A la fin de la cuisson, reporter manuellement le bouton Timer
(B) en position "0".
• Tournez à mi-cuisson.
fig. 2
fig. 3
fig. 1
Côte de porc (2)
Saucisses de Frankfort (3)
Hamburgers frais (2)
Saucisses (4)
Brochettes 500 g/1.1 lb
Retournez après 16 min environ.
Retournez après 11 min environ.
Retournez après 13 min environ.
Retournez après 14 min environ.
Retournez après 8, 15 et 21 minutes.
“
“
“
“
30 min.
20 min.
25 min.
26 min.
26 min.
Programme
Bouton
thermostat
Temps position Observations et conseils
Page 11

31
NETTOYAGE ET ENTRETIEN
Un nettoyage fréquent évitera la formation de fumées et de mauvaises
odeurs pendant la cuisson. Ne laissez pas la graisse s’accumuler dans
l’appareil.
Avant toute opération d’entretien ou de nettoyage, débranchez le four
et laissez-le refroidir.
Nettoyez la porte, les parois intérieures et les surfaces émaillées ou
laquées du four avec une solution d’eau additionnée de détergent.
Essuyez bien.
Pour nettoyer l’intérieur du four, n’utilisez jamais de produits corrosifs
pour l’aluminium (détergents en sprays) et évitez de gratter les parois
avec des objets pointus ou coupants.
Pour nettoyer la surface extérieure, utilisez toujours une éponge humide.
Évitez les produits abrasifs qui abîmeraient la peinture.
Veillez à ce qu’il ne pénètre pas d’eau ni de savon liquide dans les fentes au-dessus du four. Ne pas essayer d'introduire de fourchettes, couteaux ni autres objets pointus dans les fentes sur la face droite du four
ni derrière.
Évitez d’immerger l’appareil dans l’eau ; ne le lavez pas sous un jet
d’eau.
Tous les accessoires peuvent être lavés comme de la vaisselle normale, à la main ou à la machine.
Extraire le tiroir ramasse - miettes du fond de votre four.
Laver à la main. Dans le cas de dépôts persistants,
mouiller le tiroir ramasse - miettes avec de l'eau
savonneuse chaude et, si nécessaire, frotter délicatement
sans griffer.
Avertissements pour l'élimination correcte du produit aux termes de la Directive européenne
2002/96/EC.
Au terme de son utilisation, le produit ne doit pas être éliminé avec les déchets urbains.
Le produit doit être remis à l'un des centres de collecte sélective prévus par l'administration communale ou
auprès des revendeurs assurant ce service. Éliminer séparément un appareil électroménager permet
d'éviter les retombées négatives pour l'environnement et la santé dérivant d'une élimination incorrecte, et
permet de récupérer les matériaux qui le composent dans le but d'une économie importante en termes d'énergie et de
ressources. Pour rappeler l'obligation d'éliminer séparément les appareils électroménagers, le produit porte le
symbole d'un caisson à ordures barré.
Pour poids supérieures est conseillé d’utiliser la fonction cuisson chaleur tournante.
Pour les temps de cuisson consulter les indications figurant dans le tableau ci-dessous
Programme
Poids
Tem ps
Poulet
1-2 Kg
120 min.
Rôti de porc
0,8-1,7 Kg
90 min.
Page 12

L Crumb tray
M Top heating element
N Interior light (if supplied)
O Turnspit mount (if supplied)
P Broil rack (if supplied)
Q Handgrip for spit (if supplied)
12
A
D
P
Q
H
C
B
E
G
NMO
I
L
F
guide 1
guide 2
guide 3
crumb tray
The crumb tray (L) should always
be inserted as shown for perfect
results.
DESCRIPTION OF THE APPLIANCE
A Thermostat knob
B Timer knob
C Indicator light
D Function selector knob
E Glass door
F Bottom heating element
G Wire rack
H Bake pan
I Spit (if supplied)
Page 13

13
SPECIFICATIONS
Operating voltage . . . . . . . . . . . . . . . . . . . . . . . . . . . . . . . . . . . . . . . . . . .see rating label
Maximum power absorbed . . . . . . . . . . . . . . . . . . . . . . . . . . . . . . . . . . . .see rating label
POWER CONSUMPTION (CENELEC STANDARD HD 376)
To reach 200°C . . . . . . . . . . . . . . . . . . . . . . . . . . . . . . . . . . . . . . . . . . . . .0,09 KWh
To maintain 200°C for one hour . . . . . . . . . . . . . . . . . . . . . . . . . . . . . . . . .0,58 KWh
Total . . . . . . . . . . . . . . . . . . . . . . . . . . . . . . . . . . . . . . . . . . . . . . . . . . . . .0,67 KWh
This appliance conforms to EC directive 2004/108/EC on Electromagnetic Compatibility and EC regulation
no. 1935/2004 of 27/10/2004 on materials intended for contact with food.
WARNINGS
• Read all the instructions carefully before using the appliance.
• This oven has been designed to cook food. It must never be used for other purposes, modified or tampered with in any way.
• Place the appliance on a horizontal surface at a height of at least 85 cm and out of reach of children.
• Wash all accessories thoroughly before use.
• Before plugging into the mains, make sure that:
- the mains voltage corresponds to the voltage indicated on the rating plate;
- the mains socket has a minimum rating of 16A and an earth wire.
The manufacturer declines all liability in the event that this important accident-prevention rule is not
respected.
• Before using the oven for the first time, remove any paper and other material inside the oven such as protective cardboard, booklets, plastic bags, etc.
• Before using for the first time, operate the oven empty with the thermostat at maximum for at least 15
minutes to eliminate the "new" smell and any smoke caused by the presence of protective substances
applied to the elements before transport.
During this operation, ventilate the room.
• IMPORTANT: when you have unpacked the appliance, make sure the door is undamaged and working
correctly. The door is made from glass and is therefore fragile. If it is visibly chipped, scored or scratched,
it should be replaced. While using, cleaning or moving the appliance, avoid slamming or knocking the
door violently. Do not pour cold liquid onto the glass while the appliance is hot.
• When in operation, the door and accessible external surfaces could become very hot. Always use the
knobs, handles and buttons. Never touch metal parts or the glass. Use oven gloves if necessary.
• This electrical appliance operates at high temperatures which could cause burns.
• Accessible parts may become hot during use. Young children should be kept away.
• The appliance is not intended for use by persons (including children) with reduced physical, sensory or
mental capabilities, or lack of experience and knowledge, unless they have been given supervision or instruction concerning use of the appliance by a person responsible for their safety.
Children should be supervised to ensure that they do not play with the appliance.
• Do not move the appliance while in use.
• Do not use the appliance if…
- the power cable is faulty,
- the appliance has been dropped, is visibly damaged or malfunctions.
Should this occur, to avoid all risk take the appliance to your nearest authorised service centre.
• Do not let the power cable dangle and avoid touching hot parts of the oven. Never unplug the appliance
by pulling on the power cable.
• If you intend to use an extension, make sure it is in good condition, that the plug is earthed and that the
Page 14

14
cross section of the wires is at least equal to that of the power cable provided with the appliance.
• To avoid all risk of electric shock, never immerse the power cable, plug or appliance itself in water.
• Never position the appliance near heat sources.
• Do not leave inflammable products near the oven or under the work surface where it is located.
• Bread may burn. Never leave the oven unattended during toasting or grilling. Never operate the appliance under a wall cupboard or shelf or near inflammable materials such as curtains, blinds, etc.
• Do not use the appliance as a heat source.
• Never place paper, cardboard or plastic inside the oven and never rest anything on top of the appliance
(utensils, wire racks, other objects).
• Never insert anything into the ventilation openings. Make sure they are unobstructed.
• If food or other parts of the oven catch fire, never try and put out the flames with water. Close the
door, unplug from the mains and smother the flames with a damp cloth.
• This oven is not designed for built-in installation.
• When the door is open, remember:
- never exert excessive pressure with overly heavy objects or pull the handle downwards;
- never rest heavy containers or boiling saucepans just out of the oven on the open door.
• Given the differences in legislation in force, if the appliance is used in a country other than that where it
was bought, have it checked by an authorised service centre.
• For your personal safety, never take the appliance to pieces on your own. Always contact an authorised
service centre.
• This appliance is designed for domestic use only. Professional or inappropriate use, or failure to observe
the instructions absolves the manufacturer from all responsibility and invalidates the guarantee.
• When not in use and before cleaning, always unplug the appliance.
• If the supply cord is damaged, it must be replaced by the manufacturer, its service agent or similarly qualified persons in order to avoid a hazard.
• Do not use harsh abrasive cleaners or sharp metal scrapers to clean the oven door glass since they can
scratch the surface, which may result in shattering of the glass.
Keep these instructions
A) If your appliance comes fitted with a plug, it will incorporate a 13
Amp fuse. If it does not fit your socket, the plug should be cut off
from the mains lead, and an appropriate plug fitted, as below.
WARNING: Very carefully dispose of the cut off plug after removing the fuse: do not insert in a 13 Amp socket elsewhere in the
house as this could cause a shock hazard.
With alternative plugs not incorporating a fuse, the circuit must
be protected by a 15 Amp fuse.
If the plug is a moulded-on type, the fuse cover must be re-fitted
when changing the fuse using a 13 Amp Asta approved fuse to
BS 1362. In the event of losing the fuse cover, the plug must NOT
be used until a replacement fuse cover can be obtained from your
nearest electrical dealer. The colour of the correct replacement
fuse cover is that as marked on the base of the plug.
B) If your appliance is not fitted with a plug, please follow the
instructions provided below:
WARNING - THIS APPLIANCE MUST BE EARTHED
IMPORTANT
The wires in the mains lead are coloured in accordance with the following code:
Green and yellow: Earth
Blue: Neutral
Brown: Live
As the colours of the wires in the mains lead may not correspond with
the coloured markings identifying the terminals in your plug, proceed
as follows:
The green and yellow wire must be connected to the terminal in the
plug marked with the letter E or the earth symbol or coloured
green or green and yellow.
The blue wire must be connected to the terminal marked with the letter N or coloured black.
The brown wire must be connected to the terminal marked with the letter L or coloured red.
ELECTRICAL CONNECTION (UK ONLY)
Page 15

15
100°C-220°C
100°C-220°C
100°C-220°C
SUMMARY TABLE
Program
Function selector
knob position
Thermostat knob
position
Wire rack and
accessory position
Notes/Tips
Defrost (
only on
some models
)
•
Place the food directly on the wire rack
inserted in the guide
2.
Keeping warm
Convection oven
cooking
(
only on some
models
)
Ideal for lasagna, meat,
pizza, cakes in general,
foods that should be
crunchy on the surface
(“au gratin”) and bread.
For details on how to use
the accessories, refer to
the tips in the table on
pages 18.
Traditional oven
cooking
Ideal for cooking stuffed vegetables, fish,
plum cakes and small
poultry. For details on
how to use the accessories, refer to the
table on page 18.
Grilling
Put the broil rack (P) (if
supplied) on the bake
pan (H); place the food on
the pan and insert into
guide 1. Ideal for broiling
meat, fish and vegetables.
Delicate cooking
Use the bake pan
inserted directly in
the guide 3.
Toa st
Ideal for toasting slices of bread.
or
Select this function to
keep hot food warm.
Do not hold food for
longer than one hour
or rewarm cold food
at this setting. If food
is not hot enough for
serving turn temperature dial up.
P
or
Grilling with the
turnspit (
only on
some models
)
Insert the spit in the
turn-
spit mount
(O) as
described on page 20.
Insert the bake pan in
guide 3. Ideal for
poultry, beef, etc.
1
2
3
1
2
3
1
2
3
1
2
3
1
2
3
1
2
3
1
2
3
1
2
3
1
2
3
1
2
3
Page 16

16
USING THE CONTROLS
Thermostat knob (A)
Select the desired temperature, as follows:
• To defrost (
only on some models
) (see page 17): . . .Thermostat knob in the “•” position.
• To keep food warm (see page 17): . . . . . . . . . . . . .Thermostat knob in the position.
• For convection oven cooking (
only on some models
)
or traditional oven cooking (see page 17-18): . . . . .Thermostat knob from 100°C - 220°C..
• To toast (see page 19): . . . . . . . . . . . . . . . . . . . . . . .Thermostat knob in the position.
• For all types of grilling (see page 20): . . . . . . . . . . . .Thermostat knob in the position.
Timer knob (B)
• To switch the oven on: . . . . . . . . . . . . . . . . . . . . . .Rotate the knob in a clockwise direction.
• To switch the oven off: . . . . . . . . . . . . . . . . . . . . . .Turn the knob back to the "0" position.
Function selector knob (D)
This knob is used to select the cooking functions available, which are:
(
only on some models
)
(ventilation only)
(only top heating element
and bottom heating element
on)
(
only on some models
)
(top heating element, bottom heating element and ventilation on)
(solo resistenza superiore in
funzione alla massima
potenza)
(only bottom heating element
on)
Interior light (N) (
only on some models
) and Indicator light (C)
When the oven is in function, the indicator light (C) and the interior light (N) (only on some models) stay on.
(
only on some models
)
(only top heating element on
at maximum power + turnspit)
Page 17

17
USING THE OVEN
General tips
• When cooking with the convection oven, traditional oven and grilling, always preheat the oven for 5
minutes to the set temperature.
• The cooking times depend on the quality of the products, on the temperature of the food and on personal tastes. The times indicated in the table are subject to variation, and do not include the time required
to preheat the oven.
• To cook frozen foods refer to the recommended times on the product packaging.
Defrost (
only on some models
)
For proper defrosting in a short time, proceed as follows:
• Turn the function selector knob (D) to the position.
• Turn the thermostat knob (A) to the “•” position.
• Rotate the timer knob (B) in a clockwise direction.
• Place the bake pan (H) in guide 3, the wire rack (G) in the guide 2 and rest the food to be defrosted, then
close the door.
• After defrosting, turn the Timer knob (B) back to “0” position.
Example of defrosting: 1 kg of meat, 80-90 minutes without turning it over.
Slow bake
Ideal for pastry and cakes. Good results are also achieved when completing the cooking of the bottom of the
foods or for cooking that requires heat above all at the bottom.
• Place the bake pan (H) in guide 3, as shown in the table on page 15.
• Turn the function selector knob (D) to the position.
• Select the required temperature using the thermostat knob (A).
• Turn the Timer knob (B) in a clockwise direction; after cooking, manually turn the Timer knob (B) back to
“0" position.
Keep warm
• Turn the thermostat knob (A) to the position.
• Turn the function selector knob (D) to the position.
• Rotate the timer knob (B) in a clockwise direction.
• Place the bake pan (H) in guide 3 and rest the food on the bake pan.
• To end the operation, manually turn the Timer knob (B) back to “0" position.
It is recommended not to leave the foods in the oven for too long, as these may dry out.
Convection oven cooking (
only on some models
)
This function is ideal for baking excellent pizzas, lasagna, “au gratin” dishes, all types of meat dishes (apart
from small poultry), roast potatoes, cakes in general and bread.
Proceed as follows:
• Place the wire rack (G) or the bake pan (H) in the position shown in the table on page 15.
• Turn the function selector knob (D) to the position.
• Select the required temperature by turning the thermostat knob (A).
• Rotate the timer knob (B) in a clockwise direction.
• After having pre-heated the oven for 5 minutes, place the food to be cooked inside.
• After cooking, manually turn the Timer knob (B) back to “0" position.
Page 18

18
Quiche 700 g
Chicken 1 kg
Roast pork 900 g
Meatballs 650 g
Roast potatoes 500 g
Jam tarts 700 g
Strudel 1 kg
Margherita cakes 800 g
Biscuits (shortbread) 100 g
Bread 500 g
Use the bake pan.
Use the bake pan, turn after around
38 min.
Use the bake pan, turn after around
30 min.
Use the bake pan, turn after around
20 min.
Use the bake pan, mix twice.
Use a cake dish.
Use the bake pan.
Use a cake dish.
Use the bake pan.
Use the bake pan greased with oil.
200°C
200°C
200°C
200°C
200°C
180°C
200°C
180°C
180°C
200°C
30-35 min.
60-70 min.
50-60 min.
35-40 min.
40-50 min.
35-40 min.
35-40 min.
25-30 min.
15-20 min.
20-25 min.
3
3
3
3
2
3
2
3
2
3
Thermostat
knob
Times
wire rack/
bake pan
position
Comments and tips
Program
Bake
This function is ideal for all types of fish, stuffed vegetables, cakes with whipped egg-whites and cakes that
require long cooking times (over 60 min.).
Proceed as follows:
• Place the wire rack (G) or the bake pan in the position shown in the table.
• Turn the function selector knob (D) to the position.
• Select the required temperature by turning the thermostat knob (A).
• Rotate the timer knob (B) in a clockwise direction.
• After having pre-heated the oven for 5 minutes, place the food inside.
• After cooking, manually turn the Timer knob (B) back to “0" position.
Macaroni “au gratin” 1 kg
Lasagna 1 kg
Pizza 500 g
Trout 500 g
Stuffed calamari 450 g
Tomatoes “au gratin” 550 g
Zucchini with tuna 750 g
Plum cakes 1 kg
Use an ovenproof dish.
Use an ovenproof dish.
Use the bake pan.
Use the bake pan, turn after 16 minutes.
Use an ovenproof dish, turn halfway
through cooking.
Use the bake pan greased with oil and
turn after 20 min.
Use the bake pan; add oil, the tomatoes and water; turn the bake pan
after 20 min.
Use a mold and turn halfway through
cooking.
200°C
200°C
200°C
180°C
180°C
180°C
180°C
180°C
25-30 min.
25-30 min.
30-35 min.
30-35 min.
35-30 min.
35-40 min.
35-40 min.
65-75 min.
2
2
3
3
3
2
2
3
Program
Thermostat
knob
Times
wire rack/
bake pan
position
Comments and tips
Page 19

19
Toast
• The dimensions of the wire rack (G) allow six slices of bread to be toasted at the same time. Best results
are achieved, however, with four slices at a time.
• To toast the bread, place the slices as shown below:
Toasting one slice Toasting two slices Toasting four slices Toasting six slices
For consecutive uses, reduce the set toasting time.
Instructions for toasting bread
To automatically toast frozen bread, sandwiches, muffins and waffles, always use the wire rack.
1. Place the wire rack in the guide 2.
2. Place the food to be toasted in the center of the wire rack. Close the door.
3. Turn the thermostat knob (A) to the position and the function selector (D) to the position.
4. The Timer knob (B) should be turned clockwise. In general, to obtain medium toasting, set the Timber
knob (B) on 4-5 minutes. Toast a few pieces of bread to verify the time.
5. When toasting bread, both the top and bottom heating elements are on to toast both sides at the same
time. A little condensation may form on the inside of the glass door. This is normal. It will disappear
during toasting.
6. An audible signal indicates the end of the set time. The toasting is complete and the heating elements
automatically switch off. Turn the thermostat knob (A) to the “•” position.
Note:
If you prefer lighter toasting, it is sufficient to interrupt the automatic cycle by turning the Timer knob (B) to
“0” to switch off the oven , causing no damage.
For darker toasting re-start the cycle by turning the Timer (B) clockwise until reaching the desired level.
Then manually turn the thermostat knob and the toast timer knob off, as described previously.
The best positions for each type of bread can be identified when using the oven regularly.
Tips for good toasting:
Larger pieces of bread and frozen bread take longer to toast. Just one slice of bread requires a lower setting
than for multiple slices.
Page 20

Grilling with the turnspit (
only on some models
)
This function is ideal for cooking chickens on the spit, fowl in general, roast pork and veal.
The rotisserie function can be used for a load up to 2 kg.
• Place the food on the spit (I) and hold it firm using forks (fig. 2) (for best results, tie the meat using kitchen
string).
• Insert the bake pan (H) in the guide 3 and the spit (I) in the turnspit mount (fig. 3).
• Close the door until you hear a “click” (see figure 1).
• Turn the thermostat knob (A) to position .
• Turn the function knob (D) to position .
• Rotate the timer knob (B) in a clockwise
direction.
Broil
• Place the food to be grilled on the broil rack (P) inserted on
the bake pan (H), and place them together in the guide 1.
• Close the door until you hear a “click” (see figure 1).
• Turn the function selector knob (D) to the position.
• Rotate the timer knob (B) in a clockwise direction.
• After cooking, manually turn the Timer knob (B) back to “0"
position.
• Turn halfway through cooking.
20
fig. 2
fig. 3
fig. 1
Pork chops (2)
Hot dogs (3)
Hamburgers (2)
Sausages (4)
Kebabs 500 g
Turn after 16 minutes.
Turn after 11 minutes.
Turn after 13 minutes.
Turn after 14 minutes.
Turn after 8, 15 and 21 minutes.
“
“
“
“
30 min.
20 min.
25 min.
26 min.
26 min.
Program
Thermostat
knob
Times Comments and tips
Page 21

21
CLEANING AND MAINTENANCE
Frequent cleaning prevents the formation of smoke and bad odors
during cooking. Do not let fat accumulate inside the appliance.
Before any maintenance or cleaning operation, unplug the oven and
wait for it to cool down.
Clean the door, the inside walls and the enamel or painted surfaces of
the oven with a soap and water solution; dry thoroughly.
To clean the surfaces on the inside of the oven, never use products that
corrode aluminum (detergents in spray cans) and never scrape the
walls with sharp objects to avoid damage to the non-stick coat.
To clean the outside surface always use a damp sponge.
Avoid using abrasive products that may damage the exterior.
Make sure water or liquid soap does not seep into the vents on the top
of the oven.
Do not attempt to push forks, knives or sharp objects into the openings on
the right-hand side and the rear of the oven.
Never immerse the appliance in water; never wash it under a jet of
water.
All the accessories are washed like normal dishes, either by hand or in
the dishwasher.
Slide the crumb tray out from under the bottom of your
oven. Wash by hand. Should the soilage be difficult to
remove, rinse the crumb tray with hot soapy water and if
necessary, scour it delicately, without scratching it.
Important information for correct disposal of the product in accordance with EC Directive 2002/96/EC.
At the end of its working life, the product must not be disposed of as urban waste.
It must be taken to a special local authority differentiated waste collection centre or to a dealer providing this service.
Disposing of a household appliance separately avoids possible negative consequences for the environment
and health deriving from inappropriate disposal and enables the constituent materials to be recovered to
obtain significant savings in energy and resources.As a reminder of the need to dispose of household appliances separately, the product is marked with a crossed-out wheeled dustbin.
FOOD
WEIGHT
APPROX. TIME
Chicken
1-2 Kg
120 min.
Rost pork
0,8-1,7 Kg
90 min.
For larger foods, we recommend the convection oven cooking mode.
For information on the cooking times, refer to the instructions in the table below.
 Loading...