

ECP35.31-33.21-31.21
에스프레소 / 카푸치노 머신
사용설명서
COFFEE MAKER
Instruction for Use
KR
C5
C7*
EN
pag. 6
B
page 13
B2
B3
B1
ECP35.31
B2
B3
B1
C
C1
C2
ECP33.21 - ECP31.21
C3
C4
C6*
2
A
A1
A3
A2
A13
A12
A4
A14*
A5
A6
A10*
A8
A7**
A8 A9
A11
A9
A17*
A16*
A15**
A15**
3
78
MAX
1 2 3
ready!
1
2
5
6
9 11 12
10
4
ECP35.31
13 14 15 16
4
25 26 27
5°C
HOT MILK
max 1/3
17 18 19 20
21
22 23 24
5

기본 안전 경고
• 신체 및 감각 기능에 장애가 있거나 지적 장애가 있는 사람, 경험과 지식이 부족한 사람도
관리 감독하에서나 안전한 기기 사용에 관한 지침을 숙지하고 관련 위험 요소를 이해하고
있는 경우에는 이 기기를 이용할 수 있습니다.
어린이가 기기로 장난을 치지 않도록 하십시오.
•
어린이가 기기를 청소 또는 유지보수 작업을 어른의 관리감독 없이 해서는 안됩니다.
•
제품을 세척하거나 청소할 때 물속에 넣으면 안 됩니다.
•
본 기기는 가정용으로만 사용할수 있습니다. 됩니다. 매장, 사무실 및 기타 근로 환경의
•
탕비실이나 농가에서 사용해서는 안 됩니다. 또한 호텔, 모텔, 여관 및 기타 주거 유형 숙박
업소에서 사용해서는 안 됩니다.
플러그나 코드가 손상된 경우 고객 서비스 센터를 통해서 교체해야만 위험을 방지할 수
•
있습니다.
유럽 시장에만 해당되는 사항
• 충분한 안전 교육을 받은 8세 이상의 어린이 부터 사용할 수 있습니다.본 사용자
설명서에서 알려드리는 방법을 기본으로 하여 안전한 사용이 될수 있도록 사용방법에
충분한 이해와 안전에 대한 철저한 대비를 하신뒤 따라서 정기적으로 제품의 세척과
사용자 유지 보수를 수행하여 위험을 최소화해 주십시오.자리를 비울 때나 조립, 분해
또는 청소 전에는 항상 기기의 전원을 뽑으십시오.
어린이가 이 기기를 사용해서는 안 됩니다. 기기와 코드를 어린이의 손이 닿지 않는 곳에
•
두십시오.
기기는 신체, 감각 또는 지적 장애가 있거나 경험과 지식이 부족한 사람들도 감독
•
하에서나 안전한 기기 사용에 관한 지침을 읽고 관련 위험 요소를 이해하고 있는
경우에는 이용할 수 있습니다.
어린이가 기기로 장난을 치지 않도록 하십시오.
•
옆의 기호가 표시된 표면은 사용 중에 뜨거워질 수 있습니다. 이 기호는 특정 모델에만
표시됩니다.
페이지
6
중요 보호 조치
지침에
사용되는 기호
중요 경고는 아래와 같은 기호로 표시됩니다. 이 경고를 반드시
지키시기 바랍니다.
위험!
경고를 제대로 지키지 않을 경우 감전으로 인한 피해로 생명을
잃을 수도 있습니다.
•
젖은 손이나 발로 본 제품을 절대 만지지 마십시오.
•
젖은 손으로 플러그를 절대 만지지 마십시오.
•
콘센트가 언제 어디서나 손이 닿을 수 있는 곳에 있어야만
필요할 때 기기의 코드를 뽑을 수 있습니다.
•
직접 플러그를 잡고 코드를 뽑으십시오. 전원 케이블을
당기면 손상될 수 있으므로 절대로 잡아당기지 마십시오.
•
기기의 전원을 완전히 차단하려면 주 콘센트에서 코드를
뽑아야 합니다.
•
기기에 문제가 발생하더라도 직접 수리하려 하지 마십시오.
전원을 끄고 주 콘센트에서 코드를 뽑은 뒤 고객 서비스
센터에 연락해 주십시오.
•
본 제품을 청소하기 전에는 전원을 끄고 주 콘센트에서
코드를 뽑은 뒤 열기가 내려갈 때까지 기다려 주십시오.
중요!
경고를 제대로 지키지 않을 경우 부상을 당하거나 기기가 손상될
수 있습니다.
모든 패키지(플라스틱 백, 폴리스티렌 폼) 를 아이로 부터
떨어뜨려 주십시오.
화상 위험!
경고를 제대로 지키지 않을 경우 화상을 입을 수 있습니다.
이 기기는 매우 뜨꺼운 온수와 스팀이 작동중에 발생됩니다.
분출되는 스팀과 뜨거운 물을 주의하십시오.
지정된 사용
이 기기는 커피를 만들고 음료를 데우기 위한 용도로 디자인 및
제작되었습니다.
기타 목적으로 사용할 경우 부적절하고 위험한 것으로
간주됩니다. 제조사는 기기의 잘못된 사용에서 비롯된 피해에
대해 그 어떠한 책임도 지지 않습니다.
사용법
본 제품을 사용하기 전에 이 사용 지침을 자세히 읽어 주십시오.
이 사용 지침을 따르지 않으면 화상을 입거나 기기가 손상될 수
있습니다.
제조사는 이 사용법을 준수하지 않아 발생한 피해에 대해
그 어떠한 책임도 지지 않습니다.
참고!
이 사용설명서를 잘 보관하십시오. 다른 사람에게 본 제품을 양도할 경우
이 사용설명서도 함께 제공해야 합니다
.
기기 점검
포장을 제거한 후에 제품이 온전한지 손상된 부분은 없는지
확인하십시오. 그리고 모든 액세서리가 들어 있는지
확인하십시오. 손상이 눈에 띌 경우 본 제품을 사용하지 말고
드롱기 고객 서비스 센터에 연락해 주십시오.
설명
기기
설명
(3페이지 - A)
A1.
분리가 가능한 물탱크
A2. 컵 트레이
A3. 물탱크 (장착 상태)
A4.
악세서리 홀더 가이드 (커피 필터)
A5.
상부 뚜껑
A6. 스팀 / 온수 다이얼
A7. 카푸치노 메이커 (**모델 구성에 따라 공급되지 않을수
있음)
A8.
카푸치노 메이커 노즐
A9.
배출구
A10.
카푸치노 메이커 선택링 (*일부 모델 적용)
A11. ON/OFF
스위치
A12. 물탱크 수위 표시창
A13. 보일러 토출구
A14.
머그잔 또는 유리잔 트레이
A15. 드립 트레이
A16.
잔수 수위가 표시되는 드립 트레이
A17. 컵 트레이
조작부 설명
(3페이지 - B)
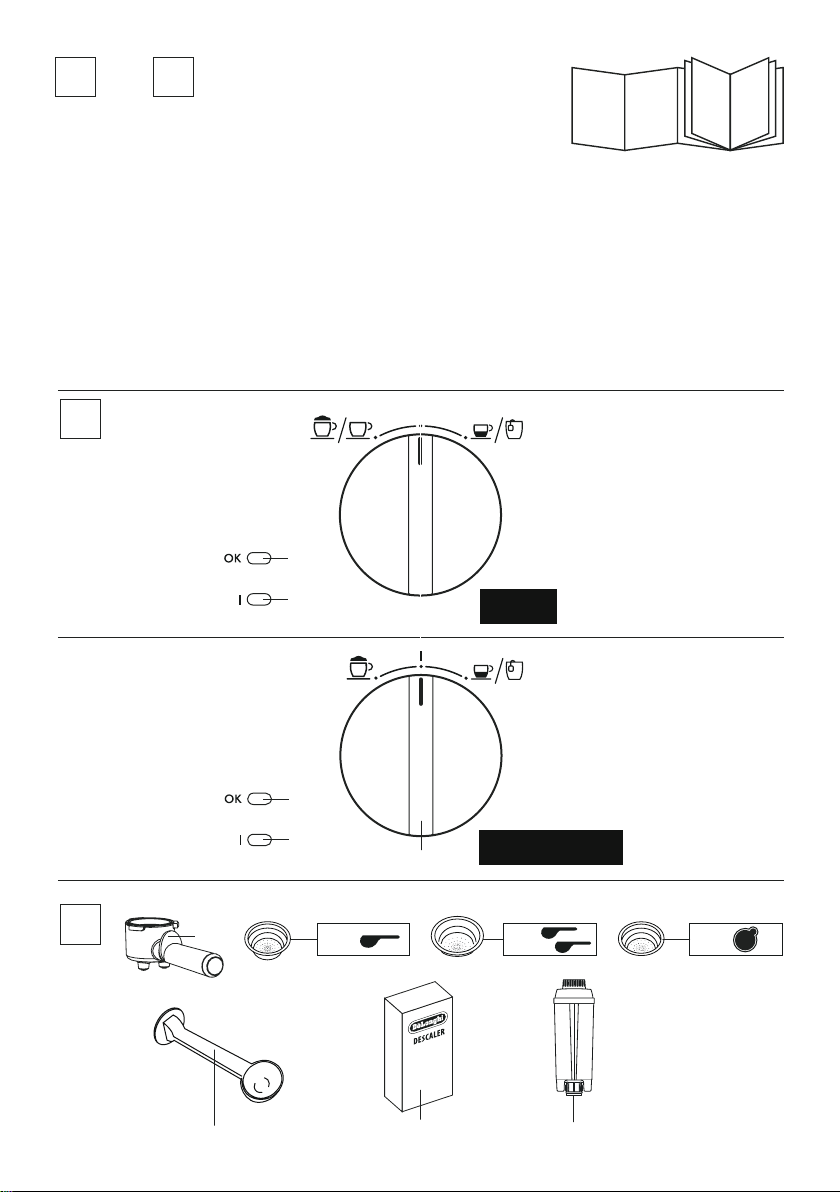
B1.
모드 선택 다이얼
B2. OK 표사등
B3.
전원 표시등 I
악세서리 설명
(3페이지 - C)
C1.
필터 홀더
C2. 1
커피 거품 필터
C3. 2
커피 거품 필터
C4. ESE
파드 거품 필터
C5.
스푼 및 스탬프 측정 / 압력
C6. 석회 제거제 (*** 포함되지 않음 공인 서비스를 통해서
구매가능)
페이지
7

C7. 연수 필터 (*** 포함되지 않음 공인 서비스를 통해서
구매가능)
제품의 설치
중요!
본 제품을 설치할 때 다음 안전 경고를 준수해야 합니다.
•
기기는 열을 발산합니다. 부엌의 적당한 장소에 본 제품을
설치하는 경우, 기기 양 측면 및 후면과 벽 사이에 3cm 이상,
기기 위쪽으로 15cm 이상 공간을 두십시오.
•
안으로 유입되는 물로 인해 커피 머신이 손상될 수 있습니다.
본 제품을 수도나 싱크대 근처에 놓으면 안 됩니다.
•
안에 들어 있는 물이 얼면 기기가 손상될 수 있습니다. 온도가
영하로 떨어질 수 있는 공간에 본 제품을 설치하지 마십시오.
•
코드를 정돈할 때 날카로운 모서리에 손상되거나 뜨거운
표면(예: 전기 열판)에 닿지 않도록 주의해 주십시오.
기기 연결
중요!
주 전원 공급 전압이 기기 하단에 있는 명판에 표시된 값과
일치하는지 확인하십시오.
최소 전류 정격 10A만을 사용해 효율적으로 접지되고 올바로
설치된 콘센트에 연결하십시오.
전원 콘센트가 기기의 플러그와 일치하지 않을 경우 자격을 갖춘
전문가를 통해 적합한 유형의 콘센트로 교체하십시오.
물탱크 채우기
1. 기기의 뚜껑을 열고 (그림.1) 물탱크를 위로 뽑아 들어 올려
주십시오. (그림.2);
2.
물탱크에 께끗한 물을 채우되 최대 표시를 넘지 않도록
해주십시오. (그림.3) 물탱크를 들어 다시 기기에 넣고 물탱크
아래 밸브가 열릴 수 있도록 약간 눌러 주십시오.
3.
좀더 간편하게 물탱크를 분리 하지 않고 별도의 준비하신
용기에 물을 담아 물탱크를 채울수도 있습니다.
중요!
절대로 기기 물탱크에 물이 비워진 상태 또는 물탱크가 장착되지
않은 상태로 동작시키지 마십시오.
물탱크 수위표시창을 활용하여 물탱크의 수위를 확인해
주십시오 (A12).
6. 스팀 다이얼을 위치로 돌려 주십시오. (그림.10) 그리고
남아 있는 모든 물을 내려 주십시오.
7.
스팀 다이얼을 0 위치로 돌린 후 모드 선택 스위 치를 I위치로
돌려 주십시오. (스탠바이 모드)
8.
보일러 분출구 아래의 용기를 모두 비우고 다시 5-6-7의
절차를 반복하여 주십시오.
이제 본 제품을 사용 하실 수 있습니다.
자동 꺼짐 기능
만약 제품이 일정기간 사용되지 않으면 (모델마다 정지시간에
차이가 있음) 제품은 자동적으로 전원이 꺼지도록 설계
되었습니다.
뜨거운 커피를 만들기 위한 팁
에스프레소 커피를 알맞은 온도로 따뜻하게 만들려면 다음과
같이 해야 합니다.
1.
본 제품의 ON/OFF 스위치를 눌러 주십시오. (ON 표시등 이 점등
되도록) (그림.4) 그리고 필터 홀더를 분쇄커피 없이 끼워
주십시오.
2.
컵을 예열 하기 위해서 필터 홀더 아래에 커피를 내릴 컵을
위치시켜 주십시오.
3. OK
표시등이 점등될때 까지 (그림.8) 기다리신 후 점등이
되면 모드선택 버튼을 위치로 돌린 후 (그림.9) 물을
내려주십시오. OK 표시등이 꺼질때까지 배출해 주시면
됩니다.
4.
컵을 비우고 OK표시등이 다시 켜질때까지 기다린 후 위의
절차를 반복하여 주십시오.
커피 추출구에서 뜨거운 물이 약간 흘러나옵니다. 물이 튀어
피부에 닿지 않도록 주의해 주십시오.
머그 또는 유리잔 트레이 (모델 ECP35.31 과 ECP33.21
전용)
만약 키큰 잔 또는 유리잔을 사용하는 경우 (예를 들어 롱 커피
또는 마끼아또 추출 시 ), 드립 트레이를 빼내고 바로 컵을 거치할
수 있습니다. (A14 - 그림 11).
커피 를 내리신 후에는 드립 트레이를 다시 되돌려서 원위치 시켜
주십시오.
기기의 설정
1. 기기의 전원을 On/Off 스위치를 돌려 켜주십시오. (그림.4 ):
전원 표시등이 점등됩니다.
2.
커피필터를 필터 홀더에 끼워 주십시오. (그림.5)
3.
분쇄커피를 넣지 않고 기기에 필터 홀더를 끼워 주십시오.
4. 0.5
리터 용기를 보일러 아래에 또다른 0.5 리터 용기를
카푸치노 메이커 아래에 두십시오.
5. OK
표시등이 점등될때까지 기다린 후 약 탱크의 절반 정도의
물을 필터 홀더를 장착한 상태에서 추출해 주십시오.
에스프레소 커피 추출방법
1. 분쇄 커피 필터 (C2 또는 C3)를 필터 홀더에 끼워 주십시오.
커피필터에 그려진 스푼 그림의 갯수에 따라서 또는
에 따라서 분쇄커피 한 스푼 또는 두 스푼을 넣어
주십시오.
2.
커피 한잔을 만들기 위해서 적정한 분쇄커피 (약 7g)을
필터에 넣어주십시오. 커피 두잔을 만들기 위해서는 적정한
분쇄 커피 약간 덜 담은 (6+6g) 분쇄커필를 담아 주십시오.
분쇄커피가 넘치지 않도록 조금씩 체워 주십시오.
페이지
8

중요!
올바른 작동을 의해서 분쇄커피를 담기전에 기존에 내린
분쇄커피가 필터에 남아있지 않도록 커피 필터를 깨끗하게
청소해 주십시오.
3.
분쇄커피를 스푼 /스탬프 를 통해서 눌러 주십시오. (그림
13)
적정한 압력으로 분쇄커피를 눌러야 좋은 에스프레소를
추출 할 수 있습니다. 만약 강하게 누른경우 커피는 추출이
천천히 되고 거품은 매우 어두운 색 일 것입니다. 만약 너무
살짝 누른 경우 커피푸풀이 매우 빠르게 되고 커품은 적고
매우 밝은색 일 것입니다.
4.
필터 홀더 림 주변부에 남은 커피를 정리하고 필터 홀더를
(
그림 6)과 같이 오른쪽으로 돌려 장착해 주십시오. 이때 물이
새거나 흐르지 않도록 확실히 잠궈 주십시오.
5.
추출구 아래에 커피를 내릴 잔을 두십시오. (그림.14 ) 이때
미리 추출한 약간의 물로 예열된 컵을 사용해 주십시오.
6. OK
표시등이 점등될 때 까지 기다린 후 (그림.8) (만약 꺼지면
다시 켜질때 까지 기다린 후) 모드 선책 다이얼를
위치로 돌려 원하는 만큼의 양만큼 커피를 추출 합니다.
커피가 알맞은 양이 추출되면 모드 선책 다이얼를 돌려
I
위치로 옮겨 주십시오.
7.
필터 홀더를 우에서 좌로 돌려 필터 홀더를 분리해 주십시오.
(뜨겁지 않도록 !) 컵은 우유의 두배 또는 새배의 양을 담을수
있는 크기여야 합니다. (그림.17)
참고!
풍부하고 진한 거품을 만들기 위해서는 냉장 온도(약
부분 탈지유를 사용해 주십시오
.
5°C)의
탈지유나
4. ECP 35.31 전용: 반드시 카푸치노 메이커 의 선택 링 (A10) 을
"CAPPUCCINO"
5.
우유가 들어있는 용기를 카푸치노 메이커 아래에 두십시오.
6. OK
온도로 상승되었다는 의미 입니다.
7.
스팀 다이얼를 위치로 돌려 배관내 남아 있는 물을
모두 제거하고 스팀을 잠그어 주십시오.
8.
카푸치노 노즐을 약 5mm 정도 우유에 담근 후 (그림.19)
스팀 다이얼을 위치로 돌려 주십시오. 그럼
우유에서 서서히 거품이 발생하며 우유의 양이 증가 합니다.
9.
우유의 양이 두배정도 되었을 때 카푸치노 메이커 노즐을
깊게 담그어 우유를 데워 주십시오. 우유가 적정 온도에
도달하면 (약 60도씨가 적정) 스팀 다이얼을 O위치로 돌려
분출을 중지하고 모드 선책 다이얼를 I 위치로 돌려 주십시오.
10.
앞서 만들어 둔 커피에 우유를 첨가합니다. 이로써
위치로 옮겨 주십시오. (그림.18)
표시등이 점등되면 보일러는 스팀을 생성하기 적합한
ㅍㅍ카푸치노가 완성되었습니다. 원할 경우 당도를
조정하고 거품 위에 코코아 가루를 살짝 뿌립니다.
중요! 화상 위험!
뜨거운 물이 튀거나 새는 것을 막기 위해서 반드시 커피를
추출할때 필터홀더를 분리하지 마십시오.
파드를 사용한에스프레소 커피 추출방법
1. "뜨거운 커피를 만들기 위한 팁"을 참고 하여 제품을 예열해
주십시오. 이때 필터홀더도 장착하여 함께 예열해 주십시오.
참고!
파드 포장 등에 표시된 로고를 확인하여 반드시
파드
(POD)를
사용해 주십시오
.
ESE
규격에 알맞는
2. 파드 커피를 필터 홀더 (C4 ) 에 (그림.15) 넣어주십시오.
3.
파드를 넣을때 가능한 필터 홀더 중심에 두십시오. 항상 파드
포장에 지시에 따라서 파드의 방향등을 맞추어 주십시오.
4.
필터 홀더를 제품에 장착하여 주십시오.
5.
이전 섹션의 5,6,7,의 절차를 다시 따라 주십시오.
카푸치노 커피를 추출하는 방법
1. 이전 섹션을 참고하여 에스프레소 커피를 준비하여
주십시오.이때 큰 컵을 사용해 주십시오.
2.
모드 선책 다이얼를 위치로 옮긴 후 (그림.16)
그리고 OK 표시등이 점등될 때 까지 기다려 주십시오.
3.
기다리는 동안 카푸치노 한잔 당 약 100g의 우유를 준비해
주십시오. 이 우유는 반드시 낮은 온도에서 보관되어야 하고
참고!
• 한잔
이상의 카푸치노를 만들기 위해서는 우선 커피를 원하는 만큼
미리 추출하고 그 후 우유를 준비해야 합니다
•
우유 거품을 생성시킨 후 커피를 내릴때에는 우선 보일러를 식혀
주십시오. 그렇지 않으면 분쇄 커피가 탈 수 있습니다. 보일러의
냉각을 위해 배출구 아래 용기를 위치시킨 후 모드 선택 다이얼을
위치에 두고
OK
표시등이 꺼질때까지 물을 추출 합니다
이후 모드 선책 다이얼를 I위치로 돌린 후 다시 커피 추출을 준비
합니다
.
.
스팀분출을 최대 60초 이상 하지 마십시오.
또한 3회 이상 연속으로 우유거품을 만들수
없습니다.
마키아또 만들기 (따듯한 우유 -모델 ECP35.31 전용)
거품이 없는 따듯한 우유를 만들기 위해서는 위의 섹션을
참고하여 주십시오. 이때 반드시 카푸치노 메이커의
선택링(A10)이 "HOT MILK"위치에 있어야 합니다.
매 사용 후 카푸치노 메이커의 청소 방법
중요!
위생상의 이유로 카푸치노 메이커는 항상 매 사용후 세척되어야
합니다.
다음을 따라 주십시오:
페이지
9
.

1. 스팀 다이얼을 위치로 옮긴 후 몇 초간 약간의
스팀을 분출 시킵니다. ("카푸치노 커피를 추출하는 방법"
섹션에 2,6,7을 참고해 주십시오.) 이렇게 하면 카푸치노
메이커에 남은 우유를 모두 분출시킨 수 있습니다. 스팀
다이얼을 0위치로 돌린 후 모드선택 스위치를 I 위치로 돌려
주십시오.
2.
몇 분간 기다리면 카푸치노 메이커가 냉각되고 이후
카푸치노 메이커를 바깥으로 올린뒤 아래로 당겨 분리
합니다.(그림.20)
ECP35.31
모델
3. 노즐을 아래로 내려 분리해 주십시오. (그림.21)
4.
카푸치노 메이커 링을 위로 올려 두개의 구멍이 보일 수
있도록 한 후 22번의 두개의 홀이 막히지 않았는지 확인해
주십시오. 필요한 경우 핀등을 사용하여 청소해 주십시오.
5.
노즐을 바꾸고 링을 아래로 내린후 카푸치노 메이커를 다시
장착해 주십시오. 돌려서 고정해 주십시오. 이후 분리전과
같은 형태로 위치 시켜 주십시오.
ECP33.21
과 ECP31.21 모델
6. 카푸치노 메이커 노즐을 아래로 내려 분리해
주십시오.(그림.23)
7.
그림 24를 참고 하여 카푸치노 메이커의 노즐이 막혀 있지
않은지 확인해 주십시오. 필요한 경우 핀등을 사용하여
청소해 주십시오.
8.
노즐을 다시 장착하고 카푸치노 메이커의 노즐을 분해의
역순으로 조립해 주십시오.
온수 만들기
1. ON/OFF 버튼을(그림.4) 눌러 제품의 전원을 켠 후 OK표시등이
점등될때 까지 기다려 주십시오.
2.
카푸치노 메이커 아래쪽에 적당한 컵을 두십시오.
3. OK
표시등이 켜진 후 모드선택 스위치를 으로
돌려 주십시오. 동시에 스팀 다이얼을 위치로
돌리면 카푸치노 메이커 노즐에서 온수가 나옵니다.
4.
온수 배출을 중단하고자 할때는 스팀 다이얼을 O위치로
돌려주시고 모드 선택 다이얼을 I위치로 옮겨 주십시오.
온수 배출을 60초 이상 해서는 안됩니다. 펌프에
무리가 됩니다.
세척
제품의 청소방법
정기적으로
-
-
-
-
-
다음을 따라서 제품을 청소하여 관리해 주십시오.
드립트레이 (A15);
커피 필터 (C2, C3 그리고 C4);
보일러 분출구 (A13)
물탱크 (A1)
카푸치노 메이커 (A7) "매 사용 후 카푸치노 메이커의 청소
방법"에 표기된 부분
중요!
• 솔벤트 또는 알콜등의 화학재 또는 강한 세정제를 사용하지
마십시오.
•
사용 중 튄 커피 방울 또는 얼룩등을 금속 쑤세미등을
사용하여 닦아내지 마십시오 플라스틱 또는 금속 표면에
상처가 생길 수 있습니다.
위험!
절대로 본체를 물에 담그지 마십시오. 본 제품은 전기 제품
입니다. `
참고해 주세요!
약
3~4일간 본
"
기기의 설정" 부분을 참고 하셔서 시행해 주시기를 강력하게 권장해
드립니다
드립 트레이의 세척
드립 트레이에는 수위 표시장치(적색)이 부착되어 있습니다.이
수위 표시장치는 드립트레이 내 잔수의 수위를 표시합니다.
수위 표시 장치가 (그림25)와 같이 표시되면 분이하여 비워야
합니다. 그렇지 않은 경우 물이 드립 트레이에서 넘쳐 흘러 제품
자체에 손상을 야기 시킬 수 있습니다.
1.
2. ECP35.21
3.
제품을 사용하시지 않은 경우 사용 전에 헹굼 절차를
.
와 33.21 모델의 경우 중요!
ECP35.31
드립트레이를 분리합니다.
과 33.21 모델의 경우: 컵 그릴을 분리하고 물을
비우고 트레이를 헝겊을 사용하여 물기를 제거하여 닦은 후
다시 결합하여 주십시오. 머그잔 또는 유리잔 트레이(A14)를
분리하여 비우고 세척 후 건조시켜 재조립 합니다.
드립트레이를 제품에 장착해 주십시오.
커피 필터의 세척
커피 필터를 정기적으로 흐르는 물에 헹구어 세척해 주십시오
미세한
구멍들이 막히지 않도록 관리해 주시고 필요시
(
그림27)과 같이 핀으로 청소해 주십시오.
보일러 분출구의 세척
매 200잔의 커피를 추출한 후 보일러 분출구를 세척해야 합니다.
약 0.5L의 물을 보일러 분출구로 내려 주십시오.
물탱크의 세척
1. 젖은 헝겊에 약간의 주방세제를 사용하여 물탱크를 닦은
후 깨긋한 물로 충분히 헹구어 주십시오. 이 물탱크는
정기적으로 세척하여야 합니다. (약 한달에 한번 정도)
그리고 만약 연수 필터(C7,*제공된 경우)를 사용하시는경우
교환할 시기입니다.
2.
필터를 분리하고 (* 만약 계속 사용하실 경우) 흐르는 물에
헹구어 주십시오.
3.
필터를 분리하고 (* 만약 교환하실 경우) 새로운 필터를
10
페이지

깨끗한 물로 헹구어 교환해 주십시오.
4.
연수 필터 (*만약 사용하시는 경우)내부에는 약 100ML의 물이
미리 체워진 상태로 결합되어야 합니다.
석회제거
매 200잔의 커피를 추출한 후 석회제거 작업을 시행해야 합니다.
가능하면 드롱기 석회제거제 (C6*)를 사용 하시기를 권장해
드립니다.
다음의 절차를 따라 석회제거를 시행하여 주십시오.
1.
물탱크에 석회제거제를 채우고 석회제거제 포장에 표시된
비율에 따라 물을 첨가해 주십시오.
2. ON/OFF
버튼을 눌러 전원을 켜 주십시오.
3.
필터 홀더를 장착하지 않은 상태로 카푸치노 메이커와
보일러 분출구 아래에 적절한 용기를 위치시켜 주십시오.
4. OK
표시등이 점등될 때 까지 기다려 주십시오.
5.
모드 선택 다이얼을 위치로 돌려 주십시오. 그리고
물탱크내 용액의 1/4의 양을 분출해 주십시오. 그리고 잠시
대기한 후에 스팀 다이얼을 위치로 돌려 카푸치노
노즐을 통해서 배출시켜 주십시오. 그후 모드선택 다이얼을
I
위치로 돌려 용액이 작용할 수 있도록 5분정도 시간을
둡니다.
6.
위의 5번 절차를 3회 더 진행하여 물탱크가 모두 비워지도록
해 주십시오.
7.
만일 물탱크내에 약간의 용액이 남았다면 모두 비운 뒤
물통을 깨끗하게 헹구어 낸 뒤 새롭게 깨끗한 물을 채워
주십시오.
8.
모드 선택 다이얼을 위치로 돌려 탱크가 모두
비워질 때까지 배출하여 주십시오.
9. 7, 8
번의 절차를 반복해 주십시오.
기기는 다음 EC 지침을 준수합니다.
•
유럽 Standby 규정 1275/2008
•
음식과 접촉하는 재질 및 액세서리는 EEC 규정 1935/2004를
준수합니다.
폐기
본 제품을 생활 폐기물과 함께 버려서는 안 되며, 허가를
받은 폐기물 분리 및 재활용 센터로 가져가야 합니다.
기술 자료
전원 : 220-240V 50/60Hz
소비전력: 1100W
크기 LxDxH: 185x244(329)x305 mm
압력 : 15 bar
물탱크 용량 : 1.1L
전원 코드 길이 : 1300 mm
무게 : 3,8kg
11
페이지

문제 해결
이물질이 많습니다.
서비스센터를 통해 교체해 주십시오.
예열해 주십시오.
물 탱크가 정확하게 장착 되지 않았습니다.
물탱크를 아래로 살작 눌러 밸브가 작동하도록
물을 배출시켜 주십시오.
주십시오.
주십시오.
커피입니다.
위치로 되어 있습니다.
옮겨 주십시오.
주십시오.
제품의 전원을 켜도 몇초 후 자동으로
모드선택다이얼이 I 위치에 있지 않습니다.
모드 선택 다이얼을 I위치로 옮긴 후 (스탠바이)
발생할 수 있는 오작동 문제가 아래에 나열되어 있습니다.
설명한 대로 했는데도 문제를 해결할 수 없다면 고객 서비스 센터에 문의해 주십시오.
문제 가능 성있 는 원 인 해결 방법
에스프레소가 추출되지 않습니다.
에스프레소 커피가 필터 홀더
주변부에서 떨어집니다.
에스프레소 커피가 차갑습니다.
펌프 작동소음이 매우 큽니다.
물탱크가 비었습니다. 물탱크에 물을 채워 주십 시오.
필터 홀더의 구멍이 막혔 습니다. 필터홀더의 구멍을 세척해 주십시오.
에스프레소 보일러 배출구가 막혔습니다 . 본 설명서의 "세척"부 분을 참고해 주십시오.
석회가 내부배관에 누적되어 있습니다. 본 설명서의 "석회제거"부분을 참고해 주십시오.
필터 홀더가 정확하게 장착되지 않았습니다 . 필터 홀더를 정확하게 장착해 주십시오.
에스프레소 보일러 가스켓이 손상되었거 나
필어 홀더의 배출구 구멍 이 막혔습니다. 필터 홀더의 배출구를 세척해 주십시오.
OK 표시등이 켜지 지 않았을때 커피를 추출
하였습니다.
예열이 되지 않았습니다. "뜨거운 커피를 만드는 방법"을 참고하여 컵을
컵의 예열이 되지 않았습 니다. 뜨거운 물로 컵을 예열해 주십시오.
내부 배관에 석회질이 있습니다. 본 설명서의 "석회제거"부분을 참고해 주십시오.
물탱크가 비었습니다. 물탱크를 채워 주십시오.
필터홀더를 올바른 방향으로 꽉 잠궈 주십시오 .
에스프레소 보일러 보일러 가스켓을
OK표시등이 점등될 때 까지 기다려 주십시오.
그래서 탱크 하부의 밸브 가 잘 열리지 않았습니다 .
탱크 연결부위에 공기방울이 있습니다. 본 설명서의 "온수 만들기" 부분을 참고하여
거피 거품이 너무 어두운 색 입니다.
(커피 추출이 너무 느리게 됩니다.)
커피에서 신맛이 납니다. 석회제거후 충분히 헹구어지지 않았습니다. 석회제거후 본 설명서의 "석회제거"부분을 참고하여
카푸치노를 만들때 우유거품이
생성되지 않습니다.
제품의 전원이 꺼졌습니다, 자동 전원차단 기능이 활성화 되었습니다. ON/OFF 버튼을 다시 눌러 제품 의 전원을 다시 켜
꺼집니다.
분쇄커피의 스탬핑이 너무 강하게 되었습니 다. 커피 스탬핑 시 기존보다 분쇄커피를 살짝 눌러
분쇄커피의 양이 충분하지 않습니다. 분쇄커피 양을 적절하게 조절해 주십시오.
보일러 분출구가 막혔습니다. 본 설명서의 "보일러 분출구의 세척"부분을 참고해
필터가 막혔습니다. 본 설명서의 "커피 필터의 세척"부분을 참고해
분쇄커피가 너무 곱게 갈렸거나 젖은상태 입니 다. 분쇄커피는 건조한 상태의 에스프레소 용을 사용해
잘못된 형식의 분쇄커피 또는 재사용되는
E
CP 35 .3 1 모델: 링의 위치가 "HOT MILK"
우유가 충분히 차갑지 않습니다. 항상 냉장 우유를 사용해 주십시오.
카푸치노 메이커가 더럽습니다. 본 설명서의 "매 사용후 카푸치노 메이커의 세척 방법"
배관내에 석회가 있습니다. 본 설명서의 "석회제거"부분을 참고해 주십시오.
(스탠바이 모드)
해 주십시오.
주십시오.
주십시오.
다른 분쇄커피를 사용해 주십시오.
충분히 헹구어 주십시오.
EC P35. 31 모델 : 링 의 위치를 "CAPPUCINO"위치로
부분을 참고해 주십시오.
ON/OFF버튼을 다시 눌러 주십시오.
12
페이지

FUNDAMENTAL SAFETY WARNINGS
• The appliance is not intended for use by persons (including children) with reduced
physical, sensory or mental capabilities, or lack of experience and knowledge, unless
they have been given supervision or instruction concerning use of the appliance by a
person responsible for their safety.
• Children should be supervised to ensure that they do not play with the appliance.
• Cleaning and user maintenance shall not be made by children without supervision.
• Never clean by immersing the appliance in water.
• This is an household appliance only.
It is not intended to be used in: sta kitchen areas in shops, oces and other working
environments; farm houses; by clients in hotels, motels and other residential type environments; bed and breakfast type environments.
• If the plug or cord is damaged, it must be replaced by Customer Services only to avoid
all risk.
FOR EUROPEAN MARKETS ONLY:
• This appliance can be used by children aged from 8 years and above if they have been
given supervision or instruction concerning use of the appliance in a safe way and
understand the hazards involved.
Cleaning and user maintenance shall not be made by children unless they are older
than 8 and supervised.
• Keep the appliance and power cord away from children under eight years of age.
• Appliances can be used by persons with reduced physical, sensory or mental capabilities or lack of experience and knowledge if they are supervised or have been given
instruction concerning use of the appliance in a safe way and if they understand the
hazards involved.
• Children shall not play with the appliance.
• Always unplug the appliance when left unattended and before assembly, taking apart
or cleaning.
Surfaces marked with this symbol become hot during use (the symbol is present in
certain models only).
13

SAFETY WARNINGS
Danger! Failure to observe the warning may result in life
threatening injury by electric shock.
This is an electrical appliance and may cause electrical shocks.
You should therefore follow these safety warnings:
• Never touch the appliance with damp hands or feet.
• Never touch the plug with damp hands.
• Make sure the socket used is freely accessible at all times,
enabling the appliance to be unplugged when necessary.
• Unplug directly from the plug only. Never pull the cord as
you could damage it.
• To disconnect the appliance completely you must unplug it
from the mains socket.
• If the appliance is faulty, do not attempt to repair.
Turn it o, unplug from the mains socket and contact Customer Services.
• Before cleaning the appliance, turn it o, unplug from the
mains socket and allow to cool.
Important: Failure to observe the warning could result in
injury or damage to the appliance.
Keep all packaging (plastic bags, polystyrene foam) away from
children.
Danger of burns! Failure to observe the warning could
result in scalds or burns.
This appliance produces hot water and steam may form while
it is in operation.
Avoid contact with splashes of water or hot steam.
Designated use
This appliance is designed and made to prepare coee and heat
drinks.
Any other use is considered improper and thus dangerous.
The manufacturer is not liable for damage deriving from improper use of the appliance.
Instruction for Use
Read this Instruction for Use carefully before using the appliance.
Failure to follow this Instruction for Use may result in burns or
damage to the appliance.
The manufacturer is not liable for damage deriving from failure
to respect this Instruction for Use.
Please note:
Keep this Instruction for Use.
If the appliance is passed to other persons, they must also be
provided with this Instruction for Use.
Checking the appliance
After removing the packaging, make sure the product is complete and undamaged and that all accessories are present.
Do not use the appliance if it is visibly damaged.
Contact De’Longhi Customer Services.
DESCRIPTION
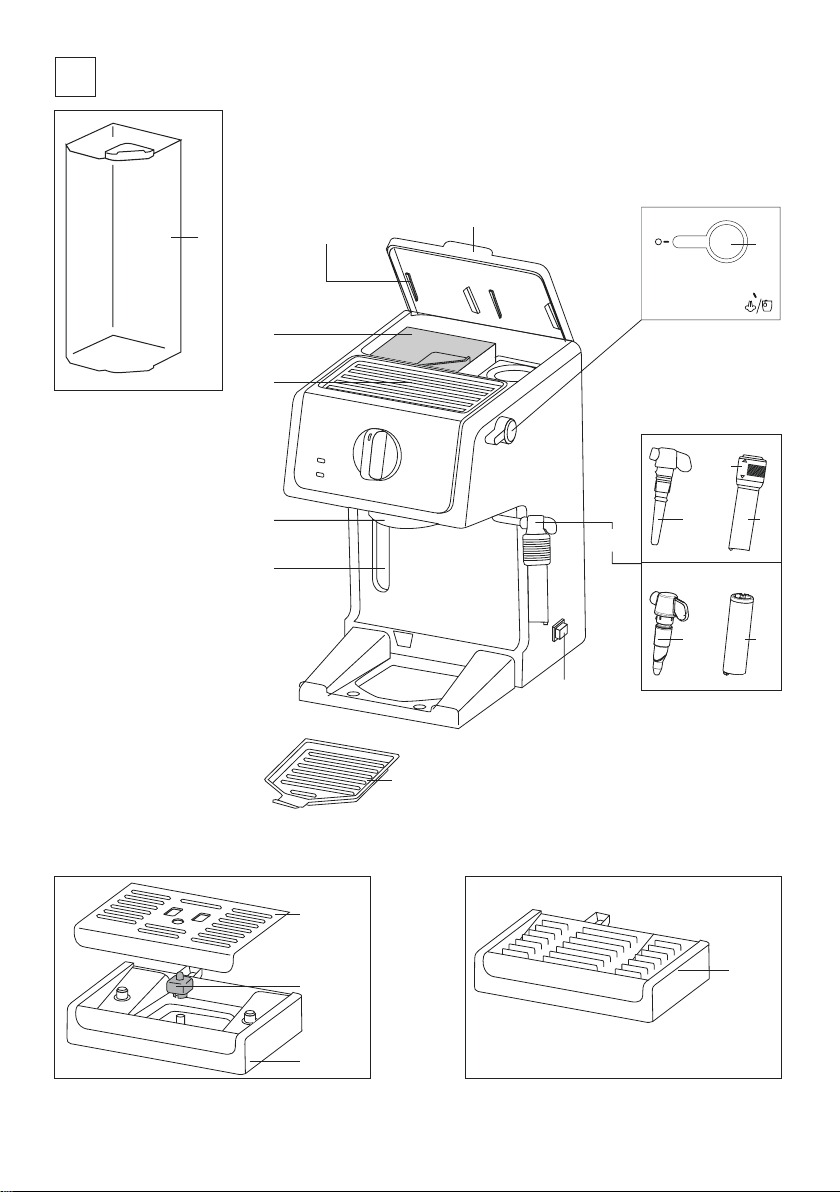
Description of the appliance
(page 3 - A )
A1. Removable water tank
A2. Cup tray
A3. Water tank compartment
A4. Guides for accessories holder (coee lters)
A5. Lid
A6. Steam/hot water dial
A7. Cappuccino maker (**varies according to model)
A8. Cappuccino maker nozzle
A9. Spout
A10. Cappuccino maker selection ring (*certain models only)
A11. ON/OFF switch
A12. Tank water level viewing window
A13. Boiler outlet
A14. Mugs or glasses tray (*certain models only)
A15. Drip tray (**varies according to model)
A16. Drip tray water level indicator (*certain models only)
A17. Cup tray (*certain models only)
Description control panel
(page 3 - B )
B1. Mode selector dial
B2. OK light
B3. Power light I
Description of the accessories
(page 3 - C )
C1. Filter holder
C2. 1 coee froth lter
C3. 2 coee froth lter
C4. ESE pod froth lter
C5. Measure/pressure
C6. Descaler (***not included, can be purchased from author-
ised Customer Services)
C7. Water softener lter (***not included, can be purchased
from authorised Customer Services)
INSTALLING THE APPLIANCE
Important!
When you install the appliance, you should respect the following safety warnings:
14

• Water penetrating the coee machine could cause
damage.
Do not place the appliance near taps or sinks.
• The appliance could be damaged if the water it contains
freezes.
Do not install the appliance in a room where the temperature could drop below freezing point.
• Arrange the cord in such a way that it cannot be damaged
by sharp edges or contact with hot surfaces (e.g. electric
hot plates).
• The appliance gives o heat.
After positioning the appliance on the worktop, leave a
space of at least 3 cm between the surfaces of the appliance and the side and rear walls and at least 15 cm above
the coee machine.
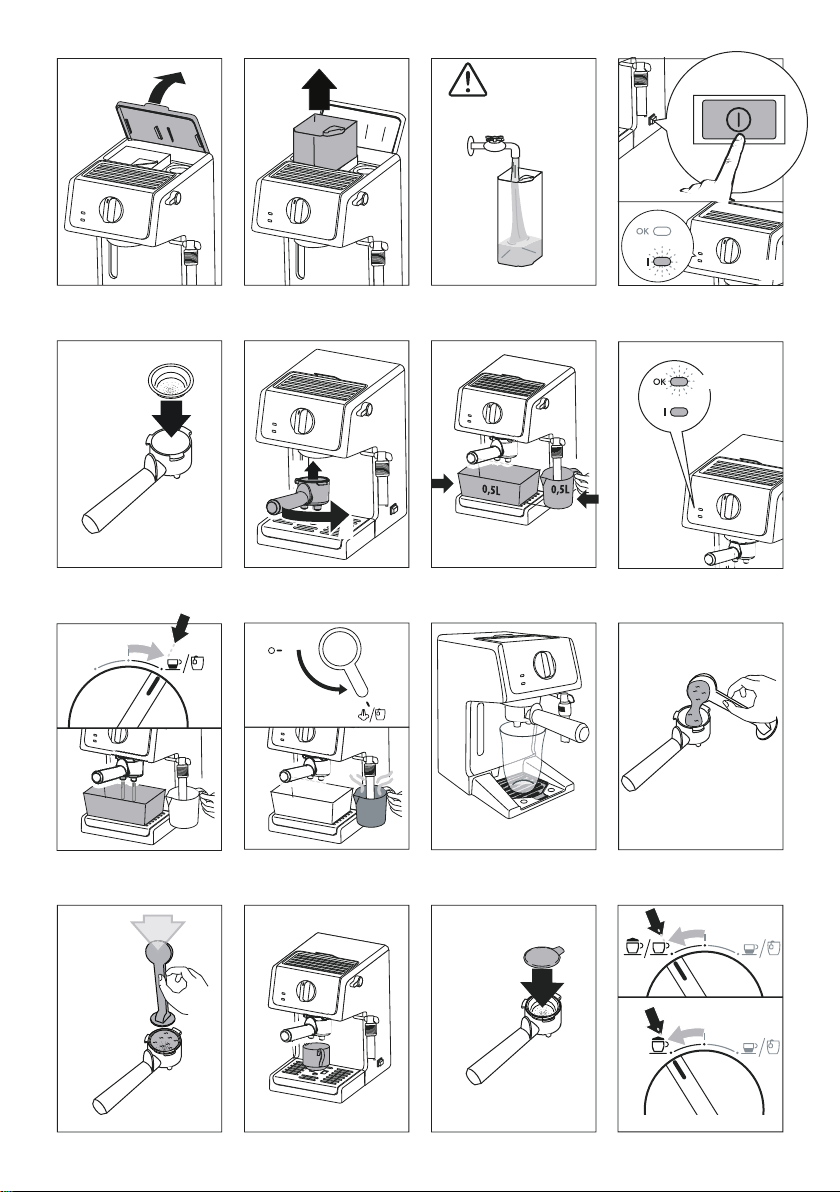
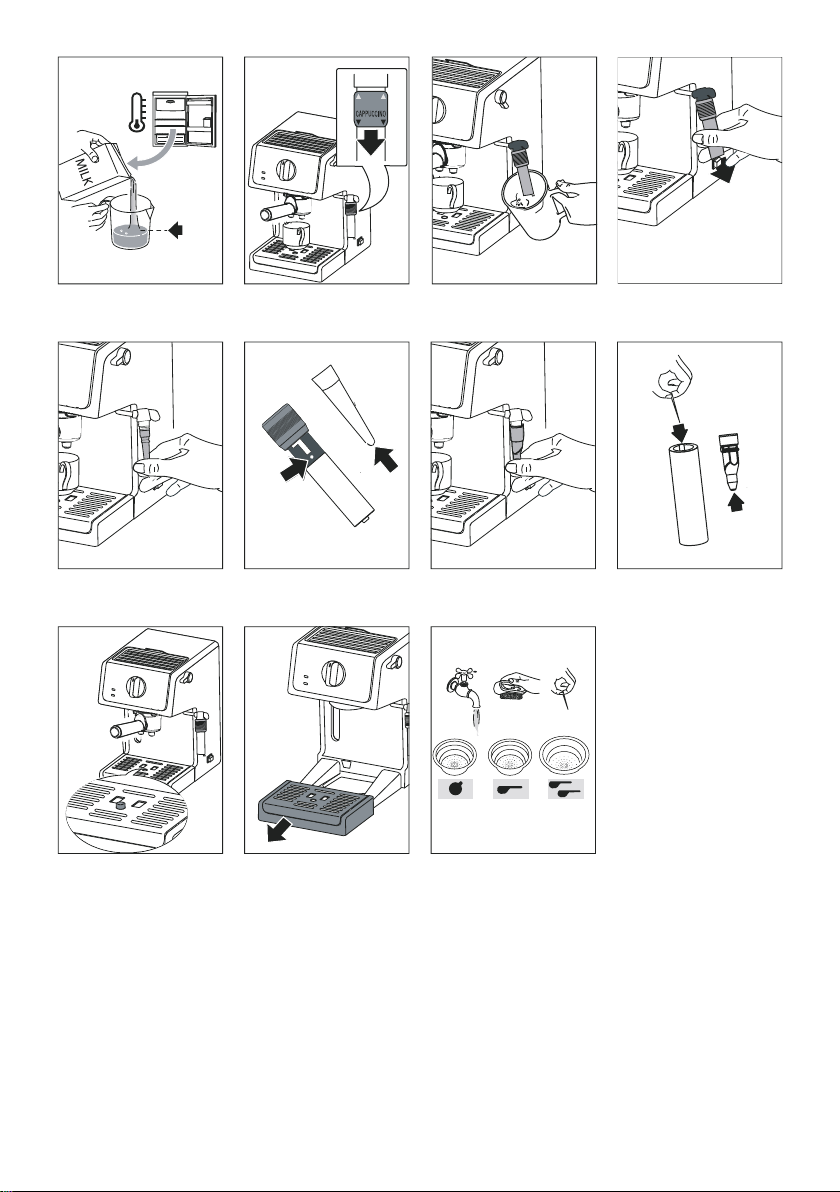
4. Place a 0.5 litre container under the boiler outlet and another 0.5 litre container under the cappuccino maker.
5. Wait until the OK light comes on (g. 8) and immediately
afterwards turn the mode selector dial to the
position (g. 9) and deliver about half the tank through the
lter holder.
6. Then turn the steam dial to the
and deliver all the water remaining in the tank through the
cappuccino maker.
7. Turn the steam dial back to the 0 position and the mode
selector dial to the l position (STAND-BY).
8. Empty the two containers and replace them under the
boiler outlet and the cappuccino maker and repeat points
5-6-7.
Now the appliance is ready for use.
position (g. 10)
Connecting the appliance
Danger!
Check that the mains power supply voltage corresponds to that
indicated on the rating plate on the bottom of the appliance.
Connect the appliance to an eciently earthed and correctly
installed socket with a minimum current rating of 10A only.
If the power socket does not match the plug on the appliance,
have the socket replaced with a suitable type by a qualied
electrician.
FILLING THE WATER TANK
1. Open the lid of the appliance (g. 1) then extract the tank
by pulling upwards (g. 2);
2. Fill the tank with fresh clean water, taking care not to exceed the MAX level (g. 3).
Put the tank back in the appliance, pressing lightly to open
the valves located on the bottom of the tank.
3. More simply, the tank can also be lled without removing
it, pouring the water directly from a jug.
Important:
Never operate the appliance without water in the tank or without the tank.
Check the level of water in the tank through the viewing window (A12).
SETTING UP THE APPLIANCE
1. Turn the appliance on by pressing the ON/OFF button (g.
4): the power light I comes on.
2. Insert the required coee lter in the lter holder (g. 5).
3. Attach the lter holder onto the machine without lling it
with ground coee (g. 6).
Auto-o
If the appliance is not used for a certain period of time (variable
according to the model), it turns o automatically (the power
light goes out).
Tips for a hotter coee
To make espresso coee at the right temperature, the coee
maker should be preheated as follows:
1. Turn the appliance on by pressing the ON/OFF switch (the
ON light comes on) (g. 4) and attach the lter holder to
the appliance without adding pre-ground coee (g. 6).
2. Place a cup under the lter holder. Use the same cup as will
be used to prepare the coee in order to preheat it.
3. Wait until the OK light comes on (g. 8) and immediately
afterwards turn the selector dial to the
(g. 9) and let water discharge until the OK light turns o,
then interrupt by turning the dial to the I position.
4. Empty the cup, wait until the OK light comes on again and
then repeat the same operation.
(It is normal for a small and harmless pu of steam to be given
o when removing the lter holder).
position
Mugs or glasses tray (models ECP35.31 and
ECP33.21 only)
If you are using tall cups or glasses (for example, to make long
coee or macchiato),extract the drip tray and rest the cup directly on the mugs or glasses tray (A14 - g. 11).
Once you have made your coee, put the drip tray back in
position.
15

HOW TO MAKE ESPRESSO COFFEE USING PRE
GROUND COFFEE
1. Place the ground coee lter (C2 or C3) in the lter holder.
Use the
lter to make one coee or the
lter to make two coees.
2. To make just one coee, place one level measure of preground coee (about 7 g) in the lter. (g. 12).
To make two coees, place two loosely lled measures
(about 6+6 g) of pre-ground coee in the lter.
Fill the lter a little at a time to prevent the pre-ground
coee from overowing.
Important: For correct operation, before lling with pre-ground coee,
make sure there are no coee residues left in the lter from the last time you made
coee.
3. Distribute the pre-ground coee evenly and press lightly with the presser (g. 13). Correct pressing of the preground coee is essential to obtain a good espresso. If
pressing is excessive, coee delivery will be slow and the
froth will be dark. If pressing is too light, coee delivery
will be too rapid and the froth will be skimpy and light
coloured.
4. Remove any excess coee from the rim of the lter holder
and attach to the appliance. Turn the handle rmly towards the right (g. 6) to avoid water leaking out.
5. Place the cup or cups under the lter holder spouts (g.
14). You are recommended to warm the cups before making coee by rinsing them with a little hot water.
6. Make sure the OK light (g. 8) is on (if o, wait until
it comes on), then turn the mode selector dial to the
position. When the desired amount of coee
has been delivered, turn the dial to the l position.
7. To remove the lter holder, turn the handle from right to
left.
Danger of burns! To avoid splashes, never remove the lter holder while
the appliance is delivering coee.
8. To turn the appliance o, press the ON/OFF button.
HOW TO PREPARE ESPRESSO COFFEE USING PODS
1. Preheat the appliance as described in the section “Tips for
a hotter coee”, making sure the lter holder is attached.
This obtains a hotter coee.
Please note: Use pods conforming to the ESE standard, indicated on the
pack by the following symbol.
The ESE standard is a system accepted by leading pod producers and enables
espresso coee to be prepared simply and cleanly.
2. Place the pod coee lter (C4 ) in the lter holder.
3. Insert the pod, centring it as far as possible on the lter
(g. 15). Always follow the instructions on the pod pack to
position the pod on the lter correctly.
4. Attach the lter holder to the appliance. Always turn as far
as it will go (g. 6).
5. Proceed as in points 5, 6 and 7 in the previous section.
HOW TO PREPARE CAPPUCCINO COFFEE
1. Prepare the espresso coees as described in the previous
sections, using suciently large cups.
2. Turn the selector to the
until the OK light comes on.
3. In the meantime, ll a recipient with about 100 grams of
milk for each cappuccino to be prepared.
The milk must be at refrigerator temperature (not hot!).
In choosing the size of the recipient, bear in mind that the
milk doubles or triples in volume (g. 17).
Please note: You are recommended to use semi-skimmed milk at
refrigerator temperature.
4. ECP 35.31 only: Make sure the cappuccino maker selection
ring (A10) is in the “CAPPUCCINO” position (g. 18).
5. Place the recipient containing the milk under the cappuccino maker.
6. Wait until the OK light comes on. This indicates that
the boiler has reached the ideal temperature for steam
production.
7. Open the steam by turning the steam selector to the
position for a few seconds to eliminate any water
in the circuit. Close the steam.
8. Immerse the cappuccino maker in the milk for about 5 mm
(g. 19) and turn the steam dial to the
The milk now starts to increase in volume and take on a
creamy appearance.
9. When the milk has doubled in volume, immerse the cappuccino maker deeply and continue heating the milk.
When the required temperature (the ideal is 60°C) is
reached, interrupt steam delivery by turning the steam
dial to the 0 position and the mode selector dial to the l
position.
10. Pour the frothed milk into the cups containing the coee
prepared previously. The cappuccino is ready. Sweeten to
taste and if desired, sprinkle the froth with a little cocoa
powder.
Please note:
• To prepare more than one cappuccino, rst make all the coees then at the end
prepare the frothed milk for all the cappuccinos.
• To make coee again after the milk has been frothed, rst cool the boiler, or the
coee will be burnt. To cool it, place a container under the boiler outlet, turn
the mode selector dial to the
light goes o. Return the selector to the I position and then proceed to make
coee.
16
position (g. 16) and wait
position and deliver water until the OK
position.

You are recommended to deliver steam for a
maximum of 60 seconds and never to froth
milk more than three times consecutively.
MAKING MACCHIATO HOT MILK MODEL ECP35.31
ONLY
To make hot milk without froth, proceed as described in the
above section, making sure the ring on the cappuccino maker
(A10) is positioned upwards in the “HOT MILK” position.
CLEANING THE CAPPUCCINO MAKER AFTER EVERY
USE
Important! or hygiene reasons, the cappuccino maker
should always be cleaned after use.
Proceed as follows:
1. Turn the steam dial to the
a little steam for a few seconds (points 2, 6 and 7 of the
section “How to prepare cappuccino coee”). This causes
the cappuccino maker to discharge any milk left inside.
Turn the appliance o by turning the steam dial to the 0
position and the mode selector dial to the l position.
2. Wait a few minutes for the cappuccino maker to cool down.
Turn the cappuccino maker outwards and remove it by
pulling it downwards (g. 20).
Model ECP35.31
3. Remove the nozzle downwards (g. 21).
4. Push the ring upwards and make sure the two holes shown
by the arrows in g. 22 are not blocked.
If necessary, clean with a pin.
5. Replace the nozzle, move the ring downwards and put the
cappuccino maker back on the nozzle, turning it and pushing it upwards until it is attached.
Models ECP33.21 and ECP31.21
3. Remove the cappuccino maker nozzle downwards (g. 23).
4. Make sure the holes in the cappuccino maker shown in g.
24 are not blocked.
If necessary, clean with a pin.
5. Reinsert the nozzle and replace the cappuccino maker on
the nozzle, turning it and pushing it upwards until it is
attached.
HOT WATER
1. Press the ON/OFF button (g. 4) to turn the appliance on.
Wait for the OK light to come on.
2. Place a recipient under the cappuccino maker.
3. When the OK light comes on, turn the mode selector dial
to the
position and at the same time turn the
position to deliver
steam dial to the position. Hot water comes out
of the cappuccino maker.
4. To stop the ow of hot water, turn the steam dial to the 0
position and the mode selector dial to the l position.
You should not deliver hot water for more
than 60 seconds.
CLEANING
Cleaning the machine
The following parts of the machine must be cleaned regularly:
- the drip tray (A15);
- the coee lters (C2, C3 and C4);
- the boiler outlet (A13);
- the water tank (A1);
- the cappuccino maker (A7) as described in the section “Cleaning the cappuccino maker after every use”.
Important!
• Do not use solvents, abrasive detergents or alcohol to clean
the coee machine.
• Do not use metal objects to remove encrustations or coee
deposits as they could scratch metal or plastic surfaces.
Danger! Never immerse the coee maker in water. It is
an electrical appliance.
Please note:
If the appliance is not used for more than 3/4 days, before using it again, we strongly recommend you perform a rinse cycle as described in the section “Setting up the
appliance”.
Cleaning the drip tray
Models ECP35.31 and 33.21: Important!
The drip tray is tted with a level indicator (red) showing the
level of water it contains.
Before the indicator protrudes from the cup tray (g. 25), the
drip tray must be emptied and cleaned, otherwise the water
may overow the edge and damage the appliance, the surface
it rests on or the surrounding area.
1. Remove the drip tray (g. 26).
2. Models ECP35.21 and 33.21: Remove the cup grille,
empty the water and clean the tray with a cloth, then reassemble the drip tray.
Extract the mugs or glasses tray (A14), clean with water,
dry and put back in the machine.
3. Put the drip tray back in place.
17

Cleaning the coee lters
Clean the coee lters regularly by rinsing under running water.
Make sure the holes are not blocked. If necessary, clean with a
pin (g. 27).
Cleaning the boiler outlet
After every 200 coees, rinse the boiler outlet by delivering
about 0.5 l of water from the boiler outlet.
Cleaning the water tank
1. Clean the water tank regularly (about once a month) and
whenever you replace the water softener lter (C7, *if
provided) with a damp cloth and a little mild washing up
liquid.
2. Remove the lter (*if present) and rinse with running
water.
3. Replace the lter (*if provided), ll the tank with fresh
water and replace the tank.
4. (Models with water softener lter only) Deliver about 100
ml of water.
DESCALING
You are recommended to descale the coee maker about every
200 coees.
We recommend using commercially available De’Longhi (C6*)
descaler.
Proceed as follows:
1. Fill the tank with the descaler solution, obtained by diluting the descaler with water following the instructions on
the pack.
2. Press the ON/OFF button.
3. Make sure the lter holder is not attached and place a recipient under the cappuccino maker.
4. Wait until the OK light comes on.
5.
Turn the mode selec
deliver about 1/4 of the solution in the tank. At intervals,
turn the steam dial to the
water from the cappuccino maker. Then interrupt delivery
by turning the mode selector dial to the l position and
leave the solution to work for about 5 minutes.
6. Repeat point 5 another 3 times, until the tank is empty.
7. To eliminate residues of descaler solution, rinse the tank
well and ll it with clean water (without descaler).
8.
Turn the selec
water until the tank is empty.
9. Repeat points 7 and 8.
tor dial to the
tor to the
position and
position to deliver
position and deliver
TECHNICAL DATA
Mains voltage: 220-240V˜50/60Hz
Absorbed power: 1100W
Size LxDxH:
185x244(329)x305 mm
Pressure: 15 bar
Water tank capacity: 1.1 l
Power cord length: 1300 mm
Weight: 3,8 kg
The appliance complies with the following EC
directives:
• Stand-by European Regulation 1275/2008 and subsequent
amendments;
• Materials and accessories coming into contact with food
conform to European regulation 1935/2004.
DISPOSAL
The appliance must not be disposed of with household waste, but taken to an authorised waste separation and recycling centre.
18

TROUBLESHOOTING
Below is a list of some of the possible malfunctions.
If the problem cannot be resolved as described, contact Customer Services.
PROBLEM POSSIBLE CAUSE SOLUTION
No espresso coee is delivered No water in the tank Fill the tank with water
The holes in the lter holder are blocked Clean the lter holder spout holes
The espresso boiler outlet is blocked Clean as described in the chapter “Cleaning”
Scale in the water circuit Descale as described in the “Descaling” section
The espresso coee drips from
the edges of the lter holder
rather than the holes
The espresso coee is cold The OK light is not on when the coee is
The pump is excessively noisy The water tank is empty Fill the tank
The coee froth is too dark
(delivered from the spout too
slowly)
The coee has an acid taste Inadequate rinsing after descaling After descaling, rinse the appliance as described in
The lter holder has been inserted incorrectly or is dirty
The espresso boiler gasket has lost elasticity or is dirty
The holes in the lter holder spouts are
blocked
delivered
No preheating was done Pre-heat as indicated in the “Tips for a hotter cof-
The cups were not preheated Pre-heat the cups with hot water
Scale in the water circuit Descale as described in the section “Descaling”
The tank is not correctly in place and the
valve on the bottom is not open
There are air bubbles in the tank
connector
The pre-ground coee is pressed down
too rmly
There is not enough pre-ground coee Reduce the quantity of pre-ground coee
The espresso boiler outlet is blocked Clean as described in the section “Cleaning the
The lter is blocked Clean as described in the section “Cleaning the
The pre-ground coee is too ne or damp Use only pre-ground coee for espresso coee ma-
The wrong type of pre-ground coee is
being used
Attach the lter holder correctly and rotate rmly
as far as it will go
Have the espresso boiler gasket replaced by Customer Services
Clean the lter holder spout holes
Wait until the OK light comes on
fee” section
Press the tank down lightly to open the valve on
the bottom
Follow the instructions given in the “Hot water”
section until water is delivered
Press the coee down less rmly
boiler outlet”
coee lters”
kers and make sure it is not damp
Use a dierent type of pre-ground coee
the sec tion “Descaling”
19

No milk froth is formed when
making cappuccino
few seconds after switching on
Model ECP35.31: the ring is in the “HOT
MILK” position
MODEL ECP35.31: push the ring into the “CAPPUCCINO” position
Milk not cold enough Always use milk at refrigerator temperature
Cappuccino maker dirty Clean as described in the section “Cleaning the
cappuccino maker”
Scale in the water circuit Descale as described in the section “Descaling”
Press the ON/OFF button to turn the appliance on
again
The mode selector dial is not in the l position (Standby)
Turn the mode selec tor dial to the l position
(Standby), then press the ON/OFF switch.
-
-
-
20

제 품 보 증 서
저희 드롱기켄우드코리아(주)에서는 품목별 소비자 분쟁해결 기준 공정거래위원회 고시에 따라 아래와 같이
제품에 대한 보증을 실시합니다. 서비스 요청 시 080-848-8800으로 연락하여 주십시오.
상담서비스 및 수리를 제공하여 드립니다.
제 품 명
커피 메이커
모 델 명 ECP 시리즈
구 입 일 제조번호
구 입 처 고객성명
주 소 연 락 처
전자동 커피머신
의 제품 보증기간은 구매 후
1년
입니다.
■ 무상 서비스
일반제품을 영업용도로 전환하여 사용할 경우의 보증기간은 반으로 단축 적용됩니다.
드롱기켄우드 코리아는 품목별 소비자분쟁해결기준(공정거래위원회 고시)에 따라 아래와 같이
제품에 대한 보증을 실시합니다.
1. 본 제품은 엄격한 품질관리 및 검사과정을 거쳐서 생산된 제품입니다.
제품에 따라서 출고전 기능점검 등의 최종 검수 작업을 위하여 제품 내 물 등이 남아 있을 수
있습니다.
2. 제품의 보증기간은 소비자의 구매일로부터 시작됩니다. 따라서 구매증빙 자료와 본 보증서를
사용설명서와 함께 잘 보관하여 주십시오.
- 구입일자 확인이 어려운 경우 제조년월로 부터 6개월이 경과된 날로 부터 보증기간을 가산 합니다.
3. 품질 보증기간 내에 정상적인 사용상태에서 발생한 성능 및 기능상의 하자에 대해서는 무상으로
수리를 보증합니다. 단 수리가 불가능한 경우 제품을 교환해 드립니다.
■ 유상 서비스
서비스 신청 시 다음과 같은 경우 무상서비스 기간내라도 요금이 부과될 수 있습니다.
반드시 사용설명서를 읽고 사용해 주십시오.
1. 기구세척 또는 조정 사용설명 설치 등의 제품의 고장이 아닌 경우
- 사용설명 및 분해가 필요하지 않은 간단한 조정
- 전원 또는 사용되는 식수 등의 기온 등 외부환경 문제 시
- 제품의 이동 또는 이사 등으로 발생된 제품의 설치 부실 또는 파손
- 소모자재 등의 교환 또는 관련부품의 세척
2. 소비자 과실로 인한 고장의 경우
- 전기 용량을 틀리게 사용하여 고장이 발생된 경우
- 당사에서 지정하지 않은 소모품 / 옵션 부품의 사용으로 인한 고장 발생 시
- 외부 충격이나 떨어뜨림 등에 의한 고장, 손상 발생 시
- 당사에서 지정하지 않은 수리서비스 업체 또는 기사 등이 수리하여 고장
또는 사고 발생 시
3. 그 밖의 경우
- 천재지변 (낙뢰, 화재, 염해, 침수 등)에 의한 고장 발생 시
- 소모성 부품이 수명이 다한 경우
고객상담 및 서비스
080-848-8800
드롱기켄우드코리아 (주)
www.delonghi.com/ko-kr

De’Longhi Appliances via Seitz, 47 31100 Treviso Italia www.delonghi.com
5713228931/03.16
수입판매원 : 드롱기켄우드코리아
서초구 강남대로 629 BNF 타워
서울시
서비스 및 문의 : 080-848-8800
제품
 Loading...